

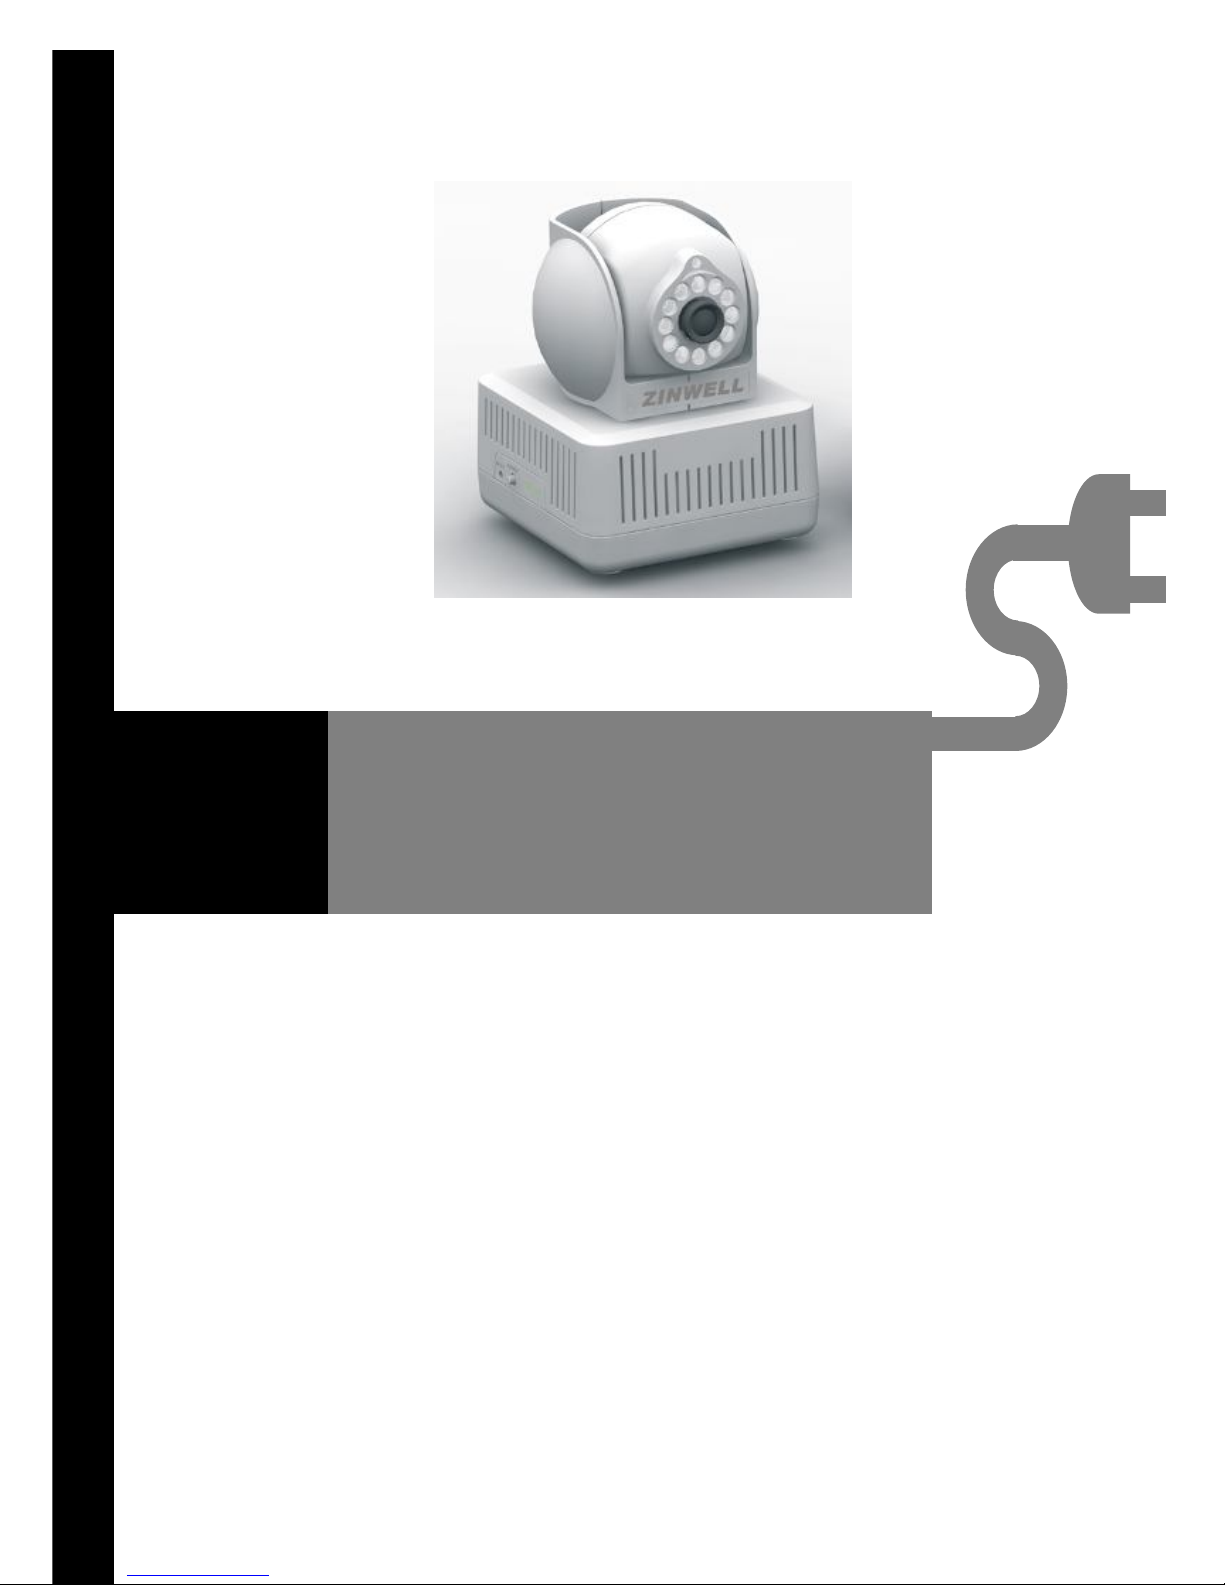
plugCAM User Manual
V1.1.4
Peer to Peer
Plug & Play
Low Power Consumption

2
Table of contents
Introduction……………………………………….………………………………………..P.3
Introducing plugCAM
Hardware installation
Installation scenarios
Installing plugCAM App
Installing at iDevices
Installing at Android system
Overview
Main screen
Tools
Getting started …………….………………………..…………………………………...P.10
Add camera
Scan QR code
Search cameras
Add manually
View images
Select camera
Take a snap shot
Reload camera
Edit …………………………………….…………………………………………………..P.18
Delete cameras
Change camera name
Change password
Arrange image
View mode
Video resolution
Video quality
Show time & date
Video frequency
Albums……………………….……………………………….…………………………..P.27
View albums
Delete albums
View pictues
App Settings……………….……………………………….…..………………………..P.31
Passcode lock
Turn on
Turn off
About…….…………………………………….…………….…..………………………..P.35
Software version
Product information
PC software instruction……………………………………………………………….
Install software
Search device in local network
Add device in PC program manually
Create private Encrypted PLC network.…………….…..…………………………..P.44
Spec Sheet…………………….…………………………….…..………………………..P.46
3
Introduction
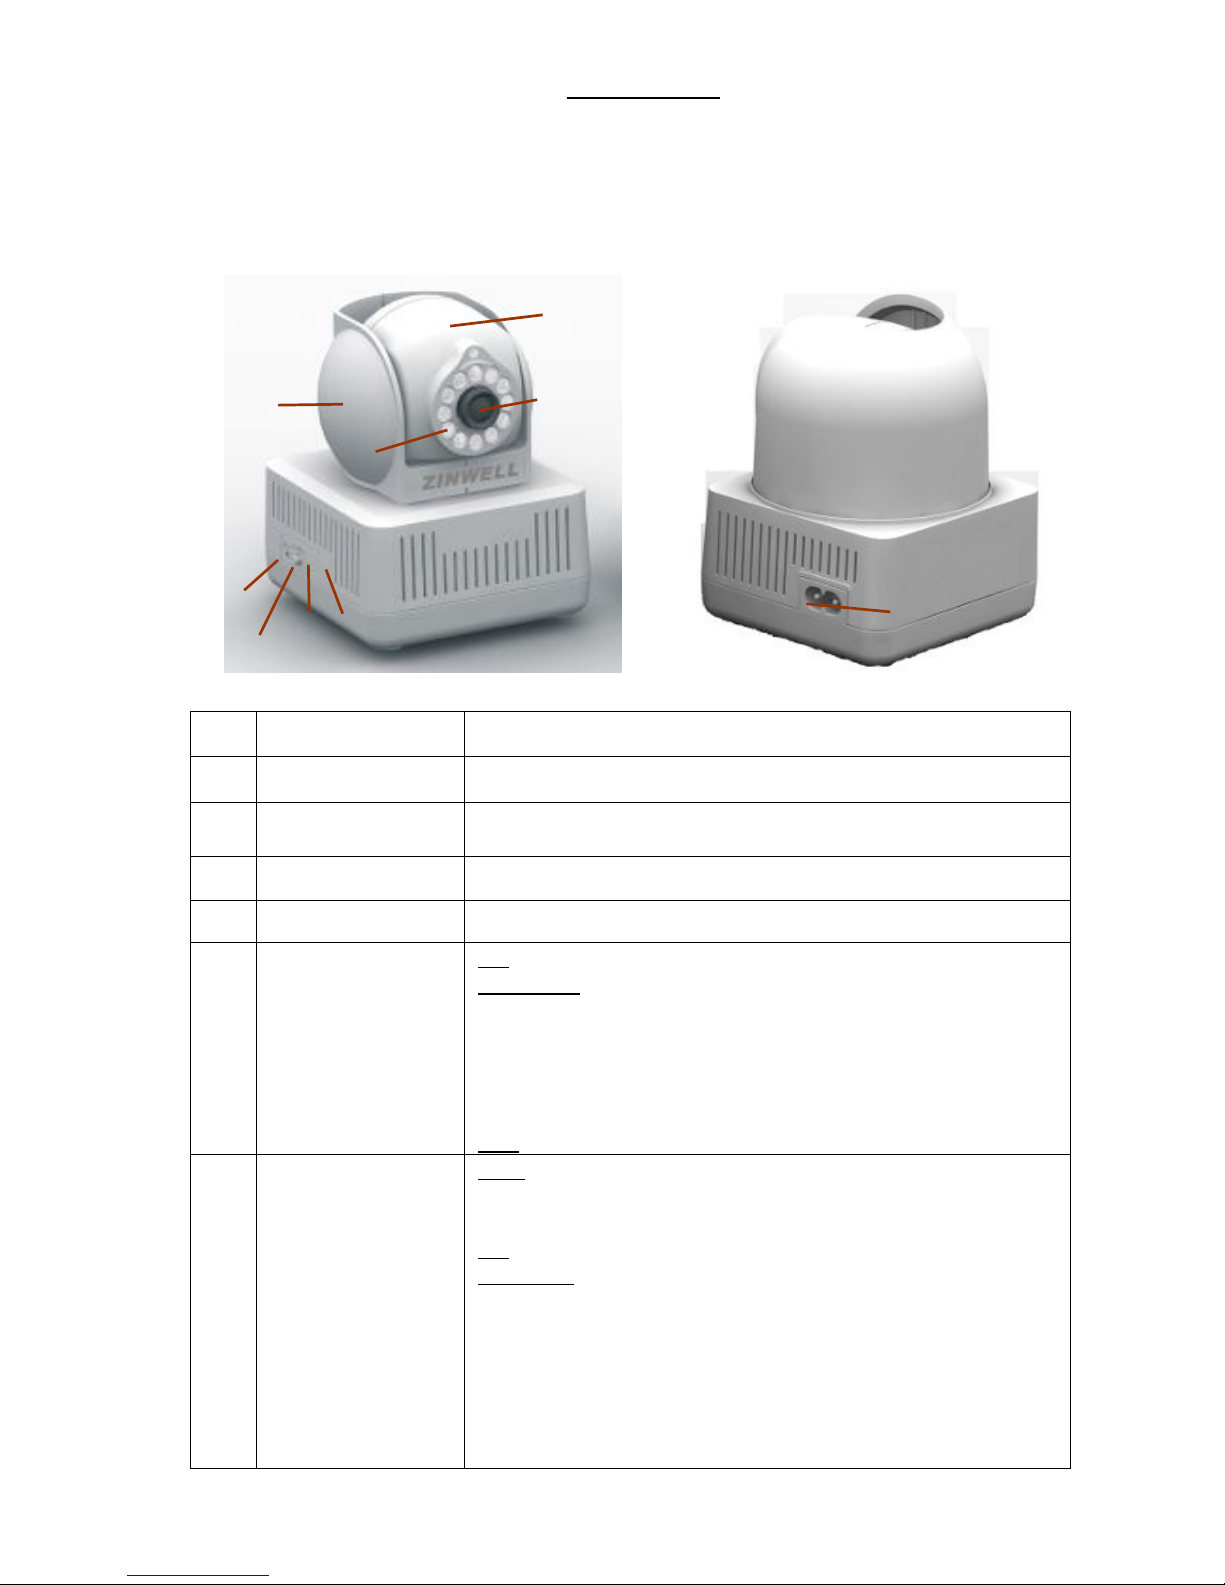
◎ Introducing plugCAM
Button/LED Descriptions
Item name Description
A
Eyeball cover
Can rotate horizontally 135 degree to the right and to the left.
B
Eyeball
Can rotate 0 to 90 degree, pointing the lens from horizontal to
vertical.
C Lens
Lens with IR reflection coating
D
IR light LED
For night vision
E
POWER LED
ON: Power on and ready.
BLINKING:
1. (blinking at 0.5s ON / 0.5s OFF) means the device is doing
Security key exchange, the device joining or being joined into
same logical network will continue 2 minutes' blinking, until the
procedure succeeds or is canceled by pressing the group
button 1 to 3 sec.
OFF: Power off.
F
PLC Act/Link LED
OFF:
Sole member (either other devices in same network is too far or
it is alone in its logical network).
ON: Powerline Link detected but no powerline traffic.
BLINKING:
1. Fast blinking (0.06 s ON/ 0.06 s OFF):
Powerline UDP data rate higher than 60Mbps.
2. Normal blinking (0.2 s ON/ 0.2 s OFF):
Powerline UDP data rate between10Mbps to 60Mbps.
3. Slow blinking (1 s ON/ 1 s OFF):
Powerline UDP data rate slower than 10Mbps.
E
F
G
H
B
A
C
D
I
4
G
GROUP button
Press 1 to 3 seconds - This will enter Group pairing procedure.
In this procedure, the device starts joining into a logical network
of other device or announcing its network group name for other
devices to join. This maximum two-minute procedure
automatically ends when it succeeds or is manually stopped.
Press this button 1 to 3 seconds will manually stop the
procedure.
Press 10 seconds or more: Clear the current and randomly
generate a new network group name.
H
RESET button
Press over 1 second and release -- reset to factory default (both
Camera and PLC)
I
Figure-8 AC
connector socket
This socket can connect with an AC cord which has “figure-8”
connector. Plug the other end of this AC cord to a wall electric
socket.
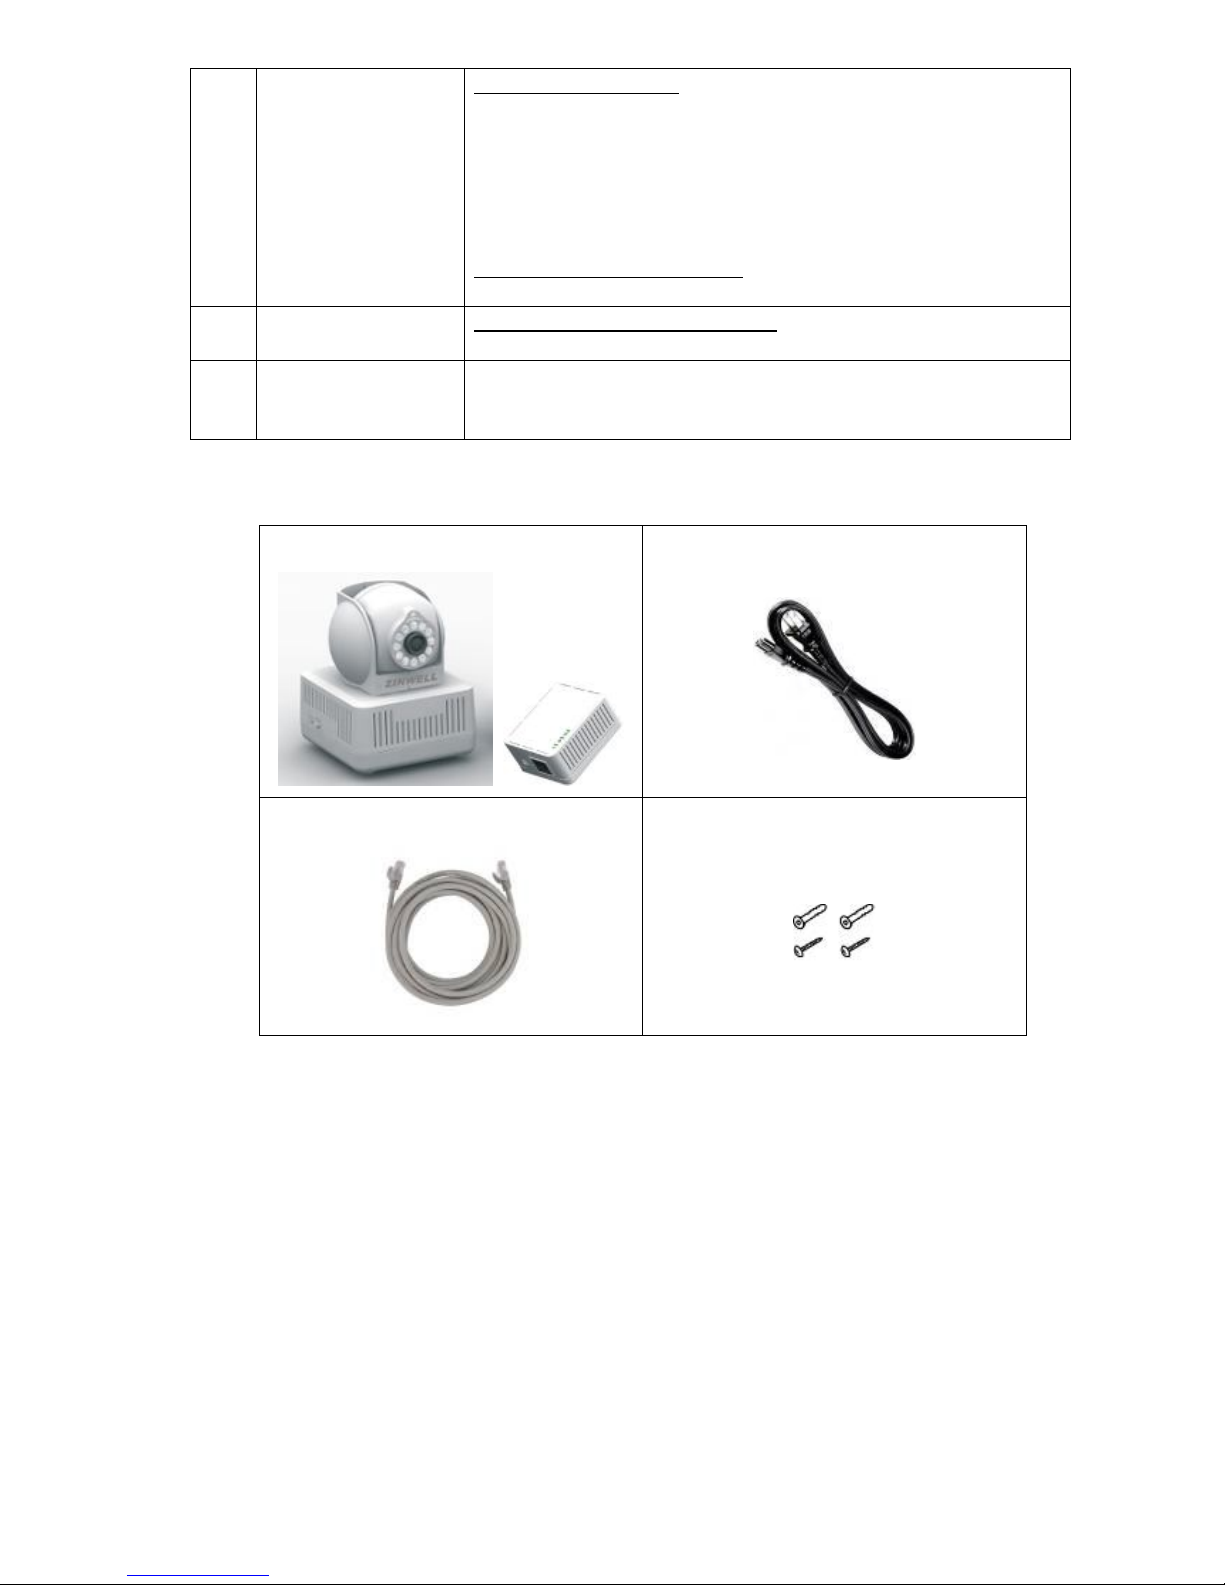
Package Content
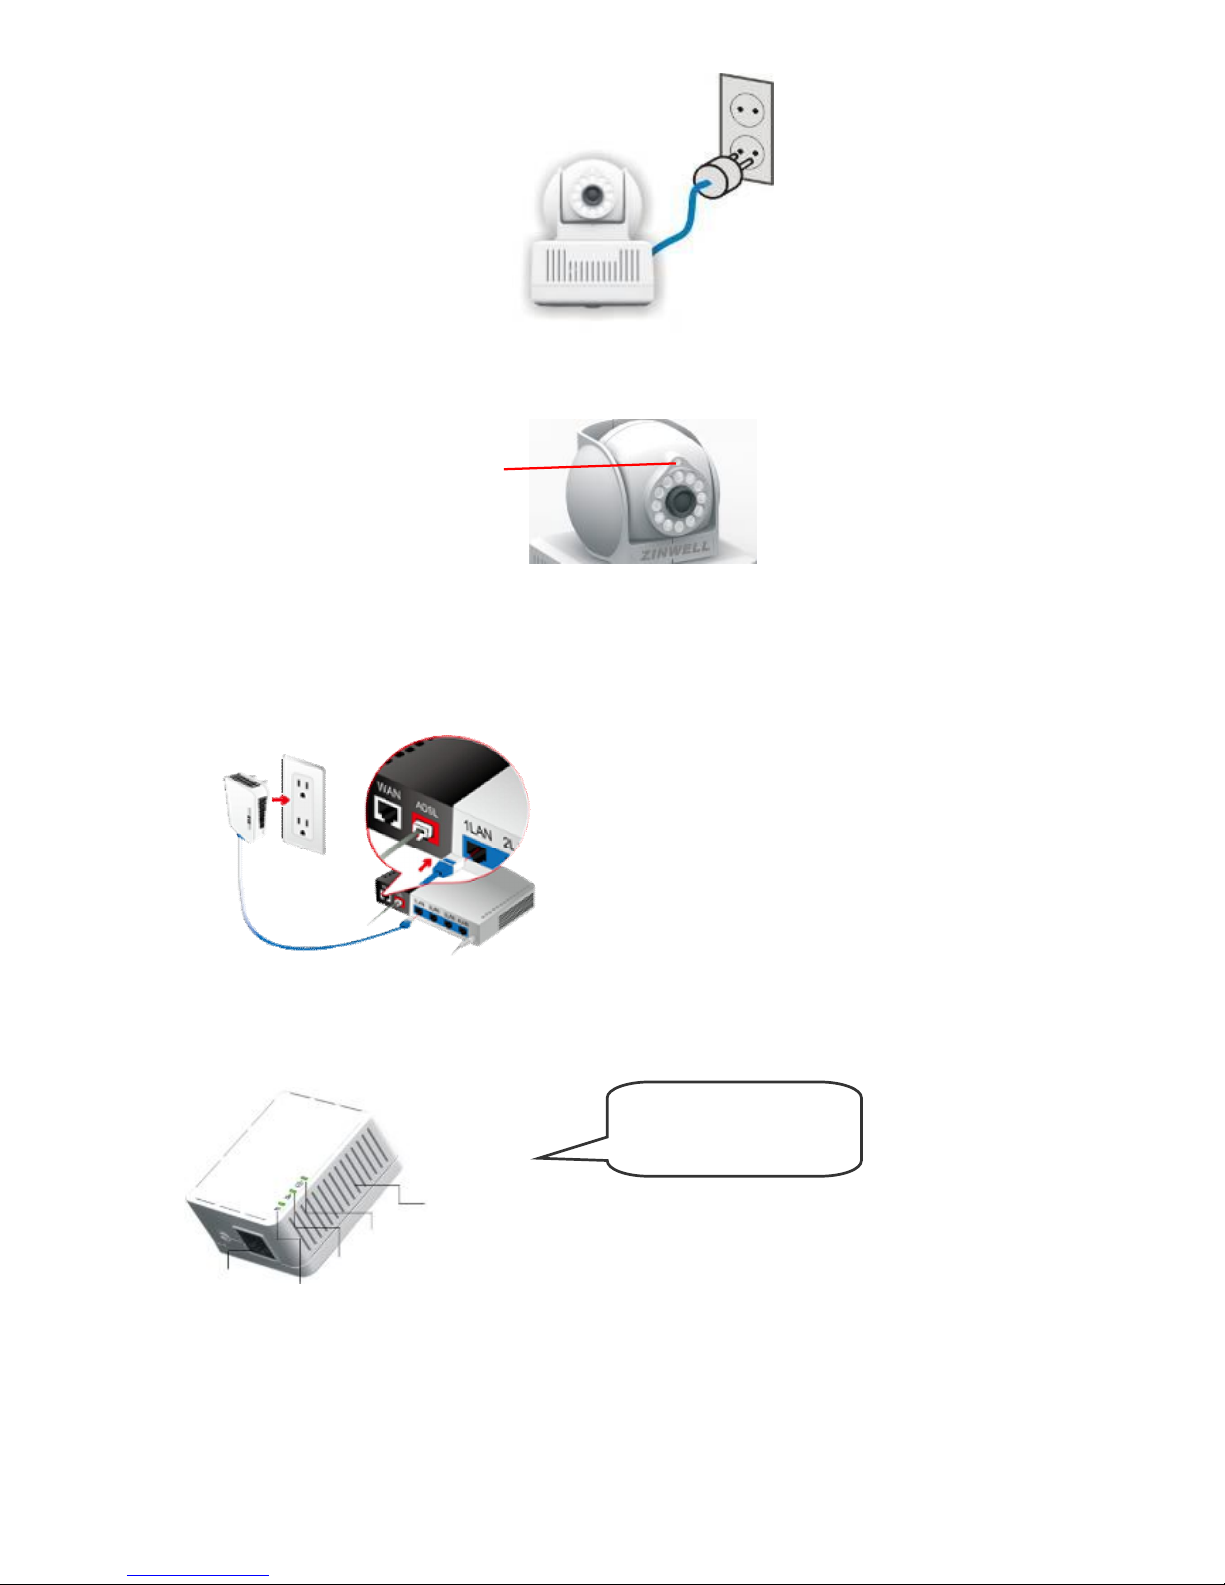
※ Hardware Installation
Camera:
1. Place your plugCAM camera anywhere in the house and power on camera.
1. Camera & PLC
2. Power cord
3. Ethernet cable
4. Nails (x2 sets)
5
2. Plug power cord to camera.
3. Connect the cord to power outlet and camera will start working automatically.
4. You can check that camera is working properly by covering the light sensor above lens and see if
LED light bulbs dim red.
PLC:
(1) Connect Wi-Fi router and PLC with Ethernet cable
(2) Plug PLC on power outlet
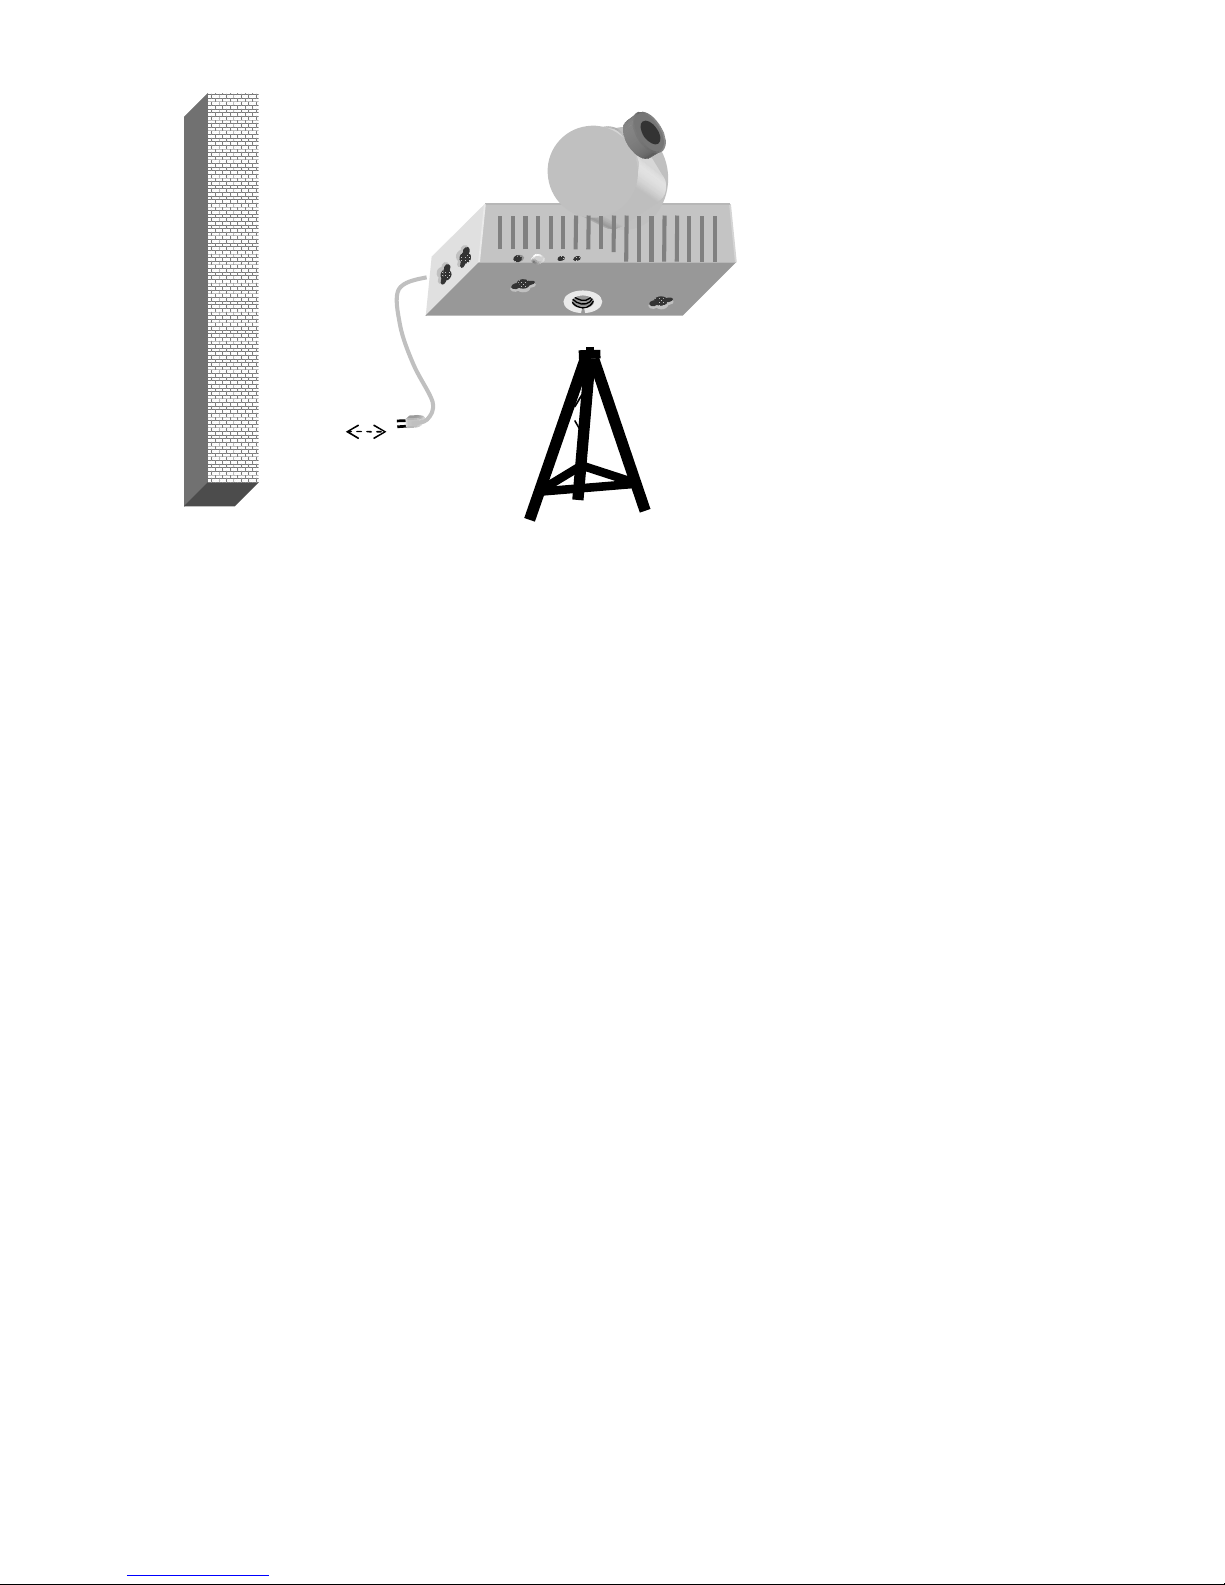
※ Installation Scenarios
Wall mounting using bottom screw hanging hole
Make sure PLC work at
light A and C on, light
B blinking status.
C: (Power)
B: (Ethernet link)
A: (PLC link)
(1)
(2)
Vent Holes
(DO NOT BLOCK)
Ethernet
Port
light sensor

6
Wall mounted using side screw hanging hole
Put on desk top or top of furniture.
Please note the surface of furniture should have enough roughness to provide enough friction for this
device. Otherwise, apply adhesive glue to fix the camera on the furniture.
Mount on tripod
Please note the surface of furniture should have enough roughness to provide enough friction for this device.
Otherwise, apply adhesive glue to fix the camera on the furniture.
Electric
socket
Desk or any
furniture
Wall
Wall
Electric
socket
Nails
Electric
socket
Wall
7
Tripod
Electric
socket
Wall
8
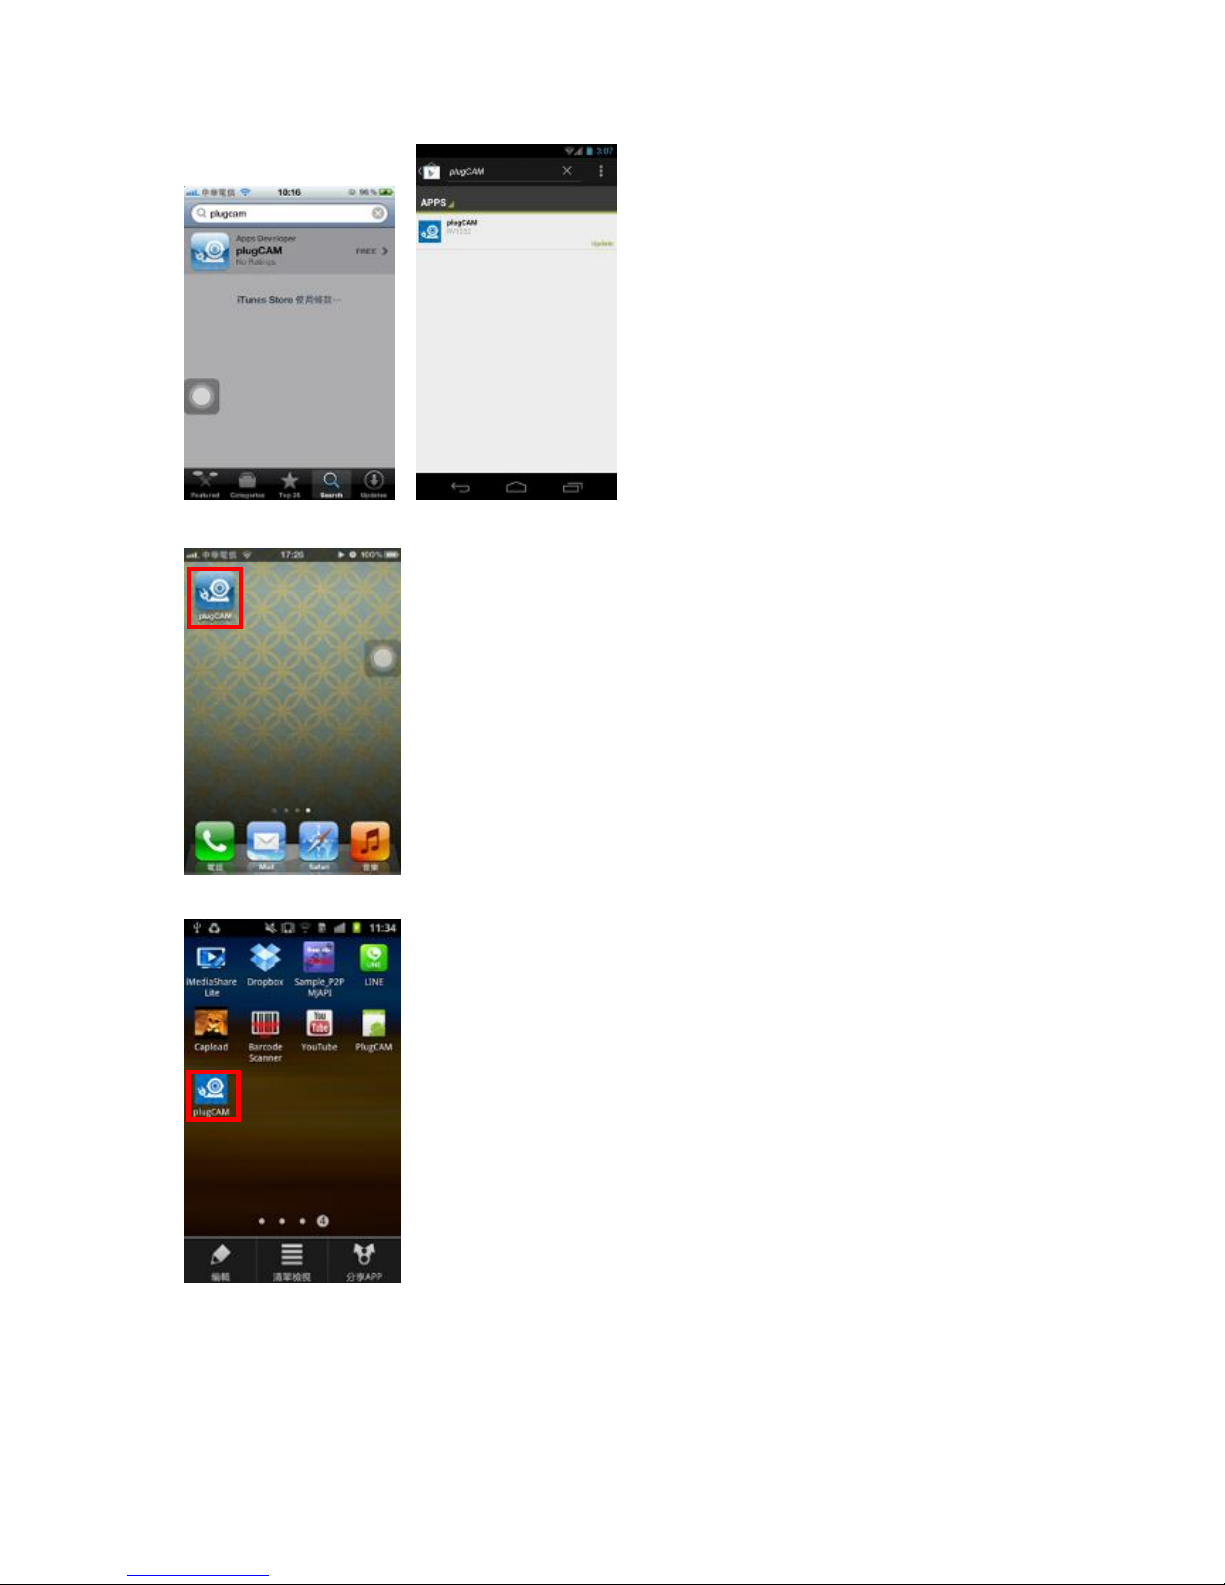
※ Installing plugCAM App
1. Search the free “ plugCAM “ program on Apple App Store or Google Play
※ Installing at iDevices
※ Installing at Android system
9
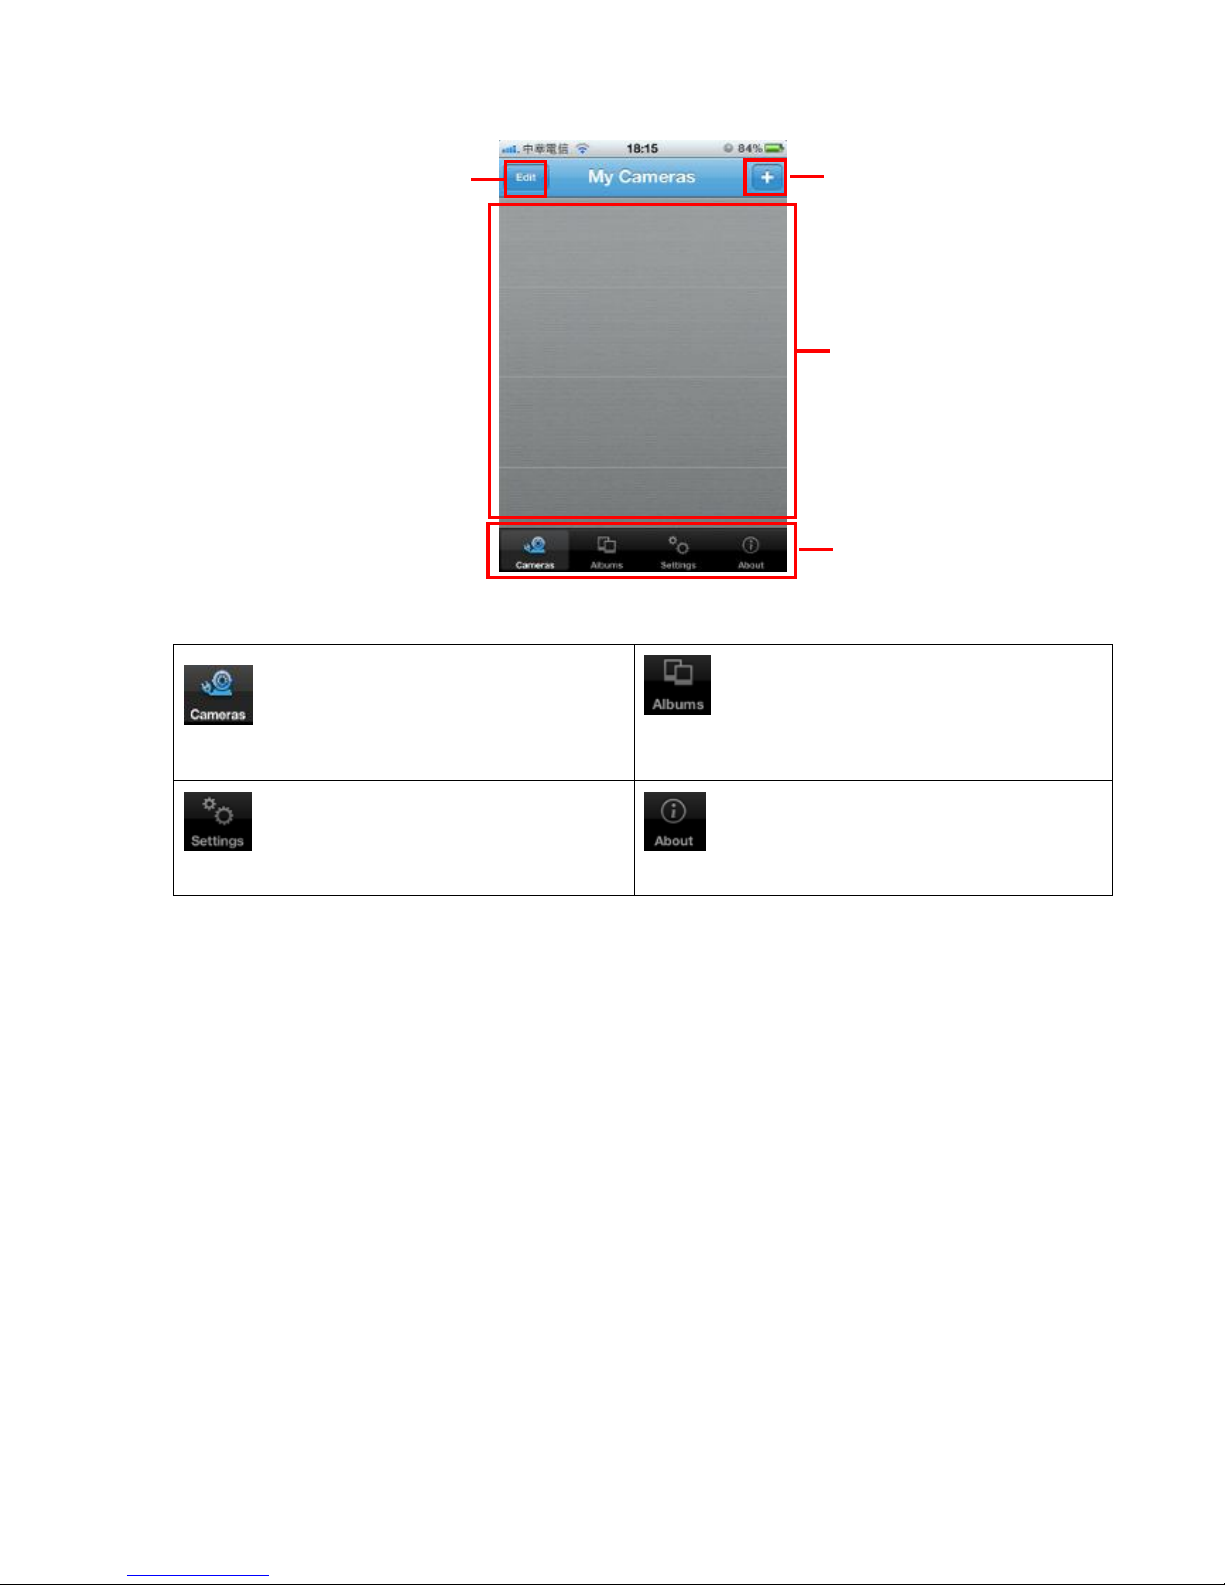
◎ Overview
※Main screen - iOS
Tools
Show camera list, delete or add in new cameras
Show albums list, view and delete pictures from
individual cameras
Change App settings
Show App and plugCAM product information
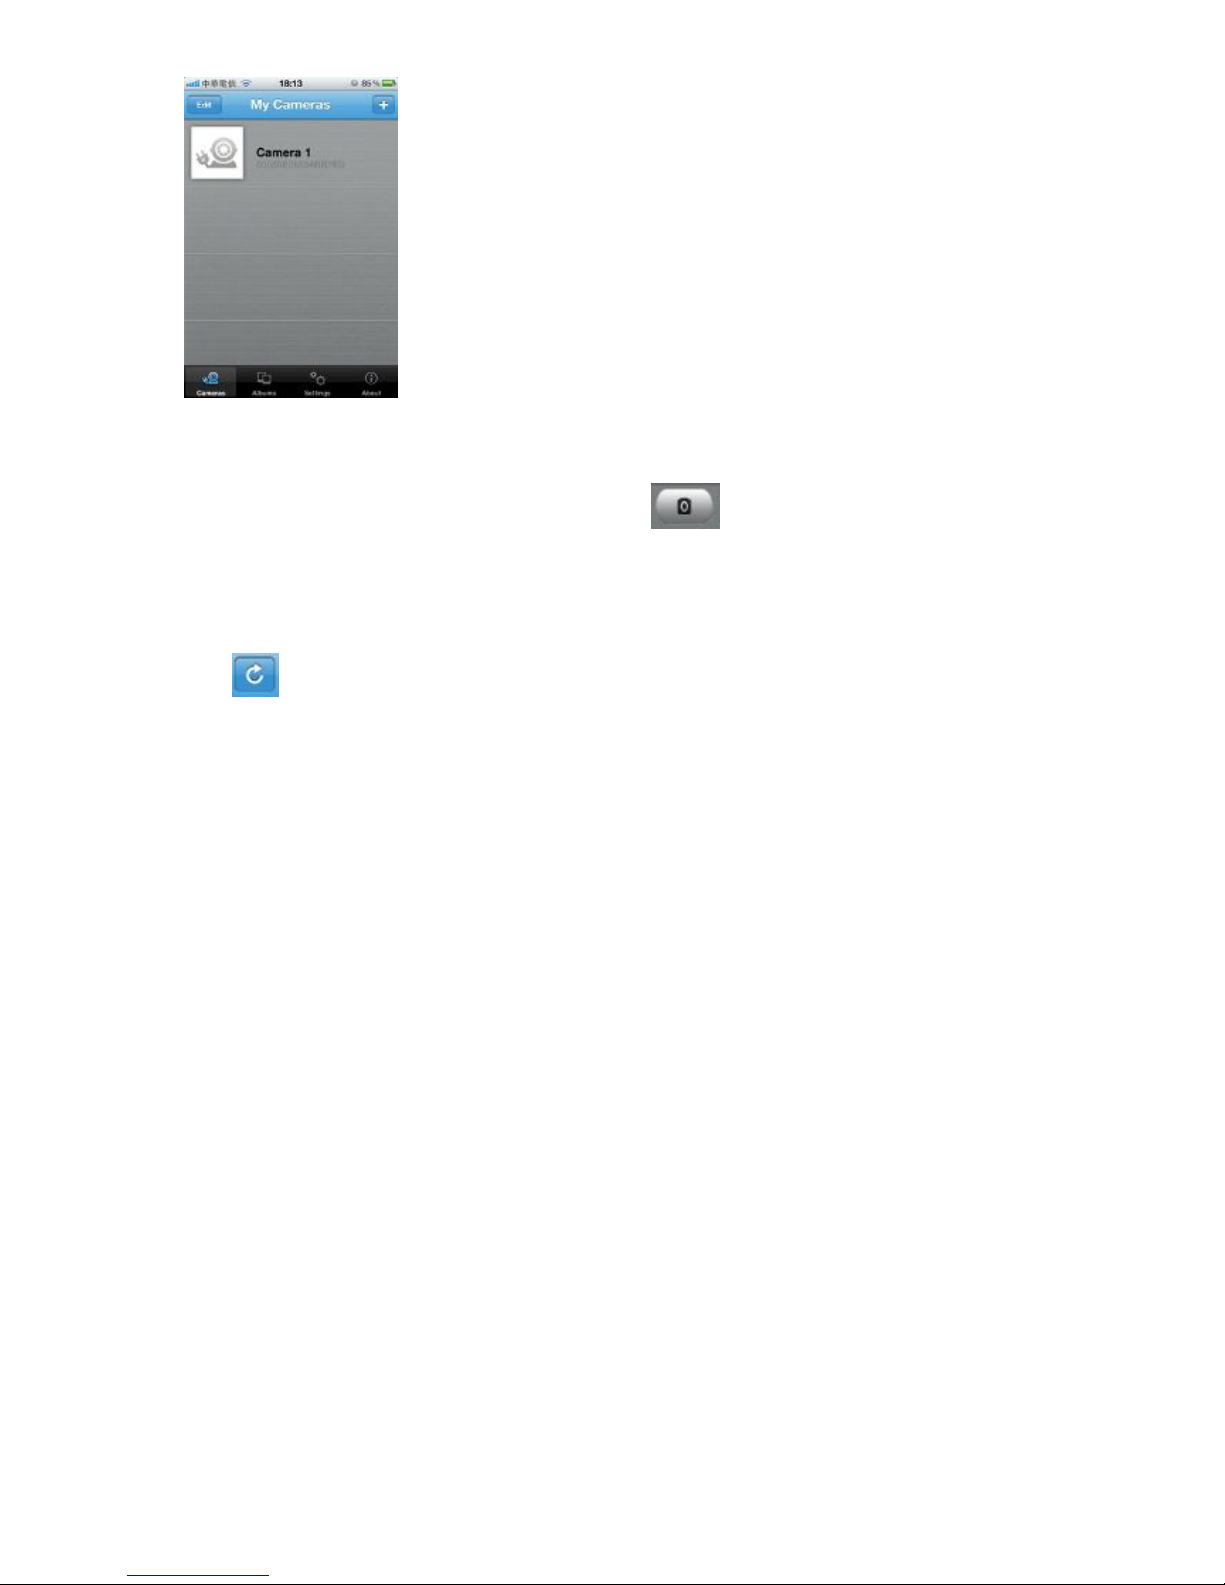
Camera list
docking area
Delete unwanted items
Add in new cameras
Viewing tools
10
Getting started
Getting started – iOS
Options of adding camera in camera list
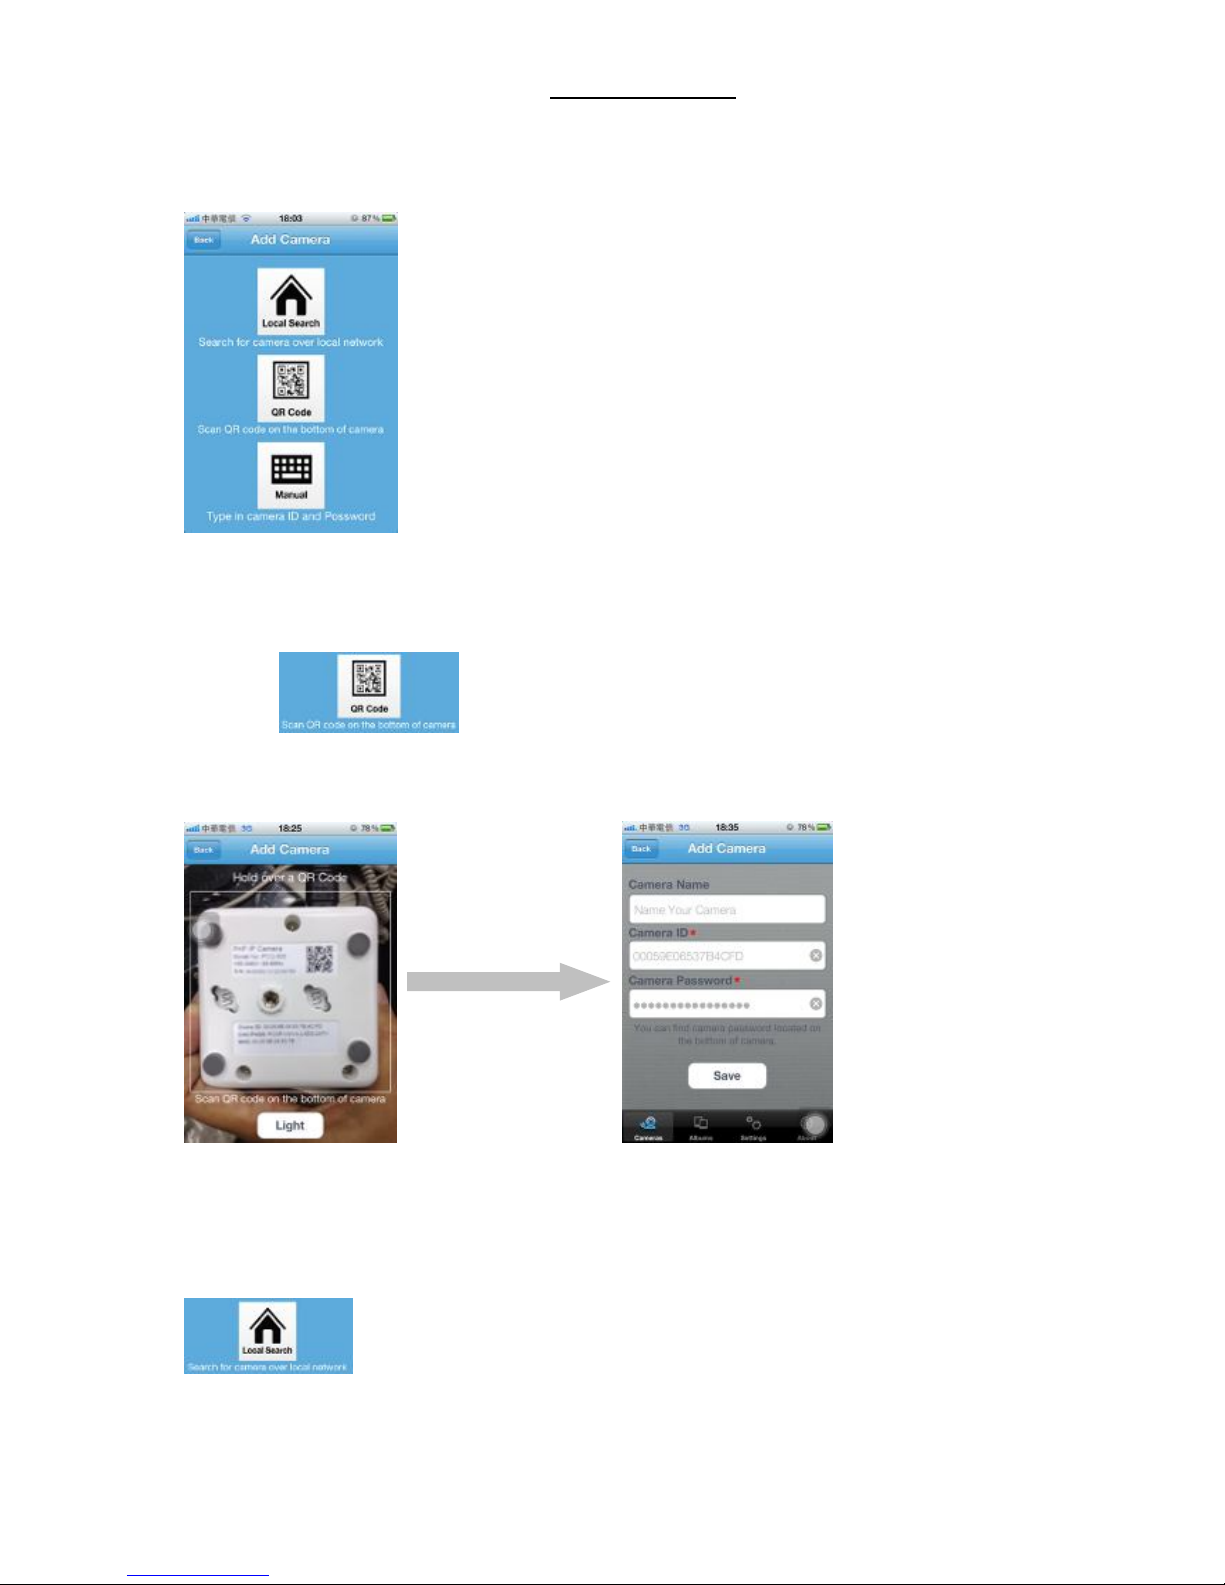
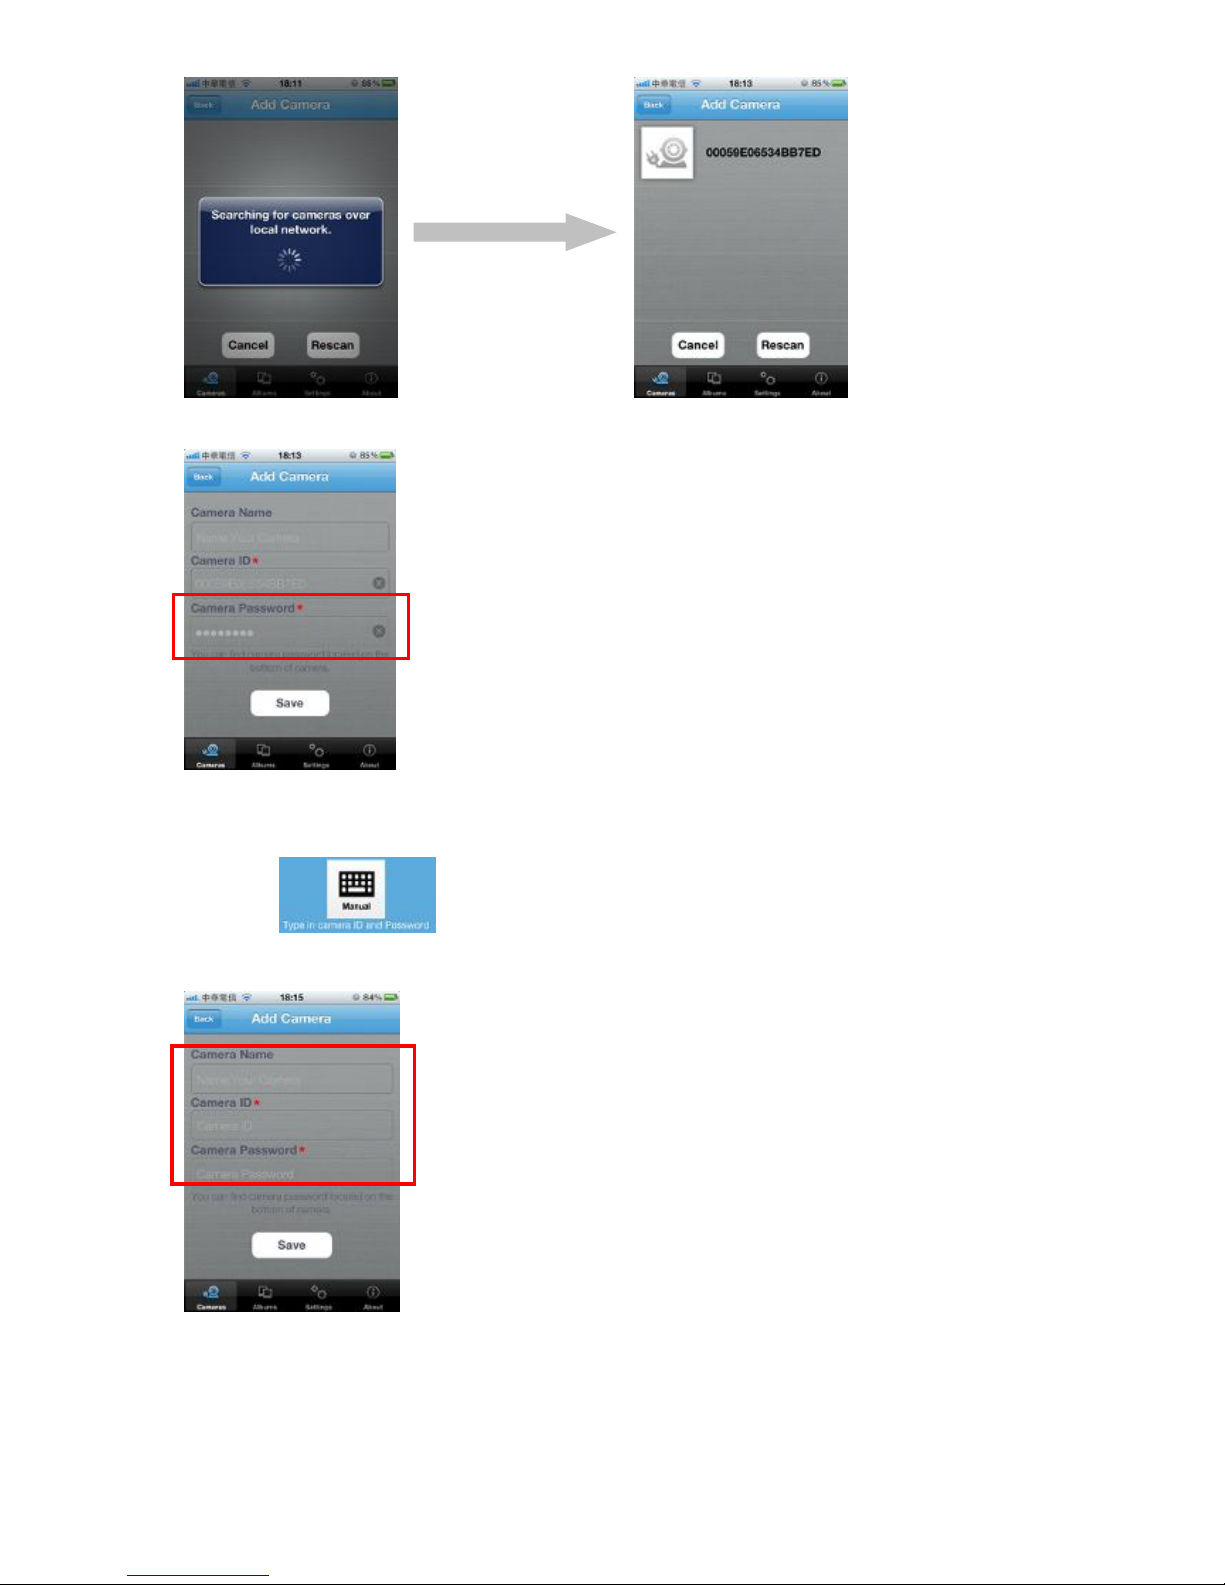
◎ Add camera
Scan QR code
1. Tap on to start QR code scan
2. Scan the QR code sticker on the bottom of plugCAM, ID and password will show up automatically
if scan successful
3. “Save” to add in camera list
Local search
1. Make sure your camera and mobile device are under the same network, then tap on
to search new camera. Once found the new camera, you can choose the camera
you want to add
11
3. Enter password of the just found camera and tap on “Save” to add in camera list
Add manually
1. Tap on
2.
(1) Input camera ID
(2) Input camera password
(3) Tap on “Save” to add in camera list
(1)
(2)
(3)
12
※ View images
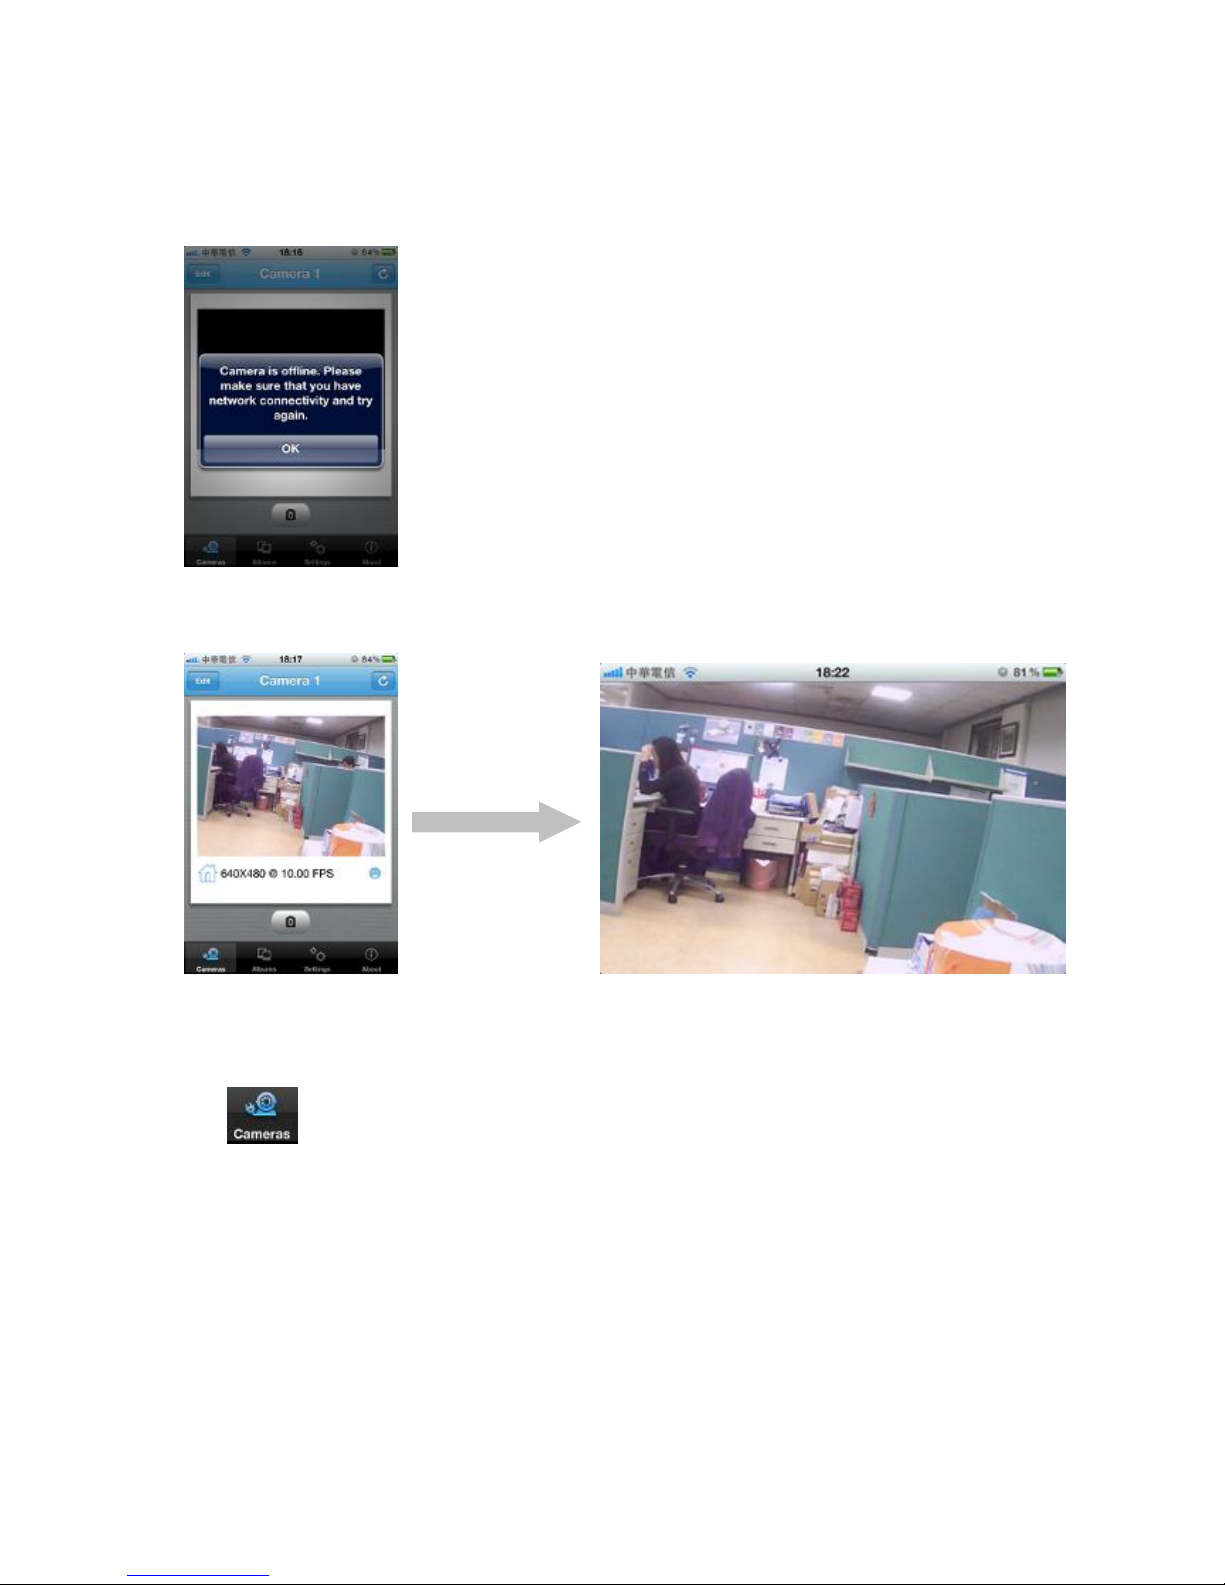
1. Tap on the camera you want to view on camera list
2. If ID and Password are all correct, program will start loading camera image
3. If the camera is shown offline, please check if you have installed the camera properly
4. If the camera is well-connected to network, you can view the image successfully. Rotate your
device to see full screen image.
Select camera
Tap to show up camera list and choose the plugCAM you want to view
13
Take a snap shot
1. When successfully view the image, tap the icon to take a quick shot of your view
2. The pictures will be saved in the albums
Reload camera
Tap to reload the camera image
14
Getting started – Andriod OS
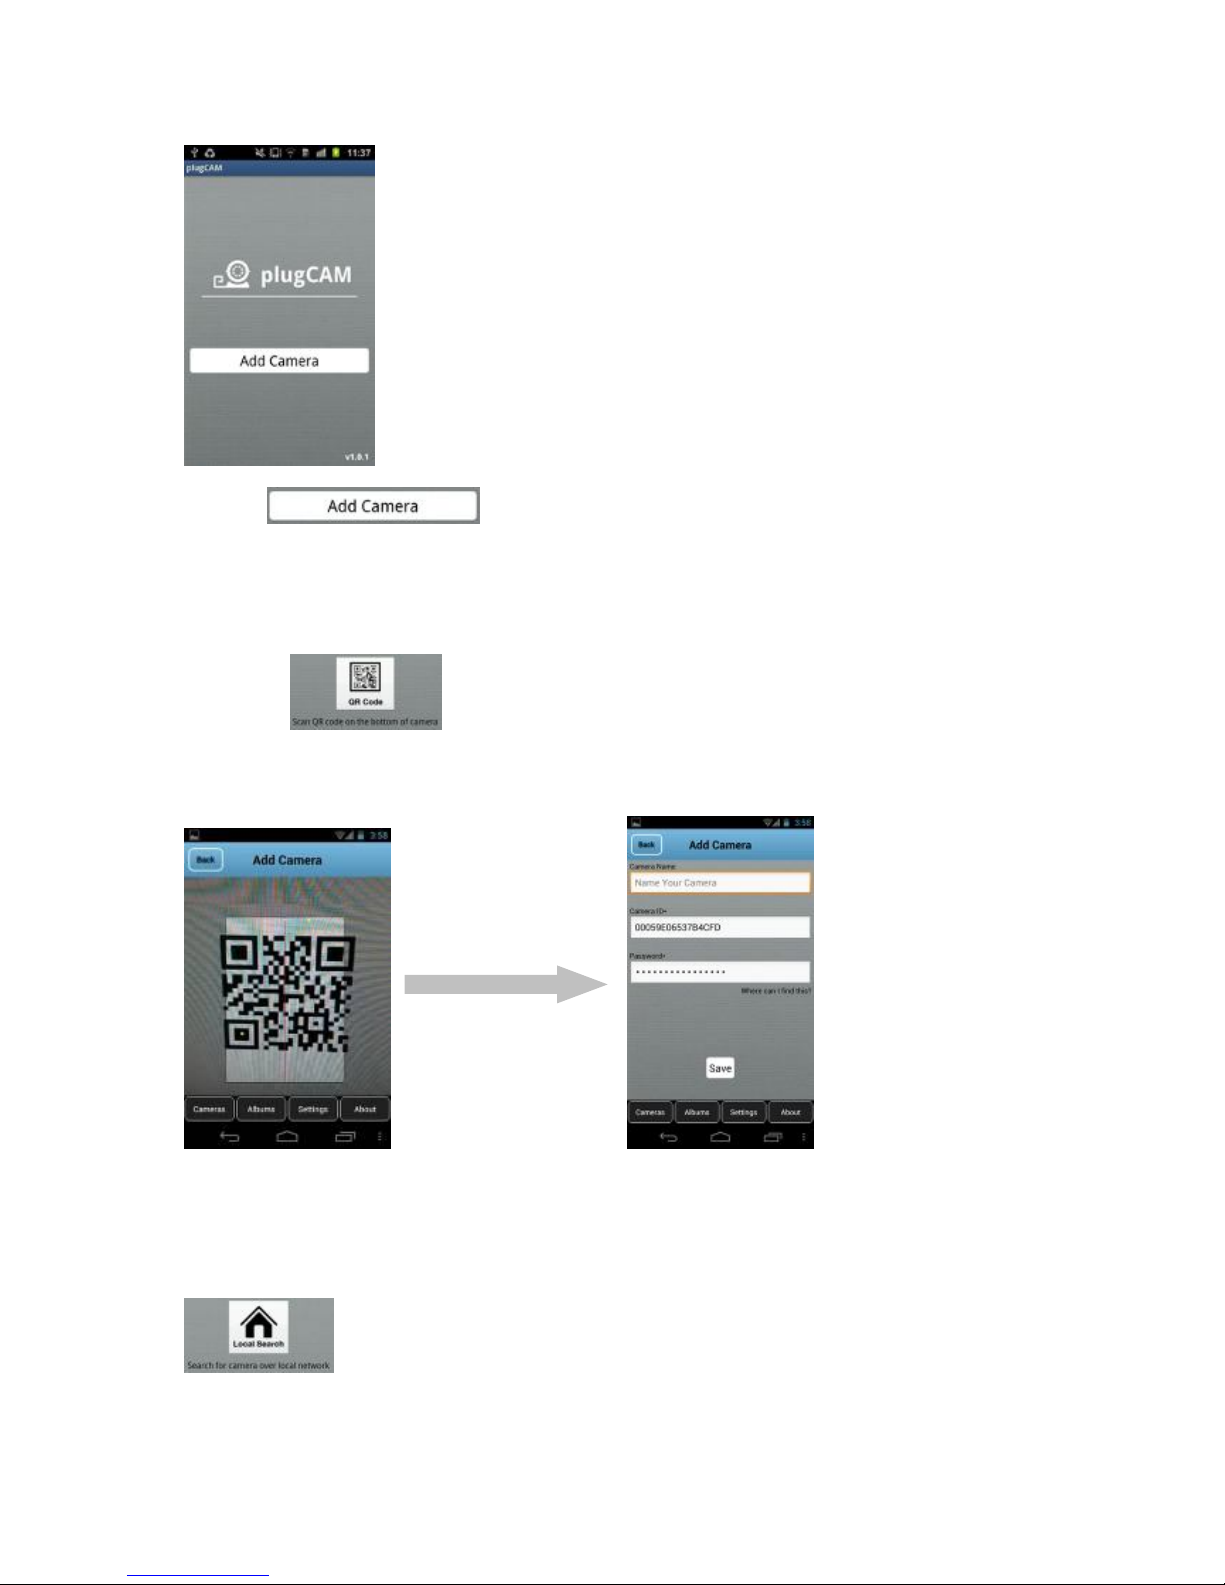
The startup screen when execute the plugCAM software
Tap on to start the program
※ Add camera
QR code scan
1. Tap on to start QR code scan
2. Scan the QR code sticker on the bottom of plugCAM, ID and password will show up automatically
if scan successful
3. “Save” to add in camera list
Local search
1. Make sure your camera and mobile device are under the same network, then tap on
to search new camera. Once found the new camera, you can choose the camera
you want to add

15
3. Enter password of the just found camera and tap on “Save” to add in camera list
Add Manually
1. Tap on
2.
(1) Input camera ID
(2) Input camera password
(1)
(2)
(3)

16
(3) Tap on “Save” to add in camera list
※ View images
1. Tap on the camera you want to view on camera list
2. If ID and Password are all correct, program will start loading camera image
3. If the camera is well-connected to network, you can view the image successfully. Tap on the
picture again to view larger image
Select camera
1. Tap to show up camera list

17
2. Tap on the camera you want to view
Take a snap shot
1. When successfully view the image, tap the icon to take a quick shot of your view
2. The pictures will be saved in the albums

18
Edit
Edit - iOS
Delete cameras
1. Tap to show up camera list, Tap “Edit” to delete camera
2. Tap “Done” to save changes
Change camera name
1. Tap to choose a camera
2.
(1) Tap “Edit” to enter the camera settings
(1)

19
(2) Tap on the camera name to change it
(3) “Save” to save changes
Change password
View mode
Video resolution
(2)
(3)

20
Video quality
Video frequency
Arrange Image

21
i.e. Flip Vertical:
Time & date
1. The default setting is Off, tap “On” to turn on time & date information
2. Tap “Done” to confirm, then time & date will show up on the viewing screen

22
Save and apply the changes
You may tap on to save each change, or tap on after all setting are done.
1. Tap “YES” to confirm setting changes
2.

23
Edit – Andriod OS
Delete cameras
1. Tap to show up camera list, tap “Edit” to delete camera
Change camera name
1. Tap to choose a camera
2.
(1) Tap “Edit” to enter the camera settings
(1)

24
(2) Tap on the camera name to change it
(3) “Save” to save changes
Change password
View Mode
Video resolution
(2)
(3)

25
Video quality
Video frequency
Arrange image

26
Show time & date

27
Albums
Albums - iOS
View albums
Tap to start
Delete albums
1. Tap “Edit”, then “Delete” -> “Done” to confirm
View pictues
1. Choose an album and tap on the picture you want to see for larger view

28
2. Tap on to Delete, Email, and Save picture
You can only process one picture at a time

29
Albums – Andriod OS
View albums
Tap to start
Delete albums
Tap “Edit”, then “Delete” -> “Delete Selected Album” to confirm
View pictures
1. Tap on the album you want to view
2. Tap on the picture you want to see to view larger image

30
Delete pictures
1. Tap “Edit” when you are in an album
2. Choose pictures you want to delete
You can only process one picture at a time

31
App Settings
App Settings – iOS
Tap to start
Passcode lock
Default “Off”.
Turn on Passcode lock can help prevent others connect to your plugCAM without your permission.
You must enter correct passcode every time when starting the plugCAM program after turning
on this function.
Turn on passcode
1. Tap on the Passcode Lock
2.
(1) Enter passcode
(2) Enter again to confirm passcode
3. Status shows “On”

32
Turn off passcode
1. Tap on the passcode lock
2. Enter passcode again to turn off passcode lock
Background skin
1. Tap on Background skin
2. Default gray. Choose a color for your background.

33
App Settings – Andriod OS
Tap to start
Passcode lock
Default “Off”.
Turn on Passcode lock can help prevent others connect to your plugCAM without your permission.
You must enter correct passcode every time when starting the plugCAM program after turning
on this function.
Turn on passcode
1. Tap on the Passcode Lock and choose “On”
2.
(1) Enter passcode
(2) Enter again to confirm passcode
Turn off passcode
1. Tap on the passcode lock
2. Enter passcode to turn off passcode lock

34
Background skin
1. Tap on Background skin
2. Default gray. Choose a color for your background.

35
About
About - iOS
Tap to start
Show software version & Product information

36
About – Andriod OS
Tap to start
Show software version & Product information

37
PC software instruction
1. Install software
Insert the software CD to your CD-R device, start the installation according to your language.
(1) Double click to start installation
(2) Set-up will start automatically
(3) Click “ Next > ” to enter PC information
(4) Choose set-up type and click “ Next > “ to enter installation procedure

38
(5) Procedure complete automatically
(6) You can see the plugCAM program and the icon after installation successfully
Startup menu
Short cut on desktop

39
Program main screen
Main function
Set snap shot and video recording path
Playback video recording
Display setting
4 channels
6 channels
9 channels (default)
plugCAM settings

40
Edit Device Setting:
Edit device Basic Info/Alarm Setting /Schedule recording
Add in new device:
Add a new device on display channel
Delete selected device:
Delete the selected device from display channel
Start up camera:
Start connection with camera device
Disconnect camera
Stop connection with camera device
Display channel
2. Search device in local network
(1) Select an empty channel
Channel name
View via
Internet
Snap shot
Video
recording
Frame per second

41
(2) Click to add in a new plugCAM device
(3) Click search to find plugCAM in the same network, wait for plugCAM ID show then type in
password, press “ Save “ to confirm
(4) Click to start up camera
(5) plugCAM image will show on the display channel
(1)
(2)
(3)

42
3. Add device in PC program manually
(1) Select an empty channel
(2) Click to add in a new plugCAM device
(3) Type in ID and password, press “ Save “ to confirm

43
(4) Click to start up camera
(5) plugCAM image will show on the display channel
(2)
(1)
(3)

44
CREATE PRIVATE ENCRYPTED PLC NETWORK
This product is a HomePlug AV powerline device. Each powerline device has predefined attributes of
Powerline network name. Multiple Powerline devices with same network names can communicate
with one another, and thus belonging to a same PLC network group. Devices with different network
name won’t communicate. Max number of devices in a PLC network group is defined in the
SPECIFICATIONS section of this manual.
Create a private encrypted network
Any ‘Homeplug-AV’ compliant PLC device newly from factories, including this device, has its default
network name of HomePlugAV, and can communicate with other brands of new Homeplug-AV
compliant devices, thus these new devices are so called belonging to the public network. Pushing
the GROUP button of the device will change its network name. This way, users can create one or
multiple private PLC network groups with this button, without complicated setup software involved,
thus protect their data been transmitted over the powerline. Pressing the RESET button of a
power-active powerline device will reset the network name back to its factory default.
By pushing GROUP button for more than 10 seconds, a random network name (different from
HomePlugAV) for the device will be generated. This device can then ask other devices to join its PLC
network to form private network group. Any other devices, device B, which want to join this device’s
(device A) PLC network group need to follow steps below: (NOTE: it is more convenient to bring
devices, which are to be configured into same logical network group, side by side during this
procedure. After network group is set, the devices can be deployed anywhere at home)
Step 1.(Clear group attribute) Firstly clear the original network group of device B by pressing its
GROUP button more than 10 seconds until all LED lights simultaneously turns off and on once. At
this moment, its network group name has been changed to a random name and thus, it is (1) ready
to be assigned another network name or (2) to be used as a seed device so other PLC devices
can join it to form a private network group.
Step 2.(Join) Press GROUP Button of device A and device B for 2 to 3 sec (make sure POWER
LED starts blinking). The device (device B) which has cleared its group attribute will join to the device
(device A) which hasn’t. It doesn’t matter which device’s button is pushed earlier than the other, but
please push the second device’s Group button within two minutes after pushing first device’s Group
button.
This way, Powerline device B joins same encrypted network as device A. Users can join device C to
device A’s logical network with same procedure, thus make device A, B, and C all in the same
encrypted network group.

45
Remove a device from a network Group
For example, device A and device B are in the same logical network group, if uses want to remove
device A from this logical network group, just follow the procedure in Step 1 by pressing GROUP
button of device A for 10 seconds. This makes device A not able to communicate with device B.
Make two public network devices private
If users want to make two new public devices (network name HomePlugAV) become private, please
carry out Step 1 on both devices, then do step 2 on these two devices. Finally, a private random
network name is generated for these two devices.
Partition four devices into two network Groups
For example, A, B, C, and D four devices, originally are in same network group. Please carry out step
1 on device A and B, to remove them from this network group. Then carry out step 2 on A and B to
form a new network group.

46
SPEC SHEET
Electric
AC Input 100 to 240V AC, 50/60Hz
Ethernet port N/A
power connector Euro8 connector
Mounting Screw inlets (side, bottom), Tripod mounting thread
Camera
Sensor (1) 1/4 -inch CMOS VGA sensor, (2) brightness sensor
Resolution
Up to 7 fps @ 640*480 in LAN
Up to 20 fps @ 320*240 in LAN
Up to 30 fps @ 160*120 in LAN
Video compression MJPEG
Lens
3.6mm, F2.0,
View angel 78 degrees
4 Glass w/ IR coating
Eyeball Pan/Tilt Manual mode
Eyeball adjustment angle Pan: 0~ 270 degree, Tilt: 0 ~ 90 degree
IR distance 5 m (IR LED x 12)
IR mode Turns on under dark & beiing accessed
Video Setting
Resolution, Brightness, Quality, Environment
Flip and Mirror setting
Security User-defined ID/Password protection, Public-key encryption
Networks
Network protocols TCP/IP, uPnP, DHCP client, Static IP, P2P
Board band router With DHCP and uPnP enabled
P2P - NAT traversal technology Proprietary UDP
PLC (Power Line Communication) Built-in 500 Mbps PLC adaptor
Max PLC Camera in a home 7 (w/ a PLC Ethernet adapter)
PLC standard Homeplug AV 1.1
PLC transmission distance Up to 300 m
PLC transmission security AES 128 bit
PLC freq. band 2 to 28 MHz, 30 to 50 MHz, 50 to 68 MHz
Mechanical and electronics
Work Temperature 0° C ~ 40° C
Storage Temperature -40° C ~ 60° C
Relative Humidity
Operating: 10~85% Non-Condensing ,
Storage: 5~90% Non-Condensing
 Loading...