

Zinwell BV-2822T, BV-2822R, BV-2822 Quick Installation Manual
Hardware Installation
BV-2822 transmitter to your HD devices:
You can connect 6 video sources to the
transmitter at the same time; four with the
HDMI connection and two with component
connection.
Use the HDMI cable to connect A/V HD devices
which support HDMI OUT connector to the
BV-2822 transmitter's HDMI IN connector.
Connect HD devices to your BV-2822
transmitter using the Component Video/ Audio
L/R cables to connect from the Y/Pb/Pr/Audio
L/R OUT connectors of HD devices to the
Y/Pb/Pr/Audio L/R IN on .
Use another HDMI cable to connect one end to
the BV-2822T via "HDMI OUT", and the other
end to the HDTV's "HDMI IN" port, only if the
loop-through feature is desired.
Plug in power adapter to BV-2822T transmitter,
it'll boot up automatically.
BV-2822R receiver Connections
Connect the "HDMI OUT" port of the BV-2822R
receiver to the "HDMI IN" port of the HDTV
with an HDMI cable.
Connect the power adapter to the receiver.
1
2
3
1
2
BV-2822
HD Video Wireless Transmitter
HD Video Wireless Receiver
BV-2822R
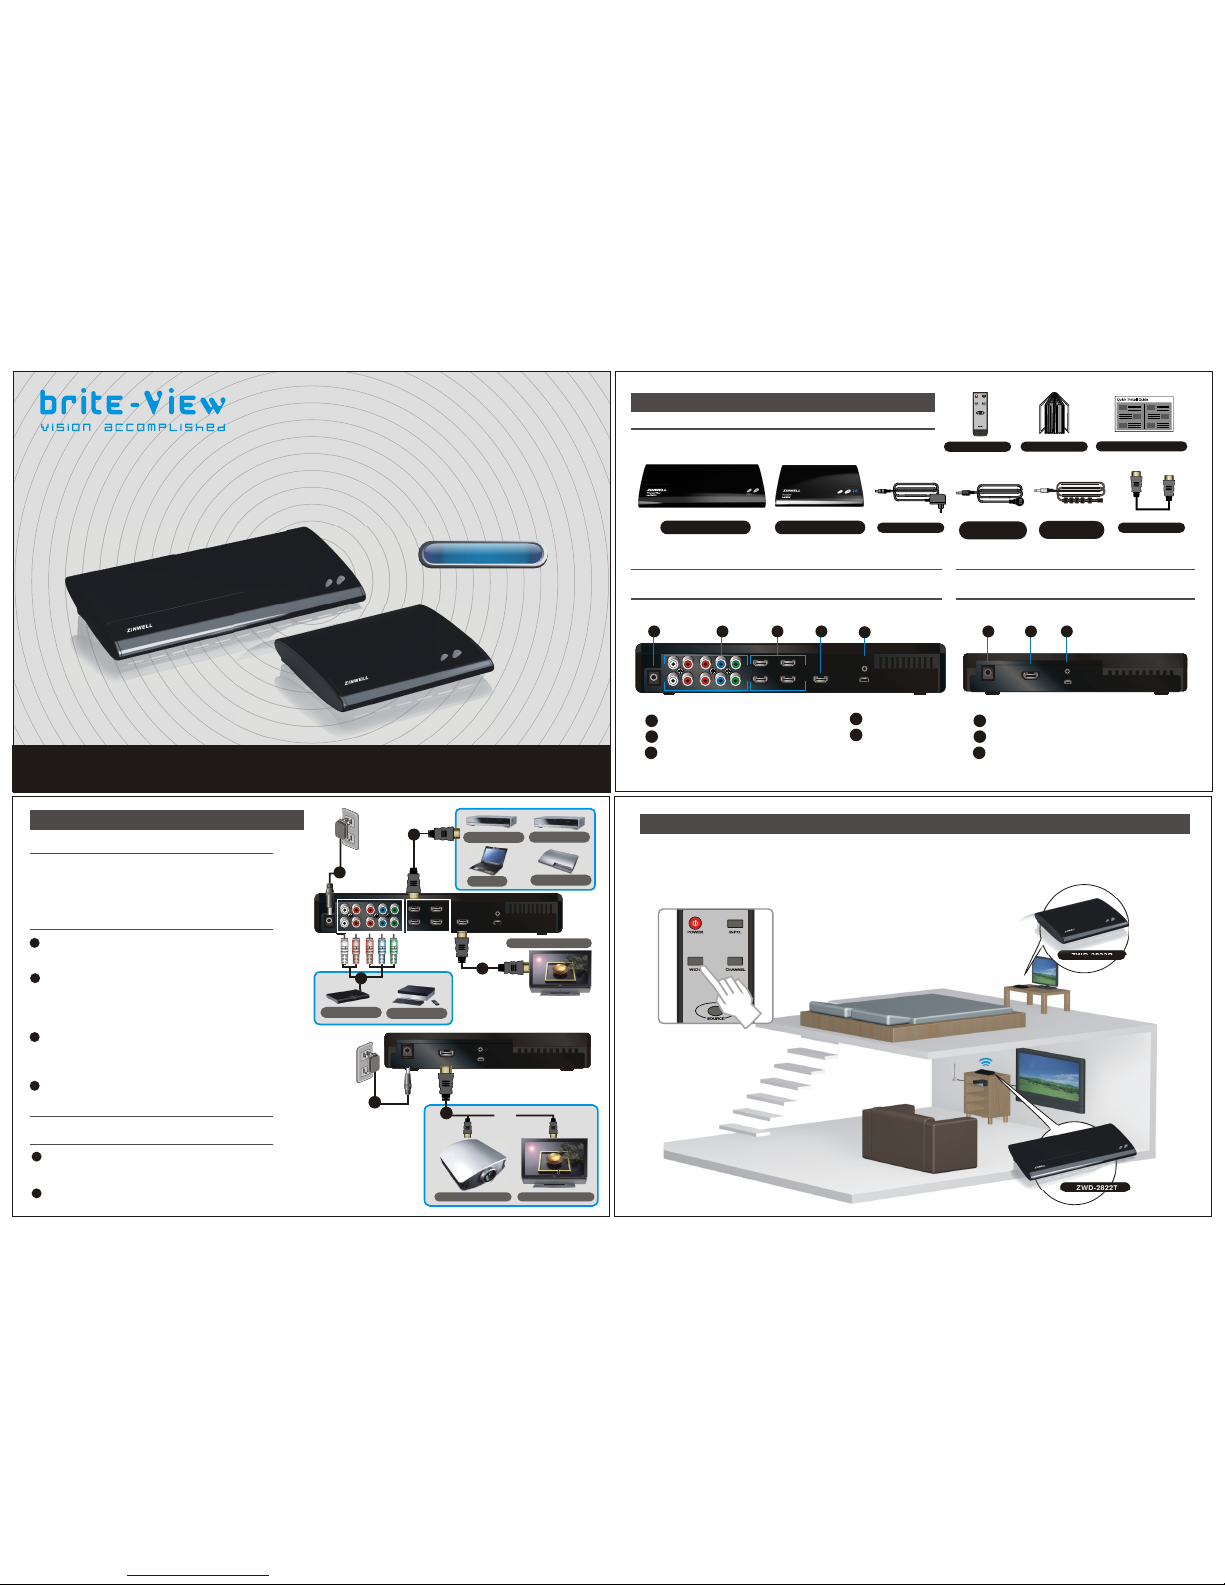
Part 1 Package Content and Connectors
BV-2822T
BV-2822R
Rear View of ZWD-2822 Receiver
Quick Installation Guide
ZRC-0000
User's Manual
Power Adaptor x2
IR Sensor
Extender Cable
Remote Control
Quick Installation Guide
Rear View of ZWD-2822 Transmitter
IR Blaster
Extender Cable
Press the "WIDE" button on the remote control to enable to "WIDE" mode for longer distance
transmission (1080i content only under WIDE mode); suitable for multi-room A/V transmission,
or transmission between different floors.
Part 3 Boost Video Transmission Range
HDMI Cable
BV-2822T
Part 2 Quick Installation Description
654321
654321
4
SERVICE
IR OUT
DC IN
HDMI IN
HDMI IN
AUDIO
Pr Pb Y
R
L
HDMI OUT
1
2
HDMI IN
HDMI IN
3
4
DC IN
Y/Pb/Pr and Audio L/R IN
HDMI IN
1
2
DC IN
IR IN
SERVICE
HDMI OUT
3
4
HDMI OUT
IR OUT
5
5
4321 1
5
6
2 3
DC IN
HDMI OUT
IR IN
1
2
3
DC IN
IR IN
SERVICE
HDMI OUT
2
OR
1
High Def. Flat-panel TV
High Def. Projector
SERVICE
IR OUT
DC IN
HDMI IN
HDMI IN
AUDIO
Pr Pb Y
R
L
HDMI OUT
1
2
HDMI IN
HDMI IN
3
4
HD Game Console
Cable STB
High Def. Flat-panel TV
Laptop
3
1
Blu-ray/DVD Player
Satellite STB
Media Player
4
2
ZWD-2822R
ZWD-2822T
Air SyncHD
1080p Video/Audio Wireless Transmission Kit
654321
654321
SERVICE
IR OUT
DC IN
HDMI IN
HDMI IN
AUDIO
Pr Pb Y
R
L
HDMI OUT
1
2
HDMI IN
HDMI IN
3
4
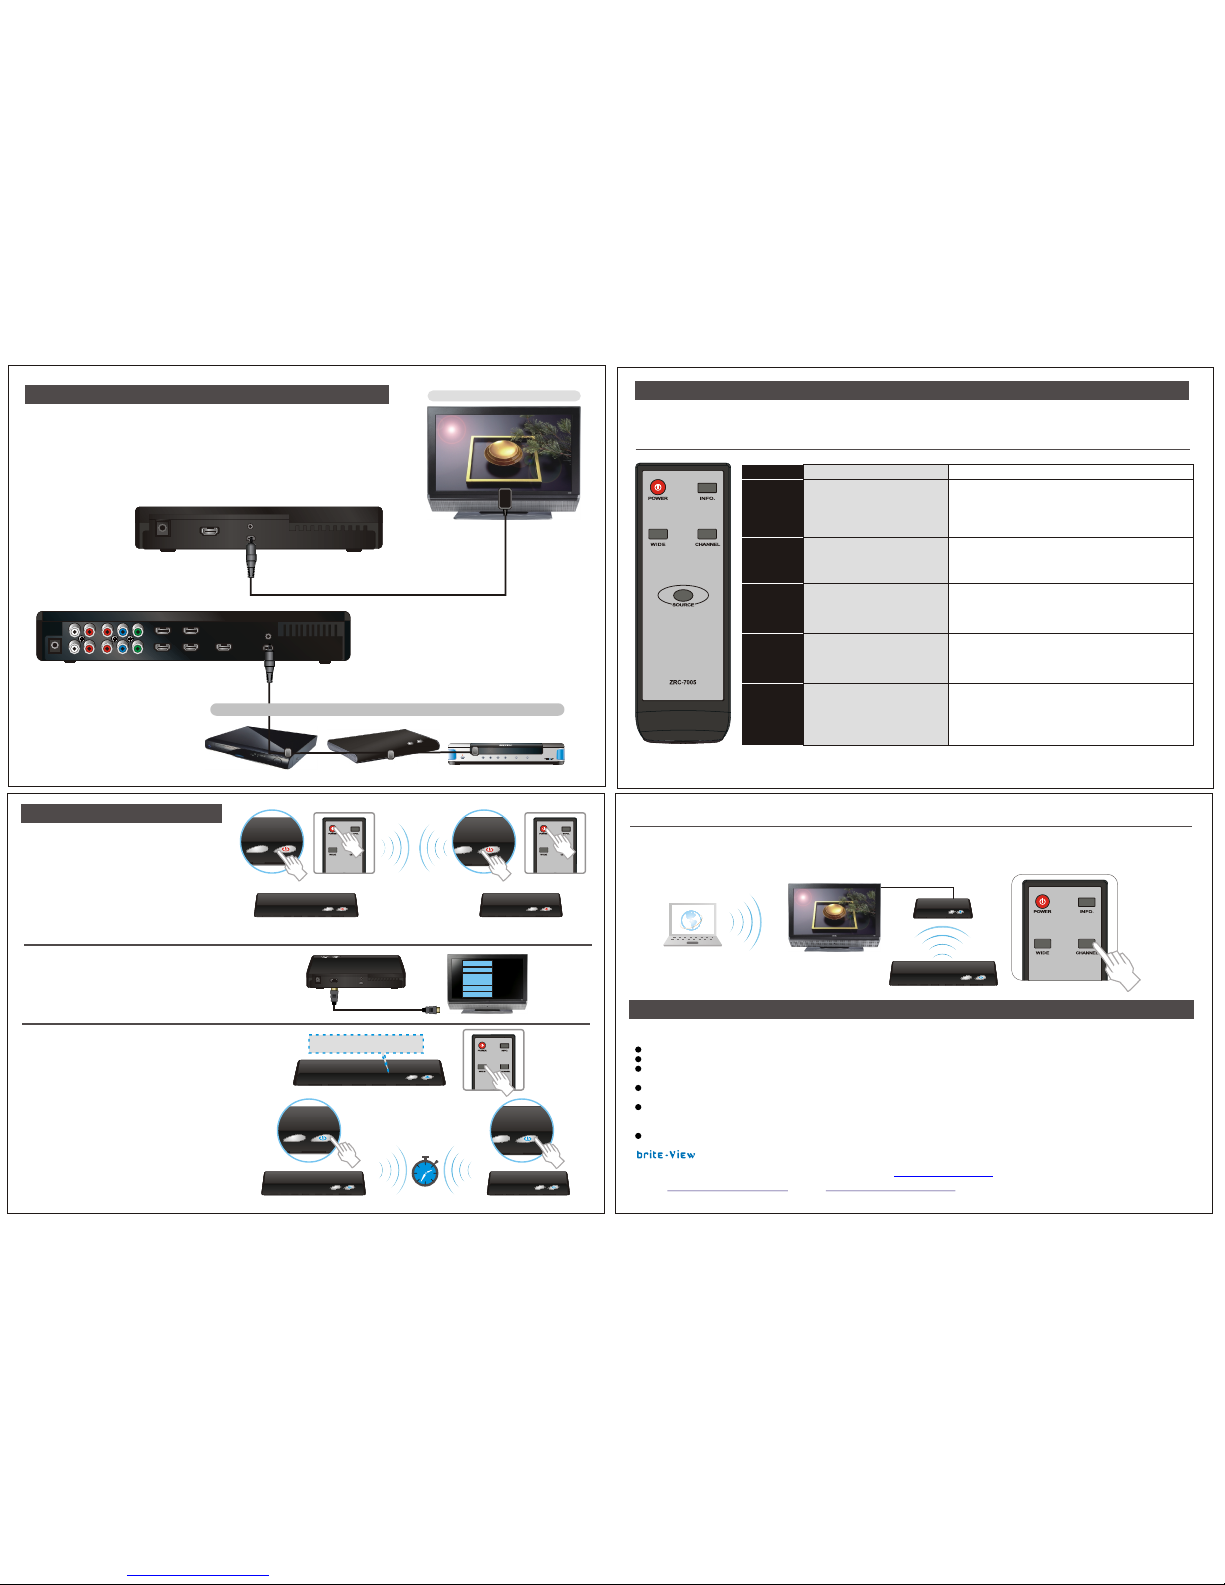
Place the two AAA batteries into the remote control.
Part 5 Remote Control Unit Instruction
ZRC-0000
DOLBY
DIGITAL
POWER
EXIT
MENU
SELECT
DC IN
IR IN
SERVICE
HDMI OUT
IR Sensor Extender cable
High Def. Flat-panel TV
IR Blaster Extender cable
If the Infrared (IR) Blaster & Sensor (included) are connected to the BV-2822T
and BV-2822R so you can point hand-held remote controls of your HD A/V
equipment at the BV-2822R (receiver) or at your HDTV instead of at the A/V
equipment. The transmission distance is 66 feet, line-of-sight.
Part 4 IR Blaster and Extender Setup
Y/Pb/Pr
Video
RGB
S-Video
HDMI
DC IN HDMI OUT
IR IN
SERVICE
Part 6 Operation
Press the POWER button on the remote
control or on the top of the BV-2822R
and BV-2822T to turn on the transmitter
and receiver when both POWER LEDs of
transmitter and receiver are lit in red.
Power on your TV set and go to the
source menu under the settings menu
of your HDTV set.
Then select the HDMI input to which
the BV-2822 receiver is connected.
Press the SOURCE button on the remote control
or on the top of the BV-2822R (receiver) to select
the input source, until available video/audio is
shown on the TV screen. If all operation is
normal, the POWER LED and SOURCE LED will be
lit in solid blue, and the user can press the INFO
button on the remote control to check the status
of signal quality and A/V source selected.
Note :
The wireless link might require 80 seconds to connect
between transmitter and receiver, and show video on
the TV screen. Please be patient and wait for a while.
Activate the BV-2822
and Set up the Link
Part 7 Limited Warranty
If you have electronic devices such as cordless phones, wireless AC points/routers operating in the 5GHz band and near the
BV-2822, the audio/video quality on the display or TV may suffer. Press the "CHANNEL" button twice on the remote control
to switch to an appropriate channel for the BV-2822.
NOTE:
Internet
Button
POWER
INFO.
SOURCE
CHANNEL
WIDE
(1080i content only)
FunctionDes cription
Press to turn the BV-2822 Transmitter/
Receiver on/off. User need to pointing at
BV-2822T & BV-2822R both to boot
up when both POWER LEDs lit in red.
Press to display "Channel","Source",
"Resolution","WIDE mode" and ' Signal
Quality'
Press this button to switch audio/
video sources connected to the
BV-2822T.
Press this button to change wireless
channels manually if the user
experiences video noise.
Press this button to enable the "WIDE"
mode to boost transmission distance.
Up to 100 feet (1080i content only)
Operation
Press to go to the next input source.
Users can see the current setting on the OSD.
Pressonc e todispl aythe current"Channel" status.
Pressagai n within 5 secondsto switch toanoth erchan nel, and
thecha nnel numberwill bedispl ayed onthe OSD.
Pressthisbutto n toenab le anddisa bleWid e mode.
Pressagai n within 5 secondsto enable WIDEmod e, andthe
statuswillbe displayedonthe OSD.
Press it pointing at the BV-2822R to enter the "Standby
Mode" and the loop-through connection is on; press
it when pointing at the BV-2822T to enter the "Standby Mode
" and the loop-through connection is off.
Pressonceto display thecurr entstat us.Pres s againto exit OSD.
During INFO. OSDdispla yed, pressSOUR CEbutt onto adjust
thecloc k phaseif necessary.
IBXXXXXXX Rev.0
Blu-ray Player or High-Def Set-top Box or High-Def Game Console
This limited warranty (hereinafter the Warranty) is valid for the BV-2822 (hereinafter the Product). The Warranty is only valid in the country where the Product
was originally purchased.
The Warranty only covers manufacturing defects, and excludes defects caused by the inappropriate use or storage of the Product.
The Warranty is issued by Xpike Innovation. Inc. to the end purchaser (hereinafter the Customer) of the Product.
In accordance with the Warranty, the Customer has a sole claim to demand repair or replacement of the Product but may not assert claims or seek compensation again
st the manufacturer/retailer for further losses (including, but not limited to, the indirect loss of data or profit).
The Warranty provides coverage over a period of 12 months, commencing from the initial purchase date of the Product by the Customer of Xpike Innovation. Subsequent
changes of ownership do not extend the warranty period.
The Warranty is valid with the proviso that the Product is shipped to Xpike Innovation within the warranty period. In the event of any faults or defects with the Product,
it must be shipped back to Xpike Innovation. Products will be repaired or exchanged at Xpike Innovation's own discretion. The warranty period is not extended for any
repaired or replaced Products. Exchanged parts are the property of Xpike Innovation .Inc.
The Warranty is valid solely on the condition that the original proof of purchase issued is presented with the Product.
, the brite-View logo, are trademarks of Xpike Innovation Inc., registered in USA.
Email or visit for tech support.service@brite-view.com www.brite-viewforum.com
For detailed operating instructions, please visit to download the user manual. www.brite-view.com
 Loading...