

Page 1
SRE 25 E
3
2
6
5
4
>
u
1
=
FIN
MANUEL D'UTILISATION
GEBRAUCHSANWEISUNG
BRUGSANVISNING
INSTRUCCIONES DE USO
KÄYTTÖOHJE
OPERATING MANUAL
ISTRUZIONI D’USO
BRUKSANVISNING
GEBRUIKSAANWIJZING
BRUKSANVISNING
2
14
26
38
50
62
74
86
98
110
Page 2

! ! ! ! ! ! ! ! ! ! ! ! ! ! ! ! ! ! ! ! !
3
PAGE PLIANTE
2
FALTBLATT
6
FOLDEUDSIDE
5
HOJA DESPLEGABLE
5
AUKI TAITETTU SIVU
4
FOLD-OUT PAGE
>
PIEGHEVOLE
u
UTBRETTSIDE
1
UITVOUWBLAD
=
UTVIKNINGSSIDA
a
-
EMC
a
-
LV
FIN
Page 3

Dear Sir, Madam,
Congratulations with your purchase of a portable domestic heater. You have
purchased a quality product, which will serve you for many years to come. This,
of course, provided you use the heater correctly. Please read these Directions
for Use first, to ensure maximum lifetime for your heater.
Your heater comes with a 48-month manufacturer’s warranty on all defects in
materials or workmanship.
We wish you a warm and comfortable time with your heater.
Yours sincerely,
PVG International b.v.
Customer Service Department
1 READ THE DIRECTIONS FOR USE FIRST.
2 IN CASE OF ANY DOUBT
, CONT
ACT YOUR DEALER.
3 BEFORE YOU START READING, FOLD OUT THE LAST PAGE. ! ! ! ! ! ! ! ! ! !
4
62
Page 4
GENERAL DIRECTIONS FOR USE
Below you will find the main steps to be taken for
using your heater. For more details, please refer to
the MANUAL (pages 65 ff.).
• The first time you ignite your heater it will smell
like ’new’ for a short time.
• Store your fuel in a cool and dark place.
• Fuel has a limited shelf life. Start every heating
season with renewed fuel.
• The right quality of fuel will be assured, when
you use Zibro Extra or Zibro Kristal for your
heater
.
• If you change to another brand and/or type of
parrafin oil, you must first finish up all the
r
emaining fuel in the heater.
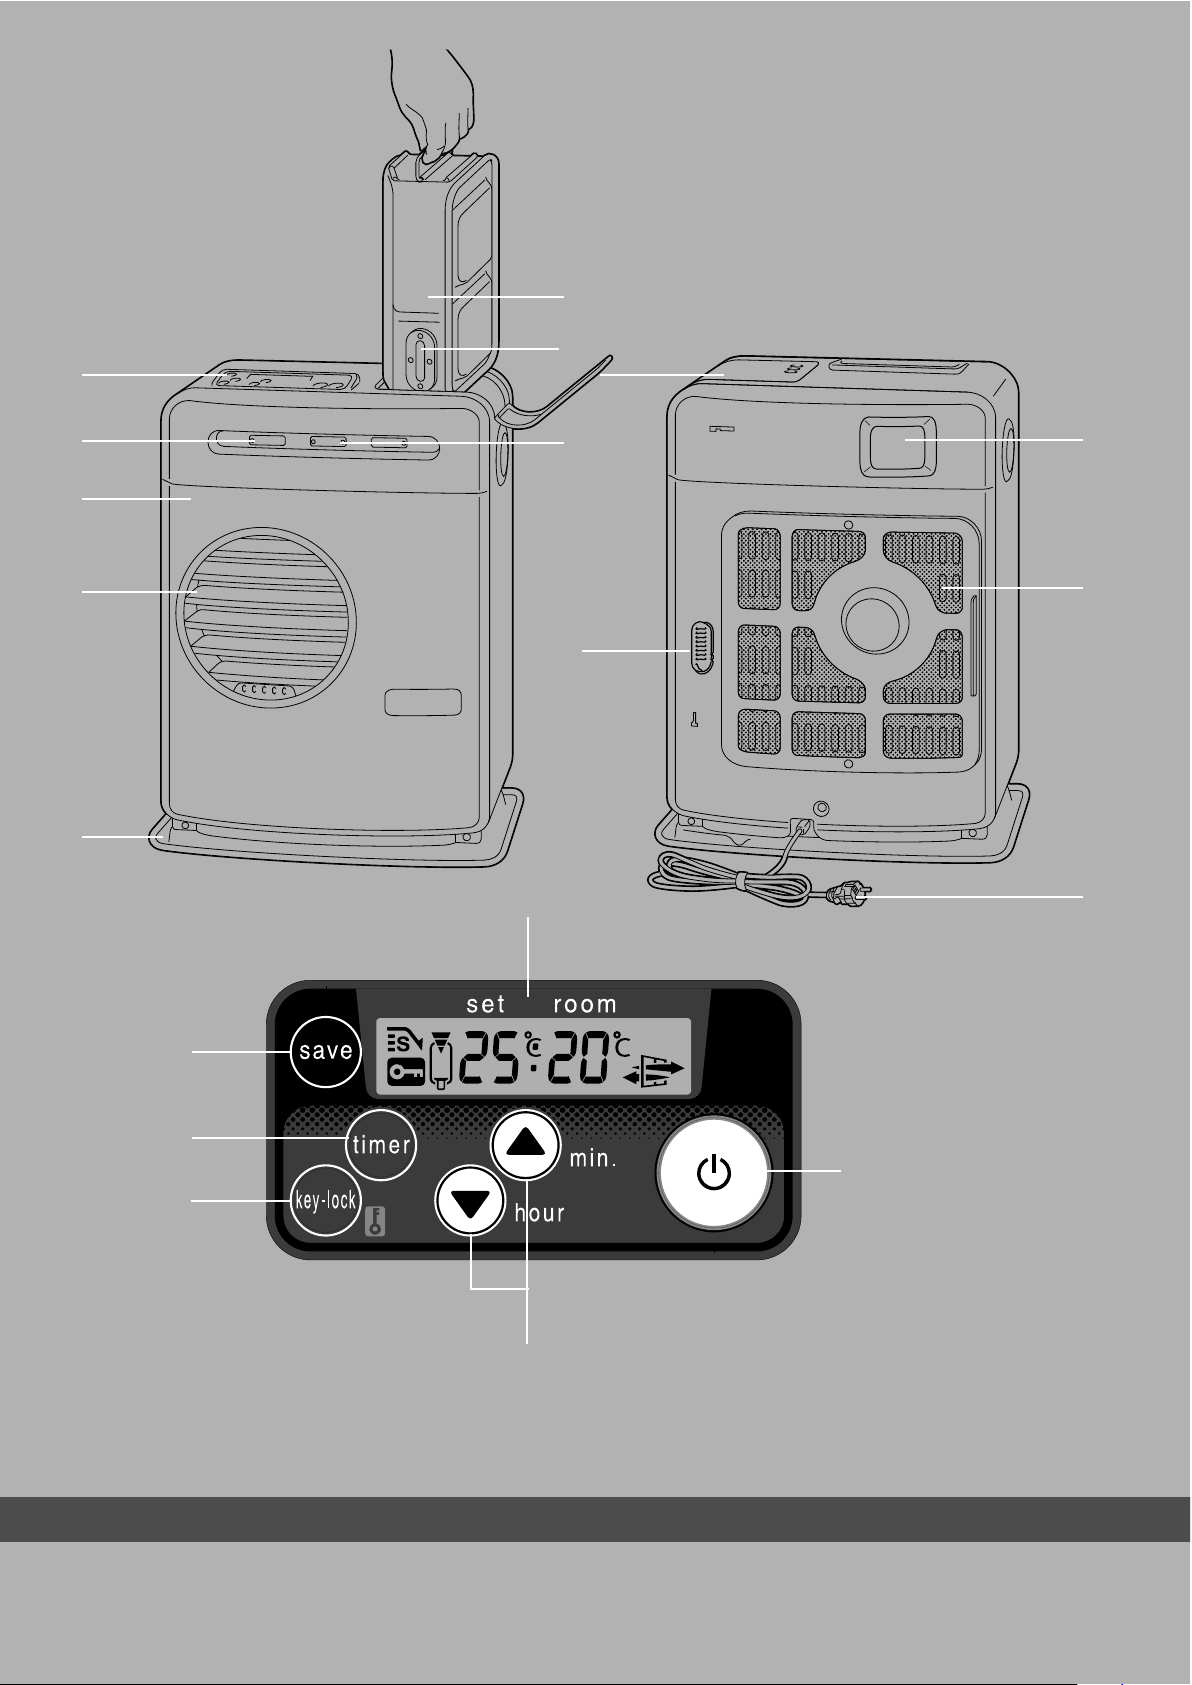
MAIN COMPONENTS
Front plate
G
rid
Base plate
Lid for removable
tank
Operation panel
Removable tank
Fuel gauge
removable tank
Vent filter
Thermostat
Plug + cord
Information display
key
Childproof lock
Adjustment keys
(time and
temperature)
Timer
POWER lamp
TIMER lamp
Air quality contr
ol
system
SA
VE key
!
"
#
$
%
&
'
(
)
*
+
,
-
.
/
0
1
2
S
3
! ! ! ! ! ! ! ! ! ! ! ! ! ! ! ! ! ! ! ! ! ! !
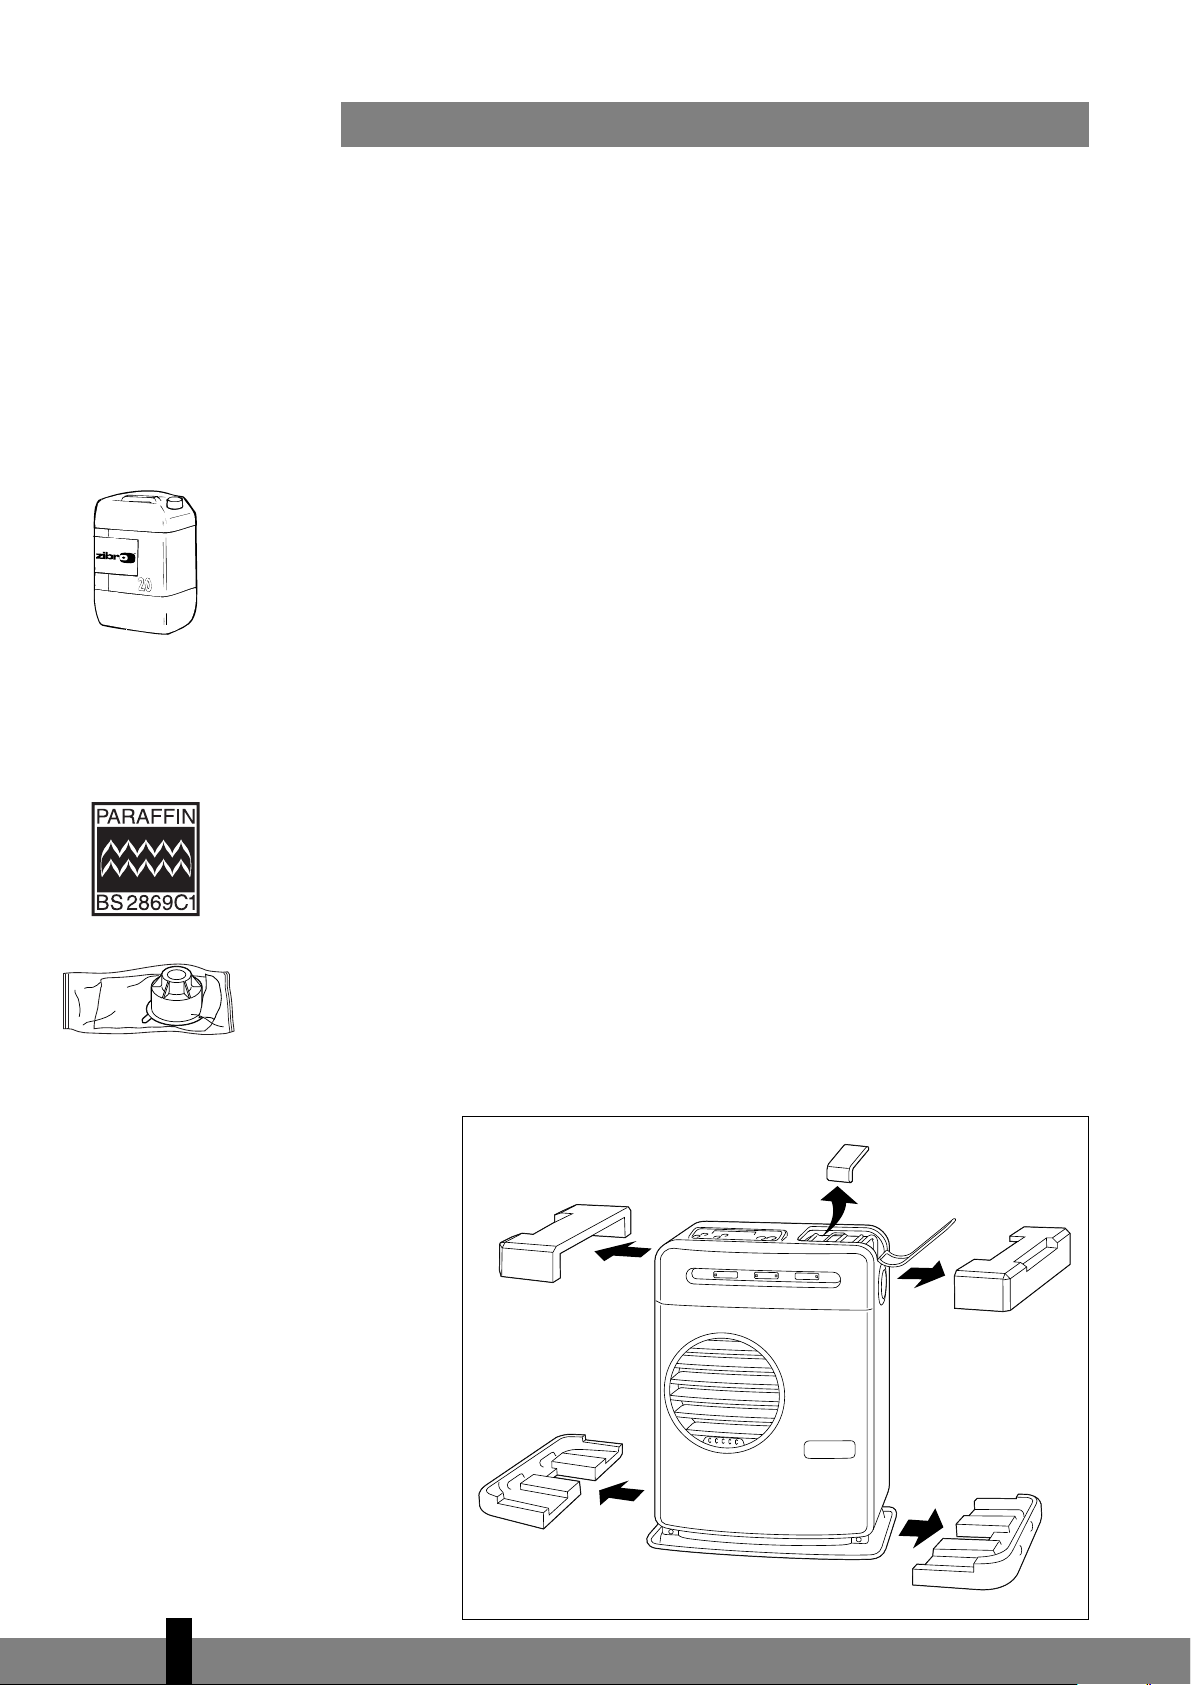
Remove all packaging materials (refer to Section A, Fig. A).
Fill the removable tank 4 (refer to Section B, Fig. C).
Insert the plug into the wall-socket.
Ignite the heater using the key , (refer to Section D).
If required, change the temperature using the adjustment keys
(refer to Section E).
Switch off the heater by pressing the key ,.
1
2
3
4
5
6
4
63
Page 5
This transportation cap
is packed separately in
the box. Only this cap
ensures trouble-free
transportation of the
heater after use.
Store it well!
WHAT YOU NEED TO KNOW IN ADVANCE
ALWAYS MAKE SURE THAT THERE IS SUFFICIENT VENTILATION
This heater is equipped with an air quality control system !. When there is
insufficient ventilation in the room or when the heater is being used in a room
w
hich is too small, the heater will shut off automatically. For comfortable and safe
heating ensure that there is sufficient ventilation.
Note: To avoid unexpected shut off, we recommend to put a door or window ajar
when the heater is operating.
For each model the minimum size of space is specified in which you can use the
heater safely, without additional ventilation
(refer to Section O). If a particular
room is smaller than the specified space, always put a window or door slightly ajar
(± 2.5 cm). We also recommend doing this in highly insulated or draught-free
rooms and/or at altitudes above 1,500 metres. Do not use your heater in cellars or
other underground areas.
THE RIGHT FUEL
Only use Class C1 paraffin fuel in accordance with BS2869; Part 2, or equivalent.
Your heater has been designed for use with high-quality water-free pure paraffin
oil, such as Zibro Extra or Zibro Kristal. Only fuels of this kind will ensure clean and
proper burning. Lower quality fuel may result in:
! increased possibility of malfunctioning
! incomplete burning
! reduced heater lifetime
! smoke and/or smells
! deposits on the grid or mantle
Using the right fuel is therefore essential for safe, efficient, and comfortable use
of your heater.
Always refer to your local dealer for the right fuel for your heater.
Only the use of the
correct fuel will ensure
safe, efficient, and
comfortable use of your
heater.
4
64
A
Page 6
MANUAL
A INSTALLING THE HEATER
Carefully remove your heater from the box and check the contents.
I
n addition to the heater you also need to have:
! a manual fuel pump
! a transportation cap
! these directions for use
Keep the box and the packaging materials (Fig. A) for storage and/or
transportation.
Open the lid of the removable tank
! and remove the piece of cardboard.
Fill the removable tank as indicated in Section B.
The floor should be firm and completely level. Reposition the heater, when it
is not level. Do not try to correct the situation by placing books or other
goods under the heater.
Insert the plug " into the wall-socket (230 Volts - AC / 50 Hz) and set the
correct time using the adjustment keys
# (refer to Section C).
Your heater is now ready for use.
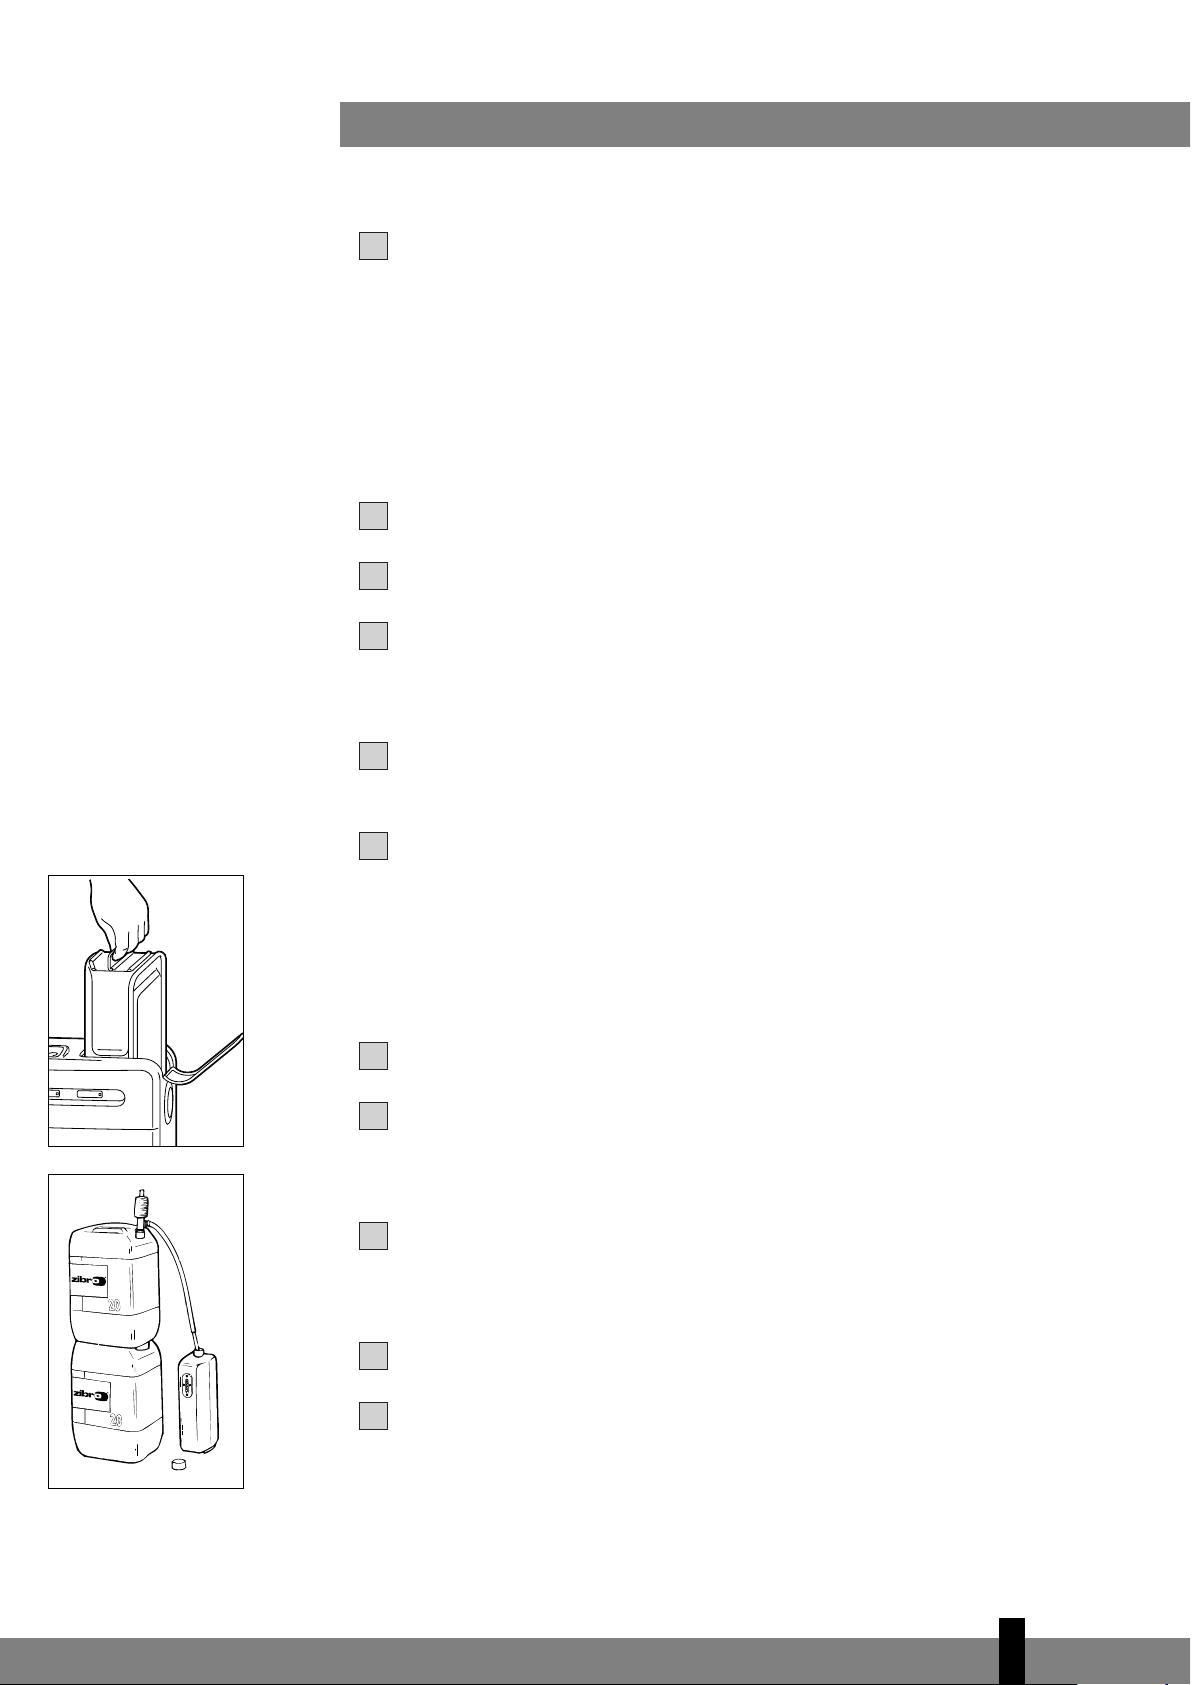
B FILLING FUEL
Do not fill the removable tank in the living room, but in a more suitable place
(there can always be some spillage). Follow the procedure below:
Make sure that the heater is switched off.
Open the lid
$ and lift the removable tank % out of the heater (Fig. B).
Note: Some drops may leak from the tank. Put down the removable tank
(cap pointing upwards) and screw off the fuel cap.
Take the manu al fue l p ump and inser t t he smo oth, most rig id tub e i nto the
jerrycan. Make sure that it is in a higher position than the removable tank
(Fig. C). Insert the ribbed hose into the opening of the removable tank.
Lock the switch button on top of the pump (turn clockwise).
Squeeze the pump a few times, until fuel star
ts flowing into the removable
tank. As soon as this happens, there is no need to press any longer.
54321
65432
1
4
65
! ! ! ! ! !
C
B
Page 7
C
heck the removable tank fuel gauge
! w
hile filling the tank (Fig. D). Stop
filling by loosening the switch button on top of the pump (turn anti-clock-
wise), once the gauge indicates that the tank is full. Never overfill the tank,
especially not when the fuel is very cold (fuel expands when it heats up).
L
et the remaining fuel in the pump flow back into the jerrycan and carefully
remove the pump. Carefully screw the fuel cap back on the tank. Clean off
any spilled fuel.
Check whether the fuel cap is straight and tightened properly. Reinstall the
removable tank in the heater (cap down). Close the lid.
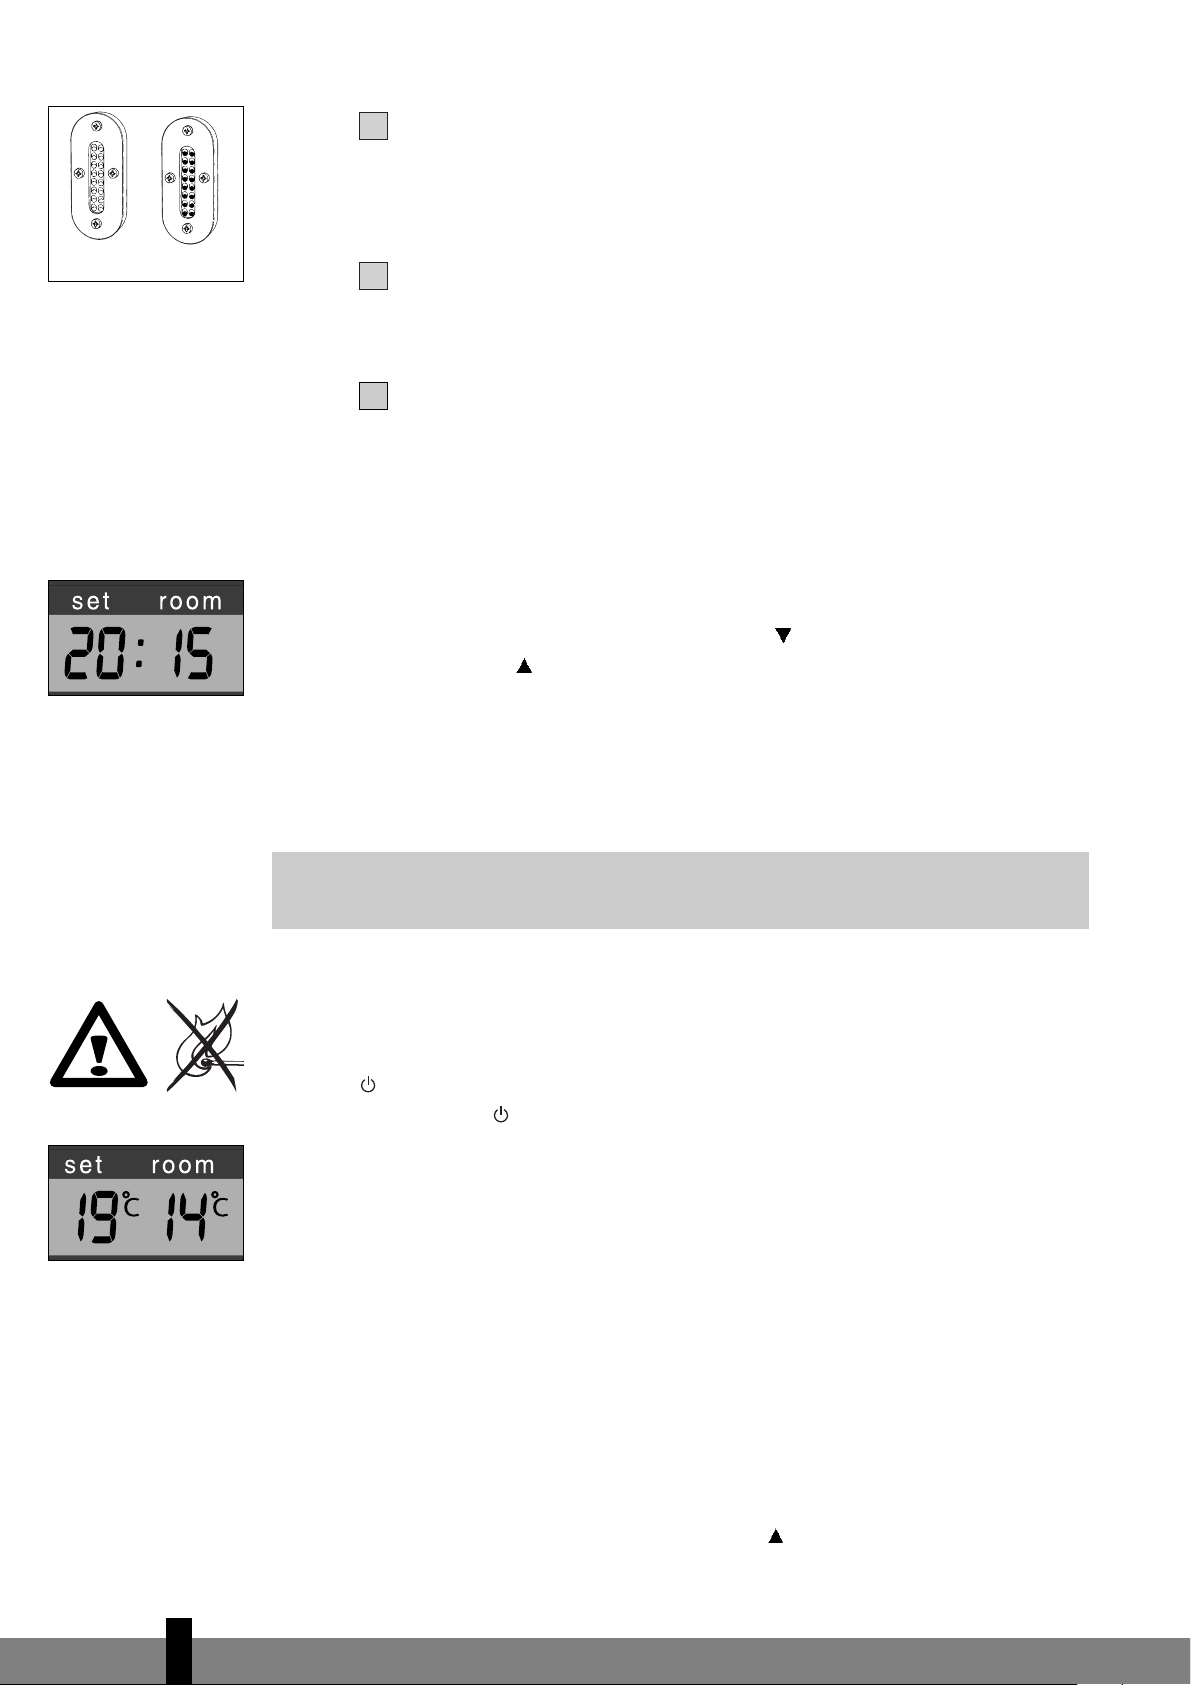
C SETTING THE CLOCK
It is only possible to set the correct time, when the heater is connected to the
mains and not burning. Use the adjustment keys " to set the time. First press
either of the two keys to switch on the function (the 4-digit # will start blinking).
Next, set the hours using the key on the left (
hour) and the minutes using the
key on the right ( min.). Press once to increase the value by one step. When you
hold down the key, the value will continue going up, until you release the key
again. After approximately 10 seconds the 4-digit will stop blinking and the
setting will be locked. 5 minutes after switching off the heater, the information on
the display will disappear and the heater will automatically switch into the stand-
by position.
When the heater has been unplugged (or after a power failure), the time needs
to be set again.
D IGNITING THE HEATER
When used for the first time, a new heater may give out a smell for a short while.
You sho uld th ere for e prov ide ex tra ve nti lat ion . Alwa ys ign ite th e he ate r with the
button $
. Never use matches or a cigarette lighter.
Just press the button $ to ignite the heater. The POWER lamp % will start
blinking, indicating that the ignition procedure has started. This will take a short
while. Once the heater is burning, the POWER lamp % will remain lit (red). The
information display # will show two numbers. The light next to them indicates
that these numbers refer to the temperatures (Fig. F). The actual room temperature
is indicated below ROOM, while the temperature setting is indicated below SET.
The latter can be changed with the adjustment keys
(refer to Section E).
Prior to igniting the heater
, always check for sufficient fuel in the removable tank.
E SETTING THE REQUIRED TEMPERA
TURE
The temperature setting can only be adjusted, when the heater is burning. Use the
adjustment keys " to adjust the temperature. First press either of the two keys to
switch on the function (the °C mark and 4-digit
# will start blinking). Next, adjust
the temperatur
e using the key on the right (
min.) to set the temperatur
e to a
8
7
6
4
66
D
empty full
F: The requir
ed
temperature on the left,
the measured
temperature on the
right.
E: When the 4-digit stops
blinking, the setting has
been locked to the
indicated value.
☞
Page 8
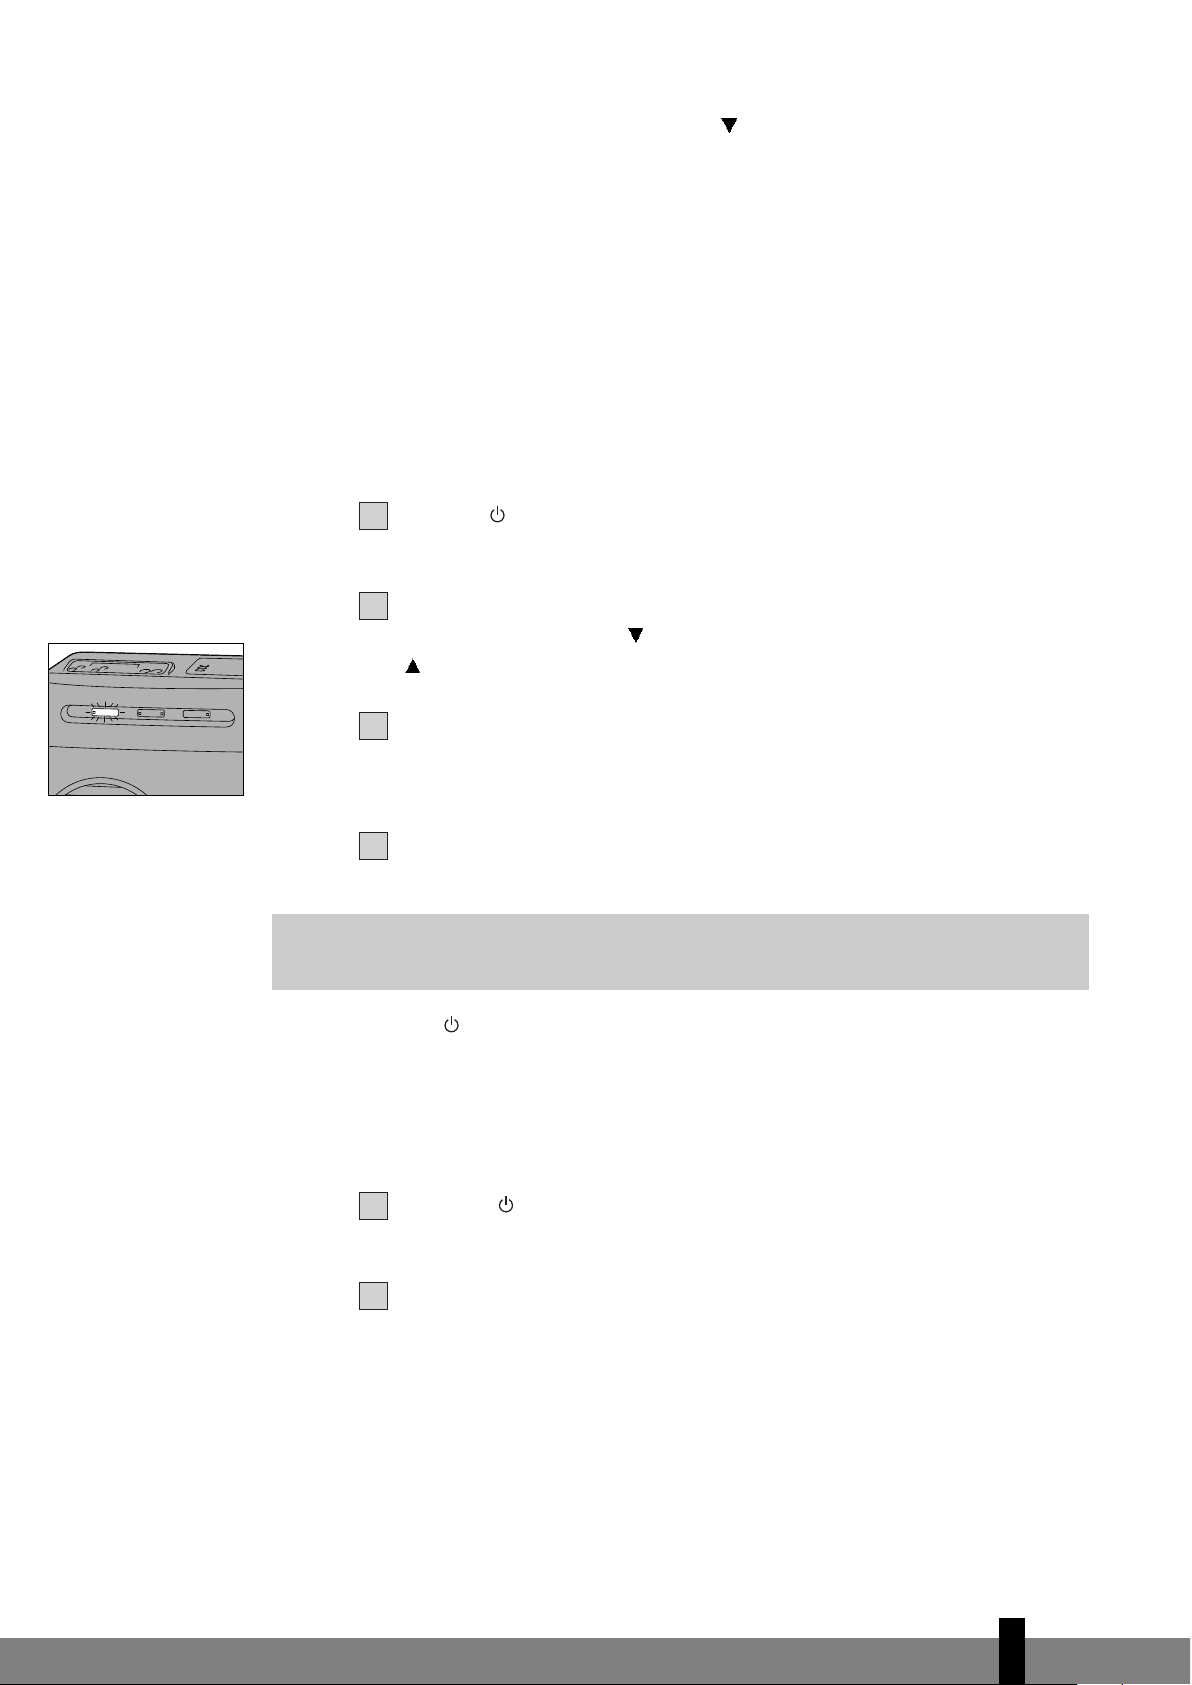
h
igher setting and the key on the left (hour) to lower the temperature. Press
once to increase the value one step. After approximately 10 seconds the °C mark
and 4-digit will stop blinking and the setting will be locked (Fig. F).
The available temperature settings range from 6°C minimum to 28°C maximum.
When the heater has been unplugged (or after a power failure), the temperature
w
ill reset to the factory setting of 20°C.
F USING THE TIMER
The timer allows you to switch on the heater automatically at a preset time.
In order to switch on the timer, the correct time must have been set (refer to
Section C) and the heater should be off. Follow the procedure below:
Press the button ! and then the TIMER key " immediately after that.
The TIMER lamp # and the 4-digit $ will start blinking.
Use the adjustment keys % to set the time at which the heater must ignite.
Use the key on the left (
hour) to set the hours and the key on the right
( min.) to set the minutes (interval of 5 minutes).
After approximately 10 seconds the 4-digit will show CLOCK again and the
TIMER lamp # will light up, indicating that the timer function has been
activated (Fig. G).
The timer will ensure that the room will have been heated to approximately
the required temperature at the set time.
When you want to switch off the heater and ignite it again with the timer, all
you have to do is press the TIMER key
(refer to Section G).
Press the button ! once to clear the timer setting.
G SWITCHING OFF THE HEATER
There are two ways to switch off the heater.
Press the button !. The information display will show the CLOCK
signal. Within approximately one minute the flame will have extinguished.
Press the TIMER key ", when you want to switch off the heater and ignite it
again with the timer the next time. This not only switches of
f the heater, but
it also activates the timer function. You can change the required time with
the adjustment keys
% (refer to Section F).
2
1
432
1
4
67
G: The TIMER indicator
light indicates that the
timer function has been
switched on.
☞
Page 9
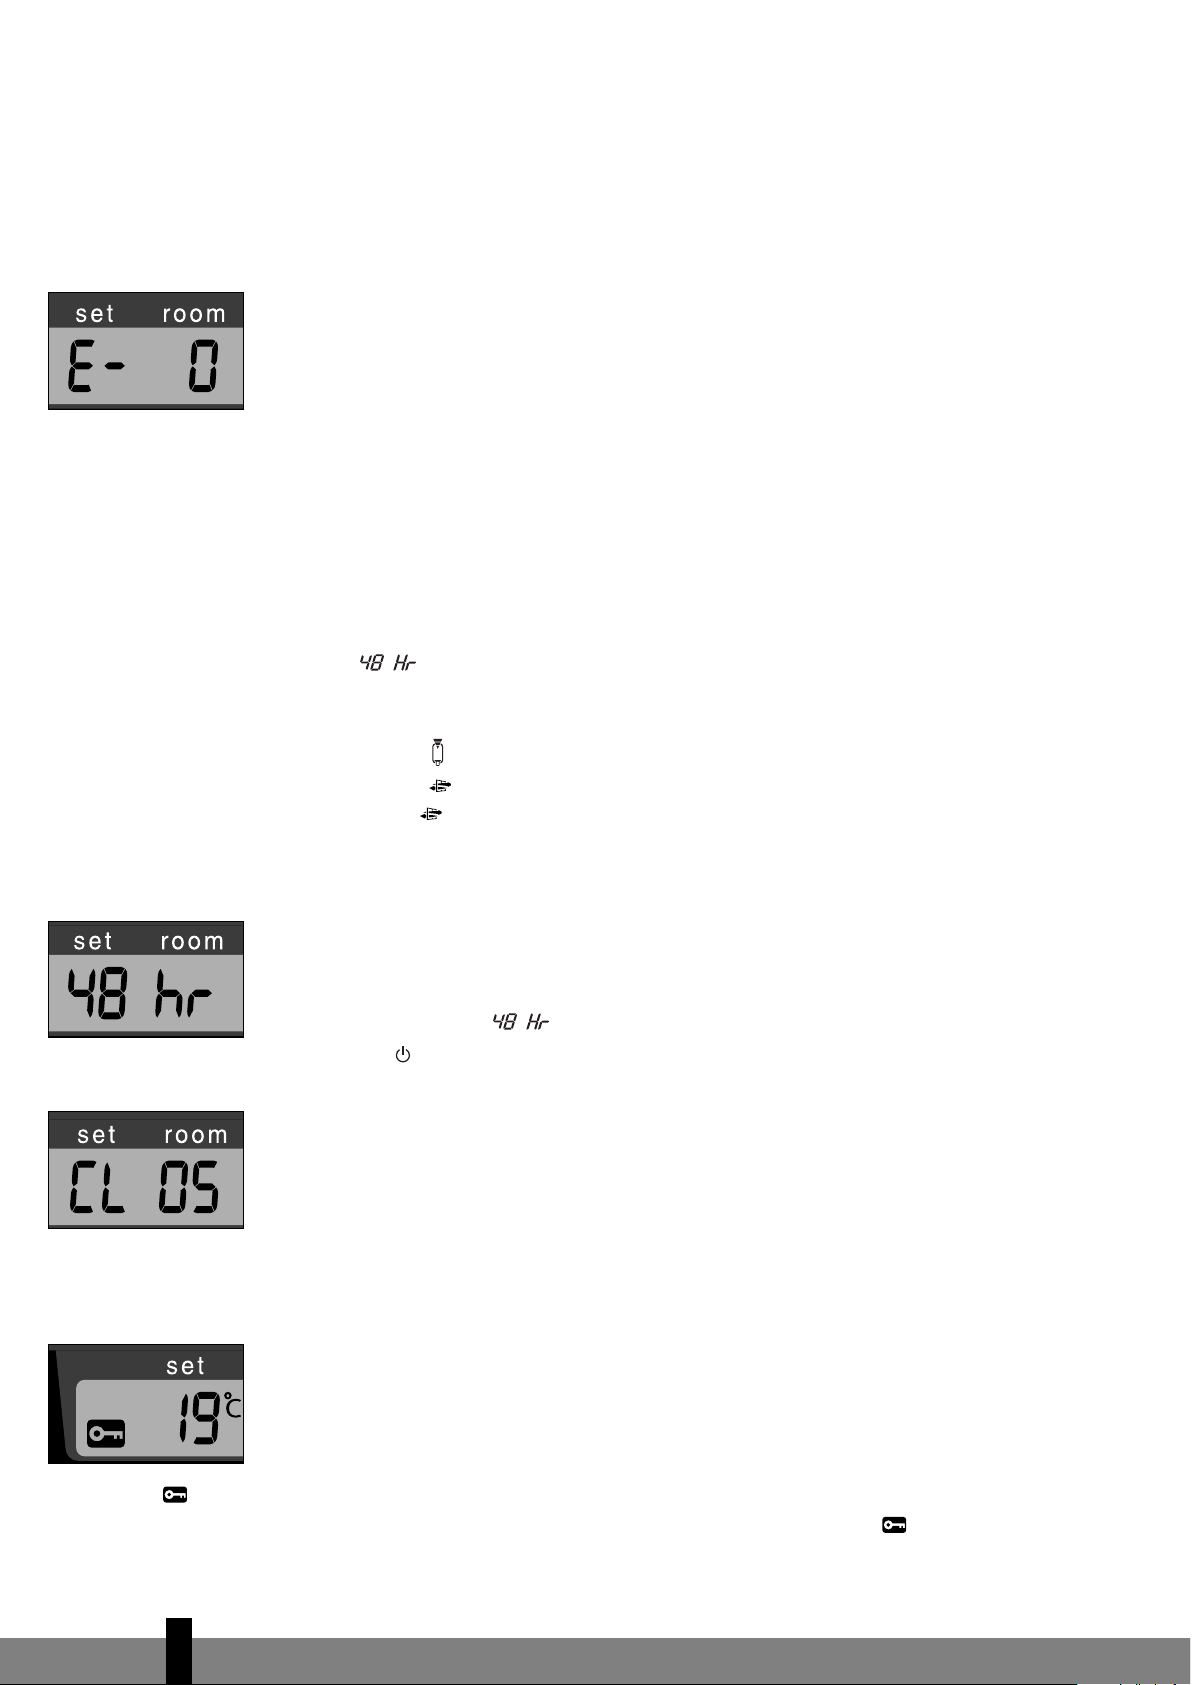
H THE INFORMATION DISPLAY
The information display ! not only serves as an indicator of the (set) time and
temperature (sections C, E, and F), it also indicates any malfunctioning of the
heater. The code on the information display tells you what is the matter:
C
ODE INFORMATION WHAT TO DO
e - 0 Temperature within the heater too high. Cool-down and re-ignite.
f - 0 Power interrupted. Re-ignite the heater.
e - 1 Faulty thermostat. Contact your dealer.
f - 1 Faulty burner thermistor. Contact your dealer.
e - 2 Starting problems. Contact your dealer.
e - 5 Tipping-over protection. Re-ignite the heater.
e - 6 Poor burning. Contact your dealer.
e - 7 Room temperature If necessary,
above 32°C. re-ignite the heater.
e - 8 Defective booster. Contact your dealer.
e - 9 Air filter dirty; or Clean filter.
Fuel pump dirty. Contact your dealer.
The heater has been in operation
continuously for a period of 48 hours
and has turned itself off automatically. Switch the heater back on.
-- : --
+
Out of fuel. Refill removable tank.
-- : --
+
Too little ventilation. Ventilate better.
e - 1 1
+
Too little ventilation. Ventilate better.
Always contact your dealer for any malfunctioning not listed above.
AUTOMATIC DEACTIVATION
This heater is fitted with a safety system that ensures that it switches off
automatically after 48 hours continuous operation. The following will then appear
in the display: . If desired, you can switch the heater on again by pressing
the button
"
(see section D).
AUTOMATIC CLEANING MODE
When the heater has been burning continuously for two hours at its highest
setting, the burner will automatically start an autoclean procedure. The display
will show the autocleaningcode cl 05 running back to cl 01. The procedure takes 5
minutes, during which the heater will burn at its lowest setting, while the burner
autocleans. When the burner is clean again, the heater will automatically switch
back to the highest setting again.
I CHILDPROOF LOCK
The childproof lock can be used to prevent children accidentally changing the
heater settings. When the heater is burning and the childproof lock is on, the heater
can only be switched of
f. Other functions ar
e blocked then. If the heater has alr
eady
been switched off, the childproof lock also prevents accidental ignition of the
heater.
Activate the childproof lock by pressing the appropriate key # and holding it
down for mor
e than 3 seconds. The KEY
-LOCK indicator
will appear on the
information display (Fig. H), indicating that the childproof lock has been activated.
Switch off the childproof lock by pressing the key
# and holding it down for more
than 3 seconds once again.
4
68
H: When the mark
appears, the childproof
lock has been activated.
I
n case of any
malfunctioning the
information display will
tell you what is the
matter.
Page 10

☞
J THE CORRECT USE OF 'SAVE'
The 'SAVE' function allows you to limit the temperature. When this function is
activated, the heater will automatically switch off, when the room temperature exceeds
the set temperature by 3°C. Subsequently, when the room temperature has dropped
again to the set temperature, the heater will automatically switch on again.
Activate
t
he 'SAVE' setting by pressing the appropriate
! k
ey. The SAVE indicator light will
light up (Fig. I). Switch off the function by pressing the SAVE key once again.
Without the 'SAVE' setting your heater will maintain the set temperature by
approximation as well, by adjusting its heating capacity. 'SAVE' is an economy
setting, which you can use when, for instance, you are not present in the room
or to keep it frost-free.
K THE 'FUEL' INDICATOR
When the FUEL indicator appears, there is enough fuel left for another 10 minutes
of heater use. The count-down of the remaining heating time can be seen in the
information display " (Fig. J). Every two minutes an alarm signal is sounded,
warning you to refill the removable tank. If you do not react, the heater will
extinguish by itself. The heater will also sound a warning signal, when it switches
off. The FUEL indicator will blink, while four lines are blinking in the information
display. You can stop this by pressing the button
# once.
Once the heater has used up all its fuel and is extinguished it will take some time,
after the refill, before the heater is completely ready for use again.
L THE 'VENT' INDICATOR
When there is insufficient ventilation in the room, an intermittent buzzer will be
heard (approximately once each 30 seconds) and the VENT indicator will be lit. When
this signal is given, ensure that the ventilation of the room is improved (e.g. by
opening a door or window a little more), to avoid that the heater shuts off. When the
ventilation of the room is improved, the VENT indicator and buzzer will be
deactivated. When there is still insufficient ventilation, the heater shuts off
automatically. When this occurs,
e -1 1 is displayed and the VENT indicator is blinking.
After improving the ventilation of the room (e.g. by opening a door or window a little
more), the heater can be ignited by pushing the button # again.
M MAINTENANCE
Switch off the heater and let it cool down, before you start any maintenance
work. Also disconnect the plug from the mains. Your heater needs hardly any
maintenance. It is, however, important that you clean the vent filter $ with a
vacuum cleaner and the grid % with a damp cloth, both on a weekly basis.
Regularly inspect the fuel filter as well:
Remove the removable tank & from the heater and remove the fuel filter
(Fig. L). Some dr
ops may leak from the filter; keep a cloth at hand.
Remove the dirt by tapping the fuel filter upside-down against a hard surface.
(Never clean it with water!)
Reinstall the fuel filter into the heater.
321
4
69
L
Fuel filter
J: When the FUEL
indicator has appeard,
the infor
mation display
will show the number of
minutes of fuel left in
the tank.
K: A blinking VENT
indicator is a sign that
you need extra
ventilation.
I: When the SAVE light
lights up, the heater will
automatically switch on
or off in order to remain
within a specified
temperature range.
Page 11

☞
W
e recommend that you remove dust and stains from time to time with a damp
cloth, because otherwise these may cause stains that are hard to remove.
Do not remove any heater components yourself. Always contact your dealer for
repairs. When the power cord is damaged, it may only be replaced by an
a
uthorised fitter. Use a new cord of the type H05 VV-F.
N STORAGE (END OF THE HEATING SEASON)
At the end of the heating season, you must store the heater in a dust-free place, if
possible in its original packaging. Unused fuel cannot be used in the next heating
season. We therefore recommend that you burn up all fuel. If there is still some
fuel left, do not throw it away, but dispose of it in accordance with the local
regulations for the disposal of domestic chemical waste.
Always start the new heating season with fresh fuel. When you start re-using the
heater follow the instructions again
(starting from section A and as specified).
O TRANSPORTATION
Take the foll owi ng mea sures to avoi d f uel le aka ge during the tr ans por tation of
the heater:
Let the heater cool down.
Remove the removable tank
! from the heater and remove the fuel filter
(refer to Section M, Fig. L). Some drops may leak from the filter; keep a cloth
at hand. Store the fuel filter and the removable tank outside the heater
.
Place the transportation cap into the position of the fuel filter (Fig. M).
Press it tight.
Always move the heater in an upright position.
P SPECIFICA
TIONS
Ignition
electrical
Dimensions (mm)
width 334
Fuel
paraffin including base plate: depth 300
Capacity (kW) max. 2.70 height 415
Capacity (kW) min. 0.83 Accessories: - manual fuel pump
Suitable space (m3)
**
40-105 - transportation cap
Fuel consumption (l/hr)
*
0.281 Mains 230 V
-- AC / 50 Hz
Fuel consumption (g/hr)
*
225
Electrical consumption
:
Bur
ning time per tank (hr)
*
14.2
-
igniter
320 W
Capacity removable tank (litres) 4.0 - continuous 14 W
Weight (kg) 8.9 Fuse rating 250V, 5A
Monitoring of the quality of ventilation (air renewal):
Direct measurement of the CO
2
level (NDIR CO2-sensor E-Guard ").
* At maximum setting **
Specified values ar
e indicative
4
321
4
70
Transportation
cap
M
Page 12

150 cm
50 cm
20 cm
50 cm
Q WARRANTY PROVISIONS
Your h ea te r co me s with a 48 -m on th w arranty st ar ti ng o n the d at e of p ur chase.
Within this period all defects in material or workmanship will be repaired without
any charge. The following provisions shall apply regarding this warranty:
We expressly dismiss all other claims for damages, including consequential
d
amages.
Any repairs or replacements of components within the term of warranty will
not result in an extension of the term of warranty.
The warranty shall no longer apply, when the heater has been modified,
non-original parts have been used, or when it is repaired by third parties.
The warranty shall not apply to parts that are subject to normal wear, such as
the burner mat and the manual fuel pump.
The warranty shall only apply, when you present the original, dated proof of
purchase, provided no changes have been made to it.
The warranty shall not apply to damages caused by actions not in compliance
with the Directions for Use, neglect, and the use of an incorrect type of fuel,
or fuel past its use-by date. The use of incorrect fuel can even be dangerous*.
Transporta tio n c osts and the ris ks inv olved duri ng the tr ansportati on of the
heater or heater components shall always be at the expense of the purchaser.
In order to avoid unnecessary costs, we recommend that you always read the
’Directions for Use’ carefully first. In case they offer no solution, please take the
heater to your dealer for repair.
* Highly inflammable substances may induce uncontrollable burning, causing flames to break out. Should this
happen, never try to move the heater, but always switch off the heater immediately. In case of emergency you
may use a fire extinguisher, but only a type B extinguisher: a carbon dioxide or powder extinguisher.
10 TIPS FOR SAFE USE
1 Make sure that children are always aware of the presence of a bur
ning
heater.
2 Do not move the heater when it is bur
ning or still hot. Do not refill nor
service the heater when it is burning or still hot.
3 Position the front of the heater at a distance of minimum 1.5 metres
from walls, curtains, and furniture.
4 Do not use the heater in dusty r
ooms or places with str
ong draughts. In
either situation you will not have optimum bur
ning. Do not use the
heater in the immediate surrounding of a bath, a shower or a
swimmingpool.
5 Switch off the heater, before you leave or go to sleep. Unplug the
heater as well, when you go away for a longer period of time
(e.g. holidays).
6 Store and move fuel only in suitable tanks and jerrycans.
7 Make sur
e that the fuel is not exposed to heat or extreme temperature
changes. Always stor
e the fuel in a cool, dr
y and dark place (sunlight
will affect the quality).
8 Never use the heater in places wher
e harmful gasses or fumes may be
pr
esent (e.g. exhaust gasses or paint fumes).
9 Beware that the grid of the heater becomes hot. If the appliance is
covered there is a risk of fire.
10 Always make sure that there is sufficient ventilation.
Defective electrical devices and batteries must be kept separate from household
waste. Ensure that there is effective recycling where possible. Ask you local council
or dealer for exper
t advice on r
ecycling.
765
4
321
4
71
Page 13

R EXCHANGING THE FRONT PANEL
Create your own Zibro!
The Zibro SRE 25 E is supplied with an exchangeable stainless steel front panel.
Design your own front panel or select a modern design! www.zibro.com
4
72
1
2
3 4
5 6
Page 14

7
8
9 10
11 12
4
73
Page 15

!
"
#
$
%
&
'
(
)
*
+
,
-
.
/
0
1
2
3
Page 16

PVG Traffic avg©080306 man_SRE125E
New 3/08
Printed in Japan
7853001921
DISTRIBUTED IN EUROPE BY PVG INTERNATIONAL b.v.
i ÖSTERREICH
P
VG Austria VertriebsgmbH
Salaberg 49
3
350 HAAG
tel: +43 7434 44867
fax: +43 7434 44868
email: pvgaustria@zibro.com
e BELGIË
PVG Belgium NV/SA
Industrielaan 55
2
900 SCHOTEN
tel: +32 3 326 39 39
fax: +32 3 326 26 39
email: pvgbelgium@zibro.com
q SCHWEIZ
PVG Schweiz AG
Salinenstrasse 63
4133 PRATTELN
tel: +41 61 337 26 51
fax: +41 61 337 26 78
email: pvgint@zibro.com
2 DEUTSCHLAND
PVG Deutschland GmbH
Siemensstrasse 31
47533 KLEVE
tel: 0800 - 9427646
fax: +31 (0)412 648 385
email: pvgdeutschland@zibro.com
6 DANMARK
Appliance A/S
Blovstroed Teglvaerksvej 3
DK-3450 ALLEROED
tel: +45 70 205 701
fax: +45 70 208 701
email: appliance@appliance-group.com
5 ESPAÑA
PVG España S.A.
Pol. Ind. San José de Valderas II
Comunidad ”La Alameda”
C/ Aur
ora Boreal, 19
28918 LEGANÉS (Madrid)
tel: +34 91 611 31 13
fax: +34 91 612 73 04
email:
pvgspain@zibr
o.com
3 FRANCE
PVG France SARL
4, Rue Jean Sibélius
B.P. 185
76410 SOTTEVILLE SOUS LE VAL
tel:
+33 2 32 96 07 47
fax: +33 0 820 34 64 84
email: pvgfrance@zibro.com
SUOMI
Appliance Finland Oy
Piispantilankuja 6C
02240 ESPOO
tel:
+358 9 4390 030
fax: +358 9 4390 0320
email: appliance@appliance-group.com
FFIINN
4 UNITED KINGDOM
S
cott Brothers Ltd.
The Old Barn, Holly House Estate
C
ranage, Middlewich, CW10 9LT UK
tel.: +44 1606 837787
fax: +44 1606 837757
email: sales@scottmail.co.uk
> ITALIA
P
VG Italy SRL
Via Niccolò Copernico 5
50051 CASTELFIORENTINO (FI)
t
el: +39 571 628 500
fax: +39 571 628 504
email: pvgitaly@zibro.com
u NORGE
Appliance Norge AS
Vogellunden 31
1394 NESBRU
tel: +47 667 76 200
fax: +47 667 76 201
email: appliance@appliance-group.com
1 NEDERLAND
PVG International B.V.
P.O. Box 96
5340 AB OSS
tel: +31 412 694 694
fax: +31 412 622 893
email: pvgnl@zibro.com
9 PORTUGAL
Gardena, Lda
Recta da Granja do Marquês
ALGUEIRÃO
2725-596 MEM MARTINS
tel: + 35 21 92 28 530
fax: + 35 21 92 28 536
email: pvgint@zibro.com
: POLSKA
PVG Polska Sp. z. o. o.
ul. Kościelna 110
26-800 Bia
łobrzegi
tel: +48 48 613 00 70
fax:
+48 48 613 00 70
email: pvgpoland@zibro.com
= SVERIGE
Appliance Sweden AB
Sjögatan 6
25225 HELSINGBORG
tel: +46 42 287 830
fax:
+46 42 145 890
email: appliance@appliance-group.com
y SLOVENIJA
Monteko d.o.o.
Neubergerjeva 4
1000 Ljubljana
tel:
+386 (0)1 437 1273
fax: +386 (0)1 437 1273
email: info@zibro.si
TURKEY
PVG Is›tma Klima So¤utma Ltd.fiti.
T
epekule is merkezi
Anadolu Cad. No: 40 K:3 D:306
35010 BAYRAKLI/IZMIR
tel: + 90 232 461 51 01
fax:
+ 90 232 461 51 85
email: pvgturkey@zibro.com
TTRR
Page 17

SRE 25 E
3
2
6
5
4
>
u
1
=
FIN
MANUEL D'UTILISATION
GEBRAUCHSANWEISUNG
BRUGSANVISNING
INSTRUCCIONES DE USO
KÄYTTÖOHJE
OPERATING MANUAL
ISTRUZIONI D’USO
BRUKSANVISNING
GEBRUIKSAANWIJZING
BRUKSANVISNING
2
14
26
38
50
62
74
86
98
110
Page 18

! ! ! ! ! ! ! ! ! ! ! ! ! ! ! ! ! ! ! ! !
3
PAGE PLIANTE
2
FALTBLATT
6
FOLDEUDSIDE
5
HOJA DESPLEGABLE
5
AUKI TAITETTU SIVU
4
FOLD-OUT PAGE
>
PIEGHEVOLE
u
UTBRETTSIDE
1
UITVOUWBLAD
=
UTVIKNINGSSIDA
a
-
EMC
a
-
LV
FIN
Page 19

Sehr geehrte Kundin, sehr geehrter Kunde,
herzlichen Glückwunsch! Sie sind jetzt der stolze Besitzer eines transportablen
Kaminofens. Sie haben sich für ein Qualitätsprodukt entschieden, an dem Sie
noch viele Jahre Ihre Freude haben werden, vorausgesetzt, Sie benutzen den
Kaminofen verantwortungsvoll.
Lesen Sie deswegen zuerst diese Gebrauchsanweisung aufmerksam durch,
um so eine optimale Lebensdauer Ihres Kaminofens zu garantieren.
Im Namen des Herstellers bieten wir Ihnen 48 Monate Garantie auf alle
eventuell auftretende Material- und Herstellungsfehler.
Wir wünschen Ihnen viel Wärme und Komfort mit Ihrem Kaminofen.
Mit freundlichen Grüßen
PVG International b.v.
Abteilung Kundendienst
1 LESEN SIE ZUERST DIE GEBRAUCHSANWEISUNG.
2 WENDEN SIE SICH IM ZWEIFELSF
ALL AN IHREN HÄNDLER.
3 VOR DEM LESEN DER GEBRAUCHSANWEISUNG BITTE DAS LETZTE BLATT AUFFALTEN. ! ! ! !
2
14
Page 20

BENUTZUNG
KURZ ZUSAMMENGEFASST
Nachfolgend sind in groben Zügen die Schritte
angegeben, die zur Inbetriebnahme Ihres Kaminofens ausgeführt werden müssen. Detaillierte
Beschreibung der Handlungen entnehmen Sie bitte
der GEBRAUCHSANWEISUNG (Seite 17 ff).
• Das erste Mal wird Ihr Kaminofen während
des Brennens noch ‘neu’ riechen.
• Lager
n Sie den Br
ennstoff an einem kühlen,
dunklen Ort.
• Brennstoff altert. Beginnen Sie jede Heiz-
saison mit neuem Br
ennstoff.
• Wenn Sie Zibro Extra oder Zibro Kristal
benutzen, können Sie sich auf die Qualität
des Brennstoffs verlassen.
• Wenn Sie zwischen den einzelnen Sorten
wechseln, müssen Sie den Kaminofen erst
vollständig leer brennen lassen.
WICHTIGE EINZELTEILE
Frontplatte
Gitter
Bodenplatte
Deckel
Brennstofftank
Bedienungsfeld
Brennstofftank
Brennstoffanzeige
Br
ennstofftank
Ventilatorfilter
Thermostat
Stecker + Kabel
InformationsDisplay
-Taste
Kindersicherung
Einstelltasten (Zeit
und Temperatur)
Zeitschaltuhr
An/Aus-Lampe
Zeitschaltuhrlampe
Überwachungssystem für Luftqualität
SAVE-Taste
!
"
#
$
%
&
'
(
)
*
+
,
-
.
/
0
1
2
3
! ! ! ! ! ! ! ! ! ! ! ! ! ! ! ! ! ! ! ! ! ! !
Entfernen Sie das gesamte Verpackungsmaterial
(
siehe Kapitel A, Abb. A).
Befüllen Sie den Brennstofftank 4 (siehe Kapitel B, Abb. C).
Stecken Sie den Stecker in die Steckdose.
Starten Sie den Kaminofen über die -Taste
,
(siehe Kapitel D).
Verändern Sie wenn nötig die gewünschte Temperatur
über die Einstelltasten (siehe Kapitel E).
Schalten Sie den Kaminofen über die -Taste , aus.
1
2
3
4
5
6
2
15
Page 21

Diesen Transport-
verschluß finden Sie im
Verpackungskarton. Nur
hiermit kann der
Kaminofen nach
Benutzung problemlos
transportiert werden.
Bewahren Sie den
Verschluß also gut auf!
WICHTIG ZU WISSEN
JEDERZEIT AUSREICHEND VENTILIEREN
Dieses Heizgerät ist mit einem System zur Kontrolle der Luftbeschaffenheit 2
ausgerüstet. Wird der Raum unzureichend belüftet oder das Heizgerät in einem zu
kleinen Raum eingesetzt, schaltet sich das Heizgerät automatisch ab. Um eine
komfortable und sichere Beheizung zu erreichen, sorgen Sie für eine ausreichende
Belüftung.
Hinweis: Um ein unerwartetes Abschalten zu vermeiden, empfehlen wir, eine Tür
oder ein Fenster einen Spalt offen stehen zu lassen, wenn das Heizgerät in Betrieb ist.
Jedes Modell benötigt eine bestimmte minimale Raumgröße, um den
Kaminofen
sicher, ohne zusätzliche Ventilation, betreiben zu können
(siehe Kapitel O).
Wenn der
betreffende Raum kleiner als der angegebene Minimumwert ist, dann muß dafür
gesorgt werden, daß immer ein Fenster oder eine Tür einen Spalt breit offen
bleibt (ca. 2,5 cm). Dies ist ebenfalls empfehlenswert bei Räumen, die stark isoliert
sind oder zugfrei gemacht wurden und/oder über 1500 m liegen. Benutzen Sie
den Kaminofen nicht in Keller
- oder anderen unterirdisch gelegenen Räumen.
DER RICHTIGE BRENNSTOFF
Ihr Kaminofen wurde für die Benutzung von wasserfreiem, sauberem Petroleum
hoher Qualität, wie Zibro Extra oder Zibro Kristal, entwickelt. Nur dieser
Brennstoff sorgt für eine saubere und optimale Verbrennung. Brennstoff
geringer
er Qualität kann zu folgenden Problemen führen:
! erhöhte Störungsanfälligkeit
! unvollständige Verbrennung
! verkürzte Lebensdauer des Kaminofens
! Rauch und/oder Geruch
! Niederschlag auf dem Gitter oder Gehäuse
Der richtige Brennstoff ist also wichtig für einen sicheren, effizienten und
komfortablen Gebrauch Ihres Kaminofens.
Informieren Sie sich bei Ihrem Händler in Ihrer direkten Umgebung über den
richtigen Brennstoff für Ihren Kaminofen.
Nur mit dem richtigen
Brennstoff ist eine
sichere, effiziente und
komfortable Benutzung
Ihres Kaminofens
gewährleistet.
2
16
A
Page 22

GEBRAUCHSANWEISUNG
A DIE INSTALLATION DES KAMINOFENS
Nehmen Sie den Kaminofen vorsichtig aus dem Karton und kontrollieren Sie
den Inhalt auf Vollständigkeit.
Außer dem Kaminofen muß folgendes vorhanden sein:
! eine Syphonpumpe
! ein Transportverschluß
! diese Gebrauchsanweisung
Bewahren Sie den Karton und das Verpackungsmaterial (Abb. A) zwecks
Lagerung und/oder Transport auf.
Öffnen Sie den Deckel des Brennstofftanks
$ und entfernen Sie das
Stückchen Karton.
Befüllen Sie den Brennstofftank wie in Kapitel B beschrieben.
Der Boden muß stabil und waagrecht sein. Stellen Sie den Kamin an eine
andere Stelle, falls er nicht waagrecht steht. Versuchen Sie nicht durch
Unterlage von Büchern oder ähnlichem den Stand zu korrigieren.
Stecken Sie den Stecker * in die Steckdose (230 Volt - AC/50 Hz) und
stellen Sie die aktuelle Uhr
zeit über die Einstelltasten
. ein (siehe Kapitel C).
Ihr Kaminofen ist jetzt betriebsbereit.
B DAS BEFÜLLEN MIT BRENNSTOFF
Füllen Sie den Brennstofftank nicht im Wohnraum, sondern an einer dazu
geeigneten Stelle (falls etwas verschüttet wird). Gehen Sie wie folgt vor:
Der Kaminofen sollte ausgeschaltet sein.
Öffnen Sie den Deckel
$ und ziehen Sie den Brennstofftank 4 aus dem
Kaminofen (Abb. B). Achtung: der Tank kann kurz nachtropfen. Stellen Sie
den Brennstofftank ab (mit dem Tankverschluß nach oben) und drehen Sie
den Tankverschluß auf.
Den glatten, steifen Schlauch der Syphonpumpe in den Kanister stecken.
Dabei ist darauf zu achten, daß der Kanister höher steht als der
Brennstofftank (Abb. C). Den geriffelten Schlauch stecken Sie dann in die
Öffnung des Brennstofftanks.
Den Knopf oben auf der Pumpe zudrehen (nach rechts).
Einige Male die Pumpe drücken, bis der Brennstoff in den Brennstofftank
fließt. Sobald dies der Fall ist, brauchen Sie nicht mehr zu drücken.
Achten Sie während des Füllvorgangs auf die Brennstoffanzeige des
Br
ennstof
ftanks
' (Abb. D). W
enn Sie sehen, daß der T
ank fast voll ist, stellen
Sie den Füllvor
gang ein. Hier
zu dr
ehen Sie den Knopf oben auf der Pumpe
wieder auf (nach links). Den Tank niemals zu voll füllen. Vor allem nicht, wenn
der Br
ennstof
f sehr kalt ist (Br
ennstof
f dehnt sich aus, wenn er wär
mer wir
d).
654
3
2
1
6
5
4
3
2
1
2
17
! ! ! ! ! !
C
D
leer voll
B
Page 23

Lassen Sie den Brennstoff, der sich noch in der Pumpe befindet, in den
Kanister zurückströmen und entfernen Sie die Pumpe vorsichtig. Schrauben
Sie den Tankverschluß wieder sorgfältig auf den Tank. Wischen Sie eventuell
verschütteten Brennstoff weg.
Kontrollieren Sie, ob der Tankverschluß gerade sitzt und fest angezogen ist.
Setzen Sie den Brennstofftank wieder in den Kaminofen ein (Tankverschluß
nach unten). Schließen Sie den Deckel.
C DAS EINSTELLEN DER UHR
Die Zeiteinstellung können Sie nur vornehmen, wenn der Kaminofen nicht in
Betrieb ist, der Stecker sich jedoch in der Steckdose befindet. Sie benutzen dazu
die Einstelltasten .. Drücken Sie zuerst auf eine der beiden Tasten um die
Funktion zu aktivieren (die 4-Stellige Zahl + im Informations-Display blinkt.).
Danach können Sie die Stunden mit der linken Taste (
hour) einstellen und die
Minuten mit der rechten Taste ( min.). Durch einmaliges Drücken der Taste wird
der W
ert stufenweise erhöht. Wenn Sie die Taste gedrückt halten, erhöht sich der
Wert, bis die Taste losgelassen wird. Nach ungefähr 10 Sekunden leuchtet die die 4Stellige Zahl und die Einstellung ist vorgenommen. 5 Minuten nachdem der Ofen
ausgeschaltet worden ist, wird die Information auf dem Display gelöscht und der
Ofen wird in den Standby-Modus umgeschaltet. Nachdem auf eine willkürliche
Taste gedrückt worden ist, erscheint wieder die Uhrzeit auf dem Display.
Wenn der Stecker aus der Steckdose gezogen wurde (oder bei Stromausfall) muß
die Zeit erneut eingestellt werden.
D DAS STARTEN DES KAMINOFENS
Ein neuer Ofen verursacht zu Beginn etwas Geruch. Sorgen Sie deswegen für
zusätzliche Ventilation. Starten Sie den kamin ofen immer mit die -Taste
,.
Niemals Streichhölzer oder ein Feuerzeug benutzen.
Um den Kaminofen zu starten, brauchen Sie nur die -Taste
, zu betätigen.
Die An/Aus-Lampe
0 blinkt dann, um zu zeigen, daß der Zündvorgang läuft. Es
dauert einige Zeit bis der Vorgang abgeschlossen ist. Anschließend leuchtet die
An/Aus-Lampe
0 ständig.
Das Informations-Display + zeigt zwei Zahlen an. An den Kontroll-Lampen
neben den Zahlen können Sie sehen, daß sich diese auf die Temperatur beziehen
(Abb. F). Unter ROOM steht die tatsächliche Raumtemperatur, während unter
SET die von Ihnen eingestellte T
emperatur angezeigt wir
d. Letztere können Sie
über die Einstelltasten verändern (siehe Kapitel E).
Kontrollieren Sie vor dem Starten des Kaminofens immer ob sich noch genügend
Brennstoff im Brennstofftank befindet.
E TEMPERATUREINSTELLUNG
Sie können die eingestellte Temperatur nur verändern, wenn der Kaminofen
eingeschaltet ist. Hierzu benutzen Sie die Einstelltasten .. Drücken Sie zuerst auf
eine der beiden T
asten um die Funktion zu aktivieren (die °C und die 4 Zahlen
+
blinken). Danach können Sie die Temperatur mit der rechten Taste ( min.) höher
und mit der linken T
aste (
hour) niedriger einstellen. Nach ungefähr 10 Sekunen
blinkt die 4-Stellige Zahl nicht mehr
,die Einstellung ist abgeschlossen (Abb. F).
Sie können die Temperatur auf minimal 6°C und maximal 28°C einstellen.
W
enn der Stecker aus der Steckdose gezogen wur
de (oder bei Str
omausfall) ist die
eingestellte Temperatur wieder auf dem Standardwert von 20°C.
8
7
2
18
F: Links die eingestellte
Temperatur, rechts die
tatsächliche Temperatur.
E: Wenn die 4-Stellige
Zahl nicht mehr blinkt,
sind die Einstellungen
gespeichert.
☞
Page 24

F DIE BENUTZUNG DER ZEITSCHALTUHR (TIMER)
Mit Hilfe der Zeitschaltuhr kann der Kaminofen zu einem vorprogrammierten
Zeitpunkt automatisch eingeschaltet werden.
Um die Zeitschaltuhr programmieren zu können, muß die aktuelle Uhrzeit
eingestellt
(siehe Kapitel C) und der Kaminofen ausgeschaltet sein.
Sie gehen wie folgt vor:
Die -Taste
, betätigen und direkt danach die TIMER Taste / drücken.
Die Zeitschaltuhrlampe 1 und die 4-Stellige Zahl + blinken.
Stellen Sie die Startzeit für den Kaminofen über die Einstelltasten . ein.
Die linke Taste ( hour) ist für die Stunden, die rechte Taste ( min.)
für die Einstellung der Minuten (Die Zeit lässt sich in 5 Minuten-Intervallen
einstellen).
Nach ungefähr 10 Sekunden zeigen die 4 Zahlen CLOCK an, und die
Zeitschaltuhrlampe 1 zeigt an, daß die Zeitschaltuhr aktiviert wurde (Abb. G).
Die Zeitschaltuhr sorgt dafür, daß der Raum zur programmierten Zeit die
gewünschte Temperatur annähernd erreicht hat.
Wenn Sie den Kaminofen ausschalten möchten und ihn über die Zeitschaltuhr
wieder einschalten lassen wollen, dann brauchen Sie nur die Taste TIMER zu
betätigen
(siehe Kapitel G).
Um die Einstellung der Zeitschaltuhr rückgängig zu machen, betätigen Sie einmal
die -Taste ,.
G DAS AUSSCHALTEN DES KAMINOFENS
Der Kaminofen kann auf zwei Arten ausgeschaltet werden:
Die -Taste
, betätigen. Das Informations-Display springt auf CLOCK
und innerhalb ca. einer Minute ist die Flamme gelöscht.
Wenn Sie den Kaminofen ausschalten möchten und ihn das nächste Mal über
die Zeitschaltuhr wieder starten wollen, dann betätigen Sie die
Taste TIMER /. Dadurch wird der Kaminofen ausgeschaltet und gleichzeitig
die Zeitschaltuhr aktiviert. Sie können die gewünschte Zeit über die
Einstelltasten . verändern(siehe Kapitel F).
H DIE FUNKTION DES INFORMATIONS-DISPLAYS
Das Informations-Display + zeigt nicht nur die (eingestellte) Zeit und Temperatur
an (Kapitel C, E und F), sondern meldet Ihnen auch eventuelle Störungen.
Über den jeweiligen Code auf dem Display erhalten Sie die notwendigen
Informationen:
CODE
INFORMATION AUSZUFÜHRENDE HANDLUNG
e - 0 Temperatur innerhalb des Ofens Abkühlen und neu starten
zu hoch
f - 0 Netzspannung war unterbr
ochen
Kaminofen neu star
ten
e - 1 Thermostat defekt Händler informieren
f - 1 Br
enner
-Ther
mistor defekt
Händler infor
mier
en
e - 2 Startprobleme Händler informieren
2
1
4
3
2
1
2
19
G: Die Kontroll-Lampe
TIMER zeigt an, daß die
Zeitschaltuhr aktiviert ist.
☞
Störungen werden im
Informations-Display
angezeigt.
Page 25

e
- 5
Kipp-Sicherung Kaminofen neu starten
e - 6 Schlechte Verbrennung Händler informieren
e - 7 Zimmertemperatur Wenn nötig Kaminofen
höher als 32°C neu starten
e - 8 Gebläsemotor defekt Händler informieren
e - 9 Luftfilter verschmutzt, oder Filter reinigen
Brennstoffpumpe verschmutzt Händler informieren
Der Ofen war 48 Stunden ohne Unterbrechung in Betrieb und wurde
deshalb automatisch abgeschaltet. Den Ofen erneut starten
-- : --
+
Kein Brennstoff Brennstofftank füllen
-- : --
+
Zu wenig Ventilation Besser ventilieren
e - 1 1
+
Zu wenig Ventilation Besser ventilieren
Bei Störungen, die nicht in dieser Tabelle aufgelistet sind, wenden Sie sich bitte an
Ihren Händler.
AUTOMA
TISCHE ABSCHALTUNG
Der Ofen ist mit einem Sicherheitssystem ausgestattet, das für eine automatische
Abschaltung des Ofens sorgt, wenn dieser 48 Stunden ohne Unterbrechung in
Betrieb war. Im Display erscheint folgende Anzeige:
.
Wenn Sie den Ofen wieder in Betrieb nehmen möchten, drücken Sie die
-
Taste
,. (siehe dazu Kapitel D).
AUTOMATIC CLEANING MODE (AUTOMATISCHES REINIGUNGSSYSTEM)
Wenn der Ofen 2 Stunden ununterbrochen auf der höchsten Stufe gebrannt hat,
wird der Brenner sich automatisch reinigen. Auf der Anzeige wird dies mit dem
Code cl 05, zurückzählend bis cl 01 angegeben. 5 Minuten lang brennt der Ofen
auf niedrigster Stufe, während der Brenner sich in diese Zeit selbst reinigt. Nach
der Reinigung schaltet der Ofen wieder auf die höchste Stufe.
I KINDERSICHERUNG
Die Kindersicherung können Sie benutzen, um zu verhindern, daß ein Kind
versehentlich die Einstellung des Kaminofens verändert. Während des Brennens
kann der Kaminofen dann nur noch ausgeschaltet werden. Wenn der Kaminofen
bereits ausgeschaltet ist, verhindert die aktivierte Kindersicherung auch, daß der
Ofen versehentlich eingeschaltet wird.Sie aktivieren die Kindersicherung dadurch,
daß Sie die betreffende Taste - länger als 3 Sekunden gedrückt halten. Die
Kontr
oll-Lampe KEY
-LOCK leuchtet auf (Abb.H) um anzuzeigen daß die
Kindersicherung eingeschaltet ist. Um diese wieder auszuschalten, drücken Sie
erneut länger als 3 Sekunden auf die Taste KEY-LOCK.
J DIE RICHTIGE BENUTZUNG DER "SAVE" FUNKTION
Mit der "SAVE"-Funktion können Sie die Temperatur begrenzen. Wenn diese
Funktion eingeschaltet ist, wird sich der Kaminofen automatisch ausschalten,
wenn die Zimmertemperatur 3°C über der eingestellten Temperatur liegt. Fällt die
Zimmer
temperatur danach wieder auf die eingestellte Temperatur, schaltet sich
der Kaminofen wieder automatisch ein.
Sie aktivieren die Einstellung "SA
VE" dur
ch Betätigung der betr
effenden Taste
3
.
Die Kontr
oll-Lampe SA
VE leuchtet auf (Abb. I). Dur
ch nochmaliges Betätigen der
Taste SAVE schalten Sie die Funktion wieder aus.
2
20
H: Wenn die Anzeige
auf dem
Infor
mations-
Display erscheint ist die
Kindersicher
ung
eingeschaltet.
I: Wenn die Kontroll-
Lampe SAVE aufleuchtet,
schaltet sich der Kamin-
ofen automatisch an und
aus, um innerhalb eines
bestimmten Temperatur-
bereiches zu bleiben.
Page 26

☞
Auch ohne die Einstellung "SAVE" sorgt Ihr Kaminofen dafür, daß die
eingestellte Temperatur annähernd beibehalten wird, und zwar durch
Anpassung der Heizkapazität.
"SAVE" ist eine Einstellung, die Sie zum Beispiel benutzen können, wenn Sie
nicht im Raum anwesend sind oder um den Raum frostfrei zu halten.
K D
IE BRENNSTOFF-ANZEIGE
Wenn die Kontroll-Lampe FUEL aufleuchtet, haben Sie noch für 10 Minuten
Brennstoff. Die restliche Brenndauer wird im Informations-Display
+ angezeigt
(Abb. J). Alle zwei Minuten hören Sie außerdem ein akustisches Warnsignal, zum
Zeichen, daß der Brennstofftank nachgefüllt werden muß.
Reagieren Sie nicht, dann geht der Kaminofen von selbst aus. Auch dann ertönt
ein Warnsignal. Die FUEL-Anzeige leuchtet auf, und im Informations-Display
blinken 4 Striche. Sie können dies ausschalten, indem Sie einmal auf die
-Taste
, drücken.
Wenn der Kaminofen vollständig leer gebrannt ist, müssen Sie nach dem Nachfüllen einige Sekunden warten, bevor der Kaminofen wieder betriebsbereit ist.
L DIE KONTROLL-LAMPE VENT
Bei unzureichender Belüftung im Raum ertönt ein unterbrochener Summton
(einmal alle 30 Sekunden etwa) und die Anzeigeleuchte VENT leuchtet. Wird dieses
Signal gegeben, sollten Sie für eine bessere Belüftung des Raums sorgen(z. B. indem
Sie eine Tür oder ein Fenster etwas weiter öffnen), um ein Ausschalten des
Heizgeräts zu vermeiden. Wird der Raum besser belüftet, werden die
Anzeigeleuchte VENT und der Summton deaktiviert. Ist die Belüftung immer noch
unzureichend, schaltet sich das Heizgerät automatisch ab. In diesem Fall wird
e -1 1
angezeigt und die Anzeigeleuchte VENT blinkt. Wenn für eine bessere Belüftung
des Raums gesorgt worden ist (z. B. indem Sie eine Tür oder ein Fenster etwas weiter
öffnen), kann das Heizgerät wieder eingeschaltet werden mit -Taste ,.
M WARTUNG
Bevor Sie Wartungsarbeiten ausführen, muß der Kaminofen ausgeschaltet und
abgekühlt sein. Ziehen Sie den Stecker aus der Steckdose.
Ihr Kaminofen benötigt kaum Wartung. Wöchentlich sollten jedoch der
Ventilatorfilter
5 mit einem Staubsauger und das Gitter 6 mit einem feuchten
Tuch gereinigt werden.
Kontrollieren Sie regelmäßig den Brennstofffilter:
Nehmen Sie den Brennstofftank
4 aus dem Kaminofen und entfernen Sie den
Brennstofffilter (Abb. L). Dieser kann etwas nachtropfen- halten Sie ein Tuch bereit.
Klopfen Sie den umgedrehten Brennstofffilter auf einem harten Untergrund
aus,
um so den Schmutz zu entfer
nen.
(Niemals mit W
asser r
einigen!)
Setzen Sie den Brennstofffilter wieder ein.
Entfernen Sie selbst keine Teile aus dem Kaminofen. Wenden Sie sich bezüglich
einer eventuellen Reparatur immer an Ihren Händler.
Wenn das Stromkabel beschädigt ist, darf nur ein anerkannter ElektroInstallateur das Kabel mit einem Typ H05 VV-F austauschen.
N LAGERUNG (ENDE DER HEIZSAISON)
Wir empfehlen Ihnen, den Kaminofen am Ende jeder Heizsaison vollständig leer
br
ennen zu lassen und staubfr
ei zu lager
n, vor
zugsweise in der Originalverpackung.
Übrig gebliebenen Br
ennstof
f sollten Sie in der nächsten Heizsaison nicht mehr
benutzen. Verbrauchen Sie diesen also. Falls doch etwas übrig bleibt, schütten Sie
diesen nicht weg, sonder
n entsor
gen Sie ihn laut den ör
tlichen V
orschriften für
chemischen Kleinabfall.
3
2
1
2
21
L
Brennstofffilter
☞
K: Wenn die VENT
–Anzeige blinkt, ist dies
ein Zeichen daß der
Raum unzureichend
ventiliert wird.
J: Wenn die FUEL-
A
nzeige aufleuchtet
sehen Sie im
Informations-Display für
wieviel Minuten Sie noch
Brennstoff haben.
Page 27

Beginnen Sie jede neue Heizsaison auf jeden Fall mit neuem Brennstoff. Beachten
Sie wieder diese Gebrauchsanweisung
(wie beschrieben ab Kapitel A), wenn Sie
den Kaminofen erneut in Betrieb nehmen.
O T
RANSPORT
Um zu verhindern, daß der Kaminofen während des Transportes Brennstoff
verliert, müssen folgende Maßnahmen getroffen werden:
Lassen Sie den Kaminofen abkühlen.
Nehmen Sie den Brennstofftank
4 aus dem Kaminofen und entfernen Sie den
Brennstofffilter
(siehe Kapitel M, Abb. L). Dieser kann eventuell etwas
nachtropfen; halten Sie ein Tuch bereit. Den Brennstofffilter und den
Brennstofftank außerhalb des Kaminofens aufbewahren.
Setzen Sie den Transportverschluß anstelle des Brennstofffilters ein (Abb. M)
und drücken Sie ihn fest, so daß kein Br
ennstoff austritt.
Den Kaminofen immer aufrecht transportieren.
P TECHNISCHE DATEN
Zündung Elektrisch Abmessungen
einschließ-
Breite 334
Brennstoff Petroleum
lich Bodenplatte
(mm) Tiefe 300
Kapazität (kW) max. 2,70 Höhe 415
Kapazität (kW) min. 0,83 Zubehör: Brennstofpumpe
Geeigneter Raum (m
3)**
40-105 Transportverschluß
Brennstoffverbrauch (Ltr/Std)*0,281 Netzspannung 230 V
-- AC / 50 Hz
Brennstoffverbrauch (g/Std)
*
225 Stromverbrauch:
Brenndauer pro Tank (Std)
*
14,2 - Zündung 320 W
Inhalt Brennstofftank (Liter) 4,0 - Im Dauerbetrieb 14 W
Gewicht (kg) 8,9 Sicherungen 250V, 5A
Überwachung der Belüftungsqualität (Luftaustausch):
Direktmessung des CO2-Werts (NDIR-CO2-Sensor E-Guard 2).
*
Bei Einstellung auf maximalem Stand ** Angegebene Werte sind Richtwerte
Q GARANTIEBEDINGUNGEN
Sie erhalten auf Ihren Kaminofen 48 Monate Garantie ab Kaufdatum. Innerhalb
dieser Zeit werden alle Material- und Herstellungsfehler kostenlos behoben.
Hierbei gelten folgende Regeln:
Alle weiteren Ansprüche auf Schadenersatz, inklusiv Folgeschäden, werden
nicht anerkannt.
Reparatur oder Austausch von T
eilen inner
halb der Garantiezeit führ
t nicht
zur V
erlänger
ung der Garantie.
Die Garantie ver
fällt, wenn V
eränder
ungen angebracht wur
den, NichtOriginal Teile montiert oder Reparaturen durch Dritte am Kaminofen
ausgeführt wurden.
3
2
1
4
3
2
1
2
22
Transportverschluß
M
Page 28

Teile, die normal em Versch lei ß ausge setzt s ind, wi e die B ren nermatte und die
Syphonpumpe, fallen nicht unter die Garantie.
Die Garantie gilt ausschließlich unter Vorlage der datierten Originalrechnung,
auf der keine Veränderungen vorgenommen wurden.
Die Garantie gilt nicht bei Schäden, die durch zweckwidrige Handlungen
entstanden sind, beziehungsweise durch Verwahrlosung und durch die
Benutzung von falschem oder veraltetem Brennstoff. Falscher Brennstoff
kann sogar gefährlich sein.*
Die Versandkosten und das Versandrisiko des Kaminofens, oder dessen Teile,
gehen zu allen Zeiten zu Lasten des Käufers.
Um unnötige Kosten zu vermeiden, empfehlen wir Ihnen, immer zuerst sorgfältig
die Gebrauchsanweisung zu lesen. Finden Sie darin keine Lösung, geben Sie den
Kaminofen Ihrem Händler zur Reparatur.
*
Leicht entzündliche Stoffe können zum Beispiel zu unkontrollierbarer Verbrennung führen, die ausschlagende
F
lammen zur Folge haben. Versuchen Sie in diesem Fall nie, den Kaminofen zu transportieren, sondern schalten
Sie den Kaminofen unverzüglich aus. In Notfällen können Sie einen Feuerlöscher benutzen, jedoch aus-
s
chließlich einen Kohlendioxid- oder Pulver-Feuerlöscher.
10 TIPS ZUR SICHERHEIT
1 Machen Sie Kinder immer auf die Anwesenheit eines brennenden Ofens
aufmerksam.
2 Transportieren Sie den Ofen nicht, wenn er brennt oder noch heiß ist. In
diesem Fall auch keine Wartungsarbeiten durchführen.
3 Stellen Sie den Kaminofen so auf, daß er sich mit der Vorderseite
minimal 1,5 Meter von Mauern, Gardinen und Möbeln befindet. Achten
Sie ebenfalls darauf, daß der Raum über dem Kaminofen frei ist.
4 Benutzen Sie den Kaminofen nicht in staubigen Räumen und nicht an
Stellen, an denen es stark zieht. In beiden Fällen erhalten Sie keine
optimale Verbrennung. Benutzen Sie den Kaminofen nicht in
unmittelbarer Umgebung einer Badewanne, Dusche oder eines
Swimmingpools.
5 Schalten Sie den Kaminofen aus, bevor Sie das Haus verlassen oder zu
Bett gehen. Bei länger
er Abwesenheit (z.B. Urlaub) den Stecker
aus der Steckdose ziehen.
6 Lagern und transportieren Sie den Brennstoff ausschließlich in den
dazu bestimmten Tanks und Kanistern.
7 Achten Sie darauf, daß der Br
ennstoff nicht Hitze oder extremen
Temperaturunt ers chieden ausgeset zt wird. Lagern Sie de n B rennstoff
immer an einem kühlen, trockenen und dunklen Ort (Sonnenlicht
schadet der Qualität)
8 Benutzen Sie den Kaminofen niemals an Stellen, an denen schädliche
Gase oder Dämpfe auftreten könnten (zum Beispiel Auspuffgase oder
Farbdämpfe).
9 Das Gitter des Kaminofens wird heiß. Der Kaminofen darf nicht
abgedeckt werden (Brandgefahr).
10 Achten Sie immer auf ausreichende Ventilation.
Defekte elektrische Geräte und Batterien gehör
en nicht in den Hausmüll. Bitte
entsorgen Sie den örtlichen Vorschriften gemäß. Erkundigen Sie sich eventuell bei
der Behör
de oder bei Ihr
em Fachhändler
.
765
4
2
23
150 cm
50 cm
20 cm
50 cm
Page 29

2
24
R AUSWECHSELN DER VORDEREN VERKLEIDUNG
Entwerfen Sie Ihren eigenen Zibro!
Der Zibro SRE 25 E wird mit einer auswechselbaren vorderen Verkleidung aus
Edelstahl geliefert. Sie können jetzt Ihre eigene vordere Verkleidung entwerfen
oder ein modernes Design wählen! www.zibro.com
1
2
3 4
5 6
Page 30

2
25
7
8
9 10
11 12
Page 31
!
"
#
$
%
&
'
(
)
*
+
,
-
.
/
0
1
2
3
Page 32

PVG Traffic avg©080306 man_SRE125E
New 3/08
Printed in Japan
7853001921
DISTRIBUTED IN EUROPE BY PVG INTERNATIONAL b.v.
i ÖSTERREICH
P
VG Austria VertriebsgmbH
Salaberg 49
3
350 HAAG
tel: +43 7434 44867
fax: +43 7434 44868
email: pvgaustria@zibro.com
e BELGIË
PVG Belgium NV/SA
Industrielaan 55
2
900 SCHOTEN
tel: +32 3 326 39 39
fax: +32 3 326 26 39
email: pvgbelgium@zibro.com
q SCHWEIZ
PVG Schweiz AG
Salinenstrasse 63
4133 PRATTELN
tel: +41 61 337 26 51
fax: +41 61 337 26 78
email: pvgint@zibro.com
2 DEUTSCHLAND
PVG Deutschland GmbH
Siemensstrasse 31
47533 KLEVE
tel: 0800 - 9427646
fax: +31 (0)412 648 385
email: pvgdeutschland@zibro.com
6 DANMARK
Appliance A/S
Blovstroed Teglvaerksvej 3
DK-3450 ALLEROED
tel: +45 70 205 701
fax: +45 70 208 701
email: appliance@appliance-group.com
5 ESPAÑA
PVG España S.A.
Pol. Ind. San José de Valderas II
Comunidad ”La Alameda”
C/ Aur
ora Boreal, 19
28918 LEGANÉS (Madrid)
tel: +34 91 611 31 13
fax: +34 91 612 73 04
email:
pvgspain@zibr
o.com
3 FRANCE
PVG France SARL
4, Rue Jean Sibélius
B.P. 185
76410 SOTTEVILLE SOUS LE VAL
tel:
+33 2 32 96 07 47
fax: +33 0 820 34 64 84
email: pvgfrance@zibro.com
SUOMI
Appliance Finland Oy
Piispantilankuja 6C
02240 ESPOO
tel:
+358 9 4390 030
fax: +358 9 4390 0320
email: appliance@appliance-group.com
FFIINN
4 UNITED KINGDOM
S
cott Brothers Ltd.
The Old Barn, Holly House Estate
C
ranage, Middlewich, CW10 9LT UK
tel.: +44 1606 837787
fax: +44 1606 837757
email: sales@scottmail.co.uk
> ITALIA
P
VG Italy SRL
Via Niccolò Copernico 5
50051 CASTELFIORENTINO (FI)
t
el: +39 571 628 500
fax: +39 571 628 504
email: pvgitaly@zibro.com
u NORGE
Appliance Norge AS
Vogellunden 31
1394 NESBRU
tel: +47 667 76 200
fax: +47 667 76 201
email: appliance@appliance-group.com
1 NEDERLAND
PVG International B.V.
P.O. Box 96
5340 AB OSS
tel: +31 412 694 694
fax: +31 412 622 893
email: pvgnl@zibro.com
9 PORTUGAL
Gardena, Lda
Recta da Granja do Marquês
ALGUEIRÃO
2725-596 MEM MARTINS
tel: + 35 21 92 28 530
fax: + 35 21 92 28 536
email: pvgint@zibro.com
: POLSKA
PVG Polska Sp. z. o. o.
ul. Kościelna 110
26-800 Bia
łobrzegi
tel: +48 48 613 00 70
fax:
+48 48 613 00 70
email: pvgpoland@zibro.com
= SVERIGE
Appliance Sweden AB
Sjögatan 6
25225 HELSINGBORG
tel: +46 42 287 830
fax:
+46 42 145 890
email: appliance@appliance-group.com
y SLOVENIJA
Monteko d.o.o.
Neubergerjeva 4
1000 Ljubljana
tel:
+386 (0)1 437 1273
fax: +386 (0)1 437 1273
email: info@zibro.si
TURKEY
PVG Is›tma Klima So¤utma Ltd.fiti.
T
epekule is merkezi
Anadolu Cad. No: 40 K:3 D:306
35010 BAYRAKLI/IZMIR
tel: + 90 232 461 51 01
fax:
+ 90 232 461 51 85
email: pvgturkey@zibro.com
TTRR
 Loading...