


Triple IR Flame Detectors FV400
CENTRE OF DETECTOR
FIELD OF VIEW
PREFERRED METHOD
FV400 Series Triple IR Flame Detectors-
Fixing Instructions
Introduction
This guide describes the installation procedure
of the FV400 Series of detectors and covers all
three flameproof variants: FV411f, FV412f and
FV413f.
The installation procedure gives a step-by-step
process of how to mount, wire, configure and
commission the detectors.
Reference Document
Refer to the FV400 Series Product Information and Design Application guide for
information on the Technical, Mechanical, Electrical and Environmental specifications.
Mounting a Detector
The location of each detector is determined at
the system design stage according to the principles detailed in the FV400 Series Product Information and Design Application guide and marked
on the site plan.
Check that the position chosen provides:
A clear view of the area to be protected.
Easy access to install and maintain the detec-
tor and cables.
A strong, stable structure suitable to mount
the detector.
CAUTION
Do not open the detector when it is
powered; in hazardous areas or
environmentally challenging conditions.
Tilt the face of the detector downwards to prevent water collection and reduce the settlement
of particle deposits on the window.
On the FV400 Series of detectors, all electrical
connections are made via terminal blocks inside
the rear housing of the detector. Two 20 mm
cable entries are provided.
Detectors must be securely mounted to a strong
stable structure either directly or using the
mounting bracket.
Mounting the detector directly
Fit the back-box of the detector onto the wall
by inserting the three M6 bolts, studs or
screws into the mounting holes.
Fig. 1: Detector Orientation Relative to Horizon
Mounting the detector using the
bracket
A bracket (stainless steel) is available to mount
the detector that provides flexible adjustment to
easily position the detector to cover the protected area.
The surface chosen for the mounting should be
flat over the area of the mounting bracket to
ensure a stable fixing.
The FV400 Series of detectors can be operated
in any position but the mounting point must be
chosen to allow sufficient clearance for adjust-
Fixing Instructions Doc. version 2 1/20

FV400 Triple IR Flame Detectors
124 mm
92 mm
181 mm
122 mm
94 mm
ment of the angle and must also allow space for
the cable assembly.
A clearance of 200 mm, in all directions, from the
fixing point will normally be sufficient to allow
the full range of adjustment as shown in Fig. 2.
A drilling template is provided to allow optimum
selection of the fixing centres.
Fig. 2: Adjustable Mounting Bracket and Surface Mounting Dimensions
1 To secure the mounting bracket onto the cho-
sen surface:
– Use four M8 bolts, studs or screws at the
fixing centres. (Refer to the orientation as
2 To secure the detector onto the mounting
bracket:
– Use M6 bolts, stud or screws at the fixing
centres shown in Fig 3.
shown in Fig 1).
2/20 Fixing Instructions Doc. version 2

Triple IR Flame Detectors FV400
94
139 mm
156 mm
FV411 RANGE : 2 x 20 mm GLAND HOLES
99 mm
mm
CAUTION
DO NOT CONNECT POWER
THE FITTING OF THIS TEMPORARY
WEATHERPROOF COVER DOES NOT CONSTITUTE
COMPLETION OF THE CERTIFIED ASSEMBLY
FlameVision
Fig. 3: FV400 Series of Detectors-Overall Dimensions
Temporary Weatherproof cover
The back-box is supplied with a cover that protects the wiring from the weather.
If the top-case is not fitted straight away then fit
the Weatherproof cover to protect the wiring.
This cover does not make the back-box flameproof.
CAUTION
Do not energise the wiring when the
Weatherproof cover has been fitted
onto the detector.
Ensure that the O-ring supplied is fitted to the
cover. Securely tighten the four M6 x 20 mm hex
head screws to retain the cover.
Fig. 4: Temporary Weatherproof cover
Weather hood fitting and removal
The Weather hood is optional and is used to protect the detector against extreme environmental
conditions such as strong sunlight or torrential
downpour.
The Weather hood can be fitted without having
to completely remove the detector from the
mounting bracket.
Fixing Instructions Doc. version 2 3/20

FV400 Triple IR Flame Detectors
Fitting the Weather hood
1 Loosen the three detector fixings and slide the
detector forward.
2 Position the central slot of the Weather hood
over the top fixing and slide it downwards
behind the detector.
3 Ensure that the two slots at the bottom of the
Weather hood slide over the two lower fixings.
4 Tighten the three detector fixings.
A small adjustment may then be necessary to the
detector orientation.
Removal of the Weather hood
The Weather hood can be removed without
having to completely remove the detector
from the mounting bracket.
1 Loosen the fixings.
2 Slide the Weather hood in the upward direc-
tion away from the detector.
Detector Wiring
CAUTION
Detectors must be appropriately
earthed to the required local standards.
Recommended Cable Types
The cable selected for interconnection to the control equipment should meet the requirements of
any national codes (for example, BS5839) or relevant approval bodies.
Cables should normally have a cross sectional
area of at least 1 mm
2
0.5 mm
for stranded conductors.
Multicore cables are required that must have an
overall screen and drain wire that are terminated
2
for solid conductors or
inside the detector using the EMC clamp. The
signals from the different interfaces can be freely
mixed together and do not need an individual
screen for each interface.
Any cabling and conduits must be chosen and
installed to meet the local safety (flameproof)
requirements and standards.
Cable temperature rating must allow for an
increase in the enclosure temperature of 20°C
above ambient for non-camera models and 25°C
for models with a camera.
Cable Routing
It is important to route cables to minimise any
coupling effects. Ensure that the detector cables
are not run in the same conduit or trunking as
heavy power cables.
Note
Wherever the detector cables need to
cross-over heavy power cables, ensure
that the cross-over is made at right
angles.
The wiring between the detectors and the control
equipment must be mechanically protected to
meet the local standards. Additionally, it should
be sufficiently flexible to allow alignment of the
detector to be adjusted to suit the area protected.
To meet the mandatory EMC requirements of EN
61000-6-3 for emissions and EN 50130-4 for susceptibility, it is necessary to terminate the
screening of the cable through 360° at the detector cable gland and ensure that the detector is
solidly bonded to a good local earth.
The EMC clamp provided must be fitted to
ensure that the cable screen is correctly terminated inside the detector.
4/20 Fixing Instructions Doc. version 2

Triple IR Flame Detectors FV400
Cable
Gland
EMC
Clamp
Cable Entry Sealing
CAUTION
Cable glands and stopping plugs MUST
be certified to the required standard.
They must be properly sealed to prevent
the ingress of moisture.
Cable glands MUST be sealed to the
detector housing by fitting a sealing
washer between their flange and the
housing.
Only cable glands incorporating an inner cable seal
should be used. In exposed outdoor areas, it is
recommended that a shroud be fitted over the
cable glands.
Fig. 5: EMC Clamp Fitted
In applications where the ambient temperature is
expected to be 40
the inner seal must be used and, when fitted, the
shroud must be made of CR rubber.
o
C or higher, cable glands with
The unused cable gland entries must be fitted
Fitting the EMC clamp
1 Remove about 120 mm of outer sleeving at the
end of the cable.
2 Fold the cable drain wire back over the end of
the cable and shorten the length to 20 mm.
3 Wrap the copper tape around the end of the
cable over the drain wire.
4 Pass the cable through the cable gland and the
clamp with the copper tape resting over the
clamp.
5 Slide the cable backwards to position wrapped
drain wire in the clamp.
6 Fit the loose part of the EMC clamp over the
cable.
7 Tighten the cable gland and then, tighten the
screws on the EMC clamp (See Fig. 5).
with a suitable stopping plug. The recommended
types are those with a mushroom head and an
integral ‘O-ring’.
The glands/stopping plugs should be hand-tightened with the addition of, at least, a further 1/4
turn applied by spanner or other suitable tool.
If it is not feasible to use a nylon gland washer or
where an anti-seizing union is required, the following alternative methods may be used:
The thread of cable glands/stopping plugs may
be sealed using PTFE tape or other jointing
putty or mastic.
For flameproof applications, the threads of the
flameproof glands/stopping plugs may be
sealed using any non-setting grease or putty as
described in BS EN 60079-14: 1997.
PBC/D loaded mineral oil based grease is a suitable compound and is available in 100g tubes
(Stock Code No. 517.001.250).
Enclosure Sealing
NOTICE
The Front Cover must be fitted with the
O-ring before fitting to the back box to
ensure that the enclosure is properly
sealed against environment and dust.
Fixing Instructions Doc. version 2 5/20

FV400 Triple IR Flame Detectors
Connections
Tables 1 to 4 details the power supplies, terminals and links for the different interfaces of the
FV400 Series of detectors.
Reference Document
Refer to the FV400 Series Product Information and Design Application guide for
information on the different interfaces.
Power
Supplies
Main/Loop Main power input used to
Ancillary
Power
Table 1: Power Supplies
Description
operate the detector
(DC/Zone/Loop)
Power input used for options:
Window heater
RS485
Camera/Video
Terminals Description
0 V IN Detector main power input -VE
(DC/Zone/Loop)
0 V OUT Detector main power -VE to
next detector
+VE IN Detector main power input +VE
(DC/Zone/Loop)
+VE OUT Detector main power +VE to
next detector
EOL End of line connection for
Conventional Zone
4-20 mA + 4-20 mA Output +VE
4-20 mA - 4-20 mA Output -VE
Alarm Relay
NC/NO
Alarm Relay
Alarm relay contact - CON4
selects NC/NO
Alarm relay contact common
COM
Alarm Relay
Alarm relay contact common
COM
Fault Relay
NC/NO
Fault Relay
Fault relay contact - CON5
selects NC/NO
Fault relay contact common
COM
Fault Relay
Fault relay contact common
COM
Table 2: Left-hand Side Terminals
6/20 Fixing Instructions Doc. version 2

Triple IR Flame Detectors FV400
Terminals Description
WTEST/LED 0 V 0 V for Walk-test Input
and Remote Indicator
(LED) Output
WTEST Walk-test Input
RLED Remote indicator (LED)
output
Network (RS485) + Network (RS485) port -
twisted pair +VE
Network (RS485) + Network (RS485) port -
twisted pair +VE
Network (RS485) - Network (RS485) port -
twisted pair -VE
Network (RS485) - Network (RS485) port -
twisted pair -VE
Ancillary Supply +VE INAncillary supply (DC)
+VE
Ancillary Supply +VE
OUT
Ancillary supply output
to next detector
Ancillary Supply 0 V INAncillary supply (DC)
0 V
Ancillary Supply 0 V
OUT
Ancillary supply output
to next detector
VIDEO + Video output +VE
(balanced line)
VIDEO - Video output -VE
(balanced line)
Table 3: Right- hand Side Terminals
Links Description
HDR1 Fit to connect 4-20 mA -VE to 0 V in
Sink mode
HDR2 Fit to connect 4-20 mA +VE to
+VE IN in Source mode
HDR3 Fit HDR3 and HDR4 to connect
HDR4
Detector and Ancillary power
together to use a single power
source.
Do Not fit HDR3/HDR4 with the
Conventional Zone or MX Loop
interfaces.
CON4 Select NC/NO contact for Alarm
relay output
CON5 Select NC/NO contact for Fault relay
output
Table 4: Links
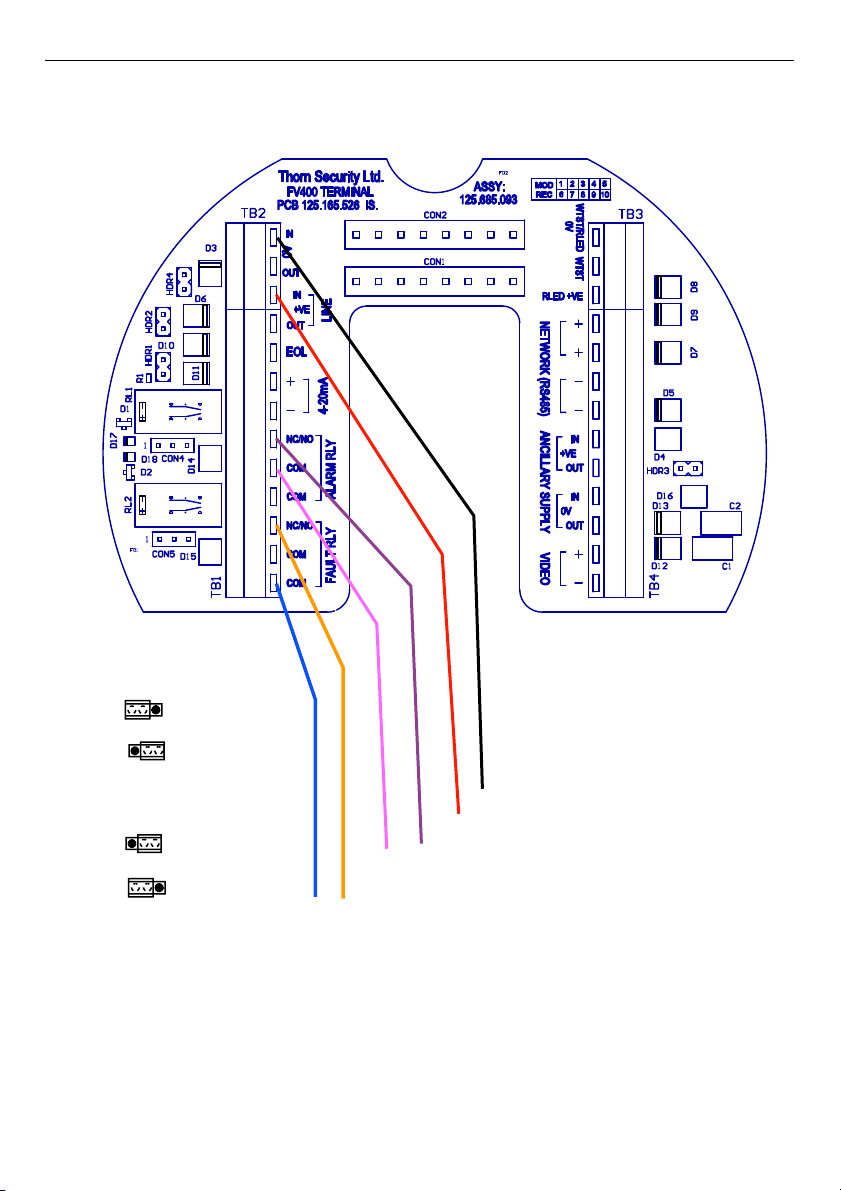
Wiring Diagrams
For details on the wiring connections of the different interfaces of the FV400 Series of detectors,
see the wiring diagrams from Fig. 6 to Fig. 13.
Fixing Instructions Doc. version 2 7/20
FV400 Triple IR Flame Detectors
+24V
0V
NC
NO
NC
NO
1
1
1
1
ALARM RELAY
Select N/C or N/O on CON4
FAULT RELAY
Select N/C or N/O on CON5
ALARM RELAY
FAULT RELAY
CON4
CON5
LINKS
Contact normally closed
Opens in alarm
Contact normally open
Closes in alarm
Contact normally closed
Opens in fault
Contact normally open
Closes in fault
Relay Mode
Fig. 6: Relay Mode Wiring Diagram
Extra COM terminals are provided for wire monitoring or EOL resistors.
Fault relay is continuously activated when detector is normal.
The fire and fault relays can be used as either normally closed or normally open contacts. The contacts are selected
by fitting links to CON4 and CON5 on the terminal board. The links must be fitted for the output to operate.
Other options can be used at the same time as the Relay output.
See Figs. 10 to 12 for wiring of Ancillary Power, Walk-test Input, Remote Indicator Output, RS485 and Video Output.
8/20 Fixing Instructions Doc. version 2

Triple IR Flame Detectors FV400
LOOP -VE
LOOP -VE
LOOP+VE
LOOP+VE
MX Loop
Fig. 7: MX Loop Wiring Diagram
Ancillary power MUST be used for RS485, Window Heater and Video, see Fig. 11.
Do not fit links HDR3 or HDR4.
Dotted lines show the loop connections to the next detector in the MX loop.
Other options can be used at the same time as the MX loop. See Figs. 10 to 12 for wiring of Ancillary Power, Walktest Input, Remote Indicator Output, RS485 and Video Output.
Fixing Instructions Doc. version 2 9/20

FV400 Triple IR Flame Detectors
+24V
0V
4-20mA SINK
Monitor current into 0V
HDR1
LINKS
Select SINK
Mode
4-20 mA Sink
Fig. 8: 4-20mA Sink Wiring Diagram
Fit link HDR1 to connect 4-20 mA- to 0 V.
Ancillary power is required for RS485, Window Heater and Video.
Either use the Main Detector Supply by fitting HDR3 and HDR4 or use a separate Ancillary Supply (see Fig. 11).
Other options can be used at the same time as the 4-20 mA output. See Figs. 10 to 12 for wiring of Ancillary Power, Walktest Input, Remote Indicator Output, RS485 and Video Output.
10/20 Fixing Instructions Doc. version 2

Triple IR Flame Detectors FV400
+24V
0V
4-20mA SOURCE
Monitor current drawn
from Line (+24V) Supply
LINKS
HDR2
Select SOURCE
Mode
4-20 mA Source
Fig. 9: 4-20mA Source Wiring Diagram
Fit link HDR2 to connect 4-20 mA+ to 24 V.
Ancillary power is required for RS485, Window Heater and Video.
Either use the Main Detector Supply by fitting HDR3 and HDR4 or use a separate Ancillary Supply (see Fig. 11).
Other options can be used at the same time as the 4-20 mA output. See Figs. 10 to 12 for wiring of Ancillary
Power, Walk-test Input, Remote Indicator Output, RS485 and Video Output.
Fixing Instructions Doc. version 2 11/20

FV400 Triple IR Flame Detectors
ZONE+
ZONE-
ZONE-
ZONE-
ZONE+
ZONE EOL
Conventional Zone
Fig. 10: Conventional Zone Wiring Diagram
Zone end of line (EOL) resistor fitted in last detector. Otherwise connect to next detector as shown.
If the Window Heater is required, then the Ancillary power MUST be used.
DO NOT FIT HDR3 OR HDR4.
Dotted lines show power connections to the next detector in the Conventional Zone. If this is the last detector on
the zone, then fit the EOL resistor (as shown).
See Figs. 10 to 12 for wiring of Ancillary Power, Walk-test Input and Remote Indicator Output
12/20 Fixing Instructions Doc. version 2

Triple IR Flame Detectors FV400
+24V
0V
Fit HDR3 and HDR4 to use the Main Supply to
provide Ancillary Power.
Do not fit HDR3 and HDR4 in the
MX Loop or Conventional Zone interfaces.
HDR3
LINKS
HDR4
Ancillary Power
Fig. 11: Ancillary Power Wiring Diagram
The Ancillary Power is required for the Window heater, RS485 and Camera/Video options.
For Relay and 4-20 mA modes the Ancillary Power may be provided from the Main detector Supply, fit HDR3 and
HDR4 and wire to the Main Supply only.
A separate Ancillary Power Supply must be used for MX Loop and Conventional Zone interfaces.
Fixing Instructions Doc. version 2 13/20
FV400 Triple IR Flame Detectors
RS485+
RS485-
VIDEO To PASSIVE
Or
100R
RS485+
RS485-
Resistor
ACTIVE Balun
EOL
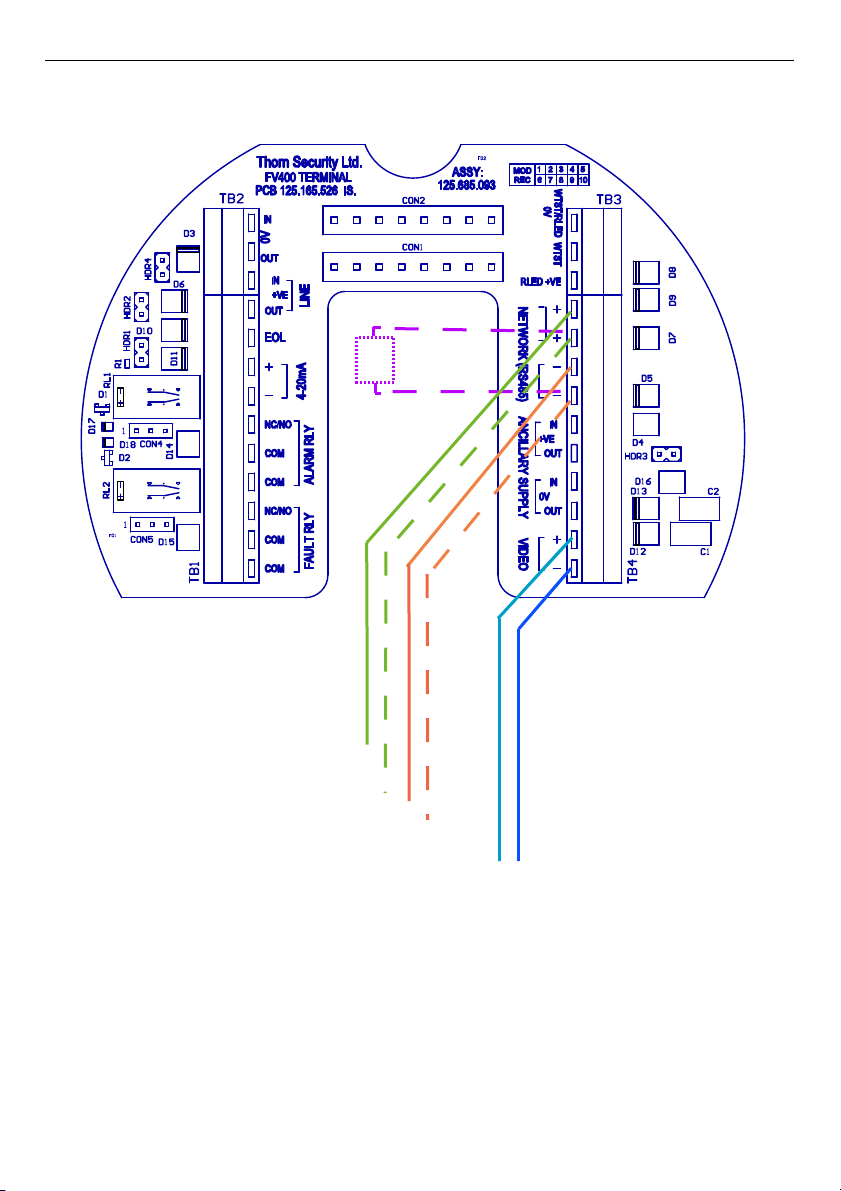
RS485 and Video
Fig. 12: RS485 and Video Wiring Diagram
EOL Termination resistor (100R) to be fitted at each end of RS485 bus.
Dotted lines show the connections to the next detector on the RS485 network. If this is the last detector in the
network, then fit the EOL resistor as shown.
14/20 Fixing Instructions Doc. version 2

Triple IR Flame Detectors FV400
FAULT
1.8K ё
4K7
ё
RESET
ALARM
TEST
15Kё
WINDOW
TEST
REMOTE
TEST
LED
Walk-Test Input and LED
Fig. 13: Walk-Test Input and Remote LED Wiring Diagram
Do not use Ancillary 0 V for Wired Input and Remote LED.
LED drive current limited to 3 mA.
LED voltage should be less than 3 V.
Fixing Instructions Doc. version 2 15/20

FV400 Triple IR Flame Detectors
PROG. PORT
Switch and Header Settings
The FV400 Series of detectors are very flexible
and can be configured for a wide range of applications. For ease of installation the most common, basic options are available on DIP switches
located on the back of the detector. Advanced
options, such as entering location information for
the video display are set using the PC400 configuration tool.
Configuration of DIP Switches
The FV400 Series of detectors hardware has two
banks of eight DIP switches (SW1 and SW2) to
configure basic detector options. If the switches
are changed, the detector must be powered off
and switched on for the alterations to take
effect. The detector is supplied in the default setting with all switches off. Table 5 shows the DIP
switch options:
Fig. 14: DIP Switch and MX Programming Port Location
Switch1 Function Action off
OFF (Default) ON
SW1-1 Internal EEPROM Configuration Ignore DIP switch settings.
(Use programmed settings.)
SW1-2 Alarm Delay See Table 9
SW1-3 Alarm Delay See Table 9
SW1-4 Range See Table 10
SW1-5 Range See Table 10
SW1-6 Ancillary Power No Power Provided
SW1-7 Alarm Latching Latching Non-Latching
SW1-8 Fault Latching Non-Latching Latching
Table 5: DIP Switch 1 Settings
a – DIP Switch 1-1 must be set to on to enable the DIP Switches selection.
b – DIP Switch 1-6 must be set to on either; if an Ancillary Supply is used or HDR3 and HDR4 are fitted.
Use DIP switch
settings
a
Power Provided
b
16/20 Fixing Instructions Doc. version 2

Triple IR Flame Detectors FV400
Switch2 Function Action
OFF (Default) ON
SW2-1 Window Heater OFF ON
SW2-2 OPM Mode
a
Automatic Manual
SW2-3 Interface See Table 8
SW2-4 Interface See Table 8
4-20 mA Modes Band mode (Discrete) Continuous (Variable) mode
SW2-5
MX Mode Consys Options DIP Switch Options
4-20 mA Modes Must be set to OFF Must be set to OFF
SW2-6
SW2-7
MX Mode Must be set to OFF Must be set to OFF
4-20 mA Modes Normal bands
b
Enhanced bands
MX Mode Loop mode Programming mode
SW2-8 Set to OFF (For future use)
Table 6: DIP Switch 2 Settings
a – Optical Path Monitoring (OPM) - Check for window cleanliness
b – This mode is equivalent to the S241f+ discrete mode bands
Interface Settings and Combinations
SW2-3 SW2-4 Interface S200 Equivalent
Off Off 4 - 20 mA Current Loop and
FV282f+/S241f+/S261f+
Relay (Default)
Off On Conventional S231f+
On Off 4 - 20 mA Current Loop S241f+
On On MX Loop S271f+
Table 7: Interface Settings and Combinations
More than one interface may be enabled in certain modes according to the following table.
Fixing Instructions Doc. version 2 17/20

FV400 Triple IR Flame Detectors
Interface Mode 4-20 mA Relay MODBUS MX Conventional
4 - 20 mA Current
Loop and Relay
(Default)
Conventional
4-20 mA
MX
Table 8: Interface Modes
The interface modes are as selected by DIP switches or PC400.
Delay Settings
SW1-2 SW1-3 Delay Alarm/Pre-alarm ON
Off Off Short (Default) 3s in 5s window 10s
Off On Medium 6s in 8s window 10s
On Off Long 12s in 14s window 10s
On On Short 3s in 5s window 10s
Table 9: Delay Settings
The alarm hold time is configurable using the PC400. The default is 10s.
In the MX mode these options may be set in Consys and configured by the panel see SW2-5.
Range Settings
SW1-4 SW1-5 Range
Off Off Normal (33 m)
Off On Half (0.5x) (15 m)
On Off Close (0.25x) (6 m)
On On Extended (2x) (65 m)
Table 10: Range Settings
In MX mode these options may be set in Consys and
configured by the panel see SW2-5.
condition
Alarm hold time
MX Configuration
Set the MX Loop Address
1 Connect the detector to the 801AP (Address
Programming)/ 850EMT (Engineering Management Tool) via the ancillary programming
lead that plugs into the back of the detector
(see Fig. 14).
2 Select the MX interface mode on the detec-
tor.
3 Enable programming by switching on the DIP
switch SW2-7.
4 Connect the programmer to the detector and
set the address as required.
5 Disconnect the programmer.
6 Turn off the programming switch SW2-7 on
the detector.
18/20 Fixing Instructions Doc. version 2

Triple IR Flame Detectors FV400
Note
Programming via IR mode of the
850EMT is not supported by the FV400
Series of detectors.
For information on 850EMT, refer to the
latest version of the 850EMT User manual.
Advanced Configuration Options
The advanced configuration options are set
using the PC400 configuration tool which connects to the detector using the CTI400 Configuration Tool Interface.
The following options can be set using the tool:
Basic options: Options available on DIP
switches can alternatively be set by the
PC400 configuration tool.
OPM timing: Set time interval for regular
OPM test.
Video Output mode: Select what information
is overlaid on camera image.
Video Information: Enter and edit detector
location and identity information that can be
overlaid on camera image.
Select logging options: Select which events
and information are logged by the detector.
Field network parameters: Enter and edit net-
work settings such as baud rate, addresses,
etc.
Additionally, the configuration tool can be used
to view the internal parameters and for diagnostics by extracting and processing log data stored
in the detector.
Commissioning
System Checks
WARNING
The Self-Test generates an alarm
that is reported on all the
interfaces. Ensure that the
monitoring system will identify it
as a test alarm and distinguish it
from a fire alarm.
Before connecting the zone wiring to the control
equipment or to the detectors, a general inspection of the system should be carried out.
In particular, ensure that the detectors are suitably positioned and follow the recommendations
as mentioned in the FV400 Series Product Information and Design Application guide.
The operation of the detector can be tested by
using the WT300 (Walk-Test Tool). For additional
information, refer to the latest version of the
WT300 Installation guide.
Tests to conduct
The wiring must be checked for loop
resistance, continuity and insulation
before powering any devices.
Reference Documents
Refer to the latest versions of the
PC400 Help file and the CTI400 Installation guide for further information on
how to use these tools for diagnostics.
Fixing Instructions Doc. version 2 19/20

FV400 Triple IR Flame Detectors
© Thorn Security Ltd., Dunhams Lane, Letchworth, SG6 1BE, UK
120.515.124_FV-D-400-F, doc. version 2, 14. October 2013
Subject to change without notice.
 Loading...