

Page 1

THE QUALITY GOES IN BEFORETHE NAME COES ON
Return the
Product
Registration
Card and your
TV could be
FR££X
/cledpaper
50percent
Page 2

SAFETY WARNINGS
A
WARNING
WARNING:
TO REDUCE THE RISK OF ELECTRIC SHOCK DO NOT REMOVE
COVER (OR BACK). NO USER SERVICEABLE PARTS INSIDE.
REFER TO QUALIFIED SERVICE PERSONNEL.
TO PREVENT HRE OR SHOCK HAZARDS, DO NOT EXPOSE THIS
PRODUCT TO RAIN OR MOISTURE.
A
The lightning flash with arrowhead symbol, within an equilateral triangle,
is intended to alert the user to the presence of uninsulated "dzngerous
voltage" within the product's enclosure that may be of safficient
magnitude to constitute a risk of electric shock to persons.
The exclamation point within an equilateral triangle is intendeAito alert
the user to the presence of important operating and maintenance
(servicing) instructions in the literature accompanying the appli_aace.
POWER-CORD POLARIZATION
This product is equipped with a three-wire grounding-type
alternating-current line plug. _Ilaisplug will fit into the power
outlet only one way. This is a ,safety feature. If you are unable
to insert the plug fully into the power outlet, contact your elec-
trician to replace your obsolete outlet. Do not defeat the safety
purpose of the three-wire grounding-type plug.
CAUTION
To prevent electric shock, do rLotuse this three-wire,
grounding-type plug with an e_tension cord, receptacle or
other outlet unless all three of the blades of theeplug can be
fully inserted to prevent blade exposure.
REGULA TORY INFORMATiON
Note: This equipment has been tested and found to comply
with the limits for a Class B digital device, pursuant to Part 15
of the FCC Rules. These limits are designed to provide reason-
able protecti,on against harmful interference in a residential in-
stallation. This equipment generates, uses and can radiate
radio frequency energy and, if not installed and used in accord-
ance with the instructions, may cause harmful interference to
radio comdaunications. However, there is no guarantee that in-
terference will not occur in a particular installation. If this
equipment does cause harmful interference to radio or televi-
sion reception, which can be determined by turning the equip-
ment off and on, the user is encouraged to try to correct the
interference by one or more of the following measures:
• Reorient or relocate the receiving antenna.
• Increase the separation between the equipment and receiver.
• Connect the equipment into an outlet on a circuit different
from that to which the receiver is connected.
• Consult the dealer or an experienced radio/TV technician for
help.
CAUTION
Do not attempt to modify this product in any way without writ-
ten authorization from the manufacturer. Unauthorized modifi-
cation could void the user's atthority to operate this product.
CAUTION
These servicing instruction.,; are for use by qualified service
personnel only. To reduce 1:herisk of electric, shock, do not
perform any servicing other than those contai:ned in the operat-
ing instructions unless you arc:qualified to do so. Refer all
servicing to qualified perso:anel.
Yc'gWRNZ2
Copyright (_ Zenith Electronics Corporation 1996
ii
Page 3

IMPORTANT SAFETY INSTRUCTIONS
Your product has been manufactured and tested with your safety in mind. However, improper use can result in potential electrical
shock or fire hazards. To avoid defeating the safeguards that have been built into your new product, please read and observe the
following safety points when installing and using your new product, and save them for future reference.
Observing the :simple precautions discussed in this section of the operating guide can help you get many years of enjoyment and
safe operation that are built into your new product.
1. Read Instructions
All the safety and operating instructions should be
read before the product i:_operated.
2. Follow Instructions
All operating and use instructions should be fol-
lowed.
3. Retain Instructions
The safety and operating instructions should be re-
tained for future reference.
4. Heed Warnings
All warnings on the product and in the operating in-
structions should be adhered to.
5. Cleaning;
Unplug this product from the wall outlet before
cleaning. Do not use liquid cleaners or aerosol
cleaners. Use a damp cloth for cleaning.
6. Water and Moisture
Do not use this product near water -- for example,
near a bath tub, wash bowl, kitchen sink, or laundry
tub, in a wet basement, or near a swimming pool.
7. Accessories
Do not place this product on an unstable cart,
stand, tripod, bracket, or table. The product may
fall, causing serious injury to a child or adult, and
serious damage to the product. Use only with a
cart, stand, tripod, bracket, or table recommended
by the manufacturer, or sold with the product. Any
mounting of the product should follow the manufac-
turer's instructions, and should use a mounting
accessory recommended by the manufacturer.
8. Transporting Product
A prod_act and cart combination should be moved
with care. Quick stops, excessive force, and uneven
surfaces may cause the product and cart combina-
tion to overturn.
PORTABLE CART WARNING
9. Attachments
Do not use attachments rLotrecommended by the
product manufacturer as they may cause hazards.
10. Ventilation
Slots and openings in the cabinet are provided for
ventilation and to ensure reliable operation of the
product and to protect it from overheating, and
these openings must not be blocked or covered. The
openings should never be blocked by placing the
product on a bed, sofa, rag, or other similar sur-
face. This; product should not be placed in a built-in
installation such as a bookcase or rack unless
proper ventilation is provided or the manufacturer's
instructions have been adhered to.
11. Power Sources
This product should be c,perated only from the type
of power source indicated on the marking label. If
you are not sure of the: type of power supply to
your home, consult your product deali_r or local
power company. For lzroducts intended to operate
from baltery power, or other sources, refer to the
operating instructions
12. Line-Cord Polarization
This product is equipped with a polarized alternat-
ing-current line plug (a plug having one blade
wider than the other). This plug will fit into the
power outlet only one way. This is a safety feature.
If you are unable to insert the plug fully into the
outlet, try reversing the plug. If the p!Lugshould
still fail Io fit, contact your electrician to replace
your obsolete outlet. Do not defeat the safety pur-
pose of the polarized phxg.
13. Power-Cord Protectio_L
Power-supply cords shoJld be routed so that they
are not likely to be walked on or pinched by items
placed upon or against them, paying particular at-
tention to cords at plugs, convenience receptacles,
and the point where they exit from the product.
°o,
¥SAFEI Ul
Page 4

m
IMPORTANT SAFETY INSTRUCTIONS
1,1. Outdoor Antenna Grounding 18.
If an outside antenna or cable system is connected
to the product, be sure the antenna or cable system
is grounded so as to provide some protection
against voltage surges and built-up static charges.
Article 8!0 of the National Electrical Code
(U.S.A.), ANSI/NFPA 70 provides information 19.
with regard to proper grounding of the mast and
supporting structure, grounding of the lead-in wire
to an antenna discharge unit, size of grounding con-
ductors, location of antenna-discharge unit,
conneclien to grounding electrodes, and require- 20.
ments for the grounding electrode.
EXAMPLE OF GROUNDING ACCORDING TO
NATIONAL ELECTRICAL CODE INSTRUCTIONS
Antenna Lead in Wire
Ground
,_ Antenna Discharge Unit
_---------.---._._ J/ (NEC Section 810-20)
I _ _ Grounding Conductors
. (NEC Section 810-21)
Power Service Grounding
Electrode System (NEC
T Art 250, Part H)
NFC - NATIONAL [-LECTRICAL CODE
15. Lightning
For added protection for this product (receiver) dur-
ing a lightning storm, or when it is left unattended
and unused for long periods of time, unplug it from
the wall outlet and disconnect the antenna or cable
system. This will prevent damage to the product
due to lightning and power-line surges.
1,6. Power Lines
An outside antenna system should not be located in
the vicinity of overhead power lines or other elec-
tric light or power circuits, or where it can fall into
such power lines or circuits. When installing an out-
side antenna system, extreme care should be taken
to keep from touching such power lines or circuits
as contact with them might be fatal.
17. Overloading
Do not overload wall outlets and extension cords as
this can result in a risk of fire or electric shock.
Object and Liquid Entry
Never push objects of any kind into this product
through openings as they may touch dangerous volt-
age points or short-out parts that could result in a
fire or electric shock. Never spill liquid of any kind
on the product.
Servicing
Do not attempt to service this product yourself as
opening or removing covers may expose you to dan-
gerous voltage or other hazards. Refer all servicing
to qualifie.d service personnel.
Damage Requiring Service
Unplug this product from the wall outlet and refer
servicing to qualified service personnel under the
following conditions:
a. If the power-supply cord or plug is damaged.
b. If liquid has been spilled, or objects have fallen
into the product.
c. If the: product has been exposed to rain or water.
d. If the product does not operate normally by fol-
lowing the operating instructions. ,Adjust only
those controls that are covered by the operating
instructions as an improper adjustment of other
controls may result ir_ damage and will often re-
quire extensive work by a qualified technician
to restore the product to its normal operation.
e. If the: product has been dropped or the cabinet
has been damaged.
f. If the product exhibits a distinct change in per-
formance.
21. Replacement Parts
When replacement parts .are required, be sure the
service technician has used replacement parts speci-
fied by the manufacturer or have the same
characteristics as the original part. Unauthorized
substitutions may result in fire, electric shock, or
other hazards.
22. Safety Check
Upon completion of any service or repairs to this
product, ask the service technician to perform
safety checks to determine that the product is in
proper operating condition.
23. Wall or Ceiling Mounti:ag
The product should be mounted to a wall or ceiling
only as recommended by the manufacturer.
24. Heat
The product should be shuated away from heat
sources such as radiators, heat registers, stoves, or
other products (including: amplifiers) that produce
heat.
YSAFEI iv
Page 5
m
INTRODUCTION
WELCOME
Welcome into the family of Zenith Color Television owners.
"ibis guide provides instructions on how to operate your new
T_. In addition, we strongly advise you to read and observe
the precautions listed in the Safety Tips section of this operat-
ing guide. Read this publication carefully so that you will re-
ceive full enjoyment from your new Zenith TV for many years
to come.
Your new TV has been designext and built to give you the very
best in quality,, features and pertormance. There are many re-
gional Zenith authorized service: centers throughout the U.S.,
Canada and Mexico who can at|end promptly and effectively
to ordinary service needs.
If you should have an unusual performance or service problem
that cannot be ,,;atisfactorily resolved by your Zenith authorized
service center, call or write:
Zenith Electronics Corporation
Customer Service Department
1000 Milwaukee Avenue
Glenview, IL 6C_325-2493
Telephone: (847) 391-8752
Mon-Fri, 8:00 a.m. - 4:30 p.m. Central Time
Send the model[ number, serial number, and dale of purchase
or original installation, with a full explanation of the problem
and the service history. We will welcome the opportunity to
look into your :specific question or problem and to be of assis-
tance in resolving it promptly.
The model and serial numbers of your new TV a_:elocated on the
back of the TV cabinet. For your future convenience and protec-
tion, we suggest that you record these numbers here:
Model No.
Serial No.
INSTALLATION CONSIDERA"I IONS
Before you install your TV...
Ventilation -- Proper ventilation keeps your TV
running cool. Air circulates through perforations
in the back and bottom of the cabinet. Do not
block these vents or you will shorten the life of
your "IV.
Power Source -- Your TV is designed to operate
on normal household current, 120 volt 60 Hertz AC.
Do not attempt to operate it on DC current.
Power Cord -- Your power cord has a polarized
plug as required by Underwriters' Laboratories. It
has one regular blade and one wide blade and fits
only one way into a standard electrical outlet. If
the blades will not enter either way, your outlet is
w;ry old and non-standard. A new outlet should be
installed by a qualified electrician.
Safe Operation -- Your TV is manufactured and
tested with your safety in mind. However, unusual
stress caused by dropping or mishandling, expo-
sure to flood, fire, rain or moisture, or accidental
spilling of liquids into the TV, can result in poten-
tial electrical shock or fire hazards. If this hap-
pens, have your TV checked by a service
technician before using it again.
Please read and observe each safety point in the "Safety
Tips" section when installing and using your TV.
VIDEO GAMES AND OTtlER FIXED
PATTERN DISPLAY CAUT]ION -- If you use your TV for
video games or other fixed disp lays, avoid setting the
BRIGHTNESS control for an excessively bright picture. A
fixed display L';any image which does not change frequently,
such as a channel/network identification or other symbol that
remains in the same location for long periods of time. A
bright, fixed pattern, if left on for long periods of time, can re-
sult in a permanent imprint oa tae "IV picture tube. You can re-
duce this possibility by alternating the use of the fixed pattern
display with normal TV pictrxe viewing, by turning down the
CONTRAST control for sustaired fixed pattern use, and by
turning off the fixed pattern display when not in use.
PLUGGING IN YOUR TV --- Be sure to plug your TV into
an "unswitched" AC power source. The "switched" AC out-
lets found on some video equipment will not continue supply-
ing power to the TV once the extuipment is turned off. If the
power to the TV is interrupted, you will have to reset the clock
in the TV to the current time.
TVWELDIR3 V
Page 6

INTRODUCTION
m
METHODS OF 71t' AND ACCESSORY EQUIPMENT OPERATION
Y_ur new Zenith TV is a very sophisticated, High-Tech electronic appliance. "IV operation, video pictare adjustments and audio
sound adjustments are performed through on-screen menus and displays. Self-explanatory menu icons are used throughout. Most
features can be selected and adjusted from the comfort of your favorite chair by using either of the infrared remote controls, the Uni-
w_rsal (7 Mode) remote or the Z-Trak trackball (TV/VCR) remote. Either of the two remote control:_ can be used to operate the TV.
Use the multi-brand (7 Mode) programmable remote if you have different brands and[types of equipment in your video system
which you need to control remotely. Use the Z-Trak (TV/VCR) programmable remote if you feel comfortable using trackball access
similar to that provided by the familiar computer mouse device. Also, many features can be selected and adjusted by using the con-
trol panel on the TV, except for StarSight.
StarSight provides an electronic programming guide which is updated with new scheduling information automatically while the TV
is Off. StarSight allows you to rapidly scan through the channel programming guide to find a prograna for viewing oi recording. Pro-
g_:amscan be searched and selected by category, theme, subject, etc. if desired.
FEATURES PROVIDED ON YOUR TV
This operating guide describes a family of TV models. Not all models have all of the features described in this guide. In addition,
different control panels may be used from model to model. Most models include the following features:
GENERAL FEATURES
Optional StarSight ® Program Guide Capability
Automatic TV Operation Demonstration
On-Screen Menus accessed by Remote Controls or TV Con-
trol Panel
Universal (7 Mode) Programmable Remote Control
Z-Trak Trackball (TV/VCR Modes) Programmable
Remote Control
Closed Captions and Text Modes
l81 Channel Tuning
Automatic Channel Search Programming
Parental Control, Block Channel(s)
Channel Labels (ABC, NBC, MAX, SHO, etc.
or create your own custom labels)
Source Identif-lcation (VCR, Cable Box, etc.)
Sleep Timer
On/Off Timer (Vacation Timer)
Activate/Deactivate On/Off Timer selection
On-Screen _-ognIdentifiers
Antenna/Cable and Loop-Out to Cable Box Jacks
Rear Chassis In/Out Audio/Video (A/V) Jacks
AUDIO FFATURES
2-Level Audio Mute Control
On-Screen Captions when Audio Muted
Variable Audio Output jacks
External Surround Sound Speaker',s) Output Jacks
Front and Rear Surround Sound Speaker Contro]Ls
Preset Surround Sound
Surround Sound Speaker Hook-Up Jacks
On-Screen Audio Adjustments
MTS Stereo
SoundRite Auto Volume Control
PIP (Picture-In-Picture) FEATURES
Video Swap PIP Window/Main Screen Picture
PIP/Main Screen Pictures Freeze
Picture-In-Picture Capability wi.th2 Direct-Source TV Tuners
1-Minute Commercial Break Surf.-to-PIP Channel Scanning
Audio Swap PIP Window/Main S:reen Picture
Move PIP Window anywhere on-screen
with Z-Trak Remote
Front Chassis In Audio/Video (A/V) Jacks Channel Surf-to-PIP
(Available on some models Olfly)
On-Screen Video Adjustments ADDITIONAL PROJECTION TV ONLY FEATURES
Channel Scan Add Channels VCR Shelf
Channel Scan Delete Channels Built-in Screen Protector (Avai!Lalzleon Some Models)
Select Channel Surfing Channels Optional Screen Protector (Available on Some Models)
Z-Trak Icons Menu Larger TV/Source Connections Jack Panel on back of TV
Adjustable Pointer Speed Control for Trackball Remote iFront Video/S-Viideo Input Jacks
3_63-o vi
Page 7

CONTENTS
Connections and Basic Operations
Safety Warnings ...................................... ii
hnportant Safety Instructions ............................ iii
INTRODUCTION
Welcome ............................................ v
Installation Considerations .............................. v
Methods of Operation .................................. vi
Features Provided on your TV Chart ...................... vi
Setup Checklisl ...................................... viii
STANDARD TV/SOURCE CONNECTIONS
Introduction TV/Source Connection Panel, Overview Connection
Options, TV/Source Connections Panel, Front ofTV A/V Jacks,
Setups: I-TV Only, 2-TV and Cable Box, 3-TV and 4-VCR, TV
_ith VCR and Cable Box, Accessory Jacks, Surround
Speakers and Audio Amplifier .......................... 1-1
FIRST TIME YOU OPERATE YOUR TV
Control Panel, Battery Installation, Power, Main Picture and PIP
Source, Auto Program, Clock, Other Options and Projection TV
Setup .............................................. 2-1
PIP (Picture-in-Picture) OPERATION
Overview, Selecting Main Picture and PIP Inset
Source, PIP ON/Off, PIP Features/Controls Options with
Universal and Trackball remotes, PIP Source Capabilities with
Different Connection Setups ........................... 3-1
(Jniversal Remote Control Menus
UNIVERSAL REMOTE CONTROL MBR3459
Introduction, Battery Installation, Operating Mode, TV
Operations, Key Functions Chart, Programming,
Special Features, Auto Find, and Brand Codes ............. 4-I
QUICK REFERENCE TO MENUS
Available Menus, Basic Menu Operation ................. 5-1
SOURCE MENU
Menu Operation, Source Selection ....................... 6-1
SETUP MENU
Menu Operation, Auto Program, Channel Add/Del/Surf, Clock
Set, Captions, Caption/Text, Language, Background, StarSight
Projo Setup: Color Convergence ........................ 7-1
SPECIAL FEATURES
Menu Operation, Timer Setup, Sleep Timer, On/OffTimer,
Channel Labels, Source ID, Parental Control, Auto Demo .... 8-1
AUDIO MENU
Menu Operaffon, Bass, Treble, Balance, Audio Mode, SoundRite,
F:ont Surround Rear Surround, Speakers ................. 9-I
VIDEO MENU
Contrast, Brightness, Color, Tint, Sharpness, Color
Temp, Video Filter, Skin Tone, and Video Preset .......... 10-I
PIP VIDEO I_IENU
Contrast, Tint, Size ................................... 11-I
Z-Trak Remote Control Menus
Z-TRAK TRACKBALL REMOTE CONTROL
Introduction, Battery Installation, Choosing Operating Mode,
Basic Operations, VCR Function Keys, Auto Find, VCR Brand
Codes, Cleaning: the Trackball ........................ 12-1
Z-TRAK REMOTE MENUS OVERVIEW
Available On-Screen Menus, Basic Menu Operation,
Menu Icons, On-Screen Displays, Volume Control ......... 13-1
Z-TRAK REMOTE MENU OPERATION
Point and Press Operation, Menu Operation Options ....... 14-1
Z-TRAK REMOTE SOURCE MENU
Menu Operation, Source Selection ...................... 15-1
Z-TRAK REMOTE SETUP MENU
Menu Operation, Auto Program, Channel Add/Del/Surf, Clock
Set, Captions, Caption/Text, Language, Background,
StarSight .......................................... 16-1
Z-TRAK REMOTE SPECIAL FEATURES
Menu Operation, Timer Setup, Sleep Timer, OrdOff Timer,
Channel Labels, Source ID, Parental Control, Auto Demo... 17-1
Z-TRAK REMOTE AUDIO MENU
Menu Operation, Bass, Treble, Balance, Audio Mode, SoundRite,
Front Surround, Rear Surround, Speakers ................ 18-1
Z-TRAK REMOTE VIDEO MENU
Menu Operation, Contrast, Brightness, Color, Tint, Sharpness,
Color Temp, Video Filter, Skin Tone, and Video Preset ..... 19-1
Z-TRAK REMOTE PIP VIDEO MENU
Menu Operation, Contrast, Tint, Size .................... 20-1
Maintenance and _Varranty
MAINTENANCE AND TROUBLESHOOTING
Caring, Extended Absence, Interference,
Before Calling for Service ............................ 21-1
Recommended Accessories
Replacement Product Registration Card
Your Zenith Warranty
tlow to use this operating guide
Standard TV installation and operation is given in this portion of the operating guide. Follow the procedures given if you will not
be using StarSight®. Two remote controls are provided, each with its own set of on-screen menus. Refer to the appropriate sec-
ti3ns of this guide when using the different remote controls.
,i_ Refer to the StarSight® portion of this operating guide for StarSight® activation and ope:ration.
3(1'53-O vii
Page 8
SETUP CHECKLIST
_ ote: Turn off the power on all system components before making connections. Do not disconnect your cable box power
, cord, it may interfere with your cable service.
3 Connect All Source Equipment to TV
E3
[3
E3
[-1
[3
[3
[3
Connect your Antenna or Cable service line as well as any accessory equipment such as a V('R. Do not connect this TV or
other system component equipment to an electrical outlet that is controlled by a wall switch.
Install Batteries in the Remote Controls
Batteries are provided but must be installed in both the universal and trackball remote controls.
Turn on All Source System Components
The TV and other Source equipment you connected to the TV/Source Connection Panel or, if available, the "I_/"Front Panel.
Select Main Picture Source and PIP Inset Picture Source
The IMam Picture Source and the PIP Inset Window Picture Source can be any source listed anc available in the Source Menu.
Subscribe to StarSight Service (Optional)
You do not have to subscribe to StarSight to operate this TV.
Refer to the StarSight portion of the operating guide for StarSight subscription information.
Perform Projection TV Setup (Projection TV Models Color Convergence)
This procedure should be performed when the TV is first installed and if it is moved later to a different location.
Perform Auto Program Procedure (Not required with StarSight Service)
This procedure finds and stores the available channels from your local broadcast area in the TV's memory.
Options
You may consider using the following options: Surf Channel Scan, Channel Labels, Channel Add/Delete/Surf_ Source ID, and
make changes to the Audio and Video settings to your personal preference.
Two Tuner Capability
Using either Ant/Cable 1or 2 sources gives you two-tuner capability; one Tuner for the Main Picture, and a second Tuner for the
PIP Inset Picture. (Use the TV to tune 2 live TV channels, depending on hookup.)
Options Quick Overview
Surf Channel Scan -- Create a list of only the channels you view frequently for access by Chan Up/Down.
Channel Labels -- Include a channel or network name such as HBO, Max etc., for the channels you receive or give a channel a cus-
tom name of your own.
Channel Add/Delete/Surf-- Allows to you include or omit any available channel from the channel scan accessed by Chan
Up/Down.
1-Minute Commercial Surf-to-PIP -- Allows you to transfer temporarily your surf channels to the Main screen picture for viewing
while a commercial is being broadcast.
Source ID -- Allows you to label and identify your system component by type of equipment such as VCR, Photo CD, etc.,
Audio/Video Adjustments -- You can set the video and audio adjustments to your personal preferences.
Color Conver£ence -- Projection TVs only. Aligning Red and Blue colors over Yellow yields the ultimate in picture appearance.
"]?hereare some TV models that have built-in and optional screen protectors, be sure to follow instrnJclions when cleaning them be-
comes necessary.
..o
3363-0 VIII
Page 9

STANDARD TV/SOURCE CONNECTIONS
INTRODUCTION W/SOURCE CONNECTION PANEL
Shown below are examples of the type of "Source" equipment you can connect to your TV. Your antenna or cable service line
should be connected to Antenna/Cable 1. If you have a Cable Box, connect it to Antenna/Cable 2. Use the Audio/Video connections
for accessory equipment like a VCR. To hear stereo audio from your stereo VCR during tape playback, you must use the
Audio/Video connections. Note: Additional Audio/Video Input jacks are provided (on some TVs) on the front of the TV for your
convenience.
OVERVIEW: SOURCE EQUIPMENT CONNECTION OPTIONS
Over-the-Air Antenna
or Cable Service
®
/
Input Source jacks on TV/Source Connection Panel
on back of TV and A/V inputs on front.
Antenna/Cable 1 In Jack
Antenna/Cable 2 In Jack
Video 1In Jacks
Video 2 In Jacks
S-Video In Jacks
l:¥ont Audio/Video (In) Jacks
Camcorder
L TV,Source
Connection -_--__ _____aye_'/ J
Panel __
Output Jacks on TV/Souv'ce Connections Panel to
Accessory Equipment
Loop-Out to Cable Box
Monitor Out Jacks
Variable Audio Out Jacks
Surround Speakers Out Jacks
External Speakers Out Jacks
StarSight Emitter Output Jack
Speaker On/Off Switch
Speaker Internal/External Switch
Example list of accessory equipment that can be
connected to the TV/Sourc,.=Connections Panel and
front of TV.
VCRs, S-Video Equipment, Camcorders, Lase:r Video Disk
Players, Video!Surveillance Cameras, Various Audio Equip-
ment such as an Audio Amplifier or Stereo System, External
Speaker, Surround Sound Speakers etc. Use Audio/Video Ca-
bles to make the connections sh,gwn above.
Note: Cables shown above are not supplied with your TV and
can be purchased at your local Zenith dealer. Measure each ca-
ble length nee_ted.
3,_63-o 1 -- 1
Page 10

STANDARD W/SOURCE CONNECTIONS
I I
TV/SOURCE CONNECTIONS PANEL
Locate the TV/Source Connection Panel on the back of the TV.
ANTENNA/CABLE 1
75-ohm antenna or cable-TV con-
nection to your TV. Attach your an-
tenna, cable-TV line or VCR to
this jack.
ANTENNA/CABLE
Routes the cable-TV input to
Antenna/Cable 2 back to the cable s_oEoj_ ,o---_'-
box supplied by the cable service. @ _)-)_,_--_ _
SPEAKER EXT/INT
Select EXT (external) to remove _ -_
, -_ ,,
sound from the TV s speakers. __ O ® _st_._ _ONtToff_,,-72----
•
Select INT (internal) to, hear sound _ _N _ _ _) (.3__
from the TV s speakers, c0_0t _T _ _
SURROUND SPEAKER __ _ ,,,_,_
TERMINALS __ __
Connections for output to optional _
surround sound speakers.
VII)EO 1 or 2 IN
Jacks for audio and video input
_ from a stereo VCR or other A/V
c,aw,ponent. (You must connect to
these jacks in order to hear stereo
sound when playing a stereo tape.)
S-VIDEO IN
-- Jacks for audio and video input
f:rora a Super-VHS component.
MONITOR OUT
Standard audio/video jacks for out-
put to an audio/video monitor.
VARIABLE AUDIO OUTPUT
Standard phono jack connectors for
output to an optional stereo ampli-
fier or to external speakers•
TURN OFF POWER OR UNPLUG
TV POWER CORD BEFORE
MAKING ANY CONNECTIONS.
STARSIGHT CONTROL PORT
Jack for connection of StarSight Re-
mote Emitter cable•
FRONT CHASSIS W/SOURCE CONNECTIONS PANEL, (Availabte on Some Models)
If your TV model is equipped with front TV/Source A/V input jacks, they are located behind a small door on the control panel on
• e front of the TV. Although two types of panels are used on the front of the TV (as shown below), in the on-screen menus, both
Type I and Type 2 are referred to as "Front Video" and "Front S-Video."
Note: Use the Right and Left Audio jacks with either Video or S-Video jacks.
Type I, S-VIDEO (In)
Jacks for audio and video input from a Super-VHS VCR.
Type II, S-VIDEO 2 (In)
Jacks for audio and video input from a Super-VHS VCR.
S-VIDEO VIDEO
FRONT VIDEO INPUT
RIGHT LEFT
_ FRONT AUDIO INPUT-
S-VIDEC) 2 VIDEO 3
VIDEO INPUT
RIGHT
AUDIOINPUT
I_pe I, VIDEO (In)
Jacks for audio and video input from a stereo VCR or other A/V
component.
Type II, VIDEO 3 (In)
Jacks for audio and video input from a stereo VCR or other A/V
component.
3')63-O 1 _ 2
Page 11

I
STANDARD W/SOURCE CONNECTIONS
SETUP 1: TV ONLY
If'you receive your television signal by antenna or basic cable-
TV (no cable box), connect your television as shown here.
TURN OFF POWER OR UNPLUG TV BE-
FORE MAKING ANY CONNECTIONS TO
YOUR TV.
;able Leading from.. Connected to..
Wall Jack--- TV--
5 ohm Antenna From Antenna or "Antenna/Cable
?able Cable Service. I."
Note: All cables shown are not supplied with this TV.
Antenna or Cable.-TV Connection
SETUP 2: TV AND CABLE BOX
If you receive your television signal from a cable box,
connect your television as shown in the illustration.
DO NOT UNPLUG YOUR CABLE BOX
POWER CORD Ar ANY TIME!
, DO NOT PLUG YOUR TV POWER CORD INTO
TIlE BACK OF YOUR CABLE BOX!
'able
5 ohm Antenna
_able
5 ohm Antenna
:able
5 ohm Antenna
?able *
) (Supplied)
',emote Emitter
;able.
Leading from..
Wall Jack--
From Antenna or
Cable Service.
TV--
"Loop Out To
Decoder."
Cable Box--
"Out."
Connected to..
TV--
"Antenna/Cable
2."
Cable Box---
"In."
'IV m
"Antenna/Cable
1."
TV-- Cable Box---
"StarSight Control Front panel.
Port."
Note: All cables shown are not supplied with this TV.
Cable Box Connection
CABLE BOX
FRONT
StarSight Note: Do not adhere the Remote Emitter until af-
t_w you have completed activating StarSight and you have
confirmed the correct code that operates your Cable Box.
Once the code is confirmed, peer off the backing of the sticker
on the Remote Emitter and adhere it in place.
If you want to activate StarSight, proceed to the StarSight sec-
tion of the operating guide.
Note: Cables shown above can be purchased at your local Ze-
nith dealer. Measure each cable !,ength needed.
;uo.,a. gto]
activate StarSight.
3<:63-0 1 -- 3
Page 12
l
STANDARD TV/SOURCE CONNECTIONS
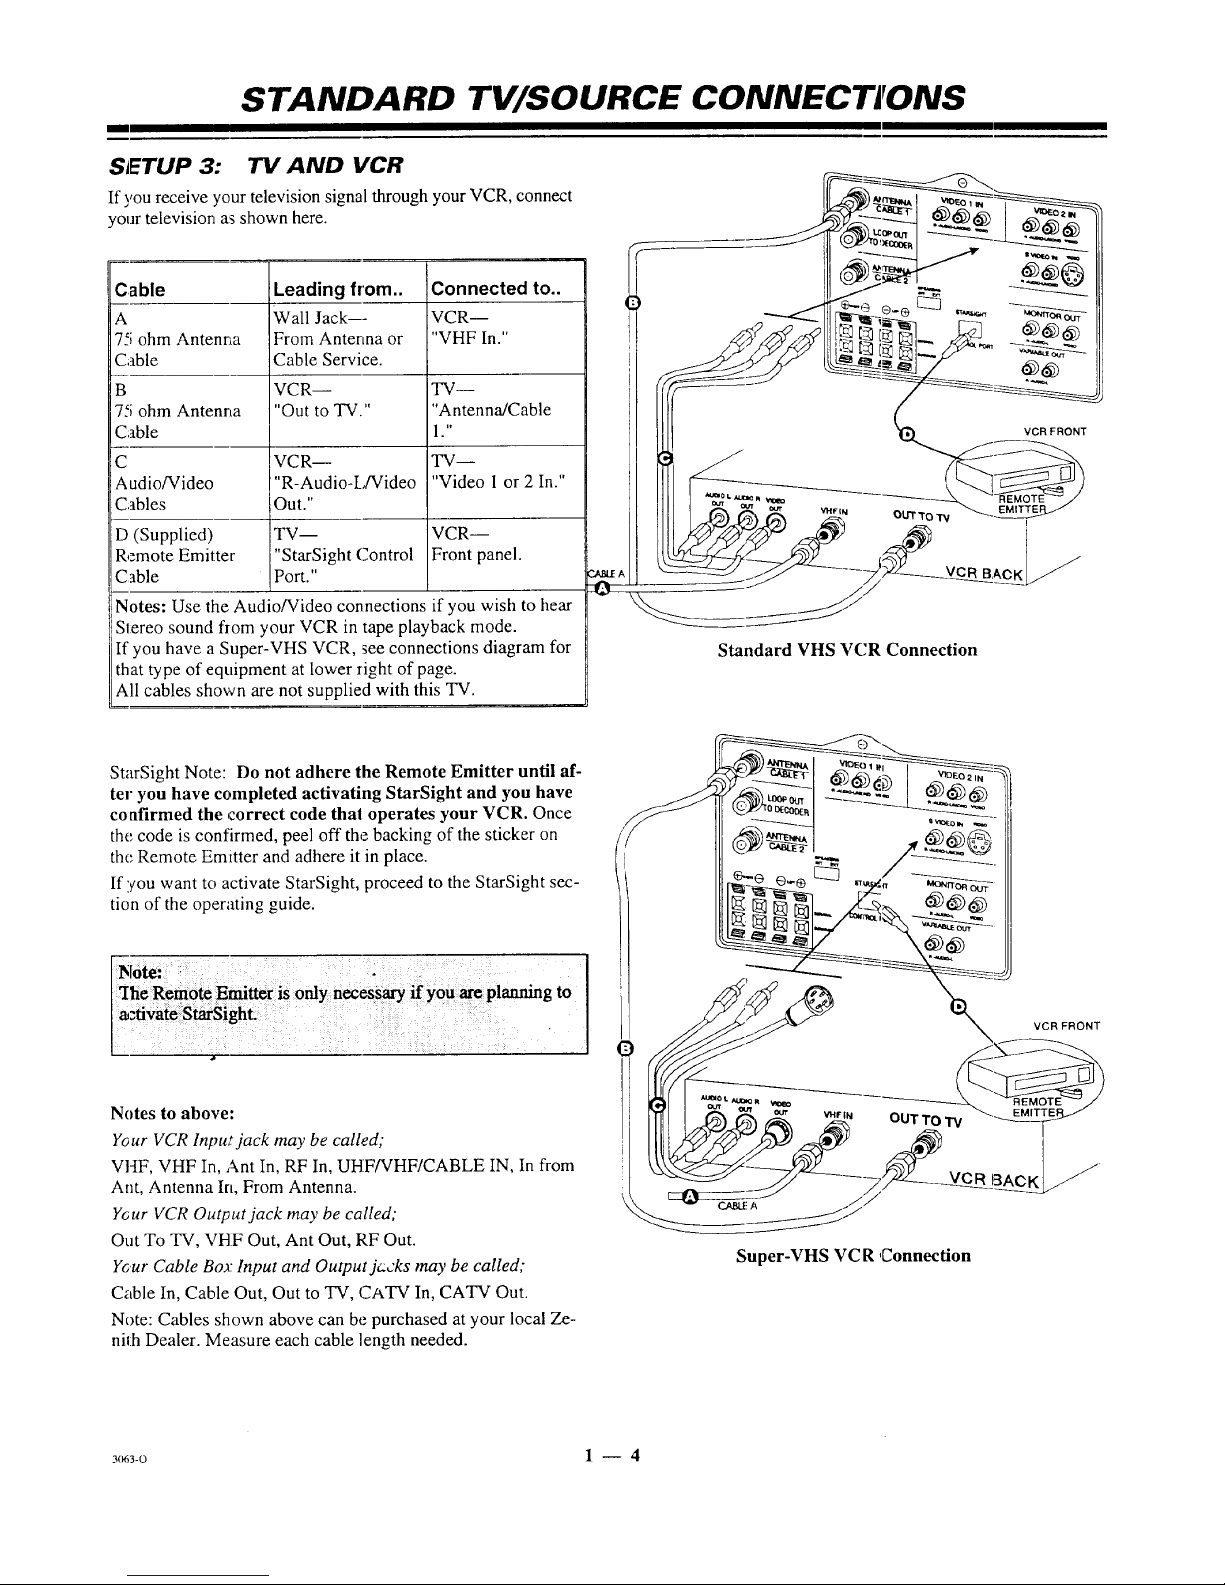
SETUP 3: TV AND VCR
If you receive your television signal through your VCR, connect
your television as shown here.
Cable
A
7-<;ohm Antenna
Cable
B
7,'; ohm Antenna
Cable
C
Audio/Video
Cables
D (Supplied)
Remote Emitter
Cable
Leading from..
Wall Jack---
From Antenna or
Cable Service.
VCR--
"Out to TV."
VCR--
"R-Audio-L/Video
Out."
TV--
"StarSight Control
Port."
Connected to..
VCR--
"VHF In."
TW--
"Antenna/Cable
1 ."
TV--
"Video I or 2 In."
VCR--
Front panel.
Notes: Use the Audio/Video connections if you wish to hear
iStereo sound flom your VCR in tape playback mode.
If you have a Super-VHS VCR, see connections diagram for
that type of equipment at lower right of page.
All cables shown are not supplied with this TV.
0 _ [_ _ __ ._----_
!_J,_ _ I_l I_ _1,..,.x._ "_ __
il _--_J" _-_---___._ _--:_
Standard VHS VCR Connection
StarSight Note: Do not adhere the Remote Emitter until af-
ter you have completed activating StarSight and you have
confirmed the correct code that operates your VCR. Once
the code is confirmed, peel off the backing of the sticker on
the Remote Emitter and adhere it in place.
If you want to activate StarSight, proceed to the StarSight sec-
tion of the operating guide.
Notes to above:
Y_ur VCR lnpu_t jack may be called,"
VHF, VHF In, Ant In, RF In, UHF/VHF/CABLE IN, In from
Ant, Antenna In, From Antenna.
Ycur VCR Output jack may be called;
Out To TV, VHF Out, Ant Out, RF Out.
Your Cable Boa: Input and Output jc:cks may be called;
Cable In, Cable Out, Out to TV, CATV In, CATV Out.
Note: Cables shown above can be purchased at your local Ze-
nith Dealer. Measure each cable length needed.
Super-VHS VC R ,Connection
3(r63-0 1 -- 4
Page 13

STANDARD TV/SOURCE CONNECTIONS
SETUP 4:" TV WITH VCR AND CABLE BOX
I1:you receive 5'our television signal through your Cable Box and
VCR, connect your television as shown here.
DO NOT UNPLUG YOUR CABLE
BOX POWER CORD AT ANY TIME!
DO NOT PLUG YOUR TV POWER CORD
INTO THE BACK OF YOUR CABLE BOX!
;able Leading from.. Connected to..
Wall Jack--- TV--
'5 ohm Antenna From Antenna or "Antenna/Cable
7able Cable Service. 2."
TV-- Cable Box--
'5 ohm Anterma "Loop Out to "In."
".able Decoder."
Cable Box-- VCR--
'5 ohm Antenna "Out." "VHF In."
_able
) VCR-- TV--
'5 ohm Antenna "Out To TV." "Antenna/Cable
.'able 1."
VCR-- TV--
_udio/Video "R-Audio-L/Video "Video 1 or 2 In."
2ables Out."
(Supplied) TV-- VCR/Cable Box--
remote Emitler "StarSight Control Front Panels.
:able Port."
Notes: Use the Audio/Video connections if you wish to hear
Stereo sound from your VCR in tape playback mode.
StarSight Note: Do not adhere the Remote Emitters until af-
ter you have completed activating StarSight and you have
confirmed the correct codes that operate your equipment.
Once the codes are confirmed, peel off the backing of the
sticker on the Fmitters and adhere it in place.
a,
I1!you want to activate StarSight, proceed to the StarSight sec-
tion of the operating guide.
_=::::O::::= I ,
kL"-..
CABLE
// BOX
/ _'_-__ VCR
IIII _ _ _--_-_ _, FRONT
Cable Box and VC R Connection
Notes to abow;:
Your VCR Input jack may be ca;led;
VHF, VHF In, Ant In, RF In, UHF/VHF/CABLE IN, In from
Ant, Antenna In, From Antenna.
Your VCR Output jack may be called;
Out To TV, VHF Out, Ant Out, RF Out.
Your Cable Box Input and O_',tp,_tjacks may be called;
Cable In, Cable Out, Out to q-V, CATV In, CATV Out.
Note: Cables shown above can be purchased at your local Ze-
nith dealer. Measure each cable length needed.
_ivate StarSight.
3(_3-o 1 -- 5
Page 14

STANDARD TV/SOURCE CONNECT IONS
I
FRONT 71/" AUDIO/VIDEO (A/V) CONNECTIONS FOR OPTIONAL VA'DEO EQUIPMENT
S,.r.oCmoo,d.,__
Connections to FRONT VIDEO IN -- I _
or FRONT S-VIDEO IN jacks. _
(Some TV models only.) ,t_,/ _,_
........
Super-VHS VCR wcwDto
O_JT
o1
i
,ll_o lmdr -_ t,t,o_ lm_R_-_
OPTIONAL AUDIO AMPLIFIER/SURROUND SOUND CONNECTIONS TO TV
If you wish to lislen to the TV audio through an external amplifier or stereo system, or listen to surround sound audio, make the connec-
tions to the TV shown in the illustration below.
,_ TURN OFF POWER OR UNPLUG TV BEFORE MAKING ANY CONNECTIONS TO YOUR TV.
Surround
:_peakers Silver _ _)_
.......
L___V Si_,_r
Amplifier and Dual Surround Speaker Connections
Sider
8 ohm
Surround
Speaker
Single Surround Sp_mker Connection
a
TV Speakers On
(Some Models Only) :
SPEAKER EXT/INT switch in the INT
(internal) position --
TV speakers are ON. Sound is heard
from both the TV's speakers and the
external amplifier's speakers.
Use TV's volume control to raise and
lower the level of sound being heard
from both sets of speakers.
TV S_ers
:(S0me Models O_y)
_3 SPEAKER EXT/INT switch in the EXT
(external) position --
TV speakers are OFF. Sound is only heard
from the speakers connected to the external
amplifier.
ta Use TV's volume control to raise and
lower the level of sound being heard from
the amplifier's speakers.
DIFFERENT WAYS TO LISTEN TO YOUR W :: : :
: :: S-,rro_dSo_d:
Q Connect :_urround sound speakers as
shown. The:level of surround sound will
vary, depending on the proglarn being
viewed. Nete that not all programs have
surround so and audio.
Q The SURROUND SPKR terminals are
always active. The SPEAKERS EXT/INT
switch does not affect the operation of
surround sound speakers.
ta If you w_mtto connect only one surround
speaker to your TV, connect the speaker
wires to the terminals adjacent to the
posigive (+) and negative (-) symbols that
are circled.
3os3-o 1 -- 6
Page 15

THE FIRST TIME YOU OPERATE YOUR, TV
E1 II
TYPICAL CONTROL PANEL
The control panel on your TV may differ from the one shown but its operation is the. same.
ENTER (ENT) SELECT (SEL) VOLUME (VOL) Down/Up
Press to see the Channel/Time dis- Press during on-screen menu op- Press to dcx:rease or increase the
p'_ay,or to remove any on-screen di,;- erations to select a menu option, sound leve.1.
Viay or menu.
ENTER </_JUST• SELECT •VOLUME • •ella |NEE• POWER
/ /
POWER
Press to turn TV
power ON or OFF.
I
ADJUST (ADJ) Left/Right
Press during on-screen menu opera-
tJon to see information/status display
f3r selected option. Press again to ad-
jast the selected menu option.
MENU
Press once to see a menu. Press re-
peatedly to sequence through the
available menus.
CHANNEL (CH) Down/Up
Press to select channels lowc:r or
higher thma the current ch annel.
Remote Window
Point the remote con-
tro] towards this
window to operate the
TV.
PROJECTION TV CONTROL PANEL
_e control panel on your TV may differ from the one shown but its operation is the same.
SELECT (SEL)
Press during on-screen menu
operations to select a menu
option.
ENTER (ENT)
Press to see the Channel/Time
display, or to remove any on-
screen display or menu.
VOLUME (VOL) Up/Down
Press to increase or dex:rease the
sound level.
OFF-ON
Press to turn TV
power ON or OFF.
r
ADJUST (ADJ) Left/Right
Press during on-screen menu op-
eration to see information/status
display for selected option. Press
again to adjust the selected menu
option.
MENU
Press once to see a menu. Press
repeatedly to sequence through
the available menus.
CHANNEL (C H) Up/Down
Press to select channels higher or
lower than the current channel.
To add or delete channels stored
in the scanning sequence, see CH.
ADD/DEL option.
CONNECT THE POWER
1. Plug your TV into an unswitched AC power source.
(Normal household current outlet that is not controlled
by a wall switch.)
2. Turn the TV On by pressing POWER.
,®:¥,, ]_
Do not plug TV into switched outlet
on a VCR or cable-TV decoder
3o63-o 2- 1
Page 16

I
THE FIRST TIME YOU OPERA TE YOUR TV
STEP 2. INSTALL THE BATTERIES INTO THE REMOTE CONTROLS
Batteries are provided but they must be installed before using
the remote controls. When a remote no longer functions nor-
mally, or when it loses memory, replace the batteries with
high-quality, alkaline batteries. !vlatch plus with plus (+ with
+), minus with minus (- with -), as shown in the battery com-
pamnent.
Unless your equipment responds to the factory preset codes,
you will need to reprogram the remote controls with the codes
of your particular equipment each time you replace batteries.
Universal Remote
(Uses 2 size AAA
batteries.)
Notes:
[] Do not to place heavy objects on top of the remote control
keys. Prolonged unintentional operation of the remote short-
ens batter?, life.
[] Remove the batteries if the remote control will not be used
for a month or more. aRE MANUFACTURER IS NOT RE-
SPONSIBLE FOR DAMAGE CAUSED BY BATTERY LEAKAGE.
Z-Trak Remote (
(Uses 2 size AA
batteries.)
STEP 3. SELECT YOUR MAIN SOURCE & PIP (Picture-in-Picture) SOURCI"
A TV source refers to the equipment connected to the TV/Source Connections Panel that supplies tbe picture and sound to your TV.
You select the viewing source by using the Source Menu. Use the universal remote control.
.Main Picture Source
1. Press SOURCE on
your ren_tote to view
the Source Menu.
:2.
Use Up or Down
arrow key to select the
Main Picture source
--which corresponds
to the jack(s) on the
TV/Source
Connection Panel.
:3. Press QUIT to remove
the menu.
pIP Inset Picture Source
1. Press SOURCE on
your remote to view
the Source Menu.
2. Use the Left or Right
arrow key to select
PIP Source column.
3.
Use the Up or Down
arrow key to select the
PIP Window Inset
Picture source.
4. Press QUIT to remove
the menu.
Ource
nu
Main <1, PIP
Ant/Cable 1 ]
Ant/Cable 2
Video 1
Video 2
S-Video
Front Video
Frnt S-Video
Main 4), PiP
IAnt/Cable 1 ]
Video 1
Video 2
S-Video
Front Video
Frnt S-Video
Source Menu with Main Source and PIP Source set to
Ant/Cable 1. Connections must be made to the corre-
sponding jack(s) on the TV/Source Connection Panel.
Note: If you select Ant/Cable I or 2 for the Main Source,
the TV will auiomatically select it also for the PIP Source.
N_3-O 2 -- 2
Page 17

I
THE FIRST TIME YOU OPERATE YOUR TV
TEP 4. USE AUTO PROGRAM (Available Channels Search.)
Jto Progr;ma finds all available channels on the currently se-
:ted source and stores them in the memory of the TV. To
lrt the Auto Program. procedure press the Left or Right
row key. Follow the instructions on the TV.
1. Press 1",1,to select Ot_7 AIR ANTENNA or CABLE TV.
2. Press _-- _ to begin (hannel search.
3. Wait for the TV to complete search, press QUIT.
_]_ etup
Menu
A_ Prograrff_
Add/Del/Surf
Clock Set
Captions
Caption/Text
Lancluage
Background
StarSight
Projo Setup
• • To Program I
Setup Menu with Auto Program Highlighted
t_Auto Program
OFF NR ANTENNA
l c_rv 1
Press T,L To Change 4" To Program
f
AutoProgram Searching...
Ch___ IsNotFound
Auto Program Searching...
Ch__ ts Found
f
Luto Program Done!
ChannelsFound
Message appears only if TV has not been authorized for
StarSight.
rEP 5. SET THE CLOCK
Press MENU repeatedly on your universal remote until
the SETUP icon is :_elected and the Setup Menu is
displayed.
Press the Up or Down arrow key to select Clock Set,
then pzess the left or right arrow key.
Choose. Auto or Manual mode:
Auto, TV sets Clock, (while TV is t_arned off).
Manual, Use the numbered keys on the universal
remote control to key-in the correct time or press the
Left or Right arrow keys repeatedly to advance the
clock. Press TIMER to select AM or PM.
Press QUIT to remove the menu.
te: If StarSight is active it automatically sets the clock.
STEP 6. USE OTHER OPTIONS
You may want to consider using the foil!owing options:
[] Create a Surf Channel Scan: "Surf' scan only your most t_ned
or favorite channels, refer to the Setup Me au for details.
[] Delete channels or add additional channels: Refer to the
Ch. (Channel) Add/Del/Surf option, Selup Menu for details.
[] Apply "labels" to available channels: Pefer to the Ch, La-
bels option, Special Features Menu for details.
[] Label the input sources with descriptive manes, such as
"VCR." Refer to the Source ID option, Special Features
Menu for details.
t_ Adjust options in the Audio and Video Menus.
_REEIV PROTECTOR (Some Projection TV Models Only)
ne projection TVs are equipped with a pre-installed Screen
,tector. If it should be necessary to remove or adjust the pro-
_or,"peel" the extrusions away from the TV to separate the
)-part Velcro fastener, being careful not to damage or pull
aythe adhesive backing strips from the Screen Frame.
Clean the TV Screen (Under the protector)
a soft cloth moistened with warm water and rub lightly in
soiled areas of the projection screen. DO NOT USE A
;SUE OR PAPER TOWEL AS THESE MAY DAM-
,E THE SCREEN SURFACE.
pe only in a vertical, up and down direction (along the
oves in the screen). If there is a dirt buildup, a mild solu-
of warrn water and Ivory dish washing detergent may be
d. Use a dry soft cloth to dry the Projection Screen and
een Protector. Care should be taken to avoid scratches or
aage to the screen sure'ace.
l Prc_ection
Screen
Screen
Extrusion Pro(oc_or
2--3
Note:
The TV
screen is eas-
ily damaged.
Avoid acci-
dental contact
with the
screen.
F'at_
\'_
Page 18

UNIVERSAL REMOTE SOURCE MENU
Front Video and Front
S-Video are source options
on the front of the TV Con-
trol Panel on some models
only. _N_
Source
Menu
Main ,<), PiP
[ An'u'Cable 1 I
AntJ'Cable 2
Video 1
Video 2
S-Video
Front Video )
Frnt S-Video ,
Source
[
Ant/Cable 1
Video 1
Video 2
S-Video
Front Video
Frnt S-Video
_)urce Menus
Shown with Main picture
source menu selo:ted (left)
and
PIP Window Inset menu
sdected (right),
Note: The TV will select the
szme PIP source as the
Main picture source if the
Main Picture source is either
Antenna/Cable 1 or 2. How-
ever, you can still select
Video 1, 2 etc., as the PIP
Window Inset Picture
Sc)urce.
MENU OPERATION
_ Press SOURCE for direct entry to the
Source Menu, or press MENU repeat-
or edly until the Source Menu is selected.
_t ress SOURCE:, repeatedly until the desired
Source is se]ec_.ed.Or use Up/Down arrow.
•,/_'_ Use the Left/Right arrow key to select
(_]___(_) either Main Picture Source menu or PIP
_ ______ Picture Source menu.
[_,__] Press QUIT or wait a few seconds for the
TV to return te normal operatic n.
SOURCE SELECTION
ANT/CABLE 1 or 2 Routes the antenna or cable-TV source to the 'IV for viewing. You see program material from the
source equipment connected to the ANT/CABLE 1 or 2 jack. (If the signa] is from a VCR era cable
box, tune the TV to either channel 3 or 4.)
VIDEO 1 or 2 Routes the audio and video from an A/V source (such as a VCR or a video disc player) to the TV for
viewing. The source equipment must be connected to the corresponding VIE,EO 1 or 2 IN jacks.
S-VIIDEO Routes the audio and video from an auxiiiary Super-VHS video source (sttch as a VCR or a video disc
player) to the TV for viewing, q-he source equipment must be connected to die corresponding
S-VIDEO IN jacks.
FRONT VIDEO or Routes the audio and video from an auxiliary A/V, or Super VHS video source (such as a VCR or a
FRNT S-VIDF_,O video disc player) to the TV for viewing. The source equipment must be connected to the
corresponding FRONT VIDEO or FRNT S-VIDEO IN jacks.
Refer to the "Standard TV/Source Connections" section to make the proper equipment connections to the TV. Fc,r i_aformation about PIP sources,
refer to the "PIP Operation" section.
3o61-o 6 -- 1
Page 19

UNIVERSAL REMOTE SETUP MENU
_ etup
Menu
Auto Program
Add/Del/Surf
Clock Set
Captions
Caption/Text
Language
Background
I StarSight
[(Projo Setup
1 <_ To Program I
Projo Setup is only avail-
able on projection TVs
_ etup
Menu
I-Clock Set
Captions
Caption/Text
Language
Background
] [<• Set Clock
While Video or Super-Video Source is Chosen
MENU OPERATION
Press MENU repeatedly until the
SETUP MENU is shown.
Press the Left/Right arrow key to
adjust the selected option.
Press the Up/Down arrow key until
the desired option is selected.
P::essQUIT or wait a few sec-
onds for the TV to return to
normal operation.
Auto Program Finds all active channels and stores them in the TV's memory for use by CHANNEL up/down. See
"THE FIRST TIME YOU OPERATE YOUR TV" fi}r more details.
(Channel) Edit the channels found by Auto Program to create your own persorLal list of channeh; using the
Add/Del/Surf Channel Add or Delete feature. You may want to add (or delete) a weak-signal channel to the channel
scan. Create your own "Surf" Channel Scan to scan your most tuned, favorite channels using Chan
Up/Down. See the information following this chart for more details
Clock Set Use to set the clock in the TV to the correct time, manually or autonaalically. See the information
following this chart for more details.
Captions Use to turn on-screen Caption/Text On or Off. Options are: On, Off ol Captions When Muted.
Caption/Text Select from the options available when Captions is turned on above. I3isplays closed captioning or
informational text when available on the selected channel. Options are: CAPTION 1, CAPTION 2,
CAPTION 3, CAPTION 4, TEXT 1, TEXT 2, TEXT 3, or TEXT 4. See the information following
this chart for more details.
Language Selects language for on-screen menus. Options are: English, Spanish or French.
Background Adds or removes a background from behind the on-screen menus.
StarSight Begins the StarSight Setup procedure. Refer to the StarSight section tbr details.
Projo Setup Lets you verify and adjust, if needed, the dynamic color convergence of the "IV picture. See the
information following this chart for more details.
continued on next page
3o63-o 7- 1
Page 20

I
UNIVERSAL REMOTE SETUP MENU
AUTO PROGRAM
Auto Program finds all available channels on the currently se-
lected source and stores them in the memory of the TV. To
start the Auto Program procedure, press the Left or Right
arrow key. Follow the instructions on the TV.
_ e tup
Menu
[-Auto Pr_
Add/Del/Surf
Clock Set
Captions
Caption/Text
Language
Background
StarSight
Projo Setup
41_ To Program]
Setup Menu with Auto Program Highlighted
1. Press 1"$ to ,;elect OFF AIR ANTENNA or CABLE TV.
2. Press 4---_ to begin channel search.
3. Wait for the TV to complete ,;earch, press QUIT.
utoProgram _'
OFF AIR ANTI NNA
___w_--]
tess T2. To C_ 4 Iz- To ProQnlrn
AutoProgram Se_ffching...
Ch __ IsNot Found
Auto Program Done!
Channels Found
Message appears only if TV has not been authorized for
StarSight.
USING (CHANNEL) ADD/DE1/SURF
Add/Delete and Surf Channels to Scan
1. Use the Up/Down arrow key to highlight
Add/DelLSurf menu.
2. Press LefdRight arrow key to view the
Add/Delete/Surf menu.
3. Use the Left/Right/Up/Down arrow key to move
channel selector to the channel being
Added/Deleted or included in Surf Channel Scan.
4. Press TINIER repeatedly to select Add, Delete or
Surf.
Add = Channel will be added to scan when Channel
Up/Down key is pressed.
Delete = Channel will not be included in scan when
Channel' Up/Down key is pressed.
Surf = Channel will be added to Surf Channel scan
when Surf is active and Channel Up/Down key is
pressed.
Repeat Steps 3 through 4 to add, delete or include
channels to Surf Channel Scan.
5, Press QUIT to remove the menu.
Notes:
Add/Del/Surf can only be used with ANT/CABLE 1 or 2
S 3urce.
Surf Scan channel numbers are shown with the Surf Icon on
the Add/Del/Surf menu as shown at the right.
The audio of"deleted channels is muted.
Available Channels Selector Highlight with Surf Icon
' y_
I I
___ ---------7 _
f
:: 9 10
• .:i: _'
; :i: 33 35 _
_---_----=r----_; h 2
47 48 50 Added
51 _ {;i - ::
:_: 57 _.'- ._, 60 ss/[_
" Pre
I
[ MoreChannels¢
Live view of
selected channel.
Added Channel
Deleted Channel
Surf Channel
Channel
Status
Instructions
Use Down key to
move selector to
additional num-
bers if present.
Available channels are:
Broadcast Band -- VHF 2 to 13, UHF 14 to 69
Cable-TV Band -- 1 to 125
3(:_3-o 7 -- 2
Page 21

UNIVERSAL REMOTE SETUP MI-NU
USING CLOCK SET
Set The Clock
1. Press MENU repeatedly on your remote until the
Setup Menu is displayed.
2. Use Up/Down arrow key to highlight Clock Set.
3. Use Left/Right arrow key to access Clock Menu.
4. Use Left/Right arrow key to select Auto or Manual.
Auto, TV sets the clock; while the TV is turned off.
Manual user keys-in time, etc. Use the numbered
keys on the universal remote control to enter the
correct time or press the Left or Right arrow key to
advance the clock. Press TIMER to select AM or
PM.
7. Press QUIT to remove the menu.
Notes: If StarSight is active, the time is automatically set and up-
dated. You car_ specify a Time Zone and Daylight Savings time even
if c!ock is in Auto mode. *See StarSight Clock Set Note below.
Clock
Menu
I Clock Mode . ]
Time Set
I
Clock
Menu
I-Clock Mode ]
Time Zone
Day. Saving
[ Manual ]
I-figblight Bar
Auto ]
TURNING CAPTIONS ON AND OFF
Turn Captions Feature On and Off
(If you select On, proceed to Choosing Captions/Text.)
1. In the Setup Menu, use the Up/Down keys to
highlight Captions.
2. Use the Left/Right arrow key to select: Off, On or
Captiorts When Muted.
3. Press QUIT to remove the menu.
Turn Captions Feature On and Off with TO DO Key
1. Press TV, press TO DO key on remote.
2. Press TO DO repeatedly to cycle through the
options: Off, On or Captions When Muted.
Note: If you select Captions When Muted, Closed Captions
will appear when the Audio is Muted.
_ etup
Menu
Auto Program
Add/Del/Surf
Clock Set
C_Captions----_
a_7T_---
Language
Background
StarSight
off ]
I captions
Off 0_1 When Muted
CHOOSING CAPTIONS OR TEXT OPTIONS
Activating Captions/Text (From the Setup Menu)
1. Use the Up/Down arrow key to highlight
Caption/Text.
2. Use t_e Left/Right arrow key to cycle through the
choices: Caption 1, Caption 2, Caption 3, Caption
4, Text 1, Text 2, Text 3, or Text 4.
3. Press QUIT to remove the menu.
Note:
At present, very few "IV programs or video tapes offer text
captioning for any option other than CAPTION 1. Therefore,
CAPTION 1 is the only recommended choice, unless you know
thata specific program is providing captioning using one of the
other selections.
StarSight Clock Set Note:
*After StarSight is authorized for your "IV it can take up to 48
hours for all StarSight information to be provided, while the
TV is Off As a consequence of that process, the Clock time
(which is automatically set by StarSight) may be set incor-
rectly. If this becomes a problem, you can use the Clock Set
menu to set the TV's time manually.
3(}63-0
_ etup
Menu
Auto Program
Add/Del/Surf
Clock Set
CaC_a_ns
_n-_ext ]
Background
StarSight
m m i m m N m m I .
See special newscast
"_o.'_A_J'] " " '_" tonightchannelat2.7:00PM on
•
• J
Typical Captions Display Typical Text Display
Captions may be shown anywhere Fixed size text window fills
on the screen, lower half of screen.
7--3
Page 22

m
UNIVERSAL REMOTE SETUP MENU
LANGUAGE
Select the On-Screen Menus Language
1. Press MENU repeatedly on your remote until the
Setup Menu is displayed.
2. Use Up/Down arrow key to highlight Language.
3.... Use Left/Right arrow key to choose:
English, Espafiol or Franqais.
(English, Spanish or French)
4. Press QUIT to remove the menu.
_ etup
Menu
Auto Program
Add/Del/Surf
Clock Set
Captions
Caption/Text
I Language _
Background
StarSight
I English
BACKGROUND
Provides a background for all or_-screen displays, making
them easier lo read.
Turn On-Screen Menus Background On or Off
1. Press MENU repeatedly on your remote until the
Setup Menu is displayed.
2. Use Up/r)own arrow key to highlight Background.
3. Use Left/Right arrow key to turn On or Off.
4. Press QUIT to remove the menu.
_ etup
Menu
Auto Program
Add/Del/Surf
Clock Set
Captions
Caption/Text
Language
StarSight
[ On
STARSIGHT
Note: Before you activate the StarSight feature, review the
StarSight section for the information about your system com-
ponents you will need to complete the StarSight activation
process.
StarSight Subscription Procedure
1. Press MF, NU repeatedly on your remote until the
the Setup Menu is displayed.
2. Use Up/I)own arrow key to highlight StarSight.
3. Use Left!Right arrow key to begin the StarSight
Setup procedure.
4. Press QUIT to remove the menu.
Auto Program
Add/Del/Su rf
Clock Set
Captions
Caption/Text
Language
<, ForSetup I
PROJO SETUP: COLOR CONVERGENCE (For Projection TVs Only)
When you first install your projection "IV, or if after time, you notice color "'fringes" around objectr; in the plcture, you may need to
realign the oolors by adjusting the convergence as described in the following steps.
"['o Converge Colors
1. From the Setup Menu, use Up/Down arrows to
choose Projo Setup.
2. Press Left/Right keys to view the converge lines.
3. Press Source key to select either RED or Blue lines
to converge.
4. Press the Up/Down and Left/Right arrow keys to
place the RED (or BLUE) lines directly on top of
the reference lines. (Do this for both colors as
necessary.)
Notes:
Any adjustments made to the Video Menu settings while Pic-
ture Pref. is in the PRESET mode will automatically be stored
in the Custom setting.
Four intersecting
WHITE lilnes indi-
cate the TV is prop-
erly converged. No
adjustment is neces-
sary.
Four RED (or Blue)
lines offeset from the
WHITE limm indi-
cate converging is
necessary. Follow the ---
steps to align the
color lines (Red and
Blue) with the white
lines.
"N
PFESS_URCE KEYTO SELECTCOLOR/
PFESSARROWKEYSTOCOfWERGE RED|
(OR_ OE)
"N
PRESS SOURCE KEY TO SELECT COLOR |
PRESSARROWKEYSTO COt€VERGERED|
/
IOR_-UE)
l
:_(_-o 7 -- 4
Page 23

UNIVERSAL REMOTE SPECIAL FEATURES
[
_ Special
Features
Timer Setup
Ch. Labels
Source ID
Parental Ctl
Auto Demo
J
4b. To Set Timers l
MENU OPERATION
_ Press MENU repeatedly until the
SETUP MENU is shown.
U,;e the Left/Right arrow key to
adjust the selected option.
'\.,_[_/' thedesired option is selected.
Press QUIT or wait a few sec-
onds for the TV to return to
normal operation.
Timer Setup Sets the TV's Sleep Timer and On/Off Timer features. See the information following this chart for
more details.
Ch (Channel) Labels Assigns a network/station label, name or call letters to specified channels. For example, if you choose
the label "ABC" for channel 7, then "ABC" will appear in the Channel/Time display whenever channel
7 :is selected. See information following this chart for more details.
Source ID Assigns a descriptive "name" to the input sources. For example, the Video 1 source may be named
VCR. "VCR" will now appear in the Source Menu as a reminder that ,1ourVCR is cennected to the
Video 1input jacks.
Parental Ctl (Control) U:sethis feature to block viewing of any undesirable channels or the entire video signal. See the
• information following this chart for more details.
Auto Demo Use to view a demonstration of the on-screen menus and features avzil_.ble on this TV.
continued on next page
3063-O 8 _ 1
Page 24

I
UNIVERSAL REMOTE SPECIAL FEA]FURES
TIMER SETUP: Sleep Timer
The Sleep Timer programs the TV to automatically turn itself off after a period from 15 minutes up tc 4 hours.
From Setup Menu
1. Make sure the time on the TV's clock is set.
2.. Use the Up/Down arrow key to highlight Timer
Setup and view the Timer Menu.
3. Use the Up/Down arrow key to highlight Sleep
Timer.
4, Use the Left/Right arrow key to set the period of
time the TV will remain on.
Direct Access
1, With no menus showing on the TV, press TIMER
on your remote to directly access the Sleep Timer.
2. Press TIMER repeatedly to set the period of time
the TV will remain on.
Timer
Menu
Sleep Timer
On Time
Off Time
On/Off Timer
]
0:15
Sleep Timer Set to Turn TV
OFF in 15;Minutes
One minute before the TV turns off, the GOOD NIGHT dis-
play appears on the screen. At this time you have a choice of
the following two actions:
A. Do nothing. The GOOD NIGHT display remains on
the screen. The TV will turn off in one minute.
t3. Delay the turn-off by resetting the timer with a new
time period.
Notes:
To cancel the Sleep Timer, turn off the TV or press TIMER re-
peatedly until OFF is showing.
As the Good blight display counts down the final 60 seconds,
file audio and video of the TV a]so" dim" for a soft, discreet
i-
!
:.(:. GOOC Night 0:58
58 Seconds
"Good Night" Display Appears 60
Seconds Before Shut-Off
turn-off.
TIMER SETUP: On/Off Timer
The On/Off Timer programs the TV to automatically turn it-
self on at a specific time then turn itself off at another time.
Set On/Off Timer
1. Make sure the time on the TV's clock is set.
2,. Use the Up/Down arrow key to highlight Timer
Setup.
2,. Use the Lip/Down arrow key to highlight On Time
and use lhe numbered keys on your remote to
key-in a time for the TV to turn itself ON. Press
TIMER on the remote to select AM or PM. (You
can also use the Left/Right arrow key to advance
the time.)
4l. Use Up/Down key to highlight Off Time and use
the numbered buttons on your remote to enter a
time for the TV to turn itself OFF. Press TIMER on
the remote to select AM or PM. (You can also use
the Left/Right arrow key to advance the time.)
5. Use Up/Down key to highlight On/Off Timer and
use the Left/Right arrow key to turn timer ON (or
OFF).
Note: To use the On/Off Timer you must specify an Off
lime.
Timer
Menu
Sleep Timer
On Time
Off Time
On/Off Timer
] [ 11:00 AM
On/Off Timer Set to Turn
TV On at 11:00 am
:_3-o 8 -- 2
Page 25

UNIVERSAL REMOTE SPECIAL FEATURES
USING CHANNEL LABELS
Assign Labels to Channels
]. From the Special Features menu, press the
Up/Down arrow key to highlight Ch. (Channel)
Labels.
2. Press Left/Right arrow key to view Channel Label
screen.
3. Select a channel by using CHANNEL Up/Down key
or key-in channel number with numbered keys.
4, Use the Left/Right/Up/Down arrow keys to move
label selector to appropriate channel label which
will add label to channel number.
5. To create a custom label, press Timer to access
custom labels screen. Use Up/Down/Left/Right
arrow keys to select each digit and customize your
channel label. Press TIMER to exit menu and return
to Ch. Labels menu.
Repeat steps 3 through 5 for each channel.
6. Press QUIT to remove menu.
Notes:
Ch. Labels can only be used with ANT/CABLE 1 or 2 Source.
Selecting the four dashes (.... ) specifies that no channel la-
bel is assigned and that the broadcaster may supply a channel
label. Or, in addition to not assigning a label, NONE blocks the
station or network labels thatare transmitted by some television sta-
tions.
Live view of selected channel.
.... NONE A&E ABC ACTS
ADC AMC BCC BET BRAV
CA CBC CSN CBS CMTV
CNBC CNN C0M CSPN CSP2
CTN CTV DIS DISC El
ENC ESPN ESPN2 ET EWTN
FAM FNN FOX F&V FX
GALA HBO HN HSE HSN
IC INSP JCN LIFE MAX
ME/U MMT MTV NBC NICK
NO$ PBS PLAY PTL OVC
RDS REQ SC SCFI SHOW
SIN TBS TBN TELE TLC
TMC TNN TNT TRAV TWC
UPN TSA VC VCR VH-1
VlSN WB [_] WTBS WWDR
" NN_ Label Selector
Ch 9
WGN --
Press
to edit
] .
A B C D E F G H I J F," L M N O
P Q R S "/ U V W X Y 21 [) I 2 3 4
5 6 7 8 9 0 - / & # . I ? * Iq I_
UseAnows to Select Ch<xracter
Press EN'i_RTo Add Chalacter
FreesTIMERTo Return
--- Channel Number
Channel Label
,_ Appears after a
label is chosen.
USING SOURCE ID
Assign Identifying Names To Your Sources
1. In the Setup Menu, press the Up/Down arrow key
to highlight Source ID
2. Press the Left/Right arrow key to view the Source
ID screen.
3. Press the Up/Down arrow key to highlight a Source.
4. Press the Left/Right arrow key repeatedly to choose
a label for the chosen Source.
5. Press QUIT to remove menu.
Optional names for ANT/CABLE 1 or 2 Sources are: .... ,
Disabled, Antenna, Cable, Cable Box, VCR, Satellite, Star-
Sight, Video Game, Laser Disc or DVD.
Optional names for VIDEO and S-Video Sources are: .... ,
Disabled, VCR, VCR 1, VCR2, Satellite, Camcorder, Video
Game, Laser Disc, DVD, Photo CD or Audio Only.
Note:
Disabling a Source prevents it from appearing in the Source
Menu.
Live view ofhighlighted Source.
Source
Label
[Ant/Cable 1] [_tarSight I
Ant/Cable 2 - - -
Video 1 VCR
Video 2 Video Game
S-Video - - -
Front Video - - -
FrntS-Video - - -
3063 0 8 -- 3
Page 26

I
UNIVERSAL REMOTE SPECIAL FEATURES
USING PARENTAL CONTROL (PC)
Parental Control allows you to be selective about viewing, on your particular TV, the programming which is being televised in your
local broadcast area. If there are undesirable programs or channels you wish to block., you can use IZ'arental Control; block out par-
ticular channels or the entire video image. You can also specify the hours Parental Control will be active. To access the Parental
Control Menu from the Special Features Menu, press Up/Down arrow key to highlight Parental Control.
Use Up/DowrvLeft/Right arrow keys to specify your Parental Control preferences.
[
Parental mocksindividual
Control ./channelsfor Ant/Ca-
/ ble 1or 2 sources.
Block Ch.
7 [] ,, 10
14 151i
18ii19 201i
""_" -_l 8
35ii CBS "
39 Unblocked __
43 .... q" __
PI'ItS_ TIMER _
54
Pre_,s
65
Antefma
Live view of
highlighted chan-
nel.
Channel highlighter
Blocked Channel
Unblocked Channel
.J
Block Video /
Set Hours/,
Set Password 11------
Lock On/Off --7--------
Blocks video and
S-Video images.
Period of time PC will
be active.
Only way to access
PC.
Turns PC feature
On/Off.
271
42
Channel Number
Status
_- Instructions
-- Source Signal
Parental Control Menu
Block Channels MenuL
Block Ch. (Channel)
Use to block an individual channel's video and audio. A pad-
lock symbol will appear next to the channel numbers that are
blocked, as shown in the example at the right. The grayed
numbers are irLactivechannels, no signal. The solid numbers
areactive charmel numbers and the channel numbers with the
padlock next to them are the blocked channels.
Block Video
Use to block the image for all video and S-Video sources. The
video image will be missing from the TV screen when Block
Video is actiw_.
Set Hours
Use to specify the number of hours ParentalControl will be ac-
tivated. Once Parental Control is active, the TV cannot be
viewed unless the Password is used to unlock the TV or the
time period elapses.
Set Password
Use to set your Parental Control Password.
Note: Remember your Passworc[ or you will have to wait until
the specified time has elapsed before you can operate the TV.
Lock On/Off
Use to turn the Parental Control feature On and[Off. The pa-
rental control settings will reraa: n but can be activated, (On)
or deactivated (Off).
AUTO D EMO
When active sets in motion a series of on-screen demonstra-
tions of the features that are available on this TV. Shows ex-
amples of the trackball remote control menus and the different
features available with the trackball, and with the universal re-
mote. Once selected, Auto Demo will begin after a short de-
lay. Options are: On or Off.
Notes:
To turn Auto Demo Off, you must choose the Off option from
the Special Features menu as shown at the right.
If you press any key during Aulo Demo operation it will disap-
pear from the TV screen, and then begin again after about 20
seconds.
_ Special
Fea tures
Timer Setup
Ch. Labels
Source ID
Parental Ctl
I Auto Derno ]
[ Off
3o63-o 8 -- 4
Page 27

UNIVERSAL REMOTE AUDIO MENU
! I
Audio
Menu
Bass
Treble
Balance
Audio Mode
SoundRite
Front Surr
Rear Surr
Speakers
4
With PIP active, to select
the audio (sound) from
the Main Picture source
or the PIP Inset, press
the note key repeatedly.
(Selected note symbol
(Audio Source) will be a
white color.) Unselected
audio source note will
be a gray color.
With no menus on-
screen press the note key
to turn Surround Sound
effect On and Off.
Ch 11-w-r-rw
1:17
Stereo
MENU OPERATION
1_ Press MENU repeatedly until the
AUDIO MENU is shown.
Press the Left/Right arrow keys to ad-
jusl tl:e selected option.
Bass
Treble
Balance
Audio Mode
(SAP is not an optionfor
the Video or S-Video
sources. Audio signals
into a video source are
assumed to be monaural
orstereo. )
Press the Up/Down arrow keys until
the desired option is either highlighted
or selected.
Press QUIT or wait a few seconds for
the TV to return to normal operation.
Adjusts',the BASS (low-frequency) level.
Adjusts; the TREBLE (high-frequency) level.
Adjusts the balance of sound between the two speakers.
Allows you to select STEREO, MONO or 2ND AUDIO/SAP operation.
STEREO: Directs the sound to the Left and Right speakers as supplied by the program. Stereo is the
recommended choice: The TV switches automatically between the STEREO and MONO
modes depending on the type of signal being received.
MONO: Directs the same sound to both Left and Right speakers, even if the program being
received is in stereo.
2ND AUDIO/
SAP:
Directs the sound for the Second Audio Program (second language) to both the Left and
Right speakers. SAP sound is always monaural. If SAP is selected, you hear the SAP
(usually a second language). When the SAP broadcast ends, the TV switches
automatically (defaults) to the type of signal being received, STEREO or MONO. The
"IV switches back to 2ND AUDIO/SAP when the SAP broadcast resumes.
SoundRite When channels are changed, automatically adjusts the sound level to the prevailing sound level. Sound
from newly selected channel will be the same volume as the previously tuned channel.
Front Surr Turns On and Off the Front Surround effect. Front Sound is only available i:; a surround encoded stereo
signal is being received.
Rear Surr Adjusts the level of Surround Sound provided to the optional rear surround sound speakers.
Speakers Turns internal speakers On and Off. (Off indicated by "EXT Volume" on Volume bar.)
Note:
[] All adjustments on the Audio Menu are optional You do not have to adjust these features in order to use your TV.
3061-0 9 -- 1
Page 28

ml
UNIVERSAL REMOTE VIDEO MENU
Contrast
Brightness
Color
Tint
Sharpness
Color Temp
Video Filter
Skin Tone
Video Preset
<
I mml_]
MENU OPERATION
_ Press MENU repeatedly until the
VIDEO MENU is shown.
Press the Left/Right arrow keys to
adjust the selected option.
_'_@@ tPde_',;;et,_:UP/D°wn arr°w keYs until
option is selected. _
Press QUIT or wait a few seconds
for the TV to return to normal op-
e:-ation.
(Sontrast Adjusts the overall contrast and color level of the picture.
Brightness Adjusts the brightness level of black areas in the picture.
Color Adjusts the intensity of the colors in the picture.
Tint Adjusts the color of the flesh tones to more Green or more Red.
Sharpness Adjusts the definition of the object edges for best picture quality.
Color Temp Changes the "color temperature" or picture white balance between cooler natural white:_ and warmer
(Temperature) (red) colors.
Video Filter Reduces video "noise" or interference in dark picture areas resulting in clearer overall pictures.
Skin Tone* Automatically maintains natural skin tones under changing scene and video source conditions.
'Video Preset Adjusts the picture to different light environments. Options are: Custom Preset, Movie, Video Game,
Sports, Daylight or Weak Signal.
Notes:
All adjustments on the Video Menu are optional. It is not nec-
essary to adjust these features in order to operate the TV.
Any adjustments made to the Video Menu settings while
Video Preset is not in the CUSTOM mode, will automatically
store the current settings as the CUSTOM setting.
3(i,51-o 10- 1
Page 29

UNIVERSAL REMOTE PIP VIDEO MENU
PIP
Menu
Contrast
Tint
Size
Selecting the PIP Menu does not "acti-
vate" PIP. However, a PIP window will
appear during men u operation to show
tile effect of any setting changes. Press
PIP to access PIP f,_ature.
MENU OPERA TION
_) Press MENU repeatedly until the PIPMENU is shown.
ff,--
N.,_.f Z"-,.V
Press the Left/Right arrow keys to
adjust the selected option.
Press the Up/Down arrow keys until
the desired option is either highlighted
or selected.
Press QUIT or wait a few seconds
lbr the TV to ret_rn to normal opera-
lion.
lC°ntrast
Tint
f[Size
Adjusts the intensity of the colors in the PIP inset.
Adjusts the color of the flesh tones in the PIP inset to more Green or m3re Red.
Adjusts the size of the PIP inset. Choose between small or large.
3_1-o 11 _ 1
Page 30

• Z-TRAK TRACKBALL REMOTE CONTROL
INTRODUCTION
This multi-brand remote control operates the common features of most, but not all, models and brands of IR (infraroS)
controlled VCRs. Some functions of your particular VCR may not be controlled by this remote. In such cases, use the original
remote control for your VCR.
BATTER Y INS TA LLA TION
13arteries are provided, but must installed before using the re-
mote control. When it no longer functions normally, or if it
loses memory, replace the batteries with two high-quality, al-
kaline, size AA batteries. Match positive with positive (+ with
+), negative with negative (- with -) as shown inside the bat-
tery compartment.
VCR Brand ('.ode Auto Find Option
Unless your VCR responds to the factory preset code com-
monly used for Zenith VCRs, you may need to use Auto Find
to program the VCR code whenever you replace batteries. See
following pages for remote programming Auto Find instruc-
tions.
Nores:
• Do not place heavy objects on top of the remote control
keys; prolonged unintentional operation of the remote
shortens battery life.
• Remove the batteries if the remote control will not be used
for a month or more. Battery leakage can permanently
damage the remote, for which Zenith is not responsible.
CHOOSING OPERA TING MODE
AA Batteries
To control your TV or VCR with this remote, you must first choose the mode of operation.
Press the TV mode key to control the TV or press the VCR mode key to control the VCR.
TV
Press to select "IV mode.
VCR
Press to select VCR mode.
:,o63-o 12 _ 1
Page 31

Z-TRAK TRACKBALL REMOTE CONTROL
BASIC OPERATIONS
Point remote at TV, press POWER. Press down on trackball to activate on-screen pointer. Rotating trackball will move pointer
around screen to access on-scream menus. Click on highlighted menu or option. (See Quick Reference to On-screen Menus section.)
TV Mode VCR Mode
Depending on Mode,
point Remote at
TV or VCR
LLILM ode TV Mode
P0W ER Power
TV TV
Selects TV operation mode.
V0 L Rewind
(Down)
MUTE Pause
RECRD Record
(Record)
VCR VCR
Selects VCR operation mode.
Track ball
Move on-screen pointer to desired
menu selection. Press trackball down
to "chc_ose" the selection,
Play CHAN
(Up)
Fast V0L
Forward (UP)
Stop C HAN
(Down)
E;nLer E NT ER
Flashback FLSH13K
TV AND VCR KEY FUNCTIONS BY MODE
IFV M ode Function Keys
Press TV to'access "IV functions
TV -- Selects TV Mode.
"VCR -- Selects VCR Mode.
POWER --Turns "IV On.
CHAN (Up) -- Tunes to next higher channel.
"VOL (Up) --Increases sound level.
VOL (Down) -- Decreases sound level.
CHAN (Down)--Tunes to next lower channel,
MUTE --Turns Sound Off.
RECRD -- Begins VCR Recording.
ENTER -- Shows Channel/Time/Audio Mode Display.
FLSHBK -- Tunes to previous TV channel.
VCR M ode Play/Record Function Keys
Press VCR to access VCR flmctions
TV -- Selects TV Mode.
VCR -- Selects VCR Mode.
Power --Turns VCR On.
Play -- Begins tape playback,
Fast Forward _ Advances tape rapidly.
Record
Pause
Enter
Stop
Flashback
Rewind
-- Begins recording.
-- Momentarily ceases tape movement.
-- Shows VCR Status display.
-- Halts tape m_vement.
-- Shows image from VCR tuner instead of
image from tape playing in VCR.
-- Rewinds tape rapidly.
3063-O 12 -- 2
Page 32

Z-TRAK TRACKBALL REMOTE CONTROL
I)ROGRAMMING YOUR Z-TRAK TRACKBALL REMOTE
The Zenith Trackball remote is already programmed
ta work with most Zenith VCRs. If your VCR is not
a Zenith, or if your Zenith VCR does not respond to
the trackball remote, you will need to program your
remote as follows:
1. Refer to lhe VCR Codes by Brand Name Listing ta-
ble on the next page. Locate the 3-digit number
which corresponds to your brand of VCR.
2. Make sure the TV is On.
2;. While pointing the Zenith Z-Trak remote towards
your TV, simultaneously hold the MUTE and EN-
TER keys until the TV displays a "VCR Setup"
menu screen (takes about 3 seconds). The VCR key
will ligh! upon entering 1:he Programming Mode.
4. Notice that the current VCR brand code (initially
20t) is displayed on the screen. Roll the trackball
up or down (or use Chan Up/Down) to choose the 3-
digit number of your VCR.
5. When (he correct 3-digit number is displayed on the
TV screen, press the POWER key to see if your
VCR turns On and Off properly. If the VCR does
not respond, refer to the VCR Code Brand Listing
table to select a different 3-digit number.
6. If your VCR turns On and Off successfully, press
the trackball (or ENTER) to save the current VCR
brand code. The VCR Setup screen will disappear
from the TV. Also tile VCR key will blink 3 times
upon exiting the Programming Mode. The remote
will be in the VCR mode.
7. Now try other controls on your VCR, such as PLAY,
REWIND, etc., to make _ure that the correct VCR
brand code number was selected. (If not, repeat
steps 1 to 7.)
8. The MUTE key can he pressed at any time to cancel
programming mode.
9. Note: Only the VCR Mode can he programmed.
Pressing the VCR or TV mode key will have no ef-
fect in the Programming Mode. Similarly VOL
Up/Down RECRD, and FLSHBK will have no func-
tion in the Programming Mode.
10. The remote will exit Programming Mode automat-
ically after 60 seconds if no key or trackball move-
ment is detected.
.AUTO FIND: PROGRAMMING YOUR Z-TRAK REMOTE TO CONTROL VCR
i[fyou have tried all 3-digit codes listed for your VCR manufacturer, and none of them operate your VCR, you will need to try
"AutoFind" to see if a different code will operate your VCR. Proceed as follows:
1. Make sure your VCR and TV are turned on.
2. Simultaneously hold the MUTE and ENTER keys
until the VCR key lights up (about three seconds).
13. Point the: Z-Trak trackball remote towards your
VCR. Press CHAN (Up) followed by POWER. If
your VCR did not turn off, keep repeatedly pressing
CHAN (Up) followed by POWER until the VCR re-
sponds,.
4. If your VCR turned off, press ENTER to save the
code. (Write it down for future reference.) The VCR
key will flash three times after ENTER is pressed.
5. Now try other controls on your VCR, such as Play,
Rewind, etc., to make sure that the correct VCR
brand cede number was selected. (If not, repeat
steps 2 to 4,)
6. The MUTE key can be pressed at any time to cancel
AutoFind mode. The original VCR brand code will
remain unchanged.
7. The remote will exit AutoFind mode automatically
after 60 seconds, if no key press or trackball move-
ment is ,detected,
m_,,aT, _:::,, -
Point at VCR
I
3(t63-O 12 _ 3
Page 33

Z-TRAK TRACKBALL REMOTE CONTROL
VCR CODES BY BRAND NAME LISTING
Admiral
Adventura
Aiwa
_kai
Audio Dynamics
Bell & Howell
Broksonic
Canon
Citizen
Craig
Curtis Mathes
Daewoo
Daytron
DBX
Emerson
Fisher
Funai
General Electric
Goldstar
Go Video
Hitachi
Instant Replay
J.C. Penney
VCRS
208,261
231
231
223,238,241
202,218
206,247
221,226,250,255
214
209
212
214,259
244,246,248,254
236,246
202,218
203,221,223,226,
233,235,243,250
211,212,213,247
231
214,216,220
209
256,262,263
215,257
214, 227
214,215,218,227
202,225,258
JVC
Kenwood 202
Logik 239
LXI 209,231
Magnavox 207,214,231
Marantz 207,218
Marta 209
Memorex 206,212,214,231
Mitsubishi 204,222,252,264
Montgomery Ward 208,214,216,219,
231,249
Multi Tech 1239
NEC 202,218
i
Orion 1250
Panasonic 214, 251,259
Penmx 1215
i
Philco 207, 214
Philips _207 214,227
Pioneer 2101 215
Portland i246
I
ProScan 1216,260
I
Quasar 1214,259
215,216,220,227,
RCA 240, 242, 260 __
Realistic !206,208,212,214,
231
Samsung 220, 230
Sansui 239
Sanyo 206, 212, 247
Scott 204, 205,233,243
Sears 206, 209, 211,212,
215
Sharp 208, 261
;hintom 239
Signature :2000 208, 214, 216, 219,
231,249
Sony 234, 217,237
Sylvania 207, 214, 227
Symphonic 231
Tashiko 209
Tatung 202
Teac 202, 231
Teknika 234
Toshiba 205,215
Vector Research 204, 218
XR- 1000 239
Yamaha 202, 218
Zenith 201,224,225,229,
237
Ref:124-207 and
gP 221-939A
,CLEANING THE TRACKBALL
To keep the Z-Trak remote functioning properly, it is neces-
sary to occ_ionally clean the I"RACKBALL device. To do
this:
1. Use a solution of mild dish washing detergent and
water.
2. Moisten a clean soft cloth with the solution and lay
the cloth flat on a table.
3. Turn the Z-Trak remote upside down and gently roll
the TRACKBALL on the cloth.
4. Allow the remote to air-dry before using it again.
CAUTION:
• DO NOT USE ALCOHOL OR OTHER CLEANING FLUIDS TO
CLEAN THE TRACKBALL A_ THESE MAY DAMAGE THE
REMOTE.
:;_3-o 12 -- 4
Page 34

Z-TRAK REMOTE MENUS OVERVIEW
Ill II
AVAILABLE ON-SCREEN MENUS
Shown below are the on-screen menus as ihey will appear when you use the trackball remote. As you move the pointer
up/down/leftlright on-screen, these menus will appear. Place pointer over icon or menu option andTV will identify it:.
Menu icons selection
TV on-screen
menu options
PIP functions menu
options when using
t'rackball remote
Volume display appears
when sound controls are
tLsed
/-
I¸iH
Ch 20
3:56 •
Mono
(PIPMoveI
oh,l
Ch,I,
All Chan -
Flashback
[Surf's Up[ "_-]--
_ _ Volume ]
< "lllllll Ilfl'llli'lllllIlltll HII'_"
-- TV Screen
Channel
--- Time
Audio Signal
--- Pointer
Channel Up/Down
All Channel Access
Channel Flashback
Status of Channel
Surfing Option
BASIC MENU OPERATION
To access tile trackball menus you must use the trackball re-
mote.
Step 1. To activate TV mode on the remote, press the TV key.
Step 2. Press ':rackball to place pointer arrow on-screen.
Step 3. Move cursor by rolling the trackball in the desired di-
rection of one of the menus that are shown above.
Step 4. When the pointer is over the desired menu option,
press trackba!l. A list of options will appear, make your selec-
tion or change.
Step 5. Move pointer to center of screen and press trackball to
remove it or wait a few seconds and the TV will return to nor-
mal operation.
For example, to access Channel/Time/Audio Signal display,
press TV. Point Remote at TV Press trackball to place pointer
on-screen, rotate trackball to move pointer to middle-right side
of TV screen until Channel/Time/Audio display appears.
Note: Moving the on-screen pointer to a menu option will pro-
duce a display identifying the option. For example, ifyou
move the arrowto the middle/left portion of the screen so that
it rests on 1he arrows icons, the on-screen display will show
the words "PIP Move" (see example above.)
®
3,_63-o 13- 1
Page 35

Movepointertoany
menuicon,press
trackballtoaccess
menuasshown.
Withthepointeron
anymenutitle,press
trackballrepeatedly
to scan available
menus.
Z-TRAK REMOTE MENUS OVERVIEW
Source Menu Setup Menu Special Features Audio Menu Video Menu PIP Video Menu
ON-SCREEN DISPLAYS
Channel/Time/Audio Mode Display
Channel - Reveals the currently tuned channel.
Time - Reveals the time set on the TV.
Audio Mode Display - Reveals the audio signal currently be-
mg received.
Channel Up/Down, All Channel, Flashback Display
Channel Up/Down - Use to move one channel higher or lower --
':nchannel selection.
All Channel - Display a listing of all channels available. Sim-
ply place pointer over desired channel number then press the
rrackball.
Flashback - Tune TV to previously viewed channel.
,Channel Surfing Display
Reveals if the Channel Surfing option is active or not.
Ch 20
3:56
Mono
_J
Ch't ]
Ch_, /
All Chon'_
Flashback'[
Move pointer over
option anti press
trackball to access
option or make a
change.
Audio Volume Display
Use the pointer to increase or decrease sound level. You can
choose the level of sound by pointing and pressing the track-
ball. Point and press on the Speaker Icon to soften sound,
press again to turn off sound, press again to restore sound.
--[ .,.v...,..=..:,....,,,,.,,.....,.1
'FV Mode Icon
]Place pointer over icon and press trackball to switch to Star-
Sight Mode.
Captions Icon
Use to turn Captions On/Off. Options are: On, Off or Captions
when muted. Use Setup menu to specify Captions/Text
choice, either Caption 1, Caption 2, Caption 3, Caption 4, Text
1, Text 2, Text 1, Text 3 or Text 4,.
Trackball Speed Icon
Lrse to specify trackball speed. Options are: Slow, Medium or
Fast.
Sleep Timer Icon
Use to set the Sleep Timer, which turns off the TV after a
specified period of time. Options are in hours and minutes:
Off, 15, 30, 1:00, 1:30, 2:00, 2:30, 3:00, 3:30, 4:00.
\
loci
Q •
O o •
/
:_o63-o 13 -- 2
Page 36

. Z-TRAK REMOTE MENU OPERATION
POINT AND PRESS OPERATION
Shown below is a typical on-screen menu as it would appear when you use the trackball remote. !5:ess TV. Press trackbali
to place pointer on the TV screen. Rotate trackball to move pointer to an area of the:'IV screen whe,re your desired menu can be ac-
cessed. (See Typical On-Screen Menus section) Rotate trackball to move pointer over icon or menu option. Press trackball to ac-
cess menu or option. See example below.
Typical Menu leon
_enu Featu,'es Menu
.st,g. 8reLaTiVe '
Selection 1
Selection 2
Selection 3
Selection 4
Selection 5
Selection 6
Selection 7
Selection 8
Feature Selection
Highlight Bar
N
ions
J
/
Menu titlle
Menu locations where
you can place the
Pointer .and make
change.,;
Option Highlight Bar
Menu Operation Options
Use the trackball remote to point and press on the
feature selection you wish to access, press on the
trackball to highlight the feature selection.
Using th_ Pointer to Access/Change
Menus or Options
The Pointer can be placed in several places to ac-
cess a menu or make a change to an option:
The Menu Title
Press Trackball repeatedly to scroll through avail-
able menu,;.
The Feature Selection Highlight Bar
Press Trackball repeatedly to make changes to the
feature or Io scroll through the available options.
The Option Highlight Bar or Arrows
Press Trackball repeatedly to make changes to the
feature or to scroll through the available options.
TV Mode Key
Power Key
Trackball
"ner
Note: For
Clock/Timer input,
you can point and
press on these
areas to make
changes
3063-0 14 -- 1
Page 37

Z-TRAK REMOTE SOURCE MENU
Move pointer to
Source Icon, press
u:ackball to access
menu
Source Menu
,MENU OPERATION
Point and press on de-
sired feature lo first high-
light it, then press
':rackball repeatedly to se-
lect the optton and/or
:make a change.
Front Video and Front
S-Video are source options
on some TV models only.
• 5q
Source
Menu
Main <1_ PIP
i Ant/Cable 1
Ant/Cable 2
Video 1
Video 2
S-Video
Front Video
Frnt S-Video
,)
Source
Menu
Ma}n • _ PIP_lp, I
[ Ant/Cable 1
Video 1
Video 2:
S-Video
Front Video
Frnt S-Video
Source Menus shown with
Main picture source menu
and selected (left)
and PIP insert menu
selected (right).
SOURCE! SELECTION (Refers to W/Source Connections Panel ,as illustrated below
Routes the antenna or cable-TV source to the TV for v:iewing. You se_ program material from
Ant/Cable 1 or 2
whichever signal source is connected to the ANT/CABLE 1 or 2 jack. Cfthe signal is from a VCR or
a cable box, tune the TV to either channel 3 or 4.)
Routes the audio and video from an A/V source (such as a VCR or a video disc player) to the TV for
Video 1 or 2; viewing. The source must be connected to the corresponding VIDEO 1 ar 2 IN jacks.
Routes the audio and video from an auxiliary Super-VHS video source (such as a VCR or a video disc
S-Video
player) to the TV for viewing. The source must be connected to the corresponding S-VIDEO jacks.
Routes the audio/video from an auxiliary video source (such as a VCR or a video disc player) to the
Front Video TV for viewing. The source must be connected to the corresponding iiont Video or S-Video IN jacks.
and Front S-Video
See the "Standard Connections for Your TV" section to make the proper equipment connex:t:ionsto the TV For information about PIP sources, re-
fer to the "PIP Operation" section.
Note: The term "Source" refers to the equipment and antenna wires connected to these jacks on the TV/Source Connection Panel, located
on the back of the TV. To place the picture/sound being received by these jacks (or Source) on the TV scr,_n, you "Select" the appropri-
ate "Source _' Antenna/Cable 1, Video 1, etc. using the Source menu as shown above.
ANTENNA/CABLE 1
75-ohm antenna or cable-TV con-
nection to your TV. Attach your an-
tenna, cabte-TV line or VCR lo
these jacks.
LOOP OUT TO DECODER
Routes the cable-TV input to
Antenna/Cable 2 back to the cable
box supplied by the cable service.
ANTENNA/CABLE 2
75-ohm ar_tenna or cable-TV con-
nection Io your TV. Attach your
Antenna, cable-TV line, cable box
or VCR to these jacks.
VIDEO 1 or 2 IN
Jacks for audio and vMeo input from a
stereo VCR or other A/V component.
(You must connect to these jacks in order
to hear stereo sound when playing a ste-
reo tai?e.)
S-VII)EO IN
Jacks for audio and video input from a Su-
per-VHS VCR.
Note: If you select Ant/Cable I or 2 as
the Main picture source, the TV will auto-
matically select it as the PIP Window In-
set Picture source. The selection will
appear as you choose the PIP Source
menu If desired, you can then manually
choose one of the Video Source options
for the PIP Window Inset Picture.
3063-O 15- 1
Page 38

Move Pointer
to Setup icon,
press trackball
to access menu
Z-TRAK REMOTE SETUP MENU
Setup Menu
MENU OPERATION
Point and press on desired feat_:xe to first highlight it, then press trackball repeatedly to select the option and/or make a change.
Setup
.Menu
Auto Program
Add/Del/Surf
Clock Set
Captions
CaptionFlext
Language
Background
StarSight
(Projo Setup
[41, To Program_
I
I
Projo Setup is only
available on projection
TVs models.
_ Setup i
Menu
[ Clock Set
Captions
Caption!Text
Language
Background
[<), SetClock !
While Video or Super-Video Source is Chosen
Auto Program Finds all active channels and stores them in the TV's memory for use by CHANNEL up/down. See
"THE FIRST TIME YOU OPERATE YOUR TV" for more details.
(Channel) Edit the channels found by Auto Program to create your own personal list of channels using the
Add/Del/Surf Channel Add or Delete feature. You may want to add (or delete) a weak-signal channel to the channel
scan. Create your own "Surt" Channel Scan to scan your most tuned, favorite channels asing CHAN
UptDown. See the information following this chart for more details.
Clock Set Use to set the clock in the TV to the correct time, manually or automatically. See the in%rmation
following this chart for more details.
Captions ° Use to turn on-screen Caption/Text On or Off. Options are: On, Off or Captions When Muted.
CaptionfFext Select from the options available when Captions is turned on above. Displays closed captioning or
informational text when available on the selected channel. Options are:: CAPTION 1, CAPTION 2,
CAPTION 3, CAPTION 4, TEXT 1, TEXT 2, TEXT 3, or TEXT 4. See the information following
this chart for more details.
Language Selects language for on-screen menus. Options are: English, Spanish or l_rench.
Background Adds or removes a background from behind the on-screen menus.
StarSight Begins the StarSight Setup procedure. Refer to the StaJSight section for details.
Projo Setup Lel_ you verify and adjust, if needed, the dynamic color convergence of the TV picture. See the
information following this chart for more details.
continued on next page
3_3-o 16 -- 1
Page 39

Z-TRAK REMOTE SETUP MENU
AUTO PROGRAM
Auto Progr_ml_ finds all available channels on the currently se-
lected source and stores them in the memory of the TV. To
start the Auto Program procedure from the Setup Menu,
point and press to highlight Auto Program. Point and
press on the Left or Right arrow, (as shown to the right)
follow the on.screen instructions.
Available channels are:
Broadcast Band -- VHF 2 to 1:3, UHF 14 to 69
Cable-TV Band -- 1 to 125
_ etup
Menu
t Auto Progr_-_
Add/Del/Surf
Clock Set
Captions
Caption/Text
Language
Background
StarSight
Projo Setup
Et_gJ' ro rag_r___j
USING (CHANNEL) ADD/DEL/SURF
This feature allows you to edit the channels that can be viewed on your TV. Add, C'hannel will be included in channel scan.
Del, Channel will be removed from channel scan. Surf, Channel will be added to Surf channel scan.
Channel Surf scan is intended to contain your favorite chan-
nels or the channels that you tune to most often.
Add/Delete Channels or Include Channels in Surf Scan
1. From lhe Setup menu, point and press on
Add/Dei/Surf.
2. Point lind press on a channel number.
3. Point lind press on the status line beneath the
channel number. Press repeatedly to choose: Add,
Del or Surf.
4. Point lind press on another channel to make changes
or to the Exit icon and press trackball to remove
menu from screen.
Notes:
In Add/Del/Surf can only be used with Ant!Cable 1 or 2
Source.
I3 The audio of deleted channels is muted.
I3 Surf Scan channels are shown with the Surf Icon on menu
as shown to the right.
Available Channels
I
1-
1
11
26
a6_
47
si r_
57
66
7e 77
82
Selector Highlight with Surf Icon
[ -_ ) _ Live view of
r[_------: _o_____ _" selected channel.
i7 i _" Added Channel
-- Deleted Channel
i as
37 38 40 Ch 2
Cl3S
48 ,5o Added
59 60
63
73
/
79
83 ;M
Channel Number
Status Line
To remove menu
/
Use pointer to
move selector to
additional num-
bers if present.
,USING CLOCK SET
Set The Clock
Note: If StarSight* Mode is active, clock is set automat-
ically. You can specify a Time Zone and Daylight Savings
lime even if dock is in Auto mode.
1. From lhe Setup menu, point and press to highlight
Clock Set.
2. Point and press on Left/Right arrow to access Clock
Menu.
Clock Mode = Use to choose clock operating mode,
Auto or manual. Auto, the clock time is set
automatically while TV is Off.
Manual, the current time and related information
must be keyed-in by the user.
3. Point and press to highlight Time Set.
4. Point and press to change time setting.
5. Move pointer off menu and press trackball to
remove menu from screen.
i/_ Clock
,,_ Menu
Clock Mode
Time Set
[
\
Manual ]
Selector Highlight
\_ Menu
Clock Mode
Time Zone
Day. Saving
] I Auto
StarSight Clock Set Note:
*After StarSight is authoriz_:l for your "IV it can take up to 48
hours for all StarSight information to be provided, while the
TV is Off. As a consequence of that process, the Clock time
(which is automatically set by StarSight) may be set incor-
rectly. If this becomes a problem, you can use the Clock Set
menu to set the TV's time m;mually.
:,_3-o 16--2
Page 40

Z-TRAK REMOTE SETUP MENU
USING CAPTIONS
Provides to the hearing-impaired words (Captions) on-screen
of the audio portion of the broadcast. If a program has cap-
tions included, the CC or captions notice will appear for 2 or 3
seconds before the broadcast begins.
Turn Captions On and Off
1. From 1he Setup menu, point and press to highlight
Captions selection.
2. Point and press on highlighted menu or highlighted
option to select: On, Off or Captions when muted.
3. Move pointer off menu and press trackball to
remove menu from screen.
Note: If you select Captions When Muted, Closed Cap-
lions will appear when the sound is muted.
Setup
[Menu
Auto Program
Add/DellSurf
Clock Set
Caption_/_xt
Languag_
Backgrq_nd
StarSTt___ -
HighlightedMenu HighlightedOption
USING CAPTIONS/TEXT
If Captions are turned on, provides a menu of available Cap-
tion/Text options.
Accessing Closed Captions/Text
1. From the Setup menu, point and press to highlight
Caption/Text selection.
2. Point arLdpress on highlighted menu or highlighted
option repeatedly (as shown above) to select:
Caption 1, Caption 2, Caption 3, Caption 4, Text 1,
Text 2, Text 3, or Text 4.
3. Move pointer off menu and press trackball to
remove menu from screen.
Note:
At present, very few TV programs or video tapes offer text
captioning fcr any option other than CAPTION 1. Therefore,
CAPTION 1 is the only recormnended choice, unless you know
that a specific program is providing captioning using one of the
other selections.
Setup
Menu
Auto Program
Add/Del/Surf
Clock Set
Captions
'Caption/Text ]
qSafi-guage
Background
StarSight
T
_A_,'e youj
'l),pical Captions Display
Captions may be shown anywl-Lere
on the screen
i | m _ m | | m | m !
See special newscast
tonight at 7:00PM on
channel 2.
J
!
Typical Text Display
Fixed size text window fills
lower half of screen.
Language
Provides foreign language options for the on-screen menus to
appear in a language other than English.
Choose Language for On-Screen Menus
1. From the Setup menu, point and press to highlight
Language.
2. Point and press on highlighted menu or highlighted
option (as shown above) repeatedly to select:
English, Espafiol or Franqais.
(English, Spanish or French.)
3. Move pointer off menu and press trackball to
remove menu from screen.
_ etup
Menu
Auto Program
Add/Del/Surf
Clock Set:
Captions
o
StarSight
English
30630 16 -- 3
Page 41

I
Z-TRAK REMOTE SETUP MENU
_4CKGROUND
Provides a background for the on-screen menus to make them
cruder to read.
Turn On-Screen Menus Background On or Off
1. From the Setup menu, point and press to highlight
Background selection.
2. Point and press on highlighted menu or highlighted
option to ,';elect: On or Off.
3. Move pointer off menu and press trackball to
remove menu from screen.
_ etup
Menu
Auto Program
Add/Del/Surf
Clock Set
Captions
Caption/Text
Language
[BackgrouSi:]-_
StarSight
On )
STARSIGHT
Note: Before you activate the oplional StarSight feature, re-
view the StarSight section so you will have at hand the infor-
mation you will need to complete the StarSight activation
process.
Accesses the StarSight Setup Menu
1. From the Setup menu, point and press to highlight
StarSight selection.
2. Point and press on Left/Right arrow to select For
Setup. "I'he TV will enter the StarSight Setup
Menu, follow on-screen instructions.
3, Point and press on EXIT if you wish to leave the
StarSight Setup Procedure menu.
_ etup
Menu
Auto Program
Add/Del/Surf
Clock Set
Captions
Caption/Text
Language
Background
For
PROJO SETUP
When you first install )'our projection TV, or if after time, you notice color "fringes" around objects in the picture, you may need to
realign the cok)rs by adjusting file convergence as described in the following steps.
To Converge Colors
1. From the Setup Menu, choose Projo Setup. f
2. Use the point and press method to view the [
"Converge" lines.
3. Use the point and press method to select either
RED or'Blue lines to converge.
4, Use the point and press method to place the RED
(or BLUE) lines directly on top of the reference
lines. (Do this for both colors of necessary.) Move
pointer off menu and press trackballl to exit menu.
Notes:
RED
(orBJue)-
Four intersecting
WH1TE lilnes indi-
cate the TV is prop-
erly converged. No
adjustment is neces-
sary,,
Any adjustments made to the Video Menu settings while Pic-
ture Pref. is in the PRESET mode will automatically be stored
in the Custom setting.
F,ach time the TV is moved to a different location, the conver-
gence shouM be checked.
Four RED (or Blue)
lines offeset from the
WHITE lines indi-
cate conw_rging is ---
necessary.Follow the
steps to align the
color lines (Red and
Blue) with the white
lines.
RED
r Blue)-_
3[)63-0 16 -- 4
Page 42

Move Pointer
to Special Fea-
l_res Icon,
press trackball
I_oaccess menu
Z-TRAK REMOTE SPECIAL FEATURES
Special Features
MENU OPERA TION
Point and pre.';s on desired feature to first highlight it, then press trackball repeatedly to select option,; or make a change.
_ Special
Features
Timer Setup _1
Ch. Labels
Source ID
Parental Ctl
Auto Demo
< • To Set Timers
Timer Setup Sets the TV's Sleep Timer and On/Off Timer features. See the information following this chart for
more details.
Ch. Labels Assigns a network/station label, name or call letters to specified channels. For example, if you choose
the label "ABC" for channel 7, then "ABC" will appear in the ChannelFI'ime display whenever channel
7 i.'_selected. See information following this chart for more details.
;
Source ID Assigns a descriptive "name" to the input sources. For example, the Vi:leo 1source may be named
VCR. "VCR" would then appear in the Source Menu as a reminder that your VCR is connected to the
Video 1input jacks.
Parental _tl (Control) Use this feature to block viewing of any undesirable channels or the entire video signal. See the
information following this chart for more details.
Auto Demo Use this feature to view a demonstration of the on-screen menus available on this TV.
continued on next page
3_3-O 17 -- 1
Page 43

Z-TRAK REMOTE SPECIAL FEATURES
TIMER SETUP: Sleep 'Timer
The Sleep Timer programs the TV to automatically turn itself off after a period from 15minutes up to 4 hours.
1. From the Special Features menu, point and press to
highlight Timer Setup.
2. Point and press on Left/Right arrow to access
Timer Menu.
3. Point and press on Sleep Timer to access Sleep
Timer option.
Press trackball repeatedly to choose time the TV
will turn off. Options are: Off, 0:15, 0:30, 1:00,
1:30, 2:00. 2:30, 3:00, 3:30 or 4:00.
4. Move pointer off menu and press trackball to
remove menu from screen.
One minute before the TV turns off, the GOOD NIGHT dis-
play appears on the screen. At this time you have a choice of
the following two actions:
1. Do nothing. The GOOD NIGHT display remains on
the screen. The TV will turn off in one minute.
2. Delay the turn-off by resetting the timer with a new
time period.
Notes:
--- To cancel the Sleep Timer, turn off the TV or point and
press on Sleep Timer repeatedly until OFF is showing.
--- As the Good Night display counts down the final 60 sec-
onds, the audio and video of the "IV also "dim" for a soft, dis-
creet turn-off.
--- The clock must be set before the Sleep Timer can be set.
Timer
Menu
Sleep Timer ___
On Time
Off Time
On/Off Timer
[ 0:15, ]
Sleep Timer Set to Turn TV
OFF in 15 Minutes
i.(i.- Good NJght 0:58
58 Seconds
"Good Night" Display Appears 60
Seconds Before Shut-Off
TIMER SETUP: On/Off Timer
The On/Off Timer programs the TV to automatically turn itself on at a specific time then turn itself off at another time.
Make sure the TV's clock is set.
Set On/Off Timer
1. From the Special Features menu, point and press to
highlight Timer Setup.
2. Point and press on Left/Right arrow to access
Timer Menu.
Point anct press on On Time to access On Time
option.
Point and press on hours/minutes/AM, PM digits to
set the TV turn On time.
Timer
Menu
[_ eneep Timer
Time
Off Time
On/Off Timer
You can point and
press on these
areas to make
changes
4. Point and press on Off Time Option.
Point and press on hourslminuteslAM, PM digits to
set the TV turn Off time.
On/Off Thner Set to Turn
TV On at 11:00 am
5. Point and press on Off/Off Timer Option.
Point and press repeatedly to specify On or Off.
On- On/Off Timer will be activated.
Note:
A time must be set for Off T:imz in order to use the On/Off
Timer.
Off- On!Off Timer will be deactivated.
6. Move pointer off menu and press trackball to
remove menu from screen.
_3-o 17- 2
Page 44

I
USING CHANNEL LABELS
Channel labels make it easier to identify on-screen programming.
Assign Labels to Your Channels
1. From the Special Features menu, point and press to
highlight Ch. (Channel) Labels.
2. Point and press on Ch Up/Ch Down arrow
repeatedly to select channel number you want to
label.
Z-TRAK, REMOTE SPECIAL FEATURES
.
4.
Point and press on the appropriate label (A&E,
ABC, etc.,) you want for the selected channel.
Point and press on Ch Up/Ch Down arrow
repeatedly to select another channel number you
want to label or move pointer to EXIT and press
trackball to remove menu from screen.
To make a custom label
Select channel number, point on any label, press
trackball twice to access Custom Labels menu.
Using the point and press method, select each digit.
Point and press EXIT when finished to return to
Ch. Label menu.
Notes:
Ch. Labels can only be used with ANT/CABLE 1 or 2 Source.
Selecting the four dashes (.... ) specifies that no channel la-
bel is assigned, although the broadcaster may supply a channel
label. Or, in addition to not assigning a label, NONE blocks the
sl;ationor network labels that are Iransmitted by some television sta-
tions.
Live view of selected channel.
.... NONE A&E ABC ACTS
ADO AMC BCC BET BRAV
CA CBC CBN CBS CMTV
_:_'_
J
CNBC CNN OOM CSPN CSP2
CTN CTV DIS DISC E! [ Ch9
ENCESPNESPN2ET EWTN
FAM FNN FOX F&V FX [ WeN ]
GALA HBO HN HSE HSN
IC INSP JCN LIFE! MAX
ME/U MMI MTV NBC NICK
NOS PBS PLAY PTL QVC [ Oh 3"
RDS REQ SC SCFI SHOW [ Ch 4.
SIN TBS TBN TELE TLC
TMC TNN TNT TRAV TWO
UPN TSA VC VCR VH-1
VlSNwB wT,3swwo.
f
/
Selector Highlight
USING SOURCE ID
Assign Name_; To Your Sources
1. From the Special Features menu, point and press to
highlighl Source ID.
2;. Point and press on source you want to identify.
21. Point and press on highlighted label repeatedly to
select identifier label (VCR, Laser disc, etc.,) you
want for an ID.
4. Select another source you want to add an identifier
label to or move pointer to EXIT and press
trackball to remove menu from screen.
Selectable names for ANT/CABLE 1 or 2 Sources are: ....
, Disabled, Antenna, Cable, Cable Box, VCR, Satellite, Star-
Sight, Vide,) Game, Laser Disk or DVD.
Selectable names for VIDEO and S-Video Sources are: ....
, Disabled, VCR, VCR 1, VCR2, Satellite, Camcorder, Video
Game, Laser Disc, Photo Cd or Audio Only.
]Note:
]Disabling a Source prevents it from appearing in the Source
]Menu.
Highlighted Source Highlighted Label
Source
[Ant/Cable 1 ]
Ant/Cable 2
Vide<) 1
Video 2
S-Video
Live view of selected Source.
Front Video _ -
Frnt :S-Video_,,,,_
VCR
Video Game
J
Onl:€ available on some models.
3063-O 17 -- 3
Page 45

Z-TRAK REMOTE SPECIAL FEATURES
USING PARENTAL CONTROL (PC)
Parental Control allows you to be :selective about viewing, on your particular TV, the programming which is being televised tnyour
local broadcast area. If there are undesirable programs or channels you wish to block, you can use Pm:er.tal Control; block out par-
ticular channels or the entire video image. You can also specify the hours Parental Control will be active. To access the Parental
Control Menu, use the "Point and Press" method of menu access described on the previous pages.
r Parental
II Control /
Block Video _ L_.----
Set Hours
Set Password --_-----
J
Lock On/Off -------___._..
Parental Control Menu
Blocks individual
channels for Ant/Ca-
ble 1 or 2 sources.
Blocks video and S-
Video images.
Period of time PC will
be active.
Only way to access
PC.
Turns PC feature
On/Off.
Block Ch. (Channel)
Use to block an individual channel's video and audio. A pad-
lock symbol will appear next to the channel numbers that are
blocked, as shown in the exampl_ at the right. The grayed
numbers are inactive channels, no signal. The solid numbers
are active channel numbers and the channel numbers with the
padlock next to them are the blocked channels.
Block Video
Use to block the images for Video and S-Video sources.
Set Hours
Use to specify the number of hours Parental Control will be ac-
tivated. Once Parental Control is active, the TV cannot be
viewed unless the Password is used to unlock the TV or the
time specified has elapsed.
, _ ,i_ I o q-
' : : 14 15_
181il 19 20_
il 27 Ch B
35ii CB.q /
39 UnMoc;ked /
42 43
54 : Ant/Cbl 1 /
Ant/Cbl 2
Live view of
selected channel.
iShannel Selector
Channel Number
Channel Label
Status Line
Source Signal
.t To remove menu
Block Channels Menu
Set Password
Use to set your Parental Control Password.
Note: Remember your Passwcrd or you will have to wait until
the specified time has elapsed before you can operate the TV.
Lock On/Off
Use to turn the Parental Control feature On and Off. The pa-
rental control settings will remain but can be activated, (On)
or deactivated (Off).
AUTO DEMO
When active sets in motion a series of on-screen demonstra-
tions of the features that are available on this TV. Shows ex-
_Jnples of the trackball remote control menus and the different
{hatures ava]htble with the trackball, and with the universal re-
mote.
Once you activate the Auto Demo feature it will take several
seconds for it to begin.
Special
Features
Timer Setup
Ch. Labels
Source ID
Parental Ctl
Auto Demo
Off ]
17-- 4
Page 46

Move pointer to
Audio Menu Icon,
press trackball to
access menu
Z'TRAK REMOTE AUDIO MENU
Audio Menu
IVIENU OPERA TION
Point and press on desired feature to first highlight it, then press trackball repeatedly to select an option or make a change.
Audio
Menu
_e
Balance
Audio Mode
SoundRite
Front Surr .b
Rear Surr
Speakers
Choose Main/P][P Audio: ---
To select the audio
(sound) from the Main
Picture source, point and
press on the note symbol
_ I_ _ _'!11_ T°selectaudi°tr°mthe J" t'
PIP Source, (If PIP is ac-
tive) point and press on
Note: Point and press on any place of
the adjustment bar, highlighted option
or either arrow to choose your audio
preferences as shown. You can also
move the center adjustment mark to
choose your preference.
the PIP note symbol.
(Selected note symbol
for Audio source will be
a white color.) Unse-
lected audio source note
will be a gray color.
Ch 11-WITW
, 1:17
Stereo,
• :, :,
Bass
Treble
Balance
Audio Mode
(SAP is notan cptionfor
theVideo or S-Video
sources.Audiosignals
intoa video source are
assumed m be monaural
orstereo. )
Adjusts the BASS (low-frequency) level.
Adjusts the TREBLE (high-frequency) level.
Adjusts the balance of sound between the two speakers.
Allows you to select STEREO, MONO or 2ND AUDIO/SAP operation.
STEREO: Directs the sound to the Left and Right speakers as supplied by the progr_na. Stereo is the
recommended choice: The TV switches automatically between the STEREO and MONO
modes depending on the type of signal being received
MONO: Directs the same sound to both Left and Right speakers, ewm if the program being
received is in stereo.
2ND AUDIO/
SAP:
Directs the sound for the Second Audio Program (second language) to both the Left and
Right speakers. SAP sound is always monaural. If SAP :is,;elected, you hear the SAP
(usually a second language). When the SAP broadcast e_.ds, the TV switches
automatically (defaults) to the type of signal being received, STEREO or MONO. The
TV switches back to 2ND AUDIO/SAP when the SAP broadcast resumes.
SoundRite When channels are changed, automatically adjusts the sound level to the pre,,ailing sound level. Sound
from newly selected channel will be the same volume as the previously tuned channel.
]Front Surr ,._ Turns On and Off the Front Surround effect. Front Surround Sound is only available if a surround encoded
stereo signal is being received and STEREO is either selected using the AIJDIO Mode option or selected by
default.
Rear Surr
Speakers
Adjusts the level of Surround Sound provided to the optional rear surround sound speakers. Surround
Sound is only available if a surround encoded stereo signal is being received.
Turns internal speakers On and Off. (Off indicated by "Ext. Volume" appearing on Volume bar.)
Note:
All adjustments on the Audio Menu are optional. You do not have to adjust these features in order tc use your TV.
3_3-o 18 -- 1
Page 47

m
Move pointer to
Video Menu Icon,
press trackball to
access menu
Z-TRAK REMOTE VIDEO MENLI
Video Menu
MENU OPERATION
Point and press on desired feature to first highlight it, then press trackball repeatedly to select the Ol:,tion or make a change.
Video
1[ Menu
S
Color
Tint
Sharpness
Color Temp
Video Filter
Skin Tone
Video Preset
Note: Point and press on any place of the
adjustment bar, highlighted option o_:
either arrow to choose your audio prefer-
ences as shown. You can also move Lhe
center adjustment m ark to choose your
preference.
Contrast
Brightness
Color
Tint
Sharpness
Color Temp
(Temperature)
Video Filter
Skin Tone •
'Video Preset
Adjusts the overall contrast and color level of the picture.
Adjusts the brightness level of black areas in the picture.
Adjusts the intensity of the colors in the picture.
Adjusts the color of the flesh tones to more Green or more Red.
Adjusts the definition of the object edges for best picture quality.
Changes the "color temperature" or picture white balance between cooler, natural whites and warmer
(rexl) colors.
Reduces video "noise" or interference in dark picture areas resulting in clearer overall pictures.
Automatically maintains natural skin tones under changing scene and video source conditions.
Ad'usts the picture to different light environments. Options are: Custom, Preset, Movie, Video Game,
Sports, Daylight or Weak Signal.
Note:
All adjustmenl.s on the Video Menu are optional. It is not nec-
essary to adjust these features in order to operate the TV.
3,363-0 19 -- 1
Page 48

l
Move pointer to PIP
Video Menu Icon,
press trackball to ac-
c(,ss menu
Z-TRAK REMOTE PIP VIDEO MENU
PIP Video Menu
MENU OPERATION
P_int and press on desired feature to first highlight it, then press trackball repeatedly to select the option or make a change.
Note: Selecting the PIP Video Menu does
not "activate" PIP. However, a PIP win-
dow MII appear during menu operation
to show the effect of any setting changes.
To activate PIP inset, move the pointer
toleft/center of TV screen so it rests on
PIP On/Off Icon, press trackball.
See PIP Operation ..section
Pip
PIP
Menu
[_,a3ntrast
"]!!_t
Size
Note: Point and l:ress on any place of the ad-
justment bar, _ighlighted option or either ar-
row to choose your audio preferences as
shown. You can also move the center adjust-
ment mark to chcose your preference.
?.ontrast
rint
_ize
Adjusts the intensity of the colors in the PIP inset.
Ad2iusts the color of the flesh tones in the PIP inset to more Green or more Red.
Ad)usts the size of the PIP inset. Choose between small or large.
3063-0 20 -- 1
Page 49

MAINTENANCE AND TROUBLESHOOTING
m
CARING FOR YOUR PROJECTION 71/
Your projection TV will look better, have a longer life and per-
form better if you care for it properly.
__ irst check to see that the TV is off. For added
safety, disconnect AC power to your TV.
NOTE: If you unplug your "IV, you will have
to reset the clock to the current time.
CABINET CARE
Non-Wood Cabinet or Cabinet Components Moisten a soft
cloth with a mild soap solution or Ivory dishwashing deter-
gent. Wipe the surface with a damp cloth. Then rinse the cloth
in clean water and wipe the surfaze again. Allow the TV to air-
dry before turning it on.
Wood Cabinets or Cabinet Components Use any good fur-
nil:ure cleanei and polish. Regular care will help preserve the
firdsh.
PICTURE SCI_dEEN CLEANING
Use a soft cloth moistened with warm water and
I_b lightly in the soiled areas of the screen. DO
NOT USE A TISSUE OR PAPER TOWEL,
AS THESE MAY DAMAGE SURFACE. Wipe
only in the vertical (up/down) direction (along
the grooves). If l_e:re is a dirt buildup, a mild so-
lution of warm wa':er and Ivory diLshwashing de-
tergent may be used. Use dry soft cloth to dry
the screen. Care should be taken to avoid
scratches or damage to the screen surface.
NOTE: THE TV SCREEN IS;EASILY DAMAGED.
AVOID ACCIDENTAL CONTACT WITH THE SCREEN.
EXTENDED ABSENCE
Before an extended absence (such as a vacation) you may
want to disconnect AC power to your TV. This will protect
the projection TV from possible damage from lightning or
power line surges. If you have an outdoor antenna, you may
also want to disconnect the antenna from the wall plate con-
nection center
NOTE: If you unplug your TV, you will have to reset the
clock to the current time.
PICTURE INTERFERENCE
Your picture may be affected by interference caused by one or
a number of factors. These include:
Speckled or Streaked Picture Can be caused by nearby auto-
mobile ignition, electrical appliances, etc. This is most notice-
able in weak _i_gnal areas.
Snow in Picture Caused by insufficient signal. Usually
caused by the',TV being located too far from the TV station or
by an improper antenna installation.
Ghosts or Reflections Caused Izy signals being,, reflected
from surrounding buildings, water tanks, or other high struc-
tures.
Radio Signal Police, amateur oi CB radio transmitters may
cause interference.
These interference problems can often be corrected through
the use of a better antenna, signal, amplifiers, or various filter
devices. See your TV dealer ff_r additional information, and ac-
cessories available for your projection "IV.
YCAREPRO 21 -- 1
Page 50

MAINTENANCE AND TROUBLESHOOTING
I Illl
BEFORE CALLING FOR SERVICE
Check these items and see if you can correct the trouble by changing the adjustment of a control or a menu setting. By making these
simple checks tefore calling for service, you may save time and money.
Problem
'['icture OK. Poor sound.
Try This
i
Re-orient antenna. Try another channel -- possible station trouble. Adjust
AUDIO MENU options. Check Mute feature? Check for local
interference. Is antenna/cable connection loose7
Sound OK. Poor picture. Re-orient antenna. Try another channel --- possible station trouble.
Adjust VIDEO MENU options. Trouble with cable-TV :system? Is
antenna/cable connection loose?
No picture or sound. Is TV on? Is there power in wall outlet? Is TV plugged in? Is antenna
hooked up? Is cable hooked up7 Trouble with cable-TV system7 Check
auxiliary andio/video equipment. Check channel selection. Is the
channel blocked by PARENTAL CONTROL?
Picture blurred or distorted. Ghost in picture. Check antenna or cable hook up for broken wires. Try another channel
-- possible station trouble. Check for local interference.
No color, or poor color. Is it a color program? Check antenna c r c able hook up for broken wires.
Adjust VIDEO MENU options.
No sound or sound is low. VOLUME (VOL) setting may be too low. Check MUTE key operation
on remote control. Is St_aker EXT/INI _switch set to EXT['?
Cannot select certain channels or other channels. Channels may be skipped in CH. ADDK)EL/SURF option of SETUP
MENU. Use AUTO PROGRAM a sex:ond time. Is TV in Surf Channel
Scan mode with only one channel specified as a Surf cl7annel?
No closed captions Are captions available7 Is CAPTION l, CAPTION 2, CAPTION 3 or
CAPTION 4 selected using the CAPTIONS option on the SETUP MENU?
Black or blue: box covers half of screen. Is text information available? Is TEXI" l, TEXT 2, TEXT 3 or TEXT 4
selected in the CAPTIONS option of the SETUP MENU.
No picture or sound when VIDEO 1 or Is audio/video source hooked up properly? Are all wires connected to
VIDEO 2 source is selected. VIDEO 1 IN or VIDEO 2 IN jacks on connection center?
No stereo sound or weak stereo sound Check AUDIO mode. Was stereo sound present before selecting
when using a stereo VCR. VIDEO 1 or VIDEO 2 source?
Cannot s'elect desired PIP source. If Ant/Cable 1 or 2 is Main Source, TV makes it PIP source also.
PIP inset frame is black or lacks contrast Adjust PIP COLOR AND CONTRAST settings in PIP MENU. Are all
when selecting VIDEO 1 for PIP inset, wires connected to VIDEO 1 IN jacks on connection center?
PiP inset frame is "snowy" when using ANT/ Is "INVVCR switch on the VCR (or remote) in the TV position?
CABLE 1 or2 for PIP and VIDEO 1 for
main picture.
No picture'when using VIDE() 1 for PIP Is TV/VCR switch on the VCR (or remote) in the TV position?
inset source and ANT/CABLE 1 or 2 for
main picture.
Remote comrol does not work. Are batteries okay? Does Indicator light: turn On? Is TV turned ON? Is
remote in TV mode?
ii
Notes:
If your TV fails to respond to the VIDEO PRESET selection, or to any other menu selection, you must reset the TV. Simply discon-
nect the AC power cord from the power outlet. Wait a few minutes, then plug the "IV back into the power outlet. You may have to
reset the clock to the current time.
3o_6-o 21 -- 2
Page 51

Recommended Accessories For Your Television
Broken or Lost
Remote Control?
For an exact replacement
remote control for your
new Zenith television, see
your Ioca Zenith dealer or
order direct by calling
1-800-255-6790.
To assure t',qe correct remote
for your new Zenith TV, please
have your t_=!evision's model
number ready when you call!
Only $39.95
Wireless
Speakers
Listen to your stereo
inside or outside with
these wireless speakers
Prolong the life of your
expensive VCR or camcorder
with this one-way rewinder:
• Receivers sound from TV,
VCR or stereo through
walls, floors or outside.
• Create a home theater
system.
• Sleek, contemporary
design and no 'cord clutter.'
• Works up to 150 feet.
ZEN800
Wireless Speaker System
Only $199.95
Wireless
Headphones
Complete Cordless
Stereo Headphones
Relax and enjoy your
favorite music or TV
programs without
disturbing others.
• Operates wil:h any TV, VCR
or Stereo System.
• Works up to 50 feet--
Indoors or Outdoors.
• Separate left and right
volume controls.
• Great for the hard of
hearing.
ALG2032
Wireless Headphone System
Only $69.95
Surround Sound
Speakers
A sound so real...
almost as if you were
part of the action!
• An ideal addition to any
Home Theater system.
• For use with any Surround
Sound coml3atible TV.
• Contemporary black finish
complements any room.
• Bookshelf size, can be
wall-mounted or set on a
shelf.
CV4000
StereoSpeakers
Only S99.95
Photocopy Page and Detach Here
To order these fine accessories,
please complete this order form
and return a photocopy with
your 3ayment to:
Accessory Offers
Zenith Video Tech Corporation
1000 Milwaukee Avenue
Glenview, Illinois 60025-2493
Or'Call 1-800-255-6790
Check or Money Order
(Made Payable 1o Zenilh Video Tech Corp.)
Item Number Descnption
SalesTax: Pleaseaddyour state saJestaxif you
liveinone of theIollowing 'states.
I CA 7.75%, GA6%, IL 8.75%, KS 4.9%, KY6%, ME6%NJ 6%, PA 6%, RI 7%, "IX 7.75%. VA4.5%. WA 8.2%
(Note: Orders can only be sent to
customers within the United States.)
Account #
IL
Price per Item Total
Price
Sub Total
;tate Sales Tax
Shipping and Handling
To:al mount of Order
$4.50
Ship To:
Name
Exriratien Date Signature
IMPORTANT: PLEASE BE SURE TO COMPLETE THE INFORMATION BELOW
/ /
"iV Model NumOe¢ TV _nal Number Motet1 Day Year
{Imm Sticker on back o_ un_) Ifrom S_cke_ on back of un_) (A#orox. date of purchase)
PLEASE ALLOW 2-3 WEEKS FOR DELIVERY
T'VA CCS4A
1_)6
Address
A0t#
State
Telept_one L_____
c_y
Zip/Postal 3oce
.).
Page 52

REPLACEMENT PRODUCT REGISTRATION CARD
You could win a full refund on your new Zenith product.
Look for the Product Registration Card on your new video
product.
Each month a drawing is held by Zenith from the completed
Product Registration Cards recei red during the preceding
month. Zenith will reimburse the winner for the full purchase
price of the product purchased.
In order to participate, simply complete and return the Product
Registration Card at once, even if you choose not to complete
the information and interests portion of the questionnaire.
Product Card lost or misplac_:l?
The Product Re,gistration Card furnished with your video
product is pre.-printed with its Model and Serial numbers.
Please flu out the card and mail it at your earliest convenience.
It is imperative that Zenith know how to reach you promptly if
we discover a safety problem that would affect you. If the
original card has been lost or misplaced, you may use the
replacement card provided below. Either card will qualify you
for the free drawing, but you are, limited to only one entry in
the drawing. Complete the card, place it in an envelope and
mail it to:
The odds of winning the free drawing described above,
depend on tim number of participants. Free drawing offer
is void in Canada and other places where restricted or
prohibited by law. Offer is void for Hotel/Motel and
Institutional models. Rental models are not eligible.
Zenith Electronics Corporation
P. O. Box 173257
Denver, CO 80217-3257
Use the replacement Product Registration Card below only if
the original caxd has been misplaced or lost.
PHOTOCOPY AND CUT ALONG DAStJED LINE
Zenith Product Registration Card
1@Please Print Clearly or Type (_ Area Code Telephone
1. F]Mr. 2. [-] Mrs. 3. [_Ms. 4. [-j Miss [___[__._ _L__L._] -- [ I
First Name Initial Last Name
Street ...... ..... ......................
H5Z01-01
City
State
'O0 LH lkkkkkitNUMBER
Copy Numbers Here
From Label on Set
SERIAL ]______I____NUMBER
F'leaserecord tl_emodel number
and serial number from the sticker
on the back of yourset.
TVREG t
Page 53

YOUR ZENITH TV WARRANTY
DIRECT-VIEW COLOR TV
Welcome into the Zenith family? We believe that you will be pleased with your new Zenith Color TV. Please read this warranty
carefully. It is a "LIMITED WARRANTY" as defined under Federal Law. This warranty gives you specific legal fights, and you
may also have other fights that vary from state to state within the U.S.A.
Zenith "s Responsibility
Service Labor -- During a period of 90 days from effective
warranty date, Zenith will pay for service labor by a Zenith
authorized service center _hen needed as a result of
manufacturing defects.
Parts -- New or reman_tfactured replacements for
factory-defective parts will be supplied by a Zenith authorized
service center for one year from effective warranty date (color
picture tube -- two years). Such replacement parts are warranted
for the remaining portion of the original warranty period.
Home Service --Warranty service for 21" diagonal (U.S.A.) or
larger screen ,,;izemodels is provided in the home in most cases.
(Some repairs may require the unit to be taken by the servicer to
the repair facility and returned, at no additional charge.)
Not Covered -- This warranty covers manufacturing defects
and does not cover installation, adjustment of customer controls
in the home, installation or repair of home antenna systems, cable
converters or cable company-supplied equipment; it also does
not cover damage due to misuse, abuse, negligence, acts of God
or other causes beyond the control of Zenith. Any alteration of
the product atter manufacture voids this warranty in its entirety.
Before you ask for Warranty service, check the
operating guide section entitled, "Maintenance
And Troubleshooting." It may be possible to
avoid a service call.
Owner's Responsibility
Effective Warranty. Date -- Warranty begilas on the date of
original consumer installation. For your conw_nience, keep the
dealers dated bill of sale or delivery ticket a_;evidence of the
purchase date.
Operating Guide -- Read your Operating Guide carefully so
that you will understand the operation of your set and how to
adjust the customer controls.
Carry-In Service -- Model,; under 21" diagonal (U.S.A.)
screen size must be taken to a Zenith authorized service center
for warranty service and must be picked up by the owner.
Antenna -- Reception problems caused by inadequate home
antennas or faulty antenna connections are the owner's
responsibility.
Important: Product Registration -- Please fill out and mail
your Product Registration Card. It is imperative.,that Zenith know
how to reach you promptly if we should discover a safety
problem that could affect you.
Warranty Service --- For warranty service information, contact
any Zenith authorized service, center. Parts and service labor that
are Zenith's re,sponsibility (see above) will be provided without
charge. Other service is at the owner's expense. If you have any
problem in obtaining satisfactory warranty service, call or write:
Zenith Electronics Corporatian
Customer Service Department
1000 Milwaukee Avenue
Glenview, IL 60025-2493
Telephone: (_47) 391-8752
Mon-Fri, 8:00 a.m. - 4:30 p.m. Central Time
ADDITIONAL ZENITH PROTECTION PLAN AVAILABLE
Zenith offi_rs you the opportunity to obtain additional long-term protection agair st failure of
the picture tube in your new television. Our Picture Tube Protection Plan enables you to avoid
any unexpected picture tube repair expenses and keep your lelevision in top condition. It
guarantees you a genuine Zenith replacement picture tube and service ti'o_aa a Zenith
authorized service center.
Be sure to send in the Product Registration Card. We will send you an application for the
Protection Plan near the expiration of the two year manufacturer's warranty or_ the picture
tube. For additional information, call (847) 391-8757.
Page 54

m
YOUR ZENITH TV WARRANTY
PROJECTION COLOR "IV
Welcome into the Zenith family !We believe that you will be pleased with your new/Senith Projection TV. Please read this
wmxanty carefully. It is a "ONE YEAR FULL WARRANTY," plus a limited second year picture t ab,e warranty, as defined under
federal law. This warranty gives you specific legal rights, and you may also have other rights that vary from state to state within the
U.S.A.
Zenith "s Responsibility
Service Labor and Parts -- During a period of one year from
effective warranty date, Zenith will supply new or
remanufactured replacement picture tubes or other parts, and will
p_.y for service iiabor by a Zenith authorized service center, when
such parts or service labor are needed to repair the product as a
result of manu:_'acturing defects. Further, Zenith will supply a
new or remanufactured replacement for any picture tube which
fails during the second year after effective warranty date because
of a manufacturing defect. Replacement parts are warranted for
the remaining portion of the original warranty period. The above
service labor warranty applies only in the U.S.A.
On-Site Service -- Warranty service is provided where the
Projection TV is installed.
Not Covered -- This warranty covers manufacturing defects
and does not cover installation, adjustment of customer controls
in the home, installation or repair of home antenna systems, cable
conveners or cable company-supplied equipment; it also does
not cover damage due to misuse, abuse, negligence, acts of God
o,: other causes, beyond the control.of Zenith. Any alteration of
the product after manufacture velds this warranty in its entirety.
Before you ask for Warranty service, check the
_ operating guide section entitled, "Maintenance
And Troubleshooting." It may be possible to
, avoid a service call.
Owner's Responsibility
Effective Warranty Date -- Warranty begins on the date of
original consumer installation For your convenience, keep the
dealers dated bill of sale or delivery ticket as evidence of the
purchase date.
Operating Guide -- Read your Operating Guide carefully so
that you will understand the operation of your set and how to
adjust the customer controls.
Antenna -- Reception problerrs caused by inadequate home
antennas or faulty antenna connections are the owner's
responsibility.
Important: Product Registration -- Please fill out and mail
your Owner Registration Card. It is imperative that Zenith know
how to reach you promptly if we should discover a safety
problem that could affect you.
Warranty Service --- For warranty service information, contact
any Zenith authorized service center. Parts and service labor that
are Zenith's responsibility (see above) will be provided without
charge. Other service is at the owner's expense. If you have any
problem in obtaining satisfactory warranty service, call or write:
Zenith Electronics Corporation
Customer Service Department
1000 Milwaukee Avenue
Glenview, IL 60025-2493
Telephone: (708) 391-8752
Mon-Fri, 8:00 a.m. - 4:30 p.m. Central Time
ADDITIONAL ZENITH PROTECTION PLAN AVAILABLE"
Zenith offers you the opportunity to obtain additional long-term protection again,,;t failure of
the picture tube in your new television. Our Picture Tube Protection Plan enables you to avoid
any unexpe, cted picture tube repair expenses and keep your television in top condition. It
guarantees you a genuine Zenith replacement picture tube and service flora a Zenith
authorized service center.
Be sure to .,;end in the Product Registration Card. We will send you an application for the
Protection Plan near the expiration of the two year manufacturer's warranty on the picture
tube. For additional information, call (847) 391-8757.
ZENITH ELECTRONICS COPPORATION
1000 MILWAUKEE AVENUE;
GLENVIEW, ILLINOIS 60025-2493
1WWRPRO3
Part No. 206-3063
Printed in U.S.A.
VG-EDCBAO
 Loading...