

Page 1

nachine numbers I A19AIID I A25AIID I A27AIID
r
th
h tv
_,111t
"6 p e r ,] t i n g g u i d e / w a r r a n t y
Page 2

RECORDYOUR MODEL NUMBER l
The mode{ and seria[ number of your new TV are Located
on the back of the TV cabinet. For your future convenience,
we suggest that you record these ntlmbers here:
MODELNO.
WARNING
WARNING:
TO REDUCETHE RISK OF ELECTRICSHOCKDO NOTREMOVECOVER(OR BACK). NO USERSERVICEABLEPARTSINSIDE.
REFERTOQUALIFIED SERVICEPERSONNEL.
The {ightning flash with arrowhead symbol, within an equilateral triangle, is intended to alert, tile user to the presence
of uninsu[ated "dangerous voltage" within the product's enc{osure that may be of suffident mac nitude to constitute a
risk of e[ectric shock to persons.
The exclamation point within an equiLateraL triangle is intended to a{ert the user to the presence of important operating
and maintenance (servicing) instructions in the literature accompanying the appliance.
WARNING:
TOPREVENTFIREORSHOCKHAZARDS,DONOTEXPOSETHISPRODUCTTORAINORPOISTURE.
POWER CORD POLARIZATION:
CAUTION:To PreventELectricShock, Match wide bladeof pLugto wide scot,fully insert.
SERIALNO.
._J
ATTENTION: Pour 6viter [es chocs 6[ectriques, introduire [a Lame Laplus large de [a fiche dans [a borne
correspondante de Laprise eL pousser jusqu'au fond.
NOTETO
REGULATORY INFORMATION:
CAUTION:
CABLE/TV SYSTEM INSTALLER:
Thisreminder is provided to caU the cable TV system installers attention to ArticLe 820-40 of the National Electric Code
(U.S.A.). The code provides guidelines for proper grounding and, in particular, specifies that the cable ground shaLLbe
connected to the grounding system of the building, as dose to the point of the cable entry as practical
This equipment has been tested and found to comply with the [imits for a Class B digital device, pursuant to Part 15
of the FCCRuLes. These Limits are designed to provide reasonable protection against harmfut interference when the
equipment is operated in a residential installation. This equipment generates, uses ,and can radiate radio frequency
energy and, if not installed and used in accordance with the instruction manual may cause harmful interference to radio
communications. However, there is no guarantee that interference wiLLnot occur in a particuLar instaUation. If this
equipment does cause harmfuL interference to radio or television reception, which can be deter_lined by turning
the equipment off and on, the user is encouraged to try to correct the interference by one or more of the foL{owing
measures: • Reorient or relocate the receiving antenna.
• Increase the separation between the equipment and receiver.
• Connect the equipment into an outlet on a circuit different flom that to which the
receiver is connected.
• Consult the dea{er or an experienced radio/TV technician for help.
Do not attempt to modify this product in any way without written authorization from Zenith ELectronics Corporation.
Unauthorized modification could void the user's authority to operate this product.
Page 3

,NSTA''AT,O.IOE.'N( STA.T OIPAGE3
IMPORTANT!!
Use this page to decide where you need to begin your Setup. First, find the Une
be!.ow that best describes what you want to do, then go to that page number.
If you are using an antenna and no other equipment, go to ................... page 4
This page wil[
direct you to
which page
to go to for
proper hook-up
of your
' Entertainment
Machine.
_x \\ _\[ J J /v _
If you have cable and no other equipment, go to ......................... page 5
Cable W
wall jack
o In (_) Cable box]
Ifyou are using an antenna and have a VCR, go to ....................... page 6
\\ \\ _\ // /z /
J
] _
If you have cab[e and a VCR, go to .................................. page 7
Cabte TV
wai_jack
In _ Cable box
[_ Feelingbrave?Ifyoujustwantsome generalhook-upinformationabout
3370-o
customizingyourown set-up,thensloptopage8.
/'
Page 4

PA, E I,NS,A,,A,,ONI S,ANOA.O
Connect an
off-airantenna
to your
Entertainment Hook up your Entertainment
Machine. Machine.
Remove the back of the remote
and put in two AAA batteries.
L back of \'_ [
WmIll'_ remote ,_
_ 5_=::-- _J .........
-Ptug in your W. Do not plug it
Iv
into a switched outlet.
Go to page 8 to Auto Program
your Entertainment Machine.
If you have a 75 ohm RF cable,
then you don't need any adapters!
Remember, when screwingRF
cablesonto jacks,clockwiseb'ght-
ens,and counterclockwiseloosens.
Antenna
f.1_\
:-_--------_--:J H[ [
© i, ;_
F!.atwire T, Z '-' -_
_l_ (_oooh,_) [ Tvba_,par,elII
\ \_ _ ?_ Audi_ In Videoll
] _,> _! I Antenna J_-._, _ _ II
\ \ _, / I F
Antenna
i-_-back _]/" [ii [
iil_ " ,I
, ,._J | . _
_L_...... ) "-. /l[
A 300 to 75 ohm adapter is not
included with your Entertainment
Machine.
75 OHM RF CABLE
, 300 TO 75 OHM ADAPTER
RFcoaxial w;re
(75chm)
_._ (expandecl,4ew!
"_ AuCio In Vid
IAntenna_ _:._, _:-_-_II
The wire that comes from an off-air antenna or cable service provider. Each end looks [ike a hex shaped nut with a wire
sticking through the middle, and it screws onto the threaded jack on the back of your IV.
A sma[[ device that connects a two-wire 300 ohm antenna to a 75 ohm RFjack. They are usually about an
inch long with two screws on one end and a round opening with a wire sticking out on the other end.
3370-o
Page 5

N_ID Hook up your Entertainment
Machine.
INSTALLATION I STANDARD _ PAGE 5
Connect cable
to your
Entertainment
Machine.
Elll
ic o
Remove the back of the remote
and put in two AAA batteries.
Plug in yo_Jr TV. Do not plug it
into a s_tched outlet. Your
Entertainment Machine is
designed to operate on household
current, 120-volt 60 Hertz AC do
not attempt to operate it on DC
Current.
Go to page 8 to Auto Program
your Entertainment Machine.
If you're using a cable box, leave
your TVon channel 3 or 4 and use
your cable box to change channels.
CabLeTV
waLLjack
l
I
l
!
!
CabLe TV
wattjack
A
i In Cable box
J
RemenTbe&-_ghen screwing RF cables
•mw
i ¸_-_ i
: J
mm
CABLE SERVICE The wire that supplies all. your cabl.e IV (CAW) stations.
3370-0
onto jacks, clockwise tightens, and
counterclockwise loosens.
If you*re using o cable box, Auto
Program (page 8) might only ]9nd
the channel your cable service is on
(usually channel 3 or 4). Don't
worry, that's all you need!
_RF coaxial wire (75ohm)
J
I
J
Page 6
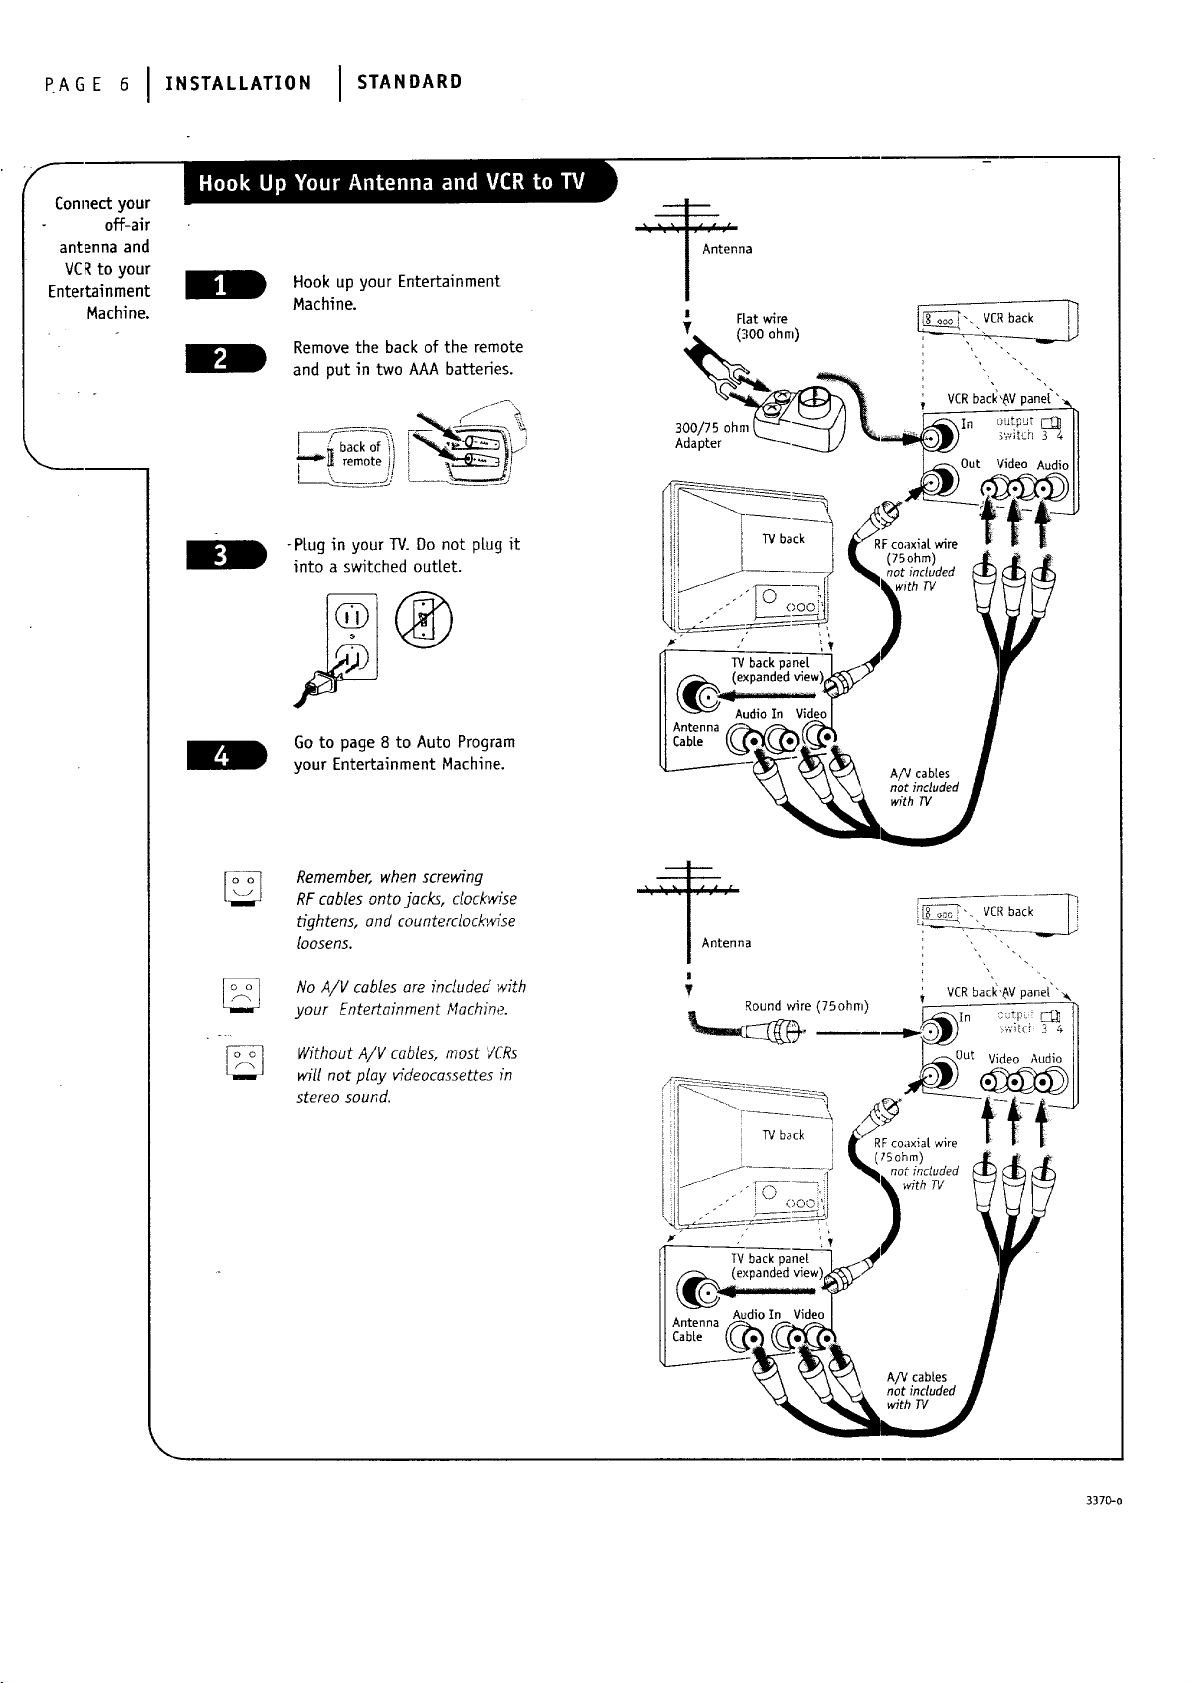
PA0E01,NS,A''AT,ONISTANOA"O
f
Connect your
off-air
antenna and
VCRto your
Entertainment
Machine.
Hook up your Entertainment
Machine•
Remove the back of the remote
and put in two AAA batteries.
-Plug in your TV. Do not plug it
into a switched outlet.
",_n_n_a
! Fiatwire
T (300 ohm)
300/75 ohm
Adapter
VCR
_q
Go to page 8 to Auto Program
your Entertainment Machine.
Remember, when screwing
RF cables onto jacks, clockwise
tightens, and counterclockwfse
loosens.
No A/V cables are included with
your Entertainment Machine.
Without A/V cables, most 7CRs
will not play videocassettes in
stereo sound•
• • -i o - .
Antenna
i
|
T
Roundwire (75ohm)
TV back
-" ! OL_L) i_i
IV back panet
VCR back'$V pane|"&
RF coaxia[ wire f t
not included
with TV
3370-0
Page 7

Hook up your Entertainment
Machine.
Remove the back of the remote
and puz in two AAA batteries.
(/" '!",
bac of i" i_..-:_q S
L__I............!_
PLug in your W. Do not plug it
into a ',;witched outlet.
INSTALLATION I STANDARD " PA G E 7
Cable %/
walljack
l_I o ! i_o_" VClback !'_
- I ; VCRb_cl_'_AVpane[",,_.
Roundwire(75ohm) 'r------------_
Out Video Audio U
![ ! IV baCK _ RF coaxial wire 31l _t _.
i _i....... ) _" not included ['-_
I .._ .... _..... _i I _ with TV }_J
TV back pane_ _j.S'_I r_
_ AudioIn Video_
Connect your
VCR and Cab[e
to your
Entertainment
Machine.
J
"o o]
Go to page 8 to Auto Program
your Entertainment Machine.
Leave your VCRand your television
tuned to channel three and use
the cable box to change channels.
Remember, when screwing in RF
cables onto jacks, clockwise tight-
ens, and counterclockwise loosens.
No AiV cables are included with
your Zenith Entertainment
Machine. Without A/V cables, most
VCRswilt not play videocassettes
in stereo sound.
Cable TV
wattjack
[iTL'_-i;7i
Out
VCR
b_ck -,AV
il _ound wire (75ohio) _ "_
panel
"_%,F,_+_I/t/LJ
TV back panel _.) iY I
Audio
3370-o
AudioIn Vi
Antenna_
CableL_'.)%'_
/
J
Page 8

PAC,E81,.STAL'ATIONI QUlCKSTART
_Auto
Program to
automatically
find and
store alL the
stations
avail_kble ]n
your area.
With the remote control in hand,
press the POWER key to turn on
your Entertainment Machine.
Pressthe MENUkey so the Setup
menu appears.
Using the UP/DOWN arrows on
the remote control, select Auto
Program on your screen.
Press a RIGHT or LEFT arrow to
-reach the Auto Program screen.
_ MUTE
t
' i
1 2 3
Using the UP/DOWN arrows,
choose either Cabte TV or Off-air
Antenna on your screen.
Pressa RIGHTor LEFTarrowto
L
F
begin Auto Program.
PressENTERto return to
TVviewing.
4 5 6
, k__,; \ j
7 8 9
0 ENTER
J
MENU
©
!
0
FUNCTIO;'_ Q
i
J_
C_
t
t
\
t_ /i I
\
ADJ b,-
E ;
i
' i
i i
r
AUTO PROGRAM Auto Program is how your Entertainment Machine finds aLLthe channeLs avaiLabLe in your area and stores them into memory.
3370-o
Page 9

Power
TurnscontroLLed
device on and off.
CC
SeLectsclosed captions.
POWER
p
INSTAL'AT,ONI OUICKSTA.TI PAGE9
A quicktist
of all the
buttonson
your remote
and what they
do.
MUTE
Turns sound off and on.
Timer
Dis2[ays_teepJi mer
menu. See "Timer
Setup" on page-t7 for
more information.
rot
Adjusts the sound on
your Entertainment
Machine.
Number Key Pad
Use for direct channel
entry or for on-screen
programming.
Menu
Displays on-screen
menus available.
• ADJ
5 6
8 9
MENU
FUNCTION
ENTER
ADJ ll_
Ftashback
Returnsto Lastchannel
viewed.
Cycles through avaiLabLe
channels.
Enter
Displays current TV
channel and time, removes
on-screen menus. Press
after channel numbers for
instant selection.
SeLect Up/Down Arrows
Selects on sc'een
rneru options.
3370-o
Adj Left/Right
Adjust on-screen
menu options.
remote control part number
SC3492
J
Page 10

.A+,:loIoPE.A+,ONI BU++ON.U.<+,ONS
_
f
How to
use your
s:ix-button
pane[ to
operate
the menus.
When using the on-screen menus, the
buttons on the front pane[ correspond to.
the remote control buttons as fo{[ows:
VOLUME= Adjust Left/Right
CHANNEL = Se[ect Up/Down
it f
ii
To access the Setup menus, press
the MENU button once; to get the
Video menus, press the MENU
button twice.
-Choose the function you wish to
change using the CHANNEL
UP/DOWN buttons. The Channe[
buttons act as a "Setect"
(Up/Down) function.
The VOLUME buttons act as an
"adjustment" (Left/Right)
function. Use the VOLUME
buttons to make changes or
adjustments.
Menus disappear a_ter jSve seconds.
Toget them back,push the MENU
button again.
o_-o_ You'll want to get a new remote;
call 1-800-255-5970 to purchase a
replacement.
* ....................... -- ....................... ] i
,L ................ :'Z ........... - .........
/
/ \
i
/
/
/
/
/
/
J
!!
! i
i i
!
\
\,
3370-o
Page 11

OP .AT,O.I BUTTO"FO.CT,O"SIPAOE11
Introducing
you tothe
basicsofyour
Entertainment
Machine
On some modeLs, the A/V input is designated as a channel that is one
below the.Lowest/one above the highest. You't[ have to use the Channel
Up/Down buttons to access it. The Time/ChanneL display wiLL read
"Video" :n place of a channel number.
CabLe/Antenna Input: This setting at[ows you to change cable or
antenna channeLs and to view v[deocassettes on channel 3 (or 4) in
mono sound.
Video Input: This setting- aLLows stereo playback of videocassettes. The
te[evisiol cannot change channeLs in the Video mode, but the VCRcan.
To view the current input source, press ENTERon your remote.
The Time/Channel display should appear in the upper right hand
comer of the screen. Ij =the display reads "Video,"then the source
is an A/V input. If the display reads a channel number, then the
source is your Cable or Antenna.
CHANNEL UP/DOWN arrows: Use these arrows to change the channeLs.
Auto Program wiLL haw._found at[ channels avaiLabLe to you.
10:55
CH1_2
STEREO ---
--- Time
Channel or Vicleo
(Indicates Source)
Audio Mode
J
NUMBEE Key pad: To skip to any channet, enter the number of the
channel using the NUMBER key pad, then press ENTER.
FLASHBACK:To instantly return to the fast channel viewed,
press FLASHBACK.
Volume Right/Le_ To adjust the volume LeveL, use the volume
Right/Left arrows. To silence your TV instantly, press MUTE. To get the
sound back, press MUTE again.
oo_ While some mono modeLs (A19AO2D and A25AO2D) do not
have A/V inputs, you can still use or instoU o VCR.Just tum to
page 6 to learn how to hook up your antenna and VCR.
3370-0
J
Page 12

PAGEI210 ERATIONITVFONOA"ENTA'S
He# on
combining
Entertainment
Machine
with more
equipment.
your
There aM a number of ways you can choose to integrate your Entertainment Machine with the rest of your equip-
ment. Chanhels can be changed using the television, the VCR, or the cable box, with advantages to each.
USING TIIE TELEVISION AS THE TUNER preserves all your channel labels (not available on some models). It also
reduces the number of keys on the remote control you need to worry about. (One device, one remote to [earn.)
USING THE VCR AS THE TUNER has the advantage of simplifying the recording process. If the VCRis tuned to
channel seven, then the VCRwill record channe[ seven.
USING THE CABLE BOX (if you have one) to change the stations sometimes has an advantage, :oo, especia[ly if
your cable provider requires you to use their cable box to descramble their stations.
Based on the advantages listed above, decide what
device you want to use as the tuner.
Connect the antenna or cable source to the input
of your tuner. If you chose your television as the
tuner, then you're done. Go watch your
Entertainment Machine.
Connect the output of your tuner to the input of the
next device.
If you used A/V cables for step 3, set the "next
device" to Video input. If you used an RF coaxiaL
cable in step 3, then tune the "next device" to
match the output channel of your tuner (usually
channel 3 or 4).
Repeat steps 3 and 4 until you reach your
Entertainment Machine. Then enjoy!
i TUNER
AiV CABLES
i A/V DEVICE
i DESCRAMBLE
The television, VCR, or cable box that you choose to change channels with.
Audio!Video cab[es. Three cab[es bunched together--right audio (red), left audio (white), and video (yellow).
Any device that produces video or sound (VCR, DVD, cable box, or television).
Programs are often broadcast scrambled. Your cable box sorts out the channeLs you pay for.
3370-o
Page 13

Function What it does
Go to page
OPERATION I MENUS
Setup Menu
PAGE 137
Descriptions
of the menu
options found
in the Setup
menu.
Auto Program
Ch.Add/De[
ClockSet
Timer Setup
Captions/Text
Audio Mode
Automatically finds and stores active channeLs
to f-tip through using Channel Up/Down.
ManualLy pick and choose which active
channeLs wilt appear when flipping through
using Channe[ Up/Down.
-'S6ts';the eOrrent time on ybur Entertainment
,,:Machine. ,.
Opens menu for the following functions:
• Turns the Steep Timer on or off.
• Selects an automatic On Time for your
Entertainment Machine.
• Selects an automatic Off Time for
shut-down.
• On/Off timer controls automatic power
on and power off.
Must be set to On for above functions
to work.
Displays closed captions or text when
available. Options are Off, Caption I,
Caption 2, Caption 3, Caption 4, Text I,
Text 2, Text 3, and Text 4.
Switches your sound between Stereo (separate
sound on [eft and right speakers) and Mono
(same sound on both speakers).
15
17
18
14
16
AutoProgram
Ch. Add/De{
Clock Set
Timer Setup
Captions/Text
Language
Thisis a sample of what on-screen
men.s took like•
3370-o
Language
Selects tanguage for on-screen menus. Your
• options are EngLish, Spanish, or French.
In video mode, only ClockSet,TimerSetup,
Caption/Textand Language will appear.To view
allmenus, switchto Cable/Antennainput.
19
js
Page 14

F
you]" channel
Customize
selection.
Press the MENU key on the remote
so the setup menu appears.
Select the Ch. Add/Delete menu
using the UP/DOWN arrows.
Using either the NUMBER key pad
or the CHANNEL UP/DOWN arrows
-- :__ ......on the remote, s_[ect a channel.
_- flf adding a deleted channel,
you will need to use the NUMBER
key pad.)
Using the RIGHT/LEFT arrows,
pick whether that channel is
Added or Deleted.
To continue, select another
channel and repeat step 4. If you
are finished, press ENTERto return
to TV viewing.
You can odd or delete a channel
without the remote control.
Ptease refer to page ] 0 on work-
ing the menus with the buttons
on the.front of your
Entertainment Machine.
POW EFI
,lO k* _ J-"
1 2 3
00©-
0
0
7
0
©©
8 9 i •
00,
0
MENU i i
W ADJ I_
FUNCTION
MUTE
,,.... ) ,..... ?
!
ADD
DELETE
If you delete a channel, it isn't
gone for good. Just select it using
the NUMBER key pad on the
remote, or add it later.
This functbn lets you add new channeLsto the fist that you't[ scrott through when using your remcte.
This function lets you remove channeLsthat you don't watch from the list you'[[ _;crotlthrough.
C>
/
3370-0
Page 15

Press the MENU key on the remote
contro[ so the Setup menu appears.
Using the UP/DOWN arrows on
the remote control select Clock
Set on your screen,
I . .osIPAGE
Set the dock.
on your
Entertainment
Miachine
Press a RIGHT or LEFT arrow to
adjust the time. _,
Press the TI_4ERbutton-to select
AN or PN.-
PressENTERto return to
TVviewing.
YoucanusetheNUMBER key
pad tosimplytypeinthetime
(AM orPM isstillselectedwith
theTimerkey).
1 2 3
, i' ( .,
4 5 6
' J ',._3 ',. , LJ.....
7 8 9
\__j _) L.__)
o
MENU
_ [
• ADJ T ADJ b'- I
' G)
\.
\
J
I
1
I
r i
1
i
3370-a
\
\\\. //J
/
//
/
/
,/
J
Page 16

I
PAGE 16 I OPERATION
"f
Automaticatty
turn your
Entertainment
Machine on
oroff.
I MENUS
Press the MENU key on the
remote control so the Setup menu
appears.
Using the UP/DOWN arrows on the
remote contro[, select Timer Setup
on your screen.
b,
Press a RIGHT/LEFT arrow. The
Iv
Timer Setup screen wilt appear.
l_ime until the TV shuts down
(select a countdown from ten
minutes to four hours).
At this point, continue to step
six to set the On Time, or press
ENTERor QUIT to return to
TV viewing.
1 2: 3
4 5 6
'__J '___9
7 8 9
__J
0 IENTER i
\
\
On Time: Using the UP/DOWN
arrows on the remote control
select On Time on your screen.
Press a RIGHT or LEFTarrow to
L
F
adjust the time your TV wi[[
automatically turn on.
L
Press the TIMER button to select
F
AM or PM.
Press ENTERor QUIT to return to
TV viewing or continue program-
ming by repeating the above steps
for Off Time, and the On/Off Timer.
TheOn/Off timer will not work
until the Clockon your television
has beenset.
MENU
w
4 ADJ
" ADJ •
FUNCTION
J
• /"
",\ /,
-\ /
i
F
3370-0
Page 17

m|
Press the MENU key on the
remote control so the Setup menu
appears.
Using the UP/DOWN arrows on the
remote control, select
Captions/Text on your screen.
Press a RI61_T_LEk-[..arrow to
choose any of the fo{towing
options: Off_ Caption -t,
Caption 2, Caption 3, Caption 4,
Text !, Text 2, Text 3 or Text 4.
PressENTERto return to
TV viewing.
O.E.,T,O.I .ENOSI PAG
-Turn on dosed
captioningor
textthat
appears atthe
bottom of
your screen.
POWER
,o ol
Captionscome inhandywhen the
televisionison mut&
Standard Closed Cap6oning is
available using the Caption I
opUon.
Not all programming has closed
capboning or text available.
o
MENU
i
©
"_ ADJ _"
O FUNCTION
i
!
O
_ t
,\
\
\. /
"_'_ ......... .I/
ADJ I_
t
i
f
J
i
/
//
3370-o
J
Page 18

PAGE18IOPE.AT,ONI .E.US
Choose
_etween
stereo sound
and mono
sound.
!
Press the MENU key on the
remote control so the Setup
menu appears.
Using the UP/DOWN arrows on
the remote controL, select Audio
Mode on your screen.
Press a RIGHT/LEFT arrow to
select either of the following
oDtions: Stereo or.Mono.
Press ENTERto return to
TV viewing.
/ POWER _, \
' / /---_, !_
• " )
i
' I
1 2 3
4 .5 6
: i
7 8 9
_ ot all programming is broadcast
in stereo sound.
0
I
MENU
I
• ADJ ? ADJ I_
G FUNCTI,DNjt _
t
/'
/
/
///
_-_ ................... .I./"is
STEREO SOUND
NONO SOUND
Stereo (stereophonic) sound refers to audio that's dMded into fight and left sides.
Nono (monaurat) sound is one channel of sound. A[[ the speakers pray _he same audio.
3370-o
Page 19

Press the MENU key on the
remote control so the Setup menu
appears.
Using the UP/DOWN arrows on
the remote controL, select
Language on your screen.
Press a RIGHT/LEFT arrow to
choose any of the fottowing
options: Enqtish, Snanish,
or French
Press ENTERto return to regutar
TV viewing.
OPERATION I MENUS I PAGE 19
Choosethe
l_riguageyou
want allthe
menus to
appearin.
i
1 2 3
r
[
i
i <1AOJ T
! i0 FUNCTION
MENU
ADJ I_
J
i 1
//
/
/
,/
/.
3370-o
Page 20

PAG 2010. .,T,ONI .ENUS
F
Use the
- Video menu
to customize
how your
picture looks.
Pressthe MENUkey twice and the Video
menu will appear. Your options are:
• Contrast: Adjusts the level of
difference between white and black
in the TV picture. The more contrast,
the brighter the picture appears.
MUTE
\
• Brightness: Increases or decreases the
amount of white in the TV picture.
• -Color: Adjusts levels of all colors in
the TV picture.
• Tint: Balances between amounts of red
and green in the TV picture.
• Sharpness: Raises or lowers the
definition of the TV picture. The tower
the level, the softer the images wilt
appear.
• Picture Preference: Choose either
Custom or Preset. Custom allows you
to set the picture the way you want.
Preset moves all the above options
back to their original, factory-set lev-
eLs.
Using the UP/DOWN arrows on the
remote control, select Contrast on your
screen.
Using the RIGHT/LEFT arrows, adjust the
contrast level to your preference.
Press ENTER,QUIT or MENU one more
time to return to TV viewing, or repeat
from step two to set the other menu
options.
Using the UP/DOWN arrows, select
Picture Preference on your screen.
Using the RIGHT/LEFT arrows, choose
either the original settings with Preset,
or use your own settings with Custom.
MENU
41ADJ T ADJ II,.-
O FUNC'IFION_
G
'\
',\\
\_\.. /
,/
Someoneleftthepicturelookingterrible?
JustchoosethePresetoptioninPicture
Preferencetoquicklyresetthelevels.
3370-0
Page 21

.EF,.,NC I M,,,.TENANCEIPAGE21
Early malfunctions can be prevented. Careful and regular cleaning can extend the amount of time you wi[I have with
your rew Entertainment Machine. Be sure to turn the power off and pull out the plug before you begin any cleaning.
1. Here'.,;a great way to keep the dust off your screen for a white. Wet a soft c[oth in a mixture of luke-
warm water and a [ittte fabric softener or dish washing detergent. Wring the cloth until it's almost dry,
and t:he_n<u_'e_]tto _pe the screen.
2. Make s6re the excess water is off the screen, and then let it air-dry before you turn on your
Entertainment Machine.
II1_ ;lh [q |MI_.li| Il[, II
1. Use a soft cloth with a mi[d soap solution to wipe the cabinet (avoid using any cteaner that says
"industrial strength" or "wilt wash the white off of rice" on the [abe[).
Caring for
your
Entertainment
Machine.
J
2. Rinse the cloth and wipe the cabinet again.
3. Let the cabinet air-dry before turning the Entertainment Machine on.
Use a quality wood cleaner and polish. This will protect the Entertainment Machine from dirt and dust, a_
wet[ as keep the cabinet rooking new.
If you leave your Entertainment Machine dormant for a tong time (such as a vacation') it's a good idea to
unp[L_g the power to protect against possible damage from lightning or power surges. If you use an
off-air ant_nna, you may aLso want to disconnect it from the back of your TV before Leaving.
If you unplug your Zenith Entertainment Hachine, you may have to reset the clock using the Clock Set
menu described earlier.
3370-0
J
Page 22

pAGE221 I ,, OLES.O0,,.O
Some quick
and easy
tips to fixing
probh:ms
yourself.
SYMPTO_ SOLUTIONS
Snowy picture and lousy sound. • Check your antenna connection or Location.
MulUp[e images or 'ghost shadows" • Check your antenna direction and/or Location.
• Make sure the wire from your antenna to your Entertainment Machine is
properly connected.
Interference: Sharp tines across
the screen and lousy sound.
Normal picture:but no sound.
No picture and lousy sound. • Are you in TV or Cable tuning mode (See Auto Program ,in page 9), and should
No picture and no sound --
The thing is just DEAD!
No color,but the sound is O.K. • Check the color control in the Video menu.
The.following may cause image problems or distortion:
Electrical appliances, powerful lights, cars, trucks; Computers cr portable
phones; Medical equipment
• If possible increase the distance between your Entertair ment Machine and
the offending appliance. Or shut one of them off.
• Check volume control
• Make sure the TV is not Muted.
• Try another channel. The problem may be the broadcast, not your
Entertainment Machine.
• Are the Audio A/V cables property installed?
• Are the wires for external speakers (if you have externa[ sFeakers)
property installed?
be in the other?
• Make sure output channels on all A/V equipment are on the same channel (3 or 4).
• Check that all connections are tight.
• Is the AC power plugged in?
• Check that your AC power outlet works. (Test it by plugging in something else
or try another plug.)
• Make sure your brightness and audio controls are set properly.
• Try another channel The problem may be with the broadcast, not your
Entertainment Machine.
• Try another channel. The problem may be with the broadcast.
Picture has a big black box • The CC (cLosed caption) option may be in Text mode. Select OFF in the
on it, but the sound is O.K. Captions!Text menu (see page 16).
Picture has two horizontal • Your program is in [etterbox. This means that the shape of your TV is
black bars, one on top and square, but the program is a rectangle. Think of the bars as empty space the
one on bottom, program doesn't fill; not picture that's blocked out. Bec_u.,e this format is a
direct representation of film as you see it in the movies, you are actually seeing
MOREof the program when you see those bars. Trust us
Remote control doesn't work. • Make sure the batteries are fresh and installed properly.
• Check to see that the MBR (Multi Brand Remote availab.e on some models) is in
the Hght mode for your equipment.
Menu options won't change. • Try unplugging the TV, waiting about five minutes, and then plugging it back in
and trying again.
If all else fails, call 1.847.391.8752, extension 5, between 8:30 am and 4:30 pm Central Standard Time.
3370-0
Page 23

75 OHM RF CABLE
The wire that comes from an off-air antenna or cable service provider.
Each end Looks like a hex shaped nut with a wire sticking through the
middle. It screws onto the threaded jack on the back of your TV.
REFERENCE J PAGE 23
- A comp[ete
Ustof
definitions for
wordsfound
in this guide.
300 TO 75 OHM
ADAPTER
A/V CABLES
ADD
ANTENNA
AUTO PROGRAM
DELETE
INPUT
JACK
A small device that connects a two-wire 300 ohm antenna to a
75 ohm RFjack. They are usually about an inch long with two screws on
one end and a round opening with a wire sticking out on the other end.
J
Audio/Video cables.Three cab[esbunched together--Rightaudio(red),
Leftaudio (white),and Video (yellow).A/V cablesare used forstereo
playbackof videocassettesand forhigherqualitypictureand sound
_from other A/V _evices.
- This function lets you add new channels to list that you'll scro[[ through
when using your remote.
The physicalreceiverof televisionsignalssent overthe air.A large
metalpieceofequipment does not alwayshave to be visibleforyour
home to be usingan antenna.
Auto Program has your Entertainment Machine automatically find all the
channels available in your area.
Thisfunctionletsyou remove channelsthatyou don'twatch from the
list you'll scroff through using your remote.
Refersto the jackthat receivesa signalfrom a TV,VCR or other
A/V device.
A connection on the back of a TV, VCR, or any other A/V device.
3370-0
MONO SOUND
OUTPUT
SECOND AUDIO
PROGRAMMING/SAP
SIGNAL
STEREO SOUND
TUNER
Mono (monaural) sound is one channel of sound. On more than one
speaker, all the speakers play the same audio.
Refers to the jack that sends a signal out of a VCR, DVD, or other
A/V device.
Second Audio Programming (SAP) is another, separate, audio channel
available with some programming. Choosing SAP often refers to listening
to audio in another language, such as Spanish or French.
Picture and sound traveling through cable, or on the air, to your
television screen.
Stereo(Stereophonic)sound refersto audiothat'sdividedintorightand
leftsides.
Devicethatpicksup the signaland turnsthem into
pictureand sound.
J
Page 24

PAGE241, FE .CEI
f
Find what you
want quickly.
INDEX
FEATURE PAGE
Antenna ............................................................. 4, 6
Audio Mode ........................................................... 19
Auto Program ........................................................... 9
\
Basic Television Operation .............................................. 12, 13
Button Functions ....................................................... 10
Cable_, ........................................................ 2. .... 5, 7
Captions and Text Menu .................................................. 18
Ch. Add/De[ ............................................................. 15
C[ock Set ........... : .................................................. 16
Custom Installation ........................................................ 8
Front Pane[ Diagram ...................................................... 11
Glossary ............................................................. 24, 25
Hook-Up Directory ........................................................ 3
Language Menu .......................................................... 20
Maintenance ............................................................ 22
Safety Information ....................................................... 2
Setup Menu ........................................................... 14
T1"mer................................................................ 17
Troubleshooting ........................................................ 23
VCR ................................................................. 6, 7
Video Menu ............................................................ 21
Warranty ............................................................... 28
3370--0
Page 25

STEREO SURROUND SOUND SPEAKERS
For use with any Surround Sound compatible TV. These speakers create
a sound so reaL,it's as if you were part of the action. The convenient,
space-saving shelf design make these speakers all ideal
addition to any Home Theater System. The contemporary
black finish complement any room.
cv5oooONLY $224.9 _'L°__'7"'_
Broken or Lostremote? Perhaps you would just Likethe convenience
of haying a second remote on hand. Order your replacement remote ,
control direct from Zenith! To ensure that you receive t:he correct
remote, have your television's model number ready when you cart.
SHIPPING & HANDLIhlG
REPLACEMENT REMOTE
oN
UHF/VHF/FM INDOOR ANTENNA
This UHF/VHF/FM indoor antenna provides sharp, dear sound and
icture in a high-tech design. Perfect for use as a cable _utage ba:kup
or to receive Local programming not avaiLabLe with a SateLLite Svst:em.
Works with most TVsor audio devices and includes four feet of75 ohm
cable for easy hook-up.
AST47SONLY $24.95 _L,usp_S_._H,,_,,,o
CORDLESS STEREO HEADPHONES
These cordless, Lightweight headphones aLLowyou to enjoy a
private Listening experience without disturbing others. The infrarec
technology delivers a virtuaLLy interference-free sigr, a[. Works with
most TVs, VCRsor audio devices with a fixed audio output jack.
Comes with optional microphone hookup. Soft cushioned ear pads
For comfortable use. Perfect for the hard-of-hearing.
ZEN911ONLY $59.95 PLOSS,.,,SHIPPING & HANDLING
zenith
Use Your Visa or MasterCard to Order
PLEASEALLOW 3-,; WEEKS FORDELIVERY
Page 26

Direct-_ew Color TV "Welcome into the/_enltn ramify: we Deuev_ u,dL yuu _,L, u= v,aased with your new Zenith Entertainment Machine. Please read this
warranty careful,l,y, it is a "lIMITED WARRANTY" as defined under Federal. Law. This warranty !)ires you specific legal rights.
and you may also have other dghts that vary from state to state within the U.S.A.
ZENITH RESPONSIBILITY
Service Labor
Home Service Warranty service for 21" diagonal` (U.S.A.) or Larger screen size models is provided in the home in most cases, (Some
Not Covere_
During a period of 90 days from effective warranty date, Zenith will pay for service labor by a Zenith authorized __;ervicecenter
when needed as a result of manufacturing defects.
Parts
New or remanufactured replacements for factory-defective parts will be serviced will. be suppl,ied by a Zenith authorized
service :enter for one year from effective warranty date (col,or picture tube -- two years). Such replacement parts are
warranted for the remaining portion of the original` warranty period.
_.-._re'p_irs may require the unit to,_e taken by the servicer to the repair facil,ity and returned, at no additional cha_le.)
This warranty covers manufacturing defects and does not cover instal,lotion, adjustment of customer controls in the home,
instal,JaSon or repair of home antenna systems, cable converters oT cable company-suppl,ied equipment; it also does
not cover damage due to misuse, abuse, negligence, acts of God or other causes beyond th_ control of Zenith. A_y
alteration of the product after manufacture voids this warranty in its entirety.
OWNER'S RESPONSIBILITY
l'ffective Warranty Date Warranty begins on the date of original consumer installation. For your convenience, keep the deal,er's dated bil!. of sale or
del,ivery ticket as evidence of the purchase date.
Operating Guide
Carry-In Service
Antenna
Important Product Re§istration--Pl,ease fill out and mail your Product Registration Card. It is imperative that Zenith know how to reach
Warranty Service For warranty service information, contact any Zenith authorized service center. Parts and service labor that are Zeni:h's
ZENITH CONSUMER SERVICES
FactoryOwned ServiceCenter
Home & Carry-inService
[ Te_evision!_CR
Parts and Accessories
PTV/Computer
Read your Operating Guide carefu[{yso that you willunderstand the operation of your set and how to adjust the customer controls.
Models under 21" diagona[ (U.S.A.)screen size must be taken to a Zenith authorized servicecenter for warranty serzice
and must be picked up by the owner.
Reception problems caused by inadequate home antenna or faultyantenna connections are the owner's responsl,Dil,ity.
you promptl,y if we should discover a safety problem that coul,daffect you.
respon_fbiIity(seeabove) wf_Ibe provided _thout charge. Other _erviceis at the owner's _xpense. Ifyou have _ny problem
in obtaining satisfactorywarrantyservice,cal'l'or write the Zenith Response Center.You must provic!ethe mode[ number,
serialnumber and date of purchase or date of origina[instal,kation.Beforeyou ask for warranty service,read "Maintenance
And Troub[eshooting" in your operating guide. You might avoid a _ervice cal,L
ZENITH ELECTRONICS CORPORA[ION
Zenith Response Center
1_000 Mi[waJkee Avenue
Service Hours:
M-F 8-6, Sat 9-2
Will accept UPS Shipments
G[eoview, IL 60025-2493
Te[Ephone (847)391-8752
Morl-Fri,7:00 a.m.-8:00 p.rn.CST
www.zenith.com
B,Dl E. Roosevelt Rd
Lombard, IL 60148
(630) 705-2830
201 James Record Rd.
BuiLding 4
Huntsvi[[e, AL 35824
(205)461-8583
Additional Zenith Picture Tube Protection Plan Available
Zenith offers you the opportunity to obtain additional. Long-term protection against failure of the picture tube in _/our _ew Entertainment Machine
Our l_cture Tube Protection PLan enables you to avoid any unexpected picture tube repair expenses and keep your Entertainment Machine ir top condition.
It guarantees you a genuine Zenith replacement picture tube and service from a Zenith authorized service center.
Be sure to send in the Product Registration Card. We will send you and application for the Protection Pton near the exp)ration of the
two year rnanu_actureFs warranty on the picture tub& For additional information call (847) 391-8757.
3370-o
Page 27

3370-0
Page 28

 Loading...