

Page 1
machine numbers I A25AI2D I A27AI2D
r
th
ch tv
amfll
operating q uide / warranty
Page 2
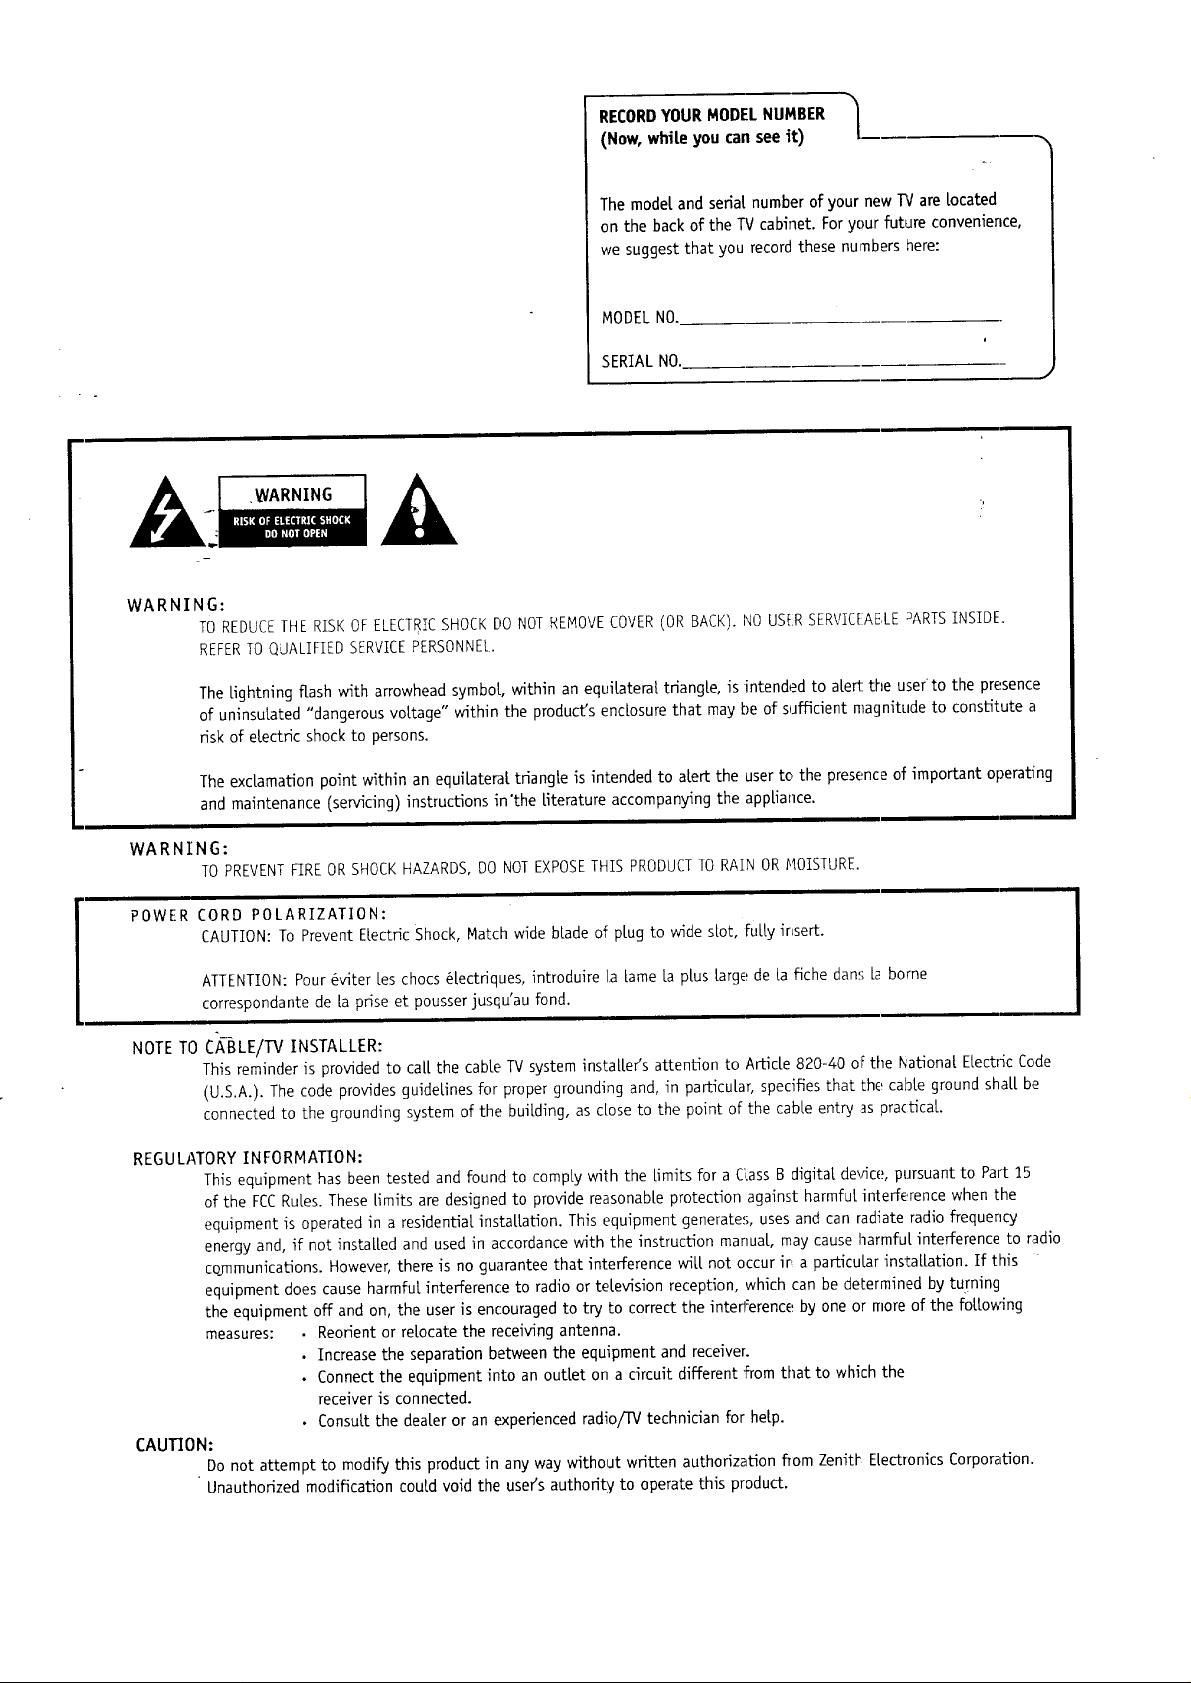
RECORDYOUR MODEL NUMBER |
(Now, while you can see it)
The model and serial number of your new TVare located
on the back of the TV cabinet. For your future convenience,
we suggest that you record these numbers here:
MODEL NO.
/
"x
,WARNING
WARNI
WARNI
NG:
TO REDUCETHE RISK OFELECTRICSHOCKDONOT REMOVECOVER(OR BACK). I'40 USERSERVIGAELE _ARTSINSIDE.
REFERTO QJALIFIED SERVICEPERSONNEL.
The lightning flash with arrowhead symbol, within an equilateral triangle, is intended to alert: the user to the presence
of uninsulated "dangerous voltage" within the product's enclosure that may be of s_afficient magnitude to constitute a
risk of electric shock to persons.
The exclamation point within an equilateral triangle is intended to alert the user to the presence of important operating
and maintenance (servicing) instructions in'the literature accompan_ng the appliance.
NG:
TOPREVENTFIREORSHOCKHAZARDS,DONOTEXPOSETHISPRODUCTTORAINORNOISTURE.
POWER CORD POLARIZATION:
CAUTION: To Prevent Electric Shock, Match wide blade of plug to wide scot, fully insert.
SERIAL NO.
J
ATTENTION: Pour 6viter [es chocs _[ectriques, introduire la lame la plus large de [a fiche dans [a borne
correspondante de [a prise et pousser jusqu'au fond.
NOTETO
REGULATORY INFORMATION:
CAUTION:
CABLE/W INSTALLER:
Thisreminderisprovidedto ca[[the cableTV systeminstallersattentionto Article820-40 ofthe NationalELectricCode
(U.S.A.). The code provides guidelines for proper grounding and, in particular, specifies that the cable ground shall be
connected to the grounding system of the building, as dose to the point of the cane entry as practical.
This equipment has been tested and found to comply with the limits for a C'.assB digital de_4ce, pursuant to Part 15
of the FCCRules. These limits are designed to provide reasonable protection against harmful interference when the
equipment is operated in a residential installation. This equipment generates, uses and can radiate radio frequency
energy and, if not installed and used in accordance with the instruction manual, may cause harmful interference to radio
communications. However, there is no guarantee that interference will not occur ira particular installation. If this
equipment does cause harmful interference to radio or television reception, which can be determined by turning
the equipment off and on, the user is encouraged to try to correct the interference by one or more of the following
measures: • Reorient or relocate the receiving antenna.
• Increase the separation between the equipment and receiver.
• Connect the equipment into an outlet on a circuit different from that to which the
receiver is connected.
• Consult the dealer or an experienced radio/q'V technician for help.
Do not attempt to modify this product in any way without written authorization flom ZenitV Electronics Corporation.
Unauthorized modification could void the users authority to operate this product.
Page 3

,.STA,,A*,ONIOE*T,N S*A"'EOIPAGE3
• ";
INPORTANTH
Use this page to decide where you need to begin your set up. First, find the line
below that best describes what you want to do, then go to that page number.
If you are using an antenna and no other equipment, go to .................. page 4
lw- r-
mmlmm
Cable PC
waLt jack
If you have cable and no other equipment, go to ......................... page 5
o-- In
CabLe box I
This page wilt
dire(_ you to
which page to
go to for
proper hook-
up of your
' Entertainment
Machine.
J
If you are using an antenna and have a VCR, go to ....................... page 6
_\ \\ _\ // // /
c]E_
: [ _]
If you have cable and a VCR, go to .................................. page 7_J LvL_
[abqe TV
wall jack
C2_C_
[_ Feelingbrave?Ifyoujustwantsome generalhook-upinforrnationabout
customizingyourown set-up,thenslaptopage8.
3416-o
J
Page 4
PAGE I..ST,,,,T,O,I STA"OA"O
f
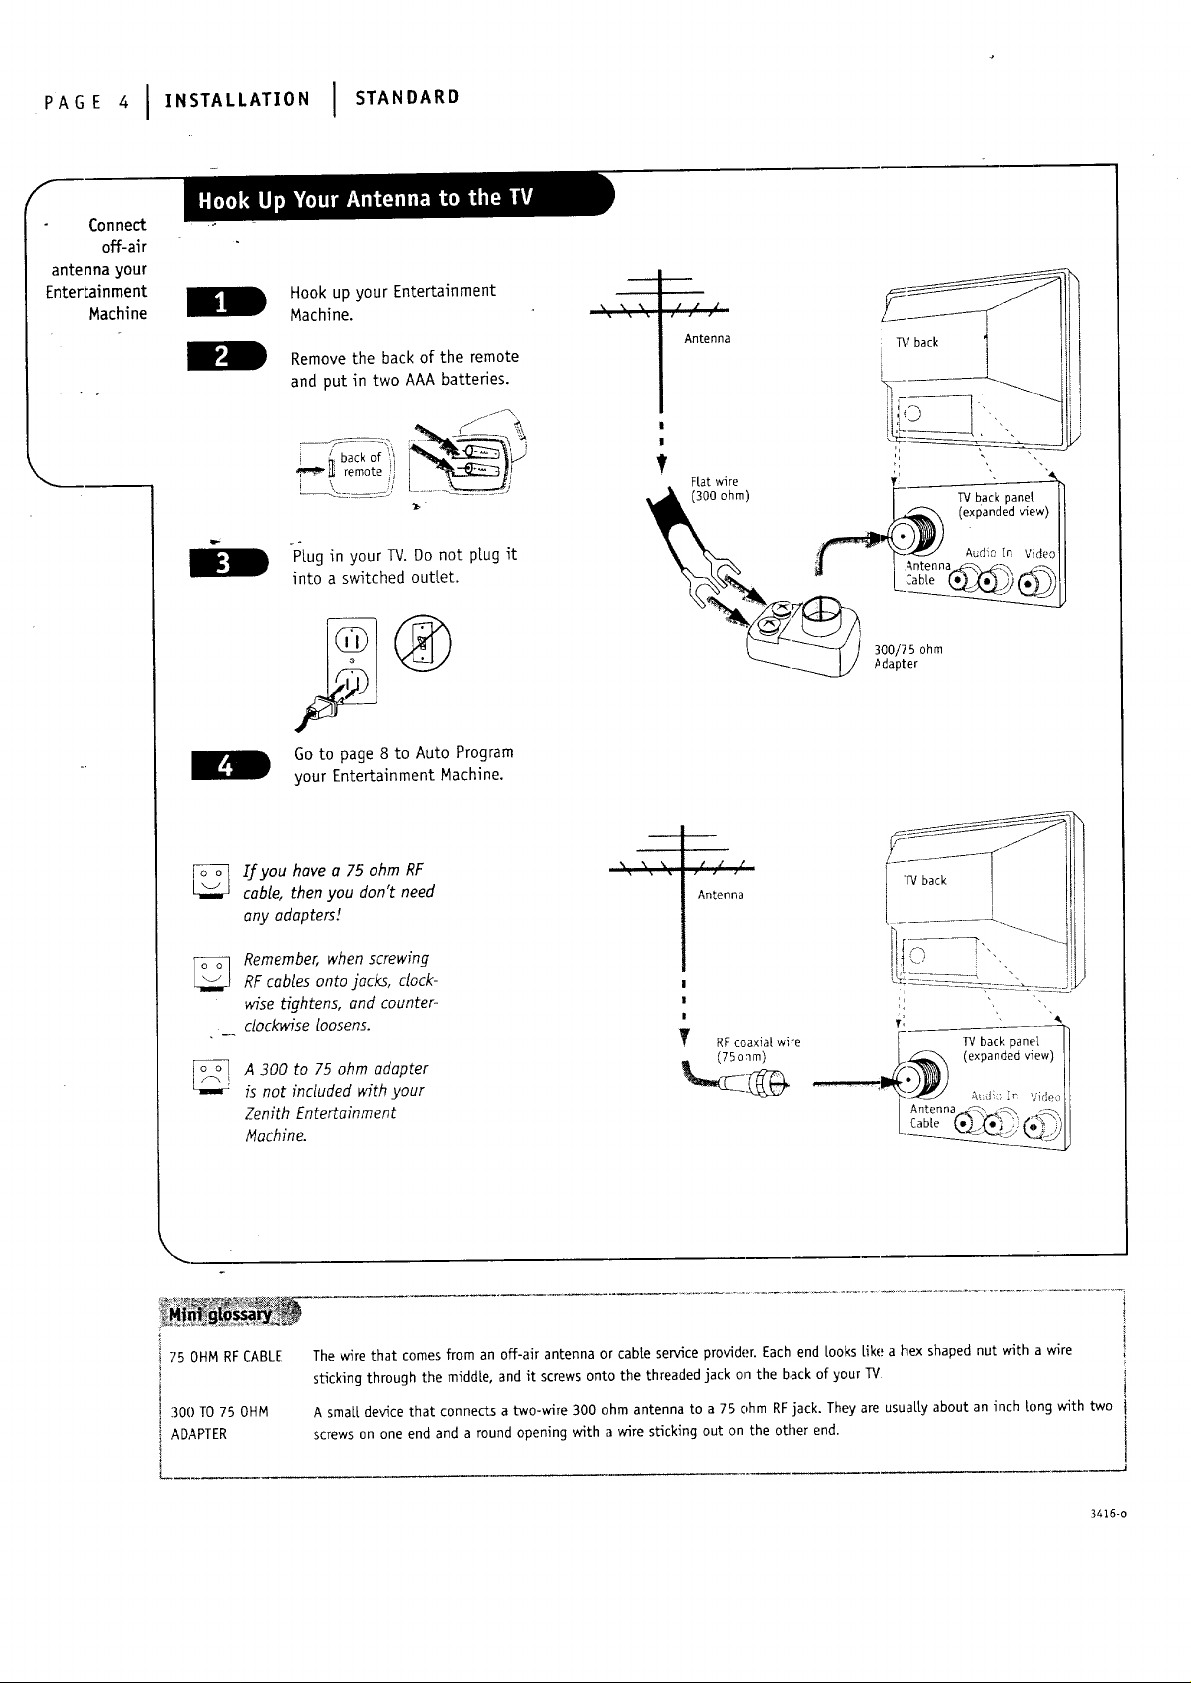
Connect
off-air
antenna your
EnterLainment
Machine
Hook up your Entertainment
Machine.
Removethe back of the remote
and put in two AAA batteries.
i - back of _!
-PLugin your TV. Do not plug it
into a switched outlet.
Go to page 8 to Auto Program
your Entertainment Machine.
[_ If you have a 75 ohm RF
cable, then you don't need
any adapters!
Antenna _,' back i "_
jJ_
j_l!_ (expanded view)
• \ \
/ ,1 /
Antenna
i!F_--q, -'_4i! i
RF cables onto jacks, dock-
A 300 to 75 ohm adapter
Zenith Entertainment
<
75 OHM RF CABLE
300 TO 75 OHM
ADAPTER
Remember, when screwing
wise tightens, and counter-
clock_nse loosens.
_' RFcoaxial wi_e
is not included with your
Nachine.
The Mre that comes from an off-aft antenna or cabte service provider. Each end Looks Like a hex shaped nut Mth a Mre
sldcking through the middle, and it screws onto the threaded jack on the back of your TV
A smaLL device that connects a two-wire 300 ohm antenna to a 75 ohm RFjack. They are usuaLty about an inch k)ng with two
screws on one end and a round opening with a wire sticking out on the other end.
3416-o
Page 5
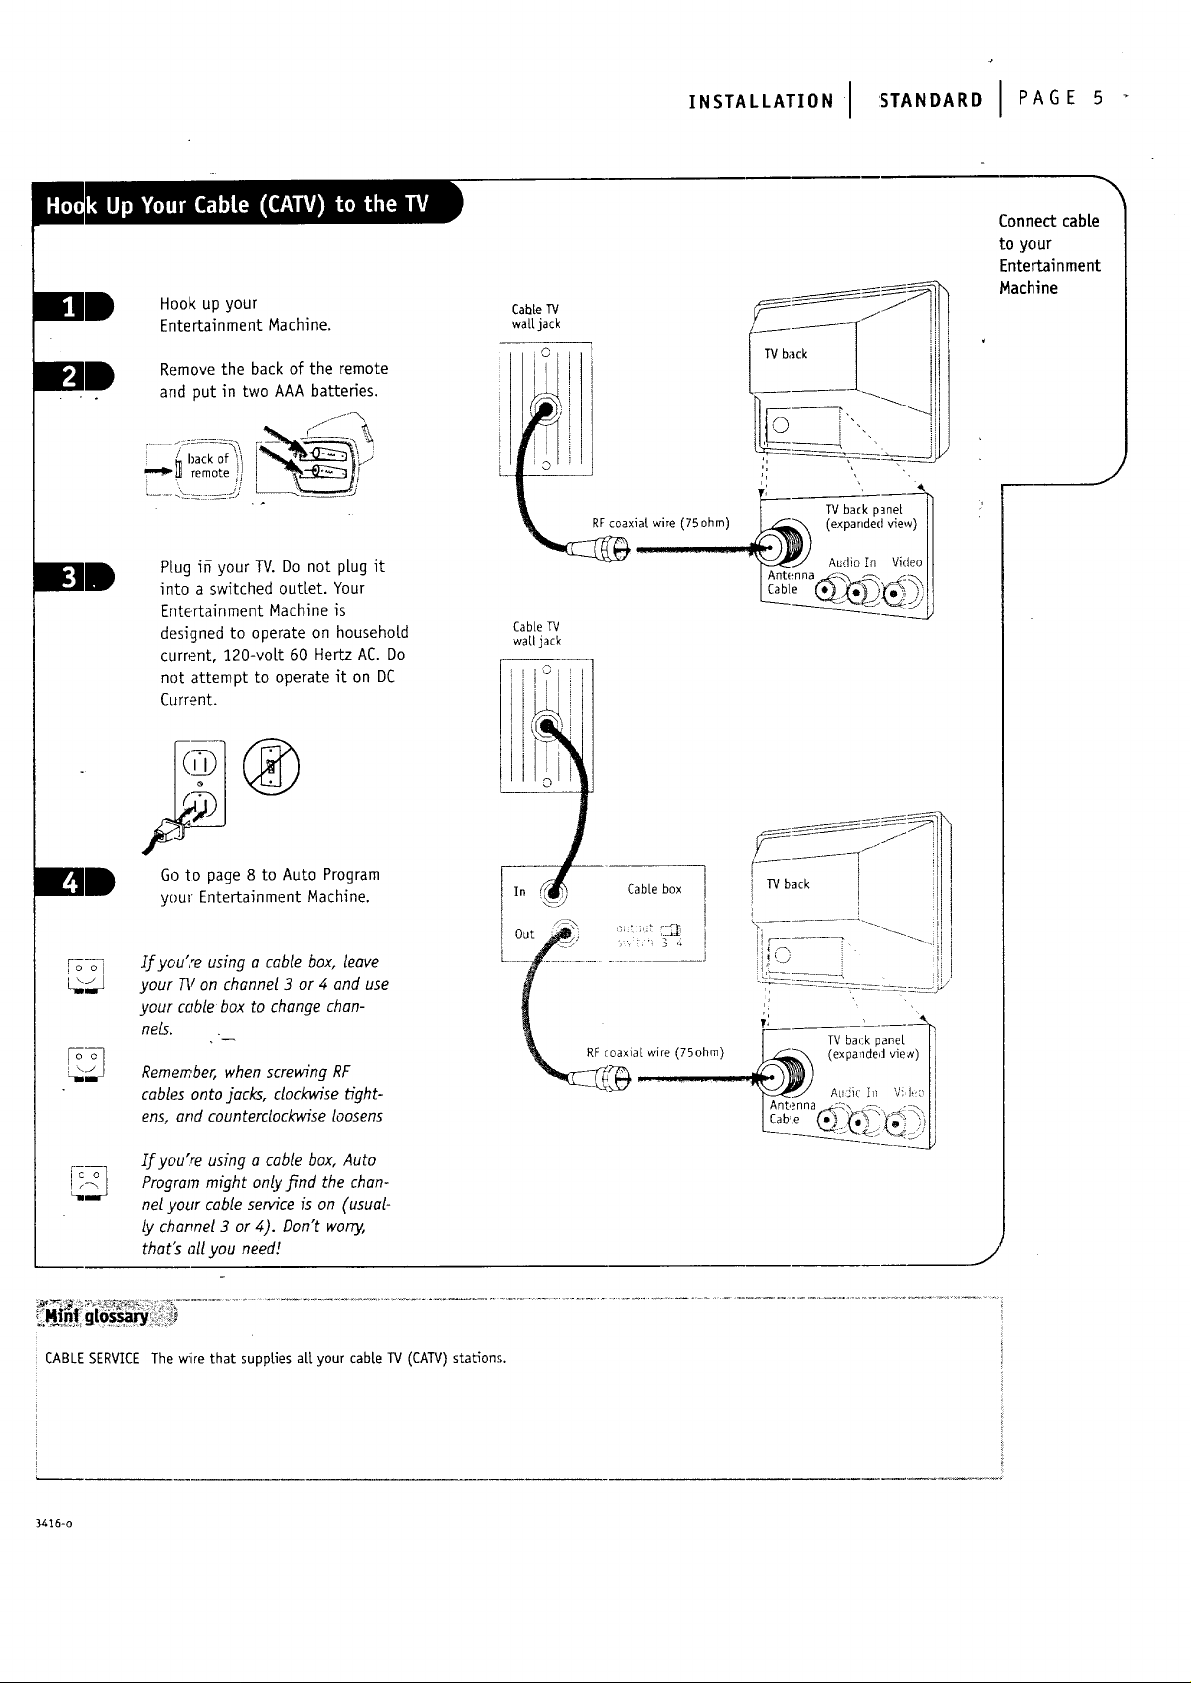
Hook up your
Entertainment Machine.
Remove the back of the remote
and put in two AAA batteries.
if-_
,.S*ALLA*'ONI S*A.OAROIPAGE
Connect cable
to your
Entertainment
Machine
Cabl.eTV
wattjack
_o_
""_" ill remote i
Plug ifi your TV. Do not p[ug it
into a switched out[et. Your
Entertainment Machine is
designed to operate on household
current, 220-volt 60 Hertz AC. Do
not attempt to operate it on DC
Current.
Go to page 8 to Auto Program
your Entertainment Machine.
Ifyou'reusinga cablebox,leave
your TV on channel 3 or 4 and use
your cablebox to change chan-
nell.
Cable TV
waUjack
TV back p_ne[
_> (expanded view)
Audio In Video
Antenna_ _. _-_
,J
?
Remember, when screMng RF
cablesontojacks,clockvn'setight-
ens,end counterdock_n'seloosens
Ifyou'reusinga cablebox,Auto
Program might onlyj_nd the chan-
nelyour cableserviceison (usual-
lychannel3 or 4). Don't worry,
that'sallyou need!
CABLESERVICEThe wire that supplies all your cable TV (CAW)stations.
3416-o
J
Page 6
PAGE61,.STA''AT,ONI ST,NOA"O
f
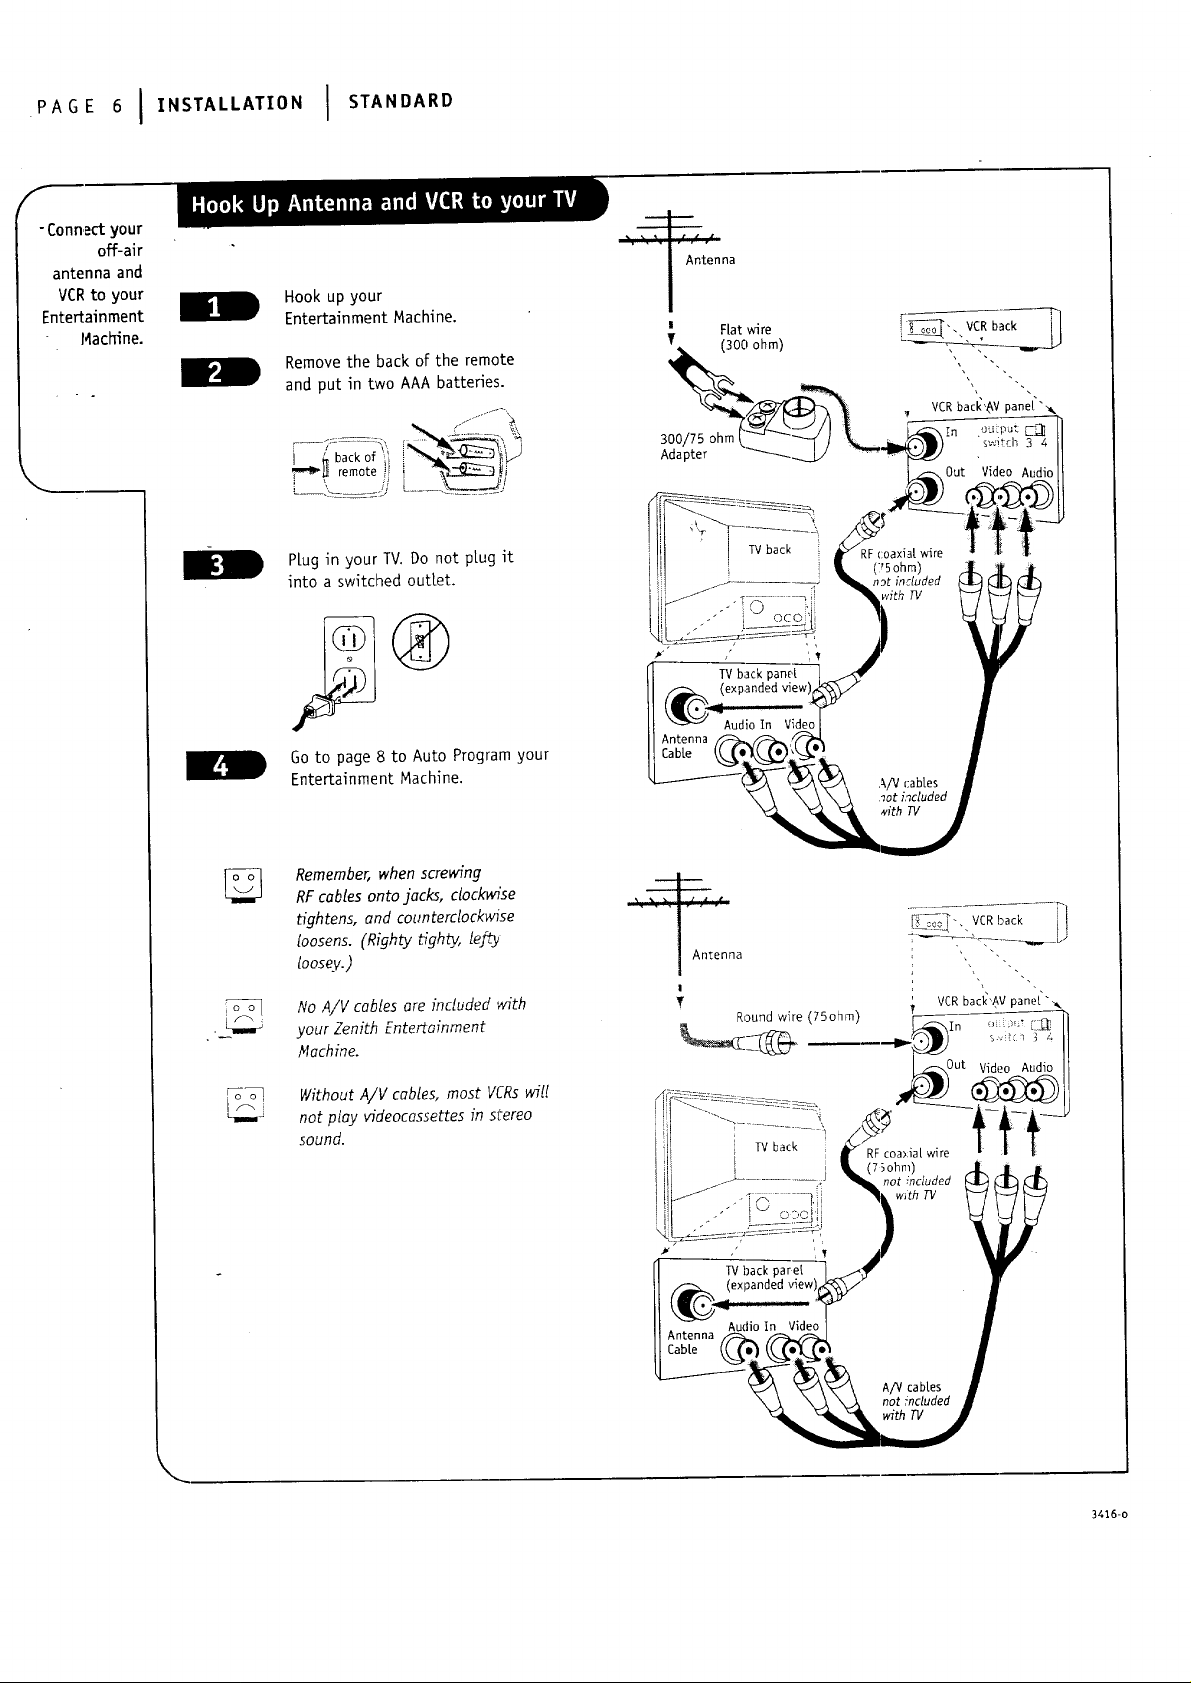
- Connect your
off-air
antenna and
VCRto your
Entertainment
Machine.
Hook up your
Entertainment Machine.
Remove the back of the remote
and put in two AAA batteries.
\
I _ back of ;_
PLug in your TV. Do not plug it
into a switched outlet.
Antenna
CabLe
io o]
Go to page 8 to Auto Program your
Entertainment Machine.
Remember, when screwing
RF cables onto jacks, dockvdse
tightens, and counterclockwise
[oosens. (Rfghty dgh_, le]_t
loose.v.)
No A/V cables are included with
your Zenith Entertm'nment
/_fachine.
o o 1
Without A/V cables, most VCRs wil!
not play videocassettes in stereo
sound.
Antenna
CaMe
] TV back
3416-o
Page 7
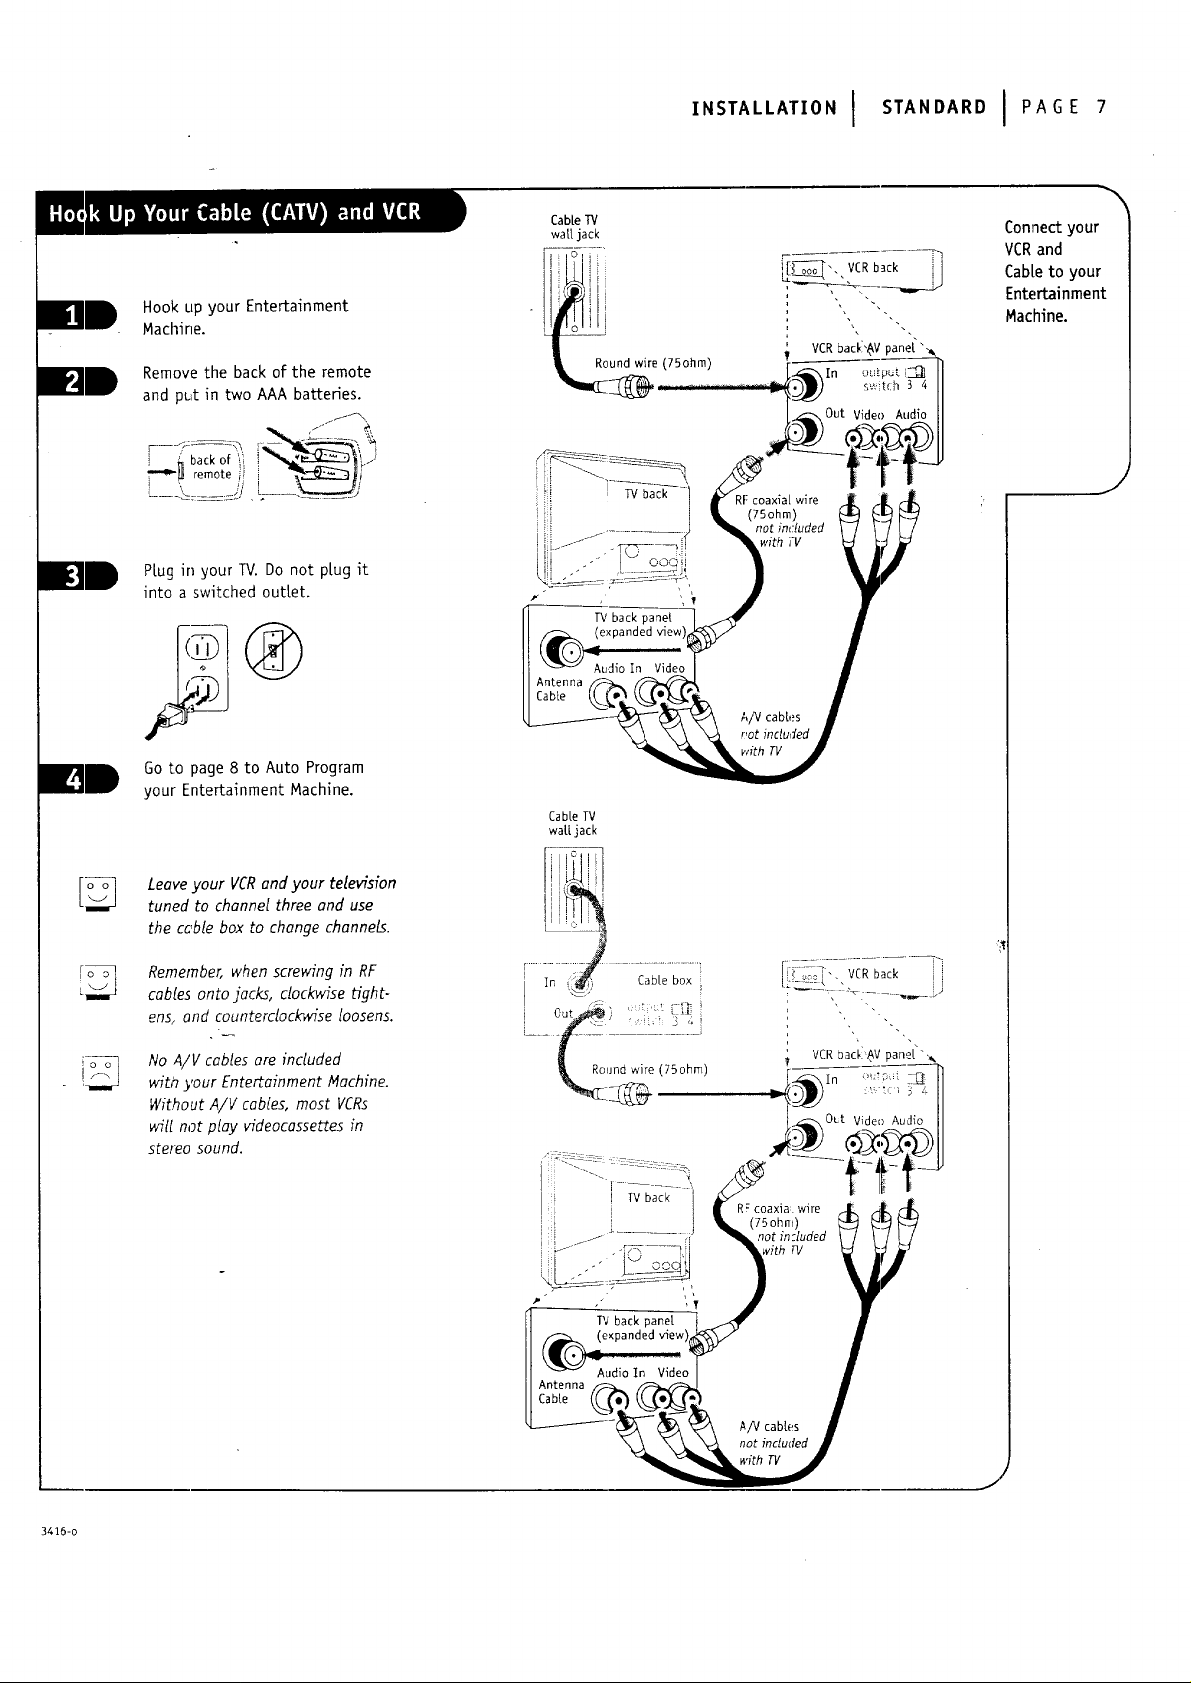
Hook up your Entertainment
Machine.
Remove the back of the remote
and pL_t in two AAA batteries.
f.1_
i _ back of _I_, i-
•,-!,-_ remote ii
PLug in your TV. Do not p[ug it
into a switched outlet.
,NS.A''A,,ONI .ANOA,OIPAGE,
Connectyour
MCRand
CabLeto your
Entertainment
Machine.
E_
Go to page 8 to Auto Program
your Entertainment Machine.
Leave your VCRand your television
tuned to chonnel three and use
the cable box to change channels.
Remember, when screwing in RF
cablesonto jacks, dock_q'setight-
eng and counterclockwise loosens.
No A/V cables are included
witi_ },our Ente_ainment Machine.
Without A/V cables, most VCRs
wiU not play videocassettes in
stereo sound.
Cable IV
watt jack
.........: :;2_i{Li
!_Jnd wire (75ohm)
3416-o
jt
Page 8
PA E8I ,.S,A'LAT,O.I QU,CKS,A.,
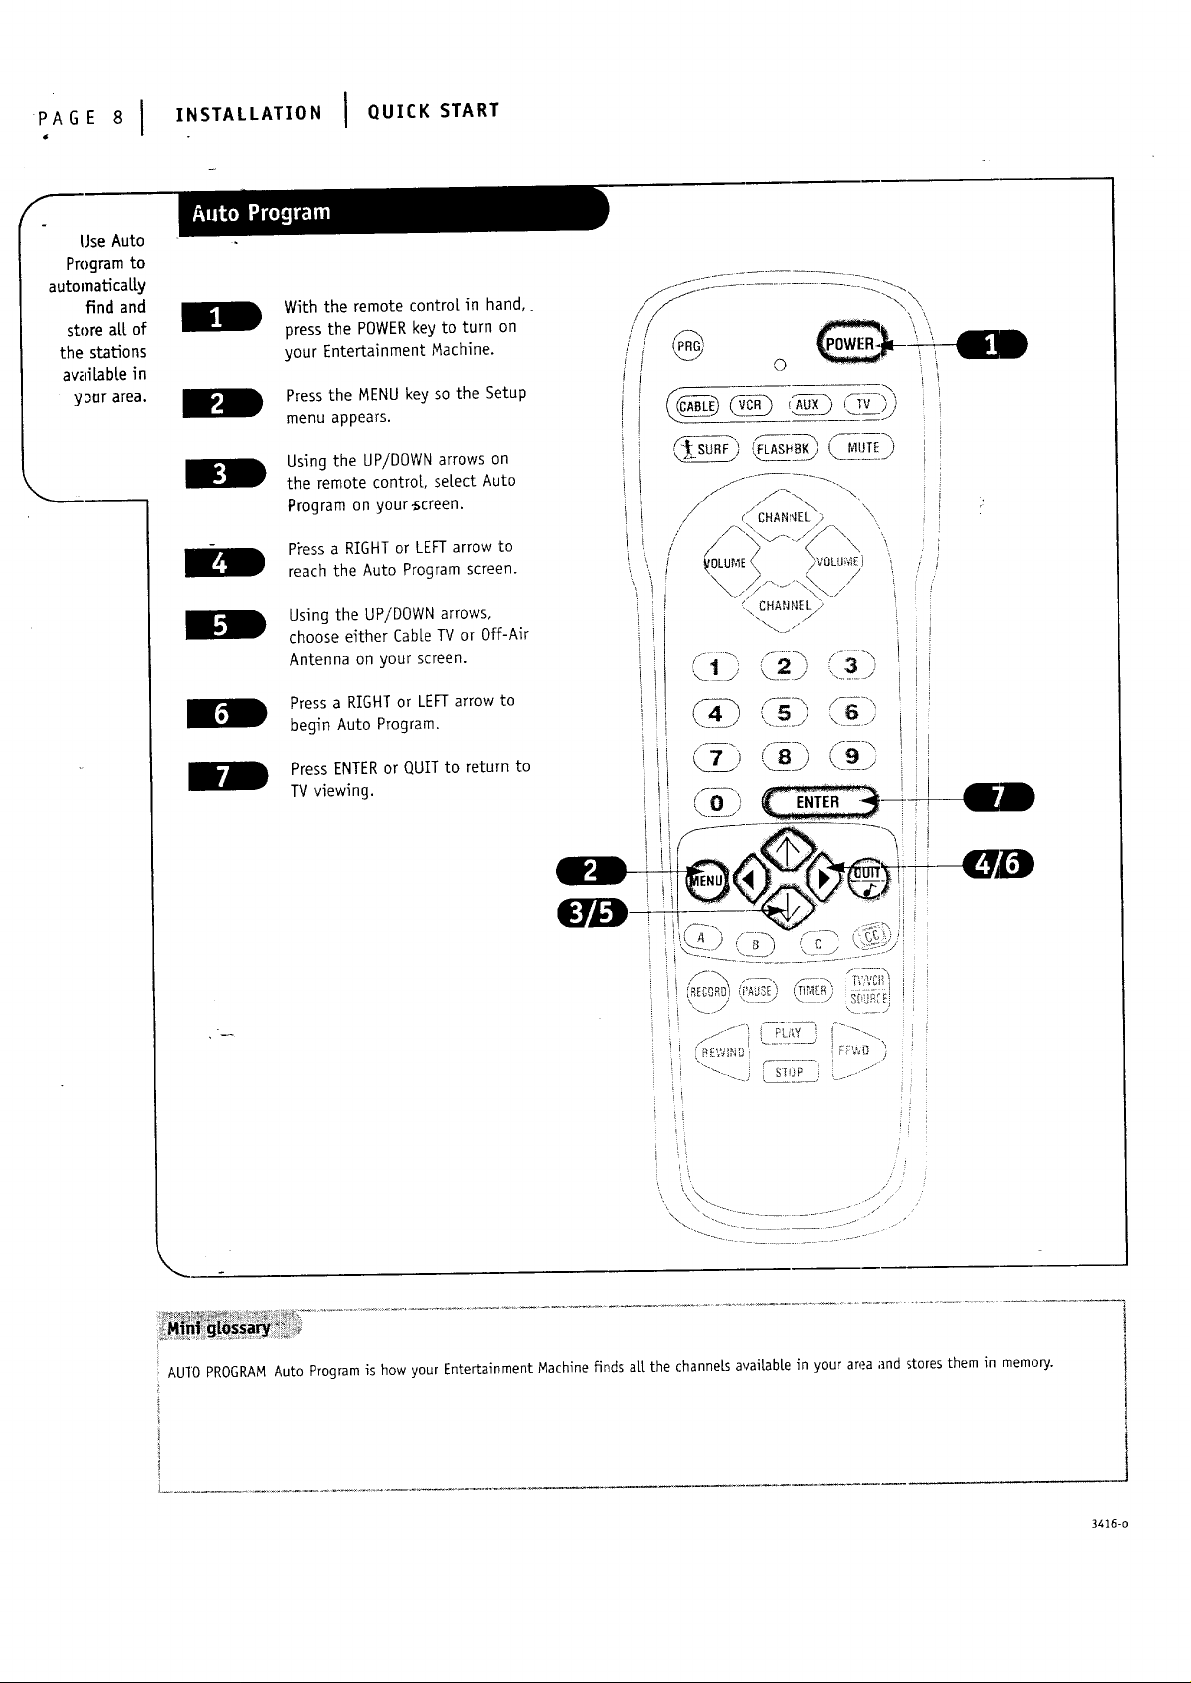
Use Auto
Program to
automatically
find and
store all of
the stations
awli[able in
_9ur area.
\
With the remote contro[ in hand,.
press the POWERkey to turn on
your Entertainment Machine.
Press the MENU key so the Setup
menu appears.
Using the UP/DOWN arrows on
the remote control select Auto
Program on your_creen.
PYessa RIGHT or LEFT arrow to
reach the Auto Program screen.
Using the UP!DOWN arrows,
choose either Cable TV or Off-Air
Antenna on your screen.
Press a RIGHT or LEFT arrow to
begin Auto Program.
Press ENTER or QUIT to return to
TV viewing.
AUTO PROGRAM Auto Program is how your Entertainment _achine finds air the channeLs avai[ab[e in your area and stores them in memory.
3416-o
Page 9
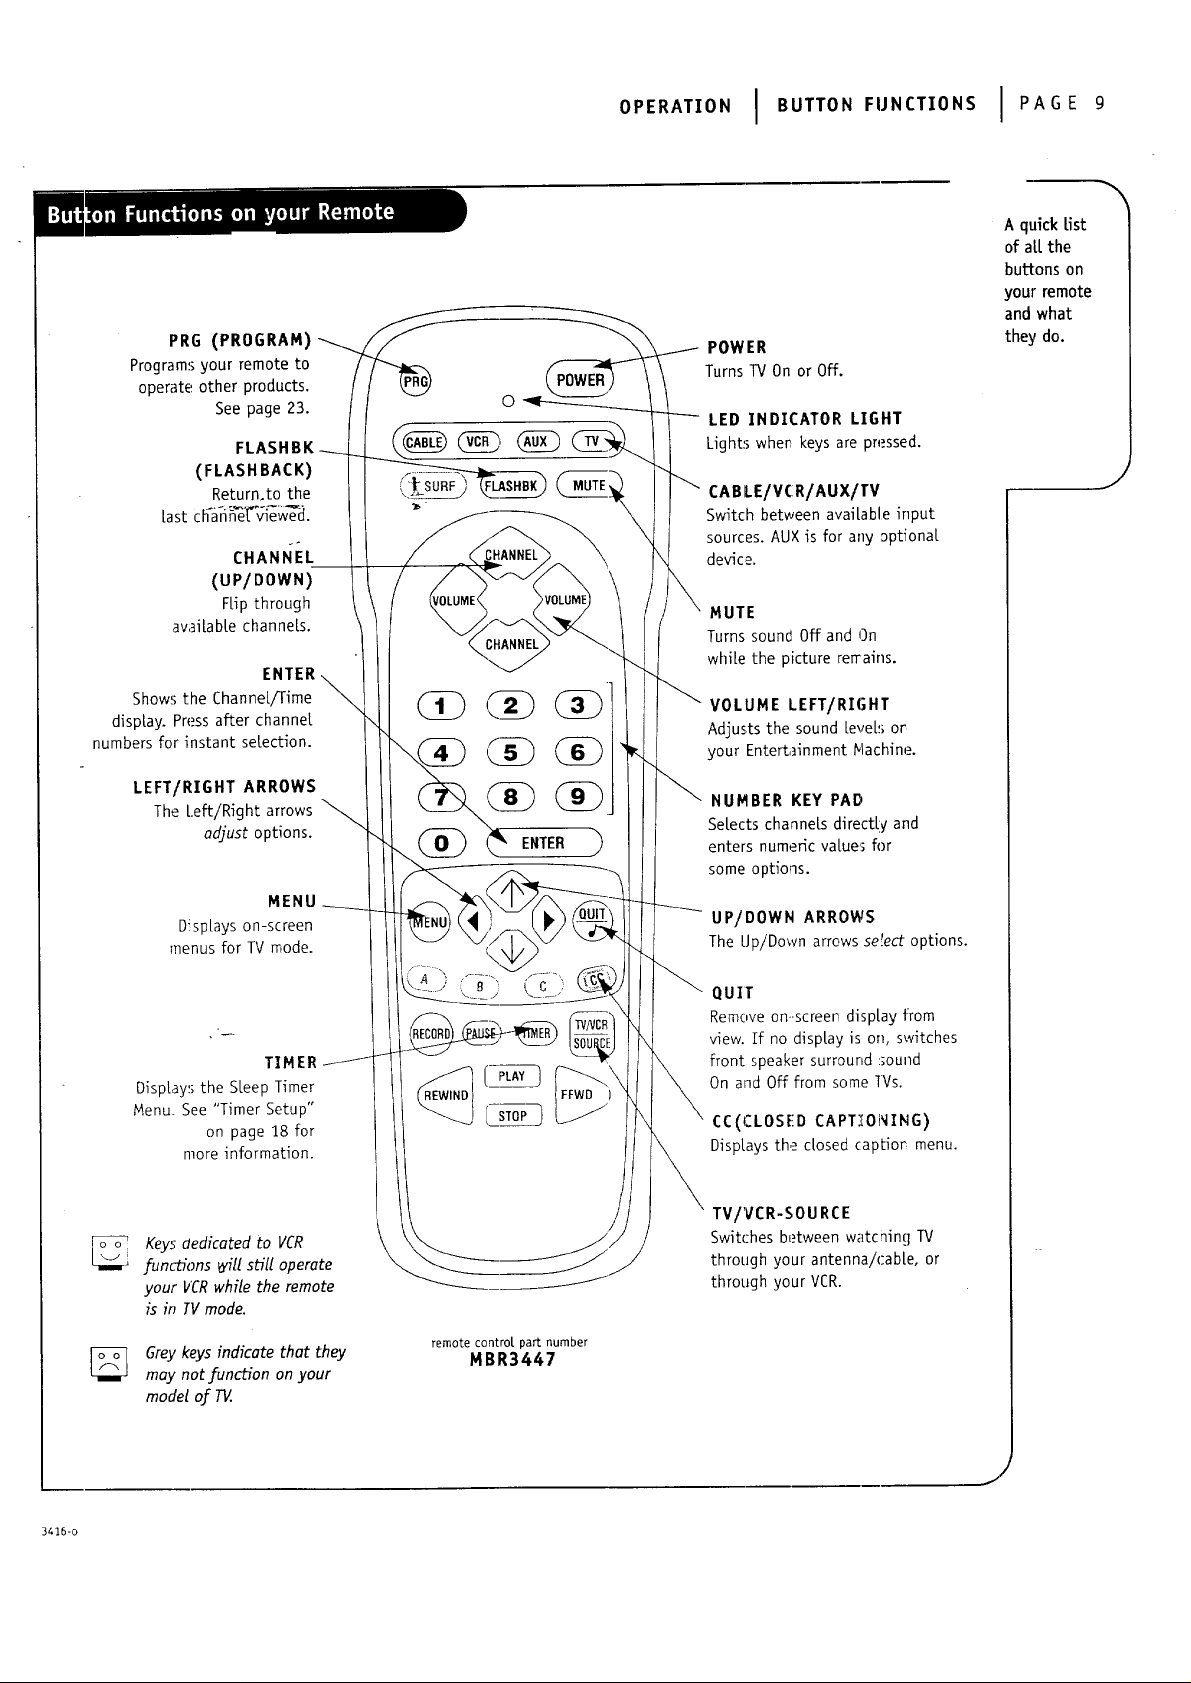
PRG (PROGRAM)
Programs your remote to
operate' other products.
See page 23.
FLASHBK
(FLASHBACK)
Return.to the
Last Ch-an _'[_vie w-_cl.
CHANI_EL
(UP/DOWN)
FLipthrough
aw_iLabte channels.
ENTER
Shows the ChanneL/Time
display. Press after channel
numbers for instant selection.
O E.AT,O.I BUTTO.F"NCT'O"SI PAOE'
A quick Ust
of aLLthe
buttons on
your remote
and what
POWER
TurnsTV Onor Off.
LED INDICATOR LIGHT
Light_'; whe_ keys are pressed.
CABLE/VCR/AUX/TV
Switch between available input
sources. AUX is for any optional
device.
MUTE
Turns sound Off and On
while the picture terrains.
\
VOLUME LEFT/RIGHT
Adjusts the sound LeveLsor
your Entertainment Machine.
they do.
J
LEFT/RIGHT ARROWS
The Left/Right arrows
odjust options.
MENU
DispLays on-screen
menus for TV mode.
TIMER
DispLays the SLeep Timer
Menu. See "Timer Setup"
on page 1_8for
more information.
Keys dedicated to VCR
.functions will sGll operate
your VCRwhile the remote
is in IV mode.
Grey keys indicate that they
may not function on your
model of TV.
NUMBER KEY PAD
Setects channels directLv and
enters numeric values for
some options.
UP/DOWN ARROWS
The LJp/Down arrows se!ect options.
QUIT
Remove on. screen display from
view. If no display is on, switches
front speaker surround sound
On and Off from some TVs.
CC(CLOSED CAPT.'[ONING)
DispLays the dosed capLio_ menu.
TV/VCR-SOURCE
Switches between watcnin!] TV
through your antenna/cabLe, or
through your VCR.
remote control, part number
MBR3447
3416-o
j!
Page 10
PAGEI010PE.,T'O"I BUTTO"FU"CT'O"S
ffAn examp[eof
using the
panel on the
front of your
Ente_dnment
Machine.
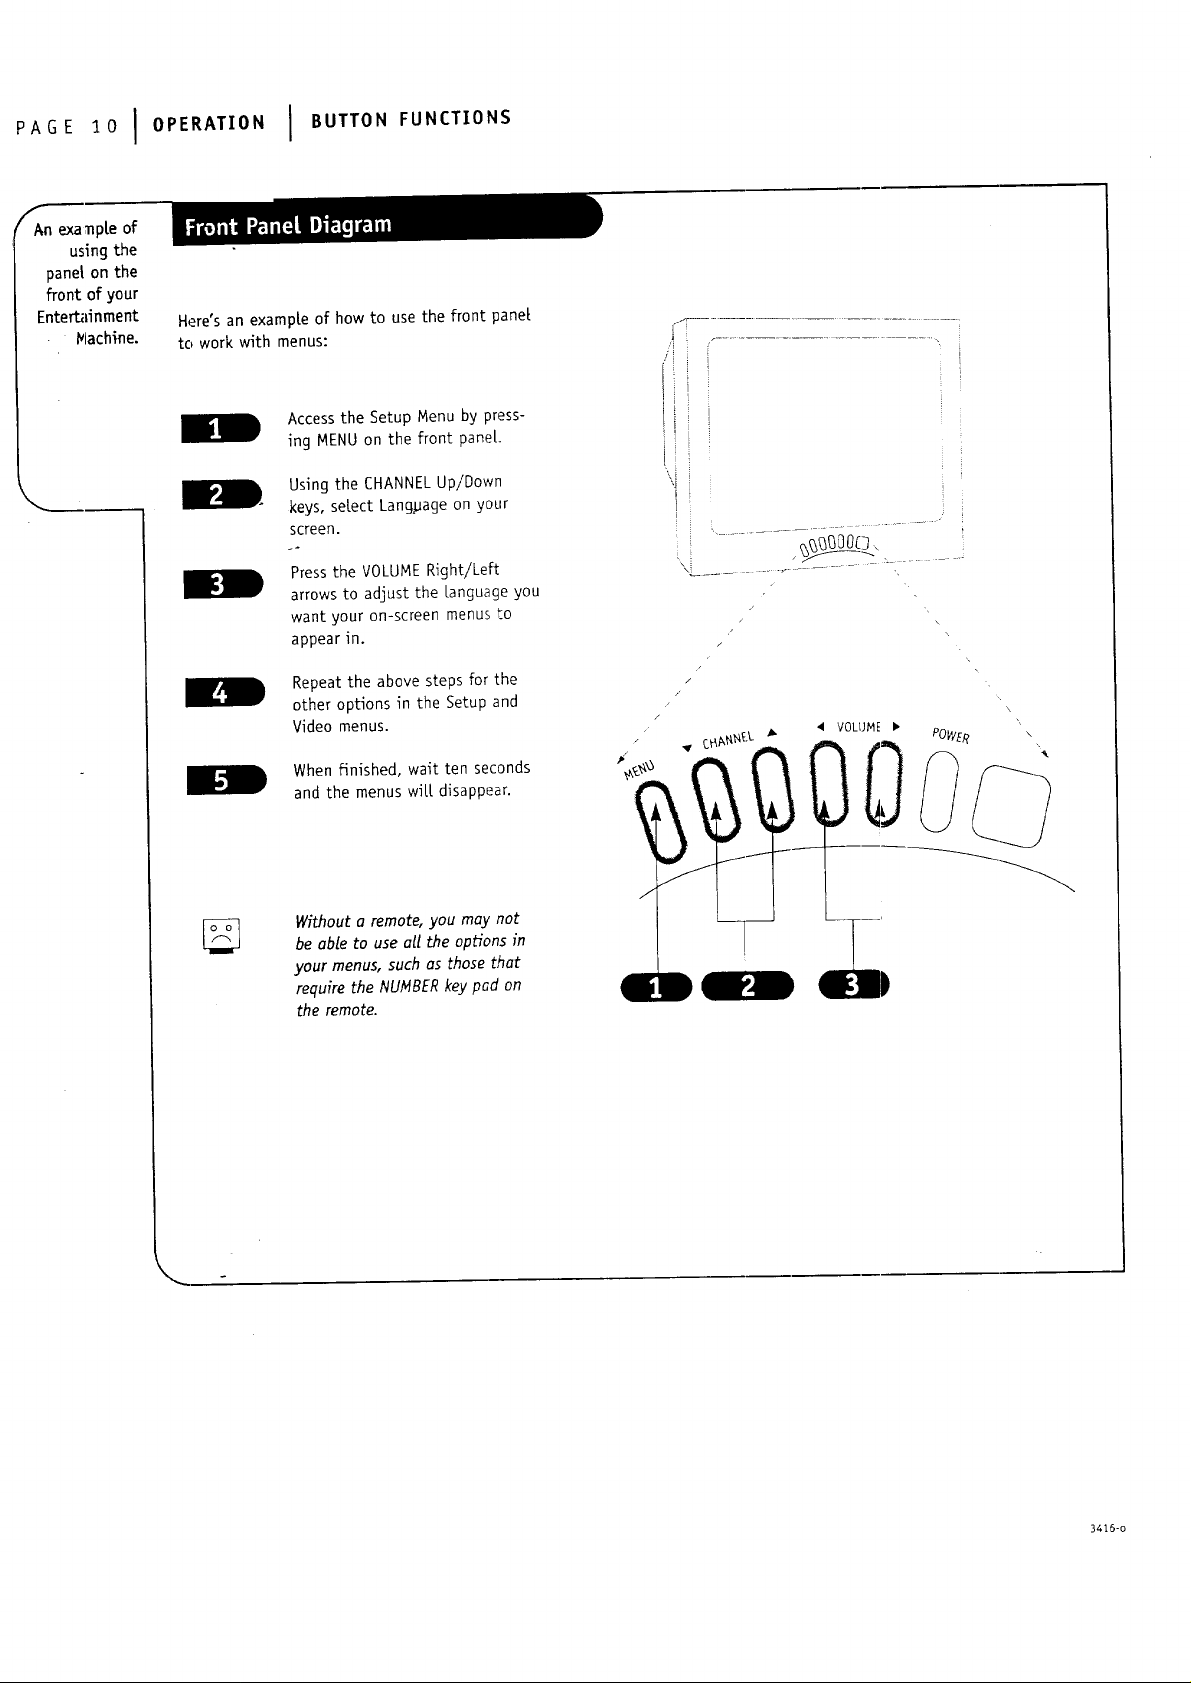
Here's an example of how to use the front panel
to work with menus:
II
E.I
Access the Setup Menu by press-
ing MENU on the front pane[.
Using the CHANNEL Up!Down
keys, setect Language on your
screen.
Press the VOLUME Right/Left
arrows to adjust the Language you
want your on-screen menus to
appear in.
Repeat the above steps for the
other options in the Setup and
Video menus.
When finished, wait ten seconds
and the menus will disappear.
Without a remote, you may not
be able to use all the opHons in
your menus, such as those that
require the NUNBER key pad on
the remote.
i i i
i ! i
\i i
t
i .....................................i
z
/
/
/
/
/
z
\
\
\
3415-o
Page 11
On ,_;omemodels A!V input is designated as a channel that is one below
the lowest/one above the highest. You'll have to use the Channel
Up/Down buttons to access it. The Time/Channel display will read "Video"
in place of a chan_eL number.
CabLe/Antenna ]nput: This setting allows you to change cable or
antenna channels and_t_,,vj,e.w vJdeocassettes on channel 3 (or 4) in mono
sound.
Video Input: This setting allows stereo pLayback of videocassettes. The
television cannot change channels in the Video mode, but the VCRcan.
Op RAT,ONItV IPAGE"
Introdudng
you to the
basi(_ of your
Entertainment
Machine.
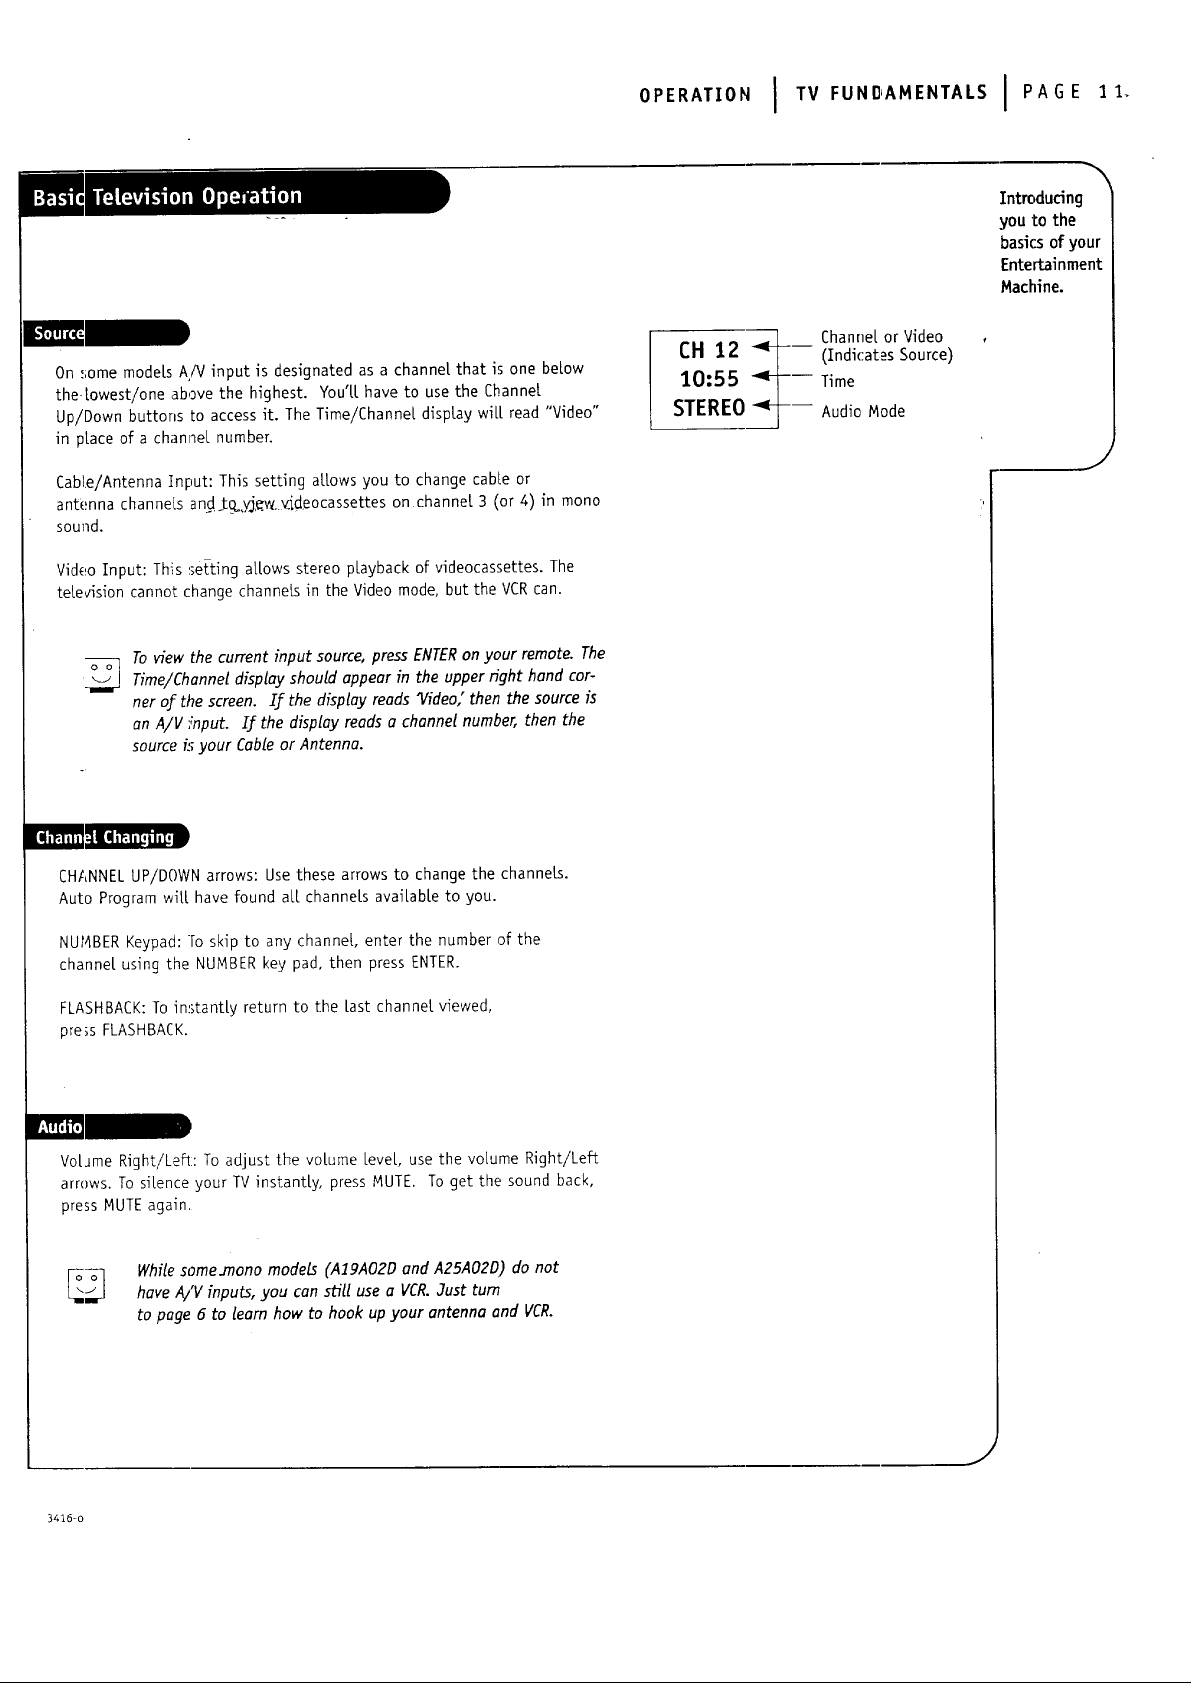
Channel or Video
(Indicates Source)
10:55
CH 12
STEREO ---
--- Time
Audio Mode
J
To view thecurrentinputsource,pressENTER on your remote-The
Time/Channeldisplayshould appear inthe upper fight cor-
her of the screen.If the displayreadsI/ideo,"then the sourceis
an A/V input. If the displayreadsa channelnumber, then the
sourceisyour CableorAntenna.
I[1_ i Y.1i1i 1:.1I[11 i l':.! i l__.I_ III
CHANNEL UP/DOWN arrows: Use these arrows to change the channels.
Auto Program will have found aLl channels available to you.
NUI4BER Keypad: To skip to any channe!, enter the number of the
channel using the NUMBER key pad, then press ENTER.
FLASHBACK: To instantly return to the Last channel viewed,
pre_s FLASHBACK.
VotJme Right/Left: To adjust the volume LeveL, use the volume Right/Left
arrows. To silence your TV instantly, press MUTE. To get the sound back,
press MUTE again,
hand
_ WhilesomeJnono models (AIgAO2D and A25AO2D) do not
3416-o
have AiV inputs,you can stilluse a VCR.Just turn
to page 6 to team how to hook up your antenna and VCR.
J
Page 12

AOE121OPt.AT,ONITVFU"OA"E"TA'S
f
-leLpon
combining
Entertainment
your
l_achine
with more
equipment.
There area number of ways you can choose to integrateyour EntertainmentMachine with the restofyour equip-
ment. ChanneLs can be changed using the television,the VCR, or the cable box, with advantagesto each.
USING THE TELEVISION AS THE TUNER preservesallyour channellabeb;(notavailableon some models).Italso
reducesthe number of keys on the remote controlyou need to worryabout. (One device,one remote to learn.)
USING THE VCR AS THE TUNER has the advantage of simplifyingthe recordingprocess.Ifthe VCR istuned to
channel seven,then the VCR willrecordchannelseven.
USING TH.E CABLE BOX (if you have one) to change the stations sometimes has an advantage, too, especially if
your_cauL_p_uv,u_,requiresyou_t-ousetheircable box to descramble theirstations.
Based on the advantages listed above, decide what
device you want to use as the tuner.
Connect the antenna or cablesourceto the input
of your tuner.(Ifyou chose yourte{evisionas the
tuner,then you'redone.Go watch your
EntertainmentMachine.)
Connect the outputof your tuner to the input of the
nextdevice.
Ifyou used A/V cablesforstep 3,set the "next
device"to Videoinput.Ifyou used an RF coaxial
cablein step 3, then tune the "nextdevice"to
match the output channe[ of your tuner (usually
channel 3 or 4).
Repeat steps 3 and 4 until you reach your
Entertainment Machine. Then enjoy!
TUNER Thetelevision,VCR,orcableboxthatyouchooseto changechannelswith.
A/V CABLES Audio/Videocab{es.Threecab[esbunchedtogether--fightaudio(red),{eftaudio(white),andvideo(yet{ow).
A/V DEVIZE Any devicethatproducesvideoorsound(VCR,DVD,cablebox,orte[evision.
J
3416-o
Page 13

Function What it is for
Go to page
OPE.AT,O.I .ENOSI AOE
Setup Menu
Descriptions
of the menu
options found
in the Setup
Menu.
Auto Program
,:h. Add/Del
Z[ock Set
Timer Setup
Captions/Text
Audio Mode/
AutomaticaLLy finds and stores active
channels to flip through using Channel
Up/Down.
ManuaLLy pick and choose which active
channels wiLL appear when flipping through
usincl. GhanneL Up/Down.
,gets the cuFrent time on your Entertainment
-Machine.
Opens menu for the foLLowing functions:
• Turns the SLeep Timer on or off.
• SeLects an automatic On Time for your
Entertainment Machine.
• SeLects an automatic Off Time for
shut-down.
• On/Off timer controls automatic power
on and power off.
Must be set to On for above functions
to work.
DispLays closed captions or text when
avaiLabLe. Options are Off, Caption 1,
Caption 2, Caption 3, Caption 4, Text I,
Text 2, Text 3, and Text 4.
Switches your sound between Stereo
(separate sound on [eft and right speakers)
and Mono (same sound on both speakers).
AutoProgram
Ch. Add/Del
14
Crock Set
--i
_ 18_I
J
Timer Setup
15
Captions/Text
Language
16
This is an example of
what on-screen menus
look tike.
17
18
3416-o
Language
"seLects language for on-screen menus. Your
options are EngLish, Spanish, or French.
In videomode, only ClockSet,TimerSetup,
Caption/Textand Language willappear.To view
allmenus, switchto Cable/Antennainput.
?9
..J
Page 14

AGE14IOPt'AT'O"I " "US
f
Customize
your channeL
seLection.
Press the MENU key on the remote
so the Setup menu appears.
Select the Ch. Add/Delete menu
using the UP/DOWN arrows.
Using either the NUMBER key pad
or the CHANNEL UP/DOWN arrows
on the remote, se[ect a channel
(If adding a de[eted channel you
_{[[ need to use t_e number pad.)
r-
Using the RIGHT/LEFT arrows,
pick whether that channe[ is
Added or Deleted.
To continue, select another
channe[ and repeat step 4. If you
are finished, press ENTER or QUIT
to return to TV viewing.
/ /
E
-Z-Z-----
\ \
f
° i i
r
If you delete a channel, it isn't
gone for good. Just select it
using the NUNBER key pad on
the remote, or add it later.
ADD This {:unction lets you add new channels to the list that you'lLscro[[ through when usingyour remote.
DELETE This function [ets you remove channels that you don't watch from the [ist you'[[ scro[[through.
34_6-o
Page 15

iI
Press the MENU key on the remote
control so the setup menu appears.
Using the UP/DOWN arrows on
the remote controL, select Crock
Set on your screen.
Press a RIGHT or LEFTarrow to
adjust the time.
Press the TINER button to select
AM or F_.
Press ENTER or QUIT to return to
"IV viewing.
OPt.AT,ONI .ENUSI PAG_1
Set the dock
on your
Entertainment
Machine.
J
i
\\
L
YoucQnuse the NUhlBERpod
to simply type in the time (AM
orPM isstillselectedwiththe
Timerkey).
_, :i I
j "!
\\ \\ "............................ ;_ ......./,,"
,/
3416-o
Page 16

PAGEI010P "'T'O"I "E"US
f
/_utomatica[[y
turn your
Ente_inment
Machine on
or Off-
Press the MENU key on the
remote control so the Setup menu
appears.
/
/
t
I
©
Using the UP/DOWN arrows on
the remote control select Timer
Setup on your screen.
Press a RIGHT/LEFT arrow. The
:-'- Timer Setup screel_ -Mll appea_.
Sieep Timer: Use the RIGHT/LEFT
arrows to adjust the length of
time until the TV shuts down
(se[ect a countdown from ten
minutes to four hours).
At this point, continue to step
six to set the On Time, or press
ENTERor QUIT to return to
TV viewing.
On Time: Using the UP/DOWN
arrows on the remote control,
se[ect On Time on your screen.
Press a RIGHT or LEFT arrow to
adjust the time your TV will
automatically turn on.
Press the TIMER button to select
AM or PM.
i
J
Press ENTER or QUIT to return to
TV vkwing or continue program-
ming by repeating the above steps
for Off Time, and the On/Off Timer.
_j_ TheOn/OJ_timer wilt not work
until the Clockon your television
has been set.
i c"_",,_olf__'>_<i i
\'-_.IL__J,J i I
i I? i_
\x '\ \\. ,/ /_ ,'
\
3416-o
Page 17

Press the MENU key on the
remote control so the Setup
menu appears.
Using the UP/DOWN arrows
on the remote controL, select
Captions/Text on your screen.
o,.,:.A-,-.o,,,t ,,,,,:NUSI PAGE
Turnon dosed
captioningor
\
0
textthat
appearsatthe
bottomof
yourscreen.
Press a RIGHT/LEFT arrow to
choose.an_.of:the.foL[owin g
op_ons::Off, Caption I,
Eaptiog'_2, Captiorr 3, Caption 4,
Text I, Text 2, Text 3 or Text 4.
Press ENTER or QUIT to return to
TV viewing.
Captions come in handy when the
television is on mute.
Standardclosedcaptioningis
availableusingthe CaptionI
option.
Not o11programming has dosed
captioningortextavailable.
J
3416-o
.l
Page 18

PAGE18IOPE"'T'O"I "E"US
F
Choose
between
stereo sound
and mono
sound.
Press the MENU key on the
remote control so the Setup
menu appears.
Using the UP/DOWN arrows on
the remote control se[ect Audio
Mode on your screen.
Press a RIGHT/LEFT arrow to
_tect either of _e fo[Lowinq
options: Stereo or Mono.
PressENTERor QUIT to return to
TV viewing.
FLASHBK ) i I'#IUTE
Not all programming is broadcast
in stereo sound.
STEREO SOUND
MONO SOUND
Stereo (stereophonic) sound refers to audio that's dMded into fight and teft sides.
Mono (monaural) sound is one channel of sound. On more than one speaker, aL[ the speakers pray the same audio.
3416-o
Page 19

Press the MENU key on the
remote control so the Setup menu
appears.
Using the UP/DOWN arrows on
the remote controt, select
Language on your screen.
OPE.AT'ONIMENUSI,>AGE19
Choosethe
Languageyou
want alLthe
menusto
appearin.
Press a RIGHT/LEFT arrow to
ch oose_any,_:the_foLLowi ng
options_ EngUsh, Spanish,
or French.
Press ENTERor QUIT to return to
regular TV viewing.
J
3416-o
Page 20

PAGE2010P .A,'O.I M NUS
Use the Video
. menu to
customize
how your
picturelooks.
Press the MENU key twice and the Video
menu wi[[ appear. Your options are:
Contrast: AdJusts the revel of
difference between white and b[ack in
the TV picture. The more contrast, the
brighter the picture appears.
i
t
I
o
• Brightness: Increases or decreases
amount of white in the TV picture.
• Cotor:Adjusts_ve[sofartco[orsinthe
,Vpicture.
i'T_nt: Batances between amounts of red
and green in the TV picture.
Sharpness: Raises or towers the
definition of the TV picture. The tower
the [ever, the softer the images wi[[
appear.
Picture Preference: Choose either
Custom or Preset. Custom allows you to
set the picture the way you want. Preset
moves art the above options back to
their original factory-set levers.
Using the UP/DOWN arrows on the remote
control, setect Contrast on your screen.
Using the RIGHT/LEFT arrows, adjust the
contrast [eve[ to your preference.
Press ENTER, QUIT or MENU one more time
to return to TV viewing, or
repeat from step two to set the other
menu options.
f- ---\ \
• _CHANNEL'> \
¢i-) "........"
" ..... S[()P .J
II.
Using the UP/DOWN arrows, select Picture
Preference on your screen.
Using the RIGHT/LEFT arrows, choose
either the original settings
with Preset, or use your own settings with
Custom.
Someoneleftthepicturelookingterrible?
.lustchoosethePresetoptioninPicture
Preferencetoquick(yresetthelevels.
---_ .......... -
.... o
3416-o
Page 21

The device you want to program
should be off.
On the charton page 27, find
the bjpe of deviceyou're
programming, and then findthe
brand name. Make a note of
the three-digit code, you't[ need
itsoon.
PressarglhOtdthe kKb Key.its
recesse_so itdoesn'tget pushed
accidentatty.Use a sma[l object.
When the indicatorlightturns on,
you can re[easethe button.
Push the button with the name of
device you're programming (VCR,
CABLE, AUX, W).
, i
OPERATION I MENUS I PAGE 2ri
Programyour
..... remoteto
"Q"_ work with a
_f\ " vast rangeof
__l-_a brand name
<5
devices.
J
Using the number pad, enterthe
threedigitcode you found on
page 27.
Pre__.sENTERand save the code.
Aim the remote at the device and
push the POWER button.It shoutd
turnon. If not,trythe other
codes listedand continue from
stepthree.
Programmmy your Zenith remote
will ollow you to use one remote
to work up to 7 different things.
Not all devices vn'll work with your
Zenith remote control.
,J
3416-o
Page 22

'AGE" IO E.AT,O.I .E.US
f
Controlthe
votumeon
yourhome
audiosystem
_thout
changing
modes.
II
Find the code that operates your
amplifier. Test it to make sure it's
the correct one by folowing the
procedure in the "Programming
Your Remote" page.
Program your audio system into
the CABLE or AUX mode.
Select the mode i_which you
want volume to appear (e.g. TV).
Press and hold PRGon your
remote until the indicator light
stays lit.
Press 4-9-9; then ENTERon the
remote. The indicator light will
flash three times if code is
accepted.
Audio system volume/mute now
appears in the mode selected.
! i _
The volume and mute keys
now control your ampUJier. To
put everything back to normal,
reprogram all buttons with their
originalcodes
(see the "Programming Your
Remote" section).
If you can't find the codefDr
your amplifier, usethe Auto Find
h_tum
3416-o
Page 23

Refer to the chart on page 25 to
find the type and brand name of
the device you're programming.
Press and ho|d the PRG key until
the indicator light turns on.
Press the AUX key and the I on
the NUMBER key pad at the same
time(f_o_x.+_)a."
Using t_e NUMBER.key pad, enter
the thTee-digit code for the
device you've selected.
Press ENTERto save the code.
Aim the remote at the device and
press POWER.It should turn off.
O"E"A"O"I "'NUSIPAGE2,
-N
Controlup
to seven
different
deviceswith
your remote!
C)
Repeat the steps for AUX+2, and
AUX+3.
Programming your Zenith remote
will allow you to use one remote
to work up to 7 different things.
Some devicesmay not work with
your Zenithremote control.
3416-,)
Page 24

pAG IOPE.AT,O.I . NOS
f
Usethe
remote
control to
search a[[
possibte
codes.
Turn on the device you're
programming for the
remote control
Press and hold the PRGkey until
the indicator [ight turns on.
Press the key for the device you
are trying to program (CABLE,
VCR, AUX, TV)
Type the code 0-0-0 (zero-zero-
zero), then press the ENTERkey
right away.
Aim the remote at the correct
device and push the POWER
button. Alow a second to pass,
then push the POWERbutton
again. Repeat until the device
turns off.
Push ENTERto save the code.
PressPOWERto turn the device
back on.
You can quickly get out of Auto
Find by pressing the QUIT button.
If the indicatorlightstayson
whileyou push Power insteadof
blinking,oU the codes have been
triedand your devicecan'tbe
programmed.
3416-o
Page 25

,E,E.E.C,I..O0.A..,.°CO°ESIPAOE
Admiral. ....... 116 12! !30 Funai W/VER .... 154 -MGA/Nitsubishi... 104 !19 120 Sears ......... 103 ]08 109
A,tventura TViVCR 154 116 117 161 Montgomery Ward 103 104 105
A<ai .......... 104 GoLdstar ....... 103 104 !19 121 130 133 133 :.37 156
• 147 169
Am'ark ........ 103 146 NE[ .......... 104 119
A3[ .......... 1_04 Panasonic ...... 106 107 160 113 114 119
Bell 8, HowelL . .. 121 163
Broksonic 131 136 J,C. Penney 104 110 114 Panasonic TV/VCR 174 Sony ......... 115 iz.3 151
C_nd[e
........ 139.. 113 139 Soun(lesign 139
Centurion ...... 119: PhiUps ........ 112 113 Sy[vafia ....... 112 '113 117
Citizen 12_" 139 r- KMC .......... 103 119 127 128
........ Pioneer ........ 135
Contec ........ 1_41 Portland ....... 103
Coronado ...... !03 ProScan ....... 116 157 162
Crown ........ 103 Lodgenet ....... 121 !67 [atuncj ....... ]06
CurtisMathes .... 116 119 121 Logik .121 Quasar 106 107 Teknika ....... 503 I12 121
[aewoo ....... 149 159 157 161 162
EaewooTV/VCR 148 Magnavox ...... 103 112 113 167 168 Toshiba _.10 111 134
[aytron ....... !19 128 139 165 Realistic ....... 105 123 124
E_.ektra ........ 1_21 Magnavox "FV/VCR 173 Sampo ........ 119
Emerson ....... 103 104 123 Majestic ....... 121 Samsung ....... 103 119 134
Emerson TV/VCR 158 Megatron ....... 146 Sanyo ......... 108 109 118 Zenith I_iVCR . . . 153 154 172
[isher ......... 109 118
133 130 140 155 110 111 118
...... " .... 170
'" 117 119 127 .......
124 131 136 Marantz ....... 104 120 155 141 Zenith ........ _!01 149 175
145
• " Scott ......... 1!9 124
Genera[ EI.ectric .. 106 107 114 134
113 114 119 Sharp ......... 103:05 122
Go[dstar TViVCR . . 153 Signature 2000... 103 i04 105
Hitachi ........ 102 103 129 166 121 !30 133
117 119 Phitco ......... 103 104 112
JVC .......... 125 132 164 .....
KTV .......... 103 104 138 139
Kurazai ........ 121 Symphonic TViVC_ ]54
........ • ....... _24 139
LXI .......... 133 137 RCA .......... 104 116 126 Telerent ....... _03 I21
L71
XR 1(}00 ....... L21
Yorx .......... _L19
Memorex ....... 121_
Find the codes
you need to
program your
remote. On
this page: TVs
and VCRs.
J
_dmira[ ....... 208 261
Adventura ...... 231
_dwa ......... 231
Akai .......... 22,3-238 241
Audio Dynamics . . 202 218
BeE[ & Howe[[ .... 206 247
Broksonic ...... 221 226 250
Canon ........ 214
I]itfzen ......... 209
L'raig ......... 212
.'u_'s Nathes 214 259
)aewoo ....... 244 246 248
)aytron ....... 236 246
DBX .......... 202 21-8
Emerson ....... 203 209 221
Fisher ......... 211- 212 213
Funai ......... 231
3416 o
255
254
223 226 233
235 243 250
247
Genera[Electric .. 214 216 220 NEC .......... 202 218 Sharp ......... _;08 261
Go[dstar ....... 209 Orion ......... 250 Shintom ....... __39
Go Video ....... 256 262 263 Panasonic ...... 214 251 259 Signature 2000... __08 214 21_6
Hitachi ........ 215 257 Pentax ........ 215
Instant Rep[ay . . . 214 227 Phitco ......... 207 214
3.C. Penny ...... 214 215 218 Phi[ips ........ 207 214 227
JVC .......... 202 224 225 Tash ko ........ 209
Kenwood ....... 202 ProScan ....... 21_6 260
Logik ......... 239 Quasar ........ 214 259
LXI .......... 209 231 RCA .......... 215 216 220
Magnavox ...... 207 214 231_ 249 260
Marantz ....... 207 218 Rea[istic ....... 206 208 212
Marta ......... 209
Memorex ....... 206 212 21,$
Mitsubishi ...... 204 222 252 Sanyo ........ 206 212 247
Montgomery Ward 208 214 216 243
Mu[ti Tech ...... 239 21-2 215
227 Symphonic ..... 231
258 Portland ....... 246
231 Sansui ........ 239 Zenith ........ 201 224 225
26/+ Zeni[h TViVCR . .. 201 224 229
21-9 231 249
Pioneer ....... 21_0 215
227 240 242 Toshiba ........ 205 215
214 231 Vectar Research .. 204 218
Samsung ....... 220 230 238 Yamaha ........ 202 218
Scott ......... 204 205 233 237
Sears ......... 205 209 211
Sony ......... 217 232 237
Sy_v_:nfa ....... 207 214 227
fatu:lg ........ 202
Teac .......... 202 231
Teknika ........ 209 234
XR I000 ....... 239
219 231 249
229 237
__#
Page 26

PAGE20I.E,ERE.CEIPROORA""'"OCOOES
/" Hnd the codes
you need to pro-
gramyour
remote.
On this page:
Cable, Satellite,
Video Disc
PLayers,CD
Playe's, Tape
Decks an_ Audio
Tune_ and
Amplifiers.
Allegro ........ 358 362 Kate Vision ..... 335 RCA DSS ....... 373
Allegro A!B Switch 361 Nacom ........ 314 321 Regency ....... 329
Gemini ........ 305 331 338 Nagnavox ...... 334 Samsung ....... 335
General. Electric... 367 NSC ........... 335 33g 368 Scientific Atlanta 316 3_3 336
Genera[ Instrument 304 305 306
Hamlin ........ 302 303 345
Jerro[d ........ 304 307 308 _il.ips ........ 347 350 352 Texscan ....... 339 356 371
Pioneer ....... 402 403 Sony ......... 404
Sanyo ......... 401 Zenith ........ 401
307 308 309 Oak .......... 311 332 342 Sprucer ........ 313
310 318
365 366 Paragon ....... 333 Stargate ........ 379
309 310 318 354 355
-360 363 Tocom ........ 317 3_i8 346
Panasonic ...... 313 320 StandardComp.. 335
Pioneer ........ 315 343
369 370 364
Unika ......... 348 362
United Satell,ite . . 344
Unwersal, ...... 358 362
Vid Tech ....... 340
Video Way ...... 349
Viewstar ....... 354 355 372
Zenith ........ 301 353 374
Zenith Satell,ite . . 112 328 330
35! 378
Akai .......... 40g 424 434
(town ......... 410 Mitsubishi ...... 423 424
Denon ........ 411 NAD .......... 425 426 447
fisher ......... 412 438 Nakamichi ...... 427 428
Go[dstar ....... 460 NEC .......... 42g
Harman/Kardon ..413 Onkyo ........ 430
{IVC .......... 415 Panasonic ...... 431 432
Kenwood ...... 412 416 417 Phi[ips ........ 421 433 434
Magnavox ...... 421 422 433
]enon ......... 455
Harman/Kardon...456
,]VC .......... 457
Kenwood ....... 450
Denon ......... 462 463
Fisher ......... 464
Gol,dstar 460
Harman/Kardon . . 465
3VC .......... 466
Kenwood ...... 468 46g
441
Pioneer ........ 431 435
Quasar ........ 432
Onkyo ......... 458
Phil,ips DC[ ..... 454
Pioneer ........ 451 478
Sony ........... 452
Na_n_ ........ 472 503
Onkyo ........ 473
PhiLips ........ 475 476
Pioneer ........ 477 478 479
Radio Shack ..... 487 488
Realistic ....... 480
Radio Shack ..... 431 436 439
RCA .......... 437
Sanyo ......... 438 439
Scott ......... 440
Sharp ......... 441 442
Sony .......... 443 444 445
Soundesign ..... 461 498 501
Syl,vania ....... 433
Sanyo ......... 481
Sco_ ......... 482
Sharp ......... 483
Sony .......... 489 490 491
Soundesign ..... 461 ag8 501
440 441
5O2
492
502
Teac ........ 446
Tech nir_s ....... 432 459
Toshiba ........ 447
Yamaha ....... 448
Zenith ........ 46L1 461 498
Teac ......... 494 495
Technics ....... 491
Yamaha ....... 495
Zem'th ........ 463 461 498
501 502
501 502
3416-o
Page 27

KEY NAME
REFERENCE ! PROGRAMMING CODES I PAGE 27
TV Mode VCRMode Cable Mode AUX Mode
Zenith Code 101 Zenith Code 201 Zenith Code 353 Zenith Code 401
A complete
Listof button
functions for
your remote
control
POWER IV On/Off
CABLE Setects CabLe
VCR SeLects VCR
AUX Setects Aux
TV Selects IV
FLASHBK TV FLashback
MUTE IV Mute
CHANNEL UP"---_'_;1;VChannel Up
CHANNEL DN
VOLUME (RIGH_
VOLUME (LEFT)
ENTER
MENU
UP ARROW
DOWN ARROW
LEFT ARROW
RIGHT ARROW
QUIT/
TIMER
TV/VCR/SOURCE
RECORD
PAUSE
REWIND
PLAY
STOP
FFWD
IV Channe[ Dn VCR Channel Dn Cable Channel Dn AUX Skip .:<
TV Volume Up TV Volume Up IV Volume Up IV Volume UF
IV Volume Dn IV Volume Dn IV Volume Dn IV Vo[urne Dr
1
IV Digit 1 VCR Digit 1 Cable Digit 1 AUX Digit 1
2
IV Digit 2 VCR Digit 2 Cable Digit2 AUX Digit 2
3
TV Digit3 VCR Digit:3 Cable Digit3 AUX Digit3
4
TV Digit4 VCR Digit,; Cab[e Digit4 AUX Digit4
5
IV Digit5 VCR Digit5 Cable Digit5 AUX Digit5
6
IV Digit6 VCR Digit6 Cable Digit6 AUX Digit6
7
IV Digit7 VCR Digit7 Cable Digit7 AUX Digit7
8
IV Digit8 VCR Digit8 Cable Digit8 AUX Digit8
g
IV Digit9 VCR Digit9 Cable Digit9 AUX Digitg
O
IV Digit0 VCR Digit0 Cable DigitO AUX DigitO
IV Enter VCR Enter CabLe Enter Aux DispLay
IV Menu VCR Menu CabLe Menu AUX Program
IV SeLect Up VCR SeLect Up CabLe Up Arrow AUX Part
IV SeLect Dn VCR SeLect Dn CabLe Dn Arrow AUX Random
TV Adjust Left VCR Adjust Left CabLe Left Arrow AUX x3 F_ST <
TV Adjust Right VCR Adjust Right Cable Right Arrow AUX x3 FgST >
TV Seq Sound VCR Quit Cable Quit AUX CLear
IV PIP VCR+ Day Up AUX Repeat-.€;ide
A
B
TV PIP Swap VCR Channel Map Day Down AUX Repeat-A-B
C
TV PIP Freeze VCR Search Cable Pg Up AUX Repeat-Chap
CC-
IV Closed Captions VCR Memory Cable Pg Down AUX Memory
IV Timer VCR Timer CabLeTimer AUX StiLL
TV Sources TV Tuner or VCR Tuner CabLe ]nfo AUX IV/Dsc
VCR Record VCR Record Cab[e Buy AUX Edit
VCR Pause VCR Pause Cab[e Guide AUX Pause
VCR Rewind VCR Rewind VCR Rewind AUX Scan <<
VCR PLay VCR Play VCR PLay AUX Play
VCR Stop VCR Stop VCR Stop AUX Stop/Eject
VCR Fast Forward VCR Fast Forward VCR Fast Forward AUX Scan >>
VCR On/Off Cable Box On/Off AUX On/Off
Selects Cable Selects Cable Selects Cable
Selects VCR Selects VCR Selects VCR
SelectsAUX SelectsAux SelectsAUX
SelectsTV SelectsIV SelectsTV
VCR FLashback Cable Flashback AUX Frame/Time
TV Mute IV Mute TV Mute
VCR Channel Up Cable Channe[ Up AUX Skip :->
3416-o
References: 124-212-37 and pP 221-952-02A
Some of the functions shown obove moy not be ovailob(e on your TV (such as PIP).
jl
Page 28

PAGE28I . 'E" NCEI "A'"TENANCE
Caringfor
Entertainment
your
Machine.
Early malfunctions can be prevented. Careful and regular cleaning can extend the amount of time you will have _ith
your new Entertainment Machine. Be sure to turn the power off and pull out the plug before you begin any cleaning.
1. Here's a great way to keep the dust off your screen for a while. Wet a soft cloth in a mixture Of luke-
-- warm water and a Little fabric softener or dish washing detergent. Wring the cloth until it's almost d_.l,
and then use it to wipe the screen.
2. Make sure the excess water is off the screen, and then let it air-dry before you turn on your
Entertainment Machine.
[1_'1Qla[Q |11 [_1i|1i[, n
Ert_ _
!. Use a soft cloth with a mild soap solution to wipe the cabinet (avoid using any cleaner that says
"industrial strength" or "will wash the white off of dee" on the [abe[).
2. Rinse the cloth and wipe the cabSnet again.
3. Let the cabinet air-dry before turMng the Entertainment Machine on.
Use a quality wood cleaner and polish. This will protect the Entertainment Machine from dirt and dust, as
welt as keep the cabinet looking new.
If you leave your Entertainment Machine dormant for a Long tirne (such as a va:atlon,, it's a good idea to
unplug the power to protect against possible damage from Lightning or power surcles. If you use an off-
air antenna, you may also want to disconnect it from the back of your TV before Leaving.
If you unplug your Zenith Enterteinment Machine, you may have to reset the clock using the Clock Set
menu described eer6er. See poge 17.
3416-o
Page 29

.EFE.E.CEI T.OOB'ES.OOT,.GI F'AGE29"
.€_MPTOMS SOLUTIONS
Sno_J picture and Lousy sound. • Check your antenna connection or Location.
Some quick
and easy
tips to fixing
problems
yourself.
.MultipLe images or 'ghost shadows" • Check your antenna direction and/or Location.
]interference: Sharp Lines across
the screen and Lousy sound.
Normal picture but no sound.
]qopicture and Lousysound.
I_opicture and no sound --
"rhe thing is just DEAD!
• Make sure the wire from your antenna to your Entertainment Machine is
properly connected.
The.following may cause image problems or distortion:
Electrical appliances, powerful (ights, cars, trucks; Computers or portoble phones;
Medic_ equipment
• If possible increase the distance between your Entertainment Machine and
the offending appliance. Or shut one of them off.
• Check volume control
• Make sure the T¢ is not Muted.
• Try another channel The problem may be the broadcast, not your
Entertainment Machine.
• Are the Audio A/V cables properly instaLLed?
• Are the wires for external speakers (if you have e_ternat speakers)
properly instaLLed?
• Are you in IV or CabLetuning mode (See Auto Program on page 9), and
should be in the other?
• Make sure output channels on aLLA/V equipment are on the same ,:hanne[
(3 or 4).
• Check that aLl connections are tight.
• Is the AC power plugged in?
• Check that your AC power outlet works. (Test it by pLugging in something else
or try another plug.)
• Make sure your brightness and audio controls are set properly.
• Try another channel. The problem may be with the broadcast, not your
Entertainment Machine.
No color, but the sound is O.K. • Check the color control in the Video menu.
• Try another channel. The problem may be with the broadcast.
Picture has a big Mack box • The CC(closed caption) option may be in Text mode. SeLect OFFin ':he
on it, but the sound is O.K. Caption/Text menu. See page 19.
Picture has two horizontal • Your program is in letterbox. This means that the shape of your -V is
black bars, one on top and square, but the program is a rectangle. Think of the bars as empty ;;pace the
one on bottom program doesn't flU; not picture that's blocked out. Because this fo'mat is a
direct representation of film as you see it in the movie:;, you are actual.ly seeing
MOREof the program when you see those bars. Trust us.
Remote control doesn't work. • Make sure the batteries are fresh and installed properLy.
• Check to see that the MBR (Multi Brand Remote available on some models) is in
the right mode for your equipment.
Menu options won't change. • Try unplugging the IV, waiting about five minutes, and then plugging it back in
and trying again.
If all else fails, call 2.847.391.8752, extension 5, between 8:30 AM and 4:30 PM Central Standard Time.
3416-o
jl
Page 30

PAGE30IREFERENCEIOLOSSARY
f
A complete
Listof
definitions for
WOl"dsfound
in this guide.
75 OHM RF CABLE
The wirethat comes from an off-airantenna or cableseMce provider.
The end Lookslikea hex-shapednut with a wirestickinG through the
middle. It screws onto the threaded jack on the back of your 1V.
300 TO 75 OHM
ADAPTER
A/V CABLES
A/V DEVICE
ADD
AMPLIFIER
ANTENNA
AUTO PROGRAM
DELETE
A smaLL device that connects a two-wire 300 ohm antenna to a
75 ohm RFjack. They are usuaUy about an inch Long with two screws on
one end and a round opening with a wire sticking out on the other end.,
Audio/Video cables. Three canes bunched together--fight audio (red),
Left audio (white), and video (yeLLow). A/V cables are used for stereo :,
playback of videocassettes and for higher quality picture and sound
from other A/V devices.
Any device that produces video or sound (VCR, DVD, cable box,
or television).
This function Lets you add new channels to List that you'LLscroLLthrough
when using your remote.
An external machine that ampLifies sound from a television, CD player,
VCR, DVDor other AM device.
The physical receiver of television signaLs sent over the air. A Large
metal piece of equipment does not always have to be vi,sibl.efor your
home to be using an antenna.
Auto Program has your Entertainment Flachine automatica:[y find aLLthe
channels avaiLabLein your area.
This function Lets you remove channels that you don't watch from the
List you'LLscroLLthrough using your remote.
INPUT
Refers to the jack that receives a signal from a TV, VCR or other
A/V device.
3416-o
Page 31

.]ACK
MONO SOUND
FE E.CEI O'OSS''YIPAGE
A connection on the back of a TV, VCR, or any other A/V device.
Mono (monaura[) sound is one channel of sound. On more than one
speaker, aLLthe speakers play the same audio.
A comp[ete
fist of
definitions for
wordsfound
in this guide.
OUTPUT
SECOND AUDIO
PROGRAMMING/SAP
SIGNAL
STEREO SOUND
TUNER
Refers to the jack that sends a signal out of a VCR, DVD, or other
A/V device.
Second Audio Programming (SAP) is another, separate, audio channel
avaitabte with some programming. Choosing SAP often refers to Listening
to audio in another language, such as Spanish or French.
Picture and sound traveUng through cable, or on the air, to your
television screen.
Stereo(Stereophonic) sound refersto audio that's divided into right anc
Leftsides.
Device that picks up the signal and turns them into
picture and sound.
3416-0
Page 32

PAOE 32I.E""ENC I'"°EX
f
Find what you
want quickly.
FEATURE PAGE
Amp[ifier Vo[ume Override ......................... 24
Antenna ................................... 4, 6
Audio Mode Menu .............................. 20
Auto Find ................................... 26
Auto Program ................................. 9
AUX+I, AUX+2, AUX+3 ........................... 25
r-
Basic Television Operation ...................... 13, 14
Batteries ................................ 4-7, 31
Button Functions .............................. 10
Cab[e ...................................... 5,7
Captions and Text Menu ......................... 19
Ch. Add/De[ .................................. 16
Clock Set .................................... 17
Custom Hook-Up Information ....................... 8
Front Pane[ ................................ 11, 12
G[ossary .................................. 32, 33
Hook-up Directory .............................. 3
Language Menu ............................... 21
Maintenance ................................. 30
Programming the Remote ......................... 23
Remote Control Auto-Find ........................ 26
Safety Information .............................. 2
Setup Menu .................................. 15
Timer ...................................... 19
Troubleshooting ............................... 31
VCR ...................................... 6, 7
Video Menu .................................. 22
Warranty .................................... 36
3415-o
Page 33

Page 34

Page 35

STEREO SURROUND SOUND SPEAKERS
For use with any Surround Sound compatible TV. These speakers create
a sound so real, it's as if you were part of the action. The convenient,
space-saving shelf design make these speakers an ideal
addition to any Home Theater System. The contemporary
black finish complement any room.
cv5oooONLY $224.95 ""st''' l
Broken or Lostremote? Perhaps you would just Like the convenience
of having a second remote on hand. Order your replacement remote ?
control direct from Zenith! To ensure that you receive the correct
remote, have your television's model number ready when you call.
ONLY$39.9S
UHF/VHF/FM INDOOR ANTENNA
ThisUHF/VHF/FM indoorantennaprovidessharp,clearsound and
pictureina high-techdesign.Perfectforuseas a (:ableoutage backup
orto receiveLocalprogrammingnot availablewith a Sate[LifeSystem.
Works with most TVs oraudiodevicesand include.(;fourfeetof 75 ohm
cableforeasy hook-up.
SHIPPING 81 HANDLING
SHIPPING _ HANDLING
REPLACEMENT REMOTE
AST475ONLY $24.95,,uss_.,_SHIPPING _ HANDLING
CORDLESS STEREO HEADPHONES
These cordless, Lightweight headphones allow you to enjoy a
private Listening experience without disturbing others. The infrared
technology delivers a virtually interference-free signal Works wiLh
most TVs, VCRsor audio devices with a fixed audio output jack.
Comes with optional mirrophone hookup. Soft cush_ioned ear pac!s
for comfortable use. Perfect for the hard-of-hearing.
ZEN911ONLY $59.95PLOSiVeS
SHIPPING _ HANDLING
zenith
Use Your Visa or MasterCard to Order
PLEASE ALLOW 3- 4 WEEKS FOR DELIVERY
Page 36

Direct-View Color TV " Welcome to the Zenith family! We believe that you wil,[ be pleased with your new Zenith Entertainment Machine. Please read this
warranty careful,l,y it is a "lIMITED WARRANTY" as defined under Federal. Law. This warranty gives you specific legal, righ=s,
and you may also have other fights that vary from state to state within the U.S.A.
ZENITH RESPONSIBILITY
Service Labor During a period of 90 days from effective warranty date, Zenith wilt pay for service [abor by a Zenith authorized service center
when needed as a result of manufacturing defects.
Part New or remanufactured replacements for factory-defect%e parts will, be seMced will be supplied by a Zenith authoized
service center for one year from effective warranty date (color picture tube -- two years). Such reL)l,acement pzrts are
warranted for the remaining portion of the original warranty period.
Home Service
Not Covere_l
Warranty service for 21" diagona_ (U.S.A.) or larger screen size models is provided in the home in most cases. (Some
_l_airsmay require the unit t_be taken by the servicer to the repair facility and retuned, at no aclditional cha,'ge.
This warranty covers manufacturing defects and does not cover instal,lation, adjustment of customer controls ir the borne,
installation or repair of home antenna systems, cable converters ar cable company-supplied equipment: it also do_s
not cover damage due to misuse, abuse, negligence, acts of God .Dr other causes beyond the contn)l, of Zenith. A%
alteration of the product after manufacture w;ids this warranty in its entirety.
OWNER'S RESPONSIBILITY
Effect-lye Warranty Date Warraqty begins on the date oF original consumer insta[l.ation. For your convenience, keep the dealer's dated b:Ll oF sale or
delivery ticket as evidence of the purchase date.
Operating Guide Read your Operating Guide carefully so that you will, understand the operation of your set and how to adjust the customer controls.
Carry-In Service Models under 21" diagonal (U.S.A.) screen size must be taken to a Zenith authorized serv-ce center for warranty service
Antenna Reception probl,ems caused by inadequate home antenna or faulty antenna connections a_e the owner's respon_ibi.ibj.
Important Product Registration--Please fit[ out and mail, your Product Registration Card. It is imperative that Zenith know how to reach
Warranty Service
ZENnH CONSUMER SERVICE
Factory Owned SoMce Center
Home & Carry-in Service
Te[evision!VCR
Partsand Accessories
PTV/Computer
801 E. RooseveltRd
Lombard, IL 60148
(630) 705-2830
and must be picked up by the owner.
you promptly if we should discover a safety problem that could affect you.
For warranty seP¢ice information, contact any Zenith authorized service center. Parts and !_ercice labor that are Zeldth's
responsibffity (see above) will be provided without charge. Other service is at the owner's expense. If you haw_ any prcb{em
in obtaining satisfactory warranty service, call or write the Zenith Response Center. You must provide the mode[ nJmber,
serial number and date of purchase or date ef odgina[ installation. Before you ask for Waman_ service, read "I4aintenance
And Troubleshooting" in your operating guide. You might avoid a seMce call,.
IN CANADA, WRITE OR CALL US AT:
Service Hours:
M-F 8-6, Sat 9-2
Will accept UPS shipments
LG Electronics
235 Superior Blvd.
Mississauga Ontario Canada LST-2L6
tel: (905) 795-6240
fax: (905) 670-2379
201 3ames Record Rd.
Building 4
Huntsville, AL 35824
(205) 461-8583
Additional. Zenith Picture Tube Protection Plan Avai[abl.e
Zenith offers you the opportunity to obtain additional Long-term protection against fail,ure of the picture tube in your new Entertainment 9achine.
Our Picture Tube Protection Plan enabl,es you to avoid any unexpected picture tube repair expenses and keep your Entertainmrmt Machine in t_p condition.
It guarantees you a genuine Zenith repl,acement picture tube and service from a Zenith authorized service center.
Be sure to 5en_ in the l:roduct Reglstrotion Cord. We will send you and oppllcation /:r the Protection Plan near the exl:irQtion of the
two yec'r manufacturer's warranty on the picture tube. For odd;tionot in[nrm_'on ca_ (847) 391-8757.
341_6-o
 Loading...