

Page 1

Z-E 2 015
CAR SPECIFIC NAVICEIVER FOR
VW VEHICLES
USER MANUAL
DEVICE USER MANUAL
ENGLISH/ GERMAN
Page 2

Z-E 2 015
TABLE OF CONTENT
SAFETY INSTRUCTIONS .................................................................................... 3
FRONT PANEL BUTTONS ................................................................................. 4-5
IR REMOTE CONTROL ...................................................................................... 6-7
STEERING WHEEL REMOTE CONTROL .........................................................8-9
BASIC OPERATION OF MAIN DEVICE ......................................................... 10-11
RADIO OPERATION ....................................................................................... 12-15
OPERATION OF CD/DVD SOURCE .............................................................. 16-19
OPERATION OF USB SOURCE .................................................................... 21-26
OPERATION OF IPOD / IPHONE SOURCE .................................................. 27-31
BASIC BLUETOOTH HANDS-FREE OPERATION .......................................32-41
OPERATION OF A2DP STREAMING SOURCE ............................................ 42-43
BLUETOOTH VOICE COMMAND OPERATION ............................................ 44-47
BASIC OPERATION OF NAVIGATION* ......................................................... 48-49
MAIN DEVICE SYSTEM SETUP ....................................................................50-59
M-ZONE OPERATION ......................................................................................... 60
OPERATION OF EXTERNAL DVB-T / DAB+ SOURCES .................................. 61
GLOSSARY.....................................................................................................62-64
TROUBLESHOOTING .................................................................................... 65-66
SPECIFICATIONS ................................................................................................ 67
WARRANTY .................................................................................................... 68-69
LEGAL DISCLAIMER .......................................................................................... 70
GRACENOTE EUL .............................................................................................. 71
SIVR VOICE COMMANDS LANGUAGE MATRIX ......................................... 72-73
EC DECLARATION OF CONFORMITY .............................................................. 74
* NAVIGATION MANUAL IS SEPARATE.
SAFETY INSTRUCTIONS
1. Read these instructions entirely.
2. Keep these instructions within reach. Whoever uses the unit should have access to this manual.
3. Heed all warnings. Follow the instructions.
4. This unit is designed to be used in a vehicle with 12V DC battery and negative ground.
5. Do not operate the unit in any other way than described in this manual. Failure to follow the
instructions within this manual may void your warranty.
6. Do not disassemble or alter the unit in any way, because it will void your warranty. Do not attempt to
repair or to service the unit yourself, but contact an authorized ZENEC dealer instead.
7. Use only original accessories which are designed and manufactured for the unit, otherwise you
will risk damage. Install the unit according to the mounting manual, using the supplied mounting
accessories. The forces of acceleration upon accidents are sometimes huge. Incorrect mounted
units are a big risk for the driver and the car passengers.
8. Protect the unit from water and other liquids, which can enter the casing. A short circuit or even fire
could result.
9. To prevent a short circuit, never insert or stick any metallic objects (such as coins or metal tools) into
the unit.
10. Before you replace a defective fuse, try to find the cause for the short circuit. Please pay attention
to the cables of the power supply! If the short circuit doesn't result from a failure of the power supply
or wiring, you can replace the defective fuse with a new one (same values). If the short-circuit is still
present, please contact an authorized ZENEC dealer.
11. When connecting to any other device, read its user's guide for detailed safety instructions. Do not
connect incompatible products.
12. Be careful not to drain the car battery while using the unit when the car engine is turned off. Because
the unit uses a considerable amount of energy and the battery will be charged only while the engine
is running, it might happen that the battery will discharge to a point where it's not longer possible to
start the engine.
13. According to the law in different European countries, driving with monitors which are showing moving
pictures, except navigation system use, in the viewing range of the driver is not allowed because the
driver might be distracted from traffic. Please respect the traffic regulations of your country, or you
might face penalties in case of an accident or even loose insurance coverage. Please pay attention
to the volume inside your vehicle, because you are obliged to notice exterior sounds like police
sirens etc.
14. Don't expose the unit to hard impacts. A mechanical or electrical malfunction of the unit could be the
result.
15. Should any problems or questions occur during installation, please consult your ZENEC dealer/
importer.
16. This unit utilizes a class 1 laser. Use of controls or adjustments or performance of procedures other
than those specified herein may result in hazardous exposure to coherent light. Do not open covers
and do not repair yourself. Refer servicing to qualified personnel.
2 3
Page 3
FRONT PANEL BUTTONS FRONT PANEL BUTTONS
Z-E 2 015
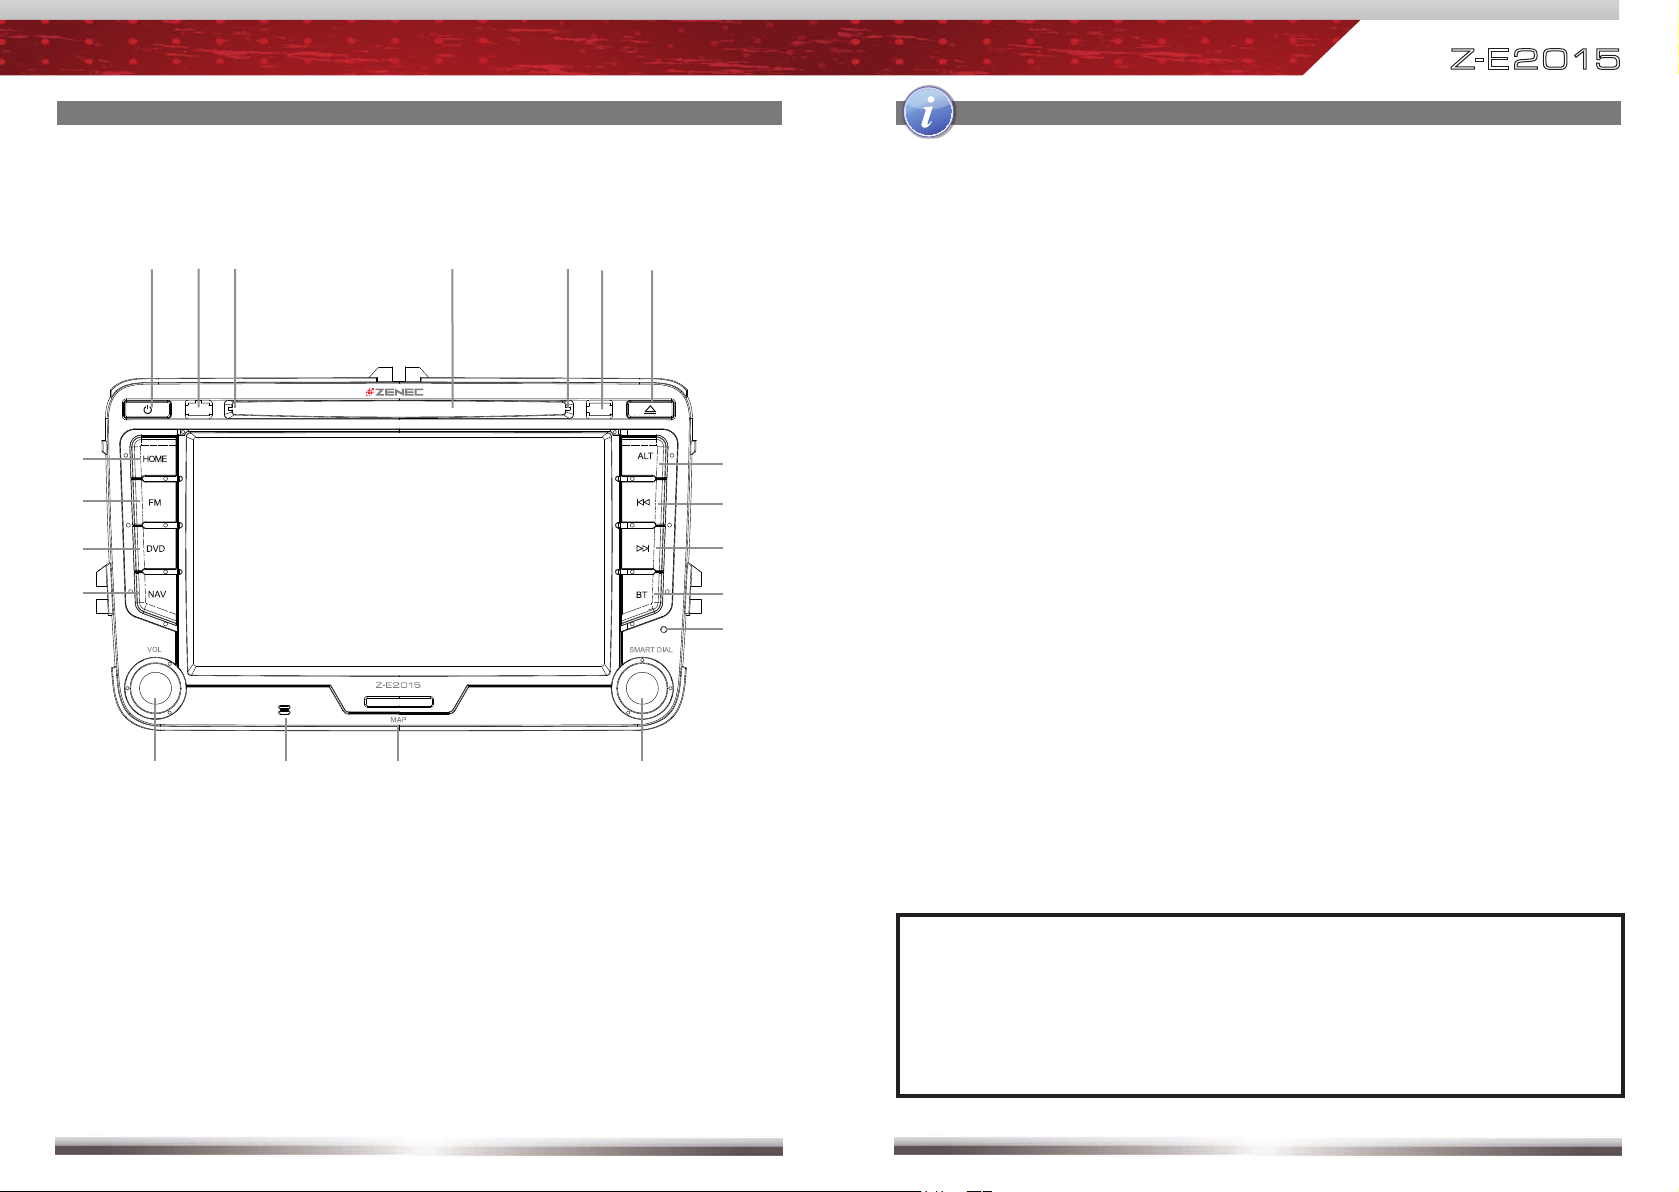
1. POWER
2. IR RECEIVER
3. DISC INDICATOR
4. DISC SLOT
5. BRIGHTNESS SENSOR
6. EJECT
Eject disc.
7. HOME
Press to open Main Menu, hold to
open EQ page.
8. FM/AM
Press to switch to AM/FM Tuner
source.
Press and hold to activate /
deactivate TA function.
9. DVD
Press to switch to DVD source.
10. NAVIGATION
Press to enter Navigation mode.
Press to switch between Navigation
mode and last playback source.
Press and hold to fade in/out info
bars manually.
11. VOLUME
Rotate to increase or decrease
volume.
Press and hold to turn on / off
device.
Press to mute / unmute audio
output.
12. INTERNAL MICROPHONE
13. SD CARD SLOT
For navigation use only.
14. SMART DIAL
Rotate to move a cursor up and
down.
Press to confirm a selection.
15. RESET
Press to initiate a hardware and
software reset of device.
16. BT
Press to enter Bluetooth mode.
Press and hold to activate Bluetooth
Voice Command operation.
17. NEXT
Press to choose next
track|title|station.
Press and hold to fast forward.
18. PREVIOUS
Press to choose previous
track|title|station.
Press and hold to fast rewind.
19. ALT
Function can be set in System
Setup.
Press and hold to open Video Setup.
NOTE:
■ Pressing the RESET button will invoke a hardware and software reset. It’s
suggested to export your system settings to a USB flash drive.
For more detailed information how to export your system settings, please
see chapter “MAIN DEVICE SYSTEM SETUP: IMPORT / EXPORT
SYSTEM SETTINGS” of this user manual.
4 5
Page 4
Z-E 2 015
IR REMOTE CONTROLS
e
r
t
o
1@
1^
1&
1*
2!
2@
2%
2^
w
q
y
u
i
1)
1!
1#
1$
1%
1(
2)
2#
2$
2&
2*
IR REMOTE CONTROLS
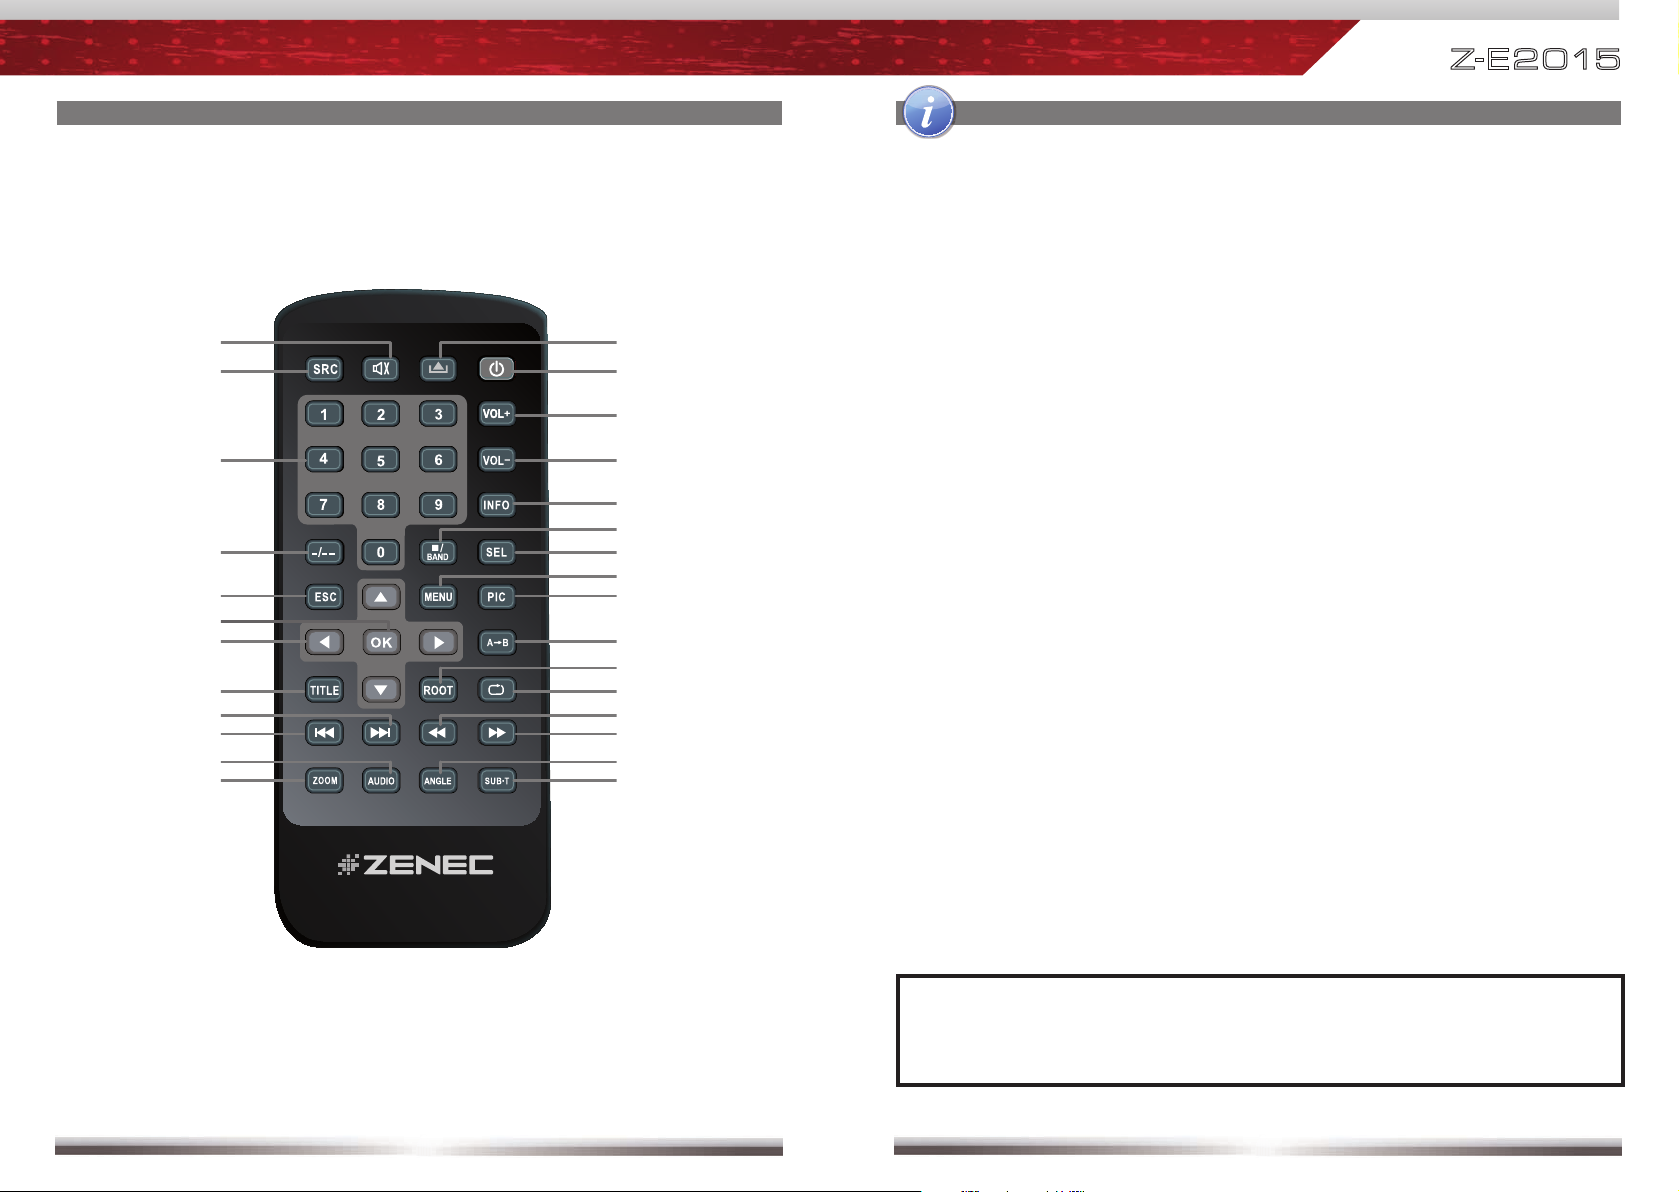
1. POWER
Device ON/OFF
2. EJECT
Eject disc
3. MUTE
Mute/Un-mute audio output
4. SRC
Change sources
5. KEYPAD
Choose preset 1-6 (Tuner)
6. VOL+
Increase volume
7. VOL-
Decrease volume
8. INFO
No function
9. GOTO
No function
10. STOP/BAND
Change frequency band
11. SEL
Open EQ
12. ESC
Close Main Menu/EQ
13. MENU
Open Main Menu
14. PIC
No function
15. REPEAT A B
No function
16. OK
Play/Pause
17. DIRECTION BUTTONS
No function
18. TITLE
No function
19. ROOT
No function
20. REPEAT
No function
21. SKIP NEXT
Jump to next track/title; scan
forward in Tuner source
22. SKIP PREVIOUS
Jump to previous track/title; scan
backward in Tuner source
23. FAST REVERSE
Fast reverse; 50kHz down in Tuner
source
24. FAST FORWARD
Fast forward, 50kHz up in Tuner
source
25. AUDIO
No function
26. ZOOM
No function
27. ANGLE
No function
28. SUB-T
No function
NOTE:
■ Some functions may not be available; depending on selected source, mode
and type of media.
6 7
Page 5
STEERING WHEEL REMOTE CONTROL STEERING WHEEL REMOTE CONTROL
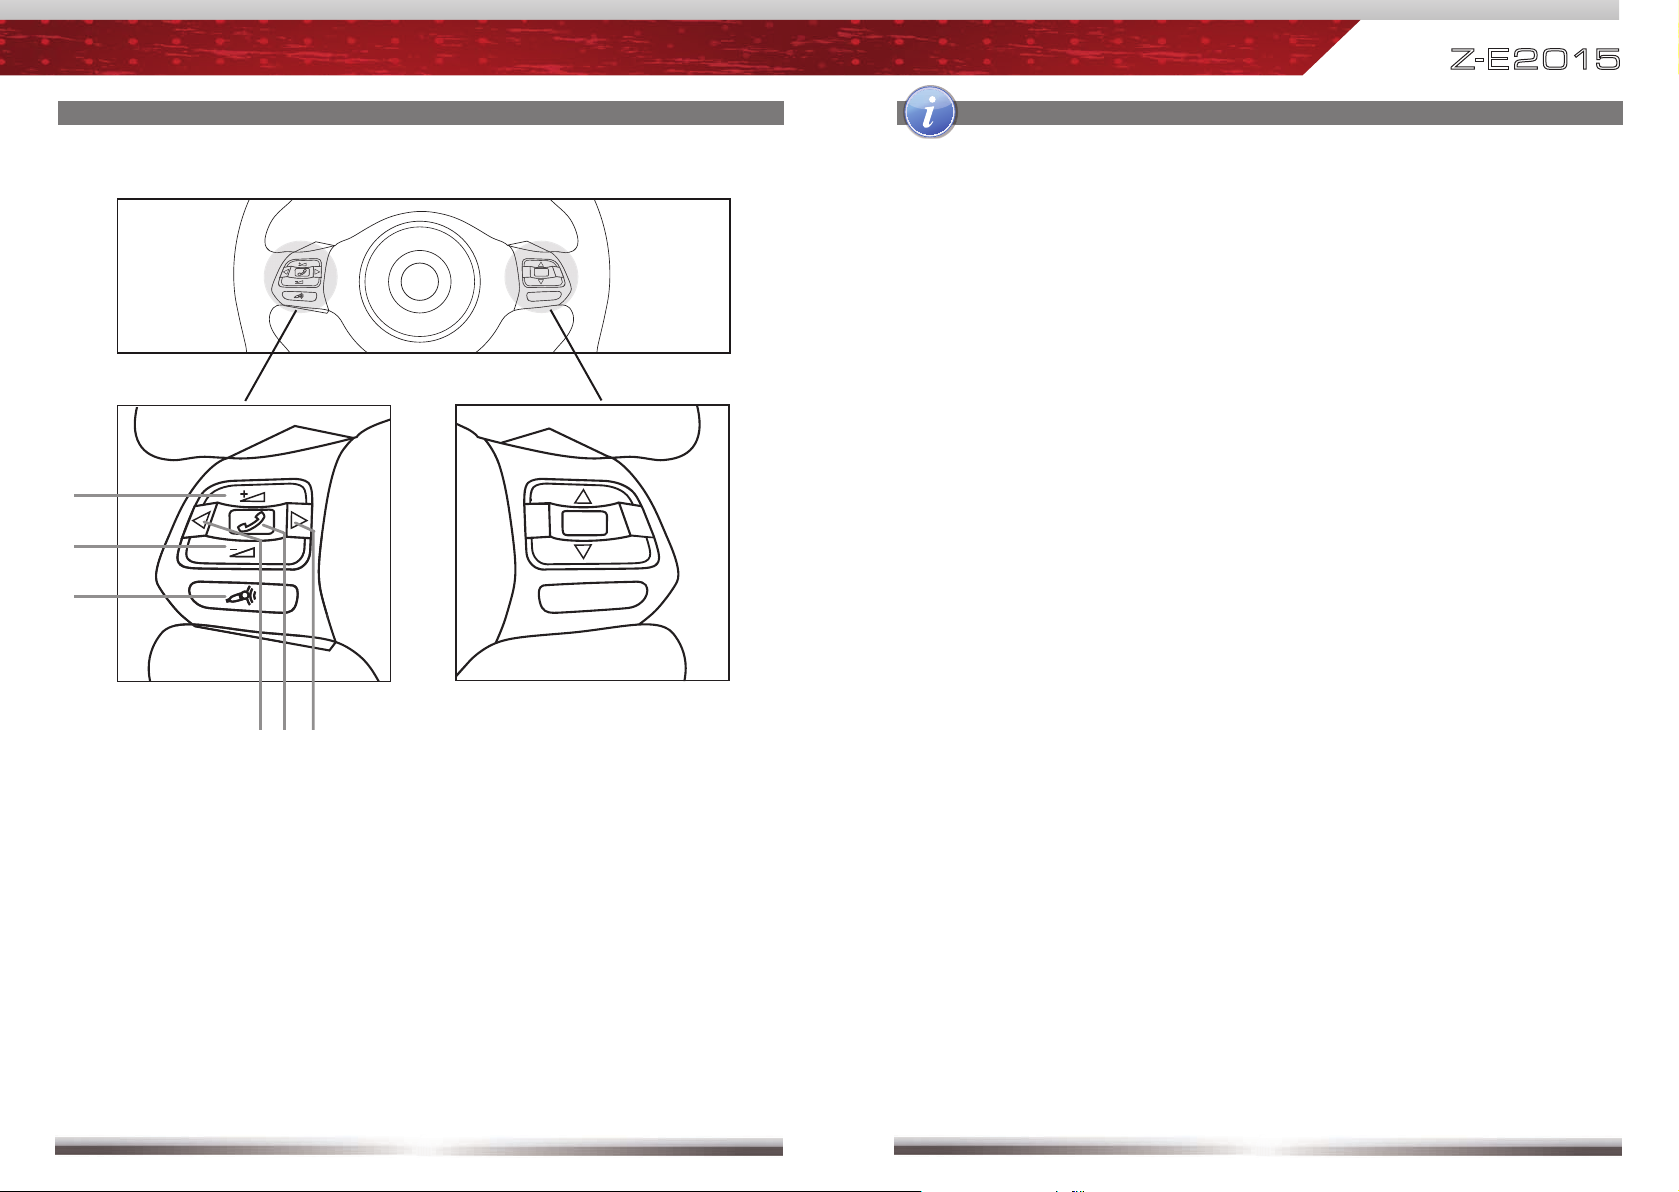
1. VOL+
Press to increase volume
2. VOL-
Press to decrease volume
3. MUTE
Press to mute/unmute audio
4. PREVIOUS
Rotate down to choose previous
Track | Chapter | Station
Press and hold to fast rewind
Z-E 2 015
No function
for this device
5. TELEPHONY
Press to answer or hang up a call
Press and hold to deny an incoming call
In case of you are at the Bluetooth mode, press and hold to activate the
SIVR voice command operation.
In case of SIVR voice command operation is active, press and hold to
finish it.
6. NEXT
Rotate up to choose next
Track | Chapter | Station
Press and hold to fast forward
8 9
Page 6
Z-E 2 015
BASIC OPERATION OF MAIN DEVICE
POWER ON/OFF
Correctly installed, your device will power on together with the ignition of the vehicle.
Ignition off: It's not possible to turn on the device. When the ignition is activated, you
may switch the device on and off anytime, using the front panel POWER button.
SELECT A SOURCE
Enter Main Menu:
- Via Touchscreen:
Touch the icon in the upper left corner of the screen.
- Via HOME button:
Push HOME button to enter Main Menu.
Operation at Main Menu:
The Main Menu consists of three pages.
There are two basic ways to get there:
- Slide You can slide the two pages back and forth.
Just slide your fingertip onscreen in the respective direction.
- Bar Tap on any of the two rectangular markers in the top area of the
screen to select first or second page.
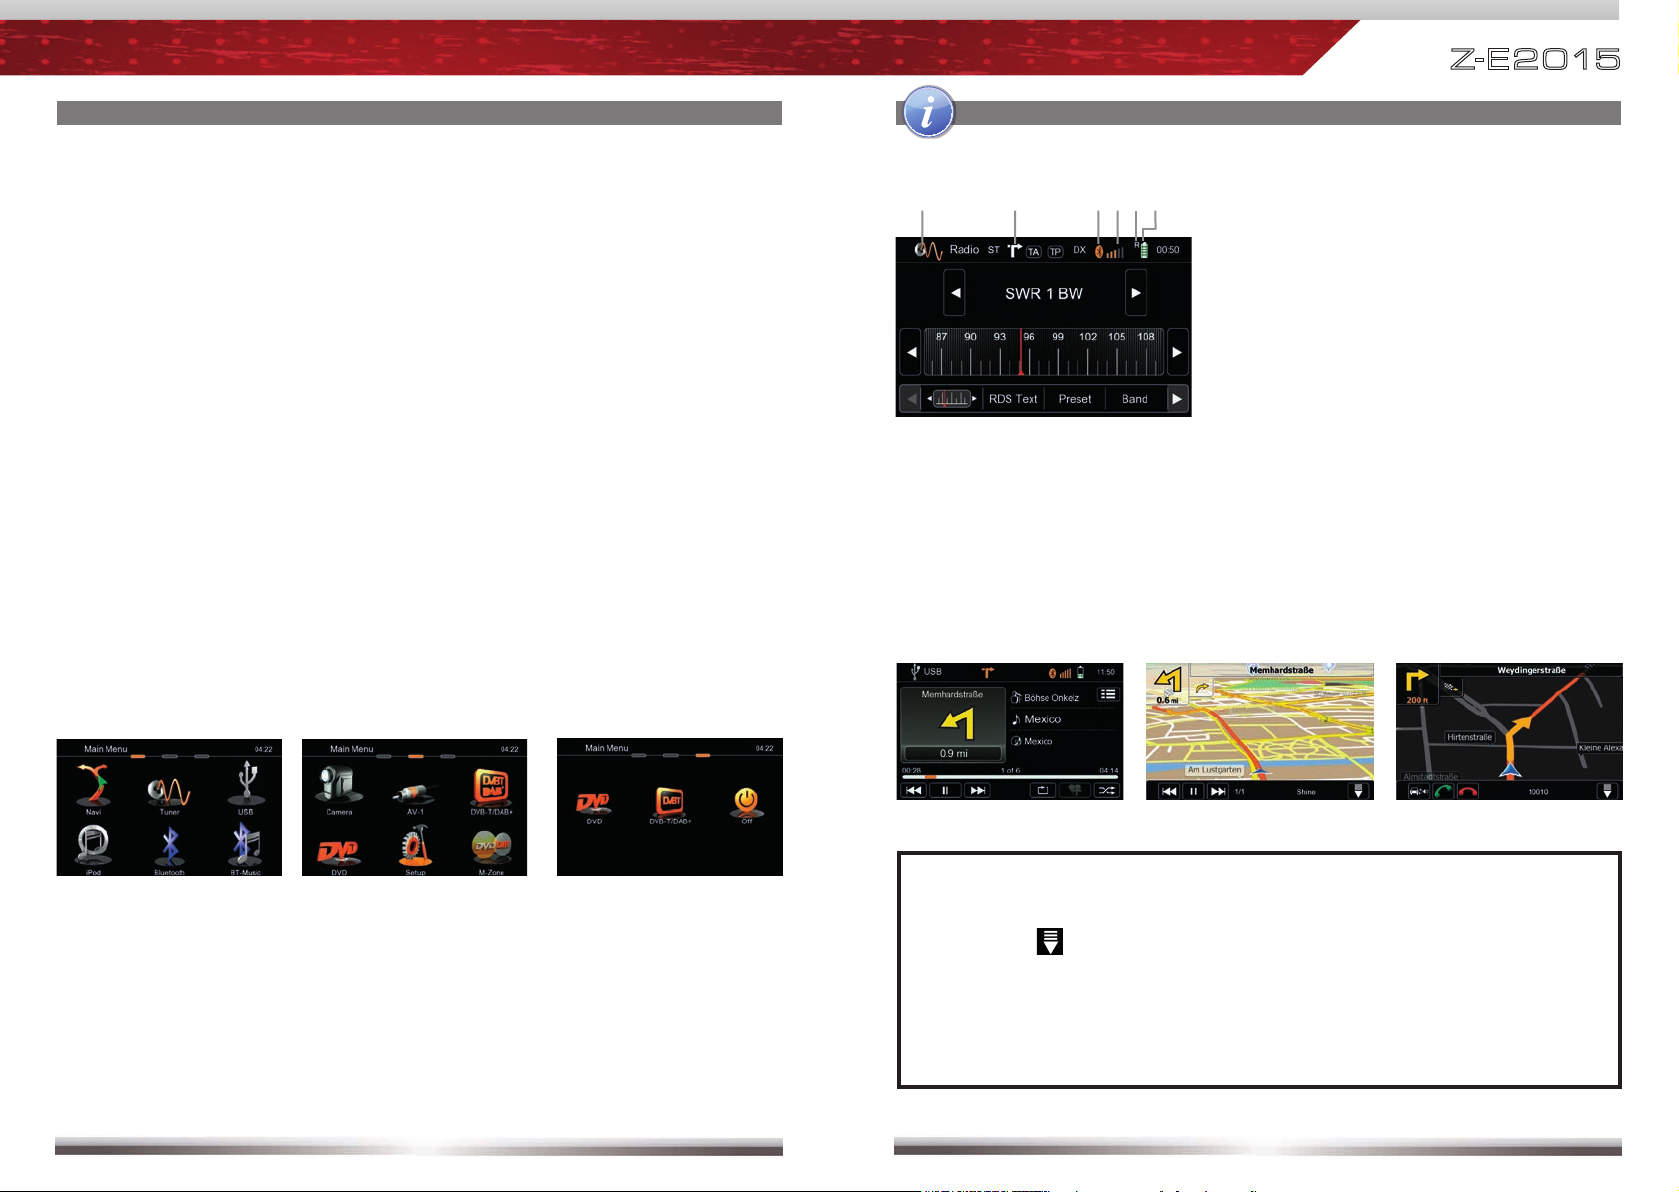
BASIC OPERATION OF MAIN DEVICE
Basic elements (for all playback sources)
Display & control elements:
Indicates current source.
- Tap to enter Main Menu.
Indicates when NAV infobar is available.
- Tap to display NAV infobar.
- Tap again to hide it.
Indicates Bluetooth connection status.
- Tap to enter Bluetooth mode.
- White icon means inactive Bluetooth
connection.
- Orange icon means active Bluetooth
connection.
Mobile phone GSM reception fi eld
strength.
Roaming indicator.
Connected mobile phone battery
Three infobar styles
status.
Entering the Main Menu, provides access to all sources, modes and settings.
Main Menu 1
ADJUST LOCAL LANGUAGE
Tap second header button or slide to second page. Choose SETUP > GENERAL
> LANGUAGE and adjust to your likings. You might want to adjust some other
basic settings. See chapter "Main Device System Setup".
Main Menu 2
10 11
M-Zone
Navigation infobar Playback infobar Bluetooth infobar
NOTE:
■ Press and hold the NAV button to fade in/out the infobar manually.
Touch the
■ NAV infobar is only available during active route guidance.
■ An incoming call or new playback information triggers the automatic
pop-up of the other infobar types at NAV screen. They will fade out after
fi ve seconds.
icon to fade out the infobar manually.
Page 7
Z-E 2 015
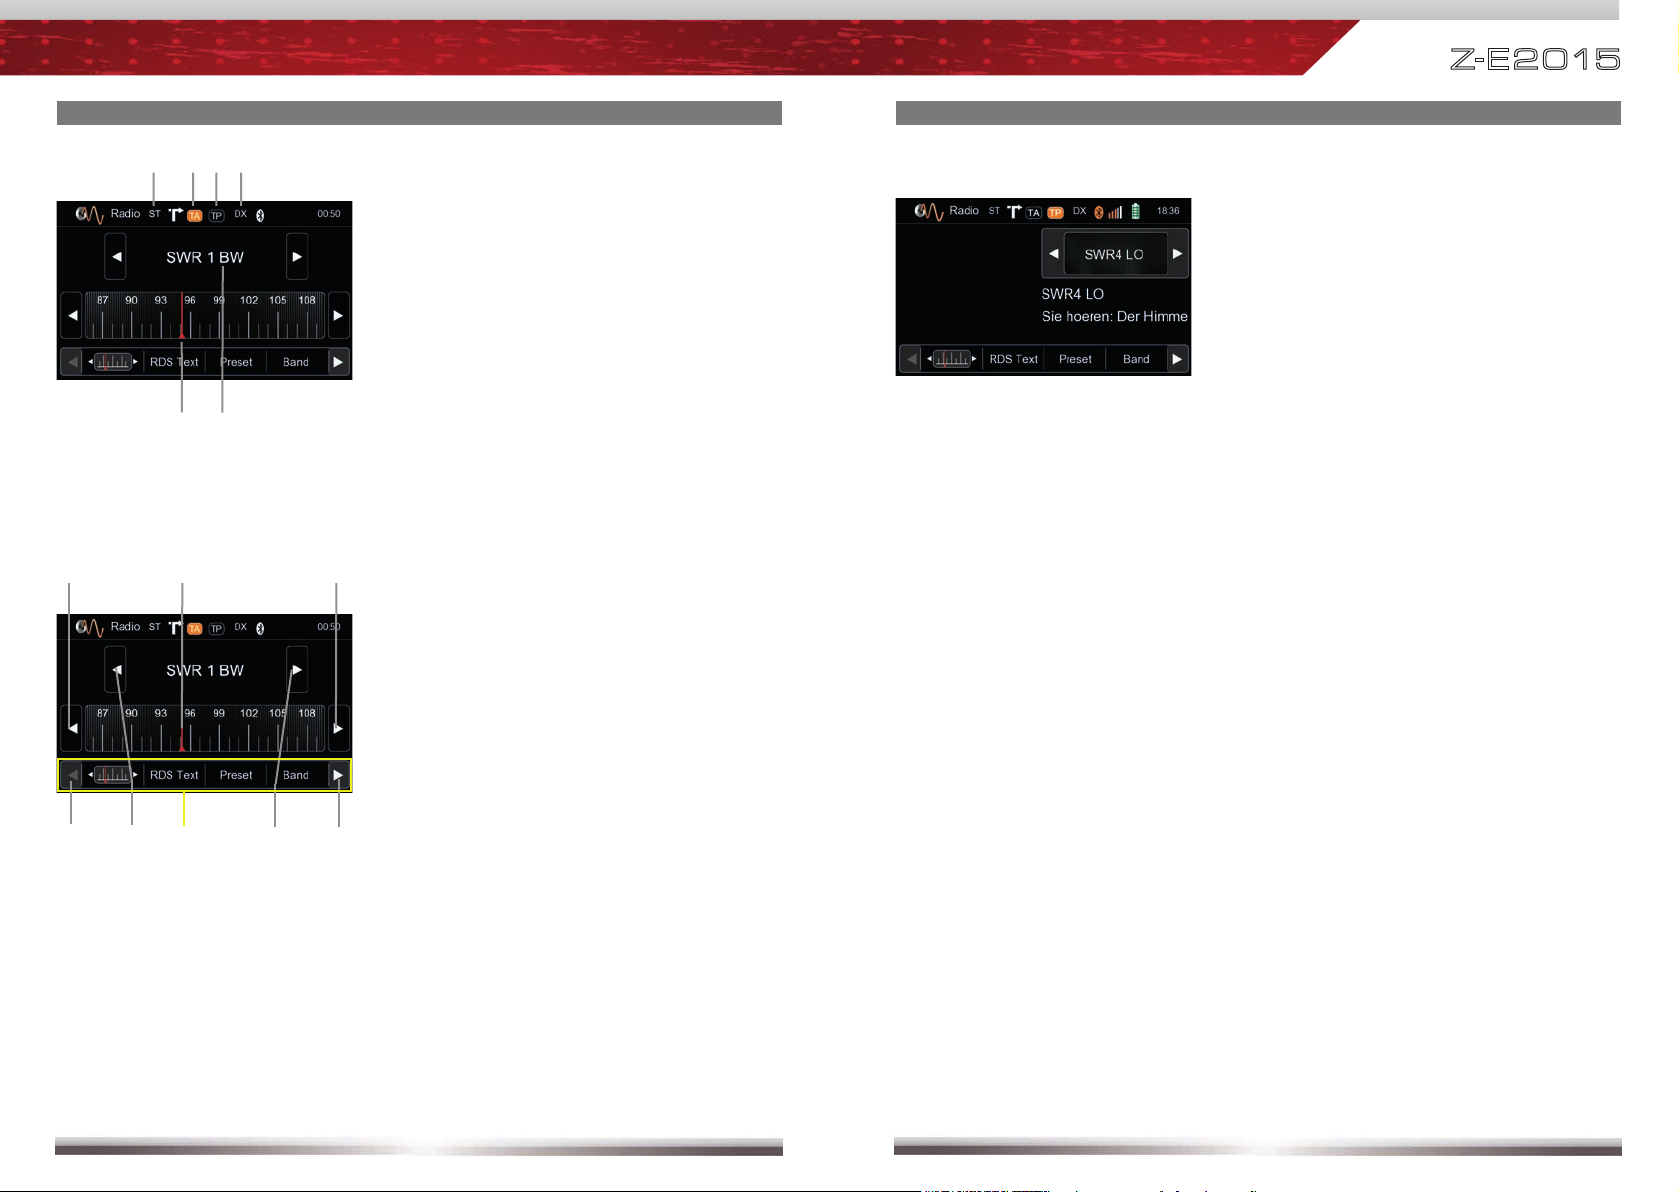
RADIO OPERATION
Display elements:
Red line marks current frequency
Frequency or station name
Stereo reception indicator
Traffi c announcement status
Traffi c announcements on carrier
LOC/DX status
Control elements:
Scroll left
Previous station
Tap to select center display content
Next station
Scroll right
50 kHz down
Drag to adjust frequency
50 kHz up
RADIO OPERATION
RDS text allows a radio station to transmit
free-form textual information that can be
either static e.g. station slogans or in sync
with the programming such as the title
and artist of the currently playing song or
even short ads. Availability depends on
region, reception quality and carrier.
12 13
Page 8
Z-E 2 015
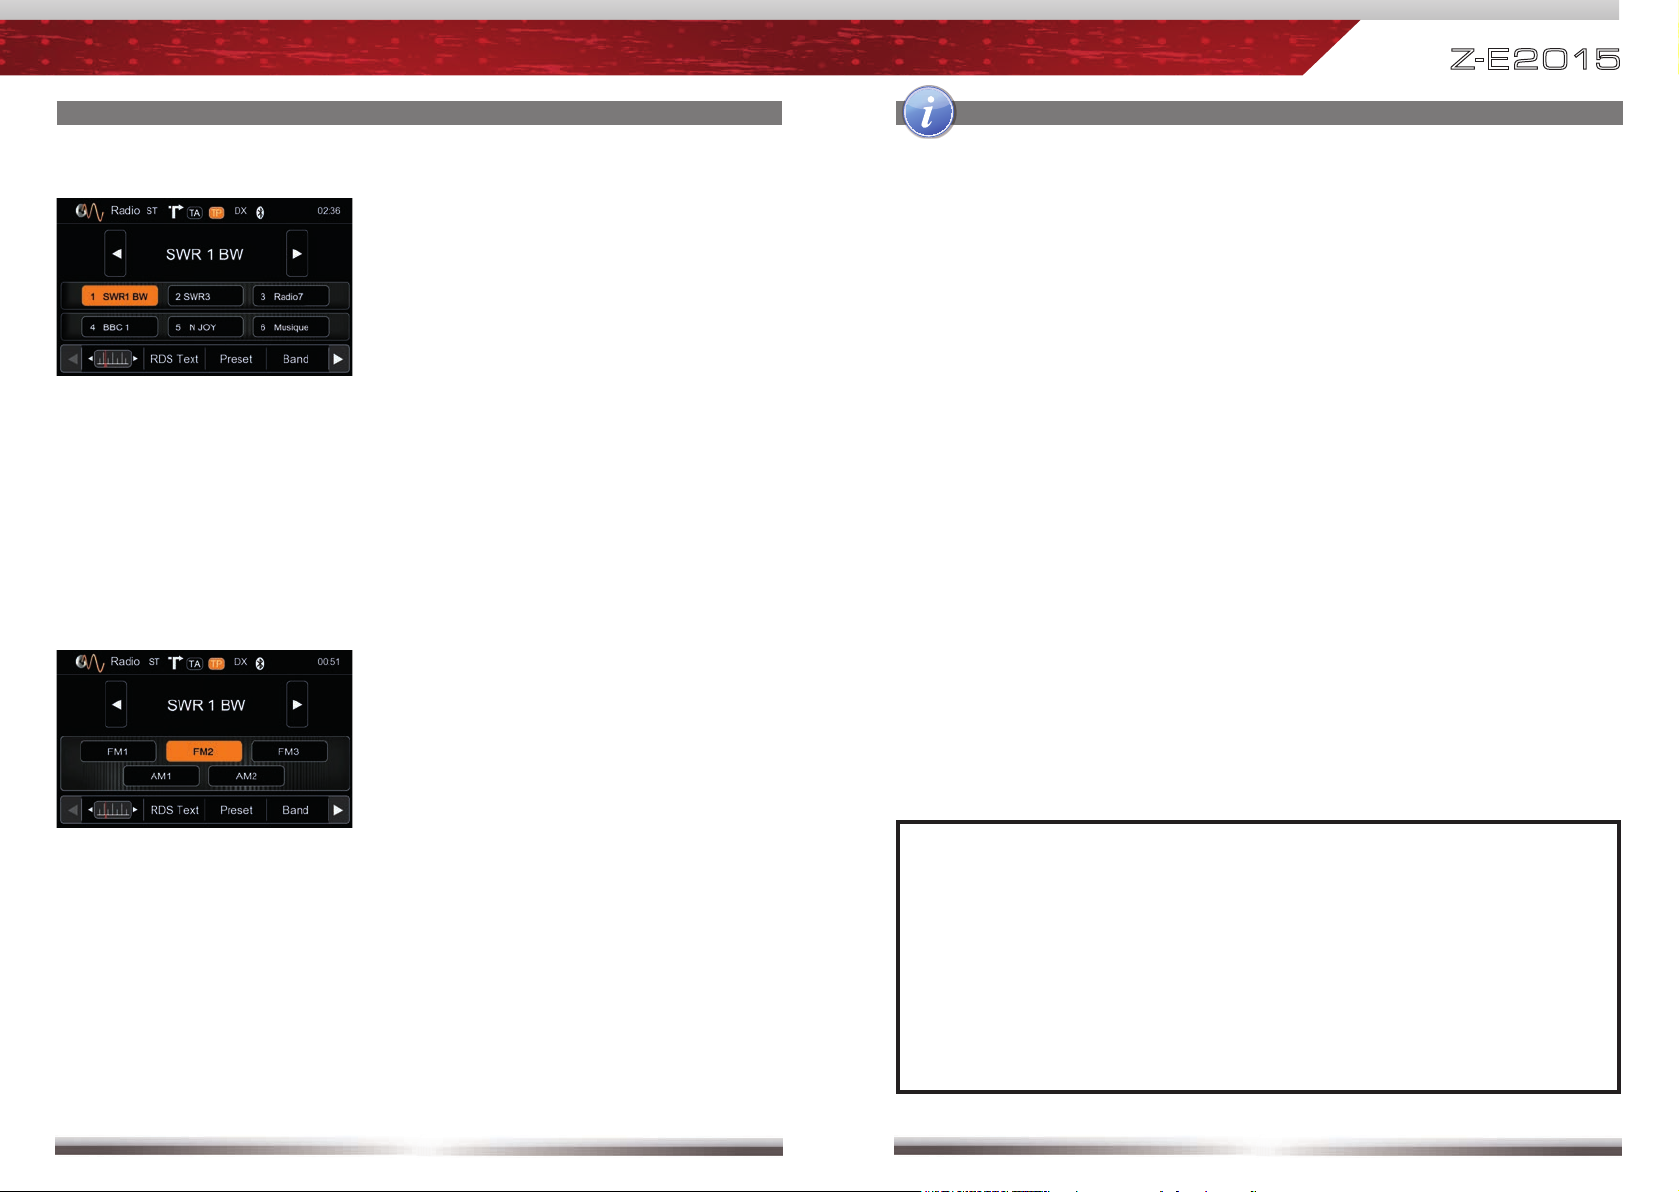
RADIO OPERATION
Select preset or save a preset. Press
and hold a center button to save a new
frequency as preset.
To select a frequency band tap on one
of the center buttons.
RADIO OPERATION
Lower bar options:
The selected item is highlighted in orange color on the screen:
AF ON/OFF: When activated, AF function automatically switches to an
alternative frequency (AF) of your chosen station, in order to always offer
the best possible reception quality.
TA ON/OFF: When activated, the radio temporarily switches, for the duration
of the traffi c announcement, to tuner mode.
AS Searches for the next six strongest stations and saves them as preset.
SCAN Intro-scan of all stations in reception range. You can hear each station for
a short moment. Choose a station you like by pressing scan again.
REG ON/OFF: At certain daytimes some stations divide their program into
regional subprograms. The REG function prevents your receiver from
switching to an alternative frequency with different content.
LOC Touch LOC/DX to omit or allow reception of stations with weak signals.
/DX If LOC is activated it will exclusively tune to strong stations.
NOTE:
■ This unit features an RDS tuner. RDS is a system which transmits data
on top of the FM radio signal. Availability and content of the RDS data
depend on the respective broadcast station and its signal strength. RDS
does, for example, transmit alternative frequencies, which allow for
frequency changes without user interaction. AM band doesn´t support
RDS functions.
■ You need to have the AF function activated in order to use the RDS
feature. However, the AF function is activated ex factory.
14 15
Page 9
Z-E 2 015
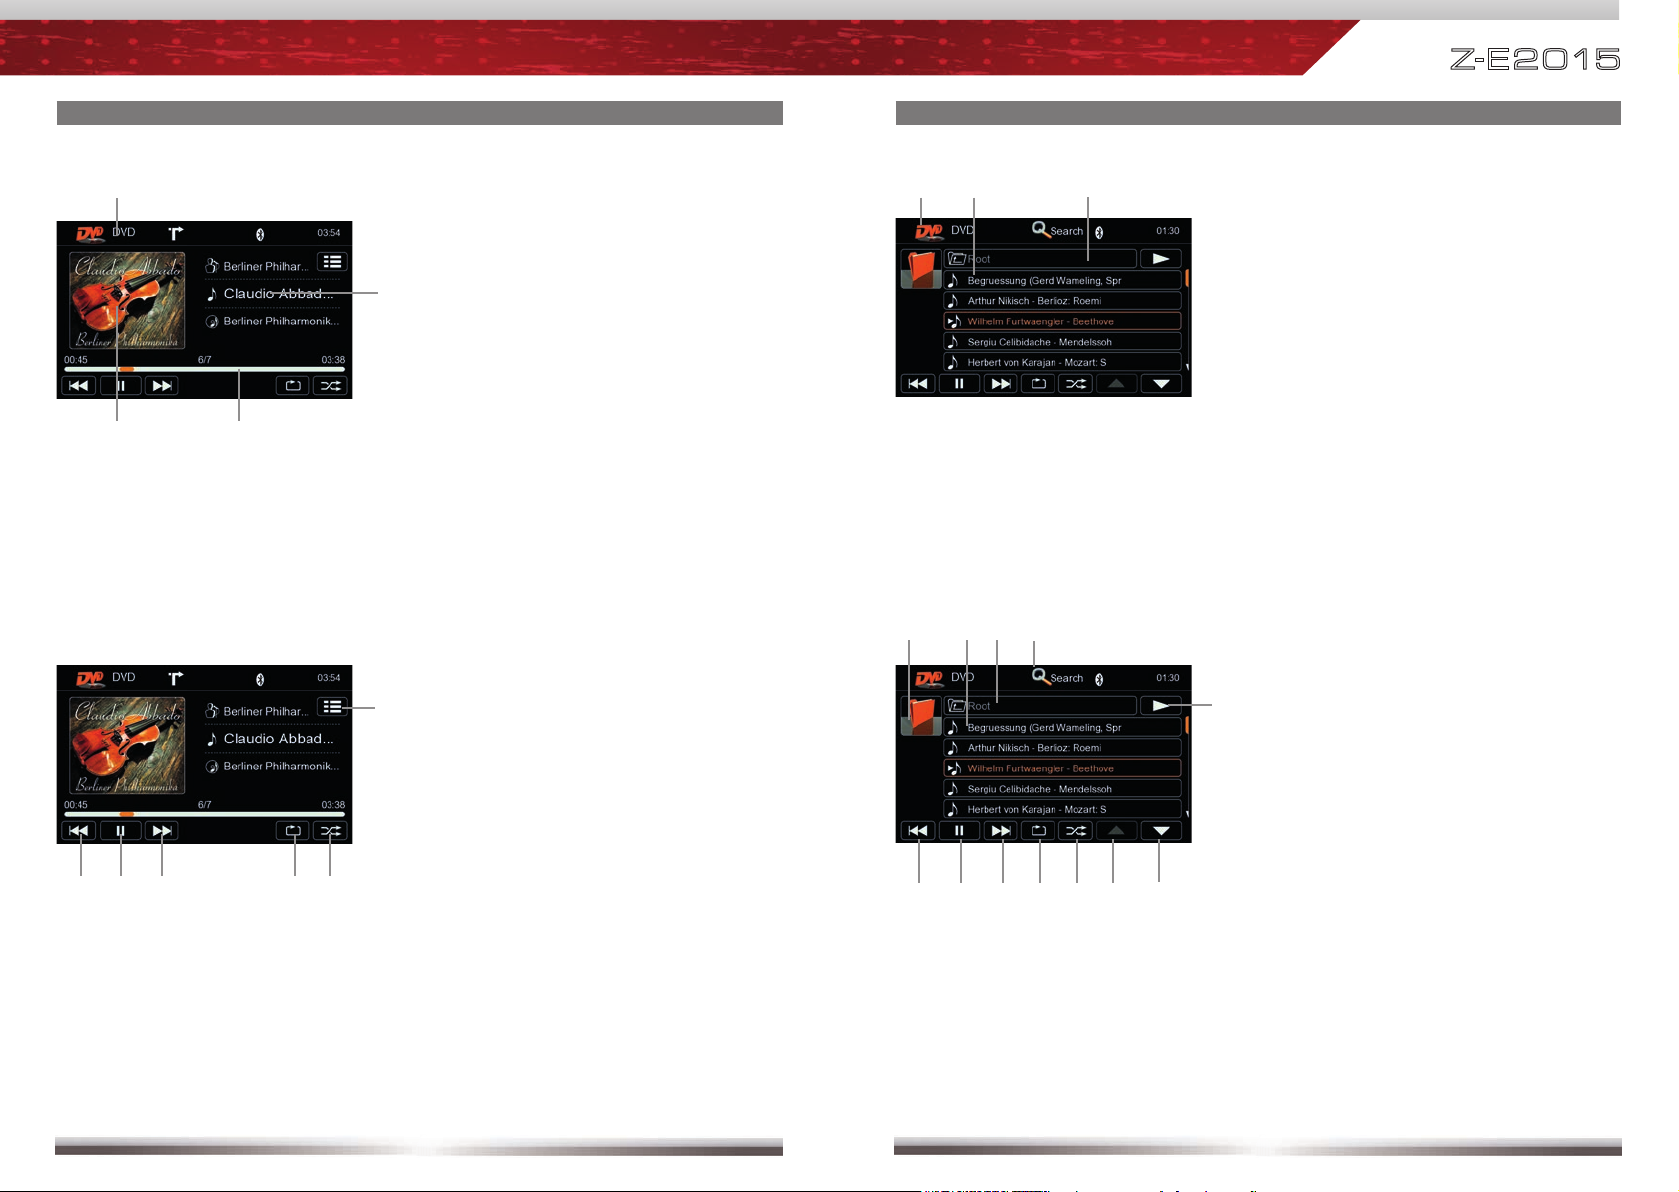
OPERATION OF CD/DVD SOURCE
Playback Page:
Display elements:
Source
ID3 tag info
Progress bar
Album Art
Control elements:
Previous track
Play/Pause
Next track
Repeat
Shuffl e
Switch to Playlist Page
OPERATION OF CD/DVD SOURCE
Playlist Page:
Display elements:
CD/DVD mode
Track/folder
Current folder
Control elements:
Previous track
Play/Pause
Next track
Repeat
Shuffl e
Cursor up
Cursor down
Switch to Playback Page
Go to root directory
Choose track/folder
Folder up
Open Search function
16 17
Page 10
Z-E 2 0 15
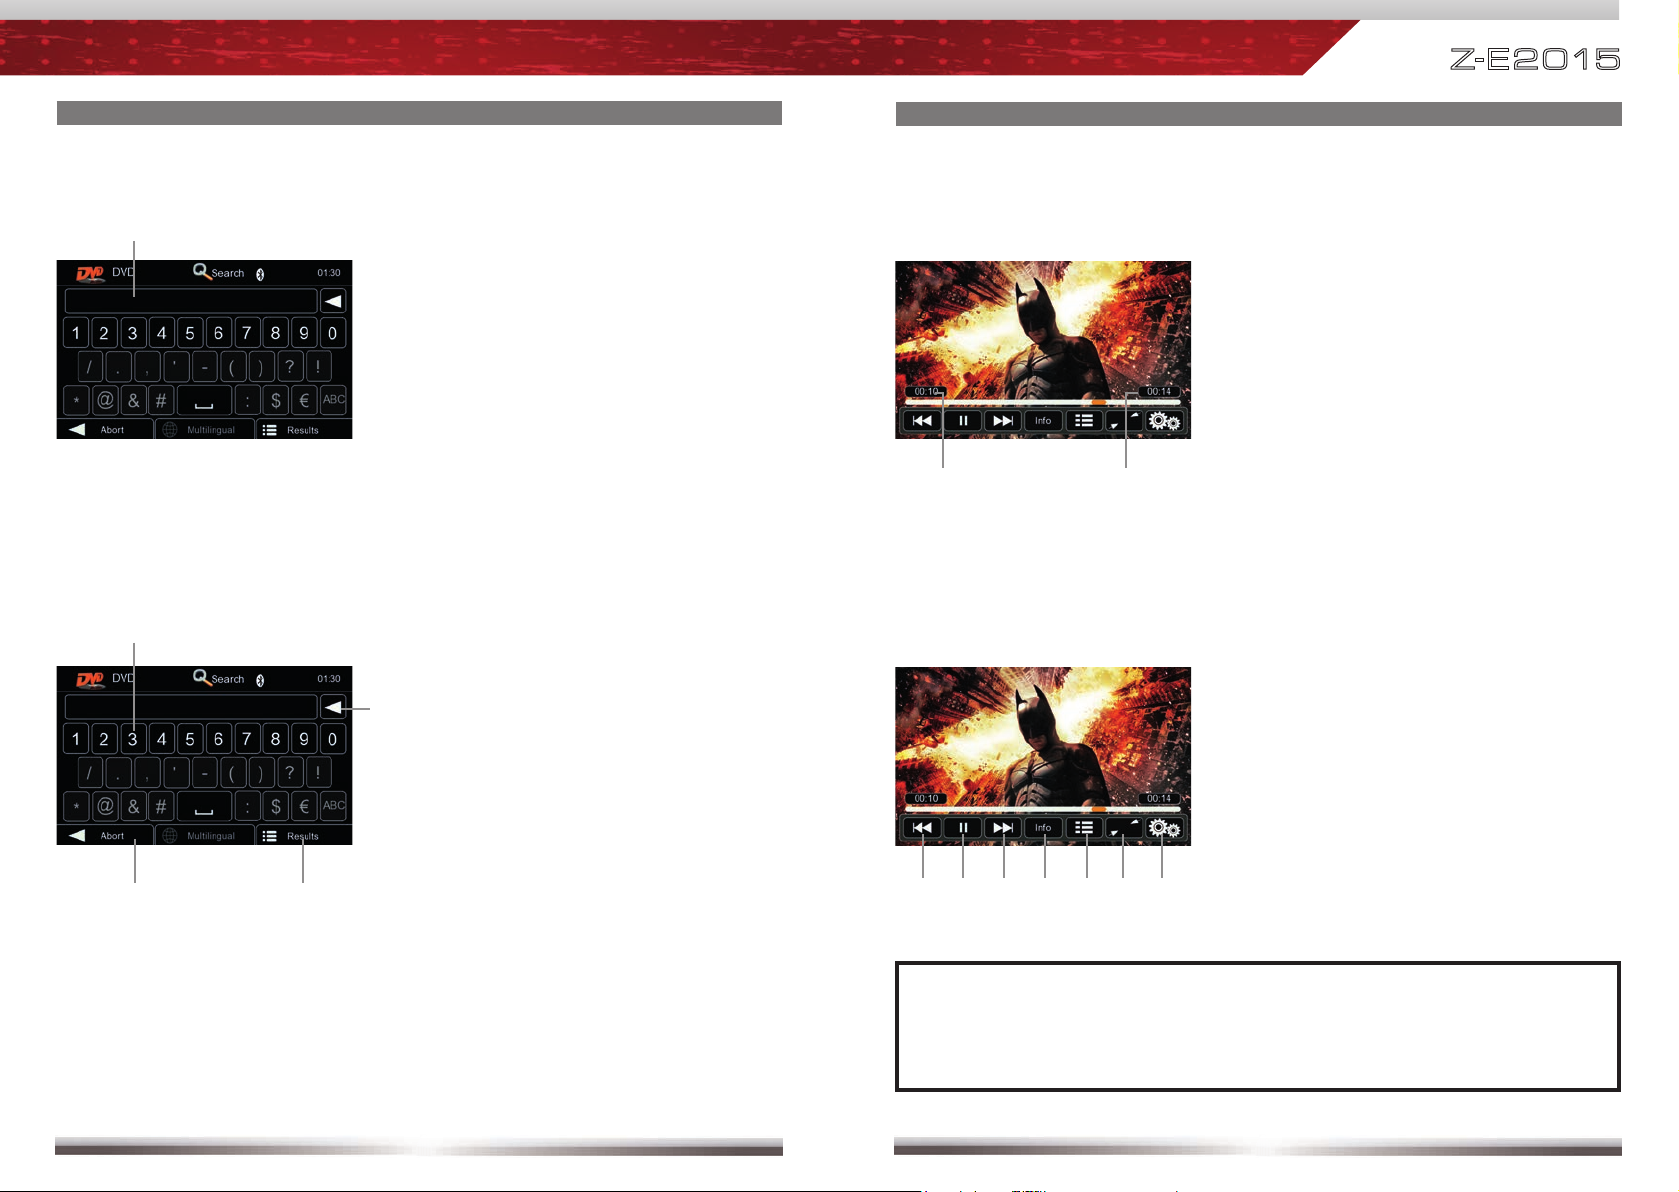
OPERATION OF CD/DVD SOURCE
Search function:
Allowing you to enter numbers to search for a specific track.
Display elements:
Search result
Control elements:
OPERATION OF CD/DVD SOURCE
Elements to control playback of video fi les:
Display elements:
Current temporal position in title
Total duration of title
Control elements:
Numeric keyboard
Abort Search function
Show all results of Search function
Delete last input
NOTE:
See www.zenec.com for:
■ Compatible fi le formats and possible restrictions.
18 19
Previous title
Play/Pause
Next title
Playback information
To Playlist Page
Full screen mode
DVD settings
Page 11
Z-E 2 0 15
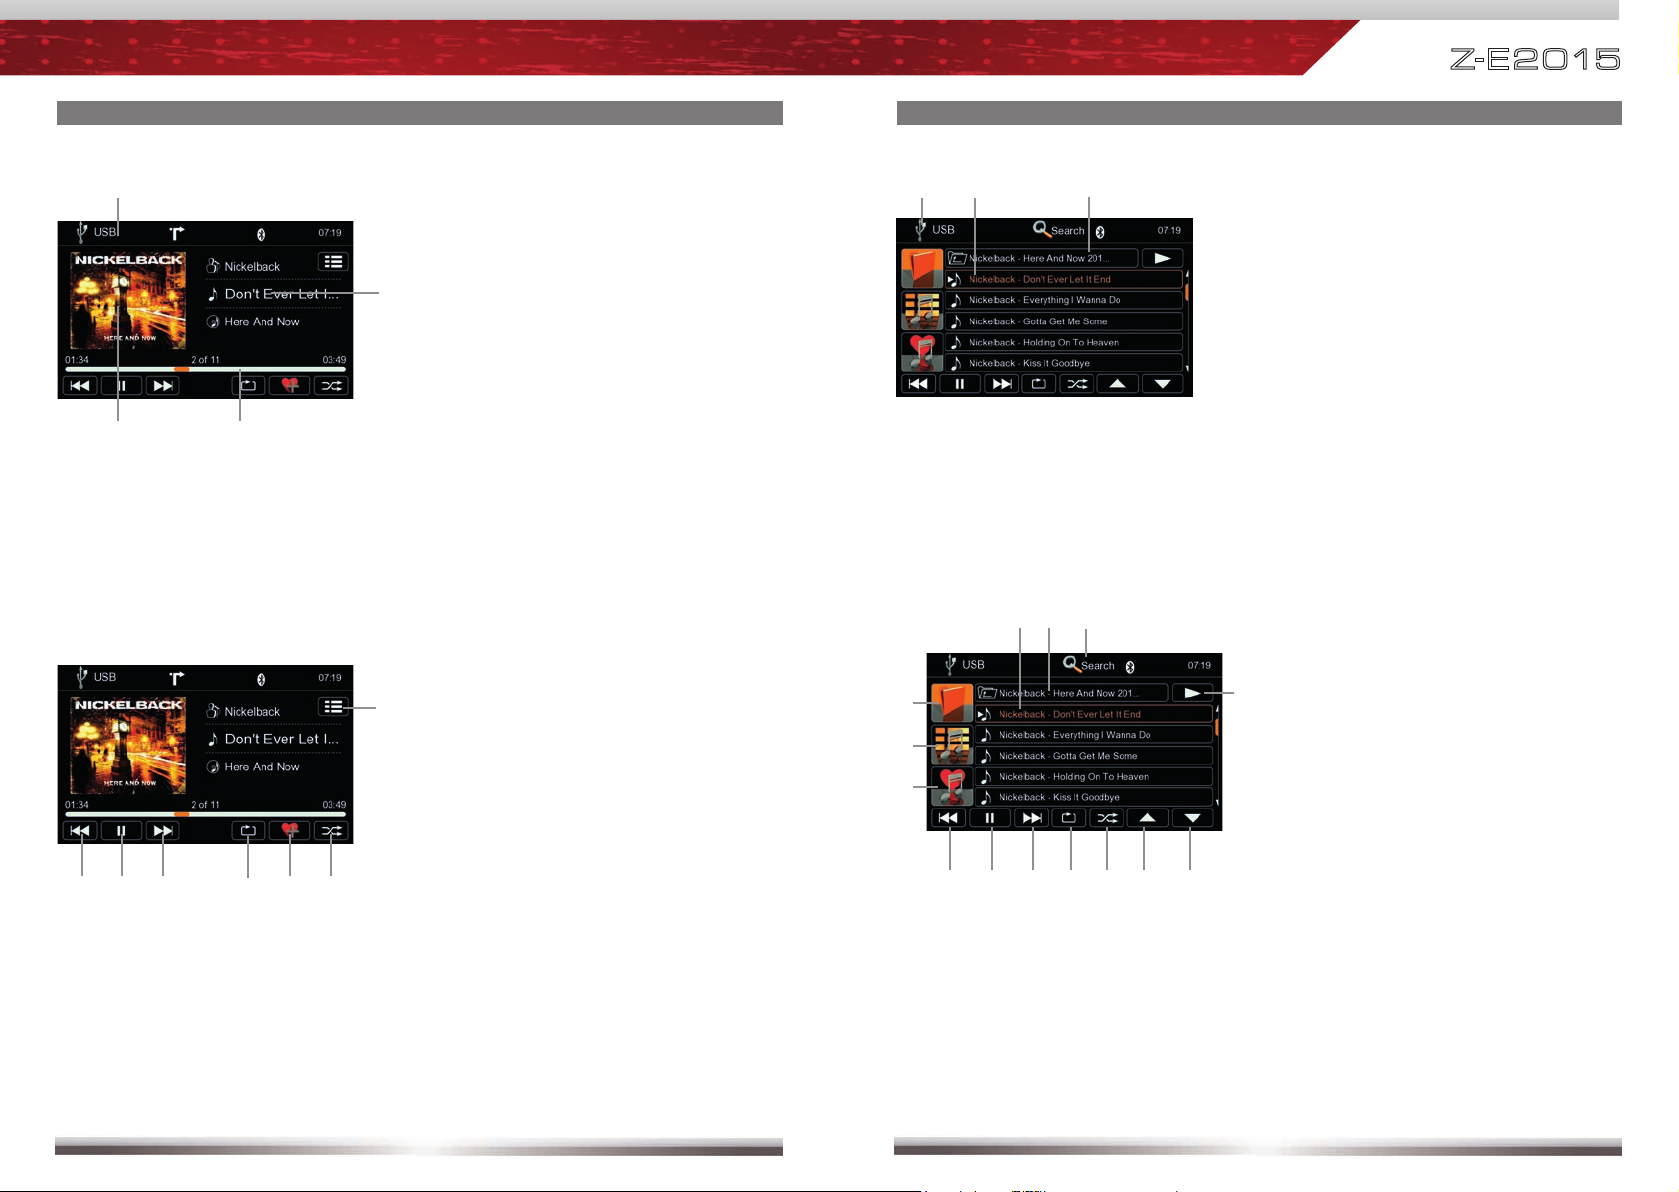
OPERATION OF USB SOURCE
Playback Page:
Display elements:
Source
ID3 tag info
Progress bar
Album Art
Control elements:
Previous track
Play/Pause
Next track
Repeat
More like this
Shuffl e
Switch to Playlist Page
OPERATION OF USB SOURCE
Playlist Page:
Display elements:
USB mode
Track/folder/playlist ...
Current folder
Control elements:
Previous track
Play/Pause
Next track
Repeat
Shuffl e
Cursor up
Cursor down
Switch to Playback Page
Folder sorting
ID3 sorting
Playlist
Choose track/folder ...
Folder up
Open Search function
20 21
Page 12
Z-E 2 0 15
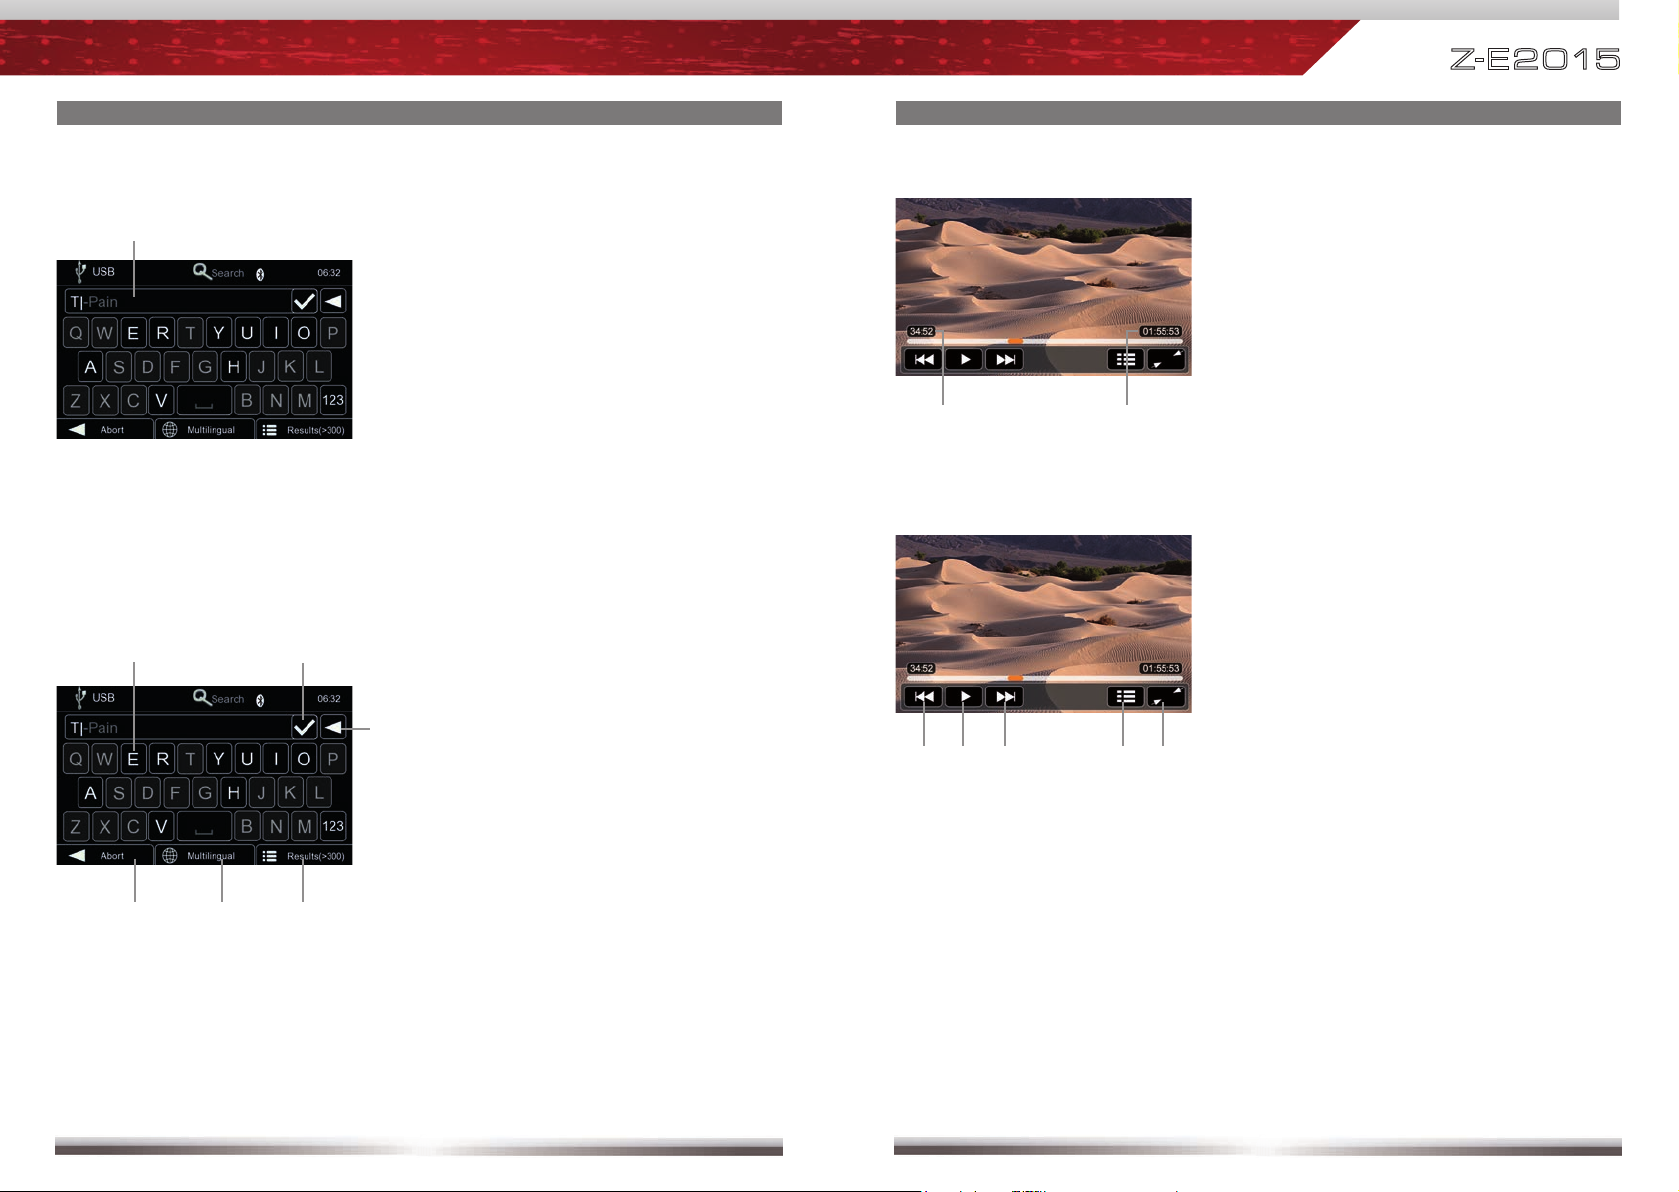
OPERATION OF USB SOURCE
Search function:
Allowing you to enter letters to search for a specific track, album etc.
Display elements:
Search result
Control elements:
Alphabetic keyboard
Abort Search function
Select among different keyboard
languages
Show all results of Search function
Delete last input
Confirm search result
OPERATION OF USB SOURCE
Elements to control playback of video fi les:
Display elements:
Current temporal position in title
Total duration of title
Control elements:
Previous title
Play/Pause
Next title
To Playlist Page
Full screen mode
22 23
Page 13

Z-E 2 0 15
OPERATION OF USB SOURCE
Special functions of the USB source
USB Hub
”More Like This” function
Control elements:
Choose USB memory device
With two USB memory devices
connected to the USB Hub, each USB
stick can be selected and accessed via
uppermost folder level, independently.
Up to four USB memory devices can be
connected and accessed / operated.
Control elements:
Start “More Like This“
Tapping on the “More Like This“ field
starts the generation of a playlist that
is based on Gracenote meta data
present on titles located on the currently
selected USB memory device.
The playlists generated via “More Like
This“ will only include titles, which are
stored in the Gracenote data base
preloaded on this device.
OPERATION OF USB SOURCE
Playlist – “More Like This“ Overview
Control elements:
Save playlist
After a playlist was generated by
tapping on the “More Like This“
field, tapping on the Save field will
permanently store the playlist. A
maximum of five playlists can be
stored.
Permanently saved playlists can be
edited.
Tap and hold of a stored playlist field
for two seconds will erase the selected
playlist.
Using the same tap and hold operation
also allows to erase single titles out of a
stored playlist.
24 25
Page 14

Z-E 2 0 15
OPERATION OF USB SOURCE
■ Make sure your mass storage device is FAT32 formatted.
■ Directory structure of your mass storage should not exceed 400 files or folders
each directory.
■ Make sure that the path length of single files does not exceed 200 characters.
■ Connected USB hard disks have to be formatted with FAT32 and are only
allowed to consume a maximum of 400mA (peak) current. Otherwise they
must be considered incompatible and can´t be used with the device.
■ By using the Gracenote data base, you can meet loading times up to one
minute, when selecting another USB memory device connected to
the USB hub.
■ Connected USB memory devices will be named hard disk 1 ‒ 4 after power
on. It's not guaranteed that memory devices keep the same after power-on.
OPERATION OF iPOD/iPHONE SOURCE
Playback Page:
Display elements:
Source
ID3 tag info
Progress bar
Album Art
Control elements:
NOTE:
See www.zenec.com for:
■ Compatible fi le formats and possible restrictions.
26 27
Previous track
Play/Pause
Next track
Repeat
Shuffl e
Switch to Playlist Page
Page 15

Z-E 2 0 15
OPERATION OF iPOD/iPHONE SOURCE
Playlist Page:
Display elements:
iPod mode
Track/folder/playlist ...
Current folder
Control elements:
Previous track
Play/Pause
Next track
Repeat
Shuffl e
Cursor up
Cursor down
Switch to Playback Page
Switch to iPod audio mode
Go to root directory
Switch to iPod video mode
Choose playlists/artists/albums ...
Folder/playlist up
Open Search function
OPERATION OF iPOD/iPHONE SOURCE
Search function:
Allowing you to enter letters to search for a specific track, album etc.
Display elements:
Search result
Control elements:
Alphabetic keyboard
Abort Search function
Choose between different keyboard
languages
Show all results of Search function
Delete last input
Confirm search result
28 29
Page 16

Z-E 2 0 15
OPERATION OF iPOD/iPHONE SOURCE
Elements to control playback of video fi les:
Display elements:
Current temporal position in title
Total duration of title
Control elements:
Previous title
Play/Pause
Next title
To Playlist Page
Full screen mode
OPERATION OF iPOD/iPHONE SOURCE
■ Depending on the size of the search list, results may be delayed during first
search. That is due to the iPod, which takes a moment to poll and provide
the search index.
■ iPods/iPhones may show, depending on content and sorting, an extended set
of information on the Playlist Page.
■ It's not possible to connect and use more than one iPod/iPhone to the USB
hub.
NOTE:
See www.zenec.com for:
■ Compatible fi le formats and possible restrictions.
■ iPod/iPhone compatibility list.
30 31
Page 17

Z-E 2 0 15
BASIC BLUETOOTH HANDS-FREE OPERATION
Bluetooth main menu:
Control elements:
Onscreen keypad
Favorites
Call Log
Contacts
Bluetooth settings and device list
Bluetooth settings and device list:
Control elements:
Tap to open Bluetooth settings
Tap to open device list
De- or activate auto connect function
Choose between different pairing
mode
Microphone selection
Adjust microphone gain
Sorting phonebook entries by fi rst or
last name
BASIC BLUETOOTH HANDS-FREE OPERATION
NOTE:
■ Auto Connect:
It’s possible to deactivate the function temporally, but defaults back to
activated after the next system start.
Mobile phones, which are registered in the ZENEC device list, will be
connected after a system start or a short disconnection automatically.
The sequence of the mobile phones ensued by priority. Usually the
ZENEC device searches for the last connected mobile phone.
Mobile phones, which were disconnected with the ZENEC device, won’t
be connected automatically again.
In some cases, you have to manually connect a mobile phone, if it was
rarely used or the search failed often.
■ Pairing Mode:
SMART:
Do not enter a long PIN to connected your mobile phone, if your phone
supports this mode.
There will be a password, displayed on the screen of the ZENEC device
and the mobile phone. If they are identical, please tap to confirm.
If your mobile phone doesn’t support this mode, the ZENEC device will
use the PIN mode automatically.
PIN:
The ZENEC device sends a request to your mobile phone.
The ZENEC device is listed as “ZENEC C9PLUS“ and requires you to
enter the PIN. Please enter 1234 and confirm your input.
32 33
Page 18

Z-E 2 0 15
BASIC BLUETOOTH HANDS-FREE OPERATION
Accept call, dial, hang up, switch between calls:
Display elements:
First incoming call
Second incoming call
Dialled number
Control elements:
Keypad
Delete last digit
Pick up call / Switch to second call
Hang up active call / Back to fi rst
call
Toggle to shift call between hands-
free and mobile phone (privacy
mode)
Back to BT main menu
BASIC BLUETOOTH HANDS-FREE OPERATION
Contacts - Manage phonebook:
Control elements:
Search for an entry
Tap a contact number to start a call
Tap on star to save as favourite
Choose contact name from list
Back to Bluetooth main menu
Search for an entry:
Control elements:
Display input
Tap to delete last character
Show all results of search function
Show between different keyboard
languages
Quit keypad
Back to Bluetooth main menu
34 35
Page 19

Z-E 2 0 15
BASIC BLUETOOTH HANDS-FREE OPERATION
Call logs:
Control elements:
Tap to display missed call list
Tap to display outgoing call list
Tap to display incoming call list
Tap on contact name to call
Back to Bluetooth main menu
BASIC BLUETOOTH HANDS-FREE OPERATION
NOTE:
■ If automatic phone book synchronisation does not work, consult the
manual of your mobile phone. Some mobile phones require explicit
activation of that function.
■ The synchronisation, the transferring, the sorting as well as the display
of the phone book entries depend on the mobile phone brand and model.
If the synchronisation doesn't work properly, disconnect the mobile phone
and repeat the pairing process.
36 37
Page 20

Z-E 2 0 15
BASIC BLUETOOTH HANDS-FREE OPERATION
Manage favourites:
Display elements:
List of favorites
Control elements:
Tap to call a favourite
Tap to delete a favourite
Back to Bluetooth main menu
BASIC BLUETOOTH HANDS-FREE OPERATION
Pairing a mobile phone:
1
Enter device list.
Tap on "Add" to trigger a search for Bluetooth devices.
2
NOTE:
■ Be aware that solely terminating the connection, or deleting a connected
mobile phone, does not affect the list of favorites. Favourites have to
be explicitly deleted one by one.
38 39
3
Choose your mobile phone from the list or retry searching. Press "Pair".
Control elements:
Confi rm selected mobile phone to be
paired
Back to Bluetooth device list
Tap to select mobile phone
Browse list up/down
Page 21

Z-E 2 0 15
BASIC BLUETOOTH HANDS-FREE OPERATION
4
Control elements:
Abort pairing
The ZENEC device will send a request to your mobile phone to use SMART or
PIN pairing mode.
To use SMART pairing mode, please confi rm the same passkey on the
ZENEC device and your mobile phone.
If SMART pairing mode is not possible or PIN pairing mode is selected, a
notifi cation on your mobile phone prompts that ZENEC C9PLUS requests a PIN.
Please enter 1234 on your mobile phone.
Your mobile phone is added to the pair list. The ZENEC device will connect in a
few seconds.
BASIC BLUETOOTH HANDS-FREE OPERATION
NOTE:
■ In order to use the built-in handsfree function you need to pair and connect
your mobile phone first.
NOTE:
■ Your ZENEC device is not visible for incoming pair attempts until you enter
the Bluetooth settings device list.
This is to protect from unauthorized connections requests issued outside
of the car.
40 41
■ If your mobile phone is compatible and still does not appear in the search
list, make sure Bluetooth is turned on and set to "visible for all devices".
■ Bluetooth connections usually work within a range of approx. 8 meters.
Obstacles in the way may shorten the distance.
■ You can pair up to five mobile phones, and synchronise up to a thousand
phonebook contacts each.
■ It cannot be guaranteed, that all mobile phones can be paired and
that all functions will work.
■ For the "BT compatibility list" of tested and compatible mobile phones
as well as the latest software updates go to www.zenec.com.
Page 22

Z-E 2 0 15
OPERATION OF A2DP STREAMING SOURCE
Display elements:
ID3 Tag info
Connected mobile phone
Control elements:
Previous track
Play/Pause
Next track
OPERATION OF A2DP STREAMING SOURCE
NOTE:
■ If you want to use the A2DP streaming source, please make sure that the
mobile phone, which is the intended music source, was paired and
connected before.
■ The display of ID3 tag information will depend on the used mobile phone.
42 43
Page 23

BLUETOOTH VOICE COMMAND OPERATION BLUETOOTH VOICE COMMAND OPERATION
Z-E 2 0 15
Control elements:
A moving spinner shows system is
„calculating”
Tap to cancel voice recognition mode
Tap to start (TTS based) voice
control HELP
Tap to restart voice recognition mode
Microphone backlit in orange shows
“waiting for voice command”
Tap to show contact details
Tap on any number fi eld, to start
a call directly
Microphone backlit in orange shows
“waiting for voice command”
Tap to close contact details
Voice commands in the Bluetooth hands-free mode
The speaker independent voice recognition feature allows to control call functions
even easier and dial phone book contacts directly using voice commands.*
*The paired mobile phone must allow contact access.
The system will acknowledge voice command by text-to-speech (TTS) and guide
you to directly perform the call function.
Activate voice control mode:
Via buttons on the device: Pressing and holding the Bluetooth button, or else by
pressing the ALT key (ALT key allocation for voice control function can be adjusted
under Setup / General / Driver Assist).
Via touch screen: Press and hold the Search icon in the phone book.
End voice control mode:
Via buttons on the device: Press the HOME button.
Touchscreen: By touching the fi eld "cancel".
Via voice command: In active voice command mode, say "cancel."
Using voice commands:
Say a commands clearly and distinctly after the beep, e.g. the system asks for it.
System readiness is indicated by the microphone which is highlighted in orange
color.
44 45
Page 24

Z-E 2 0 15
BLUETOOTH VOICE COMMAND OPERATION BLUETOOTH VOICE COMMAND OPERATION
Desired Function Voice Command
Starting the help dialog. Works in all menus. >help<
Return and start all over again. Works in all
menus.
Cancel or exit the voice control. Works in all
menus.
Confi rmation to call a contact, after system
suggests it.
Call a phonebook contact. >call< contact name
Call a phonebook contact with different
number location type options.
Command to spell and dial a telephone number. >Dial<
Dial a contact by spelled telephone number
Correction of the last entry (name or digit). >Correction<
>restart<
>cancel<
>yes<
>call< contact name /
number location type
>Dial<
numbers
NOTE:
■ Voice Command language settings:
The main OSD / HMI language selected on initial device setup is adopted
for the voice command settings. You can however, select another
language for the voice command function anytime later. To do this, go
to "Setup / General / Language" and select from eight different EU
languages.
46 47
Page 25

Z-E 2 0 15
BASIC OPERATION OF NAVIGATION
How to input a destination and start a route guidance:
Tap on "Find".
Choose your preferred destination
search method. Here, in our example,
choose "Find address".
Type in a city, street name,
house number and confirm
each step
by tapping
BASIC OPERATION OF NAVIGATION
.
NOTE:
■ For operation and detailed description of navigation features, please
refer to the separate navigation manual.
■ You may listen to any playback source in route guidance mode.
The program is now calculating the
desired route. Once route calculation
has completed just tap "GO!" to
enter active route guidance mode.
The navigation software automatically manages volume levels of
voice guidance.
■ You can change the volume level during voice guidance with the volume
knob. The chosen volume level is stored.
■ Audio playback is, during voice guidance, capped to volume 10.
If the preset audio volume is below 10, it will be muted.
48 49
Page 26

Z-E 2 0 15
MAIN DEVICE SYSTEM SETUP
Main screen:
Control elements:
Return to the previous page.
Works with all four submenus as
well.
Tap to enter "Video" Setup.
Tap to enter "Audio" Setup.
Tap to enter "General" Setup.
Tap to enter "Misc" Setup.
MAIN DEVICE SYSTEM SETUP: IMPORT/EXPORT SYSTEM SET
Go to Setup>Misc>Help
Export system settings:
1. Format USB flash drive with FAT32.
2. Connect USB flash drive to device.
3. Tap "OK", at System Settings-Export
option, to launch file export.
Import system settings:
1. Connect USB flash drive to device.
2. Tap "OK", at System Settings-Import
option, to launch import.
3. Restart device once import is
completed.
TINGS
NOTE:
■ Make sure the USB flash drive has been FAT32 formatted.
■ Refrain from manually modifying the generated export file. Re-import
relies on proper file integrity.
■ After adding new functions, by means of a system update, they will
always be intialised with standard default values. This compensates for
lacking values from the import file content.
■ After a firmware update, check the update installation instructions for
notes on system settings import and take them into consideration.
50 51
Page 27

Z-E 2 0 15
MAIN DEVICE SYSTEM SETUP: VIDEO
Animated picture visualises your setting
during adjusting TFT screen brightness.
It´s possible to adjust the brightness of
the Day-/Night TFT screen brightness
separately.
Day-/Night TFT screen brightness is
controlled by built-in brightness sensor,
GPS time signal or CAN signal of the
car.
Choose between two diffferent skins
with different background colour for a
better visibility during day or night.
Standby activation turns screen off.
Apart from that, the device operates in
a normal manner.
NOTE:
Name Descriptor Function Choice/Range
Brightness Day -10... 0...10
Brightness Night -10... 0...10
Brightness Sensor, Navi, Car
Picture
TFT brightness
adjustment
Brightness
control
GUI look Skin Auto, Day, Night
Standby TFT off
Tap on the screen to exit standby.
NOTE:
■ When select “Navi” at brightness control option, you can set two different
brightness values controlled by the day/night signal of Navigation system.
■ When select “Car” at brightness control option, TFT brightness will be
controlled by car backlight information on CAN Bus.
■ If you choose “Auto” at GUI look option, skin will be controlled by the day/
night signal of Navigation system.
52 53
Page 28

Z-E 2 0 15
MAIN DEVICE SYSTEM SETUP: AUDIO
Fixing volume settings for various
functions and mode.
Last: Use the adjusted volume before
device was turned off.
Set: Use ”Set Volume” menu items to
adjust volume to fixed values.
De- or activate the use of an available
Gracenote data base.
Using the Gracenote data base,
you can choose between keeping the
original sort sequence or using the sort
criteria of the Gracenote data base.
Animated picture visualises fader and
balance settings.
Animated picture visualises sub-out level.
Choice and individual adjustments of
different audio settings and access to
equalizerer menu.
If your vehicle is equipped with an
integrated OE Soundsystem, activate
parameter "OE Soundsystem" in order
to avoid audio distortion.
NOTE:
Name Descriptor Function Choice/Range
Start Volume Set, Last
Set Start Volume 1...20
Volume
TA Volume Set, Last
Set TA Volume 4...32
NAV Volume Set, Last
Set NAV Volume 4...32
Database On, Off
ID3 sorting GN, All
Tuner Volume -6…0…+6
Source
CD / DVD Volume -6…0…+6
USB / iPod Volume -6...0...+6
A/V In Volume -6...0...+6
Audio
A/V In Use A/V In, RVC
Fader -9...0...+9
Balance -9...0...+9
EQ OK
EQ
Set Bass Frequency 50Hz, 100Hz, 200Hz
Set Mid Frequency 0.5kHz, 1kHz, 2kHz
Set Treble Frequency 5kHz, 10kHz, 15kHz
Loudness On, Off
Level -9…0…9
X-Over Sub 55Hz, 80Hz, 120Hz
Setup
Sub Phase 0°, 180°
X-Over Speakers Flat, 62Hz, 95Hz, 135Hz
OE Soundsystem On, Off
54 55
Page 29
Z-E 2 0 15
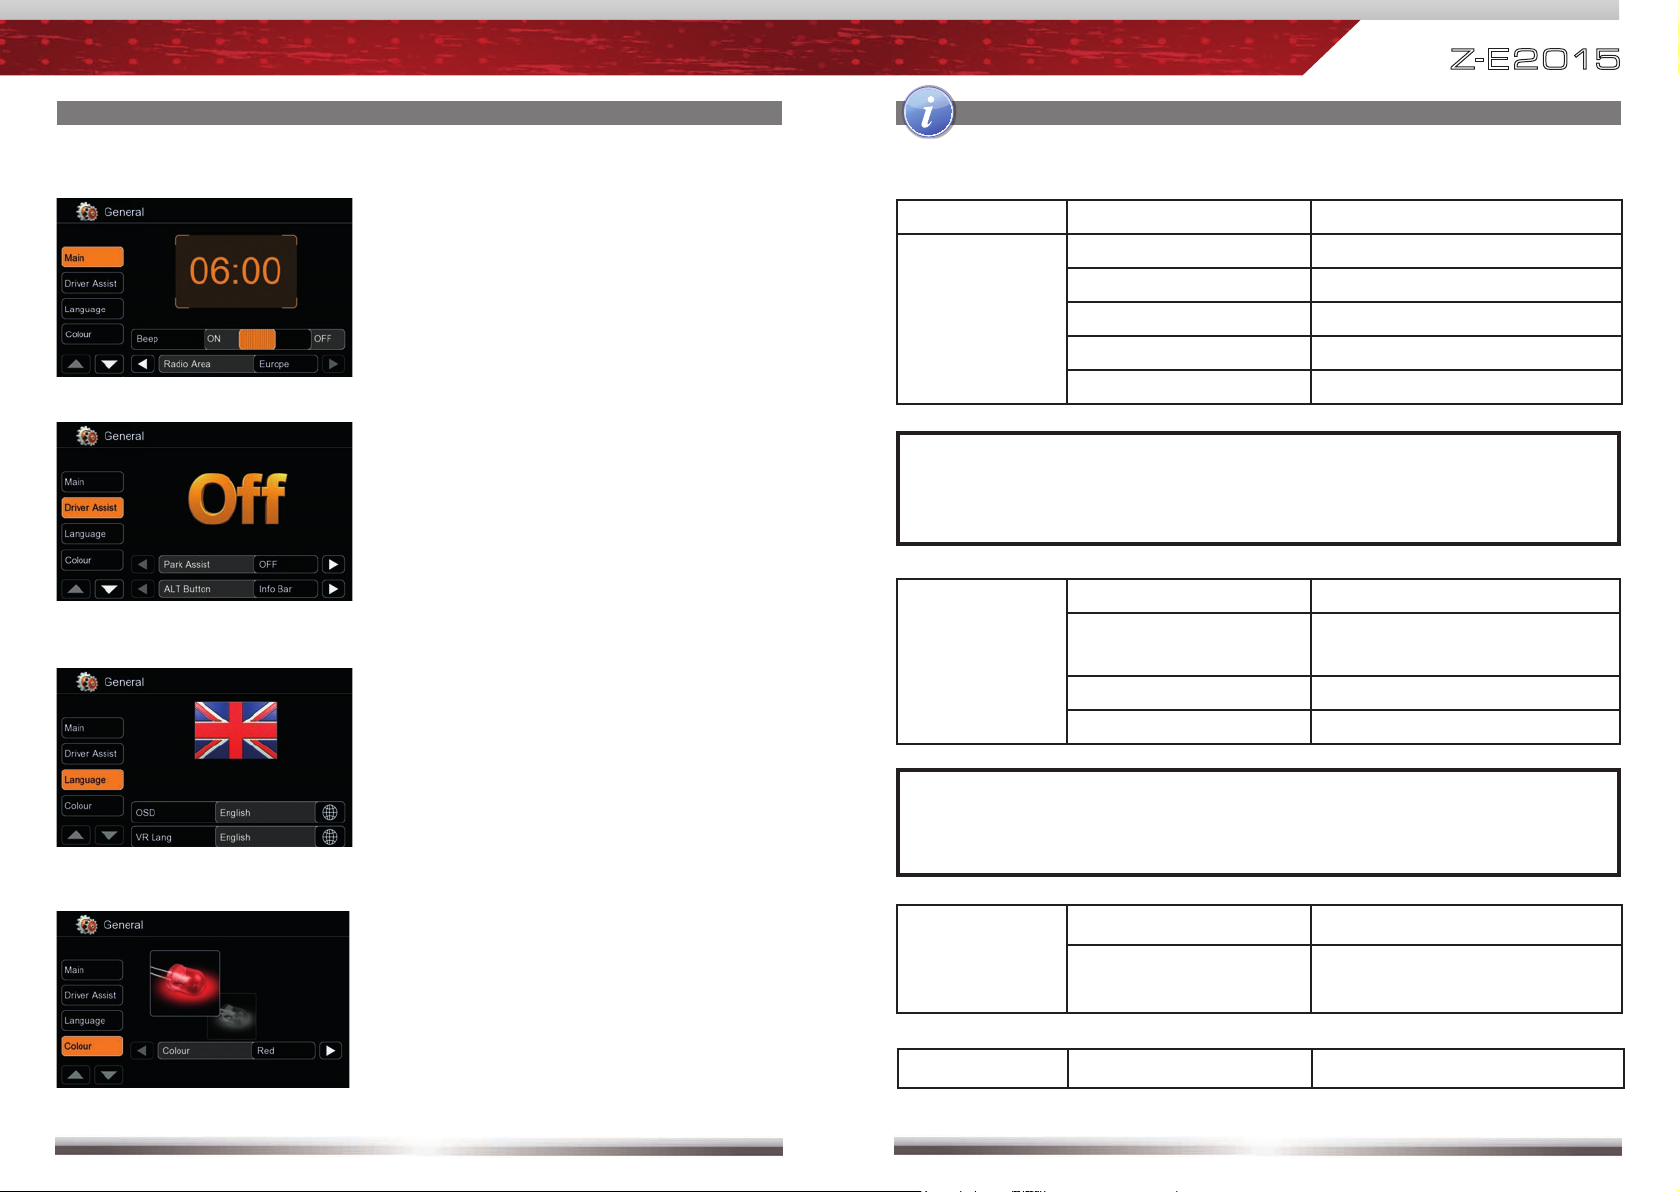
MAIN DEVICE SYSTEM SETUP: GENERAL
System time gets periodically updated
by GPS time stamp.
Animated picture visualises your chosen
driver assist setting.
Choose between different functions for
the ALT button.
Choose reverse mute "On" to mute
audio signal when reverse gear is
engaged.
Shown flag visualises the chosen
OSD and BT voice language.
NOTE:
Name Function Choice/Range
Beep On, Off
Radio area Europe, Latin, USA
Main
Bluetooth On, Off
Volume Pop-Up On, Off
Antenna supply On, Off
NOTE:
■ Switch above mentioned antenna supply parameter to "Off", if your
vehicle does not deploy an active antenna.
Parking assist Off, Rear view camera, OPS*
Driver
ALT button
Infobar, Voice Cmd, Standby,
Camera, A/V In
assist
Reverse mute
On, Off
AC info* On, Off
NOTE:
■ *Functions are only present if respective data is present in CAN bus
network.
Choose between red or white key
OSD Set OSD language
illumination.
Language
BT Voice
Colour Colour Red, White
56 57
Set language for Bluetooth voice
command operation.
Page 30

Z-E 2 0 15
MAIN DEVICE SYSTEM SETUP: MISC
You may export/import your system
settings to/from a USB flash drive.
A helpful feature, to restore your device
settings after a software update, reset
or a complete power disconnection.
Display installed Main System software
versions.
Activate password function to secure
the device in case of theft. The antitheft function is based on CAN-bus
and is locking the device if it´s installed
to another car. It´s possible to enter a
4-digit password. The password code is
"0000" by default.
NOTE:
Name Function Choice/Range
TS Calibrate OK starts touchscreen calibration.
Load factory OK loads factory settings.
Help
System Settings
System Settings
Export settings to USB.
Load settings from USB.
Show Info Software
Info
Show Info
Show Info
Show Info
BT Software
RDS
Gracenote
Password enable On, Off
Security
Password
OK sets password.
Update Update OK starts software update.
Press "OK" to launch a software update.
For preparation and details, consult the
accompanying update installation
instructions BEFORE you run software
NOTE:
updates.
■ Compare installed software versions with potentially newer versions listed
on www.zenec.com.
58 59
Page 31

Z-E 2 0 15
EXTERNAL PLAYBACK AND SOURCES
M-Zone
Control elements:
Direct access to DVB-T / DAB+
Direct access to M-Zone
Control elements:
Direct access to main menu
Choose DVD
Choose DVB-T / DAB+
Deactivate M-Zone
OPERATION OF EXTERNAL DVBT / DAB+ SOURCES
Control elements:
Direct access to DVB-T or DAB+.
Control elements:
Tap into the upper right corner in
the DVB-T / DAB+ screen to return
to the Main Menu.
NOTE:
■ With deactivated M-Zone you will not see any signal on connected
M-Zone monitors (blackscreen).
■ The M-Zone volume cannot be adjusted on the device. Use the control
elements of the connected peripherals (i.e. roof monitor) instead, to adjust
the volume.
■ If the M-Zone and the front zone get both fed by one and the same
media source, the M-Zone stereo output won't be muted.
■ The headunit does not memorize that the M-Zone has been activated
after shutting off. Therefore you have to reselect the M-Zone after
each re-start.
60 61
NOTE:
■ For DVB-T or DAB+ reception you need to connect an external ZENEC
DVB-T or DAB+ receiver. For a compatibility check out the user manual
and the compatibility list of the ZENEC DVB-T or DAB+ receiver in
advance.
■ Compatible DVB-T and DAB+ devices offer direct operation via
touchscreen of the headunit.
■ It's not possible to connect a DVB-T and DAB+ receiver at the same time.
Page 32

Z-E 2 0 15
GLOSSARY
NOTE:
■ The following features are device-dependent. Please pay attention to the
chapter “Specifi cations” of this user manual to learn more about the
specifi c features of your ZENEC device.
TOUCH PANEL
The func tions of the devic e functions can
be controlled directly via the touch-sensitive touc hscreen TFT LCD panel.
PICTURE RESOLUTION/LED BACKLIGHT
Describes the screen resolution in pixels.
The device features LED backlight illumination. A uniform panel illumination, high
panel br ightness and highest life span of
the product are assured.
PICTURE RESOLUTION/LED BACKLIGHT
Describes the screen resolution in pixels.
6.2"/15.7 cm
The device features LED backlight illumination. A uniform panel illumination, high
panel br ightness and highest life span of
the product are assured.
PICTURE RESOLUTION/LED BACKLIGHT
Describes the screen resolution in pixels.
6.5"/16.5 cm
The device features LED backlight illumination. A uniform panel illumination, high
panel br ightness and highest life span of
the product are assured.
PICTURE RESOLUTION/LED BACKLIGHT
Describes the screen resolution in pixels.
7"/17.8 cm
The device features LED backlight illumination. A uniform panel illumination, high
panel br ightness and highest life span of
the product are assured.
PHASE DIVERSITY FM TUNER
Device features phase diversity FM dual
tuner for vehicles that are OE equipped
with a twin antenna system.
FM TUNER WITH DSP
FM TUNER
WITH DSP
The analog radio receiver front-end also
combines a spec ifi c DSP soft ware algo-
rithm to provide noise canceling for low
level FM station broadcast signals for a
more clear radio playback qualit y.
DVD
The disc loader can play DVD media.
XVID
Xvid is the container format of choice.
Over 90% of pres ent-day AVI fi les are en-
coded with Xvid.
USB
The device features a USB port 2.0; all
hardware compliant to this USB standard
is supported.
USB HUB
The device comes with a USB extension
wire on its backside, allowing to connected the USB 2.0 hub blackbox. T he USB
hub allows to connect up to three USB 2.0
storage devices (up to 64 GB) and a ZENC-IPS inter face for iPod / iPhone.
GRACENOTE PLAYLIST PLUS™
The Gracenote “More Like This” feature
stands for the „one-c lick “ generation of
style and genre based playlists in USB
playback mode by pre-selectinga single
song/track. In addition, the normalization function based on the Playlist Plus™
database and a selected ar tist or song,
fi lls in info showing up around title/artist/
album in USB playback mode (if iD3 tag is
not complete).
SD/SDHC
The device can play SD cards up to 2 GB
and SDHC cards from 2 to 8 GB.
microSD/SDHC
The device can play micro SD and SD
cards up to 2 GB and SD HC cards from
2 to 8 GB.
GLOSSARY
PARROT BLUETOOTH-TECHNOLOGY
The device deploys a Bluetooth module
from the market leader Parrot. The integrated voice guidance and in particular
the DSP based echo and noise cancelling
provide most convenient hands-free calling with highest speech intelligibility.
A2DP + AVRCP 1.3
The unit suppor ts A2DP audio streaming
A2DP
+AVRCP 1.3
and allows stereo audio playback over
Bluetooth. The protocol suppor ts AVRCP
1.3, i.e the functions play, stop and track
skip forward / backward.
A2DP + AVRCP 1.4
The unit suppor ts A2DP audio streaming
A2DP
+AVRCP 1.4
and allows stereo audio playback over
Bluetooth. The protocol suppor ts AVRCP
1.4, i.e the functions play, stop, track skip
forward / back ward as well as title / artist info.
BT VOICE RECOGNITION + COMMAND
BT VOICE
RECOGNITION
+ COMMAND
Voice Recognition / voice Command is a
TTS-based user-independent voice recognition to control call features* in the
Bluetooth menu, e.g. dialin g of phonebook
contacts via voice command. Voic e commands are available for eight different
languages (DE, U K, FR, IT, ES, NL, TR,
RU). *Coupled phone must allow access
of phonebook contact data.
MADE FOR iPOD/iPHONE
You can connect an iPod/iPhone to the
device. The playback of the iPod/iPhone
can be directly c ontrolled through the
touchscreen of the device (optional interface cable required).
24 BIT D/A CONVERTER
Device features 24 Bit Digital-to-AnalogConver ter for best signal noise ratio and
high resolutio n playback of digital audio
fi l e s .
DSP HPF/LPF CROSSOVER
DSP
HPF/LPF
CROSSOVER
The device features an internal DSP with
active crossover functions, processing
both the pre-amp line-level signals and
the speaker outputs (internal amplifi er),
with selectable high-pass and low-pass
frequencies and 12dB/oct . crossover
slopes. This function provides for best
integration of ac tive subwoofers in both
passive or active system confi gurations.
LINE-OUT
Describes the number of pre-amplifi er
outputs and the ma ximum output voltage.
LINE-OUT
Describes the number of pre-amplifi er
outputs and the ma ximum output voltage.
12 V PHANTOM POWER SUPPLY
Device features switchable built-in 12 V
antenna phantom power supply for active
antenna systems.
MULTICOLOR
The key illumination color of the device
can be chosen from a set of preselected
colors.
DAY/NIGHT MODE HMI
The unit features a built in light senso r
with amb ient light senso r logic contro l and
day / night sw itching of the contrast optimized HMIs, respectively. This provides
maximum contrast for daylight conditions
and does reduce glare at night.
DVB-T READY
The device can be c ombined with a separately available ZENEC DVB -T tuner, featuring full touchscreen compatibility.
DAB+ READY
Device is touchscreen c ompatible with
ZENEC DAB+ tuner model(s).
SECURITY CODE
The device features a software controlled security code, to prevent hardware
against thieves.
FULL EUROPE
The map data covers all European countries, including Switzerland.
62 63
Page 33

Z-E 2 0 15
GLOSSARY
NAV SPLITSCREEN
The device allows navigation map picture- in-picture overlay mode on the TFT
LCD screen for all audio sources, including the Bluetooth hands- free mode.
MULTISENSOR DEAD RECKONING
MULTISENSOR
DEAD
RECKONING
Devices with dead reckoning process
gyro and speed pulse sensor data.
By interpolation of velocity and direction,
accurate dynamic positioning is ensured
even in areas where GPS satellite signal
is unavailable (eg, parking garages, tunnels, cities with skyscrapers).
TMC - TMC PRO READY
The device includes a TMC receiver. The
TMC PRO function can be activated online against a license fee (optional) at
www.zenec.naviextras.com.
8 GB SDHC NAV MEMORY
The device is equipped wit h a SD card
slot exclusively for use with the included
8 GB SD card for navigation, contained in
the set (no audio / video playbac k).
8 GB MICRO SDHC NAV MEMORY
The device is equipped wit h a micro SD
card slot exclusively for use with the included 8 GB micro SD card for navigation, contained in the set (no audio / video
playback).
8 GB ON-BOARD NAV MEMORY
Device contains 8 GB Nand fl ash memory
for navigation software and map data on
main pc board.
STALK INTERFACE INCLUDED
Set cont ains a Stalk/CAN inter face, to
enable data transfer and car specifi c in-
tegration of device with target vehicles
and steering wheel remote controls and/
or CAN bus.
STALK INTERFACE READY
Allows connection of a Stalk/CAN interface
to be purchased separately, that supports
vehicle specifi c functions such as CAN
turn-on/off and/or steering wheel controls.
DRIVER INFO DISPLAY INTEGRATION
Device c ommunicates with driver info dis play to show radio station and track info
of A/ V sourc es as well as navigation tur n
key arrows, if applicable.
ONBOARD COMPUTER INTEGRATION
20:02
OK
ON BOARD
COMPUTER
INTEGRATION
Device t aps into the Vauxhall on-board
computer, allowing to adjust date and time
settings of vehicle directly over touchscreen.
PARKING RADAR INTEGRATION
Device integrates OE park radar systems,
showing graphical park radar HMI dynamically on the screen.
OE ACTIVE SOUND SYSTEM INTEGRATION
Device c onnec ts to and is able to drive
OE installed active sound systems (i.e.
factor y installed multichannel amplifi ers).
A/C INFO
The device supports the climate status
data present in the CAN net. User operation of the climate control system such
as temperature, fan speed, heated seats
controls are read and status change is
displayed on the TF T LCD screen by a
pop- up.
DVB DIGITAL VIDEO BROADCASTING
DVB is a digital vid eo broadcasti ng standard, for transmission of digitally encoded
A/ V content.
TROUBLESHOOTING
Problem Cause Solution
GENERAL
Radio fuse blown. Install new fuse with correct rating.
Unit will not
power on.
Car battery fuse blown. Install new fuse with correct rating.
Illegal operation. Press the RESET button.
Improper audio output connection. Check wiring and correct.
Volume set too low. Increase volume level.
Speakers damaged. Replace speakers.
No/low audio output.
Only one channel is playing.
Speaker wiring is in contact with
metal part of car.
Check the balance and fader
adjustments.
Insulate all speaker wiring
connections or replace the speaker
cable.
Mute is activated. Turn off the Mute function.
Poor sound quality or
Speaker power rating not
compatible with unit.
Connect proper speakers.
distortion.
Speaker is shorted. Check speaker connections.
TFT MONITOR
The parking brake is not engaged.
No image.
The "Monitor off"-function is
activated.
Stop vehicle in a safe place and
apply parking brake.
Touch the monitor to activate the
display.
64 65
Page 34

DVD-PLAYER
[Bad Disc] Disc is warped or scratched. Use disc in good condition.
[Bad Disc] Disc is dirty or wet. Clean disc with soft cloth.
Disc
does
not play
back.
Cannot insert disc. Disc already inside unit.
[Unknown
Disc]
[Unknown
Disc]
[Region
Error]
Incompatible disc is used. Use compatible disc.
Disc rating exceeds parental lock
rating limit.
Disc region code is not
compatible with unit.
[Bad Disc] Disc is inserted upside down. Insert disc with label side up.
Change parental lock settings
to lower restriction.
Use disc with proper region
code.
Eject current disc and insert
new one.
Z-E 2 0 15
SPECIFICATIONS Z-E2015
NAVIGATION
• 3D High-Definition splitscreen navigation
• SD card based navigation system (on 8 GB memory card)
• Premium P.O.I. bundle with over 6,5 million destinations
• TTS Pro voice guidance in 28 different spoken languages
• Realistic 3D rendering of terrains and landmarks, Tunnel-View, 3D Auto-Zoom for crossings and
roundabouts, Real Junction View
• Eco and Smart Route Planning, Calculation of Real-Time Route Alternatives, Parking Around Algorithm,
Detour Hint function etc.
• Outlook address import, Driver Aler ts etc.
• TMC receiver for free TMC data services*
• 30 Days Latest Map Guarantee
* Extendable functionality via separate TMC pay service providers (countr y specific)
BLUETOOTH
• Parrot Bluetooth hands-free module
• DSP audio processing for background noise masking
• Synchronization of up to 1‘000 phonebook entries with 5 numbers per entr y
• Advanced phonebook contact search function
• Voice control of phonebook contact dialing functions in 8 different EU languages
• Selectable internal or external BT microphone
MULTIMEDIA/AUDIO
• DVD loader – compatible media/formats: CD, CD-R/RW, MP3, WMA, DVD, DVD±R, DVD-MP3, AVI,
Xvid
• USB hub allocating three USB 2.0 memory devices (each up to 32 GB)
• Compatible USB file formats: MP3, WMA, AVI, Xvid
• Gracenote “More Like This” for USB audio source and “one-click” generation of playlists by selection of
one track
• BT-music streaming via A2DP with AVRCP 1.4
• DSP crossover with HPF / LPF function
• 4 x 50 watts amplifier
• 24 bit D/A converter
• Made for iPod and iPhone
GENERAL FEATURES
• 7“/17,8 cm 16:9 TFT-LCD touchscreen with HMI for 24 different languages
• Phase diversity RDS dual tuner with 30 preset stations (18 FM/12 AM)*
• Multi zone function
• 1 x IR-remote control
CONNECTIVITY
• 4.2 RCA preamp line outputs (4 V)
• 2.0 RCA preamp line outputs (fixed level)
• 2 x RCA composite video outputs (NTSC)
• 1 x RCA A/V-input (CVBS) for optional RVC use and microphone, audio-in
• 1 x RCA video input for rear view camera (CVBS) with auto-switching function
• Connectivity for touchscreen compatible DAB+ or DVB-T devices
VEHICLE INTEGRATION FEATURES
• Steering wheel remote control integration via CAN
• Multifunctional display (MFD+) integration via CAN*
• Optical Park System (OPS) integration via CAN*
• Climatronic control status integration via CAN*
• Dynaudio soundsystem integration*
• Selectable key illumination: red/white
Vehicle integration disclaimer:
*1 The vehicle must be fitted with a phase diversity antenna system, or else, must be retrofitted with such a system.
*2 Functionality provided only, if required embedded hardware is present and CAN data is available, respectively.
*3 VW Fender active systems are not supported.
HINW EIS: ÄNDERUNGEN AM GERÄT NACH DRUCK DIESES HANDBUCHS BLEIBEN VORBEHALTEN.
3
2
2
2
1
66 67
Page 35

Z-E 2 0 15
WARRANTY 2 YEARS
Dear customer,
Thank you for purchasing this ZENEC product. It is advisable to keep the original packaging
material for any future transporting of the product. Should your ZENEC product require warranty
service, please return it to the retailer from whom it was purchased or the distributor in your
country. This ZENEC product is warranted against defective materials or workmanship for a
period of TWO years from date of purchase at retail to the original purchaser.
WARRANTY LIMITATIONS
This warranty does not cover any damage due to:
1. Improper installation, incorrect audio or mains connection(s).
2. Exposure to excessive humidity, fluids, heat sun rays or excessive dirt or dust.
3. Accidents or abuse, unauthorized repair attempts and modifications not explicitly
authorized by the manufacturer.
This warranty is limited to the repair or the replacement of the defective product at the manufacturer’s
option and does not include any other form of damage, whether incidental, consequential or
otherwise. The warranty does not cover any transport costs or damages caused by transport or
shipment of the product. Warranty work will not be carried out unless this warranty certificate is
presented fully completed with model, serial number, purchaser’s address, purchasing date and
dealer stamp together with the original sales slip!
ZENEC MODEL: Z-E2015
Serial number: .................................................................................................................................
Date of purchase: ............................................................................................................................
Your name: ......................................................................................................................................
Your address: ..................................................................................................................................
City: .................................................................................................................................................
State: ................................... ZIP or postal code: ............................................................................
Country: ...........................................................................................................................................
Dealer’s address & stamp
■ If at any time in the future you should need to dispose this product, please note that waste electrical
products are not be disposed with the household waste. Please recycle where facilities exist.
Check with your Local Authority or retailer for recycling advice (Waste Electrical and Electronic
Equipment Directive).
68 69
Page 36

Z-E 2 0 15
LEGAL DISCLAIMERS
The packing material of this item and the finished product contained inside are fully compliant with RoHS
2 directive. Halogenated flame retardants are not used in any of the plastic injection parts of the product,
nor for the printed circuit boards.
This item incorporates copy protection technology that is protected by U.S. patents and other intellectual
party rights of Rovi corporation. Reverse engineering and disassembly are prohibited.
The Bluetooth word mark and logos are owned by the Bluetooth SIG, Inc. and any use of such marks
by Parrot S.A. is under license. Other trademarks and trade names are those of their respective owners.
The Parrot trademarks appearing on this giftbox artwork are the sole and exclusive property of Parrot
S.A. All the others trademarks are the property of their respective owners and are used under license
by Parrot S.A.
The SD logo is a trademark of the SD Card Association.
All other trademarks and commercial names are the property of their respective owners.
Microsoft Windows and MS Windows CE logos are trademarks / registered trademarks of Microsoft
Corporation in the United States and other countries.
“Made for iPod“ and “Made for iPhone“ mean that an electronic product has been designed to connect
specifically to iPod or iPhone, respectively, and has been certified by the developer to meet Apple
performance standards. Apple is not responsible for the operation of this device or its compliance with
safety and regulatory standards. Please note that the use of this product with iPod or iPhone may affect
wireless performance.
iPod, iPhone, iPad and iTunes are trademarks of Apple Computer, Inc., registered in the United States
and other countries.
If at any time in the future you should need to dispose this product, please note that waste electrical
products are not be disposed with the household waste. Please recycle where facilities exist.
Check with your Local Authority or retailer for recycling advice (Waste Electrical and Electronic
Equipment Directive).
Great care was taken in preparing this user manual. Constant product development may mean that
some information is not entirely up to date. The information in this document is subject to change without
prior notice. ZENEC shall not be liable for technical or editorial errors or omissions contained herein;
nor for incidental or consequential damages resulting from the performance or use of this user manual.
Check www.zenec.com for compatibility of your mobile phone model and its compatibility with the Parrot
BT section of your ZENEC device.
Check www.zenec.com for the compatibility and potential limitations of devices to be connected – i.e.
iPod/iPhone models listed to be compatible with the ZENEC device of choice.
The driver of a car with a ZENEC navigation or multimedia system installed should know and follow the
local traffic laws/traffic regulations existing in the country of use.
GRACENOTE EULA
Gracenote® End User License Agreement
This appli cation or devic e contains so ftware fr om Gracenote, I nc. of Emery ville, Califor nia (“Grac enote”).
The software from Gracenote (the “Gracenote Software”) enables this application to perform disc
and/or file identification and obtain music-related information, including name, artist, track, and title
information (“Gracenote Data”) from online servers or embedded databases (collectively, “Gracenote
Servers”) and to perform other functions. You may use Gracenote Data only by means of the intended
End-User functions of this application or device.
You agree that you will use Gracenote Data, the Gracenote Software, and Gracenote Servers for
your own personal non-commercial use only. You agree not to assign, copy, transfer or transmit
the Gracenote Software or any Gracenote Data to any third party. YOU AGREE NOT TO USE OR
EXPLOIT GRACENOTE DATA, THE GRACENOTE SOFTWARE, OR GRACENOTE SERVERS,
EXCEPT AS EXPRESSLY PERMITTED HEREIN.
You agree that your non-exclusive license to use the Gracenote Data, the Gracenote Software, and
Gracenote Servers will terminate if you violate these restrictions. If your license terminates, you agree
to cease any and all use of the Gracenote Data, the Gracenote Software, and Gracenote Servers.
Gracenote reserves all rights in Gracenote Data, the Gracenote Software, and the Gracenote Servers,
including all ownership rights. Under no circumstances will Gracenote become liable for any payment
to you for any information that you provide. You agree that Gracenote, Inc. may enforce its rights under
this Agreement against you directly in its own name.
The Gracenote service uses a unique identifier to track queries for statistical purposes. The purpose
of a randomly assigned numeric identifier is to allow the Gracenote service to count queries without
knowing anything about who you are. For more information, see the web page for the Gracenote
Privacy Policy for the Gracenote service.
The Gracenote Software and each item of Gracenote Data are licensed to you “AS IS.” Gracenote
makes no representations or warranties, express or implied, regarding the accuracy of any Gracenote
Data from in the Gracenote Servers. Gracenote reserves the right to delete data from the Gracenote
Servers or to change data categories for any cause that Gracenote deems sufficient. No warranty is
made that the Gracenote Software or Gracenote Servers are error-free or that functioning of Gracenote
Software or Gracenote Servers will be uninterrupted. Gracenote is not obligated to provide you with new
enhanced or additional data types or categories that Gracenote may provide in the future and is free to
discontinue its services at any time.
GRACENOTE DISCLAIMS ALL WARRANTIES EXPRESS OR IMPLIED, INCLUDING, BUT NOT
LIMITED TO, IMPLIED WARRANTIES OF MERCHANTABILITY, FITNESS FOR A PARTICULAR
PURPOSE, TITLE, AND NON-INFRINGEMENT. GRACENOTE DOES NOT WARRANT THE RESULTS THAT WILL BE OBTAINED BY YOUR USE OF THE GRACENOTE SOFTWARE OR ANY
GRACENOTE SERVER. IN NO CASE WILL GRACENOTE BE LIABLE FOR ANY CONSEQUENTIAL
OR INCIDENTAL DAMAGES OR FOR ANY LOST PROFITS OR LOST REVENUES.
© Gracenote, Inc. 2009
70 71
Page 37

Z-E 2 0 15
SIVR VOICE COMMANDS – LANGUAGE MATRIX SIVR VOICE COMMANDS – LANGUAGE MATRIX
English (en-GB) Français (fr-FR)
Command functions controlled by
<_CALL_CONTACT_LOCATION_> call <contact name> [<location type>] (appelle | appeler) <nom du contact> [<type de numéro>]
<_CALL_NAME_> call appeler
<_DIAL_NUMBER_> dial [number] composer [[un] numéro]
<_DIAL_DIGITS_> dial <sequence of digits> composer [le] <séquence de chiffres>
<_CANCEL_> cancel | abort annuler
<_HELP_> help | what can i say? aide | que [puis-je] dire ?
<_RESTART_> restart redémarrer
<_CONTACT_> <contact name> <nom du contact>
<_CONFIRM_> yes | confi rm oui | confi rmer
<_CONFIRM_NUMBER_> dial | call composer | appeler
<_CORRECT_NUMBER_> correction corriger
<_HOME_> [at] home [à la] maison | [au] domicile
<_WORK_> [at [the]] offi ce | [at] work [au] travail | [au] bureau
<_MOBILE_> [on] (mobile | cellular | cell) [phone] [sur le | sur son] [téléphone] (portable | mobile | cellulaire)
<_OTHER_> other autre
<_DEFAULT_> preferred | default | general préféré | par défaut | général
+ (plus) plus plus
# (hash) hash | pound dièze
* (star) star étoile
Command functions controlled by
<_CALL_CONTACT_LOCATION_>
<_CALL_NAME_> llame | llamar bellen
<_DIAL_NUMBER_> marcar [[un] número] [nummer] intoetsen
<_DIAL_DIGITS_> marcar [el] <combinación de cifras> intoetsen <volgorde van de cijfers>
<_CANCEL_> cancelar annuleren
<_HELP_> ayuda | qué puedo decir help | wat moet ik zeggen?
<_RESTART_> reiniciar terug
<_CONTACT_> <nombre de contacto> <contactpersoon>
<_CONFIRM_> sí | confi rmar ja | bevestigen
<_CONFIRM_NUMBER_> marcar | llamar intoesten | bellen
<_CORRECT_NUMBER_> cancelar corrigeren
<_HOME_> [a la] casa [aan] huis | thuis
<_WORK_> [a la] ofi cina | [al] trabajo [op het] werk | [op] kantoor
<_MOBILE_> [teléfono] (celular | móvil)
<_OTHER_> otro overige
<_DEFAULT_> preferido | defecto | general | por omisión algemeen | voorkeur
+ (plus) más plus
# (hash) almohadilla | cardinal hekje
* (star) asterisco sterretje
voice
voice
(llame | llamar) <nombre de contacto> [<tipo de número>]
Valid voice commands Commandes vocale valides
Español (es-ES) Nederlands (nl-NL)
Comandos válidos de voz Geldig spraakcommando's
bellen <volgorde van de cijfers> [<soort nummer>]
[op de] (mobiele telefoon | mobiel | GSM) | [op het] mobieltje
Deutsch (de-DE) Italiano (it-IT)
Gültige Sprachkommandos Comandi vocali validi
<Kontakt Name> [<Typ Rufnummer>] Anrufen chiama <nome del contatto> [<tipo di numero>]
Anrufen chiama
[Nummer] Wählen componi [[un] numero]
Wähle <Abfolge von Einzelnummern> componi [il] <sequenza di cifre>
Abbrechen annulla
Hilfe | Was kann ich sagen? aiuto | che (posso | devo) dire?
Neustart ricomincia
<Kontakt Name> <nome del contatto>
Ja | Bestätigen si | confermare
Wählen | Anrufen componi | chiama
Korrigieren correggi
[zu] Hause | Privat [a] casa
Geschäftlich | [in seinem | in ihrem | im] Büro | [auf der | bei der] Arbeit [al] lavoro | [all'] uffi cio
[auf] [seinem | ihrem | dem] Handy [sul] ([telefono] (cellulare | portatile | mobile) | telefonino)
sonstige | andere altro
bevorzugt | gewünscht | allgemein | Standard preferito | predefi nito | generale
plus più
raute cancelletto
stern asterisco
Türk (tr-TR) Pусский (ru-RU)
Geçerli ses komutlari действительный голосовых команд
<İletişim adı> [<alan>] aramak вызов <имя контакта> [<тип расположения>]
aramak вызов
[numara] çevirmek набрать [номер]
<Tek tek numara sırala> çevirin набрать <последовательность цифр>
iptal etmek отмена
yardım | ne diyeyebilirim? помощь | что сказать?
Yeniden başlat перезагрузка
<İletişim adı> <имя контакта>
evet | onaylamak да | подтвердить
numara çevirmek | aramak набрать | вызов
düzeltmek исправить
ev [de] дома | дом
ofi s [imde | te] | iş [im | te] офис | в офисе | [на] работе
cep [telefon] [dan] [на] (сотовый | сотовый | мобильный) [телефон]
Diğer прочие
Standart любимые | по умолчанию
artı плюс
kare решетка | решетка
yıldız звездочка
呼叫 <聯繫人姓名> [<位置類型>]
呼叫
拨打[数字]
撥打<數字號碼>
取消|终止
帮助|我们讲哪些词?
终止
<聯繫人姓名>
拨打|呼叫
拨打|呼叫
改正
[他]家
([他]办公室|工作)[电话]
([他]移动|蜂窝)[电话]
其它[号码]
默认[号码]
加号
井号
星号
中國普通話 (zh-CN)
有效的語音命令
72 73
Page 38

EC DECLARATION OF CONFORMITY
ZENEC by
ACR Braendli + Voegeli AG
Bohrturmweg 1
5330 Bad Zurzach
Hereby declares under our sole responsibilily that the products:
Description of object:
Name of object:
Type name of objects:
are conform to the essential requirements of the:
European Vehicle EMC Directive 72/245/EEC, including all modifications up to 2009/19/EC dated 12.03.2009 including proof
for complience with following standards: CISPR25 (2
Radio and Telecommunications Terminal equipment Directive, R&TTE 1999/5/EC
The following harmonized European Standards have been applied:
ECE R10-04 Type approval of an electrical / electronic sub-assembly under Regulation Nr. 10
EN 55022:2006 Class B Information Technology equipment - Emission Limits and Methods
EN 55024:1998 + A1:2001 + A2:2003 Information Technology equipment Immunity Limits and Methods
EN 61000-3-2:2006 Class D Electromagnetic compatibility (EMC). Limits. Limits for harmonic current emis sions
EN 61000-3-3:1995 + A1:2001 + A2:2005 Electromagnetic compatibility (EMC) - Part 3: Limits - Section 3: Limitation of voltage
EN 301 489 EMC and Radio Spectrum Matters (ERM)
ISO 7637-2:2004 Road vehicles - Electrical disturbances from conduction and coupling - Part 2: Electrical
EN 60950-1:2006 Information technology equipment – Safety – Part 1: General requirements
2002/96/EC Restriction of the use of certain hazardous substances in electrical and electronic
2002/95/EC (2008/385/EC) RoHS Directive and the German ElektroG.
2011/6 5/EC RoHS2 Directive, revised and extended by Annex II.
Part 1 V1.5.1 Common Technical Requirements
Part 17 V1.2.1 Specific Conditions for 2,4 GHz Wideband Transmission Systems and 5GHz
In-Car Navigation Device
ZENEC E>GO
Z-E2015
nd
edition 2002)
ISO 11452-2 (2
(equipment input current ≤ 16 A per phase)
fluctuations and flicker in low-voltage supply systems for equipment with rated current
<= 16 A
high Performance RLAN equipment
transient conduction along supply lines only
(IEC 60950-1:2005, modified)
equipment (RoHS), Product is in accordance with the European WEEE Directive,
nd
edition 2004)
Switzerland
Z-E 2 0 15
NOTESEC DECLARATION OF CONFORMITY
Declared by:
Andre Grossenbacher, Chief Technology Officer
Bad Zurzach
(Place) (Date) (Signature)
Roland Braendli, Managing Director
Bad Zurzach
(Place) (Date) (Signature)
EU Legal Representative:
ACR S & V GmbH, Industriestrasse 35, D-79787 Lauchringen, Germany
Page 1 of 1 03.08.2013 RevA
74 75
Page 39

ZENEC by ACR AG · Bohrturmweg 1 · Bad Zurzach · Switzerland
www.zenec.com
Rev. A
 Loading...