

Page 1
INSTRUCTION MANUAL
MOBILE ENTERTAINMENT STATION
1-DIN DVD-MONICEIVER WITH MOTORIZED 7’’ LCD DISPLAY
Page 2

Contents
Preparation 4-5
Features 4
WARNINGS 4
Disconnecting the Battery 4
Controls and Indicators 6-7
Button Operation 6-7
LCD Display / Indicators 8
The Key Areas Of the Touch Screen 8
Remote Control 9
Remote Control 9
TFT Monitor Operation 10-11
Open/Close the TFT Monitor 10
TFT Monitor Auto Open 10
Monitor Tilt Angle Adjustment 10
Image Setting 10
Parking Brake Interlock 11
Monitor Movement Mechanism 11
Basic Operations 12-13
Power On / Off 12
Playing Source Selection 12
Volume Adjustment 12
Audio Control Menu 12
Four-Channel Audio Control 12
System Reset 13
Mute 13
System Setup Menu 14-20
MAIN Menu 14
General Setup Menu 15
Screen Setting 16-17
Language Setting 18
Video Setting 19
Rating Setting 20
Tuner Operation 21-23
Tuner Operation Display 21
Switch to Radio Tuner source 22
Select FM/AM Band 22
Auto Tuning 22
Manual Tuning 22
Using Preset Stations 22
Auto Store (AS) 23
Program Scan (PS) 23
Seek the PTY 23
AF Function 23
TA Function 23
Local Radio Stations Seeking (LOC) 23
2
Page 3
DVD Player Operation 24-28
Opening/Closing the TFT Video Screen 24
Insert/Eject Disc 24
Reset the Loading Mechanism 24
Accessing DVD Mode 24
Using the Touch-Screen Controls 25
Controlling Playback 26
Accessing the DVD Menu 26
Moving Through Chapters 26
GOTO Search 26
Direct Chapter / Track Selection 27
Viewing an Alternate Picture Angle (DVD Only) 27
Multi-Language Discs (DVD Only) 27
Playback Information 27
General Disc Information 28
CD/MP3/WMA/JPEG Operation 29
CD Player Interface 29
Troubleshooting 30-31
Remote Control 32-33
Specifications 34
NOTE: 1. Certain description in the book may differ from the actual unit.
2. Some pictures or icons in the book may differ from actual display.
3. Specifications subject to change without notice.
3
Page 4

Preparation
Features
INTEGRATED DVD/CD/MP3/WMA-PLAYER
• Playback of CD, CD-R/RW, MP3, WMA, DVD,
DVD-R/RW, DVD+R/RW and DVD-MP3
• Region code 2
• Integrated Dolby Digital decoder
• Electronic (ESP) and mechanical anti-shock system
MOTORIZED LCD MONITOR
• Fully motorized high-quality 7"/16:9 LCD display with touchscreen-control
TUNER
• FM/AM-tuner
• 30 preset stations (18 FM/12 AM)
• Radio data system (RDS)
A/V-CONNECTIONS
• 2 x RCA composite video outputs
• Analog 4.1 RCA preamp line outputs (front, rear and
subwoofer)
• 1 x RCA Aux-In (stereo)
ADDITIONAL FEATURES
• Integrated 4 x 40 watts digital amplifier
• Blue and white backlit key illumination and high contrast blue dot-matrix status display
• ISO connectors for power supply and speakers
• IR-remote control
WARNINGS
1. Only connect the unit to a 12-volt negative ground system.
2. Never install this unit where operation and viewing could interfere with safe driving conditions.
3. To reduce the risk of a traffic accident (except when using for rear view video camera), never use
the video display function while driving the vehicle. This is a violation of law.
4. To reduce the risk of a traffic accident, never drive with the sound at a level, that prevents you
from hearing sounds outside around the vehicle.
5. Never disassemble or adjust the unit without the assistance of a professional installer.
For details, please consult your local car stereo specialty shop.
6. To prevent injury from shock or fire, never expose this unit to moisture or water.
7. Never use irregular discs.
8. To prevent damage to the mechanism inside this unit, avoid impact to the TFT monitor.
9. Do not change the fuse on the power wire without professional guidance. Using an improper
fuse may cause damage to the unit and result in a fire.
10. The monitor employs an automatic motorized mechanism. To prevent damage to the core
mechanism, please do not push, pull or swivel the monitor manually.
4
Page 5

Disconnecting the Battery
To prevent a short circuit, be sure to turn off the ignition and remove the negative (-) battery cable
prior to installation.
NOTE: If the unit is to be installed in a car equipped with an on-board drive or navigation computer,
do not disconnect the battery cable. If the battery cable is disconnected, the preset memory may be
erased. Under these conditions, use extra caution during installation to avoid causing a short circuit.
NOTE: It is especially important that you read the WARNINGS and NOTES in this manual.
5
Page 6
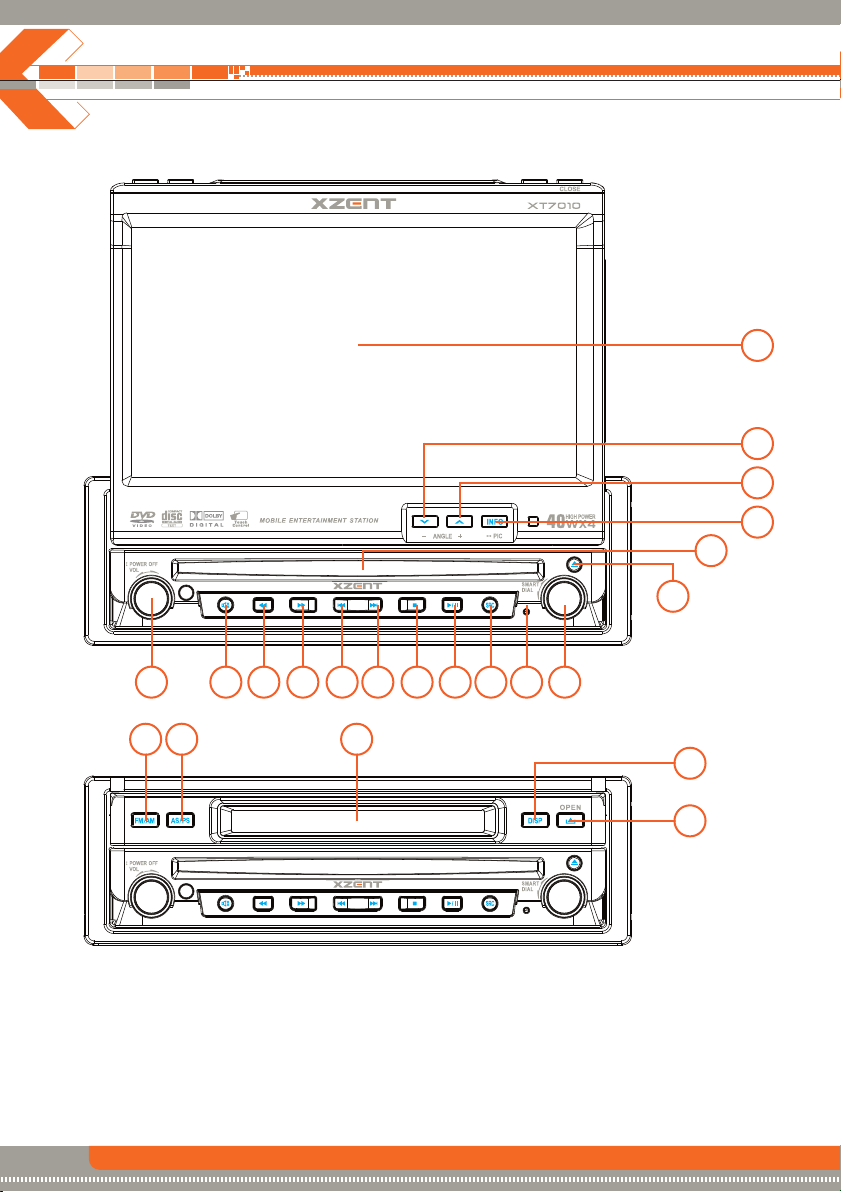
Controls and Indicators
Button Operation
17
16
15
14
13
12
1
22 21 20
1 POWER OFF/ VOL
Rotary encoder.
Press the encoder to turn on the unit, press and hold it to turn off.
Rotate clockwise/counterclockwise to adjust the volume.
Press to enter the audio adjust menu when the unit is on.
2 MUTE
Press the button to mute the volume, and press the button again to restore the volume.
2 3 4 5 6 7 8 9
6
10 11
19
18
Page 7

3 FAST REVERSE
4 FAST FORWARD
5 PREVIOUS
6 NEXT
7STOP
8 PLAY/PAUSE
9 SRC
Press the button to select a playing source.
10 RESET
Press the button to restart the unit.
11 SMART DIAL
Rotary encoder.
Press the encoder to access the MAIN menu.
Rotate clockwise/counterclockwise to select a desired item and press to access or confirm.
12 EJECT
Press the button once to eject the disc.
Hold to reset the loading mechanism.
13 DISK SLOT
14 INFO
Press the button to display playback information on the screen on DVD mode, if the TFT monitor
is closed DVD playback information will display on the LCD screen.
Press and hold to access the picture setup.
15 ANGLE+
Press the button to adjust the upward tilt angle of the screen one step at a time.
Press and hold to continuously adjust the upward tilt.
Press to adjust the picture settings in picture setup mode.
16 ANGLE-
Press to adjust the downward tilt angle of the screen one step at a time.
Press and hold to continuously adjust the downward tilt.
Press to adjust the picture settings in picture setup.
17 TFT DISPLAY
18 OPEN
Press the button to activate the motorized system and move the TFT monitor into the
viewing position.
Press again to close the TFT.
19 DISP
Press the button to display system information on the front LCD screen when the main screen
is closed.
20 LCD DISPLAY
21 AS/PS (Auto store/program scan)
Press the button to auto store strong radio stations in the 6 preset channels in the
current band.
Press and hold to start to scan the preset radio station.
22 FM/AM
Press the button to change among the following bands: FM1, FM2, FM3, AM1 and AM2.
Press to change tuner mode while in other source.
7
Page 8
Controls and Indicators
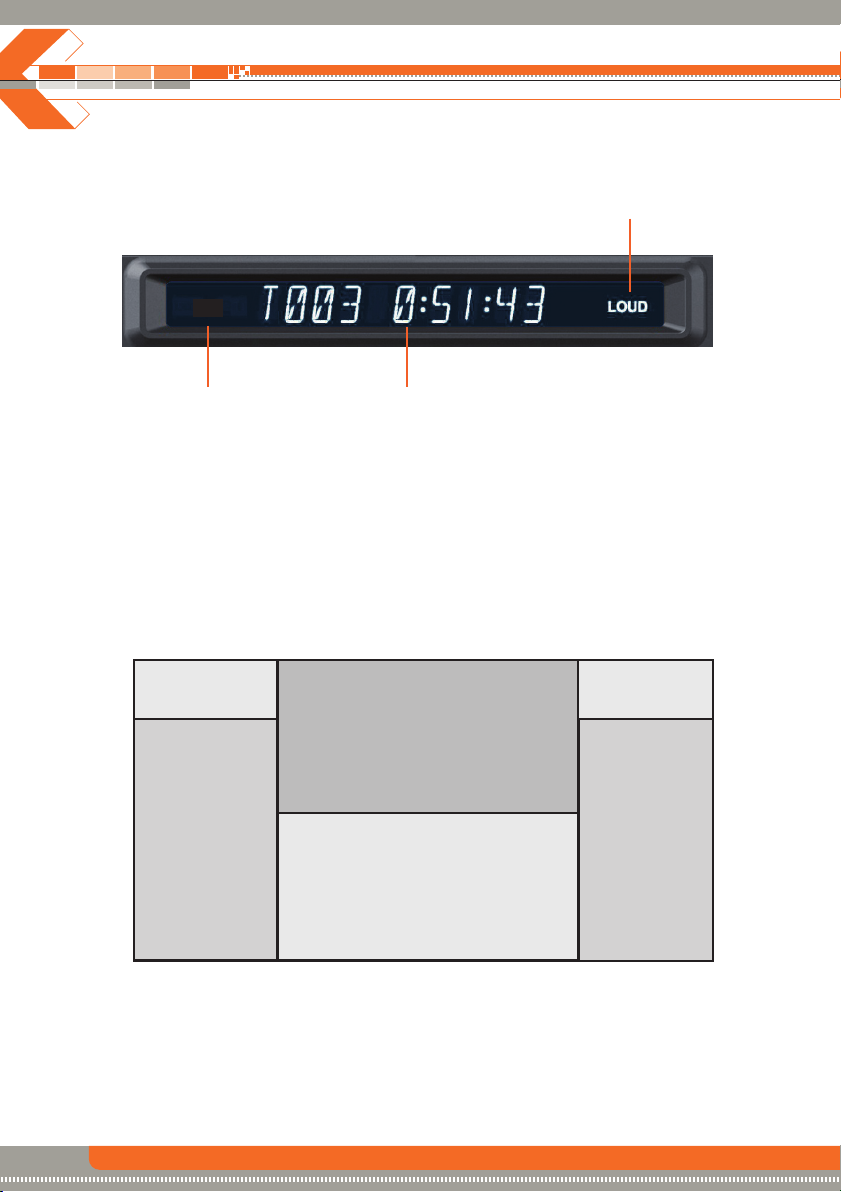
LCD Display / Indicators
2
ST
13
1. Main display area, displays the time, tuning frequency and other text information.
2. Loudness indicator. Indicates the LOUD function is activated or not.
3. Stereo broadcasting indicator. Indicates the radio is in stereo mode or not.
The key areas of touch screen
Area A
Area B
Area C
Area E
A — Return to MAIN MENU.
B — Display playing information.
C — Select previous chapter.
D — Select next chapter.
E — Display the on-screen controls. Different mode displays different menu.
F — In DVD mode, display the GOTO search menu on the screen directly.
8
Area F
Area D
Page 9
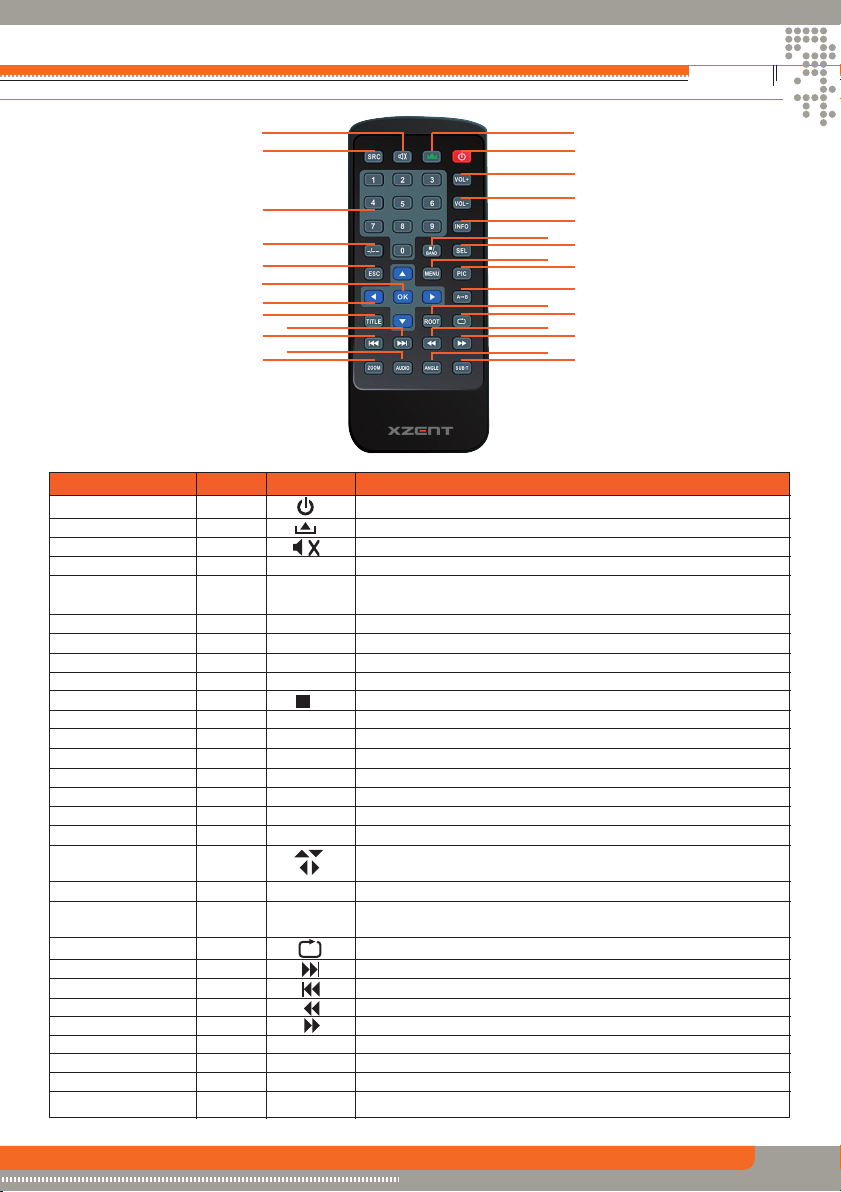
REmote Control
10
13
19
2321
27
2
1
6
7
8
11
14
15
20
24
28
3
4
5
9
12
16
17
18
22
25
26
Name Ref # Signal Function
Power 1 Turn the power on/off.
Open 2 Open/close the TFT monitor.
Mute 3 Toggle on/off audio output.
SRC 4 SRC Select playing mode.
Numeric button 5 1.2.3.4.5. Directly access certain chapter / track / preset station in
VOL up 6 VOL+ Increase the volume.
VOL down 7 VOL- Decrease the volume.
Information 8 INFO Display playing information.
GOTO search 9 -/-- Position search function on VCD/DVD mode.
Stop/Band 10 / Select FM/AM band on Tuner mode.
Select 11 SEL Enter the audio settings.
ESC 12 ESC Exit the current menu.
Menu 13 MENU Enter the main menu of system.
Picture 14 PIC Adjust the parameter of TFT settings.
Repeat A>B 15 A B Set start point A and end point B to repeat continually.
OK 16 OK Start or pause playback and confirm settings.
Direction buttons 17 Up/down/left/right to select items for setting.
6.7.8.9.0 current band.
BAND Stop playback in other mode.
©
Title 18 TITLE Enter the title menu of current source.
Root 19 ROOT Enter the main menu of the disc.
Repeat 20 Repeat playback for current chapter.
Next 21 Select the next chapter/track for playback.
Previous 22 Select the previous chapter/track for playback.
Fast Reverse 23 Fast reverse the disc content.
Fast Forward 24 Fast forward the disc content.
Audio 25 AUDIO Change the audio language for disc playback.
Zoom 26 ZOOM Zooming in/out on an image.
Angle 27 ANGLE Playback in different angel for a scene(if it is applicable).
SUB Title 28 SUB-T Language selection for subtitle.
Turn on PBC while playing VCD.
9
Page 10
TFT Monitor Operation
Open/Close TFT Monitor
Press the ( ) button on the remote control or press the (OPEN) button on the front panel to
open/close the monitor.
TFT Monitor Auto Open
• If “TFT Auto Open” is “On”, when the unit is turned on, the monitor automatically opens to the
last viewing position.
• If “TFT Auto Open” is ”Off” , when the unit is turned on, press the ( ) button on the remote
control or press the (OPEN) button on the front panel to open the monitor into the desired
viewing position.
• If “TFT Auto Open” is ”Manual” when the unit is turned on or turned off, the monitor will not open.
See “General setting” for more instructions.
Monitor Tilt Angle Adjustment
The monitor angle can be adjusted for optimum viewing using one of the following methods:
Press the ( ) or ( ) buttons on the front panel to adjust the tilt angle of the screen one step
at a time.
Press and hold the ( ) or ( ) buttons on the front panel to continuously adjust the tilt angle.
Adjust the “Screen Tilt” in the “Screen setting” to adjust the tilt of the screen to the desired degree.
Image Setting
Video output format
The table below shows the video output format for each source.
Playing Source Video Output Format
FM/AM Tuner RGB Mode
DVD RGB Mode
Adjustable parameters
While in RGB mode, the only parameter that can be adjusted is brightness (BRIGHT).
Parameter adjustment procedure
1. Enter picture quality setting mode:
Press the PIC button on the remote control or press and hold the INFO button on the front panel
of the unit.
2. Select items to set:
Press the ( / ) buttons on the remote control or rotate the SMART DIAL button clockwise/
anticlockwise to select an item.
3. Set parameters:
Rotate the“ VOL” on the front panel to adjust the selected feature.
4. Exit picture quality setting mode:
Press the PIC button on the remote control or press and hold the INFO button on the unit.
NOTE: A video source must be connected to the AUX input and be playing to access the above
adjustments.
10
Page 11

Parking Brake Interlock
1. When the “PARKING” lead is connected to the brake switch, the display on the TFT monitor will
display video only, when the vehicle is stopped and the parking brake is applied.
2. When the “parking brake inhibit” is active, the front monitor displays a caution message with
blue background, preventing the driver from watching video while driving to reduce the risk of a
traffic accident.
Monitor Movement Mechanism
If an obstruction occurs in the monitor path, the motion will stop automatically to prevent damage
to the mechanism or monitor.
Normal operation is resumed by pressing the (OPEN) button or disconnecting and reconnecting
the power.
11
Page 12
Basic Operations
Power On / Off
Press the POWER OFF /VOL button to turn the unit on. The buttons on the front panel of the unit
are illuminated and start up message is briefly displayed on the LCD screen, and then displays the current
mode status. You can also turn on the unit by pressing the POWER button ( ) on the remote control.
Press and hold the POWER OFF /VOL button on the front panel for more than 1 second or
press the POWER button ( ) on the remote control to power off the unit. The monitor is drawn
back into the main compartment and the LCD screen displays “BYE BYE”.
Playing Source Selection
Press the MODE button on the front panel or the (SRC) button on the remote control to change
among available playing sources: TUNER, DVD, AUX IN. The playing mode is displayed on the TFT
display.
Volume Adjustment
To increase or decrease the volume level, turn the POWER OFF /VOL on the front panel or press
the (VOL+/ VOL-) buttons on the remote control. The volume ranges from “0” to “40”. The default
volume is “10” when the unit is powered on each time. Default volume memory setup: Rotate
Power Off/VOL knob on the front panel to select volume value and then press and hold the Power
Off/VOL button until you hear a single beep. When you hear the beep, setup is completed.
Audio Control Menu
The audio control feature allows you to easily adjust your audio system to meet the acoustical
characteristics of your vehicle, which vary depending on the type of vehicle and its measurements. To get the best possible sound quality from your new system, be sure to adjust the settings
for the speakers as well. Proper setting of the fader and balance boosts the effects of the cabin
equalizer.
Audio adjustments
Audio Function Adjustable Range
EQ Folk
Jazz
Pop
Classical
Rock
News
Urban
Rave
Movie
Techno
User
BASS -7 to +7
TREBLE -7 to +7
BAL -9 to +9
FADE -9 to +9
SW -7 to +7
LOUD off, on
12
Page 13
NOTE: The bass and treble levels are only adjustable when EQ is on “User” mode.
The loudness function compensates for deficiencies in sound ranges at low levels. Loudness levels
range from 1-4 or “off”. When the loudness function is on, LOUD is displayed on the screen.
Exiting the audio control menu
Touch the return arrow on the top right of the display.
Press the (ESC) button on the remote control to exit the audio control menu.
System Reset
To correct a system halt or other unusual operation, use the tip of a pen to press the RESET button
located on the front bottom-right corner of the unit. After a system reset, the unit restores the
settings before last power off.
Mute
Press the MUTE button on the front panel or the MUTE button ( ) on the remote control to
mute the playback volume.
NOTE: Press the MUTE button again to restore the volume.
Adjusting the volume or using any of the audio set-up features will cancel the mute function.
13
Page 14
System Setup Menu
4
5
2
31
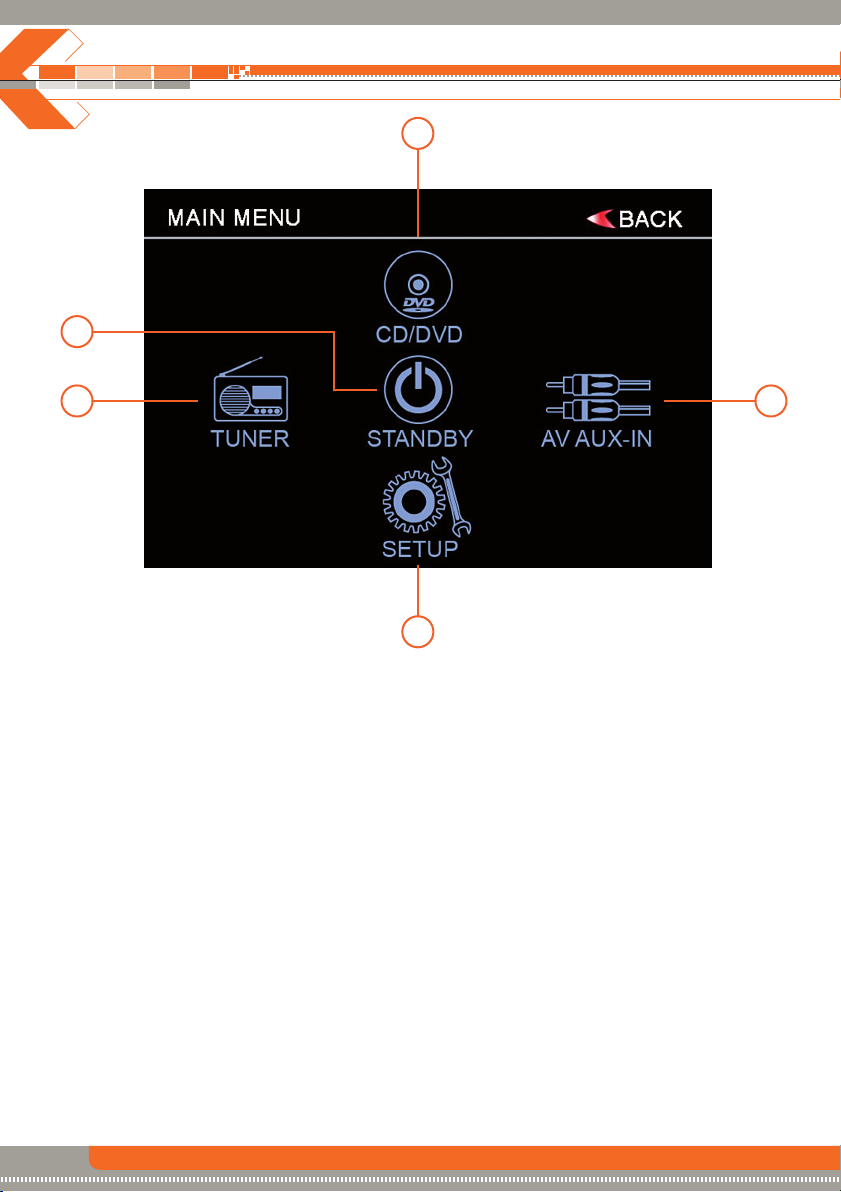
MAIN Menu
There are three methods to access the MAIN menu.
• Press the MENU button on the remote control.
• Touch the A area on the touch-screen.
• Press the SMART DIAL button on the front panel.
1. Touch to access Radio mode.
2. Touch to access SETUP mode.
3. Touch to access AUX IN mode.
4. Touch to access DVD mode.
5. Touch to turn off the TFT display.
Note: Touch screen operations and buttons on front panel are all useable to select menu and
adjust “SETTING”. The following instructions will show the different ways to access the menus
and adjustments.
14
Page 15
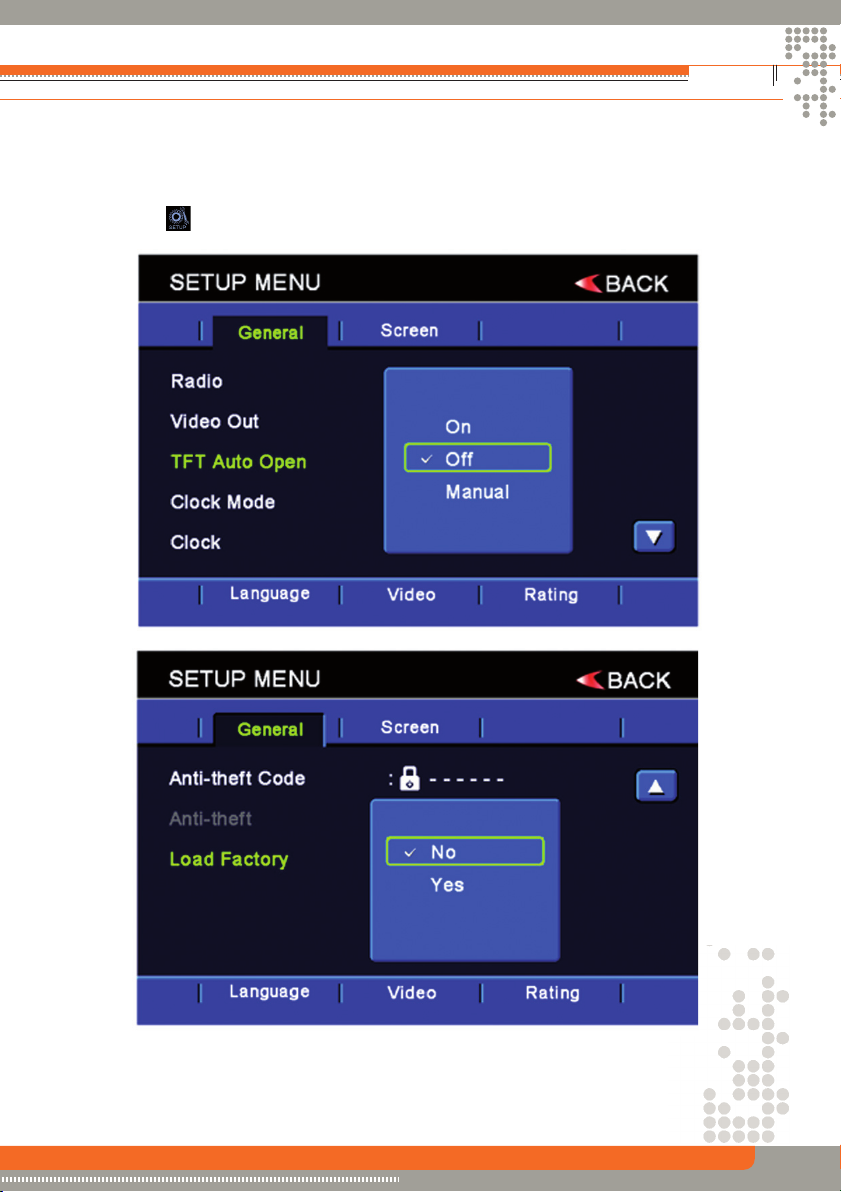
General setup Menu
Accessing the general setup menu
• Press the (MENU) button on the remote control to access the MAIN menu.
• Select the icon on the bottom of the screen and select the general menu to access the
general setup.
Selecting a feature for adjustment
Press the direction buttons on the remote control or touch the option directly on the screen to
select the feature to be adjusted.
15
Page 16

System Setup Menu
Screen Setting
Accessing the screen setup menu
• Press the (MENU) button on the remote control to access the MAIN menu.
• Select the icon on the bottom of the screen and select the screen menu to access the
screen setup.
Adjusting a feature
Setting Options Function
Screen Tilt 1 to 5
Screen Saver On
Off
TS Calibrate No
Ye s
Version Displays the software version of the unit.
Press the ( / ) buttons on the remote control touch the (1 to 5) number on
the screen directly to adjust the tilt of the screen to the desired degree.
Touch to activate/deactivate the screen saver.
Touch “Yes” to enter the touch screen calibrate mode.
16
Page 17
Adjusting a feature
1. Enter the option field for the feature you want to adjust by pressing the (OK) button on the
remote control. A submenu appears in a second row with the selected option.
2. Select a new value by pressing the direction button.
3. Confirm your selection by pressing the (OK) button. The new value setup is complete.
Adjusting the clock
1. Access the “Clock” setting under the general setup menu.
2. Press the direction button on the remote control to move the cursor to the “Hour” or “Min” position,
and press the (OK) button. You also can touch the “Hour” or “Min” position directly.
3. The numeric keypad will pop up.
4. Press the numeric button on the remote control or touch the numeric keypad on the screen to
adjust the hour or minutes.
5. Press the (OK) button on the remote control or on the keypad of the screen to confirm the setup.
Return to normal playback
The system will automatically return the previous playback mode you were in before accessing
the setup menu after setting with no operation.
Setting Options Function
Radio
Video out
TFT Auto Open
Clock Mode
Clock 00:27 Present time.
Load Factory No/Yes Load all factory parameters to their original setting.
USA
S-Amer1
S-Amer2
Europe
Disable
Enable
On The TFT panel automatically opens when the unit is turned on.
Off
Manual
12Hr Clock displays 12 hour time using AM and PM.
24Hr Clock displays 24 hour time up to 23:59.
Select the appropriate setting based on the country in which
you reside.
Select whether to activate video out.
You must press the button on the TFT panel or the button
on the remote control to open the TFT .
The monitor does not open or close when the unit is turned on
or turned off.
17
Page 18
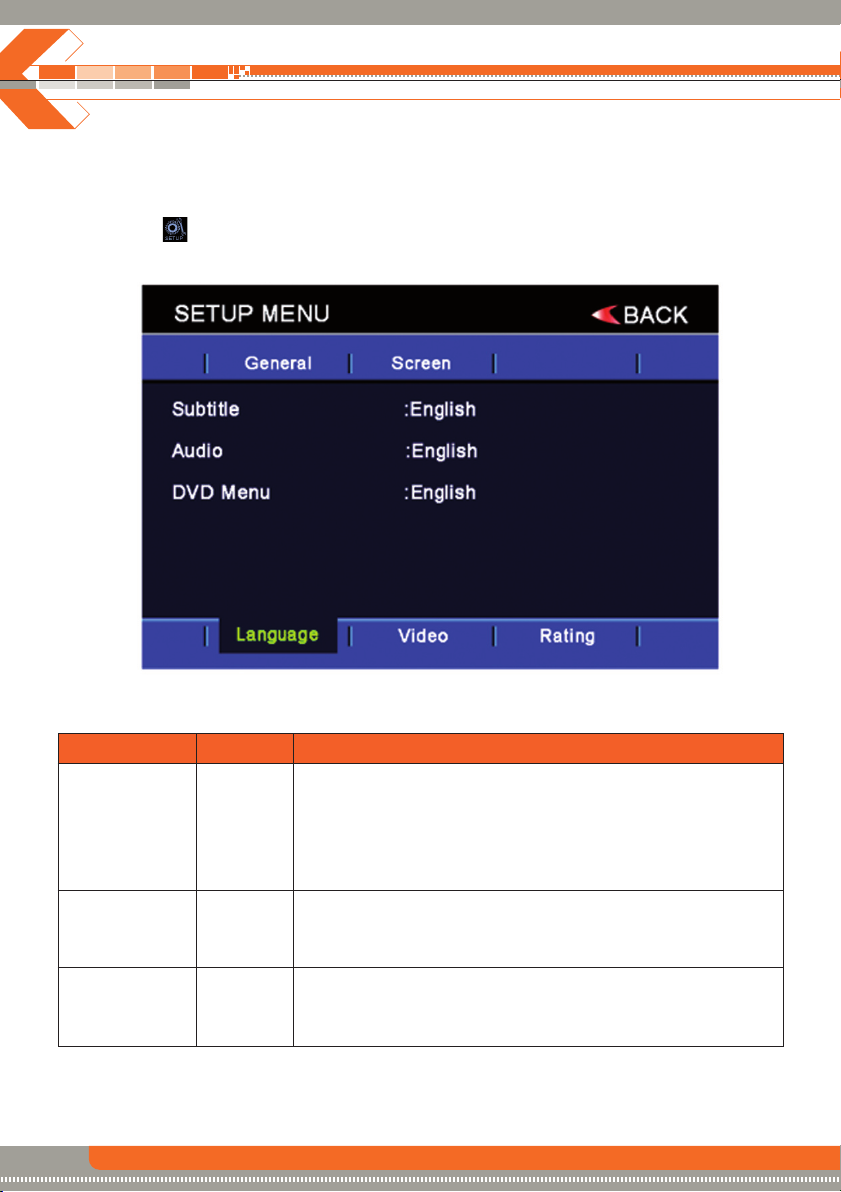
System Setup Menu
Language Setting
Accessing the language setup menu
• Press the (MENU) button on the remote control to access the MAIN menu.
• Select the icon on the bottom of the screen and select the language menu to access the
language setup.
Adjusting a feature
Setting Options Function
Subtitle English Select desired disc subtitle language.
Audio English Select desired disc audio language.
DVD Menu English Select desired disc menu language.
French
Spanish
German
Auto
off
French
Spanish
German
French
Spanish
German
18
Page 19
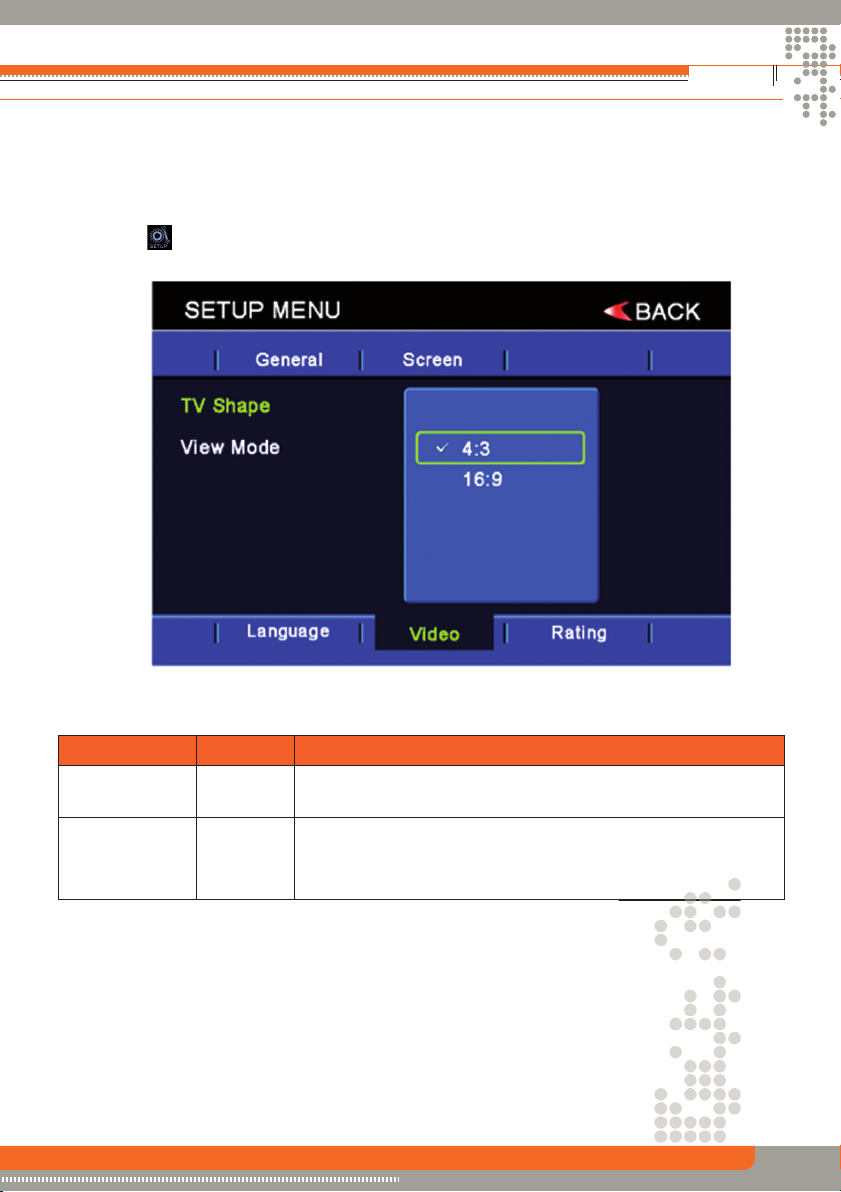
Video Setting
Accessing the video setup menu
• Press the (MENU) button on the remote control to access the MAIN menu.
• Select the icon on the bottom of the screen and select the video menu to access the video setup.
Adjusting a feature
Setting Options Function
TV Shape
View Mode
4:3 No function.
16:9
Fill
Original
Auto Fit
Pan Scan
Select desired view mode.
19
Page 20

System Setup Menu
Rating Setting
Accessing the rating setup menu
• Press the (MENU) button on the remote control to access the MAIN menu.
• Select the icon on the bottom of the screen and select the rating menu to access the rating setup.
Adjusting a feature
Setting Options Function
Set Password
Rating
1. Kid Safe
2. G
3. PG
4. PG-13
5. PG-R
6. R
7. NC-17
8. Adult
Touch to display the numeric keypad on the screen and then
you can use the numeric keypad to set the password.
20
Page 21
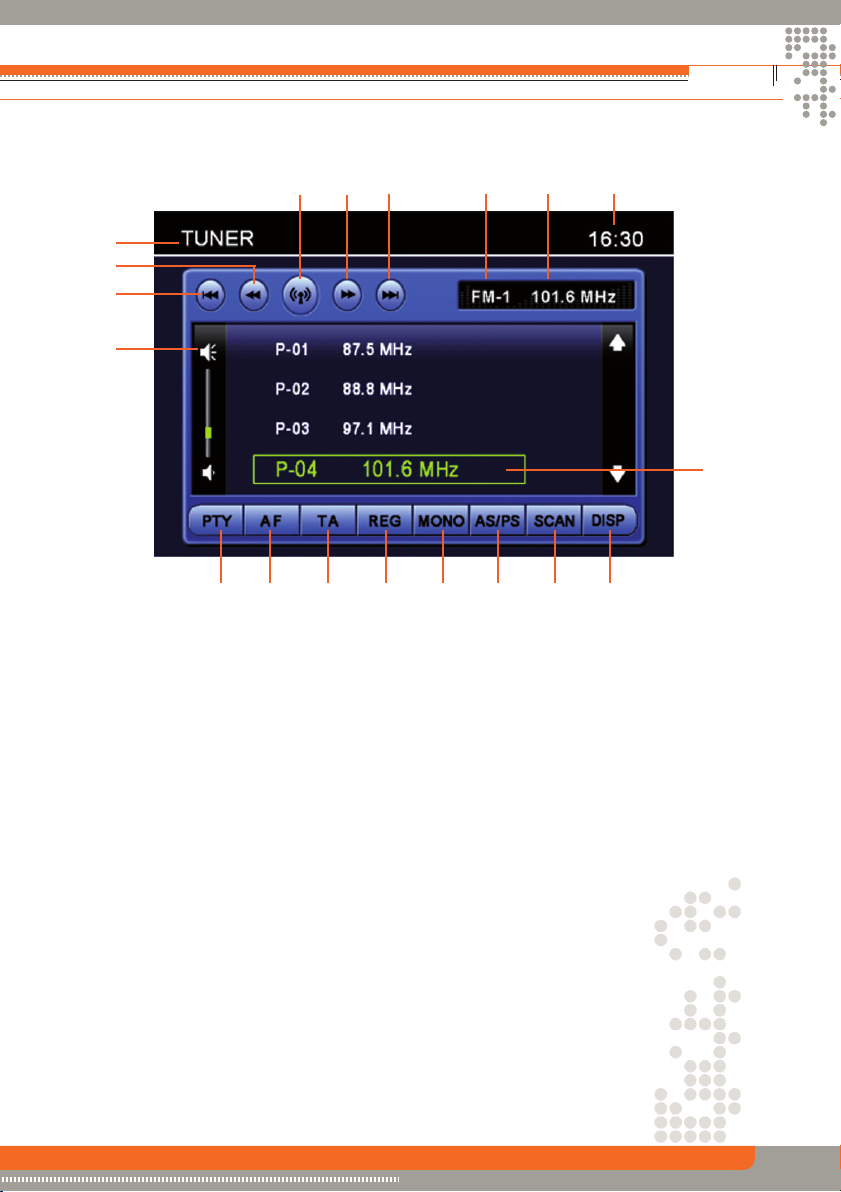
TUNER Operation
Tuner Operation Display
567 8 9 10
4
3
2
1
19 18 17 16 15 14 13 12
11
1. Volume indicator.
2. Touch to seek down.
3. Touch to tune down one step.
4. Current source information, touch this area to return to MAIN menu.
5. Touch to change among the following bands: FM-1, FM-2, FM-3, AM1 and AM2.
6. Touch to tune up one step.
7. Touch to seek up.
8. Current radio band indicator
9. Radio frequency indicator.
10. Current time indicator.
11. Preset radio stations: Touch to recall preset stations or touch and hold to store a station.
12. Press to select between standard display and preset view.
13. Touch to activate/deactivate scan mode.
14. Auto Store / Program Scan. You also can press the AS/PS button on the front panel.
15. Touch to activate/deactivate mono function.
16. Touch to activate/deactivate region function.
17. Touch to activate/deactivate TA (Traffic Announcement) function.
18. Touch to activate/deactivate AF (Alternative Frequency) function.
19. Touch to activate/deactivate PTY (Program Type) function.
NOTE: This product features a tuner with RDS function. RDS (Radio Data System) is a system,
that transmits broadcast station information together with FM programs.
You get display of program service name and PTY, tuning to stations broadcasting a desired PTY,
automatic tuning to traffic information, emergency broadcasts and radio text display.
RDS service is not available in AM broadcasting. RDS service availability depends on the FM
broadcasting provider.
21
Page 22
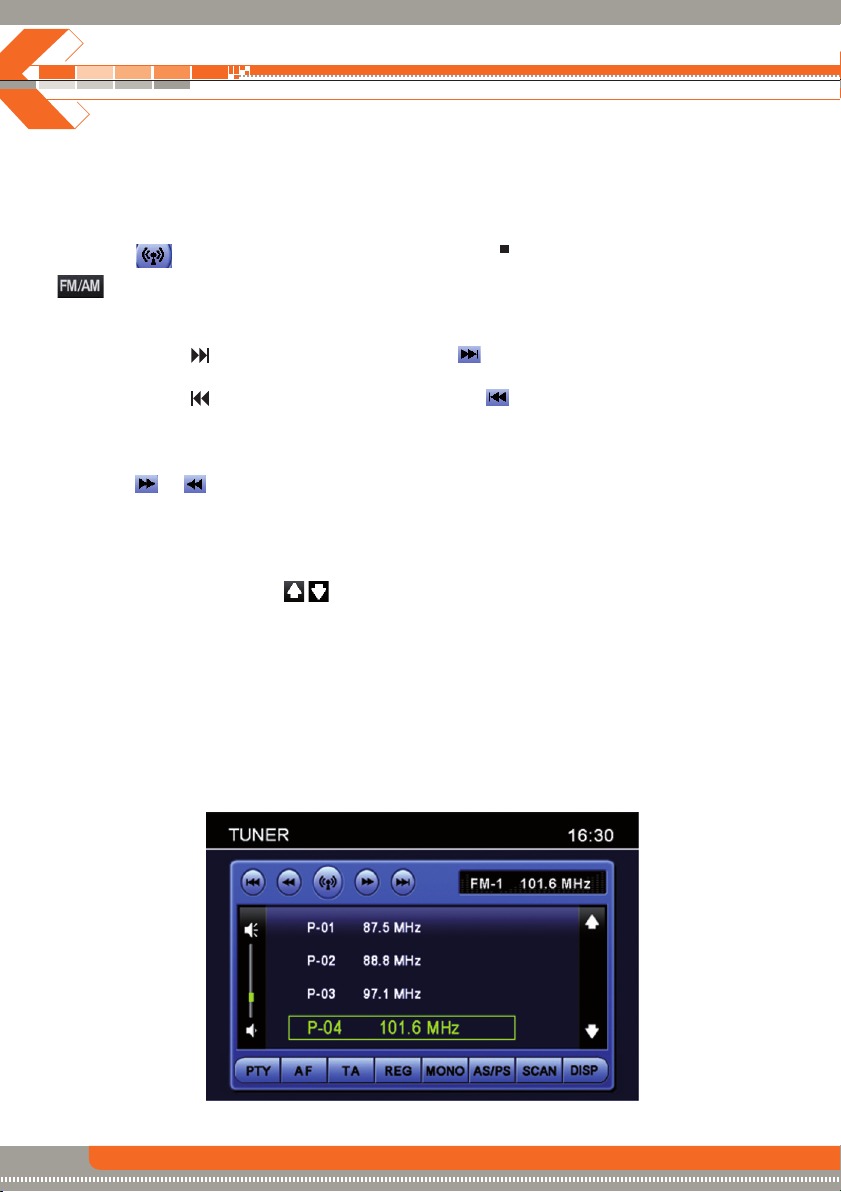
TUNER Operation
Switch to Radio Tuner source
Press the SRC button on the front panel or on the remote control to switch to the Tuner source.
You can also access the tuner mode from the MAIN menu directly.
Select FM/AM Band
/
Touch the icon on the screen, press the BAND button on the remote control or press the
on the front panel to change among the following bands: FM-1, FM -2, FM-3, AM1 and AM2.
BAND
Auto Tuning
Press the button ( ) on remote control or touch the icon on the screen to seek the next
available channel by increasing the tuning frequency. Press the button again to stop searching.
Press the button ( ) on the remote control or touch the icon on the screen to seek the next
available channel by decreasing the tuning frequency. Press the button again to stop searching.
Manual Tuning
Touch the or icon to increase or decrease the tuning frequency in one step.
Using Preset Stations
6 numbered preset buttons store and recall stations for each band. 6 stored stations (P01-P6) for
the current band appear on the screen, touch the channel directly to select.
You can touch the arrow icons on the screen to select other stations.
Storing a station
1. Select a band (if needed), then select a station.
2. Touch and hold an preset button (4) for three seconds. The preset number appears at the top of
the screen.
Recalling a station
1. Select a band (if needed).
2. Touch an on-screen preset button (4) to select the corresponding stored station.
22
Page 23

Auto Store (AS)
Press the AS/PS button on the panel or press the icon on the screen to automatic scan and
store strong radio stations in the 6 preset channels in the current band.
Program Scan (PS)
1. Press and hold the AS/PS button on the panel or press the icon on the screen. Scan the
stations in the 6 preset channels in the current band.
2. Touch the icon on the screen to automatically scan all stations in current band to preview
stations.
3. Press any button to stop scanning and listen to the selected station.
Seek the PTY (Program Type)
Touch the icon on the screen to enter PTY menu, then touch to select one in the PTY menu,
the unit will auto seek the next available PTY by increasing tuning frequency until the program
type matches the PTY, if no matched was found, the tuner will return to original radio and “None”
is displayed.
AF (Alternative Frequency/Auto Following)
Function
Touch the icon on the screen to activate/deactivate AF function. When AF is activated and a
radio signal is too weak, the tuner automatically switches to the best alternative frequency.
Note: During auto switching radio frequency, some interference could be heard. Turn off AF
function can cease this issue.
TA (Traffic Announcement) Function
Touch the icon on the screen to activate/deactivate the TA function. When TA is activated, the
unit will auto seek an available TP or TA station. After the seeking, no matter if PTY was found, the
tuner will auto seek each 1 minute.
When TA is activated and a traffic announcement is received, the current playing source is overridden
by the traffic announcement automatically, if the tuner was last set to the FM band but not if it was
last set to the AM band. When traffic announcement is over, the current playing source will be
resumed.
23
Page 24

DVD Player Operation
NOTE: When properly installed, DVD video cannot be displayed on the main TFT screen unless
the parking brake is applied. If you attempt to play a DVD while the vehicle is moving, the TFT
screen displays caution information with a blue background. Rear video screens, if applicable, will
operate normally.
Opening/Closing the TFT Video Screen
Opening the TFT screen
To open the TFT video screen, press the (OPEN) button on the unit or press the button on the
remote control.
Closing the TFT screen
Press the (OPEN) button on the unit or press the button on the remote control again to close
the TFT screen.
Insert/Eject Disc
Inserting a disc
When inserting a DVD disc, DVD mode is entered and playback begins.
NOTE: You cannot insert a disc, if there is already a disc in the unit or if the power is off.
NOTE: CD-R/RW, DVD-R/RW, DVD+R/RWs will not play, unless the recording session has been closed.
Ejecting a disc
Press the button on the unit to eject the disc. The unit automatically reverts to the Tuner mode
at the same time.
Reset the Loading Mechanism
If the disc loads abnormally or does not play properly, press and hold the button on the unit to
reset the loading mechanism. The disc is ejected and normal operation resumes.
Accessing DVD Mode
To switch to DVD mode when a disc is already inserted, press the button on the front panel or on
the remote control untill ”DVD” sign appears at the top of the screen.
24
Page 25

Using the Touch-Screen Controls
9 8
1 2
1. Touch to play/pause.
2. Touch to stop.
3. Touch to fast reverse.
4. Touch to fast forward.
5. Touch to repeat from A to B. Select the repeat point A wherever you want to start and the
point B wherever you want to end, then, DVD displays from A to B continually.
6. Touch to repeat playback.
7. Touch to choose a language, if the disc is recorded in multiple languages.
8. Touch to display sub-title.
9. Touch to return to DVD main menu.
3 4
25
5
6 7
Page 26

DVD Player Operation
Controlling Playback
Stopping playback
Touch the stop icon on the screen or press the button on the remote control to stop the
DVD play; touch the play/pause icon on the screen or the (OK) button on the remote control
to resume the disk play.
Pausing playback
Touch the play/pause icon on the screen to suspend or resume disc play.
Repeat playback
Press the Repeat button on the screen or on the remote control to alter repeat mode according
to the following:
• DVD: Repeat Title, Repeat Chapter, Repeat Off
• MP3: Repeat Single, Repeat Folder, Repeat Off
Sectional repeat function (A-B)
Use the A-B function to define a specific area of a disc to repeat.
• Press the icon on the screen or on the remote control to set the start point (A) of the
repeated section.
• Press the icon again once you reach the desired end point (B) of the repeated section.
The selected portion of the DVD will now repeat continuously.
• Press the icon again to cancel the A-B section setting and stop repeat play.
Accessing the DVD Menu
1. You can touch the area F, and then touch the icon to recall the main DVD menu.
2. Use the arrow buttons on the remote to select a title from the menu.
3. Press the (TITLE) button on the remote control to select a different title for playback.
4. Press the (OK) button on the remote control or touch the item directly to confirm your selection
and begin playback.
BAND
/
Moving Through Chapters
Press the ( ) button on the remote control to advance to the next chapter on the DVD.
Press the ( ) button on the remote control to move to the previous chapter on the DVD.
Touch the right side of the screen to advance to the next chapter, or touch the left side of the
screen to move to the previous chapter.
GOTO Search
During DVD playback, perform the following steps to use the GOTO feature to access a specific
location on a disc:
1. Press the ”-/--” button on remote control or touch the F Area on the screen to enter the
“GOTO” mode.
2. Press the ( / ) buttons on the remote control to select a category.
Search
Title --Chapter --Time -- : -- : --
DVD Search
Time – Go to specific time in current title.
Title/Chapter – Go to specific chapter in a title.
26
Page 27

3. Touch the ( -- : -- : -- )/ (---) area on the screen to display a numeric keypad on the touch screen.
4. Enter a time/track number into the field using the numeric keypad on the remote control or on
the screen.
5. Press the OK button on the remote control or on the touch screen to go to the specified
location on the disc.
6. Press the (-/--) button on the remote control or touch the F Area on the screen again to exit.
Direct Chapter / Track Selection
During DVD and CD playback, you can use the numeric keypad on the remote control to access a
track directly.
Viewing an Alternate Picture Angle (DVD Only)
Some DVDs contain scenes that have been shot simultaneously from different angles. For discs recorded with multiple angles, press the (ANGLE) button on the remote control to toggle available
angles of the on-screen image.
Multi-Language Discs (DVD Only)
Changing audio language
If you are watching a disc recorded in multiple languages, press the (AUDIO) button on the re-
mote control to choose a language. You also can touch area E and then touch the icon.
Changing subtitle language
If you are watching a disc recorded in multiple languages with subtitles, press the (SUBT) button
on the remote control to choose the language in which you would like the subtitles to appear. You
also can touch area E and then touch the icon.
Playback Information
During the DVD playback, press the (INFO) button on the remote control or touch area B to display
the playback information on the screen, including the media playing and current playback time.
DVD playback information
The following information is displayed at the top of the screen during DVD playback:
DVD Video Elapse time 05:24
Title 1/1 Remain time 02:05:39
Audio 1/16 Chapter 2/32
Subtitle Off
Angle 1/1
27
Page 28

DVD Player Operation
General Disc Information
Symbol 12cm Disc Properties Max Play Time
(MPEG 2 Method)
Single side single layer (DVD-5) 133 minutes
Single side double layer (DVD-9) 242 minutes
Double side single layer (DVD-10) 266 minutes
Double side double layer (DVD-18) 484 minutes
Single side single layer 74 minutes
Disc Symbols
Symbol Meaning
Number of voice languages recorded. The number inside the icon indicates
the number of languages on the disc (maximum of 8).
Number of subtitle languages available on the disc (maximum of 32).
Number of angles provided (maximum of 9).
Aspect ratios available. “LB” stands for Letter Box and “PS” stands for
Pan/Scan. In the example on the left, the 16:9 video can be converted to
Letter Box video.
Indicates the region code where the disc can be played.
• Region 1: USA, Canada, East Pacific Ocean Islands
• Region 2: Japan, Western Europe, Northern Europe, Egypt, South Africa,
Middle East
• Region 3: Taiwan, Hong Kong, South Korea, Thailand, Indonesia, SouthEast Asia
• Region 4: Australia, New Zealand, Middle and South America, South Pacific
Ocean Islands/ Oceania
• Region 5: Russia, Mongolia, India, Middle Asia, Eastern Europe, North Korea,
North Africa, North-West Asia
• Region 6: Mainland China
• ALL: All regions
Instructions for Insert/Eject, Play/Pause, Stopping Playback, Track Selection, Fast Forward/Fast Reverse,
Scan and Random Play are identical for DVD, CD and MP3 operation. Please see the DVD player
operation section for more information about these topics.
28
Page 29

CD/MP3/WMA Operation
The file naming formats listed below are compatible with this unit:
• ISO 9660 – file name: 12 characters, file extension: 3 characters
• ISO 9660 – file name: 31 characters, file extension: 3 characters
• Joliet – 64 characters
If the file or folder name does not conform to ISO 9660 file system standards, it may not be displayed
or played back correctly.
CD Player User Interface
141516171819
1
2
3
4
56 7 8 9101112
13
1. Current source indicator, touch this area to access MAIN menu.
2. Touch to fast backward current track.
3. Touch to seek down.
4. Volume indicator.
5. Touch to stop disc playback.
6. Touch to turn to the previous page.
7. Touch to turn to the next page.
8. Touch to activate/deactivate scan mode.
9. Touch to display the numeric keypad on the screen, then you can use the numeric keypad
to access a track directly.
10 Touch to activate/deactivate repeat single mode.
11 Touch to activate/deactivate random mode.
12. Touch to display track title information on the screen.
13. Track title.
14. The curret time.
15. Elapsed playing time.
16. Current track and total number of tracks on disc.
17. Touch to seek up.
18. Touch to fast forward current track .
19. Stop.
Playing CD Files
After inserting a CD disc, files will play in the sequence of the directory. In playback mode, you can
press the numeric button on the remote control or touch a track on the screen directly to play.
Previous/Next Page
Touch the or icon on the screen to navigate through the pages/files.
Fast backward/fast forward
Touch the or icon on the screen to fast backward or fast forward play.
29
Page 30

Troubleshooting
Problem Cause Corrective Action
GENERAL
Unit will not power on Radio fuse blown Install new fuse with correct rating
Remote control Battery depleted Replace battery with new one
does work Battery installed incorrectly Remove battery and install correctly
No/low audio output Improper audio output Check wiring and correct
Poor sound quality Unauthorized disc is in use Use original copy
or distortion Speaker power rating not Connect proper speakers
Tel-Mute malfunction “MUTE” wire is grounded Check that “MUTE” connection is not
Unit resets itself when Incorrect connection between Check wiring and correct
engine is off yellow memory wire and
Car battery fuse blown Install new fuse with correct rating
Illegal operation Press the RESET button located in the
bottom right corner of the front panel
connection
Volume set too low Increase volume level
Improper “MUTE” connection Review wiring diagram and check
“MUTE” connection
Speakers damaged Replace speakers
Heavily biased volume balance Adjust the channel balance to the
center position
Speaker wiring is in contact Insulate all speaker wiring connections
with metal part of car
compatible with unit
Speaker is shorted Check speaker connections
grounded and that it’s properly insulated
positive battery wire
TFT MONITOR
Monitor does not open TFT Auto Open is turned off Turn TFT Auto Open on
automatically
No image Incorrect connection of Check wiring and correct
Flashing image or DVD is not compatible with Change setup to accommodate disc
interference appears current TV system settings
on screen Improper video signal Check wiring and correct
Prolonged image Improper aspect ratio setup Use correct aspect ratio setting
or improper height/
width ratio display
Monitor stops at Moving path is blocked Press OPEN key to restart monitor
incorrect position movement
TUNER
Weak station searching Auto antenna is not fully Connect the auto antenna control cable
parking brake wire
PRK SW is activated and Stop vehicle in safe place and apply
parking brake is not engaged parking brake
connections
extended properly
Auto antenna not properly Connect the auto antenna control cable
connected properly
30
Page 31

Problem Cause Corrective Action
DISC
Cannot insert disc Disc already inside unit Eject current disc and insert new one
Disc does not play back Disc is warped or scratched Use disc in good condition
Image blurred, distorted, Disc is illegally copied Use original disc
or dark
PBC cannot be used PBC is not available on the disc
during VCD playback
No repeat or searching PBC is on Turn PBC off
while playing VCD
MP3
Interruption occurred Disc is dirty or scratched Clean disc or replace
during playback
Incorrect playback Message is longer than LCD
message displayed can display
Error Messages
Loading Disc is being read
No Disc Disc is dirty Clean disc with soft cloth
Bad disc Disc is dirty Clean disc with soft cloth
Unknown disc Disc format is not compatible
Region error DVD is not compatible with
Error Illegal mechanism operation Press EJECT key for 5 seconds to reset
Disc is dirty or wet Clean disc with soft cloth
Incompatible disc is used Use compatible disc
Disc rating exceeds Parental Change Parental Lock settings to lower
Lock rating limit restriction
Disc region code is not Use disc with proper region code
compatible with unit
Disc is inserted upside down Insert disc with label side up
File is damaged/bad recording Recreate disc with good files
Disc is upside down Insert disc with label side up
Disc not present in loading Insert disc
compartment
Disc is upside down Insert disc with label side up
with this unit
region code of unit
loading mechanism
Remote control
Remote control does Battery is covered with Pull out the insulation tape
not work insulation tape
Battery depleted Replace battery with new one
Battery installed incorrectly Remove battery and install correctly
31
Page 32

Remote Control
1. When using the remote control for the first time, you must pull out the insulation tape.
2. Remove the battery if the remote control is not used for a month or longer.
Remove and dispose the old battery immediately.
Do not store the battery with metallic materials.
3. Inserting/Replacing the battery:
Remove the battery from the battery holder
32
Page 33

Insert the battery holder
NOTE: Use only one CR2025(3V) lithium battery.
Danger of explosion if battery is incorrectly replaced. Replace only with the same or equivalent type.
Do not recharge, disassemble, heat or dispose of the battery in fire.
Keep batteries away from children to avoid the risk of an accident.
Suggestions
1. Only use a piece of clean silicone cloth and neutral detergent to clean the front panel and the monitor.
A rough cloth and non neutral detergent (such as alcohol) may result in scratching or discoloration.
2. Keep off water and other liquids.
3. If the temperature inside the player gets too high, a protective circuit automatically stops playing
the disc. And then, please wait for the unit to cool down before operating the player again.
4. Never insert anything other than a 5” (12 cm) compact disc into the player as the mechanism
can be damaged by foreign objects.
5. Do not attempt to use a 3” (8 cm) CD-Single disc in this unit, either with or without an adaptor, as
it will damage the player and disc. Such damages are not covered by the warranty on this product.
6. When the vehicle warms up during cold weather or under very humid conditions, condensation
may appear on the LCD panel. If this occurs, the screen will not operate properly until the moi-
sture
has evaporated.
7. We suggest that you should clean the discs used in this unit more frequently than used in your
home, because of the environmental conditions of the vehicle.
33
Page 34

Specifications
DVD Player
Frequency response: 10Hz-20kHz
Channel separation @ 1kHz: >65dB
D/A converter: 24 Bit
FM Tuner
Tuning range: 87.5MHz-108MHz
Usable sensitivity: 8.5dBf
50dB quieting sensitivity: 10dBf
Stereo separation @ 1kHz: 40dB
Frequency response: 30Hz-13kHz
AM Tuner
Tuning range: 522MHz-1629MHz
Usable sensitivity: 22uV
Frequency response: 30Hz-2.2kHz
Monitor
Panel size: 7°± (177.8 mm) diagonal measurement
View angle (up/down/left/right): 30/60/60/60
Resolution: 480 W x 234 H
Brightness (cd/m2): 350
Contrast ratio: 300:1
Elements: 336,960
General
Operating voltage: 11-16 VDC, negative ground
Speaker output impedance: 4~8 ohms
Line output voltage: 2 Volts
Line output impedance: 200 ohms
Chassis dimensions: 7" x 7" x 2", (178 x 178 x 51 mm)
CEA-2006 Power Standard Specifications
(reference: 14.4VDC +/- 0.2V, 20Hz~20kHz)
Power Output: 17 Watts RMS x 4 channels at 4 ohms and < 1% THD+N
Signal to Noise Ratio: 80dBA (reference: 1 watt into 4 ohms)
Specification and design of this model is necessarily subject to changes without notice.
If at any time in the future you should need to dispose this product please note
that waste electrical products should not be disposed of with household waste.
Please recycle where facilities exist. Check with your Local Authority or retailer
for recycling advice. (Waste Electrical and Electronic Equipment Directive)
This unit is manufactured under license from Dolby Laboratories. “Dolby”,
“Pro Logic II”, and the
double - D symbol are trademarks of Dolby Laboratories.
34
Page 35

INTEGRATED DVD/CD/MP3/WMA-PLAYER
• Playback of CD, CD-R/RW, MP3, WMA, DVD,
DVD-R/RW, DVD+R/RW and DVD-MP3
• Region code 2
• Integrated Dolby Digital decoder
• Electronic (ESP) and mechanical anti-shock system
MOTORIZED LCD MONITOR
• Fully motorized high-quality 7"/16:9 LCD display with touchscreen-control
TUNER
• FM/AM-tuner
• 30 preset stations (18 FM/12 AM)
• Radio data system (RDS)
A/V-CONNECTIONS
• 2 x RCA composite video outputs
• Analog 4.1 RCA preamp line outputs (front, rear and subwoofer)
• 1 x RCA Aux-In (stereo)
ADDITIONAL FEATURES
• Integrated 4 x 40 watts digital amplifier
• Blue and white backlit key illumination and high contrast
blue dot-matrix status display
• ISO connectors for power supply and speakers
• IR-remote control
35
Page 36

NHALTSVERZEICHNIS
SICHERHEITSHINWEISE 38-39
BEDIENELEMENTE 40-45
BEDIENTEIL 40-41
LCD DISPLAY 42
TOUCHSCREEN 43
FERNBEDIENUNG 44-45
TFT BILDSCHIRM 46-47
EIN- UND AUSFAHREN DES TFT BILDSCHIRMS 46
AUTOMATISCHES ÖFFNEN DES TFT BILDSCHIRMS 46
EINSTELLUNG DES NEIGUNGSWINKELS 46
BILDEINSTELLUNGEN 46
HANDBREMSE 47
MONITORMECHANISMUS 47
GRUNDFUNKTIONEN 48-49
POWER ON/OFF 48
AUSWAHL DER WIEDERGABEQUELLE 48
LAUTSTÄRKEEINSTELLUNG 48
AUDIOMENÜ 48
RESET 49
MUTE 49
SYSTEMMENÜ 50-56
HAUPMENÜ 50
GENERELLE EINSTELLUNGEN 50-52
BILDSCHIRMEINSTELLUNGEN 53
SPRACHEINSTELLUNGEN 54
VIDEOEINSTELLUNGEN 55
RATINGEINSTELLUNGEN 56
TUNER 57-59
BENUTZEROBERFLÄCHE 57
AUSWAHL DES TUNER MODUS 58
AUSWAHL DES FREQUENZBANDES 58
AUTOMATISCHER SUCHLAUF 58
MANUELLER SUCHLAUF 58
VERWENDUNG DER SENDERSPEICHERPLÄTZE 58
AUTOMATISCHES SPEICHERN VON SENDERN (AS) 58
ANSPIELEN VON GESPEICHERTEN SENDERN 59
SUCHE NACH EINEM BESTIMMTEN PROGRAMMTYP 59
AF-FUNKTION 59
TA-FUNKTION 59
36
Page 37

DVD-WIEDERGABE 60-64
EINLEGEN UND AUSWERFEN EINER DISC 60
ZURÜCKSETZEN DES LADEMECHANISMUS 60
AUSWAHL DES DVD MODUS 60
VERWENDEN DES TOCHSCREENS 60
WIEDERGABEOPTIONEN 61
AUFRUFEN DES DVD MENÜS 61
KAPITELAUSWAHL 62
GOTO-FUNKTION 62
DIREKTE AUSWAHL EINES KAPITELS/TRACKS 62
AUSWAHL VON VERSCHIEDENEN KAMERAWINKELN (DVD)
AUSWAHL VON VERSCHIEDENEN TONSPUREN (DVD) 63
AUSWAHL VON VERSCHIEDENEN UNTERTITELN (DVD)
WIEDERGABEINFORMATIONEN 63
GENERELLE CD/DVD INFORMATIONEN 64
CD-WIEDERGABE 65
BENUTZEROBERFLÄCHE 65
WIEDERGABE EINER CD 65
WECHSELN DES ORDNERS 65
SCHNELLER VOR- UND RÜCKLAUF 65
FERNBEDIENUNG 66-67
VOR DER INBETRIEBNAHME 66
ENTFERNEN DER BATTERIE 66
EINLEGEN DER BATTERIE 67
FEHLERSUCHE 68-69
SPEZIFIKATIONEN 70
63
63
37
Page 38

SICHERHEITSHINWEISE
1. Dieses Gerät ist nur für den Betrieb an einem Bordnetz mit +12V (DC) und Minus gegen Masse
geeignet.
2. Bedienen Sie das Gerät nur so, wie es in der Bedienungsanleitung beschrieben wird. Alles
andere kann zum Erlöschen Ihres Garantieanspruches führen.
3. Zerlegen oder modifizieren Sie das Gerät nicht. Dies kann zu einer Beschädigung des Gerätes
führen und Ihr Garantieanspruch erlischt dadurch. Versuchen Sie auch nicht das Gerät selbst zu
reparieren oder zu warten, sondern wenden Sie sich an einen autorisierten XZENT-Händler.
4. Benutzen Sie nur das Originalzubehör um das Gerät zu installieren und zu betreiben, da ansonsten
eine Beschädigung des Gerätes riskiert wird. Befestigen Sie das Gerät in Ihrem eigenen Interesse
auf einem soliden Untergrund, unter Verwendung des mitgelieferten Montagezubehörs. Die bei
Unfällen auftretenden Beschleunigungskräfte sind teilweise enorm. Unsachgemäß montierte Geräte
stellen bei Unfällen ein großes Risiko für den Fahrer und die Insassen des Fahrzeuges dar.
5. Schützen Sie das Gerät vor Wasser oder anderen Flüssigkeiten, die in das Innere des Gerätes
eindringen können. Ein Kurzschluss mit Brandfolge könnte daraus resultieren.
6. Bevor Sie eine defekte Sicherung austauschen, sollten Sie erst einmal überprüfen was der Grund
für den Kurzschluss war. Achten Sie dabei besonders auf die Kabel der Spannungsversorgung!
Wenn der Kurzschluss nicht durch einen Fehler in der Spannungsversorgung resultiert, müssen
Sie die defekte Sicherung gegen ein neues Exemplar mit identischen Werten austauschen. Sollte
der Kurzschluss immer noch vorhanden sein, wenden Sie sich bitte an Ihren XZENT-Händler.
7. Achten Sie darauf, dass bei ausgeschaltetem Motor die Batterie des Fahrzeuges nicht entladen
wird. Da es sich bei dem Gerät um einen Verbraucher handelt und die Batterie nur bei laufendem
Motor aufgeladen wird, kann es passieren dass die Batterie tiefentladen wird und das Fahrzeug
sich nicht mehr starten lässt.
8. Achten Sie bei der Installation des Gerätes darauf, dass es nicht dem direkten Sonnenlicht
ausgesetzt ist und auch nicht in der Nähe von Wärmequellen wie z.B den Öffnungen der
Heizung montiert wird. Die Umgebungstemperatur sollte daher zwischen 0°C und 45°C liegen.
Sollte die Temperatur im Inneren des Fahrzeuges extrem hoch sein, ist es empfehlenswert den
Innenraum vor der Inbetriebnahme des Gerätes erst einmal etwas abkühlen zu lassen.
9. Gemäß den in den verschiedenen Ländern der EU geltenden Verkehrsvorschriften, darf ein
Monitor der in Sichtweite des Fahrers montiert ist während der Fahrt nicht betrieben werden,
da er den Fahrer vom Verkehrsgeschehen ablenkt. Beachten Sie unbedingt die geltenden
Vorschriften in Ihrem Land, da ansonsten Regressansprüche von der Kfz Versicherung geltend
gemacht werden können. Achten Sie zusätzlich darauf, dass die Lautstärke in Ihrem Fahrzeug
nur so hoch ist, dass Sie Außengeräusche, wie z.B eine Polizeisirene, noch klar wahrnehmen
können.
10. Die Mechanik des Monitors ist vollautomatisch. Versuchen Sie niemals den Bildschirm manuell
zu bedienen, da dies zu einer dauerhaften Beschädigung des Gerätes führen kann.
38
Page 39

11. Setzen Sie den Monitor keinen harten Stößen aus. Eine mechanische und elektronische
Beschädigung des Gerätes könnte daraus resultieren.
12. Da sich auf dem Monitor mit der Zeit Staub und Schmutz sammelt, sollten Sie das Gerät ab und
zu mit einem weichen Tuch reinigen. Verwenden Sie dazu niemals Reinigungsbenzin, Alkohol,
Verdünner oder ähnliches, da dies zu einer Beschädigung des Monitors bzw. des Gehäuses
führen kann.
13. Sollte es während der Bedienung des Gerätes zu Störungen oder Problemen kommen, empfehlen
wir Ihnen erst einmal das Kapitel “Fehlersuche“ genau durchzulesen, um auszuschließen, dass
es sich nur um einen Bedienungsfehler handelt.
14. Wenn Sie Fragen oder Probleme bei der Installation haben, wenden Sie sich bitte an einen
XZENT-Händler oder den jeweiligen Landesvertrieb.
39
Page 40

BEDIENELEMENTE
17
16
15
14
13
12
1
22 21 20
1. POWER/VOL-Drehregler
> Drücken Sie den Drehregler, um das Gerät einzuschalten oder halten Sie ihn gedrückt, um
das Gerät wieder auszuschalten.
> Betätigen Sie den Drehregler nach links oder rechts, um die Lautstärke entsprechend zu
verändern oder um Menüeinstellungen vorzunehmen.
> Um die Anfangslautstärke des Gerätes zu speichern, müssen Sie die gewünschte Lautstärke
einstellen und anschließend sofort den Drehregler für ca. 3 Sekunden gedrückt halten, bis ein
kurzer Piepton ertönt und das Speichern der eingestellten Lautstärke quittiert.
2. MUTE-Taste
> Drücken Sie die Taste, um die Stummschaltung für die Audiowiedergabe zu aktivieren bzw.
drücken Sie die Taste erneut, um sie wieder zu deaktivieren.
3. FAST REVERSE-Taste
> Drücken Sie die Taste, um den schnellen Rücklauf zu starten oder um im Radiomodus
durch verringern der Frequenz nach einem Radiosender zu suchen.
2 3 4 5 6 7 8 9
40
10 11
19
18
Page 41

4. FAST FORWARD-Taste
> Drücken Sie die Taste, um den schnellen Vorlauf zu starten oder um im Radiomodus durch
erhöhen der Frequenz nach einem Radiosender zu suchen.
5. PREVIOUS-Taste
> Drücken Sie die Taste, um das vorherige Kapitel bzw. den vorherigen Track auszuwählen
oder um im Radiomodus den automatischen Suchlauf zu starten, um durch verringern der
Frequenz automatisch nach einem Radiosender zu suchen.
6. NEXT-Taste
> Drücken Sie die Taste, um das nächste Kapitel bzw. den nächsten Track auszuwählen oder
um im Radiomodus den automatischen Suchlauf zu starten, um durch erhöhen der Frequenz
automatisch nach einem Radiosender zu suchen.
7. STOP-Taste
> Drücken Sie die Taste, um die Wiedergabe zu stoppen.
8. PLAY/PAUSE-Taste
> Drücken Sie die Taste, um die Wiedergabe zu pausieren bzw. drücken Sie die Taste erneut,
um die Wiedergabe wieder zu starten.
9. SRC-Taste
> Drücken Sie die Taste, um einen Wiedergabemodus auszuwählen.
10. RESET-Taste
> Drücken Sie die Taste, um das Gerät in den Auslieferungszustand zurückzusetzen.
11. SMART DIAL Controller
> Drückern Sie den Drehregler, um das Hauptmenü aufzurufen oder betätigen Sie ihn nach rechts
oder links, um einen Menüpunkt aufzurufen und Ihre Auswahl durch erneutes drücken zu bestätigen.
12. EJECT-Taste
> Drücken Sie die Taste, um eine Disk auszuwerfen oder halten Sie die Taste gedrückt, um
den Lademechanismus bei Betriebsstörungen zurückzusetzen.
13. DISK Slot
14. INFO-Taste
> Drücken Sie die Taste, um sich im DVD-Modus Wiedergabeinformationen anzeigen zu lassen,
wenn der TFT Bildschirm geschlossen ist oder halten Sie die Taste gedrückt, um das Menü für
die Bildeinstellungen aufzurufen.
15. ANGLE+-Taste
> Drücken Sie die Taste, um die Neigung des TFT Bildschirms um einen Schritt nach oben zu
verändern oder halten Sie die Taste gedrückt, um sie stufenlos nach oben zu verändern.
> Drücken Sie die Taste, um bei aktiviertem Bildeinstellungsmenü den ausgewählten Wert
entsprechend zu verändern.
16. ANGLE--Taste
> Drücken Sie die Taste, um die Neigung des TFT Bildschirms um einen Schritt nach unten zu
verändern oder halten Sie die Taste gedrückt, um sie stufenlos nach unten zu verändern.
> Drücken Sie die Taste, um bei aktiviertem Bildeinstellungsmenü den ausgewählten Wert
entsprechend zu verändern.
17. TFT Display
18. OPEN-Taste
> Drücken Sie die Taste, um den Bildschirm ein- und auszufahren.
19. DISP-Taste
> Drücken Sie die Taste, um sich verschiedene Informationen über den aktuellen
Wiedergabemodus auf dem kleinen LCD Display anzeigen zu lassen.
20. LCD Display
21. AS/PS-Taste
> Drücken Sie die Taste, um die sechs Radiosender im aktuell ausgewählten Frequenzband zu
speichern oder halten Sie die Taste gedrückt, um die bereits gespeicherten Radiosender eines
Frequenzbandes kurz anzuspielen.
22. FM/AM-Taste
> Drücken Sie die Taste um im Tunermodus zwischen den verschiedenen Frequenzbänder
(FM1, FM2, FM3, AM1 und AM2) zu wählen oder um in den Tunermodus zu wechseln, wenn
Sie sich in einem anderen Wiedergabemodus befinden.
41
Page 42

BEDIENELEMENTE
LCD DISPLAY
ST
2
13
1. Main
> Anzeige der Zeit, Sendefrequenz und Name des eingestellten Radiosenders und
entsprechend dem Wiedergabemodus weitere Informationen.
2. Loudness
> Leuchtet auf, wenn “Loudness“ aktiviert wurde.
3. ST
> Leuchtet entsprechend auf, je nachdem die Radioübertragung in Mono oder Stereo ist.
42
Page 43

TOUCHSCREEN
Area A
Area C
Bildschirmbereich A
> Berühren Sie Bereich A, um das Hauptmenü aufzurufen.
Bildschirmbereich B
> Berühren Sie Bereich B, um Wiedergabeinformationen einer DVD anzuzeigen.
Bildschirmbereich C
> Berühren Sie Bereich C, um das vorherige Kapitel einer DVD auszuwählen.
Bildschirmbereich D
> Berühren Sie Bereich D, um das nächste Kapitel einer DVD auszuwählen.
Bildschirmbereich E
> Berühren Sie Bereich E, um verschiedene Wiedergabeoptionen anzuzeigen
und auszuwählen.
Bildschirmbereich F
> Berühren Sie Bereich F, um die GOTO Suchfunktion aufzurufen.
Area F
Area B
Area D
Area E
43
Page 44

FERNBEDIENUNG
3
4
5
9
12
16
17
18
22
25
26
Name Ref # Signal Function
Power 1
Open 2
Mute 3
SRC 4 SRC
Numeric button 5 1.2.3.4.5.
6.7.8.9.0
VOL up 6 VOL+
VOL down 7 VOLInformation 8 INFO
GOTO search 9 -/--
Stop/Band 10 /
BAND
Select 11 SEL
ESC 12 ESC
Menu 13 MENU
Picture 14 PIC
Drücken Sie die Taste, um das Gerät ein- bzw. wieder auszuschalten.
Drücken Sie die Taste, um den Bildschirm ein- und auszufahren.
Drücken Sie die Taste, um die Stummschaltung für die Audiowiedergabe zu aktivieren bzw. um sie wieder zu deaktivieren.
Drücken Sie die Taste, um einen Wiedergabemodus auszuwählen.
Drücken Sie die Tasten, um direkt einen Track, Radiosender oder ein
Kapitel auszuwählen.
Drücken Sie die Taste, um die Lautstärke zu erhöhen.
Drücken Sie die Taste, um die Lautstärke zu verringern.
Drücken Sie die Taste, um sich im DVD-Modus Wiedergabeinformationen anzeigen zu lassen, wenn der TFT Bildschirm geschlossen ist.
Drücken Sie die Taste, um die GOTO Suchfunktion für VCD/DVD
aufzurufen.
Drücken Sie die Taste, um die Wiedergabe einer CD/DVD zu stoppen.
Drücken Sie die Taste, um im Radiomodus zwischen UKW und MW
zu wechseln.
Drücken Sie die Taste, um das Audiomenü aufzurufen.
Drücken Sie die Taste, um ein aufgerufenes Menü wieder zu beenden.
Drücken Sie die Taste, um das Hauptmenü aufzurufen.
Drücken Sie die Taste, um das Bildeinstellungsmenü auszurufen.
10
13
19
2321
27
2
1
6
7
8
11
14
15
20
24
28
44
Page 45

Name Ref # Signal Function
Repeat A>B 15 A B
OK 16 OK
Pfeiltasten 17
Title 18 TITLE
Root 19 ROOT
Repeat 20
Next 21
Previous 22
Fast Reverse 23
Fast Forward 24
Audio 25 AUDIO
Zoom 26 ZOOM
Angle 27 ANGLE
SUB Title 28 SUB-T
©
Drücken Sie die Taste, um einen bestimmten Zeitrahmen (A>B)
einer CD/DVD zu wiederholen.
Drücken Sie die Taste, um die Wiedergabe einer CD/DVD zu starten,
zu pausieren oder Ihre Menüauswahl zu bestätigen.
Drücken Sie einer der Tasten, um den Cursor in der Menüauswahl
entsprechend zu bewegen.
Drücken Sie die Taste, um das Titelmenü einer DVD aufzurufen.
Drücken Sie die Taste, um das Hauptmenü einer DVD aufzurufen.
Drücken Sie die Taste, um das PBC-Menü während der Wiedergabe
einer VCD aufzurufen.
Drücken Sie die Taste, um die Wiedergabe des gerade wiedergegebenen Kapitels oder Tracks zu wiederholen.
Drücken Sie die Taste, um das nächste Kapitel bzw. den nächsten
Track auszuwählen oder um im Radiomodus den automatischen
Suchlauf zu starten, um durch erhöhen der Frequenz automatisch
nach einem Radiosender zu suchen.
Drücken Sie die Taste, um das vorherige Kapitel bzw. den vorherigen
Track auszuwählen oder um im Radiomodus den automatischen
Suchlauf zu starten, um durch verringern der Frequenz automatisch
nach einem Radiosender zu suchen.
Drücken Sie die Taste, um den schnellen Rücklauf zu starten oder
um im Radiomodus durch verringern der Frequenz nach einem
Radiosender zu suchen.
Drücken Sie die Taste, um den schnellen Vorlauf zu starten oder um
im Radiomodus durch erhöhen der Frequenz nach einem Radiosender zu suchen.
Drücken Sie die Taste, um zwischen den verschiedenen Tonspuren
einer DVD zu wählen.
Drücken Sie die Taste, um das Bild zu vergrößern bzw. wieder zu
verkleinern.
Drücken Sie die Taste, um eine DVD bzw. eine Szene in verschiedenen Blickwinkeln wiederzugeben.
Drücken Sie die Taste, um zwischen den verschiedenen Untertiteln
zu wählen.
45
Page 46

TFT BILDSCHIRM
EIN- UND AUSFAHREN DES TFT BILDSCHIRMS
> Drücken Sie die ( )-Taste auf der Fernbedienung oder die OPEN-Taste auf dem Bedienteil um
den TFT Bildschirm ein- oder auszufahren.
AUTOMATISCHES ÖFFNEN DES TFT BILDSCHIRMS
> Wenn Sie die “TFT Auto Open“ Funktion aktiviert haben (On), öffnet sich der TFT Bildschirm
automatisch, sobald das Gerät eingeschaltet wird.
> Wenn Sie die Funktion deaktiviert haben (Off), öffnet sich der TFT Bildschirm nicht
automatisch, wenn das Gerät eingeschaltet wird.
> Wenn Sie die manuelle Funktion gewählt haben (Manual), bleibt der TFT Bildschirm in der
Position stehen, in welcher er sich während dem Ausschalten befindet.
EINSTELLUNG DES NEIGUNGSWINKELS
> Drücken Sie eine der ( ) oder ( ) Tasten, um den Neigungswinkel des TFT Bildschirms
schrittweise einzustellen.
> Halten Sie eine der Tasten gedrückt, um den Neigungswinkel stufenlos einzustellen.
> Zusätzlich lässt sich der Neigungswinkel auch im Hauptmenü (Screen Settings) einstellen.
BILDEINSTELLUNGEN
> Die folgende Tabelle zeigt die Wiedergabequellen und die dazugehörigen Videoformate.
Wiedergabequelle Videoformat
UKW/MW RGB
DVD RGB
EINSTELLEN DER BILDPARAMETER
1.Drücken Sie die PIC-Taste auf der Fernbedienung oder halten Sie die INFO-Taste auf dem
Bedienteil gedrückt, um das Menü für die Bildeinstellungen aufzurufen.
2.Drücken Sie eine der ( ) oder ( )-Tasten auf der Fernbedienung oder betätigen
Sie den Smart Dial Controller auf dem Bedienteil, um den Menüpunkt auszuwählen, von
welchem Sie den Wert verändern möchten.
3.Betätigen Sie den POWER/VOL-Drehregler auf dem Bedienteil, um den Wert des
ausgewählten Menüpunktes zu verändern.
4.Drücken Sie die PIC-Taste auf der Fernbedienung oder halten Sie die INFO-Taste auf dem
Bedienteil gedrückt, um das Menü für die Bildeinstellungen zu beenden.
46
Page 47

HANDBREMSE
> Wenn Sie das “PRK SW“ Kabel richtig angeschlossen haben, können Sie die Funktion für die
Videowiedergabe nur dann nutzen, wenn das Fahrzeug steht und die Handbremse angezogen ist.
> Wird das Kabel überhaupt nicht angeschlossen oder die Handbremse wird bei angeschlossenem
Kabel nicht angezogen, ist es nicht möglich, die Funktion zu verwenden. Anstatt dem Bild einer
DVD erscheint nur ein blauer Bildschirmhintergrund mit einem Warnhinweis auf dem TFT
Bildschirm.
> Die beiden Videoausgänge für den Anschluss weiterer Monitore sind davon nicht betroffen.
MONITORMECHANISMUS
> Wird das Ausfahren des TFT Bildschirms durch ein Hindernis behindert, bricht das Gerät
automatisch den Vorgang ab, um den TFT Bildschirm vor einer Beschädigung zu schützen.
> Drücken Sie anschließend noch einmal die OPEN-Taste oder trennen Sie das Gerät von der
Spannungsquelle, um den Vorgang noch einmal zu wiederholen.
47
Page 48

GRUNDFUNKTIONEN
POWER ON/OFF
> Drücken Sie die ( )-Taste auf der Fernbedienung oder den POWER/VOL-Drehknopf auf dem
Bedienteil, um das Gerät einzuschalten.
> Drücken Sie die ( )-Taste erneut oder halten Sie den POWER/VOL-Drehregler gedrückt, um das
Gerät wieder auszuschalten.
AUSWAHL DER WIEDERGABEQUELLE
> Drücken Sie die SRC-Taste auf der Fernbedienung oder die MODE-Taste auf dem Bedienteil,
um zwischen den verschiedenen Wiedergabequellen (Tuner, DVD und Aux-In) zu wählen.
LAUTSTaeRKEEINSTELLUNG
> Drücken Sie eine der VOL+ oder VOL--Tasten auf der Fernbedienung oder betätigen Sie den
POWER/VOL-Drehregler auf dem Bedienteil, um die Lautstärke entsprechend zu verändern.
Die Lautstärke lässt sich von 0 bis 40 regeln, der voreingestellte Wert ist 10.
> Um die Anfangslautstärke des Gerätes zu speichern bzw. um den voreingestellten Wert zu
verändern, müssen Sie die gewünschte Lautstärke einstellen und anschließend sofort den
Drehregler für ca. 3 Sekunden gedrückt halten, bis ein kurzer Piepton ertönt und das Speichern
der eingestellten Lautstärke quittiert.
AUDIOMENueÜ
> Um das Gerät an die akustische Charakteristik des Fahrzeuges und Ihren Hörgewohntheiten
anzupassen, lassen sich diverse Audioeinstellungen vornehmen.
Audio Function Adjustable Range
EQ Folk
BASS -7 to +7
TREBLE -7 to +7
BAL -9 to +9
FADE -9 to +9
SW -7 to +7
LOUD off, on
> Drücken Sie die ESC-Taste auf der Fernbedienung oder den Pfeil auf dem
TFT Bildschirm, um das Audiomenü zu verlassen.
Jazz
Pop
Classical
Rock
News
Urban
Rave
Movie
Techno
User
48
Page 49

RESET
> Drücken Sie die RESET-Taste auf dem Bedienteil des Gerätes, um alle Einstellungen in den
Auslieferungszustand zurückzusetzen. Dies könnte von Nöten sein, wenn sich das Gerät nach
einer Fehlbedienung oder einer Fehlfunktion nicht mehr richtig bedienen lässt.
MUTE
> Drücken Sie die ( )-Taste auf der Fernbedienung oder die MUTE-Taste auf dem Bedienteil, um
die Stummschaltung für die Audiowiedergabe zu aktivieren bzw. drücken Sie die Taste erneut,
um sie wieder zu deaktivieren.
49
Page 50

SYSTEMMENueÜ
5
4
31
2
HAUPTMENue
1. Berühren Sie das Icon, um den Radiomodus auszuwählen.
2. Berühren Sie das Icon, um das Hauptmenü aufzurufen.
3. Berühren Sie das Icon, um Aux-In auszuwählen.
4. Berühren Sie das Icon, um den DVD-Modus auszuwählen.
5. Berühren Sie das Icon, um Standby zu aktivieren.
> Sie haben drei Möglichkeiten, das Hauptmenü des Gerätes aufzurufen:
1. Drücken Sie die MENU-Taste auf der Fernbedienung.
2. Berühren Sie den Bereich A des TFT Bildschirms.
3. Drücken Sie den SMART DIAL Controller auf dem Bedienteil.
GENERELLE EINSTELLUNGEN
Aufrufen des Menüs für generelle Einstellungen
1. Drücken Sie die MENU-Taste auf der Fernbedienung um das Hauptmenü aufzurufen.
2. Wählen Sie zuerst das Setupmenü und anschließend das Menü für generelle Einstellungen.
50
Page 51

Auswahl eines Menüpunktes
> Drücken Sie eine der Pfeiltasten auf der Fernbedienung oder berühren Sie das gewünschte Icon
direkt auf dem TFT Bildschirm, um den Menüpunkt auszuwählen, den Sie verändern wollen.
Verändern der Menüeinstellung
1. Wählen Sie den Menüpunkt welchen Sie verändern möchten und drücken Sie die OK-Taste auf
der Fernbedienung, um Ihre Auswahl zu bestätigen.
Ein Untermenü, mit den zur Verfügung stehenden Auswahlmöglichkeiten erscheint daraufhin
auf dem TFT Bildschirm.
2. Drücken Sie eine der Pfeiltasten, um eine andere Einstellung zu wählen.
3. Drücken Sie die OK-Taste auf der Fernbedienung, um Ihre Auswahl zu bestätigen.
51
Page 52

SYSTEMMENueÜ
Einstellen der Uhrzeit
1. Wählen Sie den Menüpunkt “Clock“ aus.
2. Drücken Sie die entsprechenden Pfeiltasten auf der Fernbedienung, um den Cursor auf “Stunden
(Hour)“ oder “Minuten (Min)“ zu bewegen und drücken Sie anschließend die OK-Taste, um
die Auswahl zu bestätigen oder berühren Sie direkt das jeweilige Icon auf dem TFT Bildschirm.
3. Das Feld mit den numerischen Tasten erscheint auf dem TFT Bildschirm.
4. Verwenden Sie die numerischen Tasten auf der Fernbedienung oder auf dem TFT Bildschirm,
um die Stunden und Minuten einzustellen.
5. Drücken Sie die OK-Taste auf der Fernbedienung oder das OK-Icon auf dem TFT Bildschirm, um
die Einstellung zu bestätigen.
Verlassen des Menüs
Einstellung Option Funktion
Radio USA Wählen Sie die Region aus, in welcher das Gerät betrieben wird.
Video Out Disable (Inaktiv) De- bzw. aktivieren Sie die Videoausgänge des Gerätes.
Videoausgang) Enable (Aktiv)
TFT Auto Open On Der TFT Bildschirm fährt automatisch heraus, wenn das Gerät
(Bildschirm) eingeschaltet wird.
Clock Mode 12Hr Anzeige der Uhrzeit im 12h Modus (AM und PM).
(Uhrzeit) 24Hr Anzeige der Uhrzeit im 24h Modus (bis 23:59).
Clock (Uhrzeit) 00:27 Aktuelle Uhrzeit
Load Factory No/Yes (JA/Nein) Alle Einstellungen des Gerätes werden in den Auslieferungs(Auslieferungs- zustand zurückgesetzt.
zustand)
S-Amer1
S-Amer2
Europe
Off Sie müssen die ( )-Taste auf dem Bedienteil oder die ( )-
Taste auf der Fernbedienung drücken, um den TFT Bildschirm
herausfahren zu lassen.
Manual Der TFT Bildschirm bleibt in der Position, in welcher er sich
während dem Ausschalten des Gerätes befindet.
52
Page 53

BILDSCHIRMEINSTELLUNGEN
Aufrufen des Menüs für die Bildschirmeinstellungen
1. Drücken Sie die MENU-Taste auf der Fernbedienung, um das Hauptmenü aufzurufen.
2. Wählen Sie zuerst das Setupmenü und anschließend das Menü für die Bildschirmeinstellungen aus.
Verändern der Menüeinstellung
Einstellung Option Funktion
Neigungswinkel 1 bis 5
Bildschirmschoner Ein De- bzw. aktivieren Sie den Bildschirmschoner des Gerätes.
Aus
Kalibrieren des Nein Möglichkeit zur Kalibration des Touchscreens.
Touchscreens Ja
Version – Anzeige der Software Version.
Einstellungsmöglichkeit des Neigungswinkels für den TFT Bildschirm.
53
Page 54

SPRACHEINSTELLUNGEN
Aufrufen des Menüs für die Spracheinstellungen
1. Drücken Sie die MENU-Taste auf der Fernbedienung, um das Hauptmenü aufzurufen.
2. Wählen Sie zuerst das Setupmenü und anschließend das Menü für die Spracheinstellungen aus.
Verändern der Menüeinstellung
Einstellung Option Funktion
Subtitle English Anzeige der Untertitel in der jeweiligen Sprache.
(Untertitel) French
Audio English Auswahl der jeweiligen Tonspur.
DVD Menü English Auswahl der Sprache, in welcher das DVD Menü dargestellt
Spanish
German
Auto
Off (Aus)
French
Spanish
German
French werden soll.
Spanish
German
54
Page 55

VIDEOEINSTELLUNGEN
Aufrufen des Menüs für die Videoeinstellungen
1. Drücken Sie die MENU-Taste auf der Fernbedienung, um das Hauptmenü aufzurufen.
2. Wählen Sie zuerst das Setupmenü und anschließend das Menü für die Videoeinstellungen aus.
Verändern der Menüeinstellung
Einstellung Option Funktion
TV Shape 4:3 Ohne Funktion.
(Bildverhältnis) 16:9
View Mode Option Auswahl der erweiterten Bildformateinstellungen.
(Erweiterte Bild- Fill
formatein- Original
stellungen) Auto Fit
DVD Menü Pan Scan
55
Page 56

RATINGEINSTELLUNGEN
Aufrufen des Menüs für die Ratingeinstellungen
1. Drücken Sie die MENU-Taste auf der Fernbedienung, um das Hauptmenü aufzurufen.
2. Wählen Sie zuerst das Setupmenü und anschließend das Menü für die Ratingeinstellungen aus.
Verändern der Menüeinstellung
Einstellung Option Funktion
Set Passwort Berühren Sie den Menüpunkt, um das numerische Tastenfeld
(Eingabe eines auf dem Bildschirm aufzurufen und um ein Passwort einzugeben.
Passwortes)
Rating 1. Kid Safe
2. G
3. PG
4. PG-13
5. PG-R
6. R
7. NC-17
8. Adult
56
Page 57

TUNER
BENUTZEROBERFLÄaeCHE
567 8 9 10
4
3
2
1
19 18 17 16 15 14 13 12
11
1. Anzeige der eingestellten Lautstärke.
2. Berühren Sie das Icon, um den Suchlauf durch verringern der Empfangsfrequenz zu starten.
3. Drücken Sie das Icon, um die Empfangsfrequenz um einen Schritt zu verringern.
4. Berühren Sie das Icon, um das Hauptmenü aufzurufen.
5. Berühren Sie das Icon, um zwischen den verschiedenen Frequenzbändern zu wählen (FM1,
FM2, FM3, AM1 und AM2)
6. Berühren Sie das Icon, um die Empfangsfrequenz um einen Schritt zu erhöhen.
7. Berühren Sie das Icon, um den Suchlauf durch erhöhen der Empfangsfrequenz zu starten.
8. Anzeige des ausgewählten Frequenzbandes.
9. Anzeige der Frequenz des ausgewählten Senders.
10. Anzeige der aktuellen Uhrzeit.
11. Berühren Sie einen der Speicherplätze, um einen gespeicherten Sender auszuwählen oder
halten Sie eines der Icons gedrückt, um einen eingestellten Sender auf dem gedrückten
Speicherplatz zu speichern.
12. Berühren Sie das Icon, um zwischen den beiden Anzeigevarianten zu wählen.
13. Berühren Sie das Icon, um den Scan Mode zu de- bzw. aktivieren.
14. Berühren Sie das Icon, um den automatischen Sendersuchlauf zu starten.
15. Berühren Sie das Icon, um die Mono Funktion zu de- bzw. aktivieren.
16. Berühren Sie das Icon, um die REG Funktion zu de- bzw. aktivieren.
17. Berühren Sie das Icon, um die TA Funktion zu de- bzw. aktivieren.
18. Berühren Sie das Icon, um die AF Funktion zu de- bzw. aktivieren.
19. Berühren Sie das Icon, um die PTY Funktion zu de- bzw. aktivieren.
57
Page 58

TUNER
AUSWAHL DES TUNER MODUS
> Drücken Sie die SRC-Taste auf der Fernbedienung oder auf dem Bedienteil, um den Tuner als
Wiedergabequelle auszuwählen oder verwenden Sie das Hauptmenü, um direkt den Tuner als
Wiedergabequelle auszuwählen.
AUSWAHL DES FREQUENZBANDES
> Drücken Sie die ( )-Taste auf der Fernbedienung, die ( )-Taste auf dem Bedienteil
oder das ( )-Icon auf dem TFT Bildschirm, um zwischen den verschiedenen
Frequenzbändern (FM1, FM2, FM3, AM1 und AM2).
BAND
/
AUTOMATISCHER SUCHLAUF
> Drücken Sie die ( )-Taste auf der Fernbedienung oder berühren Sie das ( )-Icon
auf dem TFT Bildschirm, um den Suchlauf durch erhöhen der Empfangsfrequenz zu starten.
Sobald ein Sender gefunden wird, wird der Suchlauf automatisch beendet und der gefundene
Sender wird wiedergegeben.
> Drücken Sie die Taste erneut, um den Suchlauf sofort zu beenden.
> Drücken Sie die ( )-Taste auf der Fernbedienung oder berühren Sie das ( )-Icon auf dem TFT
Bildschirm, um den Suchlauf durch verringern der Empfangsfrequenz zu starten. Sobald ein
Sender gefunden wird, wird der Suchlauf automatisch beendet und der gefundene Sender wird
wiedergegeben.
> Drücken Sie die Taste erneut, um den Suchlauf sofort zu beenden.
MANUELLER SUCHLAUF
> Berühren Sie das ( ) oder ( )-Icon auf dem TFT Bildschirm, um den manuellen Sendersuchlauf
zu starten.
VERWENDUNG DER SENDERSPEICHERPLaeTZE
Speichern einer Radiostation
1. Wählen Sie das Frequenzband aus, in welchem Sie die gewünschte Radiostation speichern wollen.
2. Stellen Sie die Empfangsfrequenz des zu speichernden Senders ein.
3. Halten Sie das Icon des Senderspeicherplatzes gedrückt, auf welchem der ausgewählte Sender
gespeichert werden soll.
Aufrufen einer gespeicherten Radiostation
1. Wählen Sie das Frequenzband aus, in welchem der Sender gespeichert ist.
2. Berühren Sie das Icon des Senderspeicherplatzes, auf welchem der gewünschte Sender
gespeichert wurde.
AUTOMATISCHES SPEICHERN VON SENDERN (AS)
> Drücken Sie die AS/PS-Taste auf dem Bedienteil oder berühren Sie das ( )-Icon auf dem TFT
Bildschirm, um die 6 stärksten Sender in dem ausgewählten Frequenzband automatisch zu
speichern.
58
Page 59

ANSPIELEN VON GESPEICHERTEN SENDERN
> Halten Sie die AS/PS-Taste auf dem Bedienteil gedrückt oder berühren Sie das ( ) oder
( )-Icon auf dem TFT Bildschirm, um die gespeicherten Sender des ausgewählten Frequenzbandes kurz nacheinander anzuspielen.
> Drücken Sie erneut die AS/PS-Taste oder berühren Sie erneut das ( )-Icon, um das Anspielen
zu beenden und die gerade wiedergegebene Radiostation auszuwählen.
SUCHE NACH EINEM BESTIMMTEN PROGRAMMTYP
> Berühren Sie das PTY-Icon, um das Menü mit den verschiedenen Programmtypen aufzurufen.
Berühren Sie das Icon des gewünschten Programmtyps, um das Gerät automatisch nach Radiostationen suchen zu lassen, die gerade eine Sendung mit der gewählten PTY Kennung ausstrahlen.
> Sollte gerade keine Sendung ausgestrahlt werden, welche über die ausgewählte PTY Kennung
verfügt, kehrt das Gerät automatisch in den normalen Radiobetrieb zurück.
AF-FUNKTION
> Berühren Sie das AF-Icon, um die AF-Funktion zu de- bzw. aktivieren.
Bei aktivierter AF-Funktion wählt das Gerät automatisch die am Besten zu empfangende Frequenz
der gehörten Radiostation aus.
TA-FUNKTION
> Berühren Sie das TA-Icon, um die TA-Funktion zu de- bzw. aktivieren.
Wenn die TA-Funktion aktiviert wurde, schaltet das Gerät automatisch auf eine Radiostation um,
welche eine entsprechende Verkehrsdurchsage sendet.
Dabei spielt es keine Rolle, in welchem Wiedergabemodus Sie sich befinden.
59
Page 60

DVD-WIEDERGABE
EINLEGEN UND AUSWERFEN EINER DISC
> Legen Sie die Disc in das Laufwerk und achten Sie dabei darauf, das sich noch keine Disc im
Laufwerk befindet.
> Drücken Sie die ( )-Taste auf dem Bedienteil, um die Disc wieder aus dem Laufwerk
auszuwerfen.
ZURueCKSETZEN DES LADEMECHANISMUS
> Sollte nach dem Einlegen einer Disc eine mechanische oder elektrische Störung auftreten, muss
der Lademechanismus zur Behebung der Störung zurückgesetzt werden. Halten Sie die ( )-Taste
auf dem Bedienteil gedrückt, um den Lademechanismus zurückzusetzen und um die Disc auszuwerfen. Anschließend sollte sich das Gerät wieder normal bedienen lassen.
AUSWAHL DES DVD MODUS
> Drücken Sie die SRC-Taste auf der Fernbedienung oder auf dem Bedienteil, um den integrierten
CD/DVD-Player als Wiedergabequelles auszuwählen oder verwenden Sie das Hauptmenü, um
direkt den integrierten CD/DVD-Player als Wiedergabequelle auszuwählen.
VERWENDEN DES TOuCHSCREENS
1 2 3 4 5 6 7
1. Berühren Sie das Icon, um die Wiedergabe zu starten oder zu pausieren.
2. Berühren Sie das Icon, um die Wiedergabe zu stoppen.
3. Berühren Sie das Icon, um den schnellen Rücklauf zu starten.
4. Berühren Sie das Icon, um den schnellen Vorlauf zu starten.
5. Berühren Sie das Icon, um einen bestimmten Bereich (A-B) zu wiederholen.
6. Berühren Sie das Icon, um die Wiedergabe zu wiederholen.
7. Berühren Sie das Icon, um eine der verfügbaren Tonspuren auszuwählen.
8. Berühren Sie das Icon, um die verfügbaren Untertitel anzuzeigen.
9. Berühren Sie das Icon, um das DVD-Menü aufzurufen.
9 8
60
Page 61

WIEDERGABEOPTIONEN
Stoppen der Wiedergabe
> Drücken Sie die ( )-Taste auf der Fernbedienung oder berühren Sie das ( )-Icon auf dem
BAND
/
TFT Bildschirm, um die Wiedergabe zu stoppen.
> Drücken Sie die OK-Taste auf der Fernbedienung oder berühren Sie das ( )-Icon auf dem
TFT Bildschirm, um die Wiedergabe wieder zu starten.
Pausieren der Wiedergabe
> Drücken Sie die OK-Taste auf der Fernbedienung oder berühren Sie das ( )-Icon auf dem
TFT Bildschirm, um die Wiedergabe zu pausieren oder wieder zu starten.
Wiederholen der Wiedergabe
> Drücken Sie die REPEAT-Taste auf der Fernbedienung oder berühren Sie das
REPEAT-Icon auf dem TFT Bildschirm, um einen der folgenden Funktionen auszuwählen:
DVD: Titel wiederholen, Kapitel wiederholen, Wiederholung deaktivieren
MP3: Track wiederholen, Ordner wiederholen, Wiederholung deaktivieren
Wiederholung eines bestimmten Bereichs der Wiedergabe (A-B)
> Verwenden Sie diese Funktion, um einen bestimmten Bereich einer DVD zu markieren und
wiederzugeben.
1. Drücken Sie die ( )-Taste auf der Fernbedienung oder das ( )-Icon auf dem TFT
Bildschirm, um den Startpunkt (A) festzulegen.
2. Drücken Sie die ( )-Taste auf der Fernbedienung oder das ( )-Icon auf dem TFT
Bildschirm, um den Endpunkt (B) festzulegen. Der markierte Bereich wird ab sofort fortlaufend
wiedergegeben.
3. Drücken Sie die Taste bzw. das Icon erneut, um die Funktion zu beenden.
AUFRUFEN DES DVD MENuesÜ
1. Berühren Sie Bereich F des TFT Bildschirms und anschließend das ( )-Icon, um das
DVD-Menü aufzurufen.
2. Verwenden Sie die Pfeiltasten auf der Fernbedienung, um die Titelauswahl auszuwählen.
3. Drücken Sie die TITLE-Taste auf der Fernbedienung, um zwischen den verschiedenen Titeln zu wählen.
4. Drücken Sie die OK-Taste auf der Fernbedienung oder berühren Sie direkt einen der auf dem
TFT Bildschirm angezeigten Titel, um Ihre Auswahl zu bestätigen und die Wiedergabe zu starten.
61
Page 62

DVD-WIEDERGABE
KAPITELAUSWAHL
> Drücken Sie die ( )-Taste auf der Fernbedienung oder berühren Sie Bereich D des TFT Bildschirms,
um das nächste Kapitel einer DVD auszuwählen.
> Drücken Sie die ( )-Taste auf der Fernbedienung oder berühren Sie Bereich C des TFT Bildschirms,
um das vorherige Kapitel einer DVD auszuwählen.
GOTO-FUNKTION
> Während der Wiedergabe einer DVD können Sie mit der GOTO-Funktion direkt an einer bestimmten
Stelle der Disc mit der Wiedergabe fortfahren.
1. Drücken Sie die (-/--)-Taste auf der Fernbedienung oder berühren Sie Bereich A auf dem
TFT Bildschirm, um die GOTO-Funktion zu aktivieren.
2. Drücken Sie eine der ( ) oder ( )-Tasten auf der Fernbedienung, um eine der folgenden
Suchkriterien auszuwählen:
Search
Title --Chapter --Time -- : -- : --
3. Berühren Sie das (-- : -- : -- )-Icon auf dem TFT Bildschirm, um das numerische Tastenfeld auf
dem Bildschirm aufzurufen.
4. Verwenden Sie die numerischen Tasten auf der Fernbedienung oder auf dem TFT Bildschirm,
um die gewünschte Spielzeit oder den gewünschten Track einzugeben.
5. Drücken Sie die OK-Taste auf der Fernbedienung oder berühren Sie das OK-Icon auf dem
TFT Bildschirm, um die Wiedergabe ab der ausgewählten Spielzeit fortzusetzen.
6. Drücken Sie die (-/--)-Taste auf der Fernbedienung oder berühren Sie Bereich F auf dem
TFT Bildschirm, um die Funktion zu beenden.
Spielzeit: Wiedergabe wird bei der ausgewählten Spielzeit fortgesetzt.
Titel/Kapitel: Wiedergabe wird beim ausgewählten Track/Kapitel fortgesetzt.
DIREKTE AUSWAHL EINES KAPITELS/TRACKS
> Währen der Wiedergabe einer CD oder DVD können Sie durch drücken einer der numerischen
Tasten auf der Fernbedienung direkt einen Track bzw. ein Kapitel auswählen.
62
Page 63

AUSWAHL VON VERSCHIEDENEN KAMERAWINKELN /DVD
> Einige DVDs bieten die Möglichkeit, einzelne Szenen aus verschiedenen Kameraperspektiven
wiederzugeben. Wenn eine DVD diese Funktion unterstützt, können Sie durch drücken der
ANGLE-Taste eine der vorhandenen Kameraperspektiven auswählen.
AUSWAHL VON VERSCHIEDENEN TONSPUREN /DVD
> Einige DVDs bieten die Möglichkeit, deren Inhalt in verschiedenen Sprachen (Tonspuren)
wiederzugeben. Wenn eine DVD diese Funktion unterstützt, können Sie durch drücken der
AUDIO-Taste auf der Fernbedienung oder durch berühren des ( )-Icons auf dem
TFT Bildschirm eine der vorhandenen Tonspuren auswählen.
AUSWAHL VON VERSCHIEDENEN UNTERTITELN /DVD
> Einige DVDs bieten die Möglichkeit, den Untertitel in verschiedenen Sprachen anzuzeigen.
Wenn eine DVD diese Funktion unterstützt, können Sie durch drücken der SUB.T-Taste auf der
Fernbedienung oder durch berühren des ( )-Icons auf dem TFT Bildschirm einen der
vorhandenen Untertitel auszuwählen.
WIEDERGABEINFORMATIONEN
> Drücken Sie während der Wiedergabe einer DVD die INFO-Taste auf der Fernbedienung oder
berühren Sie Bereich B auf dem TFT Bildschirm, um sich die folgenden Wiedergabeinformationen
anzeigen zu lassen.
DVD Viedo Elapse time 05:24
Title 1/1 Remain time 02:05:39
Audio 1/16 Chapter 2/32
Subtitle Off
Angle 1/1
63
Page 64

DVD-WIEDERGABE
GENERELLE CD/DVD INFORMATIONEN
Symbol Eigenschaft (12cm Disc) Max. Spielzeit
Single Side (Single Layer, DVD-5) 133 minutes
Single Side (Double Layer, DVD-9) 242 minutes
Double Side (Single Layer, DVD-10) 266 minutes
Double Side (Double Layer, DVD-18) 484 minutes
Single Side (Single Layer, VCD) 74 minutes
Single Side (Single Layer) 74 Minuten
Disc Symbole
Symbol Bedeutung
Anzahl der Tonspuren, die auf der DVD enthalten sind (maximal 8).
Anzahl der Untertitel, die auf der DVD enthalten sind (maximal 32).
Anzahl der Kameraperspektiven die auf der DVD enthalten sind (maximal 9).
Angabe über die verschiedenen Bildformate, die auf der Disc gespeichert
sind. Die Buchstaben “LB” stehen für Letter Box und “PS” fur PAN/SCAN.
Das abgebildete Symbol bedeutet, dass man das 16:9 Bildformat als Letter
Box darstellen kann.
(MPEG 2 Kodierung)
(MPEG 1 Kodierung)
Hinweis auf den Regional Code der DVD:
■ Region 1: USA, Canada, East Pacific Ocean Islands
■ Region 2: Japan, Western Europe, Northern Europe, Egypt,
South Africa, Middle East
■ Region 3: Taiwan, Hong Kong, South Korea, Thailand, Indonesia,
South-East Asia
■ Region 4: Australia, New Zealand, Middle and South America,
South Pacific Ocean Islands/ Oceania
■ Region 5: Russia, Mongolia, India, Middle Asia, Eastern
Europe, North Korea, North Africa, North-West Asia
■ Region 6: Mainland China
■ All: Alle Regionen (Code Free)
64
Page 65

BENUTZEROBERFLaeCHE
1
2
3
141516171819
4
56 7 8 9101112
1. Anzeige der aktuellen Wiedergabequelle. Berühren Sie das Icon, um das Hauptmenü aufzurufen.
2. Berühren Sie das Icon, um den schnellen Rücklauf zu starten.
3. Berühren Sie das Icon, um den vorherigen Track auszuwählen.
4. Anzeige der eingestellten Lautstärke.
5. Berühren Sie das Icon, um die Wiedergabe zu stoppen.
6. Berühren Sie das Icon, um den vorherige Ordner mit den sich auf der Disc befindlichen Tracks anzuzeigen.
7.
Berühren Sie das Icon, um den nächster Ordner mit den sich auf der Disc befindlichen Tracks anzuzeigen.
8. Berühren Sie das Icon, um die SCAN-Funktion zu de- bzw. aktivieren.
9. Berühren Sie das Icon, um das numerische Tastenfeld anzuzeigen.
10. Berühren Sie das Icon, um die REPEAT-Funktion zu de- bzw. aktivieren.
11. Berühren Sie das Icon, um die RANDOM-Funktion zu de- bzw. aktivieren.
12. Berühren Sie das Icon, um zwischen den beiden Anzeigevarianten zu wählen.
13. Name des gerade wiedergegebenen Tracks.
14. Anzeige der aktuellen Uhrzeit.
15. Anzeige der abgelaufenen Spielzeit.
16. Anzeige des gerade wiedergegebenen Tracks und die Gesamtzahl der sich auf der Disc
befindlichen Tracks.
17. Berühren Sie das Icon, um den nächsten Track auszuwählen.
18. Berühren Sie das Icon, um den schnellen Vorlauf zu starten.
19. Berühren Sie das Icon, um die Wiedergabe zu pausieren bzw. wieder fortzusetzen.
13
WIEDERGABE EINER CD
> Nachdem Sie eine CD in das Gerät eingelegt haben, startet die Wiedergabe automatisch und die
Tracks werden nacheinander wiedergegeben.
> Drücken Sie eine der numerischen Tasten auf der Fernbedienung oder berühren Sie das Icon für
den jeweiligen Track, um direkt mit dessen Wiedergabe zu starten.
WECHSELN DES ORDNERS
> Berühren Sie eines der ( ) oder ( )-Icons, um zwischen den sich auf der Disc befindlichen
Ordnern zu wählen und sich deren Inhalt anzeigen zu lassen.
SCHNELLER VOR- UND RÜCKLAUF
> Berühren Sie eines der ( ) oder ( )-Icons, um den schnellen Vor- bzw. Rücklauf zu starten.
65
Page 66

FERNBEDIENUNG
VOR DER INBETRIEBNAHME
> Wenn Sie die Fernbedienung das erste Mal verwenden, müssen Sie die Isolation zwischen den
Batteriekontakten entfernen.
Entfernen
ENTFERNEN DER BATTERIE
Rückseite
Batteriehalterung Drücken
66
Herausziehen
Page 67

Herausziehen Drücken
EINLEGEN DER BATTERIE
Rückseite
Legenen Sie die Batterie mit der
Vorderseite nach oben (+) ein
Drücken
Batteriehalterung
BITTE BEACHTEN:
> Verwenden Sie für diese Fernbedienung nur Lithium Batterien des Typs CR2025 (3V).
> Entfernen Sie die Batterie wenn sie leer ist oder die Fernbedienung eine längere Zeit nicht
benutzt wird.
> Sollte es trotzdem einmal passieren dass die Batterie ausläuft, müssen Sie mit einem Tuch die
Flüssigkeit im Batteriefach entfernen und anschließend eine neue Batterie einlegen.
> Bewahren Sie die Batterie außer Reichweite von kleinen Kindern auf. Sollte die Batterie von
einer Person verschluckt werden, bitte sofort einen Arzt aufsuchen.
67
Page 68

FEHLERSUCHE
GENERELLE PROBLEME:
Problem Ursache Lösung
Das Gerät lässt sich nicht einschalten. 1. Die Sicherung des Gerätes ist defekt. 1. Wechseln Sie die defekte Sicherung aus.
Die Fernbedienung funktioniert nicht. 1. Die Batterie der Fernbedienung ist leer. 1. Wechseln Sie die Batterie aus.
Keine bzw. zu leise Audiowiedergabe.
Verzerrte bzw. schlechte 1. Eine kopierte Disc wird nicht 1. Verwenden Sie eine originale Disc.
Audiowiedergabe. wiedergegeben.
Die “Tel.Mute“ Funktion funktioniert 1. Das Anschlusskabel “MUTE“ hat 1. Überprüfen Sie entsprechend die Installation,
nicht richtig. Kontakt mit Masse. bzw. die Verkabelung.
Der Gerätespeicher wird nach
Ausschalten des Motors gelöscht. 1. Die Stromversorgung (ACC und +12V) 1. Überprüfen Sie entsprechend die Installation,
BILDSCHIRM:
Der Monitor öffnet sich nicht automatisch.
Kein Bild (DVD). 1. Das Anschlusskabel “PARKING BRAKE“ 1. Überprüfen Sie entsprechend die Installation,
Die Bildsynchronisation ist fehlerhaft 1. Die DVD ist nicht mit der eingestellten 1. Ändern Sie die eingestellte Videonorm im Menü
und weist Störungen auf. Videonorm kompatibel.
Das Bildformat wird fehlerhaft dargestellt.
Der Monitor stoppt beim ausfahren
an einer falschen Stelle. um den Monitor noch einmal auszufahren.
Der Touchscreen funktioniert 1. Das Gerät wurde vorher von der 1. Kalibrieren Sie den Touchscreen.
schlecht bzw. gar nicht. Spannungsversorgung getrennt und/
TUNER:
Der Radioempfang ist schlecht. 1. Die automatische Antenne ist nicht 1. Überpru¨fen Sie entsprechend die Installation,
2. Die Fahrzeugsicherung ist defekt. 2. Wechseln Sie die defekte Sicherung aus.
3. Falsche Bedienung. 3. Drücken Sie die RESET-Taste, um das Gerät,
2. Die Batterie wurde nicht richtig eingelegt.
1. Fehlerhafte Installation bzw.Verkabelung.
2. Die Lautstärke ist zu leise eingestellt. 2. Erhöhen Sie die Lautstärke.
3. Das Anschlusskabel “MUTE“ ist nicht 3. Überprufen Sie entsprechend die
richtig angeschlossen. Installation, bzw. die Verkabelung.
4. Die Lautsprecher sind beschädigt. 4. Tauschen Sie die Lautsprecher aus.
5. Die Balance ist nicht richtig eingestellt. 5. Stellen Sie die Balance richtig ein.
6. Das Anschlusskabel eines 6. Isolieren Sie blanke Lautsprecherkabel.
Lautsprechers hat Kontakt mit der
Fahrzeugmasse.
2. Die Impedanz des Lautsprechers 2. Verwenden Sie Lautsprecher mit einer
passt nicht zum Gerät. passenden Impedanz.
3. Der Lautsprecher hat einen Kurzschluss. 3. Überprüfen Sie die Lautsprecheranschlusse
ist nicht richtig angeschlossen. bzw. die Verkabelung.
1. Die Funktion “TFT Auto Open“ ist 1. Aktivieren Sie “TFT Auto Open“.
deaktiviert.
wurde nicht richtig angeschlossen. bzw. die Verkabelung.
2. Die Funktion “PRK SW“ ist aktiviert und 2. Parken Sie das Fahrzeug an einem sicheren
die Handbremse ist nicht angezogen. Ort und ziehen Sie die Handbremse an.
2. Die Videoverbindung ist fehlerhaft. 2. Überprüfen Sie entsprechend die Installation,
1. Das Bildformat wurde falsch eingestellt, 1. Stellen Sie das Bildformat richtig ein.
bzw. angepasst.
1. Der Monitormechanismus wurde blockiert.
oder ein neues Software Update
wurde installiert.
vollständig ausgefahren.
2. Die automatische Antenne ist nicht 2. Überpru¨fen Sie entsprechend die Installation,
richtig angeschlossen.
3. Die “REG“ Funktion ist aktiviert. 3. Deaktivieren Sie die “REG“ Funktion.
bzw. alle Einstellungen in den Auslieferungszstand zuruckzusetzen.
2. Entnehmen Sie die Batterie noch einmal und
legen Sie die Batterie richtig ein.
1. Überprüfen Sie entsprechend die
Installation, bzw. die Verkabelung.
oder tauschen Sie den evt. defekten
Lautsprecher aus..
bzw. die Verkabelung.
1. Drucken Sie noch einmal die OPEN-Taste,
bzw. die Verkabelung der automatischen Antenne.
bzw. die Verkabelung der automatischen Antenne.
68
Page 69

CD/DVD:
Problem Ursache Lösung
Es kann keine Disc eingelegt werden. 1. Es wurde bereits eine Disc eingelegt. 1. Entfernen Sie die Disc und legen anschließend
Die Disc kann nicht wiedergegeben 1. Die Disc ist verzogen oder verkratzt. 1. Verwenden Sie eine Disc die sich in einem
werden. guten Zustand befindet.
Das Bild ist unscharf, gestört oder dunkel.
Das PBC Menu¨ kann während der 1. Die wiedergegebene Disc verfu¨gt u¨ber
Wiedergabe einer VCD nicht kein “PBC“ Menu¨.
genutzt werden.
Die “REPEAT“ Funktion und der 1. Die “PBC“ Funktion ist aktiviert. 1. Deaktivieren Sie die “PBC“ Funktion.
Suchlauf funktionieren während der
Wiedergabe einer VCD nicht.
MP3:
Störungen während der Wiedergabe. 1. Die Disc ist schmutzig oder verkratzt. 1. Reinigen Sie die Disc oder verwenden Sie
Die Anzeige eines Dateinamens 1. Das LCD-Display kann die Menge an
(ID3-Tag) ist fehlerhaft. Buchstaben nicht darstellen.
EINGABE DES SICHERHEITSCODES:
Das Gerät lässt sich nicht mehr in
Betrieb nehmen und die Eingabe von der Spannungsquelle getrennt festgestellten Sicherheitscode ein um das
eines Sicherheitscode wird verlangt. und die Funktion “Eingabe eines Gerät wieder in Betrieb zu nehmen.
Der eingegebene Sicherheitscode 1. Sie haben den falschen Sicherheitscode 1. Geben Sie den richtigen Sicherheitscode ein.
wird nicht angenommen. eingegeben.
Das Gerät ist gesperrt und es 1. Der Sicherheitscode wurde dreimal 1. Wenden Sie sich direkt an den XZENT Händler,
ist nicht länger möglich, einen hintereinander falsch eingegeben. bei welchem Sie das Gerät gekauft haben bzw.
Sicherheitscode einzugeben. Aus Sicherheitsgru¨nden (Diebstahl etc.) an einen XZENT Händler in Ihrer Nähe.
FEHLERMELDUNGEN:
Loading 1. Die Disc wird gerade geladen.
No Disc 1. Die Disc ist verschmutzt. 1. Reinigen Sie die Disc mit einem weichen Tuch.
Bad Disc 1. Die Disc ist verschmutzt. 1. Reinigen Sie die Disc mit einem weichen Tuch.
Unknown Disc 1. Das Format der Disc ist nicht mit dem
Region Error 1. Der Regional Code der Disc stimmt
Error 1. Eine nicht zulässige mechanische 1. Halten Sie die EJECT-Taste fu¨r 5 Sekunden
2. Die Disc ist verschmutzt oder nass. 2. Reinigen Sie die Disc mit einem weichen Tuch.
3. Die Disc ist nicht mit dem Gerät 3. Verwenden Sie eine kompatible Disc
kompatibel.
4. Die “PARENTAL LOCK“ Einstellung 4. Ändern Sie die “PARENTAL LOCK“ Einstellung.
ist zu hoch eingestellt.
5. Der Regional Code der Disc stimmt 5. Verwenden Sie ein Disc mit dem richtigen
nicht mit dem des Gerätes überein Regional Code.
6. Die Disc wurde falsch herum eingelegt. 6. Legen Sie die Disc mit dem Label nach
1. Die Disc wurde illegal vervielfältigt. 1. Verwenden Sie eine originale Disc.
2. Die Datei ist beschädigt, bzw. wurde 2. Verwenden Sie eine andere Disc, bzw.
falsch aufgenommen. brennen Sie die Dateien noch einmal.
1. Das Gerät wurde länger als 40 Sekunden
Sicherheitscode“ wurde davor aktiviert.
wird das Gerät automatisch gesperrt und
lässt sich nur mit einem Mastercode
wieder in Betrieb nehmen.
2. Die Disc wurde falsch herum eingelegt. 2. Legen Sie die Disc mit dem Label nach
3. Die Disc wurde nicht richtig eingezogen. 3. Legen Sie die Disc richtig ein.
2. Die Disc wurde falsch herum eingelegt. 2. Legen Sie die Disc mit dem Label nach
Gerät kompatibel.
nicht mit dem des Gerätes u¨berein.
Bedienung wurde ausgefu¨hrt. gedru¨ckt, um einen Reset des
die andere Disc ein.
oben in das Gerät.
eine andere Disc.
1. Geben Sie den von Ihnen im Vorfeld
2. Deaktivieren Sie die Funktion “Eingabe
eines Sicherheitscode“. Wenn Sie diese
Funktion deaktiviert haben und das Gerät
von der Spannungsquelle trennen, ist es
nach der erneuten Installation nicht nötig,
den Sicherheitscode einzugeben.
oben in das Gerät.
oben in das Gerät.
Lademechanismus durchzufu¨hren.
69
Page 70

SPEZIFIKATIONEN
DVD Player
Frequenzgang: 10Hz-20kHz
Kanaltrennung @ 1kHz: >65dB
D/A Konverter: 24 Bit
FM Tuner
Frequenzbereich: 87.5MHz-108MHz
Empfindlichkeit: 8.5dBf
Empfindlichkeit (Stereo) @ 1kHz: 40dB
Frequenzgang: 30Hz-13kHz
AM Tuner
Frequenzbereich: 522MHz-1629MHz
Empfindlichkeit: 22uV
Frequenzgang: 30Hz-2.2kHz
TFT Bildschirm
Panel: 7°± (177.8 mm)
Blickwinkel (oben/unten/links/rechts): 30/60/60/60
Auflösung: 480 x 234 (Breite x Höhe)
Helligkeit (cd/m2): 350
Kontrast: 300:1
Pixel: 336,960
Generell
Betriebsspannung: 11-16 VDC
Lautsprecherimpedanz: 4~8 Ohm
Ausgangsspannung (Pre-out): 2 Volt
Impedanz (Pre-out): 200 Ohm
Dimensionen: 7" x 7" x 2", (178 x 178 x 51 mm)
CEA-2006 Power Standard Specifications
(Referenz: 14.4VDC +/- 0.2V, 20Hz~20kHz)
Ausgangsleistung: 17 Watt RMS x 4 an 4 Ohm < 1% THD+N
Signal-Störabstand: 80dBA (Referenz: 1 Watt an 4 Ohm)
Änderungen der technischen Daten und des Designs zum Zwecke der Verbesserung des
Produktes vorbehalten.
Sollten Sie dieses Gerät eines Tages entsorgen mu¨ssen, beachten Sie bitte
dass elektrische Geräte nicht mit dem Haushaltsmu¨ll entsorgt werden sollten.
Fu¨hren Sie das Gerät wenn möglich dem Recycling zu. Ihre lokalen Behörden
oder Ihr Händler können Sie dementsprechend informieren (Richtlinie u¨ber die
Entsorgung elektrischer und elektronischer Ausstattungen).
This unit is manufactured under license from Dolby Laboratories. “Dolby”, “Pro
Logic II”, and the double - D symbol are trademarks of Dolby Laboratories.
70
Page 71

INTEGRIERTER DVD/CD/MP3/WMA-PLAYER
• Wiedergabe von CD, CD-R/RW, MP3, WMA,
DVD, DVD-R/RW, DVD+R/RW und DVD-MP3
• Regional Code 2
• Integrierter Dolby Digital Decoder
• Elektronisches (ESP) und mechanisches AntiShock-System
MOTORBETRIEBENER LCD MONITOR
• Voll motorunterstütztes, hochwertiges 7“/16:9 LCD
Display mit Touchscreen-Steuerung
TUNER
• UKW/MW-Tuner
• 30 Stationsspeicherplätze (18 FM/12 AM)
• Radio Daten System (RDS)
A/V-ANSCHLÜSSE
• 2 x Videoausgänge
• 4.1 Vorverstärkerausgänge (Front, Rear und Subwoofer)
• 1 x Aux-In (Stereo)
SONSTIGE MERKMALE
• Tastenbeleuchtung und Farbe der LCD-Segmente
blau und weiß
• Eingebaute Digitalendstufe mit 4 x 40 Watt
• ISO-Stecker für Stromversorgung und Lautsprecheranschlüsse
• IR-Fernbedienung
71
Page 72

Contents
2 YEARS LIMITED WARRANTY
Dear customer
Thank you for purchasing this XZENT product. It is advisable to keep the original packing material
for any future transporting of the product.
Should your XZENT product require warranty service, please return it to the retailer from whom
it was purchased or the distributor in your country.
This XZENT product is warranted against defective materials or workmanship for a period of
TWO years from date of purchase at retail.
WARRANTY LIMITATIONS
This warranty does not cover any damage due to:
1. Improper installation, incorrect audio or mains connection(s).
2. Exposure to excessive humidity, fluids, heat sun rays or excessive dirt or dust.
3. Accidents or abuse, unauthorized repair attempts and modifications not explicitly
authorized by the manufacturer.
This warranty is limited to the repair or the replacement of the defective product at the
manufacturer’s option and does not include any other form of damage, whether incidental,
consequential or otherwise. The warranty does not cover any transport costs or damages
caused by transport or shipment of the product. Warranty work will not be carried out unless this
warranty certificate is presented fully completed with model, serial number, purchaser’s address,
purchasing date and dealer stamp together with the original sales slip!
2 JAHRE GARANTIE
Sehr geehrter Kunde,
Vielen Dank, dass Sie sich zum Kauf dieses hochwertigen Produktes von XZENT entschlossen
haben. Wir bitten Sie, die Originalverpackung aufzuheben, z.B. fu¨r den Transport bei einem
Garantiefall.
Wenn Sie Garantie-Leistungen fu¨r dieses XZENT Produkt beanspruchen, wenden Sie sich bitte
direkt an den Händler, bei dem das Gerät gekauft wurde.
Dieses XZENT Produkt ist durch eine Werksgarantie von 2 Jahren ab Kaufdatum im Fachhandel
gegen Material- oder Herstellungsfehler geschu¨tzt.
GARANTIE-EINSCHRÄNKUNGEN
Nicht unter Garantie fallen Schäden infolge von:
1. unsachgemässem Einbau oder inkorrektem Audio- oder Stromanschluss.
2. Einwirkung von u¨bermässiger Feuchtigkeit, Flu¨ ssigkeit, Hitze, Sonneneinstrahlung oder starker
Verschmutzung.
3. mechanischer Beschädigung durch Unfall, Fall oder Stoss; Schäden durch nicht autorisierte
Reparaturversuche und/oder Modifikationen.
Die Garantie dieses Produkts bleibt in jedem Fall auf die Reparatur bzw. den Ersatz (Entscheidung
beim Hersteller) des XZENT Produktes beschränkt. Transportschäden und die Kosten des
Ru¨cktransportes sind durch diese Garantie nicht abgedeckt. Jeder u¨ber diese Garantie-Erklärung
hinausgehende Anspruch und Haftung fu¨r direkte / indirekte Folgeschäden werden ausdru¨ cklich
abgelehnt. Garantie-Anspru¨che können nur mit einer korrekt und vollständig ausgefu¨llten
Garantie-Karte und dem Original-Kaufbeleg geltend gemacht werden.
72
Page 73

XZent MODEL: xt7010
Serial number: .........................................................................................................................................
Date of purchase: ....................................................................................................................................
Your name: ..............................................................................................................................................
Your address: ..........................................................................................................................................
City: .........................................................................................................................................................
State: ............................................. ZIP or postal code...........................................................................
Country: ..................................................................................................................................................
Dealer’s address & stamp
73
Page 74

MOBILE ENTERTAINMENT STATION
 Loading...