

Page 1

PRIME/ESSENTIAL
DEVICE USER MANUAL
EN
Page 2

2 3
Device use r manual for ZENEC medi a system
We are delighted that you have chosen a pro duct from ZEN EC.
The more familiar you make yourself with the func tions of the ZEN EC system the more co nfident you
will be in operating it. Please read this operat ing manual befor e you start you r new ZENEC system.
In this device us er manual you will f ind impor tant instr uctions and in formation for the safe operation
of the ZENEC system, an d to help you make the mos t of its technic al advantages.
For more inform ation please v isit the off icial home page, or conta ct an authori zed ZENEC dealer
(zenec.com - deal ers).
ZENEC wishes you a g ood and safe jou rney!
About this manual
This device use r manual gives a des cription of all the equipment o r model variant s of the ZENEC
systems. In additi on, optional eq uipment or featur es of the vehicle a re described that may not be
included as st andard in your vehicle. These are no t identifie d for each and ever y individual c ase.
Therefore equipment or feature s will be descr ibed that may not be i n your ZENEC system or vehi cle.
More inform ation can be obtained from your authorized Z ENEC dealer.
All the infor mation in this m anual corresponds to the st ate at the time of going to press, and applies
only to ZENEC systems i n original condition. On ac count of possible updates to dev ice soft ware, the
illustratio ns and features sh own in this oper ating manual may be di fferent fr om your ZENEC system.
Differences in the info rmation, illustrations or f eatures cannot form a basis for a ny claims.
If you sell your vehic le with the ZEN EC system still fit ted, please en sure that this op erating manual
stays with the vehi cle, and that any personal data like a phonebook stored in the device i s deleted.
Resetting:
Settings → Dev ice Confi guration → He lp → Factory Setting
BEFORE FIRST US E
✓ The safety instr uctions of the vehicle manufa cturer, and the instr uctions given in this operati ng
manual are all generally applicable.
✓ Ple ase pay attentio n to the safety instruction s on the ZENEC system.
✓ Before start ing your journey ma ke yourself famil iar with the ope ration of the ZENEC system.
✓ Ple ase use only suitable media for aud io modes.
✓ If the ZENEC system has bee n disconnec ted from the power supply before use, it will be
necessar y to carr y out a Sat-Fix before using the navigation system.
Sat-Fix:
Special User Manual → Navigation
Page 3
4 5
SAFETY INSTRUCTIONS
CAUTION
If the driver of th e vehicle is dist racted, this may le ad to an accident or injury. Operating the
ZENEC system can distract attent ion from the g eneral traf fic situat ion! Equally, connec ting,
changing or inserting dat a media can dis tract the driver from the gen eral traffic situation.
CAUTION
Devices, like mo bile phones or r emovable storag e devices, that a re not fixed or are inadequately
secured can be thrown through the interio r of the vehicle by a sud den driving maneuver or an
accident, thereby causing injury to vehicle occupants.
CAUTION
When the housing of a CD/DVD player i s opened injur ies may be caused by invisible laser
radiation.
Modific ations of the ZENEC system may only be c arried out by sp ecialists aut horized by ZENEC!
CAUTION
Always choos e loudspeaker set tings such that acoustic si gnals coming from outside c an always
be heard in the vehi cle (e.g. signal horns or sirens).
CAUTION
Incorrec t installati on or commis sioning of the ZENEC system may cause dam age to the ZENEC
system or to the vehic le electro nics. Only let q ualified sp ecialists authorized by ZEN EC install the
device.
CAUTION
This ZENEC system is i ntended solely for operatio n at an on-boa rd voltage of 12 V DC. Ope rating
the ZENEC system at any oth er voltage ca n cause damage to t he ZENEC system or to th e vehicle
electrical system.
CAUTION
Taking apart or modi fying the ZE NEC system can resu lt in damage to the dev ice or the vehic le.
Opening the dev ice or modif ication by a pe rson not autho rized by ZENEC will r ender warrant y
claims null and void.
In the event of a malfun ction or defec t please cont act an author ized ZENEC deale r. Unauthorized
repairs will r ender warrant y claims null an d void.
CAUTION
A volume level that is set too high can damage the hearin g. This is also tr ue when the volume
level is very hig h just for a shor t time.
Changing or co nnecting an au dio source c an lead to sudden f luctuatio ns in the volume level.
CAUTION
Route recomm endations and displayed traf fic signs on t he ZENEC system may dif fer from the
real situatio n. Traffic signs and t raffic regulations have precedenc e over route recom mendations
and indicati ons of the ZENEC syste ms.
Speed data dis played in the navigat ion system cor responds to th e permitte d speed limit. Pl ease
adjust your speed and driving be havior to the prevail ing visibilit y, weather, road, and traffic
conditions.
CAUTION
The connec tion and char ging leads of external mobile dev ices can get in t he way of the driver.
Please run these so that the driver's freedom of movement is not hindered.
Page 4
6 7
CONTENTS
INTRODUCTION
BEFORE FIRST USE ...................................................................................................................... S. 03
SAFETY INSTRUCTIONS .............................................................................................................. S. 04
MAIN MENU.....................................................................................................................................S. 07
MAIN FUNCTIONS ......................................................................................................................... S. 07
ADDITIONAL FUNCTION S ............................................................................................................ S. 07
GLOBAL CONTROLS..................................................................................................................... S. 09
SEARCH & INPUT ...........................................................................................................................S. 10
ENTERTAINMENT
ABOUT THIS C HAPTER ................................................................................................................. S. 11
CONTENTS OF T HIS CHAPTER ...................................................................................................S . 11
RADIO ..............................................................................................................................................S. 13
MEDIA AUDIO ................................................................................................................................ S. 23
MEDIA VI DEO ................................................................................................................................. S. 38
EXTERNAL CONNECTIONS ..........................................................................................................S. 42
REAR SID E ENTERTAINMENT .................................................................................................... S. 46
HANDS-FREE SYSTEM
ABOUT THIS C HAPTER ................................................................................................................ S. 49
CONTENTS OF T HIS CHAPTER .................................................................................................. S. 50
CONNECTION ................................................................................................................................ S. 53
PHONEBOOK ................................................................................................................................. S. 55
NAVIGATION
ABOUT THIS C HAPTER ................................................................................................................ S. 58
CONTENTS OF T HIS CHAPTER .................................................................................................. S. 59
SETTINGS
ABOUT THIS C HAPTER ................................................................................................................ S. 64
CONTENTS OF T HIS CHAPTER .................................................................................................. S. 65
RADIO CONFIGURATION ..............................................................................................................S. 67
MEDIA CONFIGURATION ............................................................................................................. S. 68
BLUETOOTH CONFIGURATION ................................................................................................... S. 6 9
TFT CONFIGURATION ...................................................................................................................S. 74
AUDIO CONFIGURATION ..............................................................................................................S. 75
VEHICLE CO NFIGUR ATION*
DEVICE CONFIGURATION ........................................................................................................... S. 85
GENERAL
ABBREVIATIONS ........................................................................................................................... S. 90
INDEX ............................................................................................................................................. S. 92
STATUTORY RIGHTS AND WARR ANTY ..................................................................................... S. 95
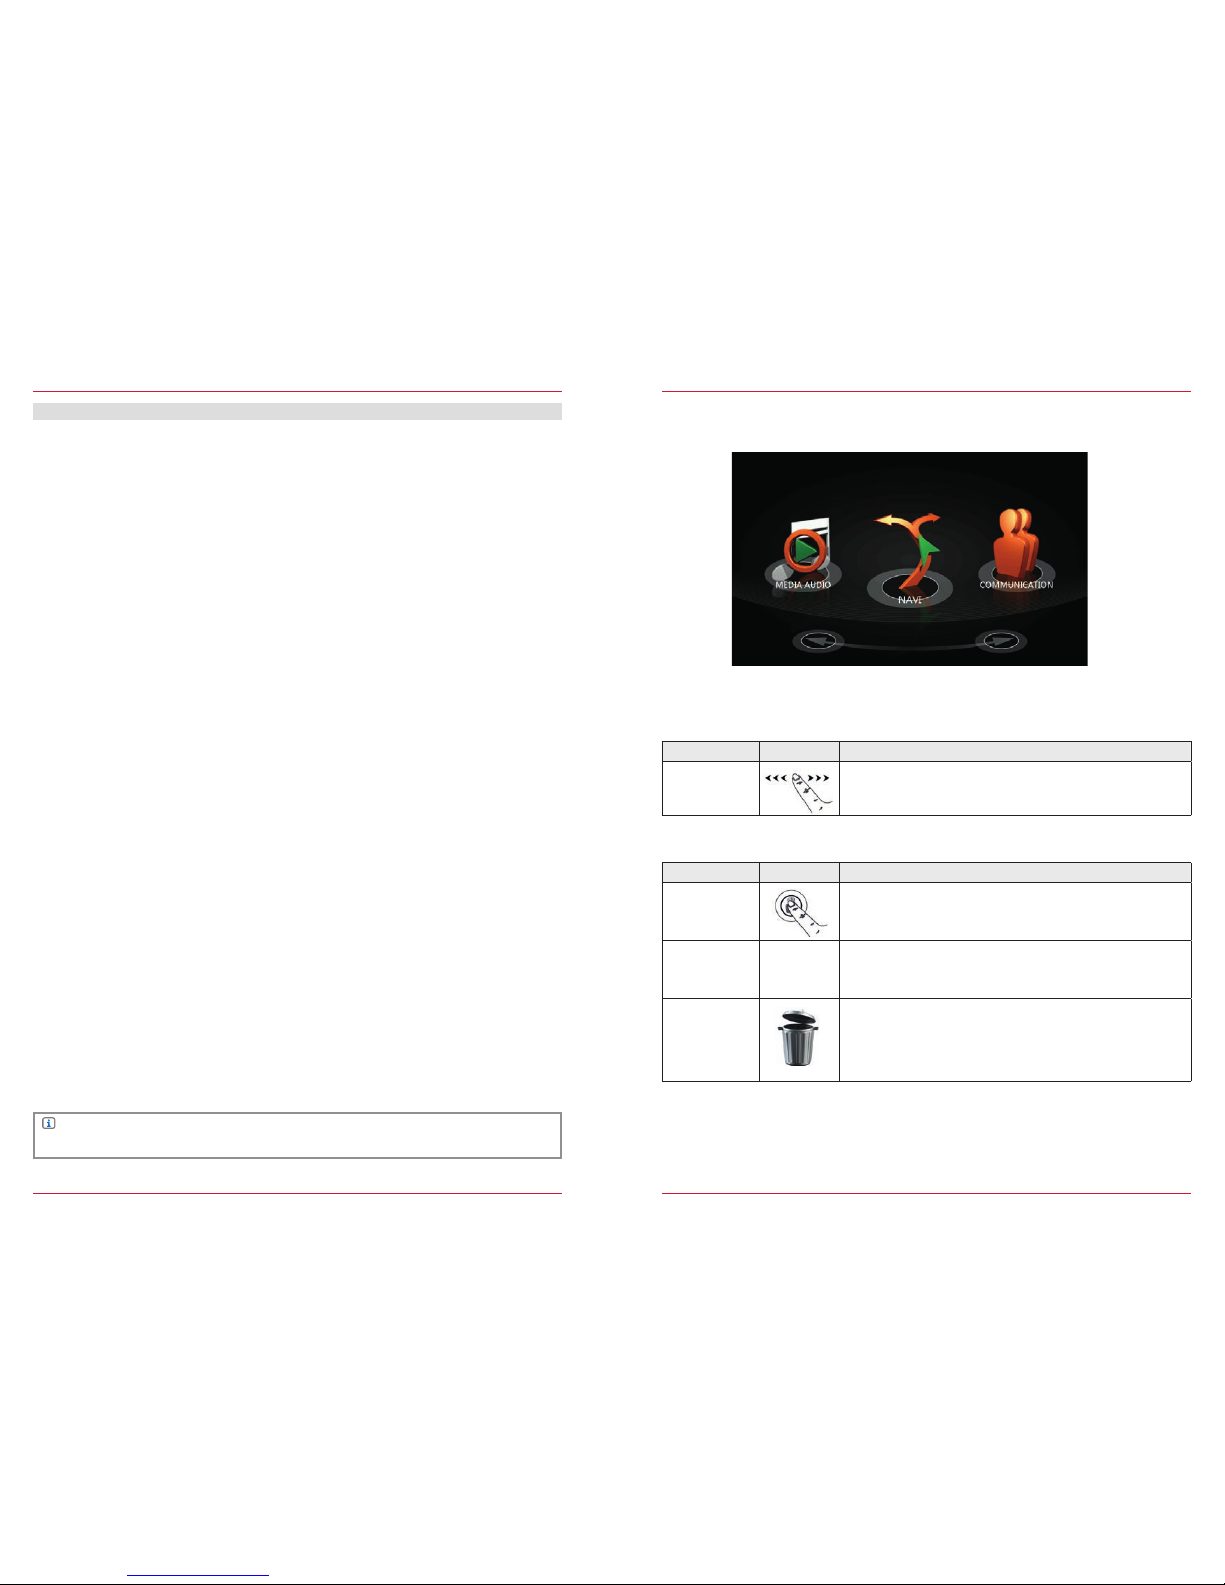
MAIN MENU
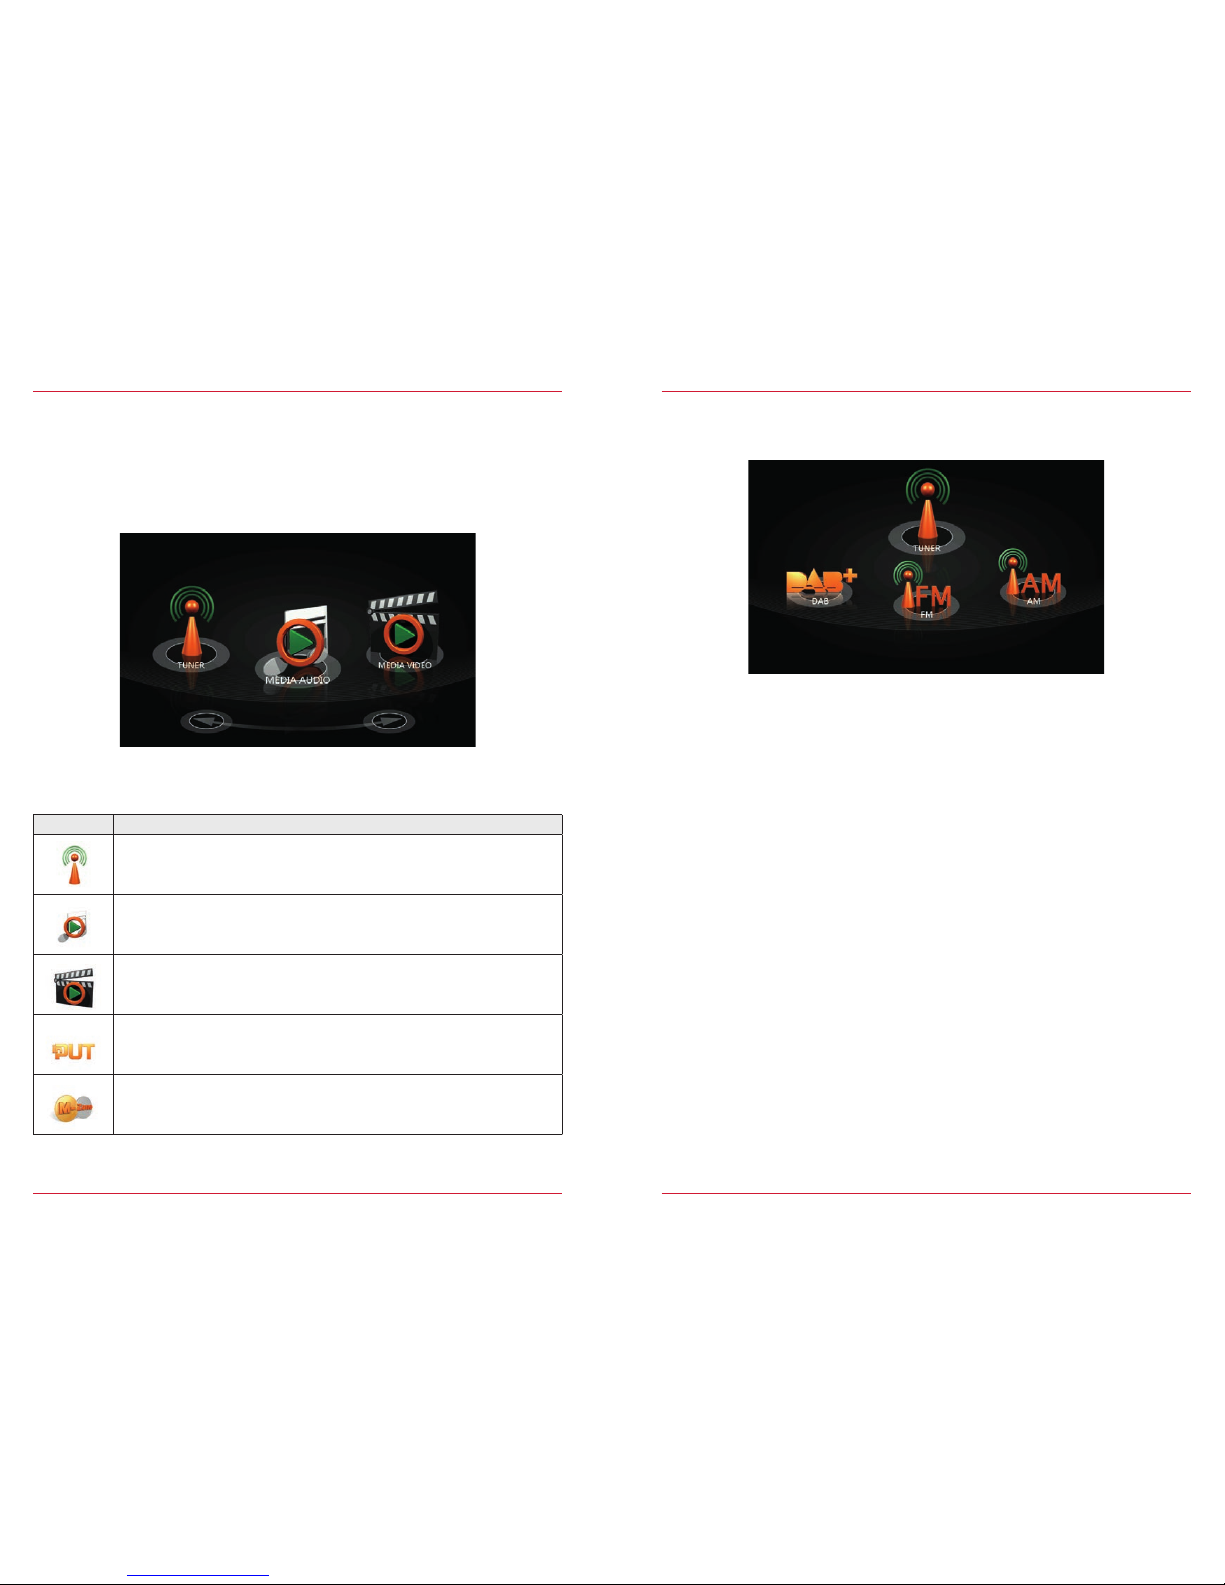
MAIN FUNCTIONS
Fig. 1/01
Function Icon Operation
Slide
Navigate in the main menu by sliding to th e left or rig ht
Function Icon Operation
Move
Press and hold to move an icon to the de sired positi on
Quick access
For quick acce ss you can drag icons that you want
into the header (max . 4 icons).
Recycle bin
By touching and h olding, you can m ove main menu icons
that you no longe r require or use into t he recycle bin.
Conversely, you can ret rieve icons fr om the recycle b in by
dragging them up into the header.
ADDITIONAL FUNCTIONS
NOTE
*Please pay attention to the Devi ce Quick St art Guide to l earn more about the vehicle integration.
Page 5
8 9
Function Icon Operation
Tun er
Touch to select radio pl ayback (FM/AM/DAB+)
Device User Manual → Entert ainment → Radio S. 13
Media Audio
Touch to select audio play back
(DVD/USB/SD/A2DP/Apple)
Device User Manual → Entert ainment → Media Au dio S. 23
Media Video
Touch to select video playback
(DVD/USB/SD/Apple)
Device User Manual → Entert ainment → Media V ideo S. 38
Input
Touch to select external sources
Device User Manual → Entert ainment → Input S. 42
M-Zone
Touch to select playback of rear seat entertainment
Device User Manual → Entert ainment → M-Zone S. 46
Communication
Touch to select Bluetooth mode
Device User Manual → Hands- free System S. 49
Navi
Touch to select navigati on mode
Device User Manual → Navigati on S. 58
Settings
Touch to access the system parameter set tings
Device User Manual → Settings S. 64
CAR
Touch to select the vehicle-specific settings
Device Quic k Start Gu ide → CAR (separately)
Recycle bin
For icons that ar e not needed in the m ain menu
See additional functions S. 7
Main sources
When you are in a sou rce overvie w, return to the main men u by touching the mai n icon you require,
or by pressing th e HOME button.
HOME
button.
NOTE
Inactive ico ns that are grayed out c annot be selected.
Function Icon Operation
List
Touch to display a list in the form of tex t
Tile
Touch to display a list in the form of tiles (image s)
Search
Touch to start a search
Back
Touch to go back one level
Global controls
This list desc ribes globa l controls and their functi ons that you will f ind in different source s of
the ZENEC system. Th e function wi ll always be the sam e: only the displayed c ontent change s,
depending on the source.
Page 6
10 11
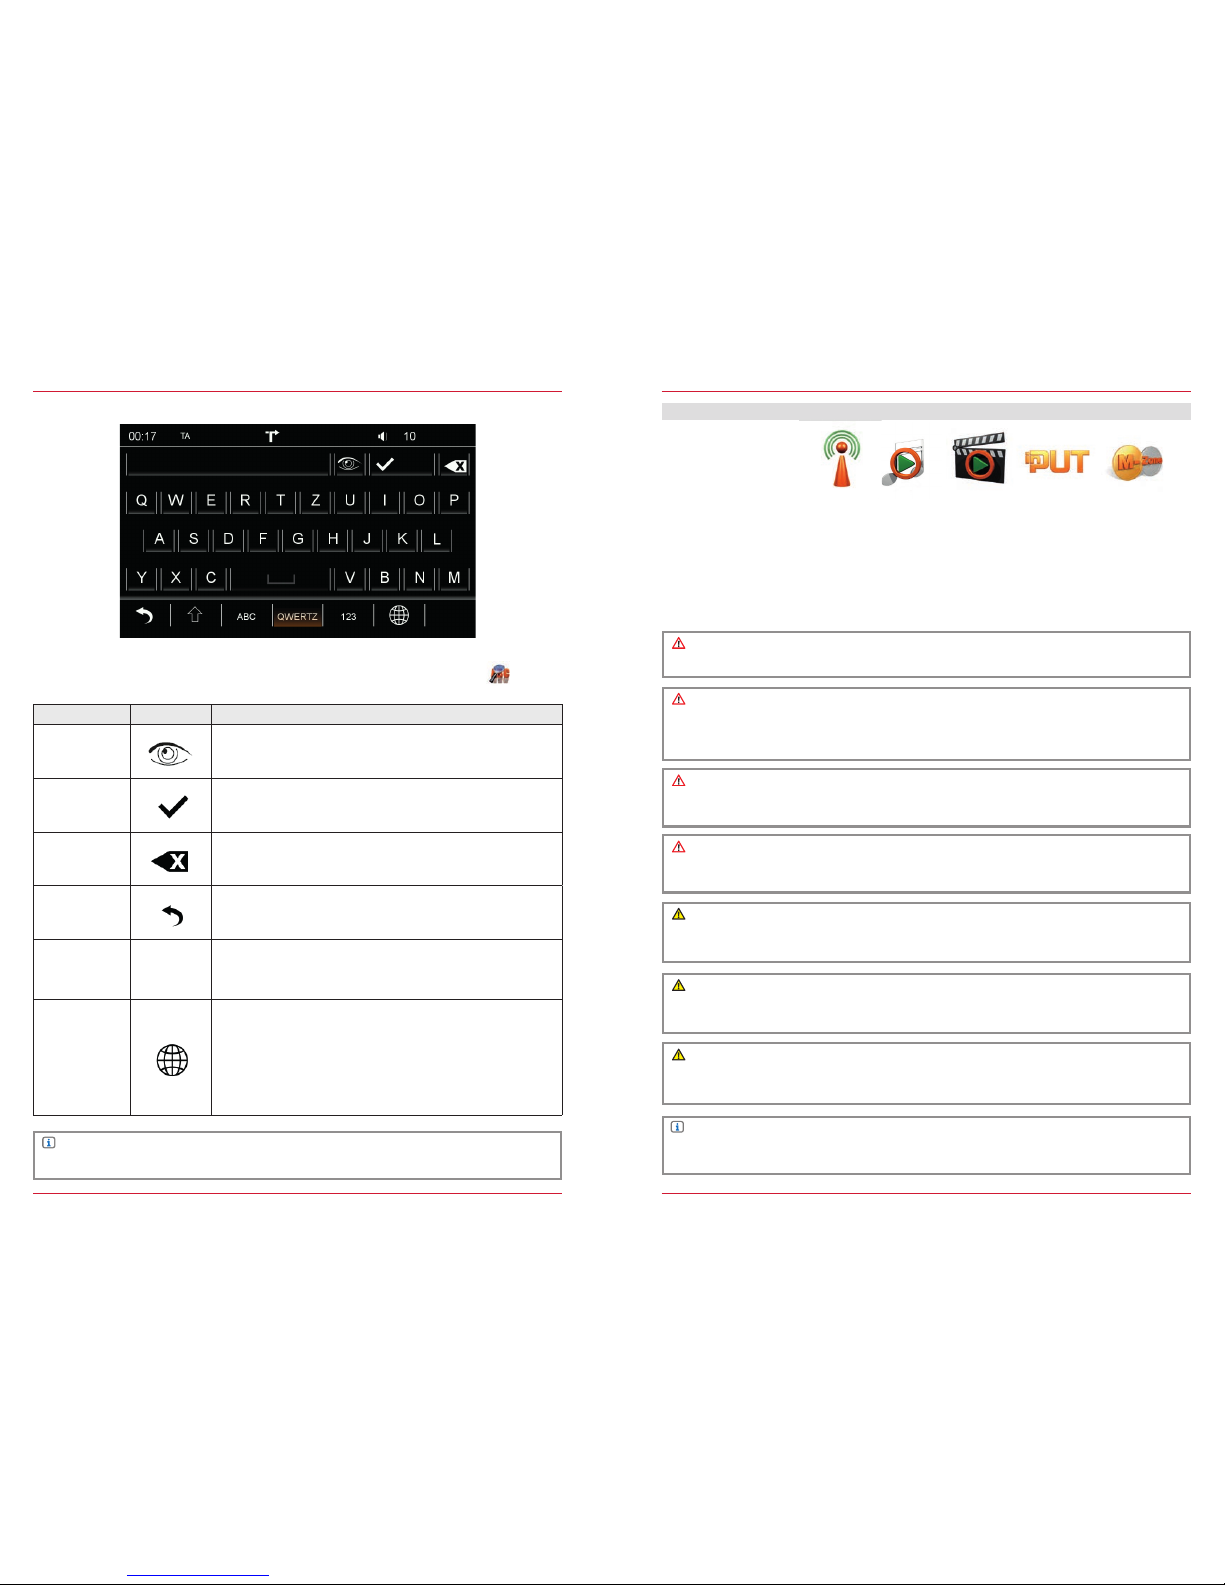
SEARCH & IN PUT
In each of the sources you have the option to make select ions using a search functio n . On this
page we show you how to us e the search mas k.
NOTE
The functio ns Security and Upper/Lower are o nly enabled in th e password func tion.
Fig. 1/02
Function Icon Operation
Security
Touch to show or hide the input on the display
Select
Touch to display the current selectio n
(the number of hits w ill be shown in brackets)
Delete
Touch to delete one character
Hold down to delete the c omplete input
Back
Touch to end the search or input
Upper/Lower
Touch to write a character in upper or lower c ase
Double touch to write all the fo llowing characters in
upper or lower case.
Keypad
Touch to change the keypad layout s
QWERTY
QWERTZ
ABC
GREEK
H E B R E W
CYRILLIC
Keypad assignments like PC keyboard wit h Y
Keypad assignments like PC keyboard wit h Z
Alphabetic keypad assignments
Geek keypad assig nments
Hebrew keypad assi gnments
Cyrillic keypad assignments
ENTERTAINMENT
ABOUT THIS CHAPTER
This chapter de scribes how to operate and use the audio and vide o sources. In ad dition, optio nal
equipment or features of the vehic le are descri bed that may not be inc luded as standard in your
vehicle. These are not identified for each and every individual case. Therefore equipment or features
will be descr ibed that may not be i n your ZENEC system or vehi cle. More info rmation ca n be
obtained fro m your authorized ZENEC dealer.
CAUTION
Only operate t he audio playback or radio while dr iving when th e traffic situation all ows.
CAUTION
Changing or co nnecting an au dio source c an lead to sudden f luctuatio ns in the volume level.
This should be b orne in mind bef ore changing o r connecting an audio sourc e.
SAFETY INSTRUCTIONS
CAUTION
If the driver of th e vehicle is dist racted, this may le ad to an accident or injury. Operating the
ZENEC system can distract attent ion from the g eneral traf fic situat ion! Equally, connec ting,
changing or inserting dat a media can dis tract the driver from the gen eral traffic situation.
CAUTION
Always choos e loudspeaker set tings such that acoustic si gnals coming from outside c an always
be heard in the vehi cle (e.g. signal horns or sirens).
CAUTION
According to the law, the operati on of the video playback while dr iving is not per mitted. For thi s
reason, the pic ture switche s off as soon as t he vehicle moves.
CAUTION
The connec tion and char ging leads of external mobile dev ices can get in t he way of the driver.
Please run the se so that the driver's freedom of movement is not hi ndered.
CAUTION
A volume level that is set too high can damage the hearin g. This is also tr ue when the volume
level is very hig h just for a shor t time.
NOTE
A compatibil ity overvi ew of useful devices together wit h memory sizes and format s can be found
at www.zenec.com.
Page 7
12 13
Sources
BEFORE FIRST US E
✓ The safety instr uctions of the vehicle manufacturer, and the instr uctions given in this operati ng
manual are all generally applicable.
✓ Please pay attention to the safety instruction s on the ZENEC system.
✓ For th e reception of d igital radio stations a suit able antenna system mu st be installed i n the
vehicle. If you have que stions pleas e contact your au thorized ZEN EC dealer.
Fig. 2/01
Icon Function
Radio
(FM/AM/DAB+)
Device User Manual → Entert ainment → Radio S. 13
Audio playback
(CD/Harddisc/A2DP/Apple interface/Gracenote)
Device User Manual → Entert ainment → Media Au dio S. 23
Video playbac k
(DVD/Harddisc)
Device User Manual → Entert ainment → Media V ideo S. 38
External connections
(Smartlink/Camera/AV-IN)
Device User Manual → Entert ainment → Input S. 42
Rear seat entertainment
Device User Manual → Entert ainment → M-Zone S. 46
Overvi ew
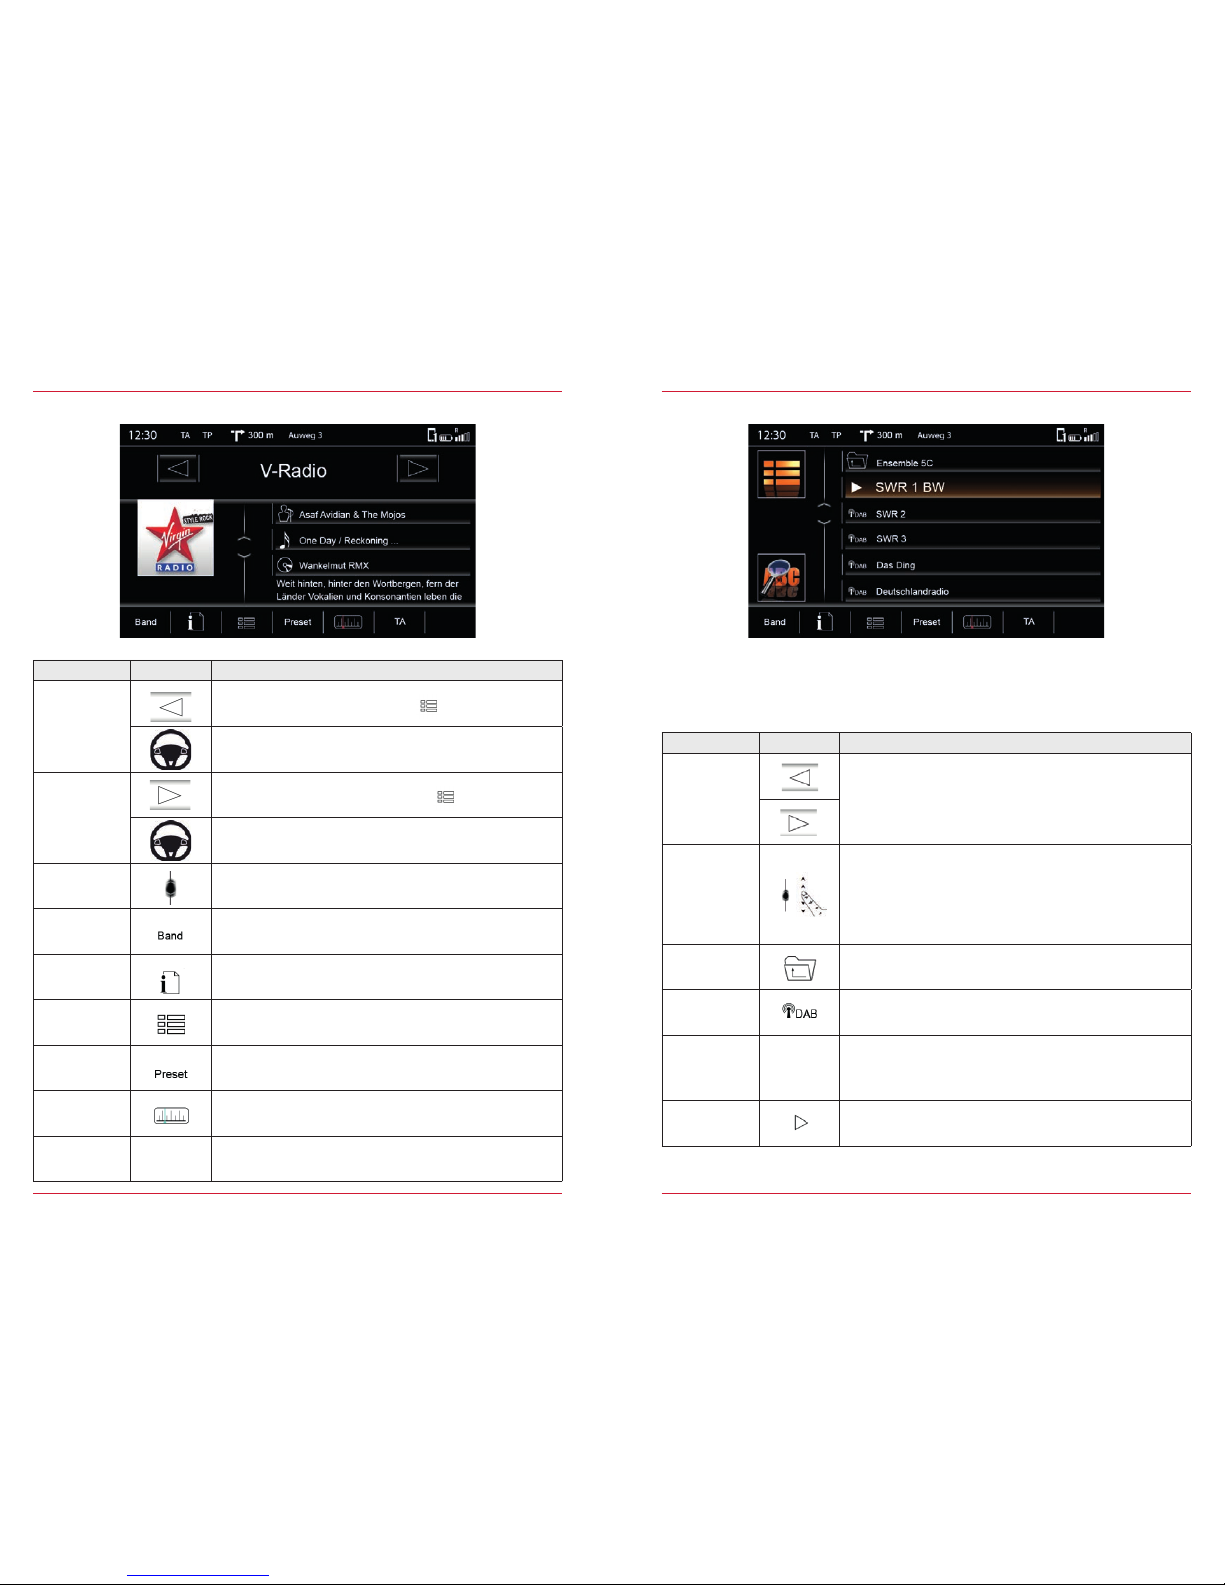
RADIO
Fig. 2/02
Overvi ew
Radio bands .....................................................................................................................................S. 14
Analoge Radio
Radio operation FM .........................................................................................................................S. 15
Station list FM ..................................................................................................................................S. 16
Manual frequency search FM ..........................................................................................................S. 17
Radio operation AM .........................................................................................................................S. 18
Manual frequency search AM ..........................................................................................................S. 19
Digital Radio
Radio operation DAB ...................................................................................................................... S. 20
Station list DA B ................................................................................................................................S. 21
Manual frequency search DAB ........................................................................................................S. 21
Storing stations
Storing stations (DAB/FM/AM) ....................................................................................................... S. 22
Setup
Device User Manual → Settings → Radio Configuration .............................................................. S. 67
Page 8
14 15
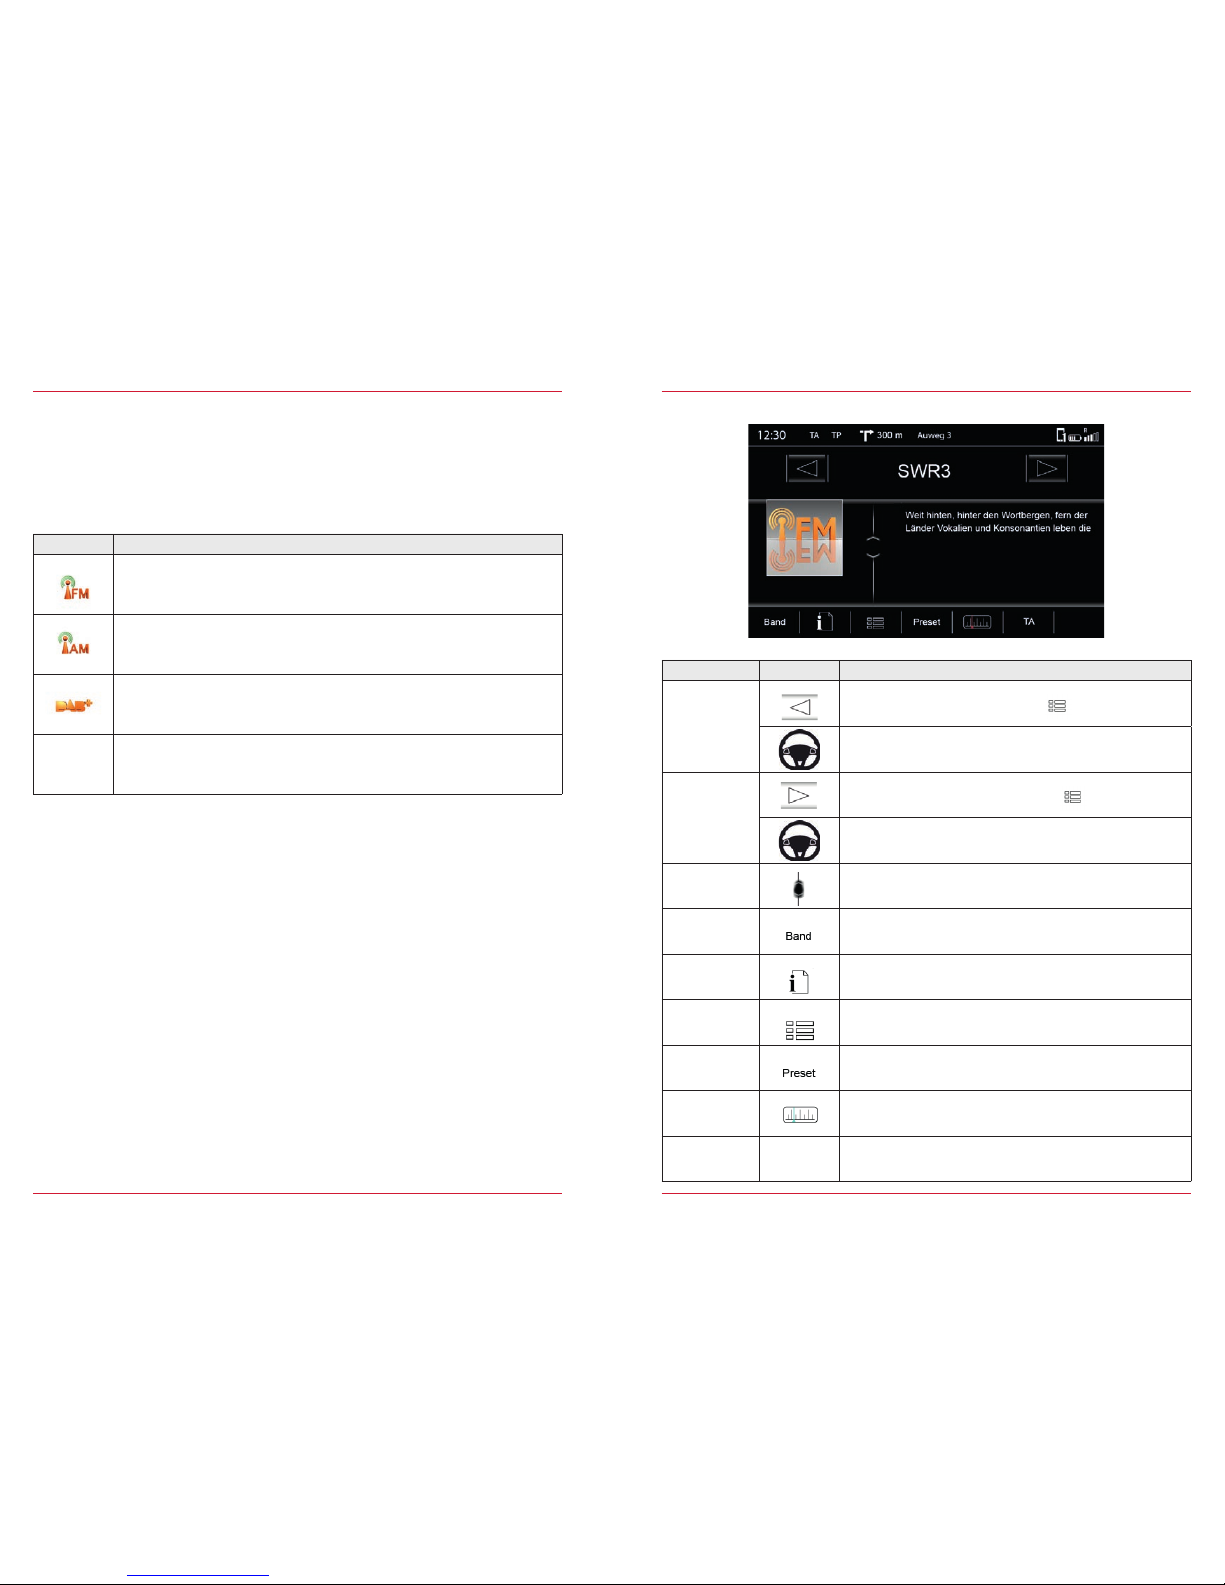
Radio bands
The ZENEC system ena bles you to receive radio statio ns via FM, AM or DA B+. The reception of
the individua l radio bands is de pendent on the position of the antenna in your vehicl e. Thus not all
vehicles fro m the factor y come with antennas designe d for digital ra dio recepti on. If your vehicle
antenna is not DAB c apable, cont act your ZENEC deal er for a retrof it.
Icon Function
Reception of an alog radio stations using FM
Entertainment → Radio → FM S. 15
Reception of an alog radio stations using A M
Entertainment → Radio → AM S. 18
Reception of di gital radio st ations using di gital audio br oadcasting
Entertainment → Radio → DAB+ S. 20
Store radio stations (FM/AM /DAB)
Entertainment → Radio → Store S tation S. 22
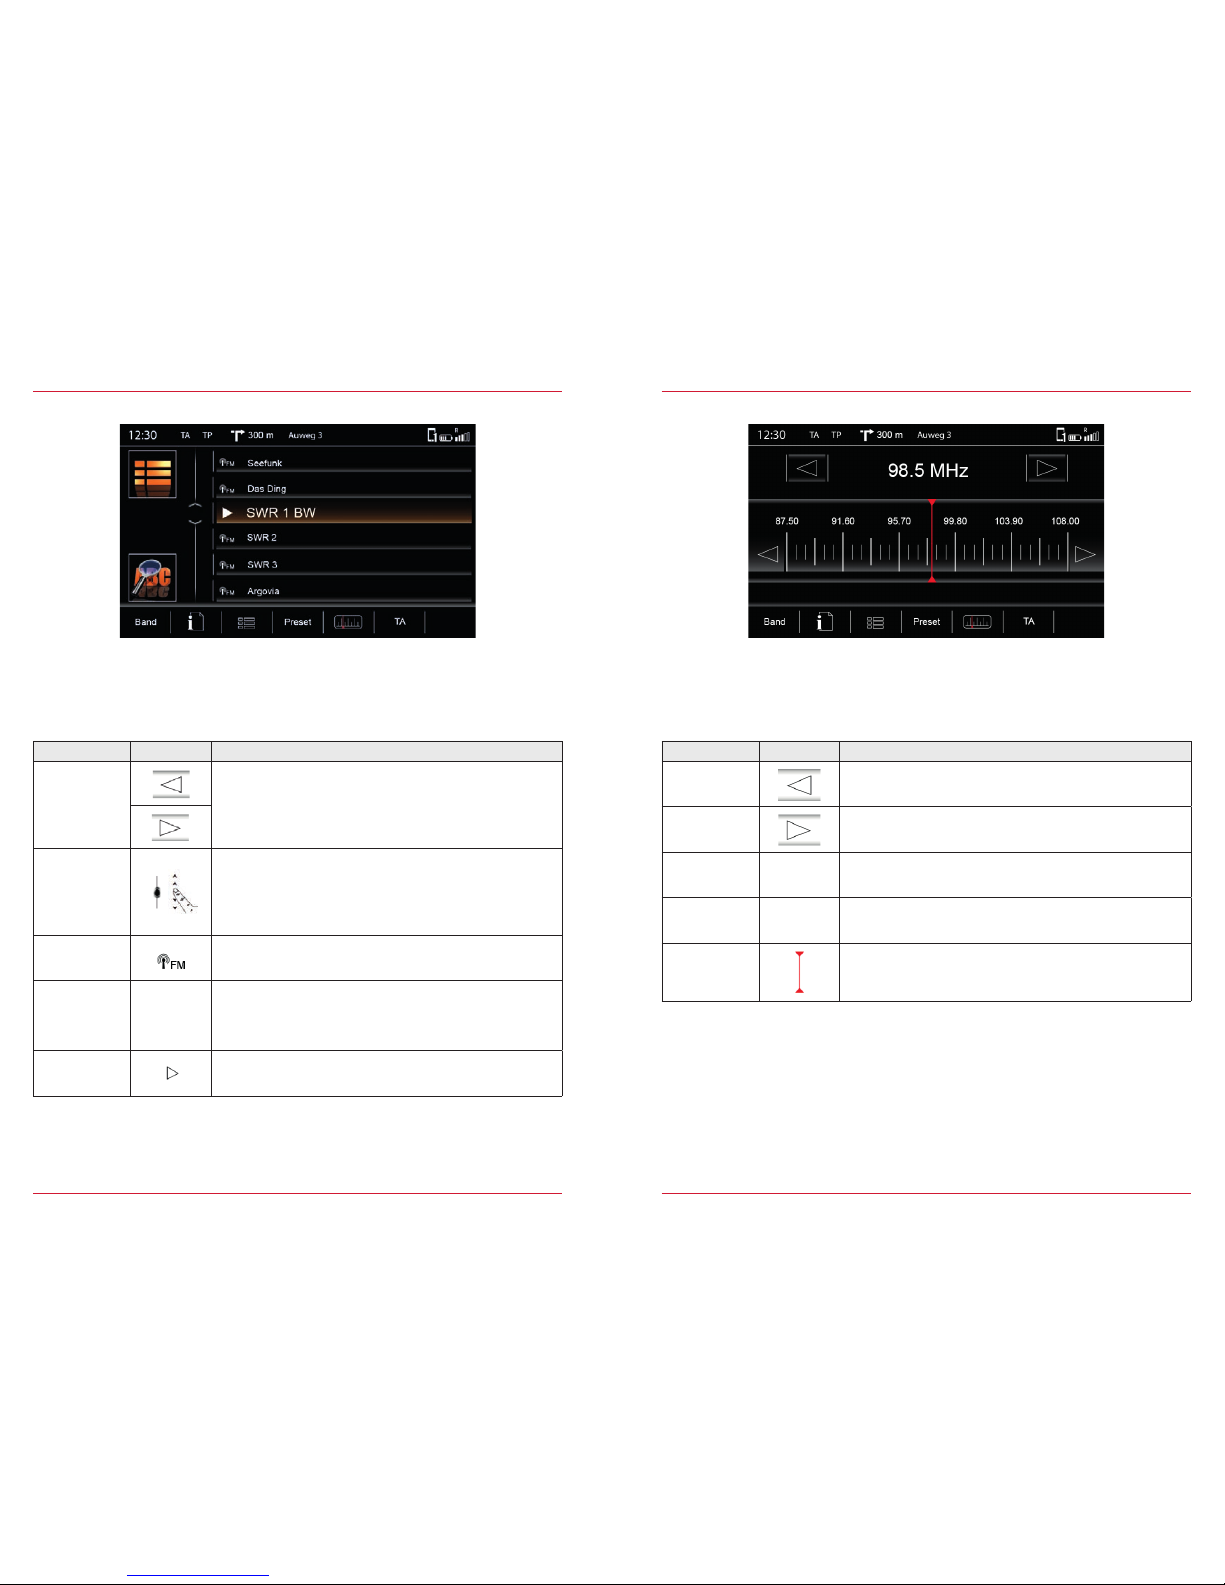
Radio operation FM
Fig. 2/03
Function Icon Operation
Station back
Touch to jump back one station in the folder
Device Quic k Start Gu ide → Multifun ction Steer ing Wheel
(only if suppor ted by vehicle and ZENEC system)
Station forward
Touch to jump forward o ne station in the folder
Device Quic k Start Gu ide → Multifun ction Steer ing Wheel
(only if suppor ted by vehicle and ZENEC system)
Scroll
Touch and hold to move the slider up or down
Band
Touch to access the the desired radio band
(DAB/FM/AM)
Info
Touch to access station information
Folder
Touch to access station lists
(lists all receivable radio stations in the surrounding area)
Preset
Touch to access stored radio stations
(18 presets across all bands)
Entertainment → Radio → Store S tation S. 22
Touch to access the radio frequency scale
TA
TA
Touch to switch on or off t he automatic ch angeover to
stations with traffic announcements
Page 9
16 17
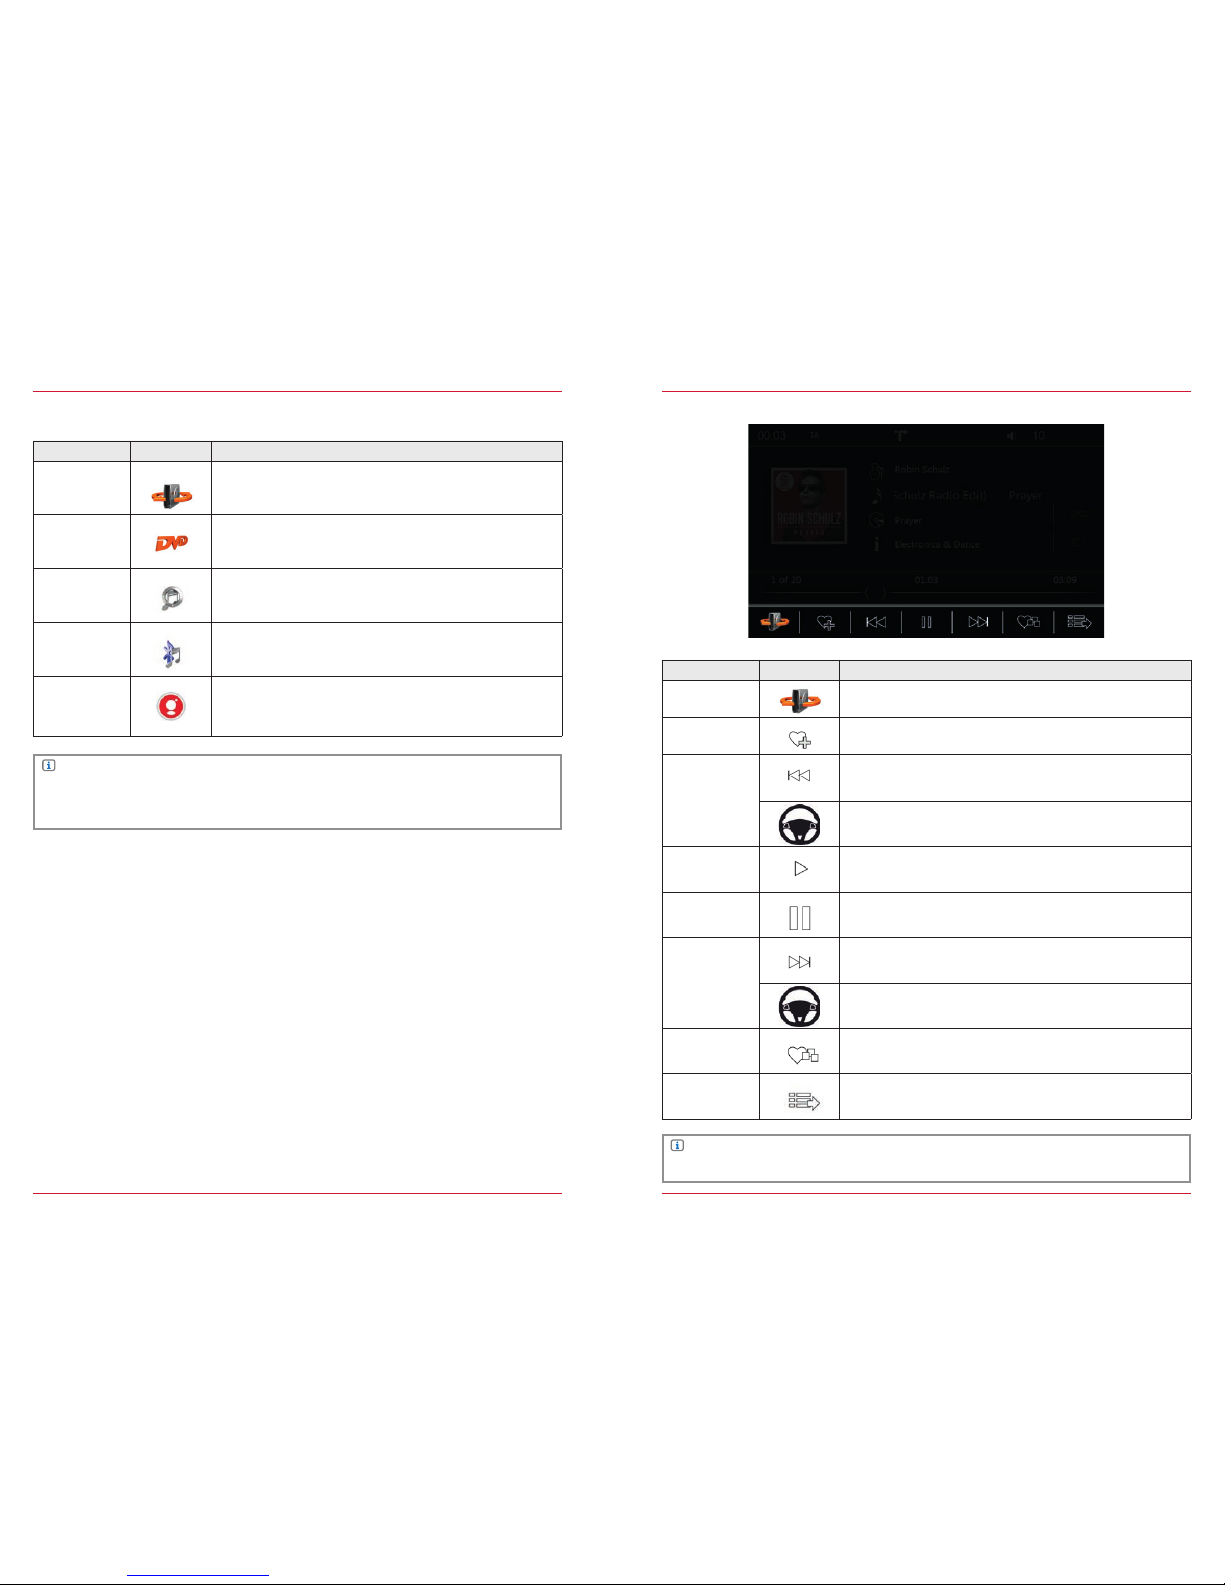
Station list FM
Fig. 2/04
Function Icon Operation
Station back /
Station forward
The functions Station back/Station forward in the previous view
(Fig. 2/03) refer to the radio stations available he re.
Scroll
Touch and hold to move the slider up or down.
Touch and hold your finger on the list to move the list
up or down.
Radio band
Indicates the frequency band (FM/DAB)
Station name
If the station name is transmitted via RDS, this will appear in
the list.
If no station name is available then its frequenc y will be
displayed.
Actual
station
This station is currently playing.
This view gives you a l ist of receivab le stations in t he region you are dr iving throu gh. The list is by
station identification, and not in alphabetical ord er.
Manual station search FM
Fig. 2/05
Function Icon Operation
Station back
Touch to jump back one station
Station
Forwar d
Touch to jump forward o ne station
Frequency
Back
Touch to jump back 50 KHz
Frequency
Forwar d
Touch to jump forward 5 0 KHz
Manual Search
Hold down and move until the desire d frequency is r eached.
Page 10
18 19
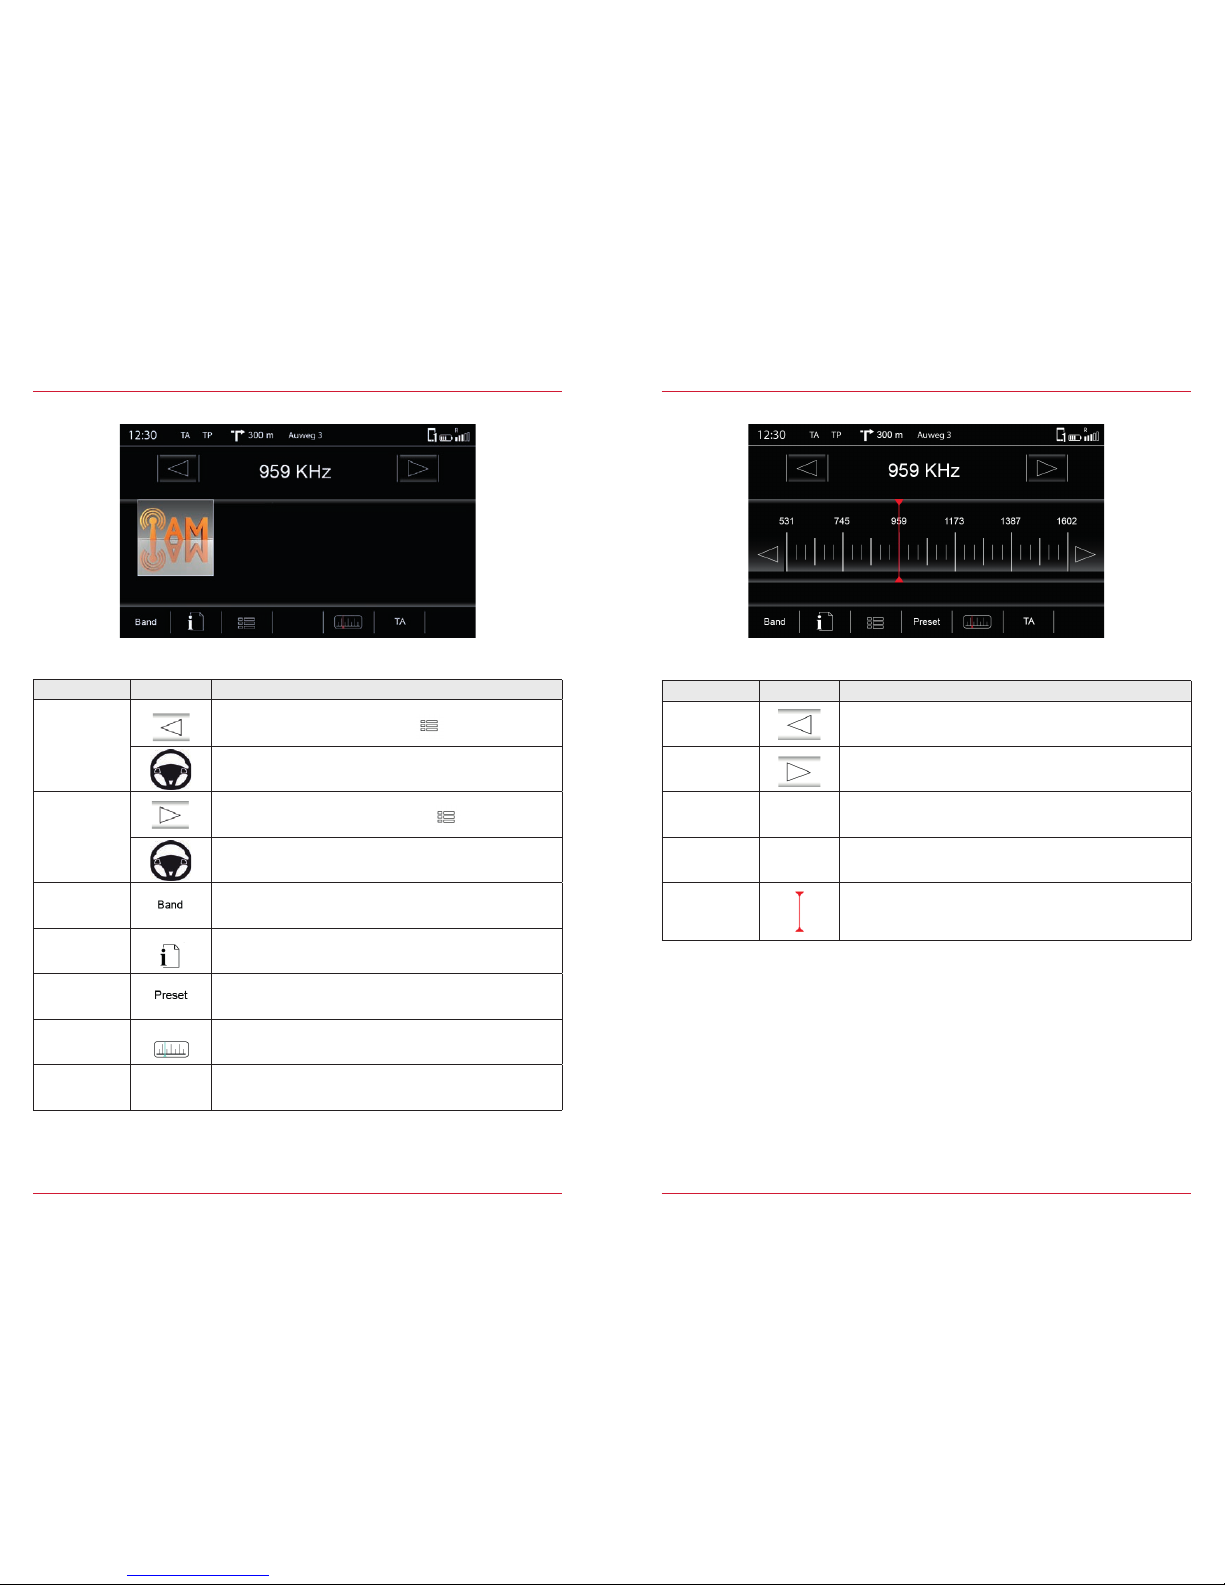
Radio operation AM
Fig. 2/06
Manual station search AM
Fig. 2/07
Function Icon Operation
Station back
Touch to jump back one station
Station
Forwar d
Touch to jump forward o ne station
Frequency
Back
Touch to jump back 9 kHz
Frequency
Forwar d
Touch to jump forward 9 k Hz
Manual Search
Hold down and move until the desire d frequency is r eached.
Function Icon Operation
Station back
Touch to jump back one station in the folder
Device Quic k Start Gu ide → Multifun ction Steer ing Wheel
(only if suppor ted by vehicle and ZENEC system)
Station forward
Touch to jump forward o ne station in the folder
Device Quic k Start Gu ide → Multifun ction Steer ing Wheel
(only if suppor ted by vehicle and ZENEC system)
Band
Touch to access the th e desired radio band
(DAB/FM/AM)
Info
Touch to access station information
Preset
Touch to access store d radio statio ns
(18 presets across all ban ds)
Entertainment → Radio → Store S tation S. 22
Scale
Touch to access the radio frequency s cale
TA
TA
Touch to switch on or off t he automatic ch angeover to
stations with traffic announcements
Page 11
20 21
Radio operation DAB
Fig. 2/08
Function Icon Operation
Station back
Touch to jump back one station in the folder
Device Quic k Start Gu ide → Multifun ction Steer ing Wheel
(only if suppor ted by vehicle and ZENEC system)
Station forward
Touch to jump forward o ne station in the folder
Device Quic k Start Gu ide → Multifun ction Steer ing Wheel
(only if suppor ted by vehicle and ZENEC system)
Scroll
Touch and hold to move the slid er up or down
Band
Touch to access the th e desired radio band
(DAB/FM/AM)
Info
Touch to access station information
Folder
Touch to access station lists
(lists all rec eivable radio st ations in the surrounding area)
Preset
Touch to access store d radio statio ns
(18 presets across all ban ds)
Entertainment → Radio → Store S tation S. 22
Scale
Touch to access the radio frequency s cale
TA
TA
Touch to switch on or off t he automatic ch angeover to
stations with traffic announcements
Station list DAB
Fig. 2/09
Function Icon Operation
Station back
Station forward
The functions Station back /Station forward in the previous
view (Fig 2/0x) refer to the radio stations available here.
Scroll
Touch and hold to move the slider up or down
Touch and hold your finger on the list to move the list
up or down
Folder
Indicates the rece ivable channel (e.g. 8 D) in which the
assigned stations are respectively located.
Radio band
Indicates the frequency band (DAB/FM/AM)
Station Name Station name that ist displayed
Actual station
This station is currently playing
This view gives you a list of receivable stations in the region you are driving through. The list is by
station identification, and not in alphabetical order.
Page 12

22 23
CONTENTS OF T HIS CHAPT ER
Overvi ew
Music sources ................................................................................................................................. S. 25
Display
Footer .............................................................................................................................................. S. 26
Middle .............................................................................................................................................. S. 26
DVD
Playback ...........................................................................................................................................S. 27
Hard disk
Playback .......................................................................................................................................... S. 28
iPod
Playback .......................................................................................................................................... S. 30
BT Music
Playback .......................................................................................................................................... S. 29
Gracenote
Operation ........................................................................................................................................ S. 32
MLT - Pl ayb ac k.................................................................................................................................. S. 33
Mood ............................................................................................................................................... S. 34
Settings
Device User Manual → Settings → Media Conf iguration ............................................................. S. 68
Search/Store radio stations
There are vari ous ways for you to store a radio station. S toring depen ds on the radio ban d.
Fig. 2/10
Function Icon Operation
Station
99.90 MHz
This station i s currently p laying.
Station back
Touch to skip to previous pre set
Station
forward
Touch to skip to next preset
Stores
Touch and hold to store the st ation at the desired store
Once the station is stored the icon of the radio band and the
frequency or station name ap pear
Store register
Touch to go to another store re gister
(3 registers each with 6 stores)
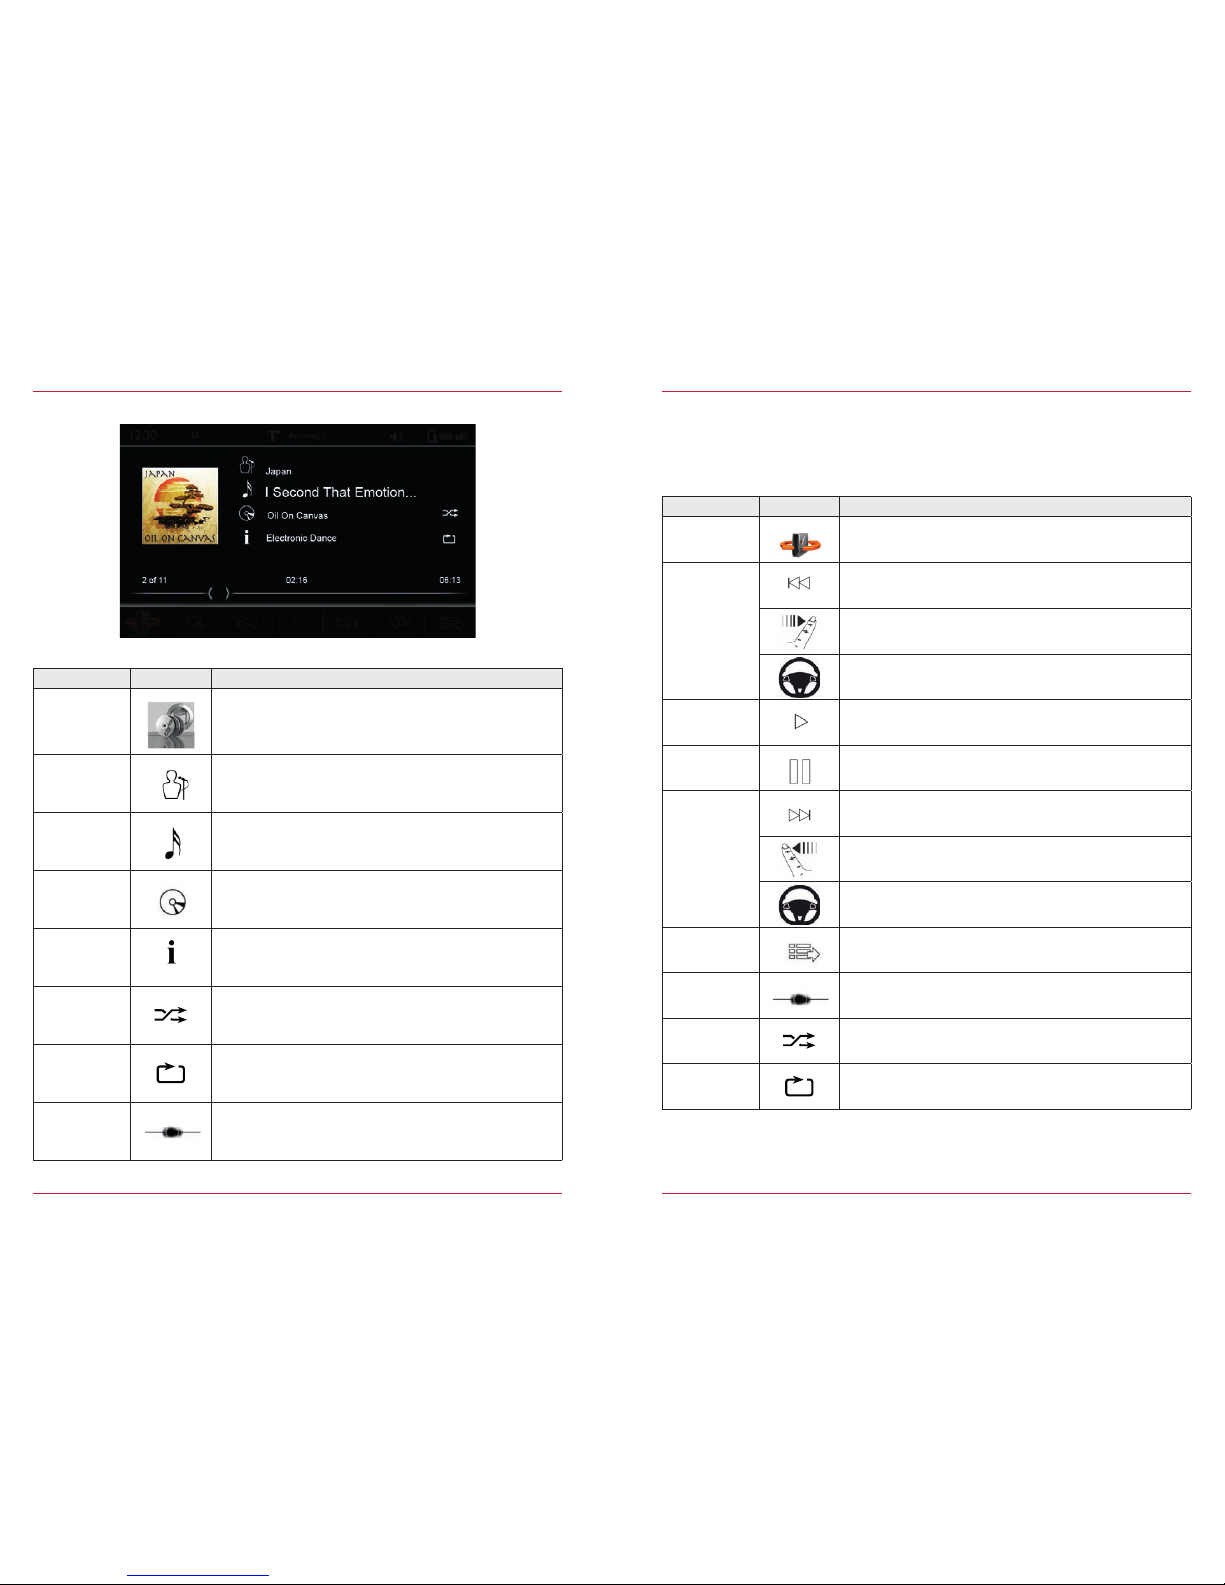
MEDIA AUDIO
Fig. 2/11
Page 13
24 25
NOTE
A wide range of dat a media can be c onnected to th e ZENEC system. The latest compatibility
overview of useful devices tog ether with mem ory sizes an d formats of the m edia suppor ted can
be found at ww w.zenec.com.
Function Icon Operation
Hard disk
Touch to access hard di sk playback (USB /SD)
Entertainment → Media Audio → Hard Disk S. 28
DVD
Touch to access the DVD p layback (CD/DVD)
Entertainment → Media Audio → DVD S. 27
iPod
Touch to access the playback with Apple devices
Entertainment → Media Audio → iPod S. 30
BT Music
Touch to access the BT Mu sic playback (A 2DP)
Entertainment → Media Audio → BT Music S. 29
Gracenote
Overview of G racenote functions
Entertainment → Media Audio → Gracenote S. 32-37
Music sources SCREEN
Fig. 2/12
Function Icon Operation
Source
Touch to go to the available sou rces.
MLT
Touch to generate a playlist
Entertainment → Media Audio → Gracenote S. 32
Back
Touch to skip to the previous track
Device Quic k Start Gu ide → Multifun ction Steer ing Wheel
(only if suppor ted by vehicle and ZENEC system)
Play
Touch to play a track
Pause
Touch to pause at a track
Forwar d
Touch to skip to the next tra ck
Device Quic k Start Gu ide → Multifun ction Steer ing Wheel
(only if suppor ted by vehicle and ZENEC system)
Mood
Touch to go to Gracenote mo od selecti on
Entertainment → Media Audio → Gracenote S. 32
Playlist
Touch to display the folder a nd list
Footer
NOTE
The listed Grac enote funct ions MLT and Mood are not available in all sourc es.
Page 14
26 27
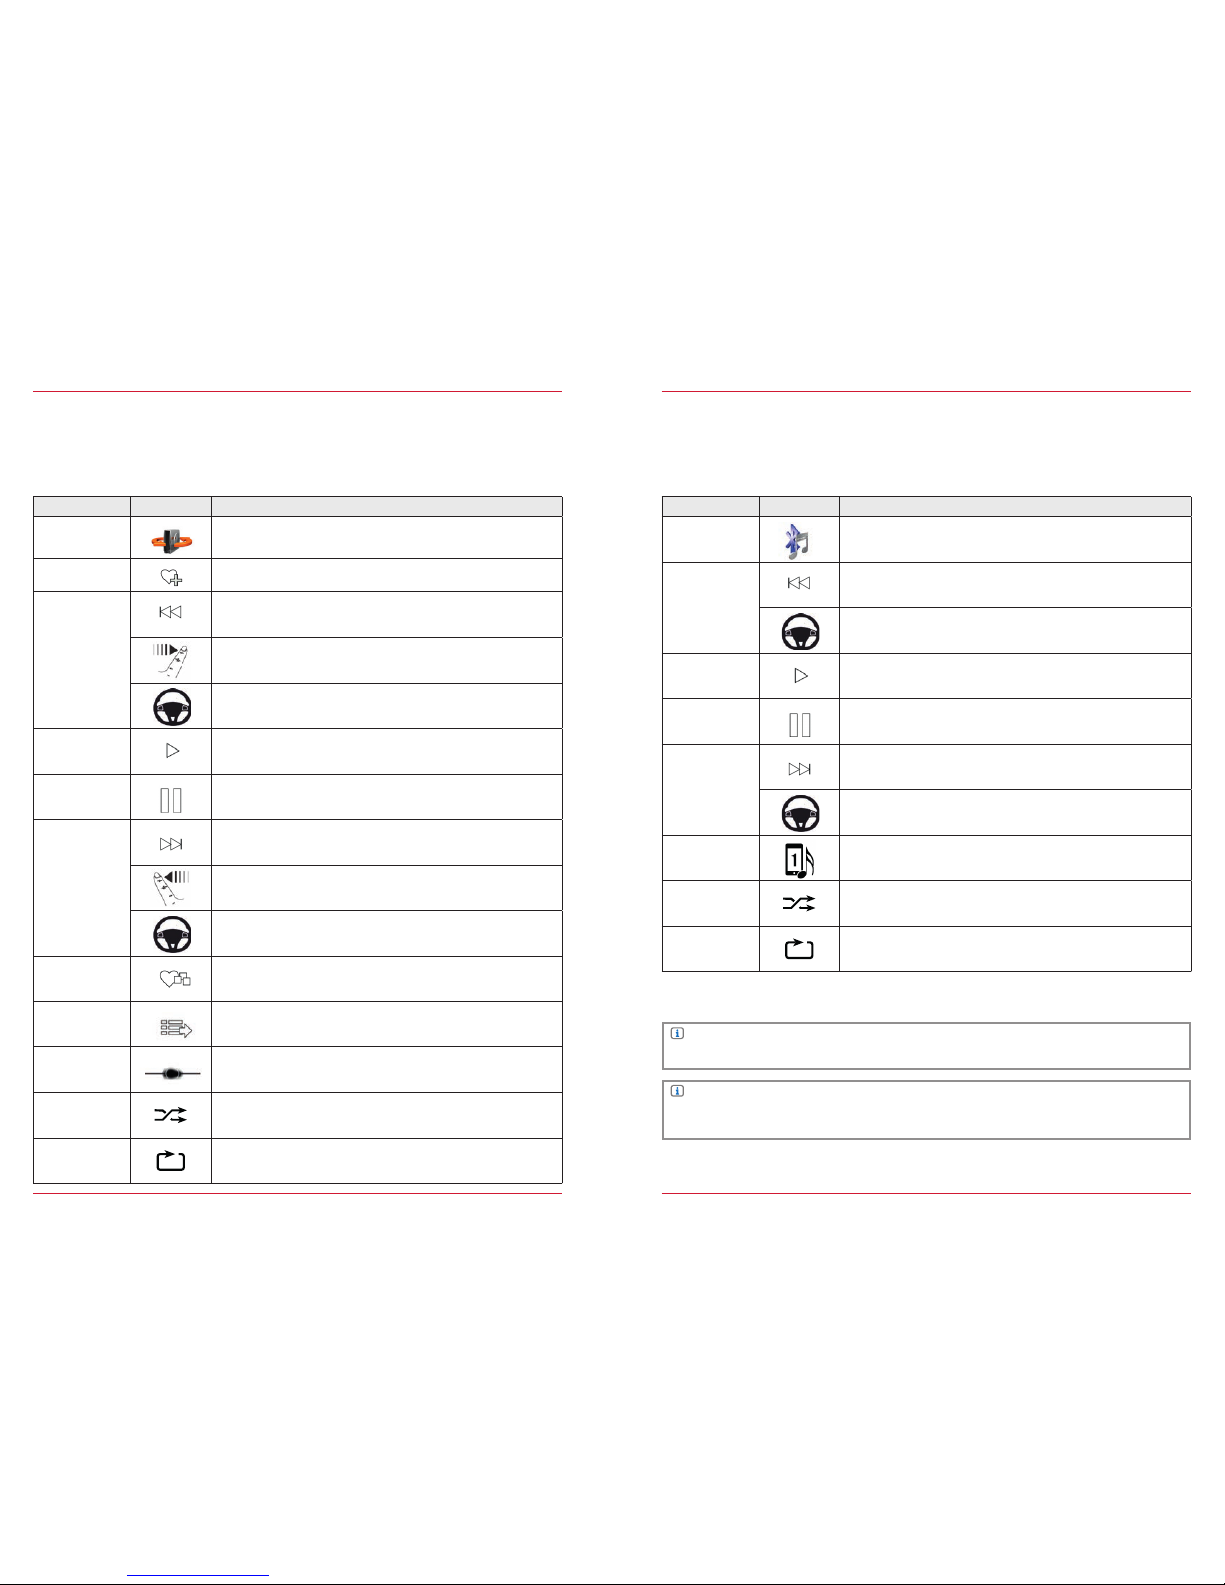
Fig. 2/13
Function Icon Operation
Cover
If a cover is stored o n the music media , or via Gracenote, it can
be displayed.
This functi on is not suppor ted for CD/ DVD and BT Audio
playback.
Artist
Information about the artist
Touch to search for ar tists is only po ssible with G racenote
enabled.
Tra c k
Informatio n about the trac k
Touch to search for trac ks is only possible with Grac enote
enabled.
Album
Information about the album
Touch to search for albums is only possible with Gracenote
enabled.
Genre
Information about the genre
(only possible with Gracenote enabled)
Shuffle
Touch to turn on the rando m play feature with in the folder th at
is playing
Repeat
Touch to automatically r epeat a track
Jump
Touch or slide to skip within a track
Middle DVD Audio
If a CD or DVD with music files is in serted into t he ZENEC system, you can play back using
this music sour ce. The require ments of CD or DVD RO Ms, and file formats can b e found at
www.zenec.com for a particular product under device compatibility.
Function Icon Operation
Source
Touch to go to the available sou rces
Back
Touch to skip back to the previous track
Hold down to ski p backwards
Swipe to the right to skip back to t he previous trac k
Device Quic k Start Gu ide → Multifun ction Steer ing Wheel
(only if suppor ted by vehicle and ZENEC system)
Play
Touch to play a track
Pause
Touch to pause a track
Forwar d
Touch to skip forwar d to the next trac k
Hold down to ski p forwards
Swipe to the lef t to skip for wards to the nex t track
Device Quic k Start Gu ide → Multifun ction Steer ing Wheel
(only if suppor ted by vehicle and ZENEC system)
Playlist
Touch to display the folder l ist
Entertainment → Media Audio → Playlist S. 31
Skip
Touch or slide to skip within a track
Shuffle
Touch for random play
Repeat
Touch to automatically repeat a track
Page 15
28 29
Hard disk
If a USB stick or S D card with music files is plugged into the ZE NEC system, you can play back
using this musi c source. The requirements of US B, SD cards, an d file formats can be found at
www.zenec.com for a particular product under device compatibility.
Function Icon Operation
Source
Touch to go to the available sou rces
MLT
Touch to generate a playlist
Entertainment → Media Audio → Gracenote S. 32
Back
Touch to skip back to the previous track
Hold down to ski p backwards
Swipe to the right to skip back to t he previous trac k
Device Quic k Start Gu ide → Multifun ction Steer ing Wheel
(only if suppor ted by vehicle and ZENEC system)
Play
Touch to play a track
Pause
Touch to pause a track
Forwar d
Touch to skip forwar d to the next trac k
Hold down to ski p forwards
Swipe to the lef t to skip for wards to the nex t track
Device Quic k Start Gu ide → Multifunction Steering Wheel
(only if suppor ted by vehicle and ZENEC system)
Mood
Touch to go to Gracenote mo od selecti on
Entertainment → Media Audio → Gracenote S. 32
Playlist
Touch to display the folder l ist
Entertainment → Media Audio → Playlist S. 31
Skip
Touch to skip direct to the d esired posit ion
Slide to reach the desired position
Shuffle
Touch for random play
Repeat
Touch to automatically r epeat a track
BT Music (A2DP)
If a compatible mobile devic e is paired via Bl uetooth
®
, you can play back us ing this music so urce.
The requireme nts of mobile end d evices can be f ound at www.zenec.com for a particular product
under device compatibility.
Function Icon Operation
Source
Touch to go to the available sou rces
Back
Touch to skip back to the previous track
Hold down to ski p backwards
Device Quic k Start Gu ide → Multifunction Steering Wheel
(only if suppor ted by vehicle and ZENEC system)
Play
Touch to play a track
Pause
Touch to pause a track
Forwar d
Touch to skip forwar d to the next trac k
Hold down to ski p forwards
Device Quic k Start Gu ide → Multifunction Steering Wheel
(only if suppor ted by vehicle and ZENEC system)
Device
Touch to change betwee n the connec ted mobile devices*
Shuffle
Touch for random play
Repeat
Touch to automatically r epeat a track
NOTE
*The chang eover applies only for music playbac k, and has no ef fect on the hands-free system.
NOTE
The listed func tions depen d on the paired mo bile phone, inst alled soft ware versio ns and the degree of compatibility.
Page 16
30 31
iPod
If a compatible Apple devic e is connected, you can play back u sing this music s ource. The
supporte d Apple devic es can be found at w ww.zenec.com for a partic ular product un der device
compatibility.
Function Icon Operation
Source
Touch to go to the available sou rces
Back
Touch to skip back to the previous track
Hold down to ski p backwards
Swipe to the right to skip back to t he previous trac k
Device Quic k Start Gu ide → Multifunction Steering Wheel
(only if suppor ted by vehicle and ZENEC system)
Play
Touch to play a track
Pause
Touch to pause a track
Forwar d
Touch to skip forwar d to the next trac k
Hold down to ski p forwards
Swipe to the lef t to skip for wards to the nex t track
Device Quic k Start Gu ide → Multifunction Steering Wheel
(only if suppor ted by vehicle and ZENEC system)
Playlist
Touch to display the folder l ist
Entertainment → Media Audio → Playlist S. 31
Skip
Touch to skip direct to the d esired posit ion
Slide to reach the desired position
Shuffle
Touch for random play
Repeat
Touch to automatically r epeat a track
Playlists
There are vari ous playlists. In g eneral we distinguish between the standard a nd the Grace note
playlists.
Function Icon Operation
Folder
Touch to go to the next highe r level
Folder
Touch to go to the highest folder level
Hold to go to the ha rd disk overvi ew (root)
Playlist
Listing of iPod dev ice playlists
(only available with i Pod playback)
Song
Listing by song
Artist
Listing by artist
Album
Listing by album
Genre
Listing by genre
Mood
Sorting by m ood
Podcast
Listing of iPod podcast direc tory
(only available with i Pod playback)
Scroll
Scroll thro ugh the list:
Touch and hold to move the slid er up or down
Tap and hold your finger o n the list to move the list up or down.
Further func tions in tile v iew (only possible w ith artist and album for Gr acenote)
Function Icon Operation
Tile
Touch the desired cover to make a selection
Touch to play the selection
(only for album)
Touch to cancel the selection
(only for album)
Page 17

32 33
GRACENOTE
The Gracen ote functions can be used for playback via USB or SD card. When a music source
is connecte d, Gracenote sy nchronizes wi th the source. T his proces s can take some mi nutes,
depending on the size of the music source conne cted. An update f or the Gracenote database c an
be downloaded from www.zenec.com → Suppor t → Software-updates under the par ticular ZENEC
system.
Function Icon Operation
MLT
This functi on generates a pl aylist based on th e song currently
playing
Audio → Grace note → Playlist S. 33
Title
Touch to list the available titles A > Z
Artist
Touch to list the available ar tists A > Z
Album
Touch to list the available alb ums A > Z
Genre
Touch to list the available genres A > Z
Mood
Sorting by m ood
Audio → Grace note → Mood S. 34 -37
MLT pla yli st
Touch to access the tem porary M LT playlist
Audio → Grace note → MLT Playlist S. 33
Portions of the content is c opyright © Gracenote or its providers
MLT Playlist
Function Icon Operation
Folder
Touch to go to the next highe r level
Temporary
By pressing a temporary p laylist is create d*
Save
Touch the temporar y MLT playlist to save it
Delete
Hold down to del ete an MLT playlist
Hold down to del ete an MLT playlist song
Scroll
Scroll thro ugh the list:
Touch and hold to move the slid er up or down
Tap and hold your finger o n the list to move the list up or down
Fig. 2/14
NOTE
*This list wi ll be deleted as soon as the ZENEC system is switched of f. To retain this playlist
permanentl y, it must be saved.
NOTE
The deletion of playlists and so ngs is only poss ible in the saved MLT playlists. Folders, song s and
directori es that already exi st, or temporar y MLT playlists cann ot be edited.
This function gives you the option of managing playlists created by the MLT feature. After being saved
the MLT playlist will be filled with the names of the artists.
Page 18

34 35
Mood
Function Icon Operation
Tile
The total numbe r of tracks whic h match to this moo d are
displayed inside the tile.
Touch one of the main tile to o pen the sub- categor ies. Touch
one of the sub- categor ies to star t the playback of t he playlist.
Mood
art
Peaceful
Beside col our-coded c lassific ation, the Mood art shows the
mood for a Moo d Playlist.
Mood title
( 53 )
Mood title s hows the total num ber of tracks for t he chosen
mood.
Fig. 2/15
This functi on gives you the opt ion of playing musi c from your col lection ac cording to your ac tual
mood. Gracenote sort s your music coll ection into 25 di fferent mai n categories, each with 4
subcategor ies, along fo ur main axes (Posit ive, Dark, Calm, En ergetic). In this way you have th e
choice of categorizing yo ur music playbac k between 100 dif ferent moo d styles.
Function Icon Operation
Peaceful
Peaceful
Delicate/Tranquil
Pastoral/Serene
Quiet/Introspective
Reverent/Healing
Easygoing
Easygoing
Charming/Easygoing
Cheerful/Playful
Friendly
Hopeful/Breezy
Upbeat
Upbeat
Carefree Pop
Happy/Soulful
Par ty/Fu n
Soulful /Easygoing
Lively
Lively
Exuberant/Festive
Lusty/Jaunty
Playful/Swingin
Showy/Rousing
Excited
Excited
Euphoric Energy
Happy Excitement
Loud Celebratory
Upbeat Pop Gro ove
Tender
Tender
Awakening/Stately
Light Groov y
Refined/Mannered
Romantic/Lyrical
Romantic
Romantic
Dramatic/Romantic
Heart felt Passion
Lush/Romantic
Sweet/Sinc ere
Empowering
Empowering
Dramatic Emotion
Idealistic/Stirring
Powerful/Heroic
Strong/Stable
Page 19

36 37
Mood
Function Icon Operation
Stirring
Stirring
Focused Sparkling
Invigorating/Joyous
Jubiliant/Soulful
Triumphant / Rousing
Rowdy
Rowdy
Confident/Tough
Driving Dark Groove
Ramshackle/Rollicking
Wild/Rowdy
Sentimental
Sentimental
Cool Melancholy
Gentle Bittersweet
Lyrical Sentimental
Tender/Sincere
Sophisticated
Sophisticated
Dark Playful
Intimate Bitter sweet
Smokey/Romantic
Suave/Sultry
Sensual
Sensual
Dreamy Pulse
Intimate
Sensual Gr oove
Soft Soulful
Fiery
Fiery
Dark Sparkling Lyrical
Energetic Abstract Groove
Fiery Gr oove
Passionate Rhythm
Energizing
Energizing
Abstract Beat
Arousing Groove
Edgy/Sexy
Heavy Beat
Melancholy
Melancholy
Light Melancholy
Mysterious/Dreamy
Sad/Soulful
Wistful/Folorn
Function Icon Operation
Cool
Cool
Casual Gro ove
Cool Confidence
Dark Groovy
Wary/Defiant
Yearning
Yearning
Bittersweet Pop
Energetic Dre amy
Energetic Yearning
Sensitive/Exploring
Urgent
Urgent
Dark Pop
Dark Pop Intensi ty
Dark Urgent
Energetic An xious
Defiant
Defiant
Attitude/Defiant
Hard Dark Excitement
Hard Positive E xcitement
Heavy Broo ding
Somber
Somber
Creepy/Ominous
Dark Cosmic
Enigmatic/Mysterious
Solem/Spiritual
Gritty
Gritty
Depressed/Lonely
Gritty/Soulful
Sober/Determined
Strumming Yearning
Serious
Serious
Hypnotic Rhythm
Melodramatic
Serious/Cerebral
Thrilling
Brooding
Brooding
Alienated/Brooding
Dreamy Brooding
Energetic Melancholy
Evocative/Intriguing
Aggressive
Aggressive
Aggressive Power
Chaotic/Intense
Dark Hard Beat
Heavy Triumphant
Page 20

38 39
CONTENTS OF T HIS CHAPT ER
Overvi ew
Video sources ................................................................................................................................. S. 39
DVD
Playback .......................................................................................................................................... S. 4 0
Hard disk
Playback ...........................................................................................................................................S. 41
Settings
Device User Manual → Setup → Medi a Setup ............................................................................. S. 68
MEDIA VIDEO
Fig. 2/16
Video sources
Function Icon Operation
CD/DVD
Touch to access the DVD p layback
Entertainment → Media Vid eo → DVD S. 40
Hard disk
Touch to access hard di sk playback (USB /SD)
Entertainment → Media Vid eo → Hard Disk S. 41
NOTE
A wide range of dat a media can be c onnected to th e ZENEC system. The latest compatibility
overview of useful devices tog ether with mem ory sizes an d formats of the m edia suppor ted can
be found at ww w.zenec.com.
CAUTION
Playing video f iles while dr iving is not per mitted by the law. For thi s reason the sc reen switches
off when the vehicle moves, wit h only the sound r emaining on.
Page 21

40 41
DVD
Function Icon Operation
Skip
Touch to skip direct to the desired position
Slide to reach the desired position
Source
Touch to go to the available sources
Eject
Touch to eject the DVD
Back
Touch to skip back to the previous section
Play
Touch to play a film
Pause
Touch to pause at a track
Forwar d
Touch to skip forward to the next section
Info
Touch to get film information
DVD Menu
Touch to display the DVD menu
Further functions in the DVD menu
Function Icon Operation
Navigation
▲ ◄► ▼
Touch the appropriate arrows to naviga te in the video men u
Confirm
OK
Touch to confirm a se lection in th e video menu
Fig. 2/17
Hard disk
Function Icon Operation
Skip
Touch to skip direct to the d esired posit ion
Slide to reach the desired position
Source
Touch to go to the available sou rces
Back
Touch to skip back to the previous sectio n
Play
Touch to play a film
Pause
Touch to pause at a track
Forwar d
Touch to skip forwar d to the next sect ion
Playlist
Touch to display the folder a nd list
Further functions in the playlist
Function Icon Operation
Navigation
▲ ◄► ▼
Touch the appropriate arrows to naviga te in the video men u
Confirm
OK
Touch to confirm a se lection in th e video menu
Fig. 2/18
Page 22

42 43
CONTENTS OF T HIS CHAPT ER
Overvi ew
INPUT Sourc es ............................................................................................................................... S. 43
A/ V-I N
Overvi ew ......................................................................................................................................... S. 44
SMARTLINK
Overvi ew ......................................................................................................................................... S. 44
Camera
Overvi ew ......................................................................................................................................... S. 45
Settings
Device User Manual → Setup → Medi a Setup ............................................................................. S. 85
EXTERNAL CONNECTIONS
Fig. 2/19
INPUT Sources
Function Icon Operation
A/ V-IN
Touch to access the ex ternal audio/ video
Entertainment → Input → A /V-IN S. 44
Camera
Touch to access the c amera sourc e
Entertainment → Input → Camer a S. 45
SMARTLINK
Touch to access the SM ARTLINK s ource
Entertainment → Input → SMARTLINK S. 44
NOTE
If no system is conn ected to a par ticular sour ce the scree n will remain black.
Page 23

44 45
A/ V-I N
This combin ed audio/video input can be used to connec t a wide range of external device s. For
example, you can use t he ZENEC system to listen music via the AUX c onnection.
NOTE
This source i s a purely passive in put: control of the end device f rom the ZENEC system is not
possible.
SMARTLINK
Via the Smar tlink conn ection it is possible to connect mobile p hones and multimedia device s to the
ZENEC system using a sp ecial ZENEC ac cessor y, and control them. In combinati on with HDMI ,
Miracast Smartlink inte rfaces , or a DVB-T tuner separ ately available fr om ZENEC, compa tible end
devices can be connected and controlled.
NOTE
Further infor mation may be obt ained at ww w.zenec.com, or from an authorized Z ENEC dealer.
NOTE
For furthe r informatio n about the control and operation of compat ible end devic es, please refer to
the relevant user ma nual for the end dev ice include d separately.
This combin ed audio/video input can be used to connec t a camera, opti onally also with sound. If
your ZENEC system has a CA M or ALT button, the co nnected cam era can be switc hed on direct ly
from these buttons.
Function Icon Operation
Settings
Touch to adjust the lines
Presentation
Touch to show or hide the line s
Line fields
Display the line f ields (1 – 3) with the arrows
to change levels.
Back
Touch to exit the settings menu
Tog eth er
►◄
Touch to narrow the cur rent field
Apart
◄►
Touch to widen the curr ent field
Up
▼
Touch to bring the current field nearer
Down
▲
Touch to push the current f ield away
Basic setting
Touch to set the lines to the bas ic setting
Fig. 2/20
NOTE
To carry out calibration of the as sist lines, rever se parallel to th e parking spac e stripes an d
centrally to t he start of th e parking spac e (see fig. 2/ 20).
Camera
Page 24

46 47
CONTENTS OF T HIS CHAPT ER
Overvi ew
M-Zone sources ...............................................................................................................................S. 47
DVD
Overvi ew ......................................................................................................................................... S. 48
A/V I n
Overvi ew ......................................................................................................................................... S. 48
Front Audio
Overvi ew ......................................................................................................................................... S. 48
SMARTLINK
Overvi ew ......................................................................................................................................... S. 48
REAR SEAT ENTERTAINMENT
Fig. 2/21
M-Zone sources
If rear seat moni tors are conn ected to the ZEN EC system, they can be c ontrolled using the source s
locally available, independently of the ZENEC system.
Function Icon Operation
CD/DVD
Touch to access the DVD p layback
Entertainment → M-Zone → DVD S. 48
A/ V-IN
Touch to access the ex ternal audio/ video
Entertainment → M-Zone → A/ V-IN S. 48
Front A udio
Touch to access the fr ont audio playbac k
Entertainment → M-Zone → Front Audio S. 48
Smartlink
Touch to access the SM ARTLINK c ontrol
Entertainment → M-Zone → SMARTLINK S. 48
M-Zone Off
Touch to switch off the M -Zone
NOTE
The A/ V-IN and Smartlink so urces can only be used synchronously in the M -Zone and the
ZENEC system.
Page 25

48 49
DVD
If additional m onitors for t he rear seat are connected to the Z ENEC system, DVD playba ck
independent of t he actual playba ck on the rear mo nitors is possible using this function.
A/ V-I N
If additional m onitors for t he rear seat are connected to the Z ENEC system, this c ombined audio /
video input can be used to conn ect a wide rang e of external devi ces, and played independently of
the actual playback at the rear.
NOTE
Control is so lely via the co nnected end dev ice.
Front Audio
With this function the act ual audio playbac k at the rear can b e played.
SMARTLINK
Via the Smar tlink conn ection it is possible to connect mobile p hones and multimedia device s to the
ZENEC system using a sp ecial ZENEC ac cessor y, and control them. In combinati on with HDMI , and
Miracast Smartlink inte rfaces , separately availa ble from ZENEC, c ompatible en d devices can b e
connected and controlled.
NOTE
Further infor mation may be obt ained at ww w.zenec.com, or from an authorized Z ENEC dealer.
NOTE
For furthe r informatio n about the control and operation, please ref er to the user manua l that is
included with the Smartlink interfaces.
HANDS-FREE SYSTEM
ABOUT THIS CHAPTER
This chapter de scribes how to operate and use the hands-fr ee system. In additi on, all the equipment
variants and fu nctions of the ZENEC system are desc ribed, as well as optional equip ment of the
vehicle manufacturer that may not be included as st andard in your vehi cle. This section does not
refer separatel y to such issues. D ifferences from this i nformation, features or functions cann ot be
used for any claims.
CAUTION
If the driver is di stracted, thi s may cause an acc ident or injur y.
Operating the ZENEC system can di stract atte ntion from the g eneral traf fic situat ion! Equally,
connecti ng, changing or i nserting data media can distract the dr iver.
CAUTION
Network c overage depend s on a number of factors – such as the network provi der, or the
geographic al positio n of the vehicle. Tunnels, und erpasses, pa rking garag es, or street canyons
in cities may lea d to interrupti on of the conne ction. Ther mal glazing o r metallic stic kers on the
windows of the vehicle may also disr upt the conne ction.
SAFETY INSTRUCTIONS
CAUTION
Using the mobi le phone with the hand while driving is not per mitted. Only e nter data or make
changes via t he ZENEC system when t he traff ic situation allows.
CAUTION
While drivi ng always stow your mob ile phone so that i t cannot be thro wn through the ve hicle if
there is a sudden driving maneuver or an accident.
NOTE
It is only possi ble to use the func tions in this c hapter with a pai red mobile pho ne enabled by the
ZENEC system. A com patibility li st of pairable mo bile phones c an be found at ww w.zenec.com.
NOTE
Making phone calls and using mobile comm unication pr oducts both at home and abroad m ay
lead to high cos ts, depending o n the networ k provider and th e contract . This is not indic ated by
the ZENEC system. No c laims against Z ENEC can be based o n these facto rs.
Page 26

50 51
CONTENTS OF T HIS CHAPT ER
BEFORE USIN G FOR THE FIRST TI ME
✓ Al ways follow all the s afety instr uctions of the ve hicle manufacturer, and the instr uctions given
in this user manual.
✓ Please pay attention to the safety instruction s on the ZENEC system.
✓ Pair ing and synchronizing a suitab le mobile phone with the ZENEC system
Compatibility→ www.zenec.com
Fig. 3/01
Overvi ew
About this chapter ........................................................................................................................... S. 49
Safety instructions .......................................................................................................................... S. 49
Before fir st use ................................................................................................................................ S. 50
Contents of this chapter .................................................................................................................. S. 50
Screen
Header..............................................................................................................................................S. 51
Footer ...............................................................................................................................................S. 52
Connection
Accepting/ending incoming calls .................................................................................................... S. 5 3
Call setup using nu meric pad ......................................................................................................... S. 53
Call setup using phonebook ........................................................................................................... S. 54
Conference call ............................................................................................................................... S. 54
Phonebook
Contacts .......................................................................................................................................... S. 55
Favorites .......................................................................................................................................... S. 56
Call logs ...........................................................................................................................................S. 57
Settin gs
Setup → BT Configuration → Device Manager ..............................................................................S. 70
Setup → BT Configuration → BT Setup ..........................................................................................S. 73
Icon Meaning
Mobile phone currently connected
TEXT
Name of the cur rent networ k provider
(appears only if th ere is a call in progress)
Battery c apacity of t he mobile pho ne currently c onnected
Signal strength of the mobile network currently connected
Appears if r oaming is char ged by the network provider
(for example abroad)
SCREEN
Fig. 3/02
This view will fa miliarize you wi th the most impo rtant ic ons and functions. If no mobil e phone is found
by the hands-f ree system, or if no mo bile phone is pa ired, you will be automatically di rected to the
device manage r.
Header
Page 27

52 53
Footer
Function Icon Operation
Select
Mobile phone
Touch to change the con nected mobil e phone. A maxim um of
three mobile p hones can be pa ired, of which t wo are connected,
and one is active.
Settings → BT Configuration → Device Man ager S. 70
Numeric pad
Touch to enable the numeric pad
Hands-fr ee System → Contr ol Panel → Numer ic Pad S. 53
Phonebook
Touch to access the ph onebook of the c urrently pai red mobile
phone
Hands-fr ee System → Phoneb ook S. 55
Favorites
Touch to access the sto red favorites
Hands-fr ee System → Favorites S. 56
Call logs
Touch to access the c all logs
Hands-fr ee System → Call Logs S. 57
Call
Touch to pass the call fr om the hands- free system to the m obile
phone or vice versa
Numeric pad
Touch to show the numeric p ad
Necessar y in case asked to enter a furt her number during the
call (telephone call center etc.)
Back
Touch to go back to the previo us level
NOTE
To be able to use the phonebo ok or call list s without any problems, make sure that during the
pairing process you conf irm data ac cess enable to the mobile pho ne. It is recomm ended to
permanentl y confirm this on your mobile phone.
CONNECTION
Function Icon Operation
Accept
Touch the green handset to accept the call
Reject
Touch the red handset to reject the incoming call
End
Touch the red handset to end the call
Via the ZENEC system
Accepting/ending incoming calls
Function Icon Operation
Accept
Device Quick Start Guide → Multifunction Steering Wheel
(only if supported by vehicle and ZENEC system)
End
Device Quick Start Guide → Multifunction Steering Wheel
(only if supported by vehicle and ZENEC system)
About the multifunction steering wheel
In the footer touch the
numeric pad.
Key in the desired phone number in full using the numeric pad. To set up the connection,
touch
. The display now changes to the call connection view.
Call setup u sing numer ic pad
Function Icon Operation
Numeric pad Input field for entering numbers
Special
characters
Touch to enter a Star
Hold down to enter a Plus
Special
characters
Touch to enter a hash symbol
Correction
Touch to delete the last digit
Repeated touching to delete more digits
Continue to hold down to delete the entire line entry
Page 28
54 55
Call setup using phonebook
In the footer touch the
phonebook.
From the phonebook list select a call partner and set up a connection by touching
.
After touching a contact you will be directed to the contact details view.
Hands-free System → Phonebook → Contacts S. 55
Function Icon Operation
Join Touch to let an incoming partner join*
Change
If more than one c all part ner is connec ted, you can chan ge
between the t wo partn ers by repeated touching.
NOTE
Depending on t he mobile phone and phonebo ok entries, the first sync hronizatio n can take up to
35 min.
Conferen ce call
A conference call enables you to accept a second call partner. This give the possibility of talking to the
first or the second partner, during which time the other partner is muted.
The simultaneous hook-up of all partners is not possible.
NOTE
This functi on depends on th e network pr ovider and the mo bile phone set ting!
NOTE
*This ico n appears only w hen a further external pa rtner ca lls your mobile phone.
Function Icon Operation
Search
Touch to open the search window
Slider
Touch and hold, move up or down to search in the phonebook;
the current letter of the alphabet will be indicated in the slider.
Contacts
Touch to go to the contact list.
Up to 1000 contacts per paired mobile phone can be synchronized; it makes no difference whether the contacts are stored in
the phonebook or on the SIM card.
Contact Type
Entry for mobile phone numb er
Entry for pr ivate number
Entry for bus iness number
Entry not ide ntified
Call /
Accept
Touch the green handset to s etup the call
Contacts
PHONEBOOK
Fig. 3/03
After successful synchronization of the mobile phone with the hands-free system, you will have access
to the phonebook and the call logs.
Page 29
56 57
Favorites
Fig. 3/04
Here you have the fac ility to store an d retrieve up to 8 phone numbers as favor ites. You can select
any of the phone numb ers in the phon ebook and save the m as favorites; except ions are are emai ls
and addresses.
NOTE
All favorites a re visible to ever y user as they are saved on the device.
Function Icon Operation
Stored
Favorit e
Name / Numbe r
Touch to set up a connection with a stored favorite
Free Fav orit e
Touch to add a new favorite
Select desired number from phonebook and confirm
with
Delete
Touch to remove a favorite
Touch the favorite you want to delete
NOTE
A change of data o n the mobile pho ne will not automatically be app lied in the Favorite s. Should
you want to change dat a such as phone numbers then you m ust also transfe r it to the Favorites.
Call lists
Fig. 3/05
If a compatible mobile phon e is coupled, th e call lists fr om the mobile p hone will be sync hronized
with the hands -free system (thi s process c an take some minute s, depending on t he number of
contacts). Onc e synchronization has been successful ly completed yo u will be able to access:
Function Icon Operation
All
Touch to see all calls
Missed
Touch to see the missed calls only
Function Icon Operation
Incoming
Entries with this icon refer to incoming calls
Contacted
Entries with this icon refer to outgoing calls
Missed
Entries with this icon refer to calls
that you did not take
Page 30

58 59
NAVIGATION
ABOUT THIS CHAPTER
This chapter describes how to operate and use the navigation function. This is only a quick guide; full
details can be found in the Navigation User manual, available separately.
CAUTION
If the driver is di stracted, thi s may cause an acc ident or injur y. Operating the ZENEC system can
distract attention from the general traffic situation! Equally, connecting, changing or inserting
data media can distract the dr iver.
CAUTION
Route recomm endations and displayed traf fic signs of th e navigation syste m may differ fr om the
real situatio n. Traffic signs and t raffic regulations have precedenc e over route recom mendations
and indicati ons of the ZENEC syste ms.
SAFETY INSTRUCTIONS
NOTE
Map updates ca n be carried out by visiting https://zenec.naviextras.com/shop/portal.
CAUTION
Speed data dis played in the navigat ion system cor responds to th e permitte d speed limit. Pl ease
adjust your speed and driving be havior to the prevail ing visibilit y, weather, road, and traffic
conditions.
BEFORE USIN G FOR THE FIRST TI ME
✓ Al ways follow all the s afety instr uctions of the ve hicle manufacturer, and the instr uctions given
in this user manual.
✓ Please pay attention to the safety instruction s on the ZENEC system.
✓ SD c ard with appr opriate map mate rial must be ins erted.
✓ Commissioning of navigation system completed (Sat-Fix, etc.)
Device Installation Ma nual → Commiss ioning (ww w.zenec.com)
CONTENTS OF T HIS CHAPT ER
Fig. 4/01
Overvi ew
About this chapter............................................................................................................................ S. 58
Safety instructions .......................................................................................................................... S. 58
Before fir st use ................................................................................................................................ S. 58
Contents of this chapter................................................................................................................... S. 59
Map
Overvi ew .........................................................................................................................................S. 61
New Route
Overvi ew ........................................................................................................................................ S. 62
Tra f fi c
Overvi ew ........................................................................................................................................ S. 63
NOTE
This user manua l explains only the m ost impor tant functi ons of the navigat ion system. Full
details of the navi gation func tions can be found in the Naviga tion User manua l, available
separately.
Page 31
60 61
Overvi ew
Fig. 4/02
Function Icon Operation
Map
Touch to go to the map view
New Route
Touch to go to the destinati on input
Tra f f ic
Touch to go to the traff ic repor t summary
Map
Fig. 4/03
In the map view you ar e given diverse information depending on the nav igation statu s. Here we
explain only the basic functio ns that are availabl e to you, including t hose when the r oute guidance
is disabled. To see a detail ed explanation of a ll map functi ons there is a separate user manual o n
navigation.
NOTE
For a full descr iption see the N avigation Use r Manual inclu ded separately.
Function Icon Operation
Traffic report
Touch to see the traffic report summar y
Compass
Touch to go to the geo data view
View of map orientation (direction of travel/North)
List
Touch to go to the control menu
Position
Current position of vehicle on the map
Page 32

62 63
New Route
Fig. 4/04
In this view we explain an input option for navigating to a destination. All the options and functions
are given in more detail in the Navigation User Manual, available separately.
Function Icon Operation
List
Touch to go to the control menu
(see Fig. 4/03)
New Route
Touch to go to the address input
Input
Touch to enter a full address
Touch to enter a POI address
Touch to navigate to a stored address
NOTE
The broadca st of traff ic announcem ents depends on different factors. Using t he TMC funct ion
requires a radi o stations, which broadca sts TMC signals.
Tra f fi c
This view presents you with info rmation on ro ad sections t hat are affec ted by traff ic events. All the
options and fu nctions are gi ven in more detail i n the Navigatio n User Manual, avail able separatel y.
Function Icon Operation
No Report
No traffic announcements received
(see Fig. 4/03 upper right corn er)
Report not
relevant
Touch to view received tr affic an nouncement s that are not on
the active route (see Fi g. 4/03 upper r ight corner)
Report relevant
Touch to view received tr affic an nouncement s that are on the
active route
(the approximate de lay caused by the event is a lso displayed)
Fig. 4/05
Page 33

64 65
SETTINGS
ABOUT THIS CHAPTER
This chapter de scribes all t he parameter and s etting func tions of the ZEN EC system. Please note
that setting s or changed par ameters can have a direct influence on the ever yday use of the ZENEC
system.
In addition, all the equipment var iants and func tions of the ZEN EC system are descr ibed, as well as
optional equi pment of the vehic le manufactur er that may not be inc luded as standa rd in your vehicle.
This sectio n does not refer se parately to such issues. Dif ferences fr om this infor mation, feature s or
functions cannot be used for any claims.
CAUTION
If the driver is di stracted, thi s may cause an acc ident or injur y.
Operating the ZENEC system can di stract atte ntion from the g eneral traf fic situat ion! Equally,
connecti ng, changing or i nserting data media can distract the dr iver.
SAFETY INSTRUCTIONS
NOTE
All updates and b ugfixes bes ides map mater ial for navigati on can be downl oaded free of ch arge
from www.zenec.com.
CAUTION
If you are using a pas sword to protect yo ur ZENEC system, ensur e that this password is kept
safe for future access.
There is a charge for unlocking the ZENEC system, w hich can only b e done by ZENEC Ser vice.
BEFORE USIN G FOR THE FIRST TI ME
✓ Al ways follow all the s afety instr uctions of the ve hicle manufacturer, and the instr uctions given
in this user manual.
✓ Please pay attention to the safety instruction s.
CONTENTS OF T HIS CHAPT ER
Fig. 5/01
Overvi ew
About this chapter ........................................................................................................................... S. 64
Safety instructions .......................................................................................................................... S. 64
Before fir st use ................................................................................................................................ S. 64
Contents of this chapter .................................................................................................................. S. 65
Setting sources ............................................................................................................................... S. 66
Radio configuration
Overvi ew ..........................................................................................................................................S. 67
Media configuration
Overvi ew ......................................................................................................................................... S. 68
Bluetooth configuration
Overvi ew ......................................................................................................................................... S. 69
Device Manager ...............................................................................................................................S. 70
BT settings .......................................................................................................................................S. 73
TFT configuration
Overvi ew ..........................................................................................................................................S. 74
Sound configuration
Overvi ew ..........................................................................................................................................S. 75
Loudspeaker system ........................................................................................................................S. 76
Audio settings ..................................................................................................................................S. 79
Profile .............................................................................................................................................. S. 84
Vehicle configuration
Device Quic k Start Gu ide ..................................................................................see separate document
Device configuration
Overvi ew ......................................................................................................................................... S. 85
Version info ..................................................................................................................................... S. 86
Diverse .............................................................................................................................................S. 87
Inputs............................................................................................................................................... S. 88
Help ................................................................................................................................................. S . 89
Page 34

66 67
Function Icon Operation
Tun er
Touch to access radio s ettings
Device User Manual → Settings → Radio S. 67
Media
Touch to access sound a nd image settings
User Manual → Set tings → Media S. 68
Bluetooth
Touch to access hands -free system settings
Device User Manual → Settings → Bluetooth S. 69-73
TFT
Touch to access displ ay settings
Device User Manual → Settings → TFT S. 74
Audio
Touch to access sound settings
Device User Manual → Settings → Sound S. 75-8 4
Vehicle
Touch to access vehicle settings
Device Quic k Start Gu ide → CAR
Devices
Touch to access devic e settings
Device User Manual → Settings → Devices S. 85
Setting sources
Fig. 5/02
RADIO CONFIGURATION
Here you can make the settings fo r operation of t he radio. To make the settings press the
appropriate wrench ico n. You will find an explanation of the abbrevi ations at the end of this user
manual.
Function Icon Operation
Tun er
configuration
Touch to access this view
Function Icon Operation
AF
ON/OFF
REG
ON/OFF
Fig. 5/03
Overvi ew
Page 35

68 69
MEDIA CONFIGURATION
Here you can make the settings for operation of the audio playback. To make the settings press the
appropriate wrench icon. You will find an explanation of the abbreviations at the end of this user
manual.
Function Icon Operation
Media
configuration
Touch to access this view
Function Icon Operation
Database
ON = Gracenote support enabled
OFF = Gracenote support disabled
ID3
GN = Grac enote sor t
ALL = User sort
Cover Art
GN = Grac enote sor t
ALL = User sort
Media Icon
Button assignment MEDIA
(Auto/USB/SD/DVD/iPod)
Fig. 5/04
Overvi ew
NOTE
If none or not all the music titles o f your external media are displayed, p lease set the ID3 and
Cover setting s to ALL.
BLUETOOTH CONFIGURATION
Here you will find all the options for Bluetooth management and settings. A description is also given on
how to pair and remove Bluetooth devices. You will find an explanation of the abbreviations at the end
of this user manual.
Function Icon Operation
Bluetooth
configuration
Touch to access this view
Function Icon Operation
Device
Manager
Touch to pair, disconnect, or manage mobile devices
Settings → BT Configuration → Devive Manag er S. 70
BT Settings
Touch to change settings for BT operation
Settings → BT Configuration → BT Settings S. 73
Fig. 5/05
Overvi ew
Page 36

70 71
Device Manager
The pairing process requires the BT function on the end device to be enabled. Please also take note
of the instructions of the device manufacturer on the pairing of devices.
Function Icon Operation
Device
Manager
Touch to access this view
Function Icon Operation
Search
Touch to search for a new Bluetooth device
(not possible if two devices are connected)
Pair
Touch to reconnect a paired Bluetooth device
Disconnect
Touch to disconnect a paired Bluetooth device
Delete
Touch to delete a Bluetooth device from the list
(requires the device to be disconnected)
Fig. 5/06
Icon Meaning
This icon indicates that the paired Bluetooth device supports HSP/HFP, and can
be used via the hands-free system.
Hands-free System S. 49
This icon indicates that the paired Bluetooth device supports A2DP, and can be
used via the audio player.
Settings → BT Configuration → BT Settings S. 73
Pairing
Via the ZE NEC system
Function Icon Operation
Search
Touch the magnifying glass to initiate a search for BT devices.
From the list select the desired mobile device that you want to
synchronize with the ZENEC system.
After selecting follow the instruction of the ZENEC system.
Code Standard Co de*: 1 2 3 4
Fig. 5/07
Via the mobile devic e
Function Icon Operation
Search
Make sure that the ZE NEC system is in Devic e Manager view
otherwi se the ZENEC system will not be visible to others. Follow
the instruc tions of the devi ce manufactu rer on pairing.
Auto Connect
Once a mobil e device has been c onnected with the ZENEC system, i t will be automati cally paired
when the ZENEC system is starte d. On being bri efly disconnected the ZEN EC system will atte mpt to
establish a new c onnectio n.
NOTE
On pairing fo r the first ti me, be sure to perm anently enable t he connect ion confirmation on your
mobile devic e, otherwi se malfunctions may occur du ring the Auto Co nnect proc ess.
NOTE
*For mobile devi ces that do not sup port the S SP standard.
Page 37

72 73
Device names
Fig. 5/08
Function Icon Operation
Device name Edit
1. Touch the name to be changed from the list.
2. Touch EDIT to open the keypad.
Edit the name as you wi sh, and then save. This n ame is only
changed in the ZENEC system: in the mobile phone the
existing name is n ot changed.
Change the name of the mobile device displayed in your ZENEC system (e.g. "Mobile phone John
Smith")
NOTE
The origina l device name of th e mobile device is not changed. T he name you enter here is only
displayed in the ZEN EC system.
BT SETTINGS
Here you can make the settings fo r Bluetooth ope ration. To make the settings press the app ropriate
wrench ico n.
Function Icon Operation
BT Settings
Touch to access this view
Fig. 5/09
Overvi ew
Function Icon Operation
Microphone
Internal = inside device
External = only if installed
Microphone
Function Icon Operation
Name
1: by first name
2: by surname
Sort
Function Icon Operation
Nickname
Here you can rename the ZENEC system.
The name you enter here is displayed on the mobile devices.
Device name
Page 38

74 75
TFT CONFIGURATION
Here you can make the settings for the display. To make the settings press the appropriate wrench
icon.
Function Icon Operation
TFT
Configuration
Touch to access this view
Function Icon Operation
TFT
Settings
Touch to select the brightness co ntrol:
Navi = Br ightness set ting Day/Nig ht is controll ed
by the navigation system.
Car = Brightnes s setting Day/N ight is controlled
by the vehicle.
TS
Calibration
OK
Touch to recalibrate th e TFT
(follow the instr uctions on t he screen).
TS
Brightness
Day
-10 < > +10
TS
Brightness
Night
-10 < > +10
Fig. 5/10
Overvi ew
NOTE
Using the DISP b utton you can s et the display bri ghtness to three levels
( 100% → 50% → 0% ).
AUDIO CONFIGUR ATION
In this menu you can make all the settings to do with audio output. Please remember that all the
settings you make here will have a direct influence on the sound in your vehicle.
Function Icon Operation
Audio
configuration
Touch to access this view
Function Icon Operation
Loudspeaker
system
Touch to make general audio settings
Settings Audio Configuration Loudspeakers S. 76
Audio
setting
Touch to make audio DSP settings
Settings Audio Configuration/Audio Settings S. 79
Presets
Touch one of the presets to apply this profile
Settings Audio Configuration Profile S. 84
Fig. 5/11
Overvi ew
Page 39

76 77
LOUDSPEAKER SYSTEM
Function Icon Operation
Loudspeaker
system
Touch to access this view
Function Icon Operation
Volu me
Touch to set initial and nor mal volume levels
Loudspeaker System Volume S. 77
Loudspeaker
setup
Touch to make general loudspeaker system settings
Loudspeaker System Loudspeaker Setup S. 78
Navi mixer
Touch to set the navigation vo ice outputs
Loudspeaker System Navi-Mixer S. 78
Fig. 5/12
Volu me
Function Icon Operation
Initial Volume
Setting = manually adjusted volume
Last = last volume set before switching off
Adjust Initial
Volume
This setting can only be made if the upper setting is at SET.
0< >+40
TA volume
Setting = manually adjusted volume
Last = last volume set
Adjust
TA Volume
This setting can only be made if the upper setting is at SET.
0< >+40
Navigation
Volume
-9< > +3
Tuner
-9< >+3
CD/DVD
-9< > +3
USB/iPod
-9< > +3
A/V In
-9< > +3
Camera Mic.
-9< > +3
Fig. 5/13
In this menu you can adjust the normal volume of the sources.
Page 40

78 79
Loudspeaker setup
Function Icon Operation
Sound
system
4.2 = 4 channel speaker system (+ 2 subwoofer)
5.1 = 5-channel speaker system (+ 1 subwoofer)
OE Sound
system
On = Sound system installed by the vehicle manufacturer
(DSP functions are partly disabled)
Off = ZENEC DSP functions fully enabled
Subwoofer
filter
12 dB filter
24 dB filter
Fig. 5/14
In this menu you can make the settings for the loudspeaker system. Please note that the settings you
make here will have an affect on the sound. You can reset them at any time using the preset profile.
Navi-Mixer
(no picture)
In this menu you can make the sound setting of the navigation output. Please note that other settings
can be made in Setup in the navigation system .
Navigation User Manual → Settings
Function Icon Operation
Mute
ON = Voice output mutes media playback
OFF = Volume of media playback reduced
Audio output
Driver = only at driver's speaker
Front = only at speakers front left and right
AUDIO SETTINGS
Fig. 5/15
Here you have the option of adjusting the sound profile optimally to your vehicle. The setting options
described in this section for parametric equalizing, crossover setting, and time delay correction have
great influence on the sound in your vehicle. To achieve an improvement in the acoustic playback by
using the correct settings presumes a certain amount of background knowledge. If you do not have
background knowledge about digital signal processors, gain settings, time delay differences, and
Q-factors, you should perhaps avoid making settings yourself. Instead make use of the vehicle presets
to quickly and easily find a suitable standard setting for your vehicle.
Function Icon Operation
Equalizer
Touch to set the 11-BAND equalizer
Audio Settings → Equalizer S. 80
X-Over
Touch to make settings for the crossover
Audio Settings → X-Over S. 81
Fader/
Balance
Touch to set fader or balance
Audio Settings → Fader/Balance S. 82
Time Delay
Correction
Touch to make the time delay correction for individual speakers
Audio Settings → Time Delay Correction S. 83
Page 41

80 81
Equalizer
Fig. 5/16
In this menu you can make the settings for the playback frequency response.
Function Icon Operation
Shape
factor Q
Touch to set the quality of the filter for the chosen band
(1= wide, 5 = narrow)
1 < > 5
Frequency
Touch to set a filter frequency for the selected band (each band
adjustable in 7 steps)
Gain
-14 < > +2
Band
Touch to select the desired BAND
Touch and hold to change the setting of the selected band
NOTE
The sound setting options are explained in a user manual included separately.
Device Quic k Start Gu ide → Basic Operation → Sound Setting
X-O ver
Fig. 5/17
In this menu you can make the settings for the crossover frequency of individual channel groups.
Function Icon Operation
Loudspeaker
Group
Selection of speaker group you want to set
Front + Rear/Subwoofer/Center (5.1 setting only)
HPF
Touch to set the high pass filter
Off (FLAT)/63 Hz/80 Hz/100 Hz/125 Hz
LPF
Touch to set the low pass filter
Off (FLAT)/63 Hz/80 Hz/100 Hz/125 Hz
Gain
Touch to set the GAIN of the selected loudspeaker group
-6 < > 6
Phase
SUBWOOFER ONLY
0/180°
ON/OFF
SUBWOOFER ONLY
ON = speaker as per setting
OFF = mute
Page 42

82 83
Balance/Fader
Fig. 5/18
In this menu you can make the settings for the balance between the speakers in the vehicle.
Function Icon Operation
Left/Right
6L > < 0 > < 6R
Front/Rear
6F > < 0 > < 6H
Crosshair
Touch at the desired position
Time Delay Correction
Fig. 5/19
In this menu you can set the time delay correction for the loudspeakers in your vehicle.
Function Icon Operation
Unit
Selection of desired unit
ms = time
cm = distance
Speaker
Touch to select the desired speaker
(FL/FR/HL/HR/SUBW/CNTR)
Delay
ms = 0.0 < > 8.9 ,0.1 ms steps
cm = 0 < > 305 ,ca. 3 cm steps
The distance between the ears and the
speaker system installed in the vehicle varies
considerably due to the complex arrangement
of the individual speakers. This menu gives
you the option to delay the audio signal at
each of the speakers so that you have a
central auditory sensation.
Page 43

84 85
PROFILES
Presets
The six preset profiles offers you a quick and easy way of tuning the sound to your vehicle.
Function Operation
Profiles
Touch to select one of the profiles
User/Flat/Subcompact/Compact/Sedan/Station Wagon/Van SUV/Convertible
Profile Description
User
If you alter the value s of the sound set tings the system switches to the pr ofile
User.
Flat
This centers a ll the settin gs back to a neutra l position.
Subcompact
Use this sett ing, if you drive a sub compact ca r.
Compact
Use this sett ing, if you drive a compact car.
Sedan
Use this sett ing, if you drive a vehi cle with a notch back.
Station Wagon
Use this sett ing, if you drive a vehi cle with an ope n trunk in the pas senger
compartment.
Convertible
Use this sett ing, if you drive a vehi cle with an ope n roof.
VAN/SUV
Use this sett ing, if you drive a vehi cle with thre e rows of seats ( VAN) or a large
interior (SUV ).
DEVICE CONFIGURATION
Function Icon Operation
General
Touch to access this view
Function Icon Operation
Version info
Touch to access current system information
Setup General Ver sio n S. 86
Diverse
Touch to make basic settings
Setup General Diverse S. 87
Input
Touch to access image s ettings of external sourc es
(c am er a/AV - IN …)
Setup General Input S. 88
Help
Touch to make system settings
Setup General Help S. 89
Fig. 5/20
Overvi
Page 44

86 87
Vers ion i nfo
Function Icon Operation
General
Touch to access this view
Function Icon Operation
Vers ion Displays the current system information
Info
Touch to access detailed information
Fig. 5/21
Diverse
Function Icon Operation
General
Touch to access this view
Function Icon Operation
ALT Button
Touch to define the source assignment of the ALT button
(CAM/Quick EQ/SmartLink/AV-IN/USB/iPod/DVD)
Button
Sounds
Off = acoustic acknowledgment disabled
Off = acoustic acknowledgment enabled
Ant. Power
Off = antenna phantom power disabled
On = antenna phantom power enabled
OSD
Language
Touch to change the menu language
Fig. 5/22
In this menu you can set the menu language, button assignments, and make other settings for the
ZENEC system.
Page 45

88 89
INPUT
Function Icon Operation
General
Touch to access this view
Function Icon Operation
Brightness
-10 to +10
Contrast
-10 to +10
Saturation
-10 to +10
Hue
-10 to +10
Fig. 5/23
In this menu you can adjust the image settings of the connected video sources (e.g. camera).
HELP
Function Icon Operation
General
Touch to access this view
Function Icon Operation
Factory setting
OK
Touch and confirm to reset the ZENEC system to the same state
as when it was shipped.
Save on USB
OK
Touch and confirm to save your profile settings in the ZENEC
system on external data media (USB). (FAT32 formatting)
Load from
USB
OK
Touch and confirm to load your saved profile settings from external data media (USB) into the ZENEC system.
Software
Update
OK
Touch and confirm to carry out a software update.
www.zene c.com → Suppor t → Soft ware-updates
Password
Prot.
Off = password protection disabled
On = password protection enabled
Password
Touch and confirm to store a password*.
In this menu you can perform various actions from password protection to factory setting.
Fig. 5/24
NOTE
*Please take note o f the instruc tions in the Device Quick St art Guide o n the subject of
anti-theft protection.
Page 46

90 91
GENERAL
ABBREVIATIONS
Abbreviation Description
A/ V-IN Input option for audio/ video signal sources (seria l input)
A2DP
Manufacturer-independent Bluetooth® technology allowing audio signals to be
transmitted (Advanced Audio Distribution Profile)
AC-Control Visual status informatio n about the air conditioner
AM
Transmission standa rd for terrest rial reception of medium wave ana log radio
(MW)
AUX Input option fo r any audio signal so urce (Auxilia ry Input)
CAN/Stalk
Specifi c communic ations adapter fo r connecti on to a CAN bus usin g an IF
interface
CAN-Bus
The CAN bus (Cont roller Area N etwork) is a ser ial bus system for th e
communic ation of contr ol units in a vehic le
DAB / DAB+
Transmission standard for terrestrial reception of digital radio (Digital Audio
Broadcasting)
DSP
The digital si gnal processor is used for t he process ing of digital si gnals (e.g.
audio or video s ignals)
DVB -T
Transmission standard for terrestrial reception of digital video (Digital Video
Broadcasting)
DVD Digital Video Disc
EQ Equalizer
FAT3 2
Formatting format for digital media
(File allocation table 32-bit)
FM
Transmission standard for terrestrial reception of very high frequency analog
radio (UK W)
GPS
Global navigation satellite system for position fixing
(Global Positioning System)
GSM
Global mobile radio network standard for fully digital mobile radio networks
(Global System for Mobile Communications)
ID 3 -Ta g
ID3 tags mean meta data, which c ould be included together w ith the MP3 fo rmat.
MFL Multifunction steering wheel
microSD Compact flash memo ry
MLT "More Like This" i s a Gracenote f unction
Mood Playlist generate d based on the mood you want to create (100 mood s tyles)
M-Zone
Interfac e for a rear seat infotainment system
(Rear seat entertainment)
OPS Visual and acoustic parking system
P.O.I.
POIs are geo -objec ts that have signif icance in the navigation sy stem. For
example: places to e at, places to st ay, filling stations , cash machine s, and
parking blocks
REG Regional station
RFK Rear-view camera
SSP Secure Simple Pairing (for Blueto oth devices)
TMC/TMC
Pro
Reception of messages about disruption s to traff ic in digital form. Modern
navigation syste ms can proce ss TMC to generate detour routes a round traf fic
tie-ups and obstructions (dynamic route guidance).
USB
A USB connec tion is a seri al bus system for co nnecting a devi ce to other
devices (Unive rsal Serial Bus).
XVID
XVID is th e most popular c ontainer for mat. Over 90% o f present-d ay AVI files
are encoded w ith Xvid.
Page 47

92 93
INDEX
A
A/ V In ......................................................... p. 44
Alternative frequency (AF) ......................... p. 67
Audio playback ........................................... p. 23
CD/DVD .................................................. p. 27
Ha rd disk (USB/S D) ................................ p. 28
BT mus ic (A2DP) .................................... p. 29
iPo d ......................................................... p. 30
B
Bluetooth ................................................... p. 69
Pair ing device ..........................................p. 70
Connecting device ...................................p. 70
Auto c onnect ............................................ p. 71
C
CD audio ................................................... p. 27
D
DVD
DV D audio ............................................... p. 27
DV D video ................................................ p. 38
E
Settings ...................................................... p. 64
Ensemble ....................................................p. 21
External connections .................................p. 42
F
Hands-fr ee system .................................... p. 49
Accepting/ending calls ........................... p. 53
Call setup ........................................from p. 5 3
Phonebook ............................................. p. 55
Co nference ca ll ...................................... p. 54
Favorites ................................................. p. 56
Call lists .................................................. p. 57
G
Gracenote ................................................. p. 32
M LT playlists ........................................... p. 33
Mood ................................................f rom p. 34
H
Main menu ................................................ p. 08
Notes .................................................from p. 05
I
Input ............................................................p. 42
K
Configuration
Configuration tuner .................................. p. 67
Configuration media ................................ p. 68
Configuration Bluetooth .................. from p. 69
Configuration TFT ....................................p. 74
Configuration sound ........................fro m p. 75
Configuration devices...................... from p. 85
Camera ...................................................... p. 45
Camera line f ields ..................................... p. 45
Map ............................................................p. 61
Sound settings .....................Quick Star t Guide
L
Volu me ...................................................... p. 77
Mute ..................................... Quick Start Guide
M
M-Zone (RSE) ............................................ p. 46
DV D ........................................................ p. 48
A /V IN ..................................................... p. 48
Front au dio .............................................. p. 48
SMARTLINK ........................................... p. 48
N
Navigation ................................................. p. 58
Ma p ..........................................................p. 61
New r oute ............................................... p. 62
Tr aff ic ...................................................... p. 63
Navi mixer ............................................... p. 78
P
Preset (save) .............................................. p. 22
Tra sh ..........................................................p. 07
Playlist s ......................................................p. 31
R
Radio ...........................................................p. 13
Radio band FM .........................................p. 15
Radio band AM .........................................p. 18
Radio band DAB ...................................... p. 20
Rear-view camera ..................................... p. 45
S
Station list
FM ............................................................p. 16
DA B ..........................................................p. 21
Station store ............................................... p. 22
Station search
FM ............................................................p. 17
A M ...........................................................p. 19
DA B ..........................................................p. 21
Search function (general) ...........................p. 10
SMARTLINK ............................................. p. 44
Security code ............................................. p. 89
T
TV tuner (DVB-T tuner) .............................. p. 44
Telephone book ......................................... p. 55
Telephone conference .............................. p. 54
U
USB
US B audio................................................ p. 28
USB video .................................................p. 41
V
Traffic announcements (TA) .......................p. 15
Traffic reports ............................................. p. 63
Video playback ........................................... p. 38
DV D ........................................................ p. 40
Ha rddisk (USB/S D) ..................................p. 41
W
Factor y set ting ........................................... p. 90
Page 48

94 95
Gracenote®-End Use r License Ag reement
This applic ation or devic e contains sof tware fr om Gracenote, I nc. of Emery ville, California
(“Gracen ote”). The soft ware from Gr acenote (the “Gr acenote Sof tware”) enables this appli cation
to perfor m disc and/or f ile identif ication and o btain music -related information, including name,
artist, t rack, and title information (“Grace note Data”) from o nline servers or embedde d databases
(collectively, “Gra cenote Ser vers”) and to per form other functions. You may use Gracenote Data o nly
by means of the intend ed End-Use r functions of this applica tion or device.
You agree that you will use Gr acenote Data, t he Gracenote Softwar e, and Gracenot e Servers fo r
your own personal non-c ommercia l use only. You agree not to assign, co py, transfer or transmi t
the Gracen ote Softwa re or any Graceno te Data to any third par ty. YOU AGREE NOT TO USE OR
EXPLOIT GR ACENOTE DATA, THE GRACE NOTE SOFT WARE, OR GR ACENOTE SERVERS ,
EXCEPT AS EX PRESSLY PERMITTED H EREIN.
You agree that your non- exclusive lice nse to use the Grac enote Data, th e Gracenote So ftware, an d
Gracenote Se rvers will terminate if you vi olate these restrictio ns. If your licens e terminates, you
agree to cease any and all use of the Gracenote Data, t he Gracenote S oftware, a nd Gracenote
Servers. G racenote reserves all r ights in Grac enote Data, the G racenote Sof tware, and t he
Gracenote Se rvers, inc luding all owne rship right s. Under no circ umstances w ill Graceno te become
liable for any payme nt to you for any inform ation that you provide. You agree that Gracenote, Inc.
may enforce its r ights under th is Agreement against you direct ly in its own name.
The Gracen ote servic e uses a unique id entifier to t rack querie s for statisti cal purpos es. The purpo se
of a randomly ass igned numeric identifi er is to allow the G racenote ser vice to co unt queries wi thout
knowing anyt hing about who yo u are. For more infor mation, see th e web page for the Gracenote
Privacy Policy for the Gracenote service.
The Gracen ote Softwa re and each item of G racenote Data are licensed to yo u “AS IS.” Gracenote
makes no represe ntations or war ranties, expr ess or implied, regarding the accuracy of any
Gracenote Da ta from in the G racenote Ser vers. Grac enote reser ves the right to d elete data from
the Gracen ote Servers o r to change data c ategorie s for any cause that G racenote dee ms sufficient.
No warrant y is made that the Gracenote Sof tware or Gr acenote Ser vers are err or-free or that
functioni ng of Gracenote S oftware or Gracenote S ervers will be uninterru pted. Graceno te is not
obligated to provide you with new enhanced or additional data t ypes or categ ories that G racenote
may provide in the f uture and is free to discontinue i ts servic es at any time.
GRACENOT E DISCLAIMS ALL WARR ANTIES E XPRESS OR IM PLIED, INCLUDI NG, BUT NOT
LIMITED TO, IMPLIED WA RRAN TIES OF MERCHA NTABILITY, FITNESS FOR A PARTICU LAR
PURPOSE, TITLE, AND NON-INFR INGEMENT. GRACENOTE DOES NOT WARR ANT THE
RESULTS THAT WILL BE OBTAINED BY YOUR USE OF TH E GRACEN OTE SOFTWA RE
OR ANY GR ACENOTE SERVE R. IN NO CASE WI LL GRACEN OTE BE LIABLE FO R ANY
CONSEQUEN TIAL OR INCIDENTAL DAMAGES OR FO R ANY LOST PROFITS OR LOST
REVENUES.
© Gracenote, In c. 2009
STATUTORY RIGHTS AND WARRANTY
Dear customer,
Please read the warranty specifications below carefully.
Should your ZEN EC product requi re warranty s ervice, p lease return it to the retailer from whom
it was purchased or the distrib utor of your count ry. Do not send any prod uct to ZENEC direc tly.
This ZENEC prod uct is protecte d against defective materials and/or imprope r workmanship by a
factory wa rranty, for the per iod of two years from date of purc hase at retail, to t he original bu yer.
For warranty wo rk to be carr ied out, an RM A number must be generated, whic h requires a valid
product serial number and the original sales slip.
Guarantee Restrictions
This warr anty does not cover any damage due t o:
1. Unauthorized or unapproved installation, incorrect audio or mains connection(s).
2. Defects caus ed by exposure of pro duct to humidit y, water and organic fluids, prolon ged
exposure to sun rays or exc essive dirt or dust.
3. Mechanical defects cau sed by accident s, fall or impact .
4. Unauthorize d repair attempts and modif ications of pr oduct not explicitly author ized by the
manufacturer.
This warranty is limited to the repair or the replacement of the defective product at the manufacturer‘s
option and does not include any other form of damage, whether incidental, consequential or otherwise.
The warranty does not cover any transport costs or damages caused by transport or shipment of the
product. Any additional or further claims and requirements for compensation of auxiliary components
that have been damaged in sequence, directly or indirectly, are strictly excluded.
Page 49

© Copyright 2015
RevA / copy deadline: Q3-2015
English
 Loading...