

Page 1
6 - 14 WT6000 User Guide
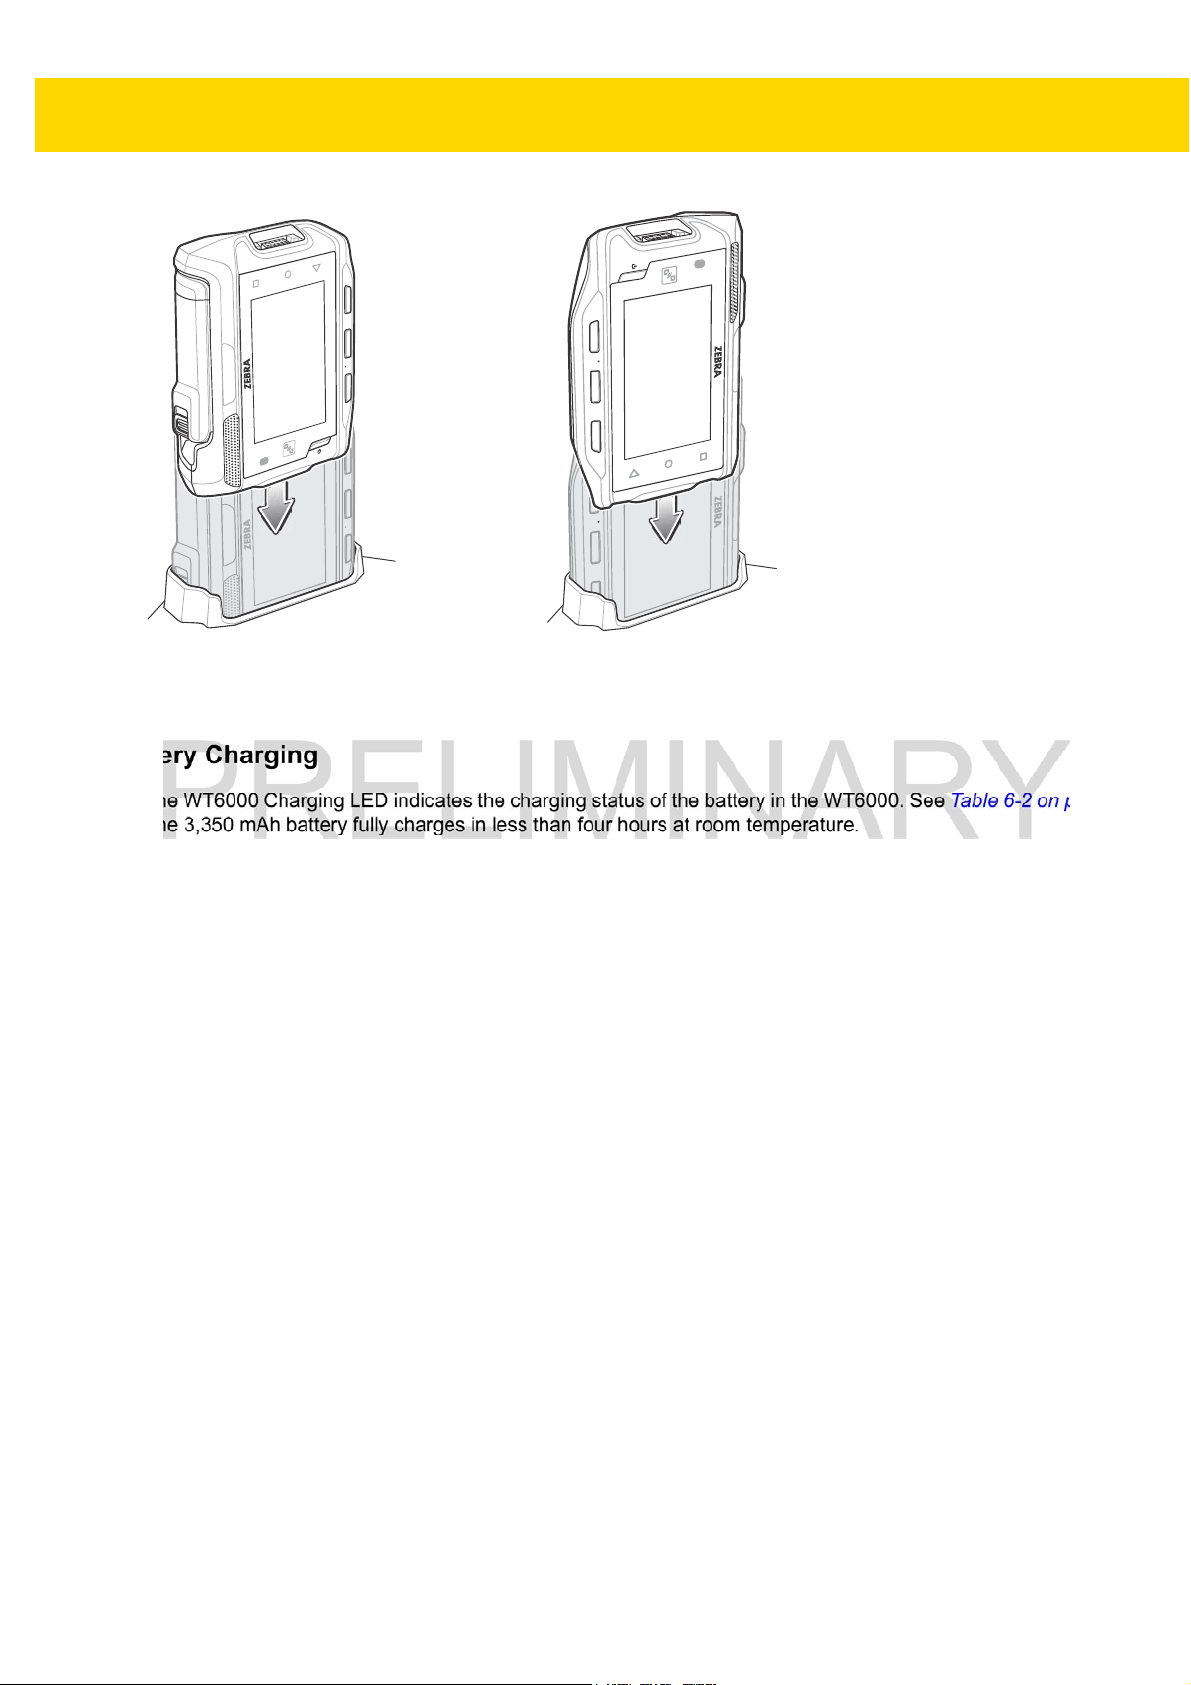
Figure 6-14 Insert WT6000 into Cradle
2. Ensure that the WT6000 is properly seated in the charging slot.
Battery Charging
The WT6000 Charging LED indicates the charging status of the battery in the WT6000. See Table 6-2 on page 6-5.
he 3,350 mAh battery fully charges in less than four hours at room temperature.
T
Charge batteries in temperatures from 0 °C to 40 °C (32 °F to 104 °F). The battery charger always performs battery
charging in a safe and intelligent manner. At higher temperatures (e.g. approximately +37 °C (+98 °F)) the battery
charger may for small periods of time alternately enable and disable battery charging to keep the battery at
acceptable temperatures. The battery charger indicates when charging is disabled due to abnormal temperatures
via its LED.
Page 2
5-Slot WT6000 Ethernet Cradle
NOTE
Ensure that you follow the guidelines for battery safety described in Battery Safety Guidelines on page 7-1.
The 5-Slot WT6000 Ethernet Cradle:
•
Provides 5.4 VDC (nominal) power for operating the WT6000.
•
Connects up to five WT6000 devices to an Ethernet network.
•
Simultaneously charges up to five WT6000 devices.
•
Simultaneously charges up to five spare batteries.
Accessories 6 - 15
WT6000 Charging LED
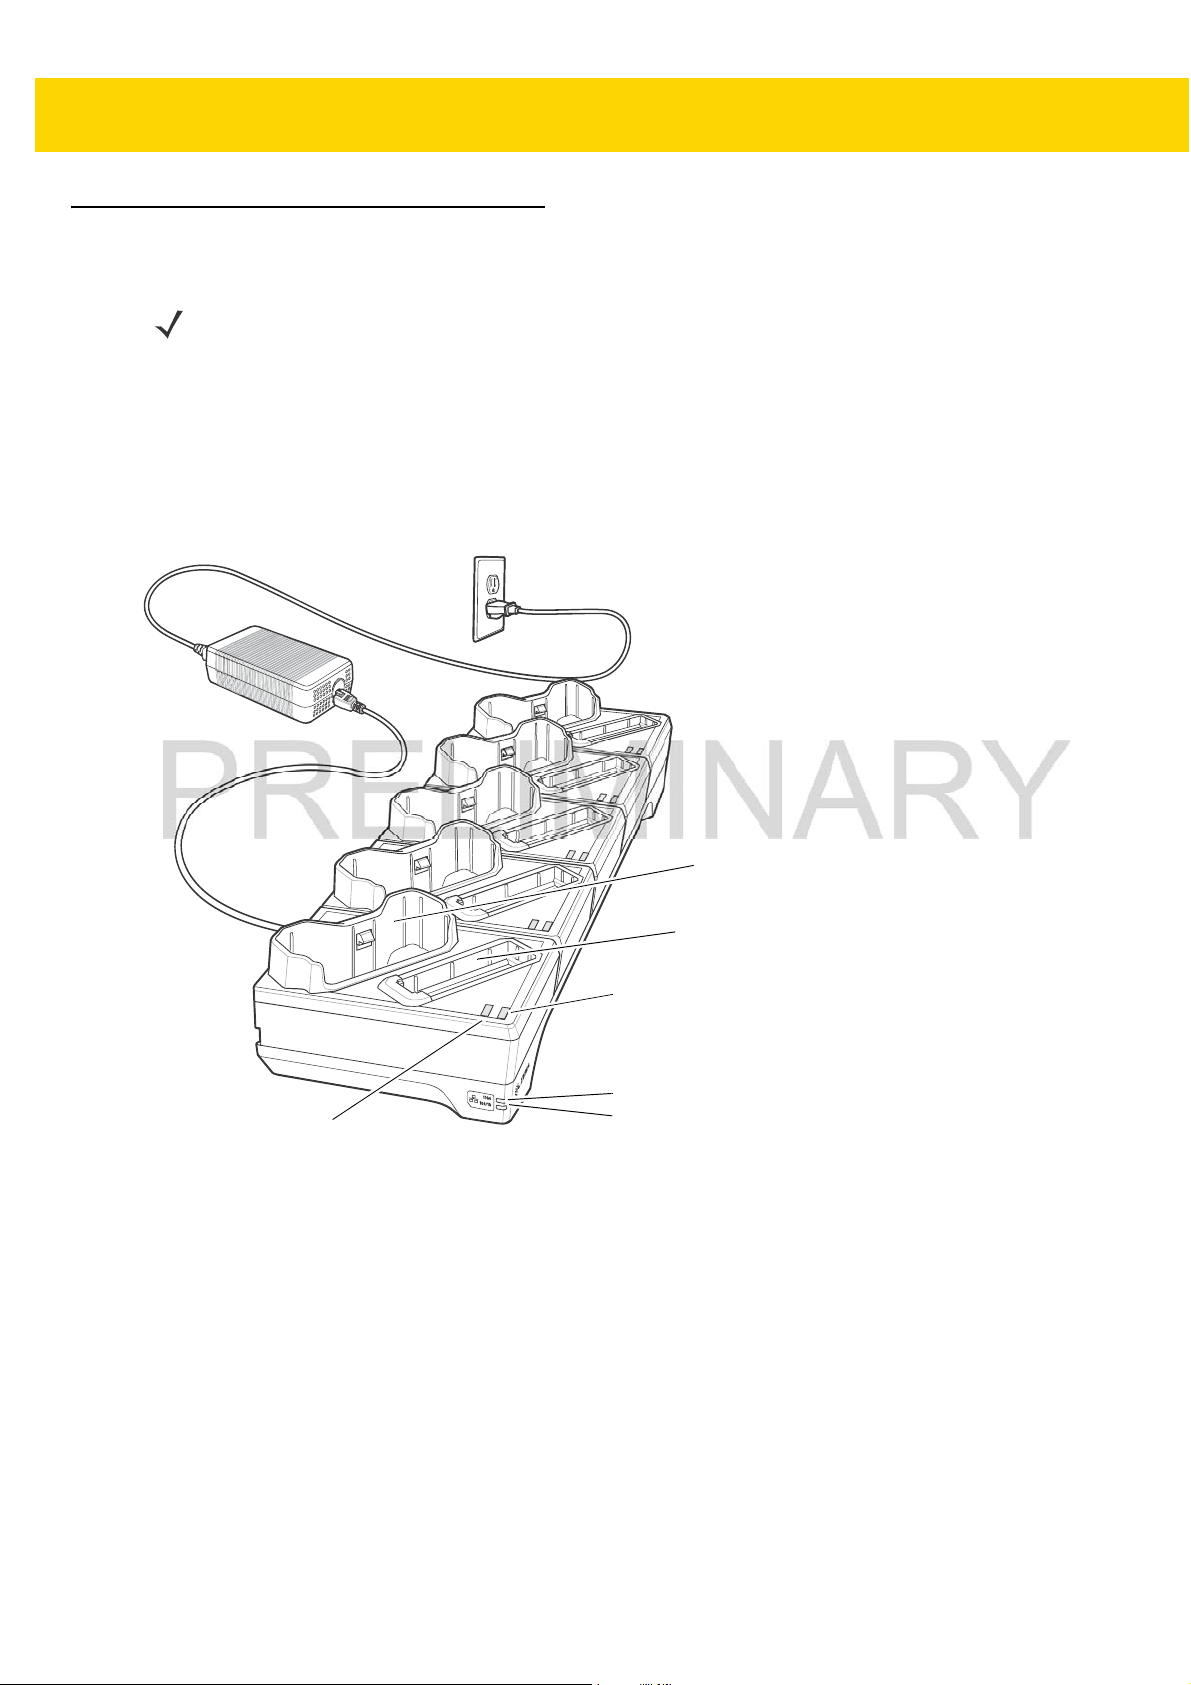
Figure 6-15 5-Slot WT6000 Ethernet Cradle
Charging the WT6000
To charge the WT6000:
1. Insert the WT6000 in the WT6000 charging slot.
WT6000 Charging Slot
Spare Battery Charging Slot
Spare Battery Charging LED
1000 LED
10/100 LED
Page 3
6 - 16 WT6000 User Guide
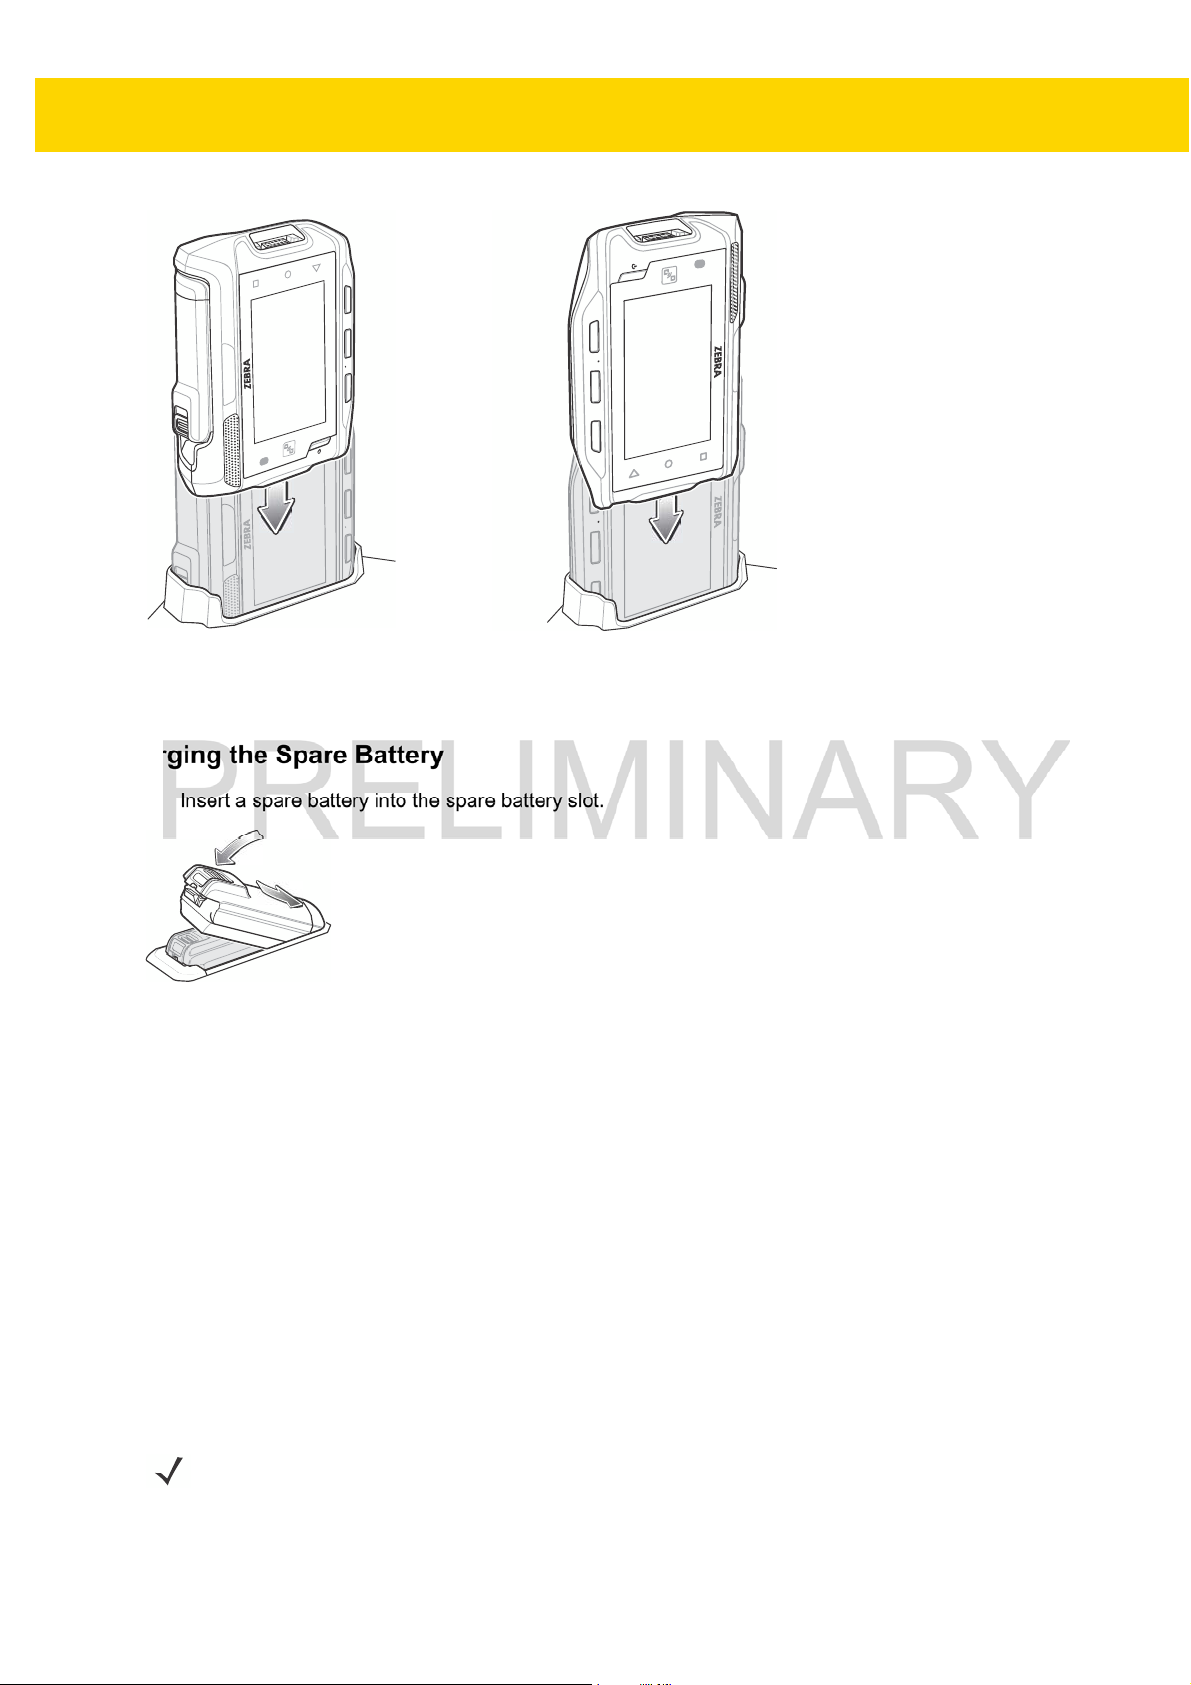
Figure 6-16 Insert WT6000 into Cradle
2. Ensure that the WT6000 is properly seated in the charging slot.
Charging the Spare Battery
1. Insert a spare battery into the spare battery slot.
Figure 6-17 Insert Battery into Cradle
2. Ensure the battery is seated properly. The Spare Battery Charging LED blinks indicating charging.
Battery Charging
The WT6000 Charging LED indicates the charging status of the battery in the WT6000 and the Spare Battery
Charging LED indicates the charging status of the spare battery. See Table 6-2 on page 6-5. The 3,350 mAh
attery fully charges in less than four hours at room temperature.
b
Charge batteries in temperatures from 0 °C to 40 °C (32 °F to 104 °F). The battery charger always performs battery
charging in a safe and intelligent manner. At higher temperatures (e.g. approximately +37 °C (+98 °F)) the battery
charger may for small periods of time alternately enable and disable battery charging to keep the battery at
acceptable temperatures. The battery charger indicates when charging is disabled due to abnormal temperatures
via its LED.
Establishing Ethernet Communication
NOTE
Refer to the WT6000 Integrator Guide for information on configuring the Ethernet settings.
Page 4
Accessories 6 - 17
1. Touch .
2. Touch Ethernet.
3. Slide the Ethernet switch to the ON position.
4. Insert the device into a slot.
5. The icon appears in the Status bar.
6. Touch Eth0 to view Ethernet connection details.
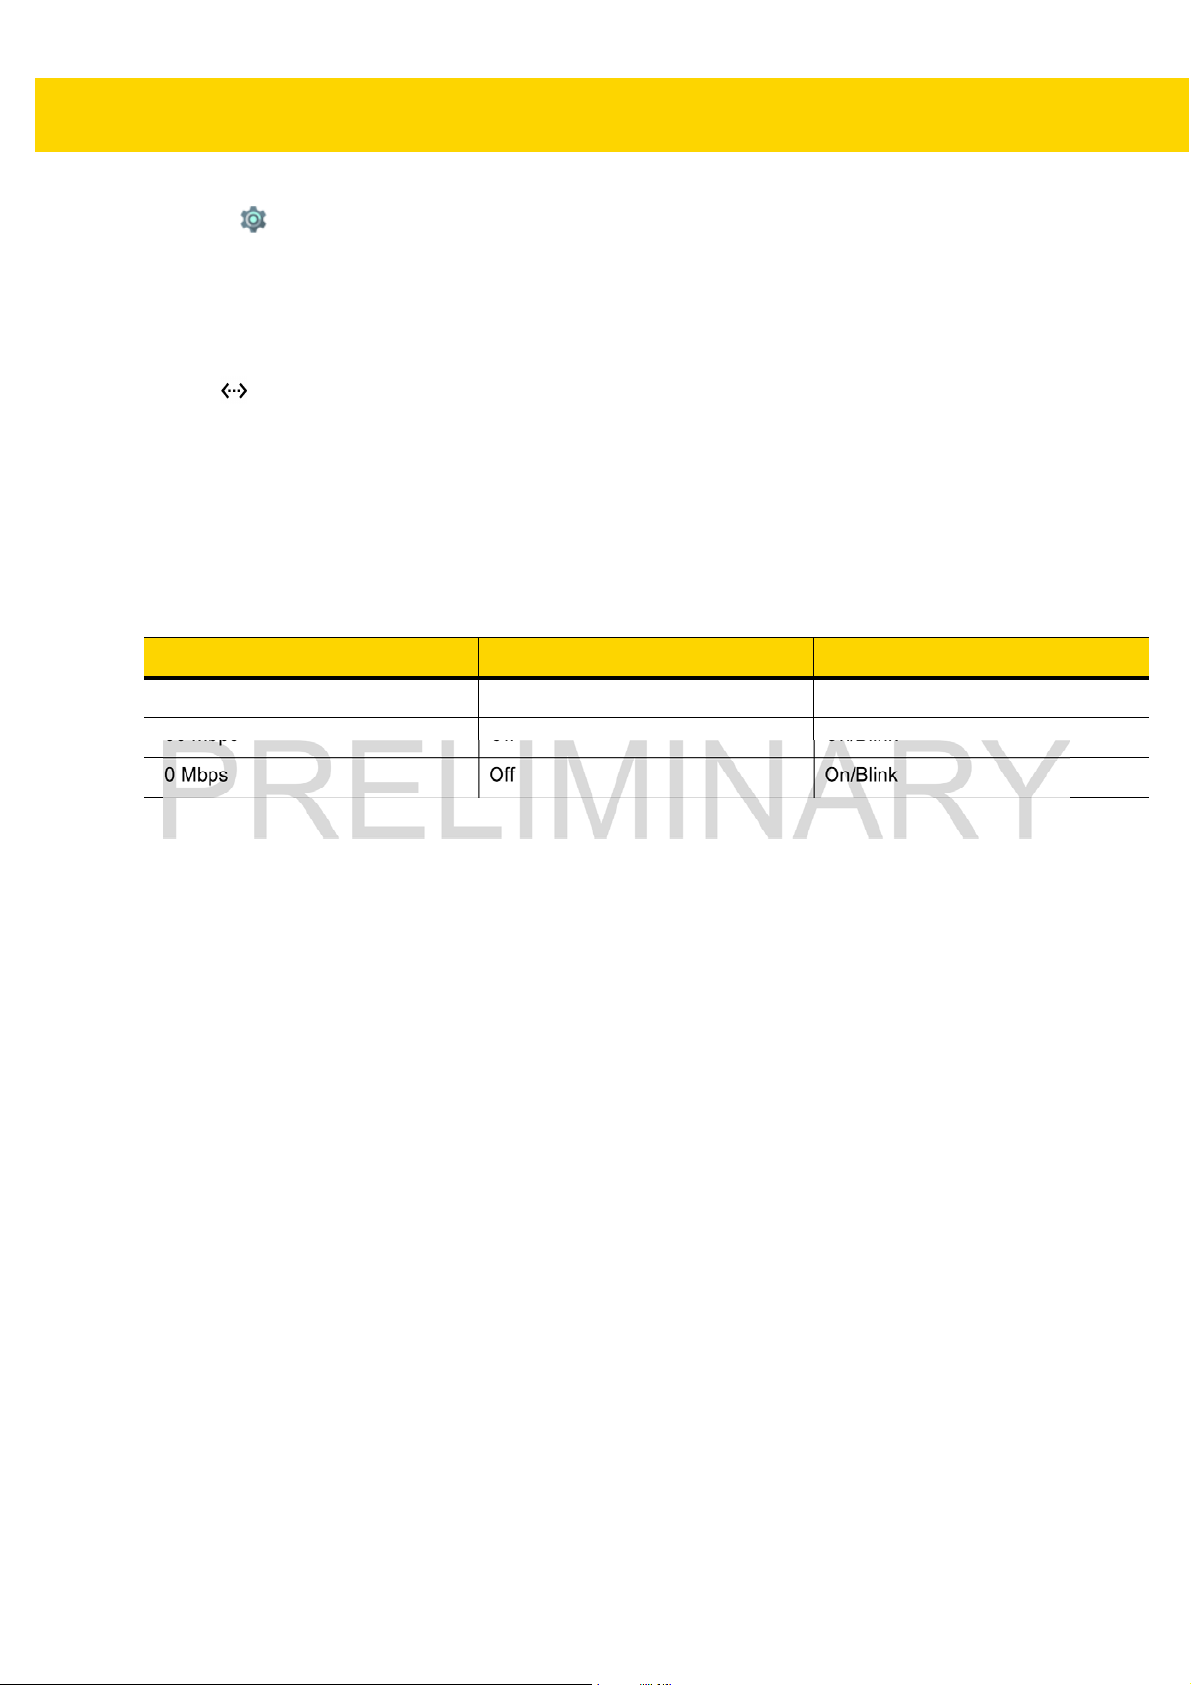
Ethernet LED Indicators
There are two green LEDs on the side of the cradle. These green LEDs light and blink to indicate the data transfer
rate.
Table 6-3 LED Data Rate Indicators
Data Rate 1000 LED 100/10 LED
1 Gbps On/Blink Off
100 Mbps Off On/Blink
10 Mbps Off On/Blink
Page 5
6 - 18 WT6000 User Guide
4-Slot Battery Charger
NOTE
Ensure that you follow the guidelines for battery safety described in Battery Safety Guidelines on page 7-1.
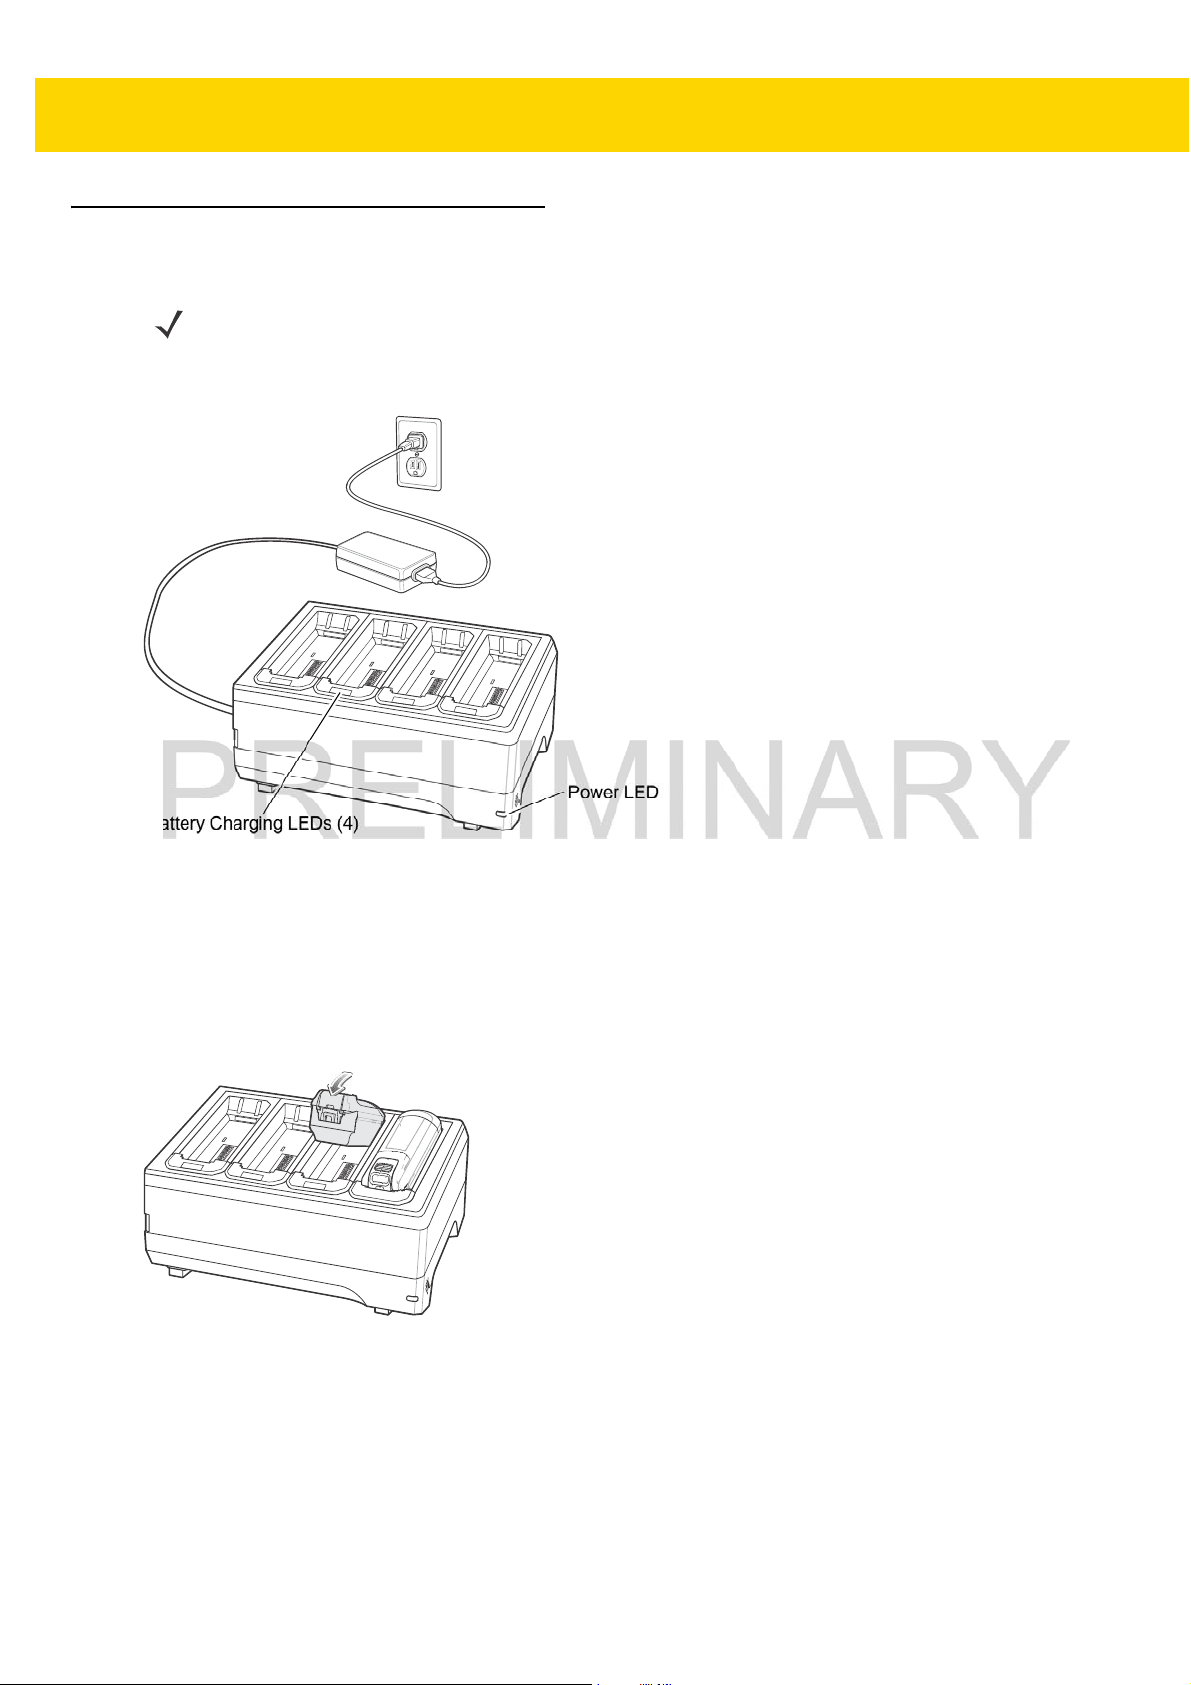
The 4-Slot Battery Charger charges up to four spare batteries.
Power LED
Battery Charging LEDs (4)
Figure 6-18 4-Slot Battery Charger
Battery Installation
To install the battery:
1. Insert the battery into a battery slot.
2. Gently press down on the battery until it snaps into place.
Figure 6-19 Insert Battery into Slot
Battery Removal
To remove the battery, press the two release latches on each side of the battery and lift the battery out of the
battery slot.
Page 6

Accessories 6 - 19
Battery Charging
Spare Battery Charging
Each Battery Charging LED indicates the status of the battery charging in each slot. See Table 6-2 on page 6-5.
The 3,350 mAh battery fully charges in less than four hours at room temperature.
Charge batteries in temperatures from 0 °C to 40 °C (32 °F to 104 °F). The battery charger always performs battery
charging in a safe and intelligent manner. At higher temperatures (e.g. approximately +37 °C (+98 °F)) the battery
charger may for small periods of time alternately enable and disable battery charging to keep the battery at
acceptable temperatures. The battery charger indicates when charging is disabled due to abnormal temperatures
via its LED.
Page 7
6 - 20 WT6000 User Guide
20-Slot Battery Charger
NOTE
Ensure that you follow the guidelines for battery safety described in Battery Safety Guidelines on page 7-1.
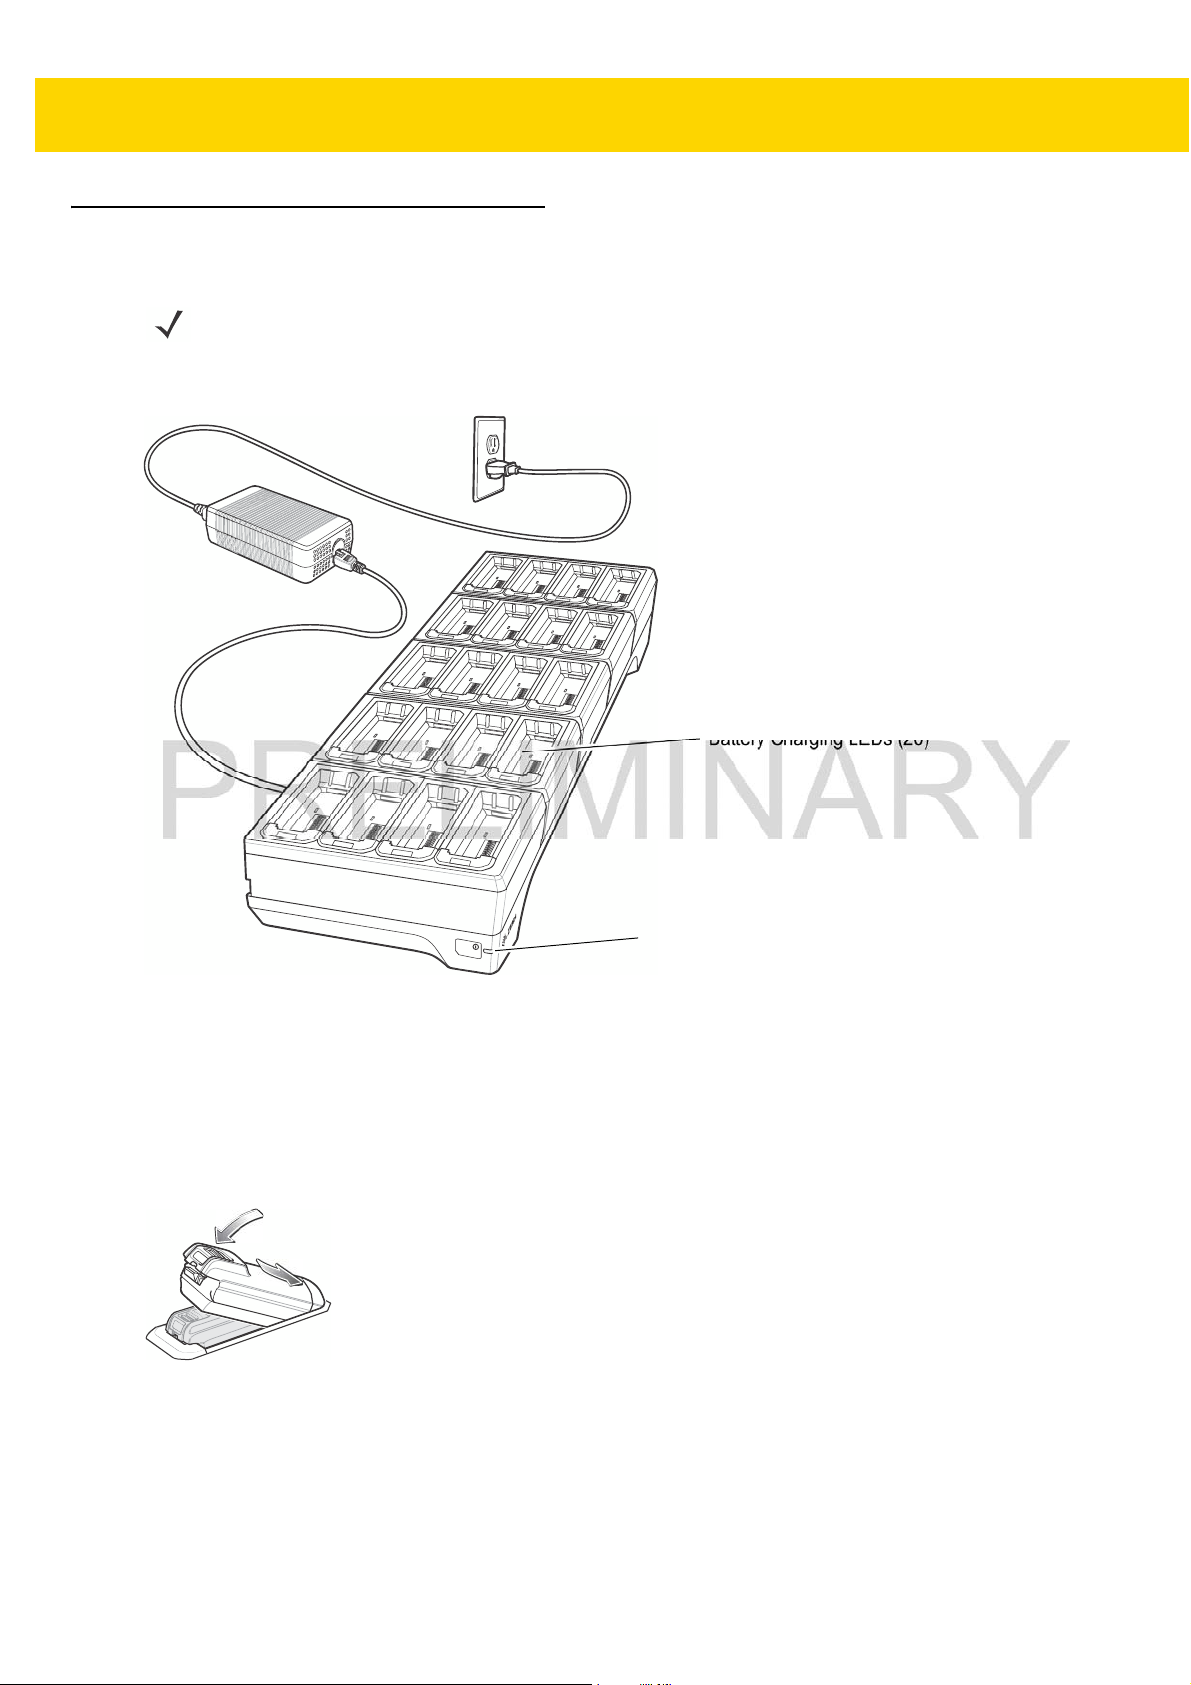
The 20-Slot Battery Charger charges up to 20 spare batteries.
Figure 6-20 20-Slot Battery Charger
Battery Installation
To install the battery:
1. Insert the battery into a battery slot.
2. Gently press down on the battery until it snaps into place.
Battery Charging LEDs (20)
Power LED
Figure 6-21 Insert Battery into Slot
Page 8

Accessories 6 - 21
Battery Removal
To remove the battery, press the two release latches on each side of the battery and lift the battery out of the
battery slot.
Battery Charging
Spare Battery Charging
Each Battery Charging LED indicates the status of the battery charging in each slot. See Table 6-2 on page 6-5.
The 3,350 mAh battery fully charges in less than four hours at room temperature.
Charge batteries in temperatures from 0°C to 40°C (32°F to 104°F). The battery charger always performs battery
charging in a safe and intelligent manner. At higher temperatures (e.g. approximately +37°C (+98°F)) the battery
charger may for small periods of time alternately enable and disable battery charging to keep the battery at
acceptable temperatures. The battery charger indicates when charging is disabled due to abnormal temperatures
via its LED.
Page 9
6 - 22 WT6000 User Guide
USB and Charging Cable
NOTE
Ensure that you follow the guidelines for battery safety described in Battery Safety Guidelines on page 7-1.
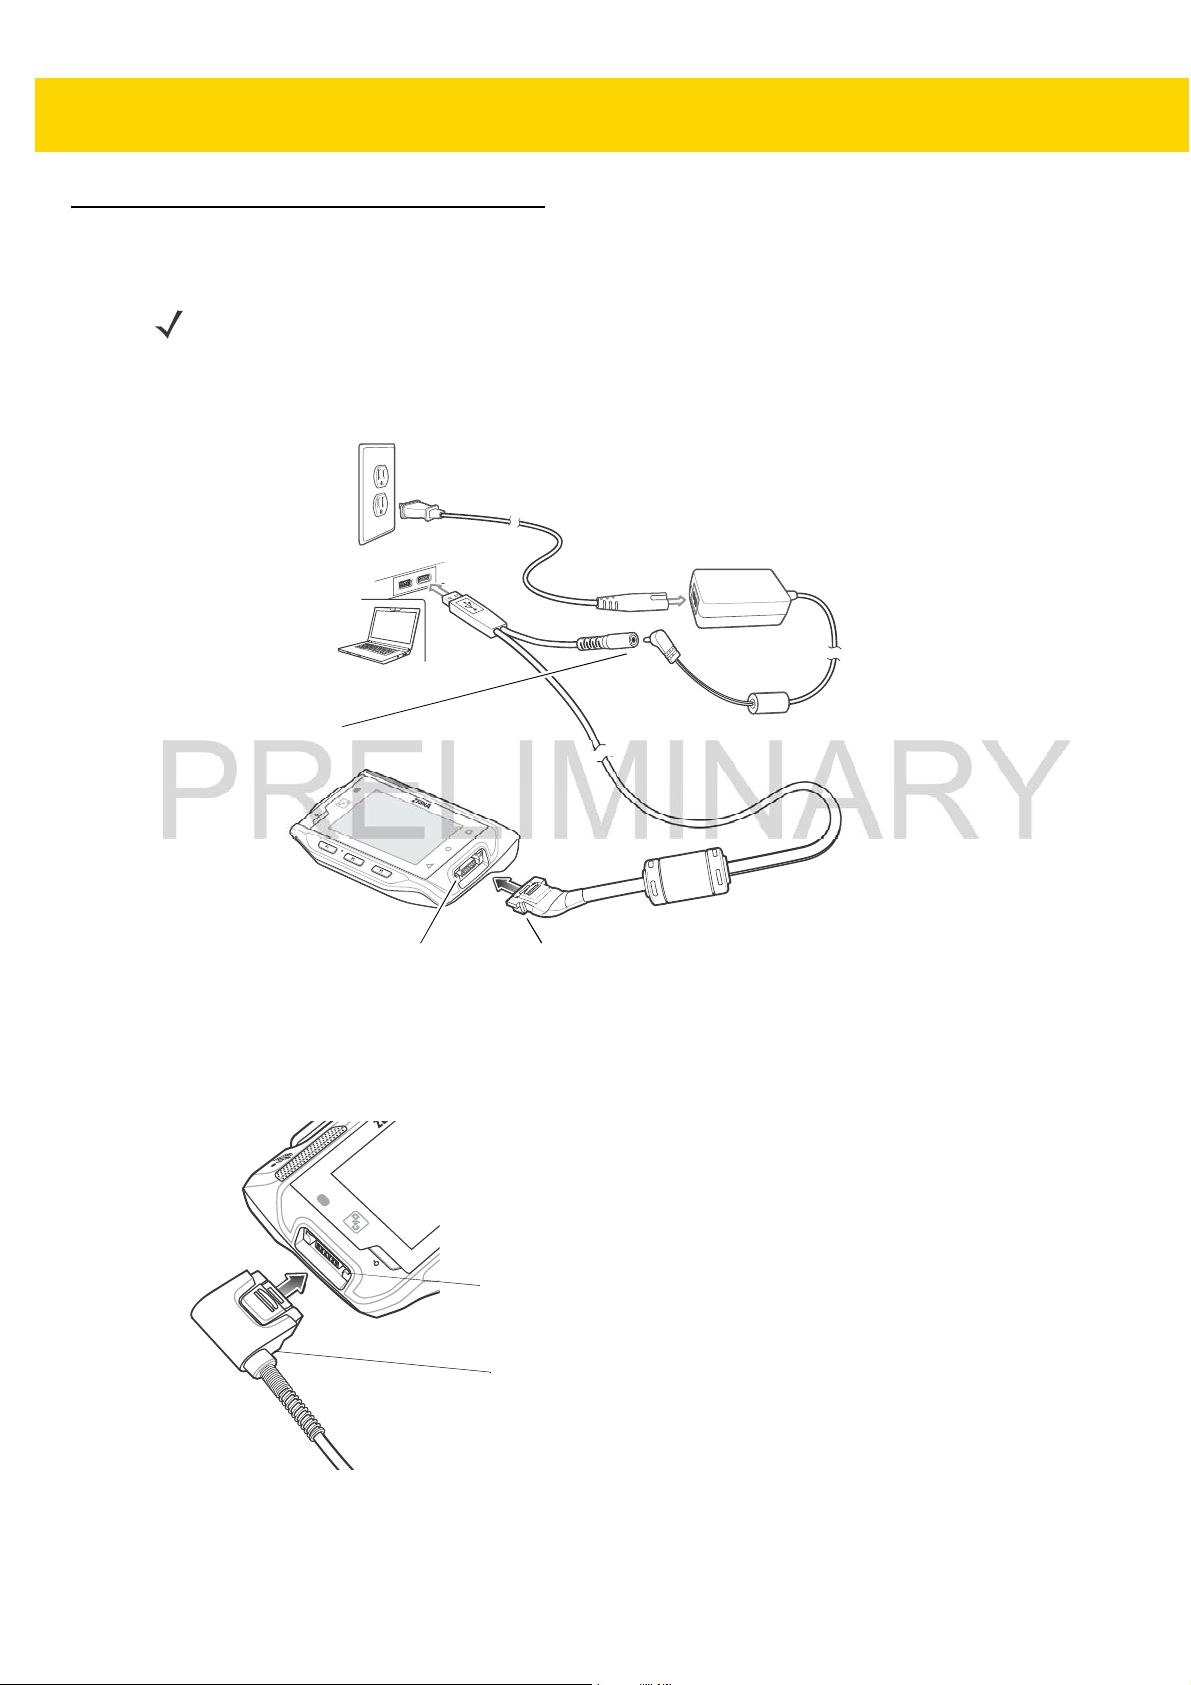
The USB and Charging cable connects to either interface connector on the WT6000. When attached to the
WT6000, allows the WT6000 to transfer data to a host computer and provide power for charging the WT6000.
Power Connector
WT6000 Connector
Figure 6-22 USB and Charging Cable
USB Connector
Attaching the USB and Charging Cable
1. Connect the connector to the WT6000 interface connector.
Interface Connector
Cable Connector
Figure 6-23 Connecting Scanner to WT6000
Page 10
Accessories 6 - 23
2. Attach the USB connection to the host computer.
Removing the USB and Charging Cable
To remove the USB and Charging cable:
1. Press the release level toward the cable.
2. Rotate the adapter toward the front of the device and remove.
Battery Charging
To charge the WT6000, attached the power cable to the Power Connection on the USB and Charging Cable.
Main Battery Charging
The WT6000 Charging/Scan LED indicates the status of the battery charging in the device. See Table 1-3 on page
1-4. The 3,350 mAh battery fully charges in less than four hours at room temperature.
Charging Temperature
Charge batteries in temperatures from 0°C to 40°C (32°F to 104°F). The battery charger always performs battery
charging in a safe and intelligent manner. At higher temperatures (e.g. approximately +37°C (+98°F)) the battery
charger may for small periods of time alternately enable and disable battery charging to keep the battery at
acceptable temperatures. The battery charger indicates when charging is disabled due to abnormal temperatures
via its LED.
Page 11

6 - 24 WT6000 User Guide
Quick Disconnect Audio Cables
The Quick Disconnect Audio Adapter snaps into either interface connector. When attached to the WT6000, the
Quick Disconnect Audio Adapter allows a user to connect a wired headset to the WT6000.
Long Audio Cable Short Audio Cable
Figure 6-24 Audio Cables
Attaching the Audio Adapter
1. Align the tabs on the Audio Adapter with the slots on the device.
2. Rotate the Adapter toward the back of the device until the Adapter snaps onto the device.
Figure 6-25 Attach Cable to WT6000
Page 12

Connecting the Audio Cable to a Headset
Accessories 6 - 25
Short Audio Cable
Figure 6-26 Short Quick Disconnect Audio Cable Connection to Headset
Removing the Audio Adapter
To remove the Audio Adapter:
1. Press the release level toward the cable.
2. Rotate the adapter toward the front of the device and remove.
Page 13

6 - 26 WT6000 User Guide
Vibrator Cable
Use the Vibrator cable to provide a touch notification to a user to in noisy environments.
Figure 6-27 Vibrator Cable
Connect the cable to the Interface connector on the WT6000.
Slide the vibrator end between the Wrist Mount strap and arm.
Figure 6-28 Connecting Vibrator Cable to WT6000
When an application generates a notification, the vibrator vibrates notifying the user.
Page 14

RS4000 Scanner
To connect the RS4000 scanner to the WT6000:
NOTE
There are two scanner configurations available. The short cable configuration connects the scanner to the
WT6000 mounted on the arm. The extended cable configuration connects the scanner to the WT6000
mounted on the hip.
1. Connect the scanner interface cable to the WT6000 interface connector. If the WT6000 is mounted on the arm,
connect the cable to the interface connector closest to the wrist.
Accessories 6 - 27
Interface Connector
Cable Connector
Figure 6-29 Connecting Scanner to WT6000
2. If using the extended cable configuration, route the scanner cable up to the shoulder and down to the hand that
the scanner mounts on. Attach two cable clips to clothing and secure cable to cable clip.
Figure 6-30 Cable Clip Installation
3. Rotate the trigger assembly to the correct position for the hand that the scanner mounts to.
Page 15

6 - 28 WT6000 User Guide
4. Slide the scanner onto the index finger with the scan trigger next to the thumb.
Figure 6-31 Place the Scanner on Index Finger
5. Tighten the finger strap.
Figure 6-32 Tightening Straps
6. If required, cut excess finger strap material.
After connecting the scanner, warm boot the WT6000. See Resetting the Wearable Terminal on page 2-19 for
nformation on performing a warm boot.
i
Page 16

CHAPTER 7 MAINTENANCE AND
TROUBLESHOOTING
Introduction
This chapter includes instructions on cleaning and storing the WT6000, battery maintenance and provides
troubleshooting solutions for potential problems during WT6000 operations.
Maintaining the WT6000
For trouble-free service, observe the following tips when using the WT6000:
•
Protect the WT6000 from temperature extremes.
•
Do not store or use the WT6000 in any location that is extremely dusty, damp, or wet.
•
Use a soft lens cloth to clean the scan exit window of the WT6000. If the surface of the WT6000 screen
becomes soiled, clean it with a soft cloth moistened with a diluted window-cleaning solution. Do not use
bleach, or ammonia or hydrogen peroxide products.
•
Take care not to scratch the screen of the WT6000.
•
The display of the WT6000 contains glass. Take care not to drop the WT6000 or subject it to strong impact.
Battery Safety Guidelines
•
The area in which the WT6000 units are charged should be clear of debris and combustible materials or
chemicals. Particular care should be taken where the device is charged in a non-commercial environment.
•
Do not use incompatible batteries and chargers. If you have any questions about the compatibility of a
battery or a charger, contact Zebra Support. See Service Information on page xiv for contact information.
•
Do not crush, puncture, or place a high degree of pressure on the battery.
•
Follow battery usage, storage, and charging guidelines.
•
Improper battery use may result in a fire, explosion, or other hazard.
•
To charge the mobile device battery, the battery and charger temperatures must be between +32°F and
+104°F (0°C and +40°C)
Page 17

7 - 2 WT6000 User Guide
•
Do not disassemble or open, crush, bend or deform, puncture, or shred.
•
Severe impact from dropping any battery-operated device on a hard surface could cause the battery to
overheat.
•
Do not short circuit a battery or allow metallic or conductive objects to contact the battery terminals.
•
Do not modify or remanufacture, attempt to insert foreign objects into the battery, immerse or expose to water
or other liquids, or expose to fire, explosion, or other hazard.
•
Do not leave or store the equipment in or near areas that might get very hot, such as in a parked vehicle or
near a radiator or other heat source. Do not place battery into a microwave oven or dryer.
•
Battery usage by children should be supervised.
•
Please follow local regulations to promptly dispose of used re-chargeable batteries.
•
Do not dispose of batteries in fire.
•
Seek medical advice immediately if a battery has been swallowed.
•
In the event of a battery leak, do not allow the liquid to come in contact with the skin or eyes. If contact has
been made, wash the affected area with large amounts of water and seek medical advice.
•
If you suspect damage to your equipment or battery, call Customer Support to arrange for inspection. See
Service Information on page xiv for contact information.
Long Term Storage
When storing the WT6000 for a long period of time, it is recommended to remove the battery. When returning the
WT6000 to everyday operation, install a fully charged battery.
Cleaning Instructions
CAUTION
WARNING
Approved Cleanser Active Ingredients
100% of the active ingredients in any cleaner must consist of one or some combination of the following: isopropyl
alcohol, bleach/sodium hypochlorite, hydrogen peroxide or mild dish soap.
Always wear eye protection.
Read warning label on compressed air and alcohol product before using.
If you have to use any other solution for medical reasons please contact Zebra for more information.
!
Avoid exposing this product to contact with hot oil or other flammable liquids. If such exposure
occurs, unplug the device and clean the product immediately in accordance with these guidelines.
Harmful Ingredients
The following chemicals are known to damage the plastics on the device and should not come in contact with the
device: ammonia solutions, compounds of amines or ammonia; acetone; ketones; ethers; aromatic and chlorinated
Page 18

Maintenance and Troubleshooting 7 - 3
hydrocarbons; acqueous or alcoholic alkaline solutions; ethanolamine; toluene; trichloroethylene; benzene;
carbolic acid, and TB-lysoform, bleach products and hydrogen peroxide.
Cleaning Instructions
Do not apply liquid directly to the device. Dampen a soft cloth or use pre-moistened wipes. Do not wrap the device
in the cloth or wipe, but gently wipe the unit. Be careful not to let liquid pool around the display window or other
places. Allow the unit to air dry before use.
Special Cleaning Notes
Many vinyl gloves contain phthalate additives, which are often not recommended for medical use and are known to
be harmful to the housing of the device. The device should not be handled while wearing vinyl gloves containing
phthalates, or before hands are washed to remove contaminant residue after gloves are removed. If products
containing any of the harmful ingredients listed above are used prior to handling the device, such as hand sanitizer
that contain ethanolamine, hands must be completely dry before handling the device to prevent damage to the
plastics.
Cleaning Materials Required
•
Alcohol wipes
•
Lens tissue
•
Cotton tipped applicators
•
Isopropyl alcohol
•
Can of compressed air with a tube.
Cleaning Frequency
The cleaning frequency is up to the customer’s discretion due to the varied environments in which the WT6000
units are used. They may be cleaned as frequently as required. However when used in dirty environments it may
be advisable to periodically clean the scanner exit window to ensure optimum scanning performance.
Cleaning the WT6000
Housing
Using the alcohol wipes, wipe the housing.
Display
The display can be wiped down with the alcohol wipes, but care should be taken not to allow any pooling of liquid
around the edges of the display. Immediately dried the display with a soft, non-abrasive cloth to prevent streaking.
Power Connector
1. Remove the battery from WT6000.
2. Dip the cotton portion of the cotton tipped applicator in isopropyl alcohol.
3. Rub the cotton portion of the cotton tipped applicator back-and-forth across the connector inside the handle of
the WT6000. Do not leave any cotton residue on the connector.
Page 19

7 - 4 WT6000 User Guide
4. Repeat at least three times.
5. Use the cotton tipped applicator dipped in alcohol to remove any grease and dirt near the connector area.
6. Use a dry cotton tipped applicator and repeat steps 3 through 5.
7. Spray compressed air on the connector area by pointing the tube/nozzle about ½ inch away from the surface.
CAUTION
8. Inspect the area for any grease or dirt, repeat if required.
Do not point nozzle at yourself and others, ensure the nozzle or tube is away from your face.
Cleaning Cradle Connectors
Use this procedure to clean the connectors on a cradle:
1. Remove power from the cradle.
2. Dip the cotton portion of the cotton tipped applicator in isopropyl alcohol.
3. Rub the cotton portion of the cotton tipped applicator along the pins of the connector. Slowly move the
applicator back-and-forth from one side of the connector to the other. Do not let any cotton residue on the
connector.
4. All sides of the connector should also be rubbed with the cotton tipped applicator.
5. Spray compressed air in the connector area by pointing the tube/nozzle about ½ inch away from the surface.
CAUTION
6. Ensure that there is no lint left by the cotton tipped applicator, remove lint if found.
Do not point nozzle at yourself and others, ensure the nozzle or tube is pointed away from your face.
7. If grease and other dirt can be found on other areas of the cradle, use lint free cloth and alcohol to remove.
8. Allow at least 10 to 30 minutes (depending on ambient temperature and humidity) for the alcohol to air dry
before applying power to cradle.
If the temperature is low and humidity is high, longer drying time is required. Warm temperature and dry
humidity requires less drying time.
Cleaning the Wrist Mount
It may be necessary to wash the wrist mount strap and replaceable comfort pad when they become soiled.
Page 20

Maintenance and Troubleshooting 7 - 5
ComfortPad
Carriage
Strap
Figure 7-1 Wrist Mount
Remove the strap and comfort pad from the wrist mount. Hand wash in cold water with a mild detergent (such as
Woolite®). Do not use bleach. Air dry. Do not use a dryer.
Figure 7-2 Comfort Pad
Page 21

7 - 6 WT6000 User Guide
Figure 7-3 Strap
Figure 7-4 Carrier
Page 22

Troubleshooting
WT6000
Table 7-1 Troubleshooting the WT6000
Problem Cause Solution
Maintenance and Troubleshooting 7 - 7
WT6000 does not turn
on.
Battery did not charge. Battery failed. Replace battery. If the WT6000 still does not operate, try a soft
During data
communication, no data
was transmitted, or
transmitted data was
incomplete.
Battery not charged. Charge or replace the battery in the WT6000.
Battery not installed
properly.
System crash. Perform a soft reset. If the WT6000 still does not turn on,
WT6000 removed
from cradle before
charging completed.
Ambient temperature
of the cradle is too
warm or too cold.
WT6000 unplugged
from host computer
during
communication.
Communication
software was
incorrectly installed or
configured.
Ensure battery is installed properly. See
on page 1-3
perform a hard reset. See
2-11
.
reset, then a hard reset. See
2-11
.
Insert the WT6000 into the cradle and begin charging. The
battery fully charges in less than four hours.
The ambient temperature must be between 0 °C and 40 °C
(32 °F and 104 °F).
Reconnect the programming cable to the host computer and
re-transmit.
See system administrator.
.
Resetting the WT6000 on page
Resetting the WT6000 on page
Installing the Battery
WT6000 turns itself off. WT6000 is inactive. The WT6000 turns off after a period of inactivity. If the WT6000
is running on battery power, this period can be set to 15
seconds, 30 seconds, 1 minute, 2 minutes, 5 minutes, 10
minutes, or 30 minutes.
Change the setting if you need a longer delay before the
automatic shutoff feature activates.
Battery is depleted. Place the WT6000 in the cradle to re-charge the battery.
WT6000
The
is low and it powers
down to protect
memory content.
’s battery
Place the WT6000 in the cradle to re-charge the battery.
Page 23

7 - 8 WT6000 User Guide
Table 7-1 Troubleshooting the WT6000 (Continued)
Problem Cause Solution
A message appears
stating that the WT6000
memory is full.
The WT6000 does not
accept scan input.
During USB data
communications, no data
was transmitted, or
transmitted data was
incomplete.
Too many files stored
on the WT6000.
Too many applications
installed on the
WT6000.
Unreadable bar code. Ensure the symbol is not defaced.
Distance between
scanner exit window
and bar code is
incorrect.
WT6000 is not
programmed for the
bar code.
WT6000 is not
programmed to
generate a beep.
Incorrect cable
connection.
Communications
software is not
installed or configured
properly.
Delete unused memos and records. You can save these
records on the host computer.
If you have installed additional applications on the WT6000,
remove them to recover memory.
Move the WT6000 closer or further from the bar code to the
proper scanning range.
Verify that the WT6000 can read the type of bar code being
scanned (See
code parameters are set properly for the bar code being
scanned.
Verify that a beep on a good decode is used.
See
Chapter 6, Accessories
Perform setup as described in
Technical Specifications
.
Chapter 6, Accessories
). Ensure that the bar
.
Page 24

APPENDIX A SPECIFICATIONS
Technical Specifications
The following tables summarize the WT6000’s intended operating environment and general technical hardware
specifications.
Table A-1 Technical Specifications
Item Description
Physical and Environmental Characteristics
Dimensions (H x L x W) 121 mm x 89mm x 34 mm
4.8 in. x 3.5 in. x 1.3 in.
Weight 245 g (8.7 oz.)
Display Color Transflective LCD Display and IPS Technology, 3.2 in. diagonal, WVGA
(800 x 480 pixels), 24 bits (16 million pixels), 400+ Nits
Touch Panel Multi-Touch projected capacitive; fingertip (bare or gloved) input; conductive
stylus supported (sold separately)); Corning® Gorilla® Glass
Backlight Configurable LED backlight control
Battery PowerPrecision+ rechargeable 3.7 VDC 3,350 mAh Lithium-Ion battery.
Backup Power SuperCap technology
Notification Vibration, Audible tone, Multi - colour LEDs
Voice and Audio Integrated Speaker, Mono wired headsets with a mic and push-to-talk button
and Bluetooth wireless headset support.
Performance Characteristics
CPU Quad-Core 1.0 GHz processor
Operating System Android AOSP 5.1 (Lollipop) with Mobility Extensions (Mx), for true enterprise
class operating system.
Page 25

A - 2 WT6000 User Guide
Table A-1 Technical Specifications (Continued)
Item Description
Memory 1 GB RAM, 4 GB Flash (pSLC)
Application Development Zebra Android EMDK
User Environment
Operating Temperature -30°C to 50°C (-22°F to 122°F)
Storage Temperature -40°C to 70°C (-40°F to 158°F)
Battery Charging Temperature 0°C to +40°C (32°F to 104°F) ambient temperature range.
Humidity 5% - 95% non-condensing
Drop Specification 1.2 m (4 ft.) drop to concrete (36 drops, over temperature range)
Tumble 1,000 tumbles @ 0.5 m (1.6 ft.) (room temperature)
Vibration Sine 5-2000 Hz, 4g peak, 1 hour per axis
Random 20-2000 Hz, 6g RMS or 0.04g2/Hz, 1 hour per axis
ESD ± 20k VDC air discharge
± 10k VDC contact discharge
± 10k VDC indirect discharge
Wireless LAN Data Communications
Radio IEEE ® 802.11a/b/g/n/ac
Data Rates 5 GHz: 802.11a/n - up to 135 Mbps;
802.11ac - Single-stream and dual-stream solution with data rates up to 433.3
and 866.7 Mbps
2.4 GHz: 802.11b/g/n - up to 72.2 Mbps (one stream) 144.4 Mbps (dual
stream)
Operating Channels Channels 36 - 165 (5180 - 5835 MHz)
Channels 1 - 13 (2412 - 2472 MHz)
Actual operating channels/frequencies depend on regulatory rules and
certification agency
Security and Encryption WEP, WPA - TKIP, WPA2- TKIP, WPA2-AES EAP-TTLS/PAP,
EAP-TTLS/MSCHAPv2, PEAPv0/EAP-MSCHAPv2, PEAPv1/EAP-GTC,
TTLS-MSCHAP, EAP-TLS, EAP-FAST (MSCHAPv2 and GTC), LEAP VPN
functionality (L2TP, PPTP and IPSec)
Multimedia Wi-Fi Multimedia™ (WMM)
Certifications 802.11n, 802.11ac, CCXv4, Wi-Fi Direct
Fast Roam PMKID Caching, Opportunistic Key Caching (OKC), Cisco CCKM, 802.11r.
Wireless PAN Data Communications
Bluetooth Bluetooth 4.1 (Bluetooth Smart Technology)
Page 26

Table A-1 Technical Specifications (Continued)
Item Description
Data Capture
Laser Scanning Optional RS4000 laser scanner.
Imager Optional Rs507 and RS6000 ring scanners.
NFC Multi-Protocol NFC (optional).
Specifications A - 3
Page 27

A - 4 WT6000 User Guide
Page 28

INDEX
Numerics
Numerics
1-D bar codes . . . . . . . . . . . . . . . . . . . . . . . . . . . . . . 3-1
2-D bar codes . . . . . . . . . . . . . . . . . . . . . . . . . . . . . . 3-1
A
accessories . . . . . . . . . . . . . . . . . . . . . . . . . . . . . . . . 6-1
airplane mode . . . . . . . . . . . . . . . . . . . . . . . . . . . . . 1-13
android version . . . . . . . . . . . . . . . . . . . . . . . . . . . . . . xii
applock administrator . . . . . . . . . . . . . . . . . . . . . . . . 2-9
B
bar codes
one dimensional . . . . . . . . . . . . . . . . . . . . . . . . . 3-1
two dimensional . . . . . . . . . . . . . . . . . . . . . . . . . 3-1
battery charging temperature . . . . . . . . . . . . . . . . . . A-2
battery usage . . . . . . . . . . . . . . . . . . . . . . . . . . . . . . 1-12
browser . . . . . . . . . . . . . . . . . . . . . . . . . . . . . . . .2-6, 2-7
build number . . . . . . . . . . . . . . . . . . . . . . . . . . . . . . . . xii
bullets . . . . . . . . . . . . . . . . . . . . . . . . . . . . . . . . . . . . . xiii
D
data capture
imager operational modes
decode mode . . . . . . . . . . . . . . . . . . . . . . . . 3-2
pick list mode . . . . . . . . . . . . . . . . . . . . . . . . 3-2
imaging . . . . . . . . . . . . . . . . . . . . . . . . . . . . . . . . 3-1
laser scanning . . . . . . . . . . . . . . . . . . . . . . . . . . 3-1
one dimensional bar codes . . . . . . . . . . . . . . . . . 3-1
scan angle . . . . . . . . . . . . . . . . . . . . . . . . . . . . . 3-2
scan range . . . . . . . . . . . . . . . . . . . . . . . . . . . . . 3-2
scanning . . . . . . . . . . . . . . . . . . . . . . . . . . . . . . . 3-1
two dimensional bar codes . . . . . . . . . . . . . . . . . 3-1
datawedge . . . . . . . . . . . . . . . . . . . . . . . . . . . . . . 2-6, 2-7
diagnostics . . . . . . . . . . . . . . . . . . . . . . . . . . . . . . . 5-14
dimensions . . . . . . . . . . . . . . . . . . . . . . . . . . . . . . . . A-1
display . . . . . . . . . . . . . . . . . . . . . . . . . . . . . . . . . .xii, A-1
downloads . . . . . . . . . . . . . . . . . . . . . . . . . . . . . . 2-6, 2-7
drop specification . . . . . . . . . . . . . . . . . . . . . . . . . . . A-2
DWDemo . . . . . . . . . . . . . . . . . . . . . . . . . . . . . . . 2-6, 2-7
E
EAP . . . . . . . . . . . . . . . . . . . . . . . . . . . . . . . . . . . . . . 4-1
Elemez . . . . . . . . . . . . . . . . . . . . . . . . . . . . . . . . . . 5-14
C
calculator . . . . . . . . . . . . . . . . . . . . . . . . . . . . . . . 2-6, 2-7
calendar . . . . . . . . . . . . . . . . . . . . . . . . . . . . . . . .2-6, 2-7
clock . . . . . . . . . . . . . . . . . . . . . . . . . . . . . . . . . .2-6, 2-7
configuration . . . . . . . . . . . . . . . . . . . . . . . . . . . . . . . . xii
contacts . . . . . . . . . . . . . . . . . . . . . . . . . . . . . . . . 2-6, 2-7
conventions
notational . . . . . . . . . . . . . . . . . . . . . . . . . . . . . . . xiii
CPU . . . . . . . . . . . . . . . . . . . . . . . . . . . . . . . . . . . . . . A-1
F
file browser . . . . . . . . . . . . . . . . . . . . . . . . . . . . . . . . 5-3
H
humidity . . . . . . . . . . . . . . . . . . . . . . . . . . . . . . . . . . . A-2
I
imager. See data capture, imaging
Page 29

Index - 2 WT6000 User Guide
imaging . . . . . . . . . . . . . . . . . . . . . . . . . . . . . . . . . . . 3-2
information, service . . . . . . . . . . . . . . . . . . . . . . . . . . .xiv
K
keyboard . . . . . . . . . . . . . . . . . . . . . . . . . . . . . . . . . . 2-5
L
laser scanning
See data capture . . . . . . . . . . . . . . . . . . . . . . . . . 3-1
LEDs
scan and decode . . . . . . . . . . . . . . . . . . . . . . . . . 3-3
lithium-ion battery . . . . . . . . . . . . . . . . . . . . . . . . . . . 1-1
low battery notification . . . . . . . . . . . . . . . . . . . . . . . 1-13
M
maintenance . . . . . . . . . . . . . . . . . . . . . . . . . . . . . . . 7-1
memory . . . . . . . . . . . . . . . . . . . . . . . . . . . . . . . . . . . A-2
mobile computer
starting . . . . . . . . . . . . . . . . . . . . . . . . . . . . . . . . 1-5
model number . . . . . . . . . . . . . . . . . . . . . . . . . . . . . . . xii
multiuser administrator . . . . . . . . . . . . . . . . . . . . . . . 2-9
set time zone . . . . . . . . . . . . . . . . . . . . . . . . . . . . . . 1-13
settings . . . . . . . . . . . . . . . . . . . . . . . . . . . . . . . . . . . 2-8
sound recorder . . . . . . . . . . . . . . . . . . . . . . . . . . . . . . 2-9
starting the mobile computer . . . . . . . . . . . . . . . . . . . 1-5
storage temperature . . . . . . . . . . . . . . . . . . . . . . . . . . A-2
T
TLS . . . . . . . . . . . . . . . . . . . . . . . . . . . . . . . . . . . . . . 4-1
troubleshooting . . . . . . . . . . . . . . . . . . . . . . . . . . . . . 7-6
TTLS
TTLS-MSCHAP . . . . . . . . . . . . . . . . . . . . . . . . . . 4-1
TTLS-MSCHAPv2 . . . . . . . . . . . . . . . . . . . . . . . . 4-1
TTLS-PAP . . . . . . . . . . . . . . . . . . . . . . . . . . . . . . 4-1
U
unpacking . . . . . . . . . . . . . . . . . . . . . . . . . . . . . . . . . 1-1
W
weight . . . . . . . . . . . . . . . . . . . . . . . . . . . . . . . . . . . . A-1
WEP . . . . . . . . . . . . . . . . . . . . . . . . . . . . . . . . . . . . . . 4-1
WLAN radio . . . . . . . . . . . . . . . . . . . . . . . . . . . . . . . . A-2
WPA . . . . . . . . . . . . . . . . . . . . . . . . . . . . . . . . . . . . . . 4-1
O
operating system . . . . . . . . . . . . . . . . . . . . . . . . . . . . A-2
operating temperature . . . . . . . . . . . . . . . . . . . . . . . . A-2
P
PEAP-GTC . . . . . . . . . . . . . . . . . . . . . . . . . . . . . . . . 4-1
PEAP-MSCHAPv2 . . . . . . . . . . . . . . . . . . . . . . . . . . . 4-1
PTT Express . . . . . . . . . . . . . . . . . . . . . . . . . . . . . . . 2-8
R
RS507 scanning . . . . . . . . . . . . . . . . . . . . . . . . . 3-4, 3-5
S
scanning
bar codes . . . . . . . . . . . . . . . . . . . . . . . . . . . . . . 3-1
imaging . . . . . . . . . . . . . . . . . . . . . . . . . . . . . . . . 3-1
See data capture . . . . . . . . . . . . . . . . . . . . . . . . . 3-1
screen
Zebra splash screen . . . . . . . . . . . . . . . . . . . . . . 1-5
screen timeout . . . . . . . . . . . . . . . . . . . . . . . . . 1-14, 1-15
secure storage administrator . . . . . . . . . . . . . . . . . . . 2-9
serial number . . . . . . . . . . . . . . . . . . . . . . . . . . . . . . . . xii
service information . . . . . . . . . . . . . . . . . . . . . . . . . . .xiv
set date . . . . . . . . . . . . . . . . . . . . . . . . . . . . . . . . . . 1-13
set time . . . . . . . . . . . . . . . . . . . . . . . . . . . . . . . . . . 1-13
Z
Zebra tap and pair . . . . . . . . . . . . . . . . . . . . . . . . . . . 2-9
Zebra utilities . . . . . . . . . . . . . . . . . . . . . . . . . . . . . . . 2-9
Page 30

Page 31

Zebra Technologies Corporation, Inc.
3 Overlook Point
Lincolnshire, IL 60069, U.S.A.
http://www.zebra.com
Zebra and the stylized Zebra head are trademarks of ZIH Corp., registered in many jurisdictions
worldwide. All other trademarks are the property of their respective owners.
© 2016 Symbol Technologies LLC, a subsidary of Zebra Technologies
Corporation. All Rights Reserved.
MN002410A01 Revision A - December 2015
 Loading...