

Page 1

WMC6300
Wireless Modem Card
User’s Guide
(Windows 2000)
Version 1.1
DMM000001-03 Copyright 2002, MeshNetworks, Inc. All Rights Reserved
Page 2

WMC6300 Windows 2000 User’s Guide
Foreword
This document describes in detail the confidential and proprietary technology of MeshNetworks’
™ Architecture. MeshNetworks products and technology are protected by US and
international patent and patent pending technology. This document represents the current
design; the contents are subject to change at any time at the discretion of MeshNetworks, Inc.
, MeshTray, and MeshNetworks’ logo are trademarks or registered trademarks of
MeshNetworks, Inc. Microsoft, Windows, Windows 2000, and Windows CE are registered
trademarks of Microsoft Corporation. All other product names and services identified
throughout this publication are trademarks or registered trademarks of their respective
companies. No such uses or the use of any trade name is intended to convey endorsement or
other affiliation with this publication. Copyright 2002, MeshNetworks, Inc. All Rights Reserved.
iii
Page 3

MeshNetworks
iv
Page 4

WMC6300 Windows 2000 User’s Guide
Table of Contents
..........................................................................................................................................1
Introduction .......................................................................................................................... 1
System Requirements ......................................................................................................... 1
General System Requirements.........................................................................................1
What’s in the Box.................................................................................................................2
WMC6300 External Connections and Lights..................................................................... 3
INSTALLING THE SOFTWARE................................................................................................... 4
Installing Software (Windows 2000 Clients Only) .................................................4
Configuring the DNS Address ............................................................................................ 8
Connect the Antenna Assembly (Laptop Computer) .......................................................9
Connect the Magnetic Antenna Assembly (Optional) .................................................... 11
Insert the WMC6300 Wireless Modem Card .................................................................... 12
Removing the WMC6300 Wireless Modem Card............................................................. 13
Uninstalling Application Software.................................................................................... 14
OVERVIEW OF MESHNETWORKS’ MESHTRAY .................................................................... 15
MeshTray™......................................................................................................................... 15
MeshTray Status ................................................................................................................16
Starting MeshTray.............................................................................................................. 16
Terminating MeshTray....................................................................................................... 16
CUSTOMER SERVICE INFORMATION ....................................................................................17
LICENSE AND WARRANTY INFORMATION ...........................................................................18
Important Information........................................................................................................ 18
REGULATORY INFORMATION ................................................................................................ 20
FCC Information.................................................................................................................20
FCC RF Radiation Exposure Statement........................................................................... 20
Safety Information for the WMC6300.................................................................... 21
v
Page 5

MeshNetworks
vi
Page 6

WMC6300 Windows 2000 User’s Guide
Introduction
Thank you for purchasing the WMC6300 Wireless Modem Card. Please install
the
Card in your system. To get started proceed to the Installing the Software
section of this document.
mobile communication at vehicular speeds. The
allow standard client hosts with a PCMCIA interface to have a mobile broadband
Ethernet connection. The
manner similar to an Ethernet connection.
data and location services. Its geo-location accuracy and availability is better
than ±10 meters within 1 second. It is capable of supporting subscribers
traveling up to 100 miles per hour.
Application Software and Drivers before inserting the Wireless Modem
is a wireless communication system capable of supporting high data rate
system is designed to
system works transparently to the client host in a
provides Internet Protocol based
Figure 1. MeshLAN WMC6300 Wireless Modem Card
The
allowed to access services on the core network. Access to the core network is
controlled by the network administrator according to current operating practice.
This document provides detailed installation and configuration instructions for
use when installing the
system pro s a secure and reliable transport for the client hvide ost. The
hoclient st may still require configuration and authentication before it will be
System Requirements
General System Requirements
For best results, ens
requirements:
• Intel based Laptop or Notebook PC running the Microsoft Windows 2000
operating systems
• rd disk storage
5 MB of available ha
• Keyboard
• Mouse
WMC6300 Wireless Modem Card and its Software.
ure the computers meet the following minimum
• CD-ROM
• Available Type II PCMCIA car
drive or DVD drive
1
d slot in the Host device
Page 7
MeshNetworks
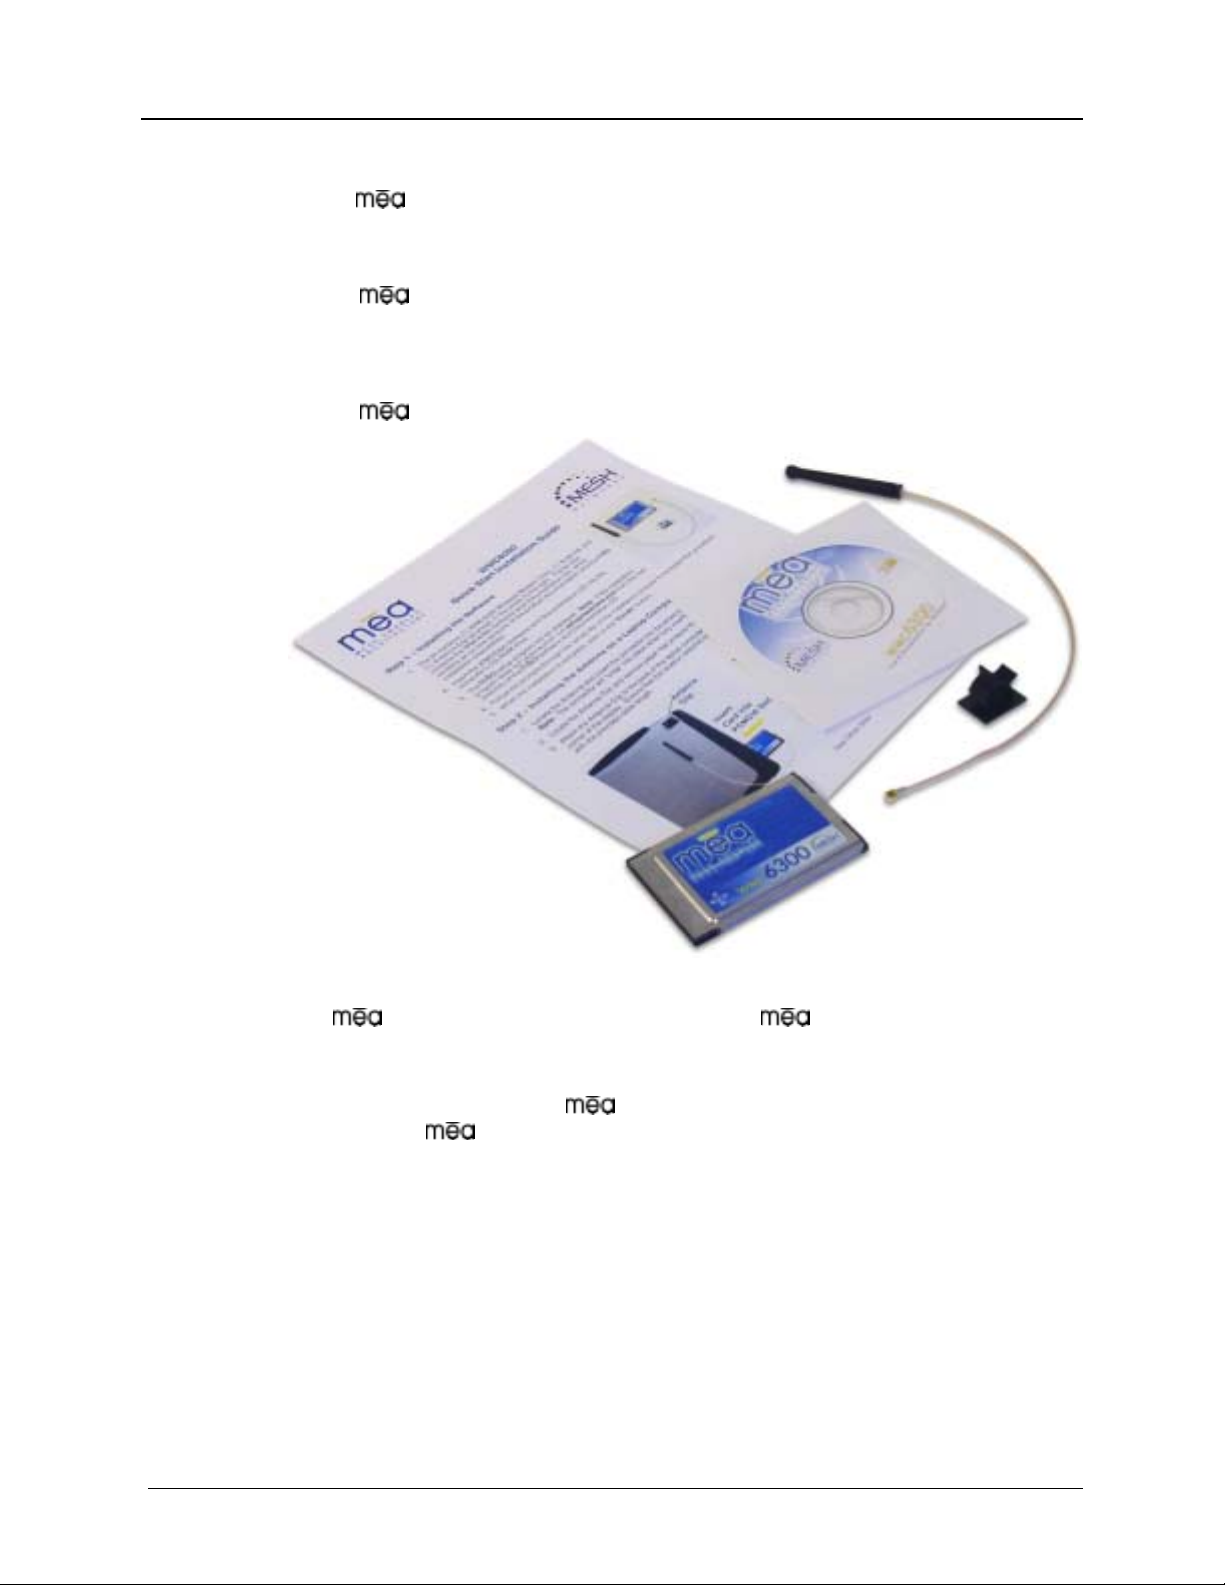
What’s in the o B x
Each WMC6300 Wireless Modem Card is a full-featured wireless
networking interface. The following is a list of the items provided with each
WMC6300 card:
• WMC
• Hz Antenna with a 12 inch cable an
2.4 G d MMCX connector
• Antenna Clip with adhesive backing
6300 Wireless Modem Card
•
WMC6300 Software and Documentation CD
Figure 2. What’s in the Box
The
Adobe PDF format. If required, the CD also contains an installation executable
to load the Adobe Acrobat Reader software.
Note: For best results, the WMC6300
you insert the
CD contains an on-line version of the WMC6300 User’s Guide in
software should be installed before
WMC6300 card into the device.
2
Page 8
WMC6300 Windows 2000 User’s Guide
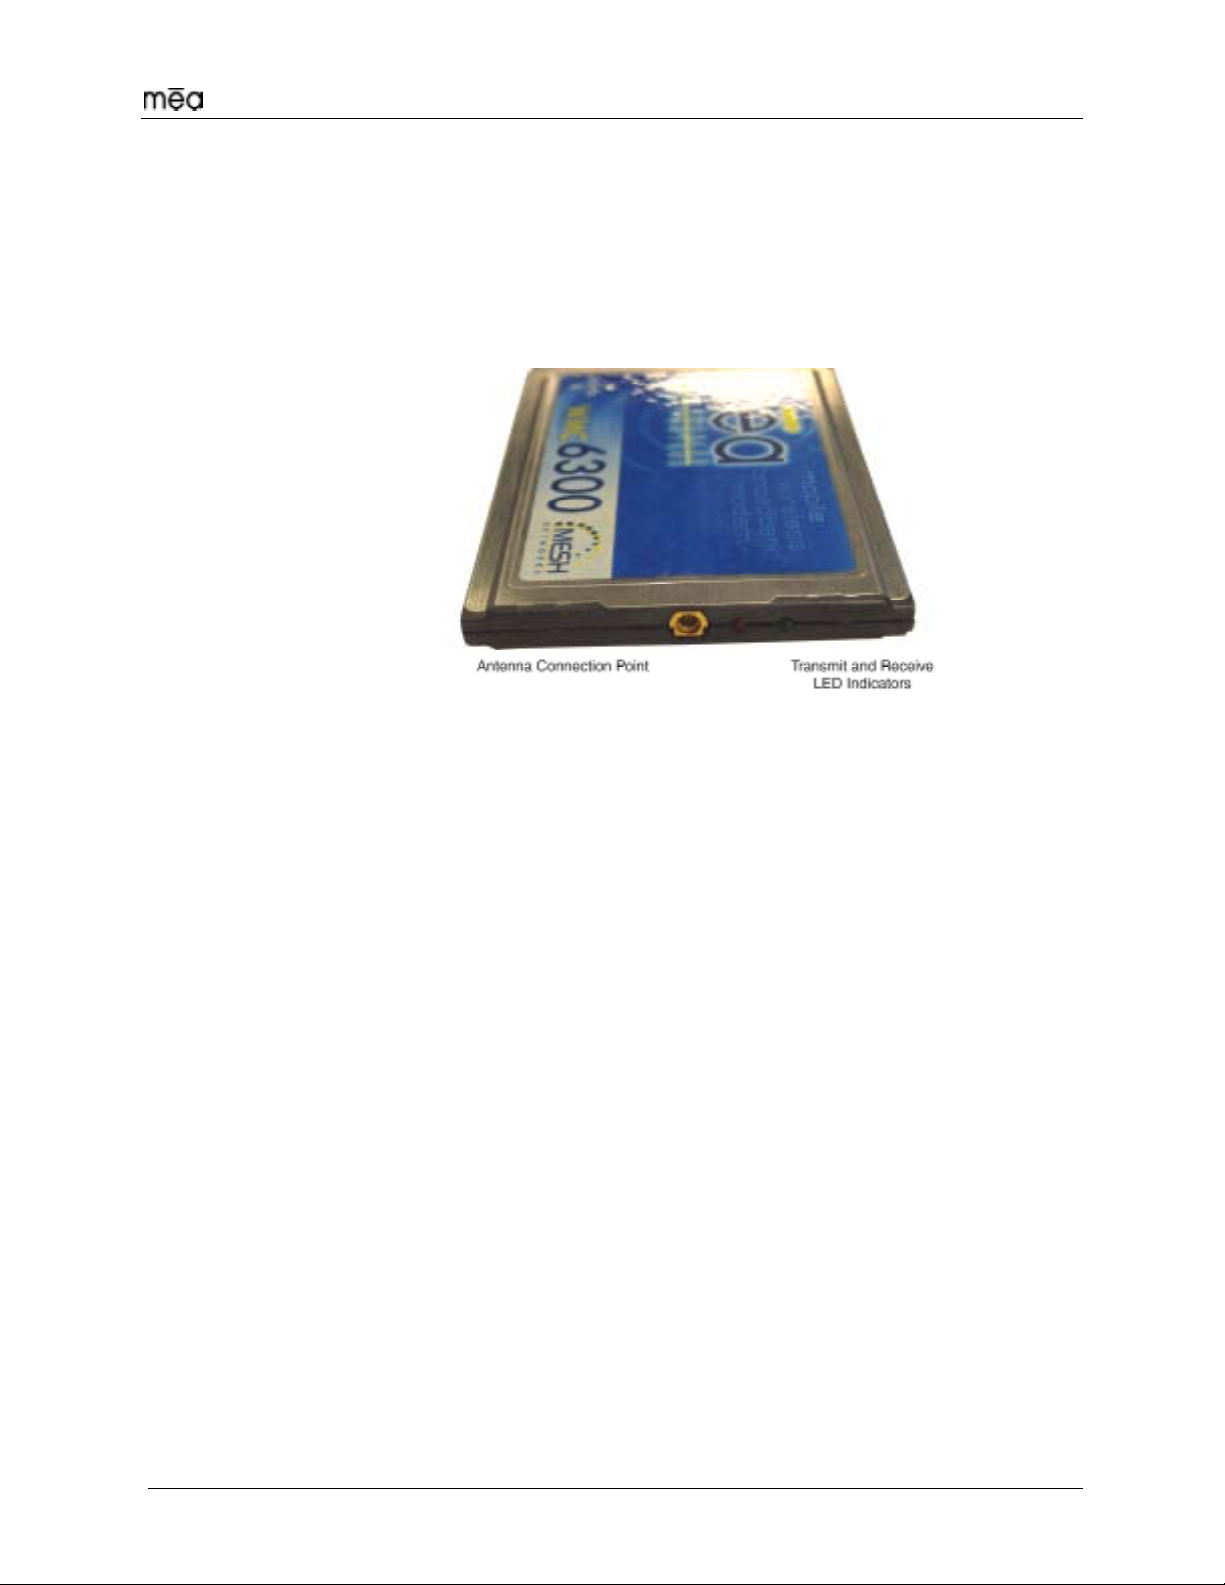
WMC6300 External Connections and Lights
The WMC6300 Wireless Modem Card is designed for insertion into an industrystandard Type II PCMCIA card slot located in a Host device. The WMC6300 has
an antenna port to connect the external antenna and two LED Indicators. The
Red LED is the transmit indicator and the Green LED is the receive indicator as
shown in Figure 4.
Figure 3. WMC6300 Antenna Port and LED Indicators
3
Page 9
MeshNetworks
Installing the Software
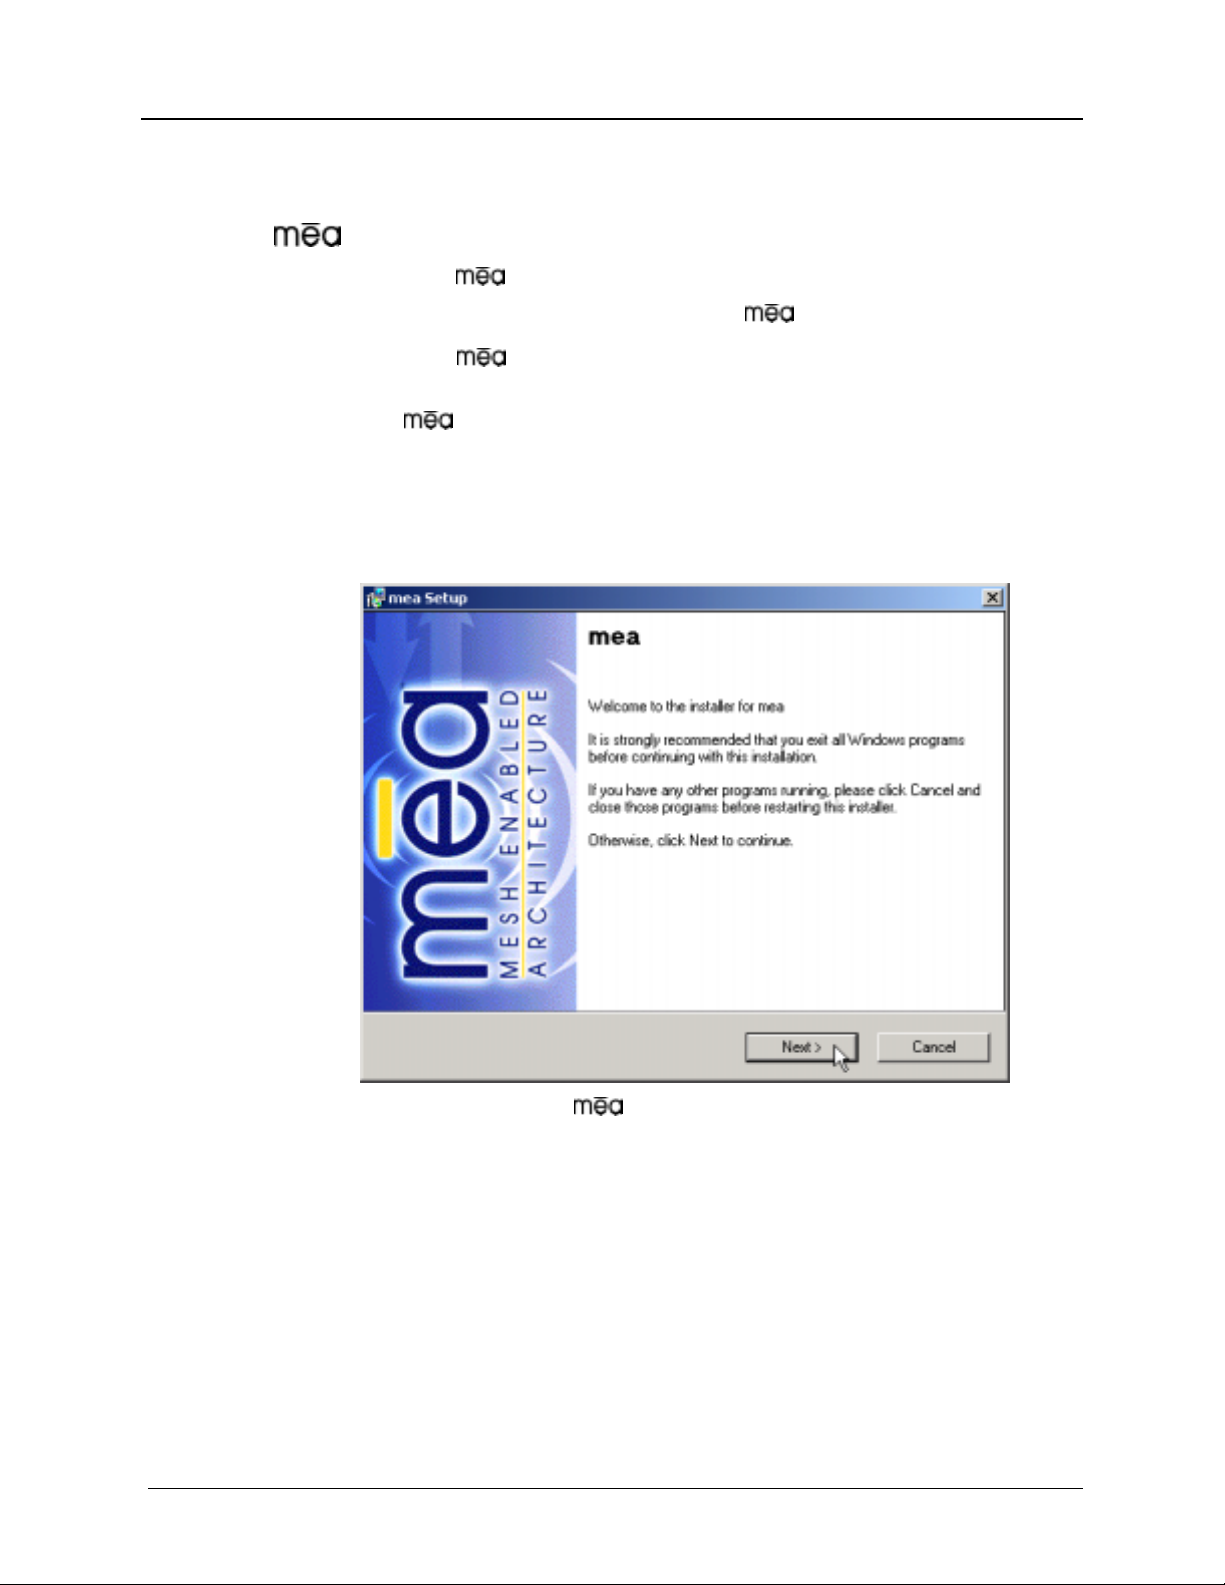
Installing Software (Windows 2000 Clients Only)
Note: Install the Software before inserting the WMC6300 card.
Complete the following procedure to install the
1. Insert the Software Installation CD into the computers’ CDROM
drive.
2. The
Note: If the installation program does not start automatically, open the
Windows Start menu, click on Run, and then type d:setup.exe (where d
is the letter of the CD-ROM drive) and click the “OK” button.
Click the “Next” button to continue the installation process. 3.
Setup program will be displayed as shown in Figure 4.
Software:
Figure 4. Installation Welcome Window
4
Page 10

WMC6300 Windows 2000 User’s Guide
4.
The “License Agreement” window will be displayed. Please review the
End User License Agreement. Use the scroll bar located at the right side
of the window to display the complete text message.
Note: If you do not agree with the terms of the license agreement, click
on “Cancel” and the installation will be terminated.
5.
To continue with the installation process, click on the “YES” button as
shown in Figure 5 and then click on “Next” to continue the installation.
Figure 5. Agree with License Agreement Window
6. The “Startup Options” window will be displayed as shown in Figure 6.
The user can modify the default installation configuration by checking or
un-checking the boxes on this installation window. Click on “Next” to
continue the installation process.
Figure 6. Ready to Install Window
5
Page 11

MeshNetworks
7. The “Ready to Install Window” will be displayed as shown in Figure
7. This window displays the Install Folder location and the Shortcut
Folder name that will be used to install the
software. Click on “Next”
to proceed with the installation process.
Figure 7. Ready to Install Window
8. During the installation process, the “Performing Setup Actions” window
displays a status bar that indicates the progress of the installation. When
the file transfer is complete, a window will be displayed as shown in
Figure 8 that allows the user to view the “ReadMe” file for late breaking
release information. It also allows the user to immediately run MeshTray.
Click on “Next” to proceed with the installation process.
Figure 8. Select Options Window
6
Page 12

WMC6300 Windows 2000 User’s Guide
9.
If selected, the “ReadMe” file will be displayed. Review the contents of
the file and then close the dialog window by clicking on the “X” located in
the upper-right corner of the window.
10.
The “ Installed Successfully” dialog window will appear as shown in
Figure 9. Click on “Finish” to complete the installation process.
Figure 9. Finished Popup Window
7
Page 13

MeshNetworks
Configuring the DNS Address
The Network Operator must supply the DNS IP address for an Internet
connection. This address must be manually configured in order for web URLs
such as www.meshnetworks.com
procedure to configure the address:
1.
Click on Start/Settings/Network and Dial-up Connections/Local Area
Connection
2.
Right click on the Local Area Connection Corresponding to the Wireless
Modem Card and select “Properties” from the pop up menu.
3.
Highlight “Internet Protocol (TCP/IP)” in the Components window.
4.
Click on the “Properties” button.
5.
Click on the “Advanced” button.
6.
Click on the “DNS” tab
7.
Click on the DNS “Add” button.
8.
Enter the “DNS Server IP Address” provided by the network administrator
and then click the “Add” button.
to be resolved. Complete the following
9.
Click the “OK” button to close the Advanced TCP/IP Settings windows.
10.
Click the “OK” button to close the Internet Protocol (TCP/IP) Properties
windows.
11.
Click the “OK” button to close the Local Area Connection Properties
windows.
12.
Click the “Close” button to close the Local Area Connection Status
window.
This configuration should remain in the Windows 2000 host.
8
Page 14

WMC6300 Windows 2000 User’s Guide
Connect the Antenna Assembly (Laptop Computer)
Complete the following procedure to connect the Antenna Assembly to the
WMC6300, for use in a standard laptop computer.
Warning
This unit is not FCC certified for use in a PDA.
Always eject card when not in use.
Locate the Antenna (Part Number MEA-Antenna12) and insert the
1.
connector into the WMC6300 antenna port as shown in Figure 10.
Note: The connector will “snap” into place when fully inserted.
Warning
Do not use the WMC6300 if the antenna connector is worn or damaged and
fails to “snap” into place. Replacement antennas are available through
MeshNetworks. Order Part Number MEA-Antenna12.
Figure 10. Attach Antenna to the WMC6300
2. Locate the Antenna Clip shown in Figure 11 and remove the paper that
protects the adhesive backing.
Figure 11. Antenna Clip
3. Attach the Antenna Clip to the back of the laptop computer display
approximately 1 inch from the top corner of the display as shown in
Figure 12. Ensure that the location selected for the Antenna Clip will
reach the WMC6300 with the provided cable length.
Note: The antenna operational position must be greater than 8 inches or
20 cm from the bottom of the case and such that the Antenna is vertically
orientated when the laptop is in use.
9
Page 15

MeshNetworks
Use of another antenna is prohibited and violates FCC regulations.
Warning
Use only the MeshNetworks supplied antenna.
Figure 12. Mounting the Antenna Clip
4. Insert the Antenna into the Antenna Clip as shown in Figure 13. The
Antenna Clip must be closed to secure the Antenna.
The Antenna Clip can be opened to remove the Antenna and WMC6300
card when not in use. If the Antenna Clip becomes unusable due to
adhesive failure or damage, additional Antenna Clips are available
through MeshNetworks by ordering Part Number MEA-AntennaClip.
Note: In some computers the PCMCIA card slot may be located near the
front of the computer, and a longer Antenna cable may be required. If the
supplied Antenna cannot be installed correctly because the cable is too short,
contact MeshNetworks for additional information or order MeshNetworks Part
Number MEA-Antenna24.
Warning
Never use the WMC6300 with the Antenna removed from the Clip.
Never use the WMC6300 with the Antenna disconnected from the Card.
Never use the WMC6300 with the display in the closed position.
10
Page 16

WMC6300 Windows 2000 User’s Guide
Figure 13. Insert the Antenna into the Clip
Connect the Magnetic Antenna Assembly (Optional)
Complete the following procedure to install the Magnetic Mount Antenna on the
rooftop of a vehicle. (The cable length of the Antenna is approximately 12-feet.)
1.
Attach the Magnetic Antenna to the metal rooftop of the vehicle so that
the antenna is in a vertical orientation.
Caution: The base of the antenna contains a powerful magnet that
secures the antenna to the rooftop. Use care when attaching the antenna
2.
Route the remaining 12-foot cable, as required to arrive at the Host
Computer.
Warning
FCC regulations require that the antenna’s operational
position must be greater than 20 cm from the human body.
Never use the WMC6300 with the Antenna removed from the rooftop.
Never use the WMC6300 with the Antenna disconnected from the Card.
3.
Insert the Antenna Cable Connector into the WMC6300 antenna port as
shown in Figure 14. Note: The connector will “snap” into place when
fully inserted.
Figure 14. Attach Magnetic Mount Antenna to the WMC6300
11
Page 17

MeshNetworks
Insert the WMC6300 Wireless Modem Card
Complete the following procedure to install the WMC6300 Wireless Modem Card
in the computer.
1.
Locate an available Type II PCMCIA card slot in the computer. If
necessary, remove the slot dust cover from the slot.
2.
To ensure the correct orientation of the card, insert the WMC6300
Wireless Modem Card into the computer’s PCMCIA card slot with the
label side up as shown in Figure 15.
CAUTION - Never force the card into the slot.
Figure 15. Installing the WMC6300 Wireless Modem Card
Warning
This unit is not FCC certified for use in a PDA.
12
Page 18

WMC6300 Windows 2000 User’s Guide
Removing the WMC6300 Wireless Modem Card
The WMC6300 should be ejected using the following procedure to ensure that
power to the card is disabled prior to removal.
Warning
Always eject card when not in use.
1.
Click on the Unplug or Eject Hardware icon in the system task bar.
2.
Select “Stop mea PC Card” from the popup menu as shown in Figure 16.
Figure 16. Eject the Hardware
3. Wait for a message that indicates that the device may be safely removed
from the system as shown in Figure 17.
Figure 17. Safe to Remove the WMC6300 Card
4. Remove the WMC6300 from the PCMCIA slot with the Antenna attached
to the WMC6300 as shown in Figure 18.
Figure 18. Removing the WMC6300 from the PCMCIA slot
5. Remove the Antenna from the Antenna Clip and store the WMC6300 with
the Antenna attached for future use. The Antenna Clip remains attached to
the computer.
Note: Should the Antenna Clip become unusable or if additional Antenna
Clips are required, the Antenna Clips are available by ordering
MeshNetworks Part Number MEA–AntennaClip.
13
Page 19

MeshNetworks
Uninstalling Application Software
Complete the following procedure to “Uninstall” the Ad Hoc Routing
Software:
From the Start menu, select Program Files
1.
Note: The
Programs” located in the Control Panel.
2. The Uninstall program will ask, “Are you sure you want to remove
MeshNetworks Software…” as shown in Figure 19. Click on “Yes” to
continue.
3. The “Removing Programs From Your Computer” window will be displayed
while the
Uninstalling Software Process is complete, click on the “Close” button.
software can also be uninstalled using “Add/Remove
Figure 19. Confirm Uninstall
software is uninstalled as shown in Figure 20. When the
→ →Uninstall .
Figure 20. Removing Programs From Your Computer Window
14
Page 20

WMC6300 Windows 2000 User’s Guide
Overview of MeshNetworks’ MeshTray
MeshTray™
MeshTray is a status application that reports vital and statistical information
about the
desktop system status tray when it is minimized as shown in Figure 21 and
Figure 22. The MeshTray icon changes to indication of the state of the wireless
interface. In Figure 21 the MeshTray icon is in an inactive or disconnected state.
Inactive MeshTray Icon
The MeshTray icon shown in Figure 22 is currently associated with an AP400.
The MeshTray icon displays the Link Strength to the associated IAP as colorcoded bars. (More bars indicate greater Link Quality.)
card. Because MeshTray is a “tray” application, it stays in the
Figure 21. Inactive MeshTray Icon
MeshTray Icon
Figure 22. MeshTray Link Strength Indicator
Clicking on the MeshTray icon restores the application to a property sheet
interface as shown in Figure 23.
15
Page 21

MeshNetworks
MeshTray Status
When the utility is launched, MeshTray displays useful system information such
as a description of the device, the MAC address of the node, the IP address of
the currently associated IAP, and the type of device (i.e., Subscriber Device,
Wireless Router or IAP). The Driver and Firmware version and the IAP Address
are also displayed.
Starting MeshTray
During the software installation process, a MeshTray shortcut icon is installed on
the users’ desktop. To start the MeshTray application, double-click on the
MeshTray icon.
Terminating MeshTray
If desired, the MeshTray application may be terminated by positioning the curser
over the MeshTray icon that is located in the Toolbar. Then, right-click on the
MeshTray icon and select “Exit” as shown in Figure 24. The task is terminated
and the icon is removed until the application is started again from the Start menu.
Figure 23. MeshTray Status Page
Figure 24. Exit MeshTray
16
Page 22

WMC6300 Windows 2000 User’s Guide
Customer Service Information
For information about solving difficulties in setting up your mea WMC6300, please see the
Frequently Asked Questions in the support page at
If you have read this document, reviewed the FAQ, and made every effort to resolve installation
or operation issues and require assistance, please contact your
http://www.meshnetworks.com/.
WMC6300 supplier.
17
Page 23

MeshNetworks
License and Warranty Information
Important Information
PLEASE READ CAREFULLY THE FOLLOWING BEFORE INSTALLING OR USING THIS HARDWARE,
CONSISTING OF A CD ROM AND PCMCIA CARD, AND THE SOFTWARE (COLLECTIVELY, THE “PRODUCT”).
IF YOU AGREE WITH ALL OF THE TERMS OF THIS LICENSE AGREEMENT & LIMITED WARRANTY, PROCEED
WITH THE INSTALLATION AND USE OF THE PRODUCT FOLLOWING THE ONSCREEN INSTRUCT IONS. IF
YOU DO NOT AGREE, DO NOT INSTALL OR USE THE PRODUCT. BY INSTALLING OR USING THE PRODUCT,
YOU ARE AGREEING TO BE BOUND BY ALL OF THE TERMS OF THIS LICENSE AGREEMENT & LIMITED
WARRANTY. IF YOU DO NOT AGREE TO THE TERMS OF THIS LICENSE AGREEMENT & LIMITED
WARRANTY, PROMPTLY RETURN THE UNUSED PRODUCT AND DOCUMENTATION TO THE SOURCE (AS
DEFINED BELOW) FOR A FULL REFUND OF THE PURCHASE PRICE.
License Agreement & Limited Warranty
LICENSE GRANT
MeshNetworks, Inc. ("MeshNetworks"), by and through its resellers and suppliers (c ollectively, the “Source”) hereby
licenses to the end-user (“You”) the software accompanying this Product ("Software"). You have right of possession
to the CD ROM on which the Software is recorded (in accordance with your arrangement with the Source), but
MeshNetworks retains title to the Software and related documentation. The license is non-exclusive, nontransferable, non-sublicensable and confers a right to use only the machine-readable, object code form of the
Software for its normal and intended pur pose by a single-user. You may make one backup copy of the Soft ware in
machine-readable form, provided the backup copy is not installed or used on any electronic device. You must
reproduce on the backup copy the MeshNet works’ copyright notice and any other proprietary legends that were on
the original copy of the Software.
RESTRICTIONS
You acknowledge that the Product contains copyrighted mat erial, trade secrets and other proprietar y material owned
by MeshNetworks, and that unauthorized use of such material may ca use serious loss or damage to M eshNetworks.
You agree that You will not:
• decompile, reverse engineer, disassemble, translate or reduce the Product to a human-per ceivable form.
• modify, adapt, pledge, lease, rent, share, lend, distribute, disclose or create derivative works based upon the
Product in whole or in part.
• electronically transmit the Software from one computer to another or over a network.
• transfer any of your rights in the Software, the backup copy of the S oftware, the media, the documentation,
or this License Agreement & Limited Warranty to another party.
• use the Product for any unlawful or harmful purpose.
TERM, TERMINATION
This license is effective until terminated. You may terminate this license at any time by destroying the Software,
related documentation and all copies thereof. This license will terminate immediately without notice from
MeshNetworks if You fail to comply with any provision of this License Agreement & Limited Warranty. Upon
termination You must destroy the Software, related documentation and all copies thereof.
HARDWARE WARRANTY
MeshNetworks warrants to You that the hardware elements of the Product will be substantially free from material
defects in workmanship and materials, under normal use and service, for a period of one (1) year from the date of
acquisition from the Source.
Our sole obligation under this express warranty will be, at our option and expense, (1) to repair the defective
hardware element or, (2) deliver to You an equivalent hardware element to replace the defective item. Any hard ware
element that is replaced will become our propert y. Replacement hardware elements may be new or reconditioned.
We warrant any replaced or repaired hardware eleme nts for the greater of ninety (90) days from shipment, or the
remainder of the initial warranty period.
SOFTWARE WARRANTY
MeshNetworks warrants to You that the Software, except as noted below, will perform in substanti al conformance to
its published program specifications, for a period of ninety (90) days from the date of acq uisition from the Source. No
updates are provided under this warranty. Our sole obligation under this express warranty will be, at our option and
expense, to replace any defective software product, with software which substantially conforms to applicable
MeshNetworks’ published program specifications.
18
Page 24

WMC6300 Windows 2000 User’s Guide
You assume responsibility for the selection of the appropriate applications program and associated reference
materials. MeshNetworks makes no warranty or representation that the Soft ware will meet your requirements or work
in combination with any hardware or applications software products provid ed by third part ies, that the operatio n of t he
Software will be uninterrupted or error free, or that all defects in the Software will be corrected.
WARRANTY SERVICE
You must contact the Source of the Product within the applicable warranty period to obtain warranty service
authorization. Dated proof of purchase may be required. A Return Material Authorization (RMA) number will be
issued. This number must be marked on the outside of the package. T he Product must be packaged appropriately
for safe shipment and sent prepaid. It is recommended that returned Products be insured or sent by a metho d that
provides for tracking of the package. Responsibility for loss or damage does not tra nsfer to the intended recipient
until the returned item is received by such part y. We will make commercially reasonab le efforts to ship the repaired
or replaced item to You, at our expense, not later than ten (10) business days after receipt of the defective Prod uct.
We will retain risk of loss or damage until the Product is delivered to You.
We will not be responsible for any software, firmware, information, or memory data belonging to You contained in,
stored on, or integrated with any Products returned to the Source for repair, whether under warranty or not.
WARRANTIES EXCLUSIVE, WARRANTY DISCLAIMER
TO THE FULL EXTENT ALLOWED BY LAW, THE FOREGOING WARRANTIES AND REMEDIES ARE E XCLUSIVE
AND ARE IN LIEU OF ALL OTHER WARRANTIES, TERMS, OR CONDITIONS, EXPRESS OR IMPLIED, EITHER
IN FACT OR BY OPERATION OF LAW, STATUTORY OR OTHERWISE, INCLUDING, WITHOUT LIMITATION,
WARRANTIES OF MERCHANTABILITY, FITNESS FOR A PARTICULAR PURPOSE, SATISFACTORY QUALITY,
CORRESPONDENCE WITH DESCRIPTION, INFORMATIONAL CONTENT, ACCURACY, SYSTEM
INTEGRATION, NON-INFRINGEMENT AND QUIET ENJOYMENT, ALL OF WHICH ARE EXPRESSLY
DISCLAIMED. WE DO NOT WARRANT THAT THE FUNCTIONS CONTAINED IN THE PRODUCT WILL MEET
YOUR REQUIREMENTS, THAT THE PRODUCT WILL BE COMPATIBLE WITH ANY OTHER SOFTWARE,
HARDWARE OR OPERATING SYSTEM, THAT THE OPERATION OF THE PRODUCT WILL BE
UNINTERRUPTED OR ERROR-FREE. WE NEITHER ASSUME NOR AUTHORIZE ANY OTHER PERSON TO
ASSUME FOR IT ANY OTHER LIABILITY IN CONNECTION WITH THE SALE, INSTALLATION, MAINTENANCE
OR USE OF THIS PRODUCT.
WE WILL NOT BE LIABLE UNDER THIS WARRANTY IF TESTING AND EXAMINATION DISCLOSE THAT THE
ALLEGED DEFECT OR MALFUNCTION IN THE PRODUCT DOES NOT EXIST OR WAS CAUSED BY MISUSE,
NEGLECT, IMPROPER INSTALLATION OR TESTING, UNAUTHORIZED ATTEMPTS TO OPEN, REPAIR OR
MODIFY THE PRODUCT, OR ANY OTHER CAUSE BEYOND THE RANGE OF THE INTENDED USE, OR BY
ACCIDENT, FIRE, LIGHTNING, OTHER HAZARDS.
LIMITATION OF LIABILITY
TO THE FULL EXTENT ALLOWED BY LAW, MESHNETWORKS EXCLUDES FOR ITSELF, ITS RESELLERS AND
SUPPLIERS AND THEIR RESPECTIVE DIRECTORS, OFFICERS, EMPLOYEES, OR AGENTS, ANY LIABILITY,
WHETHER BASED IN CONTRACT OR TORT (INCLUDING NEGLIGENCE), FOR INCIDENTAL,
CONSEQUENTIAL, INDIRECT, SPECIAL, OR PUNITIVE DAMAGES OF ANY KIND, OR FOR LOSS OF REVENUE
OR PROFITS, LOSS OF BUSINESS, LOSS OF INFORMATION OR DATA, OR OTHER FINANCIAL LOSS ARISING
OUT OF OR IN CONNECTION WITH THE SALE, INSTALLATION, MAINTENANCE, USE, PERFORMANCE,
FAILURE, OR INTERRUPTION OF ITS PRODUCTS, EVEN IF WE HAVE BEEN ADVISED OF THE POSSIBILITY
OF SUCH DAMAGES, AND LIMITS ITS LIABILITY TO REPAIR OR REPLACEMENT. AT OUR OPTION THIS
DISCLAIMER OF LIABILITY FOR DAMAGES WILL NOT BE AFFECTED IF ANY REMEDY PROVIDED HEREIN
WILL FAIL OF ITS ESSENTIAL PURPOSE.
Some jurisdictions do not allow the exclusion or limitation of implied warranties or the limitation of incidental or
consequential damages for certain products supplied to cons umers, or the limitation of liability for death or personal
injury, so the above limitations and exclusions may be limited in their application to You. When the implied warranties
are not allowed to be excluded in their entirety, they will be limited to the duration of the app licable written warranty.
This warranty gives You specific legal rights which may vary depending on local law.
EXPORT COMPLIANCE
You agree and certify that the Product will be utilized only in the United States of America or in compliance with
22CFR125.4(b)(9).
GOVERNING LAW
This License Agreement & Limited Warrant y will be governed by the laws of the state of Florida, U.S.A., and b y the
laws of the United States, excluding their conflicts of laws principles. Both the Uniform Computer Information
Transactions Act and the United Nations Convention on Contracts for the International Sale of Goo ds are hereby
excluded in their entirety from application to this License Agreement & Limited Warranty.
19
Page 25

MeshNetworks
Regulatory Information
FCC Information
This device complies with Part 15 of the FCC Rules. Operation is subject to the following two
conditions: (1) this device may not cause harmful interference, and (2) this device must accept
any interference received; including interference that may cause undesired operation.
Federal Communications Commission (FCC) Statement:
This Equipment has been tested and found to comply with the limits for a Class A digital device,
pursuant to Part 15 of the FCC rules. These limits are designed to provide reasonable
protection against harmful interference in a commercial installation. This equipment generates,
uses and can radiate radio frequency energy and, if not installed and used in accordance with
the instructions, may cause harmful interference to radio communications. However, there is no
guarantee that interference will not occur in a particular installation. If this equipment does
cause harmful interference to radio or television reception, which can be determined by turning
the equipment off and on, the user is encouraged to try to correct the interference by one or
more of the following measures:
• Reorient or relocate the receiving antenna.
• Increase the separation between the WMC6300 and radio or television receiver.
• Connect the equipment into an outlet on a circuit different from that to which the receiver
is connected.
• Consult the supplier of the WMC6300 or an experienced radio/TV technician for help.
FCC RF Radiation Exposure Statement
CAUTION: This equipment complies with FCC RF radiation exposure limits set forth for
1.
an uncontrolled environment. This equipment should be installed and operated with a
minimum distance of 20 cm between the antenna and your body.
2. This Transmitter must not be co-located or operating in conjunction with any other
antenna or transmitter.
7
20
Page 26

WMC6300 Windows 2000 User’s Guide
Safety Information for the WMC6300
The Federal Communications Commission (FCC) with its action in ET Docket 96-8 has adopted
a safety standard for human exposure to radio frequency (RF) electromagnetic energy emitted
by FCC certified equipment. MeshNetworks’
environmental limits found in OET-65 and ANSI C95.1, 1991. Proper operation of this radio
according to the instructions found in this manual and the hardware and software guides on the
CD will result in user exposure that is substantially below the FCC recommended limits.
• Do not touch or move the antenna(s) while the unit is transmitting or receiving.
• Do not hold any component containing a radio such that the antenna is very close to or
touching any exposed parts of the body, especially the face or eyes, while transmitting.
• Do not operate a portable transmitter near unshielded blasting caps or in an explosive
environment unless it is a type especially qualified for such use.
• Do not operate the radio or attempt to transmit data unless the antenna is connected;
otherwise, the radio may be damaged.
• Antenna use:
• In order to comply with FCC RF exposure limits, dipole antennas should be located
at a minimum distance of 7.9 inches (20 cm) or more from the body of all persons.
products meet the uncontrolled
WARNING
Use the antenna supplied by MeshNetworks.
Use of other antennas is prohibited may violate FCC regulations.
NOTE: The manufacturer is not responsible for any unauthorized modifications to this
equipment. Such modifications could void the user’s authority.
21
Page 27

MeshNetworks
22
 Loading...