

Page 1
L10
DRAFT
Android ™
Quick Start Guide
MN-003429-01 Rev. A
Page 2

Copyright
DRAFT
ZEBRA and the stylized Zebra head are trademarks of Zebra Technologies Corporation, registered in
many jurisdictions worldwide. All other trademarks are the property of their respective owners. ©2019
Zebra Technologies Corporation and/or its affiliates. All rights reserved.
COPYRIGHTS & TRADEMARKS: For complete copyright and trademark information, go to
www.zebra.com/copyright.
WARRANTY: For complete warranty information, go to www.zebra.com/warranty.
END USER LICENSE AGREEMENT: For complete EULA information, go to www.zebra.com/eula.
Terms of Use
Proprietary Statement
This manual contains proprietary information of Zebra Technologies Corporation and its subsidiaries
(“Zebra Technologies”). It is intended solely for the information and use of parties operating and
maintaining the equipment described herein. Such proprietary information may not be used, reproduced,
or disclosed to any other parties for any other purpose without the express, written permission of Zebra
Technologies.
Product Improvements
Continuous improvement of products is a policy of Zebra Technologies. All specifications and designs are
subject to change without notice.
Liability Disclaimer
Zebra Technologies takes steps to ensure that its published Engineering specifications and manuals are
correct; however, errors do occur. Zebra Technologies reserves the right to correct any such errors and
disclaims liability resulting therefrom.
Limitation of Liability
In no event shall Zebra Technologies or anyone else involved in the creation, production, or delivery of the
accompanying product (including hardware and software) be liable for any damages whatsoever
(including, without limitation, consequential damages including loss of business profits, business
interruption, or loss of business information) arising out of the use of, the results of use of, or inability to
use such product, even if Zebra Technologies has been advised of the possibility of such damages. Some
jurisdictions do not allow the exclusion or limitation of incidental or consequential damages, so the above
limitation or exclusion may not apply to you.
2
Page 3
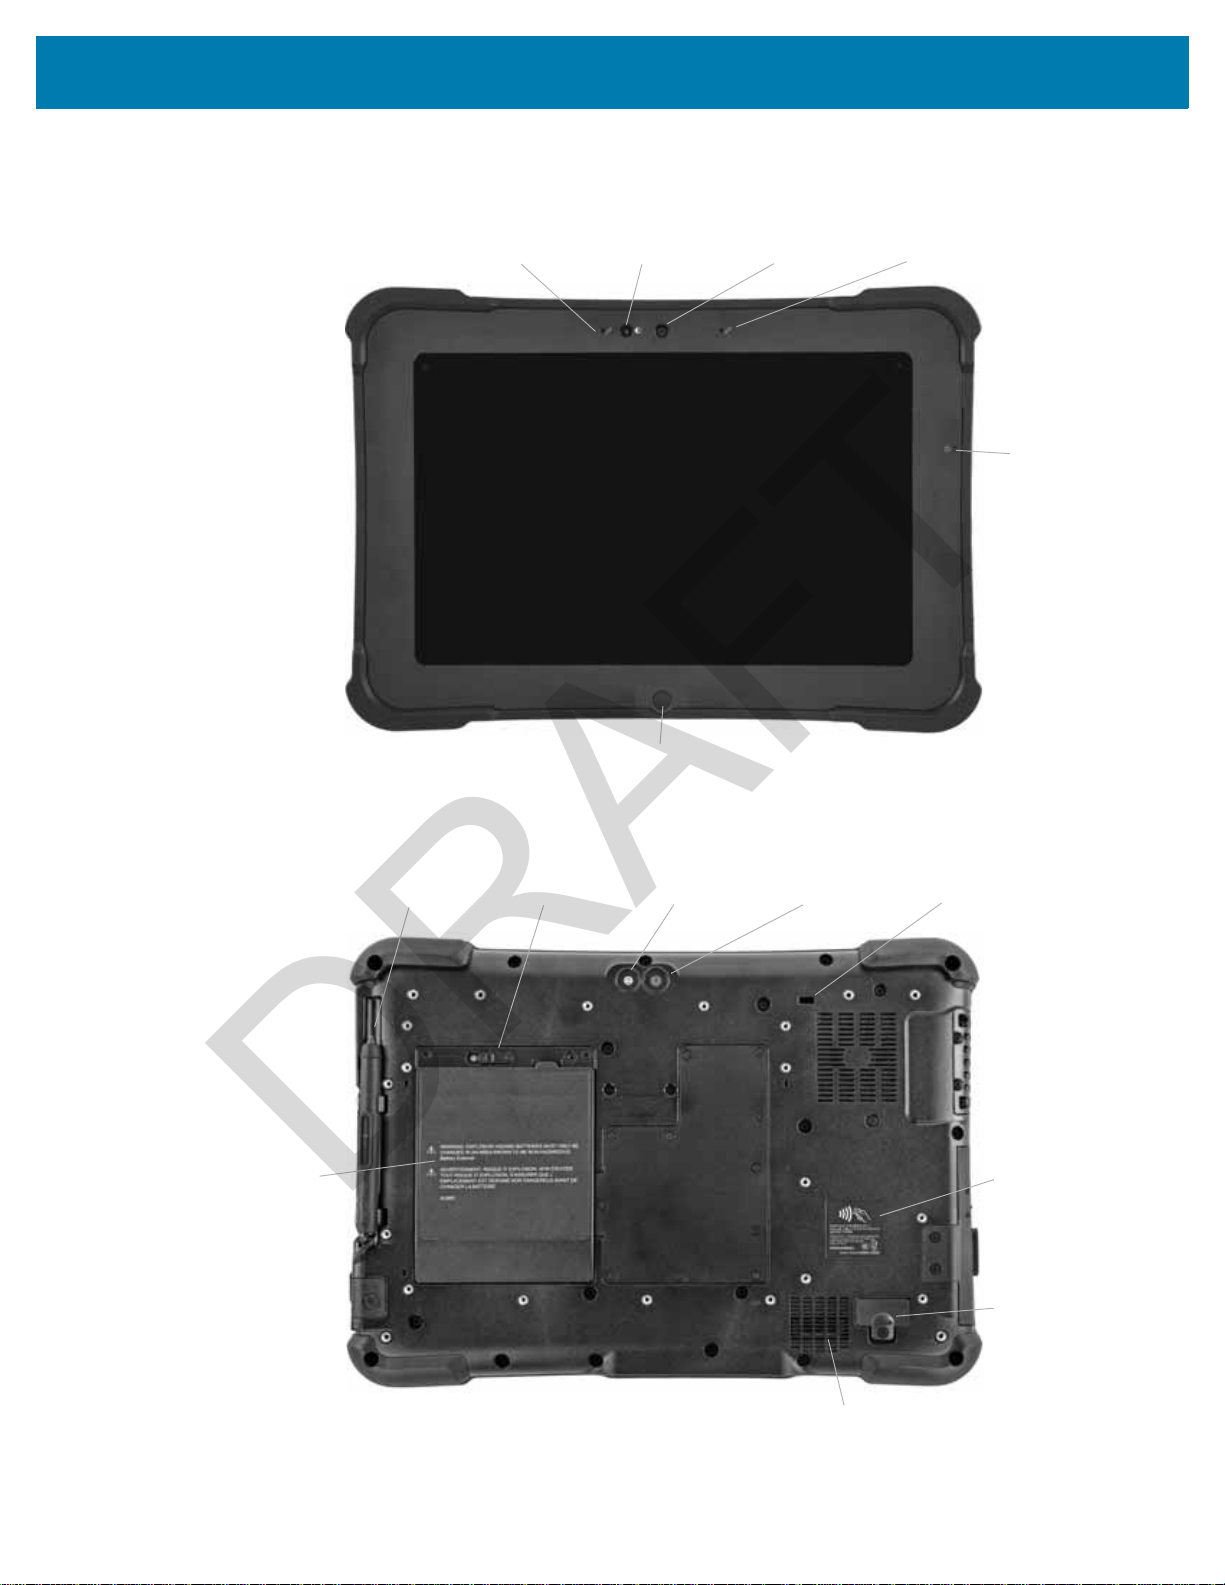
XSLATE Features
Microphone
Ambient Light
Sensor
Front Camera
Microphone
Power LED
Home Button
Pen Holder and
Pen
Battery Latch
Camera Light
Rear Camera
Kensington
Lock Slot
NFC
Antenna
Expansion
Port Cover
Speaker
Battery
Front View
Back View
DRAFT
3
Page 4

Ethernet Jack HDMI
Connector
Power Button
Volume Control
Right View
microSD
Card Slot
USB-C Port
USB-A Ports
(2)
Headset Jack
Left View
Docking
Connector
Bottom View
DRAFT
4
Page 5

XPAD Features
Pen Holder
Ambient Light
Sensor
Front Camera
Camera
Indicator
Microphone
Power LED
Home Button
Speaker
Microphone
Programmable
Function Buttons
Battery
NFC Antenna
Expansion Port
Cover
Stylus Tether
Post
Battery
Latch
Camera
Light
Rear Camera
Kensington
Lock Slot
Front View
DRAFT
5
Page 6

Preparing the device Tablet for First Use
microSD
Card Slot
USB-C Port
USB-A Ports
(2)
Headset Jack
Barcode
Scanner
Left View
Stylus
Barcode Scanner
Button
Top View
Empty SIM
card slot
DRAFT
This section has steps for setting up the device for the first use.
Inserting a SIM Card
IMPORTANT: Before you can connect to a mobile broadband network, you must have your L10 tablet configured with
a WWAN card, an active account with a cellular network provider and a SIM card in your tablet for mobile broadband
access. This SIM card works like the SIM card in your cell phone that connects you to a network provider.
The SIM card holder accommodates two Nano SIM (4FF) cards, for use with the mobile broadband option.
If inserting only one SIM card, place it in the holder labeled SIM1. If inserting two SIM cards, put the card
for the primary carrier in SIM1 and the card for the secondary carrier in the other SIM slot.
1. Find and gently remove the SIM holder tray so the slot is empty.
Figure 1 Empty SIM Card Slot
6
Page 7
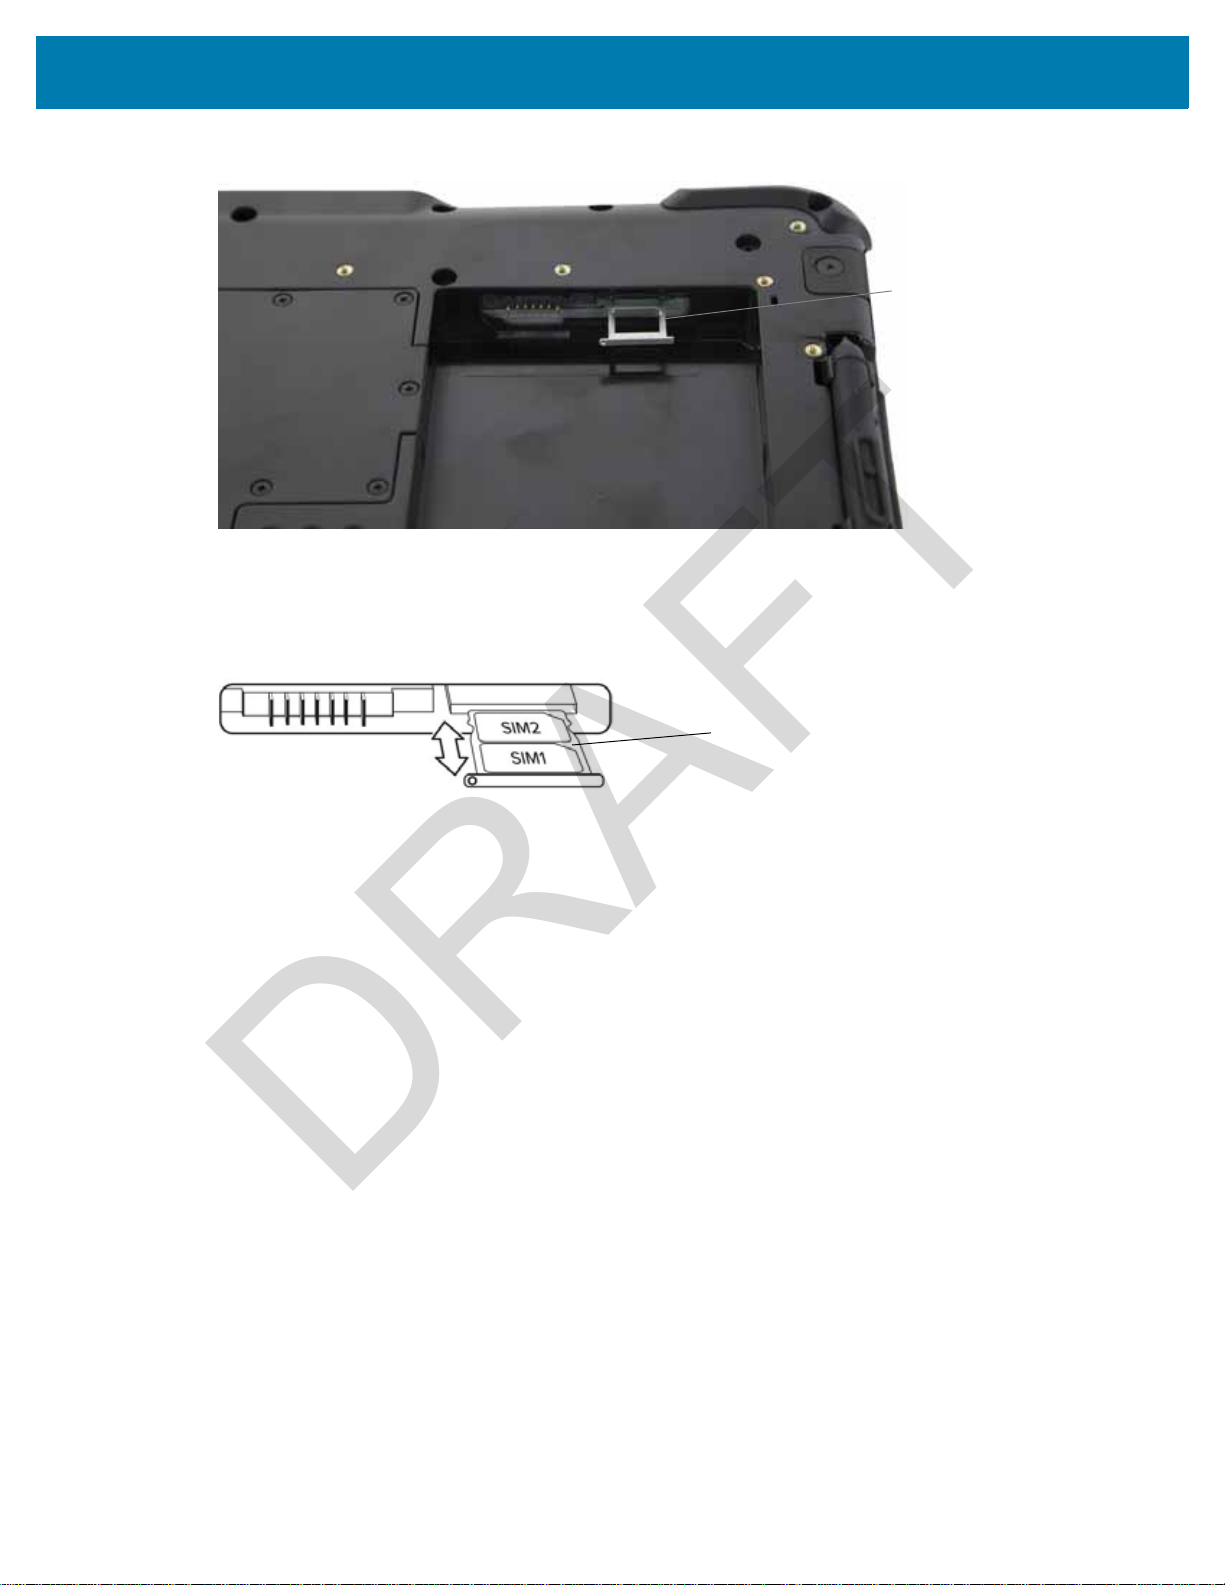
Figure 2 SIM Card Slot with Holder
SIM card slot with holder
Notched corner
DRAFT
2. Place the SIM card into the holder so that it is close to flush with the holder. Make sure that the SIM
contacts (gold) are facing down and the notched corner is on the right side as shown in this drawing
and in the graphic inside the battery bay of the tablet.
Figure 3 Two SIM Cards in Holder
The holder can hold two SIM cards. If you have two SIM cards, insert the second one into the holder in
the same way.
3. Carefully take the SIM holder and align it with the opening of the SIM holder connector. Gently slide the
SIM holder tray into the connector until it stops.
Installing the Battery
To install the battery:
1. Place the tabbed end of the battery into the battery compartment.
7
Page 8
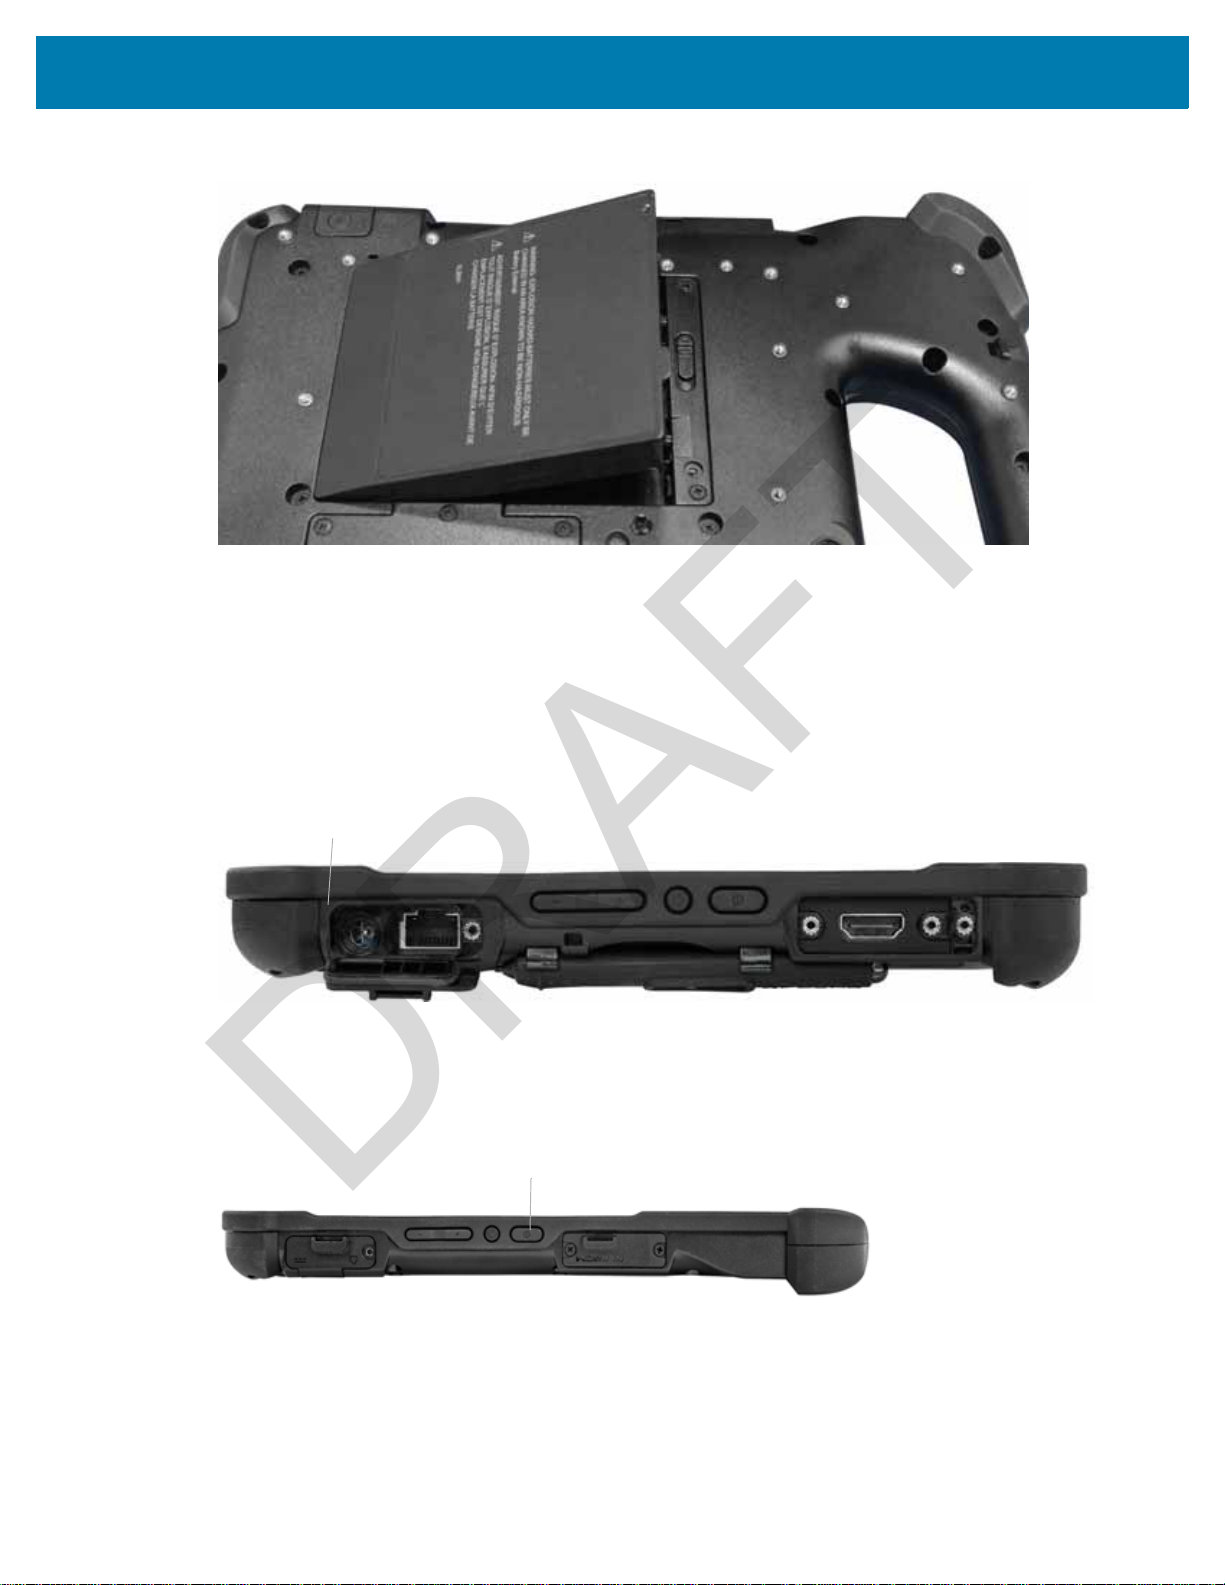
Figure 4 Battery Replacement
Power Port
Power Button
DRAFT
2. Press the battery down until it snaps into place.
Charging the Battery
To charge the battery:
1. Plug the AC line cord into the power supply.
2. Open the port door.
3. Plug the power supply output connector into the tablet power port.
4. Plug the AC line cord into an AC outlet.
The battery charging indicator on the front of the tablet blinks green to indicate that the battery is
charging. The indicator turns solid green when the battery is fully charged.
5. Press and release the Power button to turn on the tablet.
6. Keep the tablet on AC power until the battery is fully charged. However, you do not have to wait until
the tablet is fully charged to turn it on. The tablet charges while in use.
8
Page 9

www.zebra.com
DRAFT
 Loading...