

Page 1
CR2278
Draft 1
Presentation Cradle
Quick Reference
Guide
Page 2

2 CR2278 Presentation Cradle
Draft 1
Introduction
The CR2278-PC (presentation) cordless digital scanner cradle acts as
charger and radio communication interface for the DS2278 cordless digital
scanner. The CR2278-PC can sit on a desktop or be mounted on a wall.
The cradle receives data from the digital scanner via a Bluetooth radio,
and sends that data to the host through an attached cable. The cradle also
charges the digital scanner’s internal battery when the digital scanner is
inserted. The digital scanner can be charged from an external power
supply or a USB cable powered by the host.
This document provides basic instructions on setting up and using the
cradle.
Equipment Supplied
The cradle package includes one CR2278-PC cradle.
Accessories
??? verify
The following equipment may be needed:
• Power supply (for faster charging).
• Mounting bracket (must be purchased separately).
• Two M4 screws (for a bracket mount using the threaded brass screw
holes, if applicable). Not available from Zebra.
Save the shipping container for storing or shipping. Inspect all equipment
for damage. If anything is damaged or missing, call an authorized Zebra
Support Center immediately.
Related Documentation
• DS2278 Digital Scanner Quick Start Guide, p/n MN-002916-xx.
• DS2278 Digital Scanner Product Reference Guide, p/n MN-002915-xx.
All documentation and translations are available at:
www.zebra.com/support
.
Service Information
If you have a problem running your unit or using your equipment, contact
your facility’s Technical or Systems Support. If there is a problem with the
equipment, they will contact Zebra Support at
http://www.zebra.com/support
For the latest version of this guide go to: http://www.zebra.com/support
.
.
Page 3
Quick Reference Guide 3
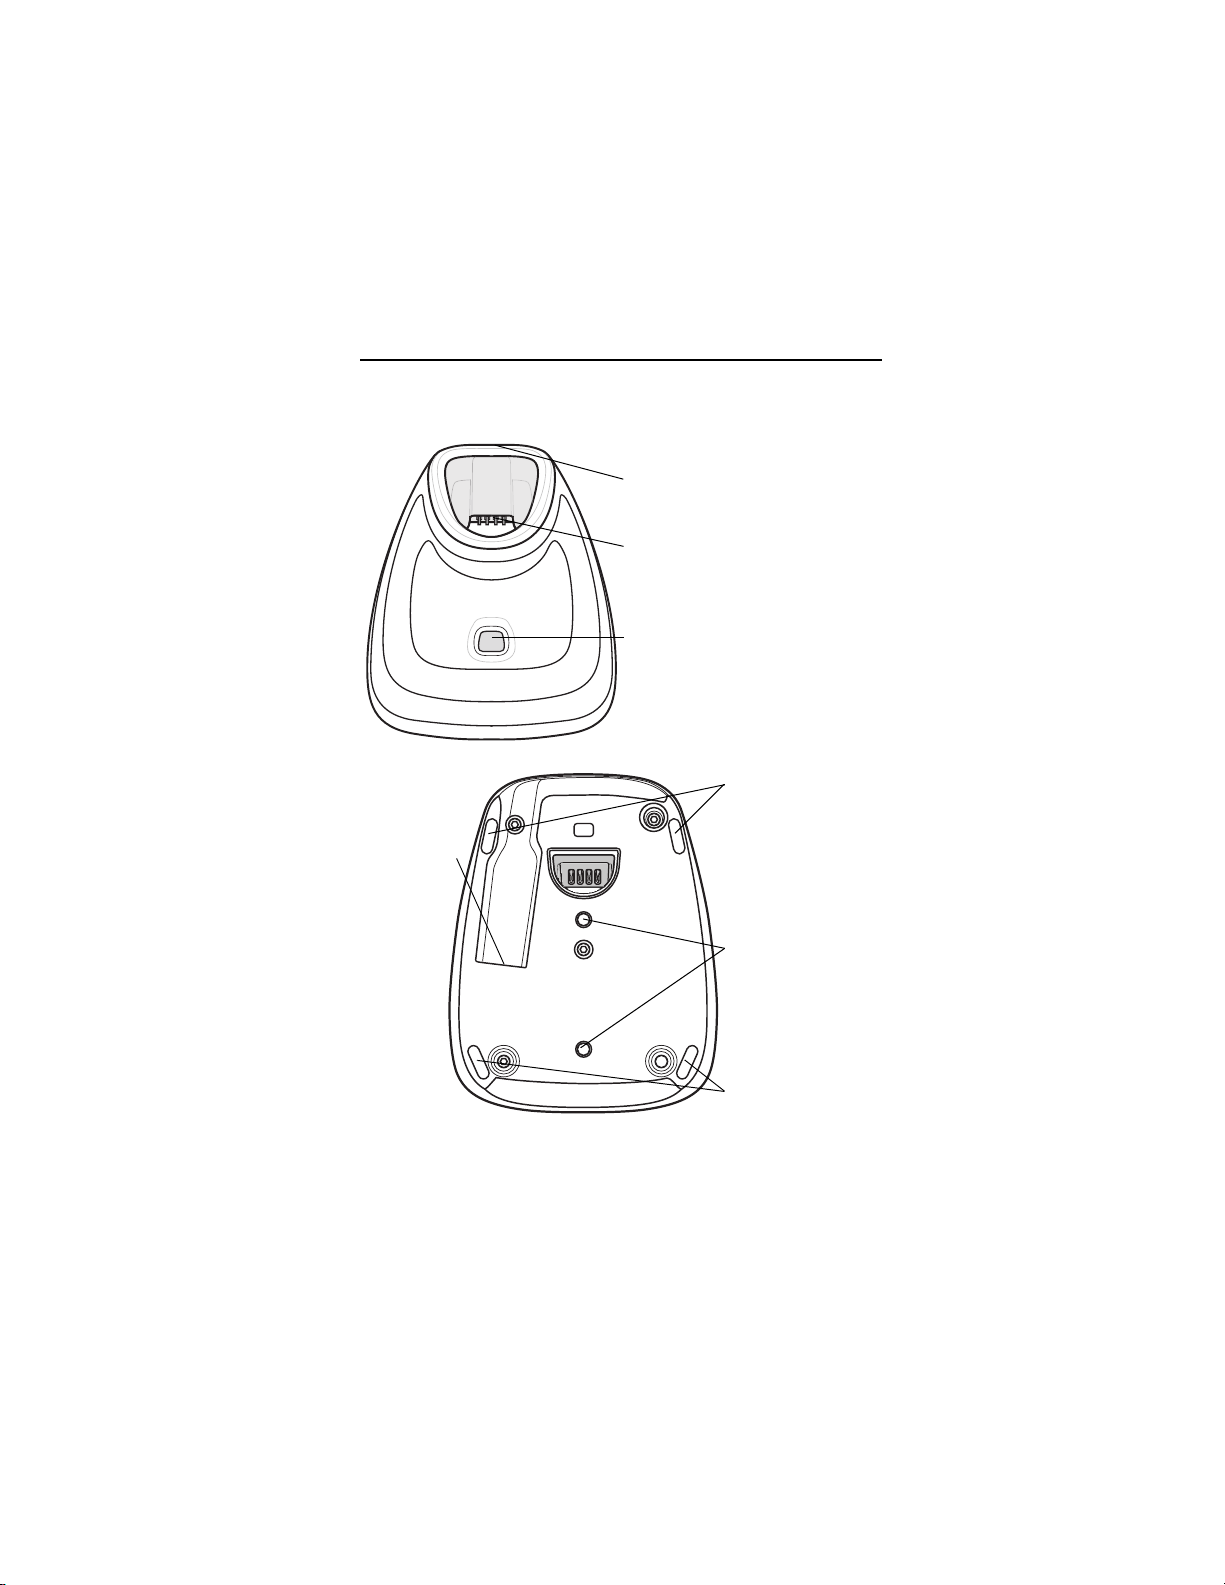
Charging/Communications
Contacts
Pairing Bar
Code (in back)
LED Indicator
Rubber Feet
Rubber Feet
Host
Interface Port
Station Mount
Threaded Brass
Screw Holes
(2 - M4 x 5 mm)
Draft 1
Cradle Features
Top
Bottom
Cradle Connections
1. Connect the appropriate cable to the power supply and an AC power
source, if necessary. This ensures detection of the host and prevent
inadvertently back powering the cradle from improper detection of the
host.
Page 4

4 CR2278 Presentation Cradle
Draft 1
2. Insert the interface cable into the host port.
3. Insert the interface cable into the cradle’s host port.
4. Pair the digital scanner to the cradle either by inserting it in the cradle
(if Pair
on Contacts is enabled) or by scanning t
??
?verify
5. If necessary, scan the appropriate host bar code (for non-autodetected
rfaces). Refer to the Product Reference Guide.
inte
he pairing bar code.
Changing the Host Interface
To connect to a different host, or to the same host through a different
cable:
1. Unplug the interface cable from the host.
2. Unplug the power supply from the cradle.
3. Connect the interface cable to the new host, or the new interface cable
to the existing host.
4. Reconnect the power supply, if required.
5. If necessary, scan the appropriate host bar code (for non-autodetected
rfaces). Refer to the Product Refere
inte
nce Guide.
Using a DC Power Supply
The cradle can operate from host supplied power, if available. If host
power is limited or not available, an external DC power supply can be
used with certain host interface cables that support a power jack. An
external power supply is recommended if fastest charging is required.
CAUTION Always disconnect the DC power supply BEFORE
disconnecting the cable to the host end or the cradle
may not recognize the new host.
Mounting the Cradle
When placing the cradle on a tabletop, the rubber feet on the bottom of the
cradle provide traction and prevent surface damage.
To mount the cradle on a mounting bracket:
1. Install the mounting bracket in the appropriate location and secure in
ce.
pla
2. Attach the interface and power cables to the cradle (see Cradle
Connections
3. Position the cradle on the mounting surface lining up the station mount
thread
on the mounting bracket.
4. Attach the cradle securely to the surface using the two M4 screws.
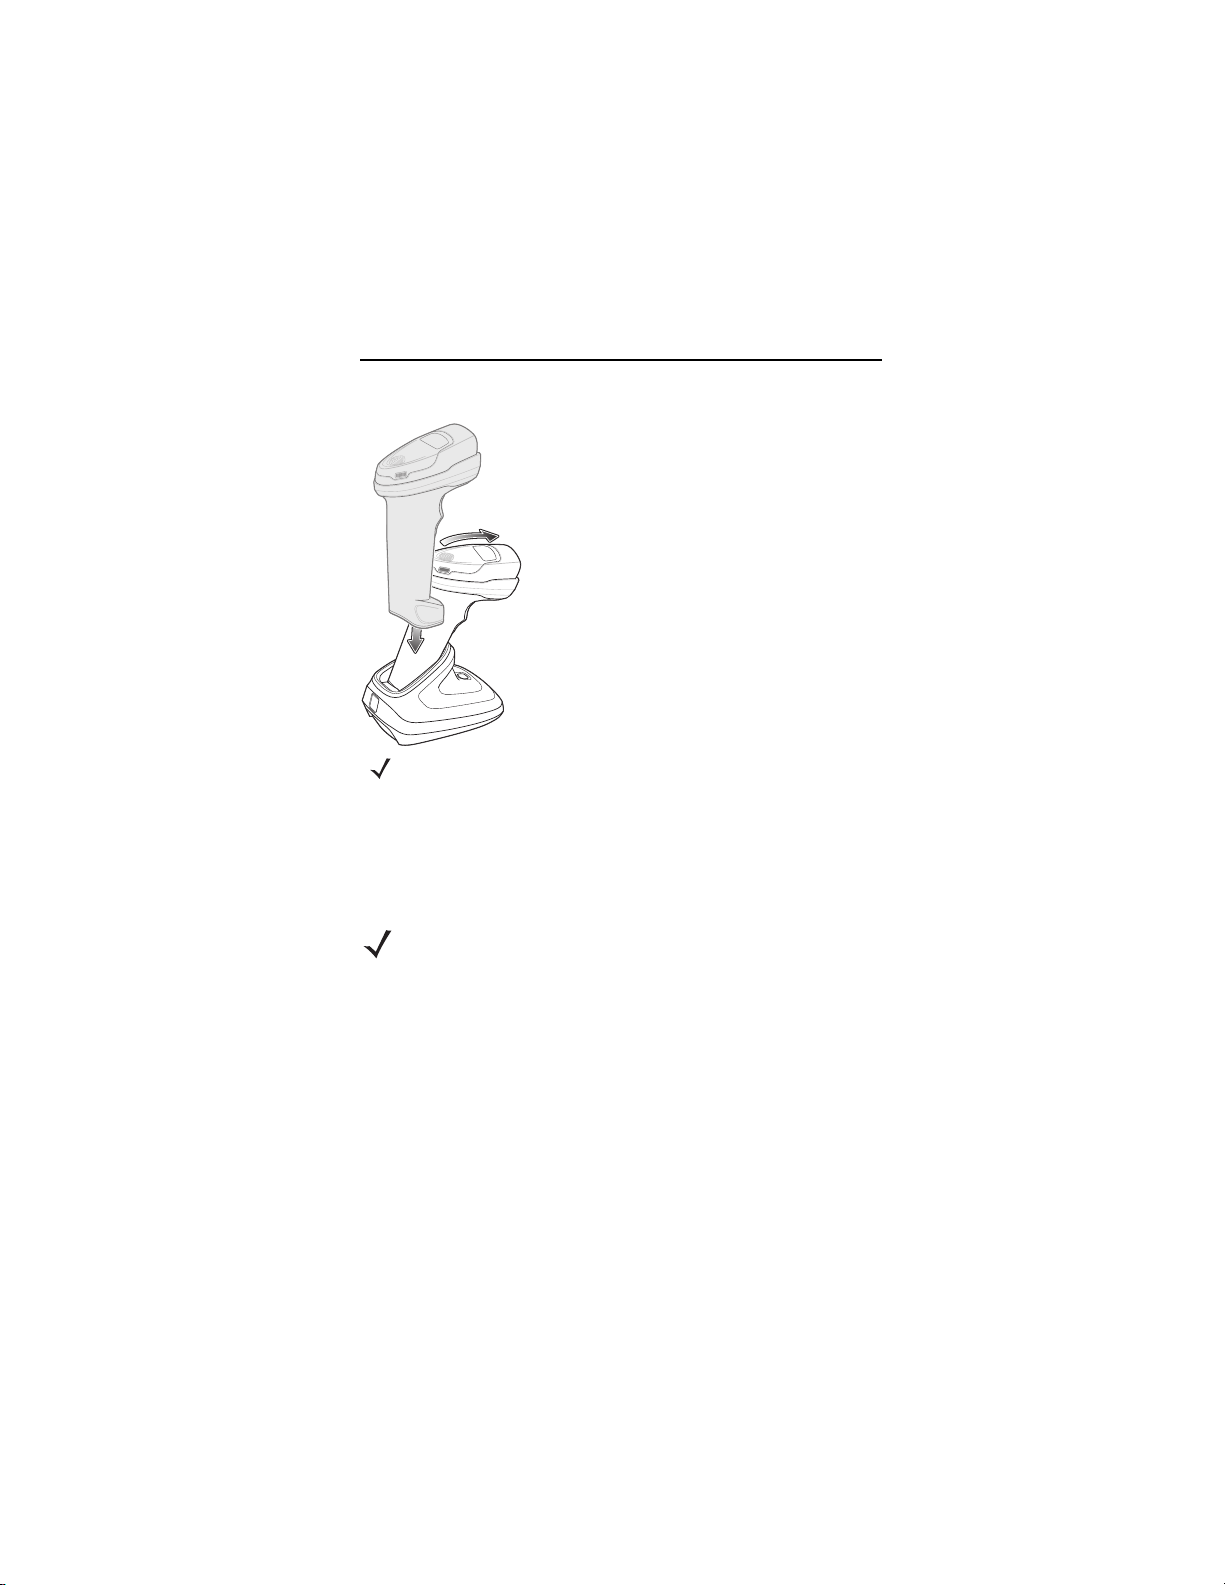
5. Insert the digital scanner in the cradle.
on page 3).
ed brass screw holes on the bottom of the cradle with the holes
Page 5
Quick Reference Guide 5
Draft 1
Inserting the Digital Scanner in the Cradle.
CAUTION Do not pour, spray, or spill any liquid on the cradle.
Sending Data to the Host Computer
The cradle receives data from the digital scanner via a wireless radio
connection and transmits it to the host computer via the host cable. The
digital scanner and cradle must be paired for successful wireless
communication.
Pairing
NOTE The pairing bar code that connects the digital scanner to a
cradle is unique to each cradle.
Do not scan data or parameters until pairing completes.
Only when the digital scanner is paired to the cradle, it
automatically tries to reconnect to a remote device when a
disconnection occurs that is due to the radio losing
communication. Refer to the Product Reference Guide for
more information.
Pairing is the process by which a digital scanner initiates communication
with a cradle. To pair the digital scanner with the cradle, scan the pairing
bar code. A high/low/high/low beep sequence indicates that the pairing
bar code was decoded. When a connection between the cradle and digital
scanner is established, a low/high beep sounds.
Page 6

6 CR2278 Presentation Cradle
Draft 1
Lost Connection to Host
If scanned data does not transmit to the cradle’s host, ensure that all
cables are firmly inserted and the power supply is connected to an
appropriate AC outlet, if applicable. If scanned data still does not transmit
to the host, reestablish a connection with the host:
1. Disconnect the host interface cable from the cradle.
2. Wait three seconds.
3. Reconnect the host interface cable to the cradle.
4. Reestablish pairing with the cradle by scanning the pairing bar code.
Charging the Digital Scanner Battery in the
Cradle
When using a new battery in the digital scanner, the battery requires a
charge to be enabled. Insert the battery in the digital scanner and place
the digital scanner in the cradle (see Inserting the Digital Scanner in the
Cradle. on page 5). The battery begins charging when the cradle LED
indicator starts flashing amber. The battery is fully charged when the
cradle LED is solid green. A complete charge of a fully discharged battery
can take up to three hours using external power.
Cradle LED Indicators ???verify/update
LED Indication
Standard Use
Green (stays on) Power Up
Radio Indications
Green (off, then on) Bluetooth connection established
Battery Indications
Amber (stays on) Pre-charging
Amber blinking Charging
Green (stays on) Fully charged
Amber fast blinking Charging Error
Battery End of Life Indications
Red blinking Charging
Red (stays on) Fully charged
Red fast blinking Charging error
Page 7

Quick Reference Guide 7
Draft 1
LED Indication
Maintenance Indications
Red (stays on) Enter boot loader
Red blinking Firmware installation
Troubleshooting
If the cradle does not work after following the previous procedures:
• Check the system power.
• Check for loose cable connections.
• Check that the digital scanner is inserted properly in the cradle.
• Check that the host settings are correct and the cradle is connected to
the appropriate port on the host.
• If water spills on the contacts area, the unit might not function properly.
Turn the power off and tilt the cradle to drain as much liquid as
possible. Do not shake the cradle. Use a paper towel to dry the outside
surfaces, and expose the unit to room conditions for up to 24 hours to
allow liquid to dry around the contacts.
Health and Safety Recommendations
Ergonomic Recommendations
CAUTION In order to avoid or minimize the potential risk of
• Reduce or eliminate repetitive motion.
• Maintain a natural position.
• Reduce or eliminate excessive force.
• Keep objects that are used frequently within easy reach.
• Perform tasks at correct heights.
• Reduce or eliminate vibration.
• Reduce or eliminate direct pressure.
• Provide adjustable workstations.
• Provide adequate clearance.
• Provide a suitable working environment.
• Improve work procedures.
ergonomic injury, follow the recommendations below.
Consult with your local Health and Safety Manager to
ensure that you are adhering to your company's
safety programs to prevent employee injury.
Regulatory Information
This device is approved under Zebra Technologies Corporation.
This guide applies to Model Number CR2278.
All Zebra devices are designed to be compliant with the rules and
regulations in the locations they are sold and will be labeled as required.
Page 8

8 CR2278 Presentation Cradle
Draft 1
Local language translations are available at the following website:
http://www.zebra.com/doc
Any changes or modifications to Zebra equipment not expressly approved
by Zebra could void the user's authority to operate the equipment.
For use only with Zebra approved and UL Listed mobile computers, Zebra
approved, and UL Listed/Recognized battery packs.
Bluetooth® Wireless Technology
This is an approved Bluetooth® product. For more information or to view
the End Product Listing, please visit
https://www.bluetooth.org/tpg/listings.cfm
Wireless Device Country Approvals
Regulatory markings subject to certification are applied to the device
signifying the radio(s) is/are approved for use in the following countries
and continents: United States, Canada, Japan, China, South Korea,
Australia, and Europe.
Please refer to the Declaration of Conformity (DoC) for details of other
country markings. This is available at: http://www.zebra.com/doc
Note: Europe includes Austria, Belgium, Bulgaria, Croatia, Czech
Republic, Cyprus, Denmark, Estonia, Finland, France, Germany, Greece,
Hungary, Iceland, Ireland, Italy, Latvia, Liechtenstein, Lithuania,
Luxembourg, Malta, Netherlands, Norway, Poland, Portugal, Romania,
Slovak Republic, Slovenia, Spain, Sweden, Switzerland, and the United
Kingdom.
CAUTION Operation of the device without regulatory approval is
.
.
.
illegal.
Warnings for Use of Wireless Devices
CAUTION Please observe all warning notices with regard to the
Potentially Hazardous Atmospheres - Fixed Installations
You are reminded of the need to observe restrictions on the use of radio
devices in fuel depots, chemical plants etc. and areas where the air
contains chemicals or particles such as grain, dust, or metal powders.
Safety in Hospitals
Wireless devices transmit radio frequency energy and may affect medical
electrical equipment. When installed adjacent to other equipment, it is
advised to verify that the adjacent equipment is not adversely affected.
usage of wireless devices.
Page 9

Quick Reference Guide 9
Draft 1
Pacemakers
Pacemaker manufacturers recommended that a minimum of 15cm (6
inches) be maintained between a handheld wireless device and a
pacemaker to avoid potential interference with the pacemaker. These
recommendations are consistent with independent research and
recommendations by Wireless Technology Research.
Persons with Pacemakers:
• Should ALWAYS keep the device more than 15cm (6 inches) from their
pacemaker when turned ON.
• Should not carry the device in a breast pocket.
• Should use the ear furthest from the pacemaker to minimi e the
potential for interference.
• If you have any reason to suspect that interference is taking place, turn
OFF your device.
Other Medical Devices
Please consult your physician or the manufacturer of the medical device
to determine if the operation of your wireless product may interfere with
the medical device.
RF Exposure Guidelines
Safety Information
• Reducing RF Exposure - Use Properly
Only operate the device in accordance with the instructions supplied.
• International
The device complies with internationally recognized standards covering
human exposure to electromagnetic fields from radio devices. For
information on 'International' human exposure to electromagnetic fields,
refer to the Zebra Declaration of Conformity (DoC) at
http://www.zebra.com/doc
For further information on the safety of RF energy from wireless devices,
see
https://www.zebra.com/us/en/about-zebra/company-information/corporat
e-responsibility.html located under Corporate Responsibility.
• US and Canada
Co-located statement
To comply with FCC RF exposure compliance requirement, the
antenna used for this transmitter must not be co-located or operating in
.
Page 10

10 CR2278 Presentation Cradle
Draft 1
conjunction with any other transmitter/antenna except those already
approved in this filling.
IMPORTANT NOTE: (For mobile device use)
Radiation Exposure Statement:
This equipment complies with IC radiation exposure limits set forth
for an uncontrolled environment. This equipment should be installed
and operated with minimum distance 20cm between the radiator and
your body.
NOTE IMPORTANTE: (Pour l'utilisation de dispositifs mobiles)
Déclaration d'exposition aux radiations:
Cet équipement est conforme aux limites d'exposition aux
rayonnements IC établies pour un environnement non contrôlé. Cet
équipement doit être installé et utilisé avec un minimum de 20 cm de
distance entre la source de rayonnement et votre corps.
To satisfy FCC RF exposure requirements, a mobile transmitting device
must operate with a minimum separation distance of 20 cm or more
from a person's body.
Power Supply
Use ONLY a Zebra approved UL LISTED ITE (IEC/EN 60950-1,
LPS/SELV) power supply with electrical ratings: Output 5Vdc, min 0.8A,
with a maximum ambient temperature of at least 50 degrees C. Use of
alternative power supply will invalidate any approvals given to this unit and
may be dangerous.
Radio Frequency Interference Requirements-FCC
Tested to comply
with FCC Standards
FOR HOME OR OFFICE USE
Note: This equipment has been tested and found to comply with the limits
for a Class B digital device, pursuant to Part 15 of the FCC rules. These
limits are designed to provide reasonable protection against harmful
interference in a residential installation. This equipment generates, uses
and can radiate radio frequency energy and, if not installed and used in
accordance with the instructions, may cause harmful interference to radio
communications. However there is no guarantee that interference will not
occur in a particular installation. If this equipment does cause harmful
interference to radio or television reception, which can be determined by
turning the equipment off and on, the user is encouraged to try to correct
the interference by one or more of the following measures:
• Reorient or relocate the receiving antenna.
Page 11

Quick Reference Guide 11
Draft 1
• Increase the separation between the equipment and receiver.
• Connect the equipment in an outlet on a circuit different from the
receiver is connection.
• Consult the dealer or an experienced radio/TV technician for help.
Radio Transmitters (Part 15)
This device complies with Part 15 of the FCC Rules. Operation is subject
to the following two conditions: (1) this device may not cause harmful
interference, and (2) this device must accept any interference received
including interference that may cause undesired operation.
Radio Frequency Interference Requirements-Canada
CAN ICES-3 (B)/NMB-3(B)
Radio Transmitters
This device complies with Industry Canada's licence-exempt RSSs.
Operation is subject to the following two conditions: (1) This device may
not cause interference; and (2) This device must accept any interference,
including interference that may cause undesired operation of the device.
Le présent appareil est conforme aux CNR d'Industrie Canada
applicables aux appareils radio exempts de licence. L'exploitation est
autorisée aux deux conditions suivantes: (1) l'appareil ne doit pas
produire de brouillage, et (2) l'utilisateur de l'appareil doit accepter tout
brouillage radio électrique subi même si le brouillage est susceptible d'en
compromettre le fonctionnement.
Label Marking: The Term 'IC:' before the radio certification only signifies
that Industry Canada technical specifications were met.
Etiquette de marquage: Le terme "IC" avant la certification radio signifie
que le produit est compatible avec le spécification Industrie Canada
CE Marking and European Economic Area
(EEA)
Bluetooth® Wireless Technology for use through the EEA have the
following restrictions:
• Maximum radiated transmit power of 100mW EIRP in the frequency
range 2.400 -2.4835 GHz.
Statement of Compliance
Zebra hereby declares that this radio equipment is in compliance with
Directive 2011/65/EU and 1999/5/EC or 2014/53/EU (2014/53/EU
supersedes 1999/5/EC from 13th June 2017).
The full text of the EU Declaration of Conformity is available at the
following internet address: http://www.zebra.com/doc
.
Page 12

12 CR2278 Presentation Cradle
Draft 1
Japan (VCCI) - Voluntary Control Council for
Interference
Class B ITE
Korea Warning Statement for Class B ITE
기 종 별 사 용 자 안 내 문
B급 기기
(가정용 방송통신기자재)
Other Countries
Brazil (UNWANTED EMISSIONS - ALL PRODUCTS)
Declarações Regulamentares para CR2278 - Brazil
Nota: A marca de certificação se aplica ao Transceptor, modelo CR2278.
Este equipamento opera em caráter secundário, isto é, não tem direito a
proteção contra interferência prejudicial, mesmo de estações do mesmo
tipo, e não pode causar interferência a sistemas operando em caráter
primário.
Para maiores informações sobre ANATEL consulte o site:
www.anatel.gov.br
Chile
Este equipo cumple con la Resolución No 403 de 2008, de la
Subsecretaria de telecomunicaciones, relativa a radiaciones
electromagnéticas
China
通过访问以下网址可下载当地语言支持的产品说明书
www.zebra.com/support
合格证:
.
이 기기는 가정용(B급) 전자파적합기기로
서 주로 가정에서 사용하는 것을 목적으로
하며, 모든 지역에서 사용할 수 있습니다.
Page 13

Quick Reference Guide 13
Draft 1
Eurasian Customs Union
Евразийский Таможенный Союз
Данный продукт соответствует требованиям знака EAC.
Mexico
Restrict Frequency Range to: 2.450 - 2.4835 GHz.
La operación de este equipo está sujeta a las siguientes dos condiciones:
(1) es posible que este equipo o dispositivo no cause interferencia
perjudicial y (2) este equipo o dispositivo debe aceptar cualquier
interferencia, incluyendo la que pueda causar su operación no deseada.
South Korea
For a radio equipment using 2400~2483.5MHz or 5725~5825MHz, the
following two expression should be displayed;
해당 무선설비는운용중전파혼신가능성이있음
해당 무선설비는 전파혼신 가능성이 있으므로 인명안전과 관련된 서비스
는 할 수 없습니다
Taiwan
臺灣
低功率電波輻射性電機管理辦法
第十二條
經型式認證合格之低功率射頻電機,非經許可,公司、商號或使用者均不得擅
自變更頻率、加大功率或變更原設計之特性及功能。
第十四條
低功率射頻電機之使用不得影響飛航安全及干擾合法通信;經發現有干擾現象
時,應立即停用,並改善至無干擾時方得繼續使用。
前項合法通信,指依電信規定作業之無線電通信。
低功率射頻電機須忍受合法通信或工業、科學及醫療用電波輻射性電機設備之
干擾。
Ukraine
Дане обладнання відповідає вимогам технічного регламенту №1057, № 2008
на обмеження щодо використання деяких небезпечних речовин в
електричних та електронних пристроях.
Thailand
.
Turkish WEEE Statement of Compliance
EEE Yönetmeliğine Uygundur.
Page 14

14 CR2278 Presentation Cradle
(Parts) (Pb) (Hg) (Cd) (PBB) (PBDE)
(Metal Parts)
(Circuit Modules)
(Cables and Cable Assemblies)
(
Plastic and Polymeric Parts)
(Optics and Optical Components)
(Batteries)
OO O O O
OO O O
OOO O
OO O O OO
O
OO O O OO
OO O O O
OO
ᴿᇩ⢟䍞
(Cr (VI))
10
X
O
X
Draft 1
CMM Disclosure
本表格依据SJ/T 11364 的规定编制。
O: 表示该有害物质在该部件所有均质材料中的含量均在 GB/T 26572 规定的限量
要求以下。
X: 表示该有害物质至少在该部件的某一均质材料中的含量超出 GB/T 26572 规定的
限量要求。( 企业可在此处,根据实际情况对上表中打 “×”的技术原因进行
进一步说明。)
This table was created to comply with China RoHS requirements.
Waste Electrical and Electronic
Equipment (WEEE)
English: For EU Customers: All products at the end of their life must be returned to Zebra
for recycling. For information on how to return product, please go to:
http://www.zebra.com/weee.
Français: Clients de l'Union Européenne: Tous les produits en fin de cycle de vie doivent
être retournés à Zebra pour recyclage. Pour de plus amples informations sur le retour de
produits, consultez : http://www.zebra.com/weee.
Español: Para clientes en la Unión Europea: todos los productos deberán entregarse a
Zebra al final de su ciclo de vida para que sean reciclados. Si desea más información sobre
cómo devolver un producto, visite: http://www.zebra.com/weee.
Bulgarish: За клиенти от ЕС: След края на полезния им живот всички продукти трябва
да се връщат на Zebra за рециклиране. За информация относно връщането на
продукти, моля отидете на адрес: http://www.zebra.com/weee.
Deutsch: Für Kunden innerhalb der EU: Alle Produkte müssen am Ende ihrer Lebensdauer
zum Recycling an Zebra zurückgesandt werden. Informationen zur Rücksendung von
Produkten finden Sie unter http://www.zebra.com/weee.
Page 15

Quick Reference Guide 15
Draft 1
Italiano: per i clienti dell'UE: tutti i prodotti che sono giunti al termine del rispettivo ciclo di
vita devono essere restituiti a Zebra al fine di consentirne il riciclaggio. Per informazioni
sulle modalità di restituzione, visitare il seguente sito Web: http://www.zebra.com/weee.
Português: Para clientes da UE: todos os produtos no fim de vida devem ser devolvidos à
Zebra para reciclagem. Para obter informações sobre como devolver o produto, visite:
http://www.zebra.com/weee.
Nederlands: Voor klanten in de EU: alle producten dienen aan het einde van hun
levensduur naar Zebra te worden teruggezonden voor recycling. Raadpleeg
http://www.zebra.com/weee voor meer informatie over het terugzenden van producten.
Polski: Klienci z obszaru Unii Europejskiej: Produkty wycofane z eksploatacji nale¿y
zwróciæ do firmy Zebra w celu ich utylizacji. Informacje na temat zwrotu produktów znajduj¹
siê na stronie internetowej http://www.zebra.com/weee.
Čeština: Pro zákazníky z EU: Všechny produkty je nutné po skonèení jejich životnosti vrátit
spoleènosti Zebra k recyklaci. Informace o zpùsobu vrácení produktu najdete na webové
stránce: http://www.zebra.com/weee.
Eesti: EL klientidele: kõik tooted tuleb nende eluea lõppedes tagastada taaskasutamise
eesmärgil Zebra'ile. Lisainformatsiooni saamiseks toote tagastamise kohta külastage palun
aadressi: http://www.zebra.com/weee.
Magyar: Az EU-ban vásárlóknak: Minden tönkrement terméket a Zebra vállalathoz kell
eljuttatni újrahasznosítás céljából. A termék visszajuttatásának módjával kapcsolatos
tudnivalókért látogasson el a http://www.zebra.com/weee weboldalra.
Svenska: För kunder inom EU: Alla produkter som uppnått sin livslängd måste returneras
till Zebra för återvinning. Information om hur du returnerar produkten finns på
http://www.zebra.com/weee.
Suomi: Asiakkaat Euroopan unionin alueella: Kaikki tuotteet on palautettava
kierrätettäväksi Zebra-yhtiöön, kun tuotetta ei enää käytetä. Lisätietoja tuotteen
palauttamisesta on osoitteessa http://www.zebra.com/weee.
Dansk: Til kunder i EU: Alle produkter skal returneres til Zebra til recirkulering, når de er
udtjent. Læs oplysningerne om returnering af produkter på: http://www.zebra.com/weee.
Ελληνικά: Για πελάτες στην Ε.Ε.: Όλα τα προϊόντα, στο τέλος της διάρκειας ζωής τους,
πρέπει να επιστρέφονται στην Zebra για ανακύκλωση. Για περισσότερες πληροφορίες
σχετικά με την επιστροφή ενός προϊόντος, επισκεφθείτε τη διεύθυνση
http://www.zebra.com/weee στο ∆ιαδίκτυο.
Malti: Għal klijenti fl-UE: il-prodotti kollha li jkunu waslu fl-aħħar tal-ħajja ta' l-użu tagħhom,
iridu jiġu rritorna
l-prodott, jekk jogħġbok żur: http://www.zebra.com/weee.
Românesc: Pentru clienţii din UE: Toate produsele, la sfârşitul duratei lor de funcţionare,
trebuie returnate la Zebra pentru reciclare. Pentru informaţii despre returnarea produsului,
accesaţi: http://www.zebra.com/weee.
Slovenski: Za kupce v EU: vsi izdelki se morajo po poteku življenjske dobe vrniti podjetju
Zebra za reciklažo. Za informacije o vračilu izdelka obiščite: http://www.zebra.com/weee.
Slovenčina: Pre zákazníkov z krajín EU: Všetky výrobky musia byť po uplynutí doby ich
životnosti vrátené spoločnosti Zebra na recykláciu. Bližšie informácie o vrátení výrobkov
nájdete na: http://www.zebra.com/weee.
Lietuvių: ES vartotojams: visi gaminiai, pasibaigus jų eksploatacijos laikui, turi būti grąžinti
utilizuoti į kompaniją „Zebra“. Daugiau informacijos, kaip grąžinti gaminį, rasite:
http://www.zebra.com/weee.
Latviešu: ES klientiem: visi produkti pēc to kalpošanas mūža beigām ir jānogādā atpakaļ
Zebra otrreizējai pārstrādei. Lai iegūtu informāciju par produktu nogādāšanu Zeb
skatiet: http://www.zebra.com/weee.
Türkçe: AB Müşterileri için: Kullanım süresi dolan tüm ürünler geri dönüştürme için
Zebra'ya iade edilmelidir. Ürünlerin nasıl iade edileceği hakkında bilgi için lütfen şu adresi
ziyaret edin: http://www.zebra.com/weee.
Hrvatski: Za kupce u Europskoj uniji: Svi se proizvodi po isteku vijeka trajanja moraju vratiti
tvrtki Zebra na recikliranje. Informacije o načinu vraćanja proizvoda potražite na
web-stranici: http://www.zebra.com/weee.
ti għand Zebra għar-riċiklaġġ. Għal aktar tagħrif dwar kif għandek tirritorna
ra, lūdzu,
Page 16

Zebra Technologies Corporation
Draft 1
3 Overlook Point
Lincolnshire, Illinois 60069 USA
http://www.zebra.com
Zebra and the stylized Zebra head are trademarks of ZIH Corp., registered in
many jurisdictions worldwide. All other trademarks are the property of their
respective owners.
© 2017 Symbol Technologies LLC, a subsidiary of Zebra Technologies
Corporation.
MN-002917-01 Revision A - March 2017
 Loading...