

Page 1

QuikCard
ID Solution
User Guide
Page 2

© 2016 ZIH Corp. and/or its affiliates. All rights reserved. Zebra and the
stylized Zebra head are trademarks of ZIH Corp., registered in many
jurisdictions worldwide. All other trademarks are the property of their
respective owners.
While every effort has been made to keep the information contained
within current and accurate as of the date of publication, no guarantee is
given that the document is error-free or that it is accurate with regard to
any specification. Zebra Technologies Corporation reserves the right to
make changes, for the purpose of product improvement, at any time.
P1009004-007 Rev A.
Page 3

Contents
Introduction . . . . . . . . . . . . . . . . . . . . . . . . . . . . . . . . . . . . . . . . . . . . 1
Do you have everything? . . . . . . . . . . . . . . . . . . . . . . . . . . . . . . . . . . 1
Installation . . . . . . . . . . . . . . . . . . . . . . . . . . . . . . . . . . . . . . . . . . . . . . 2
CardStudio Software Overview . . . . . . . . . . . . . . . . . . . . . . . . . . . . . . 3
Build a Card . . . . . . . . . . . . . . . . . . . . . . . . . . . . . . . . . . . . . . . . . . . . 4
Run CardStudio . . . . . . . . . . . . . . . . . . . . . . . . . . . . . . . . . . . . . . 4
Pick a Quick Design Card (pre-designed card) . . . . . . . . . . . . . . 5
Modify Quick Design Card Objects . . . . . . . . . . . . . . . . . . . . . . . 6
To change the background: . . . . . . . . . . . . . . . . . . . . . . . . . . 6
To position the objects on the card:. . . . . . . . . . . . . . . . . . . . 7
To change text: . . . . . . . . . . . . . . . . . . . . . . . . . . . . . . . . . . . 8
To add text: . . . . . . . . . . . . . . . . . . . . . . . . . . . . . . . . . . . . . . 9
To add a fixed image: . . . . . . . . . . . . . . . . . . . . . . . . . . . . . 10
To add, edit, or delete data file elements: . . . . . . . . . . . . . . 11
To add a bar code:. . . . . . . . . . . . . . . . . . . . . . . . . . . . . . . . 12
Save the Quick Design Card as Your Card Design . . . . . . . . . . 14
Use a Database . . . . . . . . . . . . . . . . . . . . . . . . . . . . . . . . . . . . . . . . 15
To add a new record: . . . . . . . . . . . . . . . . . . . . . . . . . . . . . . . . . 16
One-time camera setup: . . . . . . . . . . . . . . . . . . . . . . . . . . . . . . 16
To take a picture with the camera: . . . . . . . . . . . . . . . . . . . . . . . 17
Print a Card . . . . . . . . . . . . . . . . . . . . . . . . . . . . . . . . . . . . . . . . . . . . 18
Technical Assistance . . . . . . . . . . . . . . . . . . . . . . . . . . . . . . . . . . . . . 19
iii
Page 4

Important • You will need at least two USB 2.0 ports to
connect the Printer and Camera to your computer, and a
CD Drive to install the CardStudio software.
Important • It is recommended that you install the Zebra
Windows Driver from the included Zebra CD or from the
Zebra website at www.zebra.com/quikcard-info, and use
that driver when printing cards with the CardStudio
software.
Note • The recommended computer configuration is
Microsoft Windows 7, 8, or 10 operating system with a
minimum of 1 GB of memory.
Note • The included Zebra CardStudio software
specifically supports the Zebra Card Printer included with
your QuikCard ID Bundle. Please refer to the included online CardStudio Help file for the specific features and
capabilities of the CardStudio Edition included with your
Bundle
iv
Page 5

Introduction
Congratulations on your purchase of the Zebra Technologies QuikCard ID
Solution. The QuikCard ID Solution includes everything you will need to
easily create and print full-color plastic cards for use as ID cards, visitor
badges, business cards, and many other purposes.
The QuikCard ID Solution includes CardStudio software with pre-designed
Quick Designed Cards, so you do not have to be a graphic designer! Simply
select a Quick Designed Card, add or change elements including text, add
your logo, take and add a color picture, and print top quality plastic cards!
If you wish, you can easily keep the individual data for each card in a simple
Microsoft Excel® data file. This lets you do things like keeping a person's
name, address, ID number, and picture together for future use.
This Getting Started Guide will show you how easy it is to create and print
your own cards.
Do you have everything?
_______ Zebra Card Printer
_______ Print Ribbon for the Card Printer
_______ Cards
_______ Zebra CardStudio Software
_______ Camera with USB cable
1
Page 6

Installation
1. Install and configure your Printer; see the printer’s Setup Guide.
2. Install the Camera; refer to the camera’s installation instructions. Note
that the Camera Windows Driver may need to be downloaded from the
manufacturer’s web site.
3. Install the included CardStudio software.
a. Insert the CardStudio CD-ROM in the computer’s CD/DVD Drive.
b. The CardStudio splash screen will appear after a few moments. If
the CardStudio Setup Screen does not show up automatically,
choose “Run” from the Windows Start Menu; then type D:\setup,
where D is your CD/DVD Drive letter.
c. Follow the on-screen instructions for Installation.
Note • The software license is for a single user on a PC and requires software
license key activation. Please register your software and keep the license key
information in a safe place.
4. Refer to the CardStudio Setup and Install Guide for registration details.
The guide is included with your CardStudio software and can be
downloaded from the Zebra website at www.zebra.com/cardstudio.
2
Page 7

CardStudio Software Overview
The CardStudio software included with your QuikCard ID Solution is based
on the use of pre-designed Quick Design Cards. This greatly simplifies card
design.
Quick Design Cards are organized in the following categories, though any
Quick Design Card could be used for any particular function.
• Clubs and Associations
• Education
• Government ID Cards
• Healthcare
• PhotoID
• Retail
• Visitor
The use of a Quick Design Card allows you to choose images for predefined
objects, like background and logos, as well as create new design objects
over a Quick Design Card.
Individual data can be stored on a spreadsheet with point-to-image-file fields
(images are stored in a specific file location), that can be linked to predefined
objects on the Quick Design Card.
All Quick Design Card files (data, images, etc.) are stored in default subfolders within the CardStudio Program Folder:
C:\Program Files (x86)\Zebra Technologies\CardStudio\QuickDesignCards
3
Page 8

Build a Card
Run CardStudio
1. Launch CardStudio by clicking on the desktop icon. Note that the icon
was placed on the desktop when CardStudio was installed.
2. The CardStudio splash screen will briefly display.
3. View the initial Quick Design Card selection screen.
4
Page 9

Pick a Quick Design Card (pre-designed card)
1. In the Quick Design Browser, select the desired Design Type from the
drop-down menu; e.g., PhotoID.
2. Click on the desired Quick Design Card (circled above) to select it.
3. Click on the Select button.
4. The selected Quick Design Card will open in Design View.
5
Page 10

Modify Quick Design Card Objects
Examine the selected Quick Design Card in Design View.
To change the background:
1. Click on the Design option on the Dashboard.
Step 1:
Design
2. View the various backgrounds in the thumbnail display area.
3. Select a new background by clicking on the thumbnail (circled above).
4. The new background will replace the old background.
6
Page 11

To position the objects on the card:
1. Manually position the objects (text boxes, images, etc.) via the dragand-drop method.
Step 2
Alignment Tool
2. Align selected objects (text boxes, images, etc.) via the Alignment Tool.
7
Page 12

To change text:
1. Edit or replace the existing text by selecting the text directly.
Position
2. Align the text within the text boxes (left, center, right, etc.) via the
Position option on the Dashboard.
3. Apply text attributes (font, size, color, word wrap, etc.) via the Text
option on the Dashboard.
Step 2:
Step 3:
Text
8
Page 13

To add text:
1. On the Drawing toolbar, click the Text Drawing Tool; the pointer will
change to a hand with an T Icon.
Step 6:
Step 1:
Text Tool
Step 5:
2. Move the pointer to the location on the card where you want to place the
upper left-hand corner of the text.
3. Press and hold the left mouse button, and drag from left to right. As
you drag, text box forms. Continue dragging until the text box is the
desired size.
4. Release the mouse button. A text box will appear.
Position
Step 7:
Text
5. Start entering text as desired; when done, press the Enter key.
6. Align the text within the text boxes (left, center, right, etc.) via the
Position option on the Dashboard.
7. Apply text attributes (font, size, color, word wrap, etc.) via the Text
option on the Dashboard.
9
Page 14
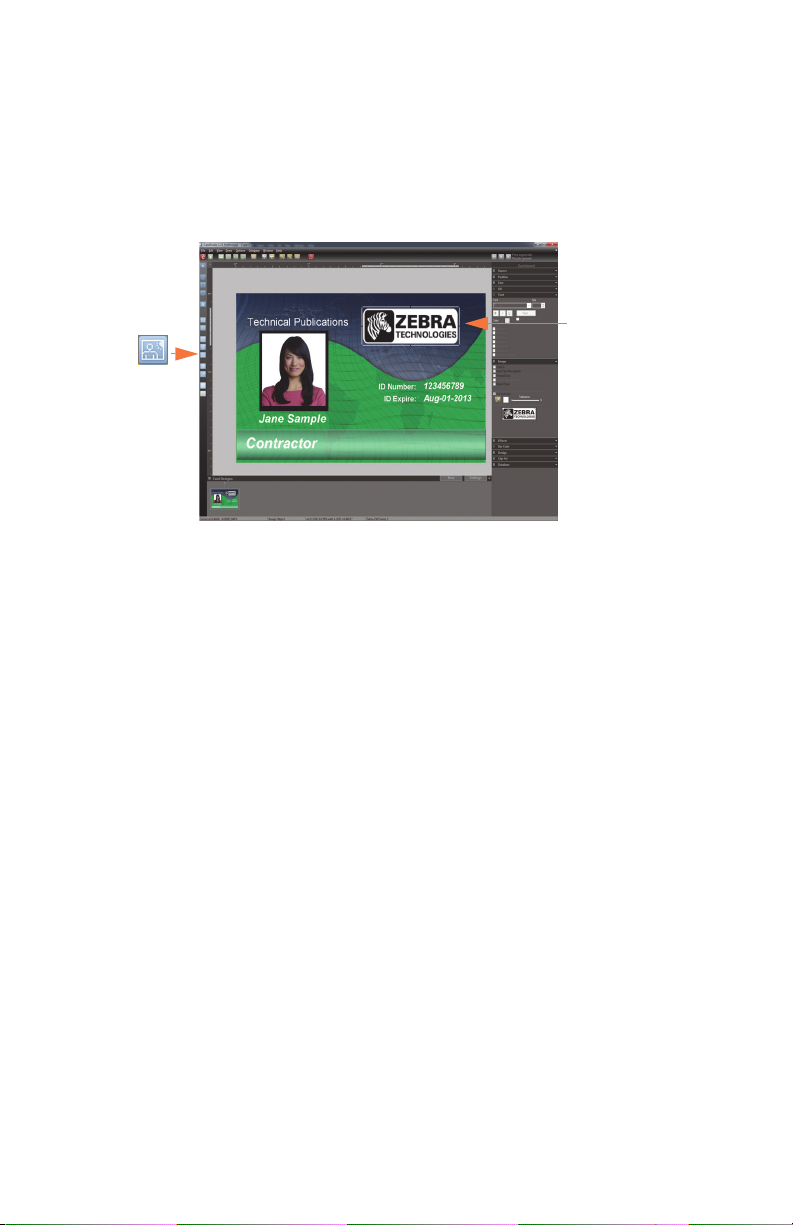
To add a fixed image:
A fixed image is repeated on every card (e.g., a Company Logo).
1. On the Drawing toolbar, click the Image Tool; the pointer will change to
a hand with an Image Icon.
Step 6:
Step 1:
Image Tool
2. Move the pointer to the location on the card where you want to place the
upper left-hand corner of the image.
3. Press and hold the left mouse button, and drag from left to right. As you
drag, an image frame forms. Continue dragging until the frame is the
desired size.
Image
4. Release the mouse button. A dialog box will appear.
5. Browse to and select the image you want to import, and click on the
Open button.
6. If necessary, re-position and/or re-size the image.
10
Page 15

To add, edit, or delete data file elements:
A data file element contains data that is linked to a data file and changes on
every card.
1. Drag-and-drop the desired field (e.g.,
Address) from the Database
option on the Dashboard into your card; then position and size the
text box.
Step 2:
Position
Step 3:
Step 1:
Database
2. Align the text (left, center, right, etc.) via the Position option on
the Dashboard.
3. Apply text attributes (font, size, color, etc.) via the Text option on
the Dashboard.
Text
Note • The ID Photo is not considered a fixed image. It is a
variable element created at the time of card issuance or
printing. See To take a picture with the camera: on
page 17 to add a photo as part of the card creation process.
11
Page 16

To add a bar code:
The following steps show how to add a bar code to your card using an
existing database field; in this example, the Expiration Date.
1. On the Drawing toolbar, click the Bar Code Tool; the pointer will
change to a hand with an Bar Code Icon.
Step 1:
Bar Code Tool
Step 6:
Bar Code
2. Move the pointer to the location on the card where you want to place the
upper left-hand corner of the image.
3. Press and hold the left mouse button, and drag from left to right. As you
drag, a rectangle forms. Continue dragging until the rectangle is the
desired size.
4. Release the mouse button. A Bar Code value dialog box will appear.
5. Click on the OK button.
6. Select the Bar Code on the card layout.
12
Page 17

7. Select the Bar Code option on the Dashboard.
a. From the Style drop-down menu, select the desired bar code
format; e.g., Code 128A, Code 39, UPC-A, etc.
b. Mark the desired field attribute checkboxes.
8. Select the Source option on the Dashboard.
a. From the drop-down menu, select Database Source. The Select
Column dialog box will appear.
Step 8:
Source
Step 7:
Bar Code
b. Select the desired data field; in this example, the Barcode.
c. Click on the Finish button.
9. If necessary, re-position and/or re-size the Bar Code.
13
Page 18

Save the Quick Design Card as Your Card
Design
Use the Save As... command (from the File menu) to save the Quick Design
Card as your card design.
1. File > Save As...
2. View the Save dialog box.
3. Choose a file name and location where your card design will be stored.
Note that the default storage location for cards is the My Cards folder in
the CardStudio program files directory.
To save a document previously named and with its location defined, use
the Save command from File menu or the Ctrl +S shortcut.
14
Page 19

Use a Database
1. Locate and open your card design.
a. File > Open...
b. From the Open dialog box, locate and select your card design.
c. Click on the Open button.
d. Examine your card design in Design View.
2. Select the Database View (click on the View button to change from the
Design View to the Database View and vice versa).
Step 2:
View Button
3. Review the database record(s).
15
Page 20

To add a new record:
1. Click on the Add Record icon on the toolbar. A new data-entry screen
will appear.
Step 1:
Add Record
Step 3:
Save Record
2. Enter data as required.
3. To add a picture, go to page 17; otherwise click on the Save
Record icon.
One-time camera setup:
Complete the following steps the first time the camera is installed or used.
1. Click on the Options icon on the toolbar, then select Imager Settings.
2. View the Imager settings pop-up.
3. In the Source Type drop-down menu, select DirectShow.
4. In the Available Sources drop-down menu, select USB Video Device.
5. Click on the Test button to verify that the camera is working.
6. View the image in the Image Acquisition pop-up.
7. Click on the Close Window button.
8. Click on the OK icon .
16
Page 21

To take a picture with the camera:
1. Click on the Live Image icon.
Step 6:
Save Record
Step 7:
Live Image
Thumbnail
Step 2 & Step 4:
Preview
Step b:
Live Image
Step 3:
Take Picture
Step 5:
OK
2. Preview the image in the Imager.
3. Click on the Take Picture icon.
4. Preview the captured image.
a. If the image in the preview window is OK, go to Step 5.
b. Otherwise, click on the Live Image icon, and repeat Step 2.
5. Click on the OK icon.
Step 1:
Live Image
6. When finished, click on the Save Record icon.
7. The image is added to the database record and is displayed as a Live
Image thumbnail.
17
Page 22

Print a Card
Important • Install the Windows Driver from the CD that
came with your Zebra Card Printer, or download it from
the Zebra website at www.zebra.com/quikcard-info.
1. Use the Card Print... command (from the File menu) to print your
card design.
a. File > Card Print...
b. View the Card Print/Process dialog box.
Step c:
Dropdown
Menu
Step d:
OK
c. From the Destination drop-down menu, select the printer.
d. Make the appropriate Operations, Layout, Print Range, and
Database selections; and click on the OK button.
2. The card will be printed. Printing time will vary depending on the
complexity of the card design and the processing speed of the computer.
3. Once the printing is completed, the card is ejected into the card
output hopper.
4. Remove the card from the card output hopper, and check for any
discrepancies. If the card is correct, your printer is ready to produce
more cards.
18
Page 23

Technical Assistance
• For questions relating to the operation of your Zebra card printer and
CardStudio software, contact your Reseller first.
• Alternately, contact Zebra Technologies Technical Support by using one
of the following methods:
Technical Support Phone: +1 877 275 9327 (877 ASK ZEBRA)
+1 847 913 2578
email: cardstudiosupport@zebra.com
You can also visit us on the web at:
www.zebra.com/quikcard
www.zebra.com/cardstudio
19
Page 24

http://www.zebra.com/locations
Printed in U.S.A.
Corporate Headquarters
+1 800 423 0442
inquiry4@zebra.com
Asia-Pacific Headquarters
+65 6858 0722
contact.apac@zebra.com
EMEA Headquarters
zebra.com/locations
mseurope@zebra.com
50%
PAP
Latin America Headquarters
+1 847 955 2283
la.contactme@zebra.com
 Loading...