

Page 1

ZD120
Direct Thermal Printers
User Guide
P1099714-002
Page 2

ZEBRA and the stylized Zebra head are trademarks of Zebra Technologies Corporation, registered in
many jurisdictions worldwide. All other trademarks are the property of their respective owners. ©2019
Zebra Technologies Corporation and/or its affiliates. All rights reserved.
Information in this document is subject to change without notice. The software described in this
document is furnished under a license agreement or nondisclosure agreement. The software may be
used or copied only in accordance with the terms of those agreements.
For further information regarding legal and proprietary statements, please go to:
COPYRIGHTS: www.zebra.com/copyright
END USER LICENSE AGREEMENT:
WARRANTY:
Terms of Use
Proprietary Statement
This manual contains proprietary information of Zebra Technologies Corporation and its subsidiaries
(“Zebra Technologies”). It is intended solely for the information and use of parties operating and
maintaining the equipment described herein. Such proprietary information may not be used,
reproduced, or disclosed to any other parties for any other purpose without the express, written
permission of Zebra Technologies.
www.zebra.com/warranty
www.zebra.com/eula
Product Improvements
Continuous improvement of products is a policy of Zebra Technologies. All specifications and designs
are subject to change without notice.
Liability Disclaimer
Zebra Technologies takes steps to ensure that its published Engineering specifications and manuals
are correct; however, errors do occur. Zebra Technologies reserves the right to correct any such errors
and disclaims liability resulting therefrom.
Limitation of Liability
In no event shall Zebra Technologies or anyone else involved in the creation, production, or delivery of
the accompanying product (including hardware and software) be liable for any damages whatsoever
(including, without limitation, consequential damages including loss of business profits, business
interruption, or loss of business information) arising out of the use of, the results of use of, or inability to
use such product, even if Zebra Technologies has been advised of the possibility of such damages.
Some jurisdictions do not allow the exclusion or limitation of incidental or consequential damages, so
the above limitation or exclusion may not apply to you.
Publication Date
September 2019
2
Page 3

About
Introduction
This guide provides information about using the Zebra product and accessories, if
applicable. Use this guide to install, operate, and physically support these printers.
Important • If you have a problem with your equipment, contact Zebra Global Customer
Support for your region. Contact information is available at: zebra.com/support
Other Online resources are available to support this printer include:
.
• “How To” videos
• ZD120 Product page links for printer specifications
• Printer supplies, parts, and software links
• Label Design Software
• Windows Printer Drivers
• Printer Firmware
• Knowledge base and support contacts
• Printer warranty and repair links
Use these links to get to your Online printer support resources:
• ZD120 Label Printer — www.zebra.com/zd120-info
3
Page 4

Zebra OneCare Printer Service and Support
For maximum productivity, we can help your business ensure its Zebra printers are Online and ready
for business. See the descriptions of the Zebra OneCare service and support options available for your
printers Online at this link: www.zebra.com/zebraonecare
Service Information
If you have a problem with your equipment, contact Zebra Global Customer Support for your region.
Contact information is available at: zebra.com/support
When contacting support, please have the following information available:
• Serial number of the unit
• Model number or product name
• Software type and version number.
Zebra responds to calls by email, telephone or fax within the time limits set forth in support
agreements.
If your problem cannot be solved by Zebra Customer Support, you may need to return your equipment
for servicing and will be given specific directions. Zebra is not responsible for any damages incurred
during shipment if the approved shipping container is not used. Shipping the units improperly can
possibly void the warranty.
.
If you purchased your Zebra business product from a Zebra business partner, contact that business
partner for support.
4
Page 5

Document Conventions
The following graphic icons are used throughout the documentation set. These icons and their
associated meanings are described below.
Caution • If the precaution is not heeded, the user could receive minor or moderate injury.
Eye Injury Caution • If the precaution is not taken, the user’s eyes could be damaged. EXAMPLE:
Wear protective eyewear when installing or removing E-rings, C-clips, snap rings, springs, and
mounting buttons. These are under tension and could fly off.
Electrical Shock Caution • If the precaution is not taken, the user could receive an electrical shock.
EXAMPLE: Turn OFF the printer and disconnect it from the power source before performing the
following procedure.
Hot Surface Caution • If the precaution is not taken, the user could be burned. EXAMPLE: The
printhead may be hot and could cause sever burns. Allow the printhead to cool.
Product Damage Caution • If the precaution is not taken, the product could be damaged. EXAMPLE:
Unplugging the computer without properly shutting it down may corrupt the data on your hard drive.
ESD Caution • If the precaution is not taken, the product electronics could be damaged by an
electrostatic discharge. EXAMPLE: Observe proper electrostatic safety precautions when handling
static-sensitive components such as circuit boards and printhead.
Important • The text here indicates information that is important for the user to know. EXAMPLE: Run
the setup.exe file for the product BEFORE connecting the product to your printer.
Note • The text here indicates information that is supplemental for the user to know and that is not
required to complete a task. EXAMPLE: Refer to zebra.com for complete information on product
warranties.
5
Page 6

Contents
Terms of Use .................................................................................................. 2
Proprietary Statement................................................................................... 2
Product Improvements.................................................................................. 2
Liability Disclaimer ........................................................................................ 2
Limitation of Liability ..................................................................................... 2
• About ................................................................................................................ 3
Introduction ..................................................................................................... 3
Other Online resources are available to support this printer include: ........... 3
Zebra OneCare Printer Service and Support................................................ 4
Service Information....................................................................................... 4
Document Conventions................................................................................... 5
• Contents ........................................................................................................... 6
• Introduction ..................................................................................................... 8
ZD120 Direct Thermal Label Printers ............................................................. 8
What’s in the Box? .......................................................................................... 9
Unpack and Inspect the Printer .................................................................... 9
Your Printer................................................................................................. 10
Opening the printer ..................................................................................... 10
Printer Features .......................................................................................... 11
Operator Controls ....................................................................................... 12
Closing the printer....................................................................................... 13
• Getting Started .............................................................................................. 14
Attaching Power............................................................................................ 15
Loading Roll Media ....................................................................................... 16
Preparing Media ......................................................................................... 16
6
Page 7

Thermal Printing..........................................................................................16
Placing the Roll in the Media Compartment................................................17
Printing a Test (Printer Configuration) Label .................................................20
Connecting your Printer to a Computer.........................................................21
Interface Cable Requirements ....................................................................21
Install ZebraDesigner Label Design and Print Software................................22
• Print Operations ............................................................................................23
Long Term Printer In-activity or Storage .....................................................23
Supported Print Media ................................................................................23
Determining Thermal Media Types .............................................................24
Replacing Supplies .....................................................................................24
Adjusting the Print Quality .............................................................................24
Printing on Fan-Fold Media ...........................................................................25
Printing with Externally Mounted Roll Media .................................................27
• Maintenance ...................................................................................................28
Cleaning ........................................................................................................28
Cleaning the Printhead................................................................................29
Media Path Cleaning Considerations..........................................................30
Sensor Cleaning..........................................................................................31
Platen Cleaning and Replacement..............................................................32
Other Printer Maintenance ..........................................................................34
• Troubleshooting ............................................................................................35
Status Light Descriptions...............................................................................36
Status Light Error Resolutions ....................................................................36
Print Quality Problems...................................................................................38
• Appendix: USB Interface ..............................................................................39
Universal Serial Bus (USB) Interface ............................................................39
• Appendix: Dimensions ..................................................................................40
External Printer Dimensions..........................................................................41
7
Page 8

Introduction
This section describes what you get in your shipping box and provides an overview of
printer features. This includes procedures that describe how to open and close the printer
and report any problems.
ZD120 Direct Thermal Label Printers
The Zebra® ZD120 model is an entry level 102 mm (4 inch) desktop thermal label printers.
The printers are designed to print from the ZebraDesigner drivers and label design
software for personal computers running Microsoft operating systems.
The ZD120 printer features:
• The printers support print speeds* up to 152.4 mm/s (millimeters per second or
6 ips - inches per second).
• OpenAccess ™ design for simplified media loading.
• Color-coded operator controls and media guides.
• Easy printer operation with a single button and status light.
• ZebraDesigner Label Design Software and Printer Drivers for Windows Operating
Systems.
• Supports die cut labels with widths from 50.8 mm to 102 mm (2 to 4 inches), see
Supported Print Media
• Print Resolution - 8 dots per millimeter (or 203 dpi - dots per inch).
This user’s guide provides all the information you need to operate your printer on a daily
basis.
Your printer, when connected to a host computer, functions as a complete system for
printing labels.
8
Page 9

What’s in the Box?
Save the carton and all packing materials in case you need to ship or store the printer later. After
unpacking, make sure you have all parts. Follow the procedures for inspecting the printer to familiarize
yourself with printer parts so you can follow the instructions in this book.
Printer
Documentation
Power Cords varies by locale or region.
Some come attached to the power supply.
USB Cable
Power Supply
Unpack and Inspect the Printer
When you receive the printer, immediately unpack it and inspect for shipping damage.
• Save all packing materials.
• Check all exterior surfaces for damage.
• Open the printer and inspect the media compartment for damage to components.
If you discover shipping damage upon inspection:
• Immediately notify the shipping company and file a damage report. Zebra Technologies
Corporation is not responsible for any damage to the printer incurred during shipment, and will
not cover the repair of this damage under its warranty policy.
• Keep all packaging material for shipping company inspection.
• Notify your authorized Zebra
®
reseller.
9
Page 10
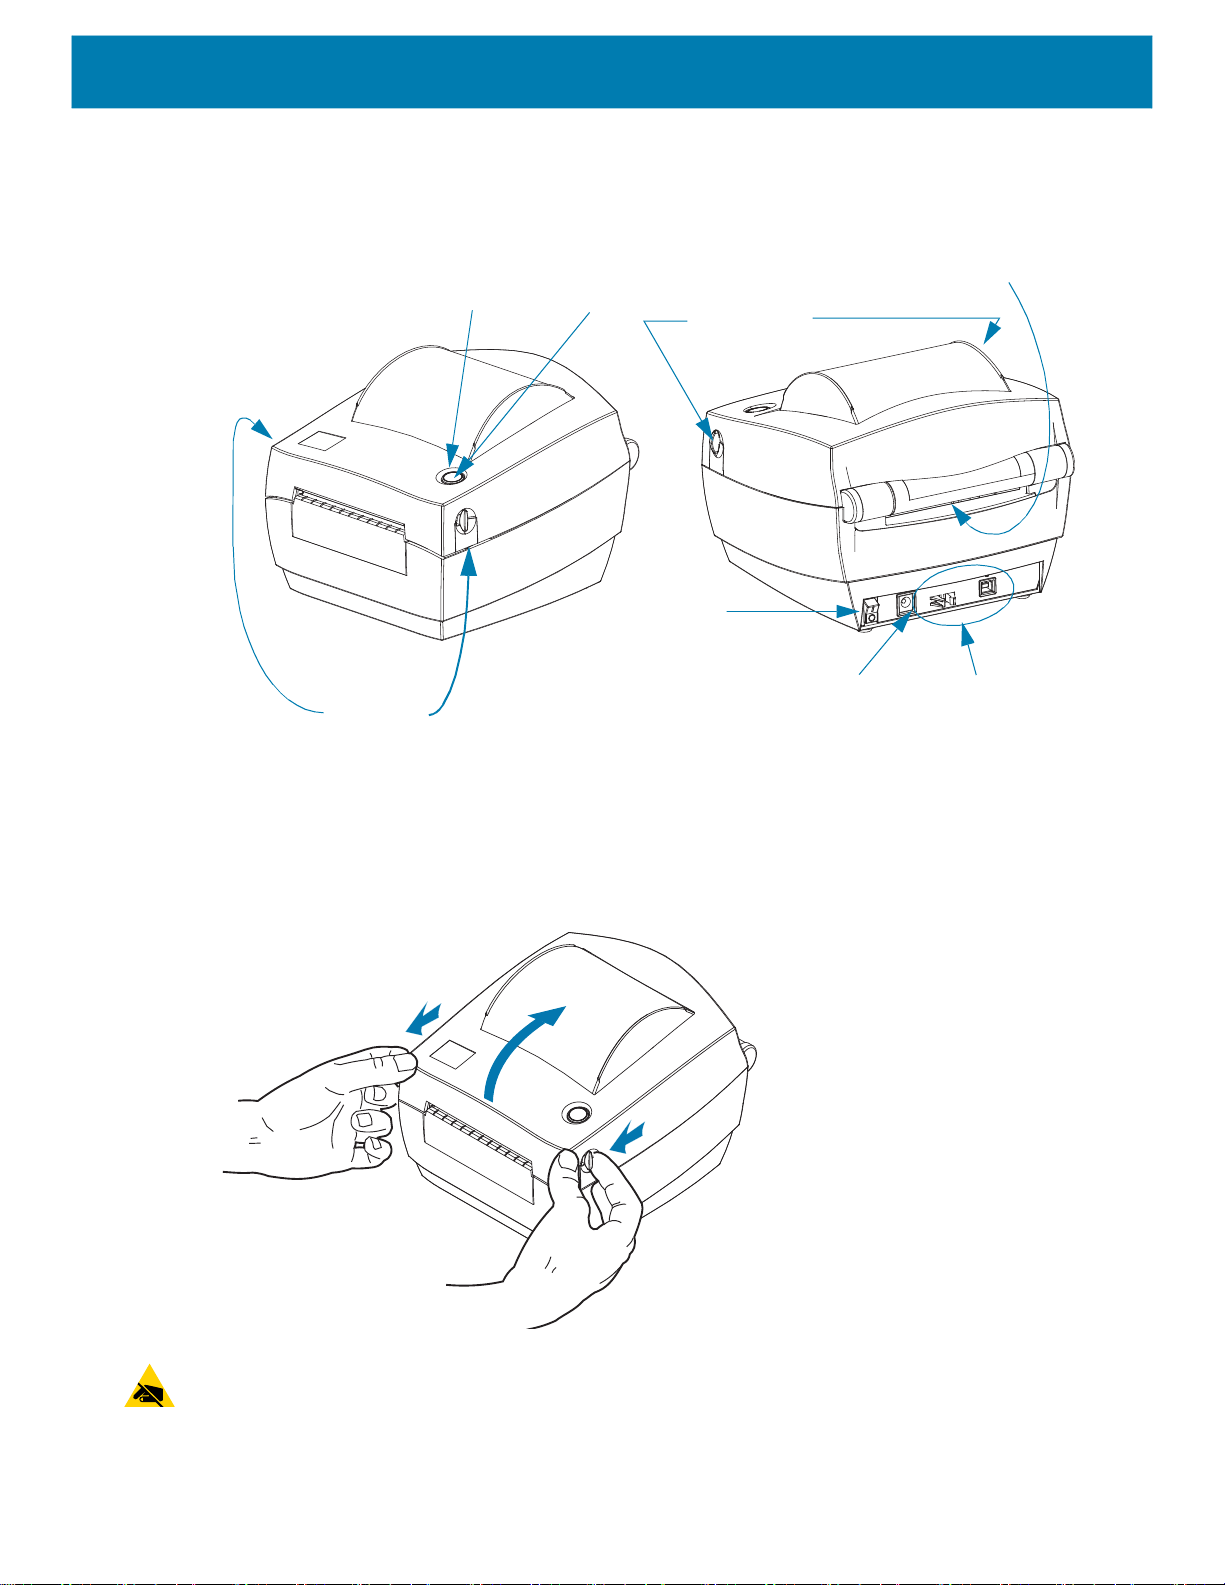
Your Printer
Status
Light
Release
Latches
Opening the printer
Feed
Button
Power
Switch
Release
Latches
DC Power
Receptacle
Fan-Fold Media Entry Slot
USB Interface and
Cable Retainer
To access the media compartment, you must open the printer. Pull the release latches towards you
and lift the cover. Check the media compartment for loose or damaged components.
ESD Caution • The discharge of electrostatic energy that accumulates on the surface of the human
body or other surfaces can damage or destroy the printhead or electronic components used in this
device. You must observe static-safe procedures when working with the printhead or the electronic
components under the top cover.
10
Page 11
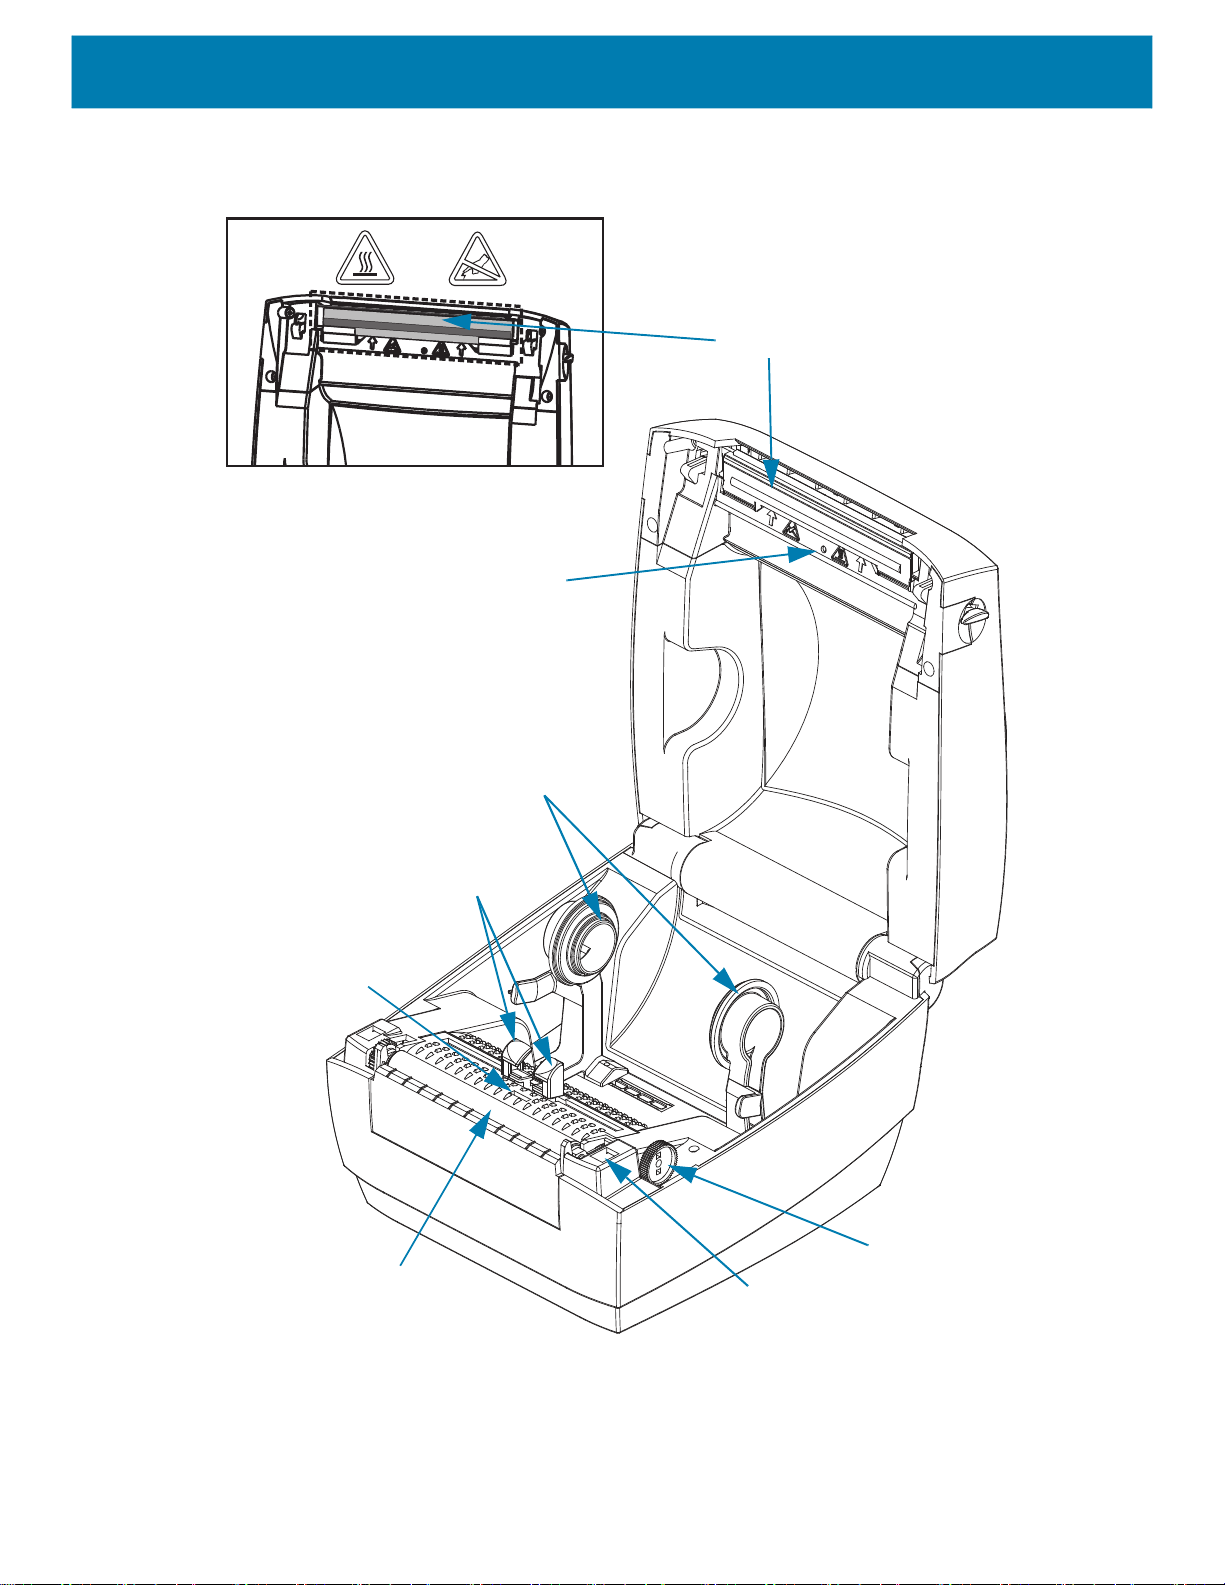
Printer Features
Upper Gap Sensor
Printhead
Lower Gap
Sensor
Platen
Roller
Roll Holders
Media
Guides
Media Guide
Adjustment
Head-Up Sensor
(inside)
11
Page 12
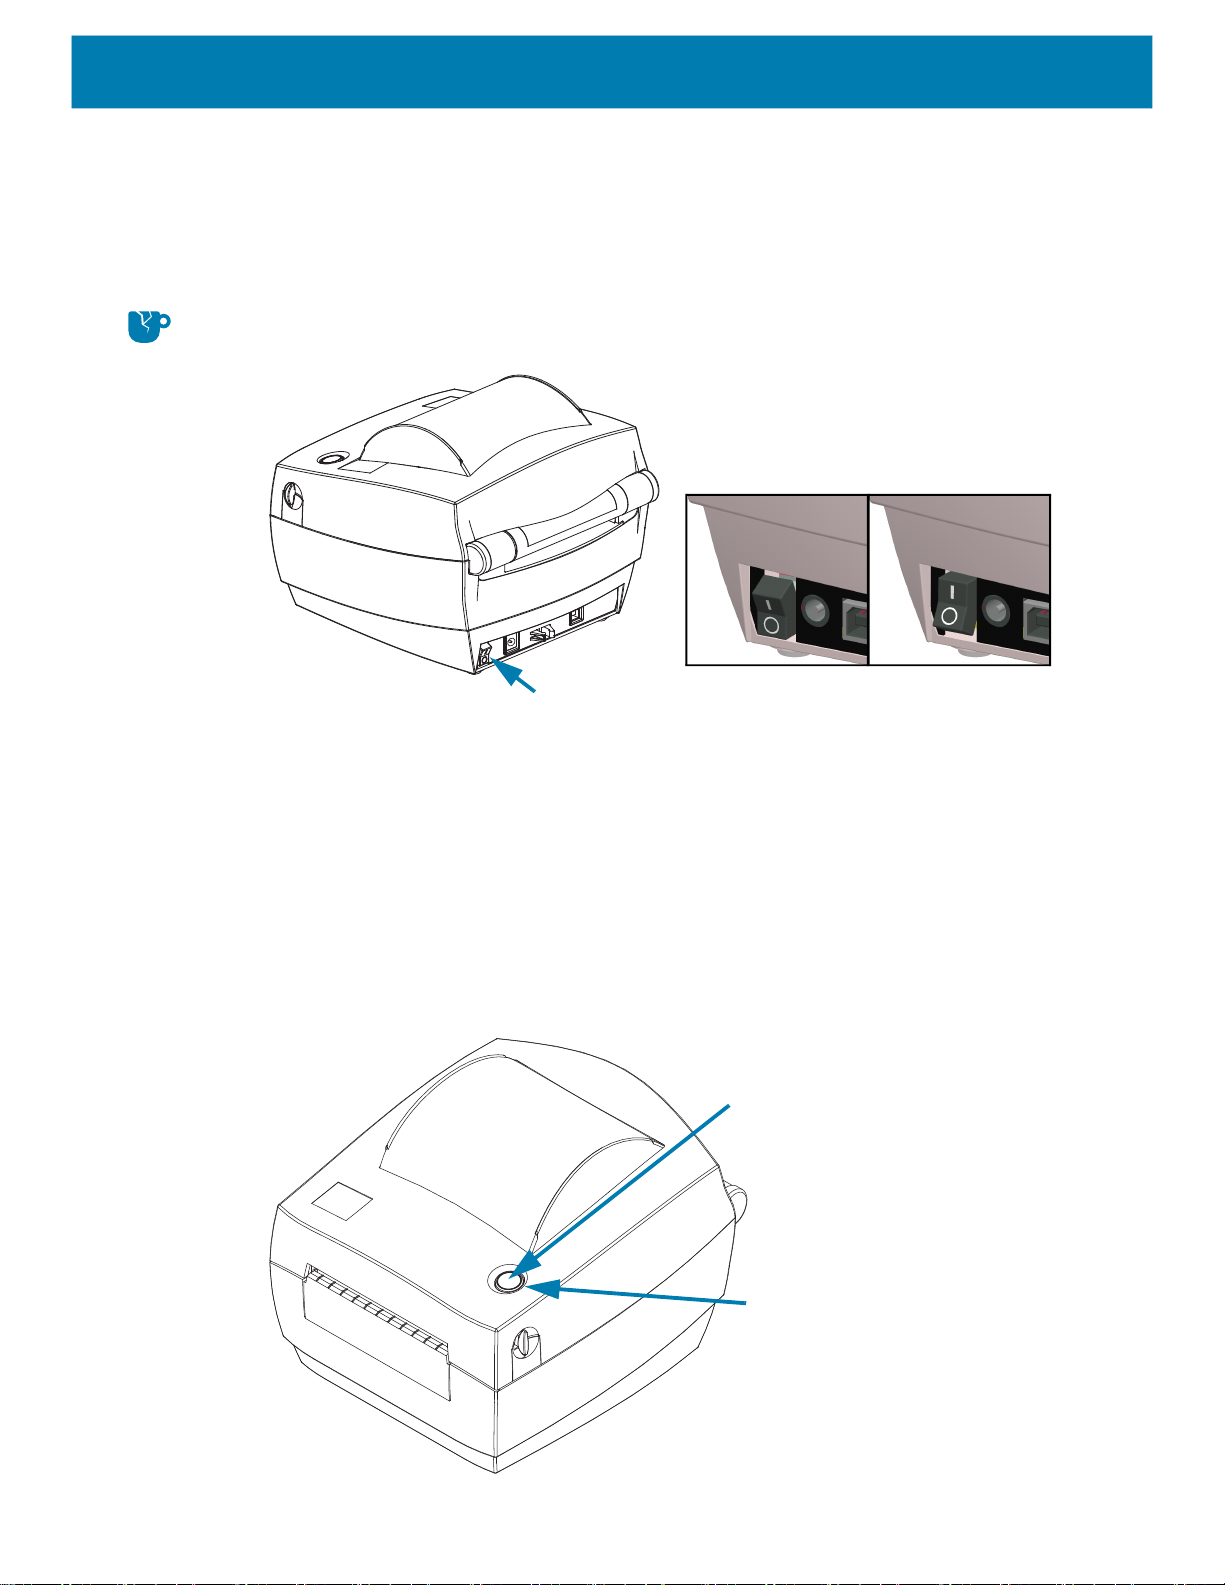
Operator Controls
Power Switch
• Press up to turn ON or down to turn OFF the printer.
Product Damage Caution • The printer power should be turned off before connecting or
disconnecting the communications and power cables.
Power Switch
Power OFF Power ON
Power Switch
Feed Button
• Tap the Feed button once to force the printer to feed one blank label.
• Press the Feed button to take the printer out of a “pause” condition. The printer is put into
“pause” by either a programming command or an error condition.
• Press and hold the Feed button until the LED ring flashes once and release to print a
Configuration Printout.
Status Light
• Located on the top case next to the Feed button, the status light functions as a printer
operational indicator (see Status Light Descriptions).
Feed
Button
Status Light
(Ring)
12
Page 13

Closing the printer
1. Lower the top cover.
2. Press down until the cover snaps closed.
13
Page 14

Getting Started
This section describes how to set up your printer for the first time and use the most
common operating procedures for loading media.
14
Page 15

Attaching Power
Caution • Never operate the printer and power supply in an area where they can get wet. Serious personal
injury could result.
Note • Set up your printer so that you can handle the power cord easily if needed. Some processes for setup or
troubleshooting issues may ask you to remove power. Separate the power cord from the power supply
receptacle or AC electrical outlet to make certain the printer cannot carry electrical current.
1. Plug the power supply into the printer’s DC power receptacle.
2. Insert the AC power cord into the power supply. Some locales have the power cord pre-attached.
3. Plug the other end of the AC power cord into an appropriate AC electrical outlet. Please note that AC outlet
end of the power cord’s plug type can vary by region.
4. The active power light on the power supply will illuminate green if power is on at the AC outlet.
Printer
Plug Varies
by Country
AC
Power
Cord
Power
Switch
Important •
Power
Connector
Active Power
Light
Power
Receptacle
Power
Supply
IEC 60320-C
Ensure the appropriate power cord with a three (3) prong plug and an IEC 60320-C13
connector are used at all times. These power cords must bear the relevant certification mark of the
country in which the product is being used.
15
Page 16

Loading Roll Media
When you load media, you must place the roll onto the media hangers.
You must use the correct media for the type of printing you require.
Preparing Media
Whether your roll media is inside or outside wound, you load it into the printer the same way.
• Remove the outside length of media. During shipment, handling, or storage, the roll may become
dirty or dusty. Removing the outside length of media avoids dragging adhesive or dirty media
between the printhead and platen.
Thermal Printing
Caution • The printhead becomes hot while printing. To protect from damaging the printhead and risk
of personal injury, avoid touching the printhead. Only use the cleaning pen to perform printhead
maintenance.
ESD Caution • The discharge of electrostatic energy that accumulates on the surface of the human
body or other surfaces can damage or destroy the printhead or electronic components used in this
device. You must observe static-safe procedures when working with the printhead or the electronic
components under the top cover.
16
Page 17

Placing the Roll in the Media Compartment
1. Open the printer. Remember that you need to pull the release latch levers toward the front of the
printer.
2. Open the media guides by turning the media guide adjustment knob toward the rear of the printer.
17
Page 18

3. Pull the media roll holders open with your free hand and place the media roll on the roll holders
and release. Orient the media roll so that its printing surface will face up as it passes over the
platen (drive) roller.
18
Page 19

4. Pull the media so that it extends out of the front of the printer. Thread the media under the media
guides.Verify the roll turns freely. The roll must not sit in the bottom of the media compartment.
Verify that the media’s printing surface is facing up.
5. Close the media guides by turning the guide adjuster knob to the front. They should just touch, but
not restrict. the edges of the media.
6. Close the printer. Press down until the cover snaps closed.
19
Page 20

Printing a Test (Printer Configuration) Label
Before you connect the printer to your computer, make sure that the printer is in proper working
order.
You can do this by printing a configuration status label.
1. Make sure the media is properly loaded and the top cover of the printer is closed. Then, turn the
printer power on if you have not already done so. If the printer initializes with the status light
blinking green (pause mode), press the Feed button once to set the printer in Ready (to print)
mode. See the Troubleshooting if the printer’s status light does not turn solid green (Ready).
2. Press the Feed button two to three times to allow the printer to calibrate the printer for the installed
media. The printer may feed several labels during this process.
3. When the status light is solid green, press and hold the Feed button until the status light flashes
once.
4. Release the Feed button. A configuration label will print.
If you cannot get this label to print, refer to Troubleshooting.
.
20
Page 21

Connecting your Printer to a Computer
The printer supports the Universal Serial Bus (USB) interface. The printer is a terminal device (not a
host or hub) when using a USB interface. You can refer to the USB Specification for details regarding
this interface.
Product Damage Caution • The printer power should be turned off before connecting or
disconnecting the communications and power cables.
Interface Cable Requirements
Data cables must be of fully shielded construction and fitted with metal or metalized connector shells.
Shielded cables and connectors are required to prevent radiation and reception of electrical noise.
To minimize electrical noise pickup in the cable:
• Keep data cables as short as possible (6 foot [1.83 m] recommended).
• Do not tightly bundle the data cables with power cords.
• Do not tie the data cables to power wire conduits.
Important • This printer complies with FCC “Rules and Regulations,” Part 15, for Class B Equipment,
using fully shielded data cables. Use of unshielded cables may increase radiated emissions above the
Class B limits.
Caution • Never operate the printer and power supply in an area where they can get wet. Serious
personal injury could result!
Note • Set up your printer so that you can handle the power cord easily if needed. Some processes for
setup or troubleshooting issues may ask you to remove power. Separate the power cord from the
power supply receptacle or AC electrical outlet to make certain the printer cannot carry electrical
current.
21
Page 22

USB Interface Connection
Universal Serial Bus (version 2.0 compliant) provides a fast interface that is compatible with your
existing PC hardware. USB’s “plug and play” design makes installation easy. Multiple printers can
share a single USB port/hub. When using a USB cable (not supplied with your printer), verify that the
cable or cable packaging bears the “Certified USB ™ ” mark (see below) to guarantee USB 2.0
compliance.
.
USB Cable
Install ZebraDesigner Label Design and Print Software
This printer needs the ZebraDesigner software (and driver) for Windows to print labels with barcodes
developed to print label format on your printer.
Download and install the Windows Driver and then ZebraDesigner Software for your printer model
from the printer’s support web page:
http://www.zebra.com/zd120-info
After the Windows driver install has been started
1. Turn the printer ON to activate the USB interface when instructed by the driver installer. The PC
begins the Windows driver install and link it to the printer’s USB port.
After ZebraDesigner has been Installed
2. ZebraDesigner will check for the newly installed ZD120 printer and it’s driver before the software
will load on your Windows PC.
3. Open the ZebraDesigner version for the printer model.
22
Page 23

Print Operations
This section provides media and print handling, font and language support, and the setup
of less common printer configurations.
Long Term Printer In-activity or Storage
Overtime the printhead may stick to the platen (drive) roller. To prevent this, always store
the printer with a piece of media (a label or paper) between the printhead and platen roller.
Do not ship the printer with a roll of media installed or damage to the printer or media may
result.
Supported Print Media
This printer is designed to print on label rolls or fan-fold media ranging in size from
50.8 mm to 102 mm (2 inches to 4 inches) wide. The labels must be on liner backing
(web) and have a at least 3 mm gap between the labels for optimal operation. The printers
label gap default is set a little more than the 3 mm and adjusts to any differences in gap
distance from roll to roll and label to label.
• The media width (including web) is 86mm - 107mm (2.0” - 4.21”) including the roll
core and media backing (or web).
• Direct Thermal Media only
• Maximum media length shall be 9” (228.6mm)
• Minimum media length shall be Tear - 1” (25.4mm)
• Inner core diameters shall be 1" (25.4mm) to 1.57" (40mm)
• Maximum media roll outside diameter shall be 5.00" (127mm)
• Media Thickness shall be 0.0055” (0.014 mm) - 0.007" (0.018 mm)
• Media Sensing: Gap, no support for black mark or black line detection
• Media Types: Roll-fed or fan-fold, die cut direct thermal labels. There is no support
for tags, continuous media (receipt) or labels without gaps between labels.
• The printer typically uses roll media, but you can also use fan-fold.
Important • Zebra strongly recommends the use of Zebra-brand supplies for continuous
high-quality printing. A wide range of label materials have been specifically engineered to
enhance the printing capabilities of the printer and to prevent premature printhead wear.
To purchase supplies, go to http://www.zebra.com/supplies
23
Page 24

Determining Thermal Media Types
Your printer only supports direct thermal. Some thermal printers require transfer ribbon (ink) for
printing while direct thermal media does not. To determine if a particular media is direct thermal media,
perform a media scratch test.
To perform a media scratch test, complete these steps:
1. Scratch the print surface of the media with a finger nail or pen cap. Press firmly and quickly while
dragging it across the media surface. Direct thermal media is chemically treated to print (expose)
when heat is applied. This test method uses friction heat to expose the media.
2. Did a black mark appear on the media?
If a black mark... Then the media is...
Does not appear on the media Thermal transfer. A ribbon is required. Your
printer does not support this media.
Appears on the media Direct thermal. No ribbon is required.
Replacing Supplies
If labels run out while printing, leave the printer power on while reloading (data loss results if you turn
off the printer). After you re-load media, press the Feed button to restart.
Always use high quality, approved labels. If adhesive backed labels are used that don’t lay flat on the
backing liner, the exposed edges may stick to the label guides and rollers inside the printer, causing
the label to peel off from the liner and jam the printer.
Adjusting the Print Quality
Print quality is influenced by the heat (density) setting of the printhead, the print speed, and the media
in use. Experiment with these settings to find the optimal mix for your application.
Note • Media manufactures may have specific recommendations for speed settings for your printer
and the media. Some media types may have lower maximum speeds than your printer’s maximum
speed.
If you find that the print speed or darkness needs to be adjusted, use:
• The Windows printer driver or application software such as ZebraDesigner ™ .
• The printer does not save any settings.
24
Page 25

Printing on Fan-Fold Media
Printing on fan-fold media requires you to adjust the media roll holders’ stop position.
1. Open the top cover.
With a sample of your media, adjust the media roll holders to the width of the media. The hangers
should just touch, but not restrict, the edges of the media.Tighten the screw using a small Phillips
driver #1.
25
Page 26

2. With a sample of your media, adjust the guides to the width of the media.The guides should just
touch, but not restrict, the edges of the media.
3. Pull the media between the media guide and roll holders and out past the front of the printer.
4. Close the top cover.
5. After printing or feeding several labels: If the media does not track down the center (moves
from side to side) or the sides of the media (liner, tag, paper, etc.) are frayed or damaged when
exiting the printer, then the media guides or roll holders may need further adjustment.
26
Page 27

Printing with Externally Mounted Roll Media
The printer accommodates externally mounted roll media similar to the printer’s support of fan-fold
media. The printer requires the media roll and stand combination to have a low initial inertia to pull the
media off the roll.
Zebra does not offer an external media holder option for the printer at this time.
Externally Mounted Roll Media Considerations:
• The media ideally should enter the printer directly behind the printer through the fan-fold media
slot in the rear of the printer. See Printing on Fan-Fold Media for media loading.
• Lower the print speed to decrease the chance of motor stalls. The roll typically has the highest
inertia when trying to start the roll moving. Larger media roll diameters require the printer to
have more torque applied to get the roll moving.
• The media should move smoothly and freely. The media should not slip, skip, jerk, bind and
then move, etc. when mounted on your media stand.
• The printer should not touch the media roll.
• The printer should not slip or lift up off the operating surface.
27
Page 28

Maintenance
This section provides routine cleaning and maintenance procedures.
Cleaning
When you clean the printer, use one of the following supplies that best suits your needs:
Cleaning Supplies Quantity Intended Purpose
Cleaning pens (105950-035) Set of 12 Clean printhead
Cleaning swabs (105909-057) Set of 25 Clean media path, guides and sensors
You can obtain cleaning supplies at: www.zebra.com/parts
The cleaning process takes just a couple of minutes using the steps outlined below.
Area Method Interval
Printhead Let the printhead to cool for a minute, then use a new
cleaning pen to swab the dark line on the printhead. See
Cleaning the Printhead
Platen
Roller
Media Path Clean with 99% medical-grade alcohol and a fiber-free
Exterior Water-dampened cloth.
Interior Gently brush out printer.
Important • Adhesives and media material can over time transfer onto the printer
components along the media path including the platen and printhead. This build-up can
accumulate dust and debris. Failure to clean the printhead, media path and platen roller
could result in inadvertent loss of labels, label jams and possible damage to the printer.
Remove the platen roller to clean. Clean the roller with
99% medical-grade alcohol and a cleaning swabs or
lint-free cloth. See Platen Cleaning and Replacement
cleaning swab. See Media Path Cleaning
Considerations
After every roll
of media.
As needed.
Important • Using too much alcohol can result in contamination of the electronic
components requiring a much longer drying time before the printer will function properly.
28
Page 29

Cleaning the Printhead
Always use a new cleaning pen on the printhead (an old pen carries contaminants from its previous
uses that may damage the printhead).
Caution • The printhead becomes hot while printing. To protect from damaging the printhead and risk
of personal injury, avoid touching the printhead. Only use the cleaning pen to perform printhead
maintenance.
When you load new media, you can also clean the printhead.
1. Rub the cleaning pen across the dark area of the printhead. Clean from the middle to the outside.
This will move adhesive transferred from the edges of media to the printhead outside of media
path.
2. Wait one minute before closing the printer.
29
Page 30

Media Path Cleaning Considerations
Use a cleaning swab to remove debris, dust or crust that has built-up on the holders, guides and media
path surfaces.
1. Use alcohol on a cleaning swab to soak debris to break up the adhesive.
2. Wipe the ridges to remove accumulated debris.
3. Wipe the inside edges of both edge guides to remove any built-up residue.
4. Wait one minute before closing the printer.
5. Discard the cleaning swab after use.
Platen
Media
Guides
Ridges
30
Page 31

Sensor Cleaning
Media (Gap) Sensors - Dust and debris can accumulate on the media sensors.
1. Gently brush away dust or use a can of compressed air; if necessary, use a dry swab to brush
away dust. If adhesives or other contaminants remain, use an alcohol moistened swab to break it
up.
2. Use a dry swab to remove any residue that may be left from the first cleaning.
3. Repeat steps 1 and 2 as required until all residue and streaks are removed from the sensor.
.
Upper Gap
Sensor
Lower Gap
Sensor
Head-up Sensor
Reflector (white)
Head-up Sensor
(down in the hole)
Head-up Sensor - Dust and contamination can accumulate on sensor optics and reflector.
1. Clean the dust and debris from the sensor optics (in the hole). Use a can of compressed air to
blow out dust and debris.
2. Clean the Head-up Sensor’s reflector (white square) on the inside of the upper cover. Use an
alcohol moistened swab to gently remove dirty and grime from printer handling.
31
Page 32

Platen Cleaning and Replacement
The standard platen (drive roller) normally does not require cleaning. Paper and liner dust can
accumulate without effecting print operations. Contaminates on the platen roller can damage the
printhead or cause the media to slip or stick when printing. Adhesive, dirt, general dust, oils and other
contaminates should be cleaned immediately off the platen.
Clean the platen (and media path) whenever the printer has significantly poorer performance, print
quality or media handling. The platen is the print surface and drive roller for your media. If sticking or
jamming continues even after cleaning, you must replace the platen.
The platen can be cleaned with a fiber-free swab (such as a Texpad swab) or a lint free, clean, damp
cloth very lightly moistened with medical grade alcohol (90% pure or better).
1. Open the cover (and dispenser door). Remove media from platen area.
2. Using a pointed stylus (such as tweezers, small slot-head screwdriver, or razor-knife), unhook the
tabs on the right and left sides. Then rotate them forward.
3. Lift the platen out of the printer’s bottom frame.
32
Page 33

4. Clean the platen with the alcohol moistened swab. Clean from the center out until the all of the
roller’s surface has been cleaned. If there has been heavy adhesive build-up or you have been
having labels catch and bind in the printer, then repeat cleaning with a new swab to remove
residual diluted contaminates. Adhesives and oils, for example, may be thinned by the initial
cleaning but not removed.
5. Install the platen in the printer. Discard the cleaning swabs after use - do not reuse.
6. Make sure the bearings and gear are on the shaft of the platen as shown.
7. Align the platen with the gear to the left and lower it into the printer’s bottom frame.
8. Rotate the tabs back and snap them into place.
33
Page 34

9. Allow the printer to dry for one minute before closing the dispenser door, media cover or loading
labels.
Other Printer Maintenance
There are no user level maintenance procedures beyond those detailed in this section. See the
Troubleshooting for more information on diagnosing printer and print problems.
34
Page 35

Troubleshooting
This section provides information about printer error reporting that you might need for
printer troubleshooting. Assorted diagnostic tests are included.
35
Page 36

Status Light Descriptions
LED Status and Color Printer Status Resolution Number
Off Off 1
Solid Green On 2
Flashing Green Normal Operation 3
Flashing Red Stopped 4
Double Flashing Green Paused 5
Flashing Amber Paused 6
Alternately Flashing Green and Red Needs Service 7
Rapid Red Flashing Media Not Sensing Properly 8
Status Light Error Resolutions
The following Status Error Light Resolution numbers correspond to the Status Light Description table
above.
1. The printer is not receiving power.
What the Status Light is Telling You
• Have you turned on the printer power? Check power connections from the wall outlet to the
power supply, and from the power supply to the printer. See Loading Roll Media.
• Disconnect the printer from the wall outlet for 30 seconds and then reconnect the printer to
power.
2. The printer is on and in an idle state.
• No action necessary.
3. The printer is receiving data.
• When data transfer completes, the status LED turns green and the printer will resume operation.
4. The media path alert.
• Media is Out - Open the cover and verify media is out. Remove the empty label roll if using roll
media. Replace the media. Follow the instructions for Loading Roll Media and then press the
Feed button to resume printing.
• Cover not latched - The cover (and printhead) is open. Open and close the top cover firmly and
then press the Feed button to resume printing.
• Head Open Sensor needs cleaning - The optical sensor and reflector are dirty. and need
cleaning, see Sensor Cleaning.
• Media is not being sensed - The media sensors are blocked or dirty, and need cleaning, see
Sensor Cleaning.
5. The printer is paused.
• Press the Feed button to resume printing.
36
Page 37

6. The printhead is over temperature.
• Printing will stop until the printhead cools to an acceptable printing temperature. When it does,
the printer will automatically resume operation.
7. FLASH memory is not programmed.
• Return the printer to an authorized reseller.
8 The label has not been detected as expected.
• The expected label gap has not been detected in the correct area for the label size set by the
printer driver. Verify the label length of he media in use matches the label length set in the
printer driver or ZebraDesigner label’s format.
• The printer has moved more than maximum label length allowed by the printer of 216 mm (8.5
inches) without detecting a label gap. The Gap Sensors may need cleaning. If clearing does not
correct this error contact a service.
37
Page 38

Print Quality Problems
No print on the label.
• New Media: The media may not be direct thermal media. See the test procedure Determining
Thermal Media Types.
• Is the media loaded correctly? Follow the instructions for Loading Roll Media in the Getting
Started section. To test if you have correctly loaded the labels and are able to print, see Printing
a Test (Printer Configuration) Label. If still not printing, contract your authorize Zebra Reseller or
service provider.
The printed image does not look right.
• The printhead is dirty. Clean the printhead.
• The printhead is under temperature.
• Adjust the print darkness and/or print speed.
• The Windows printer driver can change these settings to optimize print quality.
• The media being used is incompatible with the printer. Be sure to use the recommended media
for your application, and always use Zebra-approved labels.
• The printhead has worn out. The printhead is a consumable item and will wear out due to friction
between the media and printhead. Using unapproved media may shorten life or damage your
printhead. Contact your authorized Zebra Reseller or Service provider.
• The platen may need cleaning or replacement. The platen (driver) roller maybe losing traction
due to:
• Foreign objects attached to its surface,
• The rubbery smooth surface has become polished and slippery.
• There is damage to the normally smooth and flat print surface such as box knife cuts.
There are long tracks of missing print (blank vertical lines) on several labels.
• The printhead is dirty. Clean the printhead.
• The printhead elements are damaged. Contract your authorized Zebra Reseller or Service
provider.
The printing does not start at the top of the label or misprinting of one to three labels.
• The media may not be threaded correctly. Follow the instructions for Loading Roll Media in the
Getting Started section.
• Clean the Gap Sensor, see Sensor Cleaning.
38
Page 39

Appendix: USB Interface
This section provides printer interface connection information.
Universal Serial Bus (USB) Interface
The figure below displays the cable wiring required to use the printer’s USB interface.
The printer requires cable or cable packaging that bears the “Certified USB ™ ” mark to
guarantee USB 2.0 compliance.
Pin Signal
1 Vbus - N/C
2 D-
3 D+
4 Ground
Shell Shield / Drain Wire
For printer supported operating systems and drivers, see for visit the Zebra Web site at:
http://www.zebra.com
For information on the USB interface, go to the USB web site at:
http://www.usb.org
39
40
Page 40

Page 41

Appendix: Dimensions
This section provides external printer dimensions.
40
Page 42

External Printer Dimensions
All dimensions are
in inches
41
 Loading...