

Page 1

ZC100/300 Series
User Guide
P1094920-001
Page 2

Copyright
© 2017 ZIH Corp. and/or its affiliates. All rights reserved. ZEBRA and the stylized Zebra
head are trademarks of ZIH Corp., registered in many jurisdictions worldwide. All other
trademarks are the property of their respective owners.
COPYRIGHTS & TRADEMARKS: For complete copyright and trademark information, go to:
www.zebra.com/copyright
WARRANTY: For complete warranty information, go to: www.zebra.com/warranty
END USER LICENSE AGREEMENT: For complete EULA information, go to: www.zebra.com/eula
Terms of Use
Proprietary Statement This manual contains proprietary information of Zebra Technologies
Corporation and its subsidiaries (“Zebra Technologies”). It is intende d solely for the
information and use of parties operating and maintaining the equipment described herein .
Such proprietary information may not be used, reproduced, or disclosed to any other parties
for any other purpose without the express, written permission of Zebra Technologies.
Product Improvements Continuous improvement of products is a policy of Zebra
Technologies. All specifications and designs are subject to change without notice.
Liability Disclaimer Zebra Technologies takes steps to ensure that its published
Engineering specifications and manuals are correct; however, errors do occur. Zebra
Technologies reserves the right to correct any such errors and disclaims liability resulting
therefrom.
Limitation of Liability In no event shall Zebra Technologies or anyone else involved in the
creation, production, or delivery of the accompanying product (including hardware and
software) be liable for any damages whatsoever (including, without limitation, consequential
damages including loss of business profits, business interruption, or loss of business
information) arising out of the use of, the results of use of, or inability to use such product,
even if Zebra Technologies has been advised of the possibility of such damages. Some
jurisdictions do not allow the exclusion or limitation of incidental or consequential damages,
so the above limitation or exclusion may not apply to you.
Page 3

Contents
Introduction. . . . . . . . . . . . . . . . . . . . . . . . . . . . . . . . . . . . . . . . . . . . . . . . . . . . . . . . . . . . . . . . . . . . . 1
About This Manual . . . . . . . . . . . . . . . . . . . . . . . . . . . . . . . . . . . . . . . . . . . . . . . . . . . . . . . . . . . . 1
About the Printer . . . . . . . . . . . . . . . . . . . . . . . . . . . . . . . . . . . . . . . . . . . . . . . . . . . . . . . . . . . . . 1
Features, Controls, and Indicators. . . . . . . . . . . . . . . . . . . . . . . . . . . . . . . . . . . . . . . . . . . . . . . . 2
LCD Menu Navigation . . . . . . . . . . . . . . . . . . . . . . . . . . . . . . . . . . . . . . . . . . . . . . . . . . . . . . . . . 4
Printer Ready Screen . . . . . . . . . . . . . . . . . . . . . . . . . . . . . . . . . . . . . . . . . . . . . . . . . . . . . . . 4
Printer Soft Keys. . . . . . . . . . . . . . . . . . . . . . . . . . . . . . . . . . . . . . . . . . . . . . . . . . . . . . . . . . . 4
Help Menu . . . . . . . . . . . . . . . . . . . . . . . . . . . . . . . . . . . . . . . . . . . . . . . . . . . . . . . . . . . . . . . 5
Info menu . . . . . . . . . . . . . . . . . . . . . . . . . . . . . . . . . . . . . . . . . . . . . . . . . . . . . . . . . . . . . . . . 6
Tools Menu. . . . . . . . . . . . . . . . . . . . . . . . . . . . . . . . . . . . . . . . . . . . . . . . . . . . . . . . . . . . . . . 6
Connection Status . . . . . . . . . . . . . . . . . . . . . . . . . . . . . . . . . . . . . . . . . . . . . . . . . . . . . . . . . . . . 7
Ethernet Connection. . . . . . . . . . . . . . . . . . . . . . . . . . . . . . . . . . . . . . . . . . . . . . . . . . . . . . . . 7
Bluetooth Connection . . . . . . . . . . . . . . . . . . . . . . . . . . . . . . . . . . . . . . . . . . . . . . . . . . . . . . . 7
Wi-Fi Connection . . . . . . . . . . . . . . . . . . . . . . . . . . . . . . . . . . . . . . . . . . . . . . . . . . . . . . . . . . 7
Setup . . . . . . . . . . . . . . . . . . . . . . . . . . . . . . . . . . . . . . . . . . . . . . . . . . . . . . . . . . . . . . . . . . . . . . . . . . 9
Unpacking . . . . . . . . . . . . . . . . . . . . . . . . . . . . . . . . . . . . . . . . . . . . . . . . . . . . . . . . . . . . . . . . . . 9
Connecting Power . . . . . . . . . . . . . . . . . . . . . . . . . . . . . . . . . . . . . . . . . . . . . . . . . . . . . . . . . . . . 9
Connecting USB . . . . . . . . . . . . . . . . . . . . . . . . . . . . . . . . . . . . . . . . . . . . . . . . . . . . . . . . . . . . 10
Connecting Ethernet . . . . . . . . . . . . . . . . . . . . . . . . . . . . . . . . . . . . . . . . . . . . . . . . . . . . . . . . . 10
Loading Ribbon . . . . . . . . . . . . . . . . . . . . . . . . . . . . . . . . . . . . . . . . . . . . . . . . . . . . . . . . . . . . . 11
Loading Cards . . . . . . . . . . . . . . . . . . . . . . . . . . . . . . . . . . . . . . . . . . . . . . . . . . . . . . . . . . . . . . 11
Printing a Sample Card . . . . . . . . . . . . . . . . . . . . . . . . . . . . . . . . . . . . . . . . . . . . . . . . . . . . . . . 12
Printing a Test Card . . . . . . . . . . . . . . . . . . . . . . . . . . . . . . . . . . . . . . . . . . . . . . . . . . . . . . . . . . 12
Installing the Driver . . . . . . . . . . . . . . . . . . . . . . . . . . . . . . . . . . . . . . . . . . . . . . . . . . . . . . . . . . 12
Manual Feed . . . . . . . . . . . . . . . . . . . . . . . . . . . . . . . . . . . . . . . . . . . . . . . . . . . . . . . . . . . . . . . 13
Retrieving a Rejected Card . . . . . . . . . . . . . . . . . . . . . . . . . . . . . . . . . . . . . . . . . . . . . . . . . . . . 13
Options . . . . . . . . . . . . . . . . . . . . . . . . . . . . . . . . . . . . . . . . . . . . . . . . . . . . . . . . . . . . . . . . . . . . . . . 15
Mag Encoder . . . . . . . . . . . . . . . . . . . . . . . . . . . . . . . . . . . . . . . . . . . . . . . . . . . . . . . . . . . . . . . 15
Magnetic Encoding Type . . . . . . . . . . . . . . . . . . . . . . . . . . . . . . . . . . . . . . . . . . . . . . . . . . . 15
i
Page 4

Contents
Smart Card Encoder . . . . . . . . . . . . . . . . . . . . . . . . . . . . . . . . . . . . . . . . . . . . . . . . . . . . . . . . . 16
Contact Smart Cards . . . . . . . . . . . . . . . . . . . . . . . . . . . . . . . . . . . . . . . . . . . . . . . . . . . . . . 16
Contactless Smart Cards . . . . . . . . . . . . . . . . . . . . . . . . . . . . . . . . . . . . . . . . . . . . . . . . . . . 16
Contact Station . . . . . . . . . . . . . . . . . . . . . . . . . . . . . . . . . . . . . . . . . . . . . . . . . . . . . . . . . . . 16
Double-sided Printing. . . . . . . . . . . . . . . . . . . . . . . . . . . . . . . . . . . . . . . . . . . . . . . . . . . . . . . . . 17
Wi-Fi. . . . . . . . . . . . . . . . . . . . . . . . . . . . . . . . . . . . . . . . . . . . . . . . . . . . . . . . . . . . . . . . . . . . . . 17
Description . . . . . . . . . . . . . . . . . . . . . . . . . . . . . . . . . . . . . . . . . . . . . . . . . . . . . . . . . . . . . . 17
Cleaning. . . . . . . . . . . . . . . . . . . . . . . . . . . . . . . . . . . . . . . . . . . . . . . . . . . . . . . . . . . . . . . . . . . . . . . 19
Cleaning the Printer . . . . . . . . . . . . . . . . . . . . . . . . . . . . . . . . . . . . . . . . . . . . . . . . . . . . . . . . . . 19
From the LCD Menu . . . . . . . . . . . . . . . . . . . . . . . . . . . . . . . . . . . . . . . . . . . . . . . . . . . . . . . 19
From the Driver Software . . . . . . . . . . . . . . . . . . . . . . . . . . . . . . . . . . . . . . . . . . . . . . . . . . . 20
Cleaning the Printhead . . . . . . . . . . . . . . . . . . . . . . . . . . . . . . . . . . . . . . . . . . . . . . . . . . . . . . . 21
Cleaning the Mag Encoder . . . . . . . . . . . . . . . . . . . . . . . . . . . . . . . . . . . . . . . . . . . . . . . . . . . . 21
Cleaning Supplies . . . . . . . . . . . . . . . . . . . . . . . . . . . . . . . . . . . . . . . . . . . . . . . . . . . . . . . . . . . 21
Troubleshooting . . . . . . . . . . . . . . . . . . . . . . . . . . . . . . . . . . . . . . . . . . . . . . . . . . . . . . . . . . . . . . . . 23
LCD Warnings and Errors . . . . . . . . . . . . . . . . . . . . . . . . . . . . . . . . . . . . . . . . . . . . . . . . . . . . . 23
LED Warnings and Errors . . . . . . . . . . . . . . . . . . . . . . . . . . . . . . . . . . . . . . . . . . . . . . . . . . . . . 24
Clearing a Card Jam . . . . . . . . . . . . . . . . . . . . . . . . . . . . . . . . . . . . . . . . . . . . . . . . . . . . . . . . . 24
Identifying Job Quality Issues . . . . . . . . . . . . . . . . . . . . . . . . . . . . . . . . . . . . . . . . . . . . . . . . . . 25
Print Quality Issues. . . . . . . . . . . . . . . . . . . . . . . . . . . . . . . . . . . . . . . . . . . . . . . . . . . . . . . . 25
Replacing the Printhead. . . . . . . . . . . . . . . . . . . . . . . . . . . . . . . . . . . . . . . . . . . . . . . . . . . . . . . 26
Removal . . . . . . . . . . . . . . . . . . . . . . . . . . . . . . . . . . . . . . . . . . . . . . . . . . . . . . . . . . . . . . . . 26
Installation . . . . . . . . . . . . . . . . . . . . . . . . . . . . . . . . . . . . . . . . . . . . . . . . . . . . . . . . . . . . . . 26
Packing for Shipment. . . . . . . . . . . . . . . . . . . . . . . . . . . . . . . . . . . . . . . . . . . . . . . . . . . . . . . . . 28
ii
Page 5

Introduction
About This Manual
This manual provides setup, cleaning, and basic troubleshooting instructions for the ZC100 and ZC300 Series
printers, and their respective factory-installed options. Unless otherwise noted, instructions are identical for all
printers.
About the Printer
The ZC100 and ZC300 series printers provide full color dye sublimation or monochrome thermal transfer printing on
standard CR70 (2.051" x 3.303") and CR80 (2.125" x 3.375") PVC or PVC composite 10- to 40-mil cards. The
integrated card feeder and flipper minimizes printer size while maximizing performance. Zebra ZC Series ribbon
cartridges have an integrated card cleaning roller for easy ribbon changing or replacement. A variety of options
(some of which can be factory-installed or field-installed as upgrades) are available.
1
Page 6
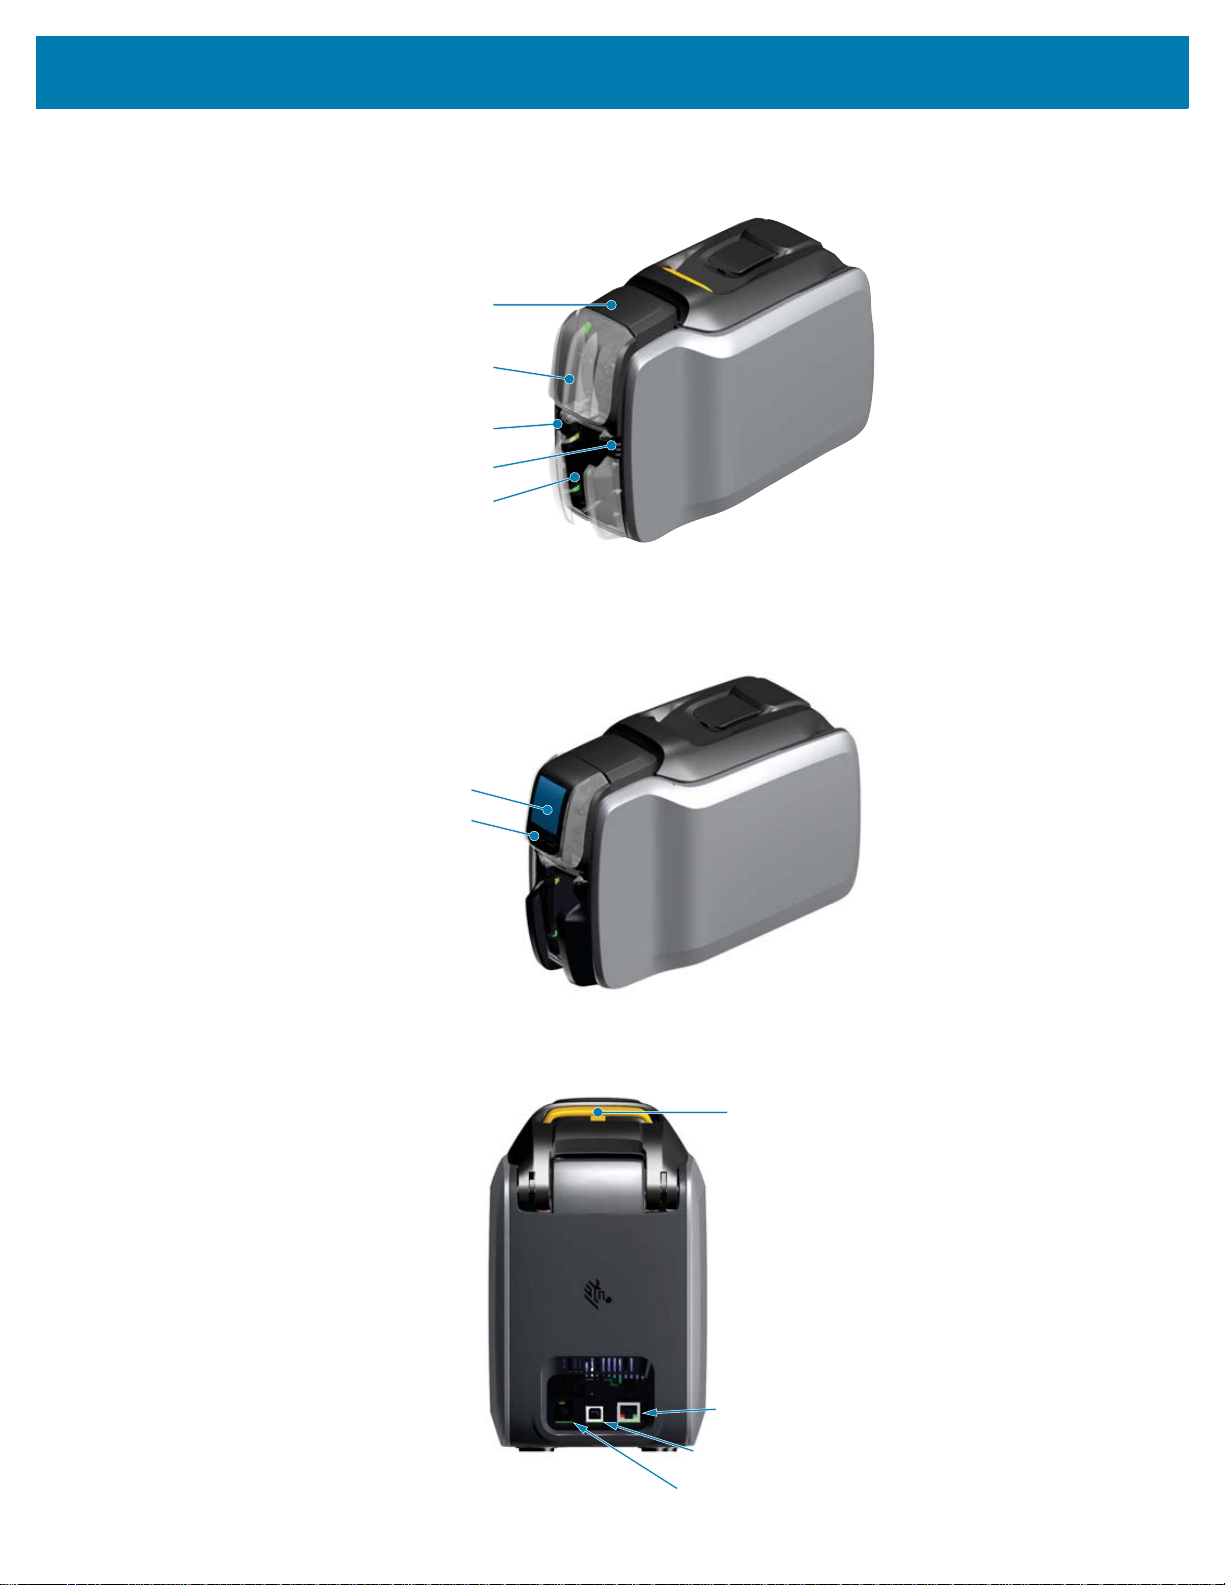
Introduction
,QSXW+RSSHU
3RZHU%XWWRQ
/(',QWHUIDFH
2XWSXW+RSSHU
=HEUD3ULQW7RXFK
Zebra Print Touch
Input Hopper
Power Button
Status Indicators
Output Hopper
/&',QWHUIDFH=&
6RIW.H\V=&
LCD Interface (ZC300)
Printer Soft Keys (ZC300)
(WKHUQHW
86%
3RZHU
7RS&RYHU5HOHDVH
Top Cover Release
10/100 Ethernet
USB 2.0
Power (100W)
Features, Controls, and Indicators
2
Page 7
Introduction
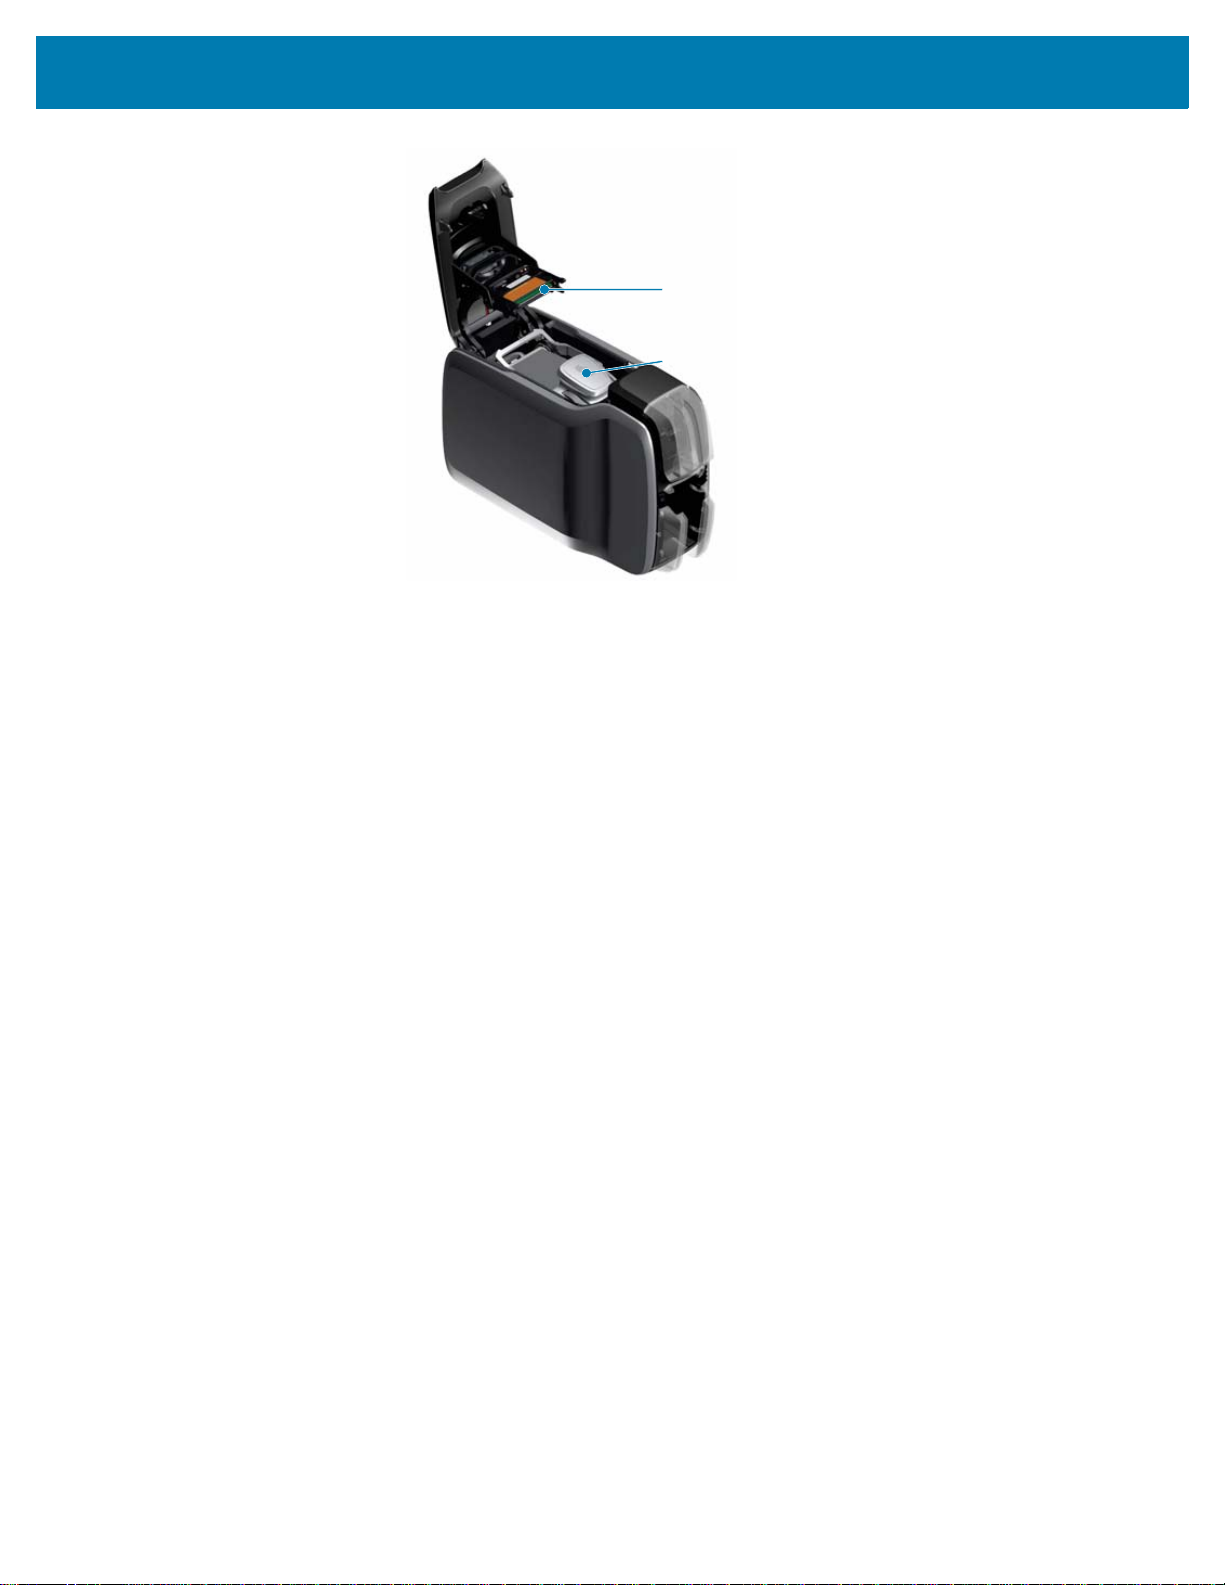
5LEERQ&DUWULGJH
3ULQWKHDG
Printhead
Ribbon Cartridge
Zebra PrintTouch—This touch point uses NFC technology to provide key information about the printer; go to
http://www.zebra.com/nfc for details.
LCD Interface—The ZC300 Series printers are equipped with a LCD interface to display menu items and errors, and
three action buttons to enable menu choices.
Input Hopper—The ZC100 and ZC300 Series printers have a 100-card (30-mil) hopper capacity.
Power Button—The power button houses a red and green LED to indicate the power status.
Status Indicators—The ZC100 and ZC300 Series printers are equipped with several indicators that displays printer
status, ribbon status, and cleaning status.
Output Hopper—The ZC100 and ZC300 Series printers are equipped with a 100-card (30-mil) hopper capacity.
Top Cover Release—Open the top cover to load and remove printer ribbon, clear a card jam, install upgrades, and
access the printhead for easy replacement.
Power—The ZC100 and ZC300 Series printers use a 100-watt power supply. Make sure to use the power supply
that came with the printer.
USB 2.0—For direct connection to a PC.
10/100 Ethernet—Used to connect the printer to a network.
3
Page 8
Introduction
LCD Menu Navigation
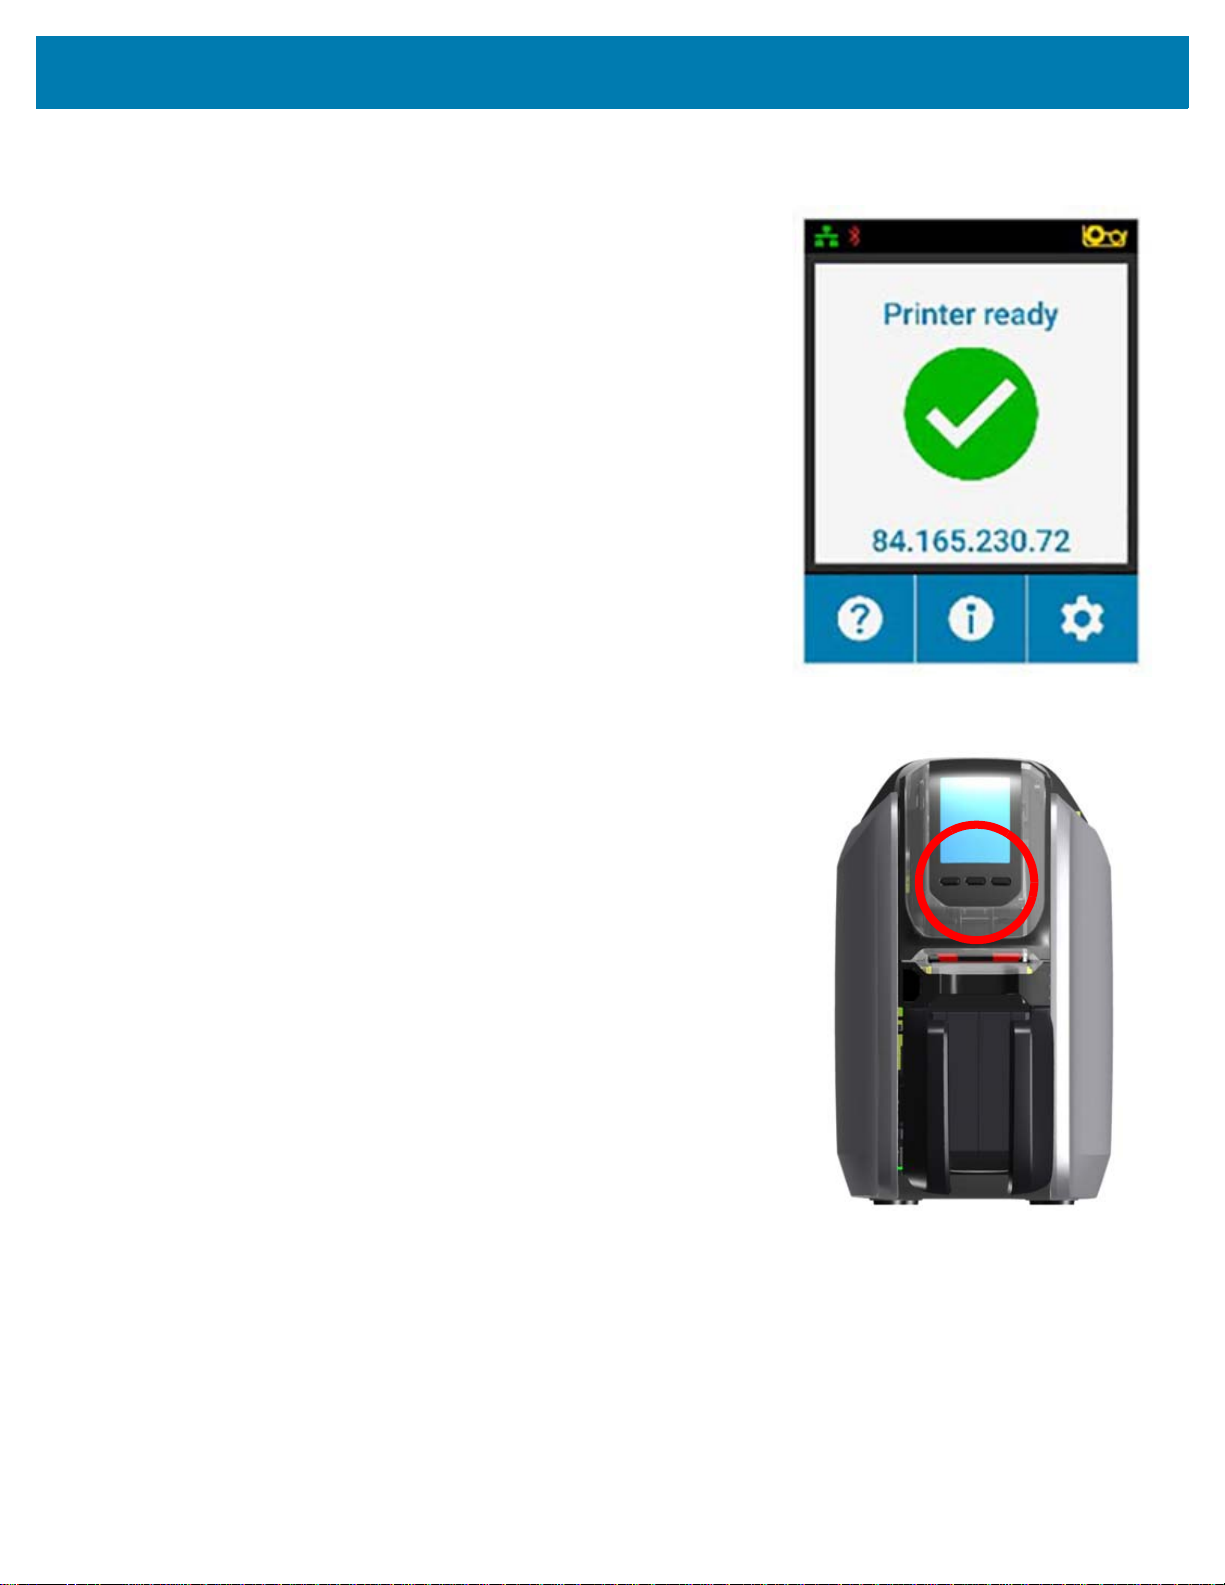
Printer Ready Screen
After successful startup, the printer will display the ready screen.
The printer ready screen displays the wired (Ethernet), Bluetooth, and
wireless (Wi-Fi) status at the top; the current printer state in the center; and
Help, Info, and Tools at the bottom.
Printer Soft Keys
There are three soft keys (buttons) that sit under the LCD and correspond to
what is displayed in the lower portion of the screen. As the menus change, the
function of the soft keys change. For example: At the Printer Ready screen,
pressing the leftmost key will take you to the Help menu; once in the Help
menu, the function of the keys change to navigation arrows.
Navigation arrows are used to cycle through the menu choices, return to the
previous menu, and make the desired selection. For example: At the Help
menu, the leftmost key corresponds to the left arrow which return you to the
previous menu; the center key corresponds to the down arrow which is used
to cycle through the menu choices; and the rightmost key corresponds to the
right-facing chevron which is used to select the menu choice and go to the
next menu.
4
Page 9
Introduction
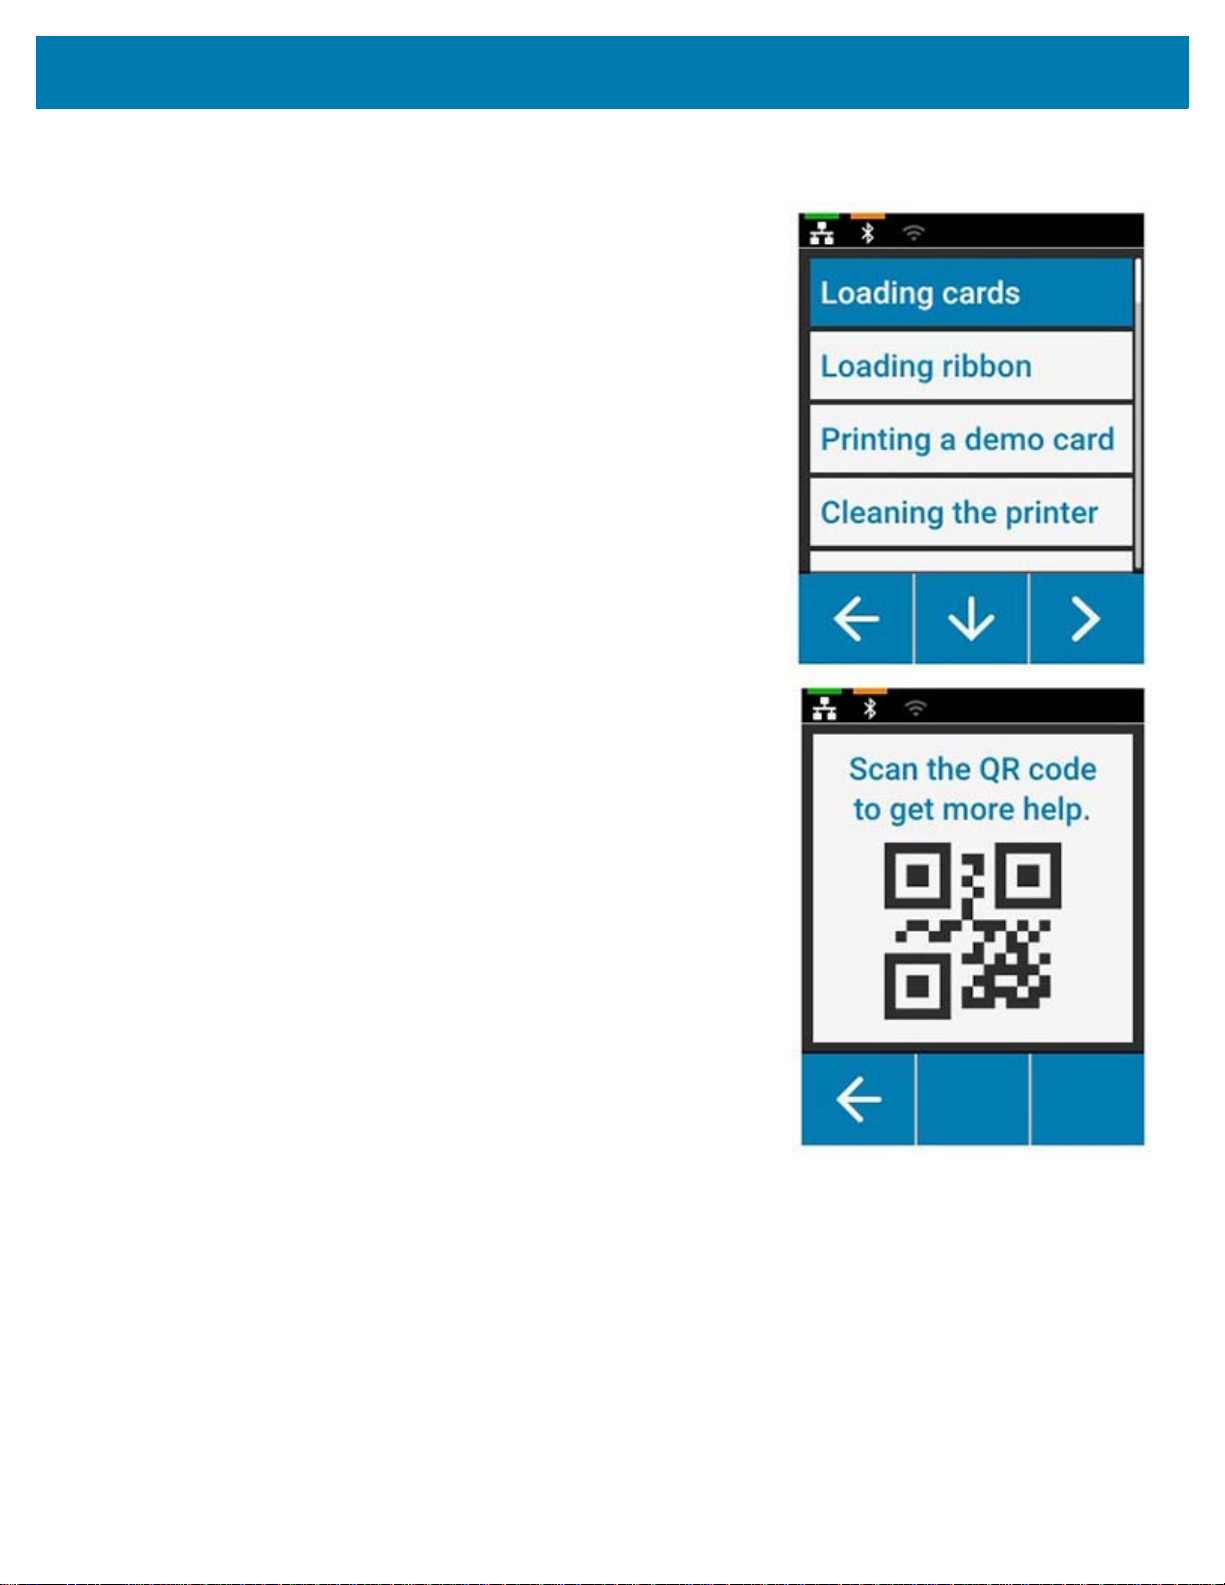
Help Menu
The Help menu offers brief animations to assist you with basic tasks. From
the Help menu, use the soft keys to navigate through the different choices
and press the rightmost key to select.
The Help menu displays the following:
• Loading cards
• Loading ribbon
• Printing demo card
• Cleaning printer
• Clearing card jam
• Clearing ribbon jam
• More help
If the topic you need isn’t listed in the help menu, select More help and a QR
code will be displayed. Scan the QR code with your mobile device and you
will be directed to the printer support page.
5
Page 10

Introduction
Info menu
The Info menu shows information on the condition and connection of the
printer.
The Info menu displays the following:
• Printer info
• Wired network
• Wireless network
• Ribbon info
• Card count
• Installed options
Tools Menu
The Tools menu enables several basic functions to keep your printer
working properly.
The Tools menu displays the following:
• Print sample cards
• Select language
• Clean printer
6
Page 11
Introduction
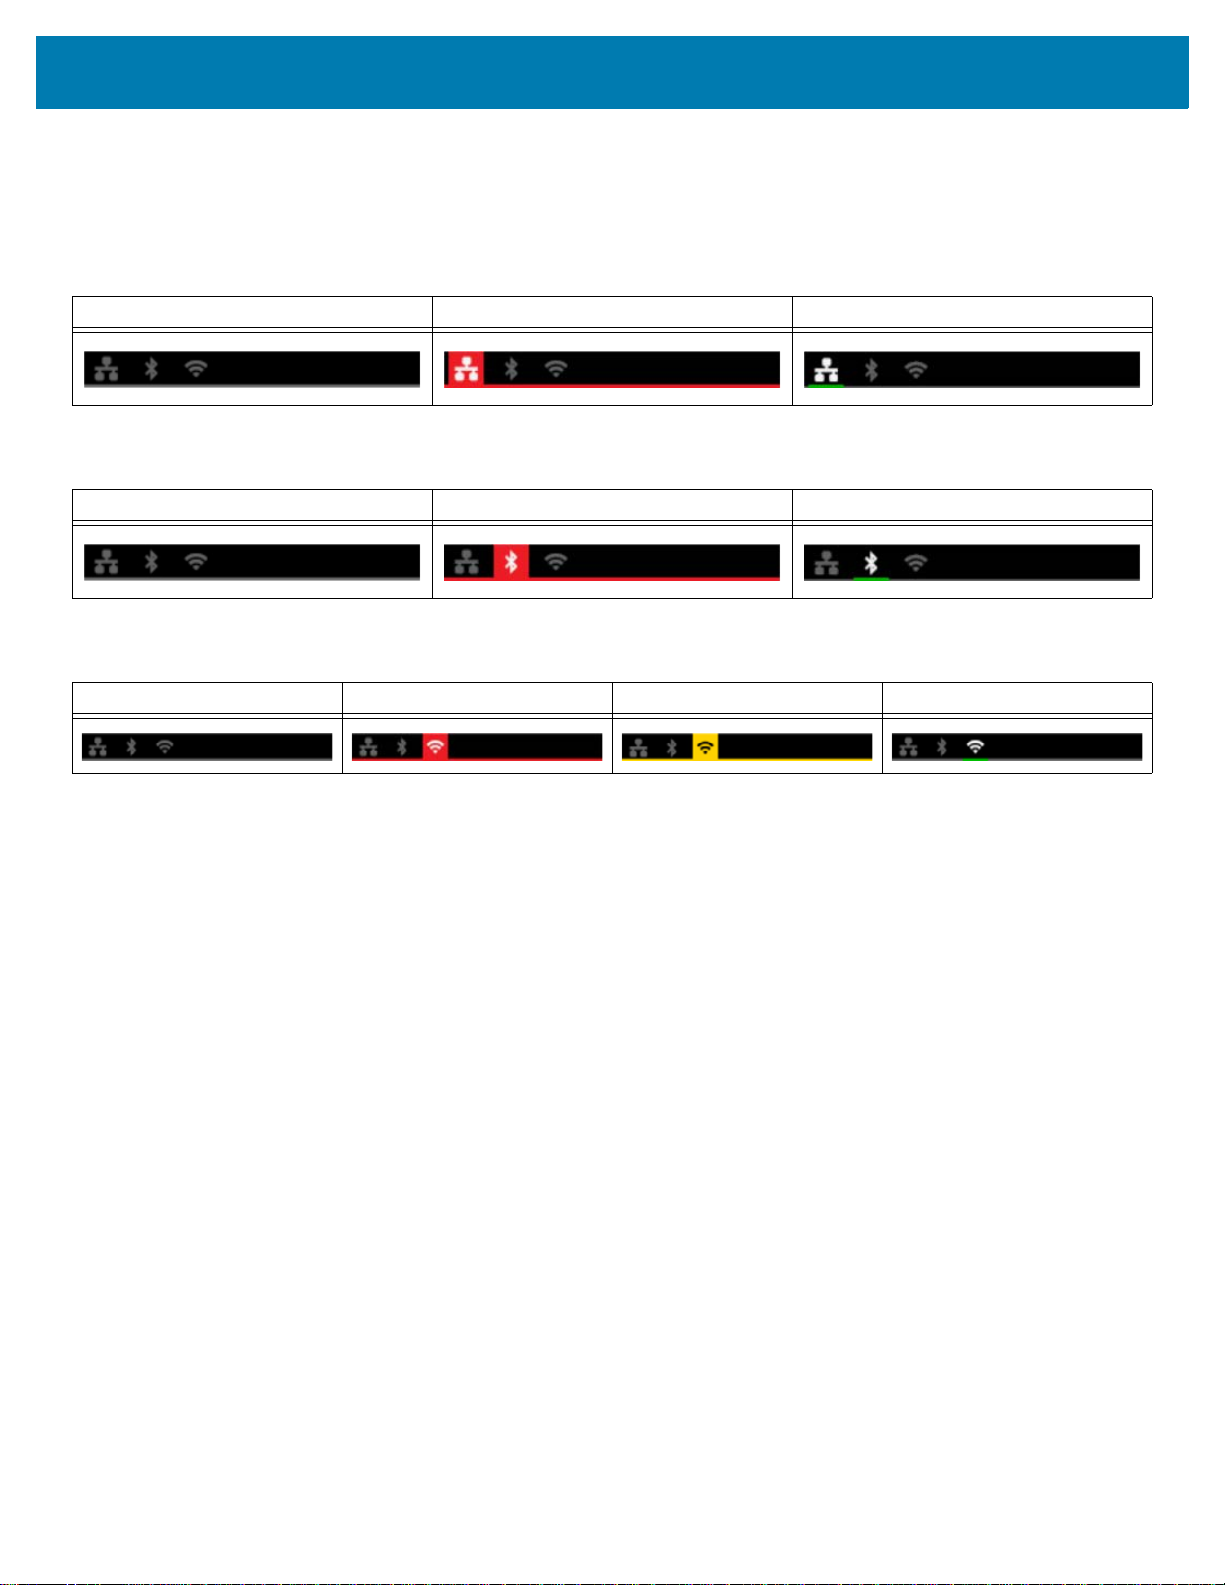
Connection Status
The top of the LCD screen shows the connection status of Ethernet, Bluetooth, and Wi-Fi.
Ethernet Connection
Off Cable detected but No IP Address Cable detected with Network
Bluetooth Connection
Off Paired but Not Connected Paired and Connected
Wi-Fi Connection
Off No Connection Poor Connection Connected
7
Page 12

Page 13

Setup
Unpacking
It is important that the printer packaging be saved in case it needs to be returned to Zebra. Maintain the box, bag, and
inserts; include the power supply when shipping. You do not need to pack the USB cable or any documentation.
1. Open the box and remove the power supply, power cable, and USB cable.
2. Remove the top tray.
3. Remove the printer in the bag.
4. Remove the printer from the bag and place it in the desired location. Refer to the product Technical Specification
(www.zebra.com/zc100-info or www.zebra.com/zc300-info) for weight restrictions and required distances around
the printer.
Connecting Power
The ZC100 and ZC300 Series printers use a 100 watt power supply.
Do not use any other power supply.
1. Connect the female end of the power cable to the power supply.
2. Connect the device end of the power supply cable to the printer.
3. Connect the receptacle end of the power cable to a compatible
power source.
9
Page 14

Setup
Connecting USB
1. Connect the device side of the USB cable to the printer.
2. Connect the PC side of the USB cable to an
appropriate computer.
Connecting Ethernet
1. Connect one end of the Ethernet cable to the printer.
2. Connect the other end of the Ethernet cable to an
appropriate network device.
10
Page 15

Setup
Loading Ribbon
Each ribbon cartridge includes features that identify the cartridge type to the
printer. These features also track usage information so the printer knows
when the ribbon is exhausted and prevents the use on non-Zebra branded
cartridges.
1. Open the top cover.
2. Remove the cleaning roller protective cover.
3. Insert the ribbon in the orientation shown. The ribbon can only be inserted
in one direction, do not force the ribbon into the incorrect position.
4. Close the top cover.
Loading Cards
The ZC Series of printers support many types of cards in different
thicknesses. As shown in the illustration below, cards must be inserted in the
proper orientation to work properly.
1. Plain cards are inserted in any direction.
2. Mag stripe cards are inserted with the stripe side down and to the right.
3. Contact smart cards are inserted with the chip facing up and forward.
4. Contactless smart cards are inserted in any direction.
11
Page 16

Setup
Printing a Sample Card
1. Make sure the printer is powered on and ready.
2. From the Printer Ready screen, press the rightmost soft key to go to the
Tools menu.
3. Use the center soft key to move the selection to Print sample cards and
press the rightmost soft key to select.
4. Use the center soft key to select the card(s) to print.
5. Press the rightmost soft key to begin printing.
Installing the Driver
The printer driver is loaded automatically from the Windows Update service when the printer is connected via USB.
The driver may be installed manually by downloading from the Zebra web site (www.zebra.com/zc100-info or
www.zebra.com/zc300-info).
You cannot download the driver to a mobile device.
You need Internet access to download a driver.
Manual Feed
Single cards can be inserted via the manual feed slot located at the front of
the printer just below the input hopper. Manual feed is selected via the
driver. When the manual feed slot illuminates green, insert the card in the
same orientation as the cards loaded into the input hopper. When the card
is finished printing, it will be sent to the output hopper.
12
Page 17

Setup
Retrieving a Rejected Card
When an error occurs during printing, the rejected card is sent to the output hopper.
If the printer is equipped with a flipper module, the rejected card is sent to the reject area located above the flipper.
To retrieve a rejected card:
• From the output hopper, remove the card from the top of the output stack.
• From the reject bin, open the top cover and remove the card (circle above).
13
Page 18

Page 19

Options
Track 1 -- 210 BPI
Track 2 -- 75 BPI
Track 3 -- 210 BPI
Mag Encoder
Magnetic Encoding Type
ISO (Default)
The encoder reads and writes standard ISO track data formats in standard ISO track locations. The following shows
the three standard ISO tracks.
Each track can be encoded and decoded with ASCII characters in the standard default ISO data formats:
Track Density
(BPI)
1 210 7 Odd 76 Even % ? 0.293" (7.4 mm)
2 75 5 Odd 37 Even ; ? 0.293" (7.4 mm)
3 210 5 Odd 104 Even ; ? 0.293" (7.4 mm)
Bits per
character
Character
parity
Length
(characters)
LRC
parity
Start
sentinel
End
sentinel
Start sentinel
offset
The magnetic encoder can read or encode up to 3 tracks of digital information onto CR-80 cards incorporating a HiCo
or LoCo magnetic stripe in the ISO 7811 format.
Encoding for the three tracks uses the ISO 7811 format.
• Track 1 uses 210 BPI (bits per inch) encoding in the International Air Transport Association (IATA) format of 79
alphanumeric characters, at 7 bits per character.
• Track 2 uses 75 BPI encoding to store 40 numeric characters at 5 bits per character in American Banking
Association (ABA) format.
• Track 3 uses 210 BPI encoding of 107 numeric characters at 5 bits per character in THRIFT format.
15
Page 20

Options
The ISO data formats include a preamble (all zeros), a start character, data (7-bit or 5-bit as specified by ISO), a stop
character, and a longitudinal redundancy check (LRC) character. The 7-bit data format has 6 bits of encoded data
and a parity bit. The 5-bit data format has 4 bits of encoded data and a parity bit.
The ISO data formats include a data field separator (or delimiter) that allows parsing of the encoded track data. An
example of separate data fields would be the ABA data format (Track 2) that includes a Primary Account Number
(PAN) field and an account information field (for expiration date, country code, etc.).
Smart Card Encoder
Contact Smart Cards
Contact Smart Cards have a pad of contacts on the surface of the card that connects to the circuitry embedded into
the card.
Encoding data onto Smart Cards and reading the data previously encoded on them is totally under control of the
application software; no operator action is required. If you experience any problems with encoding or reading data,
refer to the users manual or other documentation for the application software.
All other printer operations remain the same as the standard models.
Media Loading Orientation for Contact Smart Cards
Place the cards in the input hopper with the gold-plated contact at the top and toward the rear. Ensure that the cards
are seated properly in the feeder.
Printing on Contact Smart Cards
When designing material to be printed on contact smart cards, be sure the printing will not be on the contact area on
the front or the back of the card.
Contactless Smart Cards
Rather than using a contact pad, contactless smart cards use an embedded chip and various short-range radio
technologies to encode the card. The printer moves the card to an antenna location on the card path, and the
encoding or decoding occurs.
All other printer operations remain the same.
Media Loading Orientation for Contactless Smart Cards
Contactless smart cards are loaded the same as normal cards.
Printing on Contactless Smart Cards
When designing material to be printed on contactless smart cards, be sure the printing will not be on the smart chip
area; i.e., the printing on either side of the card must not be on top of or underneath the smart chip area.
16
Page 21

Options
Contact Station
Smart Card Interface
When a command to the printer interface sends a card to the smart card contact station, the printer connects the
smart card contact station to the female DB-9 connector on the rear of the printer.
DB-9 Connector (detail)
An attached external smart card programmer can be used to program smart card chips. The following table shows
the smart card contact points.
Pin Smart Card Contact Points DB-9 Smart Card Contact Points
1 C1 (VCC) 6 C6 (Vpp)
2 C2 (Reset) 7 C7 (I/O)
3 C3 (Clock) 8 C8 (RFU)
4C4 (RFU)
5 C5 (GND)
9
(GND when chip
is at station)
Double-sided Printing
The “flipper” printing module enables double-sided printing on applicable printers. Additionally, when the flipper
module is installed, rejected cards are sent to the rejected card area rather than the output hopper.
Wi-Fi
A printer with the wireless option ships with the wireless radio pre-installed in the printer.
Printer location is important to ensure that adequate signal strength is achieved. Follow these suggestions:
• Position the printer as close to the access point that it will connect to as possible.
• If possible, orient the printer such that there is a clear line of sight between the printer antenna and the access
point antenna.
• Locate the printer such that there are no intervening walls in the line of sight between the antennas.
• Do not put the printer in a cabinet, especially not a metal one.
• Do not locate large metal objects close to the printer antenna.
• Do not locate the printer close to devices that emit RF radiation in the 2.4 GHz range; such devices might include:
microwave ovens, cordless phones, wireless surveillance cameras, baby monitors, wireless video transmitter and
Bluetooth devices, etc.
Description
Communication
To connect to a wireless network, the printer uses wireless protocol IEEE 802.11b/g that communicates data through
radio transmission and can talk to Access Points that are either 802.11b or 802.11g compliant.
The wireless printer communicating over 802.11b radio:
• Allows nominal data rates over the air of 11 Mbps as per 802.11b standard.
17
Page 22

Options
• Supports automatic rate scaling starting at 11 Mbps and going down as low as 1 Mbps for maximum range and
optimal throughput depending on signal strength.
The wireless printer communicating over 802.11g radio:
• Allows nominal data rates over the air of 54 Mbps as per 802.11g standard.
• Supports automatic rate scaling starting at 54 Mbps and going down as low as 6 Mbps for maximum range and
optimal throughput depending on signal strength.
Security
The wireless printer supports Open System authentication.
The wireless printer supports the following security features:
• Wired Equivalent Privacy (WEP)
• Wi-Fi protected access (WPA/WPA2)
Encryption
The wireless printer supports the following encryption protocols:
• RC4 (applicable to WEP)
• TKIP (applicable to WPA)
• CCMP (a form of AES encryption applicable to WPA2)
The printer supports the Personal mode of dynamic encryption key deployment, Personal Shared Key (PSK).
Configuration
Wi-Fi configuration can be accomplished via the driver software.
18
Page 23

Cleaning
Cleaning the Printer
The Cleaning indicator on the ZC100 and ZC300 Series printers will flash amber when cleaning is required.
From the LCD Menu
1. Make sure the printer is powered on and ready.
2. Go to the Tools menu by pressing the rightmost soft key.
3. Use the center soft key to move the selection to Cleaning and press the rightmost soft key to select.
4. The following screen will be displayed:
19
Page 24

Cleaning
5. Press the rightmost soft key to proceed with the cleaning process; press
the leftmost soft key to cancel and go back to the previous menu.
From the Driver Software
1. Open the Printing Preferences control panel.
2. Click on the Help & Support tab.
3. In the Cleaning section of the Help & Support window, click on Clean Now.
4. Follow the instructions on the LCD screen on the printer.
20
Page 25

Cleaning
Cleaning the Printhead
Use of the cleaning cards will normally do an adequate job of cleaning the printer. However, a separate Printhead
cleaning, using swabs, can remove more stubborn deposits when print anomalies persist. To avoid deposits, only
use foam-tipped swabs.
Never use a sharp object to scrape deposits from the printhead. Permanent damage to the
printhead will result.
1. Turn the printer off.
2. Open the top cover.
3. Clean the Printhead by moving an alcohol-moistened swab tip side-to-side across the printhead elements.
4. Allow two to three minutes for the printhead to dry before turning the printer on.
Cleaning the Mag Encoder
1. Turn the printer off.
2. Open the top cover.
3. Clean the mag encoder by moving an alcohol-moistened swab tip side-to-side across the encoder element.
4. Allow two to three minutes for the printhead to dry before turning the printer on.
Cleaning Supplies
Cleaning supplies can be ordered from the product support page.
21
Page 26

Page 27

Troubleshooting
LCD Warnings and Errors
Warnings require operator attention, but do not prevent the printer from
successfully completing the job.
Pressing the leftmost soft key takes you to an animation showing how to
resolve the warning.
After the animation, a QR code will be displayed. Scanning the QR code
with your mobile device will take you to the printer support page.
Errors require the operator to take immediate action to continue printing.
There are no animations for error states.
23
Page 28
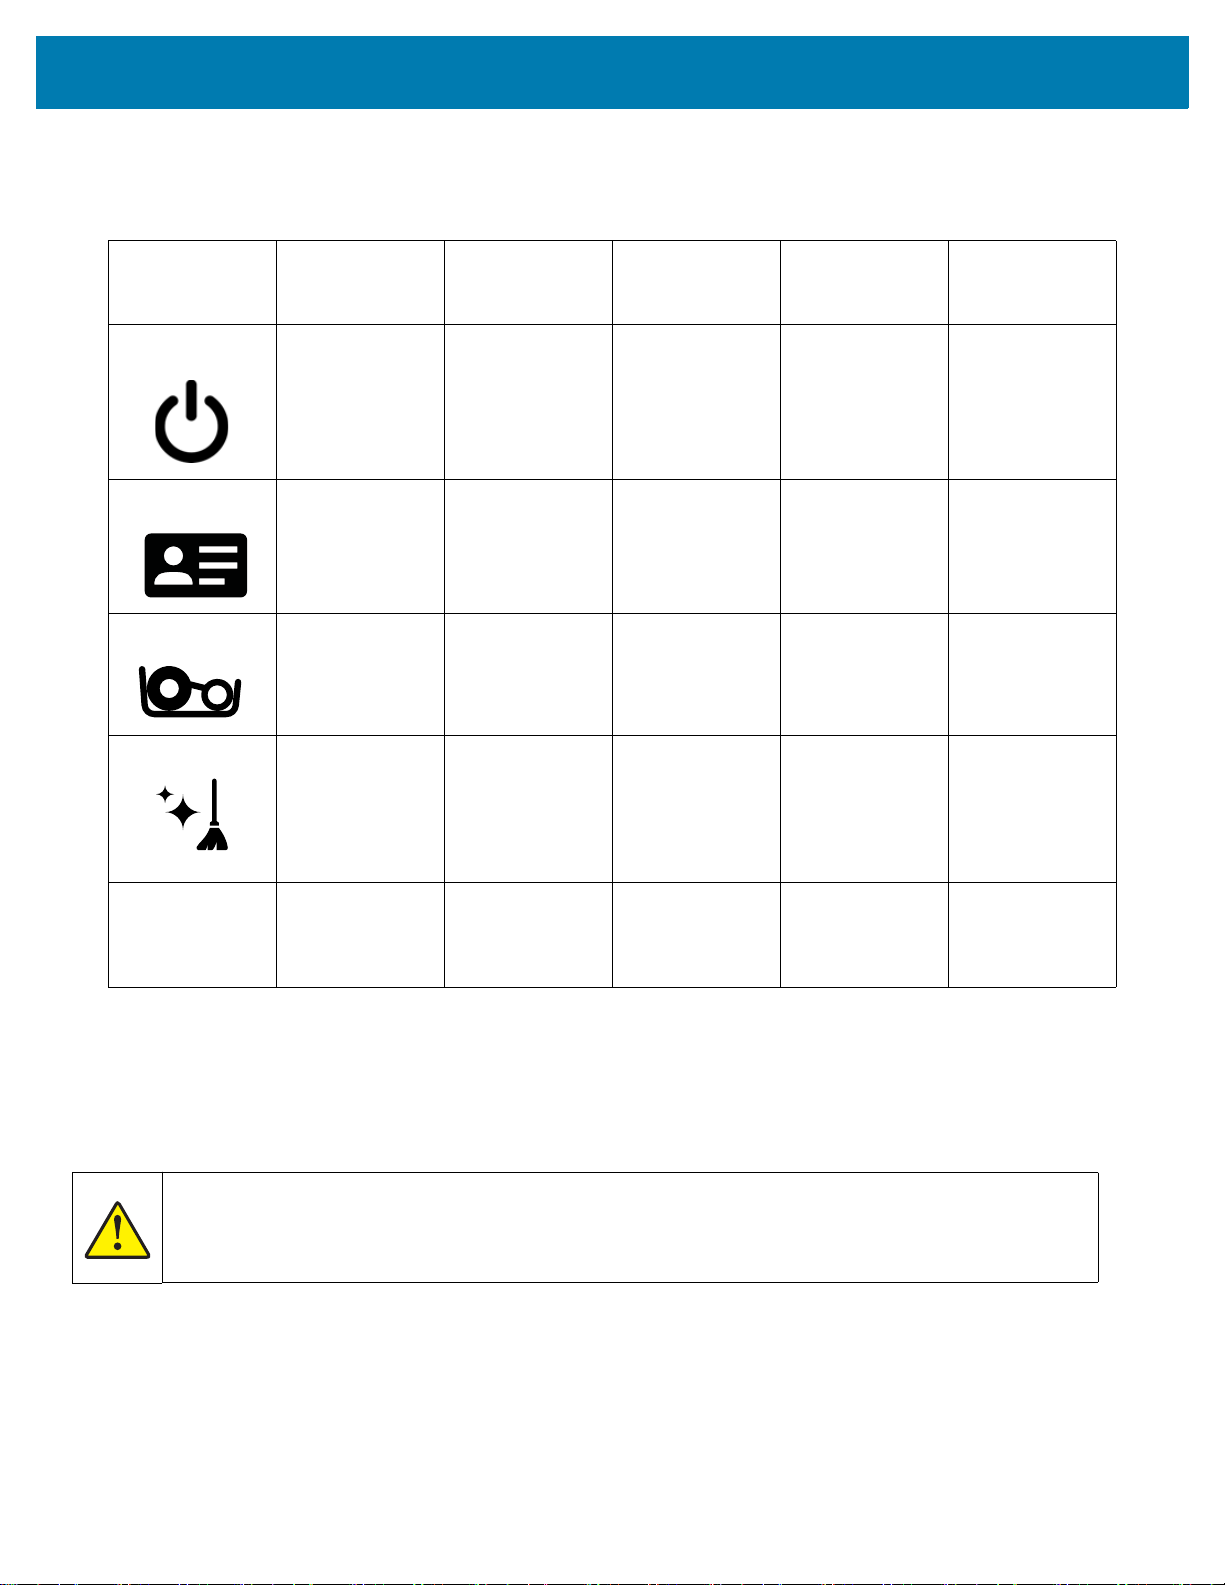
LED Warnings and Errors
Troubleshooting
Indicator
Blinking
Green
Solid Green Solid Amber Blinking Red Solid Red
Power Booting Up Power On N/A N/A Critical error
Card Printing/
Encoding in
Cards
available
N/A Card jam Cards out
progress
Ribbon Printing in
progress
Ribbon
available
Ribbon low Ribbon out/
ribbon jam/
Invalid ribbon
ribbon break
Clean Cleaning in
progress
Cleaning
complete (end
at 30 seconds)
Cleaning
warning
N/A Cleaning
error/reject
bin full
Manual Feed N/A Ready for
card/cleaning
N/A N/A Card insert
error
card
Clearing a Card Jam
A card jam is reported by the printer when a card fails to reach a sensor as expected, or a card blocks a sensor
unexpectedly.
Do not use tools to remove stuck cards, this will void the product warranty and may cause damage
to the equipment.
1. Open the printer.
2. Remove the ribbon cartridge.
24
Page 29

Troubleshooting
0DQXDO$GYDQFH:KHHO
Manual Advance Wheel
3. Rotate the manual advance wheel toward the front of the printer until the card exits the printer.
Identifying Print Quality Issues
Print quality refers to the quality of the text, barcodes, and images that are printed on the card.
Color Accuracy
When the colors on the printed card do not match the expected result, there are several steps that may be taken to
get the desired output.
1. If using the driver, make adjustments in Color Optimization.
2. If using the driver, create and apply a Windows ICC color profile.
3. Whether using the driver or not, contact Zebra to create a custom lookup table.
Dirt and Debris
Spots and speckles appearing on the card may be caused by dirt and debris in the printer.
• Replace the cleaning rollers
• Clean the printer
Image Placement
If the image printed on the card seems to have shifted, this may be an image placement issue.
• From the driver, use the Print Position adjustment feature.
Smear
Smear may occur when a sudden shift from a dark color to a light color occurs and the printhead has not sufficiently
cooled when printing the light color, thereby the dark color appears to “smear” into the light color.
• From the driver, Lower the Preheat value in Color Optimization.
25
Page 30

Troubleshooting
Black Extraction
When the black text or images does not appear black or crisp, or text that is supposed to be black appears muddy or
not sharp, this may be an issue where the black text or image was not printed using the black panel.
• Check the source image; RGB values up to 25,25,25 can be printed as black by using the sliders on the K
Extraction page. If RGB values are greater than 25,25,25, then the image will need to be modified to bring the
RGB values under this threshold
• Adjust the properties in Front or Back K Extraction.
Ribbon Wrinkle
Ribbon wrinkle appears as a streak of color that was not part of the original image. It typically originates from the
edges of the card, and sometimes occurs when printing a really dark image, or near the transition between really dark
and really light images
If this occurs, contact Zebra Tech Support.
Mis-registration
Mis-registration occurs when the Y, M, C, and/or K panels are not properly aligned with each other. The effect may
appear as a lack of sharpness, or a color halo.
If this occurs, contact Zebra Tech Support.
26
Page 31

Troubleshooting
Replacing the Printhead
Removal
1. Open the top cover
2. Push the printhead upward and then rotate to release the printhead assembly from the hooks.
3. Disconnect the cable connector from the printhead.
Installation
1. Connect the cable connector to the new printhead.
2. Note the serial number and resistance value of the new printhead.
3. Insert the stabilizer ball into its receptacle on the top cover.
4. Push the printhead upward and then rotate into the hooks.
5. Open the printer driver and click on the Advanced tab, then click on Diagnostics and Calibration, then click on
Commands & Calibration.
6. Under Printhead, enter the serial number and resistance value of the new printhead.
27
Page 32

Troubleshooting
Ethernet
Indicators
Orange — Link Speed Indicator
Off No link (disconnected)
1 Blink The LED blinks once (one blink, pause, one blink,
etc.) when a 10Base link has been established.
2 Blinks The LED blinks twice (two blinks, pause, two blinks,
etc.) when a 100Base link has been established.
Green — Link Activity Indicator
Off No link (disconnected)
On Network link has been established
Blinking Network activity has been detected
Issues
If both LEDs are off, the printer has not detected the presence of a network cable. To solve the problem:
• Verify that the network cable is appropriate and has an RJ-45 connector.
• Remove the network cable from the printer. Plug the network cable back in until you hear a positive click. Check
the other end of the cable in the same manner. If the printer still does not detect a cable, then continue.
• Connect the printer to a known good network. If the printer is still unable to detect the network cable, contact
Technical Support for assistance.
28
Page 33

Troubleshooting
Packing for Shipment
It is important that the printer packaging be saved in case it needs to be shipped to a different location. Maintain the
box, bag, and inserts; include the power supply when shipping.
1. Place the printer in the bag.
2. Place the bagged printer in the shipping box in its proper orientation.
3. Place the top tray.
4. Place the power supply and power cable into the top tray.
5. Close the box.
For further assistance, visit the support site (www.zebra.com/zc100-info or www.zebra.com/zc300-info) where you
will find:
• How-To videos for common tasks
• Driver and utility software
• Specialized user documentation
29
Page 34

 Loading...