

Page 1

ZBI-Developer™
User Guide
48789L-002
Page 2

© 2009 ZIH Corp. The copyrights in this manual and the software and/or firmware in the label printer describe d
therein are owned by ZIH Corp. Unauthorized reproduction of this manual or the software and/or firmware in the
label printer may result in imprisonment of up to one year and fines of up to $10,000 (17 U.S.C.506). Copyright
violators may be subject to civil liability.
This product may contain ZPL
Monotype Imaging fonts. Software © ZIH Corp. All rights reserved worldwide.
®
, ZPL II®, and ZebraLink™ programs; Element Energy Equalizer® Circuit; E3®; and
ZebraLink and all product names and numbers are trademarks, and Zebra, the Zebra logo, ZPL, ZPL II, Element
Energy Equalizer Circuit, and E
All other brand names, product names, or trademarks belong to their respective holders. For additional trademark
information, please see “Trademarks” on the product CD.
3
Circuit are registered trademarks of ZIH Corp. All rights reserved worldwide.
Proprietary Statement This manual contains proprietary information of Zebra Technologies Corporation and its
subsidiaries (“Zebra Technologies”). It is intended solely for the information and use of parties operating and
maintaining the equipment described herein. Such proprietary information may not be used, reproduced, or disclosed
to any other parties for any other purpose without the express, written permission of Zebra Technologies.
Product Improvements Continuous improvement of products is a policy of Zebra Technologies. All
specifications and designs are subject to change without notice.
Liability Disclaimer Zebra Technologies takes steps to ensure that its published Engineering specifications and
manuals are correct; however, errors do occur. Zebra Technologies reserves the right to correct any such errors and
disclaims liability resulting therefrom.
Limitation of Liability In no event shall Zebra Technologies or anyone else involved in the creation, production,
or delivery of the accompanying product (including hardware and software) be liable for any damages whatsoever
(including, without limitation, consequential damages including loss of business profits, business interruption, or loss
of business information) arising out of the use of, the results of use of, or inability to use such product, even if Zebra
Technologies has been advised of the possibility of such damages. Some jurisdictions do not allow the exclusion or
limitation of incidental or consequential damages, so the above limitation or exclusion may not apply to you.
Part Number: 48789L-002
Page 3

Contents
About This Document . . . . . . . . . . . . . . . . . . . . . . . . . . . . . . . . . . . . . . . . . . . . . . . 7
Who Should Use This Document . . . . . . . . . . . . . . . . . . . . . . . . . . . . . . . . . . . . . . . . . . . . 8
How This Document Is Organized . . . . . . . . . . . . . . . . . . . . . . . . . . . . . . . . . . . . . . . . . . . 8
Contacts . . . . . . . . . . . . . . . . . . . . . . . . . . . . . . . . . . . . . . . . . . . . . . . . . . . . . . . . . . . . . . . 9
Document Conventions. . . . . . . . . . . . . . . . . . . . . . . . . . . . . . . . . . . . . . . . . . . . . . . . . . . 10
Related Documents . . . . . . . . . . . . . . . . . . . . . . . . . . . . . . . . . . . . . . . . . . . . . . . . . . . . . .11
ZBI-Developer . . . . . . . . . . . . . . . . . . . . . . . . . . . . . . . . . . . . . . . . . . . . . . . . . . . . 13
Introduction - Welcome to ZBI-Developer. . . . . . . . . . . . . . . . . . . . . . . . . . . . . . . . . . . . . 13
System Requirements . . . . . . . . . . . . . . . . . . . . . . . . . . . . . . . . . . . . . . . . . . . . . . . . 14
Printers, ZBI Keys & ZBI Versions . . . . . . . . . . . . . . . . . . . . . . . . . . . . . . . . . . . . . . . 14
Supported Print Servers . . . . . . . . . . . . . . . . . . . . . . . . . . . . . . . . . . . . . . . . . . . . . . . 15
Installation. . . . . . . . . . . . . . . . . . . . . . . . . . . . . . . . . . . . . . . . . . . . . . . . . . . . . . . . . . . . . 16
Starting ZBI-Developer . . . . . . . . . . . . . . . . . . . . . . . . . . . . . . . . . . . . . . . . . . . . . . . . 17
The Interface. . . . . . . . . . . . . . . . . . . . . . . . . . . . . . . . . . . . . . . . . . . . . . . . . . . . . . . . . . . 18
Menu and Toolbars. . . . . . . . . . . . . . . . . . . . . . . . . . . . . . . . . . . . . . . . . . . . . . . . . . . 19
Edit Menu . . . . . . . . . . . . . . . . . . . . . . . . . . . . . . . . . . . . . . . . . . . . . . . . . . . . . . . . . . 27
Run Menu. . . . . . . . . . . . . . . . . . . . . . . . . . . . . . . . . . . . . . . . . . . . . . . . . . . . . . . . . . 30
Window Menu. . . . . . . . . . . . . . . . . . . . . . . . . . . . . . . . . . . . . . . . . . . . . . . . . . . . . . . 30
ZBI Perspective. . . . . . . . . . . . . . . . . . . . . . . . . . . . . . . . . . . . . . . . . . . . . . . . . . . . . . . . . 31
Navigator View . . . . . . . . . . . . . . . . . . . . . . . . . . . . . . . . . . . . . . . . . . . . . . . . . . . . . . 32
Printer View . . . . . . . . . . . . . . . . . . . . . . . . . . . . . . . . . . . . . . . . . . . . . . . . . . . . . . . . 33
Create a Virtual Printer. . . . . . . . . . . . . . . . . . . . . . . . . . . . . . . . . . . . . . . . . . . . . . . . 34
Edit a Virtual Printer . . . . . . . . . . . . . . . . . . . . . . . . . . . . . . . . . . . . . . . . . . . . . . . . . . 36
Using Virtual Printers . . . . . . . . . . . . . . . . . . . . . . . . . . . . . . . . . . . . . . . . . . . . . . . . . 38
Problems View . . . . . . . . . . . . . . . . . . . . . . . . . . . . . . . . . . . . . . . . . . . . . . . . . . . . . . 39
5/14/09 ZBI-Developer User Guide 48789L-002
Page 4

4
Contents
Debug Perspective . . . . . . . . . . . . . . . . . . . . . . . . . . . . . . . . . . . . . . . . . . . . . . . . . . . . . . 40
Debug View . . . . . . . . . . . . . . . . . . . . . . . . . . . . . . . . . . . . . . . . . . . . . . . . . . . . . . . . 41
Printer Status View . . . . . . . . . . . . . . . . . . . . . . . . . . . . . . . . . . . . . . . . . . . . . . . . . . . 42
Variable View . . . . . . . . . . . . . . . . . . . . . . . . . . . . . . . . . . . . . . . . . . . . . . . . . . . . . . . 44
Breakpoints View . . . . . . . . . . . . . . . . . . . . . . . . . . . . . . . . . . . . . . . . . . . . . . . . . . . . 45
Help Menu . . . . . . . . . . . . . . . . . . . . . . . . . . . . . . . . . . . . . . . . . . . . . . . . . . . . . . . . . 45
View ASCII Table . . . . . . . . . . . . . . . . . . . . . . . . . . . . . . . . . . . . . . . . . . . . . . . . . . . . 46
About ZBI-Developer . . . . . . . . . . . . . . . . . . . . . . . . . . . . . . . . . . . . . . . . . . . . . . . . . 47
Configuration of ZBI-Developer . . . . . . . . . . . . . . . . . . . . . . . . . . . . . . . . . . . . . . . . . . . . 48
Changing the Workspace Location. . . . . . . . . . . . . . . . . . . . . . . . . . . . . . . . . . . . . . . 48
Setting Preferences . . . . . . . . . . . . . . . . . . . . . . . . . . . . . . . . . . . . . . . . . . . . . . . . . . 49
Changing the Screen Layout . . . . . . . . . . . . . . . . . . . . . . . . . . . . . . . . . . . . . . . . . . . 53
ZBI-Developer Tutorial . . . . . . . . . . . . . . . . . . . . . . . . . . . . . . . . . . . . . . . . . . . . . . . . . . . 54
Views . . . . . . . . . . . . . . . . . . . . . . . . . . . . . . . . . . . . . . . . . . . . . . . . . . . . . . . . . . . . . 54
Perspectives. . . . . . . . . . . . . . . . . . . . . . . . . . . . . . . . . . . . . . . . . . . . . . . . . . . . . . . . 54
Project Files . . . . . . . . . . . . . . . . . . . . . . . . . . . . . . . . . . . . . . . . . . . . . . . . . . . . . . . . 55
Starting the Software . . . . . . . . . . . . . . . . . . . . . . . . . . . . . . . . . . . . . . . . . . . . . . . . . 56
Starting a New Project . . . . . . . . . . . . . . . . . . . . . . . . . . . . . . . . . . . . . . . . . . . . . . . . 57
Starting a New ZBI Program. . . . . . . . . . . . . . . . . . . . . . . . . . . . . . . . . . . . . . . . . . . . 58
Saving a New ZBI Program . . . . . . . . . . . . . . . . . . . . . . . . . . . . . . . . . . . . . . . . . . . . 59
Writing a New ZBI Program . . . . . . . . . . . . . . . . . . . . . . . . . . . . . . . . . . . . . . . . . . . . 60
ZBI Command Syntax Help . . . . . . . . . . . . . . . . . . . . . . . . . . . . . . . . . . . . . . . . . . . . 61
The Problems View. . . . . . . . . . . . . . . . . . . . . . . . . . . . . . . . . . . . . . . . . . . . . . . . . . . 62
Setting Breakpoints. . . . . . . . . . . . . . . . . . . . . . . . . . . . . . . . . . . . . . . . . . . . . . . . . . . 63
Discovering Printers . . . . . . . . . . . . . . . . . . . . . . . . . . . . . . . . . . . . . . . . . . . . . . . . . . 64
Setting Up Searches. . . . . . . . . . . . . . . . . . . . . . . . . . . . . . . . . . . . . . . . . . . . . . . . . . 64
Using a Printer via the Serial Port. . . . . . . . . . . . . . . . . . . . . . . . . . . . . . . . . . . . . . . . 67
Using a Printer via the Parallel Port . . . . . . . . . . . . . . . . . . . . . . . . . . . . . . . . . . . . . . 67
Using Virtual Printers . . . . . . . . . . . . . . . . . . . . . . . . . . . . . . . . . . . . . . . . . . . . . . . . . 68
Creating a Debug Connection . . . . . . . . . . . . . . . . . . . . . . . . . . . . . . . . . . . . . . . . . . 70
Debug a Program . . . . . . . . . . . . . . . . . . . . . . . . . . . . . . . . . . . . . . . . . . . . . . . . . . . . 72
Changing the Screen Layout . . . . . . . . . . . . . . . . . . . . . . . . . . . . . . . . . . . . . . . . . . . 73
Run a Program . . . . . . . . . . . . . . . . . . . . . . . . . . . . . . . . . . . . . . . . . . . . . . . . . . . . . . 74
Step Over a Breakpoint. . . . . . . . . . . . . . . . . . . . . . . . . . . . . . . . . . . . . . . . . . . . . . . . 76
Terminating a Running Program. . . . . . . . . . . . . . . . . . . . . . . . . . . . . . . . . . . . . . . . . 78
Creating the Autoexec.zpl file. . . . . . . . . . . . . . . . . . . . . . . . . . . . . . . . . . . . . . . . . . . 79
Sending Files to Printers. . . . . . . . . . . . . . . . . . . . . . . . . . . . . . . . . . . . . . . . . . . . . . . 80
Using CSV/TXT Files with Virtual Printers . . . . . . . . . . . . . . . . . . . . . . . . . . . . . . . . . 84
Import ZBI Files From a Printer . . . . . . . . . . . . . . . . . . . . . . . . . . . . . . . . . . . . . . . . . 85
Compare or Replace Files . . . . . . . . . . . . . . . . . . . . . . . . . . . . . . . . . . . . . . . . . . . . . . . . 86
48789L-002 ZBI-Developer User Guide 5/14/09
Page 5

Contents
Encryption of ZBI Programs . . . . . . . . . . . . . . . . . . . . . . . . . . . . . . . . . . . . . . . . . . . . . . . 87
The Default Encryption Key . . . . . . . . . . . . . . . . . . . . . . . . . . . . . . . . . . . . . . . . . . . . 87
Encrypt a ZBI Program . . . . . . . . . . . . . . . . . . . . . . . . . . . . . . . . . . . . . . . . . . . . . . . 88
Distributing Encrypted Programs . . . . . . . . . . . . . . . . . . . . . . . . . . . . . . . . . . . . . . . . 89
Generate a New Key . . . . . . . . . . . . . . . . . . . . . . . . . . . . . . . . . . . . . . . . . . . . . . . . . 89
Key Storage . . . . . . . . . . . . . . . . . . . . . . . . . . . . . . . . . . . . . . . . . . . . . . . . . . . . . . . . 90
ZBI File Properties . . . . . . . . . . . . . . . . . . . . . . . . . . . . . . . . . . . . . . . . . . . . . . . . . . . 90
ZBI Technical Support. . . . . . . . . . . . . . . . . . . . . . . . . . . . . . . . . . . . . . . . . . . . . . . . . . . . 91
Online Support . . . . . . . . . . . . . . . . . . . . . . . . . . . . . . . . . . . . . . . . . . . . . . . . . . . . . . 91
Contact Information . . . . . . . . . . . . . . . . . . . . . . . . . . . . . . . . . . . . . . . . . . . . . . . . . . 91
Index . . . . . . . . . . . . . . . . . . . . . . . . . . . . . . . . . . . . . . . . . . . . . . . . . . . . . . . . . . . . 93
5
5/14/09 ZBI-Developer User Guide 48789L-002
Page 6

Contents
Notes • ___________________________________________________________________
__________________________________________________________________________
__________________________________________________________________________
__________________________________________________________________________
__________________________________________________________________________
__________________________________________________________________________
__________________________________________________________________________
__________________________________________________________________________
__________________________________________________________________________
__________________________________________________________________________
6
48789L-002 ZBI-Developer User Guide 5/14/09
Page 7

About This Document
This section provides you with contact information, documen t struc ture and organization, and
additional reference documents.
Contents
Who Should Use This Document. . . . . . . . . . . . . . . . . . . . . . . . . . . . . . . . . . . . . . . . . . . . 8
How This Document Is Organized . . . . . . . . . . . . . . . . . . . . . . . . . . . . . . . . . . . . . . . . . . . 8
Contacts. . . . . . . . . . . . . . . . . . . . . . . . . . . . . . . . . . . . . . . . . . . . . . . . . . . . . . . . . . . . . . . 9
Document Conventions . . . . . . . . . . . . . . . . . . . . . . . . . . . . . . . . . . . . . . . . . . . . . . . . . . 10
Related Documents . . . . . . . . . . . . . . . . . . . . . . . . . . . . . . . . . . . . . . . . . . . . . . . . . . . . . 11
5/14/09 ZBI-Developer User Guide 48789L-002
Page 8

About This Document
8
Who Should Use This Document
Who Should Use This Document
This User Guide helps you quickly develop, test, and distribute ZBI programs using
ZBI-Developer™.
How This Document Is Organized
The User Guide is set up as follows:
Section Description
Introduction - Welcome to ZBIDeveloper
Installation
The Interface
Configuration of ZBI-Developer
ZBI-Developer Tutorial
Encryption of ZBI Programs
Encryption of ZBI Programs
An introduction to ZBI-Developer
How to install the program
Describes the ZBI-Developer interface
How to set up and customize software to your
preferences
How to create, test, and distribute a new ZBI
programs using the ZBI-Developer environment
How to optionally encrypt programs before
distributing them
How to contact technical support
48789L-002 ZBI-Developer User Guide 5/14/09
Page 9

Contacts
About This Document
Technical Support via the Internet is available 24 hours per day, 365 days per year.
Web Site: www.zebra.com
E-mail Back Technical Library:
E-mail address: emb@zebra.com
Subject line: Emaillist
Self Service Knowledge Base: www.zebra.com/knowledgebase
Online Case Registration: www.zebra.com/techrequest
Contacts
9
Which Department
Do You Need?
Regional Headquarters
Technical Support
For questions on the
operation of Zebra
equipment and software,
please call your distributor.
For additional assistance,
contact us.
Please have your model and
serial numbers available.
Repair Service
Department
For back-to-base service and
repair.
Technical Tr aining
Department
For Zebra product training
courses.
Inquiry Department
For product literature and
distributor and dealer
information.
Customer Service
Department (US)
Internal Sales
Department (UK)
For printers, parts, media,
and ribbon, please call your
distributor or contact us.
Key:
T: Telephone
F: Facsimile
E: E-mail
The Americas
Zebra Technologies In ternational, LLC
333 Corporate W oods Parkway
Vernon Hills, IL 60061-3109
U.S.A.
T: +1 847 793 2600
Toll-free +1 800 423 0422
F: +1 847 913 8766
T: +1 877 ASK ZEBRA (275 9327)
F: +1 847 913 2578
Hardware: ts1@zebra.com
Software: ts3@zebra.com
Kiosk printers:
T: +1 866 322 5202
E: kiosksupport@zebra.com
T: +1 877 ASK ZEBRA (275 9327)
F: +1 847 821 1797
E: repair@zebra.com
To request a repair in the U.S.,
go to www.zebra.com/repair
T: +1 847 793 6868
T: +1 847 793 6864
F: +1 847 913 2578
E: ttamerica@zebra.com
T: +1 877 ASK ZEBRA (275 9327)
E: inquiry4@zebra.com
T: +1 877 ASK ZEBRA (275 9327)
E: clientcare@zebra.com
.
Europe, Africa,
Middle East, India
Zebra Technologies Europe Limited
Dukes Meadow
Millboard Road
Bourne End
Buckinghamshire, SL8 5XF
United Kingdom
T: +44 (0) 1628 556000
F: +44 (0) 1628 556001
T: +44 (0) 1628 556039
F: +44 (0) 1628 556003
E: Tseurope@zebra.com
T: +44 (0) 1772 693069
F: +44 (0) 1772 693046
New requests: ukrma@zebra.com
Status updates:
repairupdate@zebra.com
T: +44 (0) 1628 556000
F: +44 (0) 1628 556001
E: Eurtraining@zebra.com
T: +44 (0) 1628 556037
F: +44 (0) 1628 556005
E: mseurope@zebra.com
T: +44 (0) 1628 556032
F: +44 (0) 1628 556001
E: cseurope@zebra.com
Asia Pacific
Zebra Technologies Asia
Pacific Pte. Ltd.
120 Robinson Road
#06-01 Parakou Building
Singapore 068913
T: + 65 6858 0722
F: +65 6885 0838
T: +65 6858 0722
F: +65 6885 0838
E: China: tschina@zebra.com
All other areas:
tsasiapacific@zebra.com
T: +65 6858 0722
F: +65 6885 0838
E: China: tschina@zebra.com
All other areas:
tsasiapacific@zebra.com
T: + 65 6858 0722
F: +65 6885 0838
E: China: tschina@zebra.com
All other areas:
tsasiapacific@zebra.com
E: China: GCmarketing@zebra.com
All other areas:
AP ACChannelmarketing@zebra.com
T: +65 6858 0722
F: +65 6885 0836
E: China: order-csr@zebra.com
All other areas:
csasiapacific@zebra.com
5/14/09 ZBI-Developer User Guide 48789L-002
Page 10

About This Document
10
Document Conventions
Document Conventions
The following conventions are used throughout this document to convey certain information.
Alternate Color (online only) Cross-references contain hot links to other sections in this
guide. If you are viewing this guide online in .p df format, you can click the cross-reference
(blue text) to jump directly to its location.
Command Line Examples Command line examples appear in Courier New font. For
example, type
Files and Directories File names and directories appear in Courier New font. For
example, the
Notes and Examples
Note • Indicates neutral or positive information that emphasizes or supplements important
points of the main text.
Example • Provides an example, often a scenario, to better clarify a section of text.
ZTools to get to the Post-Install scripts in the bin directory.
Zebra<version number>.tar file and the /root directory.
48789L-002 ZBI-Developer User Guide 5/14/09
Page 11

Related Documents
The following documents might be helpful references:
Applicable Zebra Printer User Guide
®
ZPL II
ZebraNet
ZebraNet
Programming Guide
®
10/100 Print Server User Guide
®
Wireless Print Server User Guide
About This Document
Related Documents
11
5/14/09 ZBI-Developer User Guide 48789L-002
Page 12

About This Document
Notes • ___________________________________________________________________
__________________________________________________________________________
__________________________________________________________________________
__________________________________________________________________________
__________________________________________________________________________
__________________________________________________________________________
__________________________________________________________________________
__________________________________________________________________________
__________________________________________________________________________
__________________________________________________________________________
12
Related Documents
48789L-002 ZBI-Developer User Guide 5/14/09
Page 13

ZBI-Developer
Introduction - Welcome to ZBI-Developer
ZBI-Developer is an Integrated Development Environment (IDE), designed to assist in the
creation, testing and distribution of programs written for use in the Zebra Basic Interpreter™
(ZBI™).
ZBI-Developer offers several ease-of-use features:
• Project File Control – Keeps related files in a single Project folder
• Pop-up Help – displays ZBI command syntax and examples
• Virtual Printers – allows ZBI programs to be run on the PC, with no need for a printer
• Multiple Perspectives – displays different display modes for the software:
• ZBI Perspective – used for writing ZBI programs
• Debug Perspective – used for testing and checking programs
• Multiple Views – displays different information screens:
• Navigator View – used to manage Projects and files in projects
• Printer View – used to manage physical and virtual printers
• Debug View – used to display the name of the program being tested
• Breakpoints View – used to view the list of breakpoints and jump to each point
• Variable View – used to view the current value of variables in the program
• Problems View – displays Warnings and Errors detected in the ZBI program
• Ports View – displays data as it flows through ports used in the program
• Program Distribution – programs can be easily sent to a prin ter
• Program Encryption – programs can be encrypted in order to protect proprietary data
• File Drag and Drop – files can be dragged into a project from the Windows® Explorer
environment
• File Import – files can be imported from printers into Projects in ZBI-Developer
• File Compare – files can be compared to earlier versions of the same file or to other files
5/14/09 ZBI-Developer User Guide 48789L-002
Page 14

ZBI-Developer
14
Introduction - Welcome to ZBI-Developer
System Requirements
These are the minimum requirements needed to run ZBI-Developer™
• Pentium®-based computer with at least 64 MB of RAM
• One of the 32-bit Windows® operating system:
• Windows 20 00 ®
•Windows XP®
•Windows Vista®
• Windows Server 2003®
• Hard disk with 80 MB of free disk space
• Administrator rights to the local computer during installation
Printers, ZBI Keys & ZBI Versions
Information about ZBI 1.x and ZBI 2.x:
ZBI versions 1.0 through 1.5:
ZBI 1.x was available on printers with X.10 or higher firmware (such as V48.10.x). To
determine if the printer supports ZBI version 1, check the firmware version loaded on the
printer. This can be determined by the absence of a “Z” in the firmware version number (for
example, firmware V60.13.0.12 supports ZBI version 1, while V60.13.0.12Z does not). The
following printers support the ZBI 1.x firmware:
• LP/TLP 284x-Z and 384x-Z
• S300/S400/S500/S600
• Z4000/Z6000
•Z4M/Z6M
Z4Mplus/Z6Mplus
•
• 105SL
• PAX 3
• XiII
• XiIII
ZBI-Developer can be used to create programs for use on printers that support ZBI version
1.x., however, the features that are only available in ZBI v2.x cannot be used with printers
running ZBI v1.x. For example, “on-printer” debugging advanced file encryption and
commands added in ZBI 2 are not supported in printers running ZBI 1.x. If you do not have a
printer that meets this requirement, contact your reseller.
Note • Support for ZBI versions 1.0 through 1.5 is limited to syntax checking only.
On-printer debugging is not supported for ZBI versions 1.0 through 1.5.
48789L-002 ZBI-Developer User Guide 5/14/09
Page 15

ZBI-Developer
Introduction - Welcome to ZBI-Developer
ZBI versions 2.0 and higher:
Printers with firmware versions X.16 or later (for example, V60.16.x and V53.16.x) can
support ZBI version 2.0 and later. The following printers support the ZBI 2.x firmware:
• XiIIIPlus
• Z4Mplus/Z6Mplus
•105SL
•S4M
• PAX4
•ZM400/ZM600
•HC100
•G-Series
•Xi4
These printers can be either ZBI-Ready or ZBI-Enabled, depending on whether or not a ZBI
Key file has been loaded on the printer. ZBI Keys can be loaded onto printers during
manufacturing or later purchased at www.zebrasoftware.com
. A Downloader Utility/ZBI Key
Manager software utility is available to assist in the task of sending ZBI Keys to printers.
15
The ZBI.nrd file is required to be present on the printer for ZBI 2.0 to be enabled. The ZBI
Key is stored on the printer’s E: memory location with the name ZBI.nrd. The file is persistent.
It cannot be deleted even if the printer’s memory is initialized. For example, if the ^JB
command is used to initialize the location, the ZBI Key file will not be deleted.
When a printer is ZBI-Ready but not ZBI-Enabled, the firmware version will display a "Z" at
the end of the version string (for example, V60.16.0Z). Additionally, the printer’s
configuration label will show that the printer is not ZBI-Enabled.
When a printer is ZBI-Enabled, the firmware version will not display a "Z" at the end of the
version string (for example, V60.16.0). Additionally, the printer’s configuration label will
show that the printer is ZBI-Enabled.
Note • Each single ZBI Key can only be used once. When multiple printers are to be
ZBI-Enabled, multiple Keys will be neede d. The ZBI Key cannot be retri eved from printer
to a host system.
Supported Print Servers
These are the supported ZebraNet print servers:
• ZebraNet 10/100 Print Server (firmware V1.1.6 or later required to support on-printer
debugging)
• ZebraNet Wireless Print Serv er (V60.16 .x , V53.16.x or later firmware required)
• ZebraNet Wireless Plus Print Server (V60.16.x, V53.16.x or later firmware required)
5/14/09 ZBI-Developer User Guide 48789L-002
Page 16
ZBI-Developer
16
Installation
Installation
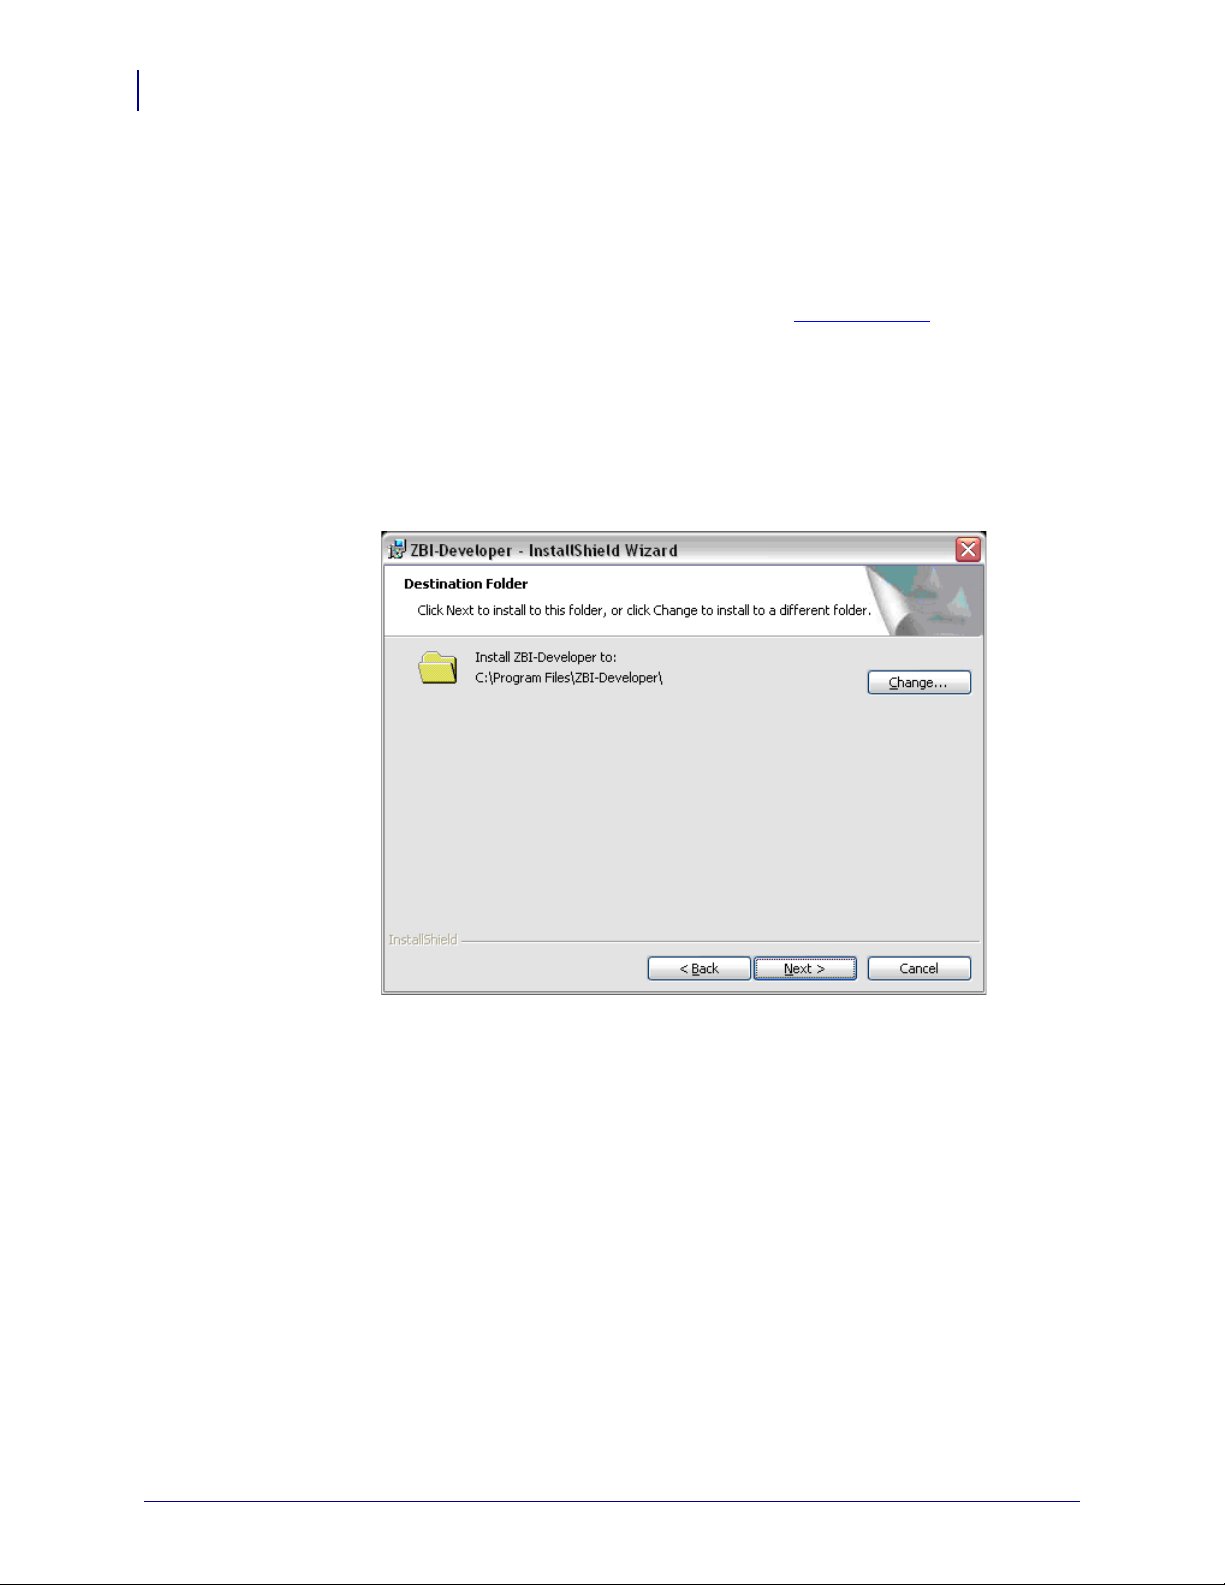
ZBI-Developer can be installed from a downloaded copy or from a CD-ROM containing the
software. Before starting the ZBI-De veloper installat ion, close all other software applicati ons.
This ensures a complete installation of all of the program files.
The complete installation package can be downloaded from www.zebra.com
Note • If you are using Windows 2000, Windows XP, Windows Vista or Windows Server
2003, you must log on with Administrator rights to p erform the installation.
During the installation, follow the user prompts to control the location in which to install the
software and other options. If you change the default directory location for the software
installation, be sure to note the new location. This information will be helpful to have for
backup and archival purposes.
Once the installation is complete, click Finish to complete.
48789L-002 ZBI-Developer User Guide 5/14/09
Page 17

Starting ZBI-Developer
ZBI-Developer can be started from the Windows Start menu – Start > Programs >
ZBI-Developer or from any shortcuts created for the ZbiDeveloper.exe file.
When the program is run for the first time, the default interface, or workspace, will be
displayed.
ZBI-Developer
Installation
17
5/14/09 ZBI-Developer User Guide 48789L-002
Page 18

ZBI-Developer
18
The Interface
The Interface
The ZBI-Developer interface is designed to give the user quick access to the key features
needed to develop ZBI programs. The interface is divided int o various vi sual elements; thes e
include the Menu bar, Toolbars, Perspectives, Views, and Editors that make up the interface.
• Menu and Toolbars – display quick access to the various functions and features of
ZBI-Developer
• Projects – used to manage the files associated with creating a ZBI program
• Perspectives – display different use modes for the software:
• ZBI Perspective for writing ZBI programs
• Debug Perspective for testing and checking programs.
• Views – display different information screens:
• Navigator View – used to manage Projects and files in projects
• Printer View – used to manage physical and virtual printers
• Debug View – used to display the name of the program being tested
• Breakpoints View – used to view the list of breakpoints and jump to each point
• Variable View – used to view the current value of variables in the program
• Problems View – displays Warnings and Errors detected in the ZBI program
• Ports V iew – disp lays da ta as it fl ows thro ugh ports (seri al, parallel , IP) used in a ZBI
program
• Editors – Used to create and alter files. The appropriate editor is displayed for the selec ted
file type.
48789L-002 ZBI-Developer User Guide 5/14/09
Page 19

Menu and Toolbars
The Menu and Toolbars are located at the top of the screen. They provide access to the File,
Edit, Run, Window, and Help submenus and commonly used program features.
File Menu
The File menu enables you to create, save, close, print, import, and export resources, and exit
ZBI-Developer.
New Project
To create a new Project, select File > New > New Project.
The New ZBI Project Wizard will display, with prompts for creating a new Project. Use the
Wizard prompts to fill in the Project name (required). Click Finish to complete the Wizard.
ZBI-Developer
The Interface
19
5/14/09 ZBI-Developer User Guide 48789L-002
Page 20
ZBI-Developer
20
The Interface
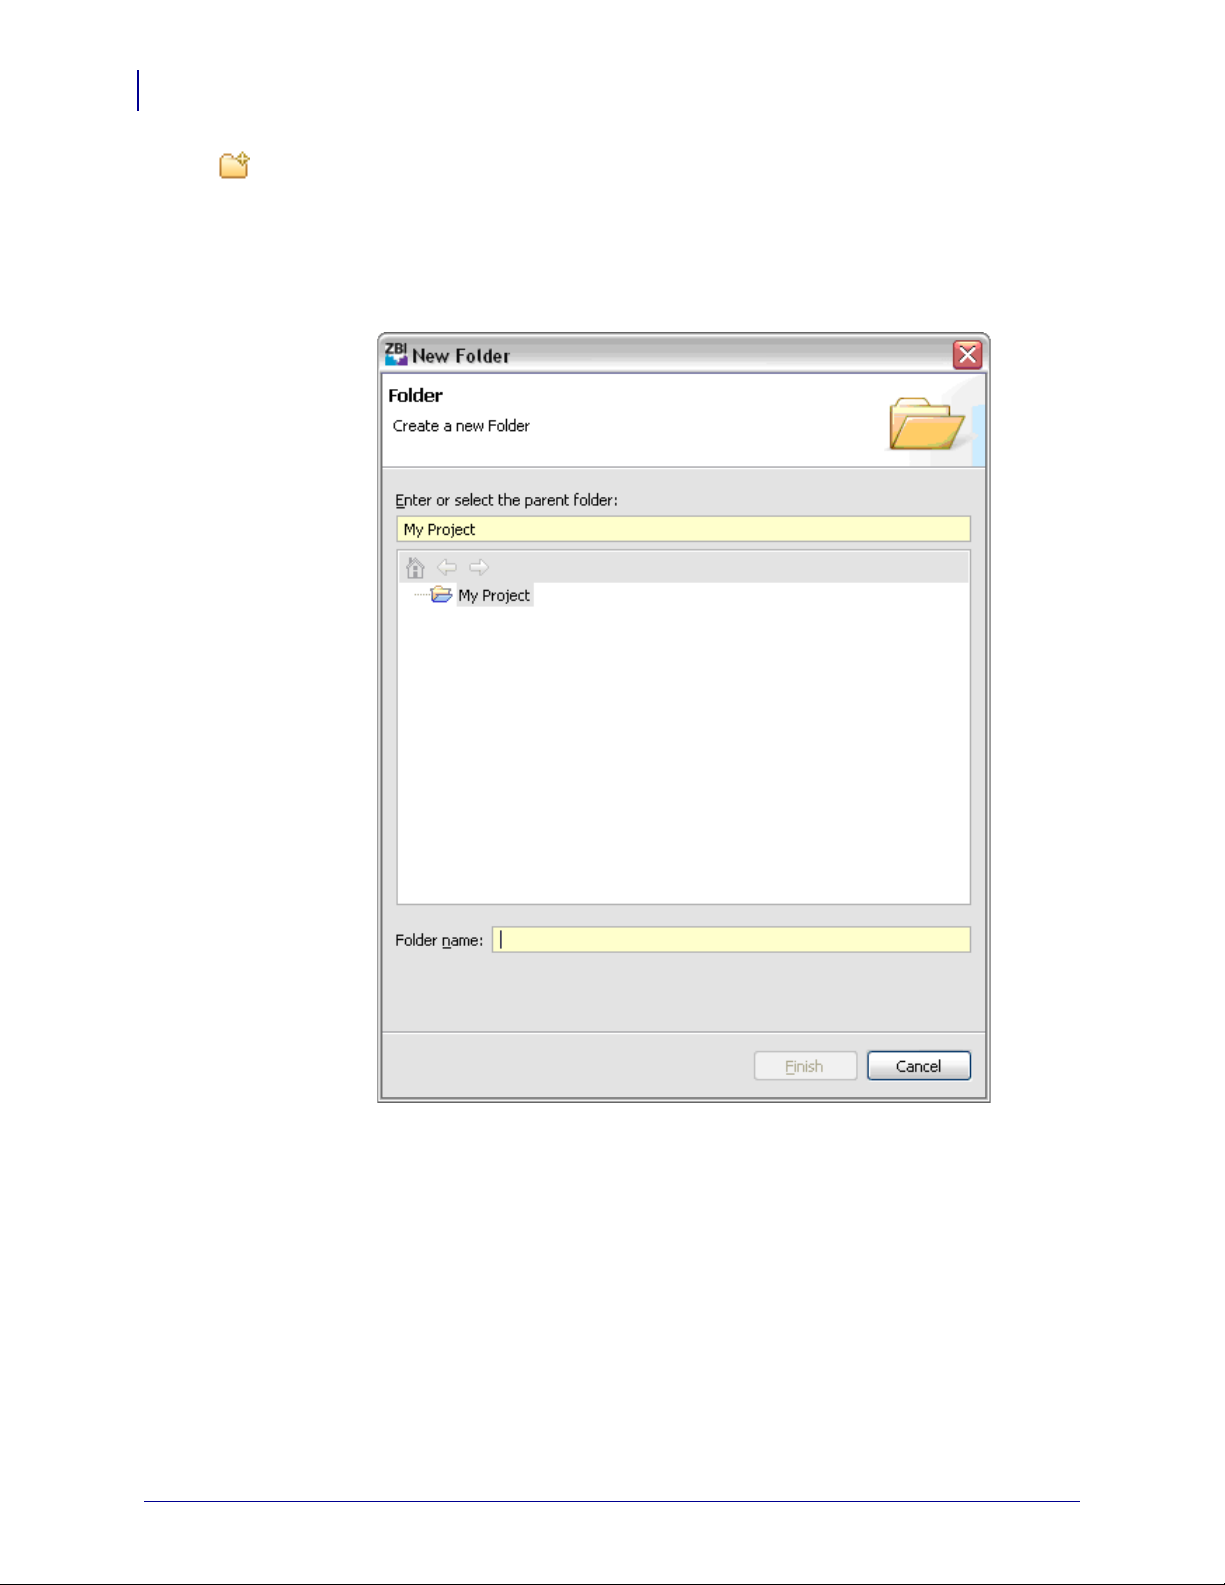
New Folder
To create a new Folder within a Project, click on a Project in the Navigator View to select it
and click File > New > New Folder.
The New Folder Wizard will display, with prompts for creating the New Folder. Use the
Wizards prompt to fill in the New Folder name. Click Finish to complete the Wizard.
48789L-002 ZBI-Developer User Guide 5/14/09
Page 21

ZBI-Developer
The Interface
New ZBI Program
To create a new ZBI Program, select File > New > New ZBI Program. A new, Untitled ZBI
program will open and display in the ZBI-Developer workspace. The program will not appear
in the Project Folders until it is named and saved. To Save and Name a program, type or paste
content into the program and click the File > Save menu selection.
New Untitled File
To create a new Untitled File, select File > New > New Untitled File. Untitled Files are
usually created to store data importan t to the Project, suc h as data or inp ut streams that th e ZBI
program will use during execution. Untitled Files can also be used to create Notes or
documentation for the Project. Clicking the New Untitle d File icon has the same ef fect. A new,
Untitled File will open and display in the ZBI-Developer workspace. The File will not appear
in the Project Folders until it is named and saved. To Save and Name a program, type or paste
content into the program and click the File > Save menu item.
21
5/14/09 ZBI-Developer User Guide 48789L-002
Page 22

ZBI-Developer
22
The Interface
Import a File
To Import a file from the computer’s hard drive into a Project, select File > Import…. Fi les
cannot be imported unless they are being directed into a Project.
When Import… is selected, the Import Wizard will be displayed. Use the Browse button to
select the file to import. Use the Name to Import As textbox to alter the name as needed. Files
with .zbi extensions will be imported as .zbi files. Other file types will retain their original file
extension. If a file does not have an extension, it will be given a .txt extension.
48789L-002 ZBI-Developer User Guide 5/14/09
Page 23
ZBI-Developer
The Interface
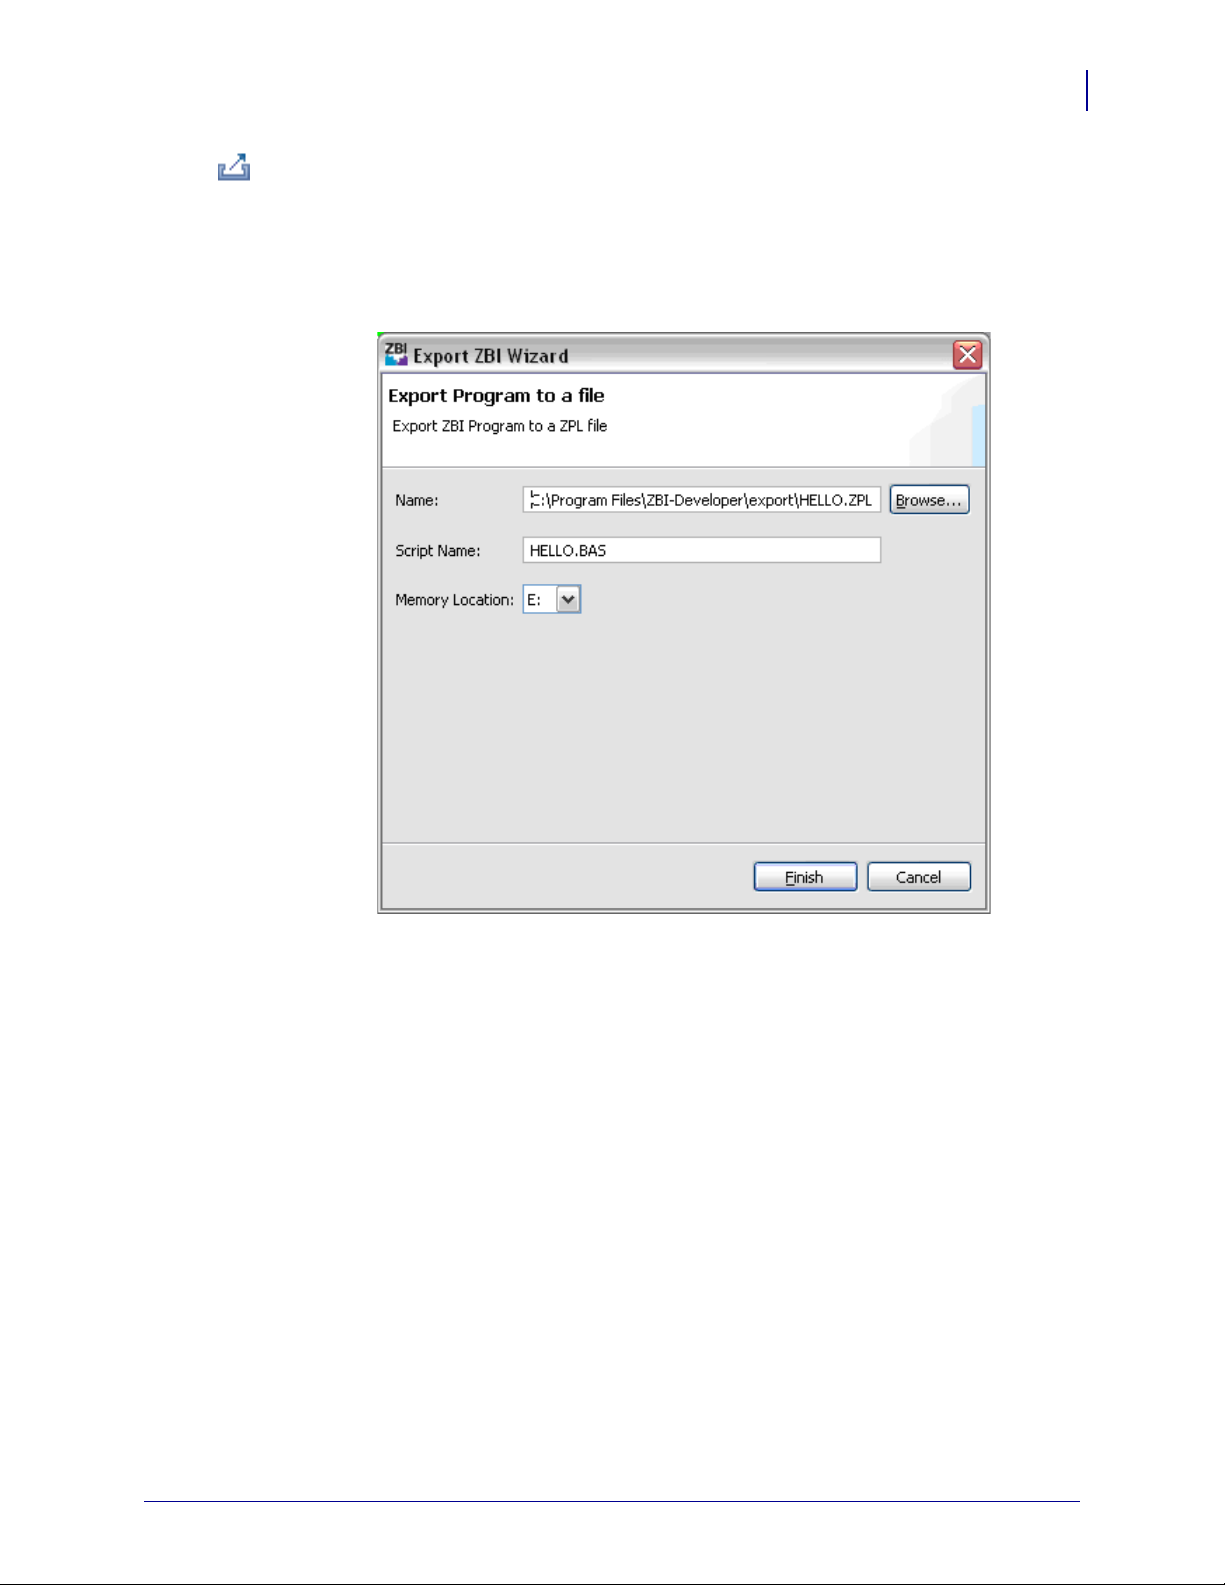
Exporting Files
To Export ZBI Programs and Encryption Key Files from the ZBI-Developer environm ent to
the computer’s hard drive, click on a file and then select File > Export….
Based on the choices entered in the Export Wizard, the name of the file and the printer
memory location to store it in will be written automatically into the Export file.
23
The purpose of the Export ZBI Program feature is to create a file that can be distributed to one
or more printers. During the Export process, ZBI programs will be exported in a format for use
on a printer. The program will be MIME encoded, with all REM statements removed from the
program.
Note: In order for an encrypted program to be executable, the mat ching encryption key
must also be present in the printer.
If the ZBI program has been Encrypted, then the Exported file will be Encryp ted and MIME
encoded. This allows the programmer to create a file that can be emailed to users without
revealing proprietary information.
5/14/09 ZBI-Developer User Guide 48789L-002
Page 24

ZBI-Developer
24
The Interface
Exporting Projects
To Export a ZBI Project to a single file on the computers hard drive, click on a Project folder
and then select File > Export…
Based on the choices entered in the Export Wizard, the files in the project will be written to a
single file on the hard drive.
The purpose of the Export feature is to create a file that can be distributed to one or more
printers. During the Export process, ZBI programs will be exported in a format for use on a
printer. The program will be MIME encoded, with all REM statements removed from the
program.
If the ZBI program has been Encrypted, then the Exported file will be Encryp ted and MIME
encoded. This allows the programmer to create a file that can be emailed to users without
revealing proprietary information. To use this feature, it is necessary to first use the Export
Encryption Key feature
48789L-002 ZBI-Developer User Guide 5/14/09
Page 25
ZBI-Developer
The Interface
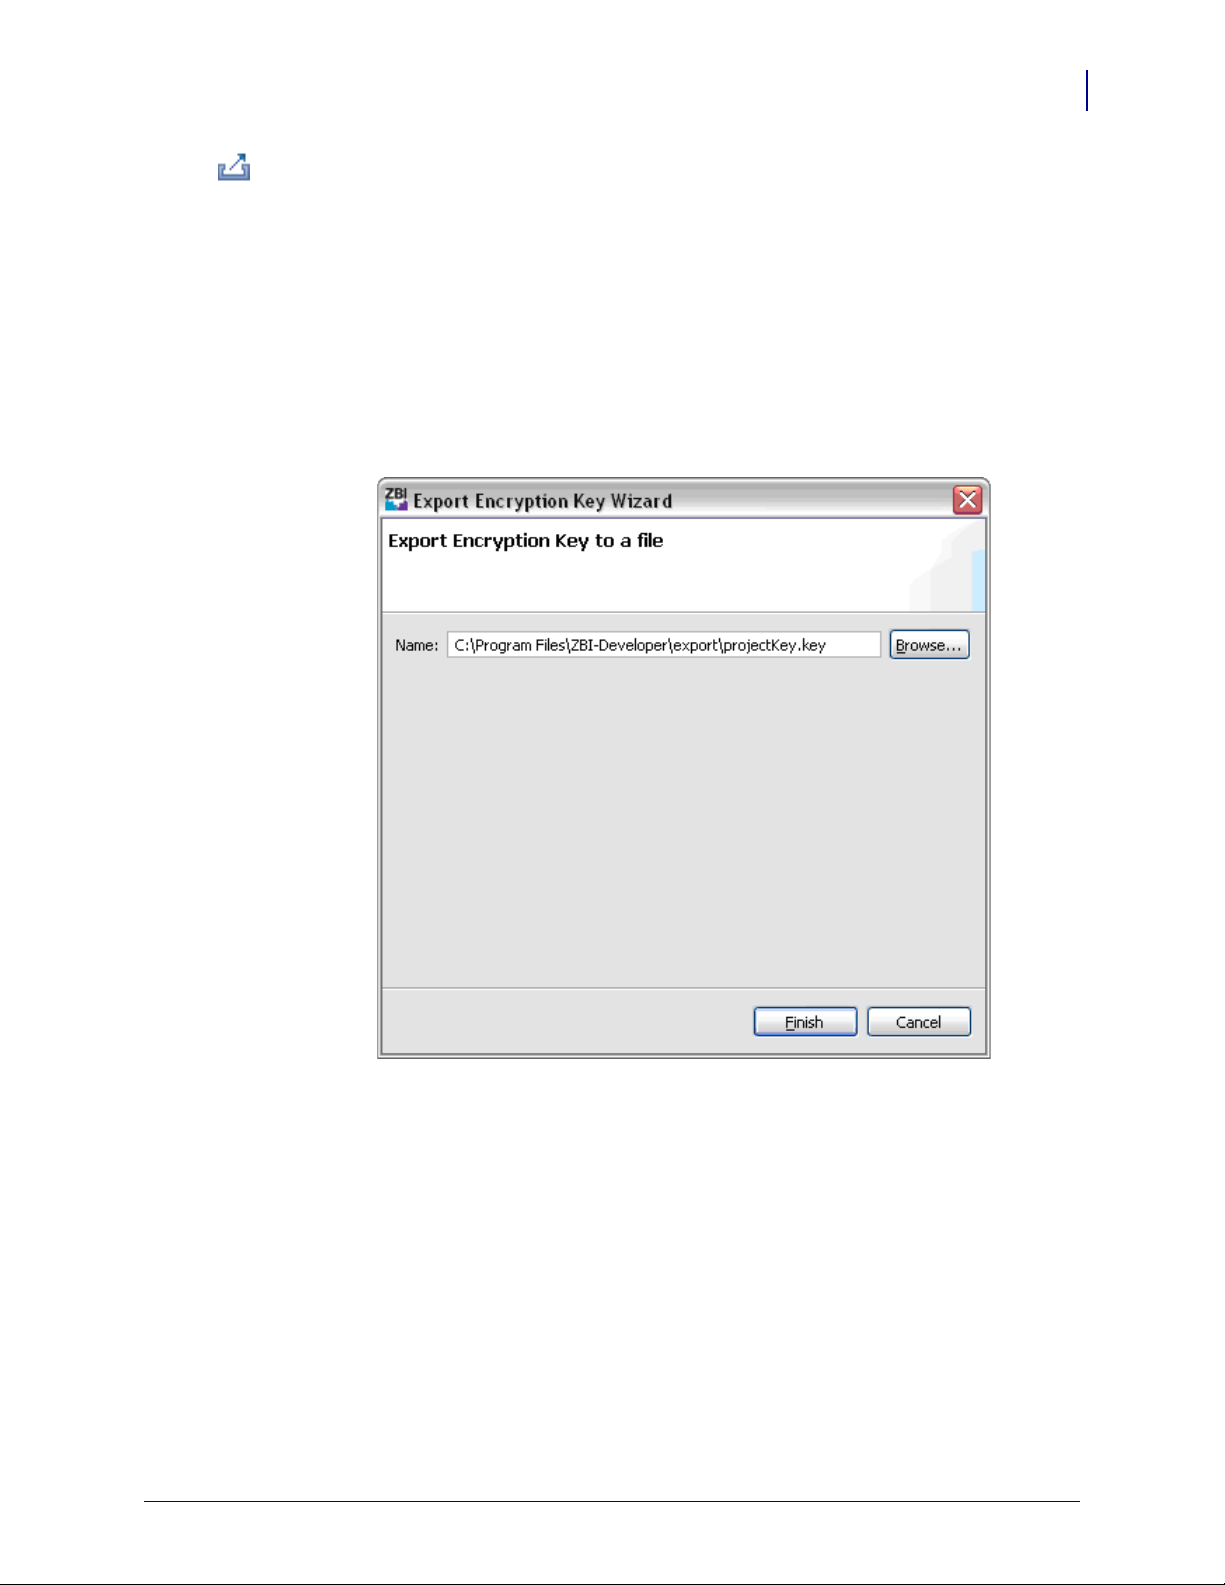
Exporting Encryption Keys
The Encryption Key can be Exported and then sent to the printer. This feature allows for the
following scenario – a Developer can create a ZBI program and then encrypt it. The
Encryption Key can then be downloaded to the printer – thus allowing later updates of the
program to also be downloaded to the printer. In this way, the Developer can protect their
source code, while also allowing for program updates.
To Export a ZBI Encryption Key to a single file on the computers hard drive, click on a
Encryption Key file and then select File > Export…
Based on the choices entered in the Export Wizard, the Encryption Key will be written to a
single file on the hard drive.
25
The exported file can now be sent to printers as needed.
Note • The Encryption Key must be installed on the printer by the programmer so as to
maintain control over the ability to put the Encrypted programs on printers. The Key
should not be distributed to end users.
Close
The Close menu selection will close the currently selected file.
Close All
The Close All menu selection closes all currently open files.
5/14/09 ZBI-Developer User Guide 48789L-002
Page 26

ZBI-Developer
26
The Interface
Save
The Save menu selection w ill Save the curre ntly selected file. If the file has a .zbi ex tension, it
will be saved as a ZBI program. If the file is an Untitled File, it will be necessary to give the
file an extension when saving it.
In all cases, if multiple Projects exist, it is necessary to specify which Project to save the file
in.
The program will display “Invalid File Name” if no name is entered or if the “.” character is
used but no extension is entered.
Note • ZBI-Developer will attempt to make u se of the file extens ion associations current ly
in use in the operating system. This means that if a file is saved as a .doc file, ZBIDeveloper will attempt to call the file viewer associated with that file type.
Save As
The Save As menu selection will Save the currently selected file with the opportunity to
rename the file, change the file’s extension, and alter the Project directory the file is stored in.
If the file has a .zbi extension, it will be saved as a ZBI program. If th e fil e is a n Unt itled File ,
it will be necessary to give the file an extension when saving it. The program will display
“Invalid File Name” if no name is entered or if the “.” (period) character is used, but no
extension is entered.
In all cases, if multiple Projects exist, it is necessary to specify which Project to save the file
in.
Note • ZBI-Developer will attempt to make u se of the file extens ion associations current ly
in use in the operating system. This means that if a file is saved as a .doc file, ZBIDeveloper will attempt to call the file viewer associated with that file type.
Save All
The Save All menu selection will close all currently open files. If the file has a .zbi exte nsi on,
it will be saved as a ZBI program. If the file is an Untitle d File, it will b e nece ssary to give the
file an extension when saving it. The program will display “Invalid Fil e Name” if no name is
entered or if the “.” (period) character is used but no extension is entered.
In all cases, if multiple Projects exist, it is necessary to specify which Project to save
previously unsaved files in.
Note • ZBI-Developer will attempt to make u se of the file extens ion associations current ly
in use in the operating system. This means that if a file is saved as a .doc file, ZBIDeveloper will later attempt to call the file viewer associated with that file type.
48789L-002 ZBI-Developer User Guide 5/14/09
Page 27

Revert
Choosing Revert will alter the content of the current Editor back to the content of the last
saved file. The Revert menu choice is disabled if the editor does not contain any unsaved
changes.
Rename
Rename allows the user to alter the name of a previously created Project or a file within a
Project. A Folder or File must be selected for the Rename menu selection to be active. Only
one Project or File can be renamed at a time.
Print
Print allows the currently selected and open file to be printed.
ZBI-Developer
The Interface
Note • Do not confuse Revert with Undo. The Undo feature reverses you most recent
editing action, while Revert returns the contents of the editing window to the saved
contents of the file.
27
Exit
Selecting Exit closes all open files. The program will confirm if recent unsaved changes
should be saved.
Edit Menu
The Edit menu helps you alter, search, and manage fi les in the ZBI-Dev elo per editor
environments.
Undo
This command will reverse the most recent edit.
Redo
The Redo feature will re-apply the last edit that was reversed by the most recent Undo action.
Cut
Removes the selected text and places it on the clipboard.
Copy
Copies the selected text to th e clipboard.
5/14/09 ZBI-Developer User Guide 48789L-002
Page 28
ZBI-Developer
28
The Interface
Paste
Places the text currently on the clipboard in the open document at current cursor location.
Delete
Removes the currently selected item.
Note • The Delete feature can remove selected text, or an object such as a file or an entire
Project.
Select All
Selects all objects or text in the current view or editor.
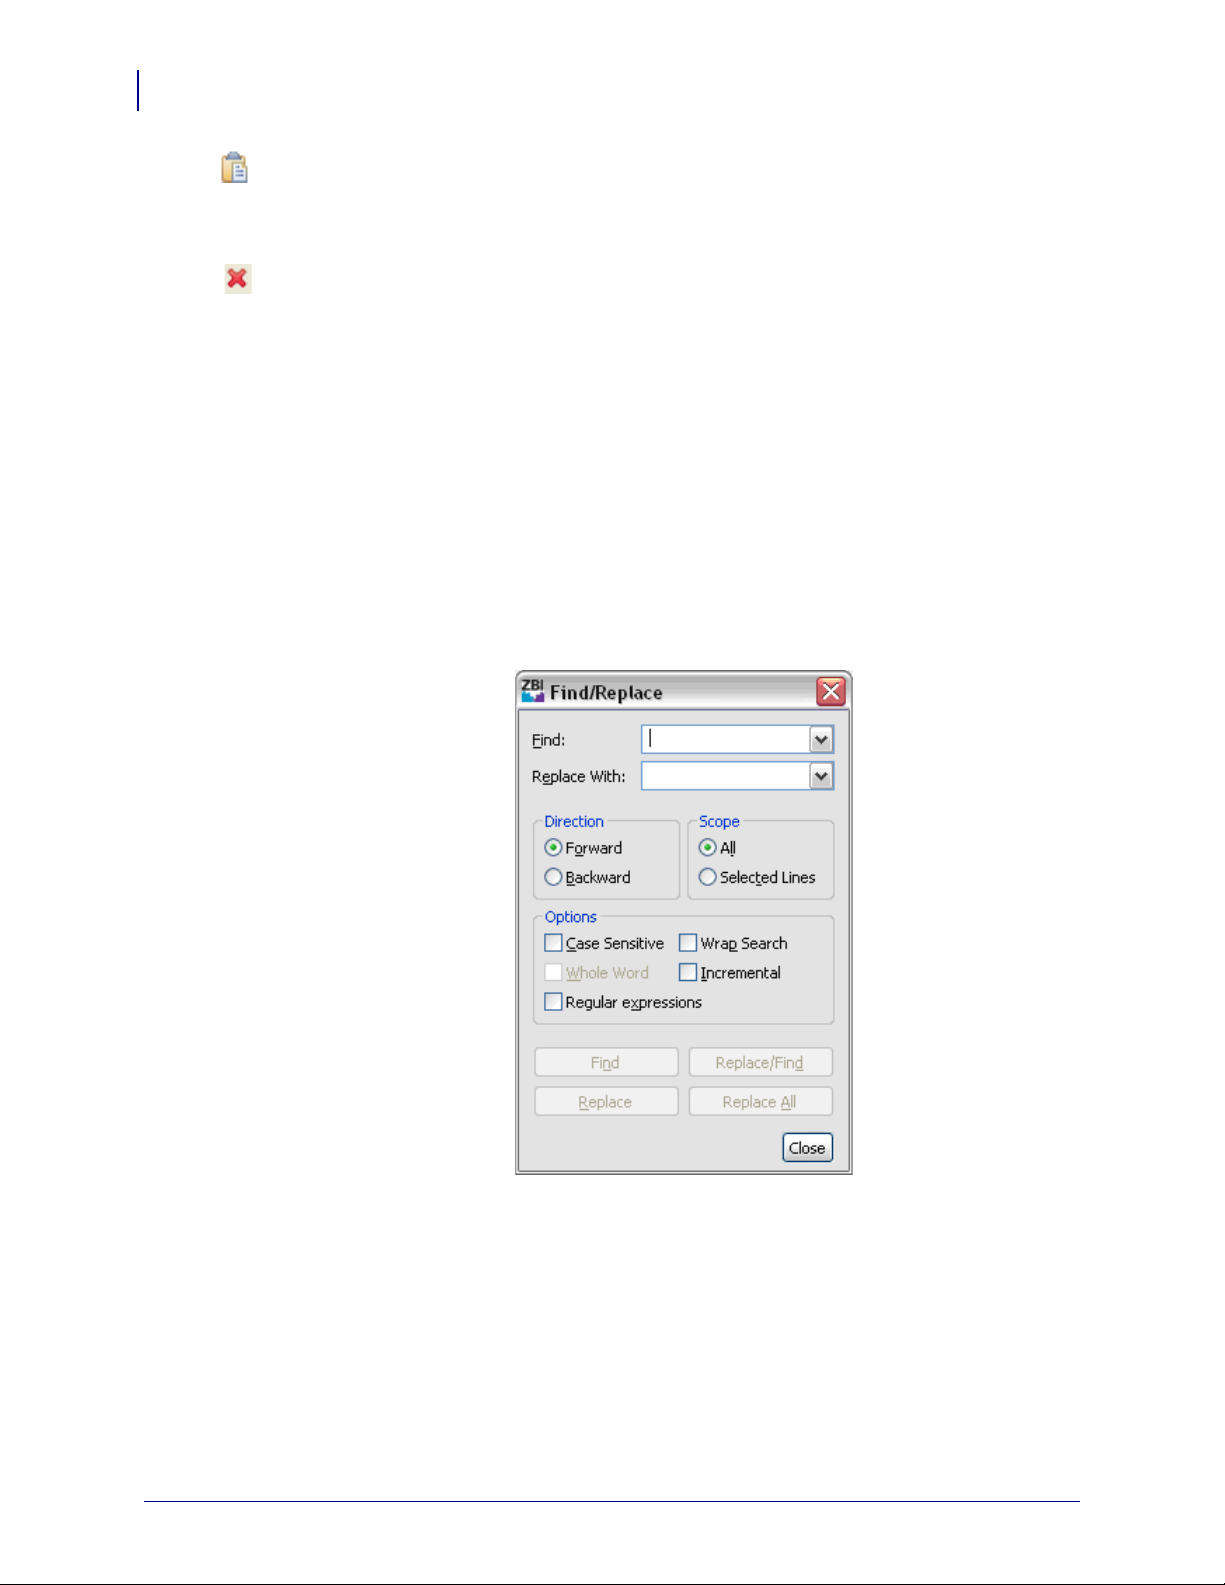
Find/Replace
The Find feature is used to search the current editor for an expression. The optional Replace
feature allows the user to replace an expression with another expression.
Find Next
Allows the user to search for the next occurrence of the selected text or the next occurrence of
the most recently found expression.
Find Previous
Allows the user to search for the previous occurrence of the selected text or the previous
occurrence of the most recently found expression.
48789L-002 ZBI-Developer User Guide 5/14/09
Page 29

Word Completion
This feature is offered when editing text files. When selected, it will attempt to complete the
current word.
Set Encoding
This feature is offered when viewing text and other files that are not ZBI programs. The
following encoding types can be set:
• Codepage1252 (Cp1252)
•US-ASCII
•UTF-16
•UTF-16BE
•UTF-16LE
•UTF-8
• ISO-8859-1
ZBI-Developer
The Interface
29
To set or change the encoding type, right-click over a file and open the Properties dialog.
5/14/09 ZBI-Developer User Guide 48789L-002
Page 30
ZBI-Developer
30
The Interface
Run Menu
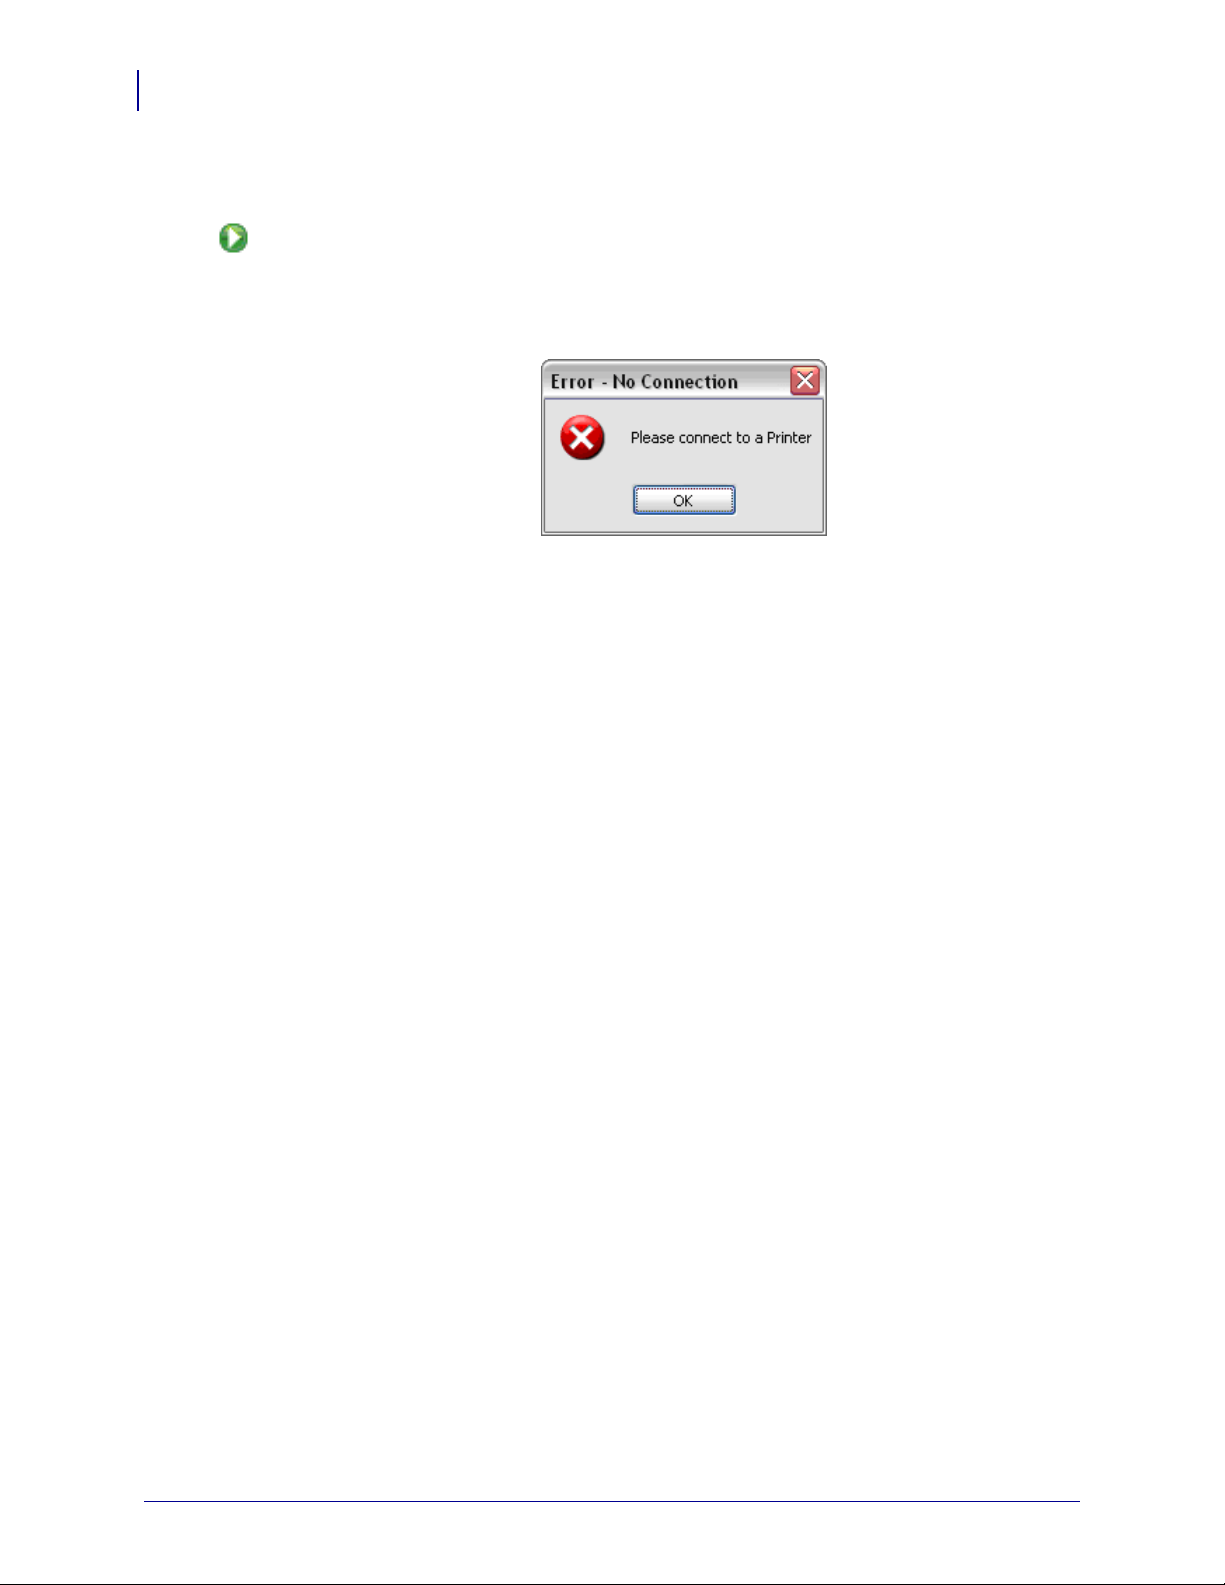
Run\Debug ZBI Application
This feature will cause ZBI-Developer to execute the selected ZBI program on the Connected
printer. If no printer connection has been created, the program will display an Error dialog
stating “No Connection. Plea se connect to a Printer”.
Window Menu
The Window > Show Perspective and > Show View menus are used to change the current
View, Perspective, and access the Preferences dialog.
A Perspective defines the set and arrangement of Views and dialogs shown in the
ZBI-Developer workspace. Within the window, each Perspective shares the same set of
editors.
Each Perspective provides a set of features and functions aimed at accomplishing a specific
task. For example, the ZBI Perspective combines Views that you would commonly use while
editing ZBI project source files. The Debug Perspective contains the Views that you would
use while debugging programs. As you work in the program, you will probably switch the
Perspective frequently.
There are two Perspectives in the program, ZBI and Debug.
48789L-002 ZBI-Developer User Guide 5/14/09
Page 31

ZBI Perspective
The ZBI Perspective is used to create ZBI Projects and the actual ZBI program. By using the
features of Navigator View, Printer View, Problems View and Editor View, the
programmer will be able to quickly create a ZBI program.
ZBI-Developer
ZBI Perspective
31
5/14/09 ZBI-Developer User Guide 48789L-002
Page 32

ZBI-Developer
32
ZBI Perspective
Navigator View
This V iew displays the list of fi le and object s associated with Projects. The Navigator View is
the primary location for managing the items used in a project.
A Project in the Navigator View can be open or closed by ri ght-clicking over the Project and
selecting the desired action.
Additionally, actions from the File menu are also available by right-clicking on the Navigator
View. The Properties for a Project can also be accessed by right-clicking over a Project name.
48789L-002 ZBI-Developer User Guide 5/14/09
Page 33

Printer View
This V i ew d isp lay s th e li st of p ri nte rs a va ila ble fo r use wit h Proje cts. The Printer View is the
primary location for managing the Printers that will be used with ZBI-Developer.
ZBI-Developer
ZBI Perspective
33
Printers can be connected directly via serial or paralle l ports, or a ZebraLink network in terface,
such as a ZebraNet 10/100 Wired or Wireless print server.
When printers are connected to the PC via a serial, parallel, USB or ZebraLink Ethernet
interface, a Debug connection can be made to the printer. This feature allows programs to be
run in the Debug mode, and allows the output of the ZBI programs to be sent directly to the
printer.
Virtual Printers can also be created so that programs can be run in the Virtual ZBI
environment. When a Virtual Printer is used, the output of the program can be directed to a PC
Comm Window that displays in the Debug View, or the output can be directed to a serial or
parallel port on the PC.
5/14/09 ZBI-Developer User Guide 48789L-002
Page 34

ZBI-Developer
34
ZBI Perspective
Create a Virtual Printer
ZBI-Developer comes with a Virtual Printer pre-installed. Additional Virtual Printers can be
defined by right-clicking over the Virtual Printer folder and selecting Add Virtual Printer.
The Add Virtual Printer Wizard will be displayed. Enter a Printer name in the textbox. The
name can be up to 100 characters long.
48789L-002 ZBI-Developer User Guide 5/14/09
Page 35

ZBI-Developer
ZBI Perspective
Configure where output from the Virtual Printers ports should be directed. Since the printer is
Virtual, output can be redirected to one of several locations. For example, if the ZBI program
directs that the output should go to a serial port (SER in ZBI commands), the Virtual Printer
can redirect that output to a Ports View dialog in the Debug Perspective, or to a physical port
on the computer.
35
Using this method, a ZBI program could logically send output to a serial port (SER in ZBI
command), but that data could be redirected to a parallel port on the PC. In this way, it is
possible to test the output of a ZBI program on a printer when a ZBI-Enabled printer is not
available.
Additionally, output could be redirected to a Ports View dialog on the PC instead of to a
physical communication port. Using this method a ZBI program can be created and tested
when no printer is available.
Note • Virtual Printers can be used to examine the output of a ZBI program. They do not
have the ability to create an image of a printed label based on the receipt of printer
commands. That capability is only present in the printer.
5/14/09 ZBI-Developer User Guide 48789L-002
Page 36

ZBI-Developer
36
ZBI Perspective
Edit a Virtual Printer
Virtual Printers can be easily edited to alter their settings. To Edit a Virtual Printer,
right-click over the Virtual Printer in the Printers View and select Edit Virtual Printer.
The Edit Virtual Printer Wizard will display.
48789L-002 ZBI-Developer User Guide 5/14/09
Page 37

ZBI-Developer
ZBI Perspective
Configure where output from the Virtual Printers ports should be directed. Since the printer is
Virtual, output can be redirected to one of several locations. For example, if the ZBI program
directs that the output should go to a parallel port (PAR in ZBI commands), the Virtual Printer
can redirect that output to a Ports View dialog in the Debug Perspective, or to a physical port
on the computer.
37
Using this method, a ZBI program could logically send output to a parallel port (PAR in ZBI
command), but that data could be redirected to a serial port on the PC. In this way, it is
possible to test the output of a ZBI program on a printer when a ZBI-Enabled printer is not
available.
Additionally, output could be redirected to a Ports View dialog on the PC instead of to a
physical communication port. Using this method, a ZBI program can be created and tested
when no printer is available.
Note • Virtual Printers can be used to examine the output of a ZBI program. They do not
have the ability to create an image of a printed label based on the receipt of printer
commands. That capability is only present in the printer.
5/14/09 ZBI-Developer User Guide 48789L-002
Page 38

ZBI-Developer
38
ZBI Perspective
Using Virtual Printers
The figure below illustrates the testing of a simple ZBI program using a Virtual Printer.
In this case, the ZBI program receives data from the Serial port and sends output to the ZPL
print engine in the printer. The Virtual printer is con figured to display both the Serial po rt input
and ZPL port output in Ports View dialogs. A Breakpoint has been set to cause t he program to
display the value of the A$ input variable in the Vari able View dialog.
Note • When using the Debug Perspective, ZBI-Developer can be occupied while it is
executing the program. If you are done using the Debug Perspective, be sure to click
Terminate.
48789L-002 ZBI-Developer User Guide 5/14/09
Page 39

Problems View
This View displays the list of Warnings and Errors the software has identified in the ZBI
programs in all open Projects. If a project is closed, ZBI-Developer will not display Problems
for the project. Only files with a ".zbi" extension will be checked for issues.
The Problems View uses plain language to inform the user of Warnings and Errors that
ZBI-Developer has identified in a ZBI programs. Double-clicking on an error will cause the
program to automatically highlight the line in the ZBI program that has been identified. If the
program is closed, it will be opened in the ZBI Editor.
ZBI programs that contain Warnings and Errors can still be run on a Virtual Printer, tested
in the Debug Perspective, or sent to a printer. The Problems View exists only to inform about
issues, not to stop users from writing and using programming techniques.
ZBI-Developer
ZBI Perspective
39
5/14/09 ZBI-Developer User Guide 48789L-002
Page 40

ZBI-Developer
40
Debug Perspective
Debug Perspective
The Debug Perspective is used to execute a ZBI program, either with a physical printer, or
with a V irtual Printer. By using the Debug View, the programmer can quickly test the logic and
flow of their ZBI program.
There are several key Views in the Debug Perspective.
48789L-002 ZBI-Developer User Guide 5/14/09
Page 41

Debug View
The Debug View displays the name of the program being tested.
Button Description
The Run/Debug Application button (located in the Toolbar) begins the execution of the
program.
The Pause button (located on the Debug View) suspends the execution of the program so that
the user can browse the program, check the printer, examine the Variable View, etc.
The Terminate button halts the execution of the program.
The Step Over button steps over a set breakpoint. Program execution will continue on the
next line.
The Resume button resumes a paused program execution.
ZBI-Developer
Debug Perspective
41
Note • When using the Debug Perspective, ZBI-Developer can be occupied while it is
executing the program. If you are done using the Debug Perspective, be sure to click
Terminate.
5/14/09 ZBI-Developer User Guide 48789L-002
Page 42

ZBI-Developer
42
Debug Perspective
Printer Status View
The Printer Status View displays the status o f the current debug printer.
Status
Detail
State Indicates if ZBI is 'Running' or 'Stopped' on the debug printer.
Program
Running
Memory Indicates how much memory, in bytes, is being consumed by running the ZBI
Indicates the name of which program is running on the debug printer.
Description
program.
Line
Number
Indicates which line of the currently running program is being executed.
When a program is Stopped, the Refresh button can be used to update the status. This
can be pressed regardless if a program was started in the ZBI IDE.
48789L-002 ZBI-Developer User Guide 5/14/09
Page 43

ZBI-Developer
Debug Perspective
When a program is Running the terminate button can be pressed to stop the program. This
can be done for any ZBI program running on the debug printer, even those not started with the
ZBI IDE.
43
Pressing the Refresh button will refresh the status of the debug pri nt er.
5/14/09 ZBI-Developer User Guide 48789L-002
Page 44

ZBI-Developer
44
Debug Perspective
Variable View
Displays the variables currently present in a ZBI program during execution in the Debug
View.
The Variable View makes it simple to identify the contents of the variables in your program.
When combined with the Port Views and carefully set breakpoints, the programmer can type
information in and immediately see how data is being popul at ed into variables in a program.
Note • In some cases, Variables may not appear in the Variable View. This can happen
when no Breakpoints have been set in the program. Be sure to set Breakpoints to make the
best use of the Variable View feature.
48789L-002 ZBI-Developer User Guide 5/14/09
Page 45

Breakpoints View
Displays the Breakpoint set in a currently running ZBI prog ram. T o set a Breakpoint in the ZBI
program, right-click immediately to the left of a line of ZBI code and choose Toggle
Breakpoint.
Enabled breakpoints are noted with a blue circle . Disabled breakpoints are noted with a
white circle . Breakpoints are displayed in the vertical editor rul er and in the Breakpoints
View.
A breakpoint suspends the execution of a program at the location where the breakpoint is set.
In the ZBI Editor, breakpoints can be ena bl ed an d disab led by using the displayed
checkboxes. Double-clicking on a breakpoint in the Breakpoints View will highlight it in the
ZBI Editor.
Note • The maximum number of breakpoints per program is 16.
ZBI-Developer
Debug Perspective
45
Help Menu
Update
This menu selection causes ZBI-Developer to contact the web-based program update service
and obtain the most recent update. The program will not be updated if it is the most current
version. Follow the prompts to complete the update.
5/14/09 ZBI-Developer User Guide 48789L-002
Page 46

ZBI-Developer
46
Debug Perspective
View ASCII Table
Causes an ASCII chart to be displayed as shown below. Scroll on the chart to view desired
character(s).
48789L-002 ZBI-Developer User Guide 5/14/09
Page 47

About ZBI-Developer
Causes the About ZBI-Developer dialog to display.
ZBI-Developer
Debug Perspective
47
5/14/09 ZBI-Developer User Guide 48789L-002
Page 48

ZBI-Developer
48
Configuration of ZBI-Developer
Configuration of ZBI-Developer
This section describes you how to set up and customize ZBI-Developer to your preferences.
Changing the Workspace Location
By default, ZBI-Developer stores its files in a Wo rkspace folder, or directory on the PC it is
being used on. Knowing where this directory is makes it possible to ensure that the directory is
being backed up on a regular basis (a recommended practice!).
Additionally , for some work-groups, it may be desirable to ma intain the Workspaces of several
ZBI Developers on networked server rather than on local drives. This practice is also
encouraged, especially if it means that the Workspace directories will be regularly archived
T o c hange the Workspace location, go to File menu and select File > Switch Workspace. The
Workspace Launch wizard will display, showing the current location of the workspace. Click
on the Browse button to navigate to and define the new location to store the Workspace in.
Note • Once a new Workspace location has been defined, ZBI-Developer will take a few
moments to move the necessary files and restart itself. You will see the start-up splash
screen as the program restarts.
48789L-002 ZBI-Developer User Guide 5/14/09
Page 49

Setting Preferences
There are four types of Preferences to configure for ZBI-Developer. To begin setting
Preferences, select Window > Prefer ences. When the Preferences dialog appears, clic k on the
"+" symbol next to ZBI Preferences to expand the list.
Email Options
The Email Options control the settings used to send email from ZBI Programs when a Virtual
Printer is being used. Enter a Server Name specific to the site the program will be used in and
set the Port to use as needed. Port 25 is the default port used for Email.
Encryption Key
ZBI-Developer
Configuration of ZBI-Developer
49
This dialog controls the location and name of the Encryption Key ZBI-Developer will use
when the user chooses to use the optional ZBI program Encryption f eature.
Note • It is recommended that one key be used for ent ire company or d evelopme nt group.
While it is possible to create multiple keys (i.e., one for each project, or one for every
developer in a given company, this is not recommended to decrease the possibility of lost
keys.
Saved Searches
In some cases, the desired printer may not be automatically discovered. This can happen
because the printer is on a different subnet, or because traffic on the network is being
controlled in such a way that the discovery process is not allowed to complete. Many times,
what is needed is a different type of search.
ZBI-Developer offers five types of network searches:
• Local Broadcast Search
• Subnet Search
• Directed Broadcast Search
• Multicast Search
• IP Address Search
Note • The connection to a networked printer can be tested by right-clicki ng over the
printer in the Printers View and choosing Print Configuration label. If the connection is
active, a configuration label should print.
5/14/09 ZBI-Developer User Guide 48789L-002
Page 50

ZBI-Developer
50
Configuration of ZBI-Developer
To set up a search for a network printer, do the following:
1. Go to the menu and choose Window > Preferences. The Preferences dialog will be
displayed.
2. Click on the "+" symb ol ne xt to ZBI-Preferences.
3. Click on Saved Searches.
4. Click on New Search.
Local Broadcast Search
Local broadcasts send a discovery request to the local broadcast address of 255.255.255.255.
This request finds printers in the same local network as the requesting computer. The local
broadcast search is the default search type used by the program.
To create a local broadcast search, do the following:
1. In the Search Type dialog, select Local Broadcast. The Value fields are automatically
populated.
2. Type a name in the Search Group Name textbox.
48789L-002 ZBI-Developer User Guide 5/14/09
Page 51

ZBI-Developer
Configuration of ZBI-Developer
3. Click Add. The Value field is added to Search type.
4. Click OK to accept the new Search Type.
5. Click OK to exit the Preferences dialog.
Subnet Search
The Subnet Search sends a discovery request to each address in the specified subnet. This
feature is useful for networks that prevent broadcast packets from passing across routers. The
Subnet search requires you to type in the first three subnet octets.
Example • A request to 192.168.2.* sends a request to: 192.168.2.1 through
192.168.2.254.
To create a Subnet Search, do the following:
1. From the Search Type dialog, select Subnet.
2. Type a name in the Search Group Name textbox.
51
3. In the Value field, type the first three subnet octets.
4. Click Add.
5. Click OK to accept the new Search Type.
6. Click OK to exit the Preferences dialog.
Directed Broadcast Search
Directed broadcasts send a discovery request to the broadcast address of the specified subnet.
Note • If a broadcast search does not work, the broadcast packets might be disabled across
routers. Try Multicast or Subnet search.
Example • The directed broadcast search requires you to type in the first three subnet
octets, followed by 255, such as 192.168.2.255.
To create a Directed Broadcast search, do the following:
1. In the Search Type dialog, select Directed Broadcast. The fourth octet of the Value field
is automatically populated.
2. In the Value field, type the first three subnet octets.
3. Type a name in the Search Group Name textbox.
4. Click Add.
5. Click OK to accept the new Search Type.
6. Click OK to exit the Preferences dialog.
5/14/09 ZBI-Developer User Guide 48789L-002
Page 52

ZBI-Developer
52
Configuration of ZBI-Developer
Multicast Search
Multicast uses the multicast address to sen d a d isco ve r y a ddr ess to a ll Zebra printers across as
many routers as the hop count specifies. A multicast search may return a large number of
printers in some installations.
This feature might be disabled on some routers and switches. See your network administrator
to determine if a search failure was due to this feature being disabled.
To create a multicast search, do the following:
1. In the Search Type dialog, select Multicast (Hops).
2. In the Value field, type the number of hops desired. The recommended starting point is 5.
3. Type a name in the Search Group Name textbox.
4. Click Add.
5. Click OK to accept the new Search Type.
6. Click OK to exit the Preferences dialog.
IP Address Search
To create a search for an IP address, do the following:
1. In the Search Type dialog, select IP Address xxx.xxx.xxx.xxx.
Example • You would type in an IP address, such as 10.3.4.97.
2. In the Value field, type in an IP address.
3. Type a name in the Search Group Name textbox.
4. Click Add.
5. Click OK to accept the new Search Type.
6. Click OK to exit the Preferences dialog.
SNMP
The SNMP settings are used to control how ZBI-Developer interacts with a printer when the
on-printer debugging features are in use. These features are available when a printer running
firmware v60.16.x and v53.16.x or later are in use. ZB I-Dev elope r wil l use SN MP commands
("set" and "get") to activate the debugging features on the prin ter when the indicated firmware
versions are being used. The default setting are the recommended settings.
Note • Some networks may be configured to not allow SNMP traffic. Pl ease consult with
your network administrators first if the on-printer debugging features are not working
when you have successfully connected to a printer. The connection to a networked printer
can be tested by right-clicking over the printer in the Printers View and choosing Print
Configuration label. If the connection is active, a configuration label should print.
48789L-002 ZBI-Developer User Guide 5/14/09
Page 53

Changing the Screen Layout
The initial screen layout may be appropriate for many uses, howeve r the user may find that the
layout is not optimized for the project being worked on. The layout of many of the Views can
be changed to suit the needs of the user.
To move a View, click and drag it to a new location. It is also possible to right-click over the
tab for a View and select Move > View. While a View is being moved, an outline of the View
will be visible.
Note • For example, the Problems View can be moved or even detached from the main
window of the program to maximize the space provided for the ZBI Editor View. Here it
is shown detached from the main window of the program.
ZBI-Developer
Configuration of ZBI-Developer
53
To re-attach a detached View, right-click over it and un-select Detached. It will re-join the
main window of the program.
5/14/09 ZBI-Developer User Guide 48789L-002
Page 54

ZBI-Developer
54
ZBI-Developer Tutorial
ZBI-Developer Tutorial
This Tutorial demonstra tes creating, testing and distribu ting a simp le ZBI project , using many
of the key features of ZBI-Developer.
This is the program that will be created:
10 close all
20 open #1: name "SER"
30 open #2: name "ZPL"
40 input #1: A$
50 print #2: "^xa^fo50,50^a0n,50,50^fd"&A$&"^fs^xz"
60 goto 40
Tutorial
Line
Number
10 Closes all ZBI Ports
20 Opens a "#1" port and names it "SER"
Line-by-Line Explanation
30 Opens a "#2" port and names it "ZPL"
40 Receives from "#1" port and stores it in the "A$" variable
50 Embed the data stored in "A$" in ZPL commands and prints it
60 Returns to line 40 to look for more input
In this Tutorial, it will not be necessary to have a ZBI-Enabled printer present. All of the
activities described here can be performed without a printe r present. However, if a ZPL printer
is available, it will augment the Tutorial if you connect the printer to the serial port of the
computer running ZBI-Developer.
Some key concepts that this Tutorial covers:
•Views
•Perspectives
Views
The software offers several Views. These are used to display different information screens.
Perspectives
Two modes of operation, or Perspectives, are available in ZBI-Developer
• ZBI Perspective – for writing ZBI programs
• Debug Perspective – for testing and checking programs
48789L-002 ZBI-Developer User Guide 5/14/09
Page 55

Project Files
Projects are used to organize and track files associated with a single or set of ZBI programs.
Projects can contain several file types:
• ZBI programs – containing up to an 8 character file name and the .zbi e xtension. ZBI
• Data Files – these can be any file, ASCII or Unicode encoded, that is associated with
• Project Key – the Encryption Key that will be used with the Project. The Project Key
• Encrypted ZBI program – ZBI programs that have been encrypted are displayed
• Project Folders – displayed with the icon. Project Folders can be copy and
• Other File T ypes – Other file types can be viewed in the ZBI-Developer
ZBI-Developer
ZBI-Developer Tutorial
programs are displayed with the icon.
the Project. Data Files are displayed with the icon.
file is displayed with the icon. Each Project can have its own Project Key file.
with the icon. An encrypted program can be viewed in plain text in ZBIDeveloper but will be sent to the printer in encrypted form.
pasted.
environment, as allowed by file associations on the PC being used. Files can also be
opened using the ZBI-Developer Text Editing environment. For example, a .jpg file
would open using the default system viewer, unless the ZBI-Developer Text Editor is
chosen.
55
Note • It is recommended that Projects and Project files be backed up on a regular basis.
ZBI-Developer does not automatically back-up files or offer a method for un-encrypting
programs if the Encryption Key is not present.
Note • Text files (with extensions of .TXT) will be stored on the printer rather than
executing the ZPL commands stored within the file. Be sure to name your files with a
.ZPL extension, if you are trying to execute the ZPL commands. Files with a .ZPL
extension will not be stored on the printer.
5/14/09 ZBI-Developer User Guide 48789L-002
Page 56

ZBI-Developer
56
ZBI-Developer Tutorial
Starting the Software
Navigate to the shortcut icon – Start > Programs > ZBI-Developer. The program’s splash
screen will be briefly shown as the program starts and th en the main inte rfa ce window will be
displayed.
48789L-002 ZBI-Developer User Guide 5/14/09
Page 57

Starting a New Project
To start a new Project, go to File > New > New Project. Alternately, right-click over the
Navigator View and choose New > New Project.
The New Project Wizard will be displayed.
Name the Project "My Project" and click Finish.
ZBI-Developer
ZBI-Developer Tutorial
57
The new Project will be displayed in the Navigator View.
5/14/09 ZBI-Developer User Guide 48789L-002
Page 58

ZBI-Developer
58
ZBI-Developer Tutorial
Starting a New ZBI Program
Next, start a new ZBI program. Right-click over the "My Project" folder and choose
New > New ZBI Program. A new, blank ZBI Editor View will be displayed, with the title
"Untitled 1".
48789L-002 ZBI-Developer User Guide 5/14/09
Page 59

Saving a New ZBI Program
To save a new blank ZBI Program:
1. Go to File > Save As. The Save ZBI Program Wizard will be displayed.
2. Enter a name for the program - "Hello".
3. Click the My Project folder to confirm that it is the Project to save the new program in.
4. Click Finish.
Note • It is necessary to click on the Project folder the ZBI program should be saved in.
This practice helps keep related files together.
ZBI-Developer
ZBI-Developer Tutorial
59
5/14/09 ZBI-Developer User Guide 48789L-002
Page 60

ZBI-Developer
60
ZBI-Developer Tutorial
Writing a New ZBI Program
Once the ZBI program has been saved, the new name will appear in the ZBI Editor View.
Clicking on the "+" next to the My Project folder will cause it to be displayed in the
Navigator View.
As the ZBI program is begin written, several features of the software can be used to assist the
developer.
These include:
• ZBI Command Syntax Help
• Problems View
• Context Sensitive Help
• Virtual Printers
•Debug View
48789L-002 ZBI-Developer User Guide 5/14/09
Page 61

ZBI Command Syntax Help
ZBI-Developer can automatically display ZBI syntax command Help by placing the mouse
cursor over a command in the Editor View.
Write the first line of the program (or copy/paste it from here).
10 close all
Place the mouse cursor over the word close. After a moment, a dialog will display over the
Editor showing the correct syntax and usage for the command. This featur e can be used wit h
all of the ZBI commands.
Note • The ZBI Command Syntax Help will only appear when a file with a ".zbi" file is
being edited.
ZBI-Developer
ZBI-Developer Tutorial
61
5/14/09 ZBI-Developer User Guide 48789L-002
Page 62

ZBI-Developer
62
ZBI-Developer Tutorial
The Problems View
The Problems View displays the list of Warnings and Errors the software has identified in
the ZBI programs in all open Projects. If a project is closed, ZBI-Developer will not display
Problems for the project. Files that do not have a .zbi extension will no t be checked for issues.
The Problems View uses plain language to inform the user of Warnings and Errors that
ZBI-Developer has identified in a ZBI programs. Double-clicking on an error will cause the
program to automatically highlight the line in the ZBI program that has been identified. If the
program is closed, it will be opened in the ZBI Editor.
Complete the new ZBI program by entering the remainder of the program as shown below.
Note • This content contains intentional errors to help demonstrate a feature of
ZBI-Developer.
20 open #1: name "SER
30 open #2: name "ZPL
40 input #1: A$
50 print #2: "^xa^fo50,50^a0n,50,50^fd"&A$&"^fs^xz"
60 goto 70
When the program has been entered as shown above, click File > Save to save the file. Once
the program has been saved, ZBI-Developer will evaluate the program and display Errors or
Warnings for any lines that contain syntax issues.
Double-clicking on an Error or Warning in the Problems View will cause the portion of the
program containing the issue to be highlighted in the ZBI Editor View.
48789L-002 ZBI-Developer User Guide 5/14/09
Page 63

Once any Errors or W arnings have be en corrected, save the program aga in to remove the items
listed in the Problems View. For convenience, here is the corrected version of the program:
10 close all
20 open #1: name "SER"
30 open #2: name "ZPL"
40 input #1: A$
50 print #2: "^xa^fo50,50^a0n,50,50^fd"&A$&"^fs^xz"
60 goto 40
Setting Breakpoints
A Breakpoint suspends the execution of a program at the location where the breakpoint is set.
In the ZBI Editor, breakpoints can be ena bl ed an d disab led by using the displayed
checkboxes. Double-clicking on a breakpoint in the Breakpoints View will highlight it in the
ZBI Editor.
T o set a breakpoi nt, right-click immediately t o the left of a line of ZBI code and choose Toggle
Breakpoint. In the case of the example p rogram in this tu torial, put the Brea kpoi nt on line 60.
When the program is executed, the printer will stop each time it reaches that line.
ZBI-Developer
ZBI-Developer Tutorial
63
Note • The maximum number of breakpoints per program is 16.
Note • When a program containing breakpoints is sent to the printer, the breakpoints will
also be transmitted–meaning that the program will stop whenever a breakpoint is reached.
To avoid this situation, remove breakpoints before sending programs to printers. It is
possible to remove all of the Breakpoints in the file by clicking on the icon in the
Breakpoints View dialog.
5/14/09 ZBI-Developer User Guide 48789L-002
Page 64

ZBI-Developer
64
ZBI-Developer Tutorial
Discovering Printers
Setting Up Searches
Once a program is written and ready to be tested, it can be run on a printer – or run in the
Virtual Printer environment.
If a physical printer is to be used, it will be necessary to first Discover and connect to a printer.
ZBI-Developer supports using printers connected to a network using a ZebraNet print server.
If a printer is connected via serial or para llel connecti on, a Virtual Printer should be used and
data should be redirected to the port on the PC that the printer is connected to. (See Using
Virtual Printers on page 68 for more details.)
If the printer is connected to the same network subnet that the PC running ZBI-Developer is
attached to, then a list of available printers will appear on the Printer View tab.
Once a printer has been discovered, it can be used to Create a Debug Connection, Run/
Debug a Program, Send Files to a Printer or Import Files From a Printer.
In some cases, the desired printer may not be automatically discovered. This can happen
because the printer is on a different subnet, or because traffic on the network is being
controlled in such a way that the discovery process is not allowed to complete. Many times,
what is needed is a different type of search.
ZBI-Developer offers five types of network searches:
• Local Broadcast Search
• Subnet Search
• Directed Broadcast Search
• Multicast Search
• IP Address Search
Note • The connection to a networked printer can be tested by right-clicki ng over the
printer in the Printer View and choosing Print Configuration label. If the connection is
active, a configuration label should print.
48789L-002 ZBI-Developer User Guide 5/14/09
Page 65

ZBI-Developer
ZBI-Developer Tutorial
To set up a search for a network printer, do the following:
1. Go to the menu and choose Window > Preferences. The Preferences dialog will be
displayed.
2. Click on the "+" symb ol ne xt to ZBI-Preferences.
3. Click on Saved Searches.
65
4. Click on New Search.
Local Broadcast Search
Local broadcasts send a discovery request to the local broadcast address of 255.255.255.255.
This request finds printers in the same local network as the requesting computer. The local
broadcast search is the default search type used by the program.
To create a local broadcast search, do the following:
1. In the Search Type dialog, select Local Broadcast. The Value fields are automatically
populated.
2. Type a name in the Search Group Name textbox.
3. Click Add. The Value field is added to Search type.
4. Click OK to accept the new Search Type.
5. Click OK to exit the Preferences dialog.
5/14/09 ZBI-Developer User Guide 48789L-002
Page 66

ZBI-Developer
66
ZBI-Developer Tutorial
Subnet Search
The Subnet Search sends a discovery request to each address in the specified subnet. This
feature is useful for networks that prevent broadcast packets from passing across routers. The
Subnet search requires you to type in the first three subnet octets.
Example: A request to 192.168.2.* sends a request to: 192.168.2.1 through 192.168.2.254.
To create a Subnet Search, do the following:
1. From the Search Type dialog, select Subnet.
2. Type a name in the Search Group Name textbox.
3. In the Value field, type the first three subnet octets.
4. Click Add.
5. Click OK to accept the new Search Type.
6. Click OK to exit the Preferences dialog.
Directed Broadcast Search
Directed broadcasts send a discovery request to the broadcast address of the specified subnet.
Note • If a broadcast search does not work, the broadcast packets might be disabled across
routers. Try Multicast or Subnet search.
Example • The directed broadcast search requires you to type in the first three subnet
octets, followed by 255, such as 192.168.2.255.
To create a Directed Broadcast search, do the following:
1. In the Search Type dialog, select Directed Broadcast. The fourth octet of the Value field
is automatically populated.
2. In the Value field, type the first three subnet octets.
3. Type a name in the Search Group Name textbox.
4. Click Add.
5. Click OK to accept the new Search Type.
6. Click OK to exit the Preferences dialog.
48789L-002 ZBI-Developer User Guide 5/14/09
Page 67

Multicast Search
Multicast uses the multicast address to sen d a d isco ve r y a ddr ess to a ll Zebra printers across as
many routers as the hop count specifies. A multicast search may return a large number of
printers in some installations.
This feature might be disabled on some routers and switches. See your network administrator
to determine if a search failure was due to this feature being disabled.
To create a multicast search, do the following:
1. In the Search Type dialog, select Multicast (Hops).
2. In the Value field, type the number of hops desired. The recommended starting point is 5
3. Type a name in the Search Group Name textbox.
4. Click Add.
5. Click OK to accept the new Search Type.
ZBI-Developer
ZBI-Developer Tutorial
67
6. Click OK to exit the Preferences dialog.
IP Address Search
To create a search for an IP address, do the following:
1. In the Search Type dialog, select IP Address xxx.xxx.xxx.xxx.
Example • Type in an IP address, such as 10.3.4.97.
2. In the Value field type in an IP address.
3. Type a name in the Search Group Name textbox.
4. Click Add.
5. Click OK to accept the new Search Type.
6. Click OK to exit the Preferences dialog.
Using a Printer via the Serial Port
If a printer is connected to the PC via the RS-232 Serial port, it is possible to use the
Debugging features of ZBI-Developer, by making use of the Virtual Printer system.
Using a Printer via the Parallel Port
If a printer is connected to the PC via the Parallel Port, it is possible to use the Debugging
features of ZBI-Developer, by making use of the Virtual Printer system.
5/14/09 ZBI-Developer User Guide 48789L-002
Page 68

ZBI-Developer
68
ZBI-Developer Tutorial
Using Virtual Printers
ZBI-Developer offers the ability to execute a ZB I program on th e PC with no printer requ ired.
The Virtual Printer system makes it possible for the user to control the inputs and view the
output of their program – all without having a printer attached to the computer.
Additionally, the Virt ual Printer system makes it possible to connect devices to the PCs’ RS232 Serial or Parallel ports and direct input from those ports into their program. For example,
if the ZBI program being written will need to accept data from coming into the printer via the
RS-232 Serial port from a weigh scale, that event could be simulated by attaching the weigh
scale to the PC and configuring the Virtual Printer to accept data from the computers serial
port.
Next, if a printer is available, but it no t y et ZBI-Ena bled, the Virtual Printer system allows the
output of the ZBI program to be sent to the computers parallel or serial ports to a printer. For
example, a ZBI program could be written to send output to the printer label formatting engi ne
– while the Virtual Printer is configured to take that same data and redirect it to the computers
serial port to a printer attached to that port. In this way, the label formatting commands that are
frequently the output of many ZBI program can be tested , even if a ZBI-Enab led pri nter i s no t
immediately available.
Edit a Virtual Printer
Virtual Printers can be edited to alter their settings. To Edit a Virtual Printer, right-click
over the Virtual Printer in the Printers View and select Edit Virtual Printer.
The Edit Virtual Printer Wizard will display.
48789L-002 ZBI-Developer User Guide 5/14/09
Page 69

ZBI-Developer
ZBI-Developer Tutorial
69
Configure where output from the Virtual Printers ports should be directed. For this Tutorial,
leave all of the Ports set to Comm Window.
Note • Virtual Printers can be used to examine the output of a ZBI program. They do not
have the ability to create an image of a printed label based on the receipt of printer
commands. That capability is only present in the printer.
5/14/09 ZBI-Developer User Guide 48789L-002
Page 70

ZBI-Developer
70
ZBI-Developer Tutorial
Creating a Debug Connection
Once the printer to be used has been Discovered, or a Virtual Printer has been selected and
configured, the next step is to run your program through the debugger environment.
ZBI-Developer offers several advanced features that allow the programmer to test the logic
and flow of a program before it is deployed. Key features are the ability to:
• Set and view breakpoints
• View the data contained in variables as a program is running
• Input and view the data being sent to Ports defined in the ZBI program
• Pause, Run or Terminate the Debugging mode as needed.
Once the printer type to be used has been determine (Virtual Printer or a networked printer) it
is necessary to create a debug connection to the printer.
In all cases, Creating a Debug Connection is done in the following way – navigate to the
Printer View Tab, right-click over the desired pr inter and choose Cre ate Debug Co nnection.
For the purposes of this tutorial, select a virtual printer.
48789L-002 ZBI-Developer User Guide 5/14/09
Page 71

ZBI-Developer
ZBI-Developer Tutorial
After the debug connection has been made, the debug connection icon will appear next to the
selected printer.
Note • Once a debug connection has been made to a printer, ZBI-Developer will attempt
to maintain that connection, even if the program is shut down and re-started. Upon
restarting, ZBI-Developer will attempt to reconnect to the selected printer.
Note • Only ZBI-Enabled printers running firmware v60.16.x, v53.16.x or later support
on-printer debugging. If you do not have a printer t hat meets t his requirement, contact
your reseller . Fo r the purpose of this T u torial, it is also possible to use a Virtual Printer if a
ZBI-Enabled printer is not availa ble, but a ZPL printer is.
71
5/14/09 ZBI-Developer User Guide 48789L-002
Page 72

ZBI-Developer
72
ZBI-Developer Tutorial
Debug a Program
Once the necessary Breakpoints have been created and a Debug Connection has been made,
the program can be run.
Note • For the purposes of this Tutorial, the program will be run in the Virtual Printer
environment, with output initially directed to the computer’s screen instead of to a printer.
The first step is to change the Perspective from the ZBI Perspective to the Debug
Perspective. Click on Window > Show Per s pe ct ive > Debug Perspective or click the
icon to change the perspective.
48789L-002 ZBI-Developer User Guide 5/14/09
Page 73

Changing the Screen Layout
The initial screen layout may be appropriate for some Debugging session s, however the layout
can also be changed to maximize the ability to see the various important Views that can be
used while Debugging a program.
For this Tutorial, the Variable View, Serial Comm Window View and ZPL Comm Window
Vi ew will be moved to make them all visible at t he same time . To move a View, click and drag
it to a new location. While a View is being moved, an outline of the View will be visible.
Rearrange the Debug Perspective so that it looks like this:
ZBI-Developer
ZBI-Developer Tutorial
73
5/14/09 ZBI-Developer User Guide 48789L-002
Page 74

ZBI-Developer
74
ZBI-Developer Tutorial
Run a Program
To run the program you’ve just written, click on menu Run > Run/Debug Program or click
the icon.
Notice that several things have changed on the screen.
• The program has executed to line 40 and is now awaiting input.
• A data entry prompt is now displayed in the Serial and ZPL Views
• The icons in the Debug View have changed so that the Terminate and Pause
icons are now active. Do not click these yet!
T o test the pro gram, type "Hello" int o the data entry prompt in the Serial View and click Send;
this simulates data coming into the printer via the RS-232 serial port.
48789L-002 ZBI-Developer User Guide 5/14/09
Page 75

ZBI-Developer
ZBI-Developer Tutorial
Notice the changes on the screen.
• The A$ variable has been filled with the data you sent via the serial port.
•The ZPL Port View has been filled with the ZPL command from Line 50 of the program.
This is the output of the program. If the program was being run on a printer, or if the
Virtual Printer was configured to direct the ZPL out to a printer connected to the PC, this
is what the printer would use to print a label.
•The Resume and Step Over icons are now active in the Debug View
• Line 60 of the program is Highlighted, showing the line the program has stopped on –
because of the Breakpoint.
75
5/14/09 ZBI-Developer User Guide 48789L-002
Page 76
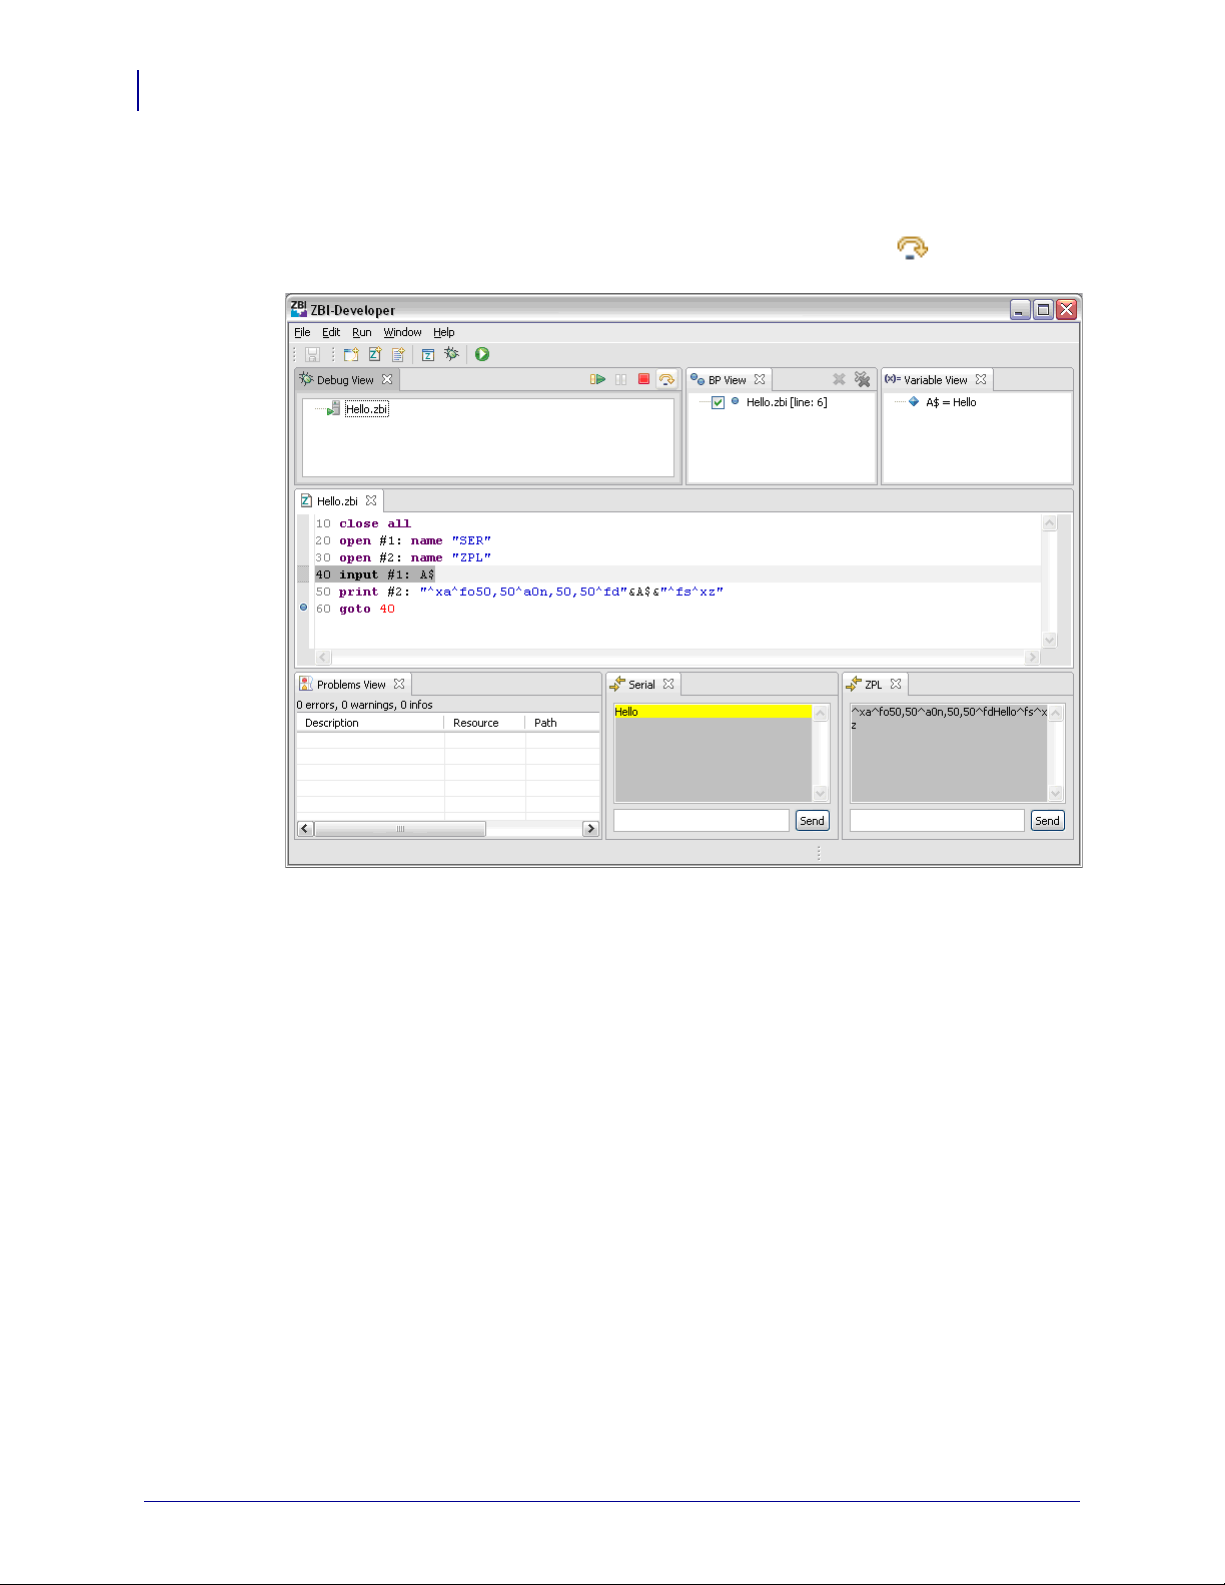
ZBI-Developer
76
ZBI-Developer Tutorial
Step Over a Breakpoint
Now that the program is at a Breakpoint, you can Step Over the breakpoint and allow the
program to execute to its next logical step. Click on the Step Over icon and note that
program has executed to Line 40, again looking for input into the serial po rt.
48789L-002 ZBI-Developer User Guide 5/14/09
Page 77
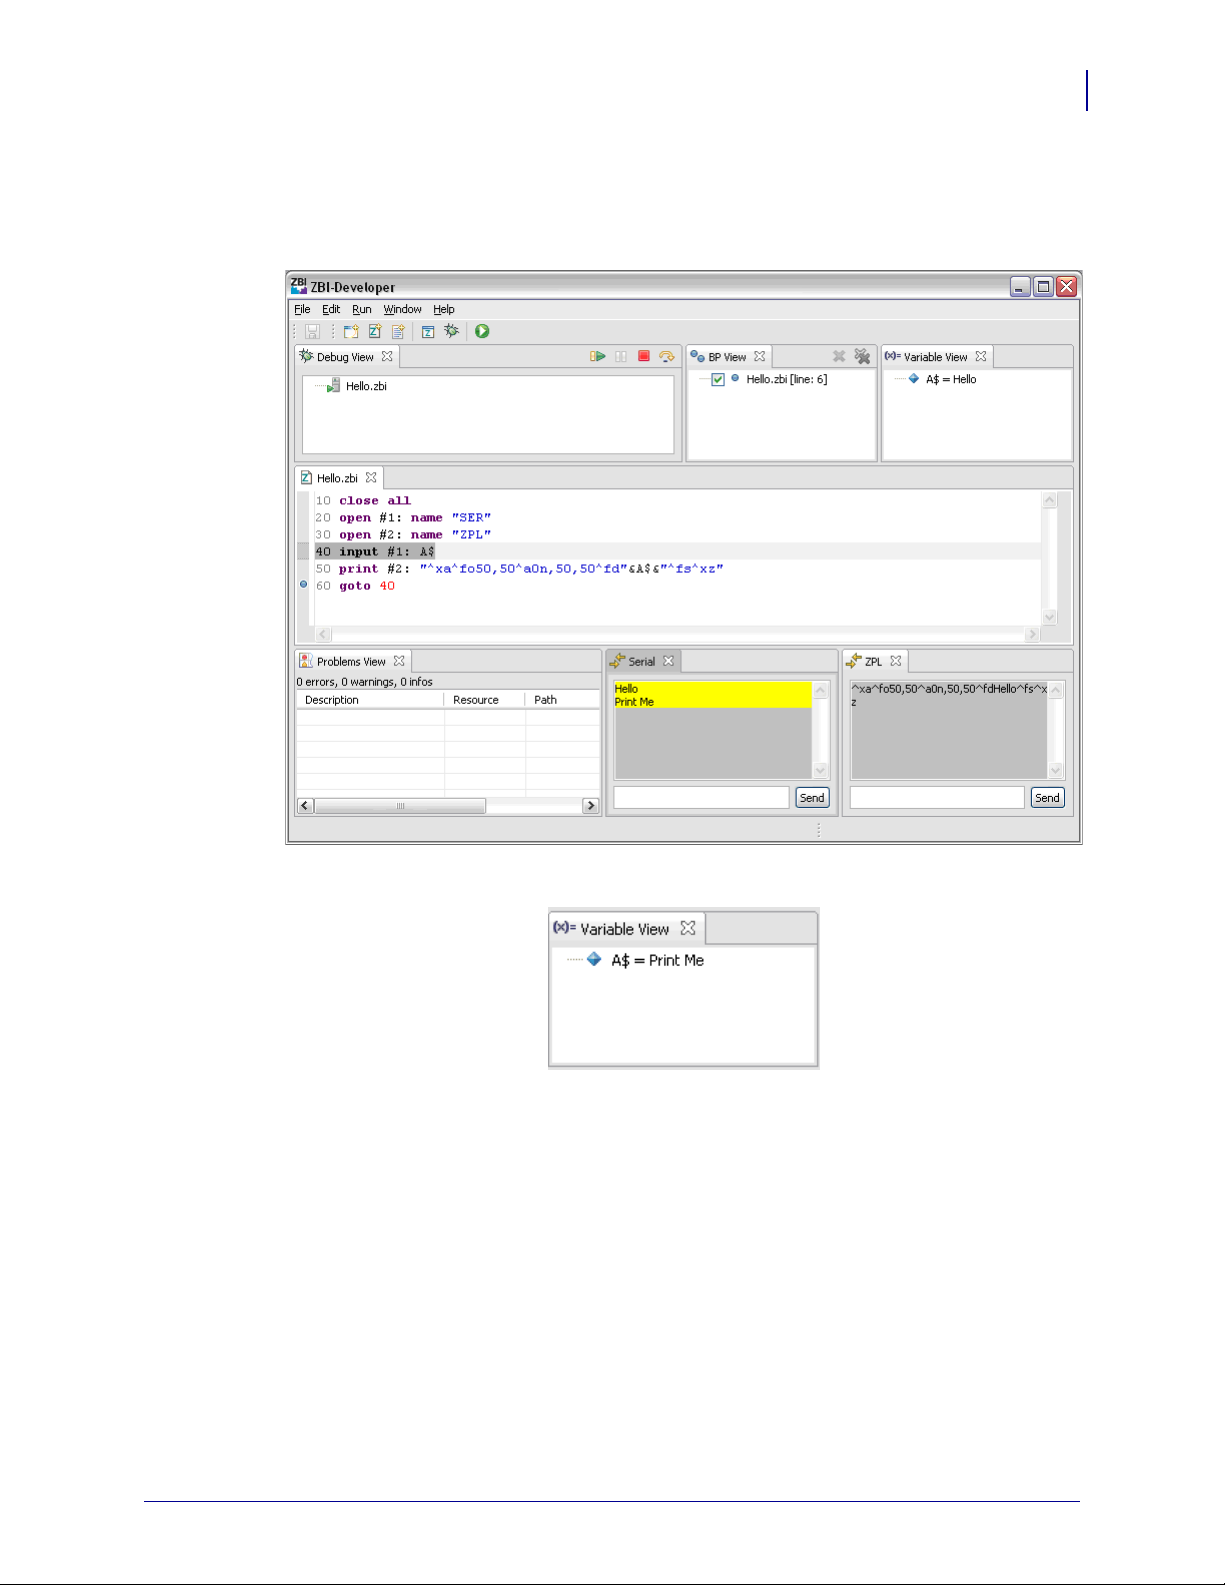
ZBI-Developer
ZBI-Developer Tutorial
Type "Print Me" in the data entry prompt in the Serial Port View and click Send; this
simulates data coming into the printer via the RS-232 serial port.
Note • The program is still on Line 40.
77
Click the Step Over icon again to move the new data into the Variable View.
5/14/09 ZBI-Developer User Guide 48789L-002
Page 78
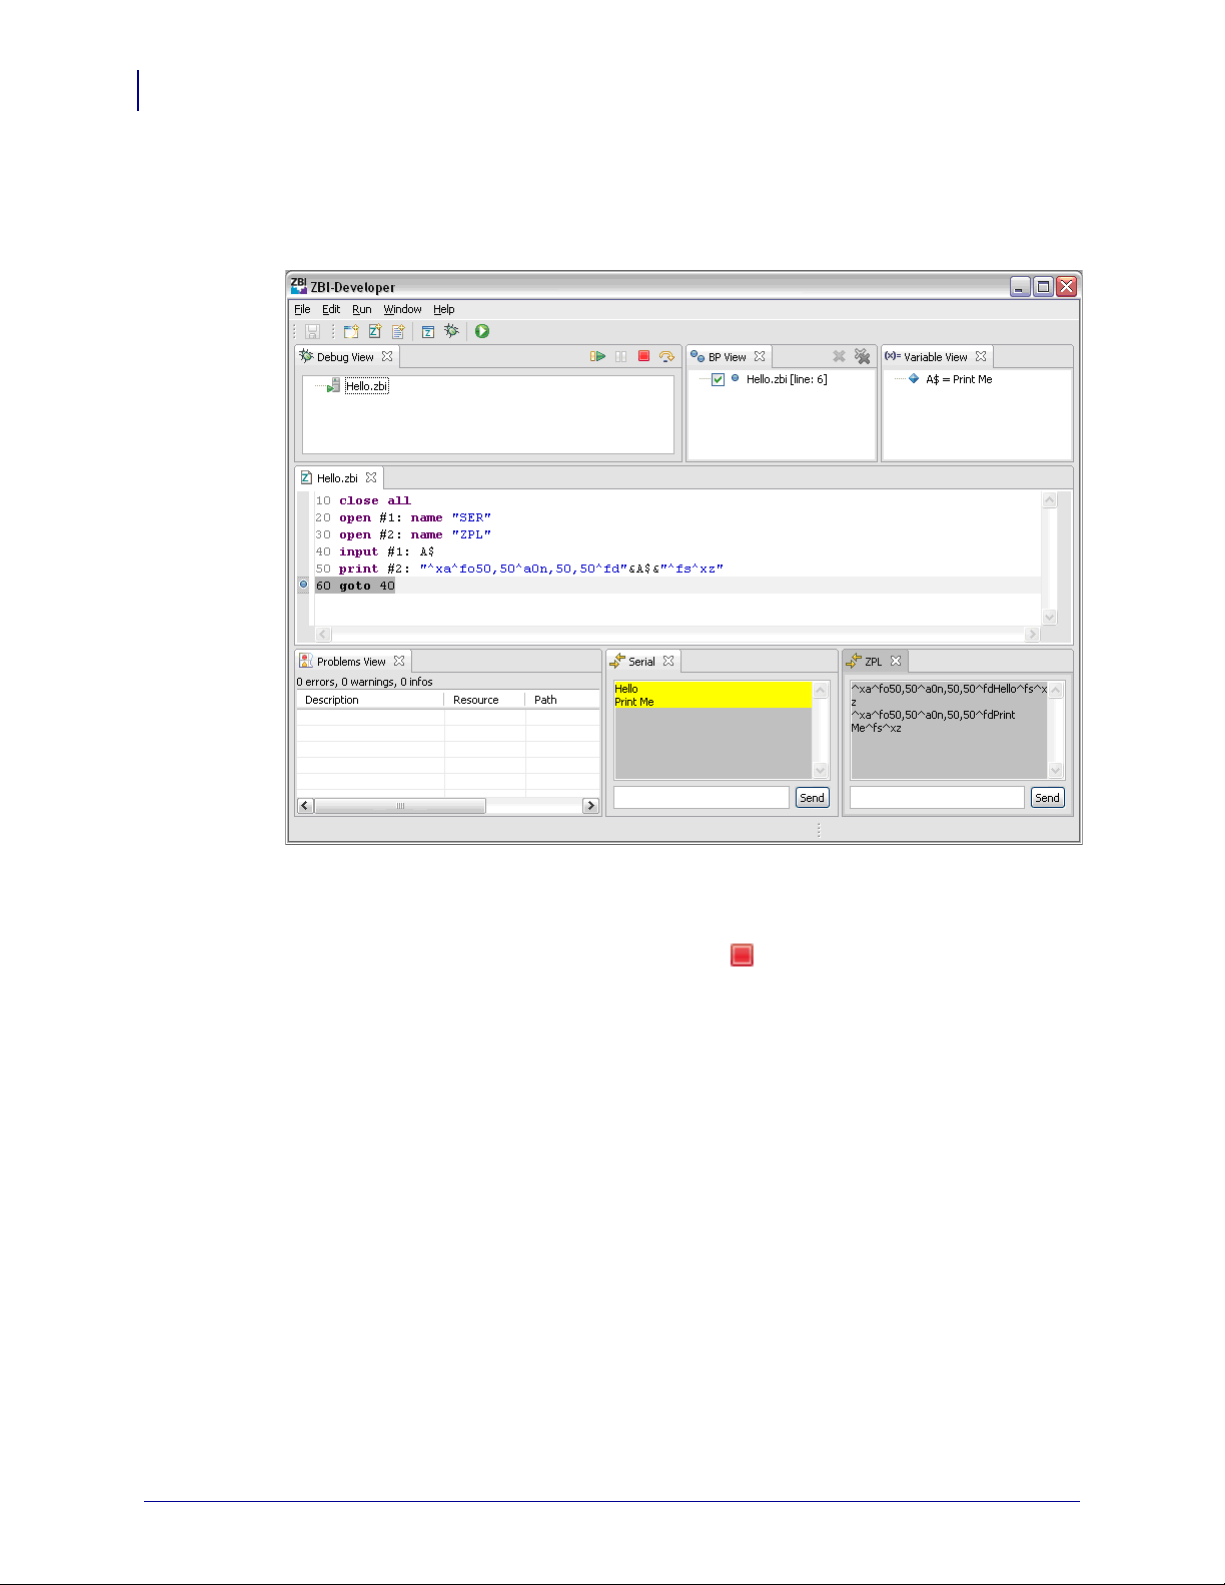
ZBI-Developer
78
ZBI-Developer Tutorial
Next, click the Step Over icon again to move the program to the next step – embedding "Print
Me" into the ZPL defined on Line 50.
Note • A new line of ZPL is shown in the ZPL Port View.
Terminating a Running Program
To stop a running program, click on the Terminate icon in the Debug View. Any active
Port Views will be deactivated and defaulted. The last v alue st ored in th e variable will re main
in the V ariables View. The Step Over , Terminate and Resume icons in the Debug View will be
deactivated. If the program was being debugged on a printer instead of in a Virtual Printer, it
will be stopped.
48789L-002 ZBI-Developer User Guide 5/14/09
Page 79

Creating the Autoexec.zpl file
ZBI-Developer can automatically create an Autoexec.zpl file for use with the program being
created.
An Autoexec.zpl file is used to cause the printer to auto matical ly run a se t of co mmands wh en
the printer is first powered up. In the context of a ZBI program, the Autoexec.zpl file can cause
the program to be executed when the printer is turned on.
Note • ZBI-Developer creates an Autoexec.zpl file that addresses only the need to start a
selected ZBI program. If the user requires that the Autoexec.zpl file perform additional
functions, the file will require editing to include those functions.
To create an Autoexec.zpl file, right-click over a .zbi file in a Project and select Generate
Autoexec.zpl. The Autoexec Wizard will display. Name the file and select the Console and
Local Echo options as needed. Consult the ZPL manual for details on how to use these
options.
ZBI-Developer
ZBI-Developer Tutorial
79
5/14/09 ZBI-Developer User Guide 48789L-002
Page 80

ZBI-Developer
80
ZBI-Developer Tutorial
Sending Files to Printers
When the software has been connected to a printer , ZBI-De veloper can send individual files or
entire projects to one or more printers, depending up on the connection type. ZBI-Developer
can send files to a debug printer, one or more networked printers, or a printer connected via
parallel or serial port.
T o send a file or project to a connected printer, right-click on a file or project and choose Send
to Printer. The Send to Printer wizard will display.
48789L-002 ZBI-Developer User Guide 5/14/09
Page 81

ZBI-Developer
ZBI-Developer Tutorial
If a project was selected, the wizard starts with a step to choose which files should be sent to
the printer(s).
81
After pressing next on the first wizard step for sending a project, or if a single file is selected
from the right-click menu, the wizard displays the available target devices.
5/14/09 ZBI-Developer User Guide 48789L-002
Page 82

ZBI-Developer
82
ZBI-Developer Tutorial
Send File to Current Debug Printer
Select the Current Debug Printer option and click on Finish to send the selected project or
file to the current debug prin ter.
Send File to Network Printer(s)
Select the Network Printer(s) option and click next to move to the next step in the Send to
Printer Wizard.
The list of printers in the Available Printers column is a combination of all printers that are
currently listed in the Printer View tab in the ZBI perspective (See Discovering Printers
on page 64 for more details).
T o send the project or file to all printers in the Available Printers list click the Add All button.
This will move all available printers to the Selected Printers column.
To send one or a select list of printers, individually select each printer in the Available
Printers column and click on Add Selected to move the selected printers to the Selected
Printers column. Hold down the CTRL key while clicking on individual items to select more
than one printer from the Available Printers column.
Click Finish when the desired printers are in the Selected Printers column.
48789L-002 ZBI-Developer User Guide 5/14/09
Page 83

Send File to Local Printer
Select the Local Printer option and click Next to move to the next step in the Send to Printer
Wizard.
The Choose Port drop down will li st all local ports that are available . Click Finish to send the
project or file to the local port.
If a serial port is selected in the Choose Port drop-down, t he serial p ort settings are displ ayed.
The settings should be set to match the settings on the connected printer.
ZBI-Developer
ZBI-Developer Tutorial
83
5/14/09 ZBI-Developer User Guide 48789L-002
Page 84

ZBI-Developer
84
ZBI-Developer Tutorial
Using CSV/TXT Files with Virtual Printers
If a CSV or TXT file is added to the project (See Project Files on page 55), it can be accessed
(e.g., CSVLOAD and TXTLOAD) via the Virtual Printer. Likewise, stored files (e.g.,
CSVSTORE and TXTSTORE ) wi ll be stored in the project directory. To do so, simply treat
the file as if it were on the printer using the DRIVE:FILENAME.EXT format.
Example • If there is a file named MYDATA.CSV in the project (see figure below) it can be
loaded via the CSVLOAD command as follows:
20 LET COLS = CSVLOAD(MYDATA$, "E:MYDATA.CSV")
The above example will load the mydata.csv file lo cat ed in the pro je ct 'myp roject'. The file
names are not case sensitive.
Do not specify the full W indows PC path name for t he file. The Virtual Printer will replace any
of the Zebra Printer Drives (Z, E, B, R, and A) with the pat h of the project . If the CSVfile is in
the root of the project in the Navigator View, then the Virtual Printer will be able to find it.
Refreshing the project contents will show any files that were created by a program that calls
CSVSTORE or TXTSTORE.
48789L-002 ZBI-Developer User Guide 5/14/09
Page 85

Import ZBI Files From a Printer
When the software has been connected to a networked printer, ZBI-Developer can retrieve
ZBI programs from a printer . See the information on Cr e ating a Debug Conn ection on page 70
for details on how to connect to a printer.
To retrieve ZBI programs from a printer, right-click over the printer and select Import File.
ZBI-Developer
ZBI-Developer Tutorial
85
The Import Wizard wi ll displa y. Select the file(s) to import from the printer to the PC and then
the Project to import the file(s) into. Click Finish to complete the Wizard.
Note • Encrypted ZBI programs (with a .bae extension) cannot be imported from the
printer back to ZBI-Developer. It is recommended that you archive Encrypted ZBI
programs.
5/14/09 ZBI-Developer User Guide 48789L-002
Page 86

ZBI-Developer
86
Compare or Replace Files
Compare or Replace Files
ZBI-Developer maintains a log of file changes, making it possible to compare or repl ace the
current version of a file with prior versions. This feature can be very useful when iterative
changes are being made to a program.
To use the Compare feature, right-click over a file and select Compare With > Local
History. The Compare with Local History dialog will be displayed. If a file has gone through
multiple changes and saves, each of those event will be available to select for comparison with
the current version. By selecting Replace With > Local Version it is possible to choose an
earlier version of the file to replace the current version.
Additionally, two files can be compared with each other. To compare two files, hold down the
Ctrl on the keyboard and select two files. Then right-click over one of the files and choose
Compare With > Each Other.
48789L-002 ZBI-Developer User Guide 5/14/09
Page 87

Encryption of ZBI Programs
This section details how to optionally encrypt pro grams before distributing them.
Note • It is recommended that Projects and Project files be backed up on a regular basis.
Zebra Technologies and ZBI-Developer do not automatically back-up files or offer a
method for un-encrypting programs.
ZBI-Developer can encrypt ZBI programs for use on printers that support ZBI 2.0 and above.
The purpose of this feature is to allow the programmer to protect the source code of the
program once it has been deployed to printers. Programs that have been encrypted are
represented in the ZBI-Developer environment with the “encrypted ZBI program” icon
instead of the standard ZBI program icon .
Note • The Encryption Key and the source code for ZBI programs should be regularly
archived.
While the encrypted program will remain in plain text in the ZBI-Developer environment, it
will be encrypted and MIME encoded when it is sent to the printer.
ZBI-Developer
Encryption of ZBI Programs
87
The Default Encryption Key
ZBI-Developer has a unique encryption key that is created when the program is installed. This
key is the default key used when a ZBI program is encrypted – unless another key has been
created.
Note • It is recommended that the Default Encryption Key be used rather than creating
additional keys. This approach is recommended to make the task of managing the keys
easier over time.
Encryption keys can be shared between users in one of two ways:
• The key file can be copied from one machine to another. This approach is recommended
when program development and encryption will be done from remote locations.
• The key file can be stored on a networked drive, made available to any of the
programmers to use.
5/14/09 ZBI-Developer User Guide 48789L-002
Page 88

ZBI-Developer
88
Encryption of ZBI Programs
Encrypt a ZBI Program
To encrypt a ZBI program, right-click over the program and choose Encrypt ZBI Program.
The program will display a Warning dialog as shown below:
Next, the program will offer the choice to use the Default Encryption Key or to Generate a
New Key.
Note • It is recommended that the Default Encryption Key be used rather than creating
additional keys. This approach is recommended to make the task of managing the keys
easier over time.
Choose which Key to use and click Finish to complete the Encryption Key Wizard. The ZBI
program will be marked as encrypted. When it is se nt to a ZBI 2.0 printer, it wil l b e e nc rypt ed
and MIME encoded.
48789L-002 ZBI-Developer User Guide 5/14/09
Page 89

ZBI-Developer
Encryption of ZBI Programs
Example • The program from the ZBI-Developer tutorial is shown below in pl ain text
form:
10 close all
20 open #1: name "SER"
30 open #2: name "ZPL"
40 input #1: A$
50 print #2: "^xa^fo50,50^a0n,50,50^fd"&A$&"^fs^xz"
60 goto 40
When encrypted and sent to the printer, the program is transmitted using the Base64 encoding
scheme. (To improve readability, line breaks have been added.)
^XA^IDE:HELLO.BAS^XZ
^XA^IDE:HELLO.BAE^XZ
^XA^IDR:HELLO.BAS^XZ
^XA^IDR:HELLO.BAE^XZ
~DZE:HELLO.BAE,176,:B64:SEVMTE8AAAAAACUAAAAAoPDiWDoW22
89
sG86Nnf7HUfLZB3YSMil9HwPcpzIMs4buW+FDGw2FY89osEEofNF9e
uU8dz5872jW8Gafq85vsr47SydHGIjymIVxQq6c50GRBJjFrEVkh+u
vhnHWQ7HRasXvB7N/VfB0qKSDiICdwzNkRZL5G3nFAQFIQtfDyrv51
IBYfGRn+4lxHcPRUGNveleNcSP58qjt+UBXziVVLlv0=:61b3
Distributing Encrypted Programs
When an Encrypted ZBI 2.0 program is distributed to a printe r, they program will appear on the
printers directory listing page with the extension “.bae” (basic encrypted). The file will be
listed in on the printer’s directory listing page, but it will not be possible to return the program to
the host in plain text format.
Note • The program will not run unless the encryption key has been sent to the printer. To
send the encryption key to the printer, right click over the key and click “Send to Printer”.
The key can also be exported out of ZBI-Developer to a file on the computers hard drive –
and then that exported file can be sent to printers as needed. Zebra does recommend
maintaining control over access to the Encryption key in order to benefit from the protection
the Encryption system offers.
Generate a New Key
The default encryption key is the recommended key to use, however it may be desirable to
create a new key . For exa mple, a developer may wa nt to create a new key for a unique project. A
new encryption key can be created when the user chooses to encrypt the program.
To create a new key, select Generate New Key when encrypting a program. A new unique key
will be created and displayed in the Project folder with the Key icon.
5/14/09 ZBI-Developer User Guide 48789L-002
Page 90

ZBI-Developer
90
Encryption of ZBI Programs
Key Storage
ZBI File Properties
Note • It is recommended that Projects and Project files be backed up on a regular basis.
ZBI-Developer does not automatically back-up files or offer a method for un-encrypting
programs if the Encryption Key is not present.
The properties for each ZBI file can be viewed and set. To set the file properties, right-click
over a ZBI file in the Navigator View and choose Properties. The file size, location, encoding
type and other settings are displ a ye d on the Info dialog. Additionally, the file attributes can be
set on the ZBI Options Info Page.
Note • Setting the attributes for a ZBI program will change how it is presented on the
printers web pages. If a file is configured to be persistent, it can only be deleted if it is
specifically named in a command. For example, if a persistent file is named
“hello.bae” was stored in E memory, the ZPL command to delete it would be
“^XA^IDE:Hello.bae^FS^XZ”.
48789L-002 ZBI-Developer User Guide 5/14/09
Page 91

ZBI Technical Support
Online Support
You can find the latest builds and updates under the Support section on the Zebra Web site.
If you cannot resolve the issue, please contact your local reseller or the offices listed in
Contact Information.
Contact Information
Worldwide, Technical Support is available through your Reseller, or at:
http://www.zebra.com/support
Professional ZBI Programming services can be obtained by contacting:
zbi-experts@zebra.com
Service Quotations available upon request.
ZBI-Developer
ZBI Technical Support
.
91
Zebra Technologies Corporation
International Headquarters
333 Corporate Woods Parkway
Vernon Hills, Illinois 60061-3109 USA
Phone: +1 847 913 2259
Fax: +1 847 913 2578
5/14/09 ZBI-Developer User Guide 48789L-002
Page 92

ZBI-Developer
Notes • ___________________________________________________________________
__________________________________________________________________________
__________________________________________________________________________
__________________________________________________________________________
__________________________________________________________________________
__________________________________________________________________________
__________________________________________________________________________
__________________________________________________________________________
__________________________________________________________________________
__________________________________________________________________________
92
ZBI Technical Support
48789L-002 ZBI-Developer User Guide 5/14/09
Page 93

Index
A
about
ZBI-Developer, 47
autoexec.zpl file
creating, 79
B
breakpoint
step over, 76
breakpoints
setting, 63
breakpoints view, 45
C
changing
screen layout, 53, 73
workspace location, 48
close
file, 25
close all
files, 25
compare
files, 86
configuration
ZBI-Developer, 48
contact information, 9, 91
copy
text, 27
creating
a virtual printer, 34
autoexec.zpl file, 79
debug connection, 70
new folder, 20
new project, 19
new untitled file, 21
new ZBI program, 21
cut
text, 27
D
debug
a program, 72
creating connection, 70
perspective, 40
SNMP, 52
view, 41, 42
default
encryption key, 87
delete
text, 28
directed broadcast
network searches, 51
setting search, 66
discovering
printers, 64
distributing
encrypted programs, 89
5/14/09 ZBI-Developer User Guide 48789L-002
Page 94

94
Index
E
edit
a virtual printer, 36, 68
edit menu, 27
email options, 49
encrypted programs
distributing, 89
encryption
default key, 87
generate a new key, 89
ZBI program, 88
ZBI programs, 87
encryption key
location, 49
name, 49
storage, 90
exit
a file, 27
export
a file, 23
encryption keys, 25
projects, 24
I
import
a file, 22
ZBI files from a printer, 85
installation, 16
interface, 18
introduction
ZBI-Developer, 13
IP address
network searches, 52
setting search, 67
K
key storage
encryption, 90
L
liability, 2
local broadcast
network searches, 50
setting search, 65
F
features
ease-of-use, 13
file menu, 19
files
sending to printers, 80
find next
text, 28
find previous
text, 28
find/replace
text, 28
G
generate a new key
encryption, 89
H
help
ZBI command syntax, 61
help menu, 45
M
menu
edit, 27
file, 19
help, 45
run, 30
window, 30
multicast
network searches, 52
setting search, 67
N
navigator view, 32
network
saved searches, 49
network searches
directed broadcast, 51
IP address, 52
local broadcast, 50
multicast, 52
setting, 64
subnet, 51
48789L-002 ZBI-Developer User Guide 5/14/09
Page 95

Index
95
new folder, 20
new project, 19
starting, 57
new untitled file, 21
new ZBI program, 21
saving, 59
starting, 58
writing, 60
O
online support, 91
P
parallel port
using a printer’s, 67
paste
text, 28
perspectives, 54
debug, 40
ZBI, 31
print
a file, 27
print servers
supported, 15
printer view, 33
printers
discovering, 64
problems view, 39, 62
program
debug, 72
run, 74
terminate while running, 78
project files, 55
properties
ZBI file, 90
R
redo
an edit, 27
related documents, 11
rename
a file, 27
replace
files, 86
revert
to last saved file, 27
run
a program, 74
run menu, 30
run/debug ZBI application, 30
S
save
a file, 26
new ZBI program, 59
save as
a file, 26
saved searches
network, 49
screen layout
changing, 53, 73
select all
objects, 28
text, 28
sending
files to printers, 80
serial port
using a printer’s, 67
set encoding
files, 29
setting
breakpoints, 63
directed broadcast search, 51, 66
IP address search, 52, 67
local broadcast search, 50, 65
multicast search, 52, 67
network searches, 64
subnet search, 51, 66
setting preferences
window, 49
SNMP, 52
software
starting, 56
starting
new project, 57
new ZBI program, 58
software, 56
ZBI-Developer, 17
step over
a breakpoint, 76
subnet
network searches, 51
setting search, 66
support
contact information, 91
online, 91
supported
print servers, 15
printers, 14
system requirements, 14
5/14/09 ZBI-Developer User Guide 48789L-002
Page 96

96
Index
T
terminating
a running program, 78
tutorial
ZBI-Developer, 54
U
undo
an edit, 27
update
ZBI-Developer, 45
using
a printer via parallel port, 67
a printer via serial port, 67
a virtual printer, 38, 68
V
variable view, 44
view
ASCII table, 46
breakpoints, 45
debug, 41, 42
navigator, 32
printer, 33
problems, 39, 62
variable, 44
views, 54
virtual printer
create, 34
edit, 36
editing, 68
using, 38, 68
W
window
setting preferences, 49
window menu, 30
workspace
changing location, 48
writing
new ZBI program, 60
Z
ZBI
command syntax help, 61
ZBI file
properties, 90
ZBI files
import from a printer, 85
ZBI keys, 14
ZBI perspective, 31
ZBI printers, 14
ZBI program
encrypting, 87, 88
ZBI versions, 14
1.0 through 1.5, 14
2.0 and higher, 15
ZBI-Developer
about, 47
configuration, 48
ease-of-use features, 13
installation, 16
interface, 18
introduction, 13
starting, 17
tutorial, 54
48789L-002 ZBI-Developer User Guide 5/14/09
Page 97

Page 98

Zebra Technologies International, LLC
333 Corporate Woods Parkway
Vernon Hills, Illinois 60061.3109 U.S.A
T: +1 847 79 3 260 0
Toll-free +1 800 423 0422
F: +1 847 913 8766
Zebra Technologies Europe Limited
Dukes Meadow
Millboard Road
Bourne End
Buckinghamshire, SL8 5XF, UK
T: +44 (0)1 62 8 55 60 00
F: +44 (0)1628 556001
Zebra Technologies Asia Pacific, LLC
120 Robinson Road
#06-01 Parakou Building
Singapore 068913
T: +65 685 8 07 22
F: +65 6885 0838
http://www.zebra.com
© 2009 ZIH Corp.
© 2009 ZIH Corp.
48789L-002
 Loading...