

Page 1
ZXP Series 9™
P1086707-002
Card Printer
User Guide
Page 2

Corporate Headquarters
+1 800 423 0442
inquiry4@zebra.com
Asia-Pacific Headquarters
+65 6858 0722
contact.apac@zebra.com
EMEA Headquarters
zebra.com/locations
mseurope@zebra.com
Latin America Headquarters
+1 847 955 2283
la.contactme@zebra.com
http://www.zebra.com/locations
©2016 ZIH Corp. and/or its affiliates. All rights reserved. Zebra and the stylized Zebra head are trademarks of ZIH Corp., registered in many jurisdictions
worldwide. All other trademarks are the property of their respective owners.
Page 3

Contents
Before Printing ................................................................................................................v
Card Type.............................................................................................................................................. vi
Single- or Double-Sided ........................................................................................................................vii
Ribbon Combination ............................................................................................................................viii
Print a Test Card ................................................................................................................................... ix
Introduction .....................................................................................................................1
Description ............................................................................................................................................. 1
Printer and Laminator Components ....................................................................................................... 2
Icons ......................................................................................................................................................3
Installation and Setup ....................................................................................................5
General Information ...............................................................................................................................5
Unpacking the Printer ............................................................................................................................6
Unpacking the Printer with a Laminator ................................................................................................. 7
Unpacking (continued) ........................................................................................................................... 8
Loading Cards ...................................................................................................................................... 11
Installing the Card Hoppers .................................................................................................................12
Input Hopper .................................................................................................................................. 12
Output Hopper ............................................................................................................................... 13
Installing the Software ..........................................................................................................................14
Supported Operating Systems ......................................................................................................14
Supported Sharing Combinations ..................................................................................................15
Installing the Cleaning Cartridge .......................................................................................................... 16
Installing the Cleaning Roller ...............................................................................................................17
Loading the Transfer Film ....................................................................................................................18
Loading Print Ribbon ...........................................................................................................................19
Replacing the Laminate .......................................................................................................................20
Opening the Laminator Door .........................................................................................................20
Removing the Laminate Cassette(s) ............................................................................................. 20
Loading the Laminate Cassette(s) .................................................................................................23
Installing the Laminate Cassette ...................................................................................................26
Using Partial-Width Laminate ........................................................................................................ 28
Laminating Contact Smart Cards ..................................................................................................30
Packing for Shipment ........................................................................................................................... 32
Printer ............................................................................................................................................ 32
Printer with Laminator ....................................................................................................................34
i ZXP Series 9 Card Printer User Guide P1086707-002
Page 4

Operation .......................................................................................................................39
Introduction ..........................................................................................................................................39
Printing Preferences ............................................................................................................................40
Card Type Selection .............................................................................................................................41
Print Ribbon Selection .........................................................................................................................43
Printing a Test Card..............................................................................................................................45
Manual Card Feed ...............................................................................................................................48
Operator Control Panel (OCP) ............................................................................................................. 50
Printer Menu Information ............................................................................................................... 51
Messages .............................................................................................................................................59
Operational .................................................................................................................................... 59
Warning Messages ........................................................................................................................ 60
Error Messages .............................................................................................................................60
Maintenance .................................................................................................................. 61
Cleaning the Printer .............................................................................................................................62
When to Clean ............................................................................................................................... 62
Rollers ...........................................................................................................................................62
Platen ............................................................................................................................................64
Replacing the Cleaning Rollers ..................................................................................................... 64
Cleaning the Laminator ........................................................................................................................ 65
When to Clean ............................................................................................................................... 65
Laminator .......................................................................................................................................65
Cleaning the Printhead ........................................................................................................................70
Magnetic Encoder Cleaning ................................................................................................................. 71
Troubleshooting ........................................................................................................... 73
OCP Error Messages ........................................................................................................................... 73
Clearing a Card Jam ............................................................................................................................ 83
Printer ............................................................................................................................................ 83
Laminator .......................................................................................................................................84
OCP Test Cards ................................................................................................................................... 86
Identifying Job Quality Issues ..............................................................................................................87
Print Quality Issues ........................................................................................................................87
Transfer Quality Issues .................................................................................................................. 88
Ethernet Indicators—Detail .................................................................................................................. 90
Network Operations .....................................................................................................91
Printer Connections .............................................................................................................................92
Printer Sharing ...............................................................................................................................92
External Print Server .....................................................................................................................92
Internal Print Server .......................................................................................................................92
Adding a Network Printer (Windows 7) ................................................................................................ 93
Wi-Fi Connectivity ................................................................................................................................ 94
Description .....................................................................................................................................95
Security ..........................................................................................................................................95
Setup via Browser Console ...........................................................................................................96
Setup via OCP ............................................................................................................................... 99
Printer Pooling ...................................................................................................................................100
Setting Up Printer Pooling (Windows 7) ...................................................................................... 100
Using the Printer Pool ..................................................................................................................101
Printer Sharing ................................................................................................................................... 102
Setting Custom Card Specications ........................................................................103
Introduction ........................................................................................................................................103
Process .............................................................................................................................................. 104
Adjustments .......................................................................................................................................106
Overview ......................................................................................................................................106
ii ZXP Series 9 Card Printer User Guide P1086707-002
Page 5

Partial Transfer ............................................................................................................................108
Warpage ...................................................................................................................................... 110
Laminator Adjustments ................................................................................................................ 11 5
Magnetic Card Encoder ............................................................................................. 117
Introduction ........................................................................................................................................ 117
Ribbon Selection ................................................................................................................................ 118
Driver Setting ..................................................................................................................................... 118
Media Loading Orientation ................................................................................................................. 120
Magnetic Encoding Type .................................................................................................................... 121
ISO (Default) ................................................................................................................................121
AAMVA ........................................................................................................................................122
CUSTOM ..................................................................................................................................... 122
BINARY .......................................................................................................................................122
Laminating Mag Cards ....................................................................................................................... 123
Using Partial-Width Laminate ............................................................................................................124
Smart Card Encoder ................................................................................................... 125
Introduction ........................................................................................................................................125
Ribbon Selection ................................................................................................................................ 126
Contact Smart Cards ................................................................................................................... 126
Printing on Contactless Smart Cards ..........................................................................................126
Driver Setting .....................................................................................................................................127
Media Loading Orientation ................................................................................................................. 128
Contact Smart Cards ................................................................................................................... 128
Contactless Smart Cards .............................................................................................................128
Contact Station Smart Card Interface ................................................................................................ 129
Laminating Contact Smart Cards ....................................................................................................... 129
P1086707-002 ZXP Series 9 Card Printer User Guide iii
Page 6

iv ZXP Series 9 Card Printer User Guide P1086707-002
Page 7

Before Printing
Before your rst print, there are several settings that need to be checked:
y Check that the proper card type is selected
y Check that either single- or double sided-printing is selected
y Check that the correct ribbon combination is selected
y Print a test card
v ZXP Series 9 Card Printer User Guide P1086707-002
Page 8
Before Printing
Card Type
Card Type
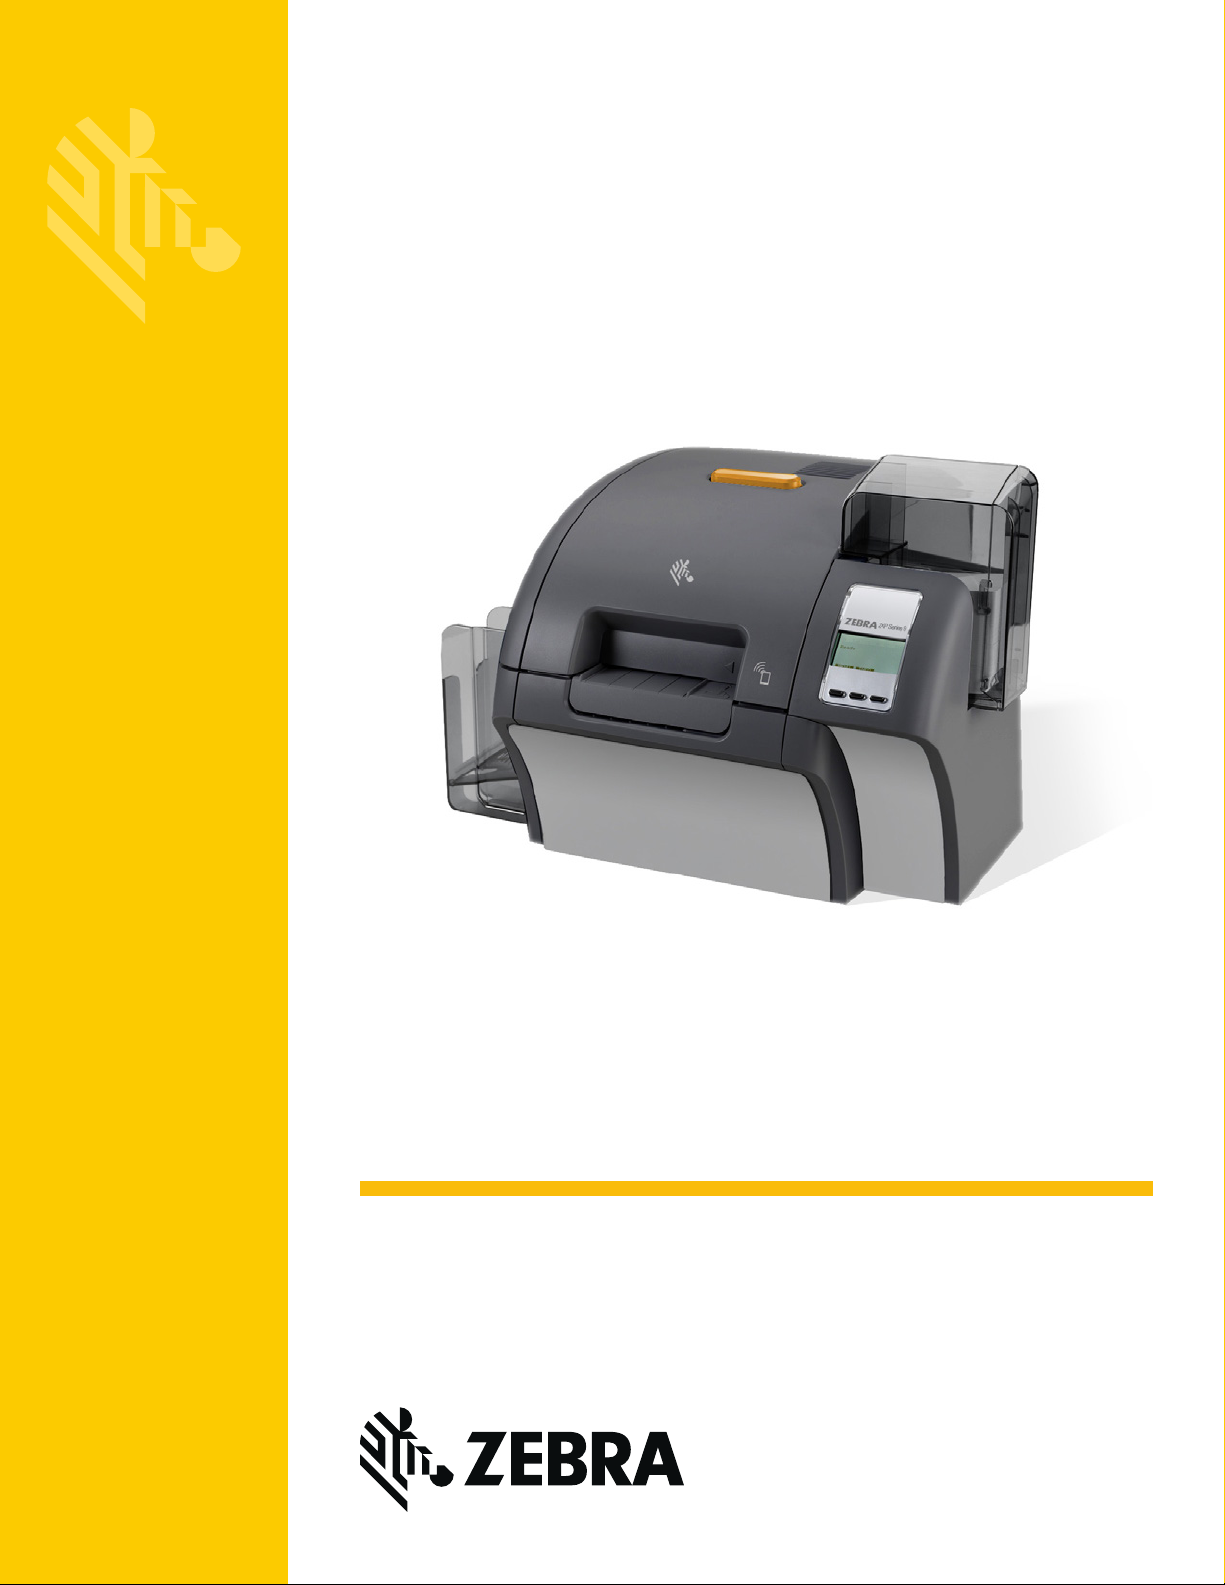
From the Printing Preferences Control Panel, select the Card type in use drop-down menu and
select the appropriate card type.
The menu contains six different card types that are supported by the printer, if there is not a card
type that suits your needs, select either Custom 1 or Custom 2 and enter the specications for the
custom card type (see “Setting Custom Card Specications” on page 101).
See “Card Type Selection” on page 39 for more detailed information.
vi ZXP Series 9 Card Printer User Guide P1086707-002
Page 9
Before Printing
Single- or Double-Sided
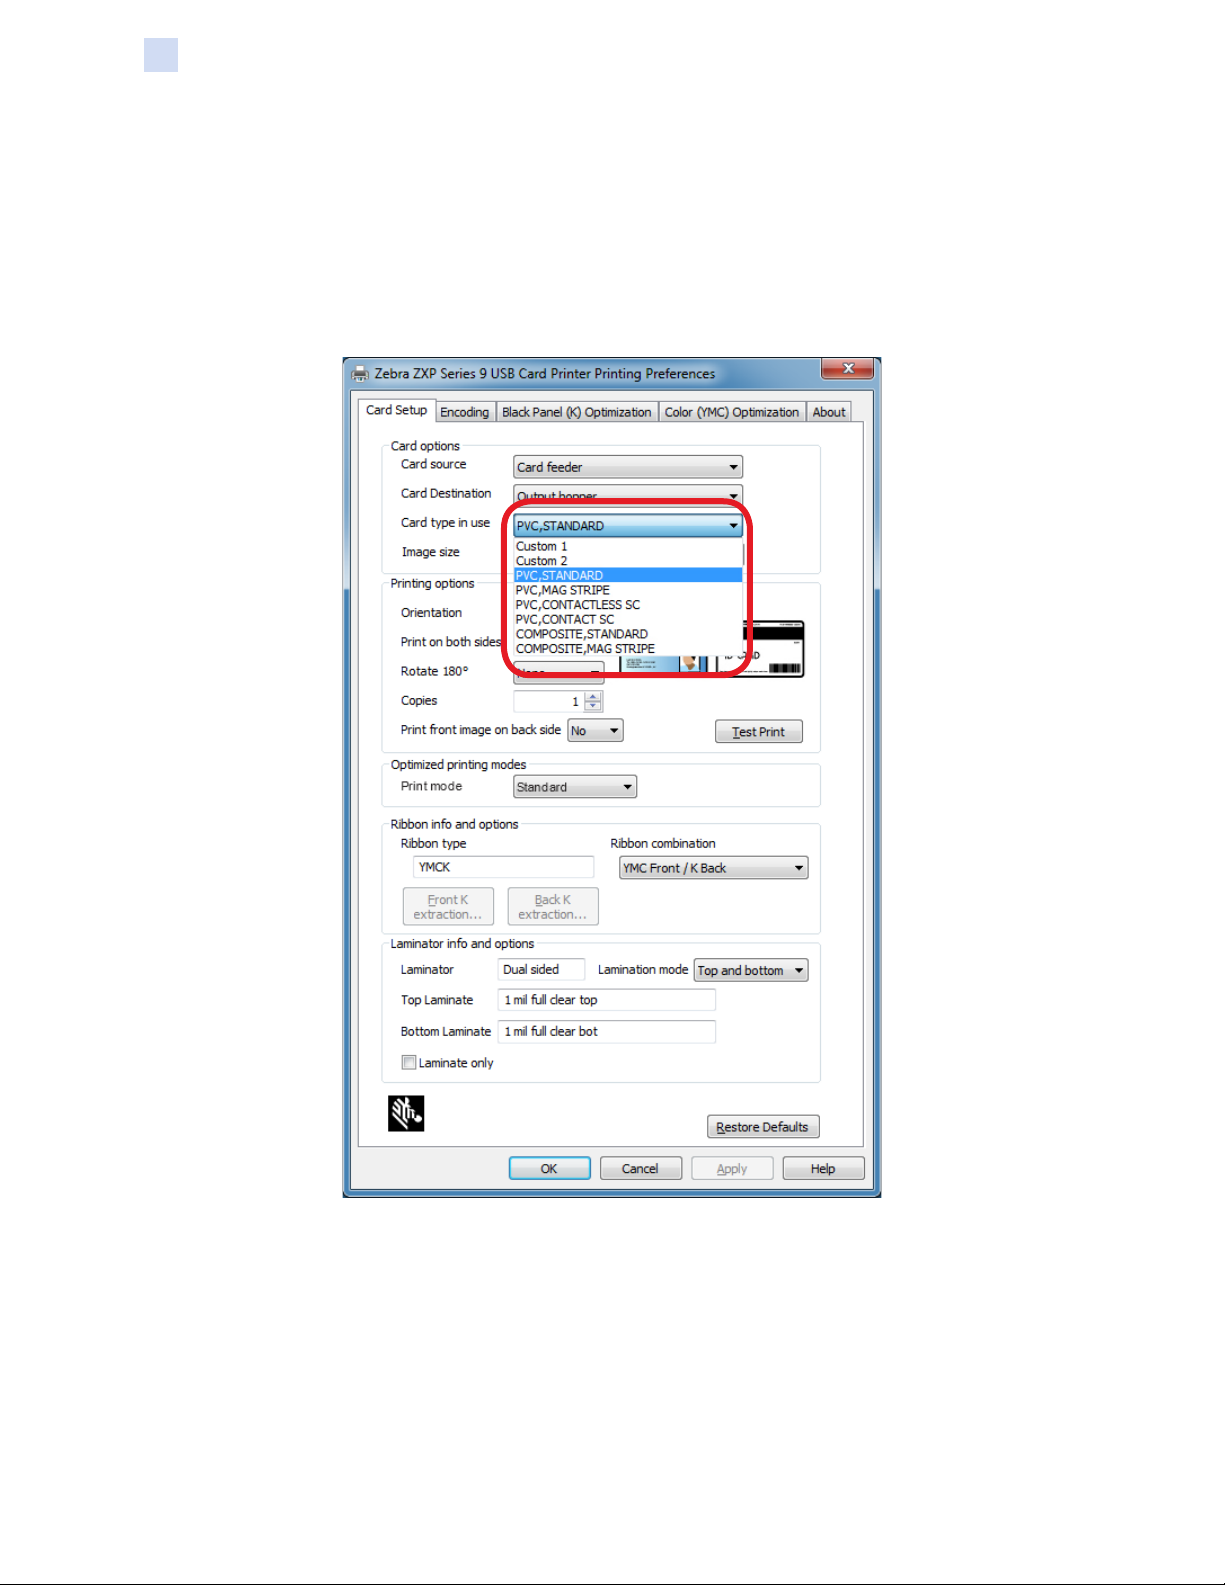
Single- or Double-Sided
The ZXP Series 9 Card Printer comes in either a single- or double sided conguration. If you have a
single-sided printer, you can skip this step. If you have a double-sided printer, and want to be able to
print on both sides of the card, select Yes from the Print on both sides drop-down menu.
P1086707-002 ZXP Series 9 Card Printer User Guide vii
Page 10
Before Printing
Ribbon Combination
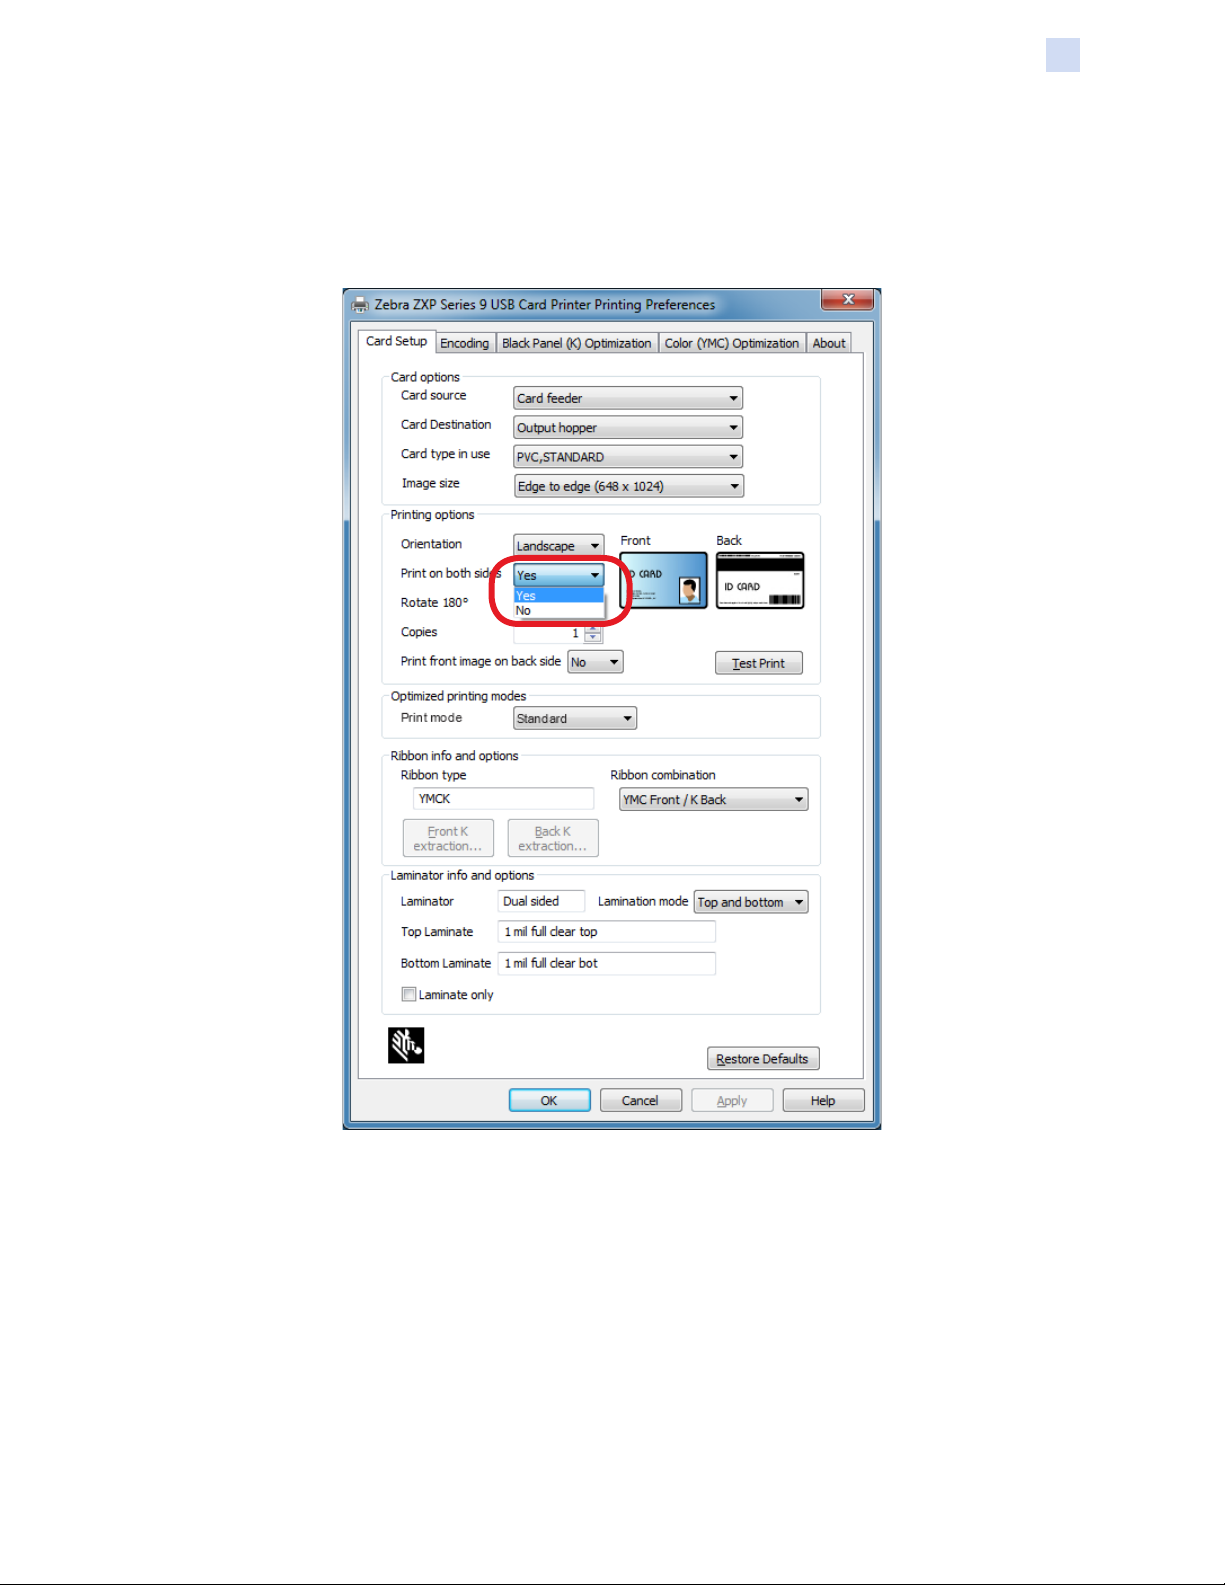
Ribbon Combination
The ZXP Series 9 Card Printer supports many different ribbon types for many different printing
requirements, and each ribbon type may support multiple ribbon combinations. For example, a
YMCK ribbon may support printing color on the front and black on the back (YMC Front / K Back), or
color on the back and front (YMCK Front / YMCK Back). Depending on your printing requirements,
select the appropriate ribbon combination from the Ribbon combination drop-down menu.
See “Print Ribbon Selection” on page 40 for more detailed information.
viii ZXP Series 9 Card Printer User Guide P1086707-002
Page 11

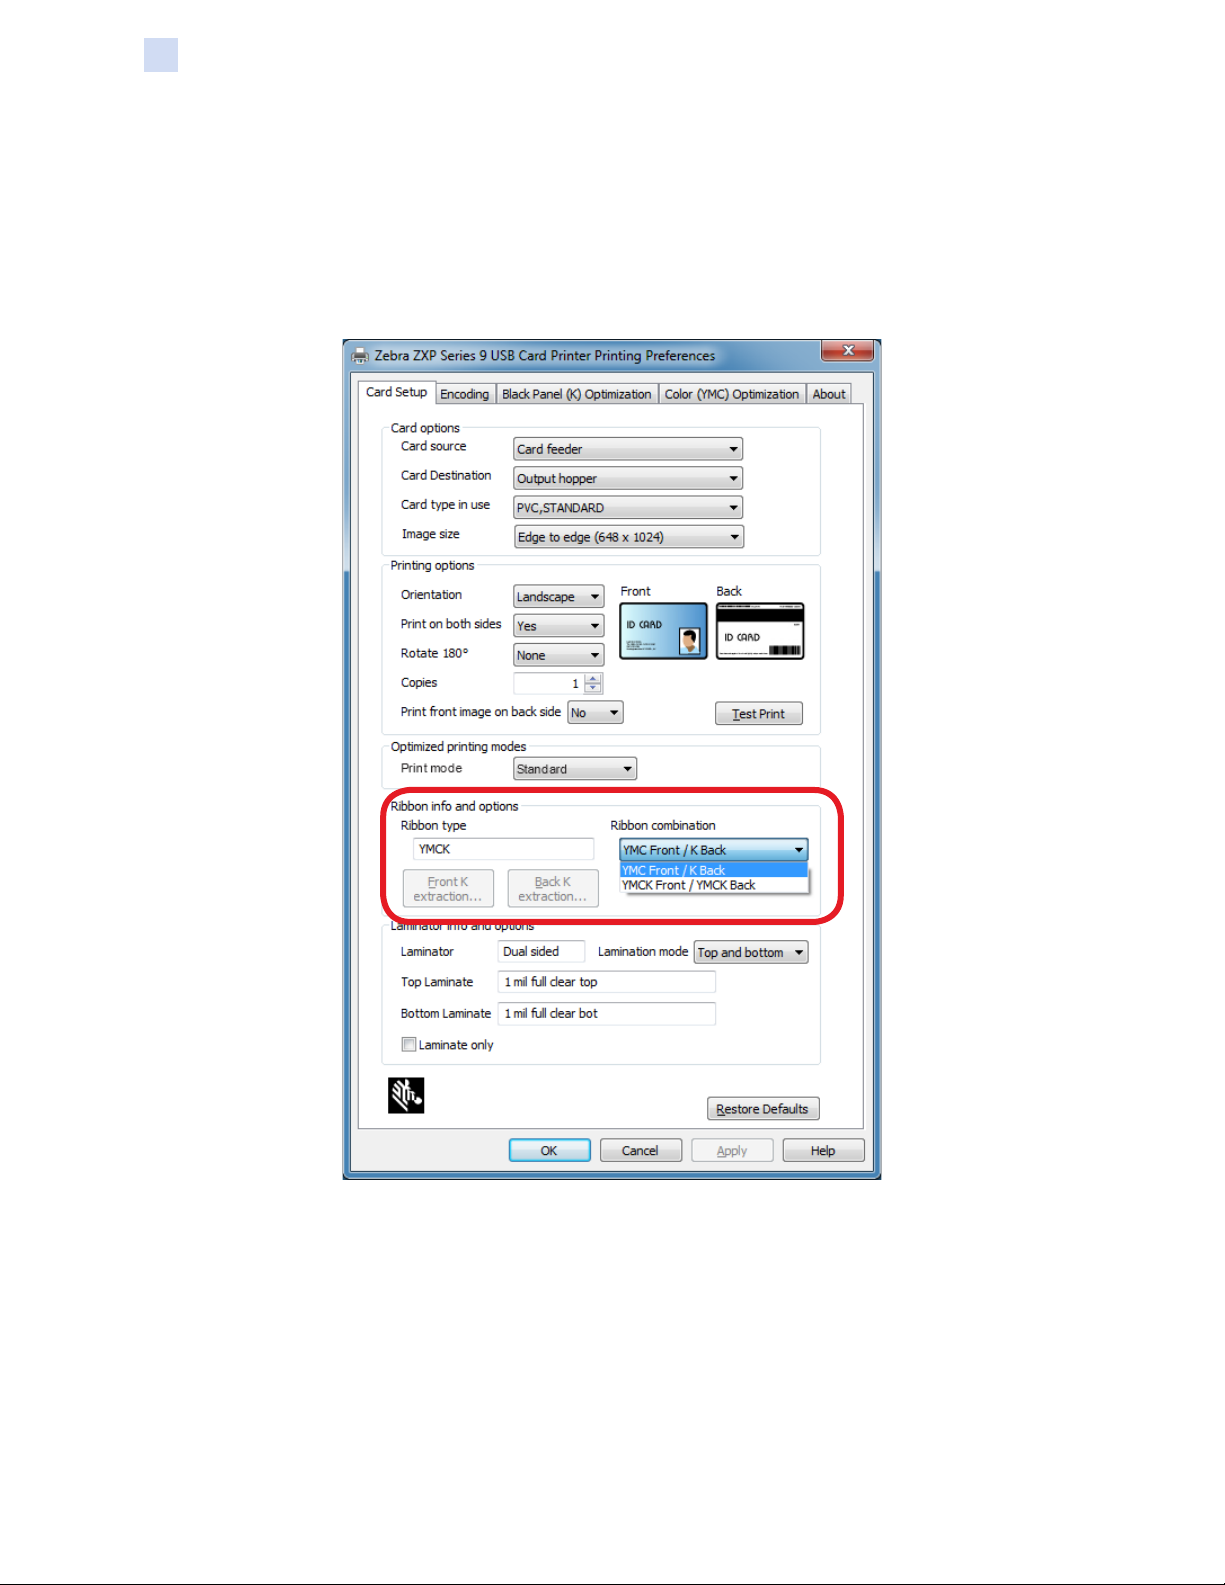
Print a Test Card
Once all your preferences have been set, click Test Print.
Before Printing
Print a Test Card
See “Printing a Test Card” on page 42 for more detailed information.
P1086707-002 ZXP Series 9 Card Printer User Guide ix
Page 12

x ZXP Series 9 Card Printer User Guide P1086707-002
Page 13

1
Introduction
Description
This manual contains installation, operation, maintenance, troubleshooting, and networking
information for the Zebra ZXP Series 9 Card Printer; and describes single- and double-sided
printers, and double-sided printers with either a single- or double-sided laminator; and is intended to
be used by an operator, as well as an experienced IT person.
The Zebra ZXP Series 9 Card Printer uses reverse transfer printing technology to create photo-
quality and over-the-edge images on plastic identication cards. Zebra’s reverse transfer printers
provide fast throughput and a range of encoding options for a variety of markets and applications.
The single-sided laminator applies a laminating lm on the top surface of the printed card for added
security; the double-sided laminator applies laminating lm on both the top and bottom surfaces of
the card.
References in this document to “the laminator” apply to either a single- or double-sided laminator.
1 ZXP Series 9 Card Printer User Guide P1086707-002
Page 14
Introduction
Printer and Laminator Components
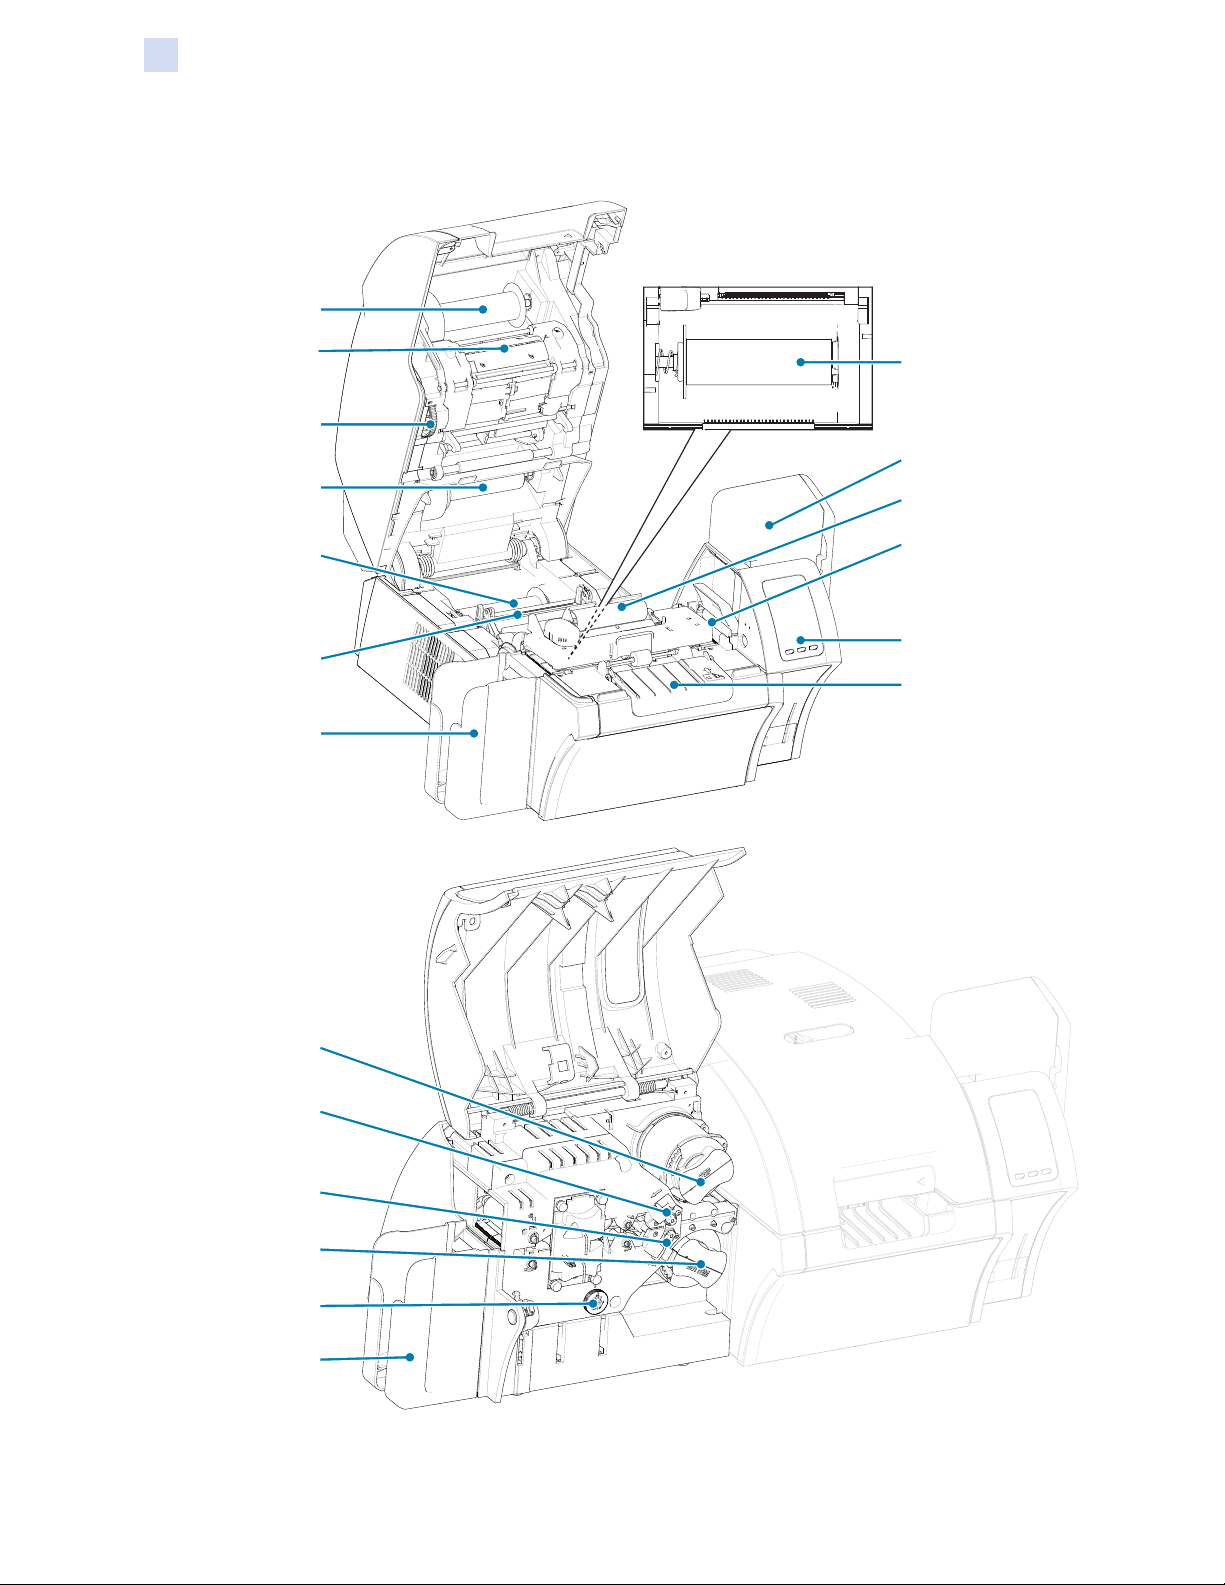
Printer and Laminator Components
Transfer Film Take-Up
Transfer Film Take-Up
Transfer Film Take-Up
Transfer Station
Transfer Station Card Slot
Transfer Station Card Slot
Manual Advance Wheel
Manual Advance Wheel
Transfer Film Supply
Transfer Film Supply
Transfer Film Supply
Print Ribbon Take-Up
Print Ribbon Take-Up
Print Ribbon Take-Up
Card Slot
Print Ribbon Supply
Print Ribbon Supply
Print Ribbon Supply
Input Hopper
Input Hopper
Input Hopper
Card Cleaning Roller
Card Cleaning Roller
Card Cleaning Roller
Card Cleaning Cartridge
Card Cleaning Cartridge
Card Cleaning Cartridge
Printhead
Printhead
Printhead
Output Hopper
Output Hopper
Output Hopper
Upper Laminate
Upper Laminate Cassette
Cassette Release
Cassette Release
Cassette
Upper Laminate
Upper Laminate
Cassette Release
Lower Laminate
Lower Laminate
Cassette Release
Operator Control Panel
Operator Control Panel
Operator Control Panel
Manual Card Feed
Manual Card Feed
Manual Card Feed
Lower Laminate
Lower Laminate Cassette
Manual Advance Tool
Manual Advance Tool
Cassette
Output Hopper
Output Hopper
2 ZXP Series 9 Card Printer User Guide P1086707-002
Page 15
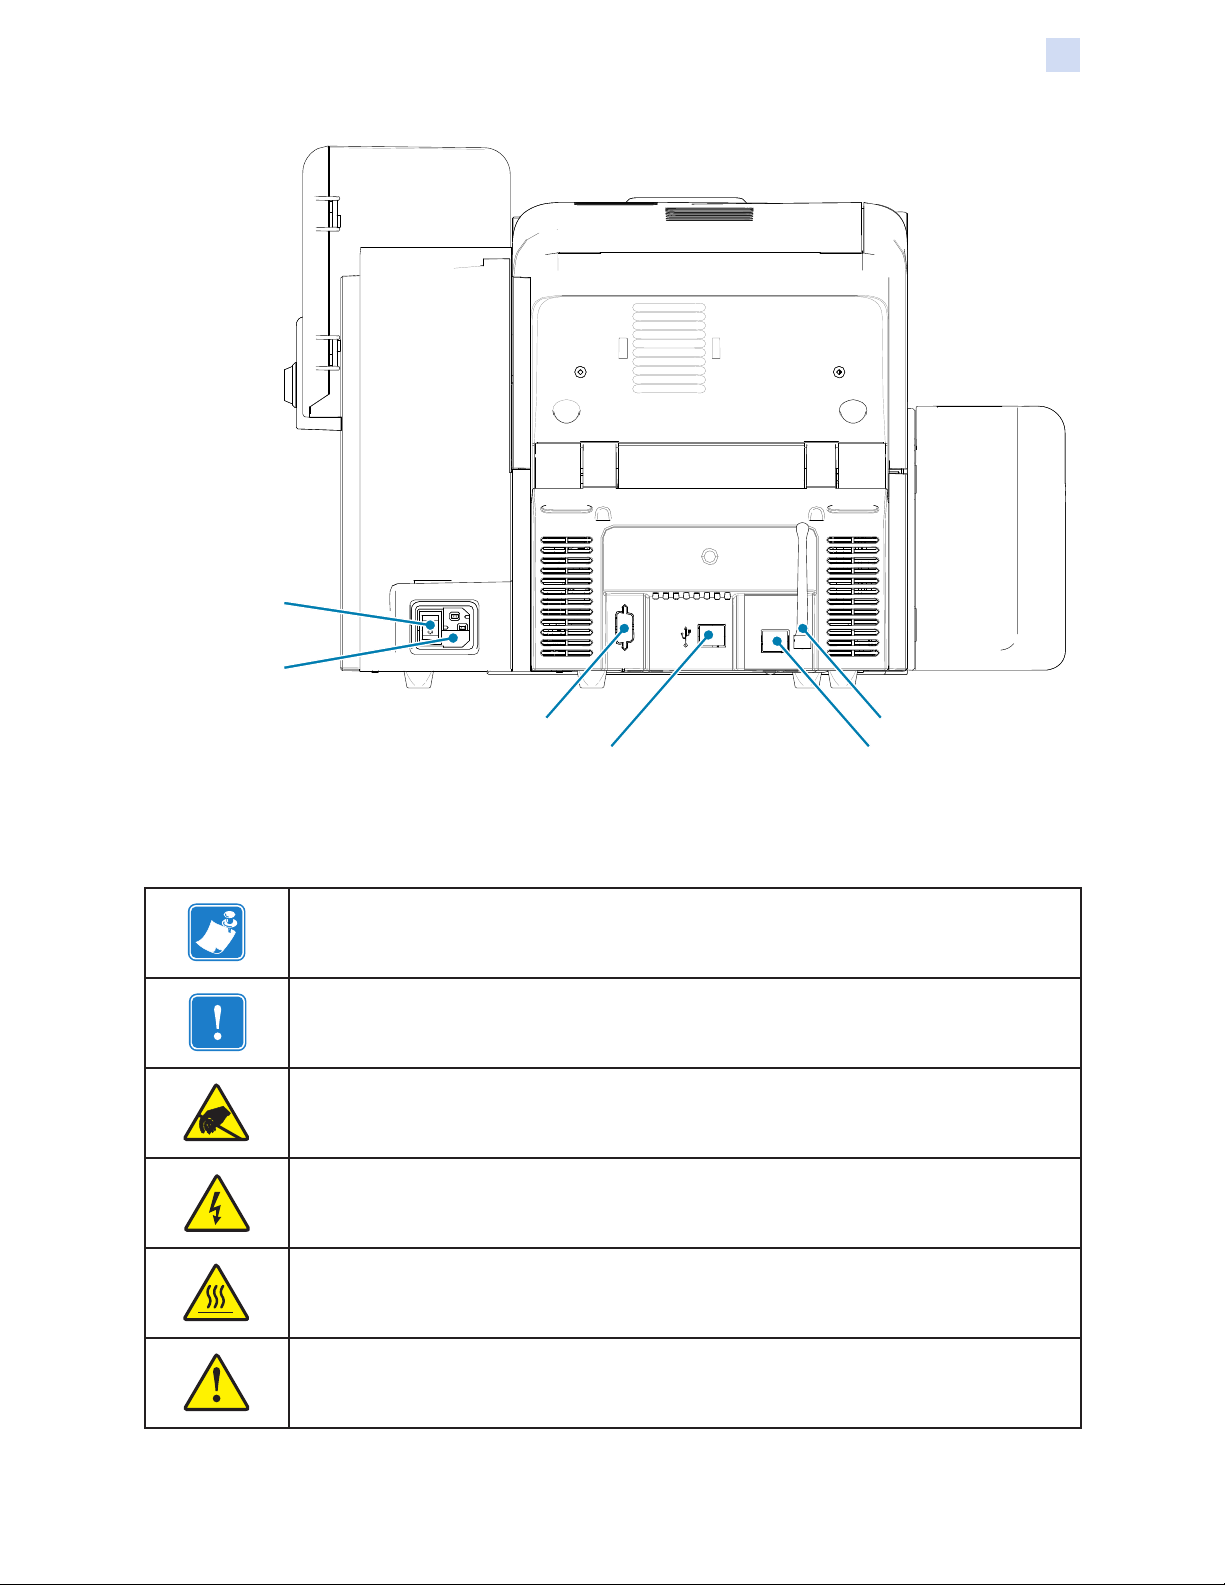
Power Switch
Power Switch
Introduction
Printer and Laminator Components
Power Connector
Power Connection
DB9 Connection (optional)
DB9 Connection
USB Connection
USB Connection Ethernet Connection
Wi-Fi Antenna (optional)
Wi-Fi Antenna (optional)
Ethernet Connection
Icons
Throughout this manual, different icons highlight important information, as follows:
Indicates information that emphasizes or supplements important points of the main
text.
Advises you of information that is essential to complete a task, or points out the
importance of specic information in the text.
Warns you of the potential for electrostatic discharge.
Warns you of a potential electric shock situation.
Warns you of a situation where excessive heat could cause a burn.
Advises you that failure to take or avoid a specic action could result in physical
harm to you, or could result in physical damage to the hardware.
P1086707-002 ZXP Series 9 Card Printer User Guide 3
Page 16

Introduction
Printer and Laminator Components
Zebra Supplies
Genuine Zebra supplies meet stringent quality standards and are recommended for optimal printing
quality and proper printer performance. The ZXP Series 9 printer is designed to work only with
Zebra True Colours® i Series™ Ribbons, Zebra True Colours i Series Transfer Film, and Zebra True
Secure™ i Series Laminates. Go to the ZXP Series 9 support page at www.zebra.com/zxp9-info for
ordering information.
4 ZXP Series 9 Card Printer User Guide P1086707-002
Page 17

2
Installation and Setup
General Information
This section provides information on the installation and setup of the ZXP Series 9 Card Printer—
procedures should be performed in the order presented.
5 ZXP Series 9 Card Printer User Guide P1086707-002
Page 18

Installation and Setup
Unpacking the Printer
Unpacking the Printer
Important • Save all the packing material and the shipping carton in case the printer needs to be
moved or shipped. If the original packing material is lost or damaged, a replacement shipping kit can
be ordered from Zebra.
Make sure the following items are included with your printer:
Setup Guide (to be used as a reference poster)
User CD
Product Registration Card
Printer Test Cards
Input Hopper with stack of 100 cards
Output Hopper
Cleaning Cartridge
Cleaning Roller
USB Cable
Power Cable
If any items are missing, please contact your Zebra representative.
Place the printer in a location that meets the following requirements:
y A reasonably dust- and dirt-free environment.
y Flat surface at least 27 x 28 inches (686 x 711 mm) that can support the weight of the printer;
additional space preferred. Allow a 4-inch minimum clearance on all sides.
y Vertical clearance at least 32 inches (813 mm).
y Temperature within the range of 59–95°F (15–35°C).
y Relative humidity 20–80% inclusive, non-condensing.
y AC power accessible.
6 ZXP Series 9 Card Printer User Guide P1086707-002
Page 19

Installation and Setup
Unpacking the Printer with a Laminator
Unpacking the Printer with a Laminator
Important • Save all the packing material and the shipping carton in case the printer needs to be
moved or shipped. If the original packing material is lost or damaged, a replacement shipping kit can
be ordered from Zebra.
Make sure the following items are included with the printer:
Setup Guide (to be used as a reference poster)
User CD
Product Registration Card
Printer Test Cards
Upper Laminate Cassette (for single- and double sided printers)
Lower Laminate Cassette (for double-sided printers)
Input Hopper with stack of 100 cards
Output Hopper
Cleaning Cartridge
Cleaning Roller
USB Cable
Power Cable
If any items are missing, please contact your Zebra representative.
Place the printer in a location that meets the following requirements:
y A reasonably dust- and dirt-free environment.
y Flat surface at least 38 x 28 inches (965 x 711 mm) deep that can support the weight of the
printer; additional space preferred. Allow a 4-inch minimum clearance on all sides.
y Vertical clearance at least 32 inches (813 mm).
y Temperature within the range of 59–95°F (15–35°C).
y Relative Humidity 20–80% inclusive, non-condensing.
y AC power accessible.
P1086707-002 ZXP Series 9 Card Printer User Guide 7
Page 20
Installation and Setup
Unpacking (continued)
Unpacking (continued)
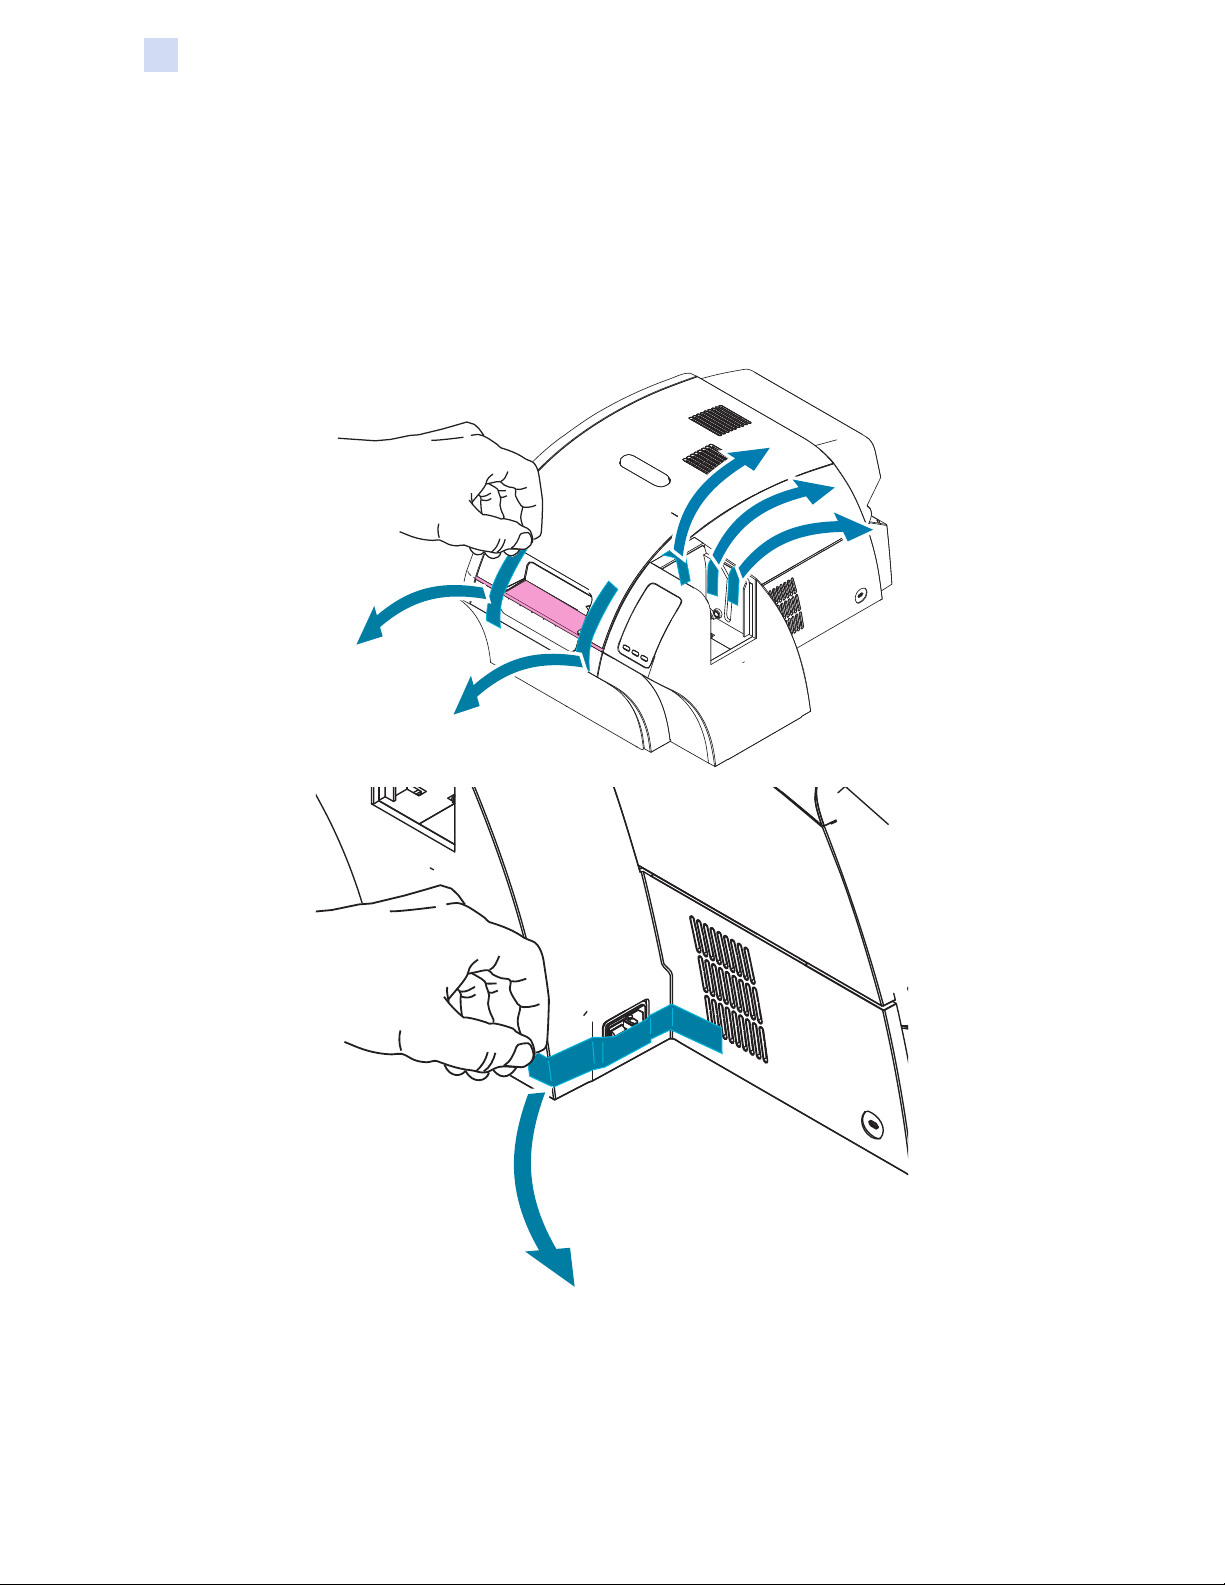
THe ZXP Series 9 Card Printer ships with packing material and tape to protect the printer from
damage during shipment—it is important to remove all packing material and tap prior to using the
printer.
Remove the tape and packing material from the front and rear of the printer as shown in the gures
below.
8 ZXP Series 9 Card Printer User Guide P1086707-002
Page 21

Installation and Setup
Unpacking (continued)
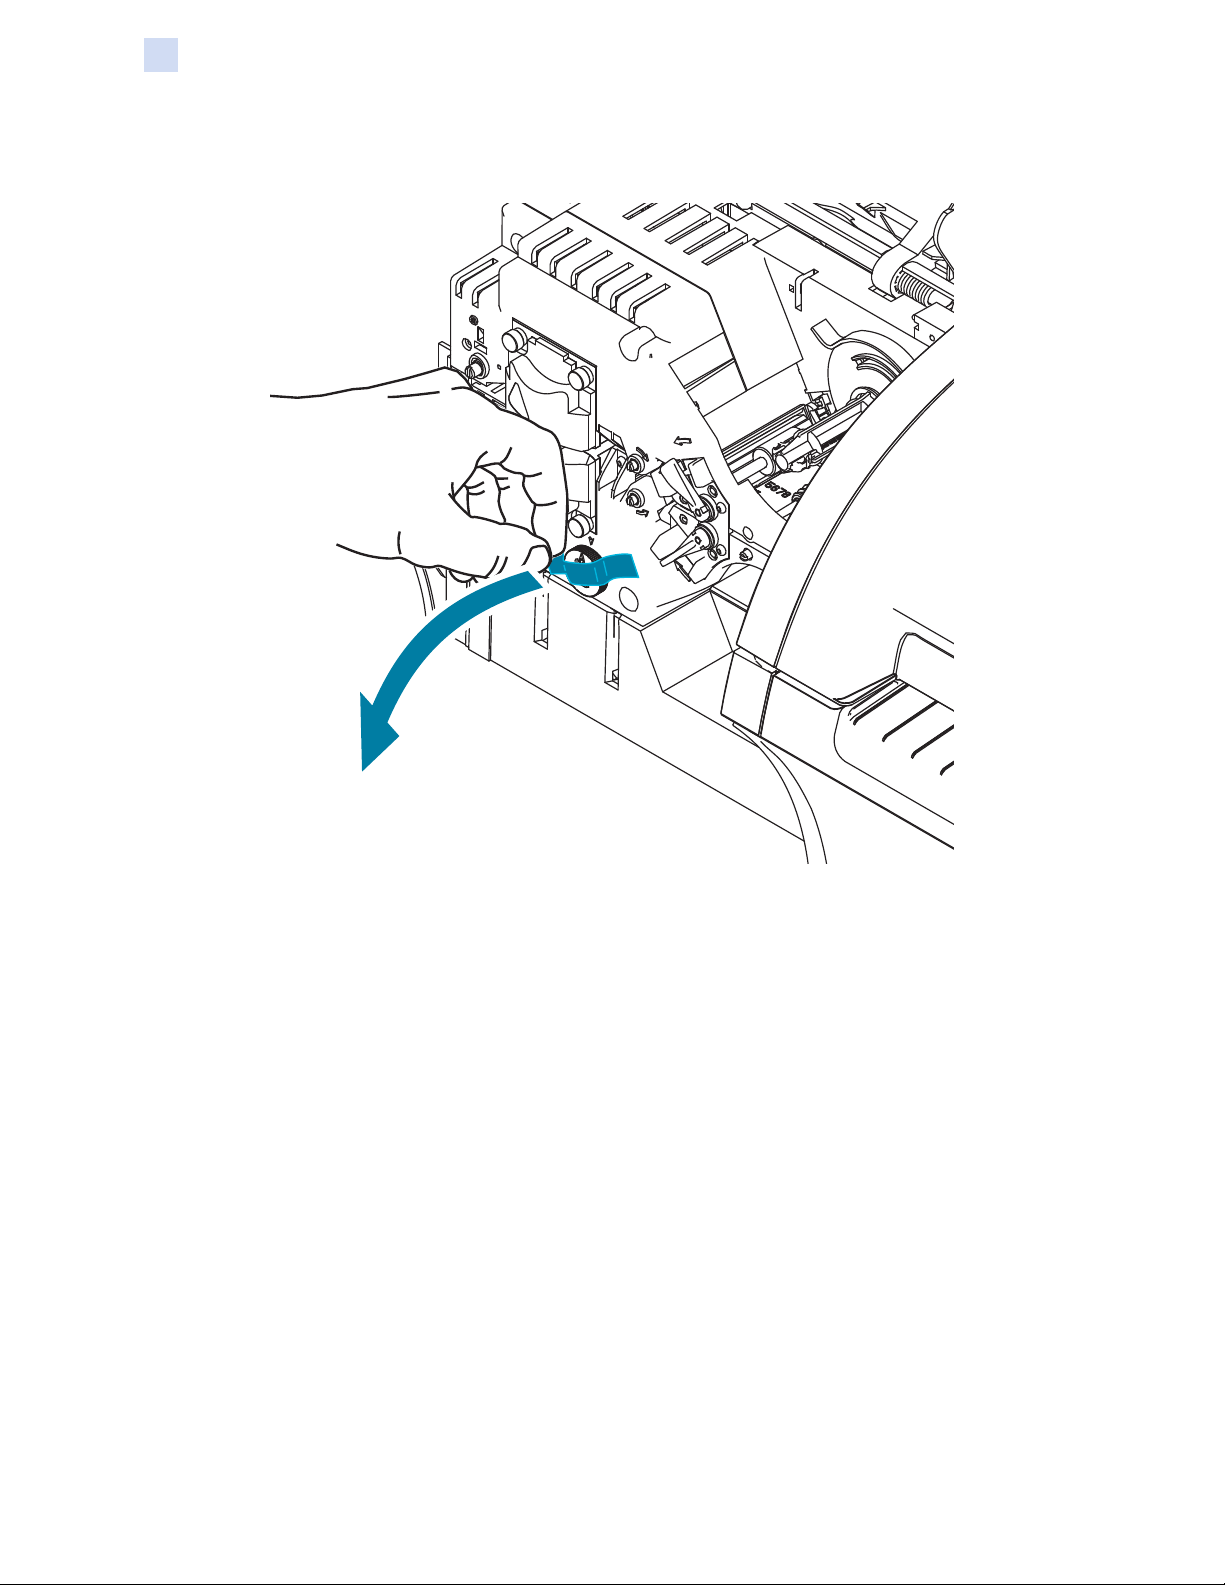
Then, open the printer by pressing the yellow release button and remove the packing material.
If the printer came with the optional laminator installed, remove the packing tape from the laminator
as shown in the gure below.
P1086707-002 ZXP Series 9 Card Printer User Guide 9
Page 22
Installation and Setup
Unpacking (continued)
Then, open the laminator cover by pulling forward on the tab on the left side of the laminator cover
and remove the packing tape as shown in the gure below.
10 ZXP Series 9 Card Printer User Guide P1086707-002
Page 23
Installation and Setup
Loading Cards
Loading Cards
Caution • DO NOT bend cards or touch print surfaces as this can reduce print quality. The
surface of the cards must remain clean and dust free. Always store cards in an enclosed
container. Ideally, use cards as soon as possible.
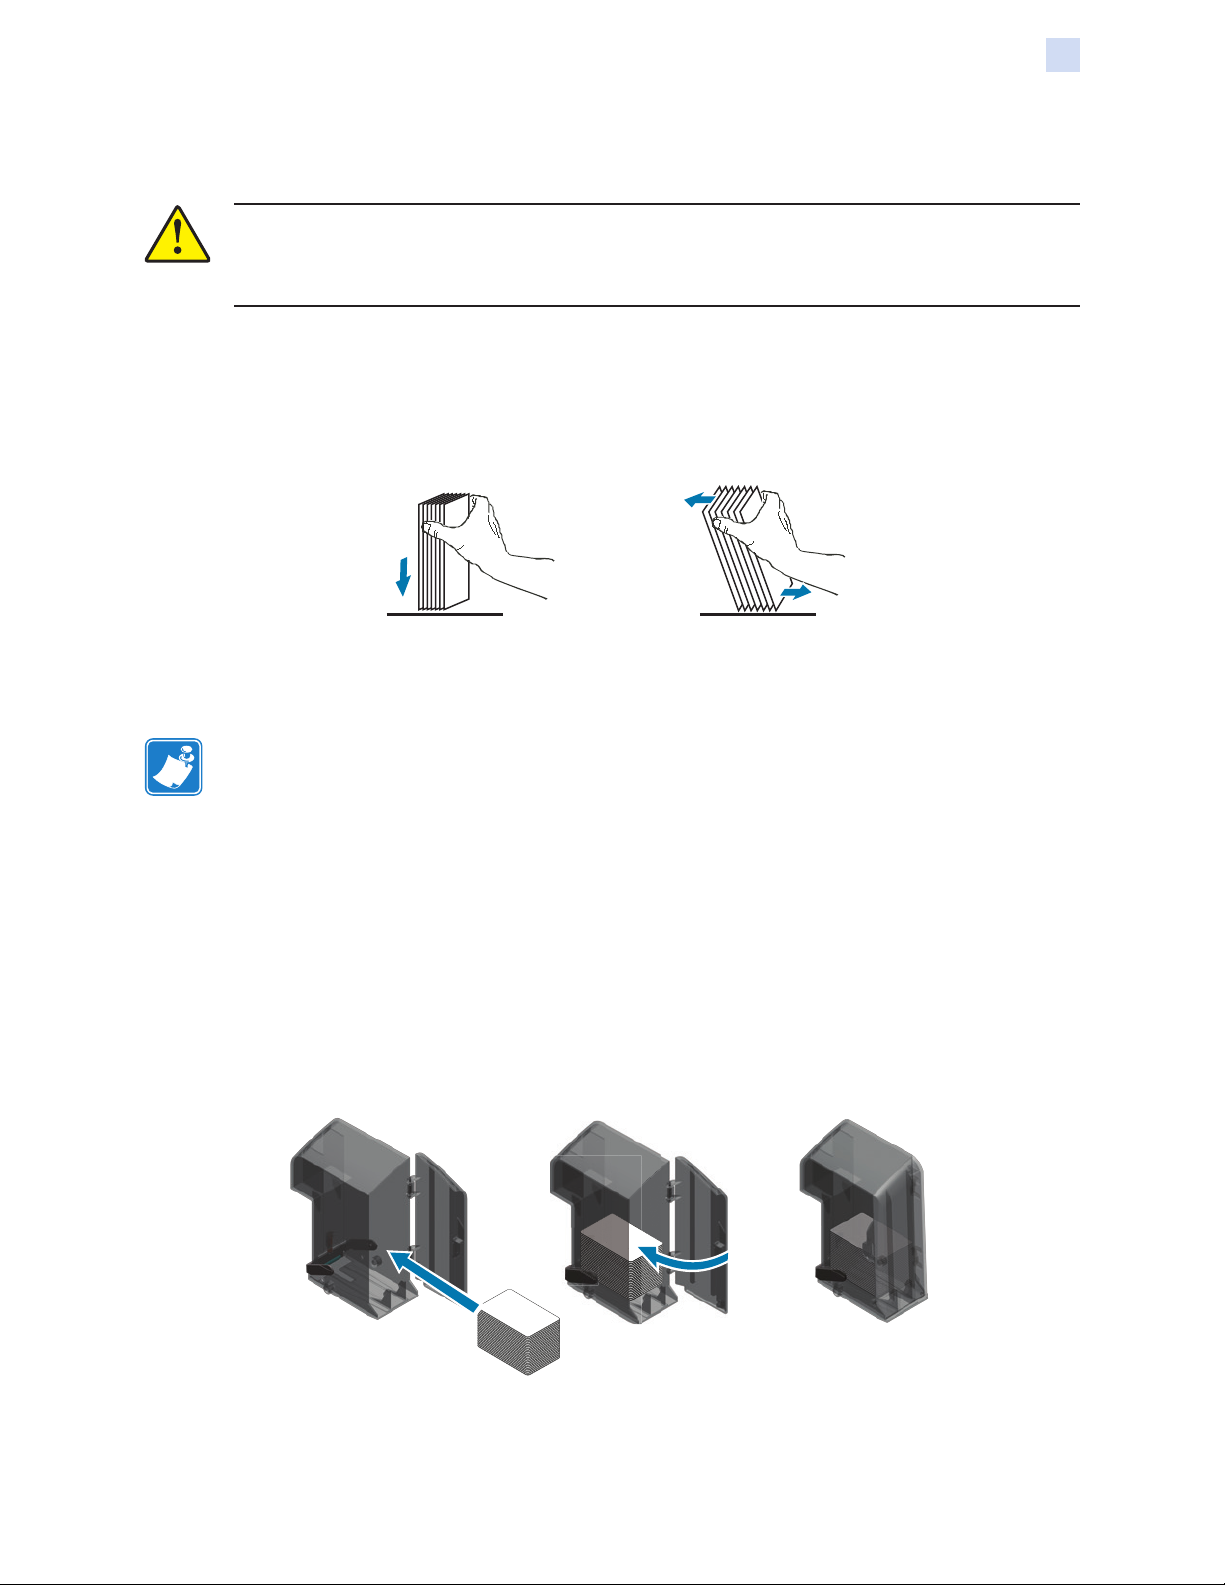
Step 1. Remove the wrapping from the card deck.
Step 2. Holding the card deck by the sides (do not touch the print surfaces), hold it vertically
against a at surface such as a desktop. If the deck is too thick for your hand to hold
it comfortably, use about half a deck at a time.
Step 3. Push the stack back and forth to an angle of about 45° from vertical, so as to
separate all of the cards.
Note • Static charges and edge burrs from the card die-cutting process can render
individual cards stuck together with signicant adhesion force. These cards must be
physically separated from each other before inserting into the feeder; if not separated,
feeding or printing problems may occur.
Step 4. Restore the card stack to its original squared-off condition.
Step 5. Open the input hopper door—cards can be loaded into the hopper while it is attached
to the printer.
Step 6. Place the cards in the input hopper in the orientation shown: smart card contacts (if
present) up and toward the body of the printer; mag stripe (if present) down and to
the rear). Ensure that the cards are seated at on the bottom of the hopper.
Step 7. Close the input hopper door.
P1086707-002 ZXP Series 9 Card Printer User Guide 11
Page 24
Installation and Setup
Installing the Card Hoppers
Installing the Card Hoppers
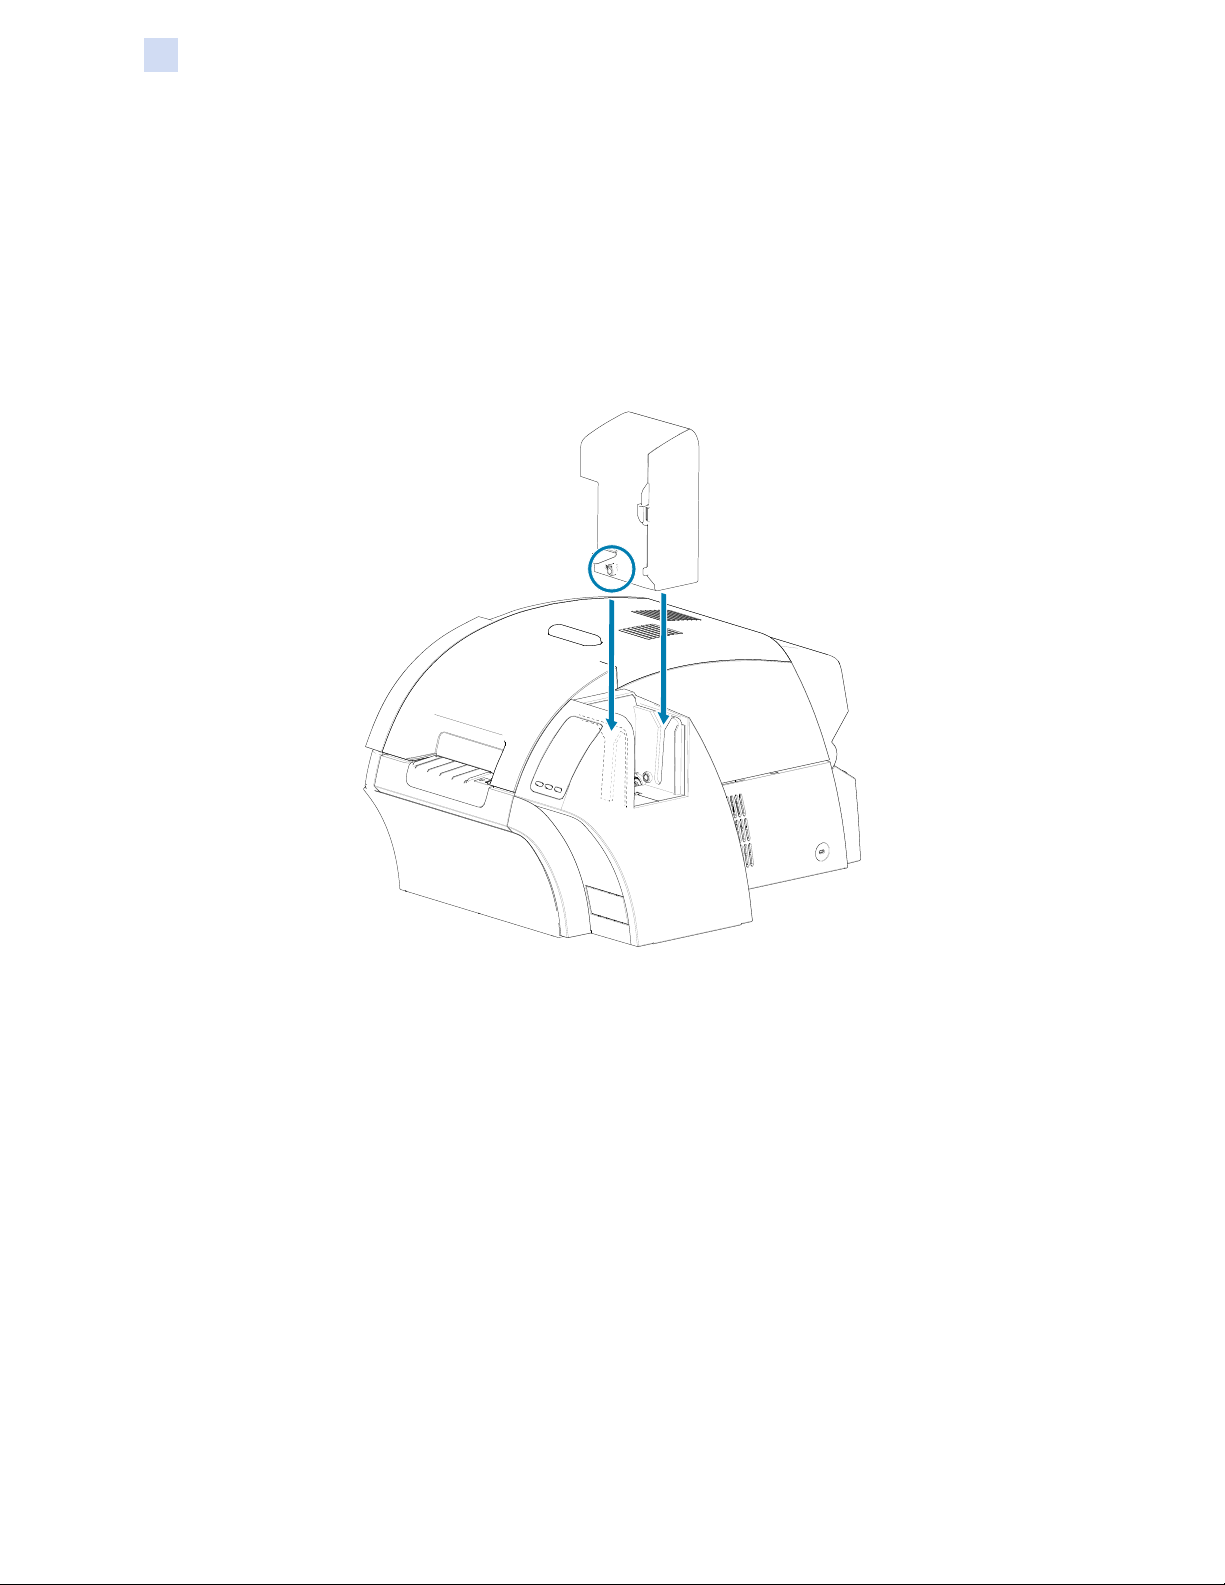
Input Hopper
The input hopper is positioned on the right side of the printer and holds the cards to be printed.
Step 1. Install the input hopper by sliding it into the receptacle so that the guide posts on the
hopper (circled below) align with the guide slots (arrows below).
Step 2. Ensure that the input hopper locks securely in place.
12 ZXP Series 9 Card Printer User Guide P1086707-002
Page 25
Installation and Setup
Installing the Card Hoppers
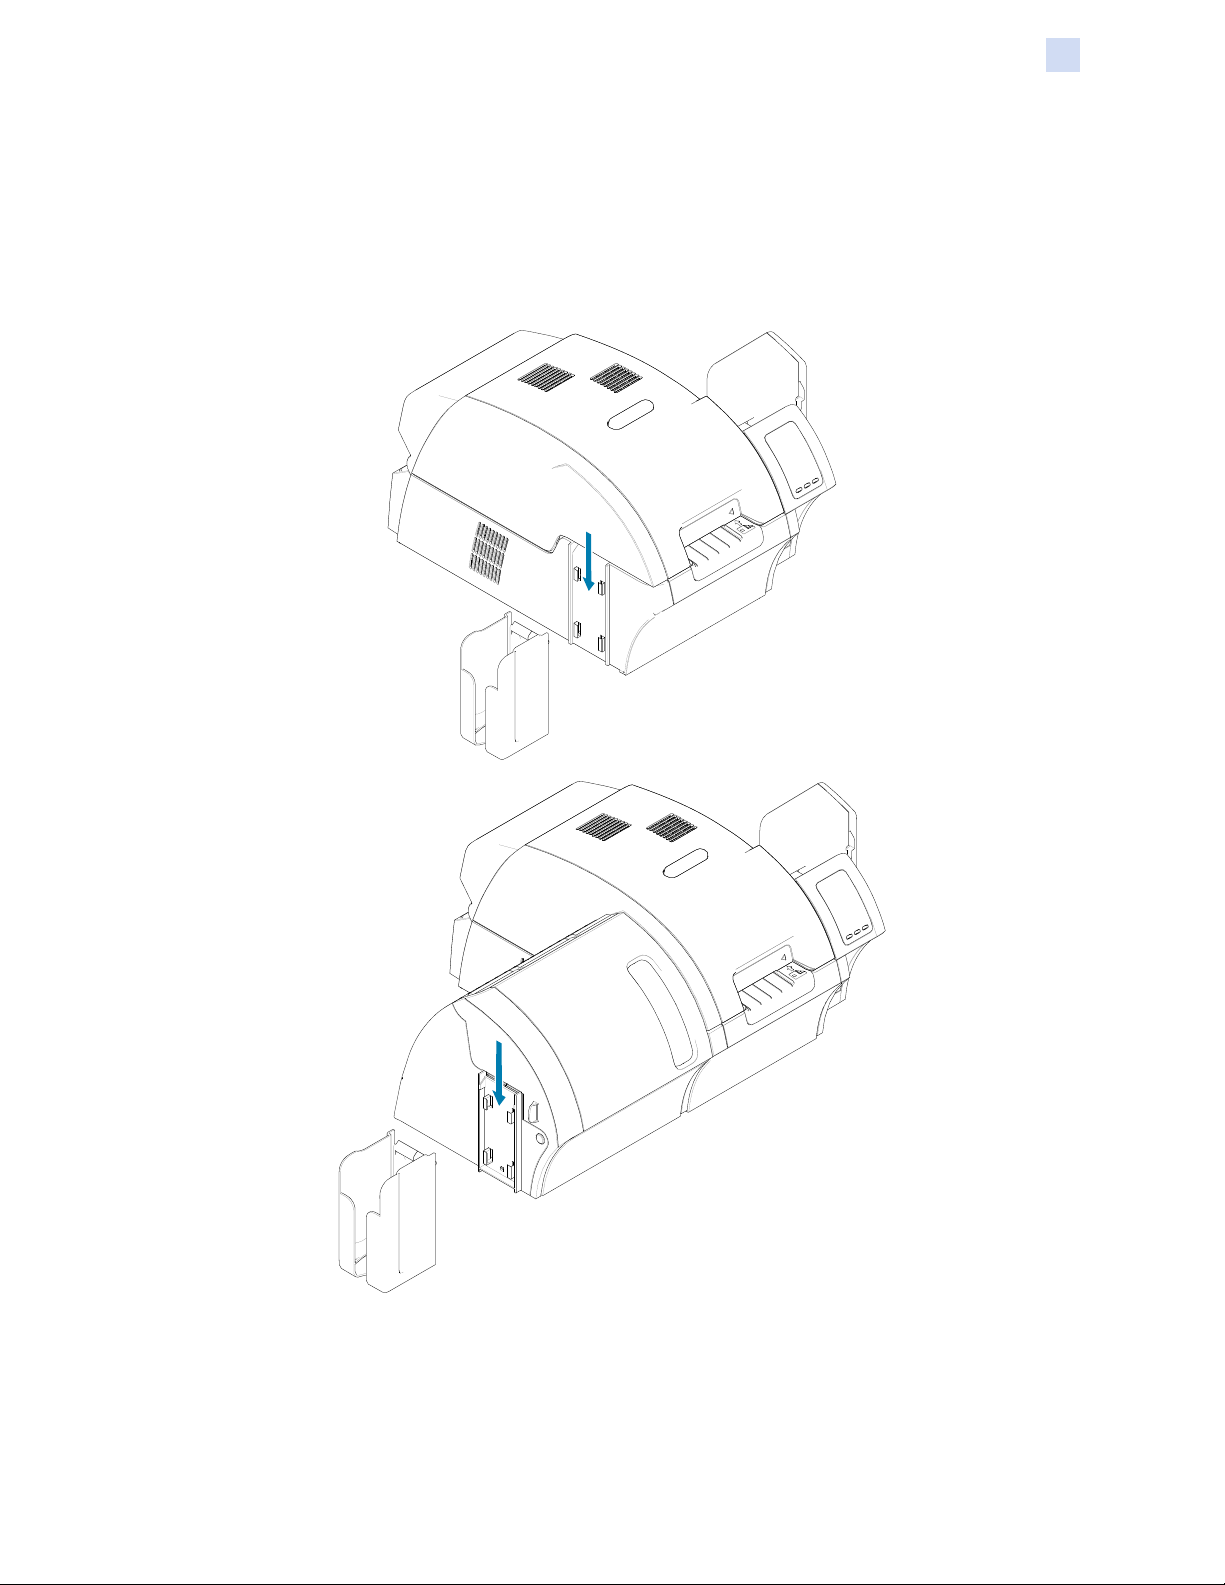
Output Hopper
The output hopper is positioned on the left side of the printer (or the left side of the laminator if the
printer includes a laminator as shown below) and receives the printed cards.
Step 1. Install the output hopper by placing the hopper onto the printer or laminator, and then
sliding downward into the corresponding slots on the printer or laminator.
P1086707-002 ZXP Series 9 Card Printer User Guide 13
Page 26
Installation and Setup
Installing the Software
Installing the Software
The CD that comes with the printer contains the latest driver software at the time of shipping.
It is recommended that the latest driver software be downloaded from the ZXP Series 9 support
page at www.zebra.com/zxp9-info.
When installing the software, follow the on-screen instructions to install and congure your printer for
the desired network.
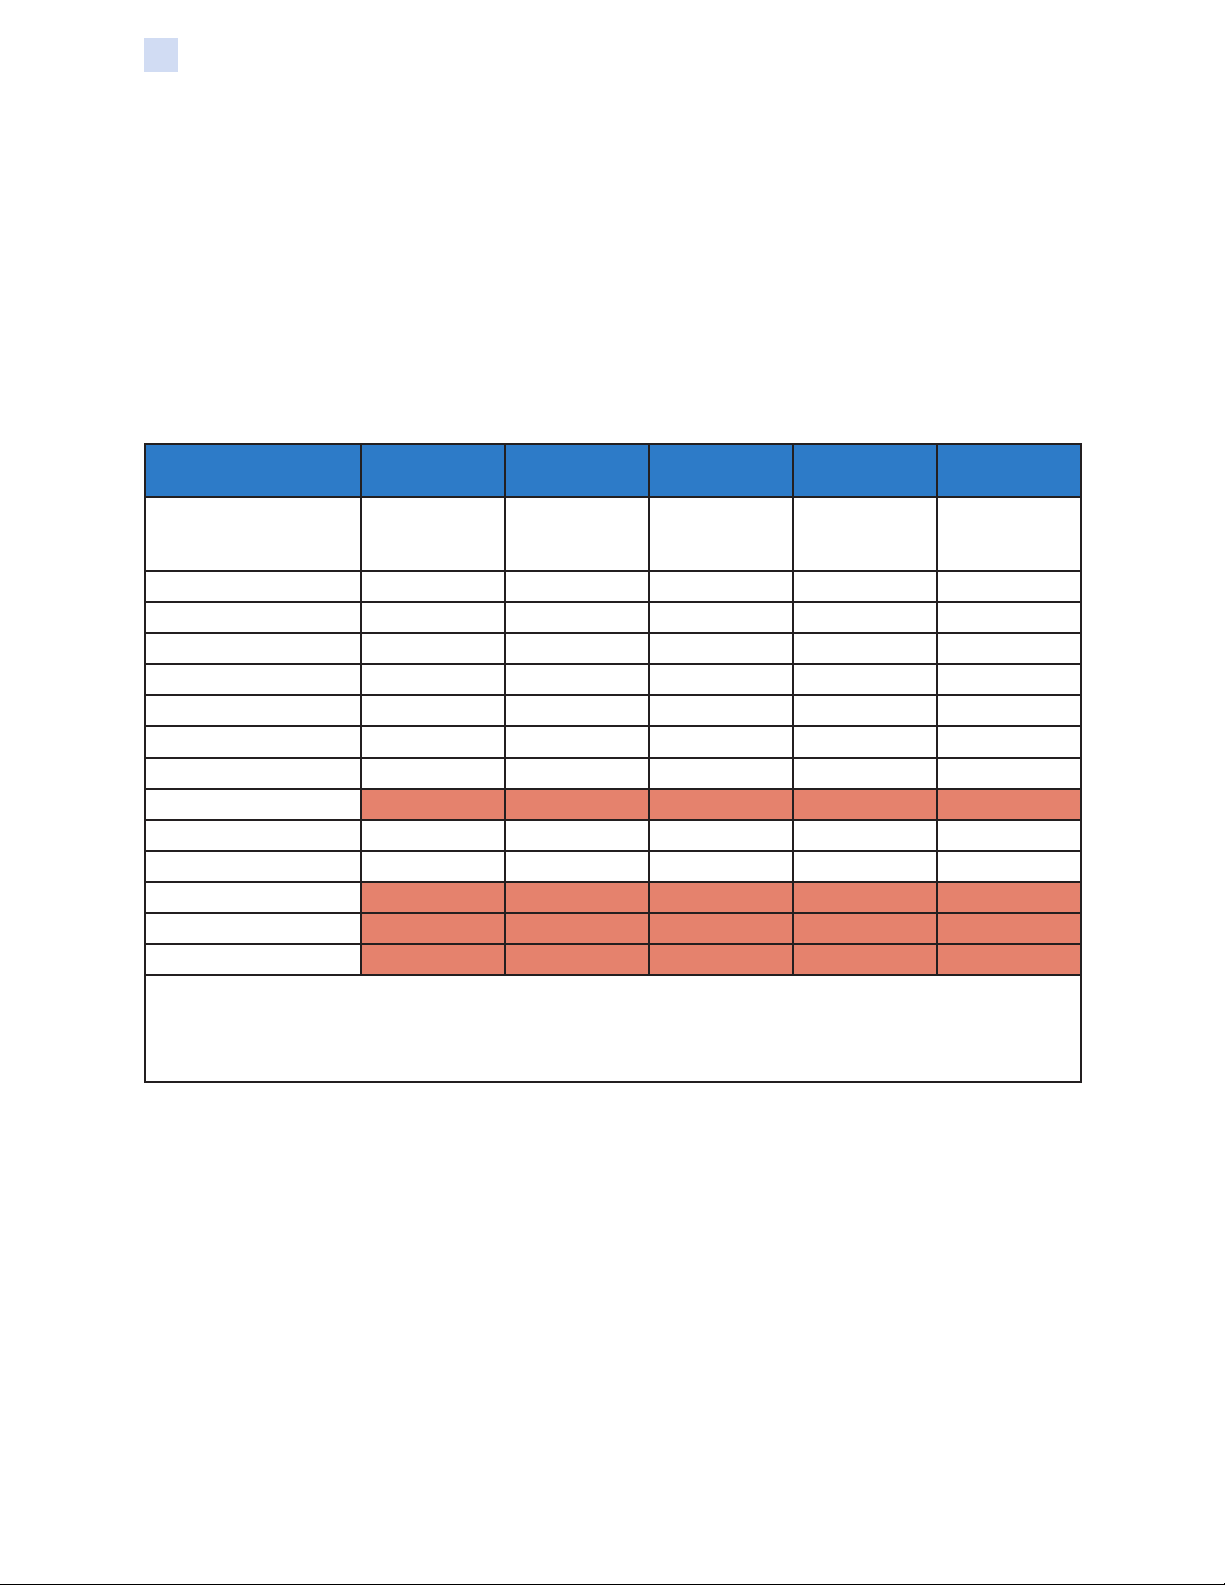
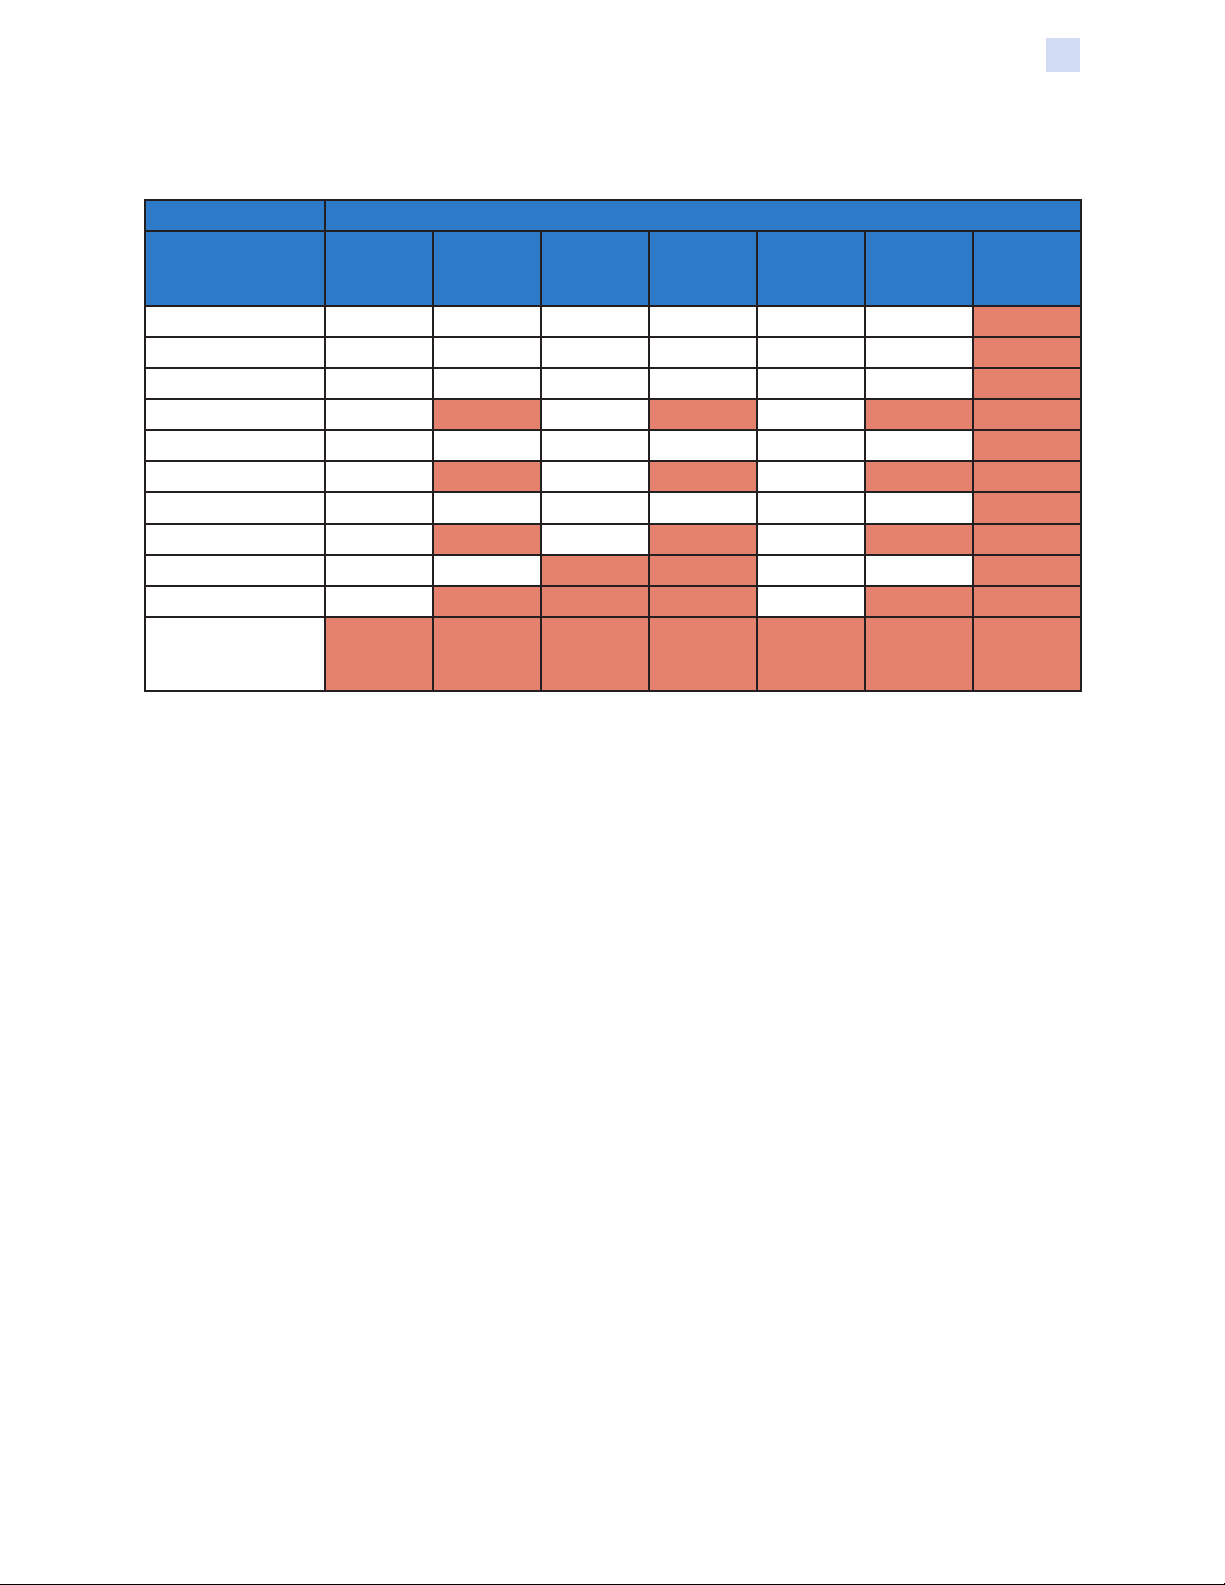
Supported Operating Systems
Supported Windows
Drivers Microsoft OS 1
Windows 10 (32 bit)
3
One to One One to Many Many to One Many to Many
1 Printer -
1 Host
One Host Many Printers
Multiple Hosts
(Drivers) One
Printer
Multiple Hosts
(Drivers) Many Printers
Yes Yes Yes Yes Yes
Printer
Pooling
Windows 10 (64 bit) Yes Yes Yes Yes Yes
Windows 8 (32 bit)
4
Yes Yes Yes Yes Yes
Windows 8 (64 bit) Yes Yes Yes Yes Yes
Server 2008 (64 bit) Yes Yes Yes Yes Yes
Server 2008 (32 bit) Yes Yes Yes Yes Yes
Server 2012 Yes Yes Yes Yes Yes
Server 2003 No No No No No
Windows 7 (64 bit) Yes Yes Yes Yes Yes
Windows 7 (32 bit) Yes Yes Yes Yes Yes
Vista (64 bit)
Vista (32 bit)
5
2
No No No No No
No No No No No
Windows XP No No No No No
1. Driver installed on individual Client PCs
2. Printer Pooling Sharing not supported.
3. Windows 10 Home and Pro only (No support for Windows 10 Mobile)
4. No support for Win 8 Metro GUI print driver environment.
5. Need to qualify Service Pack support
2
14 ZXP Series 9 Card Printer User Guide P1086707-002
Page 27
Installation and Setup
Installing the Software
Supported Sharing Combinations
Windows OS (Driver Clients)
Windows OS
Server (Driver
Host)
Server 2012 Yes Yes Yes Yes Yes Yes No
Server 2008 (64 bit) Yes Yes Yes Yes Yes Yes No
Server 2008 (32 bit) Yes Yes Yes Yes Yes Yes No
Server 2003 Yes No Yes No Yes No No
Windows 10 (64 bit) Yes Yes Yes Yes Yes Yes No
Windows 10 (32 bit) Yes No Yes No Yes No No
Windows 8 (64 bit) Yes Yes Yes Yes Yes Yes No
Windows 8 (32 bit) Yes No Yes No Yes No No
Windows 7 (64 bit) Yes Yes No No Yes Ye s No
Windows 7 (32 bit) Yes No No No Yes No No
Windows XP (All
Editions) SP 2 and
above
Win 10
(32 bit)
No No No No No No No
Win 10
(64 bit)
Win 8
(32 bit)
Win 8
(64 bit)
Win 7
(32 bit)
Win 7
(64 bit)
Windows
XP
P1086707-002 ZXP Series 9 Card Printer User Guide 15
Page 28
Installation and Setup
Installing the Cleaning Cartridge
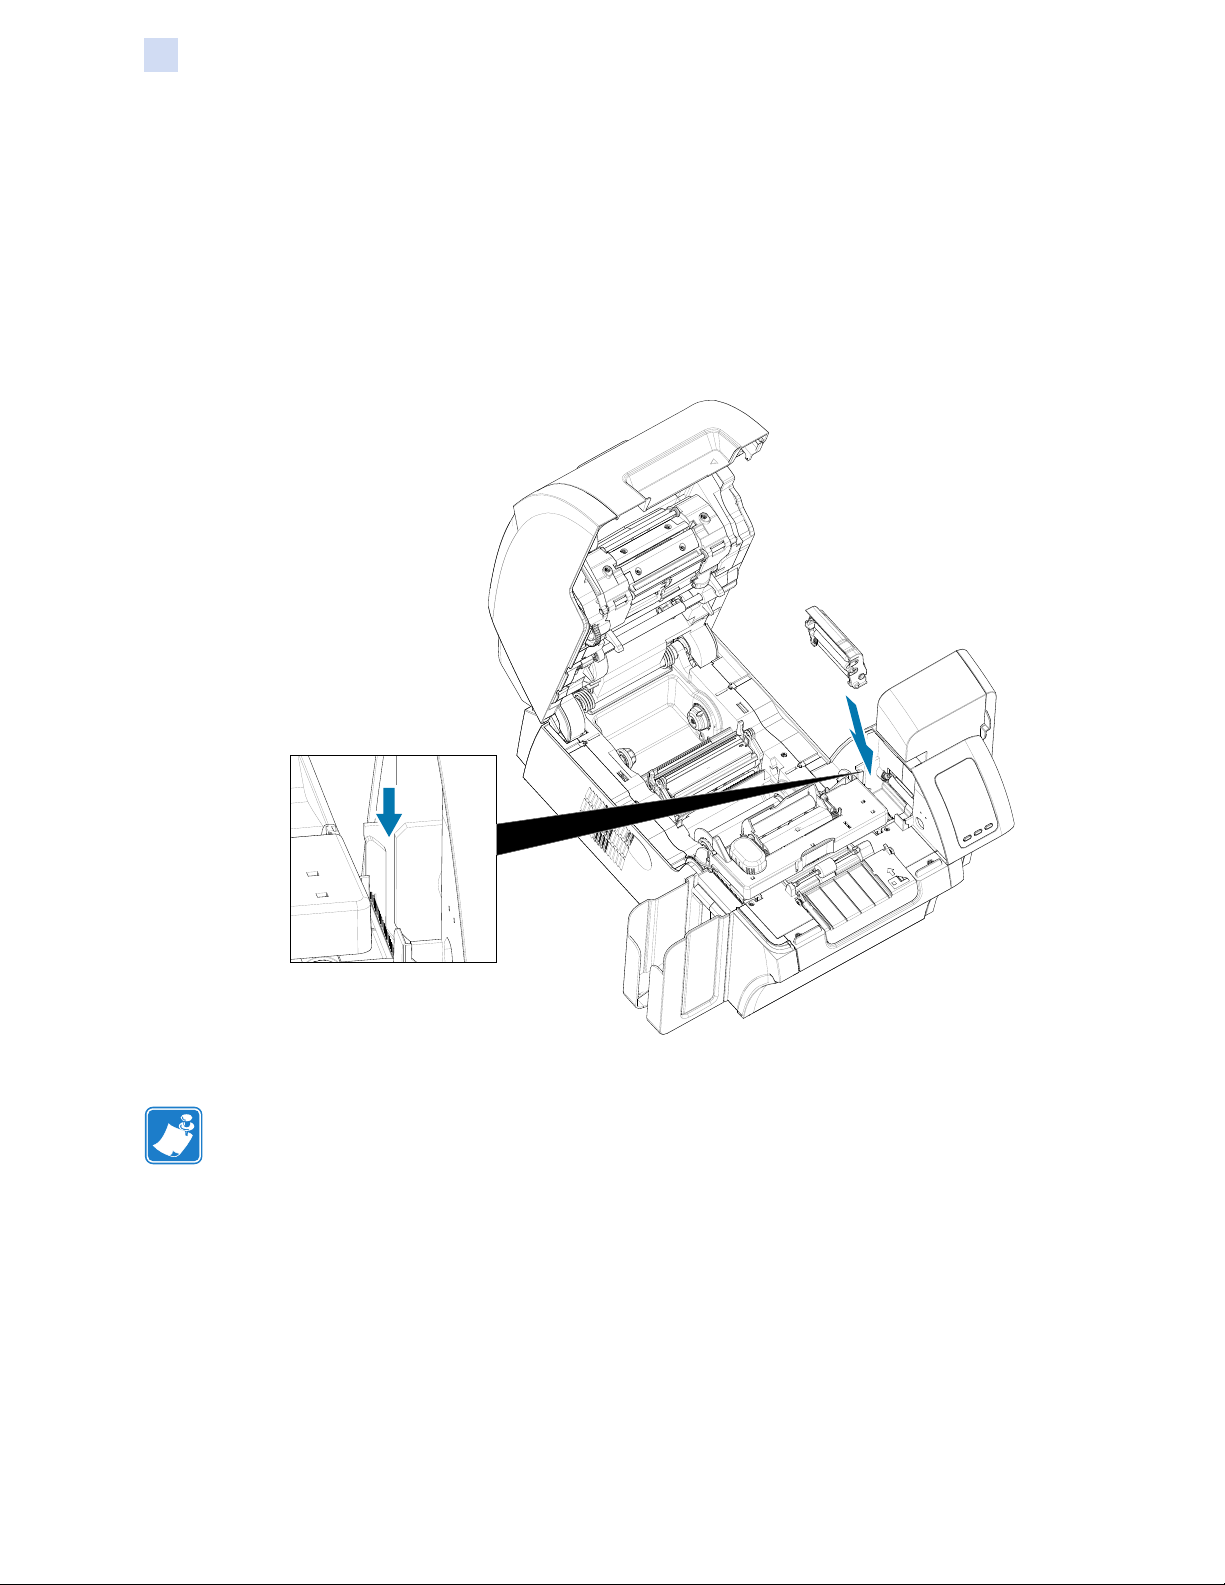
Installing the Cleaning Cartridge
The card cleaning cartridge (X-Cleaning Roller) cleans the cards entering the printer through the
input hopper. The cleaning cartridge consists of a cartridge frame and an adhesive roller.
Step 1. While holding the cleaning cartridge by the frame, peel the protective wrapper from
the adhesive roller. Do not touch the adhesive surface of the roller.
Step 2. Install the cleaning cartridge into the area shown in the gure below by sliding the
cartridge guide pins into the guide slots on the printer.
Step 3. Press down on the cartridge until it is fully seated.
Note • To ensure print quality, the card cleaning cartridge requires periodic replacement.
New card cleaning rollers are included with each print ribbon or may be purchased
separately. Before replacing the card cleaning cartridge or its adhesive roller, clean
the printer (see “Cleaning the Printer” on page 60). To replace the X-Roller, refer to
“Replacing the Cleaning Rollers” on page 62.
16 ZXP Series 9 Card Printer User Guide P1086707-002
Page 29
Installation and Setup
Installing the Cleaning Roller
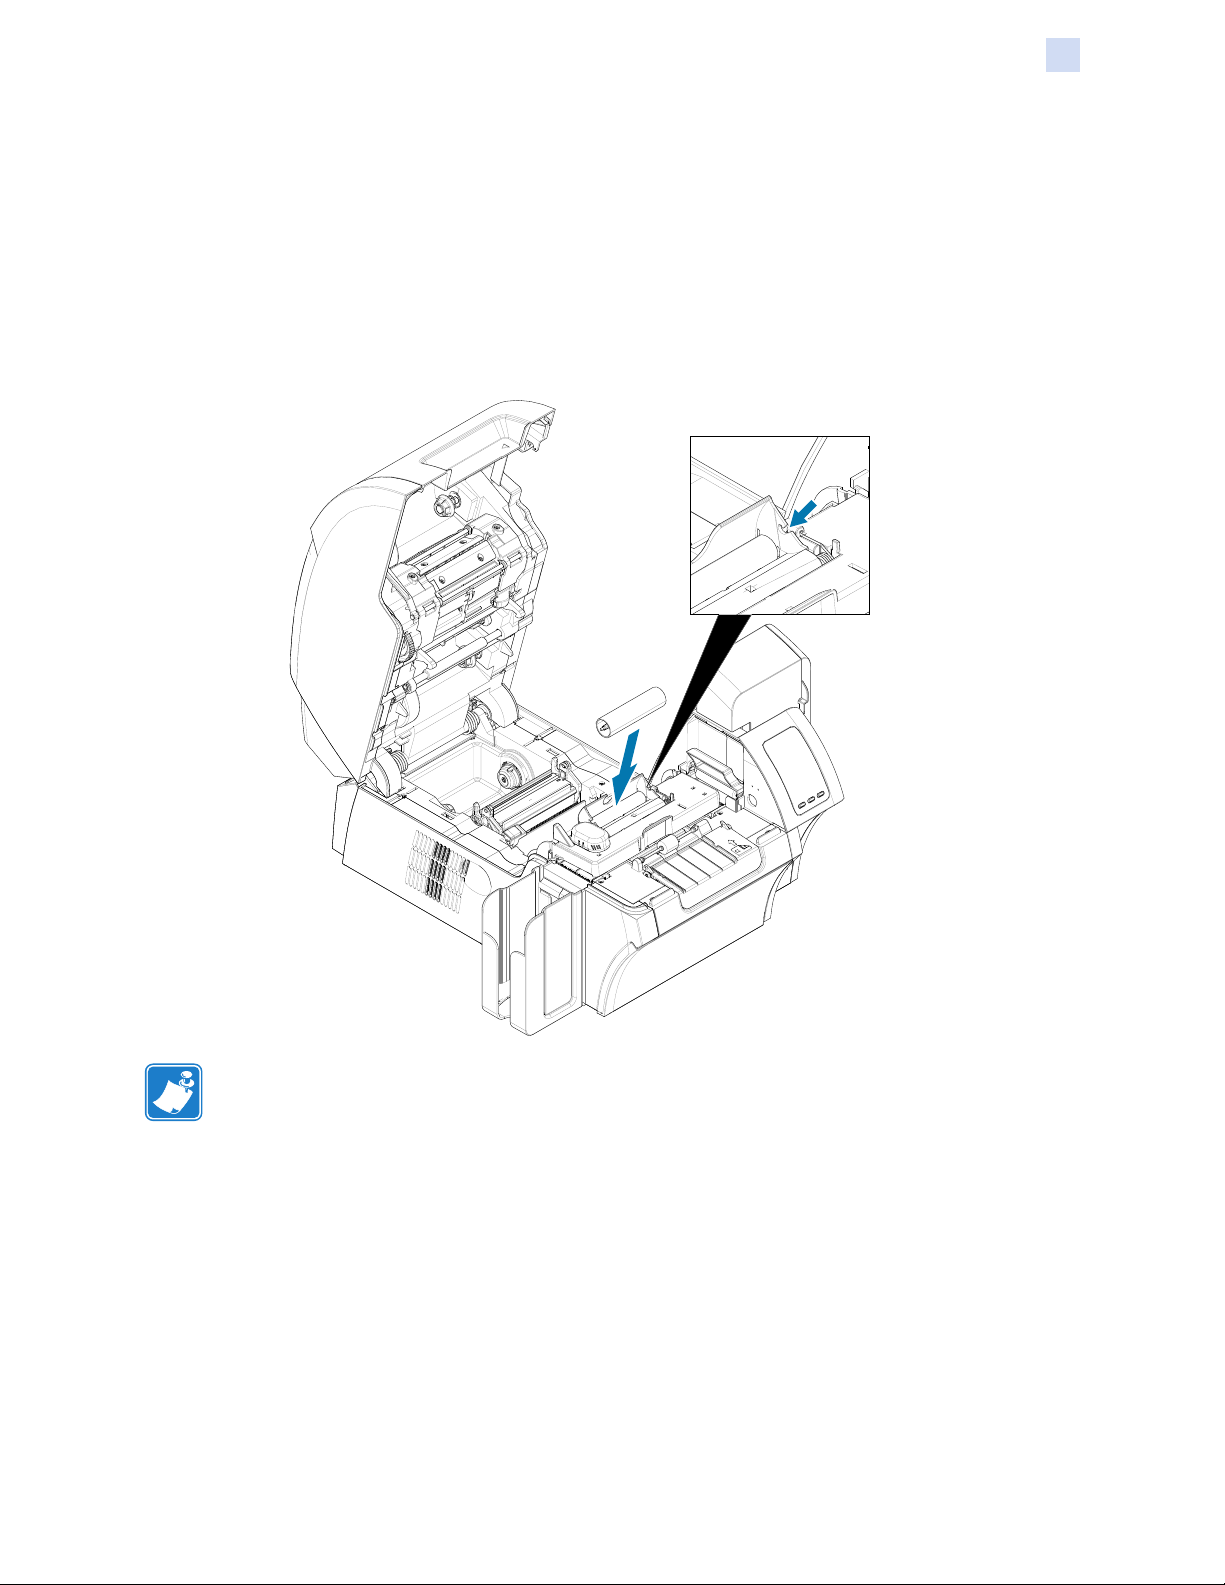
Installing the Cleaning Roller
The cleaning roller (Y-Cleaning Roller) cleans the cards entering the printer from either the input
hopper or the manual feed slot.
Step 4. Peel the protective wrapper from the cleaning roller.
Step 5. Install the cleaning cartridge into the area shown in the gure below by placing it into
the notches on the printer. Use the protective wrapper to push the cleaning roller into
place until it locks into position.
Note • To ensure print quality, the card cleaning cartridge requires periodic replacement.
New card cleaning rollers are included with each print ribbon or may be purchased
separately. Before replacing the card cleaning cartridge or its adhesive roller, clean
the printer (see “Cleaning the Printer” on page 60). To replace the Y-Roller, refer to
“Replacing the Cleaning Rollers” on page 62.
P1086707-002 ZXP Series 9 Card Printer User Guide 17
Page 30
Installation and Setup
Loading the Transfer Film
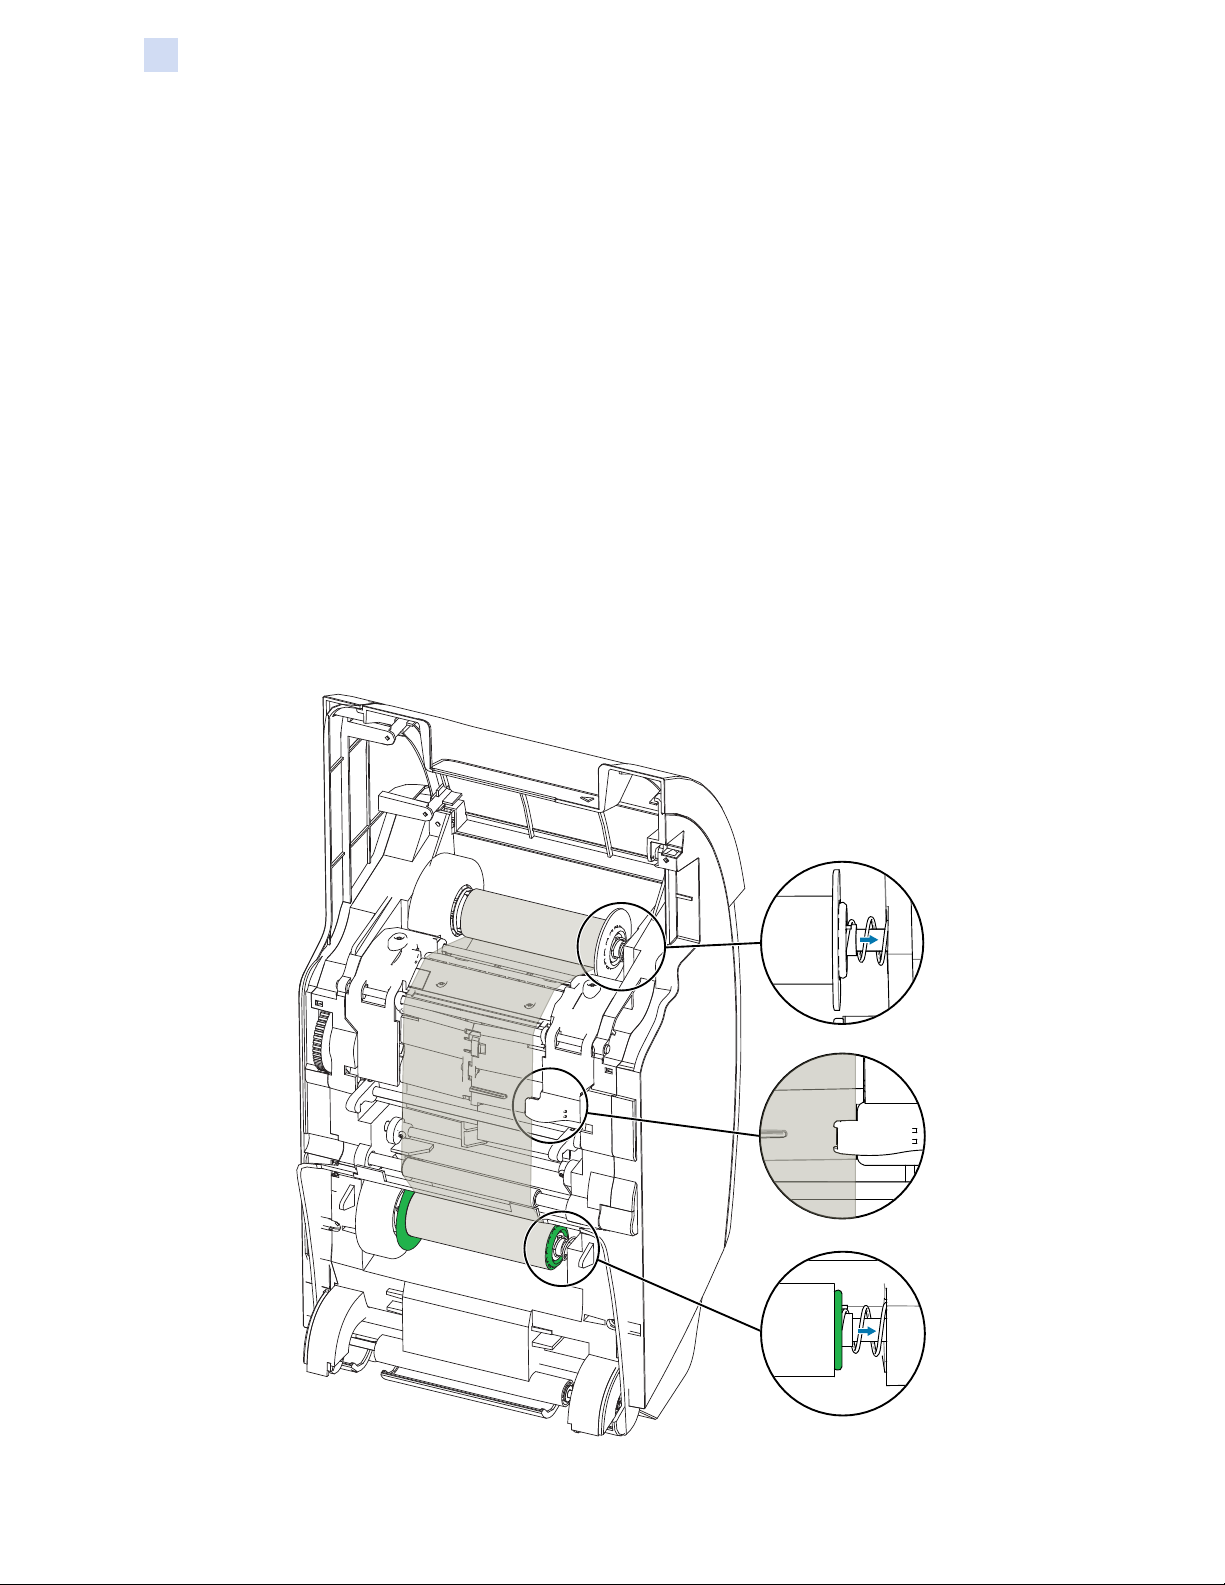
Loading the Transfer Film
The ZXP Series 9 Card printer is designed to work only with Zebra True Colours® i Series™
Transfer Film for near photographic print resolution and over-the-edge printing.
Step 1. Locate the transfer lm supply spindles and the transfer lm take-up spindles. Note
that the anges and spindles are color coded (white-to-white, green-to-green).
Step 2. Unroll about 1 foot (30 cm) from the full roll of transfer lm on the supply spool and
wind it (about 2 wraps) onto the empty take-up spool.
Step 3. Load transfer lm supply spool onto the supply spindles—green ange side to the
left.
Step 4. Load the empty take-up spool onto the take-up spindles—white ange side to the
right.
Step 5. Make sure the spring-loaded spindles on the right seat into the spools.
Step 6. Make sure the transfer lm comes off the bottom of the supply spool and feeds to the
bottom of the take-up spool.
Step 7. Route the transfer lm under the retaining tab.
18 ZXP Series 9 Card Printer User Guide P1086707-002
Page 31

Installation and Setup
Loading Print Ribbon
Loading Print Ribbon
The ZXP Series 9 Card printer is designed to work with Zebra True Colours® i Series™ Ribbons.
Each new ribbon comes with a replacement set of cleaning rollers. It is recommended that they
be replaced for each new ribbon or every 5,000 cards. Refer to “Cleaning the Printer” on page
60 for recommended cleaning intervals, and “Replacing the Cleaning Rollers” on page 62 for
replacement instructions.
Step 1. Locate the print ribbon supply spindles and the print ribbon take-up spindles. Note
that the anges and spindles are color coded (blue-to-blue, purple-to-purple).
Step 2. Load the print ribbon supply spool onto the supply spindles—purple ange side to the
left.
Step 3. Load the empty take-up spool onto the take-up spindle, blue ange side to the right—
make sure the spring-loaded spindles on the left seat into the spools.
Step 4. Make sure the print ribbon comes off the bottom of the supply spool and feeds to the
bottom of the take-up spool.
P1086707-002 ZXP Series 9 Card Printer User Guide 19
Page 32

Installation and Setup
Replacing the Laminate
Replacing the Laminate
Opening the Laminator Door
Step 1. Grasp the door at the side tab front and pull forward and lift the door to its upright
position.
Removing the Laminate Cassette(s)
Step 1. Unlock the laminate cassette by rotate the locking lever in the direction indicated in
the gure below.
20 ZXP Series 9 Card Printer User Guide P1086707-002
Page 33

Installation and Setup
Replacing the Laminate
Step 2. Rotate each cassette in the direction indicated below until it stops.
Step 3. Remove each cassette by pulling straight out from its spindle.
P1086707-002 ZXP Series 9 Card Printer User Guide 21
Page 34

Installation and Setup
Replacing the Laminate
Step 4. Open each cassette by separating its two halves at the hinge—grasp the two halves
rmly then pull apart. Do NOT use tools.
Step 5. If there is an empty laminate core in the cassette, remove it.
22 ZXP Series 9 Card Printer User Guide P1086707-002
Page 35

Installation and Setup
Replacing the Laminate
Loading the Laminate Cassette(s)
Note • The laminate roll is specic to either the top (blue) or the bottom (yellow) laminate
cassette.
Note • The lower laminate cassette (yellow) is used on a double-sided laminator only.
Important • The geared ange on the laminate spool is removable, but do not remove it. If
it does come off, snap it back onto the end of the spool.
Step 1. Remove a new roll of laminate from its packaging and place it in the upper laminate
cassette—note the orientation of the laminate spool with respect to the laminate
cassette as shown in the gure below.
Step 2. Pull out an inch or two of laminate past the lip of the cassette.
Step 3. Close the cassette—press the two halves of the cassette together until it clicks.
Step 4. Cut the laminate square (as close to perpendicular as possible) with scissors. Hold
the scissors in one hand. Hold the cassette with the other hand. Press the laminate
rmly against the white roller thereby keeping the laminate from moving while cutting.
P1086707-002 ZXP Series 9 Card Printer User Guide 23
Page 36

Installation and Setup
Replacing the Laminate
Step 5. Remove a second new roll of laminate from its packaging and place it in the lower
laminate cassette—note the orientation of the laminate spool with respect to the
laminate cassette as shown in the gure below.
Step 6. Pull out an inch or two of laminate past the lip of the cassette.
Step 7. Close the cassette—press the two halves of the cassette together until it clicks.
Step 8. Cut the laminate square (as close to perpendicular as possible) with scissors. Hold
the scissors in one hand. Hold the cassette with the other hand. Press the laminate
rmly against the white roller thereby keeping the laminate from moving while cutting.
24 ZXP Series 9 Card Printer User Guide P1086707-002
Page 37

Installation and Setup
Replacing the Laminate
Step 9. Rotate the core to adjust the laminate overhang. Stop when the end of the laminate
is just beyond the lip of the cassette, as shown below.
Important • Check for laminate overhang any time the locking lever is pressed or the
cassette is removed.
0 - 0.5 mm
0 - 1/32"
0 - 0.5 mm
0 - 1/32"
P1086707-002 ZXP Series 9 Card Printer User Guide 25
Page 38

Installation and Setup
Replacing the Laminate
Installing the Laminate Cassette
Step 1. Slide the cassette onto the spindle.
Step 2. Rotate each cassette (in the direction indicated in the gure below).
26 ZXP Series 9 Card Printer User Guide P1086707-002
Page 39

Installation and Setup
Replacing the Laminate
Step 3. Continue to turn the cassette. The locking lever will move to the left as the cassette
rotates over the locking mechanism, and will then click into the locked (green)
position.
P1086707-002 ZXP Series 9 Card Printer User Guide 27
Page 40

Installation and Setup
Replacing the Laminate
Using Partial-Width Laminate
Note • Since partial-width laminates are only used for the back (i.e., lower) surface of the
card, this section only applies to the double-sided laminator.
Laminates come in three widths:
y Full-Width laminate is 2 inches (51 mm) wide. The full-width laminate is used on the front
(i.e., upper) or back (i.e., lower) surface of the card.
y “Partial-Width” laminate is available as 1.33 inch (33 mm) wide (used for cards with a
magnetic stripe).
2”
1.3”
FRONT OF CARD
Full Width
BACK OF CARD
Magnetic Stripe
Step 1. Remove the lower laminate cassette.
Step 2. Open the cassette, and remove the laminate if present.
28 ZXP Series 9 Card Printer User Guide P1086707-002
Page 41

Installation and Setup
Replacing the Laminate
Step 3. Load the partial-width laminate into the cassette. Note that the collar on the laminate
spool is on the end opposite the geared ange and keeps the laminate positioned
correctly.
Collar
Step 4. Trim the partial-width laminate.
Step 5. Rotate the core to adjust the laminate overhang—stop when the end of the laminate
is even with the edge of the cassette.
Step 6. Install the cassette.
P1086707-002 ZXP Series 9 Card Printer User Guide 29
Page 42

Installation and Setup
Replacing the Laminate
Laminating Contact Smart Cards
The laminate for the top surface of a contact smart card has a repeating pattern of an index hole and
a rectangular cutout to expose the card’s electrical contacts.
Electrical Contacts
Electrical Contacts Cutout
Index Hole
Step 1. Remove the upper laminate cassette.
Step 2. Open the cassette, and remove the laminate if present.
Step 3. Load the smart card laminate into the cassette.
Step 4. Cut the laminate, splitting the index hole as shown.
30 ZXP Series 9 Card Printer User Guide P1086707-002
Page 43

Installation and Setup
Replacing the Laminate
Step 5. Rotate the core to adjust the laminate overhang. Stop when the end of the laminate
(not the edge of the index hole) is even with the edge of the lips of the cassette.
Step 6. Install the cassette (see “Installing the Laminate Cassette” on page 26).
P1086707-002 ZXP Series 9 Card Printer User Guide 31
Page 44

Installation and Setup
Packing for Shipment
Packing for Shipment
If the printer is to be shipped, it is important to use the original packing and shipping material to
prevent damage to the printer.
If the original material is lost, a replacement shipping kit can be ordered from Zebra. Go to the ZXP
Series 9 support page at www.zebra.com/zxp9-info for more details.
Printer
Note • The specics of the shipment and the printer condition may inuence which of the following
steps are followed; common sense should prevail.
Step 1. Ensure the printer power is set to the off ( ) position.
Step 2. Disconnect the power cable from the power source, then from the rear of the printer.
Step 3. Disconnect the USB cable from the host computer, then from the rear of the printer;
or disconnect the Ethernet cable from the network source, then from the rear of the
printer.
Step 4. Remove any cards from the input and output hoppers—place the hoppers into the
foam insert.
Step 5. Open the printer door.
Step 6. Remove the print ribbon and transfer lm (if you wish to save the print ribbon and lm
for future use, you may want to put them in a plastic bag for storage).
Step 7. Remove the card cleaning cartridge and card cleaning roller—place them in the foam
insert.
Step 8. Close the printer door.
Output Hopper
Input Hopper
Cleaning Cartridge
Cleaning Roller
Step 9. Place the printer in its protective bag.
Step 10. Place the lower foam insert with the accessories into the shipping carton.
32 ZXP Series 9 Card Printer User Guide P1086707-002
Page 45

Installation and Setup
Packing for Shipment
Caution • The printer weighs approximately 27.5 lbs (12.5 kg). Two people may be
necessary to lift the printer.
Step 11. Carefully place the printer into the recess in the lower foam insert (shown out of box
for clarity).
Step 12. Place the upper foam insert onto the printer, and gently press it down so it makes
a snug t on the printer—the top of the upper foam insert should be even with the
upper edge of the shipping carton.
Step 13. Roll up the power cord and USB cable and place them in the recess of the upper
foam insert.
Step 14. Close the shipping carton and tape it securely.
P1086707-002 ZXP Series 9 Card Printer User Guide 33
Page 46

Installation and Setup
Packing for Shipment
Printer with Laminator
Step 1. Ensure the printer power is set to the off ( ) position.
Step 2. Disconnect the power cable from the power source, then from the rear of the printer.
Step 3. Disconnect the USB cable from the host computer, then from the rear of the printer;
or disconnect the Ethernet cable from the network source, then from the rear of the
printer.
Step 4. Remove any cards from the Input and output hoppers—place the hoppers into the
lower foam insert.
Step 5. Open the printer door.
Step 6. Remove the print ribbon and transfer lm (if you wish to save the print ribbon and lm
for future use, you may want to put them in a plastic bag for storage).
Step 7. Remove the card cleaning cartridge and card cleaning roller—place them in the foam
insert.
Step 8. Close the printer door.
Output Hopper
Input Hopper
Cleaning Roller
Cleaning Cartridge
Step 9. Open the laminator door.
Step 10. Place the lower foam insert with the accessories into the shipping carton.
34 ZXP Series 9 Card Printer User Guide P1086707-002
Page 47

Installation and Setup
Packing for Shipment
Step 11. Remove the laminate cassette(s)—any unused laminate can remain in the
cassette(s)—and place the cassette(s) into the upper foam insert from the underside.
Laminate Cassette(s)
Step 12. Close the laminator door.
Step 13. Place the unit in its protective bag.
Caution • The printer weighs approximately 44 lbs (20 kg). Use two people to lower it into
the shipping carton.
Step 14. With two people, carefully lift and place the unit into the recess in the lower foam
insert.
P1086707-002 ZXP Series 9 Card Printer User Guide 35
Page 48

Installation and Setup
Packing for Shipment
Step 15. Place the two corner blocks on top of the right front and left front corners of the lower
foam insert.
Step 16. Place the upper foam insert onto the unit, and gently press it down so it makes a
snug t on the unit—the top of the upper foam insert should be even with the upper
edge of the carton.
Step 17. Roll up the power cord and USB cable and place them in the recess of the upper
foam insert.
Step 18. Close the shipping carton.
Step 19. Tape the shipping carton securely.
36 ZXP Series 9 Card Printer User Guide P1086707-002
Page 49

3
Operation
Introduction
Printing with the ZXP Series 9 Card Printer is similar to printing with any other printer in a Windows
environment:
y The printer is connected to either a host computer (via USB), or to a network (via Ethernet).
y The printer is selected by either the operating system or the appropriate software application.
y Printer properties are set via the printer driver (although the factory default values will be
appropriate for many applications).
37 ZXP Series 9 Card Printer User Guide P1086707-002
Page 50

Operation
Printing Preferences
Printing Preferences
The Printing Preferences Control panel can be used to determine preferences such as which ribbon
panels will be used to print images on the card, what card type will be used, where the card comes
from (i.e., the input hopper or the manual feed slot) and its destination. It is also used to make
adjustments to colors and black panel quality.
The following tabs are included in the Printing Preferences Control Panel:
y Card Setup Tab
y Encoding Tab
y Black Panel (K) Optimization Tab
y Color (YMC) Optimization Tab
y About Tab
The Restore Defaults button sets the printing preferences back to factory settings.
The OK button applies the settings and closes the Printing Preferences Control Panel.
The Cancel button closes the Printing Preferences Control Panel without applying the changes
made.
The Apply button makes (or applies) the changes. The Printing Preferences Control panel remains
open.
The Help button shows this help content.
To open the Printing Preferences Control Panel:
y Windows 7: Select Start > Devices and Printers, right click the Zebra ZXP Series 9 Card
Printer, and select Printing preferences from the pop-up menu.
y Windows 8: Right-click the screen’s bottom-left corner (or press Windows+I) and choose
Control Panel from the pop-up menu, right click the Zebra ZXP Series 9 Card Printer, and
select Printing preferences from the pop-up menu.
y Windows 10: Select the Start menu and then select Settings > Devices, right click the Zebra
ZXP Series 9 Card Printer, and select Printing preferences from the pop-up menu.
38 ZXP Series 9 Card Printer User Guide P1086707-002
Page 51

Operation
Card Type Selection
Card Type Selection
The Printing Preferences Control Panel enables you to specify the card type in use. Based on your
selection, the printer makes adjustments for optimum print quality.
Step 1. Open the Printing Preferences Control Panel (“Printing Preferences” on page 38).
Step 2. From the Card Setup tab, click the Card type in use drop-down menu and select the
appropriate card type (circled below). Supported card types are:
y PVC, Standard
y PVC, Mag Stripe
y PVC, Contactless SC
y PVC, Contact SC
y Composite, Standard
y Composite, Mag Stripe
If your card type is not listed in the drop-down menu, select Custom and ll out the
Card Specications pop-up screen (see “Setting Custom Card Specications” on
page 101 for details).
For help setting the custom card specications for your card type, contact the Zebra
Card Testing Service at 866-569-9086 (Toll Free), or cardtestingservice@zebra.com.
Step 3. Click Apply and then click OK.
P1086707-002 ZXP Series 9 Card Printer User Guide 39
Page 52

Operation
Print Ribbon Selection
Print Ribbon Selection
A variety of ribbons are available for use with the ZXP Series 9 Card Printer.
For example, the YMC ribbon prints yellow (Y), magenta (M), and cyan (C) on the front and the back
(if the printer is double-sided). The YMCK ribbon prints yellow, magenta, and cyan on the front of the
card, and black on the back of the card (if the printer is double-sided).
The YMCKI ribbon is for use with mag stripe cards, and will print yellow, magenta, and cyan on the
front of the card, and black on the lower half of the back—avoiding printing over the mag stripe.
The YMCUvK ribbon adds a layer of ultra-violet (Uv) to print invisible images (text or graphics) that
will glow in the visible spectrum when exposed to a Uv light.
The printer will recognize the type of print ribbon installed and display it in the Ribbon type eld
of the Printing Preferences Control Panel Card Setup tab, and (as shown in the following gure)
will make available the ribbon combinations from the Ribbon combinations drop-down menu.
Additionally, selecting Yes or No (double- or single-sided, respectively) from the Print on both sides
drop-down list will affect the available ribbon combinations.
The table below shows the supported print ribbons and their respective combinations for single- and
double-sided printing.
Ribbon Print on both sides Ribbon Combinations
No YMCK
YMCK
YMCKK
YMCKI
YMCKKI
YMCUvK
YMC
K (Monochrome)
Yes
No YMCK Front
Yes
No YMCKI Front
Yes
No YMCKI Front
Yes
No YMCUvK Front
Yes
No YMC Front
Yes YMC Front / YMC Back
No K Front
Yes K Front / K Back
YMC Front / K Back
YMCK Front / YMCK Back
YMCK Front / K Back
YMCK Front / YMCK Back
YMC Front / KI Back
YMCI Front / K Back
YMCKI Front / YMCKI Back
YMCK Front / KI Back
YMCKI Front / K Back
YMCKI Front / YMCKI Back
YMCUv Front / K Back
YMC Front / UvK Back
YMCUvK Front / YMCUvK Back
40 ZXP Series 9 Card Printer User Guide P1086707-002
Page 53

Operation
Print Ribbon Selection
Step 1. Open the Printing Preferences Control Panel (“Printing Preferences” on page 38).
Step 2. From the Card Setup tab, click the Ribbon combination drop-down menu and make
the appropriate selection (circled below).
In the example above, the available ribbon combinations for the installed YMCK ribbon are YMC on
the front of the card, and K on the back of the card; or YMCK on both the front and back of the card.
The available Ribbon combinations is also dependent on if printing is set to single- or double sided.
P1086707-002 ZXP Series 9 Card Printer User Guide 41
Page 54

Operation
Printing a Test Card
Printing a Test Card
The Printing Preferences Control Panel has the option for printing a test card. This is a simple device
to ensure the printer is working properly, and to check the quality of the print. The test card is printed
according to the settings in the Card Setup tab.
Step 1. Open the Printing Preferences Control Panel (“Printing Preferences” on page 38).
Step 2. From the Card Setup tab, adjust the Card Options, Printing Options, etc., to suit your
preferences.
Step 3. Click Test Print (circled below).
42 ZXP Series 9 Card Printer User Guide P1086707-002
Page 55

Operation
Printing a Test Card
An enhanced test print feature is also available from the ZXP Toolbox. This feature offers a wider
range of test cards to showcase the quality of print from the ZXP Series 9 Card Printer. The test card
is printed according to the settings in the Card Setup tab.
To print a test card from the ZXP Toolbox:
Step 1. Open the Printer Properties control panel:
y Windows 7: Select Start > Devices and Printers, right click the Zebra ZXP Series 9
Card Printer, and select Printer Properties from the pop-up menu.
y Windows 8: Right-click the screen’s bottom-left corner (or press Windows+I) and
choose Control Panel from the pop-up menu, right click the Zebra ZXP Series 9
Card Printer, and select Printer Properties from the pop-up menu.
y Windows 10: Select the Start menu and then select Settings > Devices, right click
the Zebra ZXP Series 9 Card Printer, and select Printer Properties from the pop-
up menu.
Step 2. Select the Device Information tab and click the ZXP Toolbox button.
P1086707-002 ZXP Series 9 Card Printer User Guide 43
Page 56

Operation
Printing a Test Card
Step 3. Select the Tools & Utilities page (the Test Cards menu is displayed by default).
Step 4. Select an image from the Test Card Library and click either Set as Front or Set as
Back to set the front and back of the test card; or you can add your own images to
the library and use them for the test card.
Step 5. When the front and the back images are set, click Print Test Cards.
44 ZXP Series 9 Card Printer User Guide P1086707-002
Page 57

Operation
Manual Card Feed
Manual Card Feed
A manual feed slot is available for feeding single cards. Note that this option works with cards in the
input hopper.
Step 1. Open the Printing Preferences Control Panel (“Printing Preferences” on page 38).
Step 2. From the Card Setup tab, click the Card source drop-down menu and select Manual
Feed (circled below).
Step 3. Click Apply.
Step 4. Send the print job to the printer. When ready, the printer OCP will prompt you to
insert the card.
P1086707-002 ZXP Series 9 Card Printer User Guide 45
Page 58

Operation
Manual Card Feed
Step 5. Insert a single card into the slot in the correct orientation. Do not feed more than one
card at a time.
Caution • DO NOT bend cards, and refrain from touching print surfaces as much as
possible as this can reduce print quality. The surface of the cards must remain clean and
dust free. Always store cards in an enclosed container. Ideally, use cards as soon as
possible.
Step 6. The printer will feed in the card and start printing.
Step 7. Once the printing job is complete, the card is ejected from the printer into the output
hopper.
46 ZXP Series 9 Card Printer User Guide P1086707-002
Page 59

Operation
Operator Control Panel (OCP)
Operator Control Panel (OCP)
The printer is equipped with an OCP display and three OCP buttons which give access to the printer
menus.
READY
MENU INFO PRINT
y Press the MENU button to access the Main Menu.
y Press the INFO button to access and view the printer information pages.
y Press the PRINT button to print the last card stored in memory.
P1086707-002 ZXP Series 9 Card Printer User Guide 47
Page 60

Operation
PREV NEXT EXIT
Displays Settings: Top and Bottom temperature; and Current:
Displays Settings: SSID, Channel Noise Floor, WEP, DHCP,
Displays Settings: Top and Bottom temperature; and Current
Displays RX Bytes, Discards, TX Bytes, Discards, Errors; TX
Operator Control Panel (OCP)
Printer Menu Information
Info Menu
INFO Button
(Operating Mode Display)
PRINTER INFO
NETWORK INFO
RIBBON INFO
FILM INFO Displays Type, # Images, and % Remaining.
PRINTHEAD USAGE
REJECT BIN Displays Card Count.
CONFIGURATION INFO
TEMPERATURE INFO
LAMINATOR INFO *
TOP LAMINATE INFO * Displays P/N, Type, # Images, and % Remaining.
Displays MCB FW Ver, HCB FW Ver, MAB FW Ver, and Mfr
Serial Number.
Displays DHCP, IP, Mask, GW, and MAC.
Displays Type, # Images, and % Remaining.
Displays Card Count and Printhead Lines.
Displays RAM, Single or Dual Sided, and Options Installed:
Mag, Encoder, Laminator.
Temperature: Top and Bottom.
Displays LCB, MAB, LSN, Top installed (yes/no), Bottom
installed (yes/no).
48 ZXP Series 9 Card Printer User Guide P1086707-002
BTM LAMINATE INFO * Displays Type, # Images, and % Remaining.
LAM TEMPERATURE INFO *
LAMINATOR ODOMETER *
CAL LUT INFO Displays Look-Up Table info for LUT1 and LUT2.
WIRELESS INFO **
WIRELESS STATISTICS **
Info Menu
Top and Bottom temperature.
Displays Unit on (# days), Top on (# days), Bottom on (#
days), # Laminated, # Processed.
IP, Mask, GW, and MAC. Only applies to Printers with the
Wireless option installed.
Success, TX Retry, RX Success,
RX Duplicate, and RTS Success. Only applies to Printers
with the Wireless option installed.
* Applies to printer with attached laminator.
** Applies to printer with optional wireless upgrade.
Page 61

Main Menu
Operation
Operator Control Panel (OCP)
MENU Button
(Operating Mode Display)
RETURN
PRINT TEST CARDS See see page 42
NETWORK SETTINGS Network Settings Menu (see page 51)
ADVANCED SETTINGS
ENCODER SETTINGS
WIRELESS SETTINGS Wireless Settings Menu (see page 55)
Main Menu
UP DOWN SELECT
Advanced Settings Menu (see page 52)
Encoder Settings Menu (see page 53)
P1086707-002 ZXP Series 9 Card Printer User Guide 49
Page 62

Operation
Operator Control Panel (OCP)
Print Test Cards Menu
Main Menu
RETURN
> COUNT
> SIDES Selects single-sided or double-sided printing.
> CARD TYPE
GRADIENT BOXES Prints a test card with varying gradient boxes.
DENSITY SETUP
MONOCHROME ONLY
Print Test Cards Menu
UP DOWN
SELECT /
PRINT
Selects the number of cards to be printed (1, 5, 10, 25, 50,
75, 100)
Selects the type of cards being printed on (varying types of
PVC, Composite, etc.).
Prints a test card with varying color densities.
Prints a test card with monochrome bitmap elements. Only
works when monochrome ribbon is installed.
50 ZXP Series 9 Card Printer User Guide P1086707-002
Page 63

Network Settings Menu
UP DOWN SELECT
RETURN WITHOUT SAVE
Operation
Operator Control Panel (OCP)
Main Menu
SAVE SETTINGS
DHCP MODE
SET IP ADDRESS
SET SUBNET MASK Change the subnet mask.
SET DEFAULT GATEWAY Change the gateway.
Network Settings Menu
Enable or disable DHCP mode.
Change the IP address of the printer.
P1086707-002 ZXP Series 9 Card Printer User Guide 51
Page 64

Operation
Operator Control Panel (OCP)
Advanced Settings Menu
Main Menu
RETURN
SELECT LANGUAGE
FLUSH PRINT QUEUE
PRINTER ONLINE
CLEAN PRINTER
SET SLEEP TIMER
SET SCREEN CONTRAST
CLEAR REJECT BIN
HOST USB SETTINGS
SET WARMUP DELAY
Select the language of the OCP.
Deletes all pending print jobs stored in the printer.
Toggles printer online/ofine.
Runs the cleaning routine (see “Maintenance” on page 59).
Sets the idle duration before entering sleep mode.
Sets the contrast level of the OCP.
Resets the reject bin count to zero.
Host USB settings.
Sets the idle duration before beginning warm-up.
Advanced Settings Menu
UP DOWN SELECT
52 ZXP Series 9 Card Printer User Guide P1086707-002
Page 65

Encoder Settings Menu
Operation
Operator Control Panel (OCP)
Main Menu
RETURN
USB ENCODING
ETHERNET ENCODING
Encoder Settings Menu
UP DOWN SELECT
Select if printer is connected via USB.
Select if printer is connected via Ethernet.
P1086707-002 ZXP Series 9 Card Printer User Guide 53
Page 66

Operation
Operator Control Panel (OCP)
Clean Printer Menu
Main Menu
RETURN
CLEAN SIDE CARD PATH
CLEAN FRONT CARD PATH
CLEAN HEATER ROLLERS
CLEAN LAM CARD PATH *
CLEAN MED LAM ROLLERS * Use the Cleaning Swab and follow the OCP instructions.
CLEAN LAM OVEN *
Clean Printer Menu
UP DOWN SELECT
Use the X Roller Cleaning Card and follow the OCP
instructions.
Use the Y Roller Cleaning Card and follow the OCP
instructions.
Use the Hot Roller Cleaning Card and follow the OCP
instructions.
Use the Laminator Cleaning Card and follow the OCP
instructions.
Use the Laminator Hot Roller Cleaning Card and follow
the OCP instructions.
* Applies to printer with attached laminator.
54 ZXP Series 9 Card Printer User Guide P1086707-002
Page 67

Wireless Settings Menu
RETURN WITHOUT SAVE
SAVE SETTINGS
Operation
Operator Control Panel (OCP)
Main Menu
RADIO CONTROL
SETUP WIZARD
DHCP MODE
SET IP ADDRESS Change the IP address of the printer.
SET SUBNET MASK
SET DEFAULT GATEWAY
SET DEFAULTS
Advanced Settings Menu
UP DOWN SELECT
Enable or disable the radio.
Easily connect you printer to a wireless network. †
Enable or disable the DHCP.
Change the subnet mask.
Change the gateway.
Return to the default wireless settings.
† See “Setup via OCP” on page 97 for additional information.
P1086707-002 ZXP Series 9 Card Printer User Guide 55
Page 68

Operation
Messages
Messages
Operational
Operational messages are displayed during normal operation.
MESSAGE DESCRIPTION
ALARM
CANCELING
CONFIG DATA
CONTACT OPERATION
CONTACTLESS OPERATION
COOLING
COOLING PRINT JOB WAITING Print job received, cooling rollers to temperature.
COOLING PRINTHEAD TEMPERATURE Cooling printhead to temperature.
COOLING WAITING TO LAMINATE Print job completed, laminator cooling to temperature.
DIAGNOSTIC Diagnostic testing in progress.
JOB DATA Data is being transferred from the computer to the printer.
LAMINATING Print job received, laminating in process.
MAG OPERATION
MANUALLY INSERT CARD FROM
FRONT
OFFLINE Status toggled (ofine/online) via the OCP Advanced Settings Menu.
PRINTING Print job received, printing in process.
READY Ready and at temperature.
STANDBY Printer is in “sleep” mode; i.e., power save mode.
WAIT INITIALIZING Performing a self test on startup.
WARMING
WARMING PRINT JOB WAITING Print job received, warming rollers to temperature.
WARMING
WAITING TO LAMINATE
WARMING PRINTHEAD TEMPERATURE Warming printhead to temperature.
WARNING
An error message needs to be cleared before normal operations can
resume.
The Cancel button was pressed, and the current operation is being
terminated.
Conguration data is being transferred from the computer to the
printer.
Contact Smart Card is being encoded; i.e., the card is in position and
data is being transferred.
Contactless Smart Card is being encoded; i.e., the card is in position
and data is being transferred.
Ready to accept a print job, rollers cooling; e.g., when switching from
2-sided printing to 1-sided printing.
A Magnetic Stripe Card is being encoded; i.e., card is in position and
data is being transferred.
Waiting for manual card feed.
Ready to accept a print job, rollers heating; e.g., at startup or when
switching from 1-sided printing to 2-sided printing.
Ready to accept a print job, laminator warming; e.g., when switching
from 1-sided laminating to 2-sided laminating.
Indicates that additional OCP instructions need to be performed; e.g.,
PRINT RIBBON LOW, etc.
56 ZXP Series 9 Card Printer User Guide P1086707-002
Page 69

Operation
Messages
Warning Messages
Warnings alert the operator to action that should be taken—the printer will generally continue
operation.
WARNING
(Printer will still operate)
BOTH LAMINATES LOW
BOTTOM LAMINATE LOW
CLEAN FEEDER Indicates that the Feeder needs cleaning.
CLEAN FRONT CARD PATH
CLEAN LAM CARD PATH
CLEAN LAM MED ROLLERS
CLEAN LAM OVEN
CLEAN SIDE CARD PATH
CLEAN TRANSFER PATH
PRINT RIBBON LOW
TOP LAMINATE LOW
TRANSFER FILM LOW
DESCRIPTION
Indicates that the Top Laminate cassette and the Bottom Laminate
cassette are low.
Indicates that the Bottom Laminate cassette is low (see “Loading the
Laminate” on page 21.
Indicates that the Front Card Path (Y-Drive Rollers) needs cleaning
(see Maintenance on page 69).
Indicates that the Laminator Card Path needs cleaning (see
Maintenance on page 69).
Indicates that the Laminator Media Feed Rollers need cleaning (see
Maintenance on page 69).
Indicates that the Laminator Transfer Path (Heated Rollers) needs
cleaning (see Maintenance on page 69).
Indicates that the Side Card Path (X-Drive Rollers) needs cleaning
(see Maintenance on page 69).
Indicates that the Transfer Path (Heated Rollers) needs cleaning (see
Maintenance on page 69).
Indicates that the Print Ribbon spool is low (see “Loading a Print
Ribbon” on page 18).
Indicates that the Top Laminate cassette is low (see “Loading the
Laminate” on page 21).
Indicates that the Transfer Film spool is low (see “Loading the
Transfer Film” on page 18).
Error Messages
Errors are displayed when a situation causes the printer to stop operating. Depending on the cause
of the error message, restarting the printer or clearing the displayed error may return the printer to
operational status; or the printer may require troubleshooting and repair.
See “Troubleshooting” on page 71 for a list of the error messages, possible causes, and possible
solutions.
P1086707-002 ZXP Series 9 Card Printer User Guide 57
Page 70

58 ZXP Series 9 Card Printer User Guide P1086707-002
Page 71

4
Maintenance
Caution • PROTECT YOUR FACTORY WARRANTY!
The recommended maintenance procedures must be performed to maintain the factory
warranty. Other than the recommended cleaning procedures described in this manual,
allow only Zebra authorized technicians to service the Printer.
NEVER loosen, tighten, adjust, or bend, etc., a part or cable inside the printer.
NEVER use a high-pressure air compressor to remove particles from the printer.
59 ZXP Series 9 Card Printer User Guide P1086707-002
Page 72

Maintenance
Cleaning the Printer
Cleaning the Printer
The regular use of cleaning cards will clean and maintain important parts of your printer that cannot
be reached, including the printhead, transport rollers, and optional magnetic encoder station.
Printer usage (total number of cards printed and total number of cards laminated) can be found
on the printer Properties, Device Information tab, or via the OCP Info Menu (see “Printer Menu
Information” on page 48).
To order cleaning supplies, please visit www.zebra.com/zxp9-info.
When to Clean
y X-Cleaning Roller and Y-Cleaning Roller replacement should occur every 5,000 cards (see
“Replacing the Cleaning Rollers” on page 62).
y Heated Roller cleaning should occur every 20,000 cards.
Rollers
Important • Do not reuse cleaning cards.
To initiate the cleaning process:
Step 1. On the operator control panel (OCP) select Menu.
Step 2. From the Main Menu select Advanced Settings.
Step 3. From the Advanced Settings menu select Clean Printer.
To clean the X-drive rollers:
Step 1. Select Clean Side Card Path to run the X-roller cleaning routine.
Step 2. Use the X-roller cleaning card.
Step 3. Follow the OCP instructions.
Step 4. When complete, the OCP will return to the Clean Printer Menu.
60 ZXP Series 9 Card Printer User Guide P1086707-002
Page 73

To clean the Y-drive rollers:
Step 1. Select Clean Front Card Path to run the Y-roller cleaning routine.
Step 2. Use the Y-roller cleaning card.
Step 3. Follow the OCP instructions.
Maintenance
Cleaning the Printer
Step 4. When complete, the OCP will return to the Clean Printer Menu.
To clean the heated rollers:
Note • To avoid a long wait while the heated rollers cool to 70°C, perform cleaning before
the rollers heat up (i.e., when rst turned on and the rollers are still cold).
Step 1. Select Clean Transfer Path to run the heated roller cleaning routine.
Step 2. Use the hot roller cleaning card.
Step 3. Follow the OCP instructions.
Step 4. When complete, the OCP will return to the Clean Printer Menu.
P1086707-002 ZXP Series 9 Card Printer User Guide 61
Page 74

Maintenance
Cleaning the Printer
Platen
Platen cleaning is done manually, there is no OCP cleaning routine.
Step 1. Open the printer door.
Step 2. Remove the transfer lm.
Step 3. Manually run the hot roller cleaning card over the platen.
Step 4. Re-install the transfer lm.
Step 5. Close the printer door.
Replacing the Cleaning Rollers
The X-cleaning roller is part of the cleaning cartridge assembly—only the roller is replaceable.
To replace the X-cleaning roller:
Step 1. Open the printer and remove the cleaning cartridge from the printer.
Step 2. Grasp the used roller and pull it out from the cartridge.
Step 3. Insert the new cleaning roller into the cartridge—press rmly until it snaps into place.
Step 4. Remove the protective cover.
To replace the Y-cleaning roller:
Step 1. Open the printer.
Step 2. Grasp the used cleaning roller and pull down and out in a singular motion.
Step 3. Grasp the new roller by the edges and remove the protective cover.
Step 4. While still holding the roller at the edges, insert the new cleaning roller into position
by pressing in and up in a singular motion.
62 ZXP Series 9 Card Printer User Guide P1086707-002
Page 75

Maintenance
Cleaning the Laminator
Cleaning the Laminator
The regular use of cleaning cards will clean and maintain important parts of your laminator that
cannot be reached.
Printer usage (total number of cards printed and total number of cards laminated) can be found
on the printer Properties, Device Information tab, or via the OCP Info Menu (see “Printer Menu
Information” on page 48).
When to Clean
y Cleaning should occur every 5,000 cards.
y Heated Roller cleaning should occur every 20,000 cards.
Laminator
Note • To avoid a long wait while the card transport rollers cool to 60°C, perform cleaning
before the rollers heat (i.e., when rst turned on and the rollers are still cold).
Important • Do not reuse cleaning cards.
To initiate the cleaning process:
Step 1. On the operator control panel (OCP) select Menu.
Step 2. From the Main Menu select Advanced Settings.
Step 3. From the Advanced Settings menu select Clean Printer.
To Clean the Card Path:
Step 1. Select Clean Lam Card Path to run the laminator cleaning routine.
Step 2. Use the laminator cleaning card in the laminator cleaning kit.
Step 3. Follow the OCP instructions.
Step 4. When complete, the OCP will return to the Clean Printer Menu.
P1086707-002 ZXP Series 9 Card Printer User Guide 63
Page 76

Maintenance
Cleaning the Laminator
To Clean the Media Feed Rollers:
Step 1. Select Clean Lam Med Rollers to run the laminator media roller cleaning routine.
Step 2. Lift the laminator door to its upright position.
Step 3. Remove the laminate cassette(s) (see “Removing the Laminate Cassette(s)” on
page 20).
Step 4. Leave the laminator door open
Step 5. Use the cleaning swab in the laminator cleaning kit. Bend the swab to release the
cleaning uid.
Step 6. Press Next when ready, then press To p.
Step 7. Clean the top media roller (circled below) by moving swab tip side-to-side as it turns
ve full revolutions. Only use moderate force.
64 ZXP Series 9 Card Printer User Guide P1086707-002
Page 77

Step 8. For the double-sided laminator only:
a. Locate the roller (circled below) for the lower cassette.
Maintenance
Cleaning the Laminator
b. Use a second cleaning swab in the laminator cleaning kit. Bend the swab to
release the cleaning uid.
c. Press Bottom.
d. Clean the bottom media roller by moving swab tip side-to-side as it turns ve full
revolutions. Only use moderate force.
e. When the operation is complete, press Exit.
Step 9. Reinstall the laminate cassette(s).
Step 10. Close the laminator door.
P1086707-002 ZXP Series 9 Card Printer User Guide 65
Page 78

Maintenance
Cleaning the Laminator
To Clean the Heater Assembly Rollers:
Step 1. Select Clean Lam Oven to run the laminator oven cleaning routine.
Step 2. Observe the OCP, and wait until the laminator temperature goes below 60°C.
Note • To avoid a long wait while the card transport rollers cool to 60°C, perform cleaning
before the rollers heat (i.e., when rst turned on and the rollers are still cold).
Step 3. Lift the laminator door to its upright position.
Step 4. Remove the four thumb screws holding the heater assembly in place and slide the
heater assembly out of the laminator (shown below).
Step 5. Use the laminator hot roller cleaning card (with adhesive) from the laminator cleaning
kit.
Step 6. Prepare the card for use.
Step 7. Insert the card into the slot (arrow below), adhesive side down.
66 ZXP Series 9 Card Printer User Guide P1086707-002
Page 79

Maintenance
Cleaning the Laminator
Step 8. Pull the card all the way through the heater assembly thereby cleaning the heater
rollers.
Step 9. Remove the card from the heater assembly.
Step 10. Turn the card over, adhesive side up; and repeat Step 8, Step 9, and Step 10.
Step 11. Reinstall the heater assembly.
Step 12. Close the laminator door.
Step 13. Press Exit on the OCP when done.
P1086707-002 ZXP Series 9 Card Printer User Guide 67
Page 80

Maintenance
Cleaning the Printhead
Cleaning the Printhead
Printhead cleaning removes deposits when print anomalies persist. To avoid deposits, only use
foam-tipped swabs or pens.
Caution • Never use a sharp object or any abrasive to scrape deposits from the printhead.
Permanent damage to the printhead will result.
Hot Surface • Do not touch the printhead if the printer has been in service in the last 10
minutes. It could be very hot and cause a burn.
Step 1. Place the printer power switch in the OFF ( ) position.
Step 2. Open the door, and remove the print ribbon.
Step 3. Bend the cleaning swab to release the cleaning uid.
Step 4. Clean printhead by moving cleaning swab tip side-to-side across the printhead
elements. Only use moderate force.
Step 5. Reinstall the print ribbon, and close the door.
Step 6. Place the printer power switch in the ON ( ) position.
68 ZXP Series 9 Card Printer User Guide P1086707-002
Page 81

Maintenance
Magnetic Encoder Cleaning
Magnetic Encoder Cleaning
The magnetic encoder is cleaned as part of the printer cleaning process . If the frequency of
encoding errors increases, the head may need additional cleaning. To clean, only use foam-tipped
swabs. To order cleaning swabs, go to the ZXP Series 9 Card Printer Support Page at www.zebra.
com/zxp9-info.
Caution • Never use a sharp object or any abrasive to scrape deposits from the magnetic encoder.
Permanent damage to the magnetic head will result.
Step 1. Open the printer cover.
Step 2. Open the idler roller assembly door.
Step 3. Bend the cleaning swab to release the cleaning uid.
Step 4. Clean the magnetic encoder by moving cleaning swab tip side-to-side across the
head elements.
Step 5. Close the idler roller assembly door.
Step 6. Close the door.
P1086707-002 ZXP Series 9 Card Printer User Guide 69
Page 82

70 ZXP Series 9 Card Printer User Guide P1086707-002
Page 83

5
Troubleshooting
OCP Error Messages
The table offers causes and solutions to symptoms related to improper operation. Check the table
when experiencing any loss of operation or print quality.
CODE MESSAGE POSSIBLE CAUSE POSSIBLE SOLUTION
1 SYSTEM NOT READY A problem was detected during
printer start-up.
2–4 SYSTEM ERROR Internal logic error. Power cycle the printer, and
5 FW UPGRADE ERROR Firmware upgrade
incompatibility.
6 DIAGNOSTIC ERROR Error encountered in
Diagnostic Mode.
7 FW UPGRADE ERROR Firmware upgrade failed. Verify the version, and retry
8 CRITICAL ERROR
SHUTTING DOWN
3001 PRINTER OFFLINE Status toggled (ofine/online)
4002 INVALID CARD TYPE Encoding error. • Ensure that you are using
Major malfunction encountered. Contact Zebra Tech Support.
via the OCP Advanced Settings
Menu.
Power cycle the printer, and
retry. If problem persists,
contact Zebra Tech Support.
retry.
Verify the version, and retry
installing the rmware.
Power cycle the printer, and
retry.
installing the rmware.
Change status to online via the
OCP Advanced Settings Menu.
the correct card type.
• In the Encoding tab of the
driver Printing Preferences,
check that the settings are
correct for the cards you are
using.
• Ensure that the data
conforms to ISO
Specications.
• Retry writing and reading.
71 ZXP Series 9 Card Printer User Guide P1086707-002
Page 84

Troubleshooting
CODE MESSAGE POSSIBLE CAUSE POSSIBLE SOLUTION
4003 CARD JAM Card is jammed in the Printer Clear the card path.
4010 OUT OF FILM The transfer lm has run out. • Conrm proper installation.
• Load new roll of transfer lm.
4011 INTM INVALID Transfer lm does not match
the printer—incorrect OEM
code.
4012 FILM JAM The transfer lm is jammed. • Check the transfer lm.
4013 FILM MOTION ERROR Transfer lm not correctly
responding to motion
commands.
4014 CARD FEED ERROR Card is jammed in Feeder
Cartridge.
4015 CARD NOT INSERTED Card was not fed into the
Single Card Feed Slot within
30-second period.
4016 OUT OF CARDS • The Feeder Cartridge is
empty.
• Card is stuck in Feeder
Cartridge.
4017 INTM AUTH FAIL RFID auth invalid or corrupt. • Contact Zebra Tech Support.
5001 OUT OF RIBBON Print ribbon has run out. Load a new roll of print ribbon.
5002 INVALID RIBBON Ribbon does not match the
printer—incorrect OEM code.
5003 RIBBON JAM Print ribbon is jammed. • Check the print ribbon.
5004 RIBBON MOTION ERROR Print ribbon not correctly
responding to motion
commands.
5005 RIBBON ADC ERROR Possible hardware issue. Contact Zebra Tech Support.
5006 RIBBON BEMF ERROR Problem with the Back EMF
(BEMF) of the ribbon motors.
• Verify the part number of the
transfer lm is correct on lm
RFID tag.
• Contact Zebra Tech Support.
• Reinstall the transfer lm.
• Repair the break in the
transfer lm and reinstall.
• Check the transfer lm.
• Reinstall the transfer lm.
• Power cycle the printer.
• Clear card jam in Feeder
Cartridge, and re-seat
Feeder Cartridge.
• Ensure that cards are not
stuck together and that they
are the correct thickness (30
mil only).
Retry and feed card into the
Single Card Feed Slot, or
cancel the operation.
• Load cards in the Feeder
Cartridge.
• Re-seat the Feeder
Cartridge.
• Verify the part number of the
ribbon is correct on lm RFID
tag.
• Contact Zebra Tech Support.
• Reinstall the print ribbon.
• Repair the break in the print
ribbon and reinstall.
• Check the print ribbon.
• Reinstall the print ribbon.
• Repair the break in the print
ribbon and reinstall.
Contact Zebra Tech Support.
72 ZXP Series 9 Card Printer User Guide P1086707-002
Page 85

Troubleshooting
CODE MESSAGE POSSIBLE CAUSE POSSIBLE SOLUTION
5007 RIB COLOR DETECT ERR • Print ribbon is not installed
correctly.
• Tricolor sensor error.
5008 RIBBON AUTH FAIL RFID auth invalid or corrupt. • Contact Zebra Tech Support.
6001–6008 GENERAL MEMORY
ERROR
6009 FLASH ERASE ERROR There is a problem when
6010 FLASH ERASE VERIF ERR There is a problem when
6011 FLASH PROGRAM ERROR There is a problem when
6012 FLASH PROG VERIFY ERR There is a problem when
6013 INVALID FW SRECORD There is a problem when
6015–6025 GENERAL MEMORY
ERROR
7001 CARD FEED ERROR Card is jammed in Feeder
7003 PRINTHEAD CABLE
ERROR
7005 PRINTHEAD TOO HOT Printhead temperature out of
7006 PRINTHEAD TOO COLD Printhead temperature out of
7008 COVER OPEN This warning will be displayed if
7010 PRINTHEAD MOTION ERR Printhead did not move
There is a problem when
accessing general memory.
accessing ash memory.
accessing ash memory.
accessing ash memory.
accessing ash memory.
accessing ash memory.
There is a problem when
accessing general memory.
Cartridge.
Printhead cable loose or
disconnected.
proper range (HOT).
proper range (COLD).
the cover protecting the Printer
Module is opened.
to proper position during
initialization.
• Reinstall the print ribbon.
• Perform tricolor calibration in
ZMotif Service Partner Tool.
• Contact Zebra Tech Support.
• Power cycle the printer, and
retry.
• Contact Zebra Tech Support.
• Power cycle the printer, and
retry.
• Contact Zebra Tech Support.
• Power cycle the printer, and
retry.
• Contact Zebra Tech Support.
• Power cycle the printer, and
retry.
• Contact Zebra Tech Support.
• Power cycle the printer, and
retry.
• Contact Zebra Tech Support.
• Power cycle the printer, and
retry.
• Contact Zebra Tech Support.
• Power cycle the printer, and
retry.
• Contact Zebra Tech Support.
• Clear the card jam in the
Feeder Cartridge, and re-
seat the Feeder Cartridge.
• Ensure that cards are not
stuck together and that they
are the correct thickness (30
mil only).
Check printhead cable
connection, reconnect if loose
or disconnected.
Contact Zebra Tech Support.
Contact Zebra Tech Support.
This warning will be cleared
when the printer cover is
closed.
• Power cycle the printer, and
retry.
• Re-seat the printhead.
P1086707-002 ZXP Series 9 Card Printer User Guide 73
Page 86

Troubleshooting
CODE MESSAGE POSSIBLE CAUSE POSSIBLE SOLUTION
7011 ROLLERS OVER TEMP Heated Rollers (used to
transfer the image from the
transfer lm to the Card) are
too hot for proper operation.
7012 ROLLERS UNDER TEMP Heated Rollers (used to
transfer the image from transfer
lm to Card) are not hot
enough for proper operation.
7013 MOTOR VOLTAGE ERROR Incorrect voltage detected at
one or several motors in the
unit.
7014 SCRIPT PROCESSING
ERROR
7015 MAG MOTION ERROR Printhead did not move
7017 REJECT ERROR A problem during the reject
7018 SMARTCARD ERROR • Encoding error.
7019 SCRIPT CONTENT ERROR Internal logic error. Power cycle the printer, and
7020 SCRIPT SEND ERROR Internal logic error. Power cycle the printer, and
7034 REJECT BIN FULL
REMOVE CARDS
9001 MAG READ ERROR • Encoding error.
Internal logic error. Power cycle the printer, and
to proper position during
initialization.
process.
• Faulty card.
The Reject Bin is full. Remove the cards from the bin,
• Defective magnetic stripe.
Turn off power, and contact
Zebra Tech Support.
Turn off power, and contact
Zebra Tech Support.
Power cycle the printer, and
retry.
retry.
Power cycle the printer, and
retry.
Contact Zebra Tech Support.
• Ensure that you are using
the correct card type.
• Check that the cards
are loaded in the correct
orientation.
• Ensure that the data
conforms to ISO
Specications.
• Retry writing and reading.
retry.
retry.
and reset the reject bin card
count to 0 via the OCP (Main
Menu > Advanced Settings >
Clear Reject Bin).
• Ensure that you are using
the correct card type.
• Check that the cards are
loaded with the magnetic
stripe in the correct
orientation.
• Ensure that the cards are
set-up correctly in the printer
driver (coercivity setting).
• Ensure that the data
conforms to ISO
Specications.
• Retry reading.
74 ZXP Series 9 Card Printer User Guide P1086707-002
Page 87

Troubleshooting
CODE MESSAGE POSSIBLE CAUSE POSSIBLE SOLUTION
9002 MAG WRITE ERROR • Encoding error.
• Defective magnetic stripe.
9004 NO MAG STRIPE Magnetic stripe not detected. • Ensure that you are using
10001 CONTACT READ ERROR • Faulty card.
• Incorrect card orientation.
• Incorrect Mode or Protocol
setting.
• Faulty reader.
10002 CONTACT WRITE ERROR • Faulty card.
• Incorrect card orientation.
• Incorrect Mode or Protocol
setting.
• Faulty writer.
11001 CONTACTLESS READ
ERROR
11002 CONTACTLESS WRITE
ERROR
14001 MISSING HCB The Halogen Controller Board
14002 HCB BULB ERROR The Halogen Controller
• Faulty card.
• Incorrect Mode or Protocol
setting.
• Faulty reader.
• Faulty card.
• Incorrect Mode or Protocol
setting.
• Faulty writer.
(HCB) is missing.
Board (HCB) is unable to
pulse the upper and lower
heaters to bring the upper
and lower rollers to the proper
temperature.
• Ensure that you are using
the correct card type.
• Check that the cards are
loaded with the magnetic
stripe in the correct
orientation.
• Ensure that the cards are
set-up correctly in the printer
driver (coercivity setting).
• Ensure that the data
conforms to ISO
Specications.
• Retry writing.
the correct card type.
• Check that the cards are
loaded with the magnetic
stripe in the correct
orientation.
• Try another card.
• Try another card (check
orientation).
• Correct the Mode or Protocol
setting.
• Contact Zebra Tech Support.
• Try another card.
• Try another card (check
orientation).
• Correct the Mode or Protocol
setting.
• Contact Zebra Tech Support.
• Try another card.
• Correct the Mode or Protocol
setting.
• Contact Zebra Tech Support.
• Try another card.
• Correct the Mode or Protocol
setting.
• Contact Zebra Tech Support.
• Check connection to HCB.
• Contact Zebra Tech Support.
• Power cycle the printer, and
retry.
• Contact Zebra Tech Support.
P1086707-002 ZXP Series 9 Card Printer User Guide 75
Page 88

Troubleshooting
CODE MESSAGE POSSIBLE CAUSE POSSIBLE SOLUTION
14003 HCB SENSOR ERROR The Halogen Controller Board
(HCB) is unable to detect
temperature of the upper or
lower rollers.
14004 HCB FIRMWARE MISSING The Halogen Controller Board
(HCB) rmware is missing.
15001 MISSING MAB An error occurred when
reading the RFID Tag by the
MAB (Media Authentication
Board).
15002 MAB FIRMWARE MISSING MAB (Media Authentication
Board) Firmware is missing.
17001 LAMINATOR MISSING Laminator data cable loose or
disconnected.
17002 LAMINATOR FAILED
INITIALIZATION
17003 LAMINATOR UNKNOWN
ERROR
17004 MISSING LAMINATOR MAB An error occurred when
17005 TOP LAMINATE FEED FAIL • Top laminate cartridge is not
17006 BOTTOM LAMINATE FEED
FAIL
17007 TOP LAMINATE
REGISTRATION ERROR
Laminator was detected by
the printer, but was unable to
communicate to it.
An unknown error has occurred
– this is an indication of a FW
problem and should not occur.
reading the RFID Tag by
trying to communicate to
the Laminator MAB (Media
Authentication Board).
installed properly.
• Cartridge is not removed
when that side of the card is
not being laminated.
• A mis-cut piece of laminate
(rare) is obscuring the media
sensor.
• Bottom laminate cartridge is
not installed properly.
• Cartridge is not removed
when that side of the card is
not being laminated.
• Improperly prepared
registered laminate.
• Media misfeed.
• Patch length improperly set.
• Unexpected end of laminate
roll detected.
Contact Zebra Tech Support.
• Update printer rmware.
• Contact Zebra Tech Support.
• Check print ribbon
orientation.
• Verify part number of the
print ribbon.
• Power cycle the printer, and
retry.
• Contact Zebra Tech Support.
Install the rmware.
Contact Zebra Tech Support.
Contact Zebra Tech Support.
Press RETRY on the OCP.
• Check laminate orientation.
• Power cycle the printer, and
retry.
• Contact Zebra Tech Support.
• Remove, reposition, and
re-install the top laminate
cartridge.
• Remove the top laminate
cartridge.
• Remove the mis-cut piece of
laminate.
• Remove, reposition, and
re-install the bottom laminate
cartridge.
• Remove the bottom laminate
cartridge.
Remove and recut laminate in
the center of the index notch,
re-install, and retry.
76 ZXP Series 9 Card Printer User Guide P1086707-002
Page 89

Troubleshooting
CODE MESSAGE POSSIBLE CAUSE POSSIBLE SOLUTION
17008 LAMINATOR CARD FEED
FAIL
17009 LAMINATOR EARLY CARD
JAM
17010 LAMINATOR MIDDLE CARD
JAM
17011 LAMINATOR LATE CARD
JAM
17012 LAMINATOR POLL
TIMEOUT
17013 LAMINATOR TOP HEATER
FAIL
17014 LAMINATOR BOTTOM
HEATER FAIL
17015 LAMINATOR TOP
TEMPERATURE HIGH
Printer has not fed the card
far enough into laminator
mechanism for infeed rollers to
grab it.
Card did not make it to the
staging rollers.
Card and laminate have
jammed inside heater
assembly, often due to mis-
positioned laminate patch
sticking to heated rollers.
Card did not unblock the exit
sensor in the specied time.
The laminator expects the
printer to periodically send
commands to it within a
specied time period. If it
fails to do so, it assumes that
something is wrong with the
communication link or that the
printer is down. This error may
occur if the printer-to-laminator
communications is having
intermittent problems.
Top heater did not turn on
after being instructed to
do so. When the heater
is enabled, the controller
will wait a certain specied
amount of time for it to attain
the set target temperature. If
the heater fails to reach the
target in the specied time, the
TopHeaterFail fault will be set.
Bottom heater did not turn
on after being instructed
to do so. When the heater
is enabled, the controller
will wait a certain specied
amount of time for it to attain
the set target temperature. If
the heater fails to reach the
target in the specied time, the
BotHeaterFail fault will be set.
If the top roller temperature
ever exceeds a xed
temperature threshold, the over
temp error occurs.
Open the Laminator and printer
doors to check for jammed/
stuck cards. Note: Only 30 mil
cards supported.
Remove the card and/or
laminate that is stuck in the
laminator staging/cutting area.
Remove the oven, and inspect
for stuck cards.
• Check for card jam in the exit
area.
• Assure that the sliding exit
door is not partially blocking
the exit path.
Power cycle the printer, and
retry.
• Power cycle the printer, and
retry.
• Replace the top halogen
bulb.
• Power cycle the printer, and
retry.
• Replace the bottom halogen
bulb.
• Power cycle the printer, and
retry.
• Contact Zebra Tech Support.
P1086707-002 ZXP Series 9 Card Printer User Guide 77
Page 90

Troubleshooting
CODE MESSAGE POSSIBLE CAUSE POSSIBLE SOLUTION
17016 LAMINATOR BOTTOM
TEMPERATURE HIGH
17017 LAMINATOR TOP CUTTER
STALL
17118 LAMINATOR BOTTOM
CUTTER STALL
17019 LAMINATOR TOP CUTTER
FAIL
17020 LAMINATOR BOTTOM
CUTTER FAIL
17021 LAMINATOR TOP TEMP
SENSOR FAIL
17022 LAMINATOR BOTTOM
TEMP SENSOR FAIL
17023 LAMINATOR FAN FAIL This should only happen if one
17024 LAMINATOR EEPROM
DEFAULT
17025 LAMINATOR TOP
TEMPERATURE LOW
17026 TOP AND BOTTOM
LAMINATES OUT
17027 TOP LAMINATE OUT The top laminate has run out. Load new roll of laminate.
17028 BOTTOM LAMINATE OUT The bottom laminate has run
17029 INVALID TOP LAMINATE Wrong OEM code, laminate not
17030 INVALID BOTTOM
LAMINATE
If the bottom roller temperature
ever exceeds a xed
temperature threshold, the over
temp error occurs.
Top cutter blade is obstructed,
or top cutter mechanism is
damaged.
Bottom cutter blade is
obstructed, or bottom cutter
mechanism is damaged.
Top cutter has failed. Contact Zebra Tech Support.
Bottom cutter has failed. Contact Zebra Tech Support.
The top temperature
(thermopile) sensor has failed.
The bottom temperature
(thermopile) sensor has failed.
or both cooling fans fail or the
cooling vents near the heated
roller assembly are blocked or
the fan(s) have failed.
The parameters stored in
EEPROM have been reset
to their default values. This
will not normally happen, but
could be seen with certain
FW upgrades when new
parameters have been added
by Engineering. It could also
indicate a problem with the
Laminator’s EEPROM.
If the top roller temperature
does not reach a xed
temperature threshold, the
under temp error occurs.
The top and bottom laminates
have run out.
out.
supported.
Wrong OEM code, laminate not
supported.
• Power cycle the printer, and
retry.
• Contact Zebra Tech Support.
Contact Zebra Tech Support.
Contact Zebra Tech Support.
Contact Zebra Tech Support.
Contact Zebra Tech Support.
Check for blocked vents.
• Press RETRY on the OCP
when this error occurs.
• Power cycle the printer, and
retry.
Power cycle the printer, and
retry.
Load new rolls of laminate.
Load new roll of laminate.
• Power cycle the printer, and
retry.
• Replace with valid Zebra
laminate.
• Power cycle the printer, and
retry.
• Replace with valid Zebra
laminate.
78 ZXP Series 9 Card Printer User Guide P1086707-002
Page 91

Troubleshooting
CODE MESSAGE POSSIBLE CAUSE POSSIBLE SOLUTION
17031 BOTTOM LAMINATE
REGISTRATION ERROR
17038 LAMINATOR COVER OPEN This warning will be displayed
17040 LAMINATOR INITIALIZING This warning will be displayed
17041 LAMINATOR FIRMWARE
MISSING
17042 LAMINATOR MAB
FIRMWARE MISSING
18001 ETHERNET COMM ERROR Ethernet communication
19001 WIFI COMM ERROR Wireless Ethernet
19002 WIFI ACCESS POINT
MISSING
19003 WIFI LINK LOST • Connection to the access
19004 WIFI INCOMPATIBLE
NETWORK
• Improperly prepared
registered laminate.
• Media misfeed.
• Patch length improperly set.
• Unexpected end of laminate
roll detected.
if the cover protecting the
laminator is opened.
after the laminator door is
closed and laminate spools are
re-read/detected.
LCB (Laminator Controller
Board) Firmware is missing.
Laminator MAB (Media
Authentication Board)
Firmware is missing.
problem.
communication problem.
Access point, specied by
printer wireless settings, not
found during initial printer scan
after power up.
point was lost.
• Poor signal quality or low
signal strength.
• Interference.
• Access point power has
been lost.
• Printer, after power up, found
the access point specied
by the wireless settings,
but found the access point
settings incompatible.
• Access point conguration
has been modied.
Remove and recut laminate in
the center of the index notch,
re-install, and retry.
This warning will be cleared
when the laminator cover is
closed.
No action needed
Install the rmware.
Install the rmware.
• Disconnect and reconnect
the network cable.
• Power cycle the printer, and
retry.
• Power cycle the printer.
• Re-run the set-up wizard to
• re-establish the wireless
settings.
• Contact Zebra Tech Support.
Verify access point, specied
by the printer wireless settings,
is properly connected to the
network and turned on.
• Verify access point is
properly connected to the
network and powered ON.
• Put the printer antenna in
a similar orientation than
access point’s antenna, and
re-run the set-up wizard to
re-establish the wireless
settings.
Re-run the set-up wizard to
establish the new wireless
settings.
P1086707-002 ZXP Series 9 Card Printer User Guide 79
Page 92

Troubleshooting
CODE MESSAGE POSSIBLE CAUSE POSSIBLE SOLUTION
19005 WIFI ASSOCIATION FAILED • During association with an
access point, the association
failed.
• Poor signal quality.
• Low signal strength.
19006 WIFI CONNECTION FAILED • They key handshake
following the association
failed.
• WEP Key or WPA
passphrase is incorrect.
Put the printer antenna in
a similar orientation as the
access point’s antenna, and
re-run the set-up wizard to reestablish the wireless settings.
Ensure that you have the
correct key/passphrase, then
re-run the set-up wizard to
establish new wireless settings.
80 ZXP Series 9 Card Printer User Guide P1086707-002
Page 93

Troubleshooting
CARD
CARD
Clearing a Card Jam
Clearing a Card Jam
A card jam is reported by the printer when a card fails to reach a sensor as expected, or a card
blocks a sensor unexpectedly.
Caution • Do not use tools to remove stuck cards, this will void the product warranty and
may cause damage to the equipment.
Printer
A card jam in the printer will normally occur in one of two places: the card path, or the transfer
station.
Step 1. Open the printer.
Step 2. Open the idler cover.
Step 3. Remove the card (if present). If no card present, continue to next step.
P1086707-002 ZXP Series 9 Card Printer User Guide 81
Page 94

Troubleshooting
CARD
Clearing a Card Jam
Step 4. Turn the manual advance wheel next to the transfer station. Continue turning until the
wheel stops or the card has been ejected sufciently enough to remove it.
Caution • Card may be hot.
Laminator
A card jam in the laminator will normally occur along the lamination path.
Step 1. Open the laminator.
There are three areas along the lamination path and six rollers that can be manually
advanced if a card is stuck.
5
6
3
2
1
4
Note • For rollers 1 through 4, use the narrow side of the manual advance tool; for rollers 5
and 6, use the wider side of the manual advance tool.
82 ZXP Series 9 Card Printer User Guide P1086707-002
Page 95

Troubleshooting
Clearing a Card Jam
Step 2. Identify the location of the card and, using the manual advance tool, turn the
appropriate roller counter-clockwise. Advance the card to the next area or until it has
been ejected sufciently enough to remove it.
In some cases, a card may get wrapped around the laminator heater assembly rollers. In this case,
the laminator heater assembly can be removed.
Step 1. Remove the four thumb screws holding the heater assembly in place and slide the
heater assembly out of the laminator (shown below).
Step 2. Remove the card—do not use tools. If the card is wrapped around the heater
assembly rollers, contact Zebra to replace the heater assembly.
P1086707-002 ZXP Series 9 Card Printer User Guide 83
Page 96

Troubleshooting
OCP Test Cards
OCP Test Cards
Image Title Description Use
GRADIENT BOXES
DENSITY SETUP
MONOCHROME ONLY Barcode and text
3 sets of light-to-dark
grayscale ramps
Mid-gray and maximum
density elds on a at gray
surface
Used to validate the tonal
scale of the printer.
Also used to check the
left/right and top/bottom
offsets or the centering of
the image on the card.
Used to verify
monochrome print
capability and quality.
84 ZXP Series 9 Card Printer User Guide P1086707-002
Page 97

Troubleshooting
Identifying Job Quality Issues
Identifying Job Quality Issues
For the ZXP Series 9 printer, image quality can be broken down into two areas: print quality and
transfer quality. Print quality refers to the quality of the text, barcodes, and images that are printed on
the lm, while transfer quality refers to the quality of the transfer of the lm onto the card, as well as
card warpage and ash artifacts.
Print Quality Issues
Color Accuracy
When the colors on the printed card do not match the expected result, there are several steps that
may be taken to get the desired output.
1. If using the driver, make adjustments in the Color Optimization tab of Printer Preferences.
2. If using the driver, create and apply a Windows ICC color prole.
3. Whether using the driver or not, contact Zebra to create a custom lookup table that can be
downloaded to the printer using the ZXP Toolbox.
Dirt and Debris
Spots and speckles appearing on the card may be caused by dirt and debris in the printer.
y Replace the cleaning rollers
y Clean the printer
Image Placement
If the image printed on the card seems to have shifted, this may be an image placement issue.
y Use the Print Position adjustment feature in the ZXP Toolbox, located in the Calibration tab.
Smear
Smear may occur when a sudden shift from a dark color to a light color occurs and the printhead has
not sufciently cooled when printing the light color, thereby the dark color appears to “smear” into the
light color.
y Lower the Preheat value on the Color Optimization tab in the Printing Preferences Control
Panel.
y Switch to Fine print mode on the Card Setup tab.
Black Extraction
When the black text or images does not appear black or crisp, or text that is supposed to be black
appears muddy or not sharp, this may be an issue where the black text or image was not printed
using the black panel.
P1086707-002 ZXP Series 9 Card Printer User Guide 85
Page 98

Troubleshooting
Identifying Job Quality Issues
y Check the source image; RGB values up to 25,25,25 can be printed as black by using the
sliders on the K Extraction page. If RGB values are greater than 25,25,25, then the
y image will need to be modied to bring the RGB values under this threshold
y Adjust the properties in the Front or Back K Extraction menu (refer to the Help content in the
Printing Preferences Control panel).
Ribbon Wrinkle
Ribbon wrinkle appears as a streak of color that was not part of the original image. It typically
originates from the edges of the card, and sometimes occurs when printing a really dark image, or
near the transition between really dark and really light images
If this occurs, contact Zebra Tech Support.
Mis-registration
Mis-registration occurs when the Y, M, C, and/or K panels are not properly aligned with each other.
The effect may appear as a lack of sharpness, or a color halo.
If this occurs, contact Zebra Tech Support.
Transfer Quality Issues
Lack of Transfer
A printed image that appears incomplete on the card may be a sign of lack of transfer. Lack of
transfer typically occurs because there is not enough energy to properly adhere the transfer lm to
the card. There are several steps that can be taken to eliminate lack of transfer.
1. Adjust the transfer settings—raise the top and/or bottom transfer temperature, and/or lower
the in and/or out transfer speed. These settings are available by selecting one of the Custom
card types in the Printing Preferences control panel.
2. If lack of transfer only occurs for the rst few cards after the printer is turned on, set or
increase the warm-up delay to allow the transfer station to fully warm up before printing. The
warm-up delay can be set in the Advanced menu on the OCP.
Warpage
Card warpage is caused by an imbalance in the amount of energy applied to the top and bottom of
the card. There are several steps that can be taken to improve card warpage.
1. Adjust the transfer settings - lower the top and/or bottom transfer temperature, and/or
increase the in and/or out transfer speed. These settings are available by selecting one of
the Custom card types in Printer Preferences, in the Driver.
2. Switch to a card type that is more resistant to high temperatures.
3. Contact Zebra about custom ribbons with a Helper panel, that may enable good transfer at
lower transfer temperatures.
86 ZXP Series 9 Card Printer User Guide P1086707-002
Page 99

Troubleshooting
Identifying Job Quality Issues
Flash
Flash is an artifact of the transfer process, that appears like little shards of transfer lm. The shards
may be clear or colored, depending on the image being printed. Flash may appear on the sides or
top of the card.
y If ash is seen on the top of the card, adjust the image placement downward. Use the Print
Position adjustment feature in the ZXP Toolbox, located in the Calibration tab. If this does not
minimize or resolve the issue, contact Zebra Technical Support.
y If ash is seen on the sides of the card, contact Zebra Technical Support.
Delamination
Delamination is the separation of the card layers and may be caused by using substandard cards.
If this occurs, contact Zebra Tech Support.
P1086707-002 ZXP Series 9 Card Printer User Guide 87
Page 100

Troubleshooting
Ethernet Indicators—Detail
Ethernet Indicators—Detail
Link/Activity Indicator (Green)
Off No link (disconnected)
On Network link has been established
Blinking Network activity has been detected
Speed Indicator (Orange)
Off No link (disconnected)
The LED blinks once (one blink, pause,
1 Blink
2 Blinks
one blink, etc.) when a 10Base link has
been established.
The LED blinks twice (two blinks,
pause, two blinks, etc.) when a
100Base link has been established.
If both LEDs are off, the printer has not detected the presence of a network cable. To solve the
problem:
Step 1. Verify that the network cable is appropriate and has an RJ-45 connector.
Step 2. Remove the network cable from the printer. Plug the network cable back in until you
hear a positive click. Check the other end of the cable in the same manner. If the
printer still does not detect a cable, then continue.
Step 3. Connect the printer to a known good network. If the printer is still unable to detect the
network cable, contact Technical Support for assistance
88 ZXP Series 9 Card Printer User Guide P1086707-002
 Loading...