

Page 1
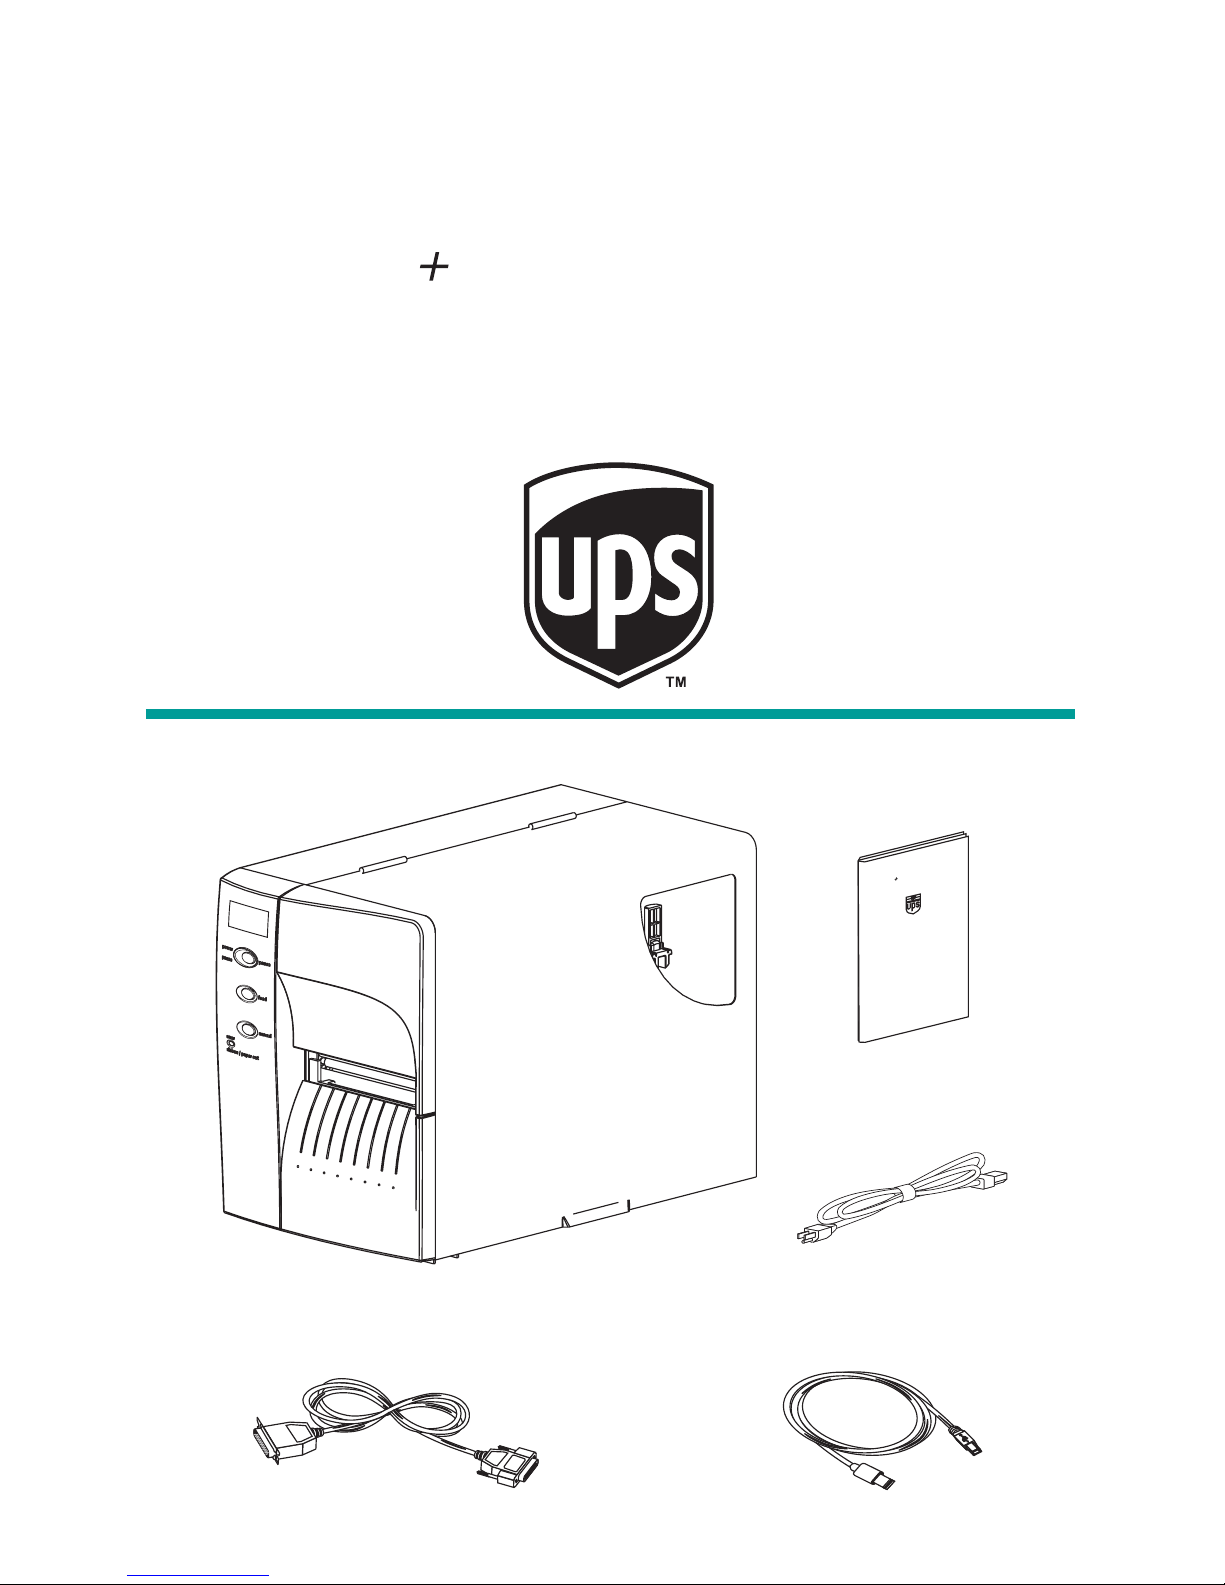
Unpack Your Printer
Printer
Power Cord
UPS
2348 Thermal Printer
Quick Start
+
®
Parallel Cable
Quick Start
USB Cable
Note: Ethernet option printers do not include any interface cables.
UPS
2348 Thermal Printer
Quick Start
+
Page 2

Getting To Know Your Printer
Page 2 980385-003 Rev.A
Auxiliary Media Access
Media Access
Door
(Lift to Open)
Peeler Bezel
Cleaning Pen
Label Taken Sensor
(Built into door)
Power Switch
& Cord Module
I/O Connectors
Label Mode
Switch
Media Sensor
and Guide
printhead
Release Lever
Printhead
Assembly
& Bracket
Page 3

Getting To Know Your Printer
980385-003 Rev.A Page 3
printhead
Platen
Roller
Peel/Tear
Bar
Liner "Peeler"
Gate
Controls
Media Roll
Holder
Save-A-Printhead
Cleaning Film
(Storage Pocket)
Platen
(Media Drive)
Roller Bracket
Page 4
Controls and Indicators
Power Switch
OFF
0 = Off
ON
1 = On
Button Function
PAUSE
Press Once - Halt batch printing.
Press Second Time - Resume batch
printing operation.
FEED
Press Once - Feed one label or “form”.
Press & Hold - Will feed labels until the
FEED button is released.
CANCEL
Press Once - resets and terminates any
print operation in progress and clears the
command input buffer.
Indicator LEDs
Condition Report
POWER ERROR
On Solid OFF
Power On
Flashing OFF
Pause
OFF Flashing
Printhead Open
OFF On Solid
Labels Out
OFF
On Solid
Hardware Error
Label Mode Switch
Mode Description
Peel
Print one label and pause. Remove label.
Prints next label. Repeats until print opera
tion is completed. Use label liner rewinder
to peel the liner from the label.
Batch
Standard operation - Prints one or more
labels until the print form operation is
complete.
Page 4 980385-003 Rev.A
PEEL
BATCH
O
O
Power
Indicator
Error
Indicator
Page 5
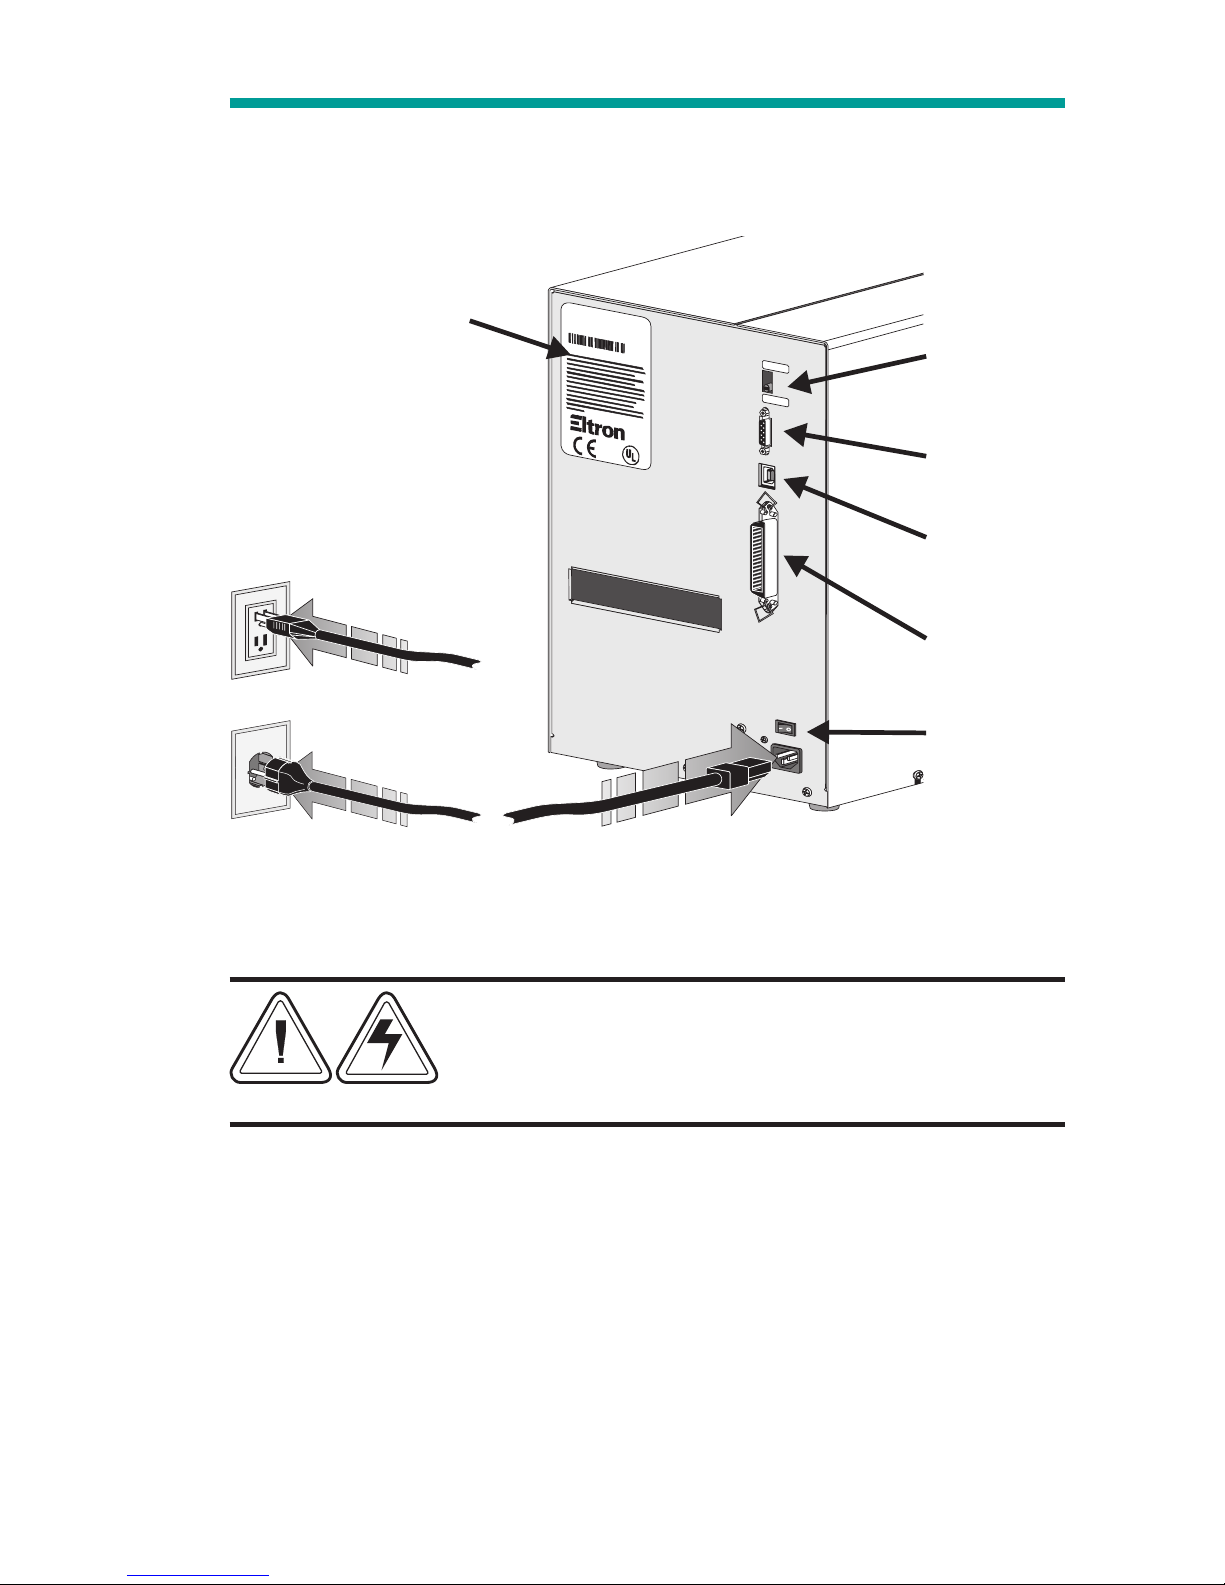
Installation
Connect the printer power and interface cable.
The printer’s serial port interface (RS-232) default setting is 9600 baud,
No parity, 8 Data bits and 1 stop bit.
Warning - Shock Hazard
See the back page, page 27, for important
information on handling, set-up and installation
of your printer.
If you use a USBcable, the New Hardwareand Printer Wizards help
you. Attachthe USB cable between the printer and the computer. Turn
on the printer. The computer detects a USB device, installs USB printer
support; then installs the printer driver.
If the computer prompts you to browse to file locations, find the
OEMSETUP.INF and USBPRINT.INF files under the UPS folder:
c:\UPS\Common\Foss\Drivers
980385-003 Rev.A Page 5
PEEL
BATCH
0 = Off
Batch
Mode
USB
Interface
Serial
Interface
Parallel
Interface
Check
Voltage
Part No.: 120XXX-XXX
Serial No.: XXXXXXXX
Input Power:115VAC 6.3A 50/60Hz
LP 2348 Plus
Page 6
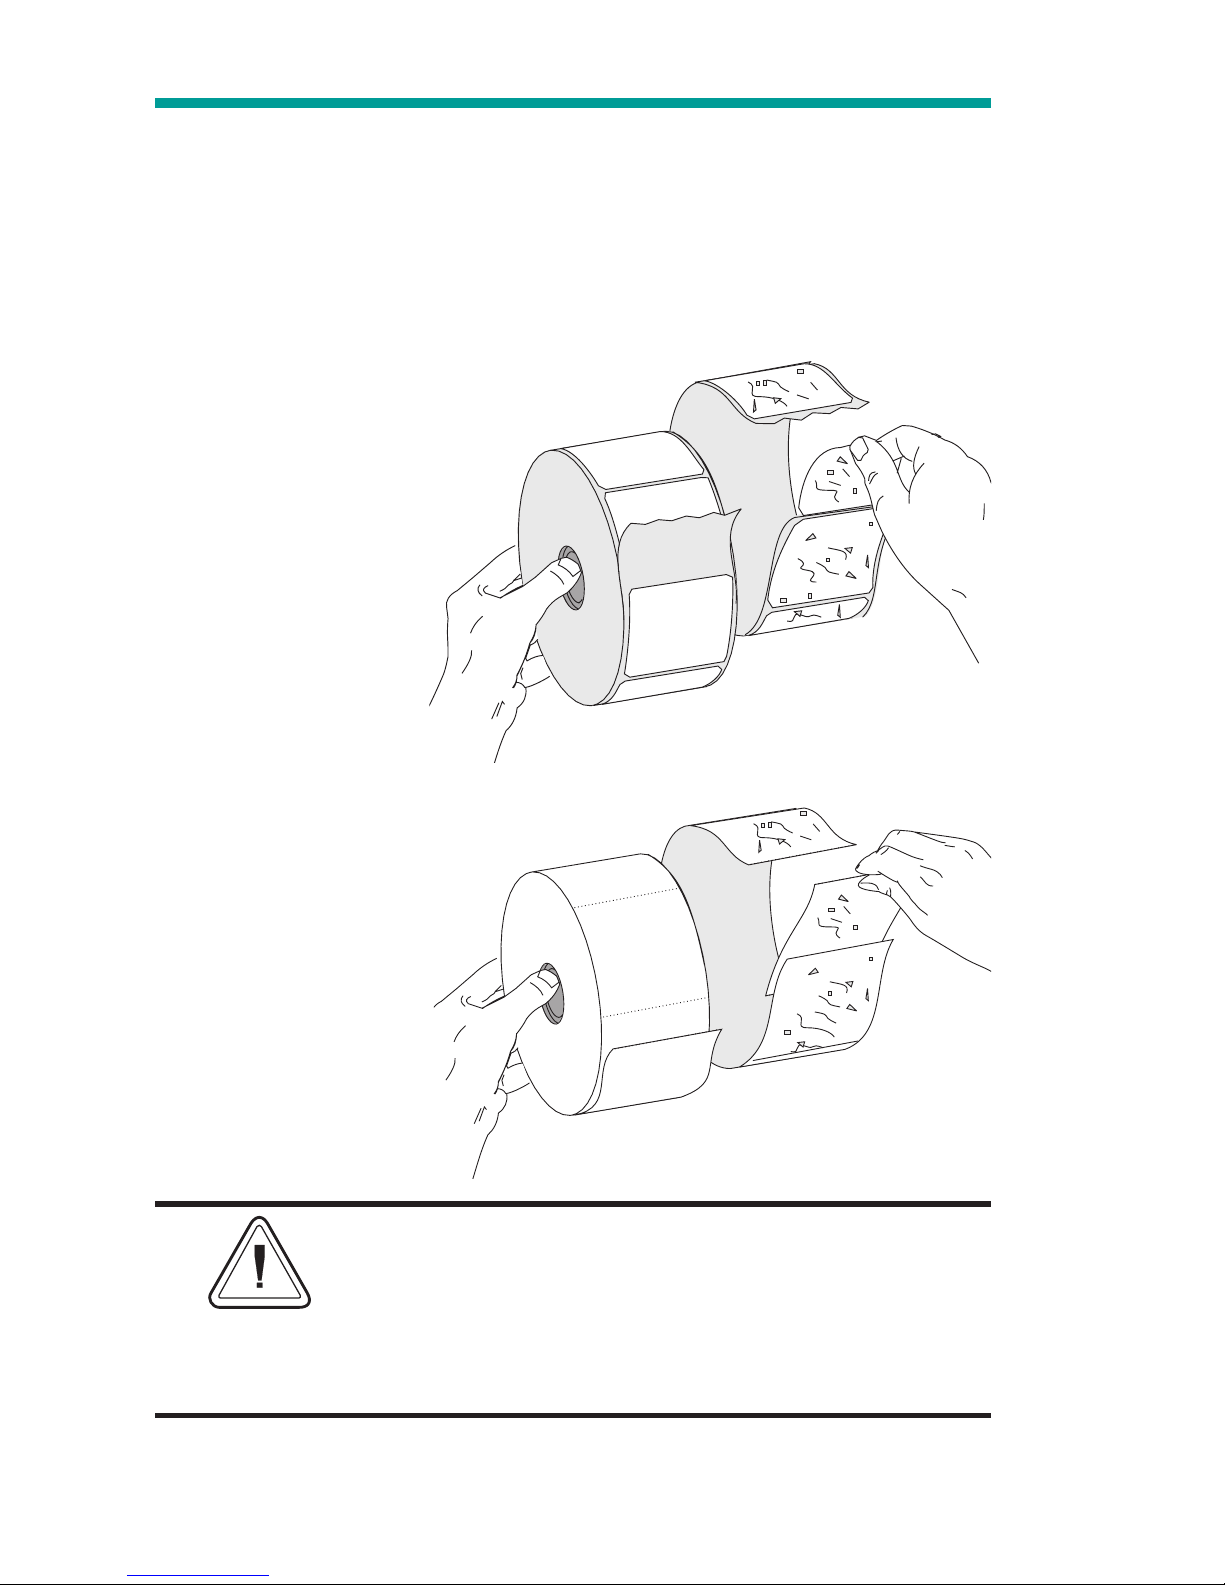
Before Loading Media
You must remove the outside length of media (that is, one, full revolution of
labels and any liner). Tape or adhesive holds the loose end andthe outside
length of media becomes contaminated when handled or stored.When
you remove this part of the media, you remove the oils, dust,and adhe
-
sives that contaminate it.
You must avoid dragging adhesive or dirty
media between the printhead and platen. Such
an occurrence damages the printhead and is
not covered under your warranty. Using clean
media prevents damage and reduces wear on
the printhead and platen.
Page 6 980385-003 Rev.A
Labels
Remove all labels
that are held by
adhesives or tape
Tag Stock
Detach both ends of
the bottom tag
Page 7
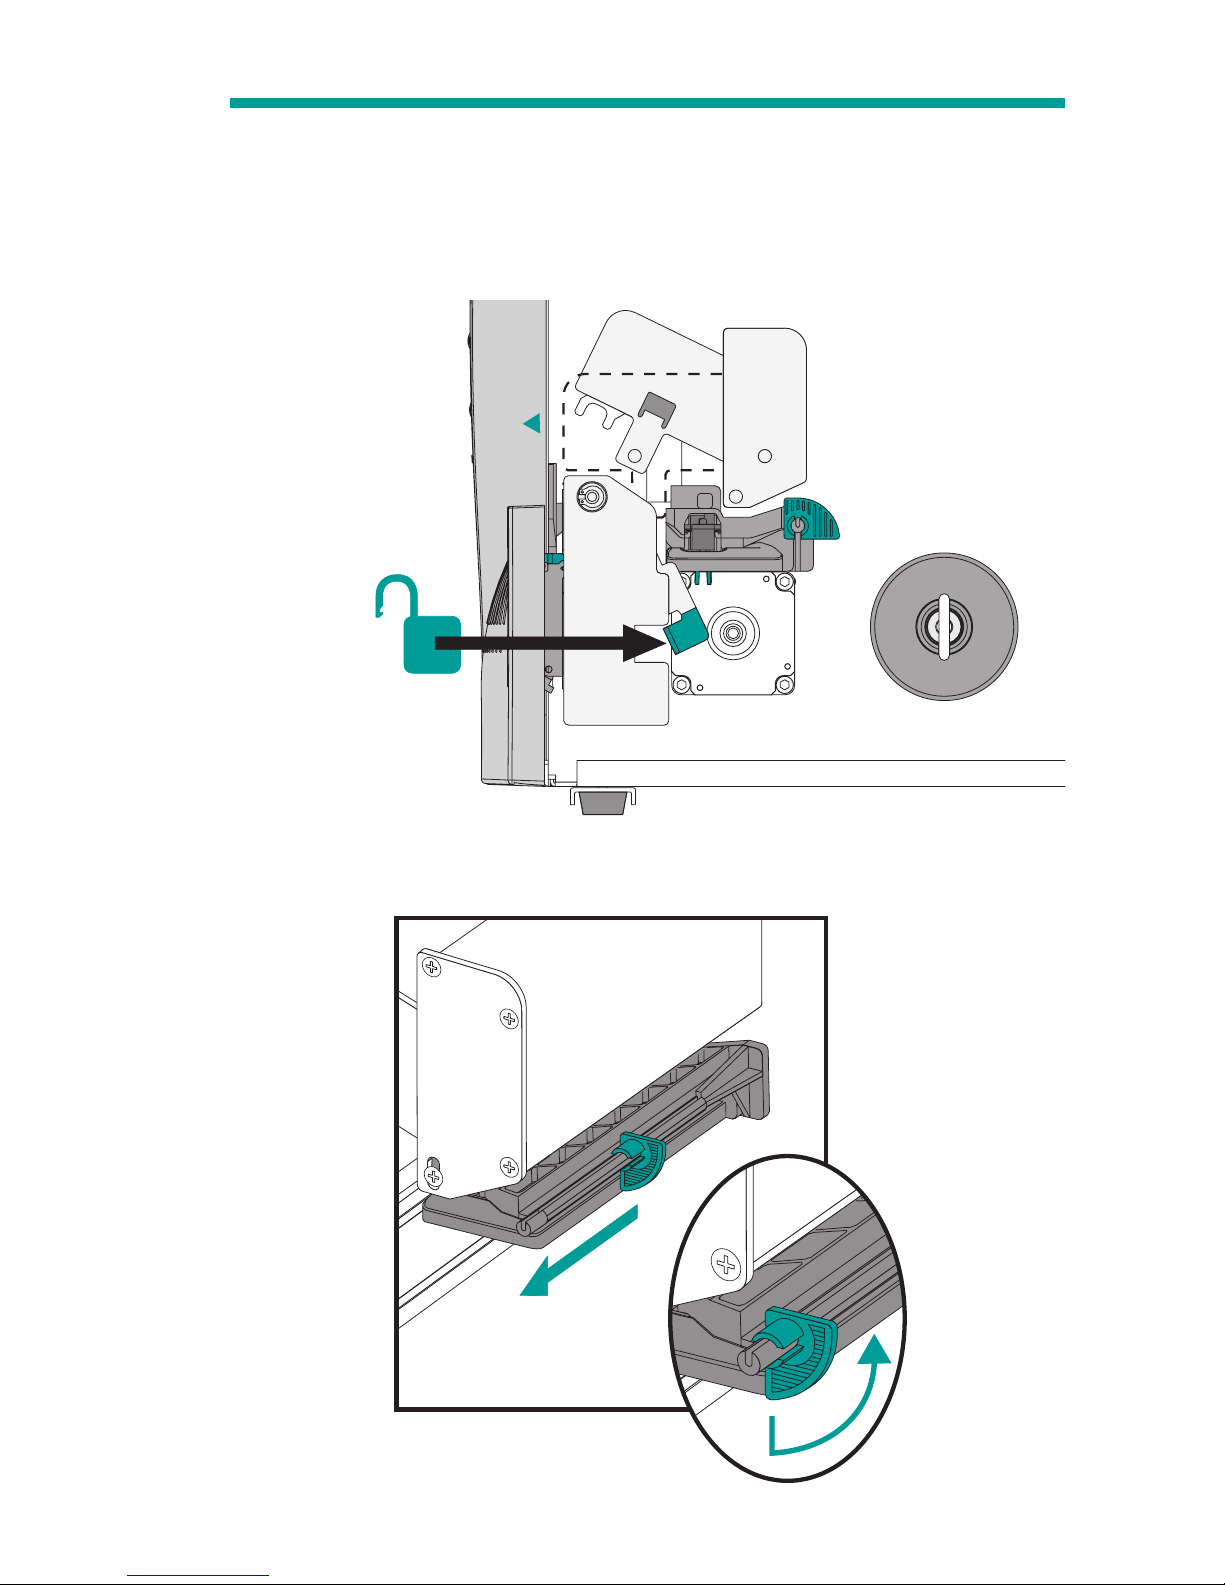
Loading Media
Use approved media for best results.
Step 1
Open printhead.
Step 2
Open media guide.
980385-003 Rev.A Page 7
B
A
Page 8

Step 3
Mount and thread the media.
Push the roll tight againsttheinsiderollbracketwiththegreenfliparm.
Page 8 980385-003 Rev.A
Page 9
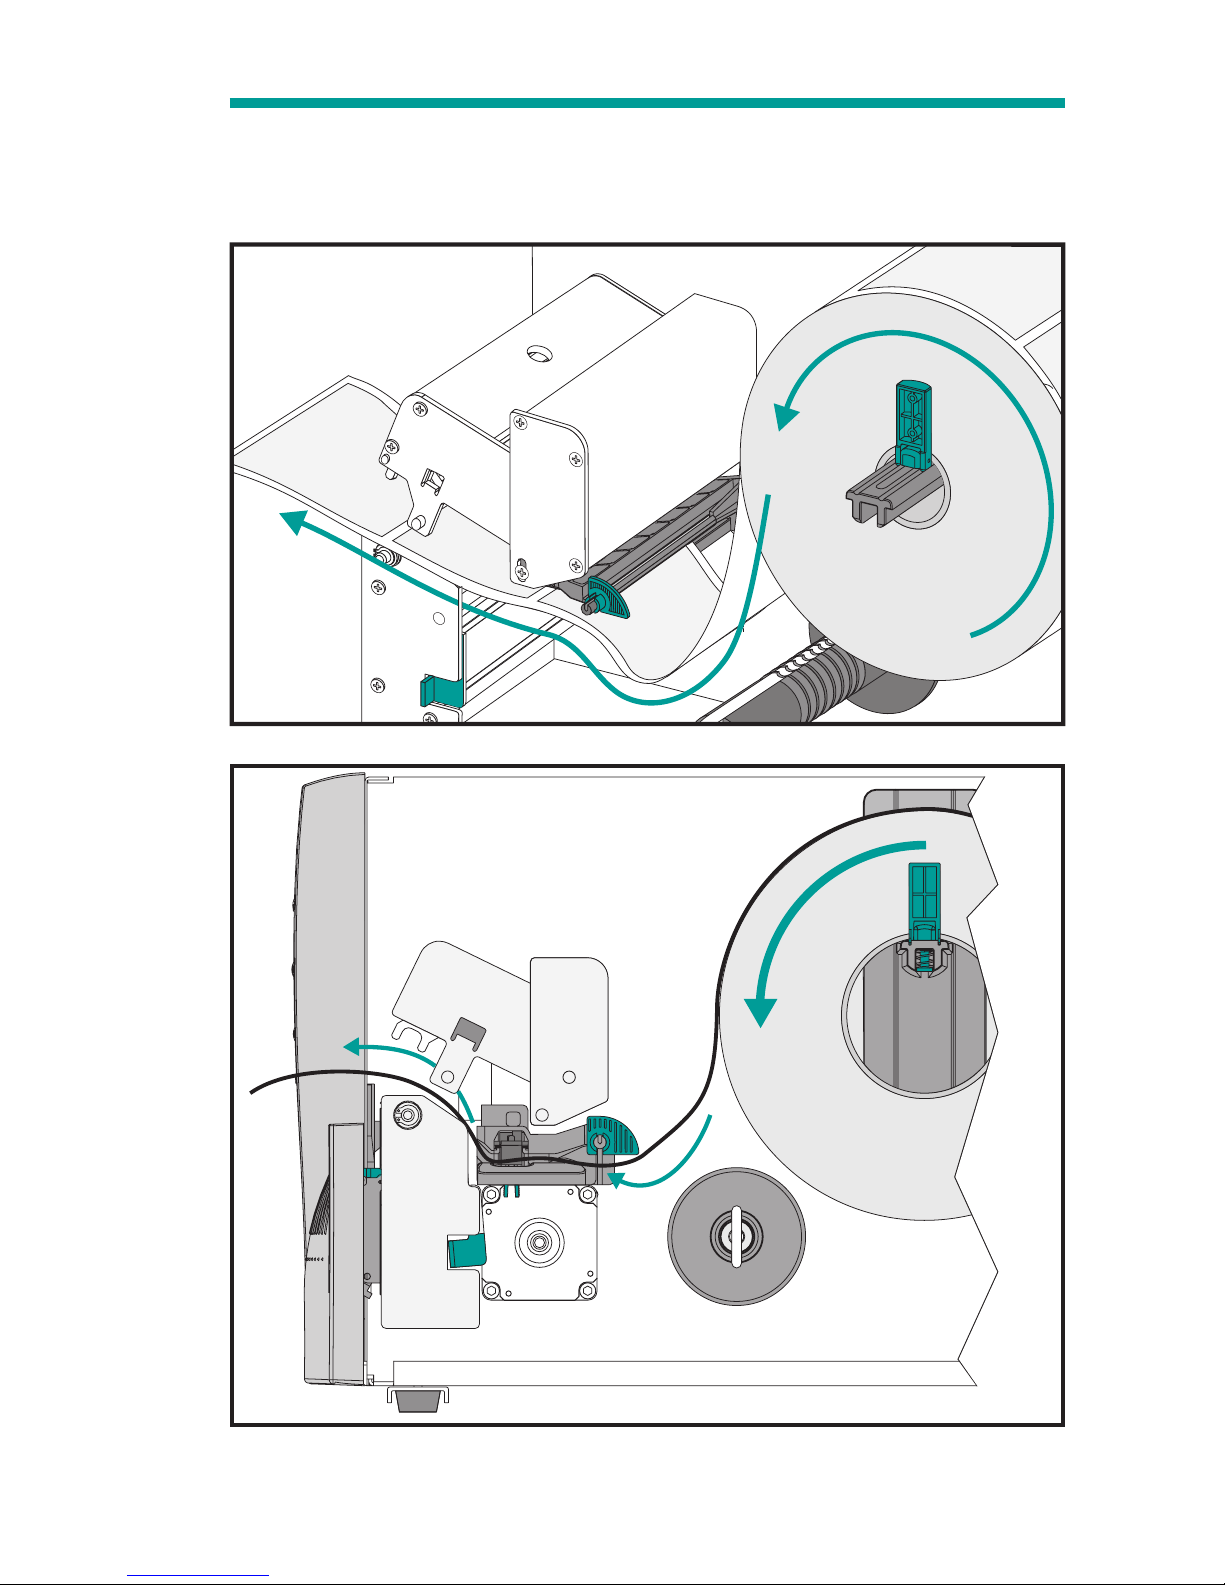
Step 4
Thread the media through the media guide and printhead.
980385-003 Rev.A Page 9
Page 10

Step 5
Close media guide. Slide the guide against the media until the media
touches the inside stop.
Step 6
Close the printhead.
Page 10 980385-003 Rev.A
A
B
2"
(50mm)
4"
(100mm)
Page 11

AutoSense: Media Calibration
Run the printer's AutoSense routine to calibrate the printer for new
media.The printer will measure the label, liner and gap parameters and
print a configuration status label.
Step 1
Close the printer.
Step 2
With the label mode switch set to "Batch", turn on the printer.
980385-003 Rev.A Page 11
PEEL
BATCH
PEEL
BAT
C
H
I
nputPower: 115VAC 6.3A 50/60Hz
ate:
PartNumber:
SerialNo.:
InputPower:
2746-120XXX-001
Forhomeorofficeuse
02/01/0
1
12345678912
115-230VAC, 2-1Amps, 50/60 Hz
N2557
®
C
US
I.T.E.
8T34
MADEIN
U
SA
withforeign and domestic parts
Page 12

AutoSense: Media Calibration
Step 3
Press and hold the Cancel and Feed buttons for one (1) second and then
release only the Cancel button. Afterthree(3)more seconds, release the
Feed button.
Step 4
A "Dump" mode configuration status label will print. Press the FEED
button (do not hold down feed button) until “Out of DUMP” prints.
Page 12 980385-003 Rev.A
4 MO3257 3.18.01
Serial port : 96,N,8,1
Image buffer size:245K
Fmem:000,0K,019.9K avl
Gmem:000K,0241K avl
E
I8,0,001 rY
S8 D12 R032,000 ZT UN
q0784 Q1227,034
Option:D
11 12 13
now in DUMP
mem:000K,0241K avl
1 sec.
3 sec.
3
sec.
1 sec.
Page 13

Label Peel Mode
The printer can present a single peeled label and wind the backing.
Removing the presented label will prompt the printer to print the next
label.
Preparation
Feed approximately 16 inches of media and remove the exposed labels
from the liner.
980385-003 Rev.A Page 13
Page 14

Step 1
Open the peeler gate. Push the peeler bezel in the lower middle area
and the gate will snap open.
Page 14 980385-003 Rev.A
Page 15

Step 2
Thread the media through the peeler gate and attach the media to the
rewind tube with the clip.
980385-003 Rev.A Page 15
Page 16

Step 3
Wind the rewind tube counter-clockwise (to remove liner slack) and
close the peeler gate.
Step 4
Set the Label Mode switch on the rear panel to PEEL.
Page 16 980385-003 Rev.A
PEEL
BATCH
Page 17

Step 5
Press CANCEL to initialize the Peel Mode. Carefully close the printer
door.
Step 6 - Optional
Press the FEED button to remove slack and the firstlabelispresented.
980385-003 Rev.A Page 17
CANCEL
FEED
Page 18

Using UPS Internet Shipping to Install the Printer
1
1. Click on the Shipping tab after Log In.
2 Click on 'Create a Shipment'. Accept “Terms and
Conditions” to continue.
3 Click on 'Set Preferences'.
4 Scroll to Printing Preferences and click 'Install UPS
Thermal Printer'.
5 Follow the instructions to install the printer driver and
plug-in.
6 Now you are able to print via UPS Internet Shipping using
your UPS 2348 Thermal Label Printer.
If you have any questions, call the UPS Internet Shipping
Support Help Desk at 877-289-6418.
Page 18 980385-003 Rev.A
Page 19

980385-003 Rev.A Page 19
Page 20

Cleaning Your Printer
The printer’s media path allows for cleaningand clearing of media jams.
The user can clean the printhead, platenroller and areas adjacentto the
media path surfaces.
Warning -Shock Hazard
Always turn the printer off before cleaning.
The media path surfaces (except the printhead) can be cleaned with a
lint free, clean, damp cloth very lightly moistened with medical grade
alcohol. Alcohol may be used to help remove any adhesive or label
material buildup.
Warning - Static Discharge.
Never touch the printhead. Always clean the
printhead with a cleaning pen (to protect the
printhead from static discharge and fibers).
If a label has become jammed in the printer,
remove the label and any adhesive residue,
immediately. Adhesive may spread throughout
the printer’s media path if not completely
removed. Many adhesives are permanent and
have short “set” times.
Page 20 980385-003 Rev.A
Page 21

Cleaning the Print Head
As you use your printer, the printhead may become contaminated
resulting in poor print quality. Whenever new labels are loaded into the
printer, the printhead should be cleaned with a cleaning pen.
Step 1
Open the printer and the printhead carriage.
Step 2
Gently rub the cleaning pen across the amber area of the printhead.
Allow the printhead to dry for 1 minute before loading labels.
Do Not Clean the printhead with sharp
objects! Only used approved cleaning
materials.
980385-003 Rev.A Page 21
Thermal Printer
Cleaning Pen
Printhead
Page 22

Print Head Care
The main factors that contribute to reduced head life are:
Touching the printhead! Static electricity can discharge and
damage the printhead. The body's oils and acids also damage
the printhead.
Cleaning - For optimum performance, clean the printhead
regularly after every roll of direct thermal labels.
Abrasion - Over time, the movement of media/ribbon across
the printhead will wear through the protective ceramic coating,
exposing and eventually damaging the print elements (dots).
Use of proper media - Use only approved media.
Non-approved media may contain chemicalsthat can destroy or
dramatically reduce the printhead's life.
Temperature - printhead density (heat) setting. Set the density
to the lowest possible setting that prints a good image.
Print Speed - Fast print speeds have higherfrictionlevelsonthe
printhead's surface.
Regular printhead Conditioning-UsetheSave-A-Printhead
cleaning film to remove printhead contamination buildup
quickly and easily. (Part No.105950-047)
Page 22 980385-003 Rev.A
Page 23

Printhead Conditioning
Every third new roll of labels the printhead needs regular printhead
conditioning. Use the Save-A-Printhead cleaning film to keep particle
and contamination build-up from occurring.
Using the Save-A-Printhead cleaning film:
1. Turn the printer power off. Remove the media.
2. Clean the printhead with the cleaning pen.
3. Insert the cleaning film with the label near the printhead.
4. Close and latch the printhead. Grasp the cleaning film and
pull it out of the front of the printer.
5 Clean the printhead with the cleaning pen.
6. Record the date cleaned on the rear of the film's label.
7. Load media and resume printing.
980385-003 Rev.A Page 23
Save-A-Printhead
Cleaning Film
Follow Instructions
On The Label
Page 24

Cleaning the Platen Roller
The platen (drive) roller normally does not require cleaning. Paper and
liner dust can accumulate without effecting print operations. Contami
nates on the platen roller can damage the printhead or cause the media
to slip when printing. Adhesive, dirt, general dust, oils and other
contaminates should be cleaned immediately off the platen.
The platen can be cleaned with a fiber free swab (such as a Texpad
swab) or a lint free, clean, damp cloth (such as Kimwipes) very lightly
moistened with medical gradealcohol (95% pure or better).Do Not Use
the Cleaning Pen!
1. Open the printhead and remove the media.
2. Clean the platen surface with the alcohol moistened swab.
Hand rotate the platen while swabbing.
3. Repeat this process two to three times with a new swab to
remove residual contaminates. Adhesives and oils, for example, may be thinned by the initial cleaning but not completely removed.
Page 24 980385-003 Rev.A
Page 25

Printer Configuration Settings
The printer has flash (non-volatile) memory to store printer configura
tion settings. The settings are stored in flash memory and are set by
programing, printer drivers or the AutoSense routine. The settings are
shown on the Dump mode printout or can be reported back to the host
via the serial port or USB interfaces.
The data printed out above the stripe bar is used to identify the printer.
The first line has Print Width (4”), Model Code (MO3257) and Firm
ware Version (V4.XX.XX XXX). The next lines are Serial Number
(S/N: XXXXXXXX) and serial port setting.
The following are the basic settings stored in the printer:
Speed (S)
Density (D) or heat applied
Form (label) length and gap in dots (Q)
Form (label) width in dots (q)
Serial port - Set by command line programming with Ycommand
Margin (R)
Buffer Mode (r)
Options: D
Print Mode is Direct Thermal (OD)
980385-003 Rev.A Page 25
Sample
Dump Mode
Printout
Page 26

Page 26 980385-003 Rev.A
Page 27

Warning - Shock Hazard
Never operate the printer in a location where it can get wet.
Personal injury could result.
Caution - Printer Setup & Handling
1)When installing or modifying the printer setup or
configuration, ALWAYS TURN POWER OFF Before
:
A) Connecting any cables.
B) Performing any cleaning or maintenance operations.
C) Moving the printer.
2) Damage to the printer interface connector, accessories or
door may result from placing the printer on it’s front bezel or
backside during unpacking or handling.
Warning - Static Discharge
The discharge of electrostatic energy that accumulates on the
surface of the human body or other surfaces can damage or
destroy the printhead or electronic components used in this
device. DO NOT TOUCH the printhead or the electronic
components under the printhead carriage.
LP2348+ Thermal Printers
European Council Directive Compliance to Standards
89/336/EEC EMC Directive EN55022-B,1998 RF Emissions Control
EMC Directive EN50024,1998
Immunity to
Electromagnetic
Disturbances
EMC Directive EN61000-3-2: 1995 Harmonic Emissions
EMC Directive EN61000-3-3: 1995 Voltage Variation
CB Scheme
EN60950
IEC60950
Product Safety
FCC - Declaration Of Conformity:
Models: LP 2348+ conform to the following specification:
FCC Part 15, Subpart B, Section 15.107(a) and Section 15.109(a) Class B
digital device.
Supplemental Information:
This device complies with Part 15 of the FCC Rules. Operation is subject to the following Two
Conditions: (1) This device may not cause harmful interference , and (2) this device must accept
any interference received, including interference that may cause undesired operation.
Industry Canada Notice:
This device complies with Industry Canada ICS-003 class A requirements.
Cet équipement est conforme à l’ICS-003 classe A de la norme Industrielle Canadienne.
©2004 Zebra Technologies Corporation, all rights reserved.
UPS
®
, UPS OnLine®and UPS OnLine®WorldShip®are registered trademarks of United Parcel
Service of America, Inc. Windows® is a registered trademark of Microsoft Corporation.
LP2348 and LP2348+ are trademarks of Zebra Technologies Corporation
980385-003 Rev.A Page 27
Page 28

Page 28 980385-003 Rev.A
980385-003
&
 Loading...