


TTP 7000 Kiosk Printer
Technical Manual
Publ. No.: 01536-000, Ed. F

Acknowledgments
Adobe and Acrobat are trademarks of Adobe Systems
Incorporated
Windows and Windows NT are trademarks of Microsoft
Corporation
This is a publication of Swecoin AB
Box 322, SE-192 30 Sollentuna, Sweden
Phone +46 8 623 45 60
Fax +46 8 594 709 89
E-mail techsupport@swecoin.se
sales@swecoin.se
Web site http://www.swecoin.se
© Swecoin AB 1998, 2001, 2003
All rights reserved. Reproduction in whole or in parts is
prohibited without written consent of the copyright owner. We
have taken great care to ensure that the information in this
manual is correct and complete. However, if you discover any
errors or omissions, or if you wish to make suggestions for
improvements, you are welcome to send your comments to
us. Swecoin AB disclaims any liability resulting from the use
of this information and reserves the right to make changes
without notice.
Edition F, August 2003
Printed in Sweden
2 TTP 7000 Kiosk Printer – Technical Manual 0308

CONTENTS
1 Introduction ...................................................................................................................5
1.1 About this manual............................................................................................5
1.2 Updating ..........................................................................................................5
2 Product presentation....................................................................................................6
2.1 Indicators.........................................................................................................7
2.2 Feed-forward (FF) button ................................................................................7
3 Installation .....................................................................................................................8
3.1 Installation considerations...............................................................................8
3.2 Connecting to the computer ............................................................................9
3.3 Connecting the power ...................................................................................11
3.4 Making a test printout ....................................................................................11
3.5 Installing a printer driver ................................................................................12
3.6 Paper level sensors.......................................................................................12
4 Operation .....................................................................................................................14
4.1 Installing a paper roll .....................................................................................14
4.2 Clearing paper jams ......................................................................................16
4.3 Self-test printout ............................................................................................17
5 Programming ..............................................................................................................18
5.1 Summary of control codes & escape sequences..........................................19
5.2 Software command syntax............................................................................21
5.3 Font loading...................................................................................................43
5.4 Logotypes......................................................................................................45
5.5 Status reporting .............................................................................................46
5.6 Default parameter setting..............................................................................47
5.7 Windows WIN32 API calls.............................................................................50
6 Aligning preprint and thermal print ..........................................................................52
6.1 Commands used with the black-mark ...........................................................53
6.2 Black-mark sensing from within "Windows" ..................................................54
7 Interface .......................................................................................................................55
7.1 Parallel...........................................................................................................55
7.2 USB ...............................................................................................................61
7.3 Serial (option) ................................................................................................61
8 Maintenance ................................................................................................................62
8.1 Fault finding...................................................................................................62
0308 TTP 7000 Kiosk Printer – Technical Manual 3

8.2 Cleaning the printhead ..................................................................................63
8.3 Removing the printhead ................................................................................63
8.4 Installing the printhead ..................................................................................63
8.5 Printer disassembly .......................................................................................64
8.6 Replacement parts ........................................................................................66
8.7 Firmware........................................................................................................67
9 Specifications .............................................................................................................70
9.1 Print data .......................................................................................................70
9.2 Text modes (non-Windows applications) ......................................................70
9.3 Basic character set........................................................................................71
9.4 Paper handling ..............................................................................................73
9.5 Printer dimensions.........................................................................................74
9.6 Environmental conditions ..............................................................................74
9.7 Miscellaneous................................................................................................75
9.8 Paper specification ........................................................................................75
9.9 Ordering numbers .........................................................................................77
REGISTER NOW!
If you wish to stay informed of product changes, manual updates etc., you are
welcome to subscribe to our bulletin service.
To register as a subscriber, either visit our web site http://www.swecoin.se to fill in
your subscription request, or send an e-mail to bulletins@swecoin.se.
Enter the text Subscribe bulletins as the subject. Do not enter any text in the message
area.
Registration date (for your own records):
REVISION HISTORY
Edition D, major changes
Status reporting for ESC ENQ 2 corrected
Status indicator LED-blink signals added
Retract and retain option added
Edition E, major changes
Added emphasis on fixed page length for landscape mode.
New commands added, (ESC L n) (EM)
Edition F, major changes
Added features up to firmware version 2.30
4 TTP 7000 Kiosk Printer – Technical Manual 0308

1 INTRODUCTION
1.1 About this manual
This manual contains the information required to install the printer and to run it from a
host computer such as a PC.
Chapter 5 gives the applicable control codes and escape sequences supported by the
printer processor firmware.
Other chapters of the manual contain information about the printer error codes,
communications parameters, test print functions, specifications, replacement parts, etc.
1.2 Updating
This manual will be updated as, from time to time, printer functions and features may be
added or amended. You will always find the latest edition on our web site
(http://www.swecoin.se). You can order printed copies of the current manual by e-mail,
fax, or phone.
If you require functions not found in the manual edition at your disposal, you are welcome
to consult one of our representatives for information.
0308 TTP 7000 Kiosk Printer – Technical Manual 5

2 PRODUCT PRESENTATION
Status indicator
Feed-forward button
Paper entry
Control board
Figure 1. Printer exterior, side view
Print mechanism
flip-back handle
Paper release lever
Printhead lifted
Paper released
Normal operation
Paper exit shutter
FRONT
SW98049
The TTP 7000 is a kiosk printer using direct thermal printing. The print speed is up to
75 mm per second.
The printer has an integrated control board that communicates with the host computer
through an IEEE-1284 bi-directional parallel port, an USB port, or an optional serial port.
Printer drivers for most versions of Microsoft Windows™ are available, and the printer is
compatible with the Plug and Play standard. It is also possible to address the printer
directly from the kiosk software without using Windows.
The loop generating presenter mechanism handles documents of various lengths. It holds
the receipt until printed, then cuts and presents the complete receipt to the customer. A
retract and retain option can retract uncollected receipts into a wastebasket inside the
kiosk.
A flip-up print module gives the operator access to the paper path, and printhead, for
maintenance purposes.
Paper entry
Serial adapter (option)
Indicators for 24 and 5V
Roll holder paper level sensors
J1
IEEE-1284C
J10
Figure 2. Printer exterior, rear view
USB
J13
Power
J8
SW98051
6 TTP 7000 Kiosk Printer – Technical Manual 0308

2.1 Indicators
2.1.1 Status indicator
The yellow status indicator (see Figure 1) has several functions:
••
ON constantly — the printer is operational
Blinks, pauses, blinks — indicates non-severe error. The number of blinks reflects
the error code:
1 Presenter jam
2 Cutter stuck
3 No paper at head
4 Head up
5 Paper-feed error
6 Temp error
Flashes rapidly — indicates severe error. The printer must be reset to be operable
again. Hold down the feed-forward button and the number of blinks will reflect the
error code.
2.1.2 Control board indicators
The control board has two power indicators behind the power connector.
Green indicator constantly ON: 24 V present
••
Red indicator constantly ON: 5 V OK (generated on control board)
••
2.2 Feed-forward (FF) button
When you insert the paper through the paper entry the printer will feed it forward, cut and
eject a receipt, then switch to on-line mode. Use the feed-forward button if you want to
advance the paper forward further.
To feed paper:
1. Press and hold the button, paper-feed starts.
2. Release the button to stop paper feed.
You can also use the feed-forward button to print a self-test receipt. See page 17.
0308 TTP 7000 Kiosk Printer – Technical Manual 7

3 INSTALLATION
3.1 Installation considerations
The TTP 7000 printer should be installed in some kind of enclosure such as a self-service
kiosk. The illustration below gives an example of a printer-mounting shelf. See also
"Printer dimensions" on page 74.
5
.
1
19.0
26.0
76.0
Top v i e w
84.5 (116.5)
128.5 (160.5)
4.2 (4x)
81
91
All measurements are in mm. Measurements in parenthesis are for TTP 7000/112.
Figure 3. Example of a simple shelf for fastening a standard printer
16.0
86.0
148.8
12.0
104.0
SW98056
Additional space is required for paper replenishment and paper jam removal. Consider
mounting the printer on a movable platform so that the printer can be maintained outside
the printer enclosure.
8 TTP 7000 Kiosk Printer – Technical Manual 0308

3.1.1 Electrostatic discharges, and earth currents
Preventing ESD and earth currents from affecting the printer operation requires proper
connection of the printer chassis to protective earth through a mounting platform or
through a separate earth conductor.
3.1.2 Ambient light
There is an optical sensor just inside the paper exit at the front of the printer.
To ensure proper printer operation, design the printer enclosure so that it prevents direct
sunlight or light from indoor lamps from reaching the sensor through the paper exit.
3.2 Connecting to the computer
3.2.1 Using the parallel interface
Connect the printer to the parallel port of the computer to be used.
Connector J10 is an IEEE-1284 type C, 36-pole mini Centronics, with clip latches. See
Table 10 for pin assignment of J10.
Use only certified cables marked IEEE-1284. See page 77 for Swecoin ordering number.
You can also use commercially available cables such as AMP 158393-3.
Figure 4. IEEE-1284 cable with type A and type C connectors
0308 TTP 7000 Kiosk Printer – Technical Manual 9

3.2.2 Using the USB interface1
Connect J13 of the printer to the USB port of the computer or the USB hub to be used.
USB connectors are recognized by the following symbol:
.
Connector J13 is a 4-pin USB type B connector. See Table 14 for pin assignment.
A suitable cable is available from Swecoin, see page 77 for ordering number. You can
also use commercially available cables such as AMP 621775-4.
Figure 5. USB cable with type A and type B connectors
3.2.3 Using a serial adapter
1. Loosen the control board module, see Control board, Removal on page 65.
2. Connect the serial adapter to J4 on the control board.
3. Fasten the control board module, see Control board, replacement on page 65.
4. Fasten the serial adapter with the two screws on the right hand side of the printer.
Connect a Swecoin serial cable, ordering No. 01659-000, between the printer and the
computer to be used. We strongly recommend using the Swecoin cable because many
incompatible cables are available.
SW98066
Figure 6. Fitting a serial adapter to the printer.
1
The USB interface was implemented in hardware revision B. You can see the hardware revision on the self-test printout.
10 TTP 7000 Kiosk Printer – Technical Manual 0308

3.3 Connecting the power
Using the Swecoin power supply (see page 77 for ordering number):
1. Make sure the line voltage selector on the power supply is set to your local line
voltage.
2. Connect the cable from the power supply to J8.
3. Connect the power cable to the line outlet.
4. Turn ON the power supply.
If you use another type of power supply unit, connect the voltages according to the
following table. At the printer end of the cable, use an AMP Mate-N-Lok connector
housing and two contact-sockets:
Pin Function
1 +24 Vdc
2 GND
AMP No. 350777-1 AMP No. 350689-1
Table 1. Power connection
80 mm paper width 112 mm paper width
Idle 150 mA 150 mA
Standard text printing 2.5 A average 3.5 A average
All black printing 8.5 A 11 A
Table 2. Current consumption
3.4 Making a test printout
You can make a self-test printout if you want to verify that the printer operates correctly.
See " Self-test printout" on page 17.
0308 TTP 7000 Kiosk Printer – Technical Manual 11

3.5 Installing a printer driver
Printer drivers for most versions of Microsoft Windows™, Macintosh and Linux are
available on the Swecoin web site http://www.swecoin.se, or on diskette from Swecoin.
See page 2 for address, and page 77 for ordering number. Please follow the installation
instructions that accompany the drivers.
3.6 Paper level sensors
The printer has inputs for one paper-near-end sensor, and one weekend sensor.
Optical weekend sensor.
Lock screw
Adjustment range equals
approximately 30 to 150 m
of paper
SENSOR
+5V
OUT
GND
Optical paper-near-end
sensor. Activated when a
couple of meters of paper
SENSOR
+5V
OUT
GND
20-60 mm
remains.
25.7
SW98052
Figure 7. Sensors on 200 mm roll holder
The paper-near-end sensor alerts the system when a couple of meters of paper remain
on the roll. The purpose of this sensor is to get an early alert so that you can replace the
paper roll in time in remotely located kiosks.
The weekend sensor should alert when the remaining paper does not last over a
weekend. A reason to use this sensor is that it is more expensive to get a serviceman out
in a weekend or holiday, than it is to replace the roll before it is totally empty.
The Swecoin 110 mm and 150 mm paper roll holders are equipped with paper-near-end
sensors, while the 200 mm roll holders have both paper-near-end and weekend sensors.
When installing the Swecoin roll holder just connect the cable from the roll holder to
connector J1 at the back of the printer. See Figure 2 on page 6.
If you use custom designed roll holders, connect the sensors according to Figure 8
12 TTP 7000 Kiosk Printer – Technical Manual 0308

+5 V
Near
end
Roll holder shaft
Ω
Weekend sensor
Sharp GP2S40
Sharp GP2S40
1
2
3
4
5
6
J1
200
Gray
Blue
Green
Red
Black
Green
Paper-nearend sensor
2
4
1
6
3
5
Figure 8. Paper-near-end sensor connection
Ω
47 k
Ω
Ω
47 k
200
WE SENSE
PL SENSE
8
0
0
-
0
3
0
3
4
x
e
l
o
M
x
e
0
l
0
o
6
M
0
-
5
2
0
3
4
SW97081D
0308 TTP 7000 Kiosk Printer – Technical Manual 13
4 OPERATION
4.1 Installing a paper roll
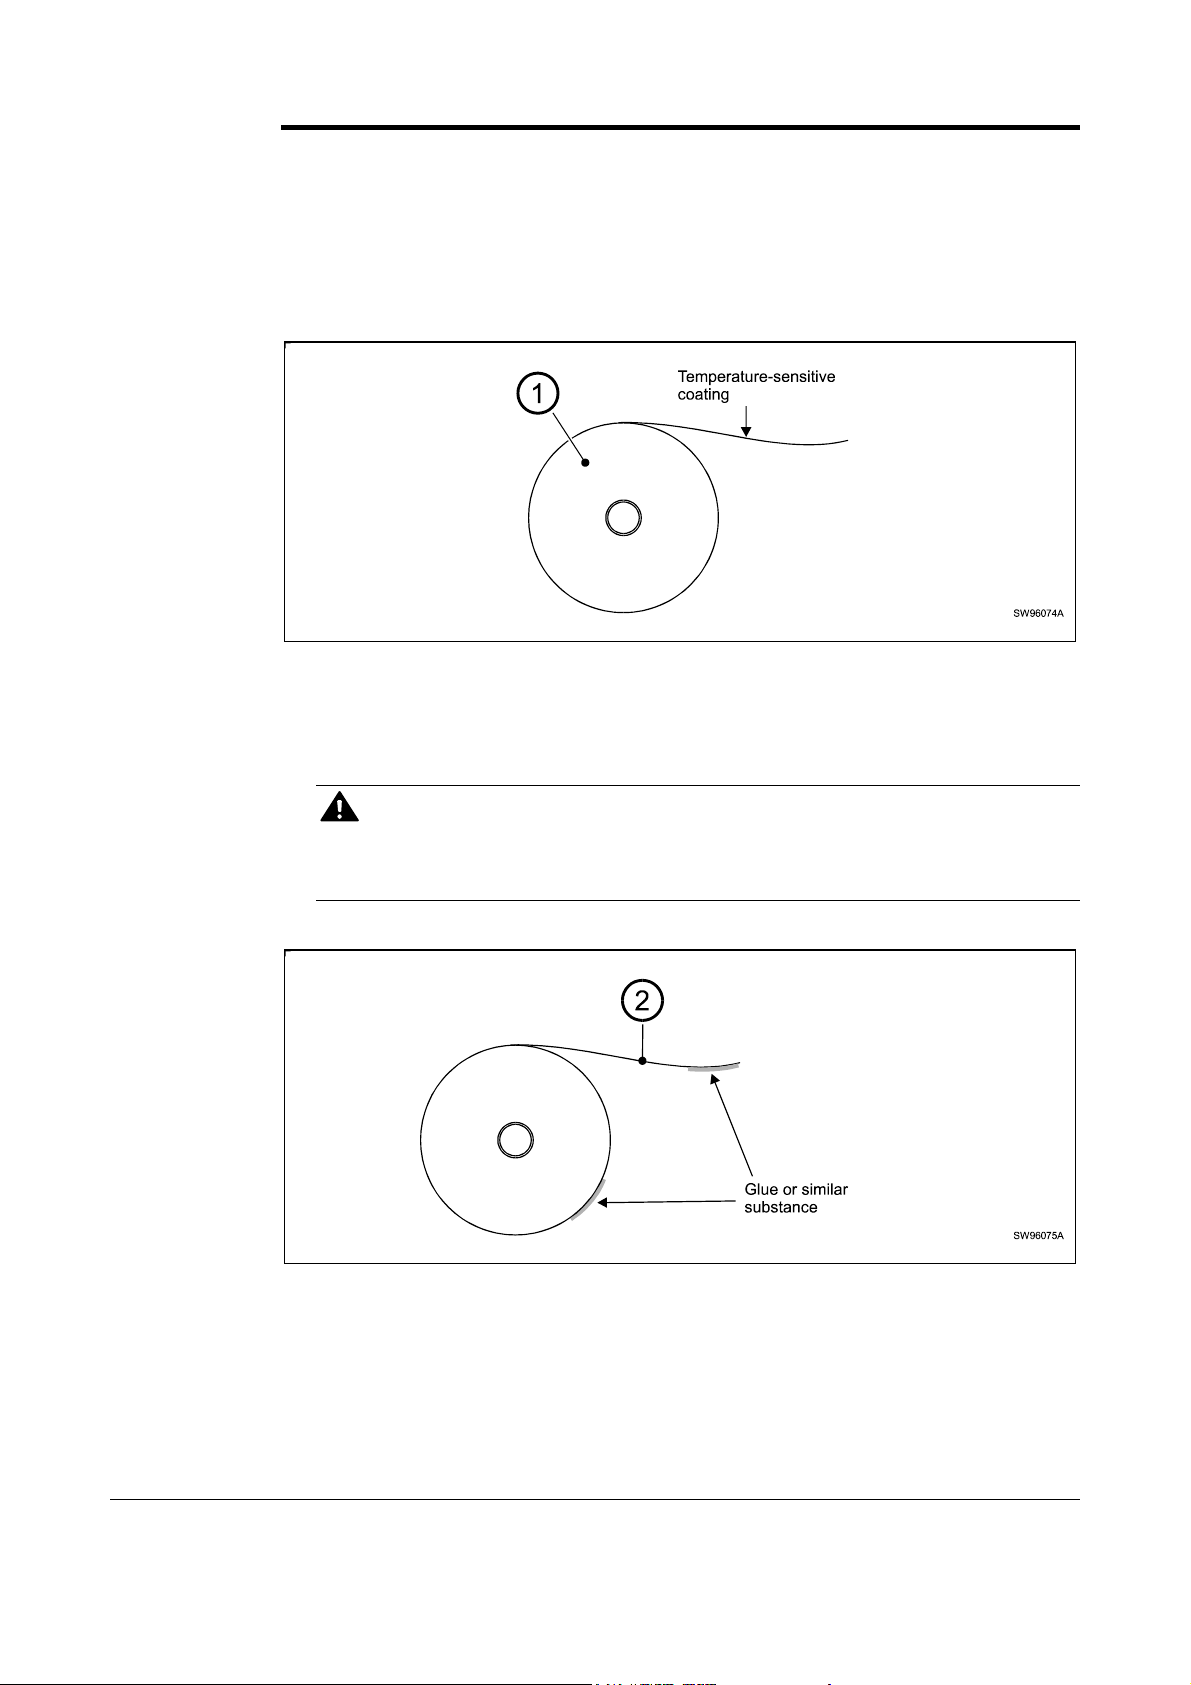
1. Turn the new paper roll as shown. The paper should be inserted into the printer with
the temperature-sensitive side up.
Figure 9. Turn the paper roll so that the paper leaves the roll from the top
2. Tear off a full turn of the paper (approximately 0.5 m) from the new paper roll.
CAUTION!
This is important since the outer end of the paper is usually fixed to the roll with some
type of glue or self-adhesive substance that might otherwise cause paper jam or even
printhead damage.
Figure 10. Tear off 0.5 m from the new paper roll
3. Make sure the printer is turned ON.
14 TTP 7000 Kiosk Printer – Technical Manual 0308

4. Cut the paper in a suitable angle:
90
(Front Surface) (Front Surface)
To
70
Figure 11. Suitable paper edge for auto load
NOTE 1! — The paper sensor is at the same side as the blue paper release lever (where
the arrow points in Figure 12). If the paper is cut in a direction opposite to that as shown
in the figure above, the sensor will not detect the paper.
5. Insert the paper through the paper entry opening at the back of the printer. The
printer will now feed, cut and eject a receipt, and then automatically go on-line. 1
NOTE 2! — In high temperature and high humidity, the paper may lose its stiffness
resulting in paper jam at automatic paper loading. In such cases, load paper manually.
Figure 12. Insert the new paper
1
TTP 7000/112 was designed for manual paper loading. A modification of the control board is required for auto loading. Such
modification was introduced mid 2003. Auto loading was improved in firmware version 2.37 (see version history).
0308 TTP 7000 Kiosk Printer – Technical Manual 15

4.2 Clearing paper jams
Should a paper jam occur, follow the procedure below:
1. Tear off the paper close to the paper roll and flip back the print module.
Figure 13. Flip open the print module
2. Lift the printhead by pushing the paper release lever upwards.
3. Remove any paper trash by gently pulling the paper up and out of the print module.
CAUTION! — Never
pull paper backwards through the print mechanism.
This may destroy the print module
Figure 14. Remove paper trash
16 TTP 7000 Kiosk Printer – Technical Manual 0309

4.3 Self-test printout
1. Switch OFF the power.
2. Hold the feed-forward button depressed while powering ON the printer. Keep the
button depressed for at least 5 seconds.
This produces a printout showing the firmware program version and date, control board
revision number and serial number, name of loaded fonts and logotypes, parameter
settings, and the set printhead burn.
3. Each successive press of the button will produce a test printout.
4. Switch the printer OFF and ON again to exit self-test mode.
0308 TTP 7000 Kiosk Printer – Technical Manual 17

5 PROGRAMMING
There are two completely different ways of setting up the receipt: Text oriented and driver
oriented style.
Text oriented
The receipt can be seen as the page of a simple word processor. You send text and
graphics to the printer, which prints the information in the same sequence as the data is
received. Design features are limited to the font stored in the flash PROM of the printer.
Text and logotypes can also be printed landscape orientation.
There are two text cursors, one for portrait, and one for landscape. The start positions of
the cursors are the upper left corner for the portrait cursor, and the upper left corner for
the landscape cursor, see Figure 15. You can switch between these cursors at any time,
the cursor will retain its last position on the ticket.
Driver oriented
When a Windows driver is used, you can use any Windows program to design the ticket
with text, graphics, bar codes or whatever you want to print and in any orientation you
want.
The Windows driver issues all the necessary commands. Only the cut-and-present and
black-mark commands need to be specified by the programmer.
Tex t r ec ei p t
Tex t
text
text
text text text text
text text text text
text text text text text text text text text text
text text text
text text text text text text text text text text
Text text text text text text text text text text
Driver (Windows) receipt
1 234567 890128
Text text
text text
text text
text text
text text
Text text text text text text text text text text
Bar codes can be added.
Text can be printed in
any orientation, font,
and size.
Lines can be added.
Graphics can be rotated,
color images converted
to gray scale, etc.
Sw98073
Figure 15. Ticket styles
18 TTP 7000 Kiosk Printer – Technical Manual 0308

5.1 Summary of control codes & escape sequences
Command Hex Decimal Function Page
BS 08 008 Backspace
CAN 18 024 Cancel
CR 0D 013 Carriage return
EM 19 025 Enforced clear presenter
ENQ 05 005 Clear presenter
ESC ACK n 1B 06 n 027 006 Set acknowledge marker
ESC ! n 1B 21 n 027 033 Select font
ESC & 1 1B 26 01 027 038 001 Load logotype into flash PROM
ESC & 4 1B 26 04 027 038 004 Store current parameter values
in flash PROM
ESC & C 1B 26 43 027 038 067 Erase all fonts
ESC & D 1B 26 44 027 038 068 Erase fonts 4—7
ESC & L 1B 26 4C 027 038 076 Erase all logotypes
ESC & P n v 1B 26 50 n v 027 038 080 n v Set parameter values
ESC & NUL 1B 26 00 027 038 000 Load font
ESC ? 1B 3F 027 063 Reset (full)
26
36
27
34
34
42
29
36
36
37
37
36
37
36
36
ESC @ 1B 40 027 064 Reset (initialize)
ESC 3 n 1B 33 n 027 051 Line spacing
ESC b 0 x1 x2 y1 y2
ESC B n 1B 42 n 027 066 n Bold ON/OFF
ESC c n 1B 63 n 027 099 n Variable page length ON/OFF
ESC C n1 n2 1B 43 n1n2 027 067 n1 n2 Page length
ESC d n 1B 64 n 027 100 n Make n line feeds
ESC ENQ 01 1B 05 01 027 005 001 Status enquiry, general
ESC ENQ 02 1B 05 02 027 005 002 Paper-near-end enquiry
ESC ENQ 04 1B 05 04 027 005 004 Fonts and logotype enquiry
ESC ENQ 06 1B 05 06 027 005 006 Status report
ESC ENQ 07 1B 05 07 027 005 007 Firmware version enquiry
ESC ENQ 09 1B 05 09 027 005 009 Serial number enquiry
ESC ENQ 10 1B 05 0A 027 005 010 Control board revision enquiry
ESC ENQ 99 1B 05 63 027 005 099 Request device ID
ESC ENQ P 1B 05 50 027 005 080 Parameter setting data enquiry
1B 62 n… 027 098 n… Print bitmap at XY position
36
27
31
25
22
21
27
38
39
39
40
40
41
41
41
41
ESC f n 1B 66 n 027 102 n Presenter loop ON/OFF/length
0308 TTP 7000 Kiosk Printer – Technical Manual 19
35

Command Hex Decimal Function Page
ESC F n1..nx NUL 1B 46 n1...nx 00 027 070 n...nx 000 Set horizontal tabs
ESC FF n 1B 0C n 027 012 n Eject (run presenter)
ESC g n1 n2 n3 n4 n5 1B 67 n1...n5 027 103 n1...n5 Print logotype at specified X, Y
ESC h n 1B 68 n 027 104 n Set multiple-height print
ESC i n 1B 69 n 027 105 n Italics ON/OFF
ESC J n 1B 4A n 027 074 n Paper advance
ESC j n 1B 6A n 027 106 n Paper reverse
ESC L n 1B 4C n 027 76 n Print logotype at current position
ESC M n1 n2 1B 4D n1n2 027 077 n1 n2 Black mark definition
ESC N n 1B 4E n 027 078 n Text alignment
ESC NUL 1B 00 027 000 Load firmware
ESC o n 1B 6F 027 111 Text and logotype orientation
ESC p 1B 70 027 112 Print
ESC q n 1B 71 n 027 113 n Print contrast adjustment
ESC RS 1B 1E 027 030 Cut only, no eject
28
34
32
29
25
32
32
33
23
24
37
24
32
33
34
ESC s n 1B 73 n 027 115 n Send dot line
ESC S n1 n2 1B 53 n1 n2 027 083 n1 n2 Send graphics data
ESC T n 1B 54 n 027 084 n Reversed text ON/OFF
ESC u n 1B 75 n 027 117 n Underline ON/OFF
ESC w n 1B 77 n 027 119 n Set multiple-width print
ESC V n 1B 56 n 027 086 n Print speed adjustment
ESC X n1 n2 1B 58 n1 n2 027 088 n1 n2 Sense black-mark position
ESC x n1 n2 1B 78 n1 n2 027 120 n1 n2 Set internal black-mark counter
ESC Z 1B 5A 027 090 Go to next top of form
FF 0C 012 Form feed
HT 09 009 Horizontal tabulation
LF 0A 010 Linefeed
RS 1E 030 Cut and eject paper
Table 3. Control codes & escape sequences in alphabetical order
31
31
29
29
29
32
23
23
23
28
28
27
34
NOTE! – In all responses from the printer the most
significant byte (MSB) is transmitted first.
20 TTP 7000 Kiosk Printer – Technical Manual 0308

5.2 Software command syntax
The commands in this section are grouped after what they do, and these groups are
sorted in a theoretical usage sequence. It starts with commands for specifying the printed
page — through text-and-graphics commands — to cut-and-present commands. System
and status commands are presented at the end.
5.2.1 Page setup commands
ESC C n1 n2
1B 43 n1 n2 hex
027 067 n1 n2 decimal
NOTE! — Use this command only when you want a fixed page
length. Shorter tickets will automatically be extended, while longer
tickets will be divided into several tickets of the desired length.
Set fixed page length
Top margin (Distance between cut and print line, 17 mm)
Page length
(minimum 75 mm)
Page width =
applicable print
window width
TEXT
Text text
Paper transport
direction
TEXT
Text text
SW97063-R2
Figure 16. Definition of page size
Sets the fixed page length expressed as a number of 0.125-mm pixel line-feeds. Form
feed is effected with the FF command.
NOTE! — Do not use fixed page length less than 75 mm (n1 = 2, n2 = 88)
• The ESC C n1 n2 setting applies unless superseded by command ESC c n that
enables the variable page length.
• Fixed page length settings, shorter than the minimum page length as defined by
default parameter settings, will automatically be adjusted to the default value.
NOTE! — To enable fixed page length you must also use ESC c 0,
see next page
0308 TTP 7000 Kiosk Printer – Technical Manual 21

Example:
Length Command n1 n2 Length Command n1 n2
ESC c n
1B 63 n hex
027 099 n decimal
n = 0 OFF. Automatic form feed if the printed page length exceeds the
75 mm ESC C <002> <088>
80 mm ESC C <002> <128>
85 mm ESC C <002> <168>
90 mm ESC C <002> <208>
95 mm ESC C <002> <248>
100 mm ESC C <003> <032>
105 mm ESC C <003> <072>
110 mm ESC C <003> <112>
115 mm ESC C <003> <152>
120 mm ESC C <003> <192>
125 mm ESC C <003> <232>
130 mm ESC C <004> <016>
135 mm ESC C <004> <056>
140 mm ESC C <004> <096>
145 mm ESC C <004> <136>
150 mm ESC C <004> <176>
Table 4. Example of page length commands
Variable page length ON /OFF
length set by
ESC C n1 n2.
155 mm ESC C <004> <216>
160 mm ESC C <005> <000>
165 mm ESC C <005> <040>
170 mm ESC C <005> <080>
175 mm ESC C <005> <120>
180 mm ESC C <005> <160>
185 mm ESC C <005> <200>
190 mm ESC C <005> <240>
195 mm ESC C <006> <024>
200 mm ESC C <006> <064>
205 mm ESC C <006> <104>
210 mm ESC C <006> <144>
215 mm ESC C <006> <184>
220 mm ESC C <006> <224>
225 mm ESC C <007> <008>
230 mm ESC C <007> <048>
n = 1 ON. Selects continuous print mode (no auto FF). See also “Default
parameter settings”.
22 TTP 7000 Kiosk Printer – Technical Manual 0308

5.2.2 Black-mark (top-of-form) commands
See also Aligning preprint and thermal print on page 52.
ESC M n1 n2
1B 4D n1 n2 hex
027 077 n1 n2 decimal
This command specifies maximum (n1) and minimum (n2) length (in transport direction)
of the black mark printed on the reverse side of the paper. The black-mark identifies the
top of the next form (document). The length of the mark is expressed in pixel lines of
0.125-mm height.
Active transition is from ”black” to ”white” (trailing edge of black-mark)
n1 Maximum valid value is 160 pixel lines (20.0 mm). Marks longer than this
n2 Minimum valid value is 15 pixel lines (1.9 mm). Marks shorter than this value
ESC X n1 n2
1B 58 n1 n2 hex
027 088 n1 n2 decimal
Looks for a black mark within the distance (paper transport) specified by n1n2, starting at
the current position.
n1n2 Specifies the distance to be searched for black-mark. n1 is the higher-order
Black mark size
value is interpreted as paper out. Default value = 80 pixel lines (10.0 mm)
is interpreted as dirt. Default value = 24 pixel lines (3.0 mm)
Locate black mark
and n2 the lower-order byte. The distance is to be expressed as a number of
0.125-mm steps.
The printer adds an error code in the status report (error, top of form, byte 1,
bit 3) if no black-mark is found within the specified distance.
ESC x n1 n2
1B 78 n1 n2 hex
027 120 n1 n2 decimal
ESC Z
1B 5A hex
027 090 decimal
Delay cut after black mark detection
n1n2 Sets the number of 0.125-mm steps to feed between the black mark
detection and the cut. n1 is the higher-order and n2 the lower-order byte.
At completed printout, an
ESC Z command effects paper feed until a black mark is
detected, that is, when black-to-white transition is detected at the trailing edge of the
black mark. The paper feed then continues the number of steps specified by n1n2, at
which point the correct cut-position is assumed.
Go to next black mark
Executes the number of pixel line feeds as defined by command ESC x n1 n2 minus
such pixel line feeds that have been effected after detection of black-mark.
NOTE! — If the black-mark has not passed the paper-out/blackmark sensor when the ESC Z is received, additional paper feed
(maximum 128 mm) takes place until a black-mark is detected.
0308 TTP 7000 Kiosk Printer – Technical Manual 23

5.2.3 Text commands
Text received by the printer is printed with the currently selected font and font attributes.
Text exceeding the page width is wrapped with the line spacing selected.
ESC o n
1B 6F n hex
027 111 n decimal
Changes the orientation of text and logotypes.
n = 0 Gives portrait orientation
n = 1 Gives landscape orientation
Portrait and landscape can be mixes on the same receipt. There are two cursors, one for
portrait and one for landscape. The cursor always starts at the top left corner of the
document. Looking at the paper when it exits the printer, the portrait cursor is at the top
left corner of the receipt, moving to the right as text is typed, while the landscape cursor is
at the top right corner, moving downwards.
NOTE! — Landscape only works if fixed page length is used. Start a
page by specifying page length for example <ESC>C<003><032>,
then turn off auto page length with <ESC>c<000>
NOTE! — ESC o <001> and ESC o <000> must be on separate lines
(separated by a linefeed <LF>).
ESC N n
1B 4E n hex
027 078 n decimal
Changes the alignment of text and logotypes.
Text and logotype orientation
Text alignment
ESC N 0= Left ESC N 1 = Center ESC N 2 = Right
ESC ! n
1B 21 n hex
027 033 n decimal
This command selects one of eight fonts. The font design depends on which fonts have
been loaded
1
into the printer. Make a test printout to see which fonts are available in your
printer.
ESC ! 0 selects normal font (font 0) ESC ! 4 selects font 4
ESC ! 1 selects font 1 ESC ! 5 selects font 5
ESC ! 2
ESC ! 3 selects font 3 ESC ! 7 selects font 7
selects font 2 ESC ! 6 selects font 6
Lines, too long to be printed in the selected font, are automatically wrapped around.
Different fonts can be used on the same line.
1
For font loading, see " " on page 36 System related commands
Select font
Table 5. Font selection commands
24 TTP 7000 Kiosk Printer – Technical Manual 0308

Selection of an erased or for any other reason non-existent font, will set bit 4 of byte 1 in
the status enquiry response to ”1". See “Parameter setting data enquiry” on page 41.
NOTE! — If more than 256 characters are sent to the printer before an LF,
the first part of the buffer contents is printed-out automatically. The text is
formatted according to the already received formatting commands.
ESC B n
1B 42 n hex
027 66 n decimal
ESC i n
1B 69 n Hex
027 105 n decimal
ESC T n
1B 54 n hex
027 084 n decimal
ESC u n
1B 75 n hex
027 117 n decimal
Bold Normal Bold
n = 0 Turns OFF bold (Normal)
n = 1 Turns ON bold
Bold is designed for normal character width and shows less and less as the width
increases.
Italics Normal Italics
n = 0 Turns OFF Italics (Normal)
n = 1 Turns ON Italics
Reversed print ON/OFF
Selects normal or reversed print.
n = 0 Gives normal print, black on white
n = 1 Gives reversed print, white on black
Single words, characters, or complete text lines can be reversed.
Underline
n = 0 Turns OFF underline
n = 1 Turns ON a 1 pixel wide underline
n = 2 Turns ON a 2 pixel wide underline, etc. up to n=7.
Single words, characters, or complete text lines can be underlined.
0308 TTP 7000 Kiosk Printer – Technical Manual 25

ESC h n
1B 68 n hex
027 104 n decimal
Applicable n values are 000 — 015.
n = 1 Increases the character height to 2 times the basic character height.
n = 2 Increases the character height to 3 times the basic character height etc.
n = 0 Resets the character height to the basic character height.
In combination with variable character width (
depending on the font to which the command has been applied.
Different fonts and heights can be mixed on the same print line.
ESC w n
1B 77 n hex
027 119 n decimal
Applicable n values are 000 — 007.
n = 1 Increases the character width to 2 times the basic character width.
n = 2 Increases the character width to 3 times the basic character width etc.
n = 0 Resets the character width to the basic character width.
In combination with variable character height (
depending on the font to which the command has been applied.
Set multiple-height print
ESC w n), give highly legible characters
Set multiple-width print
ESC h n), give highly legible characters
Different fonts and widths can be mixed on the same print line.
ESC t n1 n2 n3 n4 n5 data
1B 74 n1 n2 n3 n4 n5 data hex
027 116 n1 n2 n3 n4 n5 data decimal
Prints a text string at the specified X-Y position. The string will use the formatting set by
font, reversed, width, height, bold and underline commands.
n1n2 Two byte definition of the X print position (in pixels).
n3n4 Two byte definition of the Y print position (in pixels).
n5 The number of characters in the string.
data The text string. The length must be exactly the number of characters specified by
n5, otherwise the printer will stop, waiting for more characters.
After the string has been printed, the cursor will return to the position it had before the
string command was issued.
NOTE! — The Y print-position only works if fixed page length is used.
Start a page by specifying page length for example
<ESC>C<003><032>, then turn off auto page length with <ESC>c<000>
BS
05 hex
005 decimal
Moves the print-position one step to the left. Backspace can be used to combine
characters. For instance to print a Ø, send text commands O BS / to the printer, and the
slash will overprint the O.
Print text string
Back Space
Only one backspace can be used at a time. Excessive backspaces will be ignored.
26 TTP 7000 Kiosk Printer – Technical Manual 0308
 Loading...