

Page 1
QLn Series
Mobile Printers
TM
P1028026-005 Rev. A
User Guide
1
QLn Series User Guide
Page 2

Table of Contents
Proprietary Statements......................................................................................5
Document Conventions......................................................................................7
Cautions, Important, and Note...........................................................................7
Introduction to the QLn™ Series Printers........................................................8
QLn Series Technology......................................................................................9
Smart Battery......................................................................................................9
Printing Technology...........................................................................................10
Direct Thermal....................................................................................................10
QR Code..............................................................................................................11
Made for iPhone (MFi)........................................................................................11
Near Field Communication (NFC)..................................................................... 11
QLn Series Overview..........................................................................................12
Getting Ready to Print........................................................................................16
Installing the Battery..........................................................................................16
Battery Safety.....................................................................................................17
Charger Safety....................................................................................................17
Charging Status Indicators...............................................................................18
Battery Health Indicator.....................................................................................18
SC2 Dimensions.................................................................................................19
Model UCLI72-4 Quad Charger (AC18177-5).....................................................19
AC Power Adapter (p/n P1031365-024).............................................................21
Ethernet and Charging Cradles.......................................................................22
Printer Operation with Cradle...........................................................................26
Loading Media Procedure.................................................................................27
Loading Media in Peel-off Mode (QLn220/320)...............................................29
Loading Media in Peel-off Mode (QLn420)......................................................30
QLn Healthcare Printers....................................................................................31
Standard Control Panel.....................................................................................33
LCD Control Panel.............................................................................................35
Status Bar Icons ................................................................................................36
Main Menu Screen (QLn320/220)......................................................................38
Programmable LCD Settings............................................................................39
Home Menu Screen (QLn420 and QLn Healthcare Printers)..........................40
Verify the Printer is Working.............................................................................44
Printing a Conguration Label..........................................................................44
Connecting the Printer......................................................................................45
Cable Communication.......................................................................................46
RS-232C Communications.................................................................................46
USB Communications........................................................................................46
Providing Strain Relief for Communications Cable.........................................47
2
QLn Series User Guide
Page 3

Wireless Communications with Bluetooth.....................................................49
Bluetooth Networking Overview......................................................................49
WLAN Overview.................................................................................................52
Setting Up the Software....................................................................................52
Setting Up the Software....................................................................................53
Near Field Communication (NFC).....................................................................53
QLn Series Accessories....................................................................................55
Swivel Belt Clip..................................................................................................55
Soft Case............................................................................................................56
Hard Case...........................................................................................................56
Adjustable Shoulder Strap................................................................................57
Hand Strap..........................................................................................................58
Preventive Maintenance....................................................................................59
Extending Battery Life.......................................................................................59
General Cleaning Instructions..........................................................................59
Troubleshooting.................................................................................................62
Front Control Panel............................................................................................62
LCD Control Panil Indicators............................................................................63
Troubleshooting Topics....................................................................................64
Troubleshooting Tests......................................................................................66
Printing a Conguration Label.........................................................................66
Communications Diagnostics...........................................................................66
Specications.....................................................................................................71
Printing Specications......................................................................................71
Memory and Communications Specications ...............................................71
Label Specications..........................................................................................72
CPCL Font and Bar Code Specications and Commands.............................73
ZPL Font and Bar Code Specications and Commands................................74
Communication Ports........................................................................................75
Physical, Environmental and Electrical Specications..................................76
QLn Series Accessories....................................................................................80
QLn Series Accessories cont...........................................................................81
Appendix A.........................................................................................................82
Interface Cables (RS-232 Cables).....................................................................82
USB Cables.........................................................................................................83
Appendix B.........................................................................................................84
Media Supplies...................................................................................................84
Appendix C.........................................................................................................84
Maintenance Supplies.......................................................................................84
Appendix D.........................................................................................................85
Appendix E.......................................................................................................104
3
QLn Series User Guide
Page 4

Appendix F.......................................................................................................105
Battery Disposal..............................................................................................105
Product Disposal.............................................................................................105
Appendix G......................................................................................................106
Alert Messages................................................................................................106
Appendix H.......................................................................................................107
Using Zebra.com..............................................................................................107
Appendix I.........................................................................................................109
Product Support ...............................................................................................109
4
QLn Series User Guide
Page 5

Proprietary Statements
This manual contains proprietary information of Zebra Technologies Corporation. It is
intended solely for the information and use of parties operating and maintaining the equipment described herein. Such proprietary information may not be used, reproduced, or disclosed to any other parties for any other purpose without the expressed written permission
of Zebra Technologies Corporation.
Product Improvements
Since continuous product improvement is a policy of Zebra Technologies Corporation, all
specifications and signs are subject to change without notice.
Agency Approvals and Regulatory Information
Design Safety certified by TUV EN55022 Class B European Electromagnetic
EN60950-1: 2nd Ed. Safety Standard EN55024: European Immunity Standard
NOM (Mexico) RCM (Australia/NZ)
FCC part 15 Class B RoHS II
Canadian STD RSS-210
Liability Disclaimer
Inasmuch as every effort has been made to supply accurate information in this manual,
Zebra Technologies Corporation is not liable for any erroneous information or omissions.
Zebra Technologies Corporation reserves the right to correct any such error s and disclaims
liability resulting therefrom.
No Liability for Consequential Damage
In no event shall Zebra Technologies Corporation or anyone else involved in the creation,
production, or deliver y of the accompanying product (including hardware and software)
be liable for any damages whatsoever (including, without limitation, damages for loss of
business profits, business interruption, loss of business information, or other pecuniary
loss) arising out of the use of or the results of use of or inability to use such product, even
if Zebra Technologies Corporation has been advised of the possibility of such damages.
Because some states do not allow the exclusion of liability for consequential or incidental
damages, the above limitation may not apply to you.
Copyrights
The copyrights in this manual and the label print engine described therein are owned by
Zebra Technologies Corporation. Unauthorized reproduction of this manual or the sof tware
in the label print engine may result in imprisonment of up to one year and fines of up to
$10,000 (17 U.S.C.506). Copyright violators may be subject to civil liabilit y.
This produc t may contain ZPL®, ZPL II®, and ZebraLinktm programs; Element Energy Equalizer® Circuit; E3®; and AGFA fonts. Software © ZIH Corp. A ll rights reserved worldwide.
ZebraLink and all produc t names and number s are trademarks, and Zebra, the Zebra logo,
ZPL, ZPL II, Element Energy Equalizer Circuit, and E3 Circuit are registered trademarks of
ZIH Corp. All rights reserved worldwide.
Monotype®, Intellifont® and UFST® are trademarks of Monotype Imaging, Inc. registered in
the United States Patent and Trademark Of fice and may be registered in certain jurisdictions.
AndyTM , CG PalacioTM, CG Century SchoolbookTM, CG TriumvirateTM, CG TimesTM, Monot ype
KaiTM, Monot ype MinchoTM and Monotype SungTM are trademarks of Monotype Imaging, Inc.
and may be registered in some jurisdictions.
HY Gothic HangulTM is a trademark of Hanyang Systems, Inc.
AngsanaTM is a trademark of Unity Progress Company (UPC) Limited.
Andale®, Arial®, Book Antiqua®, Corsiva®, Gill Sans®, Sorts® and Times New Roman® are
trademarks of The Monotype Corporation regis tered in the United States Patent and Trademark Off ice and may be registered in certain jurisdictions.
Century Gothic™, Bookman Old StyleTM and Century SchoolbookTM are trademarks of The
Monot ype Corporation and may be registered in certain jurisdictions.
HGPGothicB is a trademark of the Ricoh company, Ltd. and may be regis tered in some jurisdictions.
Radiation Standard
5
QLn Series User Guide
Page 6

UniversTM is a trademark of Heidelberger Druckmaschinen AG, which may be registered in
certain jurisdictions, exclusively licensed through Linotype Library GmbH, a wholly owned
subsidiary of Heidelberger Druckmaschinen AG.
Futura® is a trademark of Bauer Types SA registered in the United St ates Patent and Trademark Off ice and may be registered in some jurisdictions.
Tru eTy p e® is a trademark of Apple Computer, Inc. registered in the United States Patent and
Trademark Of fice and may be registered in certain jurisdictions.
All other product names are the propert y of their respective owners.
“Made for iPod”, “Made for iPhone”, and “Made for iPad” mean that an electronic accessory
has been designed to connect speci fically to iPod, iPhone, or iPad, respectively, and has
been certified by the developer to meet Apple per formance standards. Apple is not responsible for the operation of this device or its compliance with safety and regulatory standards.
Please note that the use of this accessor y with iPod, iPhone, or iPad may affect wireless
performance.
Bluetooth® is a registered trademark of the Bluetooth SIG.
© 1996 –2009, QNX Soft ware Systems GmbH & Co. KG. All rights reser ved. Published under license by QNX Soft ware Systems Co.
All other brand names, product names, or trademarks belong to their respective holders.
©
2015 ZIH Corp.
Certified by:
6
QLn Series User Guide
Page 7
Document Conventions
The following conventions are used throughout this docu-
ment to convey certain information:
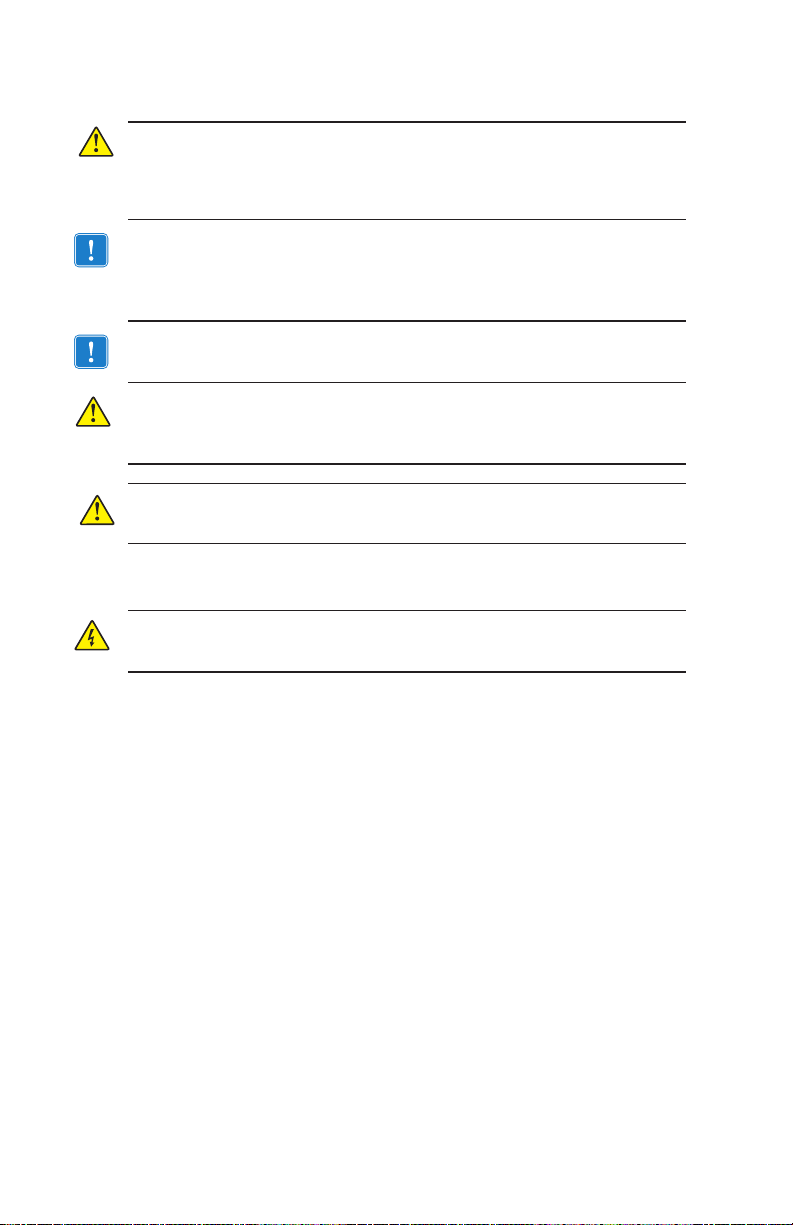
Cautions, Important, and Note
Caution • Warns you of the potential for electrostatic discharge.
Caution • Warns you of a potential electric shock situation.
Caution • Warns you of a situation where excessive heat could cause
a burn
Caution • Advises you that failure to take or avoid a specific action
could result in physical harm to you.
Caution • Advises you that failure to take or avoid a specific action
could result in physical harm to the hardware.
Important • Advises you of information that is essential to complete a
task.
Note • Indicates neutral or positive information that emphasizes or
supplements important points of the main text.
7
QLn Series User Guide
Page 8
Introduction to the QLn™ Series Printers
Thank you for choosing our Zebra® QLn™ Series Mobile
Printers. You will find these rugged printers will become a
productive and efficient addition to your workplace thanks
to their innovative design and state of the art features. Zebra
Technologies is the leader in industrial printers with worldclass support for all of your bar code printers, software, and
supplies.
This user’s guide gives you the information you will need to
operate the QLn420, QLn320, and QLn220 printers, including
QLn Healthcare and Made for iPhone® (MFi) printers. MFi printers provide Apple co-processor (MFi) support which allows an
Apple device such as an iPhone or iPad® to authenticate and
connect over Bluetooth®.
These printers use CPCL and ZPL programming languages.
To create and print labels using the CPCL and ZPL languages, refer to the Programming Guide for CPCL and ZPL (p/n
P1012728-008). See Appendix G for instructions on how to access manuals on zebra.com.
QLn Series Software Utilities:
• Zebra Net Bridge™ : printer configuration, fleet management
• Zebra Setup Utility: single printer configuration, quick setup
• Zebra Designer Pro: label design
• Zebra Designer Drivers: Windows® driver
• OPOS Driver: Windows driver
• Multiplatform SDK
(These utilities can be found on the Zebra website at
http://www.zebra.com/us/en/support-downloads.html.
See Appendix G.)
8
QLn Series User Guide
Page 9

Unpacking and Inspection
• Check all exterior surfaces for damage.
• Open the media cover (refer to “Loading the Media” in the
Getting Ready to Print section) and inspect the media compartment for damage.
In case shipping is required, save the carton and all packing ma-
terial.
Reporting Damage
If you discover shipping damage:
• Immediately notify and file a damage report with the shipping
company. Zebra Technologies Corporation is not responsible for any damage incurred during shipment of the printer
and will not cover the repair of this damage under its warranty policy.
• Keep the carton and all packing material for inspection.
• Notify your authorized Zebra re-seller.
QLn Series Technology
The QLn420, QLn320 and QLn220 use several technologies
made popular in other Zebra Mobile Printer product lines, as
well as newer technologies.
Smart Battery
The QLn Series battery pack is a high capacity, smart Lithium
Ion battery that contains electronics which allow the printer to
monitor its operating parameters. Among these are the number
of charge cycles it has undergone and its date of manufacture.
Using these parameters, the printer’s software can monitor the
battery’s condition and alert the user when to recharge or remove
the battery from service.
Operating Temperature Charging Temperature Storage Temperature
-200C to +550C
(-4oF to 131oF)
The QLn Series printers will only function properly with genuine Zebra
smart battery packs.
00C to +400C
(32oF to 104oF)
-250C to +650C
(-13oF to 149oF)
9
QLn Series User Guide
Page 10
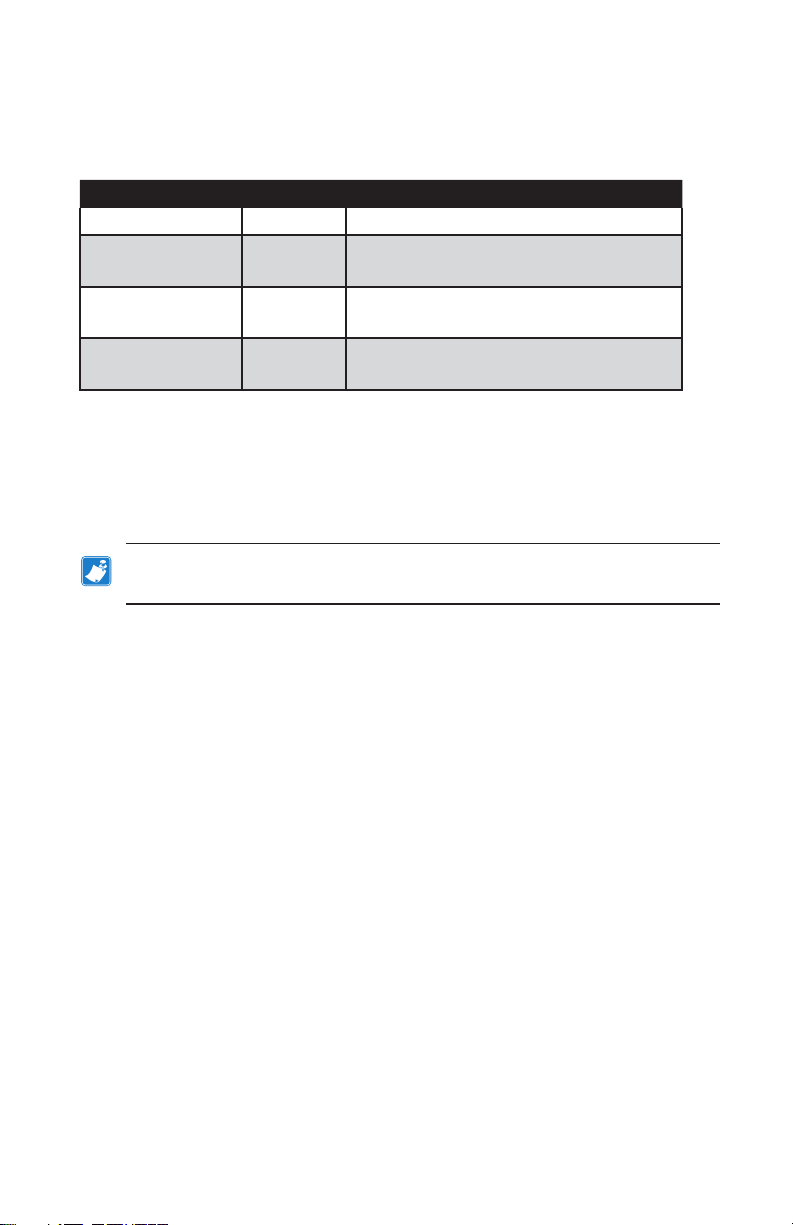
The smart battery’s health has three states: GOOD, REPLACE,
and POOR. The battery health factor determines whether or not
the printer can operate and what is communicated to the user via
the display.
# of Charge Cycles Health Power-up Message
<300 GOOD None
>300 but <550 REPLACE “Battery Diminished
_
Consider Replacing” *
>550 but <600 REPLACE “Warning-Batter y
_
Is Past Useful Life” *
>600 POOR “Replace Battery
_
Shutting Down” **
* Warning accompanied by one long beep.
** Warning will flash on and off accompanied by beeping at a
rate of once per second. After 30 seconds the printer will shut
down.
Note • Power down the printer before removing the battery to minimize
the risk of corruption.
Printing Technology
The QLn Series printers use the Direct Thermal method to print
human readable text, graphics and barcodes. It incorporates a
sophisticated print engine for optimal printing under all operational conditions.
Direct Thermal
Direct thermal printing uses heat to cause a chemical reaction on specially treated media. This reaction creates a dark mark
wherever a heated element on the printhead comes in contact
with the media. Since the printing elements are arranged very
densely at 203 d.p.i. (dots per inch) horizontal and 200 d.p.i. vertical, highly legible characters and graphic elements may be
created a row at a time as the media is advanced past the printhead. This technology has the advantage of simplicity, as there
is no requirement for consumable supplies such as ink or toner. However, since the media is sensitive to heat, it will gradually
loose legibility over long periods of time, especially if exposed to
environments with relatively high temperatures.
10
QLn Series User Guide
Page 11
QR Code
The QR barcode includes human readable text (URL) which
links the user to printer information and short videos on topics
such as buying supplies, features overview, loading media, printing a configuration report, cleaning instructions, and accessory
information. (See Page 13 for each printer’s URL address.)
Made for iPhone (MFi)
QLn printers support communication with Apple devices
running iOS 5 or later over a standalone Bluetooth 3.0 radio
and the BT3.0 radio included with the 802.11n (dual) radio.
Only printers with the “M” in the ninth digit spot of the part
number support this feature, i.e. QNx-xxxxxMxx-xx.
Near Field Communication (NFC)
A passive NFC tag with the Bluetooth printer address will provide instant access to printer-specific information via an NFCenabled smartphone.
11
QLn Series User Guide
Page 12
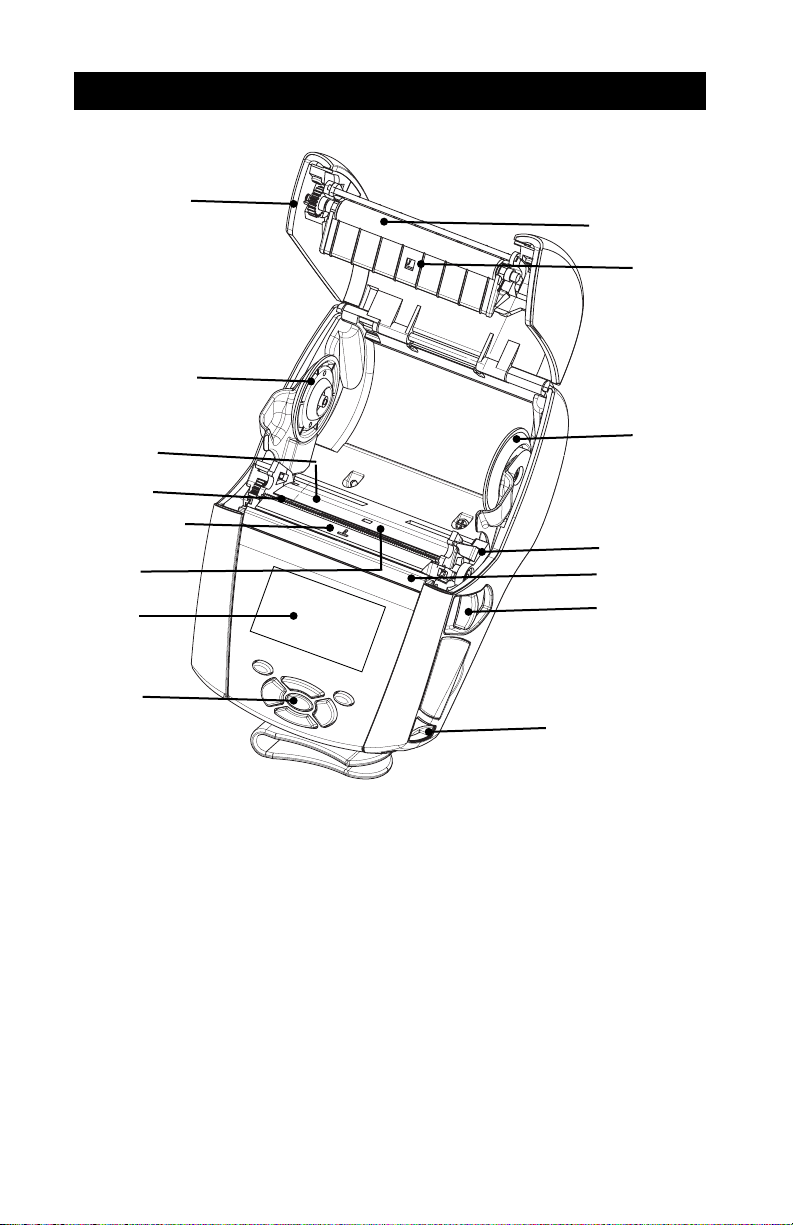
QLn Series Overview
Figure 1: QLn320 Shown
13
3
1
2
12
4
5
14
11
9
1. Platen Roller
2. Black Bar Sensor
3. Media Support Disks
4. Tear Bar
5. Label Presence Sensor
6. Peeler Lever
7. Peeler Bail
8. Latch Release Lever
9. Key Pad
10. Strap Post
11. Status Screen
12. Printhead
13. Media Cover
14. Gap Sensor
3
6
7
8
10
15. Belt Clip
16. Battery
17. USB/RS-232 Comm Por ts
18. MAC Address Label
19. Docking Contacts
20. DC Input
21. NFC (Print Touch Icon)
12
QLn Series User Guide
Page 13

17
15
16
18
19
Note: Scanning the QR code with a smartphone will provide printer-
specific information at www.zebra.com/qln220-info and
www.zebra.com/qln320 -info.
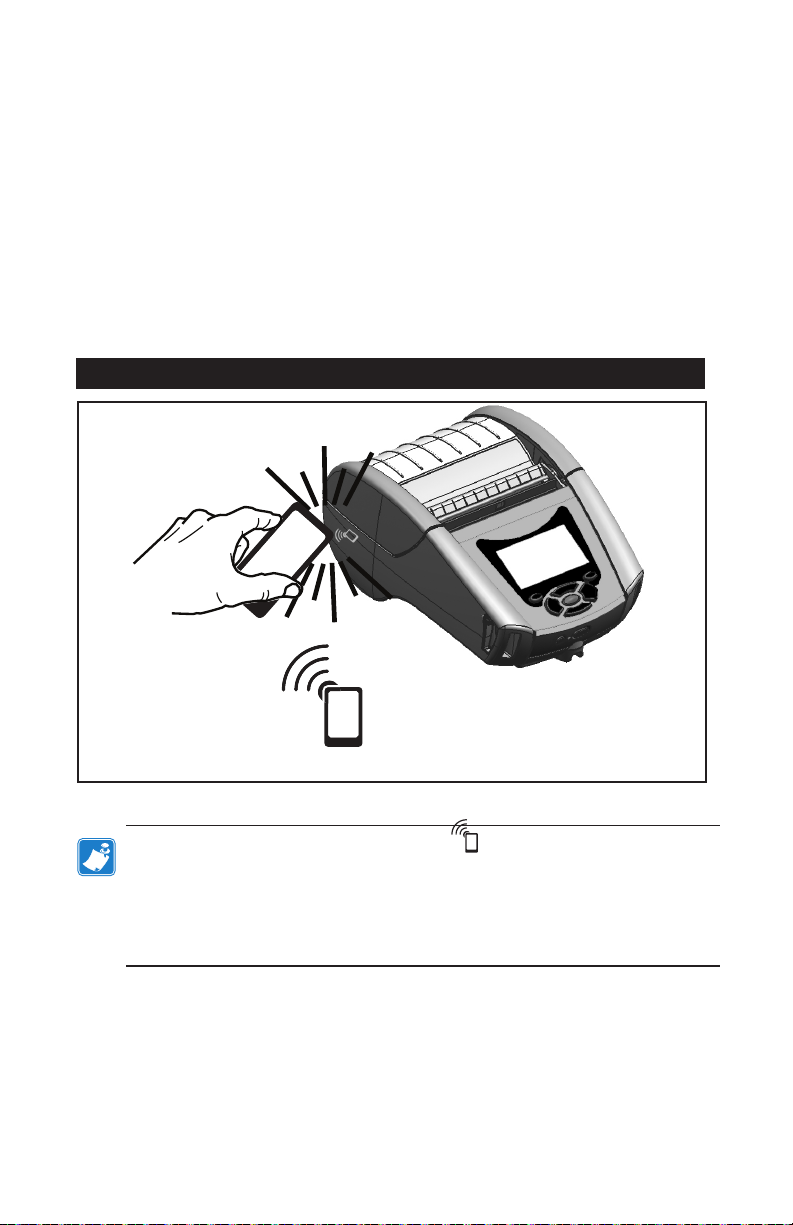
Note: Tapping the Zebra Print TouchTM icon with a Near Field
Communication (NFC) enabled smartphone will provide instant
access to printer-specific information. For more information about
NFC and Zebra products, go to
http://www.zebra.com/n fc
.
Bluetooth pairing applications via NFC is also possible. Please see
Zebra Multi-platform SDK for more information.
21
20
13
QLn Series User Guide
Page 14
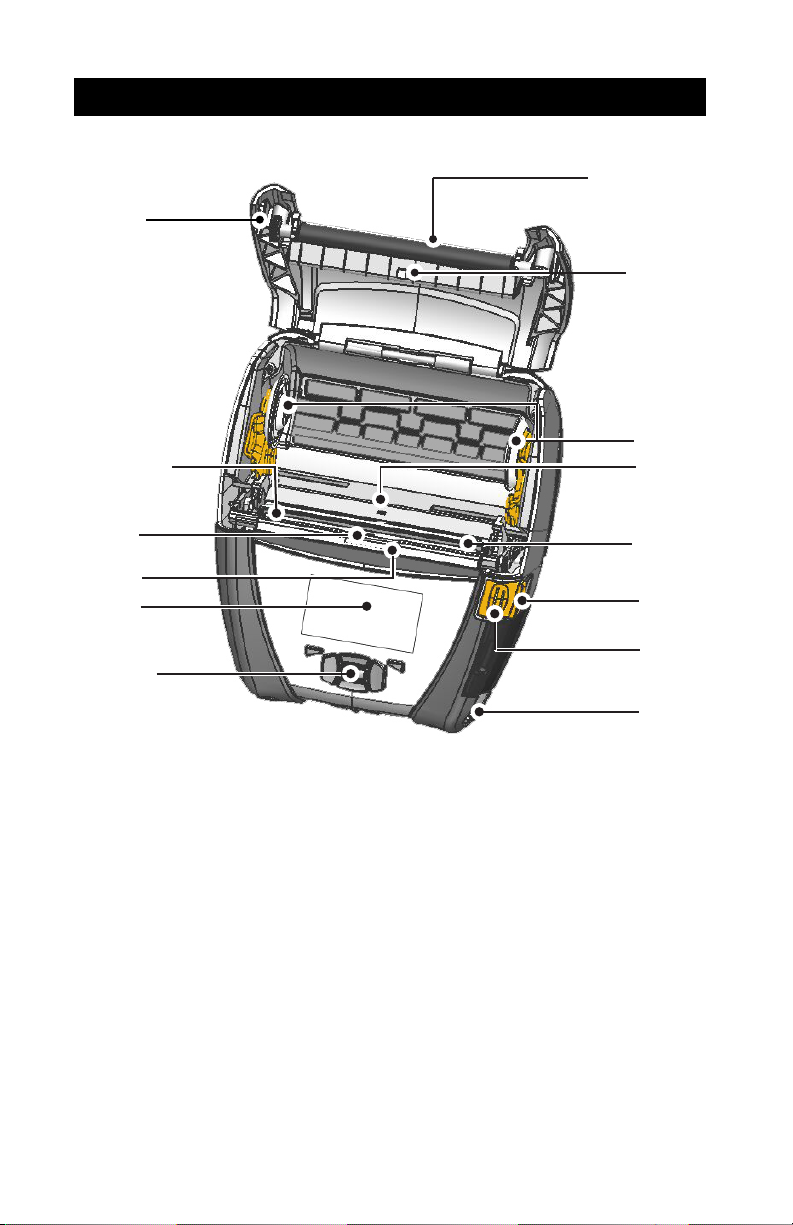
Figure 2: QLn420 Shown
13
4
1
2
3
14
5
7
11
9
1. Platen Roller
2. Black Bar Sensor
3. Media Support Disks
4. Tear Bar
5. Label Presence Sensor
6. Peeler Lever
7. Peeler Bail
8. Latch Release Lever
9. Key Pad
10. Strap Post
11. Status Screen
12. Printhead
13. Media Cover
14. Gap Sensor
12
6
8
10
15. Belt Clip
16. Battery
17. DC Input
18. MAC Address Label
19. Docking Contacts
20. USB/RS-232 Comm Ports
14
QLn Series User Guide
Page 15

15
16
17
18
19
Note: Scanning the QR code with a smartphone will provide printer-
specific information at www.zebra.com/qln420-info.
20
QLn Series User Guide
15
Page 16

Getting Ready to Print
Battery
Installing the Battery
Important • Batteries are shipped in sleep mode to preserve their
maximum capacity while in storage prior to initial use. Plug in the AC
adapter (see Pg. 19) or insert the bat tery into the Smart Charger 2 or
Quad Charger (see Pg. 17) to wake it up before using for the first time.
1. Locate the battery compartment on the bottom of the
printer.
2. Swivel the belt clip (if present) to access battery compart-ment.
3. Insert the battery into the printer as shown in Figure 1. (It
is not possible to insert the pack in an incorrect orientation.)
4. Rock the battery into the compartment as shown until it
locks in place.
When the battery is first installed, the control panel indicators may briefly turn on and then go off which indicates the
battery is not fully charged.
Figure 3: Installing the Battery (QLn220 Shown)
Belt Clip
Battery
16
QLn Series User Guide
Page 17
Battery Safety
Caution • Avoid accidental short circuiting of any battery. Allowing
battery terminals to contact conductive material will create a short
circuit which could cause burns and other injuries or could start a
fire.
Important • Always refer to the Important Safety Information data
sheet shipped with each printer and the Technical Bulletin shipped
with each battery pack. These documents detail procedures to
ensure maximum reliability and safety while using this printer.
Important • Always dispose of used batteries properly. Refer to
Appendix E for more battery recycling information.
Caution • Use of any charger not approved specifically by Zebra for
use with its batteries could cause damage to the battery pack or the
printer and will void the warranty.
Caution • Do not incinerate, disassemble, short circuit, or expose to
temperatures higher than 65oC (149oF).
Charger Safety
Do not place any charger in locations where liquids or metallic
objects may be dropped into the charging bays.
17
QLn Series User Guide
Page 18
Smart Charger-2 (SC2) Single Battery Charger (P1031365-063)
The Smart Charger-2 (SC2) is a charging system for use with
the 2-cell and 4-cell lithium-ion smart batteries used in the
QLn Series printers.
Charging Status Indicators
The SC2 uses a LED indicator to indicate the charge state in
either Green, Yellow, or Amber as detailed below.
DC Power Input Indicator Battery Status
Present Green Battery not present
Present Green Fully charged
Present Yel l ow Charging
Present Amber Fault
Present Off Present and Battery
Health = POOR
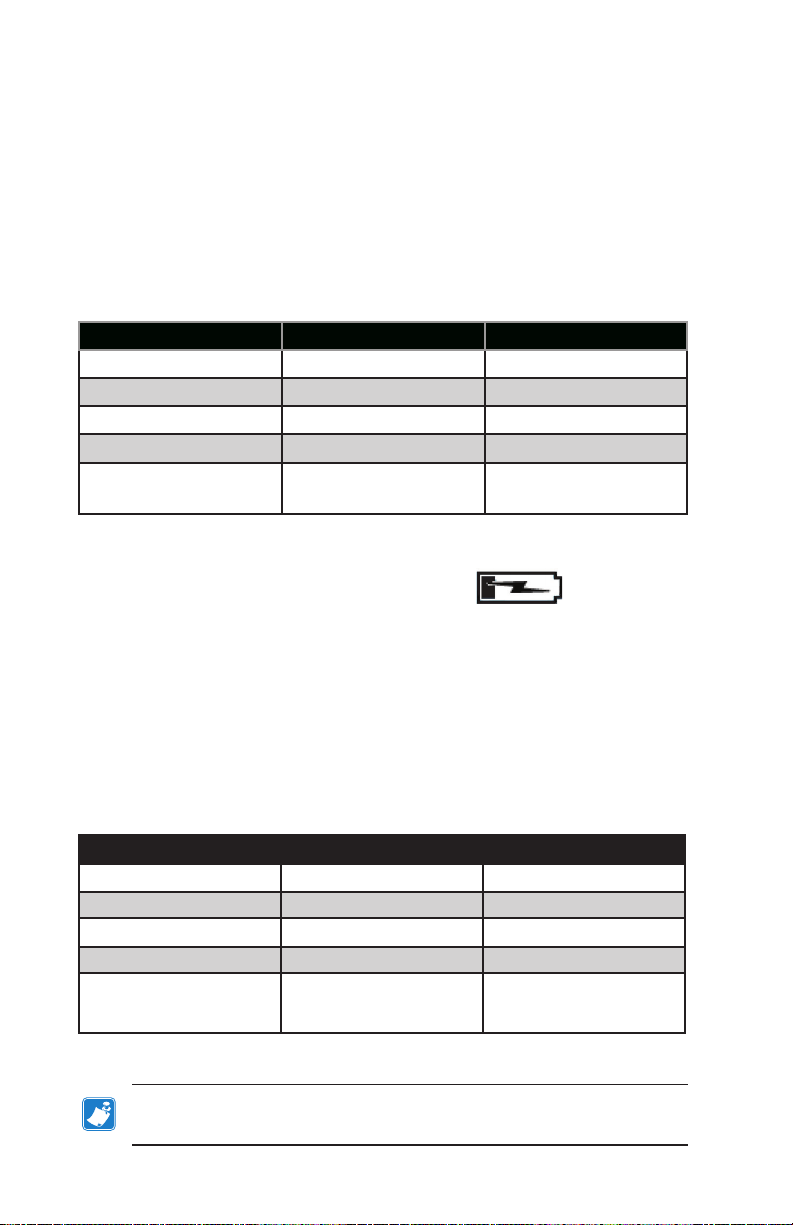
There will also be a battery charging graphic to indicate that
this LED is the charging status indicator .
Battery Health Indicator
The SC2 features a tri-color (Yellow/Green/Amber) LED to indicate the health of the battery pack. An evaluation of the battery health begins upon insertion of the battery in the charger
and results in the appropriate LED being illuminated as shown
below. The LED will remain illuminated as long as input power
is applied.
Battery Indicator Health Status
None or non-smart Off
Smart battery present Green GOOD
Smart battery present Yell ow CAPACITY DIMINISHED
Smart battery present Flashing yellow PAST USEFUL LIFE
Smart battery present Amber UNUSABLE-REPLACE
(discard per Instructions in
Appendix E
Note • For detailed information on the SC2, refer to the
Smart Charger 2 User Guide (p/n P1040985-001).
18
QLn Series User Guide
Page 19
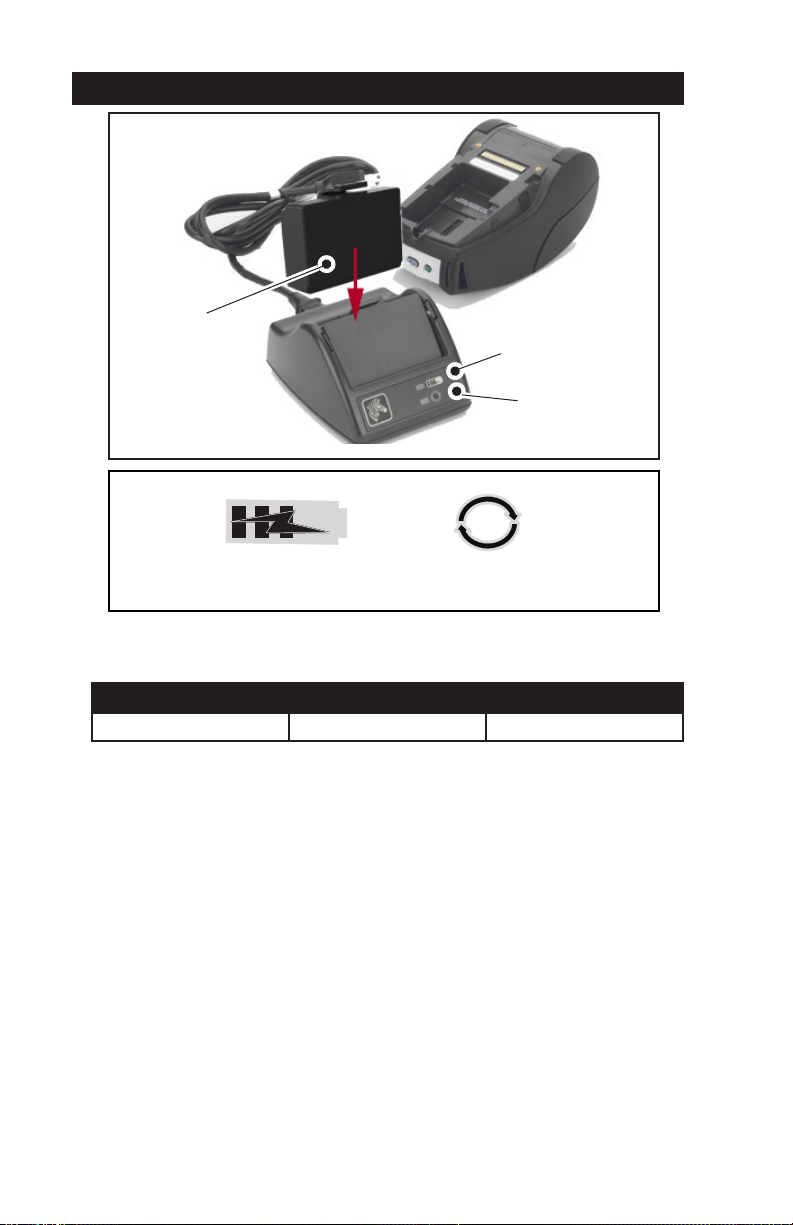
Figure 2: Smart Charger-2 (SC2)
Smart Battery
Charge Status Icon Health Status Icon
SC2 Dimensions
Charg e S tat us
LED Indicator
Health Status
LED Indicator
Height Width Length
65.1 mm (2.56 in.) 101.5 mm (4 in.) 120.9 mm (4.75 in.)
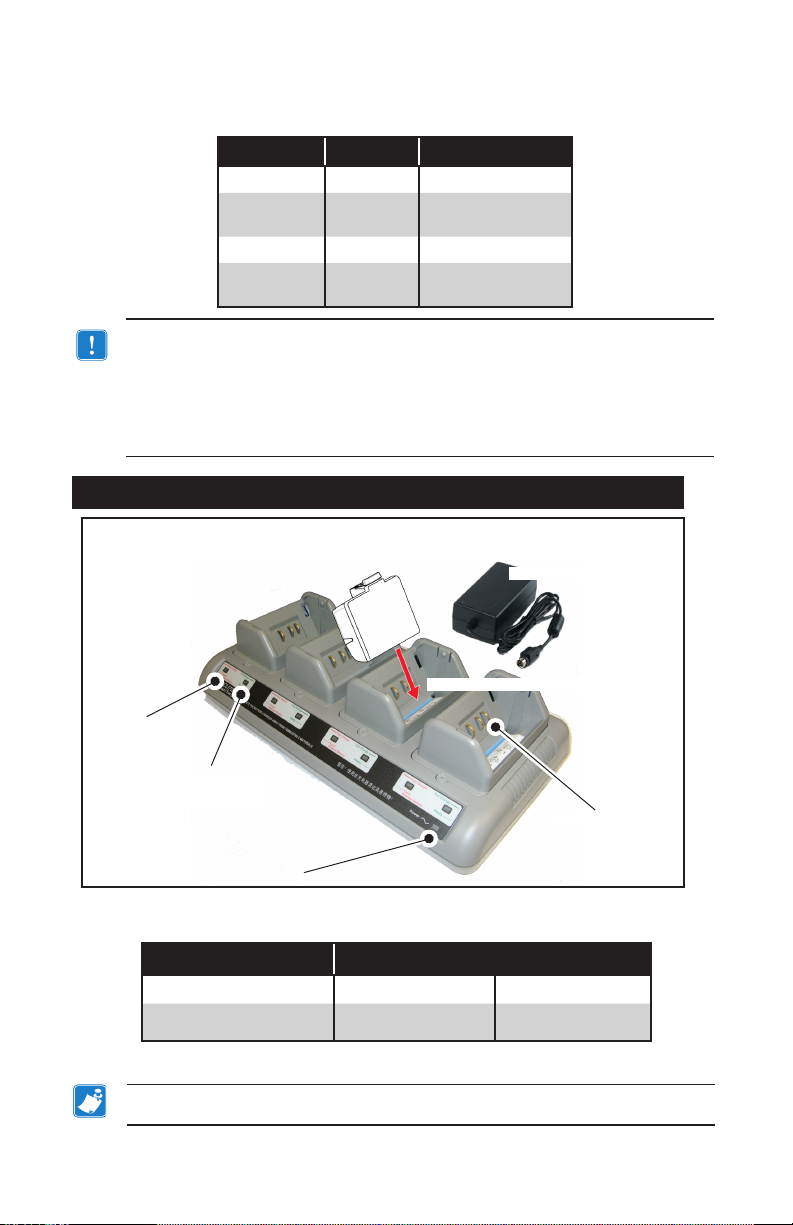
Model UCLI72-4 Quad Charger (AC18177-5)
The UCLI72-4 Quad Charger is designed to charge up to four (4)
QLn Series battery packs simultaneously. Batteries must be removed from the printer to be charged in the Quad Charger.
1. Ensure that the charger has been installed properly per the
Quad Charger instruction manual. Ensure that the power indicator on the front panel is on.
2. Plug a battery pack into any one of the four charging bays as
shown in Figure 3, noting the orientation of the battery pack.
Slide the battery pack into the charging bay until it stops and
then rock the battery pack back until it snaps into place. The
amber indicator directly under the battery being charged will
turn on if the battery is properly inserted.
19
QLn Series User Guide
Page 20
The indicators under the battery will allow you to monitor the
charging process per the table below:
Amber Green Battery Status
On Off Charging
On Flashing
Off On Completely Charged
Flashing Off Fault-Replace
Important • A fault condition is caused by a problem with the battery.
The charger may indicate a fault because the battery is too hot or cold
to charge reliably. Try to charge the battery again when it returns to the
room’s ambient temperature. If the amber indicator starts flashing on
the second attempt, the battery should be discarded. Always dispose of
batteries in a proper manner as described in Appendix F.
Figure 3: Quad Charger
80% charged (O.K.
to use)
Battery
1. Slide Battery Pack
into Charger bay.
2. Rock Battery Pack into place.
Amber
Indicator
Green
Indicator
Power Indicator
Quad Charger Cycle Times :
Battery Status Standard Pack Extended Pack
Battery 80% Charged <2 Hrs. <4 Hrs.
Battery Fully Charged < 3 Hrs. <5 Hrs.
Note • These times are for completely discharged batteries.
Power Supply
Charger Bay
20
QLn Series User Guide
Page 21
Battery packs which are only partially discharged will take less
time to reach their charged state. Batteries which have reached
80% of their charge capacity may be used, however, it is recommended that you allow the batteries to reach a full charge to
maintain maximum battery life.
The UCLI72-4 Quad Charger has a safety feature which stops charging a
battery after six hours regardless of its charge state. If not fully charged,
it might be indicative of a battery that needs to be replaced.
Use care when installing the UCLI72-4 Quad Charger so that you do not
block the ventilating slots on the top and bottom covers. Ensure that the
charger is plugged into a power source which will not accidently be
turned off if you will be charging batteries overnight.
AC Power Adapter (p/n P1031365-024)
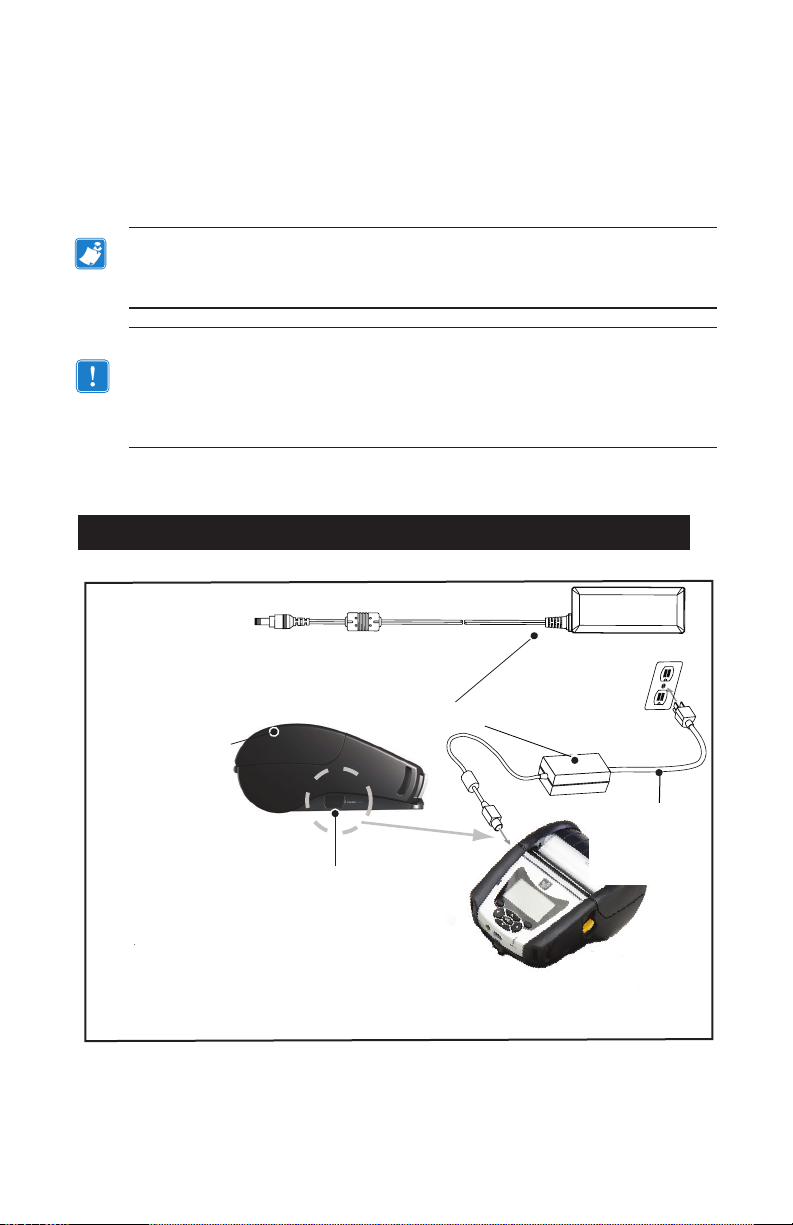
Figure 4: Charging the Battery Pack with the AC Power Adapter
AC Adapter
DC Input
21
QLn Series User Guide
AC Power Cord
(varies with
geographic
location)
Page 22
• Open the protective cover on the printer to expose the DC
input charger jack.
• Connect the appropriate AC power cord for your location to
the adapter and then plug the power cord into an AC receptacle.
• Plug the barrel plug from the AC adapter into the charger
jack on the printer.
• The printer will power up and begin charging. The printer
can be left on or turned off at this point. Charging will continue in either state.
Note • Batteries are shipped in sleep mode to preserve their maximum
capacity while in storage prior to initial use. Plug in the AC adapter (see
Pg. 19) or insert the battery into the Smart Charger 2 or Quad Charger (see
Pg. 17) to wake it up before using for the first time.
While it’s possible to charge the battery when using the printer, charge
times will increase under this condition.
Ethernet and Charging Cradles
The cradle is an expansion base intended for use with the
QLn Series printers. There is a four bay cradle (QLn-EC4) or
a single bay option (QLn-EC) for use with the QLn220 and
320, as shown on pages 23 and 24. There is also a single bay
Ethernet and charging option for the QLn420 (QLn420-EC) as
shown on page 24.
The QLn-EC/EC4 cradles provide charging power to the
docked printer as well as providing a standard 10/100Mb/S
Ethernet port for communication to the printer. The QLn420EC also provides charging power to the docked printer, as well
as a standard 10/100Mb/T Ethernet port for
communication to the printer. All cradles also supply battery
charging power to the docked printer and acts as a supplemen-
tary power source for a functioning QLn printer.
All QLn Ethernet cradles feature two LED’s to indicate the
status of the cradle: Solid green to indicate when power is
provided to the input of the cradle; and blinking green to indi-
cate Ethernet activity.
The cradle allows the user to dock the printer easily and re-
move it with the push of a button. The printer shall remain
22
QLn Series User Guide
Page 23
operable while docked, i.e. display is viewable, charge LED status is viewable, and printer controls and data entry are available.
The printer will still print while docked and the user shall be able
to replace the media as well.
LED Status Indication
Solid Green Power On
Blinking Green Ethernet Activity
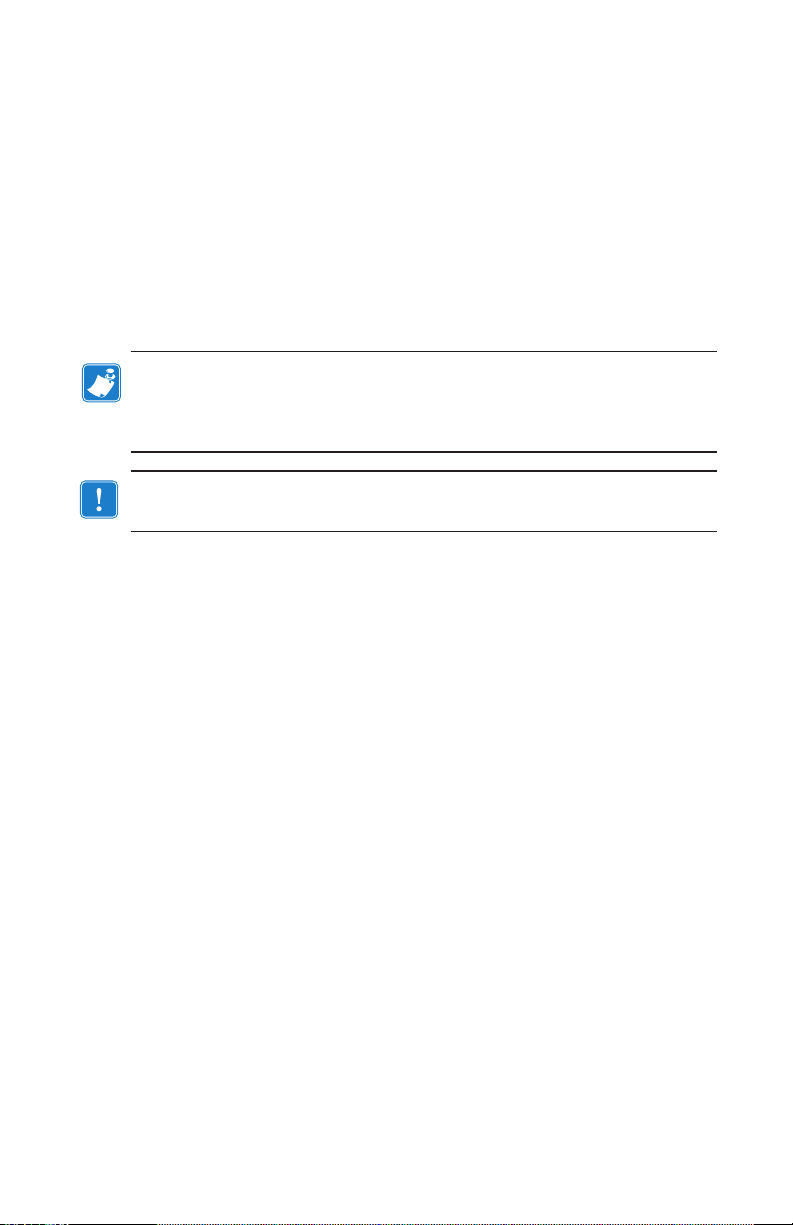
Note • Remove the “Docking Cradle Access” label on the bottom of the
QLn320 or QLn220 printers before docking the printer in the cradle.
DOCKING CRADLE ACCESS
Note • Clean the docking contacts with a Zebra cleaning pen to remove
any residue lef t behind by the label.
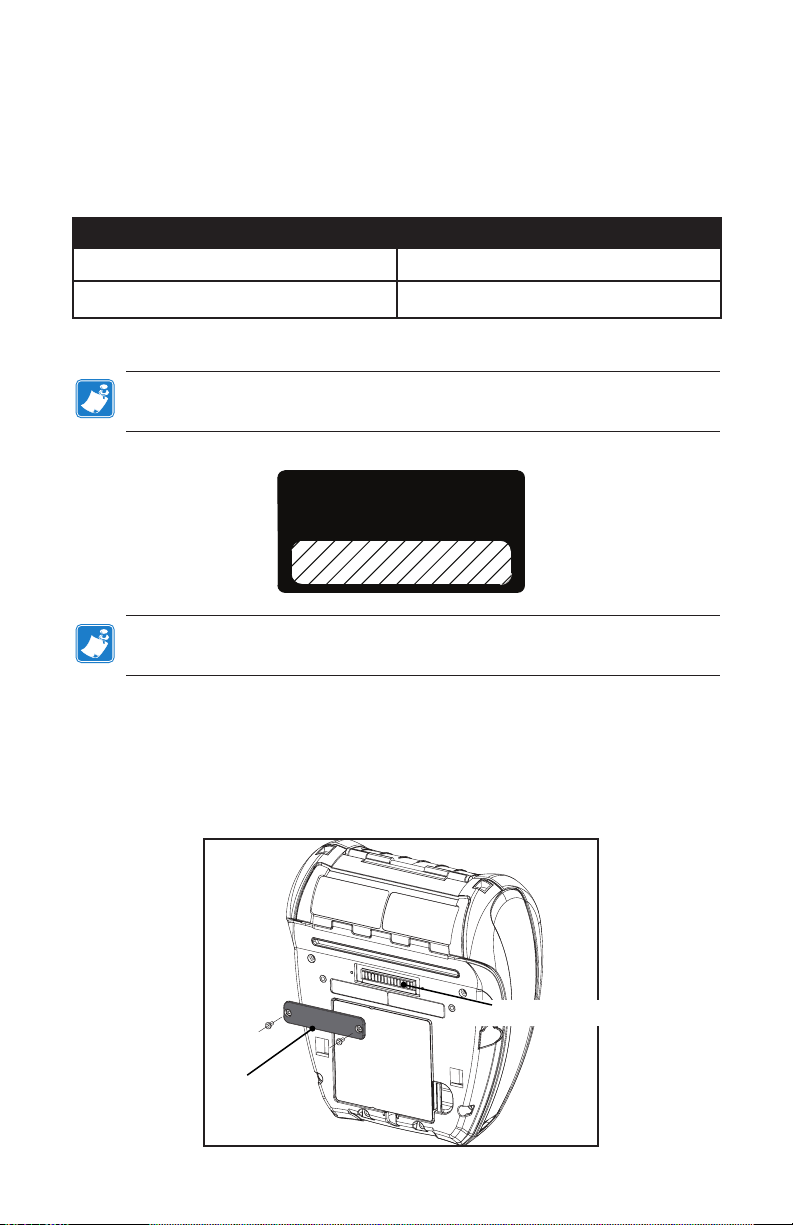
The QLn420 does not use the above label over the docking
contacts, but instead includes a plastic docking contacts cover
secured by two screws. Remove the screws to remove the
docking contacts cover from the printer and expose the docking
contacts (as shown below).
Docking Contacts
Docking Contacts
Cover
23
QLn Series User Guide
Page 24
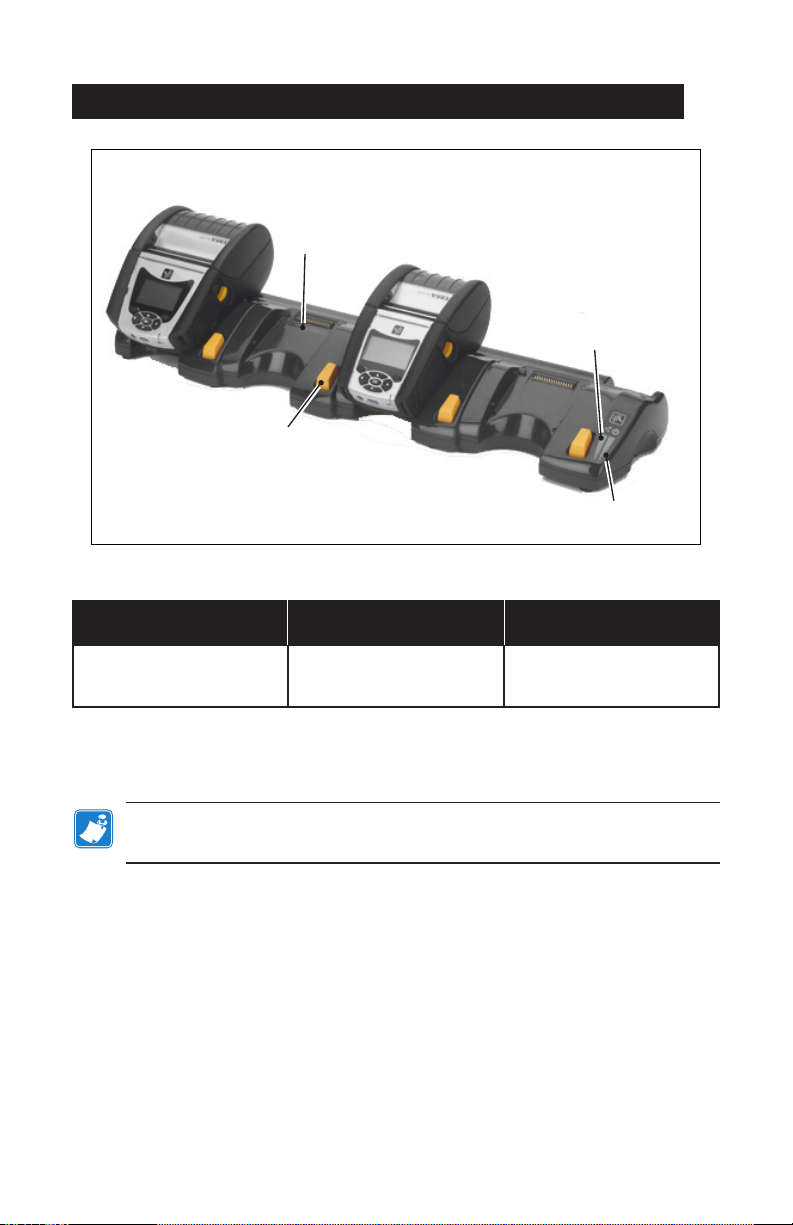
Figure 5: Ethernet Cradle (4-Bay for QLn220/320)
Docking Bay
Ethernet
Status Indicator
Release
Button
Power Status
Indicator
Height Width Length
66,7 mm (2.62 in.) 579,9 mm (22.83 in.) 150,57 mm (5.93 in.)
Note • The QLn220 and 320 extended battery capacity is not compatible
with the QLn-EC and EC4 cradles.
24
QLn Series User Guide
Page 25
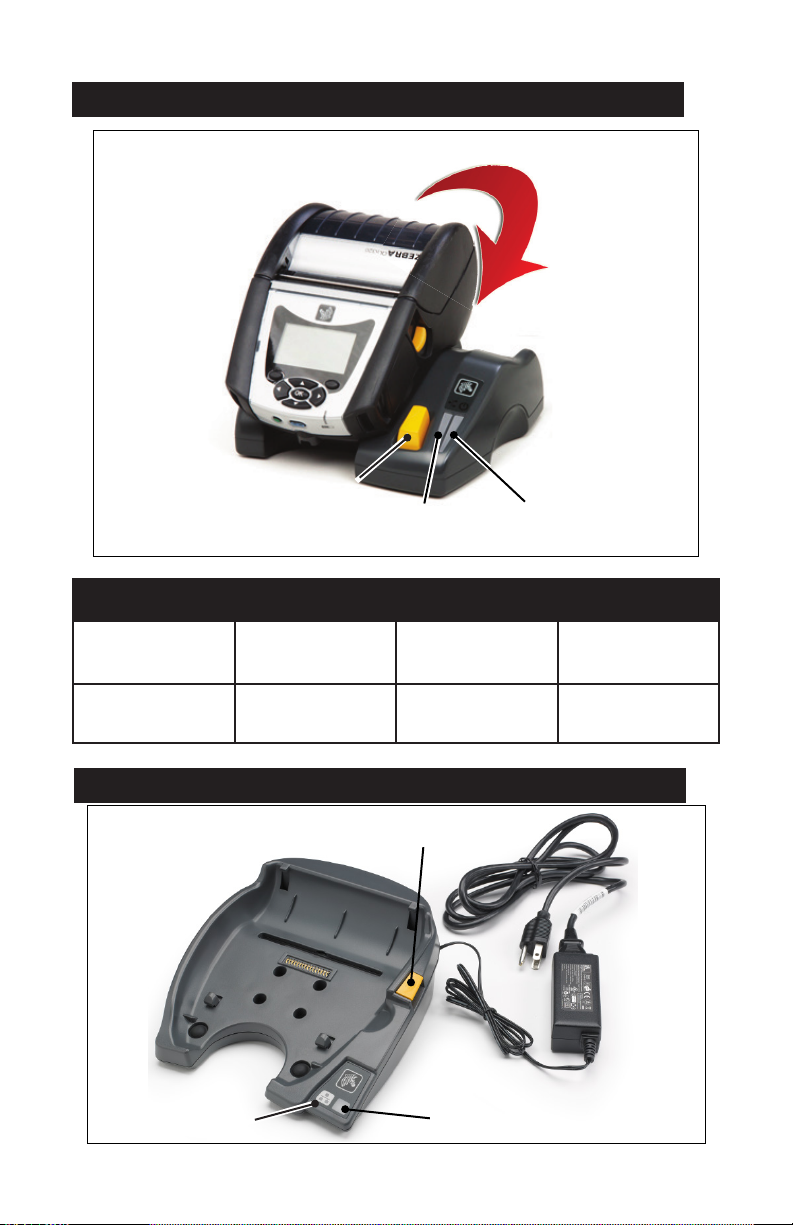
Figure 6: Ethernet Cradle Single Bay (QLn220/320)
Release Button
Ethernet Status
Release Button
Indicator
Cradle Height Width Length
QLn-EC 66,7 mm
(2.62 in.)
QLN420-EC 66,2 mm
(2.60 in.)
171,28 mm
(6.74 in.)
137,7 mm
(5.42 in.)
Figure 7: Ethernet Cradle (QLn420)
Release Button
150,57 mm
(5.93 in.)
219,6 mm
(8.64 in.)
AC Adapter
Ethernet Status
Indicator
Power Status
Indicator
25
QLn Series User Guide
Page 26

Printer Operation with Cradle
• All QLn Series printers will charge when placed in their
supported cradles.
• Only QLn Series printers that have the Ethernet option in-
stalled
will connect to an Ethernet network. Check the
PCC code on the back of the printer (see Appendix
D for location). Codes of the form QNx-xxxxx0xx-xx
do not support Ethernet, and codes of the form QNxxxxxxExxxx or QNx-xxxxxMxx-xx do support Ethernet
(where “x” means don’t care). You can also check the
“Communications” sub-menu on the LCD (see Main
Menu Screen on page 38). After selecting this sub-menu,
any communication options not installed will be so indicated.
• When power is applied to the cradle and the printer is
docked, the printer charge LED indicates the charge status
of the printer (see Figure 18).
• Docking the printer in the cradle will automatically turn
the printer on to ensure it is available to be managed remotely.
• When the printer detects input power from the cradle, and
the presence of a live Ethernet link, it will automatically
reboot and connect to the Ethernet network.
• For printers with an 802.11 radio, this interface will be
turned off when the Ethernet link is active. It will turn
back on if the Ethernet link is no longer active.
• For printers with a Bluetooth radio, this interface will remain
active while the printer is in the cradle.
• The serial and USB ports will remain active while the printer
is in the cradle.
• The DC input barrel jack connector (see Figure 7) cannot
be used while the printer is in the cradle. The DC barrel
jack should be plugged directly into the cradle instead.
Note • The printer provide over voltage protection such that no damage
occurs when voltages from 0-36V are applied at the DC Power jack. Upon
application of voltage greater than 36V, the DC line fuse will permanently
open to reduce fire hazard. The battery is only charged when 12VDC is
applied using the Zebra AC adapter.
26
QLn Series User Guide
Page 27
Loading the Media in the QLn Series Printers
You can operate QLn Series printers in one of two different
modes: Tear-Off or Peel-Off. Tear-Off mode allows you to tear
off each label (or a strip of labels) after it is printed. In Peel-Off
mode, the backing material is peeled away from the label as it
is printed. After you remove this label, the next one is printed.
Loading Media Procedure
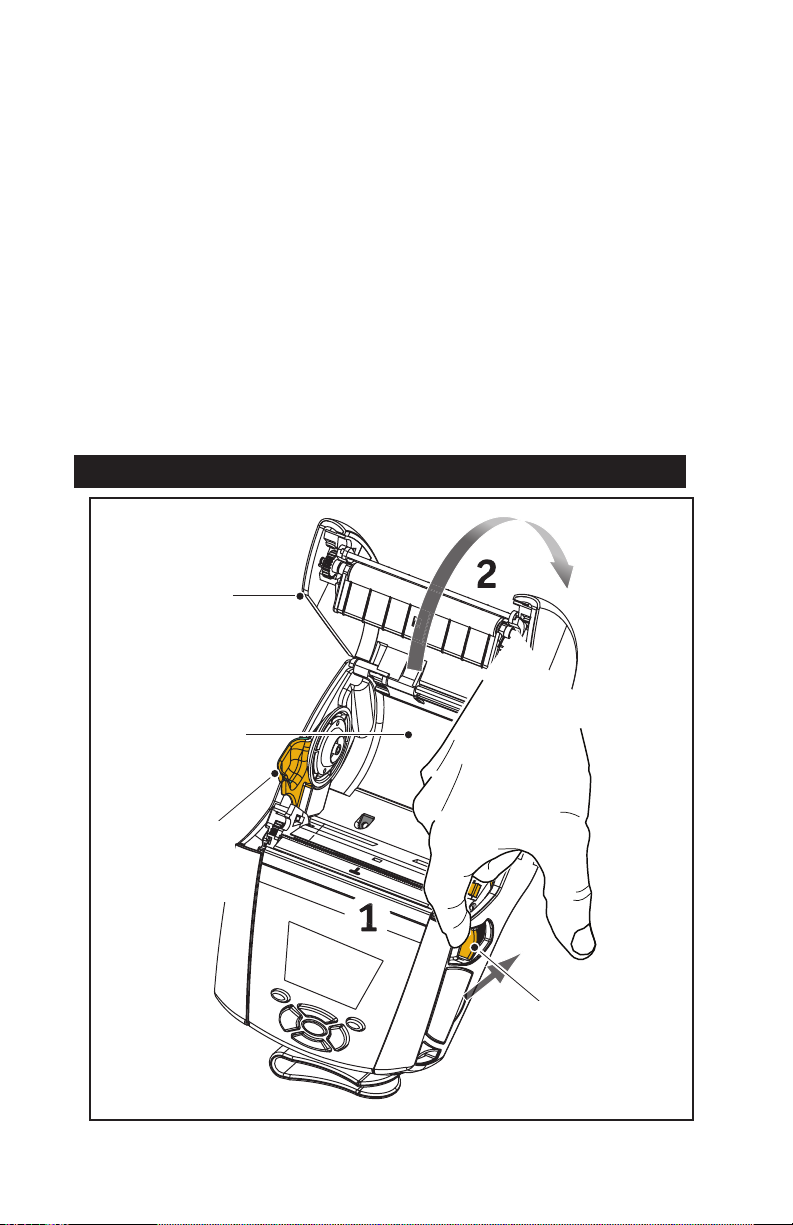
1. Open the printer (Refer to Figure 7).
• Press the Media Cover Button on the side of the printer as
shown in “1” below. The Media Cover will open
automatically.
• Rotate the Media Cover back completely as shown in “2”, exposing the media compartment and adjustable media supports.
Figure 8: Opening the Printer
Media Cover
Media
Compartment
Media Supports
(opposite support
not visible)
Latch Release
Lever
27
QLn Series User Guide
Page 28
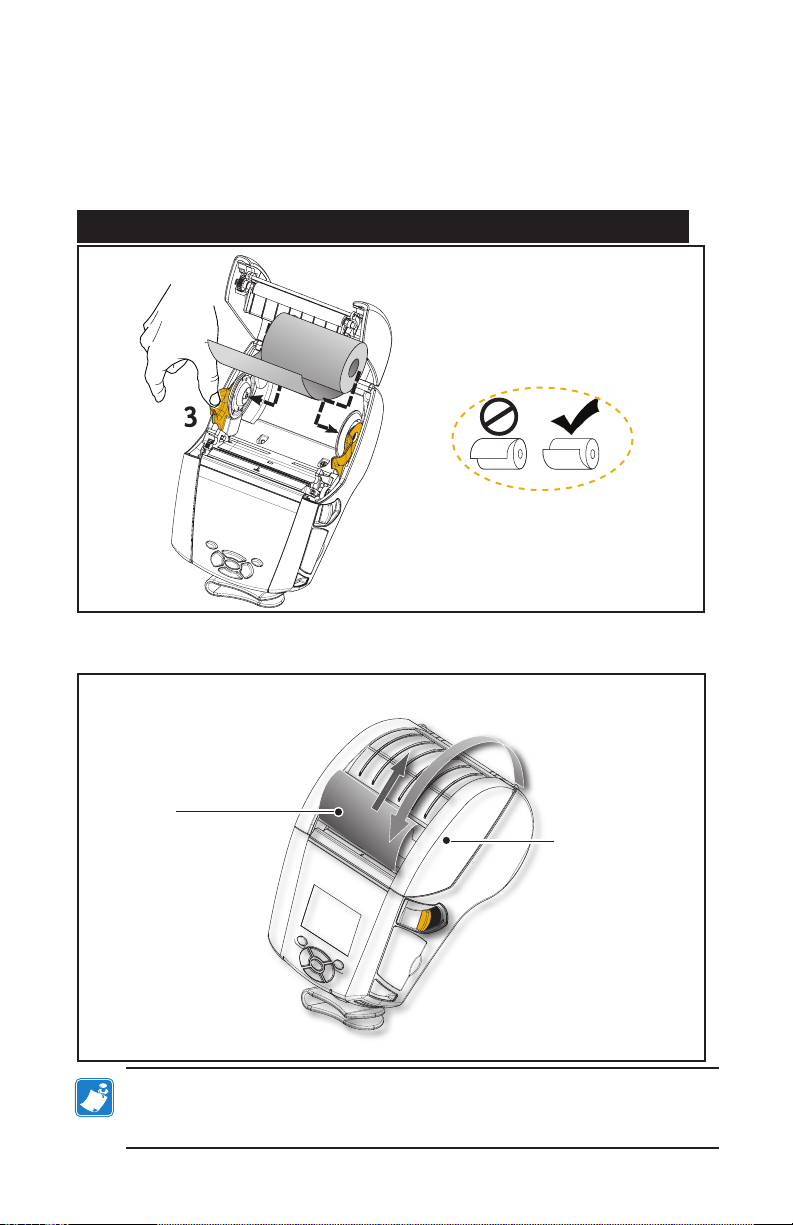
2. Pull the media supports apart as shown in Figure be-
4
low. Insert the roll of media (in the orientation shown) between
the supports and let the supports secure the media in place. The
supports will adjust themselves to the width of the media, and
the media roll should be able to spin freely on the supports.
Figure 9: Loading Media
3. If you plan to use the printer in tear-off mode, close the
media coveras shown below.
Pull Media out of
Printer
Close Media Cover
Note • Please refer to the Programming Guide (P1012728-xxx) for
information on changing the setting to adjust the media feed length via a
Set-Get-Do (SGD).
28
QLn Series User Guide
Page 29

Loading Media in Peel-off Mode (QLn220/320)
• If you plan to use the printer in the peel-off mode, peel a
few labels off of the media and load the media as previously described.
• Push the peeler lever forward to release the peeler bail into
the “up” position as shown at “3” and “4” in Figure 10.
• Close the media cover to lock the peeler bail in place. The
media will feed between the peeler bail and platen.
Figure 10: Activating Peeler Bar (QLn320 Shown)
Peeler Bail (Pull up
and ip down if using
media in pell-o mode
4
Peeler Lever
Latch Release
Lever
• Turn on the printer or press the Feed button on the front of
the printer if the printer is already on. The printer will advance the
media to the next label, if printing labels. If you are printing on
journal media, the printer will advance a short strip of media.
To disengage the peeler bail, first open the media cover as pre-
viously described. The peeler bail will automatically return to the
Up position.
Press straight down on the peeler bail to lock it in place in its
original home position.
29
QLn Series User Guide
Page 30
Loading Media in Peel-off Mode (QLn420)
• If you plan to use the printer in the peel-off mode, peel a
few labels off of the media and load the media as previously
described.
• Close the media cover.
• Lift up on the peeler lever located on the side of the printer
below the media cover button.
• Lock the peeler lever in the “up” position to fully engage
the peeler bail.
Figure 11: Activating Peeler Bar (QLn420 Shown)
Peeler Bail
Media Cover
Button
Peeler Lever
• Turn on the printer or press the Feed button on the front
of the printer if the printer is already on. The printer will
advance the media to the next label, if printing labels.
If you are printing on journal media, the printer will advance
a short strip of media.
Note • Peeler will not work with most synthetic label stock since that
media is softer and tends to adhere to its liner. However, the QLn420
printer is fully capable of printing on synthetic labels.
30
QLn Series User Guide
Page 31

• To disengage the peeler bail, press the peeler release
while pressing straight down on the peeler lever. This
will disengage the peeler bail and return it to its original
home position.
Note • Before disengaging the peeler, be sure there are no peeled labels
present on the peeler bail. This could cause a label jam if you were to
disengage with the peeled label present.
QLn Healthcare Printers
Zebra QLn Healthcare 2” and 3” printers are designed to
meet the specific and unique needs of the healthcare environ-
ment. The healthcare application is based on the QLn220 and
QLn320 printers primarily for barcode label printing, but also
retaining the QLn’s ability to print receipts.
The QLn220 and 320 Healthcare printers also offer a few key
enhancements to these existing printers:
• Provide printers with distinctive gray and white healthcare
colors (see Page 32) and performance plastics that can also be
disinfected with the most common cleaners used in hospitals.
• Leverage the technology advancements made on the QLn
platform, i.e. new User Interface, NFC, QR code.
• Add the MFi chip to the QLn main logic board to support
Bluetooth connectivity between the printer and an iOS device
as Apple devices are expected to grow in popularity in this
segment.
31
QLn Series User Guide
Page 32
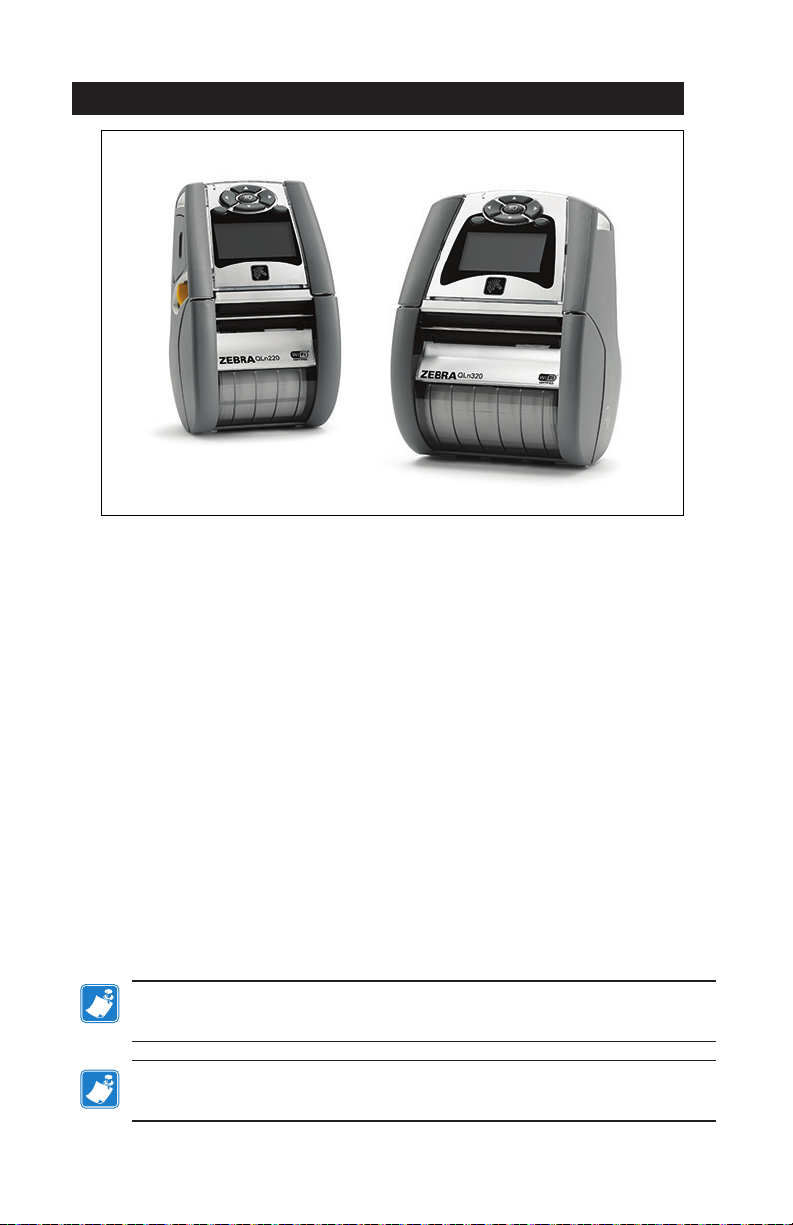
Figure 12: QLn Healthcare Printers
Since the QLn220 and 320 Healthcare are based on the
QLn220 and 320 platform, they are designed to be direct ther-
mal printers which support variable print widths. They will
provide a print experience compatible to the QLn220 and 320,
specifically in the following areas:
• They will support the same barcodes, barcode quality, and
visual print quality.
• They will offer equal wireless performance in terms of
range, reliability, and speed.
• They will be compatible with all QLn220 and 320 accessories.
Due to the nature of the healthcare environment, QLn
Healthcare printers feature more rugged plastics designed and
tested to withstand constant cleaning with all major hospital
cleaners for the life of the printer.
Note • Refer to the Guide to Disinfecting and Cleaning QLn Healthcare
Printers (P1066640-001) for detailed cleaning instructions.
Note • Refer to the QLn Healthcare Printers Quick Start Guide (P1067208-
001) for more detailed information on these printers.
32
QLn Series User Guide
Page 33

Operator Controls
The QLn Series printers come equipped with a keypad control
panel and LCD graphical user interface. The standard
control panel is illustrated in Figure 13, 13a, and 14. The LCD
interface allows easy display and selection of many printer
functions as detailed on following pages.
Standard Control Panel
The standard control panel has multiple control buttons and
two multipurpose indicators.
• The Power Button turns the printer on and off.
Note • When turning on the QLn420 printer, press and hold the Power
Button between 1.5 and 2.5 seconds. When the LCD illuminates, release
the Power Button. To turn off the printer, press and hold the Power Button
until the printer shuts down.
• The Media Feed Button advances a length of media which
is determined by the type of media being used. Label media
will be advanced to the next gap or bar sense marker. Journal
(plain) media will be advanced by a length determined by the
printer’s software.
• The LED Charge Indicator shows solid Yellow when charging,
solid Green when fully charged, and is turned off when there’s
a fault condition and the printer is plugged in.
• Four Way Navigation Buttons allow the user to scroll between
functions on the LCD user space. (The Navigation Buttons do
not apply to the Status Bar and Navigation Bar.)
• Enter Button allows the user to select the desired function
highlighted on the LCD interface and is indicated by the word
“O K”.
• Two software defined function keys allow the user to select
a function listed on the navigation bar.
33
QLn Series User Guide
Page 34
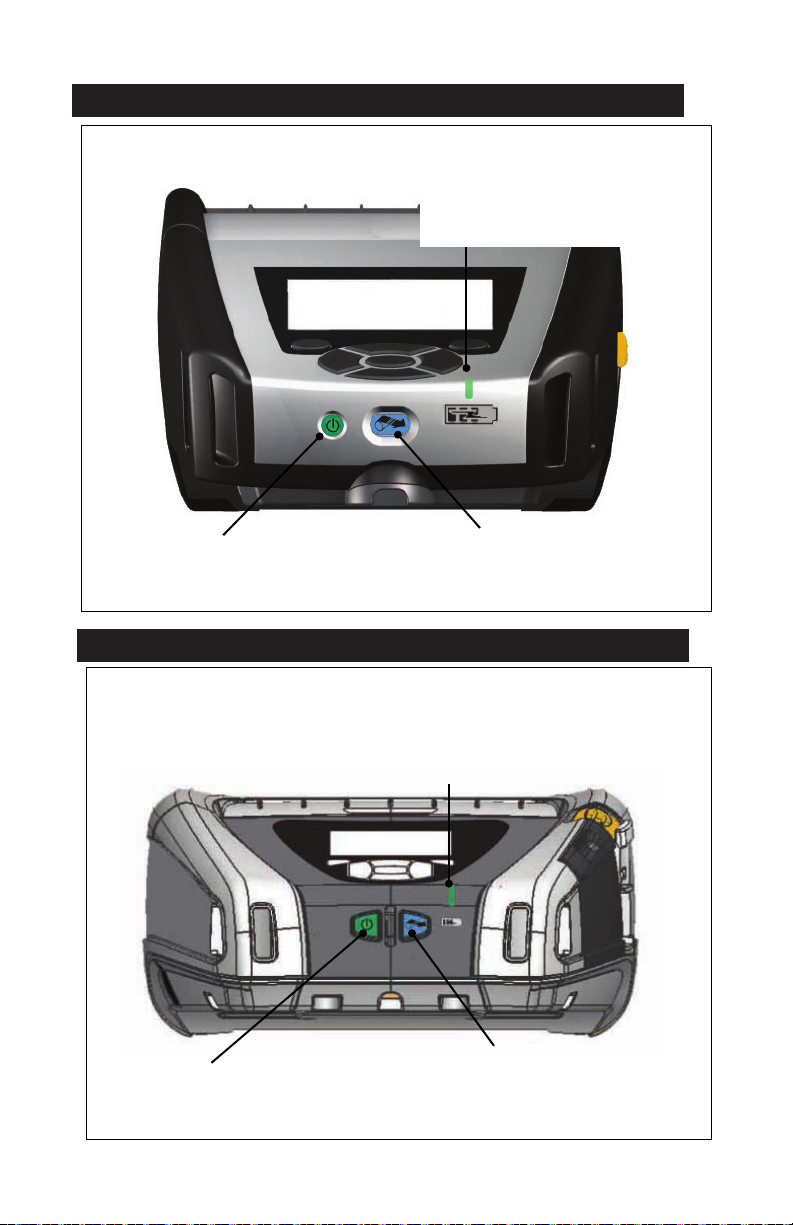
Figure 13: Standard Control Panel (QLn320/220)
LED Charge Indicator
Solid Yellow: Charging
Solid Green: Fully charged
Off: No DC P ower A pplied
Off: Wi th DC Po wer Ap plied: Charge Fault
Power Button
Press to turn unit on. There will be a 10 second boot up time.
Press again to turn unit off
Figure 13a: Standard Control Panel (QLn420)
LED Charge Indicator
Solid Yellow: Charging
Solid Green: Fully charged
Off: No DC P ower A pplied
Off: Wi th DC Po wer Ap plied: Charge Fault
Power Button
Press to turn unit on. There will be a 10 second boot up time.
Press again to turn unit off
Feed Button
Press to advance a blank label or a software
determined length of journal media.
Feed Button
Press to advance a blank label or a software
determined length of journal media.
34
QLn Series User Guide
Page 35
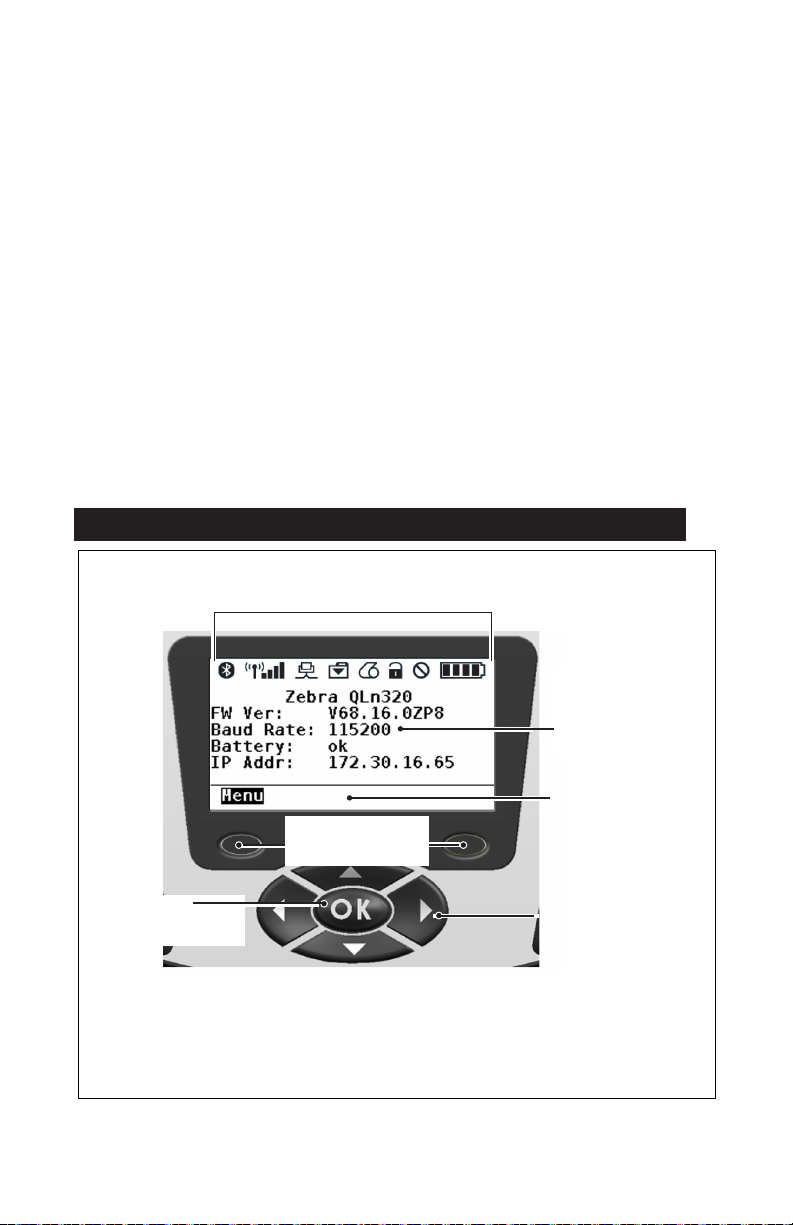
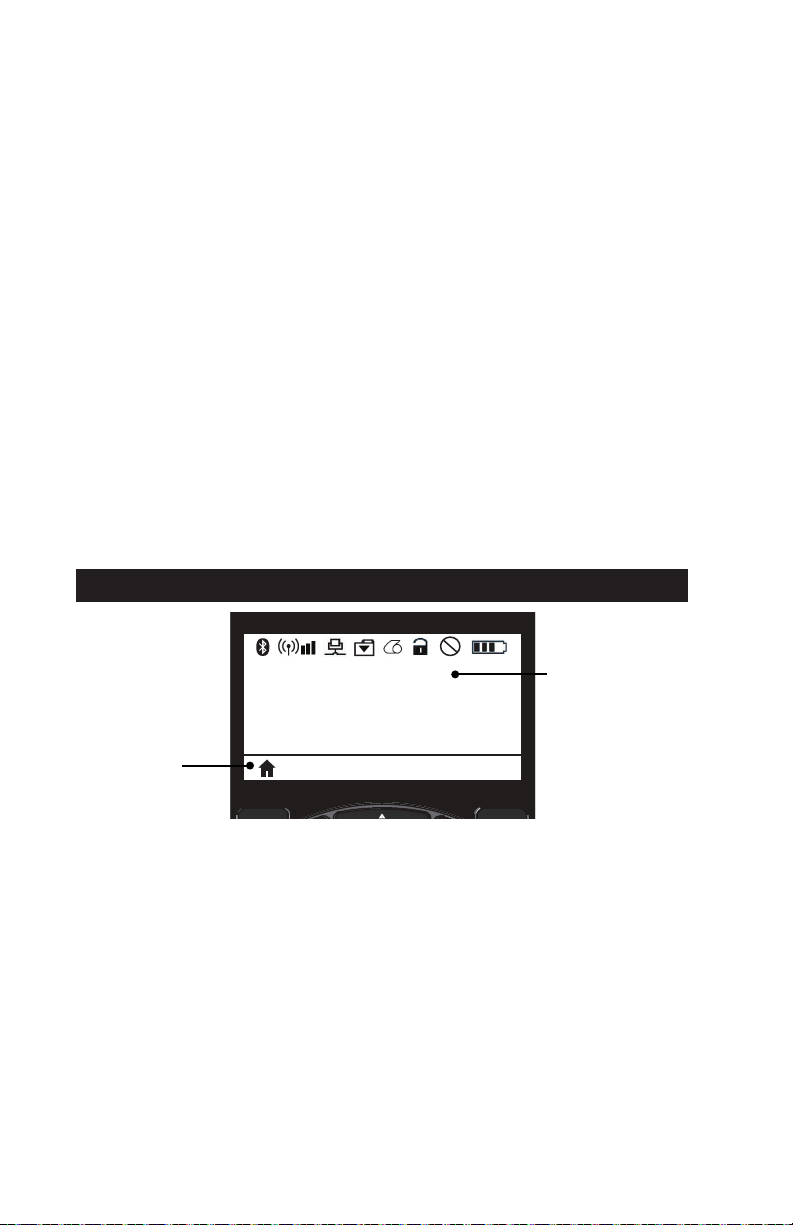
LCD Control Panel
The 240x128 pixel LCD control panel allows the user to view
the status of the QLn Series printer and have access to various
printer alerts and messages. It also has multi-directional keys
which allow navigation and selection of menu options affecting
printer functions. These keys allow scrolling through the
various options and settings. The “OK” button allows selection
of the option or function displayed on the screen.
The top of the screen has a row of status icons, or a Status
Bar, which indicate the state of various printer functions. The
Status Bar is located above the Status Screen shown below
along with a Navigation Bar. The Status Screen is the default
display and is shown at power up. When navigating the
menus, the printer will automatically return to this screen
when the user is done navigating after an appropriate delay.
Figure 14: LCD Control Panel (QLn320/220)
Printer Status Bar
Indicates the status of several
printer functions.**
Select Button
Press to select a menu choice
on the Status Screen.
Soft Keys
Press to select a function on
the Navigation Bar.
** Not every icon will be displayed
on the Status Bar at one time, only
those applicable to the printer’s
configuration.
35
QLn Series User Guide
Status Screen
Default screen the printer
will display when the user
is not navigating the main
menu screen.
Navigation Bar
Displays user-selectable
options.
Four Way Navigation
Buttons
Scroll through menu choices
on Status Screen
Press “OK” to enter.
Page 36
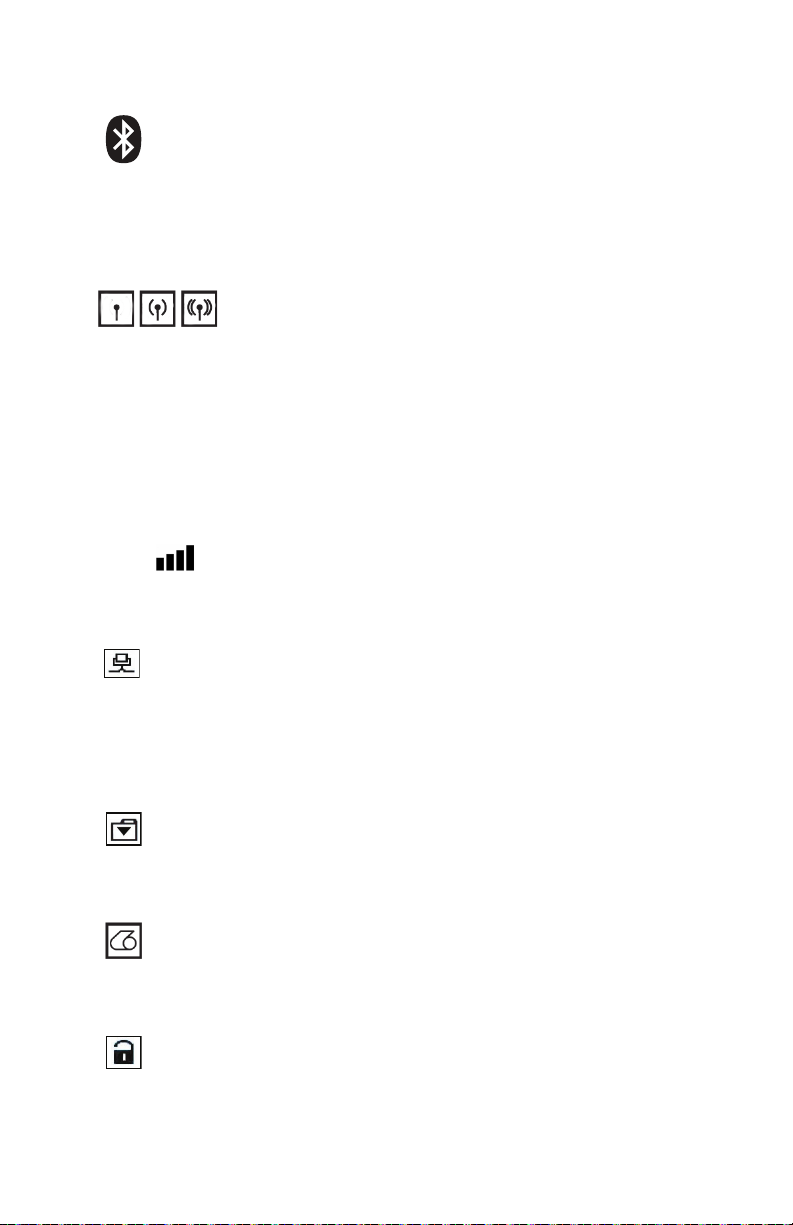
Status Bar Icons
Indicates Bluetooth® connection status. The icon will
blink to show that the printer is receiving label data via
Bluetooth, and is solid when link is established. This icon
appears only on printers with the Bluetooth wireless option
installed.
Indicates that the printer is connected to a
radio network via 802.11 protocols. The antenna icon will
blink with no parentheses when looking for an access
point. One set of solid parentheses with blinking antenna
indicates WLAN is associated and attempting authentication.
Two sets of solid parentheses and solid antenna indicate
the printer is successfully connected to the WLAN.
The icon and two parentheses will blink to show the printer
is receiving printer data via WLAN. The four (4)
bars indicate the strength of the WLAN connection
to the access point. These icons appear only with the
802.11 radio installed.
The Ethernet icon will blink when the printer is receiving
label data via the Ethernet connection. It will not be
displayed on the status bar when the Ethernet is inactive.
This icon appears only when the Ethernet option is installed
and the printer is docked in Ethernet cradle.
The Data icon indicates data being sent to the printer,
i.e. the icon will blink when there is a label data transmission
via the serial or USB ports.
The Media Out icon will blink when there is no media
in the printer and will not blink when there is media in the
printer.
The Head Latch icon indicates if the media cover is
closed or not properly latched. It will appear unlocked and
blinking if open and will not appear if the cover is closed.
36
QLn Series User Guide
Page 37
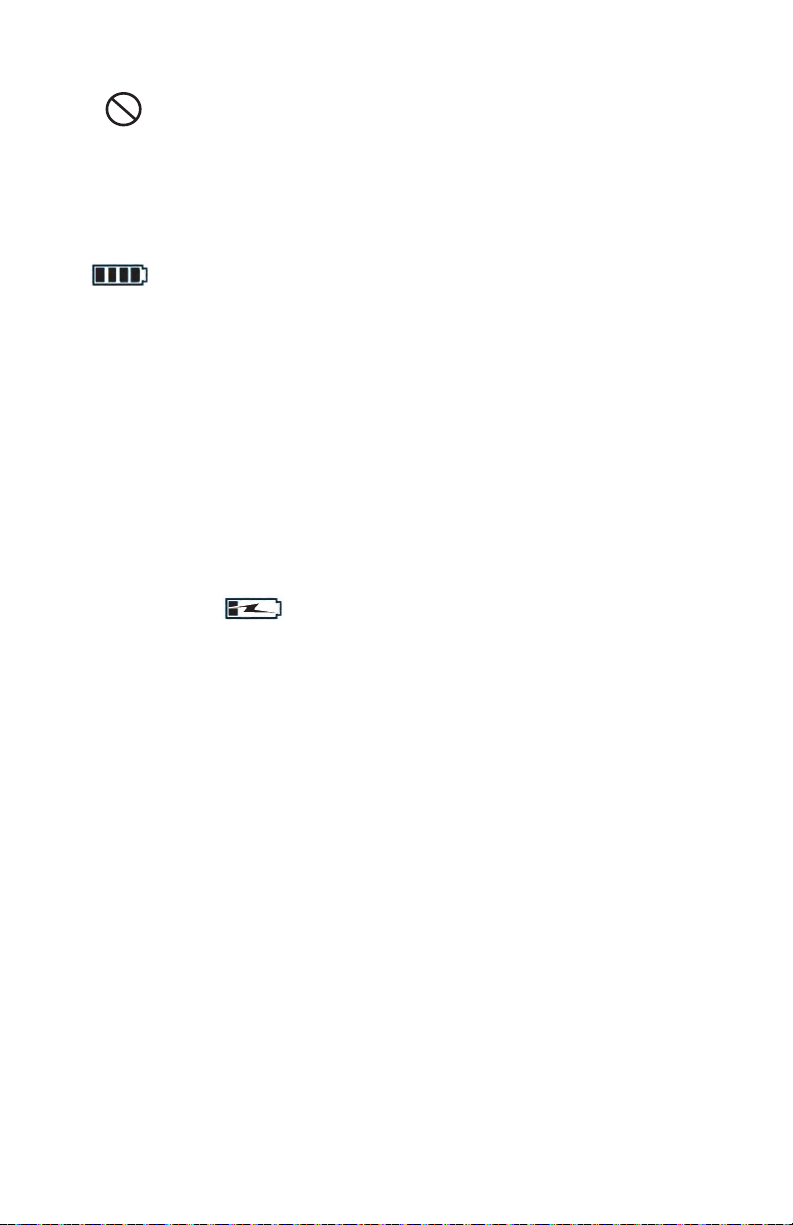
The Error icon will be displayed and blink if an error
condition exists. The icon will not be displayed if no printer
error exists. Since there are separate icons for Media
Out and Head Latch Open, these two alerts do not apply
to the Error icon.
The Battery Charge Level icon indicates the reported
state of charge from the battery pack. In a non-charging
state, four (4) bars indicates the battery level is greater
than 80%. Three (3) bars indicates if the battery level is
less than or equal to 80% but greater than 60%. Two (2)
bars indicates if the level is less than or equal to 60% but
greater than 40%. One (1) bar indicates if the battery level
is less than or equal to 40% but greater than 20%. And
zero (0) bars indicates if the level is less than or equal to
20%.
While the battery is charging, a lightning bolt will appear in the
battery icon to indicate that charging is taking place.
When the battery is charging and fully charged, four bars will be
displayed. When the battery is charging and the level is greater
than 80%, the battery icon will alternate between four bars and
three bars. When the battery is charging and the level is less than
or equal to 80% but greater than 60%, the icon will alternate between three bars and two bars. When the battery is charging
and the level is less than or equal to 60% but greater than 40%,
the icon will alternate between two bars and one bar. When the
battery is charging and the level is less than or equal to 40% the
icon will alternate between one bar and zero bars.
37
QLn Series User Guide
Page 38
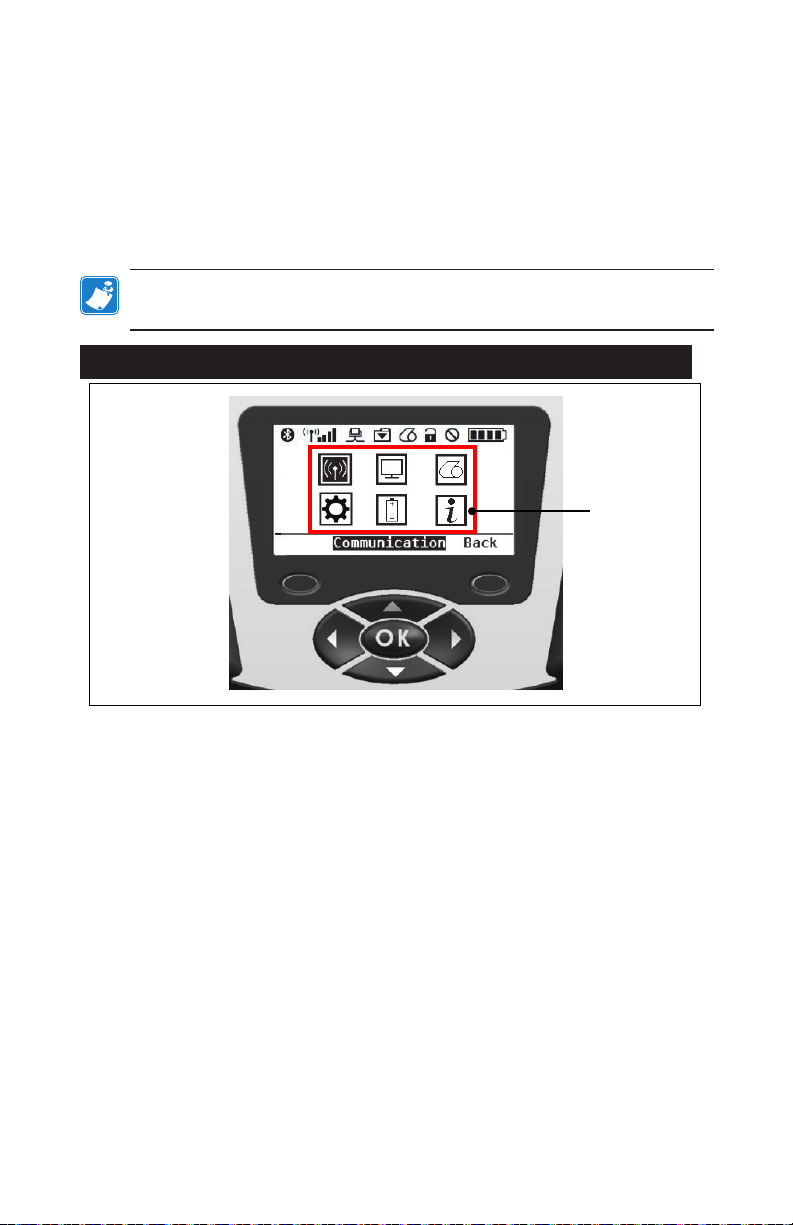
Main Menu Screen (QLn320/220)
The user can select options on the Main Menu screen by
pressing the soft key located beneath the Menu option on
the navigation bar. The Main Menu screen displays graphical
options including Communication, Display, Media, Settings,
Battery, and Help.
Note • The QLn Healthcare printers feature a different menu system. See
Page 40 for details.
Figure 15: Main Menu Screen (QLn320/220)
Info (Help)
Icon
The user can scroll between icons using the four-way arrow
buttons. When an icon is highlighted, its text description will
be displayed in the middle of the navigation bar, and can be
selected by pressing the “OK” button. This will take the user to
the screen with status information specific to that option. The
Info (or Help) menu provides useful information on a variety of
topics. Please explore this menu to become more familiar with
your printer and how it operates.
The QLn Series printers will also display various alerts, such
as “Media Out”, “Media Cover Open”, or “Battery Low”. The
user can respond to questions by pressing one of the soft
keys to indicate that an action has been taken to address the
alert in question. Once the condition causing the alert has
been addressed (i.e. loading media), the alert message will be
cleared. (See Appendix H for a complete list of alerts for the
QLn Series printers.)
38
QLn Series User Guide
Page 39

Soft Keys
Programmable LCD Settings
In addition to the status icons, the LCD control panel can display other printer settings and functions as text. Applications
can be written to allow the user to view and /or modify these
settings using the scroll and select keys on the display. The
menu that comes with the printer provides access to the most
commonly used parameters. Refer to the Programming Guide
(p/n P1012728-008) for a complete list of the parameters, and
for details on how to change the front panel display at
www.zebra.com/manuals).
The LCD backlighting option allows viewing of the screen in
a dark environment, or provides better contrast in a very bright
environment. The QLn320 and QLn220 can be programmed to
enter a low power mode (Backlight Off) during periods of front
panel inactivity. While in low power mode, the screen is populated with menus and status icons, data which may or may not
be readable depending on ambient light conditions. The QLn
Series printers provide a configurable time delay from the time
the backlight is turned on to when it turns off. The time range
for this delay is 5 to 1200 seconds with a default time of 10 seconds. The backlight can be activated within one second after any
of the cursor, select, or soft keys is pressed. (The feed button
does not activate the backlight.) The status bar icons, the user
space content, and the navigation bar will remain on the screen
with the backlight off. Extensive use of the display backlight will
decrease the time the printer can run between charges. Refer to
the section “Extending Battery Life” for more information.
39
QLn Series User Guide
Page 40
Home Menu Screen (QLn420 and QLn Healthcare Printers)
The QLn420 and QLn Healthcare printers share the same
control panel. The printer’s control panel includes a display
where the user can view the printer’s status or change its
operating parameters. After the printer completes the
power-up sequence, it moves to the Idle Display screen
(Figure 21). This screen includes the printer’s current status,
information such as firmware version and IP address, and a
Home menu shortcut.
The Home Menu for the printer uses a different set of icons
than the standard QLn320 and QLn220, uses larger fonts for
enhanced readability, and also provides support for multiple
languages. The Home Menu screen displays graphical
parameter options including Settings, Tools, Network, Battery,
Language, Sensors, Ports, and Bluetooth (as shown in Figure
22). These options allow the user to view the printer’s status
or change its operating parameters.
Figure 16: Idle Display Screen (QLn420 and QLn Healthcare)
PRINTER READY
V68.18.3z
Home
Icon
Current
Status
The printer’s operating parameters are sorted into eight (8)
user menus, which you can access through the printer’s Home
menu (Figure 22). Click on the Home icon located on the Idle
Display screen to proceed to the Home Menu.
The user can scroll between icons using the four-way arrow
buttons. When an icon is highlighted, its text description will
be displayed in the middle of the navigation bar, and can be
selected by pressing the “OK” button. This will take the user to
the screen with status information specific to that option.
40
QLn Series User Guide
Page 41
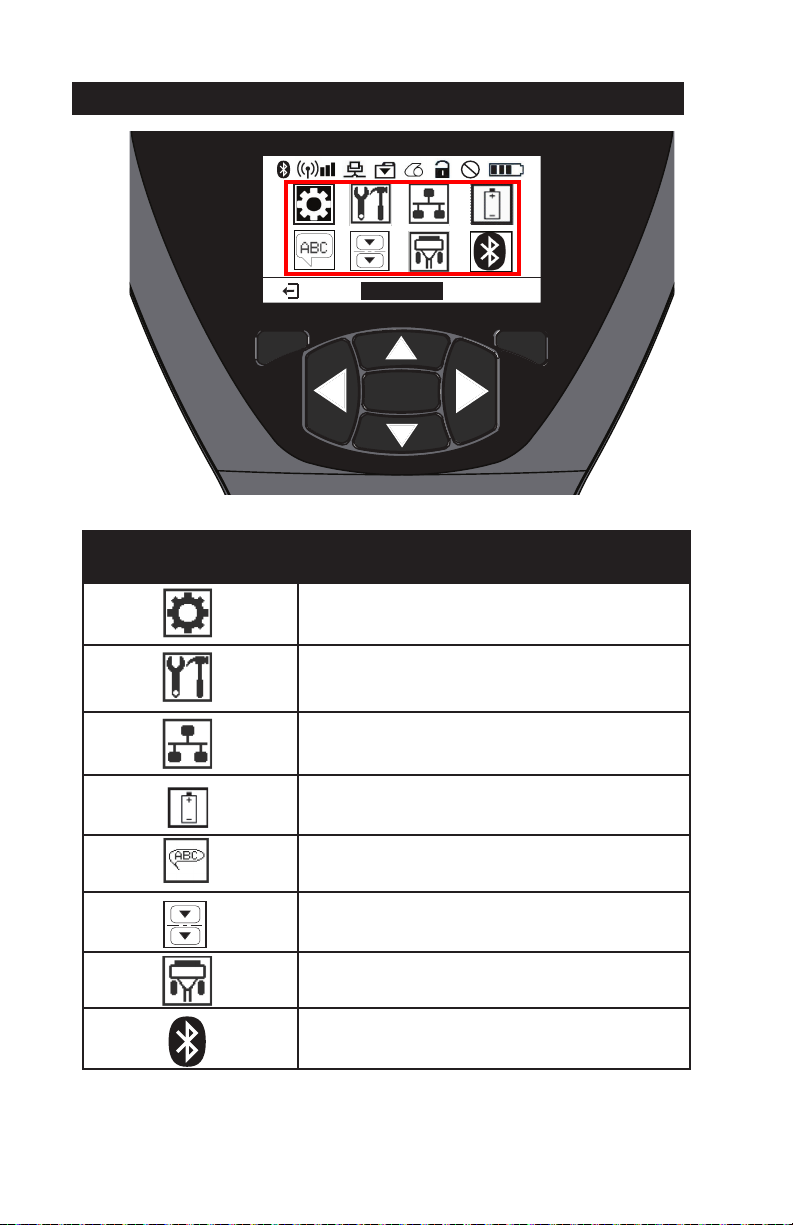
Figure 17: Home Display Screen (QLn420 and QLn Healthcare)
SETTINGS
OK
OK
Icon Parameter
See Settings menu in Appendix D
See Toolss menu in Appendix D
See Network menu in Appendix D
See Battery menu in Appendix D
See Language menu in Appendix D
See Sensors menu in Appendix D
See Ports menu in Appendix D
See Bluetooth menu in Appendix D
41
QLn Series User Guide
Page 42

Whereas the QLn320 and 220 printers have multiple line
OK
items per screen, the QLn420 and QLn Healthcare printers
display one setting per screen using larger fonts (as shown
below). In order to navigate to the next setting, click on the
right arrow button. Click on the soft key below the Home
icon to return to the Home Menu screen to choose a different
parameter.
Figure 18: Print Settings Example
DARKNESS
-49
Some parameter settings have a scroll option to view multiple
setting choices. This option is identifiable by the presence
of up and down arrows located on either side of the display
(Figure 24). For example, the Tools parameter has a Help
option for many printer functions such as media, battery icon,
error icon, latch icon, media icon, receive data icon, ethernet
icon, signal icon, WLAN icon, Bluetooth icon, power LED,
printhead, and battery.
42
QLn Series User Guide
Page 43

Press the up and down arrows on the keypad to scroll
through a setting’s various options. Press the left and right
arrows to scroll to the next setting.
Figure 19: Scroll Option (Help Settings)
HELP FOR
Scroll
Indicator
Keypad
MEDIA
OK
OK
GET HELP
Scroll
Indicator
Soft Key
Press the soft key beneath the “GET HELP” command on the
display in this example to receive basic help information for
loading media in the printer (Figure 20).
Figure 20: Scroll Details (Help For Media)
1: Open media cover by
pressing down on the gold
release button on right
hand side of the printer.
BACK
Press the soft key beneath “BACK” to return to the previous
screen.
43
QLn Series User Guide
Page 44

Verify the Printer is Working
Before you connect the printer to your computer or portable data terminal, make sure that the printer is in proper working order. You can do this by printing a configuration label using
the “two key” method. If you can’t get this label to print, refer to
“Troubleshooting”.
Printing a Configuration Label
1. Turn the printer off. Load the media compartment with
journal media (media with no black bars printed on the
back)
2. Press and hold the Feed Button.
3. Press and release the Power button and keep the Feed
button pressed. When printing starts, release the Feed
button. The unit will print a line of interlocking “x” characters to
ensure all elements of the print head are working, print out the
version of software loaded in the printer and then print the
report.
Note that the report can also be printed from the Info (Help)
menu on the LCD.
The report indicates model, serial number, baud rate, and more
detailed information on the printer’s configuration and
parameter settings. (See the Troubleshooting Section for
sample printouts and a further discussion on how to use
the configuration label as a diagnostic tool.)
44
QLn Series User Guide
Page 45

Connecting the Printer
The printer must establish communications with a host
terminal which sends the data to be printed. Communications
occur in four basic ways:
• QLn Series printers can communicate by cable via either
RS-232C or USB 2.0 protocols. USB drivers are included
in the Zebra Designer Driver which can be downloaded
from www.zebra.com/drivers.
• By means of a wireless LAN (Local Area Network) per
802.11 specifications. (Optional)
• By means of the Ethernet when docked on the Ethernet
cradle. (Optional)
• By means of a Bluetooth short range radio frequency link.
(Optional)
• WinMobile®, Blackberry®, and Android® devices use
standard Bluetooth protocol.
• QLn Series printers are compatible with iOS devices,
therefore printing via Bluetooth to an Apple® device is
possible.
45
QLn Series User Guide
Page 46

Cable Communication
Caution • The printer should be turned off before connecting or
disconnecting a communications cable.
The QLn Series printers can communicate by cable; the
specific cable supplied with your printer will vary with the host
terminal and your model printer.
RS-232C Communications
The 14-pin serial connector on your communications cable
plugs into the serial communications port on the side of the
printer. QLn Series printers also have a USB port.
USB Communications
The small 5-pin connector on the USB cable plugs into the
printer. The connectors are keyed to assure correct alignment;
do not try to force the cable if it does not plug in.
Figure 21: Communication Options (QLn320 Shown)
Communications
Port
RS-232C or USB Communications
Cable to Computer.
(Refer to Appendix A for part #’s.
QLn Series User Guide
Communications Cable to Terminal.
Part #’s vary. Refer to Appendix A.
46
Page 47

The other end of the cable must be plugged into the host
terminal as shown in Figure 21, or to a serial or USB port on a
computer (Figure 21). The QLn Series is configured with the
USB Open HCI interface driver allowing it to communicate
with Windows® based devices.
USB drivers are included in the Zebra Designer Driver which
can be downloaded from the Zebra Web site. Other terminals
or communications devices may require the installation of
special drivers to use the USB connection. Consult the factory
for further details.
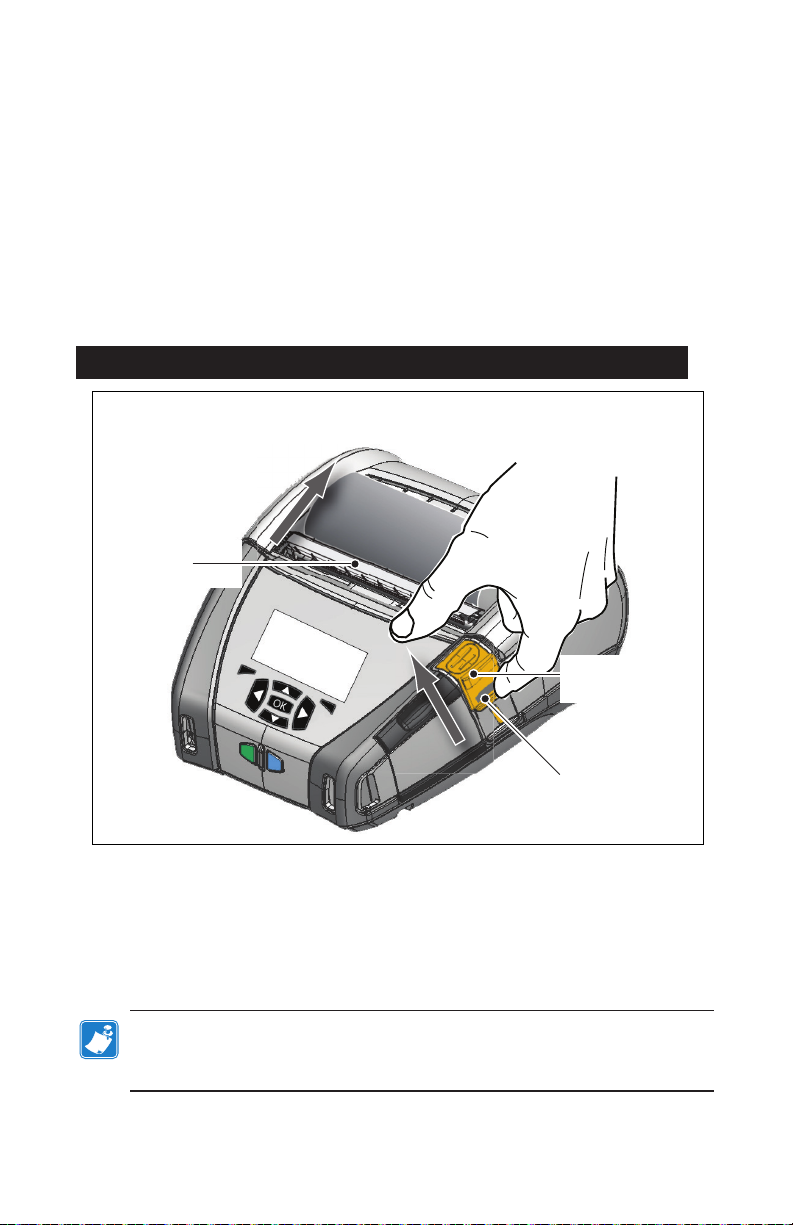
Providing Strain Relief for Communications Cable
If you are connecting either a USB or RS-232 communications
cable to the printer permanently, access the communications
port on the side of the printer next to the latch release lever.
Plug the connector into the appropriate port and align the
plastic locking cap with the cut outs shown below. Rotate the
locking cap clockwise to lock the cable in place. (Turn counter
clockwise to unlock the cable.) Once locked in place, this
provides strain relief for the cable and will prevent the cable
from disconnecting from the printer.
Note • Only one cabel can be present in the USB/RS-232
communications port at a time for strain relief purposes.
Figure 22: Communications Port (QLn420 Shown)
Align locking
connector with
these cut-outs.
USB Port
Align locking
connector with
these cut-outs.
QLn Series User Guide
RS-232 Port
47
Page 48
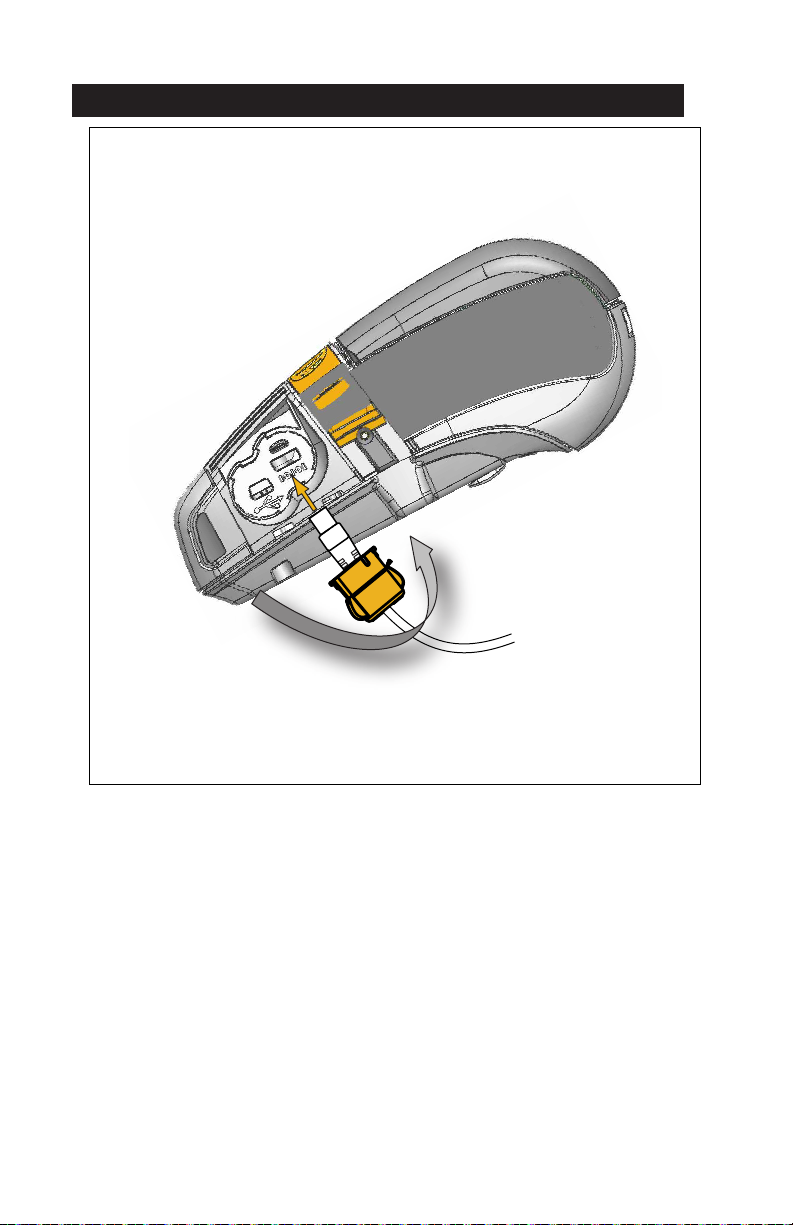
Figure 23: Communications Port Strain Relief (QLn420 Shown)
Rotate locking cap in a
clockwise direction to
lock cable in place..
48
QLn Series User Guide
Page 49

Wireless Communications with Bluetooth
Bluetooth is a worldwide standard for the exchange of data between two devices via radio frequencies. This form of point- topoint communication does not require access points or other
infrastructure. Bluetooth radios are relatively low powered to help
prevent interference with other devices running at similar radio
frequencies. This limits the range of a Bluetooth device to about
10 meters (32 feet). Both the printer and the device it communicates with must follow the Bluetooth standard. Other than conditions specified elsewhere in this manual, only one of the radio
options can be installed in the printer at one time and the antenna used for these transmitters must not be co-located or must not
operate in conjunction with any other antenna.
Bluetooth Networking Overview
Each Bluetooth enabled QLn Series printer is identified by a
unique Bluetooth Device Address (BDADDR). This address resembles a MAC address whereby the first three bytes are vendor, and the last three bytes are device (e.g. 00:22:58:3C:B8:CB).
This address is labeled on the back of the printer via a barcode
for ease of pairing. (See Page 34.) In order to exchange data, two
Bluetooth enabled devices must establish a connection.
Bluetooth software is always running in the background, ready
to respond to connection requests. One device (known as the
master or the client) must request/initiate a connection with another. The second device (the slave or the server) then accepts or
rejects the connection. A Bluetooth enabled QLn Series printer
will normally act as a slave creating a miniature network with the
terminal sometimes referred to as a “piconet”.
Discovery identifies Bluetooth devices that are available for pairing whereby the master device broadcasts a discovery re- quest
and devices respond. If a device is not discoverable, the master
cannot pair unless in knows the BDADDR or has previously paired
with the device.
Bluetooth 2.1 or higher uses Security Level 4 Secure Simple
Pairing (SSP), a mandatory security architecture that features four
(4) association models: Numeric Comparison, Passkey Entry, Just
Works (no user confirmation), and Out of Band (pairing info transmitted OOB, e.g. via Near Field Communication).
49
QLn Series User Guide
Page 50
Figure 24: Bluetooth Security Modes
Security Mode 1
If a BT>/= 2.1 device is pairing
with a BT</= 2.0 device, it falls
back to BT 2.0 compatibility
mode and behaves the same as
BT 2.0. If both devices are BT
>/= 2.1, Secure Simple Pairing
must be used according to the
BT spec.
Security Mode 2
If a BT >/= 2.1 device is pairing
with a BT </= 2.0 device, it falls
back to BT 2.0 compatibility
mode and behaves the same as
BT 2.0. If both devices are BT
>/= 2.1, Secure Simple Pairing
must be used according to the
BT spec.
Security Mode 3
If a BT >/= 2.1 device is pairing
with a BT </= 2.0 device, it falls
back to BT 2.0 compatibility
mode and behaves the same as
BT 2.0. If both devices are BT
>/= 2.1, Secure Simple Pairing
must be used according to the
BT spec.
Security Mode 4: Simple Secure Pairing
Simple Secure Pairing: a new security architecture introduced supported in BT >= 2.1.
Service-level enforced, similar to mode 2. Mandatory when both devices are BT >= 2.1.
There are four association models currently supported by mode 4. Security requirements for
services must be classified as one of the following: authenticated link key required, unauthenticated link key required, or no security required. SSP improves security through the addition
of ECDH public key cryptography for protection against passive eavesdropping and man-inthe-middle (MITM) attacks during pairing.
Numeric Comparison Passkey Entry Just Works Out of Band (OOB)
Designed for situation
where both devices are
capable of displaying
a six-digit number and
allowing user to enter
“yes” or “no” response.
During pairing, user
enters “yes” if number
displayed on both devices matches to complete
pairing. Differs from
the use of PINs in
legacy (BT<=2.0)
pairing because the
number displayed for
comparison is not used
for subsequent link key
generation, so even if it
is viewed or captured by
an attacker, it could not
be used to determine
the resulting link or
encryption key.
Designed for situation
where one device has
input capability but no
display (e.g. keyboard),
while other device has
a display. The device
with a display shows a
six-digit number, then
the user enters this
key on the device with
input. As with numeric
comparison, the six-digit number is not used in
link key generation.
Designed for situation
where one (or both) of
the pairing devices has
neither a display nor
keyboard for entering
digits (e.g. Bluetooth
headset). It performs
authentication step 1
in the same manner as
as numeric comparison, but the user
cannot verify that both
values match, so MITM
(man-in-the-middle) protection is not provided.
This is the only model
in SSP that does not
provide authenticated
link keys.
Designed for devices
that support a wireless
technology other than
Bluetooth (e.g. NFC)
for the purposes of
device discovery and
cryptographic value
exchange. In the case
of NFC, the OOB model
allows devices to pair
securely by simply tapping one device against
the other, followed by
the user accepting the
pairing via a single
button push. Security
against eavesdropping
and MITM attacks is
dependant on the OOB
technology.
Each mode, except for Just Works, has Man-In-The-Middle
(MITM) protection, meaning no third device can view the data being passed between the two devices involved. The SSP mode is
usually negotiated automatically based on the capabilities of both
the master and slave. Lower security modes can be disabled via
the bluetooth.minimu m _ security _ mode SGD. The
bluetooth.minimu m _ security _ mode SGD sets the lowest
security level at which the printer will establish a Bluetooth connection. The printer will always connect at a higher security level
if requested by the master device. To change the security mode
and security settings in the QLn Series printers, use Zebra Setup
Utilities.
50
QLn Series User Guide
Page 51
Figure 25: Bluetooth Minimum Security Modes
BT Version of Master Device (>2.1)
bluetooth.minimum_security_mode=1
bluetooth.minimum_security_mode=2
bluetooth.minimum_security_mode=3
bluetooth.minimum_security_mode=4
bluetooth.bluetooth_PIN
Secure Simple Pairing
Just Works/Numeric Comparison
Secure Simple Pairing
Just Works/Numeric Comparison
Secure Simple Pairing
Numeric Comparison
Secure Simple Pairing
Numeric Comparison
Not Used
bluetooth.minimu m _ security _ mode sets the lowest security
level at which the printer will establish a Bluetooth connection. The
printer will always connect at a higher security level if requested by the
master device.
The QLn Series printers also feature bonding for Bluetooth. The
printer caches pairing info so devices stay paired through power cycles and disconnects. This eliminates the need to re- pair on
every connection establishment.
The bluetooth.bonding SGD is on by default.
Note • For detailed information on Bluetooth, please refer to the
Bluetooth Wireless User Guide (P1068791-001) at:
http://www.zebra.com/us/en/support-downloads.html
In addition, the QLn Series printers support Near Field
Communication (NFC) technology. Using the “Print Touch” feature located on the side of the printer, end-users can automatically connect via Bluetooth from a handheld device that supports
NFC technology. The NFC tag has the printer’s BDADDR encoded in a URL on the tag. Simply touching the NFC handheld device
to the “Print Touch” icon on the printer will connect and pair the
handheld device to the printer.
51
QLn Series User Guide
Page 52

WLAN Overview
QLn Series printers can be equipped with a radio that uses the
industry standard 802.11 protocols. They will have the FCC ID
number on the serial number label on the back of the unit.
• QLn Series Wireless Network Printers with the Zebra
802.11 WLAN radio module can be identified by the text
“Wireless Network Printer” on the serial number label on the back
of the printer.
• These printers allow communication as a node within a wireless local area network (WLAN). Methods of establishing communications to the printer will vary with each application.
More information and LAN configuration utilities are included
in the Zebra Net Bridge™ program (version 2.8 and later). Zebra
Setup Utilities (ZSU) can also be used to configure WLAN communications settings. Both Net Bridge and ZSU may be downloaded from the Zebra Web site.
Setting Up the Software
QLn Series printers use Zebra’s CPCL and ZPL Programming
languages which were designed for mobile printing applications.
CPCL and ZPL are fully described in the ZPL Programming Guide
(p/n P1012728-008) available on-line at www.zebra.com/manuals.
You can also use Designer Pro, Zebra’s Windows® based label
creation program which uses a graphical interface to create and
edit labels in either language.
Refer to Appendix F for tips on downloading the Designer Pro
application from Zebra’s Web site.
52
QLn Series User Guide
Page 53

Setting Up the Software
QLn Series printers use Zebra’s CPCL and ZPL Programming
languages which were designed for mobile printing applications.
CPCL and ZPL are fully described in the ZPL Programming Guide
(p/n P1012728-008) available on-line at www.zebra.com/manuals.
You can also use Designer Pro, Zebra’s Windows® based label
creation program which uses a graphical interface to create and
edit labels in either language.
Refer to Appendix G for tips on downloading the Designer Pro
application from Zebra’s Web site.
Near Field Communication (NFC)
Much like Bluetooth and Wi-Fi technologies, Near Field
Communication (NFC) allows wireless communication and data
exchange between digital devices like smartphones. Yet NFC utilizes electromagnetic radio fields while technologies such as
Bluetooth and Wi-Fi focus on radio transmissions instead.
NFC is an offshoot of Radio Frequency Identification (RFID), with
the exception that NFC is designed for use by devices within close
proximity to each other, i.e. a smartphone and a QLn Series printer. NFC allows these devices to establish communication with
each other by touching them together or bringing them into proximity, usually no more than 7.62 centimeters (3 inches). Three
forms of NFC technology exist: Type A, Type B, and FeliCa. All are
similar but communicate in slightly different ways. FeliCa is commonly found in Japan.
Devices using NFC may be active or passive. A passive device,
such as a QLn Series printer with an NFC tag, contains information that other devices can read but does not read any information
itself.
An active device, such as a smartphone, can read the information on the printer’s NFC tag, but the tag itself does nothing except transmit the info to authorized devices.
53
QLn Series User Guide
Page 54
Active devices can read information and send it. An active NFC
device, like a smartphone, would not only be able to collect information from NFC tags, but it would also be able to exchange
information with other compatible phones or devices. An active
device could even alter the information on the NFC tag if authorized to make such changes. To ensure security, NFC often establishes a secure channel and uses encryption when sending
sensitive information.
Figure 26: Near Field Communication (NFC) Pairing
http://www.zebra.com/nfc
Note • Tapping the Zebra Print TouchTM icon with a Near Field
Communication (NFC) enabled smartphone will provide instant access to
printer-specific information. For more information about NFC and Zebra
products, go to http://www.zebra.com/nfc.Bluetooth pairing applications
via NFC is also possible. Please see Zebra Multi-platform SDK for more
information.
54
QLn Series User Guide
Page 55
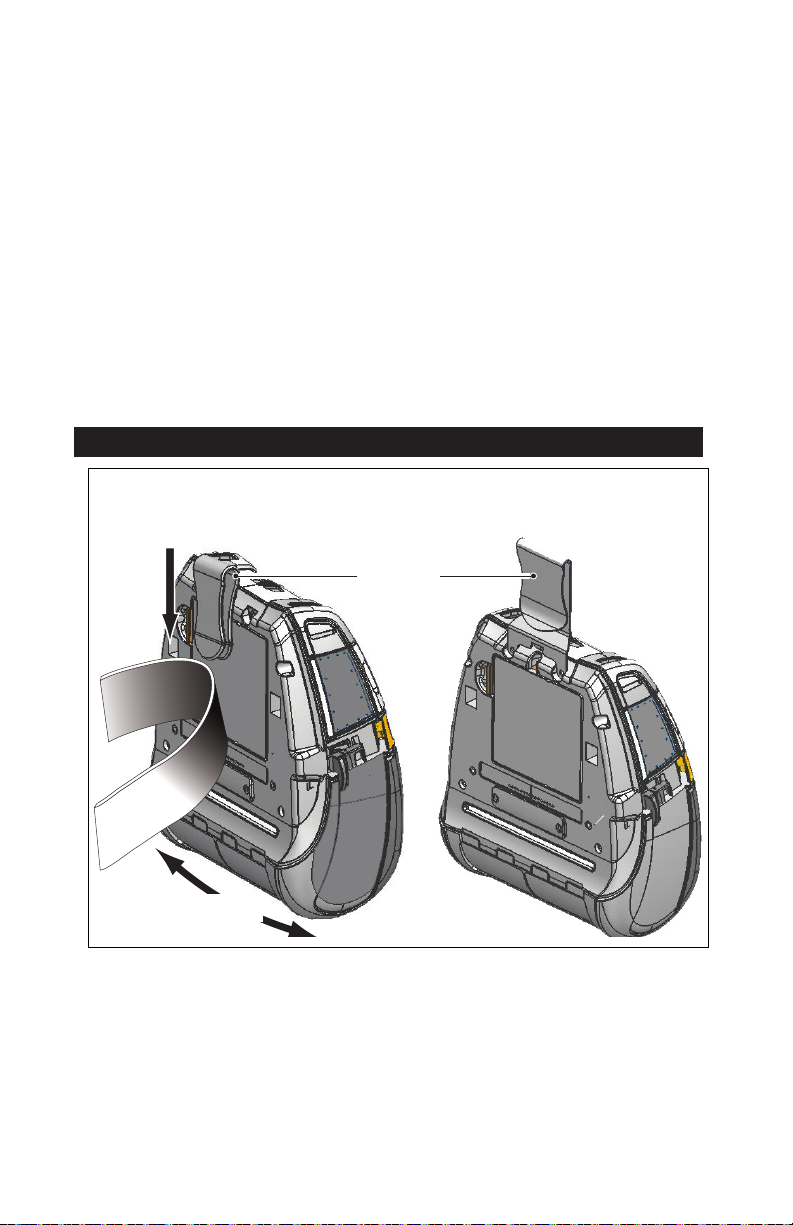
QLn Series Accessories
Swivel Belt Clip
Most QLn Series printers have a plastic swivel belt clip installed
as a standard feature. (It should be noted that QLn220
& 320 printers with extended capacity battery do not come
equipped with a belt clip.) To use: hook the clip over your belt,
and ensure that the clip is securely attached to the belt. The
belt clip will pivot to allow you to move freely while wearing
the printer. The QLn420 also provides a more rigid metal belt
clip as an option.
In order to install or remove the plastic Belt Clip you will
need to remove the battery pack.
Figure 27: Using the Belt Clip (QLn420 Shown)
Metal Belt ClipPlastic Belt Clip
Clip printer to
belt
Printer can pivot freely
55
QLn Series User Guide
Page 56
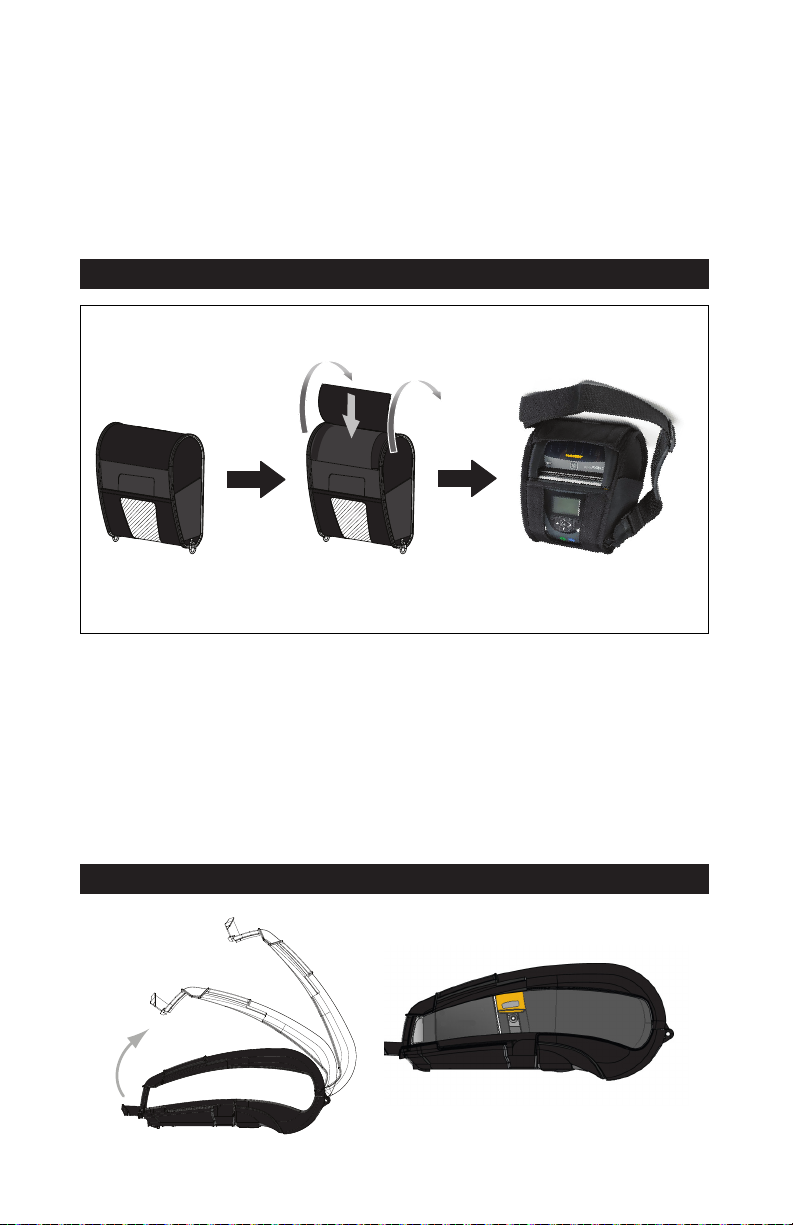
Soft Case
QLn Series printers have soft case options that also allow
you to carry the printer from your belt. The QLn420 soft case
can be ordered through accessory kit number P1050667-017,
the QLn320 is P1031365-029, and the QLn220 accessory kit is
P1031365-044.
Figure 28: Using the Soft Case
Hard Case
The QLn420 printer has a two piece hard case option that
also allows you to carry the printer from your belt, while also
providing increased protection for the printer. It pivots via
a hinge located on the back and snaps into place in front as
shown above. The metal belt clip is mounted to the hard case
and printer with two screws. If no belt clip is used, two shorter
screws are used to hold the printer to the hard case.
Figure 29: Using the QLn420 Hard Case
56
QLn Series User Guide
Page 57

Adjustable Shoulder Strap
Refer to Figure 30 if your printer is equipped with the shoulder
strap option (p/n P1031365-092).
Figure 30: Using the Optional Shoulder Strap
1. Insert the end of the shoulder strap behind the post on the
front side of the printer and loop it
around the post.
2. Slide the end of the strap under the plastic buckle (circled).
3. Slide the end of the strap under the opposite side of the plastic
buckle (as shown). Pull to tighten
the strap inside the buckle.
4. Repeat the same steps on the
opposite side of the printer.
57
QLn Series User Guide
Page 58

Hand Strap
The QLn Series hand strap accessory (p/n P1031365-027)
attaches to the printer’s cut-outs as does the shoulder strap to
provide the user with a convenient and secure method of
carrying the printer. To attach the hand strap to the printer:
• Insert the end of the strap through the cut out on the front
of the printer as shown below.
• Loop the end of the strap back around the cut out and secure
it over the button.
• Repeat this process for the opposite end of the strap.
Figure 31: Hand Strap (QLn420 Shown)
The QLn Series printers also feature two mounting holes on
the base of the printer to accommodate future mounting
options. Refer to RAM Mount Installation Procedure
(p/n AA17518-003) on zebra.com.
58
QLn Series User Guide
Page 59

Preventive Maintenance
Extending Battery Life
• Never expose the battery to direct sunlight or temperatures
over 40° C (104° F) when charging.
• Always use a Zebra charger designed specifically for LithiumIon batteries. Use of any other kind of charger may damage the
bat ter y.
• Use the correct media for your printing requirements. An authorized Zebra re-seller can help you determine the optimum media for your application.
• If you print the same text or graphic on every label, consider
using a pre-printed label.
• Choose the correct print darkness, and print speed for your
media.
• Use software handshaking (XON/XOFF) whenever possible.
• Remove the battery if the printer won’t be used for a day or
more and you’re not performing a maintenance charge.
• Consider purchasing an extra battery.
• Remember that any rechargeable battery will lose its ability
to maintain a charge over time. It can only be recharged a finite
number of times before it must be replaced. Always dispose of
batteries properly. Refer to Appendix E for more information on
battery disposal.
General Cleaning Instructions
Caution • Avoid possible personal injury or damage to the printer. Never
insert any pointed or sharp objects into the printer. Always turn off the
printer before performing any cleaning procedures. Use care when
working near the tear bars as the edges are very sharp.
Warning • The printhead can get very hot after prolonged printing. Allow
it to cool off before attempting any cleaning procedures.
Only use a Zebra cleaning pen (not supplied with the printer) or a cotton
swab with 90% medical grade alcohol for cleaning the printhead.
Caution • Use only cleaning agents specified in the following tables.
Zebra Technologies Corporation will not be responsible for damage
caused by any other cleaning materials used on this printer.
59
QLn Series User Guide
Page 60

QLn Series Cleaning
Area Method Interval
Printhead Use a Zebra cleaning pen
Platen Surface
(Linered)
Platen Surface
(Linerless)
Scraper (Linerless Units
Only)
Tear Bar Clean thoroughly with 90%
Printer Exterior Water-dampened cloth or
to swab the thin gray line
on the printhead, cleaning
the print elements from the
center to the outside edges
of the printhead.
Rotate the platen roller and
clean it thoroughly with a
fiber-free swab, or lint free,
clean, damp cloth lightly
moistened with medical
grade alcohol (90% pure or
better) (Fig. 32a/Fig. 32b).
Rotate platen roller and
clean with a fiber-free swab
and 1 part liquid soap
(Palmolive or Dawn) and 25
parts water. Use pure water
to clean after soap/water
mixture.
Use adhesive side of media
to clean scraper on linerless
units. (Fig. 32b)
medical grade alcohol and a
cotton swab. (Fig. 32a)
90% medical grade alcohol
wipe.
After every five rolls of
media (or more often,
if needed). When using
linerless type media,
cleaning is required after
every roll of media.
After every five rolls of
media (or more often, if
needed)
Clean platen only if there
is an issue during printing,
i.e. media not releasing
from the platen. (*See Note
below.)
After every five rolls of
media (or more often, if
needed).
As needed
As needed
Printer Interior Gently brush out printer.
Interior of units with
Linerless Platens
Note: This is an emergency procedure only to remove foreign
Ensure the Bar Sensor and
Gap Sensor windows are
free of dust. (Fig. 32a)
Clean thoroughly with 90%
medical grade alcohol and
a fiber-free swab. (See Fig.
32b for specific target areas
for interior cleaning.)
As needed
After every five rolls of
media (or more often, if
needed).
contaminates (oils, dirt) from the platen that can damage the printhead
or other printer components. This procedure will shorten or even exhaust
the linerless platen’s useable life. If the linerless media continues to jam
after cleaning and feeding 1 to 2 meters (3 to 5 feet) of media, replace the
platen.
60
QLn Series User Guide
Page 61

Important: The above cleaning procedures are not for QLn Healthcare
printers. Refer to the Guide to Disinfecting and Cleaning QLn Healthcare
Printers (p/n P1066640-001) for detailed cleaning instructions.
Figure 32a: Cleaning the QLn Series Printers (Linered)
Peeler Bar
Platen Roller
Bar Sensor
Gap Sensor
Printhead
Elements
Tear Bar
Peeler Bail
Figure 32b: Cleaning the QLn Series Printers (Linerless)
Platen Roller
Platen Holder
Media Support
Disk
Media Support
61
QLn Series User Guide
Label PresenceSensor
Scraper
Printhead
Elements
Media Support
Disk
Media Support
Page 62

Troubleshooting
Figure 33: Control Panels
Front Control Panel
QLn420
Green/Yellow
LED
QLn320/220
Status Icons
LCD Control Panel
Front Control Panel
If the printer is not functioning properly, refer to the chart
below to find the state of the LED charge indicator on the
Front Control Panel. Then refer to the Troubleshooting topic
referenced in the chart to resolve the problem. Please note
that the charge LED is only on when DC power is applied to
the printer. If no DC power is applied the LED is off, which
does not apply to the table below.
Green Yellow Indication Ref. to Topic
Solid Off Fully Charged n/a
Off Solid Charging n/a
Off Off Fault 1
62
QLn Series User Guide
Page 63

LCD Control Panel Indicators
The top of the display shows several icons which indicate
the status of various printer functions. Check the indicator
status, then refer to the Troubleshooting topic referenced in the
chart to resolve the problem.
Icon Status Indication
On Bluetooth link established
Not Present Bluetooth link inactive
Blinking Connecting or transmitting labels
Antenna Blinking Looking for AP
Antenna Blinking/1 Parenthesis
Steady
Antenna and 2 Parentheses
Steady
Antenna and 2 Parentheses
Blinking
Not Present No Radio Present
4 Bars >80% charged
3 Bars 60%-80% charged
2 Bars 40%-60% charged
1 Bar 20%-40% charged
0 Bars Low Battery
4 Blinking w/ Lightning Bolt Charging >80% Capacity
WLAN Associated & Attempting
Authentication
WLAN Associated and
Authenticated
Receiving Data
3 Blinking w/ Lightning Bolt Charging 60-80% Capacity
2 Blinking w/ Lightning Bolt Charging 40-60% Capacity
1 Blinking w/ Lightning Bolt Charging 20-40% Capacity
0 Bars w/ Lightning Bolt Charging <20% Capacity
Blinking Media cover open
Blinking Receiving data
Steady Ethernet Connected
Not Present No Ethernet Connection
Blinking Data processing in
Steady No data being processed
63
QLn Series User Guide
progress
Page 64
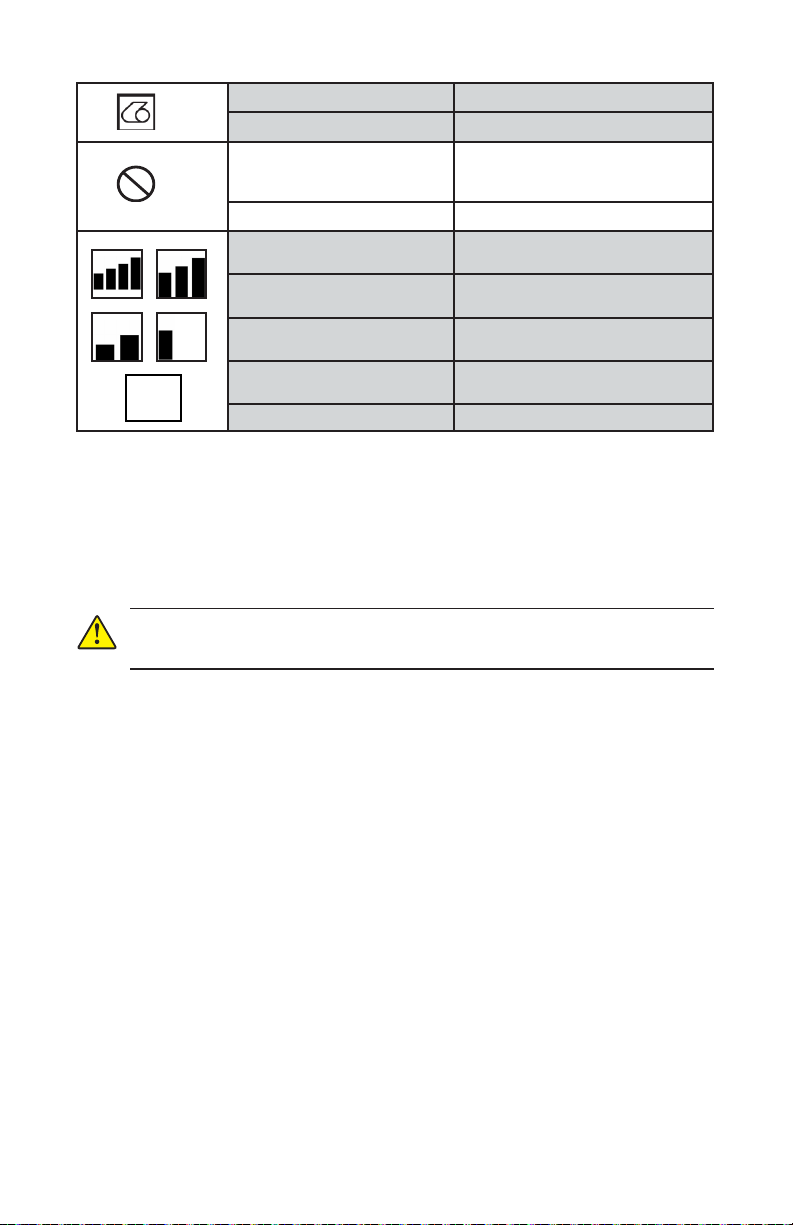
Blinking Out of Media
Steady Media present
Blinking Error exists (excluding
Not Present No error exists
4 Bars 802.11 signal strength
3 Bars 802.11 signal strength
2 Bars 802.11 signal strength </= 50% but
1 Bar 802.11 signal strength
0 Bars No Signal Strength
Media Out and Head
Latch Open)
> 75%
</= 75%
>25%
</= 25%
Troubleshooting Topics
1. No power:
• Check that battery is installed properly.
• Recharge or replace battery as necessary.
Caution: Always dispose of batteries properly. Refer to Appendix F for
more information on proper battery disposal.
2. Media does not feed:
• Be sure media cover is closed and latched.
• Check spindle holding media for any binding.
• Ensure most recently printed label is removed (only in peel
mode).
• Ensure label sensor is not blocked.
3. Poor or faded print:
• Clean print head.
• Check quality of media.
4. Partial or missing print:
• Check media alignment.
• Clean print head.
• Ensure media cover is properly closed and latched.
64
QLn Series User Guide
Page 65

5. Garbled print:
• Check baud rate.
6. No print:
• Check baud rate.
• Replace battery.
• Check cable to terminal.
•Establish RF Link and/or restore LAN associativity.
•Invalid label format or command structure. Place printer in
Communications Diagnostic (Hex Dump) Mode to diagnose problem.
7. Reduced battery charge life:
• If battery is older than 1 year old, short charge life may be due
to normal aging.
• Check battery health.
• Replace battery.
8. flashing:
• Flashing Data icon is normal while data is being received.
9. or flashing:
• Check that media is loaded and that the media cover is closed
and securely latched.
10. Communication error:
•Check baud rate.
•Replace cable to terminal.
11. Label jam:
•Open head release latch and media cover.
•Remove and reinstall media.
12. Skip Labels:
• Check media for top of form sense mark or label gap.
• Check that the maximum print field has not been exceeded
on label.
• Ensure bar or gap sensor is not blocked or malfunctioning.
65
QLn Series User Guide
Page 66

13. Blank LCD screen:
• Make sure printer is turned on.
• No application loaded or application corrupted: reload pro-
gram.
14. No NFC Connectivity
• Ensure smartphone is positioned 3 inches (7.62 cm) or closer
to the Print Touch icon on the side of the printer.
Troubleshooting Tests
Printing a Configuration Label
To print out a listing of the printer’s current configuration fol-
low these steps:
1. Turn the printer off. Load the media compartment with
journal media (media with no black bars printed on the back).
2. Press and hold the Feed Button.
3. Press and release the Power button and keep the Feed
button pressed. When printing starts, release the Feed button.
Note: The configuration report can also be printed from the Info (Help)
menu on the LCD.
Refer to Figures 34, 34a, and 34b for sample configuration print-
outs.
Communications Diagnostics
If there is a problem transferring data between the computer and the printer, try putting the printer in the Communications
Diagnostics Mode (also referred to as the “DUMP” mode). The
printer will print the ASCII characters and their text representation
(or the period ‘.’, if not a printable character) for any data
received from the host computer.
To enter Communications Diagnostics Mode:
1. Print a configuration label as described above.
2. At the end of the diagnostics report, the printer will print:
“Press FEED key to enter DUMP mode”.
3. Press the FEED key. The printer will print: “Entering DUMP
mode”.
66
QLn Series User Guide
Page 67

To enter Communications Diagnostics Mode:
1. Print a configuration label as described above.
2. At the end of the diagnostics report, the printer will print:
“Press FEED key to enter DUMP mode”.
3. Press the FEED key. The printer will print: “Entering DUMP
mode”.
Note • If the FEED key is not pressed within 3 seconds, the printer will
print “DUMP mode not entered” and will resume normal operation.
4. At this point, the printer is in DUMP mode and will print
the ASCII hex codes of any data sent to it, and their text representation (or “.” if not a printable character).
Additionally, a file with a “.dmp” extension containing the
ASCII information will be created and stored in the printer’s
memory. It can be viewed, “cloned” or deleted using the Net
Bridge application. (Refer to the Net Bridge documentation for
more information.)
To terminate the Communications Diagnostics Mode and return the printer to normal operations:
1. Turn the printer OFF.
2. Wait 5 seconds.
3. Turn the printer ON.
Contacting Technical Support
If the printer fails to print the configuration label, or you encounter problems not covered in the Troubleshooting Guide, contact Zebra Technical Support. Technical Support addresses and
phone numbers for your area can be found in Appendix H of this
manual. You will need to supply the following information:
• Model number and type (e.g. QLn320)
• Unit serial number (Found on the large label on the back of the
printer, also found in the configuration label printout.
• Product Configuration Code (PCC) (15 digit number found on
the label on the back of the unit)
67
QLn Series User Guide
Page 68
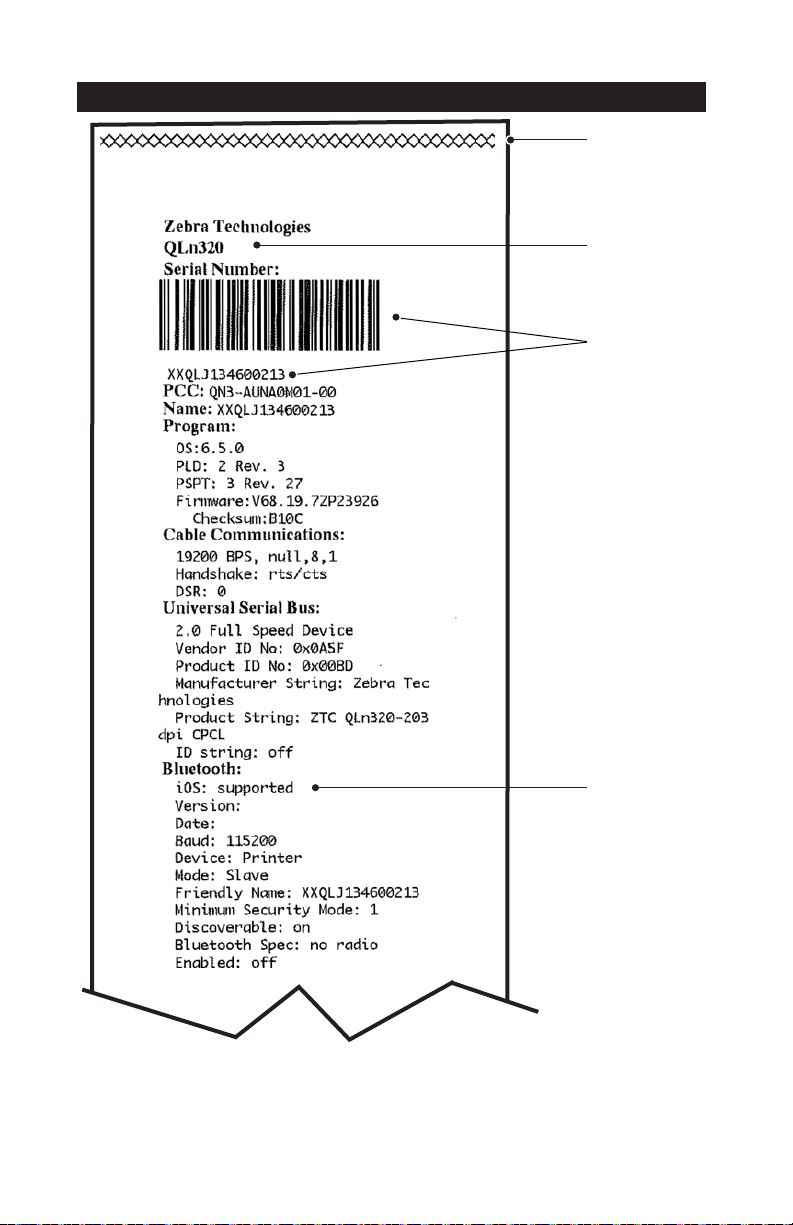
Figure 34: QLn320 Configuration Label
Printhead Test
Identies Printer
as a QLn320
Printer Serial
Number
68
QLn Series User Guide
MFi Supported
Page 69
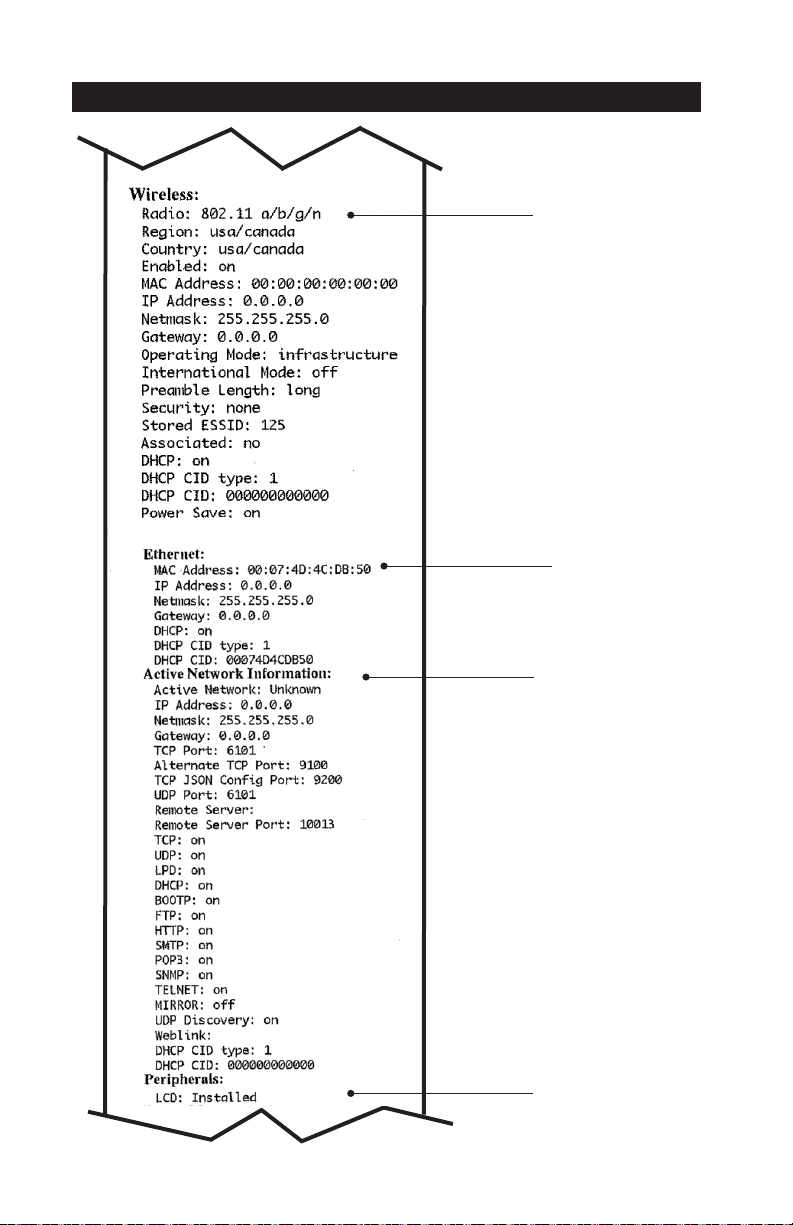
Figure 34a: QLn320 Configuration Label (cont.)
802.11 radio option /n
installed. This section
details the radio’s
network settings
Ethernet Information
Network Information
69
QLn Series User Guide
Peripherals Installed
Page 70
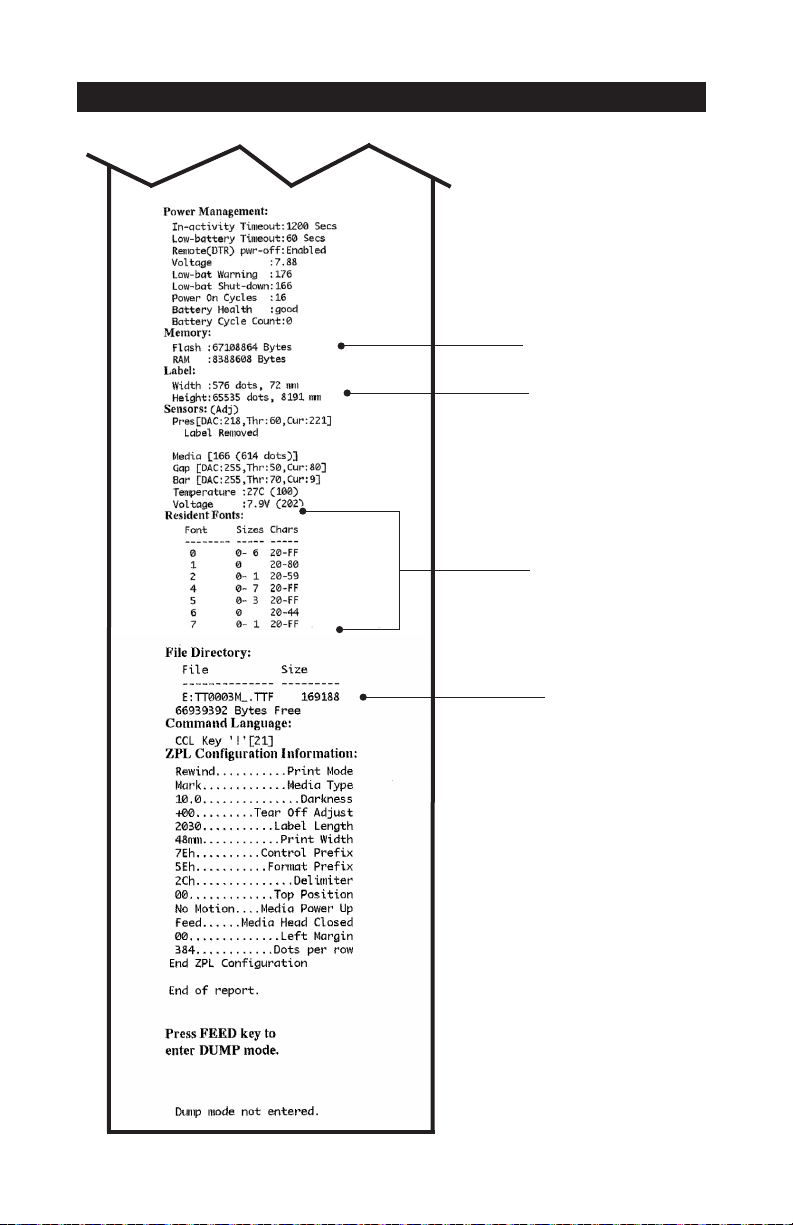
Figure 34b: QLn320 Configuration Label (cont.)
Flash and RAM Memory
Installed
Maximum Label Size
Resident Human Readable
Fonts Installed
Files loaded in printer
memory (includes prescaled or scalable fonts)
70
QLn Series User Guide
Page 71
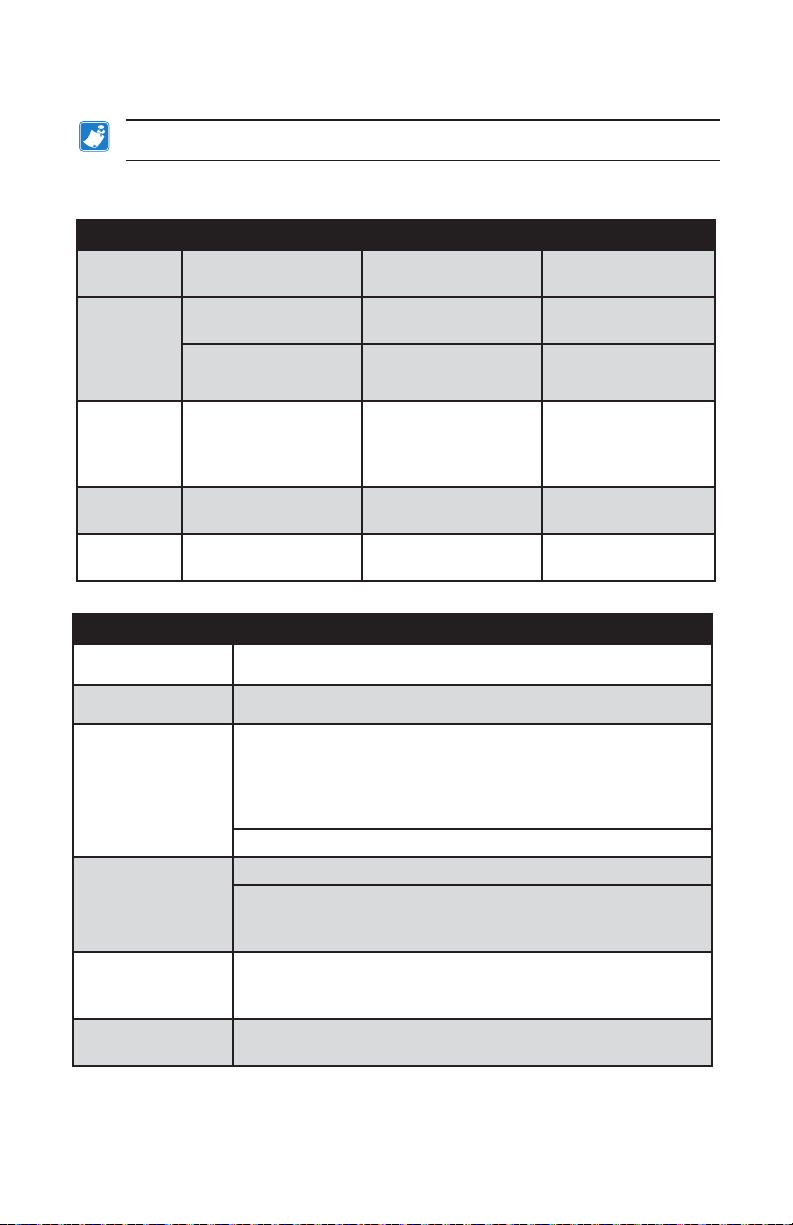
Specifications
Note • Printer specifications are subject to change without notice.
Printing Specifications
Parameter QLn320 QLn220 QLn420
Print Width Up to 74 mm
(2.91 in.)
Print Speed 101.6 mm (4 in.)/sec-
ond without peeler
50.8 mm (2 in.)/second with peeler
Up to 48 mm
(1.89 in.)
Same Same
Same Same
Up to 104 mm
(4.1 in.)
Printhead
Burn Line to
Tear Edge
Distance
Printhead
Life
Print Density
5.08 mm (0.20 in.) 4.31 mm (0.17 in.) 4.06 mm (0.16 in.)
2 million inches of
paper feed
203 dots/in. or better Same Same
Same Same
Memory and Communications Specifications
Parameter QLn Series Printers
Flash Memory 256 MB
RAM Memory 128 MB
Standard
Communications
Optional Wireless
Communication
Real Time Clock
(RTC)
Ethernet 10 or 100 mps Ethernet auto detect when docked in
RS-232 serial port (14 Pin serial connector)
Configurable Baud rate (from 9600 to 115.2 Kbps),
parity and data bits.
Software (X-ON/X-OFF) or hardware (DTR/
STR) communication handshake protocols.
USB 2.0 Full Speed Interface (12 Mbps)
Bluetooth v2.1 compatible 2.4 GHz SRRF link
Optional wireless LAN capabilities comply with
802.11a/b/g/n protocols
QLn420: BT 3.0 and 802.11a/b/g/n
Time and date under application control. Refer to
ZPL Programming Manual, available at
www.zebra.com/manuals for RTC commands.
1
1
cradle.
1. Memory configuration on your printer may be ascertained by printing a configu-
ration label as detailed on page 66.
71
QLn Series User Guide
Page 72
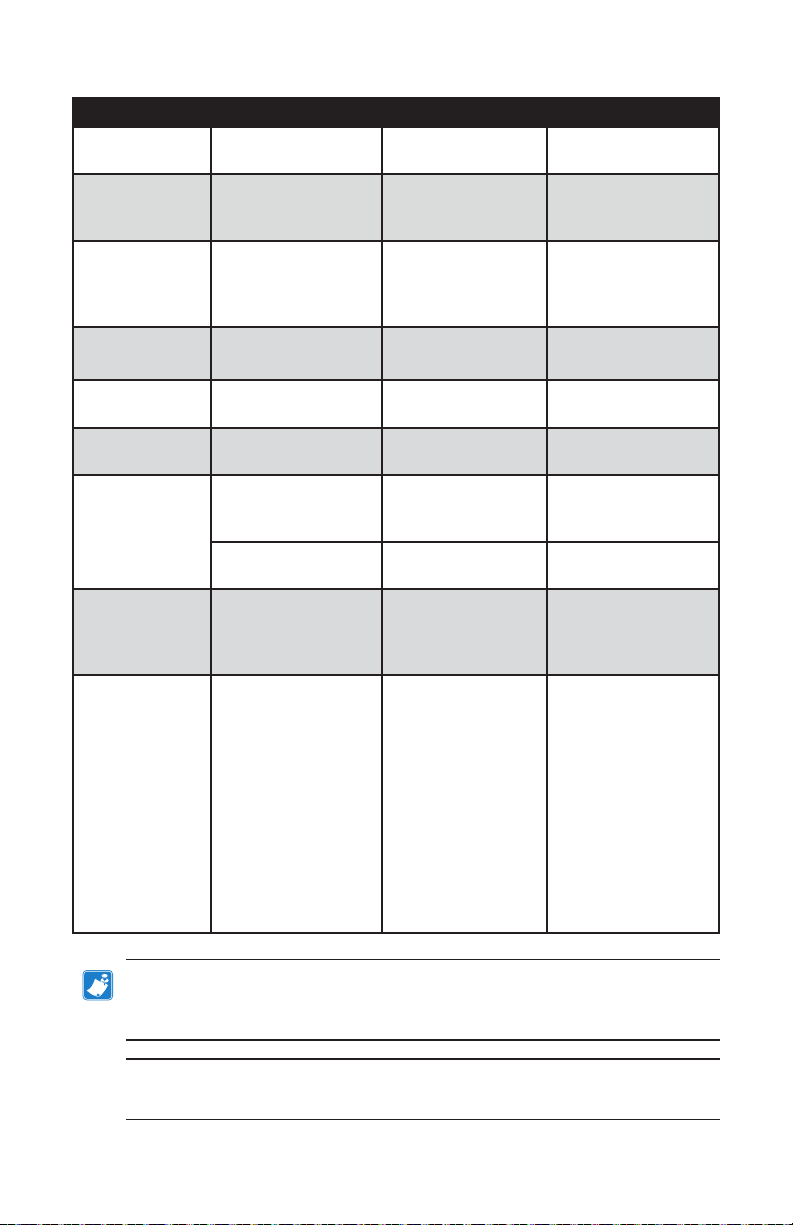
Label Specifications
Parameter QLn320 QLn220 QLn420
Max Media
Width
Max/Min Label
Length
Black Bar Sen-
sor to Printhead
Burnline Dis-
tance
Label Thickness 0.058 to 0.165 mm
25.4 to 79.4 mm
(1.0 to 3.125 in.)
12.7 to 812.8 mm
(0.5 to 32 in.)
maximum
15.87 mm (0.62 in.)
+/-
0.635 mm (0.025 in.)
(0.002 to .0065 in.)
16 to 55.37 mm
(.63 to 2.18 in.)
Same Same
13,46 mm (0.53 in.) 15.87 mm (0.62 in.)
0.058 to 0.140 mm
(0.002 to .0055 in.)
50.8 to 111.76 mm
(2.0 to 4.4 in.)
0.635 mm (0.025 in.)
0.061 to 0.190 mm
(0.0024 to 0.0075 in.)
+/-
Max Tag/Receipt
Thickness
Max Label Roll
Outer Diameter
Inner Core
Diameters**
Black Mark
Location
Black Mark
Dimensions
0.152 mm
(0.006 in.)
66.8 mm (2.6 in.) 55.8 mm (2.2 in.) 66.8 mm (2.6 in.)
19 mm (0.75 in.) or
35.05 mm (1.38 in.)
min. for linered
35.05 mm (1.38 in.)
min. for linerless
The reflective media
black marks should
be centered on
media roll
Minimum mark
width:
12,7 mm (0.5 in.)
perpendicular to
inside edge of
media,
centered within the
width of the roll.
Mark length: 3-11
mm (0.12 to 0.43 in.)
parallel to inside
edge
of media.)
0.152 mm
(0.006 in.)
Same Same
Same Same
Same Same
Same Same
0.190 mm
(0.0075 in.)
Note • Use Zebra brand direct thermal media that is outside wound. Media
may be reflective (black mark) sensing, or transmissive (gap) sensing, diecut, continuous or linerless. For die-cut labels, use only full auto dies.
** QLn Series printers support coreless media which is 19 mm (0.75 in.) in
inner diameter.
72
QLn Series User Guide
Page 73

CPCL Font and Bar Code Specifications and Commands
Standard Fonts
Available Optional Fonts
Linear Bar Codes Available
2-D Bar Codes Available
Rotation Angles
25 bit-mapped fonts; 1 scalable font (CG Trimvirate
Bold Condensed*) *Contains UFST from Agfa Monotype Corporation Downloadable optional bit-mapped &
scalable fonts via Net Bridge software.
Optional International character sets: Chinese 16 x 16
(trad), 16 x 16 (simplified),24 x 24 (simplified); Japanese 16 x 16, 24 x 24
Barcode (CPCL Command)
Aztec (AZTEC)
Codabar (CODABAR, CODABAR 16)
UCC/EAN 128 (UCCEAN128)
Code 39 (39, 39C, F39, F39C)
Code 93 (93)
Code 128 (128)
EAN 8, 13, 2 and 5 digit extensions (EAN8, EAN82,
EAN85, EAN13, EAN132, and EAN135)
EAN-8 Composite (EAN8)
EAN-13 Composite (EAN13)
Plessey (PLESSEY)
lnterleaved 2 of 5 (I2OF5)
MSI (MSI, MSI10, MSI1110)
FIM/POSTNET (FIM)
TLC39 (TLC39)
UCC Composite A/B/C (128(Auto))
UPCA, 2 and 5 digit extensions (UPCA2 and UPCA5)
UPCA Composite (UPCA)
UPCE, 2 and 5 digit extensions (UPCE2 and UPCE5)
UPCE Composite (UPCE)
MaxiCode (MAXICODE)
PDF 417 (PDF-417)
Datamatrix (using ZPL emulation) (DATAMATRIX)
QR Code (QR)
RSS-14 (RSS-Subtype 1)
RSS-14 Truncated (RSS-Subtype 2)
RSS:
RSS-14 Stacked (RSS-Subtype 3)
RSS-14 Stacked Omnidirectional
(RSS-Subtype 4)
RSS Limited (RSS-Subtype 5)
RSS Expanded (RSS-Subtype 6)
0°, 90°, 180°, and 270°
73
QLn Series User Guide
Page 74

ZPL Font and Bar Code Specifications and Commands
Standard Fonts
Available Optional Fonts
Linear Bar Codes Available
2-D Bar Codes Available
Rotation Angles
15 bit-mapped fonts; 1 scalable font (CG Trimvirate
Bold Condensed*) Downloadable optional bitmapped & scalable fonts via Net Bridge software.
Zebra offers font kits covering multiple languages including Simplified and Traditional Chinese, Japanese,
Korean, Hebrew/Arabic, and others.
Barcode (CPCL Command)
Aztec (^B0)
Codabar (^BK)
Codablock (^BB)
Code 11 (^B1)
Code 39 (^B3)
Code 49 (B4)
Code 93 (^BA)
Code 128 (^BC)
DataMatrix (^BX)
EAN-8 (^B8)
EAN-13 (^BE)
GS1 DataBar Omnidirectional (^BR)
Industrial 2 of 5 (^BI)
lnterleaved 2 of 5 (^B2)
ISBT-128 (^BC)
LOGMARS (^BL)
Micro-PDF417 (^BF)
MSI (^BM)
PDF-417 (^B7)
Planet Code (^B5)
Plessey (^BP)
Postnet (^BZ)
Standard 2 of 5 (^BJ)
TLC39 (^BT)
UPC/EAN extensions (^BS)
UPC-A (^BU)
UPC-E (^B9)
Maxi Code (^BD)
QR Code (^BQ)
0°, 90°, 180°, and 270°
74
QLn Series User Guide
Page 75

Communication Ports
RS-232C
Pin # Signal Name Type Description
1 CTS input Clear To Send from host
2 TXD output Tra n smit Data
3 RXD input Receive Data
4 DSR input Data Set Ready: low to high transition
turns printer on, high to low transition
turns printer off (if enabled)
5 GND Ground
6 DTR output Data Terminal Ready: set high when
printer is on. Switched 5V (300mA
max)
7 N/A Do Not Use
8 RTS output Request To Send set high when print-
9 N/A Do Not Use
10 N/A Do Not Use
11 N/A Do Not Use
12 N /A Do Not Use
13 N/A Do Not Use
14 N/A Do Not Use
er is ready to accept a command or data
10
12
8
4
6
2
1
5
3
7
14
9
11
13
Figure 35: RS-232C Communications Port
75
QLn Series User Guide
Page 76

USB
Pin # Signal Name Type Description
1 VBUS - USB Bus Power
2 USB- bi-directional I/O signals
3 USB+ bi-directional I/O signals
4 USB_ID - Identifies A/B connector
5 Return Ground
15
Figure 36: USB Communications Port
Physical, Environmental and Electrical Specifications
Parameter QLn320 QLn220 QLn420
Weight w/ battery 1.6 lbs. (0.75 kg) 1.35 lbs. (0.61 kg) 2.2 lbs. (0.99 kg)
Temperature
Operating: -20 °C to
50 °C
(-4 °F to 122 °F)
(Healthcare is 0 °C to 50
°C (32 °F to 122 °F
Operating:-20 °C to
55 °C
(-4 °F to 131 °F)
(Healthcare is 0 °C to
50 °C (32 °F to 122 °F
Operating: -20 °C to
50 °C
(-4 °F to 122 °F)
Storage: -25 °C to 65 °C
(-13 °F to 149 °F)
Charging: 0 °C to 40°C
(32 °F to 104 °F)
Relative Humidity Operating/Storage:
Battery
Intrusion
Protection (IP)
Rating
10% to 90%
non-condensing
Smart Battery (2 or 4
cell) Lithium-Ion, 7.4
VDC (nominal);
2.45 AHr min.
4 cell Extended Smart
Battery
(Optional)
IP43 (without
optional
environmental case)
IP54 (with case)
QLn Series User Guide
Same Same
Same Same
Same Same
Same Same
4 cell Extended Smart
Battery
(Optional)
IP43 (without
optional
environmental case)
IP54 (with case)
76
IP43 (without
optional
environmental case)
IP54 (with case)
Page 77

Figure 37: QLn420 Overall Dimensions
82.5 mm
(3.25 in.)
Height
186.7 mm
(7.35 in.)
165.1 mm
(6.5 in.)
LengthWidth
77
QLn Series User Guide
Page 78

Figure 38: QLn320 Overall Dimensions
76.9 mm
(3.15 in.)
Height
173.7 mm
(6.85 in.)
117.9 mm
(4.65 in.)
Width Length
78
QLn Series User Guide
Page 79

Figure 39: QLn220 Overall Dimensions
72.4 mm
(2.85 in.)
Height
170.9 mm
(6.73 in.)
91.4 mm
(3.5 in.)
Width Length
79
QLn Series User Guide
Page 80
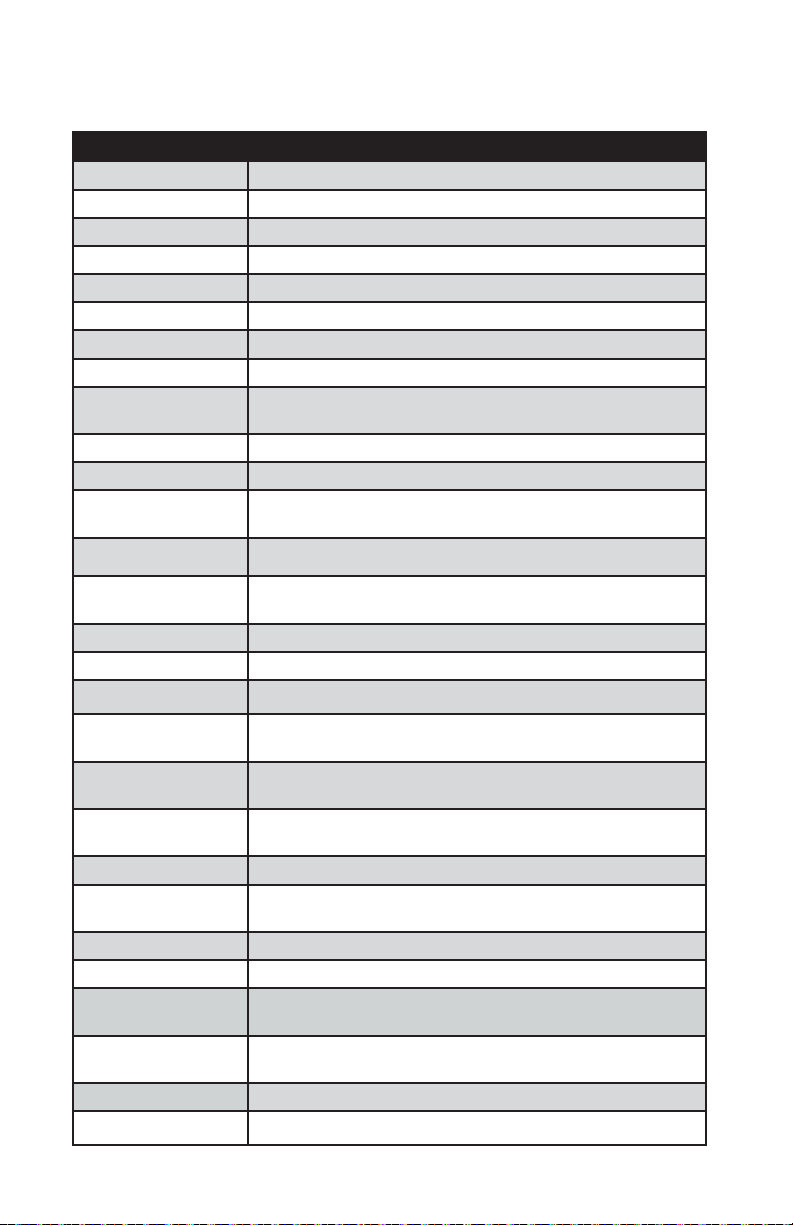
QLn Series Accessories
Part # Description
P1031365-006 KIT ACC QLn220 RUBBER DOOR I/O (15)
P1031365-018 KIT ACC QLn320 RUBBER DOOR I/O (15)
P1031365-019 KIT ACC QLn220/QLn320 RUBBER DOOR DC JACK (15)
P1031365-022 KIT ACC QLn220/320 PLATEN GEAR 48P 22T (25)
P1031365-024 KIT ACC Mobile AC ADAPTER US (type A) cord
P1031365-027 KIT ACC QLn HAND STRAP
P1031365-028 KIT ACC QLn BELT CLIP REPLACEMENT (20)
P1031365-029 KIT ACC QLn320 SOFT CASE (Includes Shoulder Strap)
P1031365-033 KIT ACC QLn-EC AC ADAPTER US (type A) CORD (see
P1031365-038 KIT ACC QLN-EC
P1031365-044 KIT ACC QLn220 SOFT CASE (Includes Shoulder Strap)
P1031365-045 KIT ACC QLN-EC4 AC ADAPTER US CORD (see Sales for
P1031365-050 KIT ACC EC4 WALL MOUNT
Sales for other countries)
other countries)
P1031365-052 KIT ACC QLn Serial Cable (with strain relief) QL Adapter
P1031365-053 KIT ACC QLn Serial Cable, 6’ (with strain relief) PC-DB9
P1031365-054 KIT ACC QLn Serial Cable (with strain relief) to MC9000
P1031365-055 KIT ACC QLn PC-USB Cable, 6’ (with strain relief)
P1031365-056 KIT ACC QLn Serial Cable (with strain relief) RJ45 to Telzon
P1031365-057 KIT ACC QLn Serial Cable (with strain relief) to LS2208
P1031365-058 KIT ACC QLn 16 PIN Serial Cable (with strain relief) to
P1031365-059 KIT ACC QLN220/QLN320 Spare Battery Smart
P1031365-060 KIT ACC QLn 11 PIN Serial Cable (with strain relief) to
P1031365-061 KIT ACC QLn Serial DEX Cable (with strain relief)
P1031365-062 KIT ACC QLn Serial Cable (with strain relief) to RJ45
P1031365-063 Kit ACC SC2 Li-ION Smart Charger, US (type A) cord (see
P1031365-069 KIT, Acc QLn220/320 and ZQ500 Series Spare Extended
P1031365-092 KIT ACC QLn SERIES SHOULDER STRAP
(female DIN)
Adapter
Scanner
MC3000
MC3000
Sales for other countries)
Battery with LED’s
80
QLn Series User Guide
Page 81
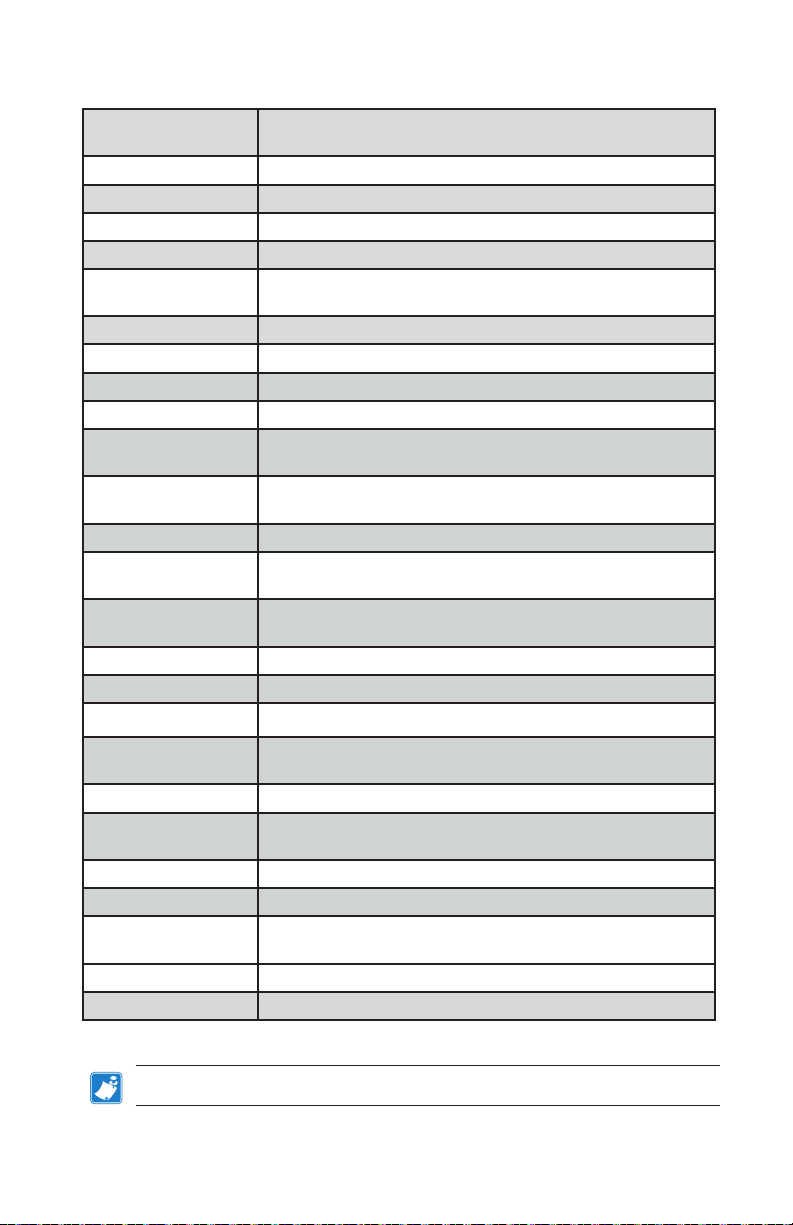
QLn Series Accessories cont.
P1031365-104 KIT ACC QLn Serial Cable (with strain relief) to LS2208
P1050667-007 KIT ACC QLn420 RUBBER DOOR I/O (15)
P1050667-010 KIT ACC QLn420 RUBBER DOOR DC JACK (15)
P1050667-016 KIT ACC QLn420 SPARE BATTERY
P1050667-017 KIT ACC QLn420 SOFT CASE (Includes Shoulder Strap)
P1050667-018 KIT ACC QLn420-EC AC ADAPTER US (type A) CORD (see
P1050667-026 KIT ACC QLn420-VC – 15V – 60V to 12V
P1050667-029 KIT ACC QLn420-EC (NO ADAPTER, NO CORD
P1050667-030 KIT ACC QLn420-VC (no adapter, no cord)
P1050667-031 KIT ACC QLn420 METAL BELT CLIP
P1050667-032 KIT ACC QLn420 Handi-Mount (compact, flexible RAM arm)
P1050667-033 KIT ACC QLn420 Handi-Mount (compact, flexible RAM arm)
P1050667-034 KIT ACC QLn420 ASSY HARD CASE W/METAL BELT CLIP
P1050667-035 KIT ACC QLn420 Mobile Mount for Forklifts (with U-arm
P1050667-036 KIT ACC QLn420 SCREEN SCRATCH PROTECTOR OVERLAY
P1050667-037 KIT ACC QLn420 MOBILE MOUNT PLATE
P1050667-038 KIT ACC QLn420 DESKTOP STAND
P1050667-039 KIT ACC QLn420 SOFT CASE W/O SHOULDER STRAP
Scanner Extended
Sales for other countries)
with Base Plate
without Base Plate
bracket and fanfold bin)
(25)
P1050667-040 KIT ACC QLn420 BATTERY ELIMINATOR WITH POWER
P1050667-041 KIT ACC QLn420 BATTERY ELIMINATOR NO ADAPTER
P1050667-042 KIT, Acc Power Adapter for Mobile Battery Eliminator,
P1050667-047 KIT ACC QLn420 RAM MOUNT PLATE
P1024458-002 BELT,CLIP,QLN,HC
AC18177-5 Model UCLI72-4 Quad Battery Charger (US line cord, see
P1051378-002 BATTERY,PACK,LITHIUM,SMART,QLN HC
ADAPTER
12~48V, open ended
Sales for others)
Note • Refer to Appendix A for additional information on Data I/O cables.
81
QLn Series User Guide
Page 82
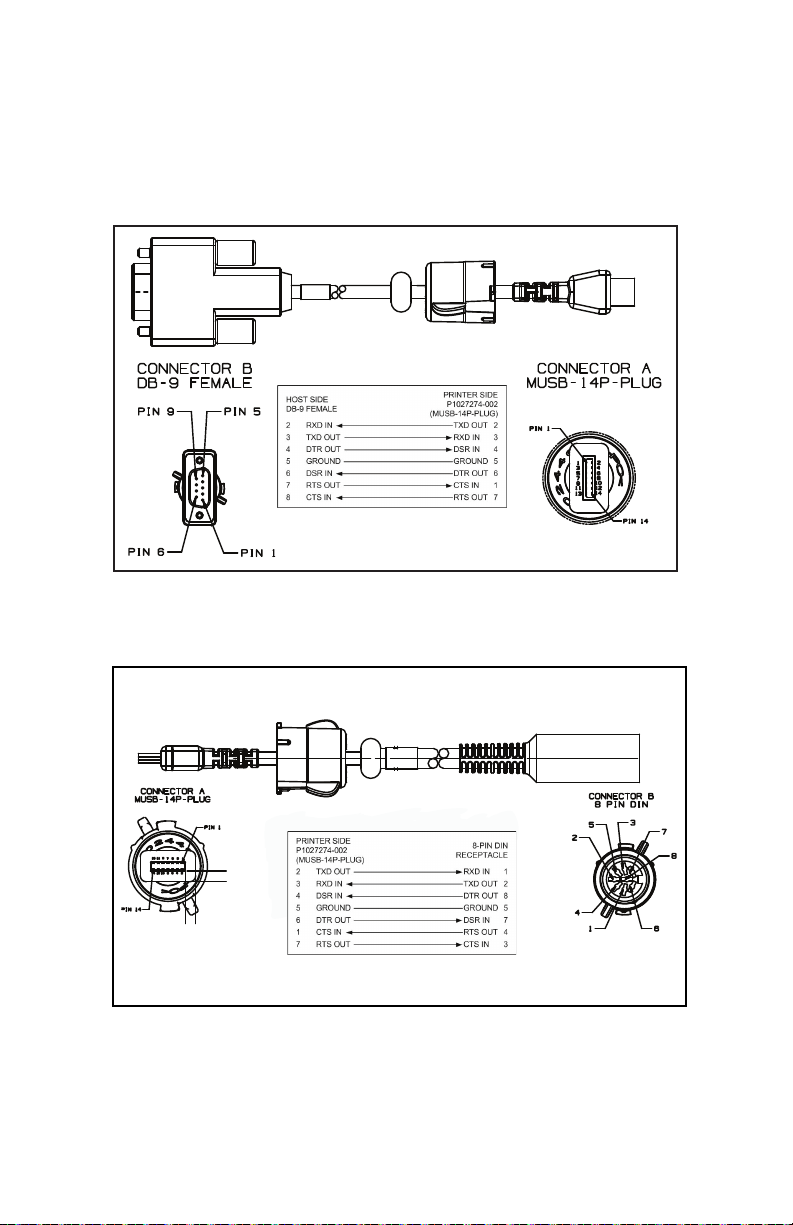
Appendix A
Interface Cables (RS-232 Cables)
Part Number P1031365-053; DB-9 to 14-Pin Serial
Part Number P103136 5 - 0 52; 8-Pin DIN to 14-Pi n Serial Cable
82
QLn Series User Guide
Page 83
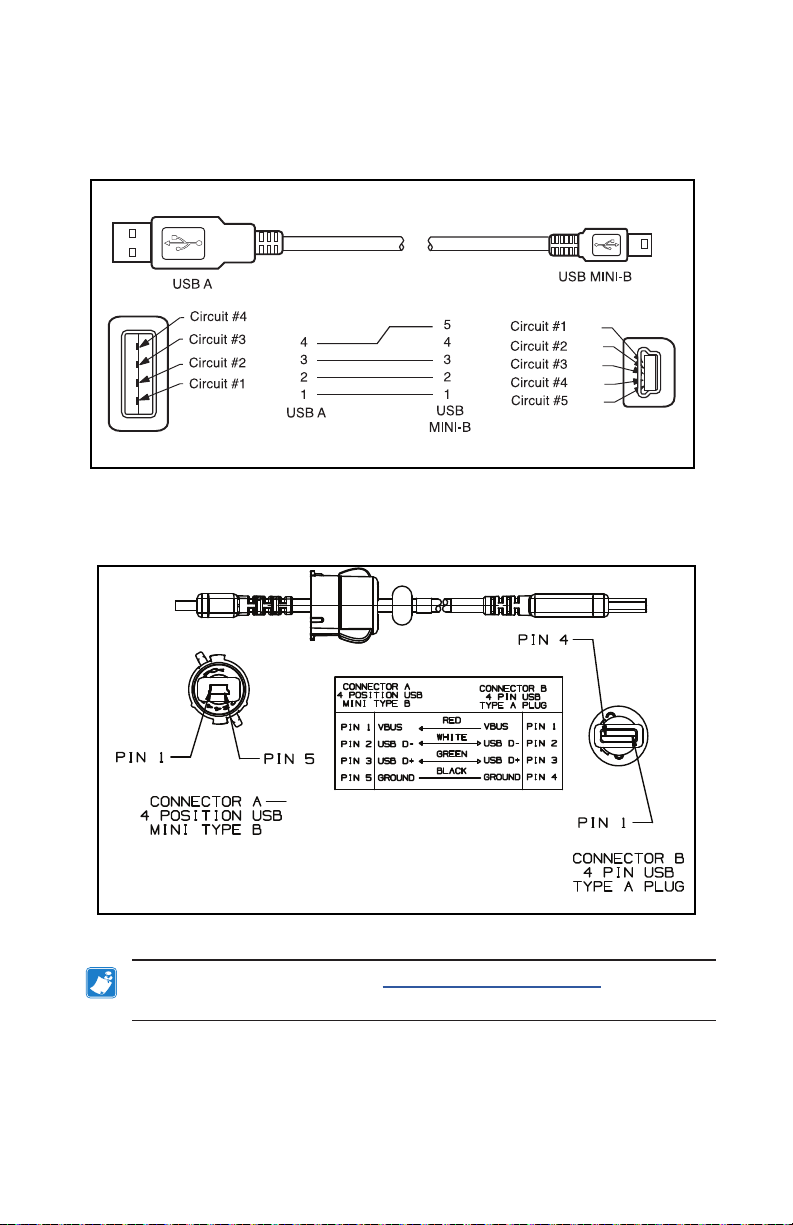
USB Cables
Part Number AT17010-1; USB A to USB Mini B Cable
- GND
- D+
- D-
- VBUS
- VBUS
- D-
- D+
- NC
- GND
Part Number P1031365-055; 4 Position USB Mini to 4-Pin USB
(w/ Strain Relief)
Note • Visit the Zebra website at: www.zebra.com/accessories for a
listing of interface cables for all Zebra mobile printers.
83
QLn Series User Guide
Page 84

Appendix B
Media Supplies
To insure maximum printer life and consistent print quality
and performance for your individual application, it is recom-
mended that only media produced by Zebra be used.
Advantages include:
• Consistent quality and reliability of media products.
• Large range of stocked and standard formats.
• In-house custom format design service.
• Large production capacity which services the needs of
many large and small media consumers including major
retail chains world wide.
• Media products that meet or exceed industry standards.
For more information go the Zebra website (www.zebra.com)
and select the Products tab, or refer to the CD included with the
printer.
Appendix C
Maintenance Supplies
In addition to using quality media provided by Zebra, it is
recommended that the printer be cleaned as prescribed in the
maintenance section. The following item is available for this
purpose:
• Cleaning Pen (12 pack): p/n 105950-035
84
QLn Series User Guide
Page 85
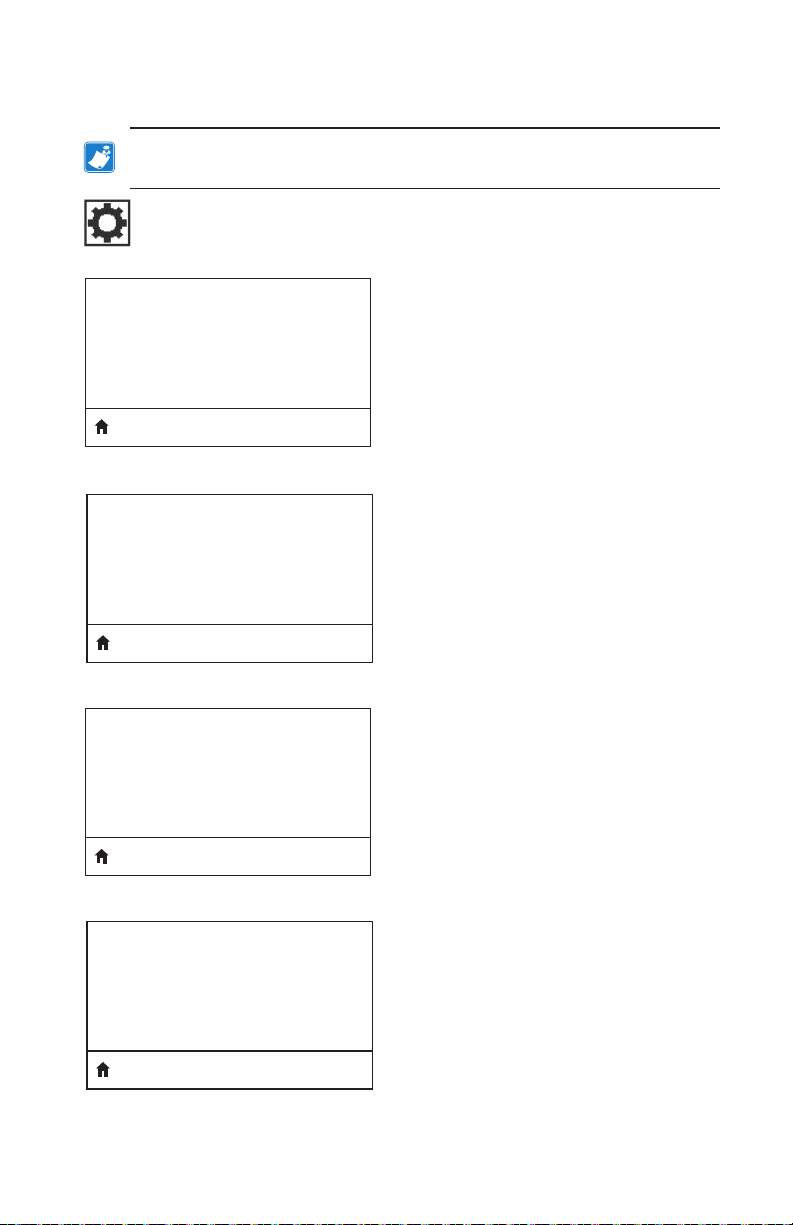
Appendix D
Note • The following menus in this Appendix apply only to QLn420 and
QLn Healthcare printers.
SETTINGS Menu
Set the darkness to the lowest setting
that provides good print quality. If you
DARKNESS
-49
PRINT SPEED
4.0
set darkness too high, the label image
may print unclearly, bar codes may not
scan correctly, or the printhead may
wear prematurely.
Select the speed for printing a label
(given in inches per second). Slower
print speeds typically yield better print
quality.
MEDIA TYPE
MARK
TEAR OFF
0
Select the type of media that you are
using.
If necessary, adjust the position of the
media over the tear-of f bar after
printing.
85
QLn Series User Guide
Page 86

PRINT WIDTH
576
Specify the width of the labels being
used. The default value is the maximum
width for the printer based on the
printhead’s DPI value.
PRINT MODE
REWIND
LABEL TOP
0
LEFT POSITION
0
Select a print mode that is compatible
with your printer options.
If necessary, shift the print position
horizontally on the label. Positive
numbers move the left edge of the
image toward the center of the label by
the number of dots selected, while
negative numbers move the left edge of
the image toward the left edge of the
label.
REPRINT MODE
OFF
When reprint mode is enabled, you can
reprint the last label printed either by
issuing certain commands or by
pressing the DOWN ARROW on the
keypad.
86
QLn Series User Guide
Page 87
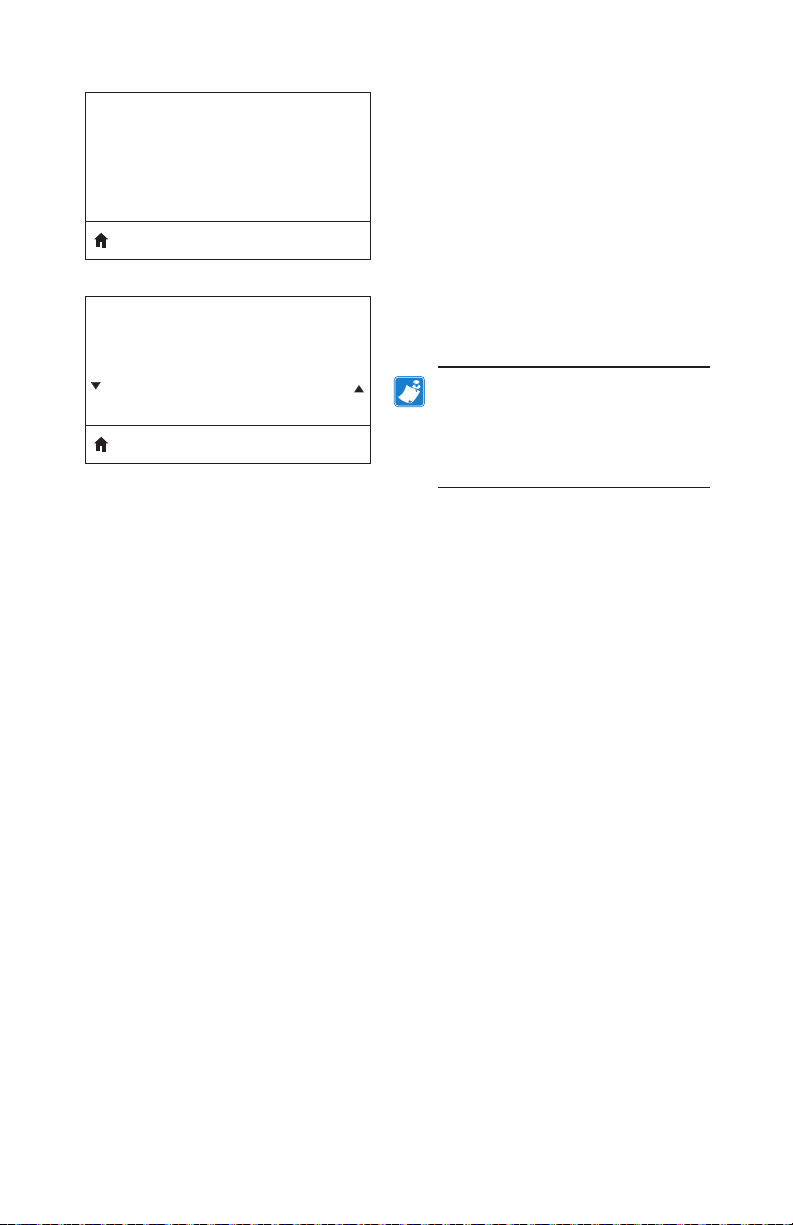
LABEL LENGTH MAX
39
LANGUAGE
Set the maximum label length to a value
that is at least 1.0 in. (25,4 mm) greater
than the actual label length plus the
interlabel gap. If yu set the value to
one that is smaller than the label length,
the printer assumes that continuous
media is loaded, and the printer cannot
calibrate.
If necessary, change the language that
the printer displays.
ENGLISH
Note • The selections for this
parameter are displayed in
the actual language to make it
easier to find one that you are
able to read.
If necessary, shift the print position
horizontally on the label. Positive
numbers move the left edge of the
image toward the center of the label by
the number of dots selected, while
negative numbers move the left edge of
the image toward the left edge of the
label.
When reprint mode is enabled, you can
reprint the last label printed either by
issuing certain commands or by
pressing the LEFT ARROW on the
keypad.
87
QLn Series User Guide
Page 88
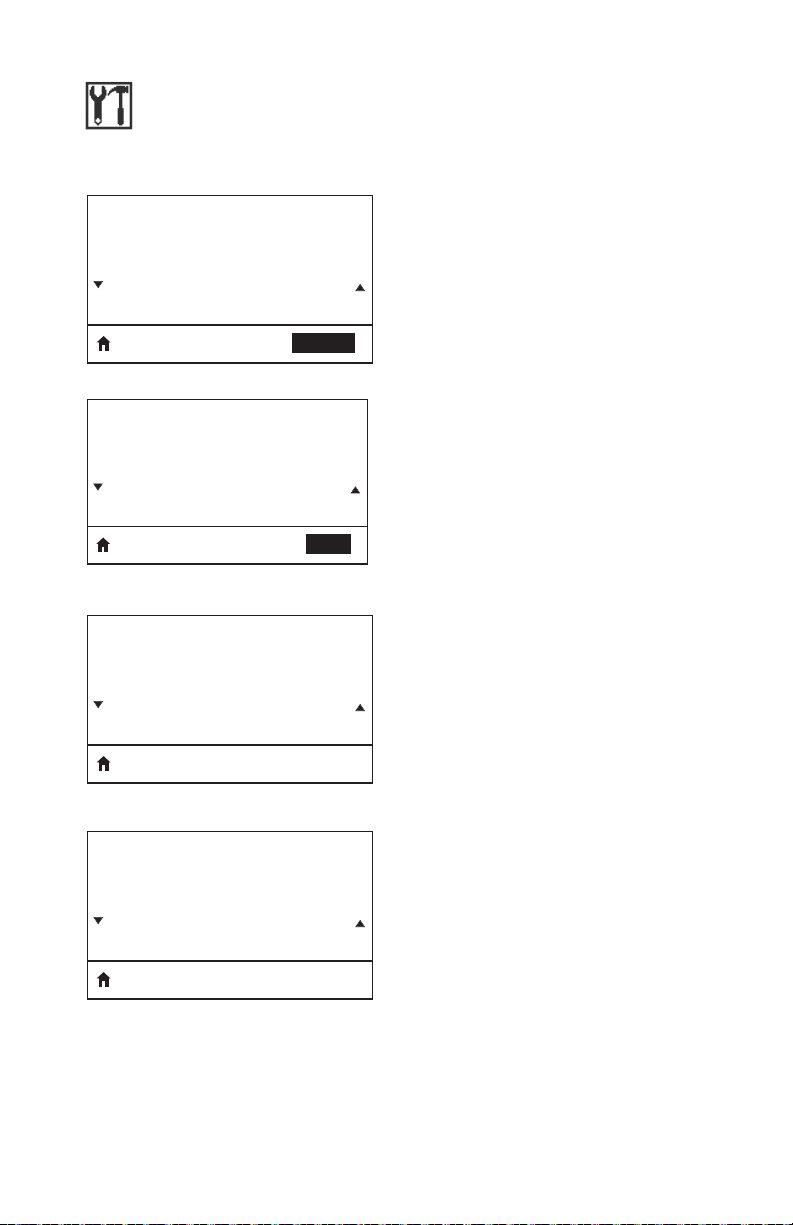
TOOLS Menu
HELP FOR
MEDIA
GET HELP
Use scrolling feature to select from a
variety of help topics including how to
load media, location and removal of
battery, and cleaning the printhead.
There are also explanations of various
icons including bat tery, error, latch,
media, RCV data, Ethernet, signal,
WLAN, and Bluetooth.
PRINT INFORMATION
SETTINGS
LCD CONTRAST
10
LCD BACKLIGHT
ON
Prints a printer configuration label,
sensor profile, barcode information,
font information, images, formats,
two-key report, and network settings..
PRINT
Changes the contrast on the printer’s
display (i.e. the higher the number, the
darker the contrast).
Allows the user to turn the LCD backlight
on or off.
88
QLn Series User Guide
Page 89
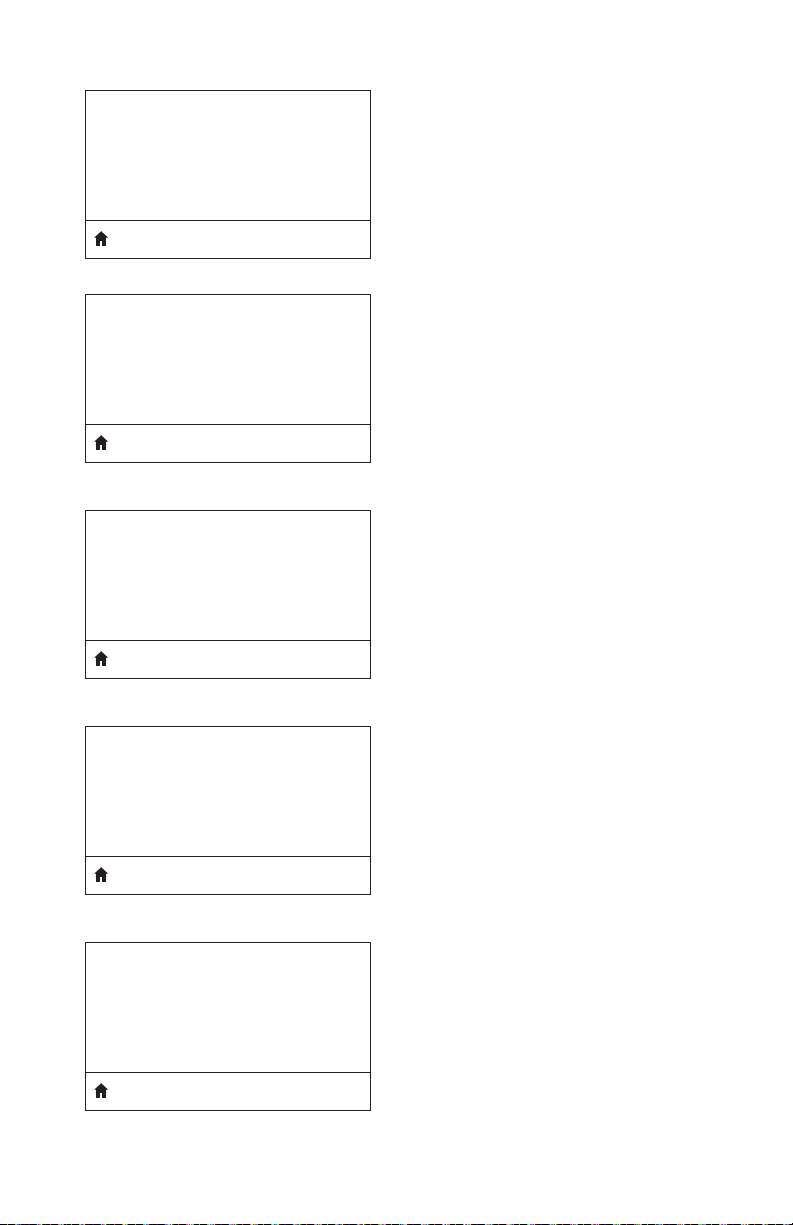
BACKLIGHT TIMEOUT
10
IDLE DISPLAY
FW VERSION
Sets the duration of the LCD backlight in
seconds.
Select the information shown on the
printer’s display when the printer is idle.
POWER UP ACTION
NO MOTION
HEAD CLOSE ACTION
FEED
LABEL LENGTH CAL
Set the action for the printer to take
during the power-up sequence, i.e. no
motion, calibrate, etc.
Set the action for the printer to take
when you close the printhead, i.e. feed,
calibrate, etc.
89
QLn Series User Guide
Page 90

DIAGNOSTIC MODE
ENABLED
Use this diagnostic tool to cause the
printer to output the hexadecimal values
for all data received by the printer.
ZBI ENABLED?
NO
This menu item indicates if the Zebra
Basic Interpreter (ZBI 2.0TM.) option is
enabled on your printer.
90
QLn Series User Guide
Page 91
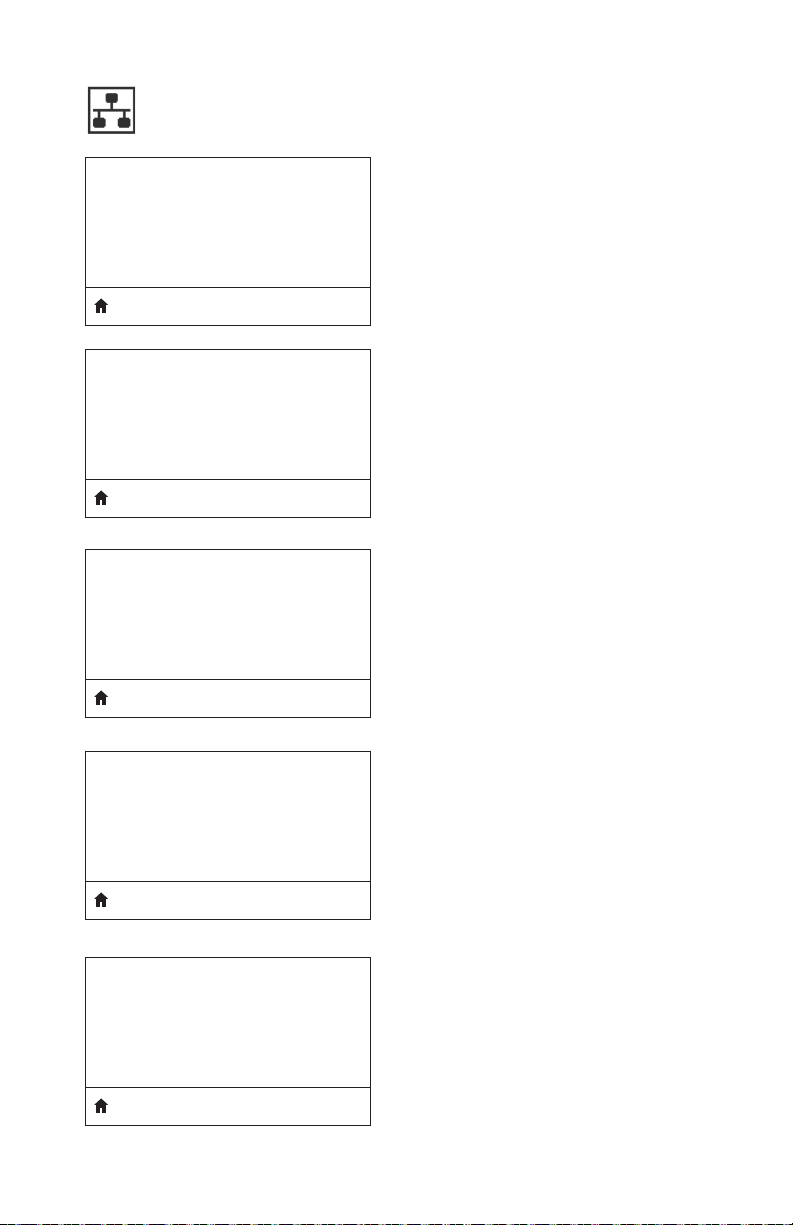
NETWORK Menu
ACTIVE PRINT SERVER
NONE
Informs the user of the presence of an
active server. Only one print server can
be installed at a time, therefore the print
server installed is the active print server.
WLAN STATUS
NOT ASSOCIATED
WLAN IP ADDRESS
0.0.0.0
WLAN SUBNET MASK
255.255.255.0
Informs the user if WLAN is associated
or not associated.
View, and if necessary, change the
printer’s WLAN IP address.
View, and if necessary, change the
WLAN subnet mask.
WLAN GATEWAY
0.0.0.0
View, and if necessary, change the
default WLAN gateway.
91
QLn Series User Guide
Page 92

WLAN IP PROTOCOL
ALL
This parameter tells if the user or the
server selects the WL AN IP address.
WLAN MAC ADDRESS
00:19:70:7A:20:44
ESSID
DSF802LESS54
AP MAC ADDRESS
00:05:9A:3C:78:00
View the WLAN Media Access Control
(MAC) address of the wireless print
server that is installed in the printer.
The Extended Service Set Identification
(ESSID) is an identifier for your wireless
network. This setting, which cannot be
modified from the control panel, gives
the ESSID for the current wireless
configuration.
View the AP MAC address associated
with the printer.
CHANNEL
View the network channel.
92
QLn Series User Guide
Page 93

SIGNAL
0
View, and if necessary, change the
printer’s network signal.
WIRED IP ADDRESS
0.0.0.0
WIRED SUBNET MASK
255.255.255.0
WIRED GATEWAY
0.0.0.0
View, and if necessary, change the
printer’s wired IP address.
View, and if necessary, change the
printer’s wired subnet mask.
View, and if necessary, change the wired
gateway setting.
WIRED IP PROTOCOL
ALL
This parameter tells if the user
(permanent) or the server (dynamic)
selects the IP address. If a dynamic
option is chosen, this parameter tells the
method(s) by which the wired or
wireless server receives the IP address
from the server.
93
QLn Series User Guide
Page 94

WIRED MAC ADDRESS
00:07:4D:3F:D3:B2
View, and if necessary, change the
printer’s network signal.
IP PORT
6101
IP ALT PORT
9100
View, and if necessary, change the
printer’s wired IP address.
View, and if necessary, change the
printer’s wired subnet mask.
94
QLn Series User Guide
Page 95

BATT ERY Menu
BATTERY ELIMINATOR
INSTALLED
HEALTH
GOOD
CYCLE COUNT
3
Indicates if a bat tery eliminator has been
installed.
Indicates the current health of the
battery, i.e. Good, Past Useful Life, etc.
View the current cycle count of the bat-
tery.
FIRST USED
7-12-2012
SERIAL NUMBER
1509
View the date on which the battery was
first used in the printer.
View the serial number of the battery
pack.
95
QLn Series User Guide
Page 96
TIMEOUT
0 SECONDS
View, and if necessary, change the
battery timeout.
VOLTAGE
8.39
WARNING
6.87 (176)
DTR CONTROL
OFF
View the current voltage level of the
battery pack.
96
QLn Series User Guide
Page 97

LANGUAGES Menu
LANGUAGE
ENGLISH
COMMAND LANGUAGE
HYBRID_XML_ZPL
ZPL OVERRIDE
DISABLED
If necessary, change the language that
the printer displays.
Note • The selections for this
parameter are displayed in the
actual languages to make it
easier to find one that you are
able to read.
Enable this menu item to allow certain
ZPL commands to override the printer’s
current settings.
COMMAND CHAR
^ (5E)
CONTROL CHAR
~ (7E)
Set the format command character to
match what is used in your label
formats.
Set the control prefix character to match
what is used in your label formats.
97
QLn Series User Guide
Page 98
DELIMETER CHAR
, (2E)
Set the delimiter character to match
what is used in your label formats.
ZPL MODE
ZPL II
VIRTUAL DEVICE
NONE
Select the mode that matches what is
used in your label formats.
98
QLn Series User Guide
Page 99

SENSORS Menu
MEDIA STATUS
OK
LABEL LENGTH CAL
TAKE LABEL
0
Informs the user of the presence or
absence of media in the printer.
Important • This value is set
during sensor calibration. Do
not change this setting unless
you are told to do so by Zebra
Technical Support or by an
authorized service technician.
99
QLn Series User Guide
Page 100
PORTS Menu
BAUD RATE
19200
DATA BITS
8
PARITY
NONE
Select the baud value that matches the
one being used by the host computer.
Select the data bits value that matches
the one being used by the host
computer.
Select the parity value that matches the
one being used by the host computer.
STOP BITS
1
HOST HANDSHAKE
RTS/CTS
Select the stop bits value that matches
the one being used by the host
computer.
Select the handshake protocol that
matches the one being used by the host
computer.
100
QLn Series User Guide
 Loading...