

Page 1

Workforce Connect
Zebra PTT Pro Version 2
User Guide for iOS
MN-003845-01 EN Rev A
Page 2

ZEBRA and the stylized Zebra head are trademarks of Zebra Technologies Corporation, registered in
many jurisdictions worldwide. All other trademarks are the property of their respective owners.
© 2020 Zebra Technologies Corporation and/or its affiliates. All rights reserved.
Information in this document is subject to change without notice. The software described in this document
is furnished under a license agreement or nondisclosure agreement. The software may be used or copied
only in accordance with the terms of those agreements.
For further information regarding legal and proprietary statements, please go to:
SOFTWARE:www.zebra.com/linkoslegal
COPYRIGHTS:www.zebra.com/copyright
WARRANTY:www.zebra.com/warranty
END USER LICENSE AGREEMENT: www.zebra.com/eula
Terms of Use
Proprietary Statement
This manual contains proprietary information of Zebra Technologies Corporation and its subsidiaries
(“Zebra Technologies”). It is intended solely for the information and use of parties operating and
maintaining the equipment described herein. Such proprietary information may not be used, reproduced,
or disclosed to any other parties for any other purpose without the express, written permission of Zebra
Technologies.
Product Improvements
Continuous improvement of products is a policy of Zebra Technologies. All specifications and designs are
subject to change without notice.
Liability Disclaimer
Zebra Technologies takes steps to ensure that its published Engineering specifications and manuals are
correct; however, errors do occur. Zebra Technologies reserves the right to correct any such errors and
disclaims liability resulting therefrom.
Limitation of Liability
In no event shall Zebra Technologies or anyone else involved in the creation, production, or delivery of the
accompanying product (including hardware and software) be liable for any damages whatsoever
(including, without limitation, consequential damages including loss of business profits, business
interruption, or loss of business information) arising out of the use of, the results of use of, or inability to
use such product, even if Zebra Technologies has been advised of the possibility of such damages. Some
jurisdictions do not allow the exclusion or limitation of incidental or consequential damages, so the above
limitation or exclusion may not apply to you.
Publication Date
August 27, 2020
2
Page 3

Open Source Software Disclosure
OpenSSL
Copyright (c) 1998-2011 The OpenSSL Project. All rights reserved. Redistribution and use in source and
binary forms, with or without modification, are permitted provided that the following conditions are met:
• Redistributions of source code must retain the above copyright notice, this list of conditions and the
following disclaimer.
• Redistributions in binary form must reproduce the above copyright notice, this list of conditions and the
following disclaimer in the documentation and/or other materials provided with the distribution.
• All advertising materials mentioning features or use of this software must display the following
acknowledgment: "This product includes software developed by the OpenSSL Project for use in the
OpenSSL Toolkit. (http://www.openssl.org/)"
• The names "OpenSSL Toolkit" and "OpenSSL Project" must not be used to endorse or promote
products derived from this software without prior written permission. For written permission, please
contact openssl- core@openssl.org.
• Products derived from this software may not be called "OpenSSL" nor may "OpenSSL" appear in their
names without prior written permission of the OpenSSL Project.
• Redistributions of any form whatsoever must retain the following acknowledgment: "This product
includes software developed by the OpenSSL Project for use in the OpenSSL Toolkit (http://
www.openssl.org/)"
THIS SOFTWARE IS PROVIDED BY THE OpenSSL PROJECT ``AS IS'' AND ANY EXPRESSED OR
IMPLIED WARRANTIES, INCLUDING, BUT NOT LIMITED TO, THE IMPLIED WARRANTIES OF
MERCHANTABILITY AND FITNESS FOR A PARTICULAR PURPOSE ARE DISCLAIMED. IN NO EVENT
SHALL THE OpenSSL PROJECT OR ITS CONTRIBUTORS BE LIABLE FOR ANY DIRECT, INDIRECT,
INCIDENTAL, SPECIAL, EXEMPLARY, OR CONSEQUENTIAL DAMAGES (INCLUDING, BUT NOT
LIMITED TO, PROCUREMENT OF SUBSTITUTE GOODS OR SERVICES; LOSS OF USE, DATA, OR
PROFITS; OR BUSINESS INTERRUPTION) HOWEVER CAUSED AND ON ANY THEORY OF
LIABILITY, WHETHER IN CONTRACT, STRICT LIABILITY, OR TORT (INCLUDING NEGLIGENCE OR
OTHERWISE) ARISING IN ANY WAY OUT OF THE USE OF THIS SOFTWARE, EVEN IF ADVISED OF
THE POSSIBILITY OF SUCH DAMAGE.
This product includes cryptographic software written by Eric Young (eay@cryptsoft.com). This product
includes software written by Tim Hudson (tjh@cryptsoft.com).
Opus CODEC
Copyright (c) 2011 Xiph.Org Foundation, Skype Limited Written by Jean-Marc Valin and Koen Vos
• Redistributions of source code must retain the above copyright notice, this list of conditions and the
following disclaimer.
• Redistributions in binary form must reproduce the above copyright notice, this list of conditions and the
following disclaimer in the documentation and/or other materials provided with the distribution.
3
Page 4

THIS SOFTWARE IS PROVIDED BY THE COPYRIGHT HOLDERS AND CONTRIBUTORS ``AS IS'' AND
ANY EXPRESS OR IMPLIED WARRANTIES, INCLUDING, BUT NOT LIMITED TO, THE IMPLIED
WARRANTIES OF MERCHANTABILITY AND FITNESS FOR A PARTICULAR PURPOSE ARE
DISCLAIMED. IN NO EVENT SHALL THE COPYRIGHT OWNER OR CONTRIBUTORS BE LIABLE FOR
ANY DIRECT, INDIRECT, INCIDENTAL, SPECIAL, EXEMPLARY, OR CONSEQUENTIAL DAMAGES
(INCLUDING, BUT NOT LIMITED TO, PROCUREMENT OF SUBSTITUTE GOODS OR SERVICES;
LOSS OF USE, DATA, OR PROFITS; OR BUSINESS INTERRUPTION) HOWEVER CAUSED AND ON
ANY THEORY OF LIABILITY, WHETHER IN CONTRACT, STRICT LIABILITY, OR TORT (INCLUDING
NEGLIGENCE OR OTHERWISE) ARISING IN ANY WAY OUT OF THE USE OF THIS SOFTWARE,
EVEN IF ADVISED OF THE POSSIBILITY OF SUCH DAMAGE.
4
Page 5

Contents
About This Guide................................................................................................................................ 8
Introduction ...................................................................................................................... 8
Chapter Descriptions........................................................................................................ 8
Notational Conventions.................................................................................................... 8
Related Documents.......................................................................................................... 9
Service Information .......................................................................................................... 9
Getting Started.................................................................................................................................. 10
Data Usage (Cellular Networks)..................................................................................... 10
Group Types and Maximum List Sizes .......................................................................... 10
User Interface.................................................................................................................................... 12
Recent Screen ............................................................................................................... 12
Contacts Screen............................................................................................................ 14
Contact Screen Action Bar............................................................................................ 15
Map Screen.................................................................................................................... 16
Settings Screen.............................................................................................................. 17
Icons............................................................................................................................... 18
Call Management .............................................................................................................................. 19
1:1 PTT Calls ................................................................................................................. 19
Ad Hoc PTT Calls.......................................................................................................... 20
Place an Ad Hoc PTT Call from the Contact List.................................................... 20
Place an Ad Hoc PTT Call from the Map Screen ................................................... 20
Respond to a Call ................................................................................................... 21
Place a Group PTT Call.......................................................................................... 22
1:1 Alert Calls ............................................................................................................... 23
Place an Alert Call from the Contact List................................................................ 23
Place an Alert Call from the Map............................................................................ 24
5
Page 6

Contents
Respond to an Alert Call......................................................................................... 24
Do Not Disturb (DnD) .................................................................................................... 24
Enable or Disable DnD ........................................................................................... 24
Block Calls ..................................................................................................................... 25
Re-Join .......................................................................................................................... 26
Talker Override/Preemption........................................................................................... 26
Call Override .................................................................................................................. 26
Call Override on 1:1 and Ad hoc Calls ................................................................... 26
Call Override on Group Calls (by Calling Individual User(s)) ................................. 26
Call Override on Group Calls (by Calling Group) ................................................... 27
Manage Calls and Messages......................................................................................... 27
Respond to Calls and Messages............................................................................ 27
Delete Calls or Messages....................................................................................... 27
Sending Messages ........................................................................................................................... 29
Send a Message to One or More Contact...................................................................... 29
Send a Message to a Group ......................................................................................... 31
Group Message Templates .................................................................................... 31
Message Notifications.................................................................................................... 31
View and Respond to Messages.................................................................................... 32
Delete Messages ........................................................................................................... 32
Contact Management ....................................................................................................................... 33
View Favorites, User, Groups, and All ........................................................................... 33
Add Contact to Favorites ........................................................................................ 33
Contact Actions.............................................................................................................. 35
Add and Search for a Contact ................................................................................ 35
Remove a Contact.................................................................................................. 35
Refresh Contact and Presence .............................................................................. 35
Add Default Callee.................................................................................................. 35
Group Management ....................................................................................................... 35
Add an Existing Group ..................................................................................... 36
Create a New Group ........................................................................................ 36
Remove a Group.............................................................................................. 36
Refresh Groups and Presence...................................................................................... 37
Location Based Services ................................................................................................................. 38
Send Location Information...................................................................................... 38
Display Location Information .................................................................................. 39
Viewing Location Information ................................................................................. 40
6
Page 7

Contents
Device Settings................................................................................................................................. 41
Management Settings .................................................................................................... 41
Contacts Settings........................................................................................................... 41
Active Call Settings ........................................................................................................ 42
Notifications Settings...................................................................................................... 43
Debug Log Files............................................................................................................ 44
Sign Out ......................................................................................................................... 44
7
Page 8

About This Guide
Introduction
This guide discusses Zebra PTT Pro for iOS features and operation. It assumes that Zebra PTT Pro for
iOS is already installed on your device. If you need assistance in installing and activating the software, see
the Zebra PTT Pro Installation Guide
NOTE: Screens, icons, and options may differ on each device. Those in this guide are samples and can
differ from actual screens.
Chapter Descriptions
Screens, icons, and options may differ on each device. Those in this guide are samples and can differ from
actual screens.
Topics covered in this guide are as follows:
• Getting Started describes PTT Pro for iOS.
• User Interface describes the user interface, which includes screens for Recent, Contacts, Map, and
Settings.
.
• Call Management provides information on placing and managing barge calls, ad hoc calls, alert calls,
and group calls.
• Sending Messages provides information on text and image messaging.
• Contact Management provides information on managing contacts and groups.
• Location Based Services provides information on the multiple options available for location tracking and
mapping services.
• Device Settings provides information on device settings such as application and sound settings and
account information.
Notational Conventions
The following conventions are used in this document:
•
Italics
are used to highlight the following:
• Chapters and sections in this and related documents
• Dialog box, window and screen names
• Drop-down list and list box names
• Check box and radio button names
8
Page 9

• Bold text is used to highlight the following:
• Key names on a keypad
• Button names on a screen.
• Bullets (•) indicate:
• Action items
• Lists of alternatives
• Lists of required steps that are not necessarily sequential
• Sequential lists (e.g., those that describe step-by-step procedures) appear as numbered lists.
Related Documents
• Zebra PTT Pro for iOS Quick Start Guide - Discusses procedures for the most common tasks, in a
two-sided single page printable format.
• Zebra PTT Pro Installation Guide - Discusses the installation and activation of all Zebra PTT Pro
applications.
• Zebra PTT Pro Management Portal Administrator Guide - Discusses the portal, which provides an
interface for administrators or technical representatives to manage an organization's Zebra PTT Pro
accounts.
About This Guide
• Zebra PTT Pro Management Portal Customer Administrator Guide - Discusses the portal, which
provides an interface for customer administrators or technical representatives to manage an
organization's Zebra PTT Pro accounts.
For the latest version of this document and all related documents, or to contact the Customer Support
Center, go to: www.zebra.com/support.
Service Information
If you have a problem using the equipment, contact your facility's technical or systems support. If there is a
problem with the equipment, they will contact the Customer Support Center at: www.zebra.com/support.
When contacting support, please have the following information available:
• Serial number of the unit
• Model number or product name
• Software type and version number
Zebra responds to calls by e-mail, telephone or fax within the time limits set forth in service agreements.
If your problem cannot be solved by support, you may need to return your equipment for servicing and will
be given specific directions. Zebra is not responsible for any damages incurred during shipment if the
approved shipping container is not used. Shipping the units improperly can possibly void the warranty.
If you purchased your business product from a Zebra business partner, please contact that business
partner for support.
9
Page 10

Getting Started
The Zebra PTT Pro solution provides a reliable full featured, instant communication service leveraging 3G,
LTE, and WiFi networks that includes three core areas of operation:
• Push to Talk (PTT) Voice
• Secure Group Messaging (text and images)
• Location tracking and mapping.
Zebra PTT Pro for iOS supports the following:
• iOS 8.0 or later
• iPhone and iPod Touch.
Data Usage (Cellular Networks)
Zebra PTT Pro is a VoIP application that, for cellular connections, requires a data plan. As compared with
other video and image communication applications, Zebra PTT Pro requires minimal data. It uses a
variable rate Voice CODEC technology so improved voice quality is delivered to users with better data
service. Zebra PTT Pro data can be estimated as follows, but note that the results may vary:
Monthly system overhead: 6 MB
Active PTT talk time (when voice is broadcast on a PTT call):
• Smartphone connected via 3G: 6 MB per hour
• Smartphone connected via 4G: 8 MB per hour
Group Types and Maximum List Sizes
Multiple types of groups exist, and each type has different characteristics related to members, call
originator, and so on. The following types of groups exist:
• Personal Groups (size limit 250): Created by a user and only visible from the creator's Group List.
Only the creator can initiate a call to a Personal Group.
• Member Groups (size limit 250): Visible in all member's Group Lists. Any member of the group can
initiate a call to the group.
• Enterprise Open Groups (size limit 250): Available for any user to join. The owner/manager of the
group may or may not be a participant in the group and there may be more than one Group Manager.
• Enterprise Closed Groups (size limit 250): Created by any user. Only the owner/manager can add
Members. The owner/manager of the group may or may not be a participant in the group and there can
be more than one Group Manager.
10
Page 11

Getting Started
• Enterprise Dispatch Groups (size limit 250): These groups have definable time of day/day of week
shifts associated with them. The members of the group can change for each shift. The owner/manager
of the Group may or may not be a participant in the Group and there can be more than one Group
Manager. Users with a Dispatch Group in their Group List can call the group and to route it to members
of the group that are on shift at the time.
• Broadcast Groups (size limit 60,000): Broadcast Groups are used to deliver high priority messages.
Broadcast Group calls are high priority unicast voice messages. Broadcast messages will re-try until all
messages have been delivered. This group can only be created by Primary or Secondary
Administrators.
• Law Enforcement Surveillance Channel (size limit 250): Surveillance Channel Groups are used by
Law Enforcement personnel whose typical profile requires long calls that cannot be automatically
ended after brief periods of inactivity.
• Public Safety Unicast Channel (size limit 250): Provide a means for Public Safety agencies to
broadcast important audio feeds, such as NOAA Weather, Air Traffic Control, and any LMR network in
a monitor only mode.
• Adhoc Groups (size limit 250): Not pre-configured groups, but a selection of multiple contacts from the
Contact List. Highlight the Contacts and press the PTT button to establish a call.
11
Page 12

User Interface
Navigation of the Zebra PTT Pro user interface is performed using a Tab Bar:
• Recent: Displays call and message history, both made and received.
• Contacts: Displays a list of all contacts and groups with a presence indicator for each, as well as a
user-defined list of contacts and groups.
• Map: Displays the location of all active users if they have enabled location reporting.
• Settings: Displays device settings such as application and sound settings and account information.
The Contacts, and Recent tabs include context-sensitive menus invoked by pressing and holding items
within the tab.
Note that after completing any activity, the user is returned to the screen as specified in the Default Tab
View field in the Management section in the Settings screen. The default can be changed to Recent,
Contacts, Map, or Server Driven.
Recent Screen
The Recent screen lists message and call history.
12
Page 13
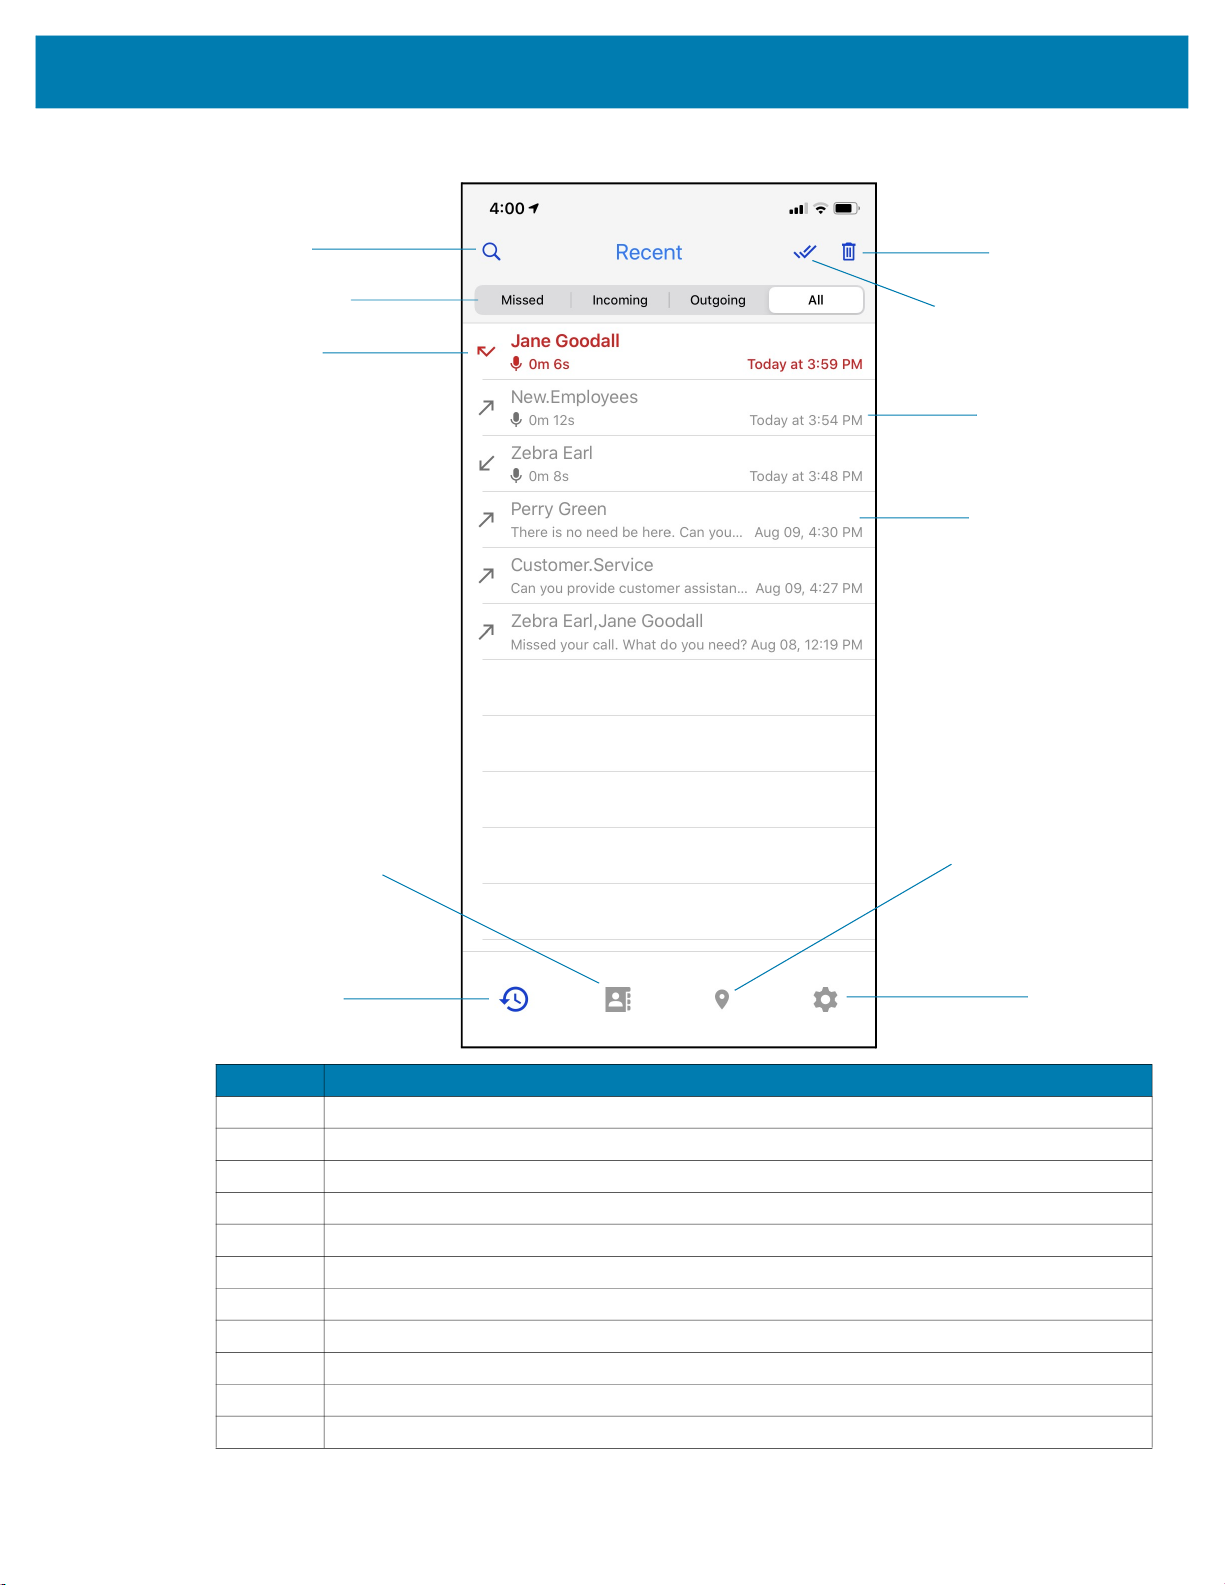
Figure 1 Recent Screen
User Interface
1
2
3
6
7
8
9
4
5
Callout Description
1 Filter messages and calls by contact or message content.
2 Switch between Missed, Incoming, Outgoing, and All messages and calls.
3 Example of a missed call.
4 Tap to view Contacts and Groups.
5 Recent displays call and message logs. Blue icon indicates that this is the active screen.
6 Delete selected message or call log.
7 Mark all unread messages as read.
8 Example of an outgoing call.
9 Example of an outgoing message.
10 Tap to open Map.
11 Tap to open Settings.
10
11
13
Page 14

Contacts Screen
The Contacts screen provides access to Favorites, User, and Groups. Use the Contacts screen to initiate
messages or calls and view a contact’s presence.
Figure 2 Contacts Screen
User Interface
1
2
3
4
5
6
7
8
Callout Description
1 Filters contacts on the device.
2 Switch between Favorites, User, Groups, or All contacts.
3 Contacts includes Favorites, User, Groups, and All. Blue icon indicates this is the
active screen.
4 Tap Recent to view call and message logs.
5 Activates Do Not Disturb (DnD).
6 Tap to add contact to Favorites.
7 Tap to open Map.
8 Tap to open Settings.
14
Page 15

Contact Screen Action Bar
Zebra PTT Pro includes an action bar on the Contacts screen when a contact selected. The action bar
provides quick access to commands that are available using touch and hold. The user can also select two
or more contacts for specific actions using the action bar.
Figure 3 Contact Action Bar
User Interface
4
1
2
3
Callout Description
1 Contact information.
2 Contact call and message history.
3 Add contact to Personal or Member group. Can apply to one or more
contacts.
4 Make contact default callee.
5 Delete contact. Can apply to one or more contacts.
6 Block calls from contact. Can apply to one or more contacts.
5
6
15
Page 16

Map Screen
The Map screen shows the location of contacts who share their location through Zebra PTT Pro.
Figure 4 Map Screen
User Interface
1
2
3
10
4
12
5
6
7
8
9
11
13
Callout Description
1 Search for contact on map who shares location.
2 Compass.
3 Available contacts. A pin with a number indicates two or more contacts at the
same location.
4 Alert call.
5 Tap Recent to view call and message logs.
6 Tap to view Contacts, Favorites, Groups, and All.
7 Orient map to north and center map to device.
8 Change map type and set Cluster Threshold. Cluster Threshold sets the zoom
level on the map so that pins are clustered at the current zoom of the map. Use
the slider to choose between 0 and 18.
The default threshold is 10.
9 Location of device.
10 Push To Talk.
16
Page 17

Callout Description
11 Tap to send message.
12 Map Screen. Blue icon indicates that this is the active screen.
13 Tap Settings to change volume and other application properties.
Settings Screen
The Settings screen includes options for configuring the PTT Pro client, signing out, and contacting
support.
Figure 5 Settings Screen
User Interface
1
2
3
4
5
6
7
8
Callout Description
1 Information about the user and Zebra PTT Pro version.
2 Sign out of the application.
3 Tap to open Contacts.
4 Tap to open Recent
5 Enable or disable Duty mode.
6 Send email to Zebra technical support.
7 Tap to open Map.
8 Settings. Blue icon indicates that this is the active screen.
17
Page 18

Icons
User Interface
The Zebra PTT Pro uses icons to:
• Indicate contact or group presence
• Provide actions on a selected contact or group
• Indicate incoming, outgoing, or missed call or message
• Navigate to a screen.
+
Tab Icons Presence Icons History Icons Action Icons
Contacts includes
Favorites, User, Group,
and All.
Map displays the location
of contacts.
Recent displays log of
messages and calls.
Settings provides options
for configuring the client.
Contact is available. Outgoing call or
message.
Contact is on a call. Incoming call or
message.
Contact is offline or
signed out.
Contact is in blocked. Mark all calls and
Contact is in Do not
Disturb (DnD) mode.
Indicates a missed
call or message.
messages as
read.
Shows history for selected
contact or group.
Adds the selected contact
to a personal or member
group.
Blocks calls from selected
contact.
Provides details about the
selected contact.
Sets the selected contact
as the default.
Deletes contact or group
from device.
18
Page 19

Call Management
The Zebra PTT Pro provides the following call features:
• Send and receive PTT calls to and from one or more contacts
• Send and receive PTT calls to and from groups
• Send Alert calls
• Send ad hoc calls
• Block calls.
1:1 PTT Calls
A 1:1 PTT call is a call between two people. The user can make a 1:1 PTT call from the Contacts screen
or the Map screen.
1. Tap Contacts and select User or tap Map.
2. Locate the contact:
• Select a favorite or scroll through the list of contacts.
• Perform a search. Tap Search and enter the contact name in the search box. As each letter is
entered, the relevant matches appear in the contact list. For more information about search, see
Add and Search for a Contact on page 35.
• In the Map screen, zoom to the contact so only that contact appears on the map.
3. Select the contact.
4. Press and hold Push To Talk.
5. Upon hearing the grant tone, begin speaking.
6. Release Push To Talk when finished.
7. Tap End Call to exit the call.
NOTE: The End Call button indicates the idle time and counts down, in seconds, to indicate when an
inactive call ends. The default idle time is seven (7) seconds but this interval can be changed in the Idle
Timeout setting.
19
Page 20

Call Management
Ad Hoc PTT Calls
Ad hoc PTT calls are calls made to multiple contacts or a temporary group for a specific purpose. Use the
ad hoc calling feature when the contacts needed for the call are not members of a single group.
Place an Ad Hoc PTT Call from the Contact List
1. Tap Contacts and then User.
2. Select one or more (up to 250) recipients.
3. Press and hold Push To Talk.
4. Upon hearing the grant tone, begin speaking.
5. Release Push To Talk when finished.
6. Tap End Call to exit the call.
NOTE: End Call indicates the idle time and counts down, in seconds, to indicate when an inactive call
ends. The default idle time is seven (7) seconds but this interval can be changed in the Idle Timeout
setting.
Place an Ad Hoc PTT Call from the Map Screen
1. Tap Map.
2. Scroll and zoom to an area that includes the desired recipients.
3. Select the recipient and tap the circle in the contact.
4. Repeat step 3 for each recipient.
The total number of recipients is indicated above the map orientation icon.
5. Press and hold Push To Talk.
6. Upon hearing the grant tone, begin speaking.
7. Release Push To Talk when finished.
8. Tap End Call to exit the call.
NOTE: End Call indicates the idle time and counts down, in seconds, to indicate when an inactive call
ends. The default idle time is seven (7) seconds but this interval can be changed in the Idle Timeout
setting.
20
Page 21

Call Management
Figure 6 Ad hoc Call From the Map
1
2
Callout Description
1 Number of recipients selected for the call.
2 Selected recipient.
Respond to a Call
1. If the device is locked, tap the Zebra PTT Pro Call notification to open Zebra PTT Pro and respond to
the call.
The Call Attendees screen identifies the caller.
2. Tap Push to Talk to begin speaking.
3. Release Push to Talk when finished.
4. After accepting the alert call, press the Push to Talk button to begin speaking and release when
finished.
5. Tap to exit the call.
21
Page 22

Figure 7 Call Attendees Screen
Call Management
Place a Group PTT Call
A group PTT call is similar to PTT calls.
1. Tap Contacts and then selects Groups.
2. Select the desired group.
Expand the group to see the list of members and their presence.
3. Tap Push To Talk.
4. Upon hearing the grant tone, begin speaking.
5. Release Push To Talk when finished.
6. Tap End Call to exit the call.
NOTE: End Call indicates the idle time and counts down, in seconds, to indicate when an inactive call
ends. The default idle time is seven (7) seconds but this interval can be changed in the Idle Timeout
setting.
22
Page 23

Call Management
1:1 Alert Calls
Zebra PTT Pro supports 1:1 alert calls, used for non-critical communication by alerting the recipient rather
than interrupting a call. The recipient can choose to respond when they are available. Initiate alert calls
from the Contact screen or the Map screen.
Place an Alert Call from the Contact List
1. Select Contacts and locate the contact.
Locate the contact by scrolling through the list of contacts, or perform a search.
2. Tap Alert call.
Zebra PTT Pro displays a notification to confirm the alert.
3. Tap Send, otherwise tap Cancel.
• If the contact accepts the call, you are placed in the call.
i. Press and hold Push to Talk.
ii. Upon hearing the grant tone, begin speaking.
iii. Release Push to Talk when finished.
iv. Tap to exit the call.
• If the contact rejects the call, Zebra PTT Pro displays a notification with the option to Send
message or Dismiss.
Figure 8 Alert Notifications
23
Page 24

Call Management
Place an Alert Call from the Map
1. Tap Map.
2. Scroll and zoom to an area that includes the desired recipient.
3. Select the recipient and tap the circle in the contact.
4. Tap Alert call.
Zebra PTT Pro displays a notification to confirm the alert.
5. Tap Send, otherwise tap Cancel.
• If the contact accepts the call, you are placed in the call.
i. Press and hold Push to Talk.
ii. Upon hearing the grant tone, begin speaking.
iii. Release Push to Talk when finished.
iv. Tap to exit the call.
• If the contact rejects the call, Zebra PTT Pro displays a notification with the option to Send
message or Dismiss.
Respond to an Alert Call
1. Select Answer to accept an incoming alert call or Ignore to reject the call.
2. If the device is locked, tap the Zebra PTT Pro Call notification to open Zebra PTT Pro and respond to
the call.
3. After accepting the alert call, press the Push to Talk button to begin speaking and release when
finished.
4. Tap to exit the call.
Do Not Disturb (DnD)
Zebra PTT Pro supports DnD that prevents the user from receiving PTT calls. The Zebra administrator
controls DnD on the device from the Zebra PTT Pro Management Portal.
Enable or Disable DnD
1. Tap Contacts.
2. Tap DnD.
24
Page 25

Call Management
Figure 9 DnD and Blocked Contact
1
2
3
1 Contact with DnD enabled.
2 Enable or disable DnD
3 Blocked contact.
The user can also activate DnD by placing the device in silent mode.
1. Tap Settings.
2. Touch Activate DnD in Silent Mode.
3. Use the Ring/Silent switch to put the device in silent and mode and turn on DnD.
Block Calls
The user can block calls from contacts and groups.
1. Tap Contacts and select User or Groups.
2. Touch and hold on the contact or group to display the action menu.
3. Select Block Calls.
Callout Description
A red banner displays at the top of the Zebra PTT Pro when DnD is enabled.
An icon, as shown in Figure 9, indicates that the reception of calls from that contact or group is
disabled.
To re-enable the reception of calls from a contact or group:
1. Tap Contacts and select User or Groups.
25
Page 26

Touch and hold on the contact or group to display the action menu.
2.
3. Select Unblock Calls.
Re-Join
For group calls, Zebra PTT Pro supports late join, which is joining a call that is already in progress, and
rejoin, which is joining a call previously participated in and exited. This also provides a group presence
indication to specify which group calls are active and available for late join/re-join.
To join a group call already in progress, tap Push to Talk to speak.
To rejoin a group call that you exited, tap the group name and tap Push to Talk to speak.
Talker Override/Preemption
Zebra PTT Pro supports Talker Override and Preemption with Enterprise Open, Enterprise Closed, and
Dispatch group types.
During a call, a user with Talker Override can press the PTT button to speak while a user without Talker
Override is speaking, interrupting the speaking user. Multiple Talker Override users requesting to speak
are managed on a first-come first-serve basis.
Call Management
Users can be assigned Talker Override capability when they are added as members to a group in the
Zebra PTT Pro Management Portal.
The Broadcast Group supports a preemption feature. Whenever a Broadcast call is made, it will preempt
every other call members of the Broadcast Group are participating in. Once the user has heard the
broadcast message, the user can make other PTT calls again.
Note that Talker Override/Preemption is not related to Call Override. Talker Override relates to interactions
during a call, while Call Override relates to interactions between calls.
Call Override
Zebra PTT Pro supports the Call Override feature on 1:1, Ad hoc, and Group Calls.
Call Override allows users to be removed from a lower priority ongoing call and put in a a new higher
priority call. Each user and group has an assigned priority between 1 and 5 which determines the behavior
of Call Override as described in the following sections.
Call Override is not related to Talker Override/Preemption. Talker Override relates to interactions during a
call, while Call Override relates to interactions between calls.
Call Override on 1:1 and Ad hoc Calls
A user or group with a higher priority than the members of a 1:1 or ad hoc call can override that call.
Call Override on Group Calls (by Calling Individual User(s))
A caller with a priority higher than group call members in an ongoing group call can remove members from
the group call and put them into a new 1:1 or ad hoc call. The group call continues with the remaining
members.
26
Page 27

Call Management
Call Override on Group Calls (by Calling Group)
A group with a priority higher than group call members in an ongoing group call can remove members from
the group call and put them into a new group call. The original group call continues with the remaining
members.
Manage Calls and Messages
The Recent screen maintains a list of incoming and outgoing calls and messages and includes four
screens:
• Missed includes incoming messages and missed calls.
• Incoming includes incoming calls and messages.
• Outgoing includes outgoing calls and messages.
• All includes incoming and outgoing calls and messages.
Respond to Calls and Messages
Use the Recent screen to respond to calls and messages.
1. Tap the call or message.
2. Tap Push To Talk or Message to respond.
If the call or message was to two or more contacts:
• For a call, Zebra PTT Pro starts an Ad Hoc group call.
• For a message, Zebra PTT Pro sends to response to all recipients.
Delete Calls or Messages
The user can delete messages and call logs.
1. Tap Recent.
2. Select Missed, Incoming, Outgoing, or All.
• To delete all records from the selected screen:
i. Tap Trash.
ii. Select Delete.
• To delete selected records:
i. Select a record.
ii. Tap Trash.
iii. Select the records to delete.
iv. Tap Delete selected.
v. Tap Delete.
27
Page 28

Figure 10 Delete Record Screen
Call Management
28
Page 29

Sending Messages
Zebra PTT Pro provides messaging capabilities to send text and photos to contacts and groups. Messages
are securely stored on the Zebra PTT Pro Management Portal.
Send a Message to One or More Contact
1. Tap Contacts.
2. Locate and select the recipients.
3. Tap Message.
4. Enter the message text.
5. (Optional) To attach a photo to the message:
a. Tap Attach Photo.
b. Select the photo.
6. (Optional) To take a new photo and attach it to the message:
a. Tap Camera.
b. Take a photo.
c. Tap Use Photo to add the photo to the message.
7. Select Send.
29
Page 30

Sending Messages
Figure 11 Sending a Message to Multiple Contacts
1
2
3
Callout Description
1 Message recipients.
2 Camera for taking photos.
3 Attach an existing photo.
4 Cancel message.
4
30
Page 31

Send a Message to a Group
1. Tap Contacts and select Groups.
2. Select a group. You can only select one group at a time.
3. Tap Message.
4. Enter the message text.
5. (Optional) To attach a photo to the message:
a. Tap Attach Photo.
b. Select the photo.
6. (Optional) To take a new photo and attach it to the message:
a. Tap Camera.
b. Take a photo.
c. Tap Use Photo to add the photo to the message.
7. Select Send.
Sending Messages
Group Message Templates
The system administrator can create message templates on the Zebra PTT Pro Management Portal for
specific groups using the Zebra PTT Pro Management Portal. Since this feature is enabled by the
administrator, it may not be seen or available to the user.
Group message templates are used to send repetitive meaningful messages without having to type in the
message. An additional feature provides the ability to have variable tags in the pre-configured message
templates. This provides the user the ability to enter specific variable(s) into the template. When the user
selects a template with variables, only the variable is requested to be entered.
The user can then send a text message to all members of a group, using message text that was created
using a template.
Message Notifications
Message notifications can be viewed from the lock screen, swiping down to see Notification Center, and
within the Zebra PTT Pro application.
31
Page 32

Sending Messages
Figure 12 New Message Notifications
View and Respond to Messages
1. Tap Recent and select Missed.
Messages to which the user has not responded are listed under Missed.
2. Select the message. A screen displays with all previous conversations and calls with that contact or
group.
• Tap Message to respond to the sender.
• Tap the arrow under the message to forward the message to another contact or group.
3. Enter a response.
4. Tap Send when finished.
Delete Messages
Delete Calls or Messages on page 27 describes how to delete messages.
32
Page 33

Contact Management
Zebra PTT Pro manages most contact functions from the device, including:
• Add contact
• Remove contact
• Add contact to Favorites
• Add contact to group
• Create new group
• Hide group
• Delete group
• View contacts on Map.
View Favorites, User, Groups, and All
The Contacts screen provides access Favorites, User, Group, and All and the contact actions menu.
1. Tap Contacts.
2. Press and hold a contact to display the action menu.
3. Select one of the available options.
NOTE: Contact actions are also available from the action bar described in Contact Screen Action Bar on
page 15.
Add Contact to Favorites
1. Tap Contacts.
2. Select the contact.
3. Tap the star. The star becomes yellow when the contact is a favorite.
33
Page 34

Figure 13 Contact Action Menu
Contact Management
Table 1 Contact Action Menu Descriptions
Action Description
Contact History Opens the call and message history for the selected contact.
Contact Information Provides information about the contact.
Set Default Callee Sets the contact to the default recipient when the user taps Push to Talk
and no contact or group is selected.
Block Calls Blocks calls from the selected contact.
Add to Group Adds the contact to a Personal or Member group.
Hide Contact Removes the contact name from the Contact screen. The contact is not
removed the Zebra PTT Pro Management Portal.
34
Page 35

Contact Actions
The user can perform a number of actions to manage the contacts on the device.
Add and Search for a Contact
1. Tap Contacts.
2. Tap Search and then tap Search on Server .
The contact search string is a “sticky” search, meaning that the letters entered remain in the search
field until cleared. Entering a string without a match causes no contacts to appear.
3. Enter the user name, email, or phone number in the search field. Contacts that match the search
criteria are listed under Filtered Contacts.
4. Select one or more contacts and tap for each contact. The contact is added from the Zebra PTT Pro
Management Portal to the Contacts list on the device.
5. Tap Cancel to close Filtered Contacts.
Contact Management
Remove a Contact
1. Tap Contacts.
2. Select Delete from the action bar.
3. Select Yes to confirm deletion.
Refresh Contact and Presence
Presence indicates the status of a contact.
1. Tap Contacts tab.
2. Select Favorites, User, Groups, or All.
3. Pull down on the screen down until Refreshing Presence... displays.
Add Default Callee
The default callee is a contact or group that is called when no contact or group is selected and the user
taps Push to Talk.
1. Tap Contacts and select a contact or group.
2. Tap in the action bar or select Set Default Callee from the action menu.
The heart icon is displayed in the row for the contact or group name.
Group Management
Use Zebra PTT Pro to manage group functions from the device.
1. Tap Contacts and select Groups.
2. Press and hold the desired group to display the action menu.
3. Select an available action.
35
Page 36

Available actions for group management include:
• Contact History—Opens the call and message history for the selected group.
• Set Default Callee—adds the group as the default callee for PTT calls.
• Block Calls—Block incoming calls from the group (see Block Calls on page 25).
• Show on Map—Show the location of group members on the map.
• Hide Group—Remove group from the group list. To unhide a group, tap Search, enter the group name,
and tap to add the group.
NOTE: When an administrator uses WFC Profile Manager, the device can display friendly group names.
When this occurs, underscores in the group name are replaced with spaces and the first letter of each
word in the name is capitalized.
Add an Existing Group
1. Tap Contacts and select Groups.
2. Tap Search and then tap Search on Server .
The search string is a “sticky” search, meaning that the letters entered remain in the search field until
cleared. Entering a string without a match causes no contacts to appear.
Contact Management
3. Enter the group name in the search field. Groups that match the search criteria are listed under Filtered
Contacts.
4. Select the group and tap . The group is added from the Zebra PTT Pro Management Portal to the
Contacts list on the device.
5. Tap Cancel to close Filtered Contacts.
Create a New Group
1. Tap Contacts and select Groups.
2. Tap .
3. Select Personal or Member for the group type.
4. Enter the group name in the GroupName field.
5. Select the contacts to add to the group.
6. Tap Create.
Remove a Group
1. Tap Contacts and select Groups.
2. Tap Delete in the action bar or press and hold on the group name and select Delete Group from the
action menu.
3. Select Yes to confirm.
36
Page 37

Contact Management
Refresh Groups and Presence
Use Group Presence to refresh the group list and check presence.
1. Tap Contacts and select Groups.
2. Pull down on the screen down until Refreshing Presence... displays.
3. Expand the group to view the presence of group members.
37
Page 38

Location Based Services
The mobile device can send GPS location information to the Zebra PTT Pro Management Portal. This is
enabled in the Zebra PTT Pro Management Portal by the administrator. When enabled, the Zebra PTT Pro
client can:
• Enable or disable location services
• Enable or disable the Duty mode.
Send Location Information
Zebra PTT Pro Management Portal administrators can configure the client to send location information
from the device to the Management Portal in the following ways:
• Administrator controlled - Administrators can set location information to ON or OFF without giving the
individual users the ability to change location so users can not change location settings.
• User Controlled - If the administrator has set the device’s location setting to Allow Location Disable
to OFF, the user has the ability to enable/disable sending location information to the Zebra PTT Pro
Management Portal.
• Duty Mode - The concept of Duty mode is designed for those going On and Off duty. When the user is
Off duty, they are indicating they are still available for a PTT call and messaging, but they are off duty
and no location information is sent to the Zebra PTT Pro Management Portal. If a user engages in a
PTT call while Off duty, the user is reset back to On duty.
If the Zebra PTT Pro Management Portal Force Duty Mode is set to off, then the user does not have
the ability to set the Off Duty mode. If the Force Duty Mode is set to on, then the user has the ability to
go on and off duty.
38
Page 39

Location Based Services
Figure 14 Location Services and Duty Mode
1
2
Callout Description
1 When location is user-controlled, the map pin indicates whether location is sent
to the Zebra PTT Pro Management Portal.
2 When Force Duty Mode is enabled on the Zebra PTT Pro Management Portal,
the map pin indicates whether the user is on-duty or off-duty.
Display Location Information
Enterprise administrators can control the display of location information:
• Map display enabled—Device users can view the location of other contacts and place calls or send
message from the Map screen.
• Map display disabled—The Map screen is not available on the device.
39
Page 40

Location Based Services
Viewing Location Information
Users with live tracking enabled and map view privileges can view location and presence information for all
contacts. Pre-call map view (the Map tab) includes the following:
• Contacts with location enabled appear on the map.
• A blue dot indicates the owner (self).
• Green pins indicate available contacts.
• Red pins indicate unavailable contacts already in-call.
• Gray pins indicates unavailable contacts in DnD mode.
• Location information updates every four minutes.
40
Page 41

Device Settings
Device settings control application and sound settings and account information. A user’s ability to change
these settings is controlled in the Zebra PTT Pro Management Portal. Settings are divided into four
categories:
• Management
• Contacts
• Active Call
• Notifications
Management Settings
Default Tab View After completing any activity, the user is returned to the default screen specified in
Default Tab View. Possible values include Recent, Contacts, Map, Last Used, or Server Driven.
Allow Bluetooth Audio Enables the use a supported Bluetooth headset for call audio.
Enable MOTD Enable this setting to specify the URL and API token for the WFC Interworking Gateway
(IWG). IWG enables the user to create, attach, and send an audio or video file with a text message to a list
of recipients. When the recipients log on, or when the message is received, the attached media file is
played on the recipient’s device.
IWG URL URL to the IWG. Requires Enable MOTB.
API Key Authentication token for the IWG. Requires Enable MOTB.
Contacts Settings
Display Name Controls how contact names are displayed. Values include Username, Firstname
Lastname, Lastname Firstname, Lastname, and Firstname.
Action Bar Style Enables or disables the action bar in the Contacts screen when the user selects a
contact or group.
• Style 1 enables the action bar with a white background above the call button bar.
• Style 2 enables the action bar with a gray background that matches the call button bar.
• Style 3 disables the action bar and provides a larger visible area on the device screen.
Show available first Sorts contacts so that are logged in appear above contacts that are signed out.
41
Page 42

Active Call Settings
Idle Timeout Determines how long an inactive call stays active.
Alert Ring Duration The duration in seconds to ring when receiving an alert call
Start call with Speakerphone Start all calls with the speaker enabled
Remember Callee Remember last call recipient to the user can call the recipient again by selecting Push
to Talk.
PTT Toggle Push to Talk functions as on and off instead of press and hold.
Whole Screen as PTT During a call the entire In Call screen acts as the PTT button.
Activate DnD in Silent Mode Enables DnD mode when the device is put in silent mode.
Enable Call Brightness Dims the screen to the configured surveillance brightness level.
Call Brightness Set the desired screen brightness during PTT calls.
Device Settings
Default Sound Profile Change the default speaker sound.
• Ring on Incoming Call—Rings when receiving a Zebra PTT Pro call.
• Vibrate on Incoming Call—Vibrates when receiving a Zebra PTT Pro call.
• Play Grant Tone—Plays a tone when you are granted permission to speak.
• Play Floor Taken Tone—Plays a tone when another user is granted permission to speak.
• Play Floor Idle Tone—Plays a tone when the floor is available for you to speak.
• Play Floor Denied Tone—Plays a tone when you are denied permission to speak because another
user is speaking.
• Play Floor Revoked Tone—Plays a tone when you are removed from the floor because you
exceeded your speaking time limit.
• Play Call Lost Tone—Plays a tone when a call is lost.
• Play Busy Bonk - Plays a tone when a call fails to connect.
• Minimum Call Volume—Adjusts the default minimum in-call volume.
• Tone Volume—Adjusts the relative gain to play tones.
• Ring Gain—Adjusts the gain reduction relative to the main volume at which the ring plays. Full gain
indicates no change.
• Volume Boost—Adjusts the amount to boost the volume. A value of 0 indicates no change. Note
that values above 0 increasingly distort the audio.
Headset Sound Profile Change the default headset sound.
• Headset Style—Options are Toggle(default), Two pulse, Bluetooth SPP, Bluetooth LE, None.
• Ring on Incoming Call—Rings when receiving a Zebra PTT Pro call.
• Vibrate on Incoming Call—Vibrates when receiving a Zebra PTT Pro call.
• Play Grant Tone —Plays a tone when you are granted permission to speak.
• Play Floor Taken Tone—Plays a tone when another user is granted permission to speak.
42
Page 43

• Play Floor Idle Tone—Plays a tone when the floor is available for you to speak.
• Play Floor Denied Tone—Plays a tone when you are denied permission to speak because another
user is speaking.
• Play Floor Revoked Tone—Plays a tone when you are removed from the floor because you
exceeded your speaking time limit.
• Play Call Lost Tone—Plays a tone when a call is lost.
• Play Busy Bonk—Plays a tone when a call fails to connect.
• Minimum Call Start Volume—Adjusts the default minimum in-call volume.
• Tone Volume—Adjusts the relative gain to play tones.
• Ring Gain—Adjusts the gain reduction relative to the main volume at which the ring plays. Full gain
indicates no change.
• Volume Boost —Adjusts the amount to boost the volume. A value of 0 indicates no change. Note
that values above 0 increasingly distort the audio.
Notifications Settings
Device Settings
Notify for All Missed Calls This setting is used when Notify for All New Messages unchecked.
Although notifications are received for all calls while the Zebra PTT Pro application is hidden, only the most
current notification displays. To see all missed calls, access the Recent screen.
Missed Call Endless Alert Play a repeating alert for missed calls.
Notify for All New Messages When the Zebra PTT Pro is in the background, issue a notification on
every new message or only the first message.
New Message Alert Set the alert when receiving a new message. By default, a new message alert uses
an iOS notification. The user can select the PTT Pro Ringtone instead.
43
Page 44

Debug Log Files
1. Tap Mail.
2. Select Email Support.
3. Enter a phone number, an email address, and provide a description of the issue.
4. Select Send.
The debug log file is automatically attached and sent.
Sign Out
1. Tap Sign Out.
2. Select Sign Out to confirm.
You are signed out but you can sign in again. The user name and password are automatically filled in.
Device Settings
44
Page 45

www.zebra.com
 Loading...