

Page 1
1
2
3
4
ZebraNet® PS4000 Print Server
Quick Start Guide
Introduction
The ZebraNet PS4000 Print Server acts as a means to connect up to four (4) printers to a Wireless Local Area Network (WLAN) using only one wireless connection. The
ZebraNet PS4000 communicates to the network by means of an 802.11g radio link and
will apppear to the network as a single printer. It will then pass properly addressed printer commands to any printer connected to it by means of a wired USB connection.
Placement
The ZebraNet PS4000 Print server should be located following these basic guide lines:
• Place the server as high as possible, bearing in mind that personnel may have to
view the optional display or have access to the controls and the console connection
for diagnostic tasks.
• Place the server away from potential sources of radio interference. Some of these
sources include computers, microwave devices, and wireless telephones which
work in the 2.4GHz frequency range.
• Place the server away from large metal surfaces which may block radio reception.
• Observe the minimum separation distance as specified in the ZebraNet PS4000
Print Server Safety Guide, supplied with each unit.
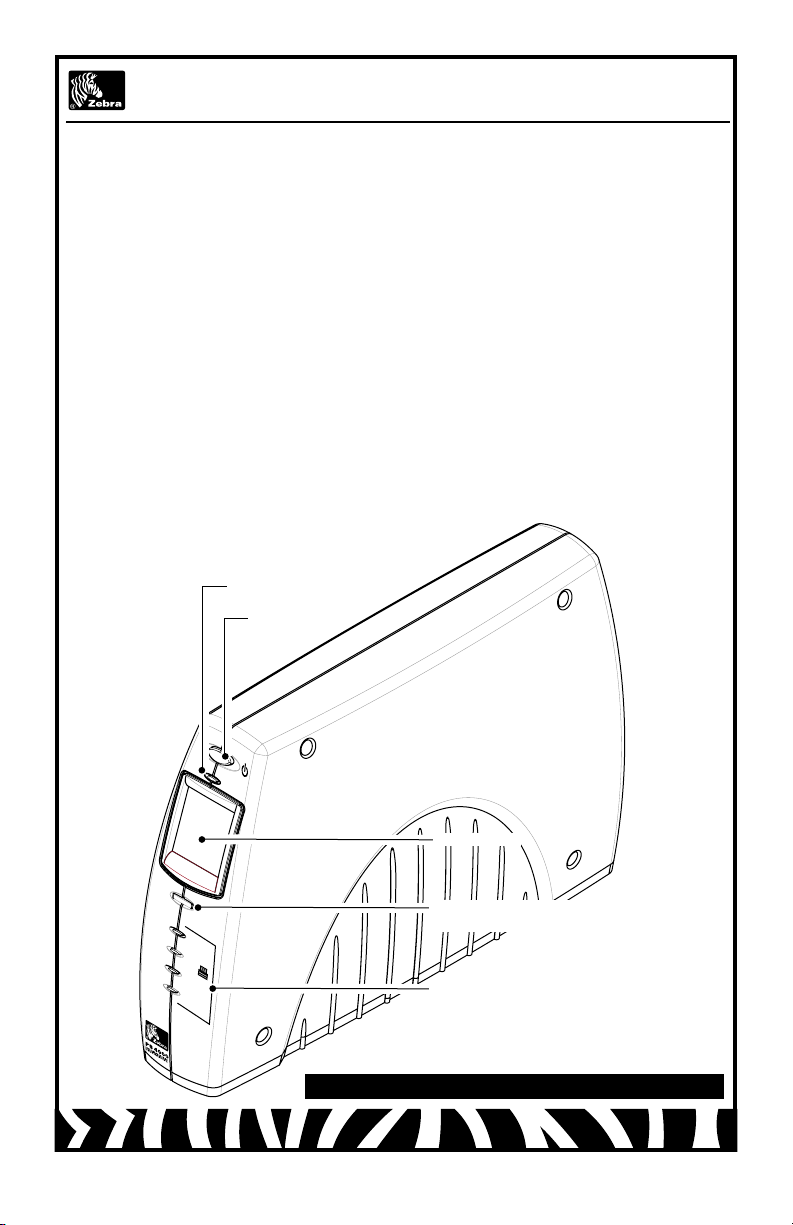
Power Indicator
Power Switch
LCD Screen
Scroll Switch (only wi th
LCD option)
Printer Connect ion Indicators
ZebraNet PS4000 Server with LCD Option
Page 2
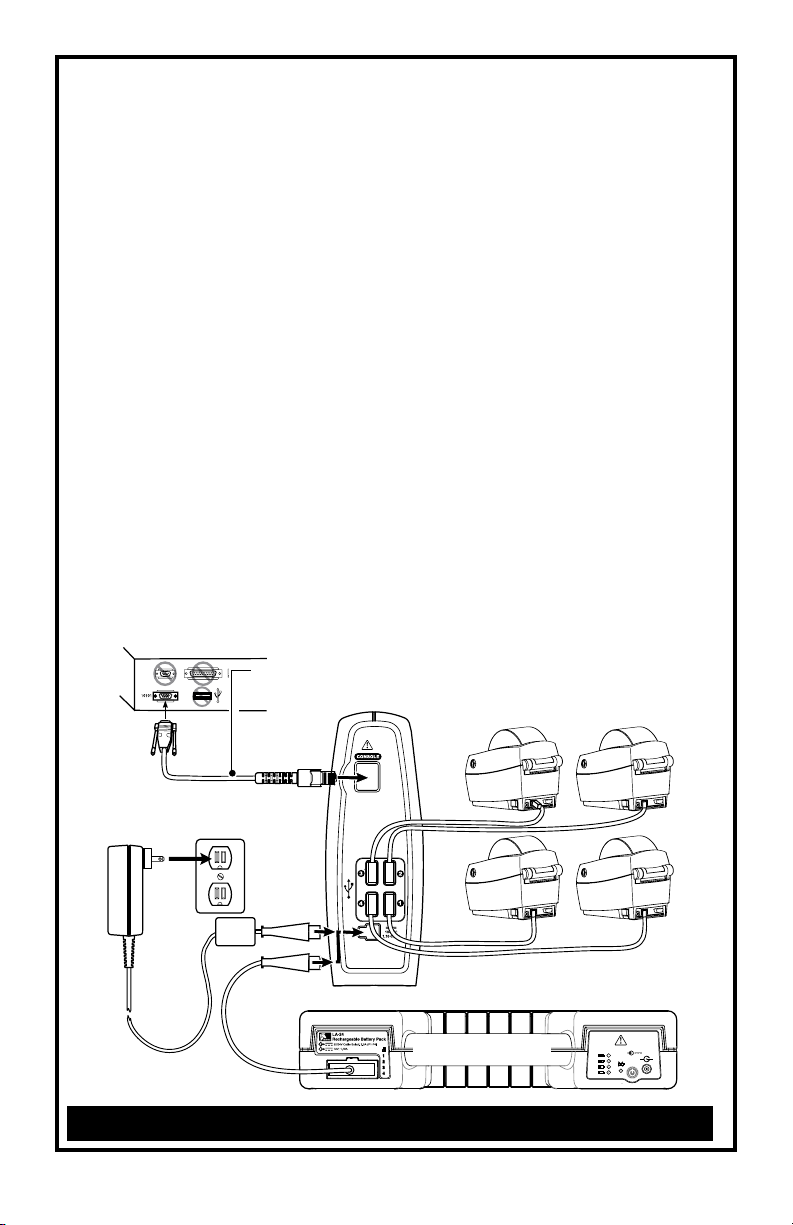
Installation
20V; 4,5A
+
-
The Server is supplied with a mounting base. When installed, the mounting base
provides a secure mount for the ser ver and allows it to be removed for servicing and
replacement. The mount should be secured with the supplied hardware per the placement recommendations above. You should leave a minimum space of approximately
3.5” (9.0 cm) behind the server to allow room to install and remove the power and printer
communication cables.
The ZebraNet PS4000 Server may be powered by either an AC power supply, or by the
Zebra Technologies LA-24 Battery Pack, which can provide DC power for the Print Server
and four (4) Zebra printers. Always observe the safety guidelines in both the LA- 24 Battery Pack Safety Guide and the ZebraNet PS4000 Print Server Safety Guide when connecting power to the server.
Once the server has been secured, and you are using the AC Power Supply, plug the
Power Supply into an AC socket and then plug the output cable of the Power Supply into
the back of the Server. (refer to figure 2 ) Note that the AC Power Supply only provides
power to the server; you must provide power to the printers seperately.
If you are using the LA 24 Battery Pack, use the correct Zebra cable to make the connection bet ween the Bat tery Pack, the Server and the printers.
You may then plug the printer communication cables into the rear of the unit, noting
which ports the printers are plugged into.
Press the power switch on the front of the Server (Figures 3a & 3b) and ensure the
power indicator is lit.
The display of servers equipped with the Liquid Crystal Display (LCD) option will also
turn on. On servers without the display option, the battery strength indicators should
light up.
Ensure each printer connected to the server has been successfully turned on and their
power indicators are also lit. (Refer to the user documentation shipped with each printer
for more details.)
Console Cable
p/n BL17502-2
ZebraNet
AC Power
Supply
PS4000 Server
LA-24 Battery Pack
FIgure 2: Server Installation
2 ZebraNet PS40 00 Print Server Quick Star t Guide
Page 3

User Controls
1
2
3
4
1
2
3
4
The ZebraNet PS4000 Server has two possible configurations; with or without an LCD.
Units without an LCD have a front panel as detailed in Figure 3a. Units with an LCD have
a scroll wheel to allow selection of menu items on the LCD. Rotating the scroll wheel to
the left or right will highlight items on the LCD screen, and pressing the scroll wheel “in”
will select a highlighted menu item. Since the LCD is programmable, the menu selections will vary depending on how the server is programmed. The illustration in Figure 3b
is a typical example.
Units without an LCD have an array of light emitting diodes (LEDs) which indicate battery strength when the server is connected to an LA-24 series battery. When the Server
is connected to the AC power supply, all the LEDs will be lit.
Once the server has made a connection with a printer, its corresponding indicator on
the Server front panel will be lit.
Power Switch
Batter y
Strength
Indicator
Number of lit
LEDs indicate
the charge
level of the
Battery Pack .
If Server is
plugged into
an AC sup-
ply, all the
LEDs will
remain lit .
Signal
Indicator
indicates
the server is
connected to
the WLA N.
A blinking
Indicator
means the
server is not
connected.
The signal icon indicates
connection with th e WLAN.
the icon represent signal
RF Signal Icon
The bars to the right of
Power On
Indicator
Printer
Indicators
indicator
printer is
connected
server.
FIgure 3a: Non LCD Front
Panel
A lit
tells
which
to the
streng th.
FIgure 3b: LCD Front
Panel
Power Switch
Press on cau ses the powe r
indicator to light and the LCD
to illumina te. Press ing off
turns the Server of f
Battery
Strength Indica tor
Number of lit
squares inside
the battery icon
indicate the charge
level of the Bat ter y
Pack if the bat ter y
status function is
enabled.
If Server is
plugged into an
AC supply, the
battery indicator
will not disp lay.
Scroll Switch
Rotating left or
right highlights a
selection on the
LCD. Pressin g
in makes that
selection
ZebraNet PS40 00 Print Server Quick Star t Guide 3
Page 4

Operation
The setup software for the ZebraNet PS4000 Ser ver requires either a connection between a PC running the setup software and the “Console” port of the server or a valid
wireless connection between the WL AN and the server. It allows configuration of the
server and the connected printers so that communication is possible over the wireless
LAN. When the server and the printers are properly configured, the server will act as a
“pass-through” device, receiving wireless commands addressed to connected printers,
and routing them to the correct printer. The setup software is available for download at
the Zebra corporate Web site at www.zebra.com.
The ZebraNet PS4000 uses many of the commands in the CPCL programming language, plus several commands unique to the server. A programming manual detailing
these commands is also available on the Zebra Web site at ww w.zebra.com.
Zebra Technologies International, LLC
333 Corp orate Wood s Parkway
Vernon Hills, Illinois 60 061-3109 USA
Phone: +1.847.793.2600 or +1.800.423. 0422
Fax: +1.847.913.8766
Zebra Technologies Europe Limited
Zebra House
The Valley Centre, Gordon Roa d
High Wycombe
Buckinghamshire HP13 6EQ, UK
Phone: +44 .1494.472872
Fax: +44.1494.4 50103
Zebra Technologies Latin America, LLC
Latin American Sa les Of fice
9800 NW 41 Stree t
Suite 220
Doral, Florida 33178 USA
Phone: +1.305.55 8.8470
Fax: +1.305.558.8485
QSG-PS4-002 Rev. A 8/11/06
 Loading...