


PS20
Personal Shopper
Product Reference
Guide
for Android ™ 8.1 Oreo
MN-003238-04EN Rev A

Copyright
ZEBRA and the stylized Zebra head are trademarks of Zebra Technologies Corporation, registered in many
jurisdictions worldwide. Google, Android, Google Play and other marks are trademarks of Google LLC; Oreo is
a trademark of Mondelez International, Inc. group. All other trademarks are the property of their respective
owners. ©2021 Zebra Technologies Corporation and/or its affiliates. All rights reserved.
COPYRIGHTS & TRADEMARKS: For complete copyright and trademark information, go to
www.zebra.com/copyright
WARRANTY: For complete warranty information, go to www.zebra.com/warranty.
.
END USER LICENSE AGREEMENT: For complete EULA information, go to www.zebra.com/eula
Terms of Use
• Proprietary Statement
This manual contains proprietary information of Zebra Technologies Corporation and its subsidiaries
(“Zebra Technologies”). It is intended solely for the information and use of parties operating and maintaining
the equipment described herein. Such proprietary information may not be used, reproduced, or disclosed to
any other parties for any other purpose without the express, written permission of Zebra Technologies.
• Product Improvements
Continuous improvement of products is a policy of Zebra Technologies. All specifications and designs are
subject to change without notice.
• Liability Disclaimer
Zebra Technologies takes steps to ensure that its published Engineering specifications and manuals are
correct; however, errors do occur. Zebra Technologies reserves the right to correct any such errors and
disclaims liability resulting therefrom.
• Limitation of Liability
In no event shall Zebra Technologies or anyone else involved in the creation, production, or delivery of the
accompanying product (including hardware and software) be liable for any damages whatsoever (including,
without limitation, consequential damages including loss of business profits, business interruption, or loss of
business information) arising out of the use of, the results of use of, or inability to use such product, even if
Zebra Technologies has been advised of the possibility of such damages. Some jurisdictions do not allow
the exclusion or limitation of incidental or consequential damages, so the above limitation or exclusion may
not apply to you.
.
Revision History
Changes to the original guide are listed below:
Change Date Description
-01 Rev A 09/2018 Initial release.
-02 Rev A 11/2018 Add support for MR1 release.
-03 Rev A
-04 Rev A
04/2019
09/2021
Various updates.
Update GMS Restric
ted.
2

Table of Contents
Copyright ......................................................................................................................... 2
Terms of Use ..................................................................................................................2
Revision History ..............................................................................................................2
About This Guide........................................................................................................ 15
Introduction ................................................................................................................... 15
Configurations ............................................................................................................... 15
Software Versions ......................................................................................................... 15
Chapter Descriptions .................................................................................................... 16
Notational Conventions ................................................................................................. 16
Related Documents and Software ................................................................................ 17
Service Information ....................................................................................................... 17
Provide Documentation Feedback ................................................................................ 17
Getting Started............................................................................................................ 18
Introduction ................................................................................................................... 18
Unpacking .....................................................................................................................18
Removing the Screen Protection Film ................................................................... 18
Features ........................................................................................................................ 19
Accessories ...................................................................................................................21
Status LED ....................................................................................................................23
Scan Key ....................................................................................................................... 24
Setup ............................................................................................................................. 25
Charging the Battery ..................................................................................................... 25
Charging Temperature .......................................................................................... 27
LED Status Indicators ............................................................................................ 27
Replacing the Battery .................................................................................................... 28
Compatibility .................................................................................................................29
Battery Comparison ...................................................................................................... 29
Powering on the Device ................................................................................................ 30
3

Table of Contents
Google Account Setup .......................................................................................... 30
Zebra Visibility Services ................................................................................................ 31
Releasing the PS20 from the Charging Cradles ........................................................... 31
Software Release Using the Menu ........................................................................ 31
Software Release Using the Cradle Utility ............................................................ 32
Manual Release Using a Release Key .................................................................. 32
Manual Release of the PS20 from the Single Slot Cradle .............................. 32
Manual Release of the PS20 from the Three Slot Cradle ............................... 33
USB Cable Battery Cover ............................................................................................. 33
Installing the USB Cable Battery Cover ................................................................ 33
Removing the USB Cable Battery Cover .............................................................. 34
Soft Holster ................................................................................................................... 35
Using the Belt Clip ................................................................................................. 35
Using the Shoulder Strap ...................................................................................... 37
Battery Management ..................................................................................................... 38
Monitoring Battery Usage ...................................................................................... 38
Low Battery Notification ......................................................................................... 39
Battery Optimization .............................................................................................. 40
Turning Off the Radios .......................................................................................... 40
Setting the Date and Time ............................................................................................ 40
Display Settings ............................................................................................................ 40
Setting the Screen Brightness ............................................................................... 41
Setting Screen Timeout ......................................................................................... 41
Setting Font Size ................................................................................................... 41
Setting Display Size ...................................................................................................... 42
Setting Screen Saver ............................................................................................ 42
Configuring Screen Saver Settings ....................................................................... 43
Example screensaverconfig.xml ..................................................................... 44
Ambient Display .................................................................................................... 44
General Sound Setting .........................................
Resetting the Device ..................................................................................................... 46
Performing a Soft Reset ........................................................................................ 46
Performing a Hard Reset ....................................................................................... 46
When in a Cradle ............................................................................................ 46
When Out of the Cradle .................................................................................. 47
......................................................... 44
Using the Device ......................................................................................................... 48
Introduction ................................................................................................................... 48
Google Mobile Services ................................................................................................ 48
Home Screen ................................................................................................................ 48
Status Bar .............................................................................................................. 49
4

Table of Contents
Status Icons .................................................................................................... 50
Notification Icons ............................................................................................. 51
Managing Notifications .................................................................................... 51
Setting App Notifications ................................................................................. 52
Viewing Notification Settings for All Apps ....................................................... 53
Controlling Lock Screen Notifications ............................................................. 53
Blink Light ....................................................................................................... 53
Quick Access Panel ........................................................................................ 53
App Shortcuts and Widgets ................................................................................... 54
Adding an App Shortcut to the Home Screen ................................................. 54
Adding a Widget to the Home Screen ............................................................. 55
Moving Items on the Home Screen ................................................................. 55
Removing an App Shortcut or Widget from the Home Screen ....................... 55
Folders .................................................................................................................. 55
Creating a Folder ............................................................................................ 55
Naming Folders ............................................................................................... 55
Removing a Folder .......................................................................................... 56
Home Screen Wallpaper ....................................................................................... 56
Using the Touchscreen ................................................................................................. 56
Using the Android and Gboard Keyboards ................................................................... 57
Editing Text ..................................................................................................... 57
Entering Numbers, Symbols, and Special Characters .................................... 57
Apps .............................................................................................................................. 57
Accessing Apps ............................................................................................................ 60
Switching Between Recent Apps .......................................................................... 61
Un-Locking the Screen ................................................................................................. 62
Suspend Mode .............................................................................................................. 64
Wireless ....................................................................................................................... 66
Introduction ................................................................................................................... 66
Wireless Local Area Networks ...................................................................................... 66
Connecting to a Wi-Fi Network ..................................................................................... 67
Configuring a Secure Wi-Fi Network ..................................................................... 68
Manually Adding a Wi-Fi Network ......................................................................... 69
Configuring for a Proxy Server .............................................................................. 70
Configuring the Device to Use a Static IP Address ............................................... 71
Advanced Wi-Fi Settings ............................................................................................... 72
Additional Wi-Fi Settings ....................................................................................... 72
Removing a Wi-Fi Network .................................................................................... 73
Wi-Fi Advanced Features ...................................................................................... 73
Bluetooth ....................................................................................................................... 74
Adaptive Frequency Hopping ................................................................................ 74
Security ................................................................................................................. 75
5

Table of Contents
Bluetooth Profiles .................................................................................................. 75
Bluetooth Power States ......................................................................................... 76
Bluetooth Radio Power .......................................................................................... 76
Enabling Bluetooth .......................................................................................... 76
Disabling Bluetooth ......................................................................................... 77
Discovering Bluetooth Device(s) ........................................................................... 77
Changing the Bluetooth Name .............................................................................. 77
Connecting to a Bluetooth Device ......................................................................... 77
Selecting Profiles on the Bluetooth Device ........................................................... 78
Unpairing a Bluetooth Device ................................................................................ 78
Cast ............................................................................................................................... 78
Applications ................................................................................................................ 79
Introduction ................................................................................................................... 79
Battery Manager ........................................................................................................... 79
Camera ........................................................................................................................ 82
Taking Photos ....................................................................................................... 82
Recording Videos .................................................................................................. 83
Photo Settings ....................................................................................................... 84
Front Camera .................................................................................................. 84
Video Settings ....................................................................................................... 85
Front Camera .................................................................................................. 85
Contacts ....................................................................................................................... 86
Adding a Contact ................................................................................................... 86
Editing Contacts .................................................................................................... 86
Deleting Contacts .................................................................................................. 86
Cradle Firmware Updater ............................................................................................. 87
Sending the Firmware File Using Intents .............................................................. 88
To send an intent using ADB: ......................................................................... 88
To send an intent using MDM: ........................................................................ 89
To send the file using the Recovery Method: .................................................. 89
To send an Airwatch intent: ............................................................................ 89
To send a SOTI intent: .................................................................................... 89
Cradle Utility ................................................................................................................. 90
Controlling the Cradle ............................................................................................ 90
Setting the Cradle .................................................................................................. 91
Performing Cradle Diagnostics .............................................................................. 92
Viewing Cradle Information ................................................................................... 92
Smart Cradle Configuration ......................................................................................... 94
Support .................................................................................................................. 94
Prerequisites/Assumptions .................................................................................... 94
Error Prevention .................................................................................................... 94
6

Table of Contents
Accessing CradleSmartConfig .............................................................................. 95
Using CradleSmartConfig ...................................................................................... 95
Auditing ................................................................................................................. 98
Quick Audit ...................................................................................................... 98
Full Audit ......................................................................................................... 99
Wall Map Examples ............................................................................................. 100
DataWedge Demonstration ........................................................................................ 101
Scanner Selection ............................................................................................... 102
Device Central ........................................................................................................... 103
Device Central Tabs ............................................................................................ 103
Paging an RS6000 Ring Scanner ....................................................................... 104
Diagnostic Tool .......................................................................................................... 106
Settings ............................................................................................................... 109
Battery Test Information ...................................................................................... 109
System Test Information ..................................................................................... 110
WLAN Test Information ....................................................................................... 110
Bluetooth Test Information .................................................................................. 110
Enterprise Browser .................................................................................................... 112
Enterprise Browser Application ........................................................................... 112
Files ........................................................................................................................... 114
Gallery ........................................................................................................................ 116
Working with Albums ........................................................................................... 117
Sharing an Album ......................................................................................... 118
Getting Album Information ............................................................................ 118
Deleting an Album ......................................................................................... 119
Working with Photos ............................................................................................ 119
Viewing and Browsing Photos ...................................................................... 119
Cropping a Photo .......................................................................................... 120
Setting a Photo as a Contact Icon ................................................................ 120
Sharing a Photo ...............................................
Deleting a Photo ........................................................................................... 121
Working with Videos ............................................................................................ 121
Watching Videos ........................................................................................... 122
Sharing a Video ............................................................................................ 122
Deleting a Video ............................................................................................ 122
RxLogger ................................................................................................................... 123
RxLogger Configuration ...................................................................................... 123
Configuration File ................................................................................................ 124
Enabling Logging ................................................................................................. 124
Disabling Logging ................................................................................................ 125
Extracting Log Files ............................................................................................. 125
RxLogger Utility .......................................................................................................... 126
............................................. 121
7

Table of Contents
Data Capture.............................................................................................................. 127
Introduction ................................................................................................................. 127
Scanning Considerations ............................................................................................ 127
Scanning Bar Codes ................................................................................................... 127
Scanning Tips ............................................................................................... 129
Decode Screen Notification ................................................................................. 129
DataWedge ................................................................................................................ 130
Enabling DataWedge ................................................................................................. 131
Disabling DataWedge .......................................................................................... 131
Hands Free Scanning ................................................................................................. 131
Settings ............................................................................................................... 131
Scanning Mode ................................................................................................... 132
Proximity Range .................................................................................................. 132
Cradle Installation..................................................................................................... 134
Introduction ................................................................................................................. 134
Installation of the Single Slot Cradle ........................................................................... 134
Charging Modes .................................................................................................. 134
Standard Charging Mode .............................................................................. 134
Fast Charging Mode ..................................................................................... 135
Mounting the Single Slot Cradle on a Dispenser Wall ......................................... 135
Wiring .................................................................................................................. 137
Assembly ............................................................................................................. 138
System Cabling ................................................................................................... 139
Installation of the Three Slot Cradle ............................................................................ 141
Mounting Configurations ..................................................................................... 141
High Density Configuration ........................................................................... 141
Super High Density Configuration ................................................................. 142
Desktop Configuration .................................................................................. 143
Charging Modes .................................................................................................. 143
Standard Charging Mode .............................................................................. 144
Fast Charging Mode ..................................................................................... 144
Mounting the Three Slot Cradle on a Dispenser Wall ......................................... 145
USB Communication ................................................................................................ 151
Introduction ................................................................................................................. 151
Transferring Files with a Host Computer via USB ...................................................... 151
Transferring Files ............................................................................................... 151
Disconnect from the Host Computer ................................................................... 152
DataWedge ................................................................................................................ 153
8

Table of Contents
Introduction ................................................................................................................. 153
Accessing DataWedge ................................................................................................ 153
Basic Scanning ........................................................................................................... 153
Profiles ........................................................................................................................ 153
Profile0 ........................................................................................................................ 154
Plug-ins ....................................................................................................................... 154
Input Plug-ins ...................................................................................................... 154
Process Plug-ins ................................................................................................. 154
Output Plug-ins .................................................................................................... 155
Profiles Screen ............................................................................................................ 155
Profile Context Menu .................................................................................................. 156
Options Menu ...................................................................................................... 156
Disabling DataWedge .......................................................................................... 156
Creating a New Profile ................................................................................................ 156
Profile Configuration ................................................................................................... 157
Associating Applications ...................................................................................... 158
Data Capture Plus ....................................................................................................... 159
Barcode Input .............................................................................................................. 161
Enabled ......................................................................................................... 161
Scanner Selection ......................................................................................... 161
Hardware Trigger .......................................................................................... 162
Auto Switch to Default on Event ................................................................... 162
Configure Scanner Settings .......................................................................... 162
Select Scanner to Set Parameters ................................................................ 163
Decoders ....................................................................................................... 163
Decoder Params ........................................................................................... 165
UPC EAN Params ......................................................................................... 170
Reader Params ............................................................................................. 173
Scan Params ................................................................................................ 175
UDI Params .................................................................................................. 177
Multibarcode params .................................................................................... 177
Keep enabled on suspend ............................................................................ 177
Voice Input .......................................................................................................... 177
Keystroke Output ................................................................................................. 178
Intent Output ........................................................................................................ 179
Intent Overview ................................................................................................... 180
IP Output ............................................................................................................. 181
Usage ............................................................................................................ 182
Using IP Output with IPWedge ..................................................................... 183
Using IP Output without IPWedge ................................................................ 184
Generating Advanced Data Formatting Rules .............................................. 185
Configuring ADF Plug-in ...................................................................................... 185
Creating a Rule ................................................................................................... 186
Defining a Rule ............................................................................................. 186
9

Table of Contents
Defining Criteria ............................................................................................ 187
Defining an Action ......................................................................................... 188
Deleting a Rule ............................................................................................. 189
Order Rules List ............................................................................................ 189
Deleting an Action ......................................................................................... 190
ADF Example ................................................................................................ 190
DataWedge Settings ................................................................................................... 193
Importing a Configuration File ....................................................................... 194
Exporting a Configuration File ....................................................................... 195
Importing a Profile File ........................................................................................ 195
Exporting a Profile ............................................................................................... 195
Restoring DataWedge ......................................................................................... 195
Configuration and Profile File Management ................................................................ 196
Enterprise Folder ........................................................................................................ 196
Auto Import .......................................................................................................... 196
Reporting ............................................................................................................. 196
Programming Notes ............................................................................................ 197
Overriding Trigger Key in an Application ............................................................. 197
Capture Data and Taking a Photo in the Same Application ................................ 197
Disable DataWedge on Device and Mass Deploy ............................................... 197
DataWedge APIs ................................................................................................. 197
Soft Scan Trigger ................................................................................................ 197
Function Prototype ........................................................................................ 198
Parameters ................................................................................................... 198
Scanner Input Plugin ........................................................................................... 198
Function Prototype ........................................................................................ 198
Parameters ................................................................................................... 198
Return Values ............................................................................................... 199
Example ........................................................................................................ 199
Comments ..................................................................................................... 199
Enumerate Scanners ........................................................................................... 200
Function Prototype ........................................................................................ 200
Parameters ................................................................................................... 200
Return Values ............................................................................................... 200
Example ........................................................................................................ 201
Comments ..................................................................................................... 201
Set Default Profile ............................................................................................... 202
Default Profile Recap .................................................................................... 202
Usage Scenario ............................................................................................ 202
Function Prototype ........................................................................................ 202
Parameters ................................................................................................... 202
Return Values ............................................................................................... 202
Example ........................................................................................................ 203
Comments ..................................................................................................... 203
Reset Default Profile ........................................................................................... 203
10

Table of Contents
Function Prototype ........................................................................................ 204
Parameters ................................................................................................... 204
Return Values ............................................................................................... 204
Example ........................................................................................................ 204
Comments ..................................................................................................... 204
Switch To Profile ................................................................................................. 205
Profiles Recap ............................................................................................... 205
Usage Scenario ............................................................................................ 205
Function Prototype ........................................................................................ 205
Parameters ................................................................................................... 205
Return Values ............................................................................................... 206
Example ........................................................................................................ 206
Comments ..................................................................................................... 206
Notes ............................................................................................................. 207
Application Deployment........................................................................................... 208
Introduction ................................................................................................................. 208
Security ....................................................................................................................... 208
Secure Certificates ...................................................................................................... 208
Installing a Secure Certificate ..................................................................................... 208
Configuring Credential Storage Settings ............................................................. 209
Development Tools ..................................................................................................... 209
Android ................................................................................................................ 209
EMDK for Android ............................................................................................... 210
StageNow ............................................................................................................ 210
MX Features ........................................................................................................ 211
GMS Restricted ............................................................................................. 211
ADB USB Setup .......................................................................................................... 211
Enabling USB Debugging ........................................................................................... 211
Application Installation ................................................................................................ 212
Installing Applications Using the USB Connection .............................................. 212
Installing Applications Using the Android Debug Bridge ..................................... 213
Uninstalling an Application .................................................................................. 214
Performing a System Update ...................................................................................... 215
Downloading the System Update Package ......................................................... 215
Using ADB ........................................................................................................... 215
Verify System Update Installation ............................................................................... 216
Performing an Enterprise Reset .................................................................................. 216
Downloading the Enterprise Reset Package ....................................................... 216
Using ADB ........................................................................................................... 216
Performing a Factory Reset ........................................................................................ 217
Downloading the Factory Reset Package ........................................................... 217
11

Table of Contents
Using ADB ........................................................................................................... 217
Storage .......................................................................................................................218
Random Access Memory .................................................................................... 219
On Device Storage .............................................................................................. 220
Internal Storage ................................................................................................... 220
Enterprise Folder ................................................................................................. 221
App Management ........................................................................................................ 221
Viewing App Details .................................................................................................... 222
Managing Downloads ................................................................................................. 223
Changing Application Location ................................................................................... 223
Settings...................................................................................................................... 225
Introduction ................................................................................................................. 225
Setting Screen Lock .................................................................................................... 225
Setting Screen Lock Using PIN ................................................................................... 226
Setting Screen Unlock Using Password .............................................................. 226
Setting Screen Unlock Using Pattern .................................................................. 227
Showing Passwords .................................................................................................... 228
Language Usage ......................................................................................................... 228
Changing the Language Setting .......................................................................... 228
Adding Words to the Dictionary ........................................................................... 229
Keyboard Settings ............................................................................................... 229
RxLogger ............................................................................................................. 229
RxLogger Settings ............................................................................................... 230
RxLogger Configuration ...................................................................................... 230
ANR Module .................................................................................................. 231
Kernal Module ............................................................................................... 231
Logcat Module .............................................................................................. 232
LTS Module ................................................................................................... 233
Ramoops Module .......................................................................................... 233
Qxdm Module ................................................................................................ 233
Resource Module .......................................................................................... 234
Snapshot Module .......................................................................................... 234
TCPDump Module ........................................................................................ 235
Tombstone Module ....................................................................................... 235
Configuration File ................................................................................................ 235
Enabling Logging ................................................................................................. 235
Disabling Logging ................................................................................................ 235
Extracting Log Files ............................................................................................. 236
RxLogger Utility ................................................................................................... 236
App View ............................................................................................................. 236
Viewing Logs ................................................................................................. 236
12

Table of Contents
Backup ........................................................................................................................238
Archive Data ................................................................................................. 238
Overlay View ................................................................................................. 238
Initiating the Main Chat Head ........................................................................ 238
Removing the Main Chat Head ..................................................................... 239
Viewing Logs ................................................................................................. 239
Removing a Sub Chat Head Icon ................................................................. 240
Backing Up In Overlay View ......................................................................... 240
About Phone ............................................................................................................... 240
Maintenance and Troubleshooting ........................................................................ 242
Introduction ................................................................................................................. 242
Maintaining the Device ................................................................................................ 242
Battery Safety Guidelines ........................................................................................... 242
Long Term Storage ..................................................................................................... 243
Cleaning Instructions .................................................................................................. 243
Approved Cleanser Active Ingredients ................................................................ 243
Harmful Ingredients ............................................................................................. 244
Device Cleaning Instructions ............................................................................... 244
Special Cleaning Notes ....................................................................................... 244
Cleaning Materials Required ............................................................................... 244
Cleaning Frequency ............................................................................................ 245
Cleaning the Device ............................................................................................ 245
Housing ......................................................................................................... 245
Display .......................................................................................................... 245
Camera and Exit Window ............................................................................. 245
Cleaning Battery Connectors .............................................................................. 245
Cleaning Cradle Connectors ............................................................................... 245
Troubleshooting .......................................................................................................... 246
PS20 ..........................................................
Cradles ................................................................................................................ 248
.......................................................... 246
Specifications............................................................................................................ 249
Technical Specifications ............................................................................................. 249
Supported Symbologies ...................................................................................... 251
Three Slot Cradle ................................................................................................ 251
Single Slot Cradle ................................................................................................ 252
PS20 Interface Connector Pin-Outs ............................................................................ 253
Cable Specifications ................................................................................................... 253
Power Supply Cable, Y-type ............................................................................... 253
Cradle Interconnection Cable .............................................................................. 254
13

Index
Table of Contents
14

About This Guide
Introduction
This guide provides information about setting up and configuring the device with an Android operating
system and installing its accessories.
NOTE: Some screens or windows shown in this guide may differ from the actual screens shown on the device.
Configurations
This guide covers the following configurations:
Table 1
Configuration Radios Display Memory
PS20 Base WLAN: 802.11
a/b/g/n/d/h/i/k/r/v/ac
WPAN: Bluetooth
v5.0
PS20 Plus WLAN: 802.11
a/b/g/n/d/h/i/k/r/v/ac
WPAN: Bluetooth
v5.0
WVGA 4.0”
color
WVGA 4.0”
color
4 GB RAM/16
GB Flash
4 GB RAM/16
GB Flash
Software Versions
Data Capture
Options
SE2100 Android
SE4710 +
Digimarc
Operating
System
Open Source
Project
(AOSP)/
Google
Mobile
Services
(GMS)
8.1
Android
Open Source
Project
(AOSP)/
Google
Mobile
Services
(GMS)
8.1
To determine the current software versions:
1. Swipe down from the Status bar to open the Quick Settings bar.
15

2. Touch > System.
3. Touch About phone.
4. Scroll to view the following information:
•Model
• Android version
•Kernel version
• Build number.
To determine the device serial number, touch About phone > Status.
• Serial number
Chapter Descriptions
Topics covered in this guide are as follows:
About This Guide
• Getting Started, describes the features and basic operation of the device, lists the accessories for
e and explains how to install and charge the batteries and start the device for the first time.
devic
• Using the Device, provides basic instructions for using the device with an Android OS.
• Wireless, provides instructions for setting up WLAN and Bluetooth connections.
• Applications, provides information on various apps pre-installed on the device.
• Data Capture, provides information for capturing barcode data.
• Cradle Installation, provides installation instructions for the cradles and other accessories.
• USB Communication, provides instructions for connecting the device to a host computer.
• DataWedge, provides information for configuring DataWedge.
• Application Deployment, provides instructions for downloading software and files to the device.
• Settings, provides various setting for the device.
• Maintenance and Troubleshooting, includes instructions on cleaning and storing the device, and provides
troubleshooting solutions for potential problems during operation.
• Specifications, includes a table listing the technical specifications for the device and accessories.
Notational Conventions
The following conventions are used in this document:
• Bold text is used to highlight the following:
• Dialog box, window and screen names
• Drop-down list and list box names
• Check box and radio button names
• Icons on a screen
• Key names on a keypad
• Button names on a screen.
• Bullets (•) indicate:
• Action items
• Lists of alternatives
• Lists of required steps that are not necessarily sequential.
the
16

About This Guide
• Sequential lists (for example, those that describe step-by-step procedures) appear as numbered lists.
Related Documents and Software
The following documents provide more information about the PS20 Personal Shopper:
• PS20 Personal Shopper Quick Start Guide, p/n MN-003318-XX
• PS20 Regulatory Guide, p/n MN-003276-XX
For the latest version of this guide and all guides, go to: zebra.com/support
Service Information
If you have a problem with your equipment, contact Customer Support for your region. Contact information is
available at: www.zebra.com/support
When contacting support, please have the following information available:
• Serial number of the unit (found on manufacturing label)
• Model number or product name (found on manufacturing label)
• Software type and version number
Customer Support responds to calls by email or telephone within the time limits set forth in support
agreements.
If the problem cannot be solved by Customer Support, you may need to return the equipment for servicing and
will be given specific directions. We are not responsible for any damages incurred during shipment if the
approved shipping container is not used. Shipping the units improperly can possibly void the warranty.
If the device was purchased from a business partner, contact that business partner for support.
.
Provide Documentation Feedback
.
If you have comments, questions, or suggestions about this guide, send an email to
EVM-Techdocs@zebra.com
.
17

Getting Started
Introduction
This chapter describes the features of the PS20 and explains how to install and charge the battery,
how to capture data using the integrated Imager and how to reset the PS20.
Unpacking
Carefully remove all protective material from the device and save the shipping container for later
storage and shipping.
Verify that the box contains all the equipment listed below:
• PS20 (includes lithium-ion battery)
• Regulatory Guide
Inspect the equipment for damage. If you are missing any equipment or if you find any damaged
equipment, contact Support immediately. See Service Information on page 17 for contact information.
Removing the Screen Protection Film
A screen protection film is applied to the PS20 screen to protect the screen during shipping. To
remove the screen protector, carefully lift the thin film off the touch screen display.
18
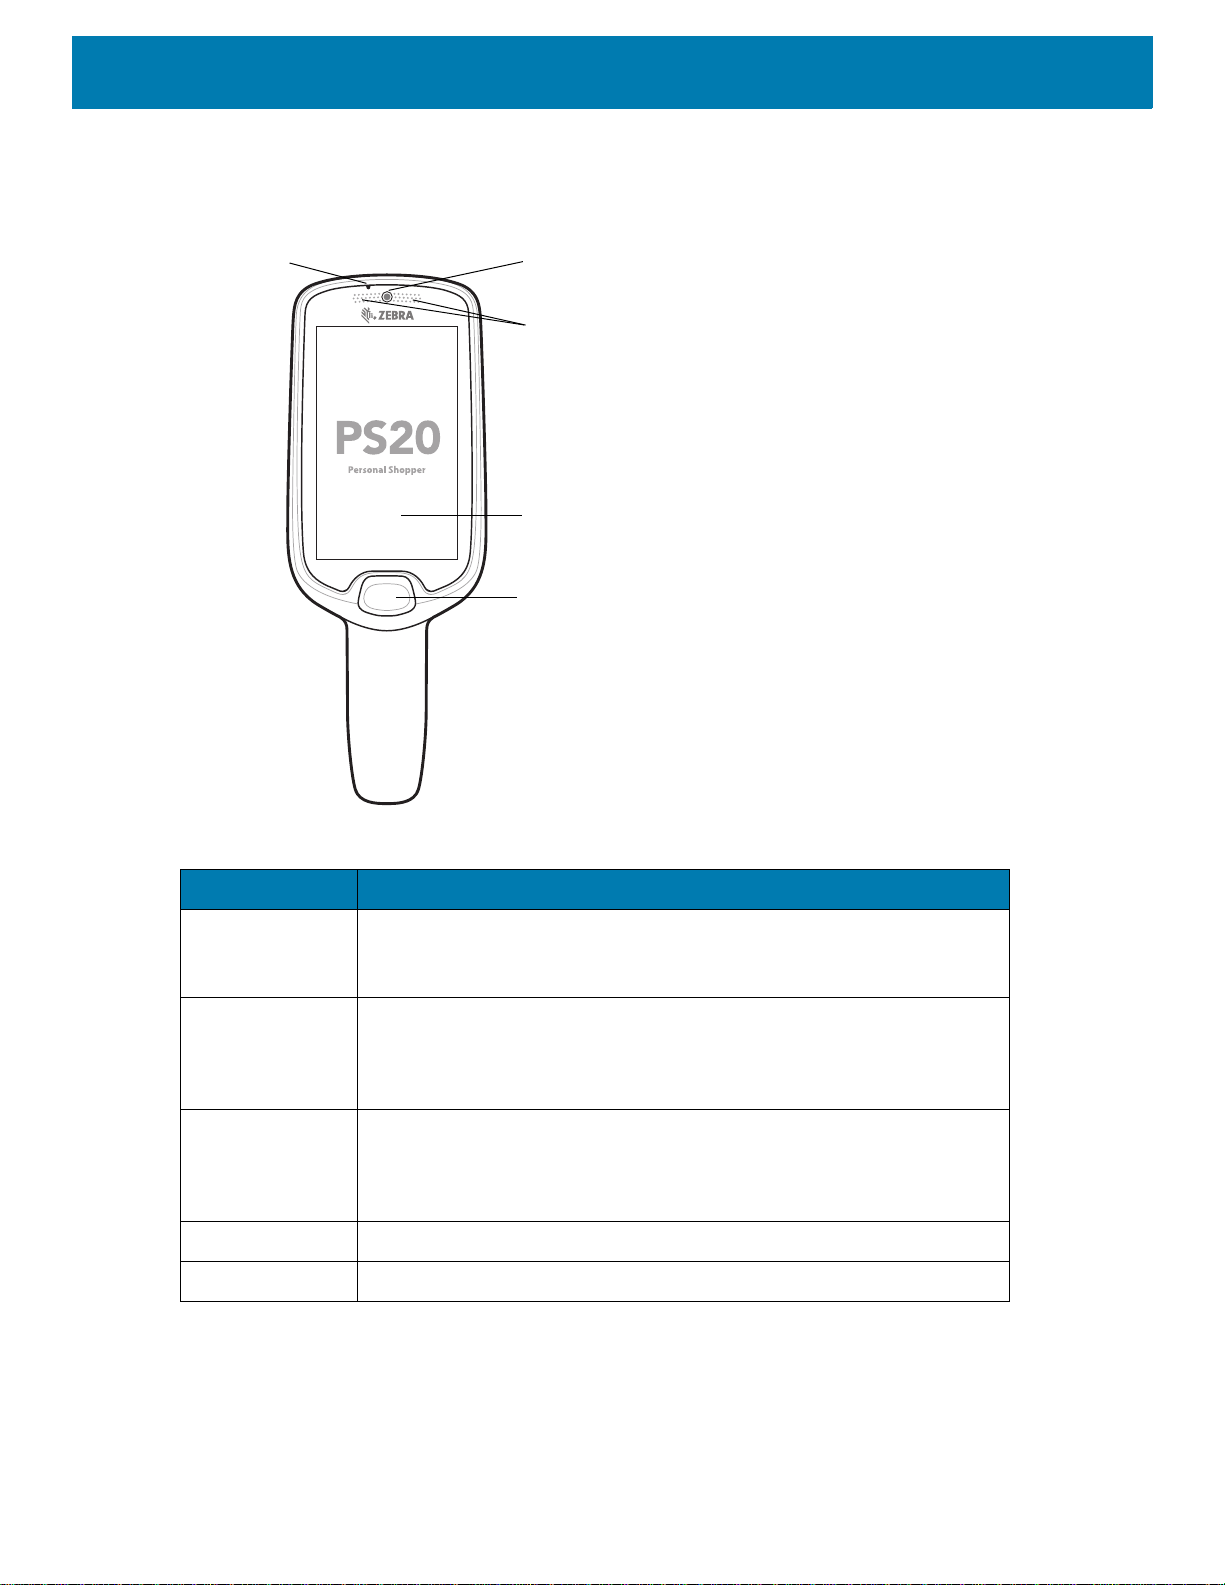
Features
Scan Key
Touch Screen
LED Status
Camera
Microphone
Figure 1 Features - Front View
Getting Started
Table 2 Features- Front View
Item Function
Microphone Use for audio input and SmartLens locationing. Allows shoppers to
speak to a store associate via push-to-talk or to a virtual assistant via
speech-to-text.
Camera With the front-facing camera, the device supports Visible Light
LED Status Indicates the battery charge state while charging or the scan/decode
Touch Screen Displays all information needed to operate the device.
Scan Key Use for trigger input for scanner or as a Select/Enter key.
Communications (VLC) indoor positioning/locationing applications. In
addition, the camera is used for image/face recognition. Available on
Plus configurations.
status.
Red: Barcode scan in progress (Scan key is pressed).
Single Green Blink: Successful decode.
19
Getting Started
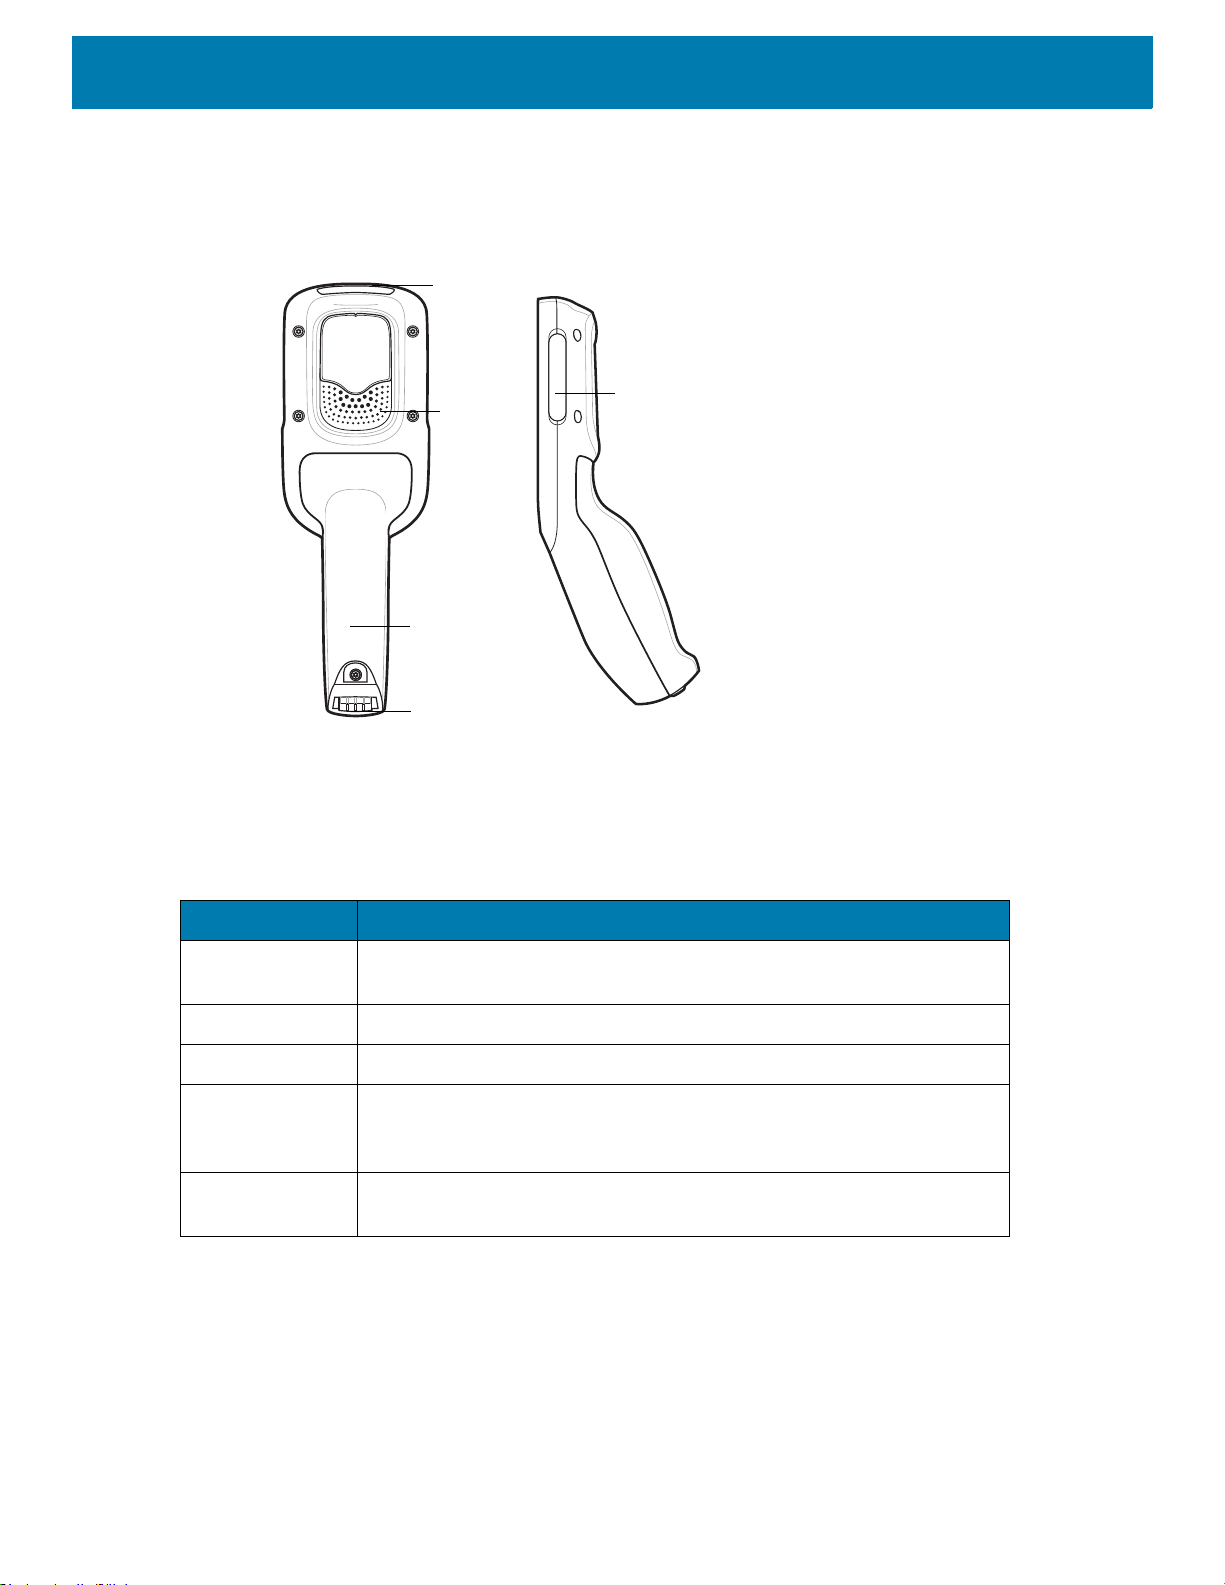
Power Connector
Battery Cover
Speaker
Scan Exit
Window
Branding Plate Slot
Figure 2 Features - Back and Side View
Table 3 Features-
Item Function
Scan Exit
Window
Speaker Provides audio output for video, music, notifications, and PTT.
Battery Cover Encloses the battery and attaches to the device’s handle.
Power/Cradle
I/OConnector
Branding Plate
Slot
Back and Side View
Provides data capture using the scanner.
Provides charging via cradle and cradle communication to lock/unlock
the cradle slots. Use to perform a hard reset with the terminal reboot
tool.
Provides space for custom logo.
20

Getting Started
Accessories
Table 4 Accessori es
Accessory Part Number Description
PS20 Lithium Ion Battery BTRY-PS20-35MA-01 PS20 PowerPrecision+ Lithium Ion Battery.
High Density (HD) Three Slot
Cradle (Locking).
High Density (HD) Three Slot
Cradle (Non-Locking)
BTRY-PS20-35MA-10
CRD-MC18-3SLCKH-01 The cradle is used for docking up to three
CRD-MC18-3SLOTH-01
PS20
PowerPrecision+
(
QTY-10
PS20 units in HD installation configuration.
The cradle slots are equipped with a
mechanism that locks the PS20 units inside
the slots. The devices are placed with the
display facing to the front. Requires
supply unit (
line cord and country specific AC line cord
(sold separately).
The cradle is used for docking up to three
PS20 units in HD installation configuration.
The devices are placed with the display
facing to the front. Requires
unit (
cord and country specific AC line cord (sold
separately).
).
PWR-BGA12V108W0WW), DC
PWR-BGA12V108W0WW), DC line
Lithium Ion Battery
power
power supply
Super High Density (SHD) Three
Slot Cradle (Locking)
Single Slot Cradle CRD-MC18-1SLOT-01 The cradle is used for docking a single
Release Key KT-MC18-CKEY-20 Tool used to mechanically unlock the PS20
Terminal Reboot Tool KT-MC18-REBOOT-05 Tool used to perform cold boot of the PS20
Cradle Cover Removal Tool KT-MC18-CTOOL-01 Tool used for removing the Three Slot
CRD-MC18-3SLCKS-01 The cradle is used for docking up to three
PS20 units in SHD installation configuration.
The cradle slots are equipped with a
mechanism that locks the PS20 units inside
the slots. The devices are placed with the
display facing up. Requires power supply
unit (PWR-BGA12V108W0WW), DC line
cord and country specific AC line cord (sold
separately).
PS20. The devices are placed with the
display facing to the front. Requires power
supply unit (PWR-BGA12V108W0WW), DC
line cord and country specific AC line cord
(sold separately).
from the Three Slot Cradle and the Single
Slot Cradle (QTY-20).
(QTY-5).
Cradle cover.
21

Getting Started
Table 4 Accessories (C ontinued)
Accessory Part Number Description
Deployment Kit KT-MC18-CSTKIT-01 PS20 Deployment Starter Kit. Includes:
20-pack of Release Key
(KT-MC18-CKEY-20)
5-pack of Terminal Reboot Tool
KT-MC18-REBOOT-05)
One Three Slot Cradle Cover Removal Tool
(KT-MC18-CTOOL-01)
Cart Holder Mounting Kit PSS-3SH01-00R Kit for mounting the PS20 on a shopping
cart.
Soft Holster SG-PS20-SFTHLT-01 Allows for wearing the PS20 on the hip
(includes belt clip) or crossbody, with an
additional shoulder strap.
Tempered Glass Screen
Protector
Programming Cable CBL-PS20-USBCHG-01 PS20 USB communication cable for
Interconnection Cable Long 25-66430-01R PS20 cradle interconnection cable (60 Inch /
Interconnection Cable Short 25-66431-01R PS20 cradle interconnection cable (12.6
Cradle Interconnection
Extension Cable
DC Charging Cable CBL-DC-394A1-01 DC charging cable (19.5 Inch / .5 Meter)
DC “Y” Charging Cable Long CBL-DC-392A1-02 DC “Y” charging cable (79.4 Inch / 2 Meter).
DC “Y” Charging Cable Short CBL-DC-393A1-02 DC “Y” charging cable (39.7 Inch / 1 Meter).
Power Supply Unit PWR-BGA12V108W0WW 100-240VAC, 12VDC, 9A. Requires country
MISC-PS20-SCRN-05 Provides additional protection for PS20
display (5-pack).
connecting the device to a host computer.
1.5 Meter). Connects cradles to each other
to run off one power supply unit
(PWR-BGA12V108W0WW).
Inch / 32 centimeter). Connects cradles to
each other to run off one power supply unit
(PWR-BGA12V108W0WW).
CBL-MC18-EXINT1-01 PS20 cradle interconnection extension cable
(12.6 Inch / 32 centimeter). Connects two
interconnection cables (25-66431-01R sold
separately) together to provide additional
length which might be required in some
installation designs.
used to connect a power supply unit
(PWR-BGA12V108W0WW) to one Single
Slot Cradle.
Connects a power supply unit
(PWR-BGA12V108W0WW) to two separate
Three Slot Cradles.
Connects a power supply unit
(PWR-BGA12V108W0WW) to two separate
Three Slot Cradles.
specific AC line cord and DC cable (sold
separately).
22

Getting Started
Table 4 Accessories (C ontinued)
Accessory Part Number Description
AC Line Cord 23844-00-00R AC Line Cord, 7.5 feet long, grounded, three
wire for power supplies. Associated Country:
United States
AC Line Cord 50-16000-221R AC Line Cord, 1.8 meter, meter grounded,
three wire, USA NEMA 5-15P. Associated
Country: United States
AC Line Cord 50-16000-671R AC Line Cord, 1.8 meter, grounded, three
wire, CIE 23-16 plug. Associated Country:
Italy.
AC Line Cord 50-16000-217R AC Line Cord, 1.9 meter, grounded, three
wire, AS 3112 plug. Associated Countries:
Australia, New Guinea
AC Line Cord 50-16000-218R AC Line Cord, 1.8 meter, grounded, three
wire, NEMA 1-15P plug. Associated
Country: Japan.
AC Line Cord 50-16000-219R AC Line Cord, 1.8 meter, grounded three
wire, BS1363 plug. Associated countries:
Hong Kong, Iraq, Malaysia, Singapore,
United Kingdom.
AC Line Cord 50-16000-220R AC Line Cord, 1.8 meter, grounded three
wire CEE 7/7plug. Associated countries:
Europe, Abu Dhabi, Bolivia, Dubai, Egypt,
Iran, Russia, Vietnam.
AC Line Cord 50-16000-257R AC Line Cord, 1.8 meter, grounded three
wire, IEC 60320 C13 plug. Associated
Country: China.
AC Line Cord 50-16000-669R 1.9 meter grounded three wire, BS 546 Plug.
Associated country: India.
AC Line Cord 50-16000-672R 1.9 meter grounded three wire, S132 Plug.
Associated country: Israel.
AC Line Cord 50-16000-678R 36 inch grounded three wire.
Associated country: United States
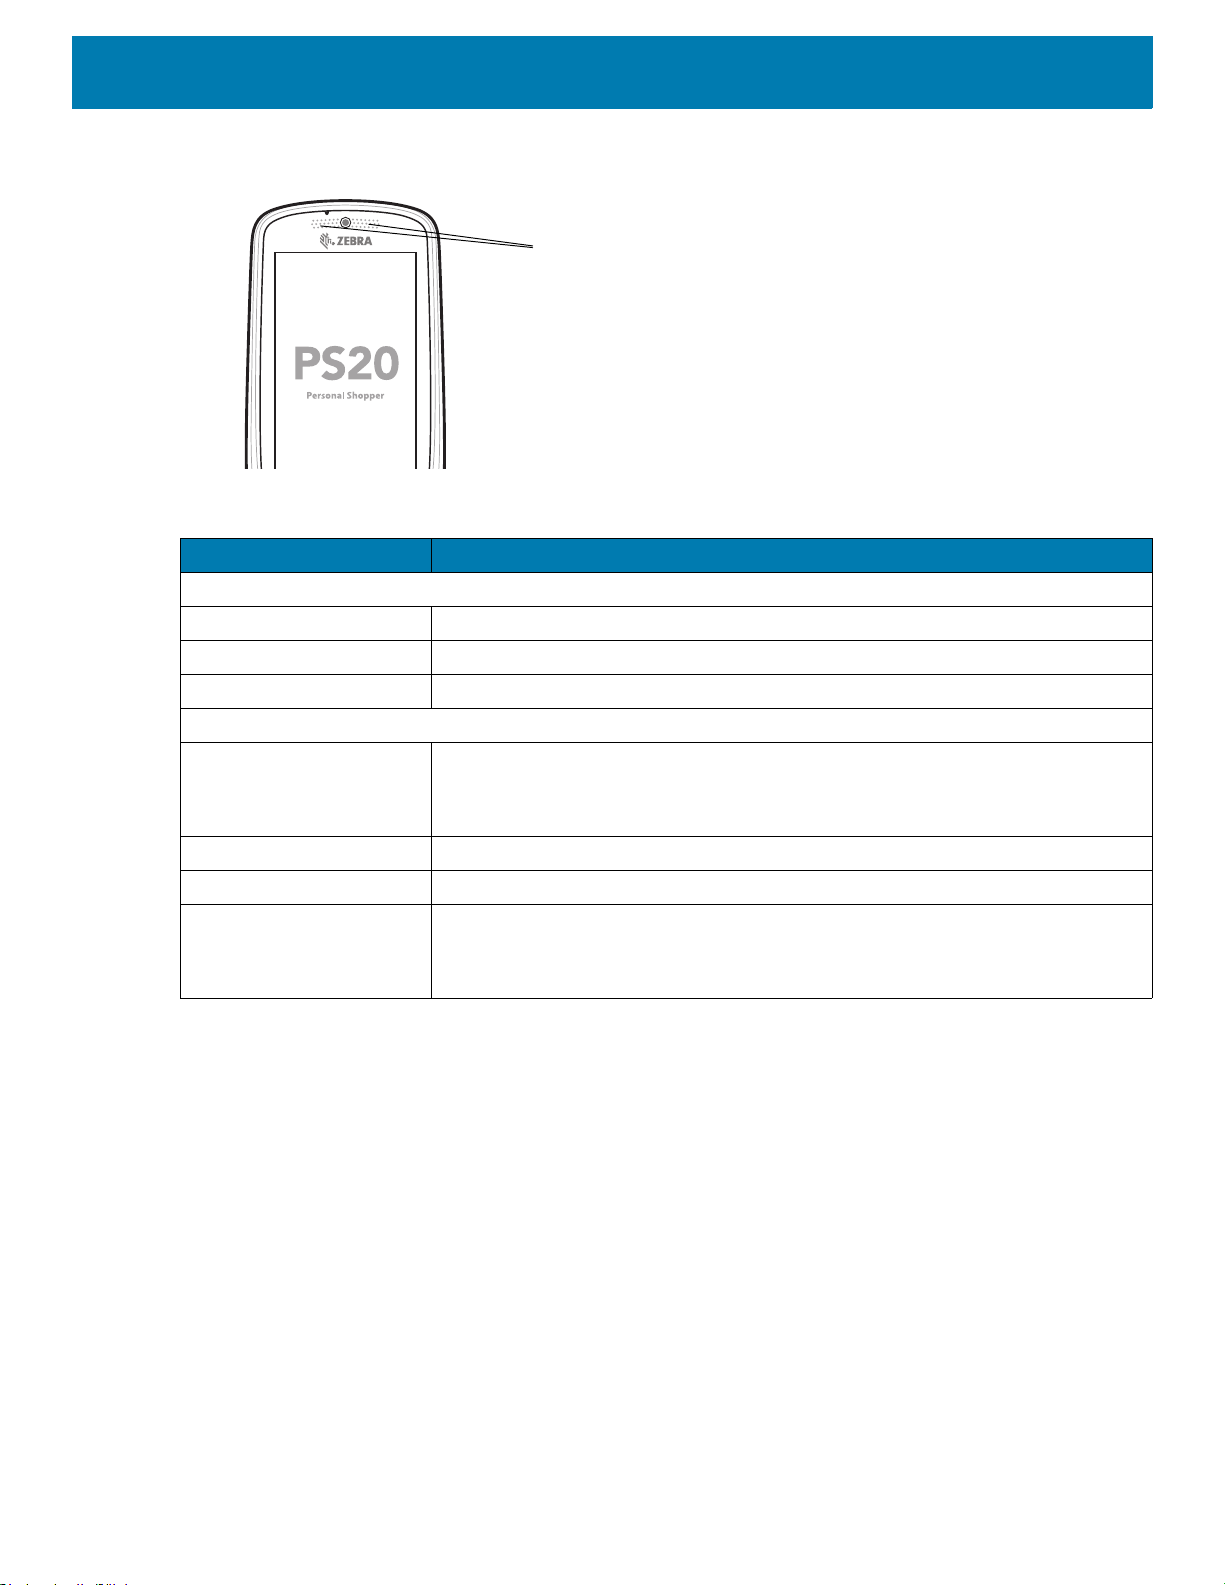
Status LED
The Status LED indicates imaging and charging status.
23
Getting Started
Status LED
Figure 3 PS20 Status LED
Table 5 Status LED Indications
LED State Indication
Imaging
Off Normal operation or PS20 is turned off.
Red Imaging in progress (Scan key is pressed).
Single Green Blink Successful decode.
Charging (PS20 docked in cradle)
Off Power not applied to cradle.
Blinking Green Charging.
Solid Green Charging complete.
Blinking Red Charging error, for example:
Scan Key
The Scan key operates the imager when a scanning application is active. When the PS20 is turned off, press
the Scan key for three seconds to power on the PS20.
PS20 not inserted properly.
Charging LED feature disabled.
Temperature is too low or too high.
Charging has gone on too long without completion (typically eight hours).
24
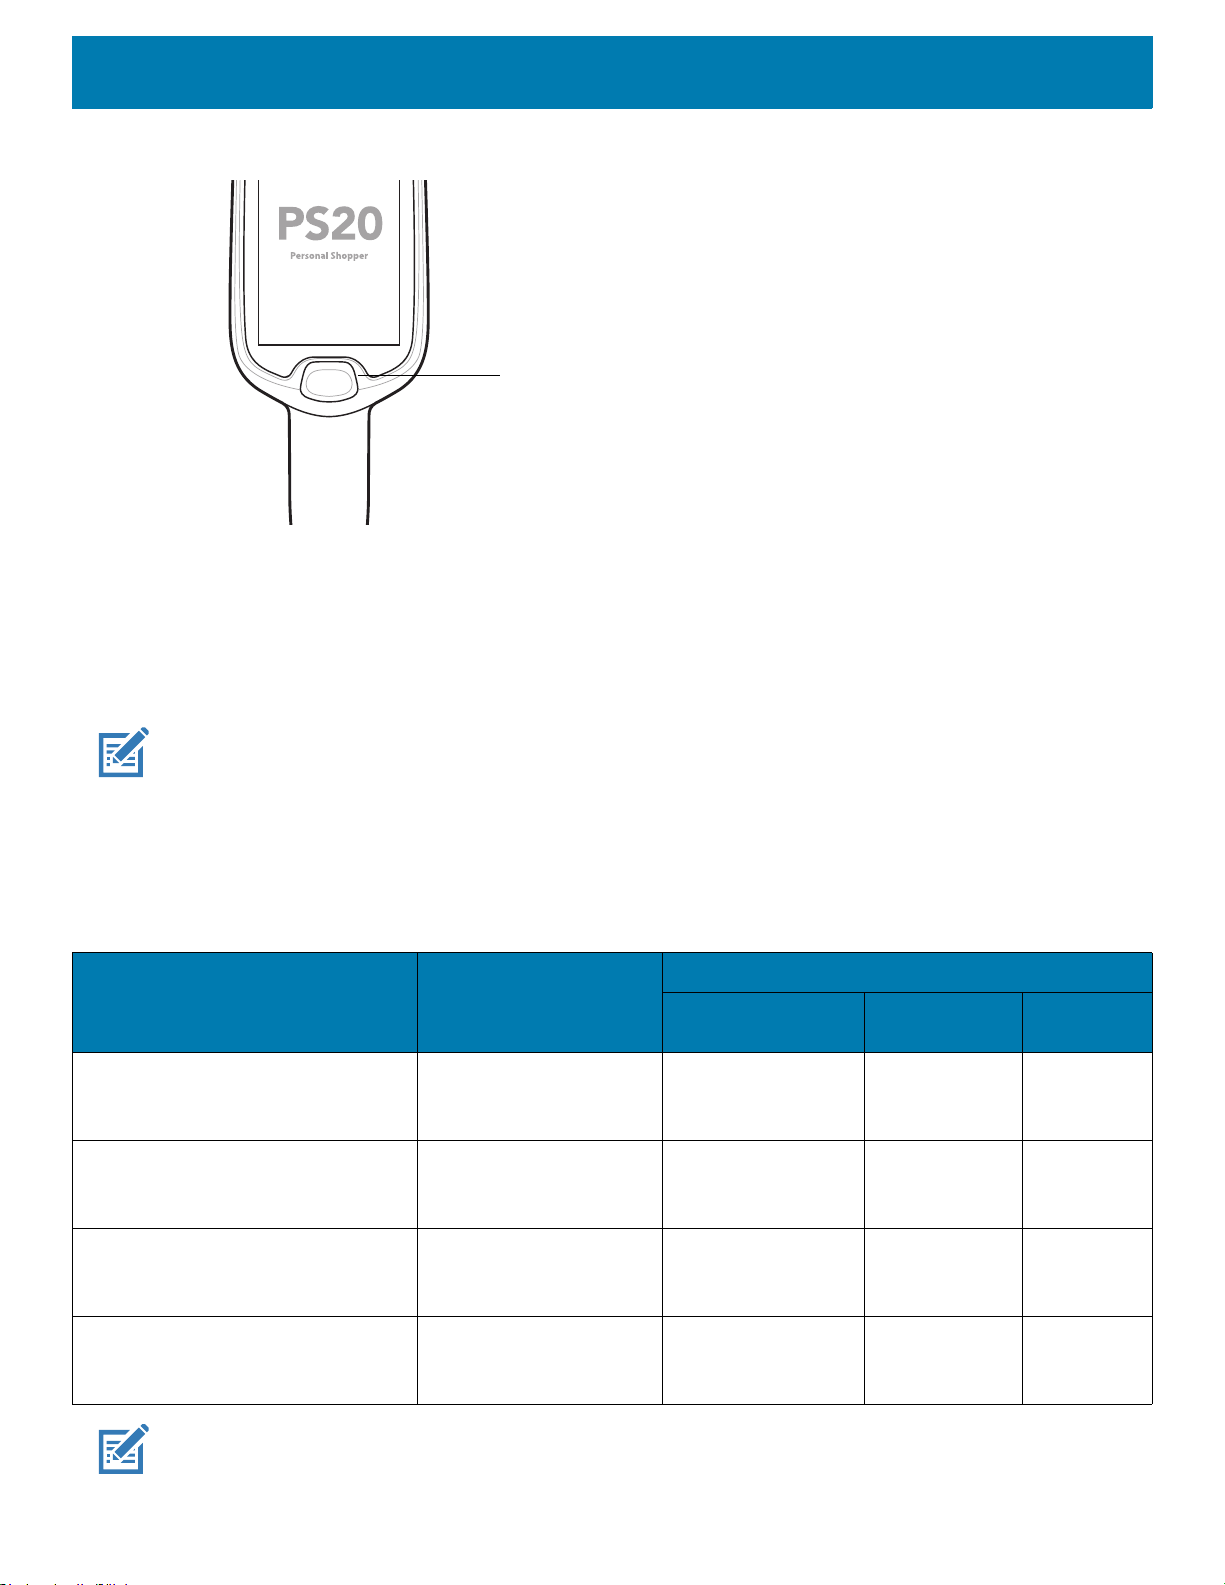
Setup
Scan Key
Getting Started
Figure 4 Scan Key
To start using the device for the first time:
• Charge the battery to at least 30% capacity.
NOTE: When the device is shipped from the factory, it is placed into Ship Mode, where the device enters its lowest possible
power state. The device can exit Ship Mode by docking it in a powered cradle or in a powered USB cable. Fully charging the
battery pack to 100% is recommended immediately after exiting ship mode to calibrate the state of charge.
Charging the Battery
Use one of the following accessories to charge the PS20.
Table 6 Charging Cradles
Description Part Number
Single Slot Cradle CRD-MC18-1SLOT-01 CBL-DC-394A1-01
CBL-DC-393A1-02
CBL-DC-392A1-02
High Density (HD) Three Slot Cradle
(Locking)
High Density (HD) Three Slot Cradle
(Non-Locking)
CRD-MC18-3SLCKH-01 CBL-DC-394A1-01
CBL-DC-393A1-02
CBL-DC-392A1-02
CRD-MC18-SLOTH-01 CBL-DC-394A1-01
CBL-DC-393A1-02
CBL-DC-392A1-02
DC
Cable
Cables
Interconnect
Cable
25-66431-01R
25-66430-01R
25-66431-01R
25-66430-01R
25-66431-01R
25-66430-01R
Extension
Cable
_____
CBL-MC18EXINT1-01
CBL-MC18EXINT1-01
Super High Density (HD) Three Slot
Cradle (Locking)
NOTE: Ensure that you follow the guidelines for battery safety described in the PS20 Product Reference Guide.
CRD-MC18-3SLCKS-01 CBL-DC-394A1-01
CBL-DC-393A1-02
CBL-DC-392A1-02
25
25-66431-01R
25-66430-01R
CBL-MC18EXINT1-01

Getting Started
1. To charge the battery, connect the charging accessory to the appropriate power source.
2. Insert the PS20 into a cradle. The PS20 turns on and begins charging.
Figure 5 Single Slot Cradle
Figure 6 Three Slot Cradle
26

The battery charges 0 to 90% depending on the following conditions, measured at room temperature:
• When connected to a 1.0 cradle (normal charge mode), charge time is less than four hours.
• When connected to a 1.5 cradle (fast charge mode), charge time is less than three hours.
NOTE: To charge the battery in the device, it is recommended to use a charging cradle instead of the USB cable, since it is
more time efficient.
Charging Temperature
Charge batteries in temperatures from 0°C to 40°C (32°F to 104°F). The device or cradle always performs
battery charging in a safe and intelligent manner. At higher temperatures (e.g. approximately +37°C (+98°F))
the device or cradle may for small periods of time alternately enable and disable battery charging to keep the
battery at acceptable temperatures. The device and cradle indicates when charging is disabled due to
abnormal temperatures via its LED.
LED Status Indicators
By default, the charging LED indication is disabled.
Getting Started
To enable the charging LED indication:
1. Swipe down from the status bar to open the quick access panel and then touch .
2. Touch Display.
3. Touch Charging LED. The option switch turns green.
4. Touch .
Table 7 LED Status Indicators
LED State Indication
Imaging
Off Normal operation or PS20 is turned off.
Red Imaging in progress (Scan key is pressed).
Single Green Blink Successful decode.
Charging (PS20 docked in cradle)
Off Power not applied to cradle.
PS20 not inserted properly.
Charging LED feature disabled.
Blinking Green Charging.
Solid Green Charging complete.
Blinking Red Charging error, for example:
Temperature is too low or too high.
Charging has gone on too long without completion (typically eight hours).
27
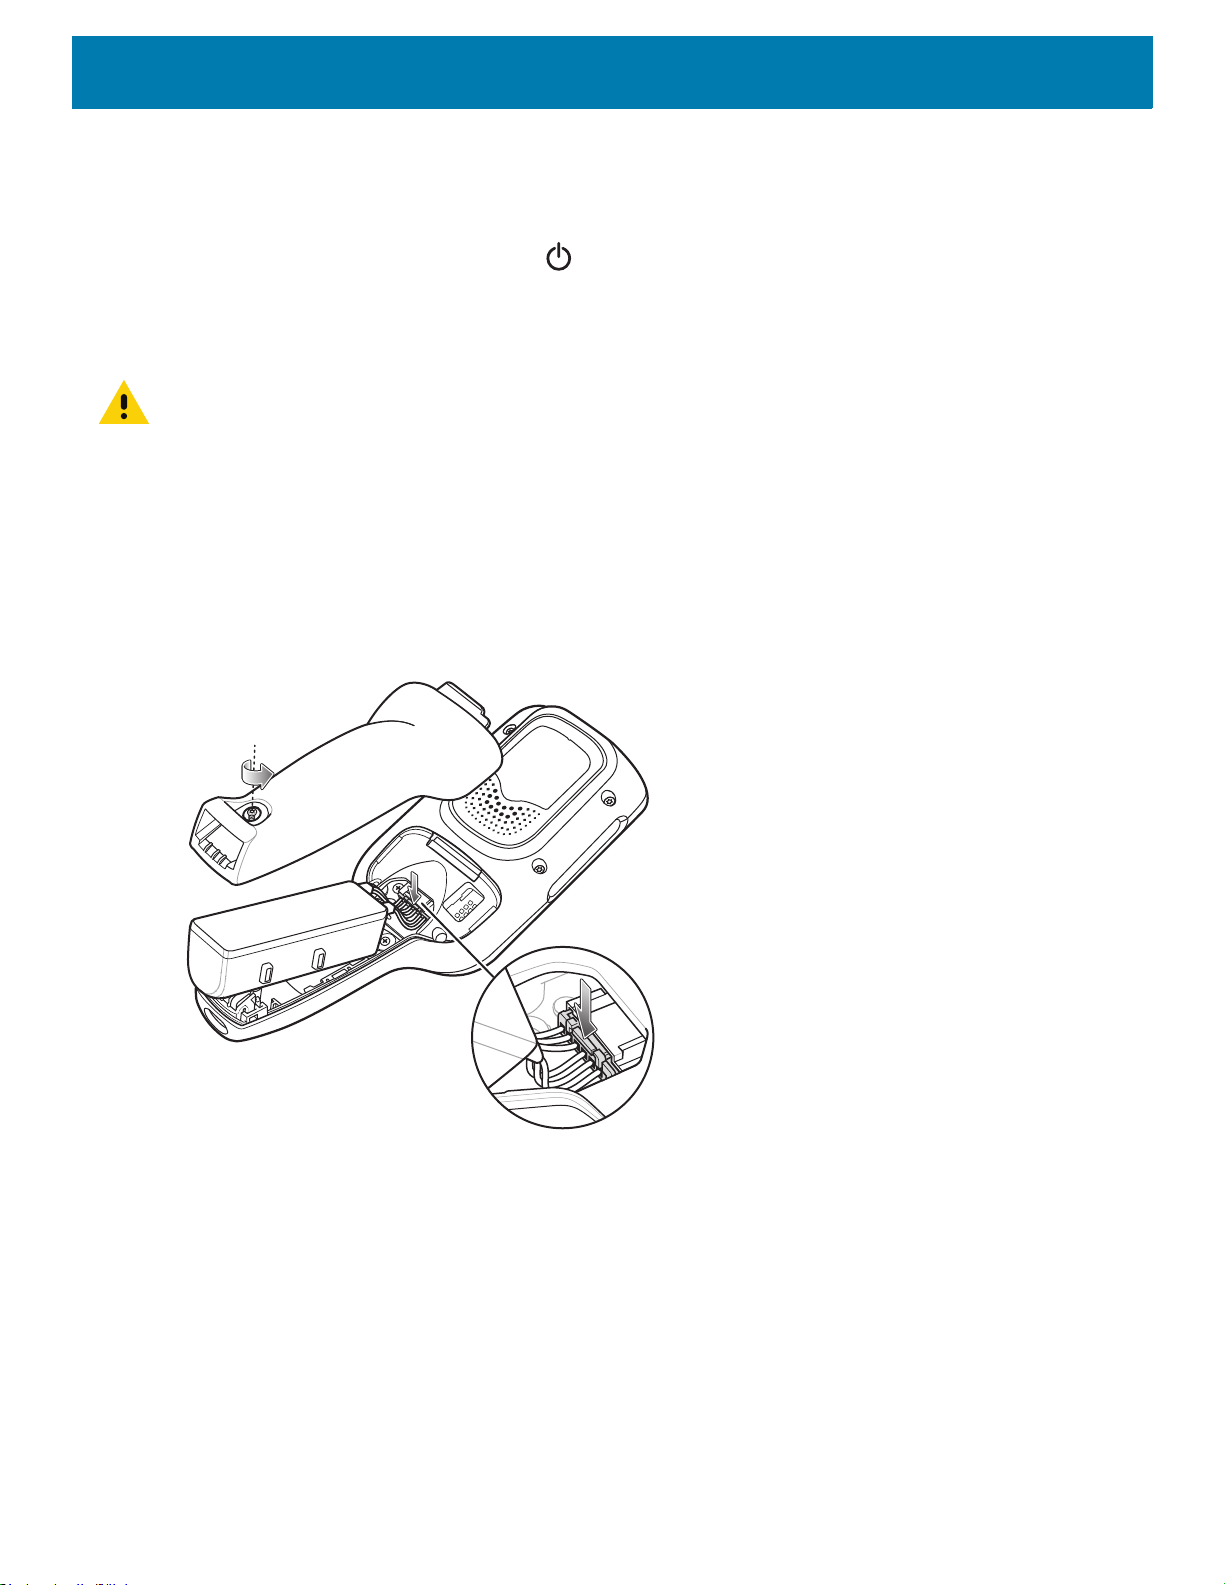
Replacing the Battery
Press down plastic tab to release
To replace the battery:
1. Touch and hold the soft power button until the menu appears.
2. Touch Power Off.
3. Touch OK.
CAUTION: The PS20 must be off before removing the battery. Failing to turn off the PS20 before removing the battery may
damage the data stored on flash memory or corrupt the operating system files.
4. Loosen the captive screw that secures the battery cover, using a Phillips (PH00)screwdriver.
5. Lift the battery cover from the handle.
6. Inside the battery compartment, press down the plastic tab of the battery cable connector and slide it out of
the shrouded male pin connector.
7. Remove the battery from the battery compartment.
Figure 7 Remove the Battery
Getting Started
8. With the replacement battery, guide and press the battery cable connector into the shrouded male pin
connector inside the battery compartment. The connector is designed to only fit one way.
9. Place the battery inside the battery compartment.
10.Place the battery cover onto the handle.
11.Secure the battery cover with the screw, using a Phillips (
PH00)screwdriver.
28

Figure 8 Installing the Battery
Battery Cover
Battery
Battery
Compartment
Battery Cable
Connector
Shrouded Male
Pin Connector
Battery
Compartment
Getting Started
Compatibility
The table below displays compatibility between the PS20 and MC18 devices and accessories.
Table 8 Compatibility
PS20 Yes No Yes
MC18 No Yes Yes
• PS20 PowerPrecision+ batteries are compatible with all PS20 devices and MC18 Single Slot and Three
Slot cradles.
• PS20 PowerPrecision+ batteries are not compatible with MC18 devices.
• MC18 PowerPrecision+ batteries are not compatible with PS20 devices.
Battery Comparison
The table below displays a comparison of the PS20 batteries with the MC18 batteries.
Table 9 Battery Comparison
Battery Type PowerPrecision+ PowerPrecision+
PS20
Batteries
Feature MC18 PS20
MC18
Batteries
MC18
Cradles
Battery Capacity 2,275 mAh 3,500 mAh
Charging Mode Standard and Fast Standard and Fast
29

Powering on the Device
The PS20 starts automatically as soon as power is applied; either with a charged battery installed or when
inserted into the cradle.
If charged battery is installed and the PS20 is turned off, press the Scan key to turn on.
Getting Started
When the PS20 is powered on for the first time, it initializes its system. The splash
period of time.
Figure 9 Splash Screen
The splash screen is followed by the boot animation screen and then the Home Screen.
Figure 10 Home Screen
screen appears for a short
Google Account Setup
NOTE: The device has to be connected to the internet in order to set up a Google™ account.
A Google account is only required on devices with GMS software.
30
 Loading...