

Page 1
PS20
Personal Shopper
Quick Start Guide
MN-003318-03
Page 2

PS20 Personal Shopper Quick Start Guide
Copyright
© 2018 ZIH Corp. and/or its affiliates. All rights reserved. ZEBRA and the stylized Zebra head are trademarks of ZIH
Corp., registered in many jurisdictions worldwide. Google, Android, Google Play and other marks are trademarks of Google
LLC; Oreo is a trademark of Mondelez International, Inc. group. All other trademarks are the property of their respective
owners.
COPYRIGHTS & TRADEMARKS: For complete copyright and trademark information, go to www.zebra.com/copyright.
WARRANTY: For complete warranty information, go to www.zebra.com/warranty.
END USER LICENSE AGREEMENT: For complete EULA information, go to www.zebra.com/eula.
Terms of Use
Proprietary Statement
This manual contains proprietary information of Zebra Technologies Corporation and its subsidiaries (“Zebra
Technologies”). It is intended solely for the information and use of parties operating and maintaining the equipment
described herein. Such proprietary information may not be used, reproduced, or disclosed to any other parties for any other
purpose without the express, written permission of Zebra Technologies.
Product Improvements
Continuous improvement of products is a policy of Zebra Technologies. All specifications and designs are subject to
change without notice.
Liability Disclaimer
Zebra Technologies takes steps to ensure that its published Engineering specifications and manuals are correct; however,
errors do occur. Zebra Technologies reserves the right to correct any such errors and disclaims liability resulting therefrom.
Limitation of Liability
In no event shall Zebra Technologies or anyone else involved in the creation, production, or delivery of the accompanying
product (including hardware and software) be liable for any damages whatsoever (including, without limitation,
consequential damages including loss of business profits, business interruption, or loss of business information) arising out
of the use of, the results of use of, or inability to use such product, even if Zebra Technologies has been advised of the
possibility of such damages. Some jurisdictions do not allow the exclusion or limitation of incidental or consequential
damages, so the above limitation or exclusion may not apply to you.
Warranty
For the complete Zebra hardware product warranty statement, go to: www.zebra.com/warranty.
Service Information
Before you use the unit, it must be configured to operate in your facility’s network and run your applications.
2
Page 3

PS20 Personal Shopper Quick Start Guide
If you have a problem using your equipment, contact your facility’s Technical or Systems Support. If there is a problem with
the equipment, they will contact the Zebra Global Customer Support at www.zebra.com/support.
For the latest version of this guide go to: www.zebra.com/support.
Provide Documentation Feedback
If you have comments, questions, or suggestions about this guide, send an email to EVM-Techdocs@zebra.com.
Configurations
This guide covers the following configurations:
Table 1 Configurations
Configuration Radios Display Memory
PS20 Base WLAN:
802.11
a/b/g/n/d/h/i/k
/r/v/ac
WPAN:
Bluetooth
v5.0
PS20 Plus WLAN:
802.11
a/b/g/n/d/h/i/k
/r/v/ac
WPAN:
Bluetooth
v5.0
WVGA 4.0”
color
WVGA 4.0”
color
4 GB RAM/16
GB Flash
4 GB RAM/16
GB Flash
Data Capture
Options
SE2100 No Android Open
SE4710 +
Digimarc
5 MP
Camera
Yes Android Open
Operating
System
Source
Project
(AOSP)/
Google
Mobile
Services
(GMS)
8.1
Source
Project
(AOSP)/
Google
Mobile
Services
(GMS)
8.1
3
Page 4
PS20 Personal Shopper Quick Start Guide
Scan Key
Touch Screen
LED Status
Camera
Microphone
Unpacking
Carefully remove all protective material from the device and save the shipping container for later storage and shipping.
Verify that the box contains all the equipment listed below:
• PS20 (includes lithium-ion battery)
• Regulatory Guide
Inspect the equipment for damage. If you are missing any equipment or if you find any damaged equipment, contact
Support immediately. See Service Information on page 2 for contact information.
Removing the Screen Protection Film
A screen protection film is applied to the PS20 screen to protect the screen during shipping. To remove the screen
protector, carefully lift the thin film off the touch screen display.
Features
Figure 1 Features - Front View
4
Page 5
PS20 Personal Shopper Quick Start Guide
Power Connector
Battery Cover
Speaker
Scan Exit
Window
Branding Plate Slot
Table 2 Features - Front View
Item Function
Microphone Use for audio input and SmartLens locationing. Allows shoppers to
speak to a store associate via push-to-talk or to a virtual assistant via
speech-to-text.
Camera With the front-facing camera, the device supports Visible Light
Communications (VLC) indoor positioning/locationing applications. In
addition, the camera is used for image/face recognition. Available on
Plus configurations.
LED Status Indicates the battery charge state while charging or the scan/decode
status.
Red: Barcode scan in progress (Scan key is pressed).
Single Green Blink: Successful decode.
Touch Screen Displays all information needed to operate the device.
Scan Key Use for trigger input for scanner or as a Select/Enter key.
Figure 2 Features - Back and Side View
5
Page 6
PS20 Personal Shopper Quick Start Guide
Table 3 Features - Back and Side View
Item Function
Scan Exit
Window
Speaker Provides audio output for video, music, notifications, and PTT.
Battery Cover Encloses the battery and attaches to the device’s handle.
Power/Cradle
I/OConnector
Branding Plate
Slot
Provides data capture using the scanner.
Provides charging via cradle and cradle communication to lock/unlock
the cradle slots. Use to perform a hard reset with the terminal reboot
tool.
Provides space for custom logo.
Setup
To start using the device for the first time:
• Charge the battery to at least 30% capacity.
NOTE When the device is shipped from the factory, it is placed into Ship Mode, where the device enters its
lowest possible power state. The device can exit Ship Mode by docking it in a powered cradle or in a
powered USB cable. Fully charging the battery pack to 100% is recommended immediately after exiting
ship mode to calibrate the state of charge.
Charging the Battery
To charge the battery:
1. Ensure the cradle is connected to the appropriate power source.
2. Insert the PS20 into a cradle.
6
Page 7
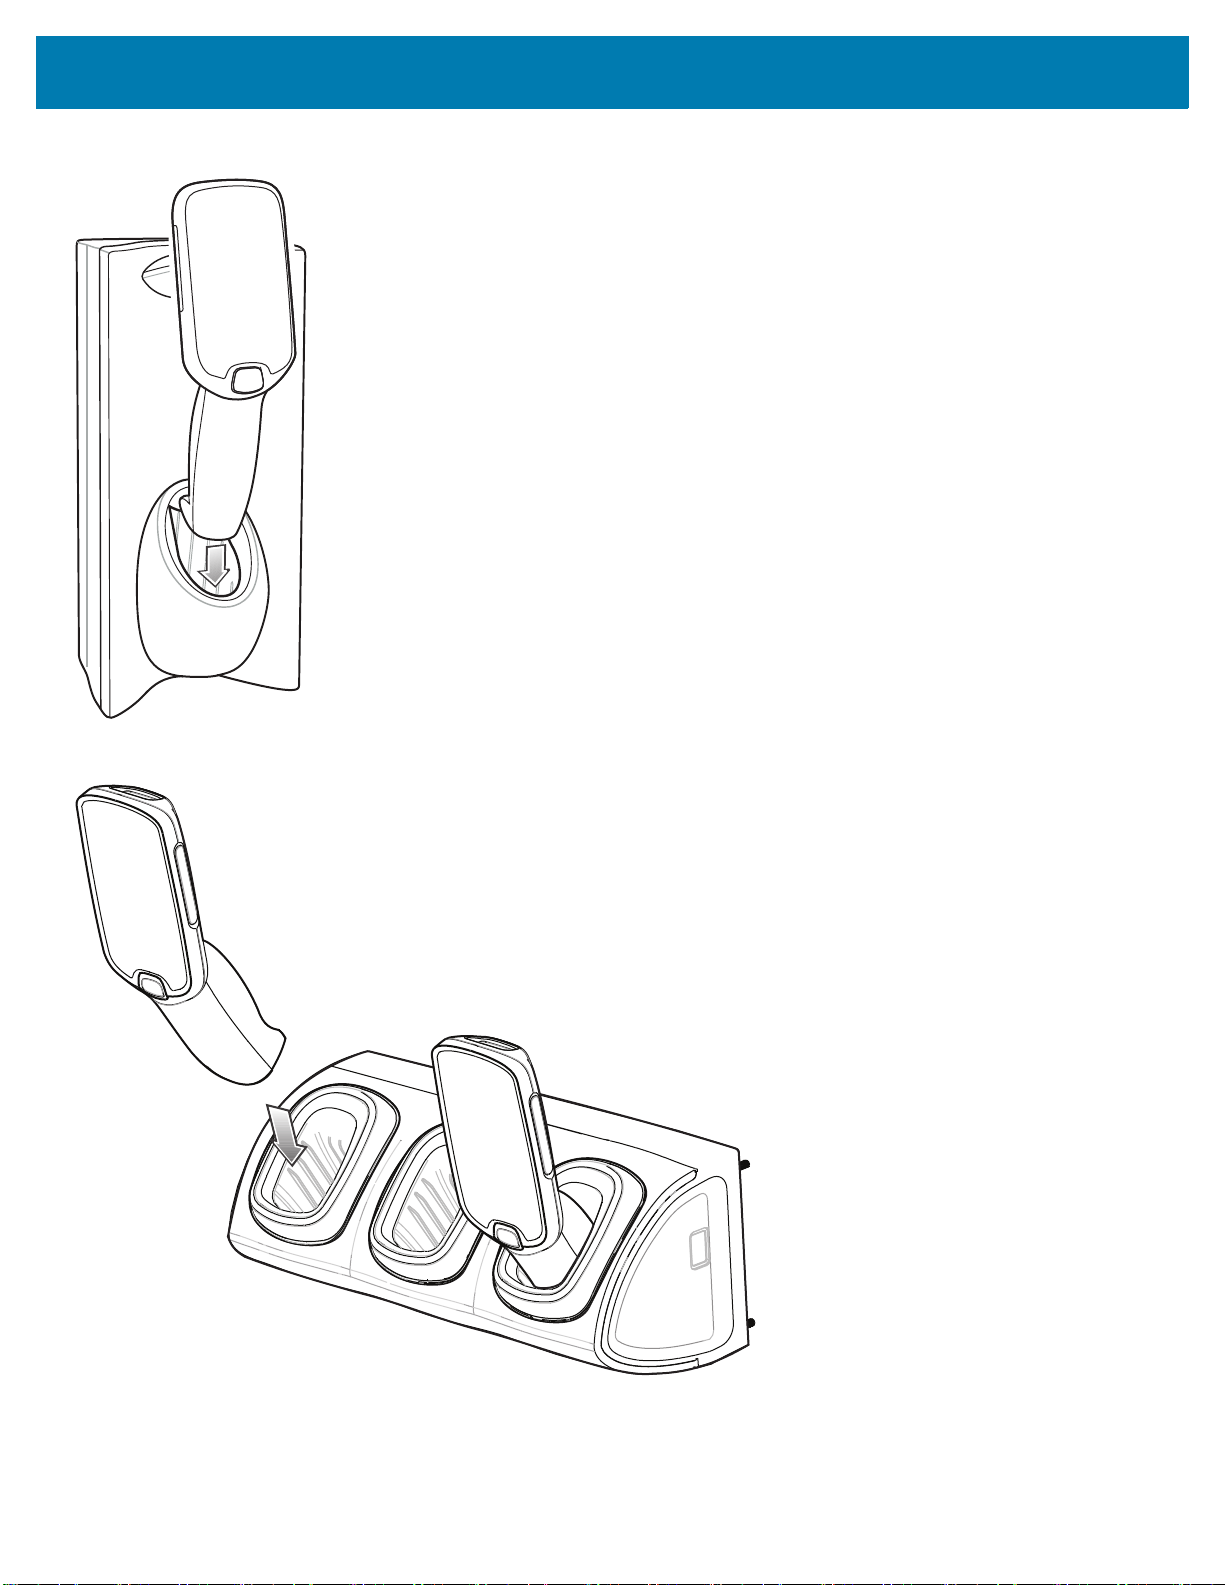
Figure 3 Single Slot Cradle
PS20 Personal Shopper Quick Start Guide
Figure 4 Three Slot Cradle
The battery charges 0 to 90% depending on the following conditions, measured at room temperature:
• When connected to a 1.0 cradle (normal charge mode), charge time is less than four hours.
7
Page 8

PS20 Personal Shopper Quick Start Guide
• When connected to a 1.5 cradle (fast charge mode), charge time is less than three hours.
NOTE To charge the battery in the device, it is recommended to use a charging cradle instead of the USB cable,
since it is more time efficient.
LED Status Indicators
By default, the charging LED indication is disabled.
To enable the charging LED indication:
1. Swipe down from the status bar to open the quick access panel and then touch .
2. Touch Display.
3. Touch Charging LED. The option switch turns green.
4. Touch .
Table 4 LED Status Indicators
LED State Indication
Imaging
Off Normal operation or PS20 is turned off.
Red Imaging in progress (Scan key is pressed).
Single Green Blink Successful decode.
Charging (PS20 docked in cradle)
Off Power not applied to cradle.
PS20 not inserted properly.
Charging LED feature disabled.
Blinking Green Charging.
Solid Green Charging complete.
Blinking Red Charging error, for example:
• Temperature is too low or too high.
• Charging has gone on too long without completion (typically eight
hours).
Installing the Battery
To install the battery:
1. Loosen the captive screw that secures the battery cover, using a Phillips (PH00) screwdriver.
2. Lift the battery cover from the handle.
3. Guide and press the battery cable connector into the shrouded male pin connector inside the battery compartment. The
connector is designed to only fit one way.
4. Place the battery inside the battery compartment.
8
Page 9

PS20 Personal Shopper Quick Start Guide
Battery Cover
Battery
Battery
Compartment
Battery Cable
Connector
Shrouded Male
Pin Connector
Battery
Compartment
5. Place the battery cover onto the handle.
6. Secure the battery cover with the screw, using a Phillips (PH00)screwdriver.
Figure 5 Installing the Battery
Removing the Battery
To remove the battery:
1. Touch and hold the soft power button until the menu appears.
2. Touch Power Off.
3. Touch OK.
4. Loosen the captive screw that secures the battery cover, using a Phillips (PH00)screwdriver.
5. Lift the battery cover from the handle.
6. Inside the battery compartment, press down the plastic tab of the battery cable connector and slide it out of the
7. Remove the battery from the battery compartment.
CAUTION The PS20 must be off before removing the battery. Failing to turn off the PS20 before removing the
battery may damage the data stored on flash memory or corrupt the operating system files.
shrouded male pin connector.
9
Page 10

Figure 6 Remove the Battery
Press down plastic tab to release
PS20 Personal Shopper Quick Start Guide
Compatibility
The table below displays compatibility between the PS20 and MC18 devices and accessories.
Table 5 Compatibility
PS20
Batteries
PS20 Yes No Yes
MC18 No Yes Yes
MC18
Batteries
MC18
Cradles
• PS20 PowerPrecision+ batteries are compatible with all PS20 devices and MC18 Single Slot and Three Slot
cradles.
• PS20 PowerPrecision+ batteries are not compatible with MC18 devices.
• MC18 PowerPrecision+ batteries are not compatible with PS20 devices.
Battery Comparison
The table below displays a comparison of the PS20 batteries with the MC18 batteries.
Table 6 Battery Comparison
Feature MC18 PS20
Battery Type PowerPrecision+ PowerPrecision+
Battery Capacity 2,725 mAh 3,500 mAh
Charging Mode Standard and Fast Standard and Fast
10
Page 11

PS20 Personal Shopper Quick Start Guide
Charging the PS20
Use one of the following accessories to charge the PS20.
Table 7 Charging Cradles
Description Part Number
DC
Cable
Cables
Interconnect
Cable
Extension
Cable
Single Slot Cradle CRD-MC18-1SLOT-01 CBL-DC-394A1-01
CBL-DC-393A1-02
CBL-DC-392A1-02
High Density (HD) Three Slot Cradle
(Locking)
High Density (HD) Three Slot Cradle
(Non-Locking)
Super High Density (HD) Three Slot
Cradle (Locking)
NOTE Ensure that you follow the guidelines for battery safety described in the PS20 Product Reference Guide.
1. To charge the battery, connect the charging accessory to the appropriate power source.
2. Insert the PS20 into a cradle. The PS20 turns on and begins charging.
CRD-MC18-3SLCKH-01 CBL-DC-394A1-01
CBL-DC-393A1-02
CBL-DC-392A1-02
CRD-MC18-SLOTH-01 CBL-DC-394A1-01
CBL-DC-393A1-02
CBL-DC-392A1-02
CRD-MC18-3SLCKS-01 CBL-DC-394A1-01
CBL-DC-393A1-02
CBL-DC-392A1-02
Charging Temperature
25-66431-01R
25-66430-01R
25-66431-01R
25-66430-01R
25-66431-01R
25-66430-01R
25-66431-01R
25-66430-01R
_____
CBL-MC18EXINT1-01
CBL-MC18EXINT1-01
CBL-MC18EXINT1-01
Charge batteries in temperatures from 0°C to 40°C (32°F to 104°F). The device or cradle always performs battery charging
in a safe and intelligent manner. At higher temperatures (e.g. approximately +37°C (+98°F)) the device or cradle may for
small periods of time alternately enable and disable battery charging to keep the battery at acceptable temperatures. The
device and cradle indicates when charging is disabled due to abnormal temperatures via its LED.
Releasing the PS20 from the Charging Cradles
Use one of the following methods to release the PS20 from the charging cradles:
• Software Release Using the Menu
• Software Release Using the Cradle Utility
• Manual Release using a Release Key.
Software Release Using the Menu
The PS20 cradles contain a locking mechanism that locks the PS20 inside the cradle when docked. The PS20 releases
from the cradle when a software command is received from the system.
11
Page 12

PS20 Personal Shopper Quick Start Guide
To remove the PS20 from the cradle using the menu:
1. Touch and hold the soft power button until the menu appears.
2. Touch Cradle unlock. The cradle unlocks the PS20.
3. Remove the PS20 from the cradle.
Software Release Using the Cradle Utility
The PS20 cradles contain a locking mechanism that locks the PS20 inside the cradle when docked. The PS20 releases
from the cradle when a software command is received from the system.
To remove the PS20 from the cradle using the Cradle Utility:
1. On the Home screen, swipe up from the bottom of the screen.
2. Touch CradleUtility.
3. Tap the CRADLE UNLOCK tab to set the cradle unlock information.
4. Touch Unlock Cradle.
Manual Release Using a Release Key
The PS20 cradles contain a locking mechanism that locks the PS20 inside the cradle when docked. If the PS20 fails to
unlock during normal operation, use a release key (KT-MC18-CKEY-20) to unlock the PS20.
CAUTION Do not use any device to unlock the cradle other than the tools described below. Failure to comply
could result in damage to the cradle and void the warranty.
Manual Release of the PS20 from the Single Slot Cradle
To release a locked PS20 from a Single Slot Cradle:
1. Insert the release key into the slot located at the bottom side of the cradle.
2. While pressing the release key all the way into the slot, remove the PS20 from the cradle.
12
Page 13

PS20 Personal Shopper Quick Start Guide
Release Key
Release Key
Figure 7 Manual Release of PS20 from a Single Slot Cradle
Manual Release of the PS20 from the Three Slot Cradle
To release a locked PS20 from a Three Slot Cradle:
1. Insert the release key straight into the slot, to a point where the bend stops.
2. Hold the release key pressed inside the slot and remove the PS20 from the slot.
Figure 8 Manual Release of the PS20 from a Three Slot Cradle
13
Page 14

PS20 Personal Shopper Quick Start Guide
Installing the USB Cable Battery Cover
Use the USB Cable Battery Cover to connect the device to a host computer.
To install the USB Cable Battery Cover:
1. Remove the standard battery cover that comes installed on the device, if it is not already removed.
a. Loosen the captive screw that secures the battery cover, using a Phillips (PH00)screwdriver.
b. Lift the battery cover from the handle.
2. Slide the tab on the top of the USB Cable Battery Cover into the slot on the back of the device.
Figure 9 Install USB Cable Battery Cover - Top
3. Push the bottom of the USB Cable Battery Cover down, until it snaps into place.
Figure 10 Install USB Cable Battery Cover - Bottom
14
Page 15

PS20 Personal Shopper Quick Start Guide
Removing the USB Cable Battery Cover
To remove the USB Cable Battery Cover:
1. Squeeze the left and right tabs in on the bottom of the USB Cable Battery Cover.
2. Lift the bottom of the USB Cable Battery Cover up.
3. Slide the top of the USB Cable Battery Cover out to remove.
Figure 11 Remove USB Cable Batter Cover
Soft Holster
The soft holster provides a holder for the MC18/PS20 and allows for wearing the device on the hip, using a belt clip, or
crossbody, using the detachable shoulder strap.
Always place the device with the correct orientation when using the soft holster with a belt clip or shoulder strap, as shown
in the following diagrams.
Using the Belt Clip
To attach the soft holster to a belt or waist band:
1. Secure the belt clip on the soft holster, if it is not already attached.
Figure 12 Secure Belt Clip on Soft Holster
2. Secure the belt clip on the belt or waistband.
15
Page 16

PS20 Personal Shopper Quick Start Guide
Figure 13 Secure Belt Clip on Belt
3. To insert the device, slide the device into the soft holster, with the screen facing the user.
Figure 14 Insert Device
4. Secure the device with the restraining strap and place over the device and hook to secure in place.
16
Page 17

Figure 15 Secure with Strap
PS20 Personal Shopper Quick Start Guide
5. To remove the device, lift the restraining strap to release. Lift the device out of the soft holster.
Using the Shoulder Strap
To attach the soft holster to a shoulder strap:
1. Connect the clips on the shoulder strap to the rings on the soft holster, if not already attached.
2. Place the shoulder strap over your head and rest on your shoulder.
17
Page 18

Figure 16 Shoulder Strap
PS20 Personal Shopper Quick Start Guide
3. Lift the strap and insert the device into the soft holster, with the screen facing the user.
4. Secure the device with the restraining strap and place over the device and hook to secure in place.
Scanning
To scan a barcode:
1. Launch a scanning application.
2. Press the Scan key and aim the device at a barcode.
3. Adjust the position of the device so that the:
• Red aiming dot appears at the center of the barcode on devices with the SE4710 imager.
• White LED appears around the barcode on devices with the SE2100 imager.
Ensure the barcode is within the area formed by the aiming pattern. On devices with the SE4710 imager, the aiming
dot is used for increased visibility in bright lighting conditions.
4. Press the Scan key.
The Status LED illuminates red. Upon successful decode, the Status LED changes from red to green and an audible
beep sounds.
18
Page 19

PS20 Personal Shopper Quick Start Guide
Figure 17 SE4710 Imager Decode Mode
Figure 18 SE4710 Imager Picklist Mode
NOTE Picklist Mode is only available on the PS20 with the SE4710 imager. When the PS20 is in Picklist Mode,
the imager does not decode the barcode until the crosshair or aiming dot touches the barcode.
Figure 19 SE2100 Imager Decode Mode
5. Release the Scan key.
The barcode data displays on the screen.
19
Page 20

PS20 Personal Shopper Quick Start Guide
Ergonomic Considerations
Taking breaks and task rotation is recommended.
Avoid Bending
Figure 20 Avoid Bending
Avoid Reaching
Figure 21 Avoid Reaching
20
Page 21

PS20 Personal Shopper Quick Start Guide
Avoid Extreme Wrist Angles
Figure 22 Avoid Extreme Wrist Angles
21
Page 22

www.zebra.com
 Loading...