


Printer Profile Manager Enterprise
(PPME)
Preparation for Installation and Setup
P1124501-02EN

About This Document
When installing and using any server-based application, some preparation in advance is required. This
document provides Best Practices to ensure a successful installation.
This document is intended to complement the PPME Installation Guide. Both documents should be
reviewed prior to the installation and setup of PPME.
The information in this document relates to the PPME On-Premise version v3.2.x and later.
Who Should Use This Document
This document is intended for use by:
• any person who needs to perform the installation and setup of PPME
• any person who will use the features within PPME
Your Information Technology team, specifically members responsible for Network and Security, should
review these documents and understand the requirements prior to installation.
2

System and Network Requirements
Before starting the installation, check the following system and network requirements.
Done
Requirements
Consider
Supported Operating Systems:
processor
PPME can be installed on servers running these listed
Supported Browsers:
The requirement is for a Chromium-based browser.
will be validated using Chrome.
Server Requirements:
Using the recommended specification will maximize
Best Practice
Network Port Requirements:
for internet access.
PPME is a network-based software product. It requires
STEP 1: Prepare for Installation
• Windows® 2012, 64-bit
processor
• Windows Server 2016, 64-bit
processor
• Windows Server 2019, 64-bit
processor
• Windows Server® 10, 64-bit
• Chrome Browser version 76 or
higher
• CPU cores:
o 4 (minimum)
o 8 (recommended)
• Memory (RAM): 16GB
• Minimum: 50GB available drive
space
• Using the printer analytics or
battery management functions
will require up to 1TB of disk
space.
operating systems whether physical or virtualized. In
general terms, if the physical or virtualized server can
run the operating system, it can run PPME.
Zebra tests on Chrome. To be clear, other Chromiumbased browsers can be used, however, reported issues
performance, especially when performing operations on
a higher number of printers.
: Zebra recommends that PPME
is installed on a physical or virtual server that
complies with Microsoft
baselines. Local access to the server should only
be by an administrator for software updates,
maintenance, and backup. It should not be used
as a workstation.
Windows security
☐
☐
☐
Internet Access
Internet access is required to complete the installation and to use PPME.
both local network connectivity and internet access to
• The PPME server requires
outgoing port 443 to be open to
the internet for the license
system and certificate signing.
• Proxy details if they are required
3
install and operate. Please carefully review the
Network Port Requirements to ensure that the app’s
connectivity needs are supported by the installation and
use environment.
PPME needs proxy details to be set
independently to those set in Windows.
☐

installation process.
Network Port Requirements:
may need to be opened.
After installation you will need to add printers to PPME,
• Access to my.nalpeiron.com is
required by the licensing
system.
• Access to acs.zebra.com is
required for certificate signing.
Internet access is required as PPME contacts
the license server every 24 hours and is
necessary for both the 30-day Trial and licensed
versions of PPME.
Access to acs.zebra.com is required when
choosing the Basic (SHA1) connection between
the printer and PPME. Printers running Link-OS
v4 and earlier require this type of connection.
Access to acs.zebra.com is needed during
installation and when updating the Basic Printer
Connection & Certificates from the PPME Admin
configuration page. If all printers are running
Link-OS v5 or later, Zebra recommends
choosing the Advanced connection.
Choosing the Basic or Advanced connection type
determines whether SHA1 or SHA256 certificates
are used for the secure connection between
printers and PPME. Choosing Advanced will
result in certificates being deployed to the printer.
(Basic and Advanced pertain to connection types
only; they do not determine available features in
PPME.)
Best Practice
Use a PPME Demo installation to validate the
product features work as expected before
moving into a live production environment.
Additionally, if a test environment is used to
preview and test the installation and use of
PPME, the production environment will require
the same capabilities for successful installation
and use.
The Installation Guide contains many more details on
installing PPME. Please review it as a key step in your
Internal Network - Outgoing Ports
• Discovery of printers utilizes
UDP on port 4201.
• Is Multicast supported on your
network for printer discovery?
• Initial printer configuration may
use TCP ports 9100, 9200, or
6101.
• If using LDAP, additional ports
4
which is done by discovering and configuring printers
on your network. Specific ports are required for the
discovery and sending of the configuration settings to
the printer.
Consider if LDAP will be used to authenticate
PPME users.
☐

Network Port Requirements:
‒ Port 443: client connections
Installation folder:
The person installing the software must have
Local user account:
Consider the user account that will be used to
%SYSTEMDRIVE%\Users\<username>\.PPME
Internal Network - Incoming Ports
• The server firewall should be
configured to only allow the
following incoming ports:
‒ Port 8443: printer
connections
☐
The default installation folder is:
C:\Program Files\Zebra
Technologies\Printer Profile
Manager Enterprise
The user account that will be used to
install PPME.
Administrative privileges on the server where PPME is
being installed.
Consider if you need to install the product
somewhere other than the default location.
install PPME. Additional files will be installed at
this location:
☐
☐
5

Gather the following information before you begin the installation and setup.
APPENDIX A – SETUP WIZARD SCREENS shows the screens displayed during the Setup Wizard.
The following information is required to complete the Setup Wizard.
Done
Requirements
Additional Details
Administrator and additional User
A PPME administrator account must be created.
requirements.
PPME Server FQDN:
The FQDN will be used in the certificate generation
server’s FQDN.
PPME License Number:
PPME can be downloaded and installed in
a license or the trial/demo to work.
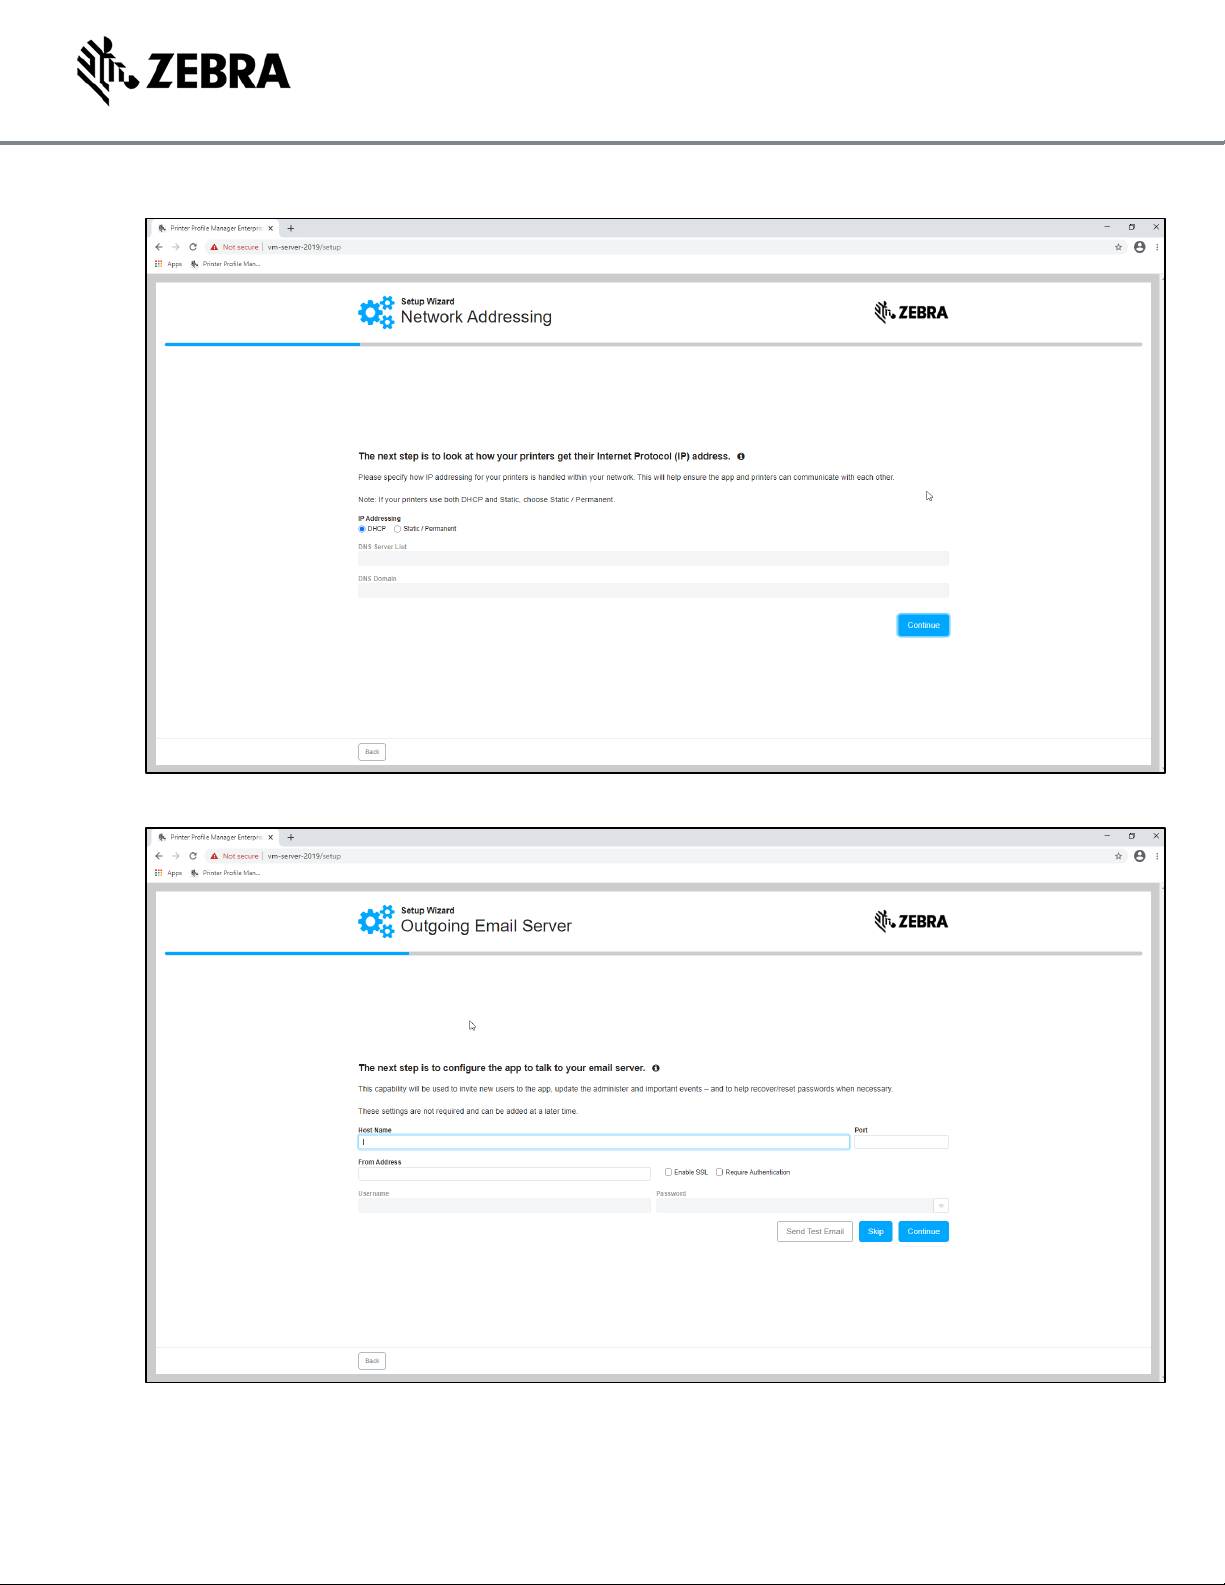
Network IP Addressing:
Consider how your printers will get their IP
requirements.
Outgoing Email (SMTP) Server
Best Practice
setup to ensure the email system is working.
STEP 2: Run the Setup Wizard
account information:
• Full Name
• Username
• Email Address
• Password
• Fully Qualified Domain Name
(FQDN)
• Your 18-digit license number
• 30-Day Trial/Demo does not
require a license number.
• DHCP or Static/Permanent IP
addressing
• Your DNS Server List
• Your DNS Domain Name
When creating the Administrator account or adding
additional PPME users, you must have the details
shown in the left pane.
When a new user accepts an email invitation to
join the system, they will need to establish a
password.
Refer to the PPME Installation Guide for password
and connections may fail if this is incorrect.
The Setup Wizard can attempt to detect the
Trial/Demo mode as fully functional and will
support up to 7K printers for 30 days. As noted in
the previous section, internet access is required for
address.
The DNS Server List is a space-delimited list of
DNS Server IPv4 addresses.
The DNS Domain Name must be a valid DNS
name
(e.g., no white space in the name and no longer
than 255 characters).
Refer to the PPME Installation Guide for further
☐
☐
☐
☐
Details:
• Host Name
• Port
• From email address
• Authentication credentials, if
required.
• Is SSL required?
6
PPME uses email to invite new users and to
recover forgotten login credentials.
If the email server configuration is not set up in
PPME, it will not be able to support the “Forgot
Password” feature.
During setup, configure PPME to connect
to your SMTP server.
Use the “Send Test Email” option during
☐

Certificate Details:
Domain Name)
The information in the left pane is required to
SSL Certificate Type for Printer
Best Practice
configuration page.
Backup Configuration Files:
Password.
At the end of the setup process, back up the
The following attributes require setup and configuration after you log in to PPME.
live production environment.
Attributes
Additional Details
Connecting Printers to PPME:
PPME can “find” your networked Link-OS printers. It sends
• Subnet discovery using wildcards or cidr format
• Company name
• Department
• Address
• City
• State
• Country
• Postal Code
• Email address
• Phone number
• Server Name (Fully Qualified
Connection:
• Basic (SHA-1)
• Advanced (SHA-2)
• Both
create certificates for the printer connection to
PPME.
Spaces or invalid characters in the email address
or other fields is a common cause for failure when
generating certificates.
It is a best practice to use the Advanced
Printer Connection (SHA-2) option for the
connection between printers and PPME.
To use the Advanced (SHA-2) option, printers are
required to run Link-OS v5 or later.
The setup process will create signed certificates.
Consider if you need to configure printers
manually and, if necessary, download the
configuration file during the setup process.
After the setup process is complete,
customer supplied certificates signed by a
CA can be added and used via the Admin
☐
☐
• Make note of the Backup Archive
STEP 3: Setup and Usage
Use the PPME Demo installation to pre-validate these attributes work as expected before moving into a
• How many printers will be
connected?
• How many different locations
contain printers?
• How many different subnets
are there?
• How will you need to group/tag
printers?
configuration files and certificates created by the
setup wizard.
discovery requests over your network and only Link-OS
printers respond. Those printers will appear in the PPME
discovery dialog where you can select them to be connected
to PPME.
PPME sends the discovery traffic over UDP port 4201. Refer
YSTEM AND NETWORK REQUIREMENTS.
to S
PPME supports discovering and adding printers using the
following methods:
• Multicast search by specifying the number of hops
☐
7

o Up to cidr block a.b.0.0/16 (max. 65K
Updating the Printer OS:
some or all your printers?
PPME makes updating the printer’s OS easy, either one
Automated Updating of Wi-Fi
PPME can automate the process of updating Wi-Fi
app.
addresses)
• Adding printers individually
Examples of acceptable subnet searches include:
• Wildcards (e.g., 10.80.4.* or 10.80.*.*)
• Ranges (e.g., 10.80.4.1-100 or 10.80.1-100.*)
• “cidr” (e.g., 10.80.4.1/21)
A TCP connection using port 9200 is used to configure the
printer to connect to PPME.
If the network does not allow either the UDP or Multicast
traffic to be used, the printers will have to be configured in
another way to allow them to connect to PPME. Zebra
recommends that UDP port 4201 is open to allow discovery.
It may be necessary to perform multiple discoveries to
find and add all your printers.
Consider setting up auto-tags before adding printers.
Consider the effects of updating the OS
on your printers.
• The printer OS range from 20
MB to 52 MB in size.
• The printer is not available for
printing during the update and
resets as the last step of the
OS update.
• Increase in your network traffic.
• When is the best time to
perform the OS update on
Certificates:
CA Server Setup
• Printers must be running Link-
OS version 6 or later to use
this feature in PPME.
• URL of your CA server.
• Username/Password and/or
certificate details to access
your CA server.
• How often PPME should check
the CA for a signed certificate
(polling timeout).
• Will you setup more than one
CA server?
• For an NDES type CA, will the
challenge type be static or
dynamic?
printer at a time or for many printers.
Best Practice
Schedule OS updates when they are not disruptive
to production activities.
certificates on your printers. PPME supports the following
Certificate Authority (CA) server types for certificate signing:
• Microsoft ADCS: Microsoft Certification Authority
10.0
• Microsoft ADCS NDES 2019: Microsoft Certification
Authority 10.0
• EJBCA-SCEP: EJBCA 7.1.0 Enterprise
At this time, these are the only certificate authorities that are
supported. Others may be added in the future.
The items in the left pane will help you gather the information
required to configure the connection to your CA server(s)
and may require assistance from the Administrator of the CA
server.
Best Practice
Test this feature on a small number of printers in a
test environment before moving the solution into a
production environment. Doing this may involve
working with different IT administrators than those
that review/approve the installation of the PPME
8

add a CA server.
Automated Updating of Wi-Fi
You must configure a CA server before you can add one or
your system administrators.
Creating and Sending Printer
A profile is a snapshot of a printer's settings, network
profile when it is sent to printers (where appropriate).
Using LDAP for PPME User
PPME can use your LDAP directory to control User access
needing to use the built-in User management system.
Since the supported CAs have different connection
requirements, refer to the PPME User Guide for the steps to
Certificates
Certificate Management Item (CMI)
• Challenge password
• Message digest type
• Encryption algorithm, key size.
• When to renew the certificate
(number of days before
certificate expiration)
• Certificate request fields:
o Common Name
o Organization
o Organization Unit
o City
o State
o Country
o Email address
o Alternative name
(optional)
Profiles:
• Network configuration
• Objects to store (graphics,
templates, fonts, etc.)
• Objects to process
(configuration settings file)
• Commands
• Firmware
• Virtual Device/Emulation
more CMIs. A CMI defines the certificate request details and
which CA server will be used in the automated certificate
signing process. You will need the information listed in the
left pane to configure a CMI.
Best Practice
As a best practice, PPME generates unique
certificates for each printer. For the COMMON
NAME in the certificate request, PPME supports a
choice of MAC ADDRESS or IP ADDRESS.
• Message Digest options are: SHA256, SHA384,
SHA512
• Key Sizes: RSA (2048, 3072, 4096), ECDSA (256,
384, 521)
• ECDSA curve: secp256k1, secp384r1, secp521r1,
prime256v1
The renew window can be between 3 and 365 days.
If you are uncertain about which to use, please consult with
configurations, objects, firmware, etc.
PPME can retrieve the profile from any printer and store it for
later distribution to other models of the same series. Or, you
can create a profile from within PPME to be distributed to
printers.
The items listed in the left pane may be included in a profile.
Profiles can include the printer’s settings, selected stored
objects (such as fonts, label templates, ZBI programs),
emulations, and customer defined commands. The printer’s
OS is not retrievable from the printer, yet an OS update file
can be included when the Profile is sent to other printers.
Network Configurations present a unique challenge in that
static addresses may be used on printers. These are
typically unique to one printer, which means they cannot be
used on additional printers. For this reason, PPME allows
the Network Configuration to be stored as a separate entity.
Best Practice
Carefully consider when choosing to include or
exclude Network Configurations in Profiles.
For security reasons PPME will not retrieve certificate
files or passwords when creating a profile from a
printer. These will need to be set independently using
a Resource file or by including commands with the
Accounts:
9
to PPME. This can simplify the User management instead of

• Hostname
The details in the left pane will be needed to configure
• Port
• Server access credentials
• LDAP Schema Settings:
o Base DN
o Additional User DN
o Additional Group DN
• User Schema Settings:
o User name attribute
o User full name attribute
o User email attribute
• The predefined PPME user
role to be assigned to the
LDAP user:
o Administrator
o Technician
o User
PPME to connect to your LDAP directory. Please contact
your system administrator to obtain the required settings for
your LDAP server.
LDAP implementations and schemas can vary. Review the
LDAP User Directory Configuration section in the PPME
Installation Guide to see which fields are required and
examples of field attributes.
10

Appendix A – Setup Wizard Screens
This section gives you a preview of the Setup Wizard screens.
11

12
13

14

15

16

17

18

19
 Loading...