

Page 1
Microsoft Applications for
Windows Mobile 6
User Guide
Page 2

Page 3

Microsoft Applications for Windows Mobile 6
User Guide
72E-108299-02
Revision A
April 2015
Page 4

ii Microsoft Applications for Windows Mobile® 6 User Guide
© 2015 ZIH Corp
No part of this publication may be reproduced or used in any form, or by any electrical or mechanical means,
without permission in writing from Zebra. This includes electronic or mechanical means, such as photocopying,
recording, or information storage and retrieval systems. The material in this manual is subject to change
without notice.
The software is provided strictly on an “as is” basis. All software, including firmware, furnished to the user is on
a licensed basis. Zebra grants to the user a non-transferable and non-exclusive license to use each software
or firmware program delivered hereunder (licensed program). Except as noted below, such license may not be
assigned, sublicensed, or otherwise transferred by the user without prior written consent of Zebra. No right to
copy a licensed program in whole or in part is granted, except as permitted under copyright law. The user shall
not modify, merge, or incorporate any form or portion of a licensed program with other program material, create
a derivative work from a licensed program, or use a licensed program in a network without written permission
from Zebra. The user agrees to maintain Zebra’s copyright notice on the licensed programs delivered
hereunder, and to include the same on any authorized copies it makes, in whole or in part. The user agrees not
to decompile, disassemble, decode, or reverse engineer any licensed program delivered to the user or any
portion thereof.
Zebra reserves the right to make changes to any software or product to improve reliability, function, or design.
Zebra does not assume any product liability arising out of, or in connection with, the application or use of any
product, circuit, or application described herein.
No license is granted, either expressly or by implication, estoppel, or otherwise under any Zebra, intellectual
property rights. An implied license only exists for equipment, circuits, and subsystems contained in Zebra
products.
Page 5
Revision History
Changes to the original manual are listed below:
Change Date Description
-01 Rev A 11/20/08 Initial release.
-02 Rev A 04/01/15 Zebra rebranding.
iii
Page 6

iv Microsoft Applications for Windows Mobile® 6 User Guide
Page 7

Table of Contents
Revision History.................................................................................................................................... iii
About This Guide
Introduction ........................................................................................................................................... xi
Documentation Set ............................................................................................................................... xi
Chapter Descriptions ............................................................................................................................ xi
Notational Conventions......................................................................................................................... xii
Service Information............................................................................................................................... xii
Chapter 1: Getting Started
Today Screen ...................................................................................................................................... 1-1
Using the Status Bar ............................................................................................................................ 1-2
Using the Command Bar ..................................................................................................................... 1-2
Soft Keys ........................................................................................................................................ 1-3
Selecting Programs ............................................................................................................................. 1-3
Using Pop-up Menus ..................................................................................................................... 1-3
Notifications ......................................................................................................................................... 1-4
Entering Information ............................................................................................................................ 1-4
Entering Information Using the Input Panel ................................................................................... 1-4
Writing on the Screen .................................................................................................................... 1-9
Selecting Text ................................................................................................................................ 1-10
Selecting Writing ............................................................................................................................ 1-10
Drawing on the Screen ........................................................................................................................ 1-10
Recording a Message .................................................................................................................... 1-11
Using My Text ................................................................................................................................ 1-11
Finding Information .............................................................................................................................. 1-12
Search ............................................................................................................................................ 1-12
File Explorer ................................................................................................................................... 1-12
Chapter 2: Windows Mobile 6 Settings
Introduction .......................................................................................................................................... 2-1
Page 8

vi Microsoft Applications for Windows Mobile® 6 User Guide
Adjusting Settings ................................................................................................................................ 2-1
Personal Tab .................................................................................................................................. 2-1
System Tab .................................................................................................................................... 2-2
Connections Tab ............................................................................................................................ 2-4
Buttons ................................................................................................................................................. 2-5
Program Buttons ............................................................................................................................ 2-5
Up/Down Control ............................................................................................................................ 2-5
Input ..................................................................................................................................................... 2-6
Keyboard Input Method .................................................................................................................. 2-6
Block Recognizer Input Method ..................................................................................................... 2-6
Letter Recognizer Input Method ..................................................................................................... 2-7
Transcriber Input Method ............................................................................................................... 2-8
Word Completion ........................................................................................................................... 2-14
Options ........................................................................................................................................... 2-15
Lock ..................................................................................................................................................... 2-16
Password ....................................................................................................................................... 2-16
Hint ................................................................................................................................................. 2-17
Menus .................................................................................................................................................. 2-18
Owner Information ............................................................................................................................... 2-19
Identification ................................................................................................................................... 2-19
Notes .............................................................................................................................................. 2-19
Options ........................................................................................................................................... 2-20
Phone .................................................................................................................................................. 2-21
Sounds & Notifications ......................................................................................................................... 2-22
Sounds ........................................................................................................................................... 2-22
Notifications ................................................................................................................................... 2-22
Today ................................................................................................................................................... 2-23
Appearance .................................................................................................................................... 2-23
Items .............................................................................................................................................. 2-23
About ................................................................................................................................................... 2-25
Version ........................................................................................................................................... 2-25
Device ID ....................................................................................................................................... 2-25
Copyrights ...................................................................................................................................... 2-26
Backlight .............................................................................................................................................. 2-27
Battery Power ................................................................................................................................ 2-27
External Power ............................................................................................................................... 2-28
Brightness ...................................................................................................................................... 2-28
Certificates ........................................................................................................................................... 2-29
Personal ......................................................................................................................................... 2-29
Intermediate ................................................................................................................................... 2-29
Root ............................................................................................................................................... 2-30
Clock and Alarms ................................................................................................................................. 2-31
Time ............................................................................................................................................... 2-31
Alarms ............................................................................................................................................ 2-32
More ............................................................................................................................................... 2-33
Customer Feedback ............................................................................................................................ 2-34
Encryption ............................................................................................................................................ 2-35
Error Reporting .................................................................................................................................... 2-36
External GPS ....................................................................................................................................... 2-37
Programs ....................................................................................................................................... 2-37
Page 9

Table of Contents vii
Hardware ....................................................................................................................................... 2-38
Access ........................................................................................................................................... 2-38
GPS Setup ........................................................................................................................................... 2-40
Keylight ................................................................................................................................................ 2-41
Battery Power ................................................................................................................................ 2-41
External Power ............................................................................................................................... 2-41
Advanced ....................................................................................................................................... 2-42
Managed Programs ............................................................................................................................. 2-43
Memory ................................................................................................................................................ 2-44
Main ............................................................................................................................................... 2-44
Storage Card .................................................................................................................................. 2-44
Running Programs ......................................................................................................................... 2-45
Power ................................................................................................................................................... 2-46
Battery ............................................................................................................................................ 2-46
Advanced ....................................................................................................................................... 2-46
Wakeup .......................................................................................................................................... 2-47
Misc ................................................................................................................................................ 2-47
CPU Power .................................................................................................................................... 2-48
Optimizing Battery Life ................................................................................................................... 2-48
Regional Settings ................................................................................................................................. 2-49
Remove Programs ............................................................................................................................... 2-51
Screen ................................................................................................................................................. 2-52
General .......................................................................................................................................... 2-52
Clear Type ..................................................................................................................................... 2-52
Text Size ........................................................................................................................................ 2-53
System Info .......................................................................................................................................... 2-54
System ........................................................................................................................................... 2-54
Hardware Version .......................................................................................................................... 2-54
Display ........................................................................................................................................... 2-54
Miscellaneous ................................................................................................................................ 2-55
Package ......................................................................................................................................... 2-55
ConfigInfo ....................................................................................................................................... 2-56
Task Manager ...................................................................................................................................... 2-57
Windows Update .................................................................................................................................. 2-58
Beams .................................................................................................................................................. 2-59
Connections ......................................................................................................................................... 2-60
Task Tab ........................................................................................................................................ 2-60
Domain Enroll ...................................................................................................................................... 2-62
USB to PC ........................................................................................................................................... 2-63
Wi-Fi .................................................................................................................................................... 2-64
Wireless Manager ................................................................................................................................ 2-66
Chapter 3: Mobile 6 Applications
Introduction .......................................................................................................................................... 3-1
Calendar .............................................................................................................................................. 3-2
Creating Appointments .................................................................................................................. 3-2
Editing an Appointment .................................................................................................................. 3-4
Deleting an Appointment ................................................................................................................ 3-4
Beaming Appointments .................................................................................................................. 3-4
Page 10

viii Microsoft Applications for Windows Mobile® 6 User Guide
Using the Summary Window .......................................................................................................... 3-5
Creating Meeting Requests ........................................................................................................... 3-5
Configuring Calendar Views .......................................................................................................... 3-5
Contacts ............................................................................................................................................... 3-7
Changing Contact Options ............................................................................................................. 3-7
Creating a Contact ......................................................................................................................... 3-7
Editing a Contact ............................................................................................................................ 3-9
Deleting a Contact ......................................................................................................................... 3-9
Finding a Contact ........................................................................................................................... 3-10
Beaming Contacts .......................................................................................................................... 3-10
Using the Summary Window .......................................................................................................... 3-10
Tasks ................................................................................................................................................... 3-11
Creating a Task .............................................................................................................................. 3-11
Editing a Task ................................................................................................................................ 3-12
Deleting a Task .............................................................................................................................. 3-13
Beaming Tasks .............................................................................................................................. 3-13
Using the Summary Window .......................................................................................................... 3-13
Configuring Tasks .......................................................................................................................... 3-14
Notes ................................................................................................................................................... 3-15
Creating a Note .............................................................................................................................. 3-15
Creating a Template ...................................................................................................................... 3-16
Editing a Note ................................................................................................................................ 3-17
Deleting a Note .............................................................................................................................. 3-17
Beaming Notes .............................................................................................................................. 3-17
Configuring Notes .......................................................................................................................... 3-18
Messaging ........................................................................................................................................... 3-19
Setting an E-mail Server Connection ............................................................................................. 3-19
Open Messaging ............................................................................................................................ 3-21
Using The Message List ................................................................................................................ 3-22
Creating an E-mail Message .......................................................................................................... 3-22
Downloading Messages ................................................................................................................. 3-23
Managing Messages and Folders .................................................................................................. 3-25
Configuring Accounts ..................................................................................................................... 3-26
Deleting Accounts .......................................................................................................................... 3-29
Windows Media ................................................................................................................................... 3-30
Copying Files To Your Device ....................................................................................................... 3-30
The library ...................................................................................................................................... 3-30
The Playlist .................................................................................................................................... 3-31
File Playback .................................................................................................................................. 3-35
Playback controls ........................................................................................................................... 3-36
Customizing the Player .................................................................................................................. 3-37
Pictures & Videos ................................................................................................................................ 3-41
Taking Photos ................................................................................................................................ 3-41
Recording Video ............................................................................................................................ 3-42
Viewing Photos and Videos ........................................................................................................... 3-43
Copying Image Files Or Video Clips to Your Device ..................................................................... 3-43
Organizing Photos and Videos ...................................................................................................... 3-44
Editing Pictures .............................................................................................................................. 3-44
Setting a Picture as Wallpaper ....................................................................................................... 3-45
Slide Show Mode ........................................................................................................................... 3-45
Page 11

Table of Contents ix
Camera Configuration .................................................................................................................... 3-45
Video Configuration ....................................................................................................................... 3-46
Customizing Pictures & Videos ...................................................................................................... 3-46
Internet Explorer Mobile ....................................................................................................................... 3-48
Windows Live ....................................................................................................................................... 3-52
Live Hotmail ................................................................................................................................... 3-53
Live Messenger .............................................................................................................................. 3-54
Live Sync ....................................................................................................................................... 3-57
Internet Sharing ................................................................................................................................... 3-58
Chapter 4: Office Mobile Applications
Introduction .......................................................................................................................................... 4-1
Excel Mobile ........................................................................................................................................ 4-1
Tips for Working in Excel Mobile .................................................................................................... 4-2
Creating a Workbook ..................................................................................................................... 4-2
Editing a Workbook ........................................................................................................................ 4-3
Deleting a Workbook ...................................................................................................................... 4-4
Beaming Workbooks ...................................................................................................................... 4-4
Formatting Workbooks ................................................................................................................... 4-4
Finding and Replacing Text ........................................................................................................... 4-6
Configuring Files ............................................................................................................................ 4-7
OneNote Mobile ................................................................................................................................... 4-9
Create New Note ........................................................................................................................... 4-9
Open or Close a Note .................................................................................................................... 4-10
Rename a Note .............................................................................................................................. 4-10
Delete a Note ................................................................................................................................. 4-10
Sort Notes ...................................................................................................................................... 4-10
Add Text Formatting to Notes ........................................................................................................ 4-10
Add a Picture or an Audio Recording ............................................................................................. 4-11
PowerPoint Mobile ............................................................................................................................... 4-13
Getting Slide Shows onto Your Device .......................................................................................... 4-13
Using PowerPoint Mobile ............................................................................................................... 4-13
Setting the Slide Show Playback Options ...................................................................................... 4-14
Sending a PowerPoint File ............................................................................................................. 4-15
Word Mobile ......................................................................................................................................... 4-16
Creating a Document ..................................................................................................................... 4-16
Editing a Document ........................................................................................................................ 4-17
Deleting a Document ..................................................................................................................... 4-18
Beaming Documents ...................................................................................................................... 4-18
Formatting Text and Drawings ....................................................................................................... 4-18
Formatting Paragraphs .................................................................................................................. 4-19
Finding and Replacing Text ........................................................................................................... 4-20
Configuring Files ............................................................................................................................ 4-20
Page 12

x Microsoft Applications for Windows Mobile® 6 User Guide
Page 13

About This Guide
Introduction
This guide provides instructions for using Microsoft Windows Mobile 6 applications on Zebra devices.
NOTE This guide covers Windows Mobile 6.0 and 6.1 Professional and Classic operating systems. Not all features
described in this guide pertain to all devices. Refer to the device’s User Guide for supported features.
Screens and windows pictured in this guide are samples and can differ from actual screens.
Documentation Set
The documentation set for Zebra devices is divided into guides that provide information for specific user needs.
The guides are:
•
Microsoft Applications for Windows Mobile 6 User Guide - describes how to use Microsoft developed
applications.
•
Application Guide - describes how to use Zebra developed applications.
•
User Guide - describes how to use the device.
•
Integrator Guide - describes how to set up the device and accessories.
•
EMDK Help File - provides API information for writing applications.
Chapter Descriptions
Topics covered in this guide are as follows:
•
Chapter 1, Getting Started, explains how to use the Today screen, select programs, and enter information on
a Windows Mobile 6 device.
•
Chapter 2, Windows Mobile 6 Settings, explains how to adjust settings on a Windows Mobile 6 device,
including screen brightness, time and regional settings, memory, power, and owner information.
Page 14
xii Microsoft Applications for Windows Mobile® 6 User Guide
•
Chapter 3, Mobile 6 Applications, explains how to use Windows Mobile 6 applications such as Calendar,
Notes, and Inbox.
•
Chapter 4, Office Mobile Applications, explains how to use Windows Mobile 6 applications such as Mobile
Word, Mobile Excel and Mobile PowerPoint.
Notational Conventions
The following conventions are used in this document:
•
“Device” refers to any Zebra computer that runs Windows Mobile 6.0 or 6.1.
•
Italics are used to highlight specific items in the general text, and to identify chapters and sections in this and
related documents.
•
Bold text is used to highlight the following:
• Dialog box, window and screen names
• Drop-down list and list box names
• Check box and radio button names
• Icons on a screen.
• Key names on a keypad
• Button names on a screen or window.
•
bullets (•) indicate:
• Action items
• Lists of alternatives
• Lists of required steps that are not necessarily sequential
•
Sequential lists (e.g., those that describe step-by-step procedures) appear as numbered lists.
NOTE This symbol indicates something of special interest or importance to the reader. Failure to read the note
will not result in physical harm to the reader, equipment or data.
CAUTION This symbol indicates that if this information is ignored, the possibility of data or material damage may
occur.
WARNING! This symbol indicates that if this information is ignored the possibility that serious personal
Service Information
If you have a problem with your equipment, contact Zebra Support for your region. Contact information is available
at: http://www.zebra.com/support
injury may occur.
.
When contacting Zebra Support, please have the following information available:
•
Serial number of the unit
Page 15

About This Guide xiii
•
Model number or product name
•
Software type and version number.
Zebra responds to calls by E-mail, telephone or fax within the time limits set forth in support agreements.
If your problem cannot be solved by Zebra Support, you may need to return your equipment for servicing and will
be given specific directions. Zebra is not responsible for any damages incurred during shipment if the approved
shipping container is not used. Shipping the units improperly can possibly void the warranty.
If you purchased your business product from a Zebra business partner, contact that business partner for support.
Page 16

xiv Microsoft Applications for Windows Mobile® 6 User Guide
Page 17
Chapter 1 Getting Started
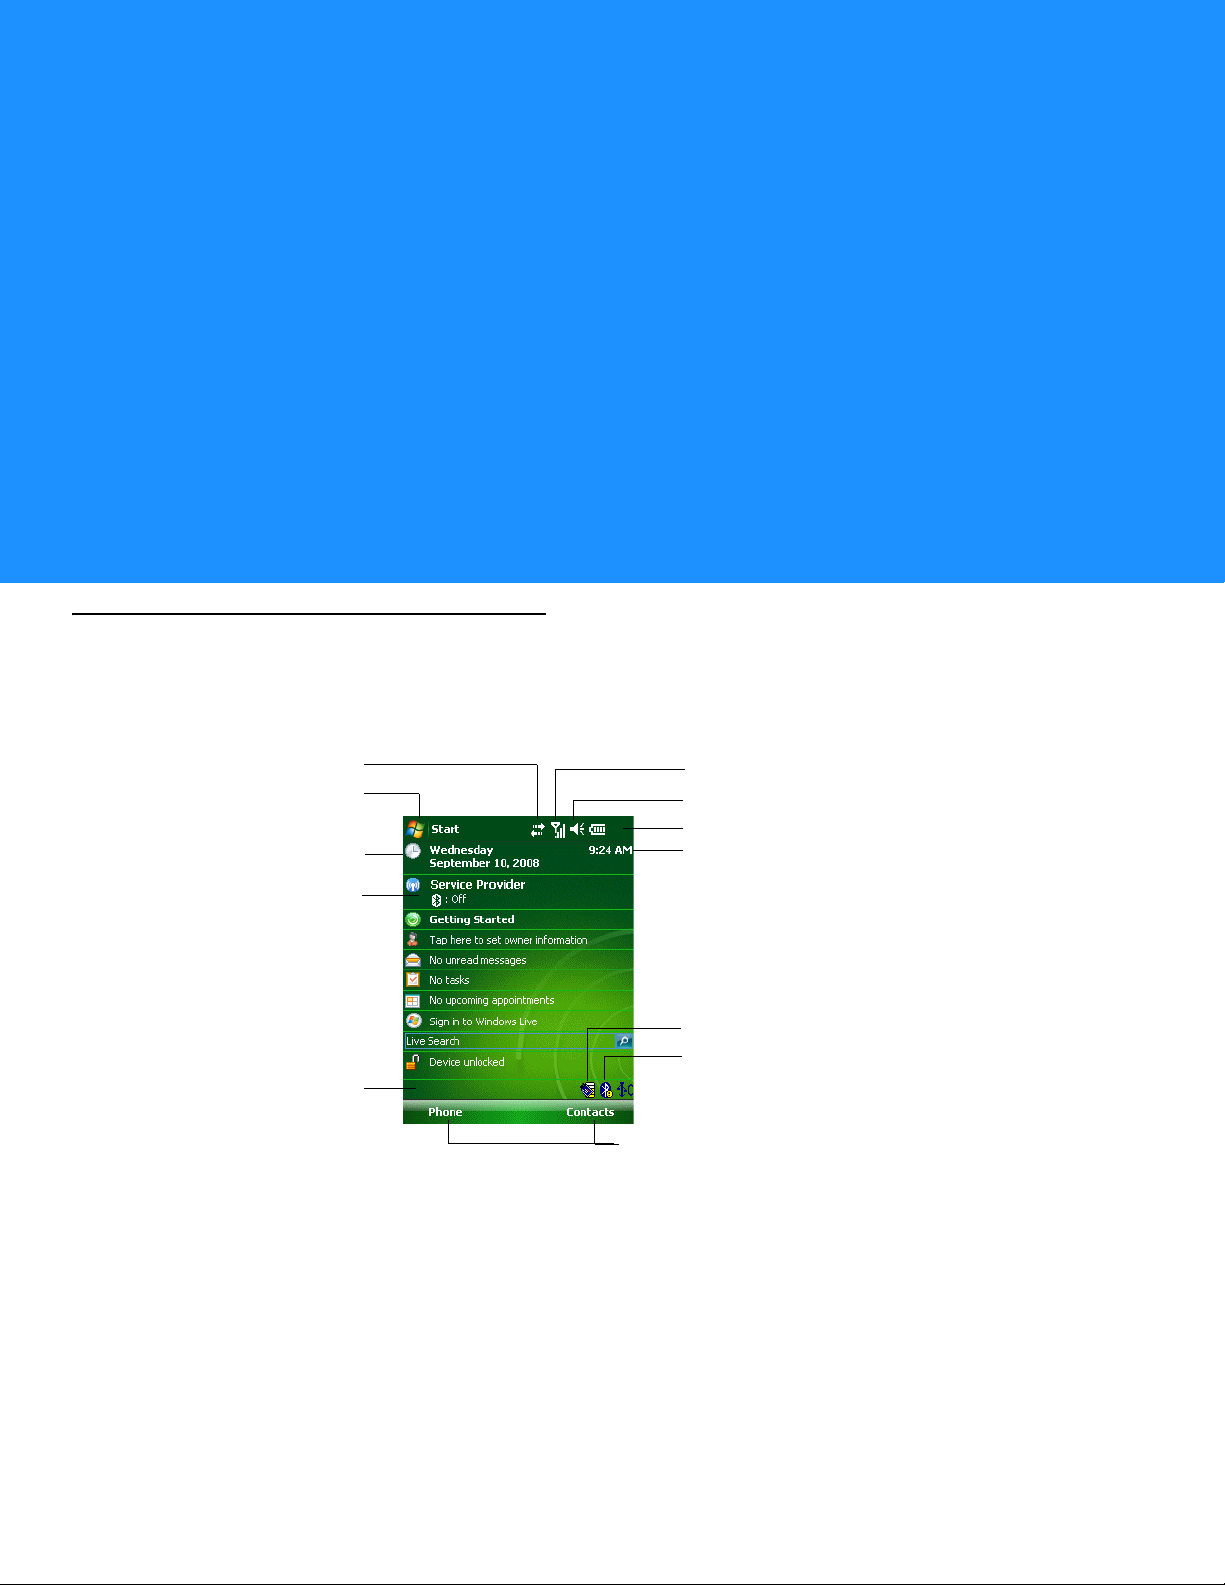
Open the Start Menu
Adjust volume
Change the date and time
Soft Keys
Battery Status
Command Bar
Signal Strength
Turn on or off radios
Change the date and time, set up the alarm, and more
BTExplorer
Wireless Applications
Connectivity
Today Screen
The Today screen displays important information, such as upcoming appointments and status indicators. Tap a
section on the screen to open the associated program. Alternatively, tap
Start > Today to display the Today screen.
Figure 1-1
The
Tod ay screen displays important information for the day, and varies depending on the device configuration.
To customize the
background and the
2-23.
Toda y S cr een
Today screen, tap Start > Settings > Today icon. Use the Appearance tab to customize the
Items tab to change the list and order of items that appear on the screen. See Today on page
Page 18

1 - 2 Microsoft Applications for Windows Mobile® 6 User Guide
Tap to change volume or mute all sounds
Tap to select a program
Tap to see additional programs
Tap to customize the device
Status Bar
Tap to view connection status
Tap to select a recently
used program
Tap to change volume or mute all sounds
Tap to select a program
Tap to see additional programs
Tap to customize the device
Status Bar
Tap to view connection status
Tap to select a recently
used program
Using the Status Bar
The status bar at the top of the screen displays various status icons, and current time.
Figure 1-2
Figure 1-3
Screen Navigation - Portrait Screens
Screen Navigation - Square Screens
Using the Command Bar
Use the command bar at the bottom of the screen to perform program tasks. The command bar includes menu
names, buttons, and the Input Panel button. To create a new item in the current program, tap
name of a button, hold the stylus on the button. Drag the stylus off the button to decline the command.
New. To see the
Page 19
Getting Started 1 - 3
Soft Key
Menu/Action
Soft Key
Menu/Action
Input
Panel
Tap and hold to display the
pop-up menu
Lift the stylus and
tap the action
Tap outside the menu to close it
without performing an action
Figure 1-4
Command Bar
Soft Keys
Use the soft menu keys on the device, if applicable, keypad to access the menu or action above this key on the
screen.
Selecting Programs
To select a program, tap Start > Programs, then select the program icon. See Menus on page 2-18 to select which
programs appear in the
Using Pop-up Menus
Use pop-up menus to quickly choose an action for an item. For example, use the pop-up menu in the contact list to
delete a contact, make a copy of a contact, or send an e-mail message to a contact. The actions in the pop-up
menus vary from program to program.
To access a pop-up menu, hold the stylus on the item on which to perform the action. When the menu appears, lift
the stylus and select the action, or tap outside the menu to close it without performing an action.
Start menu.
Figure 1-5
Pop-up Menu
Page 20
1 - 4 Microsoft Applications for Windows Mobile® 6 User Guide
Tap to see choices
Select an input method
Input Panel Button
(icon varies depending
on input method)
Notifications
The device provides notifications for appointments and tasks. For example, after setting up an appointment in
Calendar, a task with a due date in Tasks, or an alarm in Clock, the device provides a notification in any of the
following ways:
•
a message box appears on the screen
•
a pre-set sound plays
•
the device vibrates.
To choose reminder types and sounds for the device, tap
icon. Select the desired options. See Sounds & Notifications on page 2-22.
Entering Information
To enter information in applications:
•
use the keypad (on models with a keypad)
•
use the input panel
•
write directly on the screen
•
draw pictures on the screen
•
speak into the microphone to record a message
•
scan bar code data.
Entering Information Using the Input Panel
Use the input panel to enter information. Enter information using the soft Keyboard or write using Block
Recognizer, Letter Recognizer, or Transcriber. The characters appear as typed text on the screen. See Input on
page 2-6 to customize settings for input methods.
Start > Settings > Personal tab > Sounds & Notifications
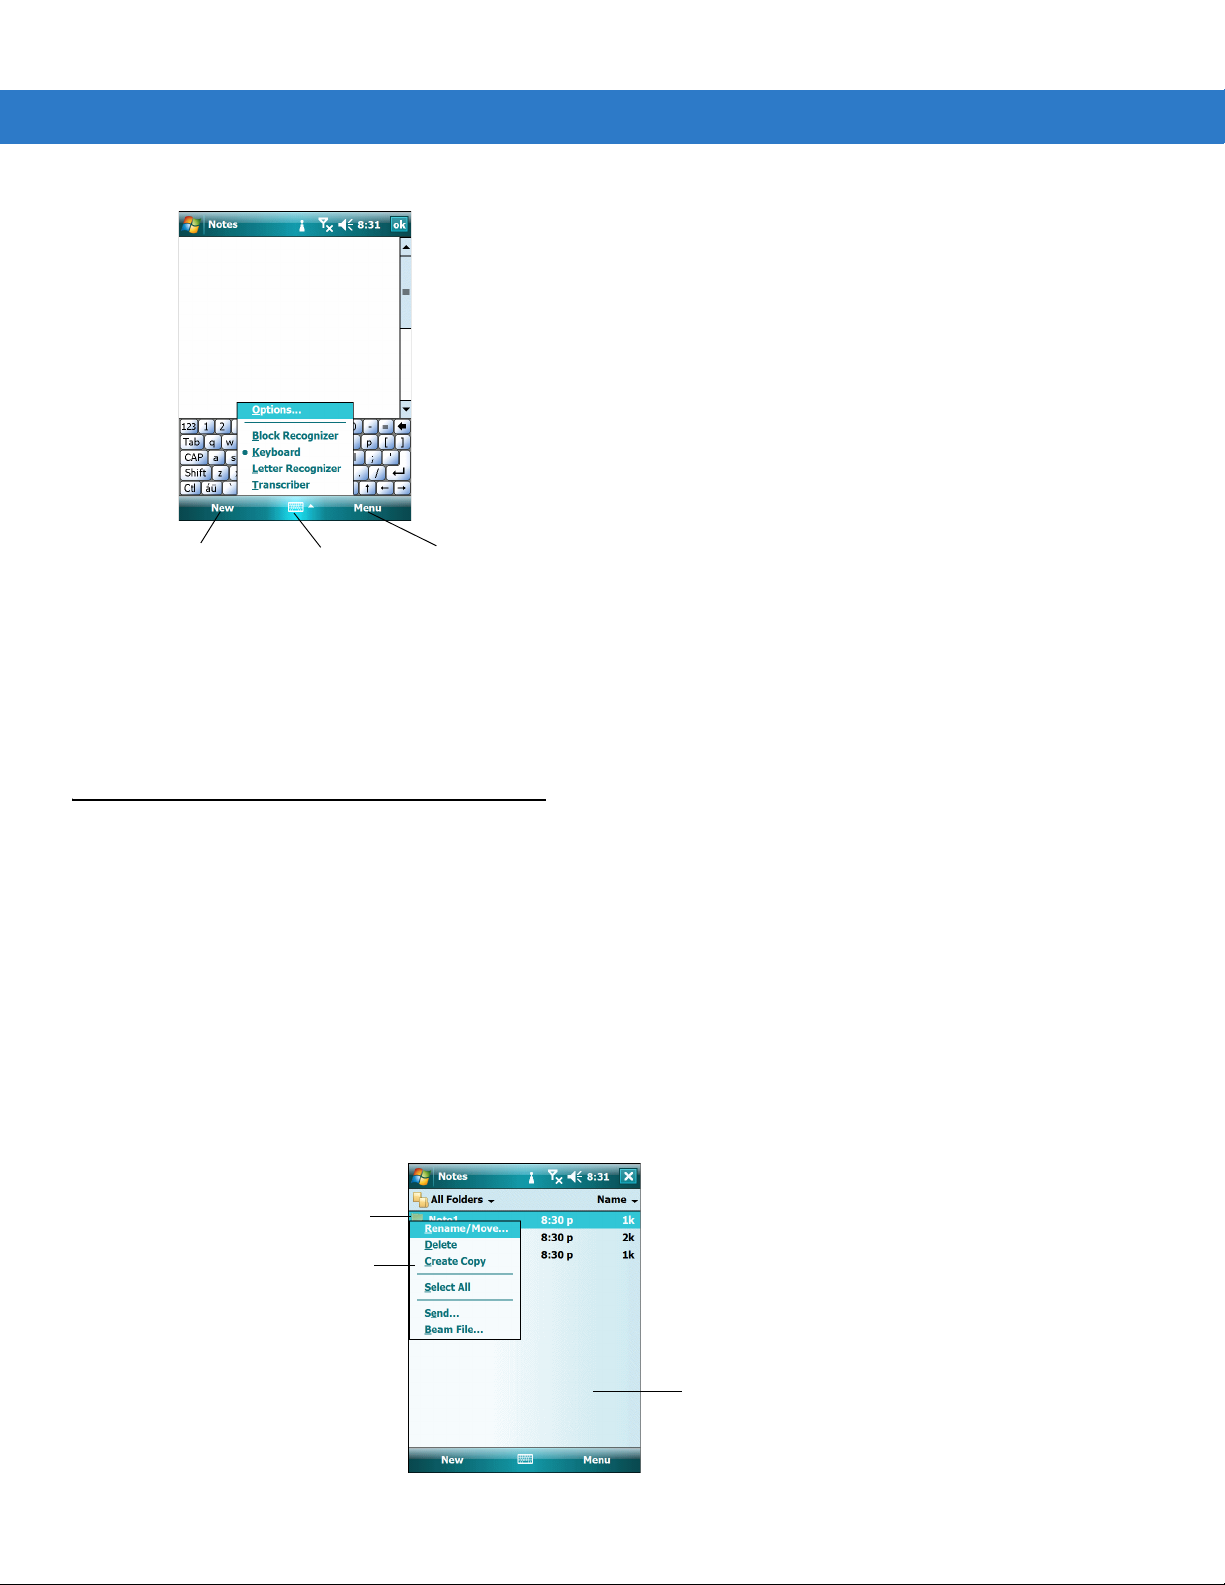
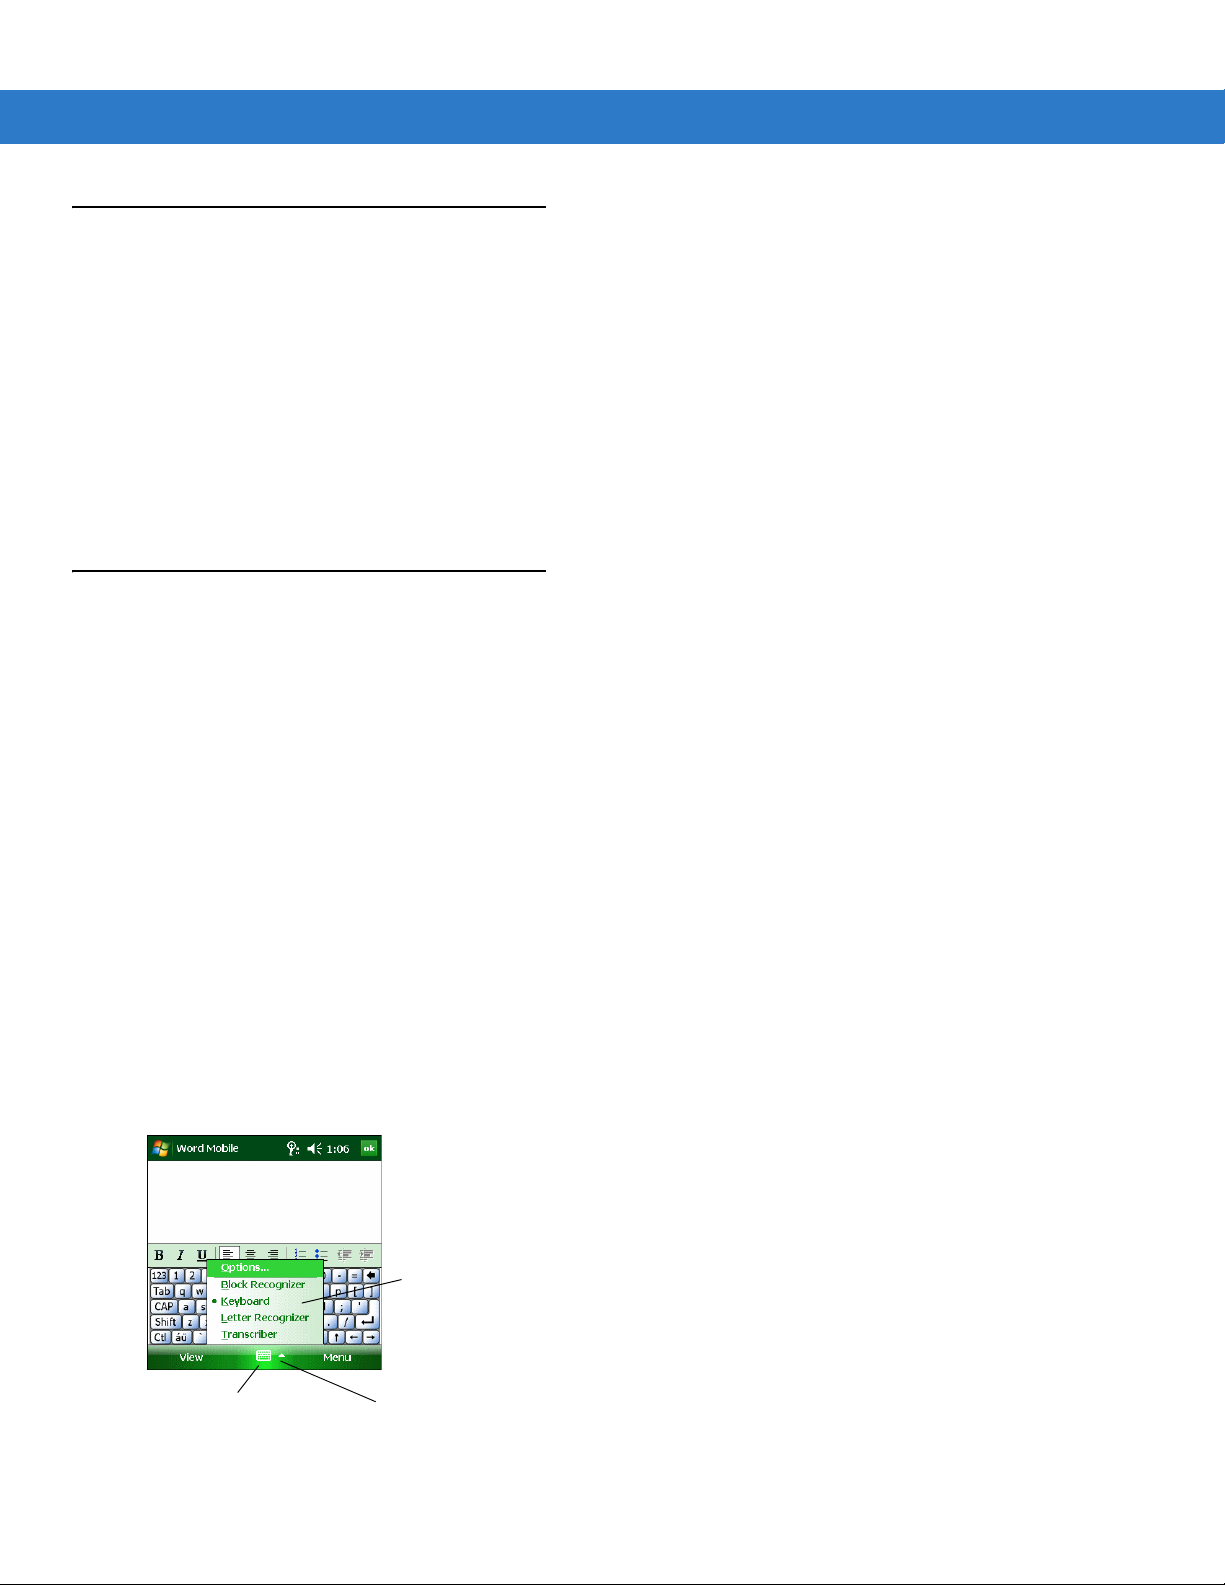
To show or hide the input panel, tap the Input Panel button. Tap the arrow next to this button to view and select
input methods.
Figure 1-6
Input Panel Menu
Page 21

Getting Started 1 - 5
Tap here if this is the right word
Writing area
When using the input panel, the device anticipates the word and displays it above the input panel, if set to do so in
Word Completion on page 2-14. Tap the displayed word to insert it into the text at the insertion point. With frequent
use, the device learns to anticipate more words.
Using the Soft Keyboard
Use the Keyboard input method to enter information by tapping keys with the stylus. To type with the soft Keyboard:
1. Tap the arrow next to the Input Panel button, then select Keyboard.
2. On the Keyboard, tap the keys with the stylus.
Figure 1-7
3. Tap the pop-up word to enter this word on the screen, or continuing tapping keys to enter information.
Keyboard Input Panel
Using Letter Recognizer
Use the Letter Recognizer input method to enter information by writing letters and numbers in a special writing
area. To enter information using Letter Recognizer:
1. Tap the arrow next to the Input Panel button, then select Letter Recognizer.
2. Write letters or numbers in the writing area. Write capital letters in the left side of the writing area, numbers in
the right side, and lower case letters in the center.
Figure 1-8
3. Tap the button to open a panel of symbols and special characters to enter, including foreign characters.
Letter Recognizer Input Panel
Page 22

1 - 6 Microsoft Applications for Windows Mobile® 6 User Guide
...
Writing area
Figure 1-9
4. Tap the button to return to Letter Recognizer.
When writing a letter, it appears as typed text on the screen. For specific instructions on using Letter Recognizer,
with Letter Recognizer open, tap the next to the writing area.
See Letter Recognizer Input Method on page 2-7 to configure Letter Recognizer.
Letter Recognizer Symbols
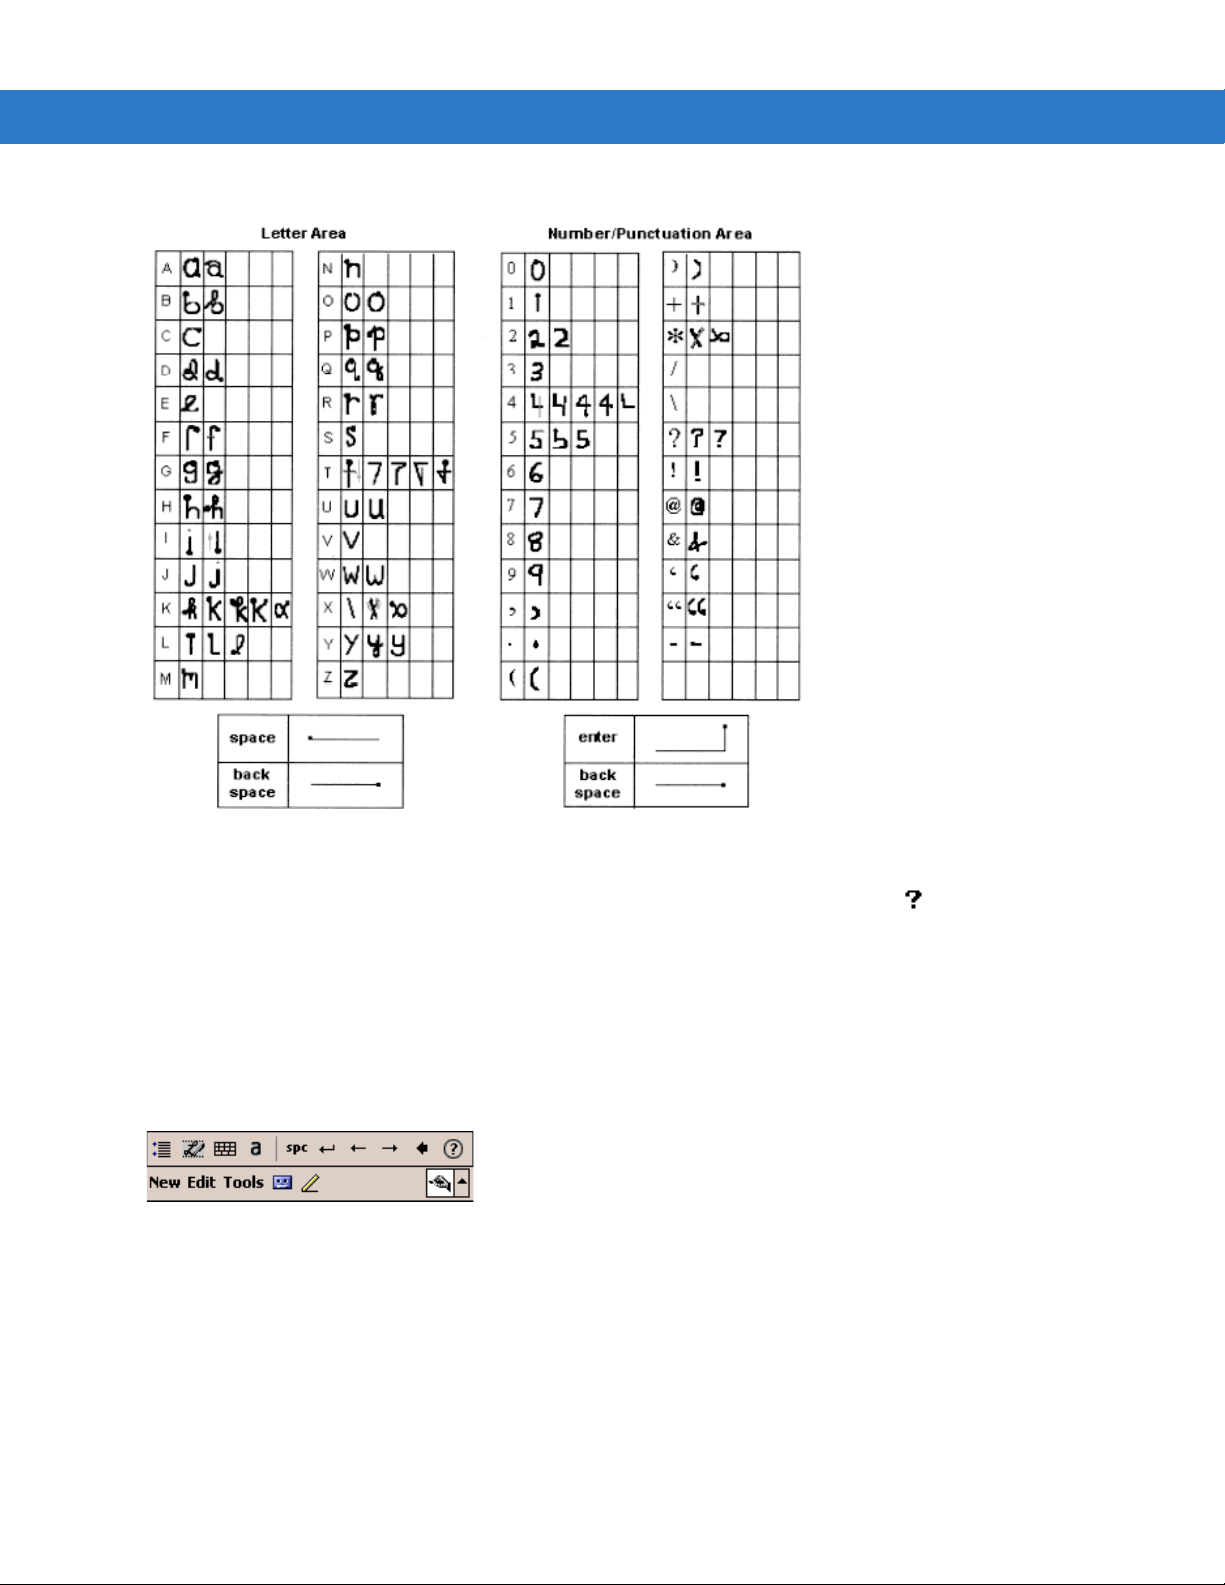
Using Block Recognizer
Use the Block Recognizer input method to enter information by writing letters and numbers in a writing area using
special stylus strokes. This requires learning how to write characters in a specific way, but speeds recognition.
To enter information using Block Recognizer:
1. Tap the arrow next to the Input Panel button, then select Block Recognizer.
2. Write letters in the left side of the writing area (labeled abc), or numbers, symbols, special characters, or
punctuation in the right side (labeled 123), using special character strokes. Each written character appears as
typed text in the window. Figure 1-11 provides examples of how to write characters in lowercase.
Figure 1-10
Following are tips for using Block Recognizer:
•
•
•
The following chart illustrates some of the characters to write (the dot on each character is the starting point for
writing).
Block Recognizer
To enter an upper case letter, enter an upstroke in the left side of the writing area, and when a cursor appears
on the screen write the letter. To enter more than one uppercase letter (to achieve a caps lock), first enter two
upstrokes. Enter another upstroke to return to lower case.
When entering special characters or punctuation, first tap in the right side of the writing area, then enter the
character.
Tap the button to open a panel of symbols and special characters to enter, including foreign characters.
Page 23
Getting Started 1 - 7
Figure 1-11
For specific instructions on using Block Recognizer, with Block Recognizer open, tap next to the writing area.
See Block Recognizer Input Method on page 2-6 to configure Block Recognizer.
Character Chart
Using Transcriber
Use the Transcriber input option to enter information by writing letters and numbers customized to an individual’s
handwriting style. To enter information using Transcriber:
1. Tap the arrow next to the Input Panel button, then select Transcriber.
Figure 1-12
Transcriber Icons
Page 24

1 - 8 Microsoft Applications for Windows Mobile® 6 User Guide
Table 1-1
Transcriber Icons
Icon Description
Set options such as writing direction and inking. See
Adapt a writing style to optimize recognition. See
Quickly input numbers, punctuation, and other symbols.
Select a recognition mode:
a
Alpha mode (
Numeric mode (
Uppercase mode (
): Default mode for handwriting recognition.
123
): Allows numbers and some letters, and activates the Calculator.
A
): Capitalizes all letters.
Inserts a space at the cursor.
Inserts a return at the cursor.
Transcriber Input Method on page 2-8
Transcriber Input Method on page 2-8
.
.
Moves the cursor one space to the left.
Moves the cursor one space to the right.
Erases the character to the left of the cursor.
Opens the help file.
2. To open a customized letter shapes file to speed recognition, tap . See Transcriber Input Method on page
2-8 to create a letter shapes file.
3. Ta p File > Open... and tap the file to open it.
Page 25

Getting Started 1 - 9
Figure 1-13
4. Ta p ok.
5. Write anywhere on the screen. Transcriber changes the written characters to typed characters. For specific
instructions on using Transcriber, with Transcriber open, tap .
See Transcriber Input Method on page 2-8 to configure Transcriber.
Opening Letter Shapes File
Writing on the Screen
In some programs that accept writing, such as Notes and the Notes tab in Calendar, Contacts, and Tasks, use the
stylus to write directly on the screen.
To write on the screen, tap
Menu > Draw to switch to writing mode. Lines appear on the screen for guidance.
Figure 1-14
Writing on the Screen
Writing Tips
•
Write neatly.
•
Write on the lines and draw descenders below the line. Cross off the “t” and write apostrophes below the top
line so they are not confused with the word above. Write periods and commas above the line.
•
For better recognition, increase the zoom level to 300% using Menu > Zoom.
•
Leave large gaps between words so the device can easily tell where words begin and end.
•
Hyphenated words, foreign words that use special characters such as accents, and some punctuation cannot
be converted.
Page 26

1 - 10 Microsoft Applications for Windows Mobile® 6 User Guide
The drawing box indicates the
boundaries of the drawing
Selecting Text
To edit or format typed text, select it by dragging the stylus across the text. Cut, copy, and/or paste text by holding
the selected words and selecting an editing command on the pop-up menu, or by tapping
Selecting Writing
To select writing to edit or format:
1. Tap and hold the stylus next to the writing to select until the insertion point appears.
2. Drag the stylus across the writing.
Ta p
Menu > Undo Ink to erase accidental writing, and try again.
Cut, copy, and paste written text in the same way as with typed text: tap and hold the selected words, then select
the command from the pop-up menu, or select the command from
Drawing on the Screen
Menu.
Menu.
Drawing on the screen is similar to writing on the screen. To create a drawing:
1. Ta p Menu > Draw. Lines appear on the screen.
2. Cross three ruled lines on the first stroke. A drawing box appears.
3. Draw strokes in or touching the drawing box to include the strokes in the drawing. Drawings that do not cross
three ruled lines are treated as writing.
Figure 1-15
To change the zoom level, select a level from
Drawing on the Screen
Menu > Zoom.
Manipulating a Drawing
To manipulate a drawing:
•
To select a drawing to edit or format, tap Menu > Draw and drag the stylus over the drawing. Selection
handles appear.
•
To resize a drawing, drag a selection handle.
•
To cut, copy, and paste drawings, tap and hold the selected drawing, then select an editing command on the
pop-up menu, or select the command from
Menu.
Page 27

Getting Started 1 - 11
Embedded recording icon
Record
Voice Bar icon
Fast-forward
Rewind
Stop
Play/Pause
Volume
Tap to select a prewritten message
Recording a Message
Record a message to capture thoughts, reminders, and phone numbers. In Calendar, Tasks, and Contacts, include
the recording in the
a written note.
To create a recording:
1. Ta p Start > Programs > Notes to open the Notes application.
2. Ta p Menu > View Recording Toolbar.
3. Tap the Record button (the circle) to begin recording.
4. Speak into the device’s microphone, or hold the microphone near another source of sound.
Notes tab. In the Notes program, either create a stand-alone recording or include a recording in
Figure 1-16
5. Tap the Stop button when finished. The new recording appears in the note list or as an embedded icon.
6. To play a recording, tap it in the list or tap the embedded icon in the note.
Using My Text
When using Messaging or MSN Messenger, use My Text to quickly insert preset or frequently used messages into
the text entry area. To insert a message:
1. Ta p Start > Messaging to open Inbox.
2. Open a new message or chat.
3. Ta p Menu > My Text and select a message.
Recording Window
Figure 1-17
Using My Text
Page 28
1 - 12 Microsoft Applications for Windows Mobile® 6 User Guide
4. If desired, add text after the My Text message by tapping at the end of the message and inserting text using the
input panel.
To edit a My Text message, tap
make the changes.
Finding Information
To locate information on the device, use the Search application or File Explorer.
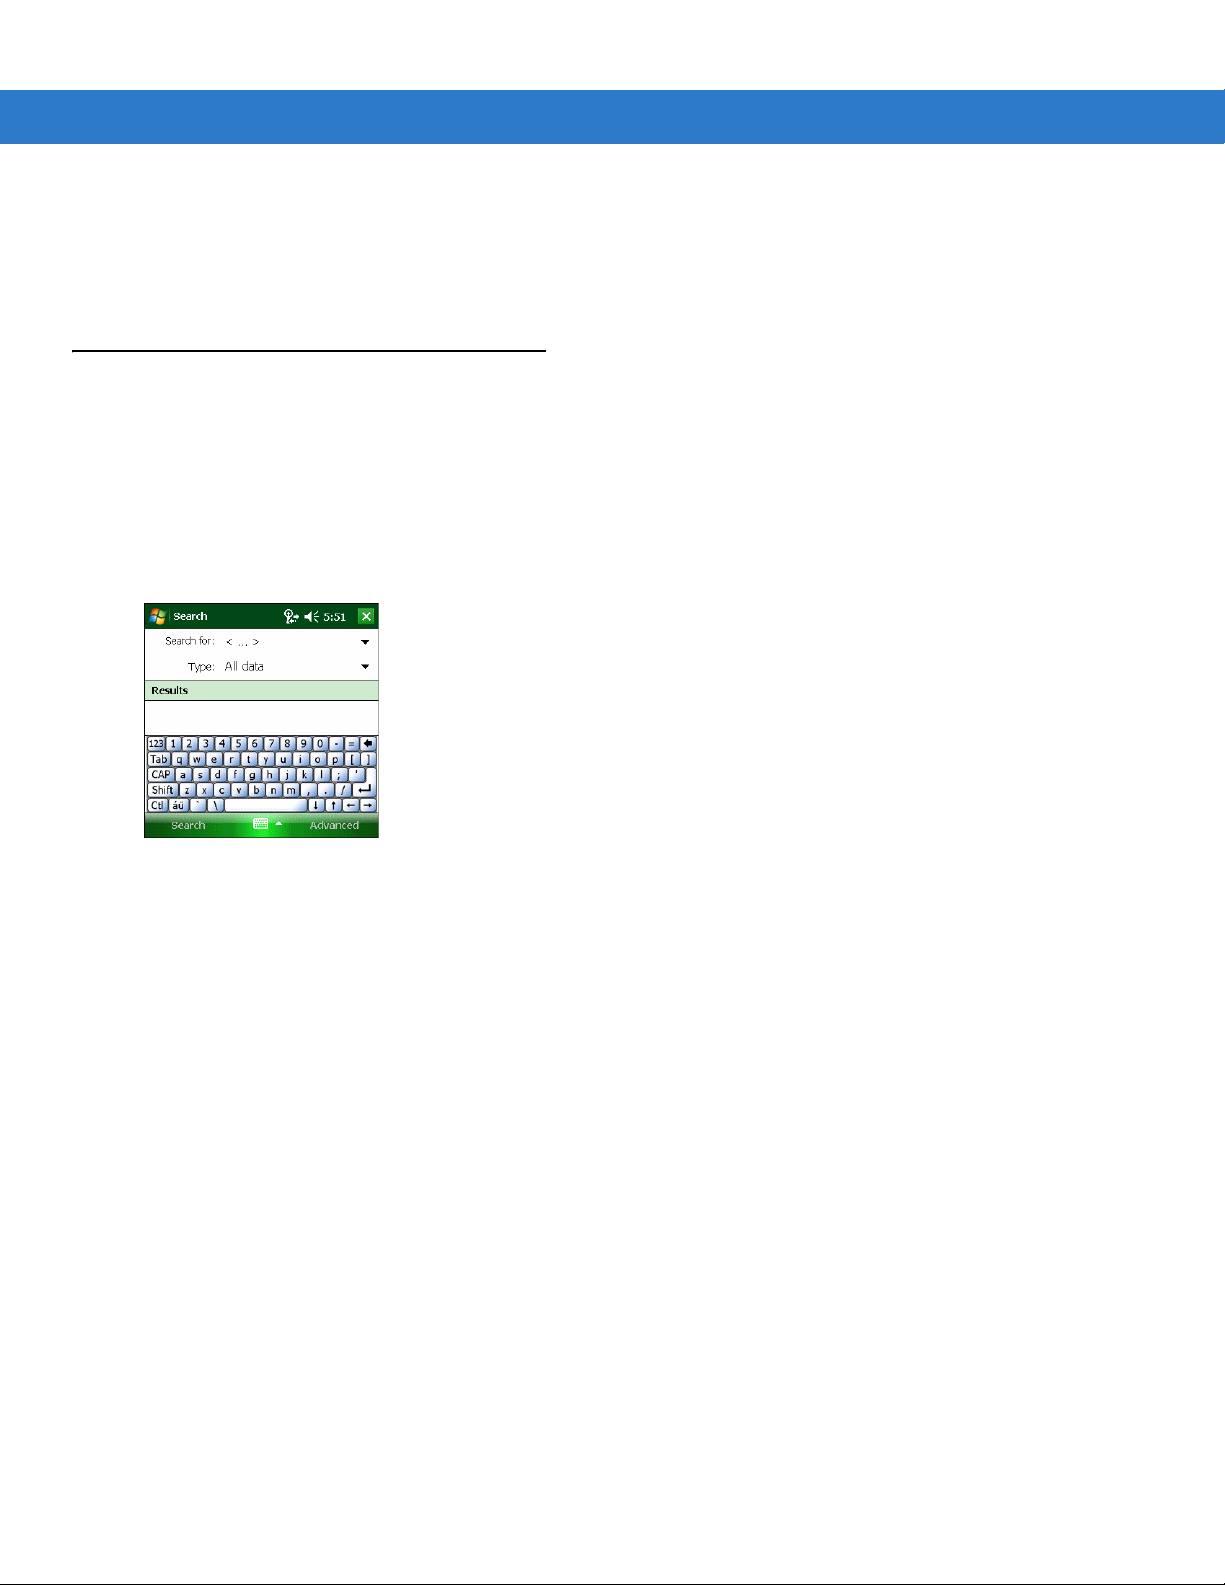
Search
The Search application locates information. To use Search:
1. Ta p Start > Programs > Search icon.
Menu > My Text > Edit My Text Messages... . Select the message to edit and
Figure 1-18
2. Enter the text to find in the Search for: field.
3. Select a data type from the Type: drop-down list. To find information taking up storage space on the device,
select
4. Ta p Search. All information containing the text entered in the Search for: field appears in the Results area.
Search Window
Larger than 64 KB.
File Explorer
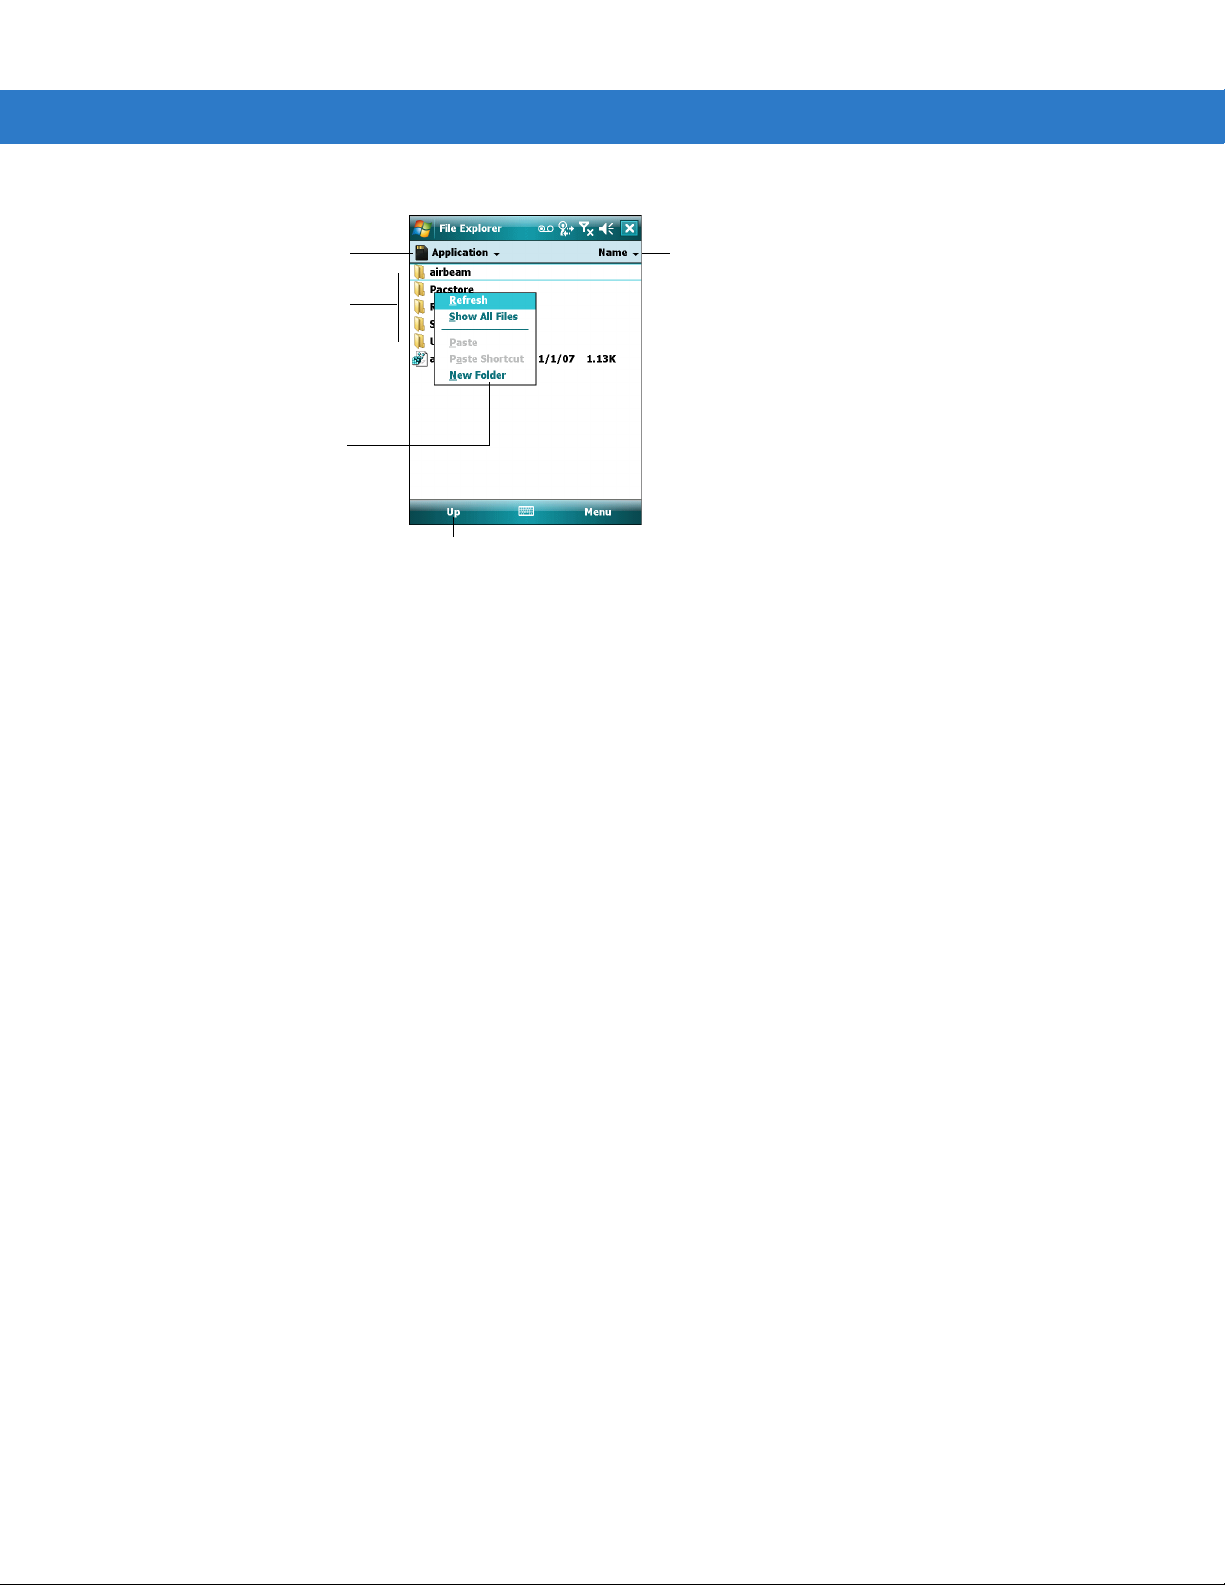
Use File Explorer to find files and organize them into folders. Tap Start > Programs > File Explorer.
Page 29
Getting Started 1 - 13
Select the sort
order for the list
Tap the folder
name to open it
Tap and hold to create a
new folder
Tap to change folders
Move up one directory
Figure 1-19
File Explorer Window
Use File Explorer to perform the following:
•
Browse folders to locate a file by tapping folders to open them, or using the Show menu (labeled My Device
by default) to close folders.
•
To list folders and files alphabetically or by date, size, or type, tap the Sort By menu (labeled Name by
default), then select an option to sort by.
•
To move a file, tap and hold the file, then select Cut or Copy. Navigate to a different folder, tap and hold the
screen, then select
•
To create a new folder, tap and hold the screen and select New Folder on the pop-up menu, or tap Menu >
New Folder, then name the folder using the input panel.
•
To delete a file or folder, tap and hold the item to delete, then select Delete.
•
To view the contents of an inserted storage card, navigate to Storage Card under My Device in the Show
Paste on the pop-up menu.
menu.
•
To enter a network path, tap Menu > Open Path > New Path.
Page 30

1 - 14 Microsoft Applications for Windows Mobile® 6 User Guide
Page 31

Chapter 2 Windows Mobile 6 Settings
Introduction
For Windows Mobile 6 devices, this chapter provides device setting adjustments and customization instructions for
setting options such as selecting programs to appear in the Start menu, setting input method options, and
customizing device sounds.
Adjusting Settings
To view available options for device settings, tap Start > Settings. Adjust settings in either the Personal tab or the
System tab.
NOTE Available settings vary depending on the device.
Personal Tab
Table 2-1 lists the applications available in the Personal tab.
Table 2-1
Personal Tab Icons
Icon Name Description
Buttons Assign an application to a key to open a frequently used application by
pressing one key. See Buttons on page 2-5 for more information.
Input Set options for each of the input methods. See Input on page 2-6 for
more information.
Lock Set a password for the mobile computer. See Lock on page 2-16 for
more information.
Page 32

2 - 2 Microsoft Applications for Windows Mobile® 6 User Guide
Table 2-1
Icon Name Description
System Tab
Personal Tab Icons
Menus Set what programs appear in the Start menu. See Menus on page 2-18
for more information.
Owner Information Enter personal information on the mobile computer. See Owner
Information on page 2-19 for more information.
Phone Make and receive calls, switch between calls, and set up conference
calling. See Phone on page 2-21 for more information.
Sounds & Notifications Enable sounds for events, notifications, and more, and set the type of
notification for different events. See Sounds & Notifications on page
2-22 for more information.
Today Customize the appearance and the information to be displayed on the
Today screen. See Today on page 2-23 for more information.
Table 2-2 lists the applications available in the System tab.
Table 2-2
System Tab Icons
Icon Name Description
About This is where you can see basic information such as the Windows
Mobile® version and type of processor used on the mobile computer.
You can also specify a name for the mobile computer. See About on
page 2-25 for more information.
Backlight Set the backlight timeout and adjust brightness. See Backlight on page
2-27 for more information.
Certificates See information about certificates that are installed on the mobile
computer. See Certificates on page 2-29 for more information.
Clock & Alarms Set the device clock to the date and time of your locale or to a visiting
time zone when you’re traveling. Alarms can also be set at specified
days and times of a week. See Clock and Alarms on page 2-31 for
more information.
Customer Feedback Submit feedback on the Windows Mobile 6 software. See Customer
Feedback on page 2-34 for more information.
Encryption Allow files on your storage card to be encrypted. Encrypted files will be
readable only on your device. See Encryption on page 2-35 for more
information.
Page 33

Windows Mobile 6 Settings 2 - 3
Table 2-2
System Tab Icons
Icon Name Description
Error Reporting Enable or disable the device's error reporting function. When this
function is enabled and a program error occurs, technical data about
the state of the program and your computer will be logged in a text file
and delivered to Microsoft's technical support if you choose to send it.
See Error Reporting on page 2-36 for more information.
External GPS Set the appropriate GPS communication ports, if required. You may
need to do this when there are programs on your device that access
GPS data or you have connected a GPS receiver to the mobile
computer. See External GPS on page 2-37 for more information.
GPS Setup
Keylight Set the keylight timeout. See Keylight on page 2-41 for more
Managed Programs Lists applications that have been installed remotely by your system
Configure Secure User Plane Location (SUPL) protocol with GPS
enabled devices. Refer to the device’s user guide for more information.
See GPS Setup on page 2-40 for more information.
information.
administrator. See Managed Programs on page 2-43 for more
information.
Memory Check the device memory allocation status and memory card
information. You can also stop currently running programs. See
Memory on page 2-44 for more information.
Power Check the remaining battery power. You can also set the timeout for
turning off the display (switching device to Sleep mode) to conserve
battery power. See Power on page 2-46 for more information.
Regional Settings Set the regional configuration to use, including the format for displaying
numbers, currency, date, and time on the mobile computer. See
Regional Settings on page 2-49 for more information.
Remove Programs Remove programs that you installed on the mobile computer. See
Remove Programs on page 2-51 for more information.
Screen Change the screen orientation, re-calibrate the screen, and change the
screen text size. See Screen on page 2-52 for more information.
System Info Displays the mobile computer’s software and hardware information.
See System Info on page 2-54 for more information.
Task Manager Enables viewing of memory and CPU allocations and stops running
processes. See Task Manager on page 2-57 for more information.
Windows Update Link to Microsoft's web site and update Windows Mobile® on your
device with the latest security patches or fixes. See Windows Update
on page 2-58 for more information.
Page 34

2 - 4 Microsoft Applications for Windows Mobile® 6 User Guide
Connections Tab
Table 2-3 lists the applications available in the Connections tab.
Table 2-3
Connection Tab Icons
Icon Name Description
Beam Set the mobile computer to receive incoming IrDA beams. See Beams
on page 2-59 for more information.
Bluetooth Launches the Bluetooth application. Refer to the device’s User Guide
for more information.
Connections Set up one or more types of modem connections for your device, such
as phone dial-up, GPRS, Bluetooth, and more, so that your device can
connect to the Internet or a private local network. See Connections on
page 2-60 for more information.
Domain Enroll Make your device an AD domain member for device management and
security. See Domain Enroll on page 2-62 for more information.
USB to PC Enables or disables the enhanced network connectivity. See USB to
PC on page 2-63 for more information.
Wi-Fi Setup wireless network connection and customerize settings. See
Wi-Fi on page 2-64 for more information.
Wireless Manager Enables or disables the mobile computer’s wireless radios and
customizes Wi-Fi, Bluetooth and Phone settings. See Wireless
Manager on page 2-66 for more information.
Page 35

Buttons
Use the Buttons windows to assign an application to a key to open a frequently used application by pressing one
key.
Program Buttons
To assign an application to a key on the keypad:
1. Ta p Start > Settings > Personal tab > Buttons icon > Program Buttons tab.
Windows Mobile 6 Settings 2 - 5
Figure 2-1
2. Select a button from the Select a button: list.
3. Select a key or application from the Assign a program: drop-down list.
4. Ta p ok.
Buttons Window - Program Buttons Tab
Up/Down Control
To set the key repeat rate:
1. Ta p Start > Settings > Personal tab > Buttons icon > Up/Down Control tab.
Figure 2-2
Buttons Window - Up/Down Control Tab
2. Adjust the Delay before first repeat: slide bar to change the time elapsed before scrolling begins.
3. Adjust the Repeat rate: slide bar to change the time it takes to scroll from one item to the next.
Page 36

2 - 6 Microsoft Applications for Windows Mobile® 6 User Guide
4. Ta p ok.
Input
Use the Input windows to set input method options.
Keyboard Input Method
Use the Keyboard input method to enter information by tapping keys with the stylus. See Using the Soft Keyboard
on page 1-5. To set options for the Keyboard input method:
1. Ta p Start > Settings > Personal tab > Input icon > Input Method tab.
2. Select Keyboard from the Input method: drop-down list.
Figure 2-3
3. Select the Large keys or Small keys radio button to set the size of the Keyboard’s keys.
4. If selecting the Large keys radio button, tap the Use gestures for the following keys: check box to use
stylus strokes to enter the keys specified in the Input window.
Input Window - Input Method Tab, Keyboard
Block Recognizer Input Method
Use the Block Recognizer to convert writing to typed text on the screen. See Using Block Recognizer on page 1-6.
To set options for the Block Recognizer input method:
1. Ta p Start > Settings > Personal tab > Input icon > Input Method tab.
2. Select Block Recognizer from the Input method: drop-down list.
Page 37

Windows Mobile 6 Settings 2 - 7
Figure 2-4
Input Window - Input Method Tab, Block Recognizer
NOTE There are currently no Block Recognizer customization settings available in Options... .
Letter Recognizer Input Method
Use the Letter Recognizer to convert writing to typed text on the screen. See Using Letter Recognizer on page 1-5.
To set options for the Letter Recognizer input method:
1. Ta p Start > Settings > Personal tab > Input icon > Input Method tab.
2. Select Letter Recognizer from the Input method: drop-down list.
Figure 2-5
3. Ta p Options... .
Input Window - Input Method Tab, Letter Recognizer
Page 38

2 - 8 Microsoft Applications for Windows Mobile® 6 User Guide
Figure 2-6
4. Select the Quick stroke check box to write letters using one stroke. This requires learning a new way to write
Letter Recognizer Options
letters.
5. Select the Right to left crossbar check box if you cross “t”, “f”, and “+” from right to left.
6. Select the Allow accented characters check box to enable the recognizer to predict whether entered
characters use accent marks.
Transcriber Input Method
Use the Transcriber input method to convert handwriting to typed text on the screen. See Using Transcriber on
page 1-7. To set options for the Transcriber input method:
1. Ta p Start > Settings > Personal tab > Input icon > Input Method tab.
2. Select Transc ribe r from the Input method: drop-down list.
Figure 2-7
3. Select Options... to customize the Transcriber for your handwriting.
Input Window - Input Method Tab, Transcriber
Page 39

Windows Mobile 6 Settings 2 - 9
Figure 2-8
4. On the Quick Settings tab, select the alphabet used for writing from the Recognition: drop-down list.
5. Next to Writing Direction: select the direction closely representing the writing angle when forming letters.
Transcriber Options - Quick Settings Tab
Select the last option to change the screen orientation for recognition when writing in landscape mode.
6. Select the Intro Screen check box to view an informative introduction dialog box when using Transcriber.
7. Select the Sound check box to use sound to indicate recognition.
8. Tap the Inking tab.
Figure 2-9
9. Use the slide bar to select how long the Transcriber takes to recognize writing after completion. Shorten the
Transcriber Options - Inking Tab
delay to speed recognition as you become more comfortable with Transcriber.
10. Select whether Transc riber adds a space after each recognized word.
11. Select the width and color of pen strokes using the drop-down lists.
12. Ta p Match Letter Shapes to your writing to familiarize Transcriber with the different ways you write letters,
numbers, and special characters, enabling Transcriber to work faster and more accurately.
Page 40

2 - 10 Microsoft Applications for Windows Mobile® 6 User Guide
Figure 2-10
Transcriber Options - Letter Shapes
NOTE Creating a letter file is optional, as Transcriber can use a default file, but recommended to optimize
recognition of an individual’s handwriting.
To update an existing letter shape file (rather than create a new file), tap File > Open... and tap the file to open
it.
Figure 2-11
13. Tap each character in the list on the Letter Shapes window (Figure 2-10), using the double arrows to scroll
Transcriber Options - Open Letter Shapes File
through character selections. Select an option representing how to write that character, then select whether
you use that method of writing the letter often, rarely, or never.
14. Ta p File > Save ... to save the set of letter shapes, recommended if more than one person uses the device.
Page 41

Windows Mobile 6 Settings 2 - 11
Figure 2-12
15. Enter a name for the file, then select the folder, type of file, and location (main memory, application, or platform)
Transcriber Options - Save Letter Shapes File
using the drop-down lists.
16. Ta p Save.
17. Ta p ok to return to the Inking tab.
18. Tap the Advanced tab.
Figure 2-13
Transcriber Options - Advanced Tab
19. Ta p Shorthand Settings to automatically expand a short word into a longer word, insert data such as a date,
or run a program.
Page 42

2 - 12 Microsoft Applications for Windows Mobile® 6 User Guide
Figure 2-14
20. In the Shorthand window, tap Add to add shorthand settings.
Figure 2-15
21. To enter words to automatically expand when written, select the Text expansion radio button, then tap Next.
Transcriber Options - Shorthand
Transcriber Options - Add Shorthand
Figure 2-16
22. Tap in t he Shorthand field, then write the shortened version of the word to expand.
23. Tap in t he Text expansion field, and write the expanded word.
24. Ta p Finish.
25. Ta p Add.
Transcriber Options - Shorthand Text Expansion
Page 43

Windows Mobile 6 Settings 2 - 13
26. In the Add Shorthand window (Figure 2-15), select the Function radio button then tap Next to assign a
shorthand to a function.
Figure 2-17
27. Tap in t he Shorthand field, then write the shorthand to assign to a function.
28. Select the function from the Function drop-down list.
29. Ta p Finish.
30. Ta p Add.
31. In the Add Shorthand window (Figure 2-15), select the Run program radio button then tap Next to assign a
Transcriber Options - Function Shorthand
shorthand to a program to run.
Figure 2-18
32. Tap in t he Shorthand field, then write the shorthand to assign to a program.
33. Select the program from the Run program drop-down list.
34. Ta p Finish.
35. Ta p ok.
36. Ta p Dictionaries Settings on the Advanced tab (Figure 2-13) to select the default dictionary or personal
Transcriber Options - Run Program Shorthand
dictionaries to optimize word recognition. See Creating Dictionaries on page 2-14 for information on creating a
personal dictionary.
Page 44

2 - 14 Microsoft Applications for Windows Mobile® 6 User Guide
Figure 2-19
37. Check the dictionaries to use in recognition.
38. Ta p ok.
Transcriber Options - Dictionaries
Creating Dictionaries
To create a personalized dictionary:
1. On a host computer, open a text program such as Notepad.
2. Enter each dictionary word on a separate line.
3. Select File > Save as.
4. In the Save as type box, select All Files, then name the file using a .dct extension.
5. Using an ActiveSync connection, copy the file to the My Device\My Documents\Dictionaries folder on the
device. The file appears in the Transcriber: Dictionaries window (Figure 2-19) for selection.
Word Completion
Use the Word Completion tab to adjust how suggested words pop up in a window above the input panel.
1. Ta p Start > Settings > Personal tab > Input icon > Word Completion tab.
Figure 2-20
2. Make the desired changes to the settings.
3. Ta p ok.
Input Window - Word Completion Tab
Page 45

Options
Use the Options tab to adjust preferences for writing and recording.
1. Ta p Start > Settings > Personal tab > Input icon > Options tab.
Windows Mobile 6 Settings 2 - 15
Figure 2-21
2. Make the desired changes to the settings.
3. Ta p ok.
Input Window - Options Tab
Page 46

2 - 16 Microsoft Applications for Windows Mobile® 6 User Guide
Lock
Use the Password window to set a password to disable unauthorized access to the device.
Password
If the device is configured to connect to a network, use a strong (difficult to figure out) password to help protect
network security. Password cracking tools continue to improve and the computers used to crack passwords are
more powerful than ever.
1. Ta p Start > Settings > Personal tab > Lock icon > Password tab.
Figure 2-22
2. Select Prompt if device unused for check box to enable password protection.
3. From the drop-down list, select a time value for the protection to take affect after non-use.
4. From the Password type: drop-down list, select either Simple 4 digit or Strong alphanumeric.
5. For a simple password, enter a four-digit password in the Password field.
For a stronger password:
a. Enter a seven character password in the Password: field. A strong password must contain at least seven
Figure 2-23
Password Window - Password Tab
characters that are a combination of uppercase and lowercase letters, numerals, and punctuation.
Strong Password
b. Re-enter the password in the Confirm: field.
6. Ta p ok.
Page 47

Hint
To set a hint to remember the password:
1. Ta p Start > Settings > Personal tab > Password icon > Hint tab.
Windows Mobile 6 Settings 2 - 17
Figure 2-24
2. In the text box, enter a password hint for a password reminder.
3. Ta p ok.
Password Window - Hint Tab
Page 48

2 - 18 Microsoft Applications for Windows Mobile® 6 User Guide
Menus
Use the Menus window to change the items that appear in the Start menu.
1. Ta p Start > Settings > Personal tab > Menus icon.
Figure 2-25
2. Select up to seven programs to appear in the Start menu.
3. Ta p ok.
Menus Window
To create subfolders and shortcuts to appear under the Start menu:
1. In ActiveSync on the host computer, click Explore.
2. Double-click My Windows Mobile-based Device.
3. Double-click Windows.
4. Double-click Start Menu.
5. Create the folders and shortcuts. The folders appear in the Start Menu after synchronization.
Page 49

Owner Information
Use the Owner Information window to enter information about the device owner. The information can appear
when the device is turned on.
Identification
To enter personal information:
1. Ta p Start > Settings > Personal tab > Owner Information icon > Identification tab.
Windows Mobile 6 Settings 2 - 19
Figure 2-26
2. Fill in or edit the data as desired.
3. Ta p ok.
Owner Information Window - Identification Tab
Notes
To add more information about the owner:
1. Ta p Start > Settings > Personal tab > Owner Information icon > Notes tab.
Figure 2-27
2. Enter information in the Notes: text box.
3. Ta p ok.
Owner Information Window - Notes Tab
Page 50

2 - 20 Microsoft Applications for Windows Mobile® 6 User Guide
ZebraTechnologies
OneZebraDrive
Options
To display information when starting the device:
1. Ta p Start > Settings > Personal tab > Owner Information icon > Options tab.
Figure 2-28
2. To have owner information display when starting the device, select the Identification information and/or
Owner Information Window - Options Tab
Notes check box(es).
3. Ta p ok.
After entering the information and selecting the Identification information and/or Notes check box(es), the
Welcome window appears whenever the device powers on.
Figure 2-29
Welcome Window
Page 51

Phone
Windows Mobile 6 Settings 2 - 21
NOTE Screens may vary depending upon product and carrier. Refer to your product user and integrator guides for
specific information.
Use the Phone Settings window to customize settings, such as the ring type and ring tone for incoming calls,
security options, and other options depending on the type of service.
•
Phone tab - Use the Phone tab to customize ring type, ring tone, keypad tone, and security options.
•
Services tab - Use the Services tab to configure settings for subscribed phone services.
•
Network tab - Use the Network tab to view available networks, determine the order in which the phone
accesses another network if the current network is unavailable, and specify whether to change networks
manually or automatically.
•
Phone Info tab - Use the Phone Info tab to view hardware and software information about the phone.
Page 52

2 - 22 Microsoft Applications for Windows Mobile® 6 User Guide
Sounds & Notifications
Use the Sounds & Notifications window to set event sounds and notification options.
Sounds
To enable event sounds:
1. Ta p Start > Settings > Personal tab > Sounds & Notifications icon > Sounds tab.
Figure 2-30
2. Select the desired Enable Sounds for options.
3. Ta p ok.
Sounds & Notifications Window - Sounds Tab
NOTE Turning off sounds saves power and prolongs battery life.
Notifications
Use the Notifications tab to customize notification about different events.
1. Ta p Start > Settings > Personal tab > Sounds & Notifications icon > Notifications tab.
Figure 2-31
2. Select the event name from the Event: drop-down list.
3. Choose how you want to be notified by selecting the appropriate check boxes. You can choose from several
options, such as sound, a message, a flashing light, or vibrate.
Sounds & Notifications Window - Notifications Tab
Page 53

4. Ta p ok.
Today
Use the Tod a y window to customize the Today screen.
Appearance
To change the appearance of the Today screen:
1. Ta p Start > Settings > Personal tab > Today icon > Appearance tab.
Windows Mobile 6 Settings 2 - 23
Figure 2-32
2. Select the desired theme for the Today screen background. To use a customized background, select the Use
this picture as the background check box and tap Browse to locate the desired file on the device.
3. To beam a theme to another device, select the desired theme and tap Beam. This feature is only available on
devices with infrared capabilities.
4. To delete a theme, select the desired theme and tap Delete.
5. Ta p ok.
Today Window - Appearance Tab
Items
To select items that appear on the Tod a y screen:
1. Ta p Start > Settings > Personal tab > Today icon > Items tab.
Figure 2-33
Today Window - Items Tab
Page 54

2 - 24 Microsoft Applications for Windows Mobile® 6 User Guide
2. Select the items to appear on the Today screen. To customize the information further, select an information
type, then tap Options... (not available for all information types).
3. To set an inactivity timeout after which the device returns to the Today screen, select the Today timeout:
check box, then select the time period from the drop-down list.
4. Ta p ok.
Page 55

About
MC55
Version
Windows Mobile 6 Settings 2 - 25
Use the About window to view general system properties, change memory settings, input device name, and view
copyright information.
The Versio n tab displays general system settings.
1. Ta p Start > Settings > System tab > About icon > Version tab.
Figure 2-34
2. Ta p ok.
About Window - Version Tab
Device ID
Use the Device ID tab to customize the name and description of the device.
1. Ta p Start > Settings > System tab > About icon > Device ID tab.
Figure 2-35
About Window - Device ID Tab
2. In the Device name: text box, enter a name for the device. Do not use spaces.
3. In the Description: text box, enter a description for the device.
4. Ta p ok.
Page 56

2 - 26 Microsoft Applications for Windows Mobile® 6 User Guide
Copyrights
The Copyrights tab displays copyright information.
1. Ta p Start > Settings > System tab > About icon > Copyrights tab.
Figure 2-36
2. Ta p ok.
About Window - Copyrights Tab
Page 57

Backlight
Use the Backlight windows to conserve battery power by turning off the backlight when the device is idle, and to
control backlight brightness.
Battery Power
To set the backlight settings when using battery power:
1. Ta p Start > Settings > System tab > Backlight icon > Battery Power tab.
Windows Mobile 6 Settings 2 - 27
Figure 2-37
2. Select the Disable backlight if device is not use for check box to turn off the backlight when the device is not
used for a certain period of time. Select this period of time from the drop-down list. Available times are 10
seconds, 30 seconds, 1 minute, 2 minutes, 3 minutes, 4 minutes, 5 minutes.
3. Select the Enable backlight when a button is pressed or the screen is tapped check box to turn on the
backlight when the screen is tapped or if a key is pressed.
4. Ta p ok.
Backlight Window - Battery Power Tab
Page 58

2 - 28 Microsoft Applications for Windows Mobile® 6 User Guide
External Power
To set the backlight settings when using external AC power:
1. Ta p Start > Settings > System tab > Backlight icon > External Power tab.
Figure 2-38
2. Select the Disable backlight if device is not used for check box to turn off the backlight when the device is
Backlight Window - External Power Tab
not used for a certain period of time. Select this period of time from the drop-down list. Available times are 1
minute to 10 minutes in 1 minute increments.
3. Select the Enable backlight when a button is pressed or the screen is tapped check box to turn on the
backlight when the screen is tapped or if a key is pressed.
4. Ta p ok.
Brightness
To set a brightness level for the backlight:
1. Ta p Start > Settings > System tab > Backlight icon > Brightness tab.
Figure 2-39
2. Select the Disable backlight check box to disable the backlight from turning on.
3. To adjust the brightness level, use the slider to adjust screen brightness.
4. Ta p ok.
Backlight Window - Brightness Tab
Page 59

Certificates
Add and delete public key certificates on the device to help establish identity when logging onto a secured network,
such as a corporate network. Certificates also help establish the identity of other computers, such as servers, with
which the device connects. This helps prevent unauthorized users from accessing the device and information.
There are two types of certificates: personal certificates that establish identity, and root certificates that establish
the identity of servers with which the device connects. The device may include a set of preinstalled certificates.
Personal
1. Ta p Start > Settings > System tab > Certificates icon > Personal tab.
Windows Mobile 6 Settings 2 - 29
Figure 2-40
The list box displays the name of the certificate issuer and the expiration date.
2. To view more information about a certificate, select it from the list box.
3. To delete a certificate, tap and hold it in the list box, and then tap Delete.
4. Ta p ok.
Certificates Window - Personal Tab
Intermediate
1. Ta p Start > Settings > System tab > Certificates icon > Intermediate tab.
Figure 2-41
Certificates Window - Intermediate Tab
The list box displays the name of the certificate issuer and the expiration date.
Page 60

2 - 30 Microsoft Applications for Windows Mobile® 6 User Guide
2. To view more information about a certificate, select it from the list box.
3. To delete a certificate, tap and hold it in the list box, and then tap Delete.
4. Ta p ok.
Root
1. Ta p Start > Settings > System tab > Certificates icon > Root tab.
Figure 2-42
Certificates Window - Root Tab
The list box displays the name of the certificate issuer and the expiration date.
2. To view more information about a certificate, select it from the list box.
3. To delete a certificate, tap and hold it in the list box, and then tap Delete.
4. Ta p ok.
Page 61

Clock and Alarms
Use the Clock & Alarms windows to change the date, time, and time zone, and set alarms.
Time
To set the date, time, and time zone:
1. Ta p Start > Settings > System tab > Clock & Alarms icon > Time tab.
Windows Mobile 6 Settings 2 - 31
Figure 2-43
2. Select the Home radio button.
3. Select the current time zone from the time zone drop-down list.
4. To set the hour, tap on the hour field and use the up and down arrows next to the time to adjust the hour.
5. To set the minutes, tap on the minute field and use the up and down arrows next to the time to adjust the
Clock Window - Time Tab
minutes.
6. To set the date, tap in the date field.
7. Tap the down arrow to the right of the date field. The Calendar window appears.
Figure 2-44
8. To select the month and year, tap the arrows to the right or left of the month until the current month and year
Calendar
appear.
9. Tap the day of the month. The calendar disappears.
10. Ta p ok.
11. Set the Visiting time zone to quickly see the correct date and time in a frequently visited time zone.
Page 62

2 - 32 Microsoft Applications for Windows Mobile® 6 User Guide
Alarms
To use the device as a travel alarm clock, set a wake-up alarm.
1. Ta p Start > Settings > System tab > Clock & Alarms icon > Alarms tab.
Figure 2-45
2. Highlight a Description field, then enter a name for the alarm.
3. Tap the letter(s) representing the day(s) of the week to enable the alarm.
4. Tap the Bell icon to set alarm features. The Alarm Settings window appears.
Figure 2-46
5. Select the Play sound check box to enable a sound when the alarm starts.
6. From the drop-down list, select the sound that plays when the alarm starts.
Clock Window - Alarms Tab
Alarm Settings Window
7. Select the Repeat sound check box to repeat the sound notification.
8. Select the Flash light and/or Vibrate checkbox to flash a light and/or vibrate when the alarm starts.
9. Ta p ok.
10. Tap the time field to set the alarm time. The clock window appears.
Page 63

Windows Mobile 6 Settings 2 - 33
Figure 2-47
11. Use the time field and up and down arrows to set the time, or tap, hold, and drag the clock hands.
12. Ta p ok.
13. Set up to two more alarms in the available fields.
14. Ta p ok.
15. To change the way the date or time is displayed on the device, see Regional Settings on page 2-49.
Alarm Clock Setting Window
More
To display the clock in the title bar:
1. Ta p Start > Settings > System tab > Clock & Alarms icon > More tab.
Figure 2-48
2. Check the Display the clock on the title bar in all programs check box.
3. Ta p ok.
Clock Window - More Tab
Page 64

2 - 34 Microsoft Applications for Windows Mobile® 6 User Guide
Customer Feedback
To help make Windows Mobile software better by participating in the Customer Experience Improvement Program,
the device can collect information on how you use the software.
1. Ta p Start > Settings > System tab > Customer Feedback icon.
2. To enable feedback, select the Send Feedback radio button.
To disable feedback, select the Don’t Send Feedback radio button.
Figure 2-49
3. Ta p ok.
Customer Feedback Window
Page 65

Encryption
Use the Encryption window to encrypt files on a storage card.
Windows Mobile 6 Settings 2 - 35
CAUTION Encrypted files are opened are opened just like other files, provided you are using the device that
encrypted them.
Figure 2-50
Tap th e Encrypt files placed on storage cards check box to encrypt the files.
Encryption Window
Page 66

2 - 36 Microsoft Applications for Windows Mobile® 6 User Guide
Error Reporting
To help Microsoft improve its software product, the device can collect information on software operation for
reporting if a serious error occurs.
1. Ta p Start > Settings > System tab > Error Reporting icon.
2. To enable error reporting, select the Enable error reporting radio button.
To disable error reporting, select the Disable error reporting radio button.
Figure 2-51
3. Ta p ok.
Error Reporting Window
Page 67

External GPS
With a Global Positioning System (GPS) receiver, the device can show your exact location on a map. An accessory
GPS receiver provides location information to programs on your device.
NOTE A device may display GPS settings without having a built-in or plug-in GPS receiver, so refer to the
Programs
Programs that use GPS must know which port to use to access GPS data. If you don’t specify a program port,
many GPS-enabled programs cannot access GPS data.
1. Ta p Start > Settings > System tab > GPS icon > Programs tab.
Windows Mobile 6 Settings 2 - 37
device’s documentation.
Figure 2-52
2. In the GPS program port: drop-down list, select the port from which programs access GPS data.
The program port must be a different port than the one specified as the hardware port.
GPS Settings Window - Programs Tab
NOTE Ensure GPS programs also have this port selected in their configuration settings. Refer to the GPS
program’s user documentation for more information.
Page 68

2 - 38 Microsoft Applications for Windows Mobile® 6 User Guide
Hardware
Windows Mobile automatically detects some GPS receivers and configures the appropriate hardware settings for
them. If your GPS receiver is not automatically configured, specify its hardware port and baud rate according to
device specifications.
1. Ta p Start > Settings > System tab > GPS icon > Hardware tab.
Figure 2-53
2. In the GPS hardware port: drop-down list, select the port to which your GPS receiver is connected. This port
must be a different port than the one specified as the program port.
3. In the Baud rate: drop-down list, select the baud rate for the GPS receiver.
4. Ta p ok.
GPS Settings Window - Hardware Tab
Access
To allow multiple programs to simultaneously access GPS data, Windows Mobile automatically manages access to
the GPS receiver. Selecting this is highly recommended, otherwise only one program at a time can access the
GPS receiver.
1. Ta p Start > Settings > System tab > GPS icon > Access tab.
Figure 2-54
2. Select the Manage GPS automatically check box.
GPS Settings Window - Access Tab
Page 69

3. Ta p ok.
NOTE Some programs require direct access to the GPS receiver. For these programs, do not select this option.
Windows Mobile 6 Settings 2 - 39
Page 70

2 - 40 Microsoft Applications for Windows Mobile® 6 User Guide
GPS Setup
Use GPS Setup to configure Secure User Plane Location (SUPL) protocol with GPS enabled devices. Refer to the
device’s user guide for more information.
Figure 2-55
GPS Setup SUPL Setup Window
Page 71

Keylight
Use the Keylight window to conserve battery power or to turn off the keyboard backlight when the device is idle.
Battery Power
To set the keyboard backlight settings when using battery power:
1. Ta p Start > Settings > System tab > Keylight icon > Battery Power tab.
Windows Mobile 6 Settings 2 - 41
Figure 2-56
2. Select the Disable keylight if device is not use for check box to turn off the keyboard backlight when the
device is not used for a certain period of time. Select this period of time from the drop-down list. Available times
are 1 minute through 7 minutes in 1 minute increments.
3. Select the Enable keylight when a button is pressed or the screen is tapped check box to turn on the
keyboard backlight when the screen is tapped or a key is pressed.
4. Ta p ok.
Keylight Window - Battery Power Tab
External Power
To set the keyboard backlight settings when using external AC power:
1. Ta p Start > Settings > System tab > Keylight icon > External Power tab.
Figure 2-57
Keylight Window - External Power Tab
Page 72

2 - 42 Microsoft Applications for Windows Mobile® 6 User Guide
2. Select the Disable keylight if device is not used for check box to turn off the keyboard backlight when the
device is not used for a certain period of time. Select this period of time from the drop-down list. Available times
are 1 minute through 7 minutes in 1 minute increments.
3. Select the Enable keylight when a button is pressed or the screen is tapped check box to turn on the
keyboard backlight when the screen is tapped or a key is pressed.
4. Ta p ok.
Advanced
To enable or disable the keyboard backlight:
1. Ta p Start > Settings > System tab > Keylight icon > Advanced tab.
Figure 2-58
2. Select the Disable keylight check box to disable the keyboard backlight from turning on.
3. Select the Track Backlight check box to enable backlight tracking. This disables the options in the Battery
Keylight Window - Advanced Tab
Power tab and the External Power tab.
4. Ta p ok.
Page 73

Managed Programs
Lists applications that have been installed remotely by your system administrator.
Windows Mobile 6 Settings 2 - 43
Figure 2-59
Managed Programs Window
Page 74

2 - 44 Microsoft Applications for Windows Mobile® 6 User Guide
Memory
Use the Memory window to adjust RAM allocation, view storage card memory usage, and control active programs.
Main
To view the amount of memory allocated to file and data storage (Flash) versus program storage (RAM), and the
amount of memory in use versus available memory:
1. Ta p Start > Settings > System tab > Memory icon > Main tab.
Figure 2-60
2. Ta p ok.
To free up memory on the device, close programs, delete unnecessary files, or move files and e-mail attachments
to a storage card. Search for large files by tapping Find.
Memory Window - Main Tab
Storage Card
The Storage Card tab displays how much memory is available in the device’s partitions.
1. Ta p Start > Settings > System tab > Memory icon > Storage Card tab.
Figure 2-61
2. Tap the drop-down list, then the name of the partition to view its information.
Memory Window - Storage Card Tab
Page 75

3. Ta p ok.
Running Programs
NOTE Running Programs is only available on Windows Mobile 6.0 devices. For Windows Mobile 6.1 devices, see
Task Manager on page 2-57.
The Running Programs tab displays a list of active programs.
1. Ta p Start > Settings > System tab > Memory icon > Running Programs tab.
Windows Mobile 6 Settings 2 - 45
Figure 2-62
2. To display an active program, select the program from the Running Program List: list box and tap Activate.
3. To stop an active program, select the program from Running Program List: and tap Stop.
4. To stop all active programs, tap Stop All.
5. Ta p ok.
Memory Window - Running Programs Tab
Page 76

2 - 46 Microsoft Applications for Windows Mobile® 6 User Guide
Power
Use the Power window to view the status of the main and backup batteries and set power management options.
Battery
NOTE Not all Zebra devices have backup batteries. Refer to the device’s User Guide for more information.
The Battery tab provides general information about battery conditions. The amount of useful operating time
remaining varies depending on battery type and device use.
To check the main battery and backup battery status:
1. Ta p Start > Settings > System tab > Power icon > Battery tab.
Figure 2-63
2. Ta p ok.
Power Window - Battery Tab
Advanced
Select options for turning off the device to conserve battery power. To conserve the most power, select the option to
turn off the device after 3 minutes or less.
1. Ta p Start > Settings > System tab > Power icon > Advanced tab.
Figure 2-64
Power Window - Advanced Tab
2. Select On battery power: Turn off device if not used for check box.
Page 77

3. Select a time value from the drop-down list.
4. Select On external power: Turn off device if not used for check box.
5. Select a time value from the drop-down list.
6. Ta p ok.
Wakeup
Enable or disable the device’s wakeup based upon how the device was suspended.
1. Ta p Start > Setting > System tab > Power icon > Wakeup tab.
Windows Mobile 6 Settings 2 - 47
Figure 2-65
2. In the Wakeup... list, select a wakeup condition.
3. Tap the value in the PwrKey or Other column to toggle the wakeup trigger on and off.
4. Ta p Apply to confirm your choices, or Restore to return the wakeup conditions to their defaults.
Power Window - Wakeup Tab
Misc
To prevent the power switch from suspending the system:
1. Ta p Start > Setting > System tab > Power icon > Misc tab.
Figure 2-66
Power Window - Misc Tab
2. Ta p Disable Power Switch check box.
3. Ta p ok.
Page 78

2 - 48 Microsoft Applications for Windows Mobile® 6 User Guide
CPU Power
To select the CPU power mode:
Figure 2-67
1. Select one of the Power Mode radio buttons:
•
•
•
2. Ta p Apply.
3. Ta p ok.
Power Window - CPU Pwr tab
Max Performance
Max Power Save
Auto Power.
Optimizing Battery Life
Under normal conditions, the device offers many hours of use from a single charge. To extend battery life as much
as possible, especially when on the road, observe these tips:
•
Use external power whenever possible, especially when:
• using the backlight
• connecting to a host computer
• using accessories.
•
Set the device to turn off when idle. While on battery power, the device automatically turns off, or suspends
operation, if not used for three minutes. Maximize battery life by shortening this time.
•
By default, the device produces sounds in response to a number of events, such as warnings, appointments,
and key presses. To optimize battery life, turn off unnecessary sounds. See Sounds & Notifications on page
2-22.
When batteries are low, a battery icon appears in the status bar.
Page 79

Regional Settings
Use regional settings to change the way the device displays dates, times, currency amounts, large numbers, and
numbers with decimal fractions. Also choose the metric or U.S. system of measurement.
Choose from a large number of input locales. When switching to another input locale, some programs offer special
features, such as font characters or spell checkers designed for different languages.
1. Ta p Start > Settings > System tab > Regional Settings icon > Region tab.
Windows Mobile 6 Settings 2 - 49
Figure 2-68
2. From the drop-down list, select the country.
3. Tap the Number tab.
Figure 2-69
4. Select the desired options. The characteristics available depend on the region selected on the Region tab.
5. Tap the Currency tab.
Regional Settings Window - Region Tab
Regional Settings Window - Number Tab
Page 80

2 - 50 Microsoft Applications for Windows Mobile® 6 User Guide
Figure 2-70
6. Select the desired options. The characteristics available depend on the region selected on the Region tab.
7. Tap the Time tab.
Figure 2-71
8. Select the desired options. The characteristics available depend on the region selected on the Region tab.
9. Tap the Date tab.
Regional Settings Window - Currency Tab
Regional Settings Window - Time Tab
Figure 2-72
10. Select the desired options. The characteristics available depend on the region selected on the Region tab.
11. Ta p ok.
Regional Settings Window - Date Tab
Page 81

Remove Programs
Samples.C
Use the Remove Programs window to remove programs that were installed on the device.
1. Ta p Start > Settings > System tab > Remove Programs icon.
Windows Mobile 6 Settings 2 - 51
Figure 2-73
2. From the Programs in storage memory: list box, select the program to remove.
3. Ta p Remove.
4. Ta p Adjust memory allocation. to adjust the allocation of storage and program memory. See Memory on
Remove Programs Window
page 2-44.
5. Ta p ok.
Page 82

2 - 52 Microsoft Applications for Windows Mobile® 6 User Guide
Portrait Orientation
Landscape Orientation
Screen
Use the Screen window to align the screen and to enable ClearType fonts.
General
1. Ta p Start > Settings > System tab > Screen icon > General tab.
Figure 2-74
2. Select a screen orientation. Figure 2-75 provides an example of screen appearance for portrait and landscape
orientations.
Figure 2-75
3. Ta p Align Screen.
4. Tap each target with the stylus and follow the on-screen messages.
Screen Window - General Tab
Portrait and Landscape Screen Orientation
5. Ta p ok.
Clear Type
1. Ta p Start > Settings > System tab > Screen icon > ClearType tab.
Page 83

Windows Mobile 6 Settings 2 - 53
Figure 2-76
2. Select the Enable ClearType check box to enable easier reading of text in programs that support ClearType.
3. Ta p ok.
Screen Window - ClearType Tab
Text Size
1. Ta p Start > Settings > System tab > Screen icon > Text Size tab.
Figure 2-77
Screen Window - Text Size Tab
2. Use the slider to set the size of displayed text.
3. Ta p ok.
Page 84

2 - 54 Microsoft Applications for Windows Mobile® 6 User Guide
ZEBRAMC75
System Info
Use System Info to view device information such as operating system and software versions, and display, memory,
and configuration information.
System
The System tab displays the versions of the operating system, applications, and partitions running on the device.
Ta p Start > Settings > System tab > System Info icon > System tab.
Figure 2-78
System Info - System Tab
Hardware Version
The HW Version tab displays information for the device’s hardware.
Ta p Start > Settings > System tab > System Info icon > HW Version tab.
Figure 2-79
System Info - HW Version Tab
Display
The Display tab displays information for the device’s screen.
Ta p Start > Settings > System tab > System Info icon > Display tab.
Page 85

Windows Mobile 6 Settings 2 - 55
Figure 2-80
System Info - Display Tab
Miscellaneous
The Misc tab displays the size and speed for various device components.
Ta p Start > Settings > System tab > System Info icon > Misc tab.
Figure 2-81
System Info - Misc Tab
Package
The Package tab displays information on the packages loaded on the device.
Ta p Start > Settings > System tab > System Info icon > Package tab.
Figure 2-82
System Info - Package Tab
Page 86

2 - 56 Microsoft Applications for Windows Mobile® 6 User Guide
ConfigInfo
The ConfigInfo tab displays information on how device components are configured.
Ta p Start > Settings > System tab > System Info icon > ConfigInfo tab.
Figure 2-83
System Info - ConfigInfo Tab
Page 87

Task Manager
NOTE Task Manager is not available on Windows Mobile 6.0 devices. Manage tasks using the Memory
Use Task Manager to view runnings applications and processes, switch between applications and stop running
applications.
1. Ta p Start > Programs > Task Manager icon.
Windows Mobile 6 Settings 2 - 57
application. See Memory on page 2-44 for more information.
Figure 2-84
The window displays a list of running applications or running process with the amount of memory allocated and the
percent of CPU time used.
•
•
•
•
Task Manager - Active Applications
To stop a running application, select the application from the list and tap End Task.
To stop all running applications, tap Menu > End All Tasks.
To switch to an application, select the application and tap Menu > Switch To.
To view running processes, tap Menu > View > Processes.
Page 88

2 - 58 Microsoft Applications for Windows Mobile® 6 User Guide
Windows Update
Use Windows Update to keep the operating system up to date. Check with your system administrator to see if it is
supported.
Figure 2-85
Windows Update screen
Page 89

Beams
By default, devices receive all incoming InfraRed (IR) and Bluetooth beams, and prompt for acceptance. Clear the
Receive all incoming beams check box to prevent the device from detecting or receiving beams.
To reject incoming beams:
1. Ta p Start > Settings > Connections tab > Beam icon.
Windows Mobile 6 Settings 2 - 59
NOTE Not all Zebra devices use InfraRed technology.
Figure 2-86
2. Tap the Receive all incoming beams check box to clear the box.
3. Ta p ok.
To receive beams from devices with older operating systems, tap Receive an infrared beam.
Beam Window
NOTE Ensure the Receive all incoming beams check box is checked to receive all incoming beams.
Page 90

2 - 60 Microsoft Applications for Windows Mobile® 6 User Guide
Connections
Use the Connections window to sets up multiple network connections to Internet Service Providers (ISPs),
network, or a VPN connection via an external modem.
Ta p Start > Settings > Connections tab > Connections icon.
Figure 2-87
Refer to the Zebra device’s Integrator Guide or the modem manufacturer’s documentation for availability of
connection options and connection instructions.
Connections Window - Tasks Tab
Task Tab
Use the Tas k tab to configure and manage network settings when using a modem. Select an item in this list and
then complete the setup screens that follow with the appropriate information for your network.
My ISP
These items enable you to add and manage modem connections to an ISP. To complete the setup screens, obtain
the following information from your ISP:
•
ISP dial-up access telephone number
•
Username
•
Password
•
TCP/IP settings.
My Work Network
These links enable you to establish the following connections types:
•
Modem
•
Virtual Private Network (VPN)
•
Proxy server connection
To complete the setup windows, obtain the network parameters from your system administrator.
Modify an Existing Connection
Page 91

Windows Mobile 6 Settings 2 - 61
Manage Existing Connections appears on the Connections tab after at least one network connection has been
established.
Tap Manage Existing Connections on the Tasks tab and follow the setup screens.
You will usually be walked through the same setup screens used to establish the connection.
Advanced Tab
Use the Advanced tab to select the default network, dialing rules, and IP address exceptions for modem
connections.
Figure 2-88
Connections Window - Advanced Tab
Page 92

2 - 62 Microsoft Applications for Windows Mobile® 6 User Guide
Domain Enroll
Domain Enroll is used with the Microsoft System Center Mobile Device Manager (MDM) 2008 to manage mobile
devices on a company network.
Figure 2-89
Domain Enroll Window
Page 93

USB to PC
Use USB to PC to change the type of USB connection your devices uses when having problems connecting to
ActiveSync.
Windows Mobile 6 Settings 2 - 63
Figure 2-90
Select the Enable advanced network functionality check box to enable the advanced network functionality.
USB to PC Window
Page 94

2 - 64 Microsoft Applications for Windows Mobile® 6 User Guide
JEDIWiFiDriver
Wi-Fi
To configure the device for a network connection:
1. Ta p Start > Settings > Connections tab > Wi-Fi icon. The Configure Network Adapters window appears.
Figure 2-91
2. In the My network card connects to: drop-down list, select the appropriate connection.
3. In the Tap an adapter to modify settings: list, select the adapter to modify.
Figure 2-92
4. In the IP address window, select the appropriate radio button:
•
Configure Network Adapters Window
IP Address Tab
Use server-assigned IP address
or
•
Use specific IP address. Enter the IP address, Subnet mask, and Default gateway, as needed.
5. Tap the Name Servers tab.
Page 95

Windows Mobile 6 Settings 2 - 65
Figure 2-93
6. Enter the appropriate DNS, Alt DNS, WINS, and Alt WINS server addresses.
7. Ta p ok.
8. Ta p ok to exit.
Name Servers Tab
Page 96

2 - 66 Microsoft Applications for Windows Mobile® 6 User Guide
Wireless Manager
Windows Mobile 6 devices include Wireless Manager, which provides a simple method of enabling, disabling, and
configuring all the device’s wireless capabilities in one place.
To open
Figure 2-94
To enable or disable a wireless connection, tap the specific button.
To enable or disable all wireless connections, tap the
Wireless Manager, tap the Connectivity icon or tap Wireless Manager on the Today screen.
NOTE Wireless connection options vary depending upon configurations.
Wireless Manager Window
All button.
To configure settings for a connection, tap
Figure 2-95
Wireless Manager Menu
Menu.
Page 97

Chapter 3 Mobile 6 Applications
Introduction
This chapter describes the following Microsoft applications:
•
Calendar
•
Contacts
•
Tasks
•
Notes
•
Messaging
•
Windows Media
•
Pictures & Videos
•
Internet Explorer
•
Windows Live
•
Internet Sharing.
Page 98

3 - 2 Microsoft Applications for Windows Mobile® 6 User Guide
Tap to go to today
Tap to display or edit
appointment details
Tap to go forward or back a week
Tap to view appointments
in different time units
Calendar
Use Calendar to schedule appointments such as meetings. View appointments in different ways (Agenda, Day,
Week, Month, and Year) and easily change views by tapping the time unit in the command bar.
Figure 3-1
Check appointments in different views by tapping the time units described in Table 3-1 in the command bar.
Table 3-1
Agenda Upcoming appointments appear in bold, past appointments do not.
Day View the day’s schedule in 30-minute blocks.
Week View the week’s schedule in one-hour blocks.
Month View the month’s schedule in 12-hour blocks.
Year View a year calendar.
Calendar Window
Appointment Views
View Description
Creating Appointments
To create an appointment:
1. Ta p Start > Calendar.
2. Ta p Menu > New Appointment. When necessary, hide the input panel or use the scroll bar to see all available
fields.
Page 99

Mobile 6 Applications 3 - 3
Figure 3-2
3. Tap in t he Subject: text box and use the input panel to enter a subject, or tap the arrow next to the Subject:
Entering an Appointment
text box to select pre-defined text.
4. Tap in t he Location: text box and use the input panel to enter a location, or tap the arrow next to the Location:
text box to select a pre-defined location.
5. Tap the date in the Starts: and Ends: fields to select new dates from a pop-up calendar. Tap the time in these
fields to enter a time, or tap the arrow next to the time to select a time.
6. Tap the All Day: drop-down list to select whether the appointment lasts all day.
7. If the appointment occurs more than once, tap the Occurs: field and select an option from the drop-down list,
or select Edit pattern... in the drop-down list to create a new pattern option.
8. In the Reminder: field, select Remind me to receive a reminder notification for the appointment according to
the options set in Start > Settings > Personal tab > Sounds & Notifications. Tap the number field below
Remind me to select the length of time before the appointment to be reminded. Tap the time unit field next to
the number field to select minutes, hours, days, or weeks.
9. To assign the appointment to a category, tap Categories.
Figure 3-3
10. To select one or more categories for the appointment, select their check boxes. This allows displaying
Calendar Categories
appointments by category in the appointment list.
11. Select New to add a category.
Page 100

3 - 4 Microsoft Applications for Windows Mobile® 6 User Guide
Figure 3-4
12. Enter the name for the category in the text box, and tap ok.
13. Ta p ok.
14. Tap in t he Attendees: field to select attendees from the contacts list.
15. Tap the Status: drop-down list to select how the appointment appears to others.
16. Tap the Sensitivity: drop-down list and select Private to mark the appointment as private.
17. To add notes, such as maps and directions, tap the Notes tab. Enter text, draw, or create a recording. For more
Calendar Categories - New Category Window
information on creating notes, see Notes on page 3-15.
18. When finished, tap ok to save the appointment and return to the Calendar.
Editing an Appointment
To make changes to an appointment:
1. Ta p Start > Calendar.
2. Tap the appointment in the list to open it.
3. Ta p Edit and make the changes. See Creating Appointments on page 3-2.
4. Ta p ok.
Deleting an Appointment
To delete an appointment:
1. Ta p Start > Calendar.
2. Tap and hold the appointment in the list and select Delete Appointment from the pop-up menu, or select the
appointment and tap Tools > Delete Appointment.
Beaming Appointments
To beam an appointment to another device:
1. Ta p Start > Calendar.
2. Align the infrared ports on the devices.
3. Tap and hold the appointment, and select Beam Appointment.
 Loading...