

Page 1
DS2208-HC & DS2778-HC
MN-003641-01
Digital Scanner
Product Reference Guide
Supplement
Page 2

Page 3

DS2200-HC & DS2278-HC DIGITAL SCANNER
PRODUCT REFERENCE GUIDE
SUPPLEMENT
MN-003641-01
Revision A
August 2019
Page 4

ii DS2208-HC & DS2278-HC Digital Scanner Product Reference Guide
No part of this publication may be reproduced or used in any form, or by any electrical or mechanical means,
without permission in writing from Zebra. This includes electronic or mechanical means, such as photocopying,
recording, or information storage and retrieval systems. The material in this manual is subject to change
without notice.
The software is provided strictly on an “as is” basis. All software, including firmware, furnished to the user is on
a licensed basis. Zebra grants to the user a non-transferable and non-exclusive license to use each software
or firmware program delivered hereunder (licensed program). Except as noted below, such license may not be
assigned, sublicensed, or otherwise transferred by the user without prior written consent of Zebra. No right to
copy a licensed program in whole or in part is granted, except as permitted under copyright law. The user shall
not modify, merge, or incorporate any form or portion of a licensed program with other program material, create
a derivative work from a licensed program, or use a licensed program in a network without written permission
from Zebra. The user agrees to maintain Zebra’s copyright notice on the licensed programs delivered
hereunder, and to include the same on any authorized copies it makes, in whole or in part. The user agrees not
to decompile, disassemble, decode, or reverse engineer any licensed program delivered to the user or any
portion thereof.
Zebra reserves the right to make changes to any product to improve reliability, function, or design.
Zebra does not assume any product liability arising out of, or in connection with, the application or use of any
product, circuit, or application described herein. No license is granted, either expressly or by implication,
estoppel, or otherwise under any patent right or patent, covering or relating to any combination, system,
apparatus, machine, material, method, or process in which Zebra products might be used. An implied license
exists only for equipment, circuits, and subsystems contained in Zebra products.
Warranty
For the complete hardware product warranty statement, go to: http://www.zebra.com/warranty.
Revision History
Changes to the original guide are listed below:
Change Date Description
-01 Rev. A 8/2019 Initial Release
Page 5

TABLE OF CONTENTS
Warranty ............................................................................................................................................ ii
Revision History ................................................................................................................................. ii
About This Guide
Introduction ........................................................................................................................................ v
Configurations.................................................................................................................................... v
Related Product Line Configurations ................................................................................................ vi
Cables ......................................................................................................................................... vi
Chapter Descriptions ........................................................................................................................ vi
Notational Conventions..................................................................................................................... vi
Related Documents .......................................................................................................................... vii
Service Information ........................................................................................................................... vii
Provide Documentation Feedback................................................................................................... viii
Chapter 1: Getting Started
Introduction .................................................................................................................................... 1-1
Interfaces ....................................................................................................................................... 1-2
Unpacking ...................................................................................................................................... 1-2
Setting Up the DS2208-HC ............................................................................................................ 1-3
Installing the Interface Cable .................................................................................................... 1-3
Removing the Interface Cable .................................................................................................. 1-4
Connecting Power (if required) ................................................................................................ 1-4
Configuring the Digital Scanner ............................................................................................... 1-4
Accessories .................................................................................................................................... 1-4
Setting up the DS2278-HC ............................................................................................................ 1-5
Cradle Features ............................................................................................................................. 1-5
Using a DC Power Supply ........................................................................................................ 1-6
Charging the DS2278-HC Battery .................................................................................................. 1-6
Charging Using the Cradle ....................................................................................................... 1-6
Presentation Cradle ................................................................................................................. 1-7
Connecting the Cradle ............................................................................................................. 1-7
Changing the Host Interface .................................................................................................... 1-7
Charging Using the Micro USB Cable ...................................................................................... 1-8
Shutting Off the Digital Scanner Battery ........................................................................................ 1-9
Page 6

iv DS2208-HC & DS2278-HC Digital Scanner Product Reference Guide
Inserting the Battery ....................................................................................................................... 1-9
Removing the Battery .................................................................................................................. 1-10
Inserting the DS2778-HC in the Cradle ....................................................................................... 1-11
Sending Data to the Host Computer ............................................................................................ 1-11
Pairing .................................................................................................................................... 1-11
Lost Connection to Host ......................................................................................................... 1-12
Accessories .................................................................................................................................. 1-12
Chapter 2: Maintenance & Technical Specifications
Introduction .................................................................................................................................... 2-1
Maintenance .................................................................................................................................. 2-1
Known Harmful Ingredients ...................................................................................................... 2-1
Approved Cleaners .................................................................................................................. 2-2
Cleaning the Digital Scanner .................................................................................................... 2-2
Technical Specifications ................................................................................................................ 2-3
Chapter 3: User Preferences & Miscellaneous Options
Introduction .................................................................................................................................... 3-1
Setting Parameters ....................................................................................................................... 3-1
Scanning Sequence Examples ................................................................................................ 3-2
Errors While Scanning ............................................................................................................. 3-2
User Preferences/Miscellaneous Options Parameter Defaults ...................................................... 3-2
User Preferences ........................................................................................................................... 3-3
Default Parameters .................................................................................................................. 3-3
Do Not Disturb Mode (Direct Decode Indicator) ............................................................................ 3-4
Chapter 4: Symbologies
Introduction .................................................................................................................................... 4-1
Setting Parameters ....................................................................................................................... 4-1
Scanning Sequence Examples ................................................................................................ 4-2
Errors While Scanning ............................................................................................................. 4-2
Symbology Parameter Defaults ..................................................................................................... 4-2
Enable/Disable All Code Types ..................................................................................................... 4-3
ISBT Concatenation ................................................................................................................. 4-4
Code 128 Security Level .......................................................................................................... 4-5
Code 128 Security Level (continued) ....................................................................................... 4-6
Composite ...................................................................................................................................... 4-7
Composite CC-C ...................................................................................................................... 4-7
Composite CC-A/B ................................................................................................................... 4-7
Index
Page 7

ABOUT THIS GUIDE
Introduction
IMPORTANT Refer to the DS2208 Digital Scanner Product Reference Guide, p/n MN-002874-xx and the
DS2278 Digital Scanner Product Reference Guide, p/n MN-002974-xx, for all interface setups,
LED and beeper indications, standard programming barcodes, and miscellaneous features.
The DS2208-HC and DS2278-HC Product Reference Guide Supplement provides general instructions for setting
up, operating, and maintaining the DS2200 for Healthcare Series of digital scanners.
Configurations
This guide includes the DS2208-HC and DS2278-HC series digital scanner configurations listed in Table A.
Table A:
DS2208-HC0000BZZRW DS2208: Area Imager, Healthcare, Corded, HC White- LA, EMEA, APAC Only
DS2278-HC0000BZZRW DS2278: Area Imager, Healthcare, Cordedless, HC White- LA, EMEA, APAC Only
CR2278-PC1000BRW DS2278: Presentation Cradle, Bluetooth, Healthcare White - LA, EMEA, APAC Only
Digital Scanner Configurations
Model Configuration Description
Page 8

vi DS2208-HC & DS2278-HC Digital Scanner Product Reference Guide
Related Product Line Configurations
The product configurations related to the DS2208-HC and DS2278-HC digital scanners are as follows.
NOTES Check Solution Builder for additional information regarding all available accessories, and the latest
available configurations.
Table B:
22-71043-0BR Gooseneck Intellistand. Weighted - DS2208, DS4308, DS8108, HC White
20-71043-0BR Gooseneck Intellistand - DS2208, DS4308, DS8108, HC White
Accessories for the Digital Scanner
Product ID Description
Cables
The full list of supported cables can be found at:
https://partnerportal.zebra.com/PartnerPortal/product_services/downloads_z/barcode_scanners/Universal-CableGuide-Bar-Code-Scanners.xlsx.
Chapter Descriptions
Topics covered in this guide are as follows:
•
Chapter 1, Getting Started provides a product overview, unpacking instructions, and cable connection
information.
•
Chapter 2, Maintenance & Technical Specifications provides suggested digital scanner maintenance and
technical specifications.
•
Chapter 3, User Preferences & Miscellaneous Options describes each user preference feature and provides
programming bar codes for selecting these features.
•
Chapter 4, Symbologies describes all symbology features and provides programming bar codes for selecting
these features for the digital scanner.
Notational Conventions
The following conventions are used in this document:
•
Unless stated otherwise, DS2200 refers to both corded and cordless versions of the digital scanner.
•
Italics are used to highlight the following:
• Chapters and sections in this and related documents
• Dialog box, window and screen names
• Drop-down list and list box names
• Check box and radio button names
Page 9

About This Guide vii
*Baud Rate 9600
Feature/Option
* Indicates Default
•
Bold text is used to highlight the following:
• Key names on a keypad
• Button names on a screen.
•
bullets (•) indicate:
• Action items
• Lists of alternatives
• Lists of required steps that are not necessarily sequential
•
Sequential lists (e.g., those that describe step-by-step procedures) appear as numbered lists.
•
Throughout the programming bar code menus, asterisks (*) are used to denote default parameter settings.
Related Documents
•
DS2208 Series Quick Start Guide, p/n MN-002873-xx - provides general information for getting started with
the DS2208 digital scanner, and includes basic set up and operation instructions.
•
DS2278 Series Quick Start Guide, p/n MN-002916-xx - provides general information for getting started with
the DS2278 digital scanner, and includes basic set up and operation instructions.
•
Advanced Data Formatting Programmer Guide, p/n 72E-69680-xx - provides information on ADF, a means of
customizing data before transmission to a host.
•
Attribute Data Dictionary, p/n 72E-149786-xx defines attribute numbers (device configuration parameters,
monitored data, and born-on information) and describes management of various attribute domains for bar
code scanners and OEM engines.
For the latest version of this guide and all guides, go to: www.zebra.com/support
Service Information
If you have a problem using the equipment, contact your facility's technical or systems support. If there is a
problem with the equipment, they will contact the Zebra Support & Downloads website at: www.zebra.com/support
When contacting support, please have the following information available:
•
Serial number of the unit
.
.
•
•
Zebra responds to calls by e-mail, telephone or fax within the time limits set forth in service agreements.
If your problem cannot be solved by support, you may need to return your equipment for servicing and will be given
specific directions. Zebra is not responsible for any damages incurred during shipment if the approved shipping
container is not used. Shipping the units improperly can possibly void the warranty.
Model number or product name
Software type and version number
Page 10

viii DS2208-HC & DS2278-HC Digital Scanner Product Reference Guide
If you purchased your business product from a Zebra business partner, please contact that business partner for
support.
Provide Documentation Feedback
If you have comments, questions, or suggestions about this guide, send an email to EVM-Techdocs@zebra.com.
Page 11
CHAPTER 1 GETTING STARTED
Introduction
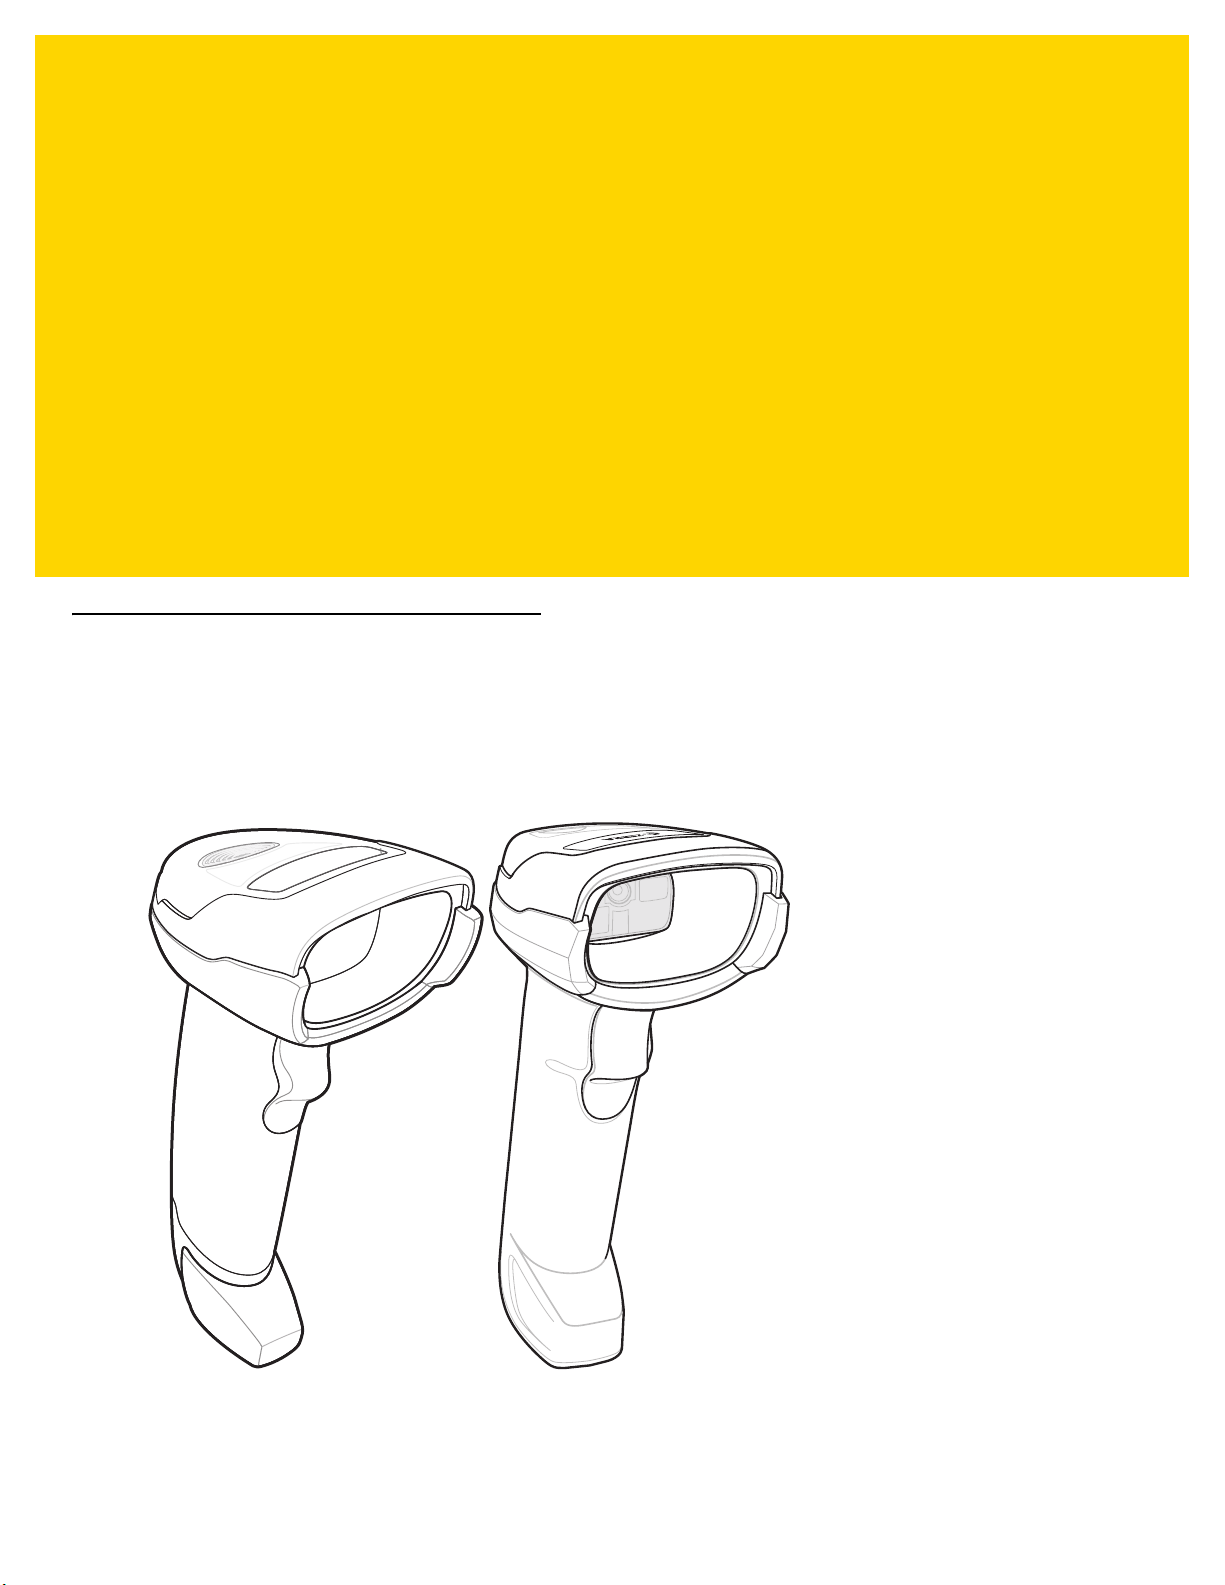
Zebra’s DS2200 Series for Healthcare is purpose-built to enhance patient care, clinician productivity and
point-of-care operations. Unlike general purpose scanners, its disinfectant-ready housing withstands regular
sanitizing. Additionally, Zebra’s PRZM software decode algorithms capture challenging barcodes for first-time,
every-time scanning to meet your healthcare needs at the patient bedside, pharmacy, and admitting.
Figure 1-1 DS2208-HC (Left) & DS2278-HC (Right) Digital Scanners
Page 12

1 - 2 DS2208-HC Digital Scanner Product Reference Guide
Interfaces
The DS2208-HC and DS2278-HC digital scanners support:
• USB connection to a host. The digital scanner automatically detects the USB host interface type and uses
the default setting (USB Keyboard HID). If the default (*) does not meet your requirements, select another
USB interface type by scanning programming bar code menus.
• Standard RS-232 connection to a host. The digital scanner automatically detects the RS-232 host interface
type and uses the default setting (Standard RS-232). If the default (*) does not meet your requirements,
select another RS-232 interface type by scanning programming bar code menus.
• Connection to IBM 468X/469X hosts. The digital scanner automatically detects the IBM host interface type
but does not select a default setting. Scan bar code menus to set up communication of the digital scanner
with the IBM terminal.
• Keyboard Wedge connection to a host. The host interprets scanned data as keystrokes. The digital scanner
automatically detects the Keyboard Wedge host interface type and uses the default setting (IBM AT
Notebook).
• Configuration via 123Scan.
Unpacking
Remove the digital scanner from its packing and inspect it for damage. If the scanner was damaged in transit,
contact support. See page vii for information. KEEP THE PACKING. It is the approved shipping container; use this
to return the equipment for servicing.
Page 13

Setting Up the DS2208-HC
Interface cable
modular connector
To h o st
Cable interface port
Interface cable modular
connector clip
Installing the Interface Cable
1. Insert the interface cable modular connector into the interface cable port on the rear of the digital scanner until
you hear a click.
Getting Started 1 - 3
Figure 1-2 Installing the Cable - DS2208
IMPORTANT Insert the cable into the cable interface port until a click sounds.
2. Gently tug the cable to ensure the connector is secure.
3. Connect the other end of the interface cable to the host (see the specific host chapter for information on host
If you already have existing non shielded cables from legacy products (such as the LS2208) they
can be reused. However, be aware that the shielded cables provide improved ESD performance.
For regional information about cables and cable compatibility, go to the Zebra Partner Portal at:
https://partnerportal.zebra.com/PartnerPortal/product_services/downloads_z/barcode_scanners/
Universal-Cable-Guide-Bar-Code-Scanners.xlsx.
-HC
connections).
Page 14

1 - 4 DS2208-HC Digital Scanner Product Reference Guide
Removing the Interface Cable
1. Press the cable’s modular connector clip through the access slot in the digital scanner’s base.
Figure 1-3 Removing the Cable
2. Carefully slide out the cable.
3. Follow the steps for Installing the Interface Cable to connect a new cable.
Connecting Power (if required)
If the host does not provide power to the digital scanner, connect an external power supply.
1. Plug the power supply into the power jack on the interface cable.
2. Plug the other end of the power supply into an AC outlet.
Configuring the Digital Scanner
To configure the digital scanner use the bar codes included in this manual, or use the 123Scan2 configuration
program. See Chapter 3, User Preferences & Miscellaneous Options, and Chapter 4, Symbologies for information
about programming the digital scanner using bar code menus.
Accessories
The digital scanner ships with the DS2208 Quick Start Guide. The following required accessories must be ordered:
• Interface cable for the appropriate interface. For example, a shielded connector cable when connecting via
USB. For regional information about cables and cable compatibility, go to the Zebra Partner Portal at:
https://partnerportal.zebra.com/PartnerPortal/product_services/downloads_z/barcode_scanners/Universal-C
able-Guide-Bar-Code-Scanners.xlsx.
IMPORTANT If you already have existing non shielded cables from legacy products (such as the LS2208) they
can be reused. However, be aware that the shielded cables provide improved ESD performance.
• Universal power supply, if the interface requires this.
• Gooseneck Intellistand for hands-free operation of the DS2208-HC.
For additional items, contact a local Zebra representative or business partner.
Page 15
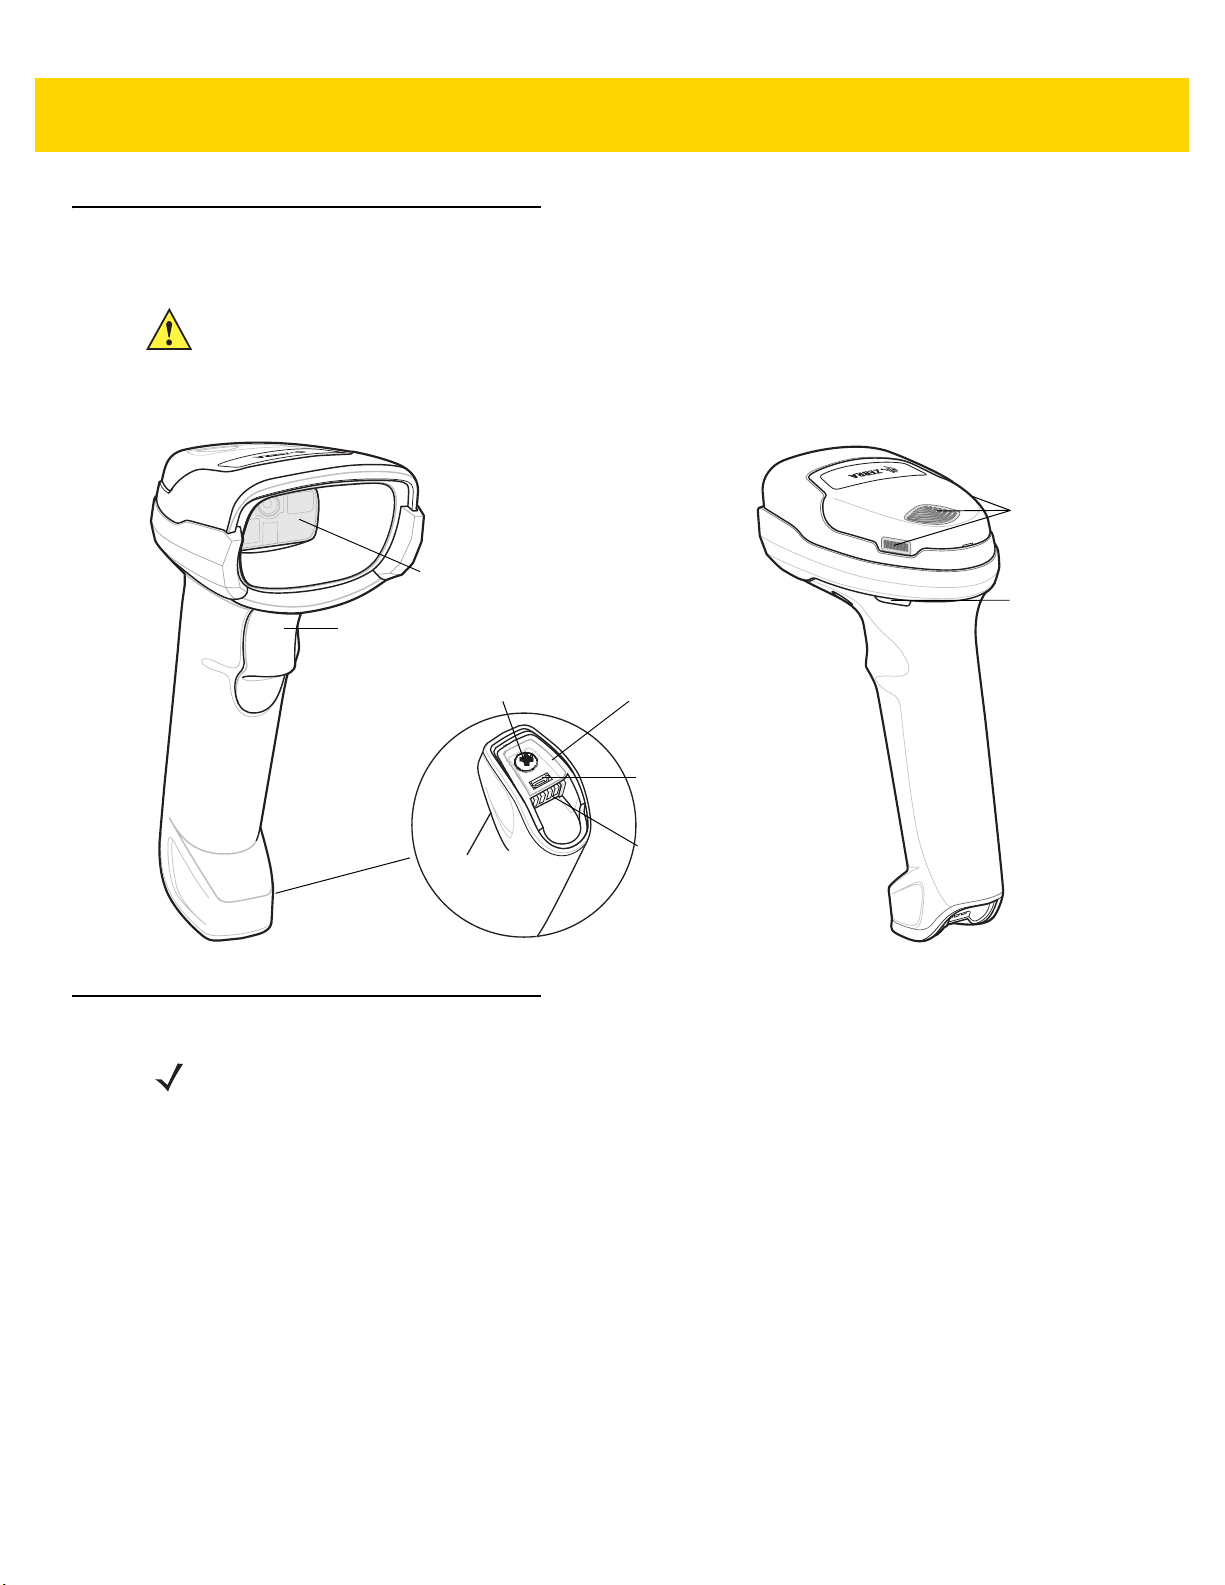
Setting up the DS2278-HC
Beeper
Scan LEDs
Trigger
Scan Window
Battery
Compartment
Screw
Charging
Contacts
Battery
Compartment
Cover
Micro USB
Port
IMPORTANT DO NOT use the CR2278-PC cradle with any scanners other than the DS2278-HC digital
scanner. No other cradles are compatible with the DS2278-HC.
DO NOT use the DS2278-HC digital scanner with any cradles other than the CR2278-PC cradle.
No other scanners are compatible with the CR2278-PC cradle.
Getting Started 1 - 5
Figure 1-4 Digital Scanner Features
Cradle Features
NOTE For detailed information about connecting, using, and mounting the CR2278-PC cradle refer to the
documentation included with the cradle (CR2278-PC Presentation Cradle Quick Reference
Guide, p/n MN-002917xx).
The CR2278-PC cordless presentation cradle serves as a charger, radio communication interface, and host
communication interface for the DS2278-HC cordless digital scanner.
The presentation cradle sits on a desktop and charges the DS2278-HC cordless digital scanner while allowing bar
code scanning in presentation mode. This cradle also provides host communication by receiving digital scanner
data via a Bluetooth radio, and sending that data to the host through an attached cable. The cable provides power
to the cradle from the host or optional power supply if supported.
Page 16

1 - 6 DS2208-HC Digital Scanner Product Reference Guide
Using a DC Power Supply
There is no separate power jack on the cradle. The cradle can operate from host supplied power, if available. If
host power is limited or not available, an external DC power supply can be used with certain host interface cables
that support a power jack. An external power supply is recommended if fastest charging is required. See host
interface chapters for connections.
CAUTION Always disconnect the DC power supply BEFORE disconnecting the cable to the host end or the
cradle may not recognize the new host.
Charging the DS2278-HC Battery
When using a new battery in the DS2278-HC, the battery may require a charge to be enabled.
NOTES 1. It is recommended to fully charge the battery before first use.
2. Charge time depends on the host type and power source.
3. The CR2278-PC passes 5V to the digital scanner which charges the battery. The charging system on
the DS2278-HC charges the battery with as much current as possible based on the power source of
the CR2278-PC. This way the input power source is never overloaded and the charge time is made
as short as possible. Charge times lengthen as scanning activity increases when a DS2278-HC
operates in presentation mode on a CR2278-PC cradle. To optimize charge performance, ensure the
digital scanner is oriented to minimize accidental scan activation.
CAUTION The battery does not charge when the temperature is above 40°C (104°F). When scanning in
presentation mode at temperatures above 40°C (104°F), the battery drains until the temperature drops.
When the battery charge is consumed the digital scanner stops scanning until the temperature drops
and the battery has sufficient time to charge.
To avoid temperature related faults, charge the battery and operate the DS2278 in presentation mode
on a CR2278-PC only within the recommended 0°C to 40°C (32°F to 104°F) range, and ideally within
5°C to 35°C (41°F to 95°F).
Charging Using the Cradle
Insert the battery in the DS2278-HC and place the DS2278-HC in the CR2278-PC cradle (see Inserting the
DS2778-HC in the Cradle on page 1-11). The digital scanner boots and the cradle LED begins flashing green to
indicate the start of normal charging.
Page 17
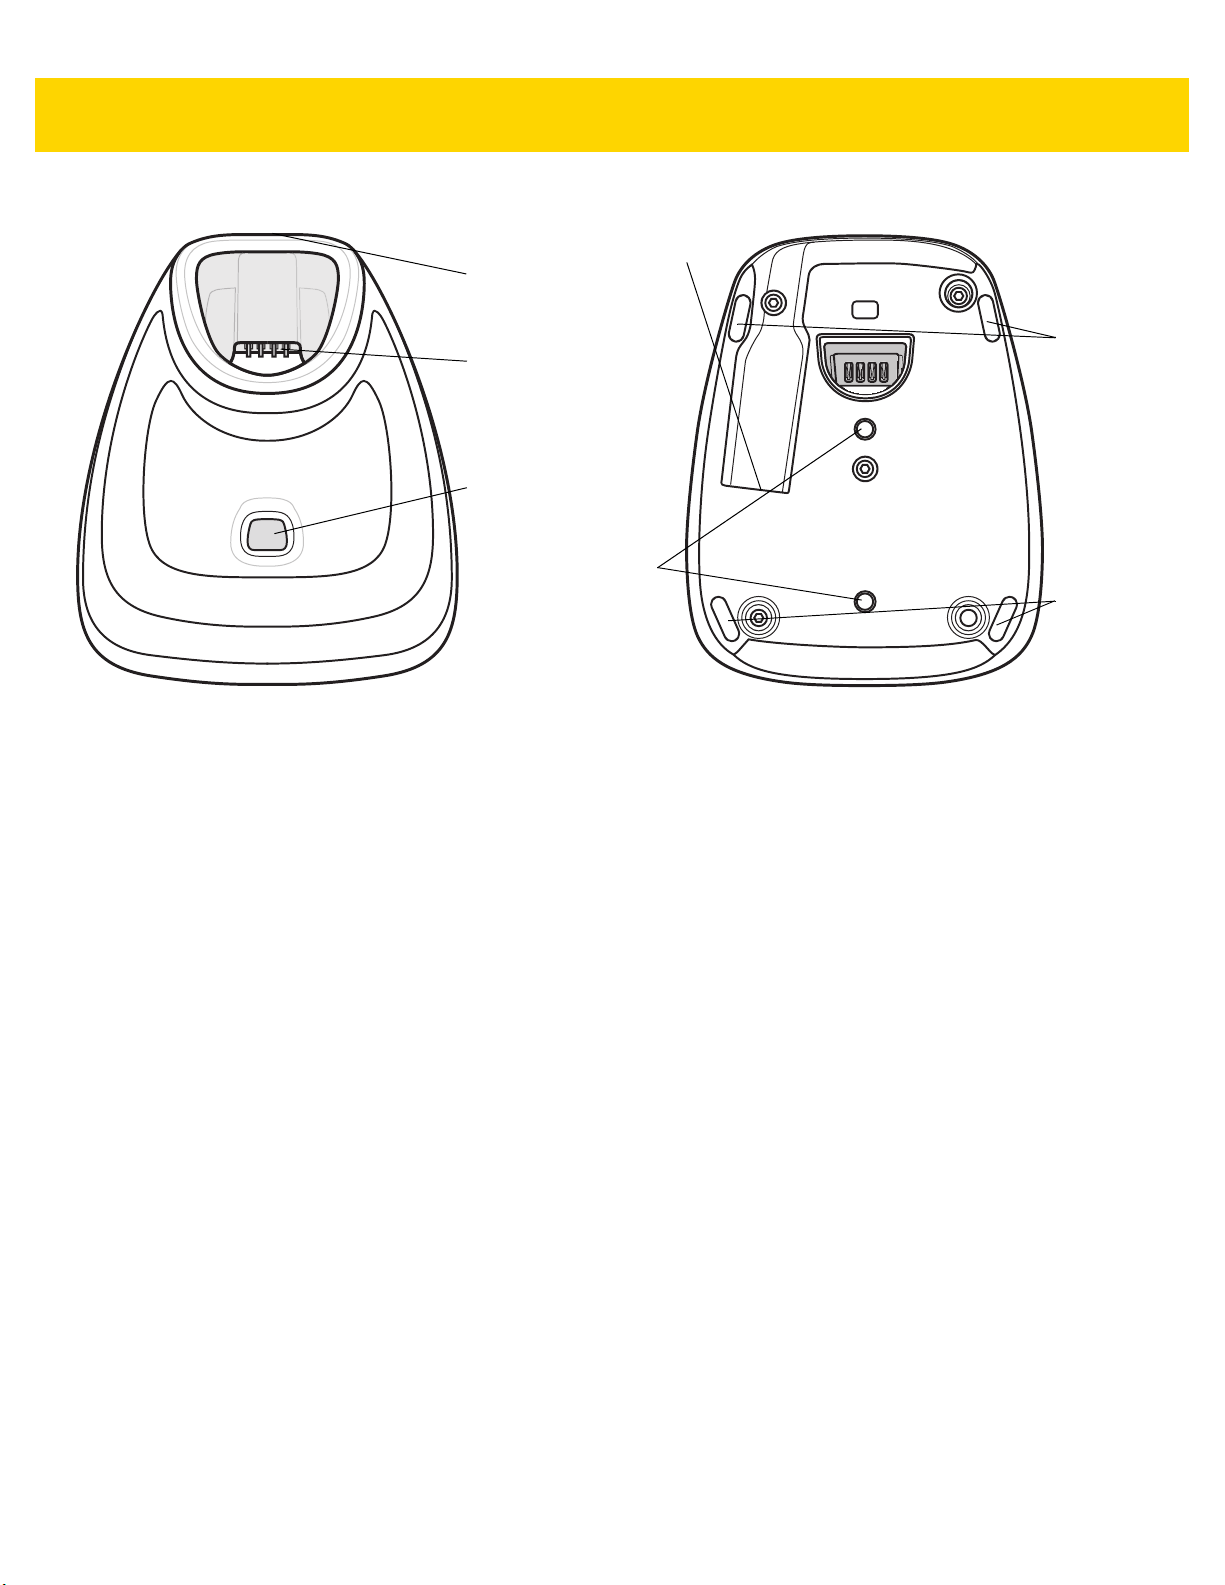
Presentation Cradle
Charging /
Communications
Contacts
Pairing Bar
Code (in back)
Rubber
Feet
Rubber
Feet
Interface Port
Station Mount
Threaded Brass
Screw Holes
(2 - M4 x 5 mm)
LED Indicator
Getting Started 1 - 7
Figure 1-5 CR2278-PC (Presentation Cradle) -Top and Bottom Views
Connecting the Cradle
Via Host Connection (for Charging and Communication)
1. Connect the appropriate cable to the power supply and an AC power source, if necessary. This ensures
detection of the host and prevents inadvertently back powering the cradle from improper detection of the host.
2. Insert the interface cable into the host port.
3. Insert the interface cable into the cradle's host port.
4. Pair the digital scanner to the cradle either by inserting it in the cradle (if Pair on Contacts is enabled) or by
scanning the pairing bar code.
5. If necessary, scan the appropriate host bar code (for non-autodetected interfaces).
Via Wall Outlet Using a Power Adapter (for Charging Only)
1. Connect the appropriate cable to the power supply and an AC power source.
2. Insert the interface cable into the cradle's host port.
3. Pair the digital scanner directly to the host device (PC, Smartphone, or Tablet).
Changing the Host Interface
To connect to a different host, or to the same host through a different cable:
1. Unplug the interface cable from the host.
2. Unplug the power supply from the host cable, if required.
3. Connect the interface cable to the new host, or the new interface cable to the existing host.
4. Reconnect the power supply, if required.
If necessary, scan the appropriate host bar code (for non-autodetected interfaces).
Page 18

1 - 8 DS2208-HC Digital Scanner Product Reference Guide
Charging Using the Micro USB Cable
The Micro USB cable is a charge only cable.
NOTE For best performance, we recommend using Zebra accessories.
Figure 1-6 Micro USB Connections
Connect the Micro USB connector to the DS2278-HC. Connect the standard USB connector to a PC or a USB wall
outlet. The digital scanner enumerates as a CDC device when the USB connector is plugged into a PC host. When
charging begins, the digital scanner LED begins flashing green to indicate the start of normal charging.
Converting a CDC Device to HID
The digital scanner enumerates over USB as a CDC device, by default. If your host does not have a CDC driver, a
delay occurs between connecting the digital scanner to the host and the start of charging. To eliminate the delay
scan HID Device Conversion below to enumerate as an HID device. This allows the scanner to begin charging
sooner.
To switch the digital scanner back to a CDC device, scan Scanner as CDC Device below.
HID Device Conversion
*Scanner as CDC Device
Page 19

Shutting Off the Digital Scanner Battery
Scan the Battery Off bar code below to shut off the battery for long term storage or shipping. Pull the digital
scanner trigger to turn on the battery.
Battery Off
NOTE Always scan the Battery Off bar code in hand-held mode.
Inserting the Battery
Getting Started 1 - 9
NOTES
It is recommended to fully charge the battery before first use.
1.
2. The battery is initially shipped inside the digital scanner. Inserting a battery would only be
applicable for a replacement battery.
Figure 1-7 Inserting the Battery
To insert the battery into the digital scanner:
1. Insert the battery into the battery compartment and push down.
Turn the screw on the battery compartment clockwise to tighten. Do not over torque the screw.
Page 20

1 - 10 DS2208-HC Digital Scanner Product Reference Guide
Removing the Battery
IMPORTANT When replacing the battery, wait at least 5 seconds after removing the old battery before
inserting the new battery.
Figure 1-8 Removing the Battery from the DS2778-HC
To remove the battery from the digital scanner:
1. Turn the screw on the battery compartment counterclockwise to remove the screw.
2. Remove the battery from the battery compartment.
3. To replace the battery, see Inserting the Battery on page 1-9.
Page 21
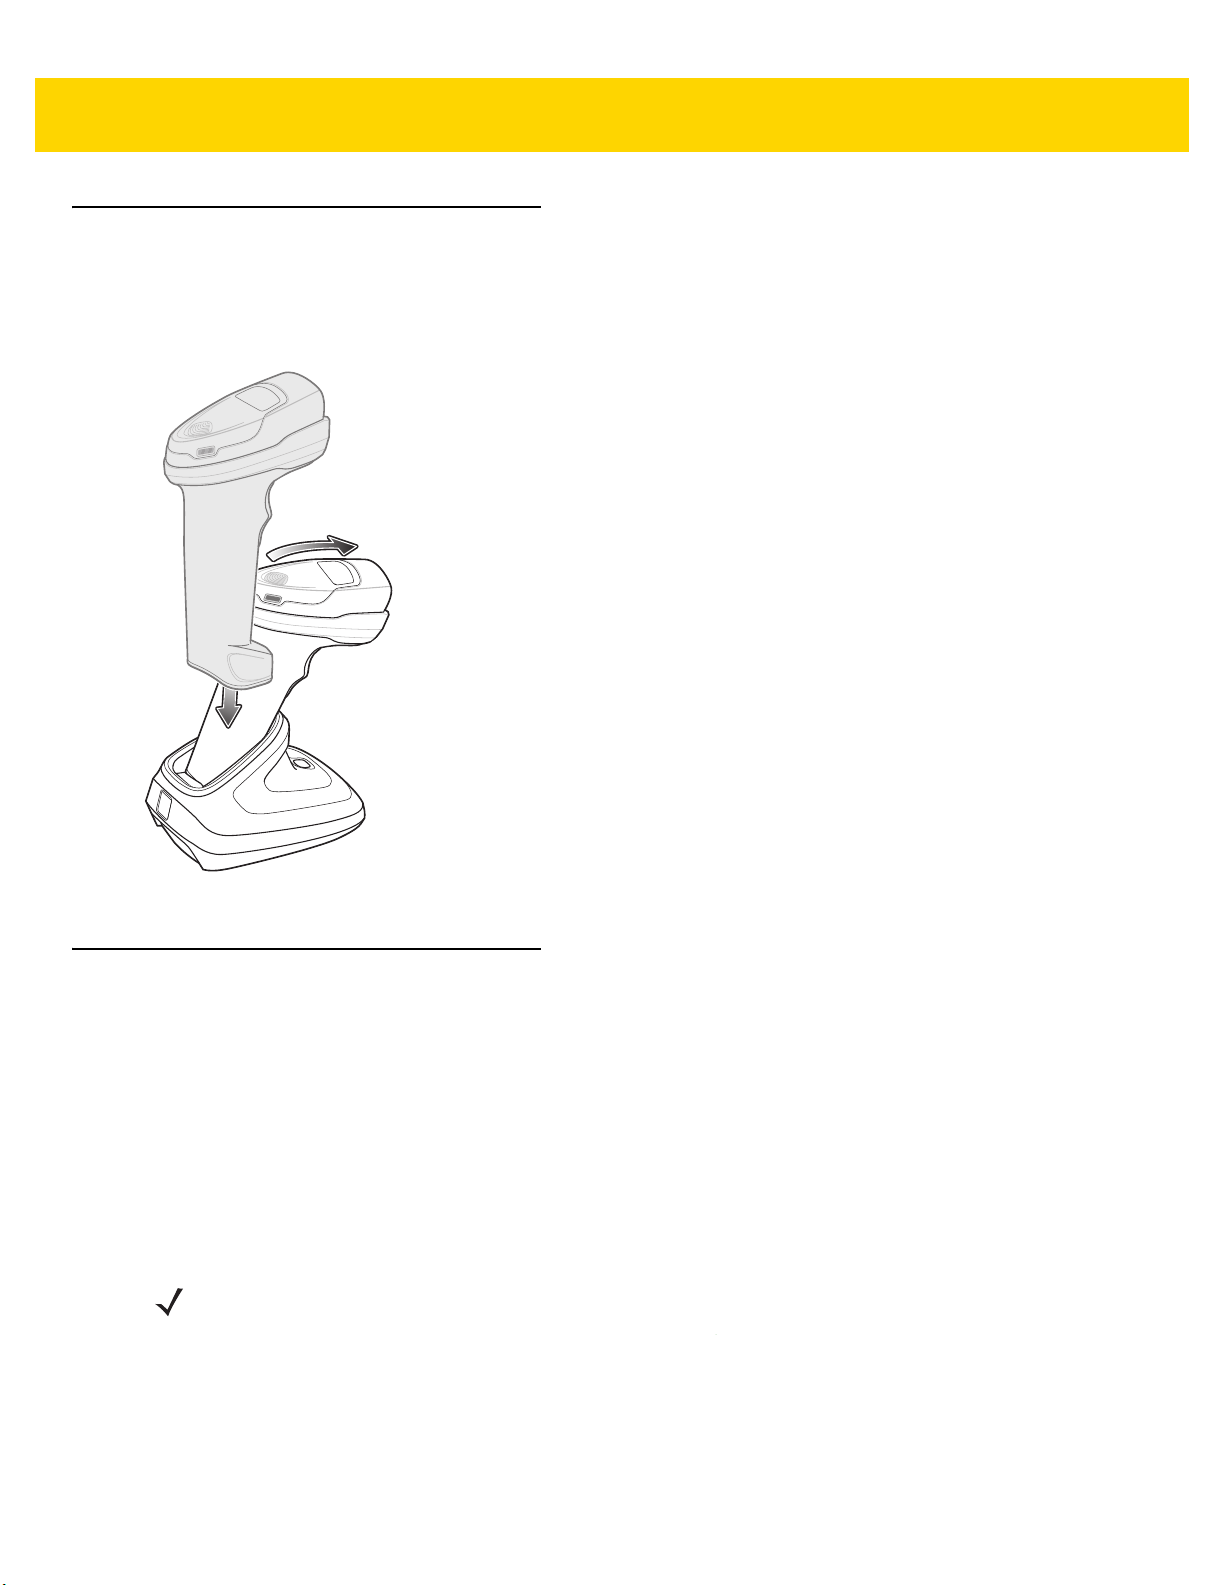
Inserting the DS2778-HC in the Cradle
To insert the digital scanner in the CR2278-PC cradle:
1. Insert the digital scanner straight down into the cradle top.
2. The digital scanner naturally rotates forward to engage the digital scanner contacts with the cradle contacts
Getting Started 1 - 11
Figure 1-9 Inserting the DS2278-HC Digital Scanner in the CR2278-PC Cradle
Sending Data to the Host Computer
The cradle receives data from the digital scanner via a wireless radio connection and transmits it to the host
computer via the host cable. The digital scanner and cradle must be paired for successful wireless communication.
Pairing
Pairing registers a digital scanner to the cradle such that the digital scanner and cradle can exchange information.
Pair the digital scanner to the cradle either by inserting it in the cradle (if pair on contacts is enabled), or by
scanning the pairing bar code.
To pair the digital scanner with the cradle, insert the digital scanner in the cradle or scan the pairing bar code.
NOTE The pairing bar code that connects the digital scanner to a cradle is unique to each cradle.
Do not scan data or parameters until pairing completes.
Page 22

1 - 12 DS2208-HC Digital Scanner Product Reference Guide
Lost Connection to Host
If scanned data does not transmit to the cradle's host, ensure that all cables are firmly inserted and the power
supply is connected to an appropriate AC outlet, if applicable. If scanned data still does not transmit to the host,
reestablish a connection with the host:
1. Disconnect the power supply from the cradle.
2. Disconnect the host interface cable from the cradle.
3. Wait three seconds.
4. Reconnect the host interface cable to the cradle.
5. Reconnect the power supply to the cradle, if the host requires.
6. Reestablish pairing with the cradle by inserting the digital scanner in the cradle or scan the pairing bar code.
Accessories
The digital scanner ships with the battery installed and the DS2278 Quick Start Guide. The following accessories
must be ordered separately:
• Cradle: Can be used for charging the digital scanner battery and host communication.
• Micro USB cable: Can be used for charging the battery in the digital scanner, without a cradle.
• Replacement battery for the DS2278-HC digital scanner, if needed.
• Interface cable for the appropriate interface.
• Power supply, if the interface requires one.
See Related Product Line Configurations on page xx for the full list of accessories. Also see Configurations on
page xix for product and cradle configurations. For additional items, contact a local Zebra representative or
business partner.
Page 23

CHAPTER 2 MAINTENANCE &
TECHNICAL
SPECIFICATIONS
Introduction
This chapter provides suggested digital scanner maintenance and technical specifications.
Maintenance
IMPORTANT Use pre-moistened wipes and do not allow liquid cleaner to pool.
Known Harmful Ingredients
The following chemicals are known to damage the plastics on Zebra scanners and should not come in contact with
the device:
• Acetone
• Ammonia solutions
• Aqueous or alcoholic alkaline solutions
• Aromatic and chlorinated hydrocarbons
• Benzene
• Carbolic acid
• Compounds of amines or ammonia
• Ethanolamine
• Ethers
• Isopropyl alcohol 70% (including wipes)
• Ketones
• TB-lysoform
• Toluene
• Trichloroethylene.
Page 24

2 - 2 DS2208-HC & DS2278-HC Digital Scanner Product Reference Guide
Approved Cleaners
• Hydrogen Peroxide
• Mild Dish Soap
• Clorox® Healthcare Bleach Germicidal Wipes
• Dispatch® with Bleach Wipes from Clorox®
• Sani-Cloth® Bleach Wipes
Cleaning the Digital Scanner
Routinely cleaning the exit window is required. A dirty window may affect scanning accuracy. Do not allow any
abrasive material to touch the window.
To clean the scanner:
1. Dampen a soft cloth with one of the approved cleaning agents listed above or use pre-moistened wipes.
2. Gently wipe all surfaces, including the front, back, sides, top and bottom. Never apply liquid directly to the
scanner. Be careful not to let liquid pool around the scanner window, trigger, cable connector or any other area
on the device.
3. Be sure to clean the trigger and in between the trigger and the housing (use a cotton-tipped applicator to reach
tight or inaccessible areas).
4. Do not spray water or other cleaning liquids directly into the exit window.
5. Wipe the scanner exit window with a lens tissue or other material suitable for cleaning optical material such as
eyeglasses.
6. Immediately dry the scanner window after cleaning with a soft non-abrasive cloth to prevent streaking.
7. Allow the unit to air dry before use.
8. Scanner connectors:
a. Dip the cotton portion of a cotton-tipped applicator in isopropyl alcohol.
b. Rub the cotton portion of the cotton-tipped applicator back-and-forth across the connector on the Zebra
scanner at least 3 times. Do not leave any cotton residue on the connector.
c. Use the cotton-tipped applicator dipped in alcohol to remove any grease and dirt near the connector area.
d. Use a dry cotton tipped applicator and rub the cotton portion of the cotton-tipped applicator back-and-forth
across the connectors at least 3 times. Do not leave any cotton residue on the connectors.
NOTE If after performing these checks the digital scanner still experiences problems, contact the distributor or
call support.
Page 25

Maintenance & Technical Specifications 2 - 3
Technical Specifications
Table 2-1 Technical Specifications
Item Description
Physical Characteristics
Dimensions Corded DS2208-HC Imager:
6.5 in. H x 2.6 in. W x 3.9 in. D
16.5 cm. H x 6.6 cm. W x 9.8 cm. D
Cordless DS2278-HC Imager:
6.9 in. H x 2.6 in. W x 3.5 in. D
17.5 cm. H x 6.6 cm. W x 9.0 cm. D
Presentation Cradle:
2.8 in. H x 3.7 in. W x 4.8 in. D
7.2 cm. H x 9.4 cm. W x 12.2 cm.
Weight Corded DS2208-HC Imager: 5.7 oz. / 161.6 g
Cordless DS2278-HC Imager: 7.5 oz. / 214 g
Presentation Cradle: 5.2 oz. / 151 g
Input Voltage Range DS2208-HC/DS2278-HC Imagers and Cradle: 4.5 to 5.5 VDC
Host Powered; 4.5 to 5.5 VDC External Power Supply
Operating Current at Nominal Voltage (5.0V) Corded DS2208-HC Imager: 250 mA (typical).
Note: Auto-Aim and Illumination on Acquiring Image
Standby Current (idle) at Nominal Voltage (5.0V) Corded DS2208-HC Imager:150 mA (typical).
Note: Auto-Aim On
Presentation Cradle and Micro USB Cable: 500 mA (typical)
BC 1.2 USB
Color Healthcare White
Supported Host Interfaces USB, RS232, Keyboard Wedge, TGCS (IBM) 46XX over
RS-485
USB Certification USB Certification
Keyboard Support Supports over 90 international keyboards
User Indicators Direct Decode Indicator, Good Decode LEDs; rear view LEDs;
beeper (adjustable tone and volume)
Performance Characteristics
Motion Tolerance (Hand-Held) Up to 5 in./13 cm. per second for 13 mil UPC
Swipe Speed (Hands-Free) Up to 30.0 in./76.2 cm. per second for 13 mil UPC
Light Source Aiming Pattern: Linear 624nm Amber LED
Illumination (2) 645nm Super-Red LEDs
Page 26

2 - 4 DS2208-HC & DS2278-HC Digital Scanner Product Reference Guide
Table 2-1 Technical Specifications (Continued)
Item Description
Imager Field of View 32.8° H x 24.8° V Nominal
Image Sensor 640 x 480 pixels
Minimum Print Contrast 15% minimum reflective difference
Skew Tolerance +/- 65°
Pitch Tolerance +/- 65°
Roll Tolerance 0° - 360°
User Environment
Operating Temperature DS2208-HC & DS2278-HC Imagers:
32.0° to 122.0° F / 0.0° to 50.0° C
Presentation Cradle:
32.0° to 104.0° F / 0.0° to 40.0° C
Storage Temperature -40.0° to 158.0° F / -40.0° to 70.0° C
Humidity 5% to 95% RH, non-condensing
Drop Specification Designed to withstand multiple drops at 5.0 ft. /1.5 m to
concrete
Tumble Specification Designed to withstand 250 tumbles in 1.5 ft./.5 m tumbler
Note: 1 tumble = 0.5 cycle.
Environmental Sealing IP52
Electrostatic Discharge (ESD) DS2208-HC/DS2278-HC Imagers and CR2278 Cradle:
ESD per EN61000-4-2, +/-15 KV Air, +/-8 KV Direct, +/-8 KV
Indirect
Ambient Light Immunity 0 to 10,000 Foot Candles / 0 to 107,600 Lux
Accessories
Gooseneck Intellistand Stand for Hands-Free use
Radio Specifications
Bluetooth Radio Standard Bluetooth Version 4.0 with BLE: Class 2 33 ft.
(10.0m), Serial Port and HID Profiles; output power adjustable
down from 2.0 dBm in 8 Steps
Battery
Battery Capacity/Battery Type 2,400 mAh Li-Ion Battery
Scans per Battery Charge 110,000 scans at 60 Scans per Minute or 50,000 scans at 10
Scans per minute
Operating Time per Full Charge 84.0 hours
Battery Charge Time (From Empty)
Standard USB 14 Hour Shift: 4 hours
Full Charge: 17 hours
Page 27

Maintenance & Technical Specifications 2 - 5
Table 2-1 Technical Specifications (Continued)
Item Description
BC1.2 USB 14 Hour Shift: 1 hour
Full Charge: 5 hours
External 5V Source 14 Hour Shift: 1 hour
Full Charge: 5 hours
Micro USB 14 Hour Shift: 1.5 hours
Full Charge: 7 hours
BC1.2 Micro USB 14 Hour Shift: 1 hour
Full Charge: 4 hours
Regulatory
Environmental RoHS EN 50581
Electrical Safety EN 60950-1 2ed + A11 + A1 + A12 + A2:2013,
IEC 60950-1 2ed + A1 + A2, UL 60950-1, CAN/CSA-C22.2
No. 60950-1-07
LED Safety IEC 62471
IT Emissions EN 55032 (Class B)
IT Immunity EN 55024
Harmonic Current Emissions EN 61000-3-2
Voltage Fluctuation and Flicker EN 61000-3-3
Radio Frequency Devices 47 CFR Part 15, Subpart B, Class B
Digital Apparatus ICES-003 Issue 6, Class B
Symbol Decode Capability
1D Code 39, Code 128, Code 93, Codabar/NW7, Code 11, MSI
Plessey, UPC/EAN, I 2 of 5, Korean 3 of 5, GS1 DataBar, Base
32 (Italian Pharma)
2D PDF417, MicroPDF417, Composite Codes, TLC-39, Data
Matrix, GS1 DataMatrix, Maxicode, QR Code, GS1 QR Code,
MicroQR, Aztec, Han Xin (Chinese Sensible)
Postal Codes US Postnet, US Planet, UK Postal, Japan Postal, Australia
Post, Royal Mail 4 State Customer, KIX Code (Dutch), UPU 4
State Postal FICS (Post US4), USPS 4 State Postal (Post
US3), Mailmark
Minimum Element Resolution
Code 39 4.0 mil
Page 28

2 - 6 DS2208-HC & DS2278-HC Digital Scanner Product Reference Guide
Table 2-1 Technical Specifications (Continued)
Item Description
Code 128 4.0 mil
Data Matrix 6.0 mil
QR Code 6.7 mil
Utilities and Management
123Scan Programs scanner parameters, upgrades firmware, provides
scanned bar code data and prints reports (see Chapter 2,
123Scan and Software Tools).
Symbol Scanner SDK Generates a fully-featured scanner application, including
documentation, drivers, test utilities and sample source code
(www.zebra.com/ScannerSDKforWindows
Scanner Management Service (SMS) Remotely manages your Zebra scanner and queries its asset
information (www.zebra.com/sms
).
)
Page 29

CHAPTER 3 USER PREFERENCES &
*Enable Parameter
(1)
Feature/option
* Indicates default
Option value
MISCELLANEOUS
OPTIONS
Introduction
You can program the scanner to perform various functions, or activate different features. This chapter describes
user preference features and provides programming bar codes for selecting these features.
The scanner ships with the settings shown in Table 3-1 on page 3-2 . If the default values suit requirements,
programming is not necessary.
Setting Parameters
To set feature values, scan a single bar code or a short bar code sequence. The settings are stored in non-volatile
memory and are preserved even when the scanner powers down.
If not using the default host, select the host type (see each host chapter for specific host information) after the
power-up beeps sound. This is only necessary upon the first power-up when connected to a new host.
To return all features to default values, see Default Parameters on page 3-3. Throughout the programming bar
code menus, asterisks indicate (
NOTE Most computer monitors allow scanning bar codes directly on the screen. When scanning from the screen,
be sure to set the document magnification to a level where you can see the bar code clearly, and bars
and/or spaces do not merge.
*) default values.
Page 30

3 - 2 DS2208-HC & DS2278-HC Digital Scanner Product Reference Guide
Scanning Sequence Examples
In most cases, scanning one bar code sets the parameter value. The scanner issues a fast warble beep and the
LED turns green, signifying a successful parameter entry.
Errors While Scanning
Unless otherwise specified, to correct an error during a scanning sequence, just re-scan the correct parameter.
User Preferences/Miscellaneous Options Parameter Defaults
Table 3-1 lists defaults for user preferences parameters. Change these values in one of two ways:
• Scan the appropriate bar codes in this chapter. The new value replaces the standard default value in
memory. To recall default parameter values, see Default Parameters on page 3-3.
Table 3-1 User Preferences Parameter Defaults
Parameter
User Preferences
Set Default Parameter N/A
Do Not Disturb Mode (Direct Decode
Indicator)
1. Parameter number decimal values are used for programming via RSM commands.
2. SSI number hex values are used for programming via SSI commands.
Parameter
Number
859 F2h 5Bh Disable
1
SSI
Number
2
Default
Page
Number
3-3
3-4
Page 31

User Preferences
Default Parameters
Scan one of the following bar codes to reset the scanner to its default settings as follows:
• Restore Defaults resets all default parameters as follows:
• If you configured custom default parameter values via the Write to Custom Defaults bar code, scanning
the Restore Defaults bar code restores these custom values.
Write to Custom Defaults
To create a set of custom defaults, select the desired parameter values in this guide, and then scan Write to
Custom Defaults.
User Preferences & Miscellaneous Options 3 - 3
Restore Defaults
Write to Custom Defaults
Set Factory Defaults
Page 32

3 - 4 DS2208-HC & DS2278-HC Digital Scanner Product Reference Guide
Do Not Disturb Mode (Direct Decode Indicator)
Parameter # 859
SSI # F2h 5Bh
This parameter is only supported in Auto Aim and Standard (Level) Trigger Mode. Scan one of the following bar
codes to select optional blinking of the illumination on a successful decode. You must continue to hold the trigger
upon decode to see the illumination blink. If you release the trigger upon decode, the blinking does not occur. If you
release the trigger upon decode, the blinking does not occur. This allows you to choose additional feedback for a
successful decode by holding the trigger, or to continue to scan as normal.
• *Disable Do Not Disturb Mode - Illumination does not blink on a successful decode.
•1 Blink - Illumination blinks once upon a successful decode.
•2 Blinks - Illumination blinks twice upon a successful decode.
*Disable Do Not Disturb Mode
(0)
2 Blinks
(2)
1 Blink
(1)
Page 33

CHAPTER 4 SYMBOLOGIES
*Enable Parameter
Feature/option* Indicates default
Introduction
You can program the scanner to perform various functions, or activate different features. This chapter describes
symbology features and provides programming bar codes for selecting these features.
Setting Parameters
To set feature values, scan a single bar code or a short bar code sequence. The settings are stored in non-volatile
memory and are preserved even when the scanner powers down.
NOTE Most computer monitors allow scanning bar codes directly on the screen. When scanning from the screen,
be sure to set the document magnification to a level where you can see the bar code clearly, and bars
and/or spaces do not merge.
If not using a USB cable, select a host type (see each host chapter for specific host information) after the power-up
beeps sound. This is only necessary upon the first power-up when connected to a new host.
To return all features to default values, see Default Parameters on page 3-3. Throughout the programming bar
code menus, asterisks (
*) indicate default values.
Page 34

4 - 2 DS2208-HC & DS2278-HC Digital Scanner Product Reference Guide
Scanning Sequence Examples
In most cases, scanning one bar code sets the parameter value. The scanner issues a fast warble beep and the
LED turns green, signifying a successful parameter entry.
Errors While Scanning
Unless otherwise specified, to correct an error during a scanning sequence, just re-scan the correct parameter.
Symbology Parameter Defaults
Table 4-1 lists defaults for all symbology parameters. Change these values in one of two ways:
• Scan the appropriate bar codes in this chapter. The new value replaces the standard default value in
memory. To recall the default parameter values, see Default Parameters on page 3-3.
Table 4-1 Symbology Parameter Defaults
Parameter
Enable/Disable All Code Types
Code 128
ISBT Concatenation 577 F1h 41h Enable 4-4
Code 128 Security Level 751 F1h EFh Security Level 2 4-5
Composite Codes
Composite CC-C 341 F0h 55h Disable 4-7
Composite CC-A/B 342 F0h 56h Disable 4-7
1. Parameter number decimal values are used for programming via RSM commands.
2. SSI number hex values are used for programming via SSI commands.
Parameter
Number
1
SSI Number
2
Default
Number
4-3
Page
Page 35

Enable/Disable All Code Types
Scan the Disable All Code Types bar code to disable all symbologies. This is useful when enabling only a few
code types.
Scan Enable All Code Types to enable all symbologies. This is useful if you need to disable only a few code
types.
Disable All Code Types
Symbologies 4 - 3
Enable All Code Types
Page 36

4 - 4 DS2208-HC & DS2278-HC Digital Scanner Product Reference Guide
ISBT Concatenation
Parameter # 577
SSI # F1h 41h
Select an option for concatenating pairs of ISBT code types:
• Enable ISBT Concatenation - There must be two ISBT codes in order for the scanner to decode and
perform concatenation. The scanner does not decode single ISBT symbols.
• Disable ISBT Concatenation - The scanner does not concatenate pairs of ISBT codes it encounters.
• Autodiscriminate ISBT Concatenation - The scanner decodes and concatenates pairs of ISBT codes
immediately.
*Enable ISBT Concatenation
(1)
Autodiscriminate ISBT Concatenation
(2)
Disable ISBT Concatenation
(0)
Page 37

Symbologies 4 - 5
Code 128 Security Level
Parameter # 751
SSI # F1h EFh
Code 128 bar codes are vulnerable to misdecodes, particularly when Code 128 Lengths is set to Any Length. The
scanner offers four levels of decode security for Code 128 bar codes. There is an inverse relationship between
security and scanner aggressiveness. Increasing the level of security can reduce scanning aggressiveness, so
select only the level of security necessary.
• Code 128 Security Level 0 - The scanner operates in its most aggressive state, while providing sufficient
security in decoding most in-spec bar codes.
• Code 128 Security Level 1 - This option eliminates most misdecodes while maintaining reasonable
aggressiveness.
• Code 128 Security Level 2 - This option applies greater bar code security requirements if Security Level 1
fails to eliminate misdecodes.
• Code 128 Security Level 3 - If you selected Security Level 2, and misdecodes still occur, select this
security level to apply the highest safety requirements.
NOTE Selecting this option is an extreme measure against mis-decoding severely out-of-spec bar codes, and
significantly impairs the decoding ability of the scanner. If this level of security is required, try to improve
the quality of the bar codes.
Page 38

4 - 6 DS2208-HC & DS2278-HC Digital Scanner Product Reference Guide
Code 128 Security Level (continued)
Code 128 Security Level 0
(0)
Code 128 Security Level 1
(1)
*Code 128 Security Level 2
(2)
Code 128 Security Level 3
(3)
Page 39

Composite
Composite CC-C
Parameter # 341
SSI # F0h 55h
Scan one of the following bar codes to enable or disable Composite bar codes of type CC-C.
Symbologies 4 - 7
Enable CC-C
(1)
*Disable CC-C
(0)
Composite CC-A/B
Parameter # 342
SSI # F0h 56h
Scan one of the following bar codes to enable or disable Composite bar codes of type CC-A/B.
Enable CC-A/B
(1)
*Disable CC-A/B
(0)
Page 40

4 - 8 DS2208-HC & DS2278-HC Digital Scanner Product Reference Guide
Page 41

INDEX
A
accessories . . . . . . . . . . . . . . . . . . . . . . . . . . . .1-4, 1-12
interface cable . . . . . . . . . . . . . . . . . . . . . . . 1-4, 1-12
power supply . . . . . . . . . . . . . . . . . . . . . . . . 1-4, 1-12
shielded cables . . . . . . . . . . . . . . . . . . . . . . .1-3, 1-4
B
bar codes
battery shut off . . . . . . . . . . . . . . . . . . . . . . . . . . 1-9
bookland ISBN . . . . . . . . . . . . . . . . . . . . . . . . . . 4-4
code 128 fnc4 . . . . . . . . . . . . . . . . . . . . . . . . . . . 4-5
code 128 security level . . . . . . . . . . . . . . . . .4-5, 4-6
composite CC-A/B . . . . . . . . . . . . . . . . . . . . . . . 4-7
composite CC-C . . . . . . . . . . . . . . . . . . . . . . . . . 4-7
disable all code types . . . . . . . . . . . . . . . . . . . . . 4-3
enable all code types . . . . . . . . . . . . . . . . . . . . . 4-3
HID device conversion . . . . . . . . . . . . . . . . . . . . 1-8
ISBT concatenation . . . . . . . . . . . . . . . . . . . . . . . 4-4
set defaults . . . . . . . . . . . . . . . . . . . . . . . . . . . . . 3-3
symbologies
default table . . . . . . . . . . . . . . . . . . . . . . . . . 4-2
transmit no read message . . . . . . . . . . . . . . . . . 3-4
user preferences
default table . . . . . . . . . . . . . . . . . . . . . . . . . 3-2
battery
charging notes . . . . . . . . . . . . . . . . . . . . . . . . . . 1-6
charging with cradle . . . . . . . . . . . . . . . . . . . . . . 1-6
charging with micro USB . . . . . . . . . . . . . . . . . . . 1-8
shut off . . . . . . . . . . . . . . . . . . . . . . . . . . . . . . . . 1-9
bluetooth . . . . . . . . . . . . . . . . . . . . . . . . . . . . . . . . . . 1-5
bullets . . . . . . . . . . . . . . . . . . . . . . . . . . . . . . . . . . . . . vii
C
cable configurations . . . . . . . . . . . . . . . . . . . . . . . . . . . .vi
cables . . . . . . . . . . . . . . . . . . . . . . . . . . . . . . . . . . . . . .vi
installing . . . . . . . . . . . . . . . . . . . . . . . . . . . . 1-3, 1-7
interface . . . . . . . . . . . . . . . . . . . . . . . . . . . 1-4, 1-12
removing . . . . . . . . . . . . . . . . . . . . . . . . . . . . . . . 1-4
shielded . . . . . . . . . . . . . . . . . . . . . . . . . . . . 1-3, 1-4
charging battery
cradle . . . . . . . . . . . . . . . . . . . . . . . . . . . . . . . . . 1-6
micro USB . . . . . . . . . . . . . . . . . . . . . . . . . . . . . 1-8
notes . . . . . . . . . . . . . . . . . . . . . . . . . . . . . . . . . . 1-6
cleaning the device
approved for standard devices . . . . . . . . . . . . . . 2-2
cleaning the devices
how to . . . . . . . . . . . . . . . . . . . . . . . . . . . . . . . . . 2-2
known harmful ingredients . . . . . . . . . . . . . . . . . 2-1
code 128 bar codes
fnc4 . . . . . . . . . . . . . . . . . . . . . . . . . . . . . . . . . . . 4-5
ISBT concatenation . . . . . . . . . . . . . . . . . . . . . . 4-4
security level . . . . . . . . . . . . . . . . . . . . . . . . . 4-5, 4-6
composite bar codes
composite CC-A/B . . . . . . . . . . . . . . . . . . . . . . . 4-7
composite CC-C . . . . . . . . . . . . . . . . . . . . . . . . . 4-7
configurations . . . . . . . . . . . . . . . . . . . . . . . . . . . . . . . . v
cables . . . . . . . . . . . . . . . . . . . . . . . . . . . . . . . . . . . vi
product line . . . . . . . . . . . . . . . . . . . . . . . . . . . . . . . vi
connecting
interface cable . . . . . . . . . . . . . . . . . . . . . . . . . . 1-3
lost connection . . . . . . . . . . . . . . . . . . . . . . . . . 1-12
power . . . . . . . . . . . . . . . . . . . . . . . . . . . . . . . . . 1-4
conventions
notational . . . . . . . . . . . . . . . . . . . . . . . . . . . . . . . . vi
cradle
connecting . . . . . . . . . . . . . . . . . . . . . . . . . . . . . 1-7
inserting scanner . . . . . . . . . . . . . . . . . . . . . . . 1-11
presentation
features . . . . . . . . . . . . . . . . . . . . . . . . . . . . 1-7
supply power . . . . . . . . . . . . . . . . . . . . . . . . . . . 1-6
Page 42

Index - 2 DS2208-HC Digital Scanner Product Reference Guide
D
default parameters . . . . . . . . . . . . . . . . . . . . . . . . . . . 3-2
setting . . . . . . . . . . . . . . . . . . . . . . . . . . . . . . . . . 3-3
symbologies . . . . . . . . . . . . . . . . . . . . . . . . . . . . 4-2
user preferences . . . . . . . . . . . . . . . . . . . . . . . . . 3-2
digital scanner
features . . . . . . . . . . . . . . . . . . . . . . . . . . . . . . . . 1-5
F
features . . . . . . . . . . . . . . . . . . . . . . . . . . . . . . . . . . . 1-5
M
maintenance . . . . . . . . . . . . . . . . . . . . . . . . . . . . . . . 2-1
approved cleaners . . . . . . . . . . . . . . . . . . . . . . . 2-2
how to clean the devices . . . . . . . . . . . . . . . . . . . 2-2
known harmful ingredients . . . . . . . . . . . . . . . . . 2-1
micro USB cable
charging battery . . . . . . . . . . . . . . . . . . . . . . . . . 1-8
convert CDC device to HID . . . . . . . . . . . . . . . . . 1-8
HID device conversion . . . . . . . . . . . . . . . . . . . . 1-8
N
connecting power . . . . . . . . . . . . . . . . . . . . . . . . 1-4
inserting scanner in cradle . . . . . . . . . . . . . . . . 1-11
installing interface cable . . . . . . . . . . . . . . . . . . . 1-3
lost host connection . . . . . . . . . . . . . . . . . . . . . . 1-12
supplying power . . . . . . . . . . . . . . . . . . . . . . . . . 1-6
unpacking . . . . . . . . . . . . . . . . . . . . . . . . . . . . . . 1-2
shut off battery . . . . . . . . . . . . . . . . . . . . . . . . . . . . . . 1-9
specifications . . . . . . . . . . . . . . . . . . . . . . . . . . . . . . . 2-3
support . . . . . . . . . . . . . . . . . . . . . . . . . . . . . . . . . . . . . vii
symbology default parameters . . . . . . . . . . . . . . . . . . 4-2
T
technical specifications . . . . . . . . . . . . . . . . . . . . . . . 2-3
U
unpacking . . . . . . . . . . . . . . . . . . . . . . . . . . . . . . . . . 1-2
UPC/EAN/JAN bar codes
bookland ISBN . . . . . . . . . . . . . . . . . . . . . . . . . . 4-4
notational conventions . . . . . . . . . . . . . . . . . . . . . . . . . .vi
P
pairing . . . . . . . . . . . . . . . . . . . . . . . . . . . . . . . . . . . 1-11
parts
scanner . . . . . . . . . . . . . . . . . . . . . . . . . . . . . . . . 1-7
power . . . . . . . . . . . . . . . . . . . . . . . . . . . . . . . . . . . . . 1-6
power supply . . . . . . . . . . . . . . . . . . . . . . . . . . . 1-4, 1-12
connecting . . . . . . . . . . . . . . . . . . . . . . . . . . . . . . 1-4
product line configurations . . . . . . . . . . . . . . . . . . . . . . .vi
Q
quick start guide . . . . . . . . . . . . . . . . . . . . . . . .1-4, 1-12
R
radio communication
bluetooth . . . . . . . . . . . . . . . . . . . . . . . . . . . . . . . 1-5
S
scanner parts . . . . . . . . . . . . . . . . . . . . . . . . . . . . . . . 1-7
scanning
errors . . . . . . . . . . . . . . . . . . . . . . . . . . . . . . .3-2, 4-2
sequence example . . . . . . . . . . . . . . . . . . . .3-2, 4-2
setting parameters . . . . . . . . . . . . . . . . . . . .3-1, 4-1
service information . . . . . . . . . . . . . . . . . . . . . . . . . . . vii
setting defaults . . . . . . . . . . . . . . . . . . . . . . . . . . . . . 3-3
setup
Page 43

Page 44

Zebra Technologies Corporation, Inc.
3 Overlook Point
Lincolnshire, IL 60069, U.S.A.
http://www.zebra.com
© 2019 ZIH Corp and/or its affiliates. All rights reserved. ZEBRA and the stylized Zebra
head are trademarks of ZIH Corp, registered in many jurisdictions worldwide. All other
trademarks are the property of their respective owners.
MN-003641-01 Revision A - July 2019
 Loading...