


P1073699-001 Rev. A
CPCL
Programming Guide
for
Link-OS™-Enabled Printers

Copyright and Liability Disclaimer
2
© 2014 ZIH Corp. The copyrights in this manual and the software and/or firmware in the printer described therein are owned
by ZIH Corp. and Zebra’s licensors. Unauthorized reproduction of this manual or the software and/or firmware in the printer may
result in imprisonment of up to one year and fines of up to $10,000 (17 U.S.C.506). Copyright violators may be subject to civil
liability.
®
This product may contain ZPL
Imaging fonts. Software © ZIH Corp. All rights reserved worldwide.
, ZPL II®, and Link-OS™ programs; Element Energy Equalizer™ Circuit; E3™; and Monotype
Zebra, the Zebra head graphic, CPCL, Link-OS, ZPL, and ZPL II , are trademarks of ZIH Corp., registered in many
jurisdictions worldwide. All rights reserved.
holders. For additional trademark information, please see “Trademarks” on the product CD.
Proprietary Statement This manual contains proprietary information of Zebra Technologies Corporation and its subsidiaries
(“Zebra Technologies”). It is intended solely for the information and use of parties operating and maintaining the equipment
described herein. Such proprietary information may not be used, reproduced, or disclosed to any other parties for any other
purpose without the express, written permission of Zebra Technologies.
Product Improvements Continuous improvement of products is a policy of Zebra Technologies. All specifications and
designs are subject to change without notice.
Liability Disclaimer Zebra Technologies takes steps to ensure that its published Engineering specifications and manuals are
correct; however, errors do occur. Zebra Technologies reserves the right to correct any such errors and disclaims liability resulting
therefrom.
All other brand names, product names, or trademarks belong to their respective
Limitation of Liability In no event shall Zebra Technologies or anyone else involved in the creation, production, or delivery of
the accompanying product (including hardware and software) be liable for any damages whatsoever (including, without limitation,
consequential damages including loss of business profits, business interruption, or loss of business information) arising out of the
use of, the results of use of, or inability to use such product, even if Zebra Technologies has been advised of the possibility of such
damages. Some jurisdictions do not allow the exclusion or limitation of incidental or consequential damages, so the above
limitation or exclusion may not apply to you.
CPCL FOR LINK-OS PRINTERS
Page 2 of 329
1073699-001

TABLE OF CONTENTS
1 DESCRIPTION 11
1.1 Purpose 11
1.2 Scope 11
1.3 Documentation Forma t 11
2 WELCOME TO CPCL! 12
2.1 Designations – Unprintable ASCII 13
2.2 Designations – Parameters 14
2.3 Designations – Advanced Notes 14
2.4 Designations – Raw ASCII and Hex 15
2.5 Designations – Binary Data 15
3 INTRODUCTION TO CPCL 17
3.1 Sessions 18
3.2 Label Sessions 18
3.3 Parameters for Sessions and Commands 19
3.3.1 Numeric Parameters 19
3.3.1.1 Unit Numbers 19
3.3.1.2 Numbers 19
3.3.1.3 Number Interpretation Rules 20
3.3.2 String Parameters 20
3.3.2.1 Terminated String Parameters 21
3.3.2.2 Quoted String Parameters 21
3.3.2.3 Raw String Parameters 21
3.4 Utilities Sessions 22
3.5 Single Line Utilities Session 22
3.6 File Sessions 23
3.6.1 Define Format File Session 23
3.6.2 Use Format File Session 23
3.6.3 CISDF Format File Session 24
3.7 Line Print Mode 25
CPCL FOR LINK-OS PRINTERS
Page 3 of 329 1073699-001

4 CPCL COMMANDS OVERVIEW 27
4.1 Alphabetical Command Lists 29
4.2 Escape Commands List 33
5 HOW COMMANDS ARE DOCUMENTED 34
6 LABEL FORMATTING COMMANDS 37
6.1 Label Session Details 38
6.2 BARCODE 40
6.2.1 1D Barcodes 40
6.2.2 Aztec Code Barcode 44
6.2.3 Data Matrix Barcode 51
6.2.4 GS1 DataBar (RSS) and Composite Barcodes 58
6.2.5 MaxiCode Code Barcode 69
6.2.6 PDF417 73
6.2.7 QR Code Barcode 78
6.3 BARCODE-TEXT 85
6.4 BAT-INDICATOR 87
6.5 BOX 89
6.6 CENTER 92
6.7 COMPRESSED-GRAPHICS 94
6.8 CONCAT 96
6.9 COUNT 101
6.10 END 104
6.11 EXPANDED-GRAPHICS 104
6.12 FONT-GROUP 107
6.13 IMAGE 110
6.14 IN-CENTIMETERS, IN-DOTS, IN-INCHES, IN-MILLIMETERS 112
6.15 INVERSE-LINE 114
6.16 LEFT 117
6.17 LINE 118
6.18 MOVE 120
6.19 MULTILINE 124
6.20 PAGE-WIDTH 127
6.21 PATTERN 130
6.22 PCX 134
6.23 PCXMAG 136
6.24 PERSIST 138
CPCL FOR LINK-OS PRINTERS
Page 4 of 329 1073699-001

6.25
PRINT 139
6.26 RIGHT 140
6.27 ROTATE 142
6.28 SCALE-TEXT 144
6.29 SCALE-TO-FIT 146
6.30 SETBOLD 148
6.31 SETMAG 151
6.32 SETSP 154
6.33 TEMP-MOVE 156
6.34 TEXT 158
7 LINE PRINT COMMANDS 163
7.1 Line Print System Details 164
7.2 LMARGIN 166
7.3 LP-LF-EQUALS-CRLF 168
7.4 LP-ORIENT 170
7.5 RX, RY, RXY 173
7.6 SETLF 175
7.7 SETLP 176
7.8 SETLP-BUFFER 179
7.9 SETLP-TIMEOUT 180
7.10 X, Y, XY 181
7.11 <LF> – Line Feed 183
7.12 <CR> – Carriage Return 184
7.13 <ESC>g – Line Print Graphics 185
8 FONT COMMANDS 188
8.1 Introduction to CP CL Font Types 189
8.1.1 CPF (Comtec Pre-scaled) Fonts 189
8.1.2 CSF (Comtec Scaleable) Fonts 189
8.1.3 TTF (True Type) Fonts 189
8.2 Built in CPCL Fonts 190
8.3 Detailed CPF File Format Information 190
8.3.1 File Header 191
8.3.2 Character Pages 192
8.3.2.1 Header 192
8.3.2.2 Offset Table 193
8.3.2.3 Glyph Data 194
CPCL FOR LINK-OS PRINTERS
Page 5 of 329 1073699-001

8.3.2.4
8.3.2.5 Small Glyphs 194
8.3.2.6 Large Glyphs 194
8.3.2.7 Pen Adjusts 195
8.3.2.8 Non-Compressed Glyph Data 195
8.3.2.9 Compressed Glyph Data 196
8.3.3 Font Encodings – Single Byte 198
8.3.3.1 USA or Dynamic – COUNTRY USA 198
8.3.3.2 United Kingdom – COUNTRY UK 198
8.3.3.3 French – COUNTRY FR ANCE 200
8.3.3.4 Italian – COUNTRY ITALY 200
8.3.3.5 Swedish – COUNTRY SWEDEN 200
8.3.3.6 Spanish – COUNTRY SPANISH 201
8.3.3.7 Norwegian – COUNTRY NORWAY 201
8.3.3.8 LATIN 9 Encoding – COUNTRY LATIN9 201
Glyphs Types 194
8.3.3.9 Code Page 850 Encoding – COUNTRY CP850 202
8.3.3.10 Code Page 874 Encoding – COUNTRY CP874 202
8.3.4 Font Encodings – Multi-byte 202
8.3.4.1 CHINA, JAPAN and KOREA Encodings 203
8.3.4.2 BIG5 Encoding 204
8.3.4.3 JAPAN-S (Shift-JIS) Encoding 204
8.3.4.4 THAI Encoding 204
8.3.4.5 VIETNAM Encoding 204
8.3.4.6 Encoding Types for Common Fonts 205
8.4 CHAR-SET and COUNTRY 205
9 MEDIA MANAGEMENT COMMANDS 208
9.1 AUTOCAL 209
9.2 AUTO-PACE 210
9.3 BAR-SENSE 212
9.4 CONTRAST 213
9.5 FEED 214
9.6 FORM 215
9.7 FORM (Utilities Command) 215
9.8 GAP-SENSE 216
9.9 JOURNAL 217
9.10 LABEL 218
9.11 MULTI 219
CPCL FOR LINK-OS PRINTERS
Page 6 of 329 1073699-001

9.12
NO-PACE 220
9.13 ON-OUT-OF-PAPER 221
9.14 PACE 224
9.15 PAPER-JAM 225
9.16 POSTFEED 227
9.17 PREFEED 228
9.18 PRESENT-AT 229
9.19 REVERSE 230
9.20 REVERSE (Utilities Command) 231
9.21 SETFF 232
9.22 SET-TOF 233
9.23 SPEED 234
9.24 TONE 235
9.25 TURN 236
9.26 <FF> – Form Feed 237
10 STATUS ENQUIRY COMMANDS 240
10.1 NAME 241
10.2 VERSION 241
10.3 <ESC>h – Printer Status 242
10.4 <ESC>i – Extended Printer Status 243
10.5 <ESC>v – Get Version Information 244
11 UTILITY AND DIAGNOSTIC COMMANDS 245
11.1 Two Key Report Information 246
11.1.1 Two Key Items without equivalent SGDs 248
11.1.1.1 OS 249
11.1.1.2 Pres, Gap, and Bar Sections 249
11.1.1.3 Voltage 249
11.1.1.4 Resident Fonts 249
11.2 Parameter Insert Commands 250
11.2.1 Insert Current Date 250
11.2.2 Insert Current Time 251
11.2.3 Insert SGD Value 251
11.2.4 Insert Custom Result 252
11.2.5 Insert File 252
11.2.5.1 Difference between USE-FORMAT and File Insert 253
11.2.6 Using More Than One Insert per Line 254
CPCL FOR LINK-OS PRINTERS
Page 7 of 329 1073699-001

11.3
ABORT 255
11.4 BAUD 256
11.5 BEEP 257
11.6 CAPTURE 258
11.7 CHECKSUM 259
11.8 CHAR-COUNT 260
11.9 DELAYED-ACTIONS 261
11.10 DISPLAY 262
11.11 DUMP 264
11.12 DUMP-IMAGE 265
11.13 GET-DATE 267
11.14 GET-TIME 268
11.15 GETVAR 269
11.16 LT (Line Terminator) 272
11.17 MAX-LABEL-HEIGHT 274
11.18 ON-FEED 275
11.19 ON-LOW-BATTERY 276
11.20 RE-RUN 277
11.21 SET 278
11.22 SET-DATE 281
11.23 SET-TIME 282
11.24 SET-VERSION 283
11.25 SETVAR and DO 284
11.26 TIMEOUT 286
11.27 WAIT 287
11.28 VCHECKSUM 288
11.29 X, Y, XY (Label Sessions) 289
11.30 <BEL> – Sound Printer Bell 291
11.31 <BS> – Backspace 292
11.32 <ESC>} – Get or Set CCL Key 293
11.33 <ESC>I – Send Two-Key Report to Host 294
11.34 <ESC>JRU – Send User Label Count 294
11.35 <ESC>N – Acknowledge Reset 295
11.36 <ESC>p – Shut Down Printer 295
11.37 <ESC>V– Print Two-Key Report 296
12 MAGNETIC CARD READING COMMANDS 298
12.1 MCR 299
CPCL FOR LINK-OS PRINTERS
Page 8 of 329 1073699-001

12.2
MCR-CAN 303
12.3 MCR-QUERY 304
13 FILE COMMANDS 306
13.1 CPCL File System Introduction 307
13.1.1 The E Drive 307
13.1.2 The R Drive 307
13.1.3 The Z Drive 307
13.1.4 Filenames 307
13.1.5 File Functions Provided By CPCL 308
13.1.6 Special File Types 308
13.2 Define and Use Format Sessions 308
13.2.1 DEFINE-FORMAT and USE-FORMAT 308
13.2.2 Defining Fields in DEFINE-FORMAT Sessions for use with USE-FORMAT 309
13.2.3 USE-FORMAT Reentrance 311
13.3 CISDF, CISDFCRC16, and CISDFRCRC16 File Sessions 311
13.3.1 Calculating the CRC16 Checksum 314
13.3.2 Calculating the Simple Checksum 315
13.4 Pre-defined Special Purpose Files 316
13.4.1 CONFIG.SYS, AUTOEXEC.BAT, RUN.BAT 316
13.4.2 SEL.BAT, FTN. BAT, FF.BAT 316
13.4.3 FF3.BAT 317
13.5 DELETE 318
13.6 DIR 320
13.7 END (File Session) 321
13.8 FILE 322
13.9 PRINT (File Session) 324
13.10 TYPE 325
14 REMOVED AND UNSUPPORTED COMMANDS 328
CPCL FOR LINK-OS PRINTERS
Page 9 of 329 1073699-001

CPCL FOR LINK-OS PRINTERS
Page 10 of 329 1073699-001

1 Description
1.1 Purpose
This document is a non-final formatted version of a user manual intended to be the final version of
documentation for the CPCL language as implemented in Link-OS enabled printers.
1.2 Scope
The document shall cover an introduction to the language, language concepts, and documentation for
every command in CPCL. The documentation also touches on SGD, but does not provide an extensive set
of documentation for that system, only to explain the SGD equivalents of various CPCL commands.
Documentation in all sections from section 2 to section 14 are intended directly for customer use, and
contain no information that should not be exposed to customer s .
1.3 Documentation Form at
The text in this document is intended to be formatted into a form that can be used directly in a user
manual or guide.
CPCL FOR LINK-OS PRINTERS
Page 11 of 329 1073699-001

2 Welcome to CPCL!
Welcome to the CPCL for Link-OS™ enabled printers manual. This manual is intended to help you
understand how the C PCL formatting language works, and also provide a full reference of all the
supported commands within the CPCL language.
This manual is divided into several sections. If you are completely new to working w ith CPCL, it is
recommended that you proceed through the manual section by section, starting with the
Introduction to Working With CPCL.
• Introduction to Working With CPCL – CPCL Sessions
This section will provide you with details about the overall format and structure of labels and
commands within CPCL.
• CPCL Commands Referenc e
This section provides documentation for each CPCL command. Examples for many
commands will be provided, and notes about how this command works with other
commands is also provided. The CPCL command reference section is sub-divided so that you
can easily find inf ormation about the areas you are looking for.
To start off the section, there is a master list of all commands, and the page their
documentation appears on. Followin g that, each section contains an introduction discussion
outlining the functions, followed by commands.
o CPCL Lab el Formatting Comman ds
This section contains all commands related to label layout and formatting – that is
the graphical content of the label. This includes barcod es, text, and graphics.
o CPCL Line Print Commands
This section contains all commands related to line-print operations, in which the
printer can be configured to receive raw ASCII text an d pr int it .
o CPCL Fo nts
This section contains all commands related to custom fonts in CPCL, including file
and data formats, and usage.
o CPCL Media Management
This section contains information relate d to commands for feeding media, and also
controlling how media is detected and sensed.
o CPCL Status and Enquiry Commands
This section contains information on how to obtain printer status via CPCL.
CPCL FOR LINK-OS PRINTERS
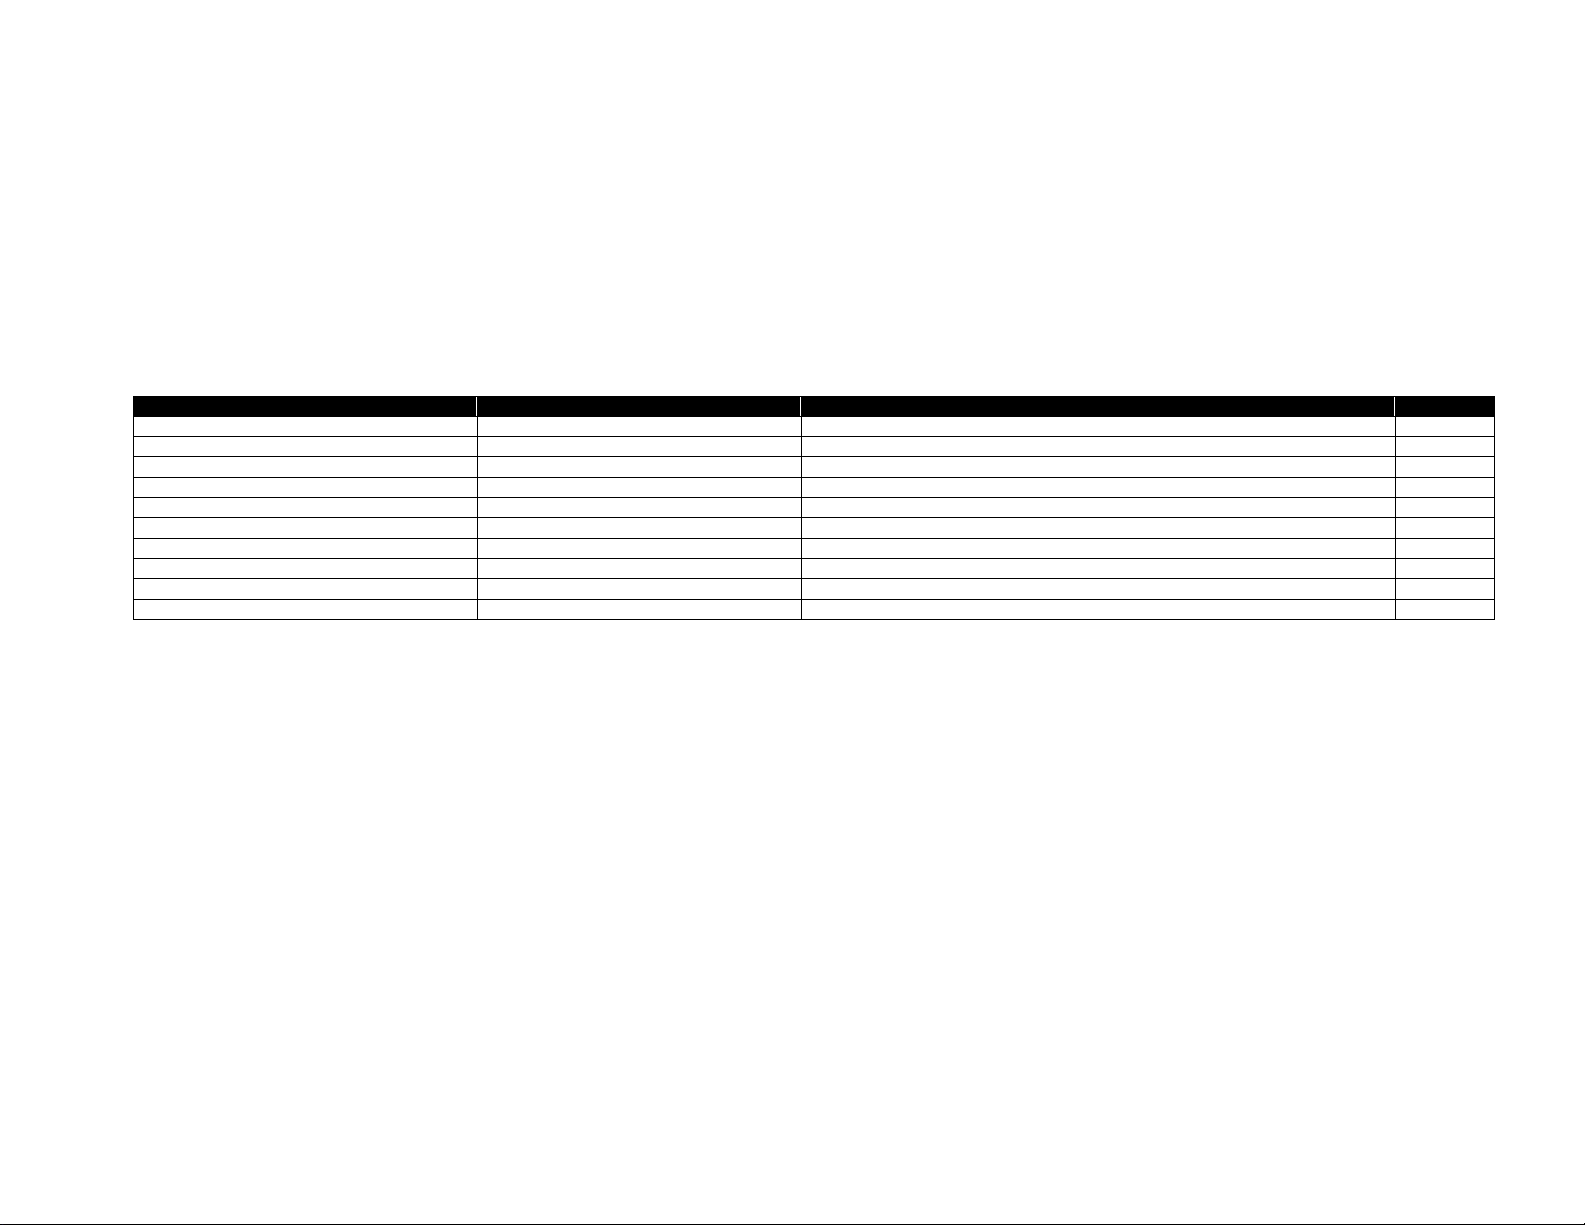
Page 12 of 329 1073699-001

Command
Byte transmitted
<NUL>
0
<SOH>
1
<STX>
2
<ETX>
3
<EOT>
4
<ENQ>
5
<ACK>
6
<BEL>
7
<BS>
8
<HT>
9
o The CPCL File System
This section contains information on using files within CPCL, including special file
designations, and commands to create and delete files.
o Utility and Diagnostic Commands
This section contains information on commands related to diagnostic and utility
functions. These include commands to dump printed data
2.1 Designations – Unprintable ASCII
While most of CPCL is in plain ASCII text, proper termination of lines is critical to proper operation.
The line-termination characters, as well as some characters from the Comtec escape language are
not printable characters. As such, this document will use the following designations to indicate
binary data.
In this manual, text which denotes an example will be designated using the Courier New font as
shown in this simple example below:
! 0 200 200 100 1<CR><LF>
TEXT 4 0 0 This is a line of text.<CR><LF>
PRINT<CR><LF>
<ESC>h
The greater than and less than symbols are used to designate areas of data that are to be
converted to binary – the <CR> is a visual representation of the non-printable “carriage return”
character, while the <LF> is the visual representation of the non-printable “line-feed” character. If
you were streaming b inary directly to the printer, you would not send the <CR>, but instead send
a carriage return character (ASCII Character 13, hex 0x0D).
Typically in this document, each <CR> and <LF> will be followed by a new line within the
document. This new line is not transmitted and is only for ease of reading of exam p les.
These designations are the standard ASCII names for these non-printable characters, however a
table of the binar y values of the cha racters is also included here. In the case that the greater than
or less than characters are needed in an example, they will be represented by <GT> and <LT> to
avoid confusion.
CPCL FOR LINK-OS PRINTERS
Page 13 of 329 1073699-001

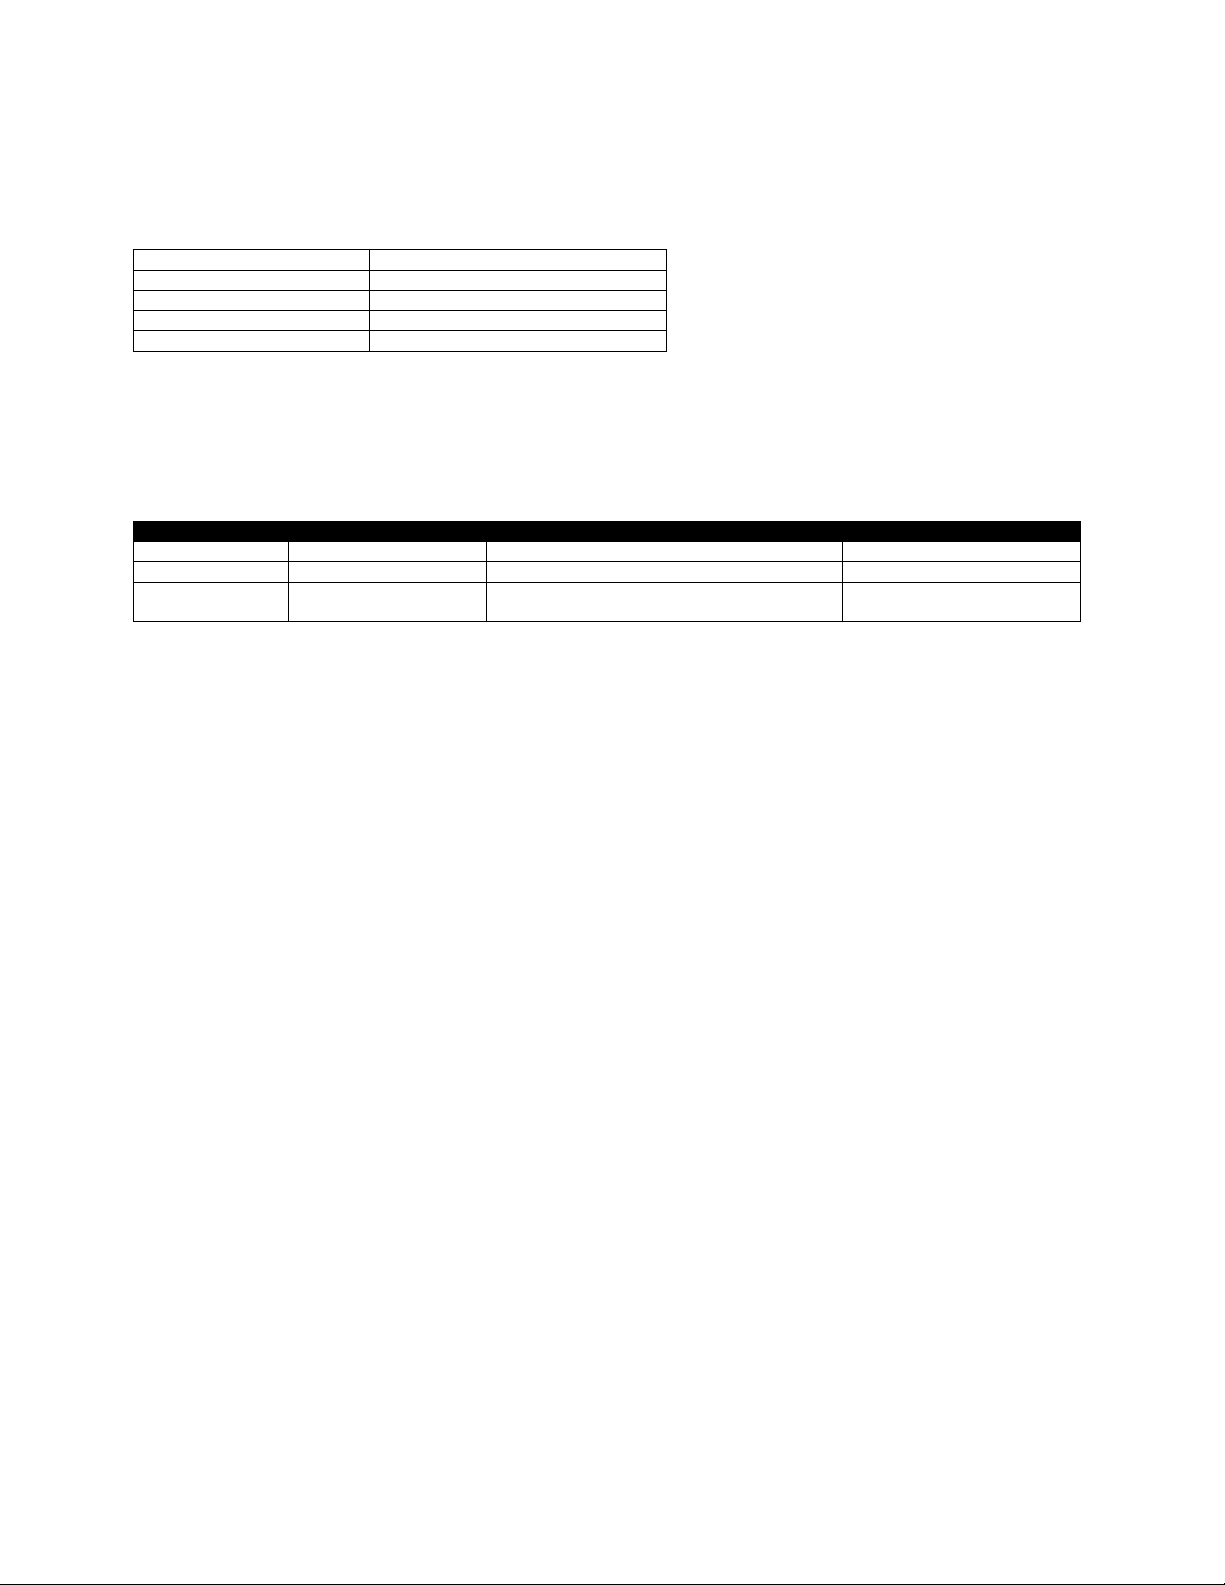
Command
Byte transmitted
<TAB>
9
<LF>
10
<VT>
11
<FF>
12
<CR>
13
<SO>
14
<SI>
15
<DLE>
16
<DC1>
17
<DC2>
18
<DC3>
19
<DC4>
20
<NAK>
21
<SYN>
22
<ETB>
23
<CAN>
24
<EM>
25
<SUB>
26
<ESC>
27
<FS>
28
<GS>
29
<RS>
30
<US>
31
<SP>
32
<LT>
60
<GT>
62
<DEL>
127
2.2 Designations – Parameters
For many functions in CPCL, there are required and optional parameters. These parameters are
represented with the following syntax.
SAMPLECOMMAND [Required 1] [Required 2] [Opt. Parameter 1]
Required parameters will appear in non-italics, a nd w ill each bear a unique name. Optional
parameters will appear in italics, and will be preceded by the abbreviation “Opt.”
Below each such designation, a list of the parame ters with their functions, options and meanings
will be shown.
2.3 Designations – Advanced Notes
CPCL FOR LINK-OS PRINTERS
Page 14 of 329 1073699-001

This document is designed to be used by both people who are new to the CPCL language, and
those who have worked with it extensively and are looking to understand a subtle detail of the
system. For the more advanced user, after text which provides a basic explanation of the
functionality of a particular area, an Advanced Notes section may appear. This section will pr ovide
technical information on the command or function.
If you are new to the language, or only require a basic understanding, the Advanced Notes
Sections can safely be skipped in order to keep to the core concepts of the topic being discussed.
2.4 Designations – Raw ASCII and Hex
When necessary, this manual will use a designation to indicate the transmission of ra w ASCII data.
The formatting of data is very similar to what was mentioned above. The greater than and less
than symbols are used to designate areas of data that are to be converted to binary – the <15>
means send the ASCII character 15. Using the above system, this would be the same as using
<SI>.
2.5 Designations – Binary Data
When necessary, this manual will use a designation to indicate the transmission of raw binary da ta.
To designate areas of data that are to be converted to binary, the manual will use a less than
symbol, then the text SEQ, followed by a series of hexadecimal characters, and finally a greater
than symbol.
The net output of this is the binary equivalent to the hexadecimal data provided. See the example
below:
As it appears in an example:
<SEQ 5468697320697320616E206578616D706C65206F662062696E61727920646174612E>
This represents:
This is an example of binary data.
This example is provided for ease of understanding, but typically this representation will only be
used for data that is otherwise contains unreadable characters, notably binary image data.
CPCL FOR LINK-OS PRINTERS
Page 15 of 329 1073699-001

CPCL FOR LINK-OS PRINTERS
Page 16 of 329 1073699-001

3 Introduction to CPCL
CPCL, short for Comtec Printer Co ntrol Language, is the name of a printer control language that was used
in printers originally made by Comtec Information Systems, which Zebra Technologies acquired in 2000.
The language consists of two parts, a label format ting language and an unformatted test printing system
called line print mode.
Although the ZPL (Zebra Printer Language) is the preferred language for new development, support for
CPCL is still included in select Link-OS enabled ZPL prin ters for compatibility with existing applications.
It is important to understand that CPCL is maintained only for backwards compatibility, and new features
added to ZPL are generally not made available in CPCL.
Commands in the CPCL formatting language are almost entirely represented in human-readable ASCII.
There are two modes of operation in the CPCL language, depending on the operation you intended to
perform.
All operations in CPCL begin with the exclamation mark character “!”. What comes after this character
determines which of the primary roles will be used to execute commands. These roles are called sessions.
The “!” character signals to the printer that the CPCL interpreter is the target of this data stream, and is a
request to begin a session. If this character does not start a line of transmission, the data will fall
through to the next parser.
In CPCL, all commands should be transmitted in upper case. String values for commands may be
transmitted in either case. By default, transmission of CPCL is performed in 8-bit ASCII characters.
Once you have entered a CPCL session using the “!” character, every line in the session must be
terminated with the CR and LF characters.
Sessions are ended with a specific command which terminates them. See each session below for more
details.
If you transmit a command that CPCL doesn’t know ho w to process, or a com mand in the wrong case,
the entire line containing the command is ignored up to the next <CR> and <LF> character sequence.
If you transmit an invalid or unrecognized session command, the entire session will fall through to the
line print system if it is enabled, or if it is not enabled, the next parser in the system. For more
information on line print see section 3.7 on page 25.
Advanced Notes
See CPCL Line Print on page 164 for more information the handling of data which does not begin with an
exclamation mark as well as parsing order.
It is possible to change the character used to begin sessions from the exclamation point to other characters. This
character is called the CCL key, and documentation on changing it can be found on page 293. At power on, it is
always set to the “!” by default. This document will assume you are using this default.
Some examples in the past have shown CPCL lines terminated with space characters. While this may function in
some cases, use of this syntax is not recommended for new labels as it is not compatible with all commands.
CPCL FOR LINK-OS PRINTERS
Page 17 of 329 1073699-001

It is possible to change the way lines are terminated in CPCL. See the LT command in on page 272 for more
information. At power on, it is always set to <CR><LF> by default. This document will assume you are using this
default.
One CPCL Command, SET, is not <CR><LF> terminated, but quote terminated. See this command on page 278
for more information.
If you are using a non-standard terminator (set by LT), lines starting with invalid commands are still consumed up
to the next <CR><LF>.
3.1 Sessions
In CPCL, there are four types of sessions that can be started with the “!” character. Some commands
may act differently depending on the kind of session you are currently using. Each of these types are
explained in this section.
In addition, just after the Label Session documentation, there is a section which explains each type of
parameter that can be used in CPCL.
• Label Session
This session is used to create labels to perform printing.
• Utilities Session
This session is used to execute a series of non-printing configuration commands.
• One Line Utilities Session
This session is used to execute a single configuration command.
• Files Sessions
There are several types of file sessions. These will not be documented here, but full
documentation is provided in the CPCL File System section on page 307.
3.2 Label Sessions
A label that contains information to be printed begins with the ! character, followed by a series of ASCII
numbers which represent information about the label that follows.
After the header, the label session can contain any number of utility or printing commands. To terminate
the session, use the PRINT or END command. See page 139 for more information on this command.
When the PRINT or END command is received, the label will be printed.
The format of the numbers which configure a label session are as follows.
! [Offset] [Horizontal Res.] [Vertical Res.] [Height] [Quantity]<CR><LF>
CPCL FOR LINK-OS PRINTERS
Page 18 of 329 1073699-001

Requested Unit
CPCL Command
Conversion Factor to Dots
Dots (Default)
IN-DOTS<CR><LF>
1
Centimeters
IN-CENTIMETERS<CR><LF>
80
Millimeters
IN-MILLIMETERS<CR><LF>
8
Inches
IN-INCHES<CR><LF>
203.2
Typically, a value of 0 is used for the offset, indicating the label is aligned to the right edge of the media.
The resolution values are typically both 200. The he ight can be set to a ny value and is measured in the
active unit, and any value for the quantity.
For more detailed information about configuring label sessions see section 6.1 on page 38.
Sample Label Session
Below is a very simple label session which prints a small text message.
! 0 200 200 203 1<CR><LF>
TEXT 4 0 40 40 Hello World!<CR><LF>
PRINT<CR><LF>
See the TEXT command on page 158 for more information on that co mmand.
3.3 Parameters for Sessions and Commands
CPCL sessions and commands use numeric and string parameters in order to specify data. This section
discusses each of the parameter types you will see used throughout the manual.
3.3.1 Numeric Parameters
In the example shown above, you see several references to numbers and unit numbers. It is important to
understand how ea ch of these parameter types are used, as they are used continually throughout the
CPCL language.
For all numeric parameters, null characters within the numbers will be ignored.
3.3.1.1 Unit Numbers
In the CPCL language, values related to size or positioning may be specified in units. By default, these
values are measured in dots, but commands are provided to allow any unit value to be interpreted in
dots, centimeters, millimeters, and inches.
These commands are as follows:
There is additional documentation for these commands in the label formatting commands starting on
page 37. If one of these commands is the very first command after a label session command, it affects
the label session command. The command otherwise takes effect immediately for any commands which
use unit numbers that follow.
When reading in unit numbers, CPCL uses the number interpretation rules mentioned below.
3.3.1.2 Numbers
CPCL FOR LINK-OS PRINTERS
Page 19 of 329 1073699-001

Regular numeric parameters in CPCL are any parameter that expresses a quantity that is not in terms of
any label formatting. These values are taken direct ly, and when you se e them documented in this
manual, the unit will be provided.
When reading numbers, CPCL uses the number interpretation rules mentioned below.
3.3.1.3 Number Interpretation Rules
When a number is read by CPCL, it follows the same set of reading rules if the value is a raw number or
a unit number.
Numbers in CPCL can be positive or negative and can have a fractional portion with up to four decimal
places. If the number is negative, the minus character ‘-‘ must precede the first digit of the number. If
the minus sign is not present, the number is assumed to be positive. The ‘+’ may also be specified, but is
not necessary.
Many functions in CPCL are not sensitive to negative numbers, and as such will simply use the absolute
value when a negative number is specified. Each command in this manual is documented regard ing its
behavior with negative numbers.
Following the desig nation of sign, there can be any nu mber of leading zeroes. These are bypassed until
the first non-zero digit is found.
Next, a number of digits determined by the particular command in use is collected. Ea ch command
documented in this manual reports on the number of digits it expects.
CPCL numbers may have up to four digits after the decimal point. If you need to specify a number with a
fractional portion, use the period character “.” to designate that there is a fractional portion. If the entire
value of the parameter is fractional (that is there is no decimal component), a leading zero is optional;
0.56 and .56 are both valid forms. CPCL functions accept up to four decimal places of accuracy for
fractional portions. This is true for all CP CL functions which accept numbers.
A number or unit number parameter is terminated by a space character. This signals to CPCL that the
number has ended. If a number is the last parameter of a command or session line, a <CR><LF> can
terminate the line. In this case, a space is not necessary and should not be added.
If the number of digits is exceeded (not including leading zeroes or symbols), the number is considered
complete, and processing of the next parameter starts with the next character. If a character within a
number is not a digit, this also completes the number, and processing of the next parameter begins with
the next character. This is also the case if the number of decimal numbers exceeds four.
It is recommended that you only terminate your numbers with space characters in order to improve readability of
your session data.
3.3.2 String Parameters
Strings are a parameter type in CPCL that is used to represent data. There are three main types of string
parameters in CPCL: terminated string parameters, quotation string parameters, and raw string
parameters.
CPCL FOR LINK-OS PRINTERS
Page 20 of 329 1073699-001

3.3.2.1 Terminated String Parameters
Terminated string parameters are a series of alpha numeric characters that are terminated by the CR and
LF at the end of a line or by a space character, or either of the two. The terminator is determined by the
specific command in which the parameter is used. Each command which uses terminated string
parameters will specify what the terminator is.
Typically, terminated string parameters are limited to 8191 bytes in size. There are some exceptions to
this, so each command which uses terminated string parameters will also call out the maximum size of
the string parameter.
These terminated string parameters accept any character except the chosen terminator (Space or CR and
LF by default), although null characters will be stripped out of the stream as if they did not exist.
If the number of characters provided exceeds the limit, the command which contained the parameter will
fail, and the remainder of the command line, up to the next <CR><LF>, will be discarded.
3.3.2.2 Quoted String Parameters
Quoted string parameters are similar to raw string parameters except they are bound by a double
quotation mark on each end ("). It is important to note that the proper character to use when
transmitting a quoted string parameter is the ASCII character 34 (hex 0x22).
Typically, quoted string parameters are limited to 8191 bytes in size. There are some except ions to this,
so each command which uses raw string parameters will also call out the maximum size of the string
parameter.
If necessary, the double quotati on character can be included in a quoted s tring param eter. This can be
accomplished by placing a backslash character before a double quotation character as shown below:
"This example has a double quote here:\""
The actual output of this string would be as follows:
This example has a double quote here:"
Note that the \" sequence has been replaced by a double quotation mark.
Within quoted string parameters, all other ASCII characters including CR and LF, with the exception of
null, are permitted and valid. Null characters are stripped out.
Although it is not technically necessary to terminate a series quoted string parameters with a space, it is highly
recommended for readability. This is also true of <CR><LF> termination of commands that end with a quoted string
parameter. The notable exception to this is the SETVAR and GETVAR commands, which must be <CR><LF> or
space terminated. See those commands for more information.
3.3.2.3 Raw String Parameters
CPCL FOR LINK-OS PRINTERS
Page 21 of 329 1073699-001

Raw string parameters are typically used when the parameter consists entirely of binary data, which may
include nulls or other control characters. Raw string parameters are typically used when the size of the
parameter is specified directly as part of the command (such as with the COMPRESSED-GRAPHICS
command), or are part of a structured file which contains its own size information (such as the PCX
command).
Raw string parameters are typically not limited in size like other types of string parameters, but their
output is limited to available memory. Each command which uses raw string parameters will explain how
their limits are used.
3.4 Utilities Sessions
A utilities session contains commands that specify configuration information, but does not result in any
printed output. This session is started by a ! character followed by either the upper case word UTILTIES
or the upper case letter U followed by a CR and LF.
! UTILTIES<CR><LF>
! U<CR><LF>
As demonstrated here, there are a number of commands in CPCL which have short forms which are
functionally identical to their long forms. When commands have a short-form, it will be documented at
the start of each command.
Utilities sessions are terminated by the PRINT or END command. See page 139 for more informati on on
these commands.
In the definition of each command, you will see if t he command operates label sessions, utilities sessions
or both. With very few exceptions, utilities commands act the same whether they are in label or utilities
sessions. If there are exceptions, they will be noted in the individual commands.
If you use label printing commands within a utilities session, they are ignored. Note that some utilities
commands can move media, so keep this in mind when making utilities sessions.
Sample Utilities Session
This small sample utilities session configures the printer with a pair of configuration commands.
! UTILITIES<CR><LF>
CONTRAST 0<CR><LF>
BEEP 8<CR><LF>
END<CR><LF>
See the CONTRAST command on page 213 and the BEEP command on pa ge 257 for more information.
3.5 Single Line Utilities Session
A single line utilities session is very similar to a utilities session except it is used to execute exactly one
utilities command, and does not require the termination command END or PRINT. A single line utilities
session is terminated by a <CR><LF>.
! U1 [CPCL Utilities Command with all parameters]<CR><LF>
CPCL FOR LINK-OS PRINTERS
Page 22 of 329 1073699-001

Field Name
Description
Type
Valid Range
Filename
The name of a filename to create on the
<CR><LF>
38 alpha-numeric
and period for extension
Field Name
Description
Type
Valid Range
Filename
The name of a filename of the format to
<CR><LF>
38 alpha-numeric
and period for extension
Sample Single Line Utilities Session
! U1 CONTRAST 0<CR><LF>
! U1 BEEP 8<CR><LF>
These two commands are each complete single line utilities sessions. These two commands have the
same function as the full-form utilities section shown in the above section.
3.6 File Sessions
Although they will not be covered in detail here, there are three types of file definition sessions in CPCL.
These sessions are used when you are defining a file or format which will be stored in the printer’s flash
memory file system. These are covered in detail starting in section 13.2 on page 308.
These file sessions are initiated via the following commands.
3.6.1 Define For m at File Session
This session is used to define a file with the filename specified, and is typically used to define label or
utilities format files in ASCII. It is not recommended to transfer binary files to the printer, instead use the
CISDF session mentioned below.
! DEFINE-FORMAT [Filename]<CR><LF>
! DF [Filename]<CR><LF>
Define Format file sessions are termina ted by an END or PRINT command. If terminated with the PRINT
command, a line containing the PRINT command is appended to the end of the file.
The filename in this session can include a drive lett er.
For more extensive information about DEFINE-FORMAT and a discussion of file names see page 308.
3.6.2 Use Format File Session
This session is used to execute a previously defined format with filename specified. These formats are
typically ones previously defined with the Define Format syntax mentioned above.
! USE-FORMAT <[Filename]><CR><LF>
! UF <[Filename]><CR><LF>
CPCL FOR LINK-OS PRINTERS
file system.
use on the file system.
Page 23 of 329 1073699-001
Terminated String
Terminated String
characters plus drive letter
characters plus drive letter

Field Name
Description
Type
Valid Range
CRC16
A special CRC-16 that represents the
the remainder of the header.
<CR><LF>
0 to FFFF as up to four
value is 0, CRC is ignored.
Filename
The name of a filename to create on the
<CR><LF>
38 alpha-numeric
and period for extension
File Size
The size of the file in hex.
<CR><LF>
0 to FFFFFFFF as up to 8
space.
Checksum
The 16 least significant bits of the result
<CR><LF>
0 to FFFF as up to four
The filename in this session can include a drive lett er.
For more extensive information about USE-FORMAT and a discussion of file names, see page 308.
3.6.3 CISDF Format File Session
This session is used to transfer Binary or ASCII files to the printer .
A CISDF session is the basic session for transferring a binary file to the printer. A CISD F file is always
stored to flash memory.
! CISDF<CR><LF>
<[Filename]><CR><LF>
<[File Size]><CR><LF>
<[Checksum]><CR><LF>
<[File Data]>
A CISDFCRC16 is very similar to the CISDF session, but adds a more robust mechanism for detecting
errors during transfer in the form of a CRC. A CISDFCRC16 file is stored always stored to flash memory.
When using a CISDFCRC16 file, the checksum is ignored but still must be specified.
! CISDFCRC16<CR><LF>
<[CRC16]><CR><LF>
<[Filename]><CR><LF>
<[File Size]><CR><LF>
<[Checksum]><CR><LF>
<[File Data]>
A CISDFRCRC16 is very similar to the CISDFCRC16 session, except the file is only stored in RAM, and is
removed when the printer is powered off or rebooted.
When using a CISD FRCRC16 file, the checksum is ignored.
! CISDFRCRC16<CR><LF>
<[CRC16]><CR><LF>
<[Filename]><CR><LF>
<[File Size]><CR><LF>
<[Checksum]><CR><LF>
<[File Data]>
CPCL FOR LINK-OS PRINTERS
checksum of all data to follow, including
file system.
Page 24 of 329 1073699-001
Terminated String
Terminated String
Terminated String
hexadecimal digit s. If
characters plus drive letter
hex digits. Limited to free

of adding each byte of the file together.
Terminated String
hexadecimal digit s.
File Data
Binary file data containing the number of
File Size
Raw String
Any data of File Size
length.
bytes specified by
.
The filenames for these sessions can include a drive letter, but it will be overridden if it does not match
the type specified. For information on the CRC format, and more details on the file sessions, see page
311.
3.7 Line Print Mode
Line print mode is a component of the CPCL formatting language which allo ws non-formatted text to be
transmitted to the printer directly for printing.
This mode may or may not be enabled by default depending on your printer model, but the command to
enable it is the same for all Link-OS printers which support CPCL.
Note that when CPCL line print mode is enabled, the printer can no longer process ZPL commands or
commands from any other control language except CPCL.
To enable CPCL line print mode, use the following command:
! U1 SETVAR "device.languages" "line_print"<CR><LF>
And to disable it and enable the ZPL control language, use the following command:
! U1 SETVAR "device.languages" "hybrid_xml_zpl"<CR><LF>
Once enabled, printing with line print is very simple. Sending text terminated with CR and LF characters
is all that is required for basic operation. Characters which are not terminate d with CR and LF will p rint
after a short timeout, or when the printer’s buffer fills.The FF character can also be used to advance the
form.
For a more detailed explanation of how line print works, see section 7.1 on page 164.
CPCL FOR LINK-OS PRINTERS
Page 25 of 329 1073699-001

CPCL FOR LINK-OS PRINTERS
Page 26 of 329 1073699-001

4 CPCL Commands Overview
Once you enter a CPCL session as documented on page 38, you can then use CPCL commands to
accomplish printing or configuration tasks.
This section provides documentation for all CPCL commands supported in the Link-OS version of CPC L,
and is divided into a number of section areas based on functions.
The layout of this section of the manual is as follows:
• Alphabetical Command List
o CPCL Command List
o Comtec Escape Command List
• Understanding How Commands are Documented
• CPCL Label Formatting Comma nds
o Introduction to Label Formatting Comma nds
o CPCL Label Formatting Commands
• CPCL Line Printing Commands
o Introduction to Line Printing in CPCL
o CPCL Line Printing Commands
• CPCL Font Command s
o Introduction to Fonts in CPCL
o CPCL Code Page and Encoding Commands
o CPCL Font Formats
• Media Management Commands
o Overview and Common Cases in Media Management
• Status Enquiry Commands
• Utility and Diagnostic Commands
o Two Key Diagnostic Re p ort
• Magnetic Card Reader Commands
• File System Commands
o Introduction to the CPCL file system in Link-OS
o Define and Use File Sessions
o CISDF and CIDSFCRC File Sessions
CPCL FOR LINK-OS PRINTERS
Page 27 of 329 1073699-001

CPCL FOR LINK-OS PRINTERS
Page 28 of 329 1073699-001

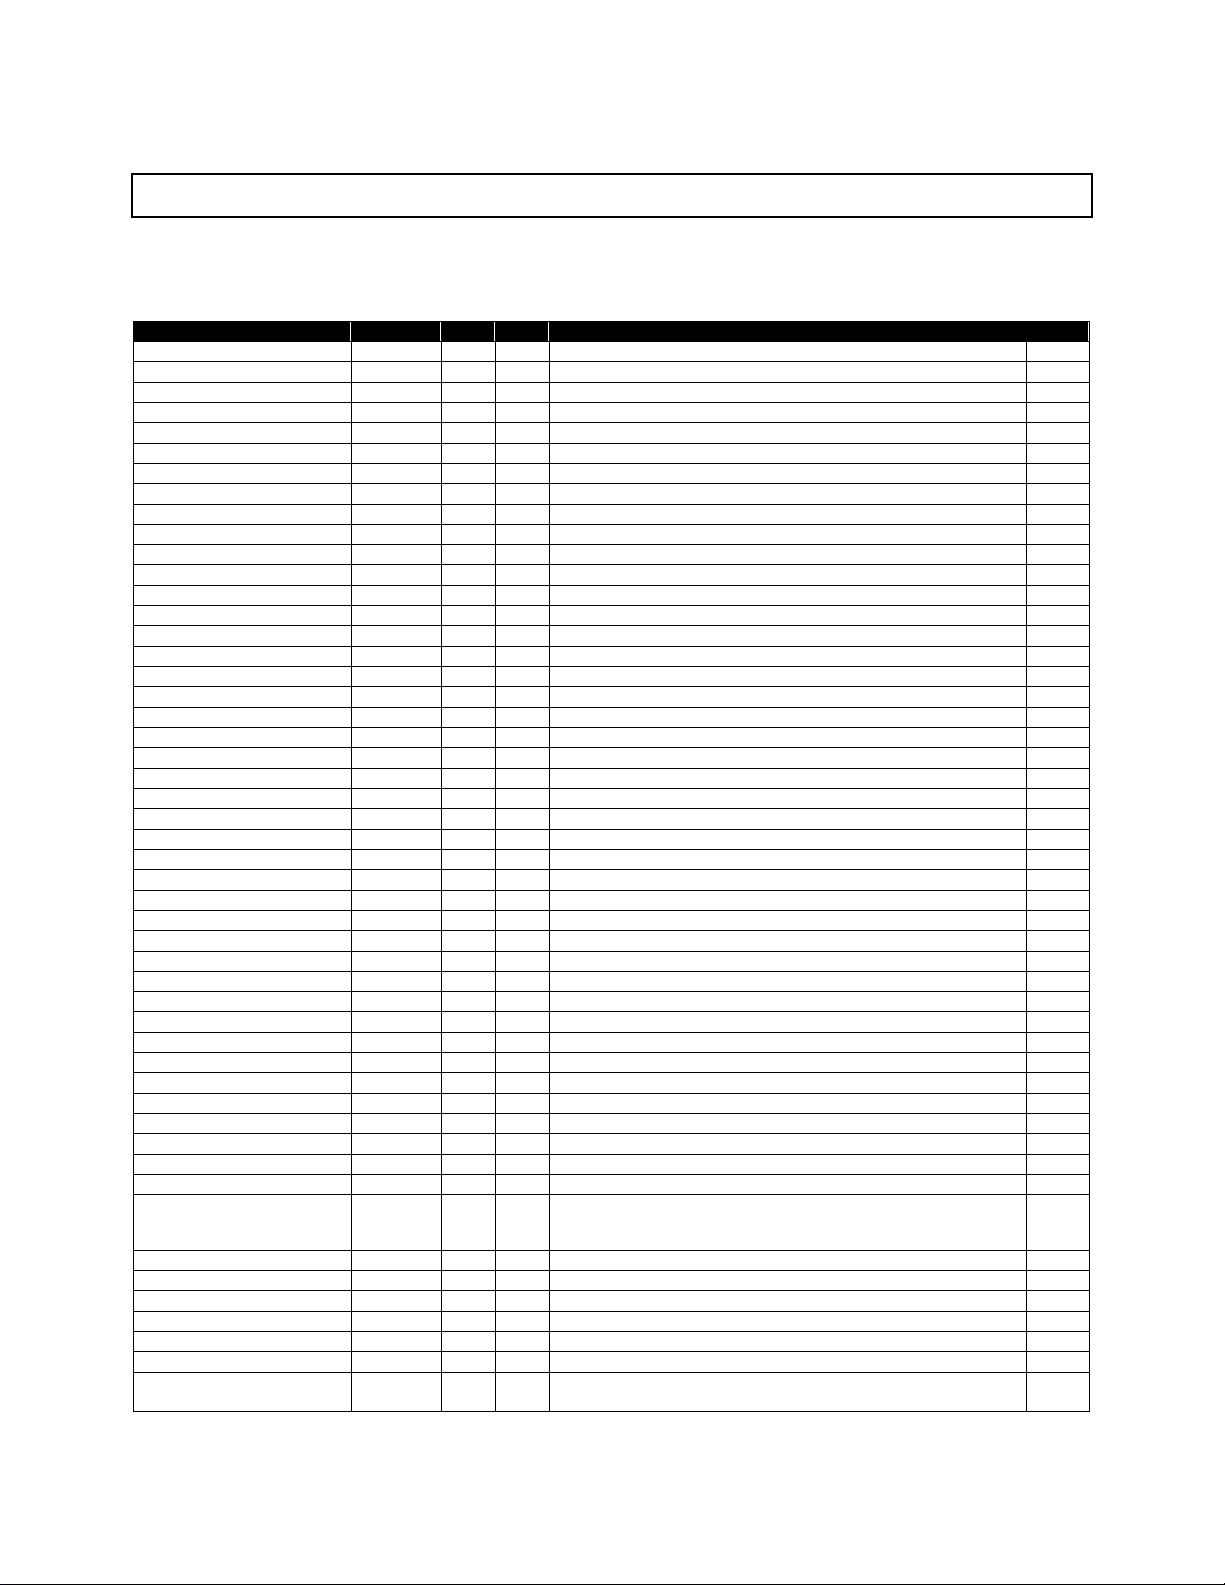
CPCL Command
Type
Label?
Utilities?
Description
Page
ABORT
Utility & Diagnostic
Yes
No
Aborts current label format
255
AUTOCAL
Media Management
No
Yes
Calibrates sensor thresholds.
209
AUTO-PACE
Media Management
Yes
Yes
Delays future prints until previous is taken.
210
B
Label Formatting
Yes
Yes (Line Print)
Alias for BARCODE
38
BARCODE
Label Formatting
Yes
Yes (Line Print)
Prints a barcode in label mode.
38
BARCODE-TEXT
Label Formatting
Yes
Yes
Turns on or off text line below barcodes.
85
BAR-SENSE
Media Management
Yes
Yes
Enables the media mark or bar sensor
212
BAT-INDICATOR
Label Formatting
Yes
No
Prints an indicator showing battery charge.
87
BAUD
Utility & Diagnostic
No
Yes
Changes serial port baud rate.
256
BEEP
Utility & Diagnostic
Yes
Yes
Makes the printers beeper sound.
257
BI
Status Enquiry
Yes
No
Alias for BAT-INDICATOR
87
BOX
Label Formatting
Yes
No
Draws a box.
89
BT
Label Formatting
Yes
Yes
Alias for BARCODE-TEXT
85
CAPTURE
Utility & Diagnostic
Yes
Yes
Captures incoming print data to file.
258
CC
Utility & Diagnostic
No
Yes
Alias for CHAR-COUNT
260
CENTER
Label Formatting
Yes
Yes (Line Print)
Specifies alignment for text fields.
92
CG
Label Formatting
Yes
Yes (Line Print)
Alias for COMPRESSED-GRAPHICS
94
CHAR-COUNT
Utility & Diagnostic
No
Yes
Returns number of characters received so far.
260
CHAR-SET
Font Commands
Yes
No
Alias for COUNTRY.
205
CHECKSUM
Utility & Diagnostic
No
Yes
Gets application checksum.
259
COMPRESSED-GRAPHICS
Label Formatting
Yes
Yes (Line Print)
Places binary graphics on a label.
94
CONCAT
Label Formatting
Yes
No
Use text of different fonts or sizes on the same line.
96
CONTRAST
Media Management
Yes
Yes
Changes print darkness coarsely.
213
COUNT
Label Formatting
Yes
No
Creates text fields which increment or decrement.
101
COUNTRY
Font Commands
Yes
Yes
Changes code page.
205
DEL
File Commands
No
Yes
Alias for DELETE.
318
DELAYED-ACTIONS
Utility & Diagnostic
Yes
Yes
Perform an action in some fixed amount of time.
261
DELETE
File Commands
No
Yes
Delete a file from disk.
318
DIR
File Commands
No
Yes
Show file directory.
320
DISPLAY
Utility & Diagnostic
No
Yes
Used to show text on printer’s display
262
DO
Utility & Diagnostic
Yes
Yes
Alias for SETVAR.
284
do
Utility & Diagnostic
Yes
Yes
Lower case alias for SETVAR.
284
DUMP
Utility & Diagnostic
Yes
Yes
Enters dump mode.
264
DUMP-IMAGE
Utility & Diagnostic
Yes
No
Dumps label data
265
EG
Label Formatting
Yes
Yes (Line Print)
Alias for EXPANDED-GRAPHICS
104
END
Label Formatting
Yes
No
Alias for PRINT.
104
END (File Session Command)
File Commands
Yes
No
Ends the definition of a stored format.
321
4.1 Alphabetical Command Lists
This section provides an alphabetical list of all CPCL commands, their basic function, their classification, and on what page in this document full
documentation can be found.
CPCL FOR LINK-OS PRINTERS
Page 29 of 329 1073699-001

CPCL Command
Type
Label?
Utilities?
Description
Page
EXPANDED-GRAPHICS
Label Formatting
Yes
Yes (Line Print)
Prints ASCII graphics on a label.
104
FEED
Media Management
No
Yes
Moves paper forward.
214
FG
Label Formatting
Yes
No
Alias of FONT-GROUP
107
FILE
File Commands
No
Yes
Renames or gets checksums of files.
322
FONT-GROUP
Label Formatting
Yes
Yes
Defines a font group.
107
FORM
Media Management
Yes
No
Advanced paper to the next mark at end of label.
215
FORM (Utilities Command)
Media Management
No
Yes
Advances paper to the next mark now.
215
GAP-SENSE
Media Management
Yes
Yes
Enables the gap or notch sensor.
216
GET-DATE
Utility & Diagnostic
Yes
Yes
Returns current date.
267
GET-TIME
Utility & Diagnostic
Yes
Yes
Returns current time.
268
GETVAR
Utility & Diagnostic
Yes
Yes
Returns SGD configuration setting value
269
getvar
Utility & Diagnostic
Yes
Yes
Lower case alias of GETVAR.
269
IL
Label Formatting
Yes
No
Alias of INVERSE-LINE.
114
IMAGE
Label Formatting
Yes
Yes
Sets drawing mode.
107
IN-CENTIMETERS
Label Formatting
Yes
Yes (Line Print)
Specifies that label is represented in centimeters.
112
IN-DOTS
Label Formatting
Yes
Yes (Line Print)
Specifies that label is represented in dots.
112
IN-INCHES
Label Formatting
Yes
Yes (Line Print)
Specifies that label is represented in inches.
112
IN-MILLIMETERS
Label Formatting
Yes
Yes (Line Print)
Specifies that label is represented in millimeters
112
INVERSE-LINE
Label Formatting
Yes
No
Draws an inverted line.
114
JOURNAL
Media Management
Yes
Yes
Specifies that a label does not end when a mark is found.
217
L
Label Formatting
Yes
No
Alias of LINE.
118
LABEL
Media Management
Yes
Yes
Specifies that a label ends when a mark is found.
218
LEFT
Label Formatting
Yes
Yes (Line Print)
Specifies alignment for text fields.
117
LINE
Label Formatting
Yes
No
Draws a line.
105
LMARGIN
Line Print
No
Yes (Line Print)
Sets left margin for line print text.
164
LP-LF-EQUALS-CRLF
Line Print
No
Yes (Line Print)
Sets LF to mean <CR><LF> in line print mode.
168
LP-ORIENT
Line Print
No
Yes (Line Print)
Sets the orientation of line print text.
170
LT
Utility & Diagnostic
Yes
Yes
Specifies the end of line terminator for label and utilities sessions
272
MAX-LABEL-HEIGHT
Utility & Diagnostic
No
Yes
Returns maximum supported label height
274
MCR
Card Reader
No
Yes
Configures the magnetic card reader
299
MCR-CAN
Card Reader
No
Yes
Cancels any pending magnetic card reader requests
303
MCR-QUERY
Card Reader
No
Yes
Retrieves card reader data when in query mode
304
ML
Label Formatting
Yes
No
Alias for MULTILINE
124
MOVE
Label Formatting
Yes
Yes
Moves label origin.
120
MULTI
Media Management
Yes
Yes
Used to set horizontal label quantity.
219
MULTILINE
Label Formatting
Yes
No
Prints multiple lines of text with same style.
124
NAME
Status Enquiry
No
Yes
Returns current firmware version.
241
NO-PACE
Media Management
Yes
Yes
Disables delaying of printing between labels
220
OLB
Utility & Diagnostic
Yes
Yes
Alias for ON-LOW-BATTERY.
276
ON-FEED
Utility & Diagnostic
Yes
Yes
Perform an action when the feed key is pressed.
275
ON-INDEX-MARK-ERROR
Media Management
Yes
Yes
Alias for PAPER-JAM.
225
ON-LOW-BATTERY
Utility & Diagnostic
Yes
Yes
Perform an action when battery is low.
276
ON-OUT-OF-PAPER
Media Management
Yes
Yes
Perform an action when out of paper error occurs.
221
PA
Media Management
Yes
Yes
Alias for PRESENT-AT.
229
CPCL FOR LINK-OS PRINTERS
Page 30 of 329 1073699-001

CPCL Command
Type
Label?
Utilities?
Description
Page
PACE
Media Management
Yes
Yes
Delay printing next label until feed key is pressed.
224
PAGE-WIDTH
Label Formatting
Yes
Yes
Specify the width of a label
127
PAPER-JAM
Media Management
Yes
Yes
Sets paper jam detection mechanism.
225
PATTERN
Label Formatting
Yes
No
Specifies fill pattern.
130
PCX
Label Formatting
Yes
Yes (Line Print)
Prints a PCX file on a label.
134
PCX180
Label Formatting
Yes
Yes (Line Print)
Prints a PCX file on a label rotated 180 degrees.
134
PCX270
Label Formatting
Yes
Yes (Line Print)
Prints a PCX file on a label rotated 270 degrees.
134
PCX90
Label Formatting
Yes
Yes (Line Print)
Prints a PCX file on a label rotated 90 degrees.
134
PCXMAG
Label Formatting
Yes
No
Prints a PCX file magnified.
136
PERSIST
Label Formatting
Yes
Yes
Determines if label is cleared once session is complete.
138
PJ
Media Management
Yes
Yes
Alias for PAPER-JAM.
225
POSTFEED
Media Management
Yes
Yes
Sets amount to feed after a label has printed.
227
PREFEED
Media Management
Yes
Yes
Sets amount to feed before a label is printed.
228
PRESENT-AT
Media Management
Yes
Yes
Sets amount to feed before and after a label is printed.
229
PRINT
Label Formatting
Yes
No
Ends a label session and effects printout.
139
PRINT (File Session Command)
File Commands
No
Yes
Ends a stored format with a PRINT command.
324
PW
Label Formatting
Yes
Yes
Alias for PAGE-WIDTH
127
R
Label Formatting
Yes
Yes
Alias for ROTATE.
142
RE-RUN
Utility & Diagnostic
Yes
Yes
Re-executes a stored format once it completes.
277
REVERSE-LINE
Label Formatting
Yes
Yes (Line Print)
Alias for INVERSE-LINE.
114
REVERSE
Media Management
Yes
No
Reverses media before the next label print.
230
REVERSE (Utilities Command)
Media Management
No
Yes
Reverse media now.
231
RIGHT
Label Formatting
Yes
Yes (Line Print)
Specifies alignment for text fields.
140
RL
Label Formatting
Yes
No
Alias for INVERSE-LINE.
114
ROTATE
Label Formatting
Yes
Yes
Sets rotation for scaled font printing.
142
RX
Line Print
No
Yes (Line Print)
Sets the line print cursor relative to where it is now.
173
RXY
Line Print
No
Yes (Line Print)
Sets the line print cursor relative to where it is now.
173
RY
Line Print
No
Yes (Line Print)
Sets the line print cursor relative to where it is now.
173
SCALE-TEXT
Label Formatting
Yes
No
Prints test from a scalable font.
144
SCALE-TO-FIT
Label Formatting
Yes
No
Prints text scaled to fit a particular area from a scaled font.
146
SET
Utility & Diagnostic
Yes
Yes
Sets up a macro substitution.
278
SETBOLD
Label Formatting
Yes
Yes
Sets text bold mode.
148
SET-DATE
Utility & Diagnostic
Yes
Yes
Sets current date.
281
SET-VERSION
Utility & Diagnostic
No
Yes
Sets response of GET-VERSION.
283
SETFF
Media Management
Yes
Yes
Sets mark search and skip distances.
232
SETLF
Line Print
No
Yes
Sets the height of a line-feed operation
175
SETLP
Line Print
No
Yes
Sets the font to be used in line print.
176
SETLP-BUFFER
Line Print
No
Yes
Set the size of the line print dot buffer.
179
SETLP-TIMEOUT
Line Print
No
Yes
Set delay before printing line print data.
180
SETMAG
Label Formatting
Yes
Yes (Line Print)
Set magnification of a font.
151
SETSP
Label Formatting
Yes
No
Set the spacing of a font.
154
SET-TIME
Utility & Diagnostic
Yes
Yes
Sets current time.
282
SET-TOF
Media Management
Yes
Yes
Set top-of-form offset relative to mark.
233
SETVAR
Utility & Diagnostic
Yes
Yes
Set a configuration setting.
284
CPCL FOR LINK-OS PRINTERS
Page 31 of 329 1073699-001

CPCL Command
Type
Label?
Utilities?
Description
Page
setvar
Utility & Diagnostic
Yes
Yes
Lower case alias of SETVAR.
284
SPEED
Media Management
Yes
Yes
Set print speed.
234
ST
Label Formatting
Yes
No
Alias for SCALE-TEXT.
144
STF
Label Formatting
Yes
No
Alias for SCALE-TO-FIT.
146
T
Label Formatting
Yes
No
Alias for TEXT.
158
T180
Label Formatting
Yes
No
Alias for TEXT180.
158
T270
Label Formatting
Yes
No
Alias for TEXT270.
158
T90
Label Formatting
Yes
No
Alias for TEXT90.
158
TEMP-MOVE
Label Formatting
Yes
Yes
Sets x and y print offset for the next label only.
156
TEXT
Label Formatting
Yes
No
Prints text on a label.
158
TEXT180
Label Formatting
Yes
No
Prints text on a label rotated 180 degrees.
158
TEXT270
Label Formatting
Yes
No
Prints text on a label rotated 270 degrees.
158
TEXT90
Label Formatting
Yes
No
Prints text on a label rotated 90 degrees.
158
TIMEOUT
Utility & Diagnostic
No
Yes
Sets power off inactivity timeout.
286
TONE
Media Management
Yes
Yes
Changes print darkness.
235
TURN
Media Management
Yes
Yes
Sets label out orientation.
236
TYPE
File Commands
No
Yes
Returns the contents of a file.
325
VB
Label Formatting
Yes
No
Alias for VBARCODE.
38
VBARCODE
Label Formatting
Yes
No
Prints a vertical barcode.
38
VBOX
Label Formatting
Yes
No
Prints a vertical box.
89
VCG
Label Formatting
Yes
No
Alias for VCOMPRESSED-GRAPHICS
94
VCHECKSUM
Utility & Diagnostic
No
Yes
Verifies application checksum.
288
VCOMPRESSED-GRAPHICS
Label Formatting
Yes
No
Prints a vertically oriented binary image.
94
VCONCAT
Label Formatting
Yes
No
Vertically rotated version of CONCAT.
96
VEG
Label Formatting
Yes
No
Alias for VEXPANDED-GRAPHICS.
104
VERSION
Status Enquiry
No
Yes
Returns short version number.
241
VEXPANDED-GRAPHICS
Label Formatting
Yes
No
Prints a vertically oriented ASCII image.
104
VSCALE-TEXT
Label Formatting
Yes
No
Prints vertically oriented text from a s calable font.
144
VSCALE-TO-FIT
Label Formatting
Yes
No
Prints vertically oriented text scaled to fit an area fr om a scaled font.
146
VST
Label Formatting
Yes
No
Alias for VSCALE-TEXT.
144
VSTF
Label Formatting
Yes
No
Alias for VSCALE-TO-FIT.
146
VT
Label Formatting
Yes
No
Alias for TEXT90.
158
VTEXT
Label Formatting
Yes
No
Alias for TEXT90.
158
WAIT
Utility & Diagnostic
Yes
No
Delays the specified amount of time.
287
X
Utility & Diagnostic
Yes
No
Specifies a constant X coordinate to use in label formatting functions.
289
X (Line Print)
Line Print
No
Yes
Specifies the X position to start from in line-print.
181
XY
Utility & Diagnostic
Yes
No
Specifies a constant X and Y coordinate to use in label formatting functions.
289
XY (Line Print)
Line Print
No
Yes
Specifies the X and Y position to start from in line-print.
181
Y
Utility & Diagnostic
Yes
No
Specifies a constant Y coordinate to use in label formatting functions.
289
Y (Line Print)
Line Print
No
Yes
Specifies the Y position to start from in line-print.
181
CPCL FOR LINK-OS PRINTERS
Page 32 of 329 1073699-001
Comtec Escape Command
Type
Description
Page
<ESC>}
Utility & Diagnostic
Set\Get the CCL Key.
293
<ESC>g
Line Print
Print line print graphics
185
<ESC>h
Status Enquiry
Send printer status
242
<ESC>I
Utility & Diagnostic
Send Two-key report to host.
294
<ESC>i
Status Enquiry
Send secondary printer status.
243
<ESC>JRU
Utility & Diagnostic
Retrieve current user label count
294
<ESC>N
Utility & Diagnostic
Acknowledge Reset
295
<ESC>p
Utility & Diagnostic
Power printer off.
295
<ESC>V
Utility & Diagnostic
Print Two-key report.
296
<ESC>v
Status Enquiry
Send firmware version.
244
4.2 Escape Commands List
Some commands still supported in CPCL are from an older language ca lled the Comtec Escape Language (CEL). These commands, unlike CPCL
Commands, are represented in short binary sequences rather than human-readable ASCII characters.
These commands are not processed while CPCL is within a session (of any type), they only operate when CPCL is not in a session.
The documentation for these commands is integrated with each of their respective sections based on the command type.
CPCL FOR LINK-OS PRINTERS
Page 33 of 329 1073699-001

5 How Commands Are Documented
In this section we will see sample documentation for a command, and go over what each of the sections
means in detail.
Documentation for each command begins with the command name. This name is case sensitive. Just
after that, there will be a format line. This line shows the format of the command, including all
parameters.
Immediately after this, there is the key properties table. This table has key information for each
command, and includes the following fields:
• Command Name
This is the name of the command.
• Short Form Aliases
Many commands in CPCL have short forms with identical syntax and parameters. If the command
has any such aliases, they are listed here.
• Valid Session Types
Many commands are only valid in certain session types. The supported session types ar e listed in
this field.
• Linked SGD
A number of configuration commands in CPCL have SGD equivalents. If the command has an
SGD which can do the same or a similar function, it will be listed here.
• Negative Aware
Not all commands in CPCL support the use of negative numbers. When they do not, a numeri c
parameters sign is ignored, and the absolute va lue of the parameter is taken. If the command
does react differently based on negative numbers , this field will be yes.
Just after that, there is a description of the function of the command, which gives a reasonable level of
detail to be able to utilize the command.
Following this is a quick reference of the parameters used in the command in table form. The entries in
this table are as follows:
• Parameter
The name of the parameter as outlined in the format line of the command.
CPCL FOR LINK-OS PRINTERS
Page 34 of 329 1073699-001

• Parameter Type
This represents the type of the para meter, which is always one of the types outlined in section
3.3 starting on page 19.
• Description
A brief description of the parameter’s function .
• Valid Range
The valid range of data taken by the parameter in a quick simple form.
After this there is a detailed breakout of each parameter that repeats all of the information in the table
and also provides more detail and additional information about the behavior when out of range values
are used.
Next, an example session showing the command in use is provided. On the example line there will be the
name of an LBL file. This is the filename of the label in the included samples label package. There may
also be a bitmap image shown which shows the expected output of the printer to the left side of the
screen.
Lastly, there is a section entitled Command Notes and Interactions, which contains more advanced details
about subtle behaviors of the command or how it interacts with other commands and sy stems. For most
users, this information is only necessary to review when you are trying to perform a very specific function
or understand an unusual behavior of a command.
CPCL FOR LINK-OS PRINTERS
Page 35 of 329 1073699-001
Command Name
SIMPLE-COMMAND
Short Form Aliases
SC
Valid Session Types
Label Sessions Only
Linked SGD
None
Negative Aware
No
Parameter
Type
Description
Valid Range
SampleX
5 Digit Unit Number
The X value for this sample command.
0 to Label Width in Units
SampleY
5 Digit Unit Number
The Y value for this sample command.
0 to Label Height in Units
SampleData
<CR><LF> Terminated
String
Data for the sample command.
Up to 8191 bytes.
X.X SAMPLE-COMMAND
SAMPLE-COMMAND [SampleX] [SampleY] [SampleData]<CR><LF>
This is the documentation of a sample command in CPCL. This command doesn’t actually exist, it is just
for the sake of helping you understand the layout of the command. Running the example label will only
print a blank label.
Parameters Quick Reference
[SampleX] - This is where there would be detail about the Sample X Parameter. We would include here
the size of the parameter that is accepted, the valid range, and information about what happens when
invalid values are specified.
[SampleY] - This is where there would be detail about the Sample Y Parameter. We would include here
the size of the parameter that is accepted, the valid range, and information about what happens when
invalid values are specified.
[SampleData] - This is where we would be detail on the SampleData Parameter. We would include here
the size of the parameter that is accepted, the valid range, and information a bout what happens when
invalid values are specified.
Example (SAMPLE-COMMAND.lbl):
! 0 200 200 150 1<CR><LF>
SAMPLE-COMMAND 100 100 Cheesecakes<CR><LF>
PRINT<CR><LF>
Command Notes and Interactions
In this section any advanced notes about the command’s behavior, as well as interaction with commands
and other systems.
CPCL FOR LINK-OS PRINTERS
Page 36 of 329 1073699-001
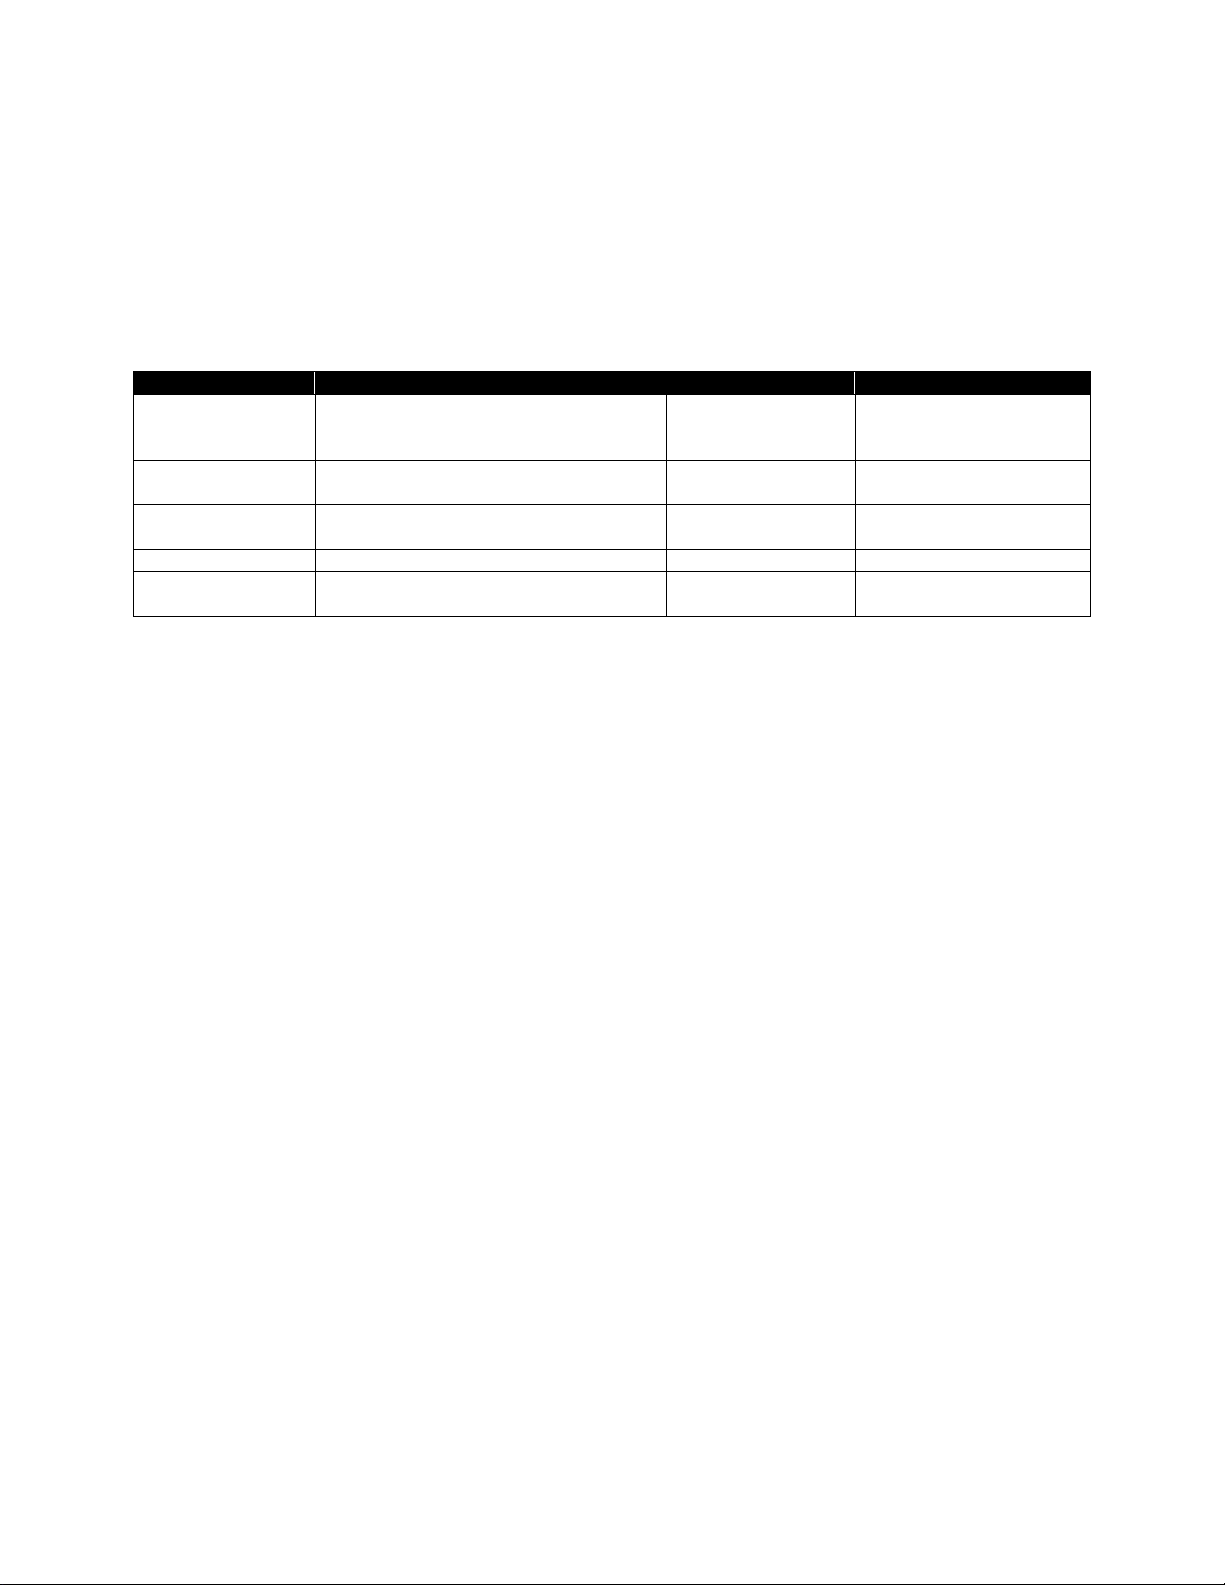
CPCL Command
Aliases
L?
U?
Description
Page
BARCODE
B
Yes
No
Prints a barcode in label mode
4038
BARCODE-TEXT
BT
Yes
Yes
Turns on or off text line below barcodes
85
BAT-INDICATOR
BI
Yes
No
Prints a battery charge indicator
87
BOX
Yes
No
Draws a box
89
CENTER
Yes
No
Specifies alignment for text fields
92
COMPRESSED-GRAPHICS
CG
Yes
No
Places binary graphics on a label
94
CONCAT
Yes
No
Use text of different fonts or sizes on the same line
96
COUNT
Yes
No
Creates text fields which increment or decrement
101
END
Yes
No
Alias for PRINT
104
EXPANDED-GRAPHICS
EG
Yes
No
Prints ASCII graphics on a label
104
FONT-GROUP
FG
Yes
Yes
Defines a font group
107
IMAGE
Yes
Yes
Sets drawing mode
107
IN-CENTIMETERS
Yes
No
Specifies that label is represented in centimeters
112
IN-DOTS
Yes
No
Specifies that label is represented in dots
112
IN-INCHES
Yes
No
Specifies that label is represented in inches
112
IN-MILLIMETERS
Yes
No
Specifies that label is represented in millimeters
112
INVERSE-LINE
IL
Yes
No
Draws an inverted line
114
LEFT
Yes
No
Specifies alignment for text fields
117
LINE
L
Yes
No
Draws a line
118
MOVE
Yes
Yes
Moves label origin.
120
MULTILINE
ML
Yes
No
Prints multiple lines of text with same style.
124
PAGE-WIDTH
PW
Yes
Yes
Specify the width of a label
127
PATTERN
Yes
No
Specifies fill pattern.
130
PCX
Yes
No
Prints a PCX file on a label.
134
PCX180
Yes
No
Prints a PCX file on a label rotated 180 degrees.
134
PCX270
Yes
No
Prints a PCX file on a label rotated 270 degrees.
134
PCX90
Yes
No
Prints a PCX file on a label rotated 90 degrees.
134
PCXMAG
Yes
No
Prints a PCX file magnified.
136
PERSIST
Yes
Yes
Determines if label is cleared once session is complete.
138
PRINT
Yes
No
Ends a label session and prints it.
139
REVERSE-LINE
RL
Yes
No
Alias for INVERSE-LINE.
114
RIGHT
Yes
No
Specifies alignment for text fields.
140
ROTATE
R
Yes
Yes
Sets rotation for scaled font printing.
142
SCALE-TEXT
ST
Yes
No
Prints test from a scalable font.
144
SCALE-TO-FIT
STF
Yes
No
Prints text scaled to fit a particular area from a scaled font.
146
SETBOLD
Yes
Yes
Sets text bold mode.
148
SETMAG
Yes
No
Set magnification of a font.
151
SETSP
Yes
No
Set the spacing of a font.
154
TEMP-MOVE
Yes
Yes
Sets x and y print offset for the next label only.
156
TEXT
T
Yes
No
Prints text on a label.
158
TEXT180
T180
Yes
No
Prints text on a label rotated 180 degrees.
158
TEXT270
T270
Yes
No
Prints text on a label rotated 270 degrees.
158
TEXT90
T90,
VTEXT
Yes
No
Prints text on a label rotated 90 degrees.
158
VBARCODE
VB
Yes
No
Prints a vertical barcode.
40
VBOX
Yes
No
Prints a vertical box.
89
VCOMPRESSED-GRAPHICS
VCG
Yes
No
Prints a vertically oriented binary image.
94
VCONCAT
Yes
No
Vertically rotated version of CONCAT.
96
VEXPANDED-GRAPHICS
VEG
Yes
No
Prints a vertically oriented ASCII image.
104
VSCALE-TEXT
VST
Yes
No
Prints vertically oriented text from a s calable font.
144
VSCALE-TO-FIT
VSTF
Yes
No
Prints vertically oriented text scaled to fit a particular area from
a scaled font.
146
6 Label Formatting Commands
The following list of commands can be used in label sessions. For this chart, it is assumed that line print
mode is disabled with regard to the use of commands in utilities sessions.
VT,
CPCL FOR LINK-OS PRINTERS
Page 37 of 329 1073699-001
Field Name
Description
Type
Valid Range
Offset
The number of units to offset all fields
horizontally.
Units Number
0 to 65535
Horizontal
Res.
The horizontal resolution of this label,
expressed in dots per inch.
Number (in dpi)
100 or 200
Vertical Res.
The vertical resolution of this label,
expressed in dots per inch.
Number (in dpi)
100 or 200
Height
The height of the label in units.
Unit Number
0 to 65535
Quantity
The number of copies of the label to
print.
Number (in quantity)
0 to 1024
6.1 Label Session Details
A label that contains information to be printed begins with the ! character, followed by a series of ASCII
numbers which represent information about the label that follows.
In order for this session to be detected, the first character of the Offset parameter must be a digit.
! [Offset] [Horizontal Res.] [Vertical Res.] [Height] [Quantity]<CR><LF>
from the left side of the label
After the header, the label session can consist any number of utility or printing commands. To terminate
the session, it can use the PRINT or END command. When this command is received, the label will be
printed. See page 139 for documentation on these commands.
Advanced Notes
All of the above values have a maximum of five digits. For more information, see the rules on Numeric
Interpretation Rules on page 20.
If the Offset is greater than the print width (as set by the PRINT-WIDTH command), the label will wrap
around the label memory space, with data wrapping to the following pixel line if it moves off the right
edge of the label. In this case, it is also set to the modulo of the value specified. Offset is byte -aligned.
If the first character of the Offset is not a digit, the entire label will fall through to the next parser, as this
is the method used to detect the difference between a label and other types of sessions. If you need to
specify value less than one for the offset, prepend the value wit h a 0, such as 0.56 rather than .56. This
ensures that the offset will be processed as expected.
If the first chara cter of the offset is not a digit, and is not an alpha character, the data passed through to
the next parser will have the space after the ! character removed.
If the Quantity exceeds 1024, or the Height exceeds the available label memory, the label operation is
aborted, and any commands that would have made up the label fall through t o the next parser.
For the Horizontal and Vertical resolution, any value except 100 is interpreted as 200.
If any values except offset are negative, their absolute value is used. The label session will be considered
invalid if a negative offset is used, and will fall throug h to the next parser.
A CPCL label always has a single blank dot line at in the top most row of the label, which cannot be
drawn to by most commands.
CPCL FOR LINK-OS PRINTERS
Page 38 of 329 1073699-001

Option
Associated Command
Contrast
CONTRAST
Tone
TONE
Print Resolution
None
Media Sense Mode
BAR or GAP
Character Spacing
SETSP
Character Bolding
SETBOLD
Horizontal Quantity
HQUANTITY
Option
Associated Command
Set to Value
Set End of Print Feed Operation
FORM
(as if not present – do not feed to mark)
Set Contrast
CONTRAST
Last valid utilities value, or 0
Set Tone
TONE
Last valid utilities value, or SGD value
Set Left Justification
LEFT
0 (justify over whole label)
Set Additional Character Spacing
SETSP
0 (no additional spacing)
Set Amount to Reverse
REVERSE
0 (no reverse)
Set Debug Flag
DEBUG
(as if not present – no debug output)
Set Wait Value
WAIT
0 (no delay)
Set Unit System to Dots
IN-DOTS
(no parameters)
Set Field Rotation
ROTATE
0 (no rotation)
Set Fill Pattern
PATTERN
100 (solid black)
Set Bolding
SETBOLD
0 (not bold)
Set Horizontal Quantity
HQUANTITY
0 (one copy)
Set X and Y Substitution
XY
0 0 (disable substitution)
When a new label session is started, the following settings are cached, and restored when the session
ends. This allows you to modify them in the label session without changing the system-wide settings.
At the start of each new label session, the following values are set.
CPCL FOR LINK-OS PRINTERS
Page 39 of 329 1073699-001

Command Name
BARCODE, VBARCODE
Short Form Aliases
B, VB
Valid Session Types
Label or Utilities Sessions
Linked SGD
None
Negative Aware
No
Parameter
Type
Description
Valid Range
Type
Space Terminated String
The type of barcode to print.
See table below.
Width
5 Digit Unit Number
The width of a narrow bar.
0 to 65535 units
Ratio
5 Digit Number
The ratio of wide to narrow bars.
0 to 4, 20 to 30.
Height
5 Digit Unit Number
The height of the barcode.
0 to 65535 units
X
5 Digit Unit Number
The X position where the barcode begins
0 to 65535 units
Y
5 Digit Unit Number
The Y position where the barcode begins
0 to 65535 units
Data
<CR><LF> Terminated
String
The data to be encoded into a barcode.
Up to 8191 bytes of Alpha
Numeric Data.
Type
Symbology
Ratio
Data Specification
128
Code 128
No
Subtype (A, B, or C) is auto-determined based on data provided.
128A
Code 128A
No
ASCII characters 0 to 95.
128B
Code 128B
No
ASCII characters 32 to 127.
128C
Code 128C
No
ASCII digits only.
128E
Code 128 Extended
No
Any character ASCII 127 or less.
39
Code 39
Yes
Any character ASCII 127 or less.
39C
Code 39 with Check Digit
Yes
Any character ASCII 127 or less.
93
Code 93
No
Any character ASCII 127 or less.
CODABAR
CodaBar
Yes
Digits 0-9 and symbols -$:/.+
A,B,C and D are valid as first or last character (start and stop characters).
CODABAR16
CodaBar with Checksum
Yes
Same as CODABAR but includes Mod16 Checksum
EAN13
EAN-13
No
12 ASCII digits (checksum will be calculated and a dded)
13 ASCII digits including checksum
EAN132
EAN-13 Plus 2
No
12 or 13, followed by a space then 2 digits.
6.2 BARCODE
The barcode command has several syntaxes based on the type of barcode being printed. The most
common syntax is the 1D barcode format.
6.2.1 1D Barcodes
BARCODE [Type] [Width] [Ratio] [Height] [X] [Y] [Data]<CR><LF>
VBARCODE [Type] [Width] [Ratio] [Height] [X] [Y] [Data]<CR><LF>
This command is used to print barcodes in the CPCL language. There are numerous sub-types of
barcodes in CPCL, each having their own specific formats for data. See the tables below for more
information.
VBARCODE is identical to BARCODE, except it is oriented vertically.
Parameters Quick Reference
[Type] – This represents the type of barcode that is to be printed. Some types of barcodes ma y take
specific amounts of data, or may have to include checksum information. If the type is not one of the
types below, no barcode will be printed.
See the table below for supported types, and what data is accepted.
CPCL FOR LINK-OS PRINTERS
Page 40 of 329 1073699-001

Type
Symbology
Ratio
Data Specification
EAN135
EAN-13 Plus 5
No
12 or 13, followed by a space then 5 digits.
EAN8
EAN-8
No
6 digits (will be prefixed with 0 and checksum added a t end)
8 digits
EAN82
EAN-8 Plus 2
No
6,7, or 8 ASCII digits, followed by space, then 2 ASCII digits.
EAN85
EAN-8 Plus 5
No
6,7, or 8 ASCII, followed by space, then ASCII 5 digits .
F39
Code 39 Full
Yes
Any ASCII character numbering 127 or less.
F39C
Code 39 Full With Check
Digit
Yes
Any ASCII character numbering 127 or less.
FIM
Facing Identification Mark
No
A or B or C only, 1 character.
I2OF5
Interleaved 2 of 5
Yes
ASCII digits only.
I2OF5C
I 2 of 5 with Checksum
Yes
ASCII digits only.
I2OF5G
German Post Code
Yes
11-14 ASCII digits.
INDUST2OF5
Interleaved 2 of 5
Yes
Identical to I2OF5.
INDUST2OF5C
I 2 of 5 with Checksum
Yes
Identical to I2OF5C.
MSI
MSI
Yes
Up to 13 ASCII digits. No check digit.
MSI10
MSI
Yes
Up to 13 ASCII digits. Single modulo 10 chec k digit.
MSI1010
MSI
Yes
Up to 13 ASCII digits. Two modulo 10 check digits.
MSI1110
MSI
Yes
Up to 13 ASCII digits. Modulo 11 and modulo 11 check digits.
NW7
Codabar
Yes
Identical to CODABAR.
NW7HEX
Codabar
Yes
Identical to CODABAR.
PLESSEY
MSI
Yes
Up to 13 ASCII digits. Fixed ratio of 2:1, otherwise same as MSI10.
PLUS2
Plus 2 Barcode Only
No
2 ASCII Digits.
PLUS5
Plus 5 Barcode Only
No
5 ASCII Digits.
POSTNET
Post Net
Yes
Any number of ASCII digits. Dash character valid but stripped out.
UCCEAN128
GS1-128
No
See the GS1-128 standard.
UCCEAN128E
GS1-128 Extended
No
See the GS1-128 standard.
UPCA
UPC-A
No
12 ASCII digits, 12th will be stripped off and replaced with checksum.
11 ASCII digits. Checksum will not be added.
UPCA2
UPC-A Plus 2
No
11 or 12, followed by space, then 2 digits. Checks um will be installed if 12.
UPCA5
UPC-A Plus 5
No
11 or 12, followed by space, then 5 digits. Checks um will be installed if 12.
UPCE
UPC-E
No
7 digits
6 digits, will be prefixed with 0
UPCE2
UPC-E Plus 2
No
6 or 7, followed by space, then 2 digits.
UPCE5
UPC-E Plus 5
No
6 or 7, followed by space, then 5 digits.
0 = 1.5 : 1
1 = 2.0 : 1
2 = 2.5 : 1
3 = 3.0 : 1
4 = 3.5 : 1
20 = 2.0 : 1
21 = 2.1 : 1
22 = 2.2 : 1
23 = 2.3 : 1
24 = 2.4 : 1
25 = 2.5 : 1
26 = 2.6 : 1
27 = 2.7 : 1
28 = 2.8 : 1
29 = 2.9 : 1
30 = 3.0 : 1
7 digits (checksum will be added at end)
[Width] – This represents the width of a narrow bar within the barcode in units. The entire range of
values is supported. This dot is automatically incremented by one dot after it is converted from units.
[Ratio] – This represents the ratio of a narrow bar to a wide bar. The “Ratio” column above indicates if a
particular barcode type supports the use of this field. If it is not supported, it is ignored, but must be
provided. Refer to the following table for the valid ratio values. If the rat io is not one of these values, the
barcode will not be printed, even if the specified barcode type does not support ratios.
When using the PostNet barcode type, Ratio represents the size of the fixed spacing between each
symbol in the barcode. This value becomes measured in dots, and one is added to the value to determine
what spacing to use.
[Height] – This represents the height of the barcode in units. T her e is no limit on this value. A value of
zero will result in no barcode being printed.
CPCL FOR LINK-OS PRINTERS
Page 41 of 329 1073699-001

To represent this character:
Send ASCII Code
Code 128 A
Code 128 B
Code 128 C
FNC3
FNC 3
N/A
128
FNC2
FNC 2
N/A
129
Shift to B
Shift to A
N/A
130
Code C
Code C
N/A
131
Code B
FNC4
Code B
132
FNC4
Code A
Code A
133
FNC1
FNC1
FNC1
134
NUL (ASCII 0)
135
LF (ASCII 10)
136
CR (ASCII 13)
137
[X] [Y] – The X and Y coordinates, in units, specifying where the barcode is to be placed. These
coordinates are affected by the alignment commands CENTER, LEFT and RIGHT.
[Data] – The data to be encoded in the barcode. The data must follow the format outlined in the table
above, or no barcode will be printed.
Some barcode (Code 128 in particul ar) types allow the encoding of the NUL, LF and CR characters.
Because nulls are stripped out of the Data parameter when it is read, and LF and CR characters are used
to terminate the parameter, if you wish to encode these characters, the following special values can be
sent in place of these characters to encode them. Note that these are not ASCII numbers, but rather a
single binary ASCII character.
In addition, there are a number of special characters that are related to the barcode specification which
can be encoded.
Examples (BARCODE-1D.LBL):
! 0 200 200 1000 1<CR><LF>
JOURNAL<CR><LF>
BT 7 0 2<CR><LF>
BARCODE 128 1 2 20 25 0 12345<CR><LF>
T 7 0 300 0 Code 128<CR><LF>
BARCODE 39 1 2 20 25 50 12345<CR><LF>
T 7 0 300 50 Code 39<CR><LF>
BARCODE 93 1 2 20 25 100 12345<CR><LF>
T 7 0 300 100 Code 93<CR><LF>
BARCODE CODABAR 1 2 20 25 150 A12345B<CR><LF>
T 7 0 300 150 CodaBar<CR><LF>
BARCODE EAN13 1 2 20 25 200 123456789012<CR><LF>
T 7 0 300 200 EAN13<CR><LF>
BARCODE EAN8 1 2 20 25 250 01234567<CR><LF>
T 7 0 300 250 EAN8<CR><LF>
BARCODE FIM 1 2 20 25 300 A<CR><LF>
T 7 0 300 300 FIM<CR><LF>
BARCODE I2OF5 1 2 20 25 350 12345<CR><LF>
T 7 0 300 350 I2 of 5<CR><LF>
BARCODE MSI 1 2 20 25 400 12345<CR><LF>
T 7 0 300 400 MSI<CR><LF>
BARCODE POSTNET 1 2 20 25 450 12345<CR><LF>
T 7 0 300 450 PostNet<CR><LF>
BARCODE UPCA 1 2 20 25 500 123456789012<CR><LF>
T 7 0 300 500 UPC-A<CR><LF>
BARCODE UPCE 1 2 20 25 550 1234567<CR><LF>
T 7 0 300 550 UPC-E<CR><LF>
BARCODE UPCE5 1 2 20 25 600 1234567 12345<CR><LF>
T 7 0 300 600 UPC-E Plus 5<CR><LF>
BARCODE F39 1 2 20 25 650 a<135>c<CR><LF>
T 7 0 300 650 Full Code 39<CR><LF>
PRINT<CR><LF>
CPCL FOR LINK-OS PRINTERS
Page 42 of 329 1073699-001

Use in Utilities Sessions for Line Print
In versions of Link-OS Firmware g reater than 19.6, The BARCODE command and all its variants can be
used in a utilities session to print a barcode in line print mode. The printer does not have to be in line
print mode for this command to be used in utilities mode. The BARCODE-TEXT command app lies to
barcodes printed in a utilities session. The X and Y parameters of the barcode must be specified, but
have no effect; instead the X, Y, RX, RY, XY or RXY commands must be used to specify the location of
the barcode.
Note that only the BARCODE command operates in line print mode, VBARCODE does not.
It may be necessary to use the SET-LF command to be able to see the entire height of the barcode. See
the line print section on page 25 for more information.
The height of barcodes in line print mode should not exceed the height specified by SETLP-BUFFER.
Utilities Example:
! U1 SETLF 160<CR><LF>
! U1 BARCODE-TEXT 7 0 0<CR><LF>
! U1 BARCODE 128 1 2 150 0 0 12345<CR><LF>
Command Notes and Interactions
When printing a vertical barcode, the Y coordinate will be increased by two.
By default, numbers are not printed below barcodes in CPCL, but this feature can be enabled using the
BARCODE-TEXT command, see page 85. The above example uses this command to print the text under
the barcodes.
CPCL FOR LINK-OS PRINTERS
Page 43 of 329 1073699-001
Command Name
BARCODE AZTEC, VBARCODE AZTEC
Short Form Aliases
B AZTEC, VB AZTEC
Valid Session Types
Label Sessions Only
Linked SGD
None
Negative Aware
No
Parameter
Type
Description
Valid Range
X
5 Digit Unit Number
The X position where the barcode begins
0 to 65535 units
Y
5 Digit Unit Number
The Y position where the barcode begins
0 to 65535 units
Width
5 Digit Number
The dot-width of a single element in the code
1 to 36
ERL
5 Digit Number
The error recovery level or size
See below
Flags
5 Digit Number
Is the barcode using flag escapes?
0 or 1
Menu
5 Digit Number
Is the barcode a menu?
0 or 1
Multi
5 Digit Number
Is the barcode a structured append part?
0 or 1
ID
<CR><LF> Or Space
Terminated String
The structured append ID field
Up to 25 ASCII Characters
Data
<CR><LF> Terminated
String
The data to be encoded in the barcode
See below
ERL Value
Meaning
0 (default)
Default error correction
1 to 99
Specify minimum error correction in percent
101 to 104
1 to 4-layer compact symbol
201 to 232
1 to 32-layer full-range symbol
6.2.2 Aztec Code Barcode
BARCODE AZTEC [X] [Y] XD [Width] EC [ERL] F [Flags] ME [Menu] M [Multi] ID [ID]<CR><LF>
[Data]<CR><LF>
ENDQR<CR><LF>
VBARCODE AZTEC [X] [Y] XD [Width] EC [ERC] F [Flags] ME [Menu] M [Multi] ID [ID]<CR><LF>
[Data]<CR><LF>
ENDQR<CR><LF>
The BARCODE AZTEC command is used to print Aztec Code barcodes in the CPCL language.
VBARCODE AZTEC is identical to BARCO DE, except it is oriented vertically.
Note that this command has optional parameters XD, EC, F, ME, M and ID. In order to use these
parameters, the optional parameter must be followed by a space, then a number which complies with the
table below.
Parameters Quick Reference
[X] [Y] – The X and Y coordinates, in units, specifying where the barcode is to be placed.
XD [Width] – The dot width of a single element within the barcode. There is no limit on the width value,
but values above 36 are not recommended as they will wrap, rendering the barcode unreadable.
A value of 0 will result in no barcode being printed. If not specified, a value of 6 is used. The use of
values 1 and 2 are not recommended as the barcode may be difficult to scan.
EC [ERL] – This value is used to specify the level of error correction data to encode in the barcode, or to
specify the exact size of the barcode. The following values are valid:
CPCL FOR LINK-OS PRINTERS
Page 44 of 329 1073699-001
300
Print simple rune only
ERL Value
Size
Capacity (Digits)
Capacity (Text)
Capacity (Binary)
101
15x15
13
12
6
102
19x19
40
33
19
103
23x23
70
57
33
104
27x27
110
89
53
201
19x19
18
12
6
202
23x23
49
40
24
203
27x27
84
68
40
204
31x31
128
104
62
205
37x37
178
144
87
206
41x41
232
187
114
207
45x45
294
236
145
208
49x49
362
291
179
209
53x53
433
384
241
210
57x57
516
414
256
211
61x61
601
482
298
212
67x67
691
554
343
213
71x71
793
636
394
214
75x75
896
749
446
215
79x79
1008
808
502
216
83x83
1123
900
559
217
87x87
1246
998
621
218
91x91
1378
1104
687
219
95x95
1511
1210
753
220
101x101
1653
1324
824
221
105x105
1801
1442
898
222
109x109
1956
1566
976
223
113x113
2216
1694
1056
224
117x117
2281
1826
1138
225
121x121
2452
1963
1224
226
125x125
2632
2107
1314
227
131x131
2818
2256
1407
228
135x135
3007
2407
1501
229
139x139
3205
2565
1600
230
143x143
3409
2728
1702
231
147x147
3616
2894
1806
232
151x151
3832
3067
1914
300
N/A
3 up to 255
N/A
N/A
Values of 0 to 99 are used for specifying error recovery data, and represent how much recovery
information to include in the barcode in percent.
Values 101 to 104 and 201 to 232 are used to specify exactly what size barcode is printed. When using
one of the size values, the error correction is automatically calculated, and cannot be separately
specified. Values 101 to 104 are using the Compact Aztec Code symbology variant, while 201 to 232 are
using the normal Aztec Code specification.
The following table shows how much data can be enco ded into each of the various values. The capacity
values in this table are recommendations, leaving room to encode the default 23% error correction data.
It may be possible to encode additional data, but it will reduce the error recovery percentage, and is not
recommended. Any remaining space for fixed-size Aztec code barcodes will be filled with error recovery
data.
See the data section for more information on each of the capacity types.
CPCL FOR LINK-OS PRINTERS
Page 45 of 329 1073699-001
Encode Type
Characters that can be encoded
Upper (Text)
Uppercase A-Z and space
Lower (Text)
Lowercase A-Z and space
Mixed (Text)
@\^_ `|~ characters, low-ASCII and space
Punct (Text)
!”#$%& '()*+,-./;<=>?[]{}
<CR>,<CR><LF>
Digit
0-9, comma, period, and space
Binary
ASCII Values 0-255
The value of 300 is a special symbol that can only encode 3 numbers up to 255. See the
more details
The default value if the value is not specified is 0, which means an erro r correction factor of about 23%.
F [Flags] – A zero or one value that specifies if flag characters are able to be encoded in the data stream.
Any non-zero value is interpreted as 1. The default value if the value is not specified is 0, disabling flag
encoding.
ME [Menu] – Specifies if the barcode is a menu. This is a flag signaling if the barc ode contains
configuration information for the scanner.
Any non-zero value is interpreted as 1. The default value if the value is not specified is 0, disabling flag
encoding.
M [Multi] – Specifies the barcode is to be split into multiple barcodes. This value must be between 1 and
26, and specifies the total number of symbols that make up the complete barcode.
The barcode data will be distributed between all the barcodes, and the barcodes will be placed next to
each other on the horizontal axis. Each symbol will be separated by one element’s worth of pixels
The default value if the value is not specified is 0, disabling mutli-encoding.
Multi is ignored when using ECL 300, only one rune is printed regardless of the value.
ID [ID] – Specifies a string which is encoded into eac h barcode when using the
Multi
often used as a description. It cannot exceed 25 characters, any characters in excess of 25 will be
ignored. ID must be an ASCII string that complies with the “Text” data mode as shown below.
Multi
When
is disabled, the value is ignored. By default this field is empty.
[Data] – Specifies the data to be encoded in the barcode. The most efficient data type will be
automatically selected based on the data provided, and the barcode will automatically switch bet ween
data types as necessary. The system starts in encoding type “uppe r ” a nd each switch takes at least the
space of one character of the current mode to change.
The full range of characters can be encoded. Codes 0-127 are ANSI X3.4, and 128-255 are encoded in
ISO 8859-1. This corresponds to an ECI of 3 (see Flag Mode, below).
The following modes are supported.
Data
section for
option. This string is
Note that in CPCL, you cannot encode ASCII NUL in the data stream.
CPCL FOR LINK-OS PRINTERS
Page 46 of 329 1073699-001

Flag Mode
Flag
When
is used to encode the escape character. If set to 0, no such conversion is made and encoding FLG
characters is not possible.
The
The value of 0 serves a de facto special purpose as FNC1, and is used to specify GS-1 style data (similar
to a GS1-128 barcode).
Values 1-6, followed by 1-6 digits respectively specify the ECI (Extended Chanel Interpretations) identifier
the data is encoded with.
A value of 7 is reserved for future use and serves no function.
Rune Mode
When
be an ASCII number from 0-255, representing the rune to encode.
Termination of Data
The data string, in either mode (manual or automatic) is terminated with the following sequence. No part
of this data is encoded in the data that is put into the barcode.
<CR><LF>ENDAZTEC<CR><LF>
This termination structure must app ear at the end of the b arcode, or the barcode is not terminated.
Examples (BARCODE-AZTEC.LBL):
! 0 200 200 1000 1<CR><LF>
B AZTEC 25 25<CR><LF>
AZTEC BARCODE<CR><LF>
ENDAZTEC<CR><LF>
ML 24 T 7 0 270 25<CR><LF>
Aztec Code - Minimal Form<CR><LF>
Default Width (6)<CR><LF>
Default Error Correction (23%)<CR><LF>
Data:<CR><LF>
AZTEC BARCODE<CR><LF>
ENDML<CR><LF>
B AZTEC 25 180 XD 6 EC 65 F 1<CR><LF>
<ESC>0FNC Barcode Example<CR><LF>
ENDAZTEC<CR><LF>
ML 24 T 7 0 270 180<CR><LF>
Aztec Code<CR><LF>
Width 6 - Use Flags<CR><LF>
Error Correction - 65%<CR><LF>
Data:<CR><LF>
[FNC1]FNC Barcode Example<CR><LF>
ENDML<CR><LF>
CPCL FOR LINK-OS PRINTERS
set to 1, <ESC>n is is used to encode FLG characters into the data stream, and <ESC><ESC>
n
in a flag command is an ASCII character 0 to 7.
ERL
is 300, a special Aztec rune is dra wn which encodes just one character. The
Page 47 of 329 1073699-001
Data
field should

B AZTEC 25 350 XD 5 EC 206<CR><LF>
Type 218 Barcode Example<CR><LF>
ENDAZTEC<CR><LF>
ML 24 T 7 0 270 350<CR><LF>
Aztec Code<CR><LF>
Width 5<CR><LF>
Manual Size 206 - 41x41<CR><LF>
Data:<CR><LF>
Type 206 Barcode Example<CR><LF>
ENDML<CR><LF>
B AZTEC 25 600 XD 8 EC 300<CR><LF>
129<CR><LF>
ENDAZTEC<CR><LF>
ML 24 T 7 0 270 600<CR><LF>
Aztec Code - Rune<CR><LF>
Width 8<CR><LF>
Manual Size 300 - Simple Rune<CR><LF>
Data: 129<CR><LF>
ENDML<CR><LF>
B AZTEC 25 740 XD 5 EC 102 M 6<CR><LF>
AAABBBCCC111222333444
AAABBBCCC111222333444
AAABBBCCC111222333444
AAABBBCCC111222333444
AAABBBCCC111222333444
AAABBBCCC111222333444
<CR><LF>
ENDAZTEC<CR><LF>
CENTER 670<CR><LF>
ML 24 T 7 0 0 870<CR><LF>
Aztec Code - Multi <CR><LF>
Width 5 - Six Multi<CR><LF>
Manual Size 101 - 15x15 Compact<CR><LF>
Data (repeated 6 times):AAABBBCCC111222333444<CR><LF>
ENDML<CR><LF>
LEFT<CR><LF>
PRINT<CR><LF>
CPCL FOR LINK-OS PRINTERS
Page 48 of 329 1073699-001
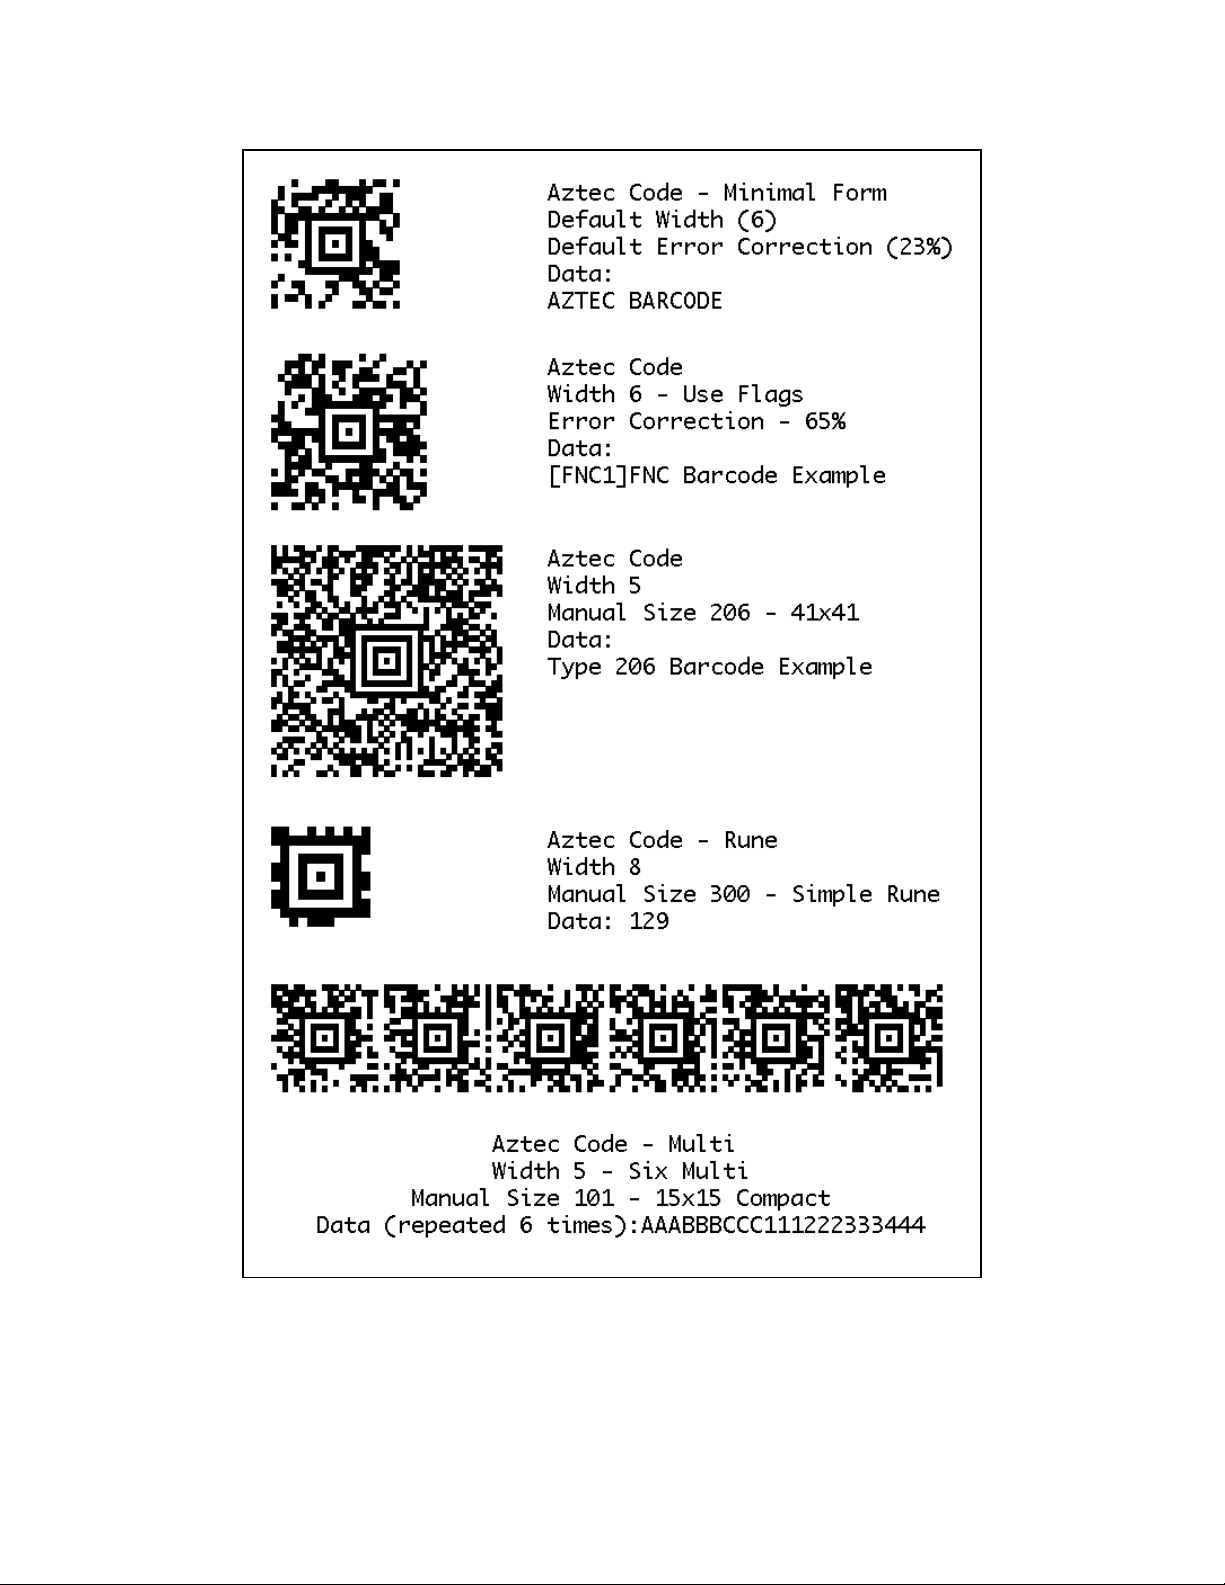
Use in Utilities Sessions for Line Print
CPCL FOR LINK-OS PRINTERS
Page 49 of 329 1073699-001

In versions of Link-OS greater than 19.6, The BARCODE command and all its variant s can be used in a
utilities session to print a barcode in line print mode. T he pr inter does not have to be in line print mode
for this command to be used in utilities mode. The X and Y parameters of the barcode must be specified,
but have no effect, instead the X, Y, RX, RY, XY or RXY commands m ust be used to specify the location
of the barcode.
Note that only the BARCODE command operates in line print mode, VBARCODE does not.
For Aztec barcodes, the X parameter of the X, XY, RX and RXY commands is not used, instead the X
value of the command itself is used.
It may be necessary to use the SET-LF command to be able to see the entire height of the barcode. See
the Introduction to Line Print on pag e 25 for more information.
Utilities Example:
! U1 SETLF 160<CR><LF>
! U1 B AZTEC 0 0<CR><LF>
AZTEC BARCODE<CR><LF>
ENDAZTEC<CR><LF>
Command Notes and Interactions
The BARCODE-TEXT command cannot be used to print data representations under barcode created with
this command, no text will print.
The justify commands LEFT, RIGHT and CENTER do not have any effect on barcodes created with this
command.
The optional parameters may be specified in any order, but this is not recommended.
Data
The
defined on many barcode readers in this case and use of it is not recommended.
parameter, if empty, causes an empty barcode to be created. The reading behavior is poorly
CPCL FOR LINK-OS PRINTERS
Page 50 of 329 1073699-001
Command Name
BARCODE DATAMATRIX
VBARCODE DATAMATRIX
Short Form Aliases
B DATAMATRIX
VB DATAMATRIX
Valid Session Types
Label Sessions Only
Linked SGD
None
Negative Aware
No
Parameter
Type
Description
Valid Range
X
5 Digit Unit Number
The X position where the barcode begins
0 to 65535 units
Y
5 Digit Unit Number
The Y position where the barcode begins
0 to 65535 units
Scale
5 Digit Number
The scale of the barcode.
0 to 65535
ECC
5 Digit Number
Specifies the level of error correction.
See Below.
Columns
5 Digit Number
Specifies the number of columns to use.
See Below.
Rows
5 Digit Number
Specifies the number of rows to use.
See Below.
Format
5 Digit Number
Specifies the data format when ECC is not 200.
1 to 6
EscapeChar
Space Terminated String
Specifies the escape character to use.
See Below.
Data
Raw String
Data for barcode
See Below.
ECC Value
Description
0
No Correction Data – Error detection only
50
2.8% Recovery - Convolution-Based Error Correction
80
5.5% Recovery - Convolution-Based Error Correction
100
12.6% Recovery - Convolution-Based Error Correction
140
25% Recovery - Convolution-Based Error Correction
200
25% Recovery – Reed Solomon-Based Error Correction
6.2.3 Data Matrix Barcod e
BARCODE DATAMATRIX [X] [Y] H [Scale] S [ECC] C [Columns] R [Rows] F [Format]
G [EscapeChar]<CR><LF>
[Data]<CR><LF>
ENDDATAMATRIX <CR><LF>
VBARCODE DATAMATRIX [X] [Y] H [Scale] S [ECC] C [Columns] R [Rows] F [Format]
G [EscapeChar]<CR><LF>
[Data]<CR><LF>
ENDDATAMATRIX <CR><LF>
The BARCODE DATA MATRIX command is used to print Data Matrix barcodes in the CPCL language.
The command has a number of optional parameters, any number of which may be specified. If a
parameter is specified more than once, the last value specified is used.
Parameters Quick Reference
[X] [Y] – The X and Y coordinates, in units, specifying where the barcode is to be placed.
H [Height] – Specifies the scale of the barcode. A value of one means each element of the Data Matrix
barcode is one dot in width and height. Values of 5 to 20 are recommended. A value of 0 is interpreted
as a value of 1. If not specified, a value of 6 is used.
S [ECC] – Specifies the level of error correction data put in the barcode. The following levels are
supported.
CPCL FOR LINK-OS PRINTERS
Page 51 of 329 1073699-001

Value
ECC Level
Size
Numeric Capacity
Alphanumeric Capacity
8-bit Binary Capacity
49 0 49x49
596
413
271
49
50
49x49
457
305
200
49
80
49x49
402
268
176
49
100
49x49
300
200
131
49
140
49x49
144
96
63
Value
Size
Numeric Capacity
Alphanumeric Capacity
8-bit Binary Capacity
0
Automatic
Any of the below.
Any of the below.
Any of the below.
10
10x10
6 3 1
12
12x12
10 6 3
14
14x14
16
10
6
16
16x16
24
16
10
18
18x18
36
25
16
20
20x20
44
31
20
22
22x22
60
43
28
24
24x24
72
52
34
26
26x26
88
64
42
32
32x32
124
91
60
36
36x36
172
127
84
40
40x40
228
169
112
48
48x48
348
259
172
52
52x52
408
304
202
64
64x64
560
418
278
72
72x72
736
550
336
Values other than 200 should o nly be used when very specific backwards compatibility is required, as
many readers will not support these older format s. The default is 0. All examples provided below use type
200.
The error recovery data is much more efficiently represented in ECC 200 barcodes, and the resulting
symbol will be smaller.
C [Columns] R [Rows] – Specifies the number of columns or rows to use when crea ting the barcode. The
CPCL implementation of Data Matrix only supports square symbols, so it is only necessary to specify one
value. If both are specified, and they are not the same, no barcode will be printed.
The value must be one of the following values from the table below. If it is not, or the data to encode
Data
specified by
The values to be used are based on the value of
A value of 0 means to automatically select the best symbol size for the data provided. This value is t he
default.
Values for Columns and Rows when using ECC 0 to 140
When using ECC 0 to 140, the sizing for rows and columns value should be an odd number between 9
and 49 specifying the number of rows. The table below shows the maximum field sizes with a 49x49
barcode.
cannot be made to fit inside the barcode size requested, no barcode is printed.
ECC
.
Values for Columns and Rows when Using ECC 200
For ECC 200, the fol lowing values for columns and rows are supported. The capacity numbers in the table
are best-case numbers, and it may not always be possible to fit the entire amount of data in the symbol.
CPCL FOR LINK-OS PRINTERS
Page 52 of 329 1073699-001
Value
Size
Numeric Capacity
Alphanumeric Capacity
8-bit Binary Capacity
80
80x80
912
682
454
88
88x88
1152
862
572
96
96x96
1392
1042
694
104
104x104
1632
1222
814
120
120x120
2100
1573
1048
132
132x132
2608
1954
1302
144
144x144
3116
2335
1556
Value
Description
Valid Characters
1
Numeric
0-9 and space
2
Alphabetic
A-Z and space
3
Alphanumeric with Punctuation
A-Z, 0-9, space, period, comma, dash and slash
4
Alphanumeric
A-Z, 0-9 and space
5
7-Bit
All ASCII Characters 0-127
6
8-Bit
All ASCII Characters 0-255
Function
Description
Start Only?
Format
_dnnn
Encode this binary character into data stream.
No
Always 3 digits 0 to 255.
__
Encode escape character
No
None.
_1
Encode FNC1 character into the data stream
No
None.
_2nnnoooppp
Encode FNC2 - Structured Append Data
Yes
See Below.
F [Format] – When using ECC values other than 200, this parameter specifies the encoding of the
barcode. When using ECC 200, the barcode will automatically switch between the best data type to use
based on the data to be encoded. If not specified, or outside of the valid range, a value of 6 is used.
Format Values for ECC 0 to 140
If a format is specified, and the data provided does not comply with the format, no barcode is printe d .
G [EscapeChar] – Specifies the escape character to use when using ECC 200, allowing the encoding of
unprintable binary and special contr ol characters.
The character can be any single character except space, tab, and NUL, CR, and LF. By default the
character is the underscore character (_).
[Data] – Any number of lines of data to be encoded in the barcode. <CR><LF>s m ay be included, but
are stripped out before the barcode data is encoded.
When using ECC 0 to 140, it is not possible to encode CR, LF or NUL characters in the data, regardless of
the value of
Format
When using ECC 200, there are a number of functions which can be accessed using the escap e character
defined with
Escape Functions when using ECC 200
The following table summarizes the escape f unctions available when using ECC 200. In the function name
the underscore is used to represent the escape character. Some of these functions are only available as
the very first character of the data stream and as such are mutually exclusive. Otherwise, they may be
repeated in the format as many times as desired. The operations are processed in the order provided in
the table.
The use of escape sequences besides the ones listed below will result in no label being printed.
.
EscapeChar
.
CPCL FOR LINK-OS PRINTERS
Page 53 of 329 1073699-001

Function
Description
Start Only?
Format
_3
Encode FNC3 - Reader Programming Character
Yes
None.
_5
Encode ANSI Application Identifier
Yes
None.
_6
Encode AIAG Data Identifier
Yes
None.
_8
Encode AIAG Application Identifier
Yes
None.
_9
Encode ANSI Data Identifier
Yes
None.
_7nnnnnn
Encode Extended Channel Data (ECI)
Yes
See Below.
_c
Encode Control Character
No
See Below
GS1 Data Matrix
GS1 Data Matrix barcodes can be encoded similar to other barcode types of GS1 barcodes by using ECC
200, and using the FNC1 prefix to the data.
Binary Data
To encode binary data within the data string use the _ dnnn escape sequence, where nnn i s the ASCII
value of the character to be encoded.
This can be any value from 0 to 255 and must be padded to 3 digits. This is the mechanism for encoding
Data
the CR and LF charact ers, as they are stripped out during parsing of the
greater than 255, no barcode will be printed.
Structured Append
Data Matrix supports structured append functionality. Up to 16 symbols may be linked. In addition, the
barcode includes a two-byte file identifier.
Structured append is enabled by specifying the _2 sequence, followed by 9 digits: _2nnnoooppp
Each set of three digits represents a digit from 1 to 254. Values outside this range are invalid and will
result in no barcode being printed. All three digits must be provided, including any leading zeros as
necessary.
The first three indicate both the total number of symbols, and the current symbol number encoded as
follows:
nnn = 16 * (symbol position - 1) + (17-total symbols)
For example, symbol 9 of 16 would be 16 * (9 -1) + (17 – 16), or 129. Symbol 3 of 7 would be 16 * (3-
1) + (17 – 7), or 42.
The file identification is encoded in two bytes, represented by ooo and ppp in the structured append
data. These values must be 001 to 254 each. Together they combine to form a unique value from 64516
possible values, which identify the structured append set.
Each barcode that is part of a set of structured append barcodes must have identical values for ooo and
ppp respectively in order to be processed as part of the set.
In the CPCL implementation of structured append, ECI data cannot be specified.
Extended Channel Data (E CI)
parameter. If the value is
CPCL FOR LINK-OS PRINTERS
Page 54 of 329 1073699-001

Sequence
ASCII Value
Char
Description
~@
0
NUL
Null
~A
1
SOH
Start of Heading
~B
2
STX
Start of Text
~C
3
ETX
End of Text
~D
4
EOT
End of Transmission
~E
5
ENQ
Enquiry
~F
6
ACK
Acknowledge
~G
7
BEL
Bell
~H
8
BS
Backspace
~I
9
TAB
Tab
~J
10
LF
New Line
~K
11
VT
Vertical Tab
~L
12
FF
Form Feed
~M
13
CR
Carriage Return
~N
14
SO
Shift Out
~O
15
SI
Shift In
~P
16
DLE
Data Link Escape
~Q
17
DC1
Device Control 1
~R
18
DC2
Device Control 2
~S
19
DC3
Device Control 3
~T
20
DC4
Device Control 4
~U
21
NAK
Negative Acknowledge
~V
22
SYN
Synchronous Idle
~W
23
ETB
End of Transmission Block
~X
24
CAN
Cancel
~Y
25
EM
End of Medium
~Z
26
SUB
Substitute
~[
27
ESC
Escape
~\
28
FS
File Separator
~]
29
GS
Group Separator
~^
30
RS
Record Separator
~_
31
US
Unit Separator
To encode ECI data, specify the _7 sequence, followed by 6 digits. These digits will be encoded as the
extended channel data within the barcode. If any of the characters are not numbers, no barcode will be
printed. The full ra nge of values (000000-999999) is supported.
Control Characters
Although all binary characters can be encoded with _d, there is a second mechanism to specify low-ASCII
character values using _c, where c is a character. Use the following escape sequences to represent the
control character s .
Note that the default escape character, underscore, cannot be used to represent the _ control sequence,
as this is overridden by the encode escape character command, which is processed first.
For this table, the escape character has been changed to the tilde character (~) for clarity.
Note that in this table ESC (Escape) does not mean the
Termination of Data
The data string is terminated with the following sequence. No part of this data is encoded in the data
that is put into the b arcode.
<CR><LF>ENDDATAMATRIX<CR><LF>
CPCL FOR LINK-OS PRINTERS
EscapeChar
Page 55 of 329 1073699-001
but means ASCII character 27.

This termination structure must appear at the end of the barcode, or the barcode is not terminated.
Examples (BARCODE-DATAMATRIX.LBL):
! 0 200 200 1050 1<CR><LF>
B DATAMATRIX 60 20 S 200<CR><LF>
Basic Data Matrix<CR><LF>
ENDDATAMATRIX<CR><LF>
ML 24 T 7 0 30 160<CR><LF>
Data Matrix Example<CR><LF>
ECC 200, Height 6 (Default)<CR><LF>
Data:<CR><LF>
Basic Data Matrix<CR><LF>
ENDML<CR><LF>
B DATAMATRIX 60 300 H 7 S 200<CR><LF>
_2015001001Structured <CR><LF>
ENDDATAMATRIX<CR><LF>
B DATAMATRIX 260 300 H 7 S 200<CR><LF>
_2031001001Append<CR><LF>
ENDDATAMATRIX<CR><LF>
ML 24 T 7 0 30 450<CR><LF>
Data Matrix Structured Append Example<CR><LF>
Two barcodes, #1 Left, #2 Right<CR><LF>
ECC 200, Height 7<CR><LF>
Data:<CR><LF>
Structured Append<CR><LF>
ENDML<CR><LF>
B DATAMATRIX 60 600 S 200 H 3 R 64<CR><LF>
Line 1 - Data Terminated with CR-LF_M_J<CR><LF>
Line 2 - Data Terminated with CR-LF_d013_d010<CR><LF>
Line terminated with the underscore character __<CR><LF>
ENDDATAMATRIX<CR><LF>
ML 24 T 7 0 30 850<CR><LF>
Data Matrix Example with Escapes<CR><LF>
ECC 200, Height 3, Forced size 64x64<CR><LF>
Data:<CR><LF>
Line 1 - Data Terminated with CR-LF<RAW><CR><LF><ENDRAW><CR><LF>
Line 2 - Data Terminated with CR-LF<RAW><CR><LF><ENDRAW><CR><LF>
Line terminated with the underscore character _<CR><LF>
<CR><LF>
ENDML<CR><LF>
PRINT<CR><LF>
CPCL FOR LINK-OS PRINTERS
Page 56 of 329 1073699-001
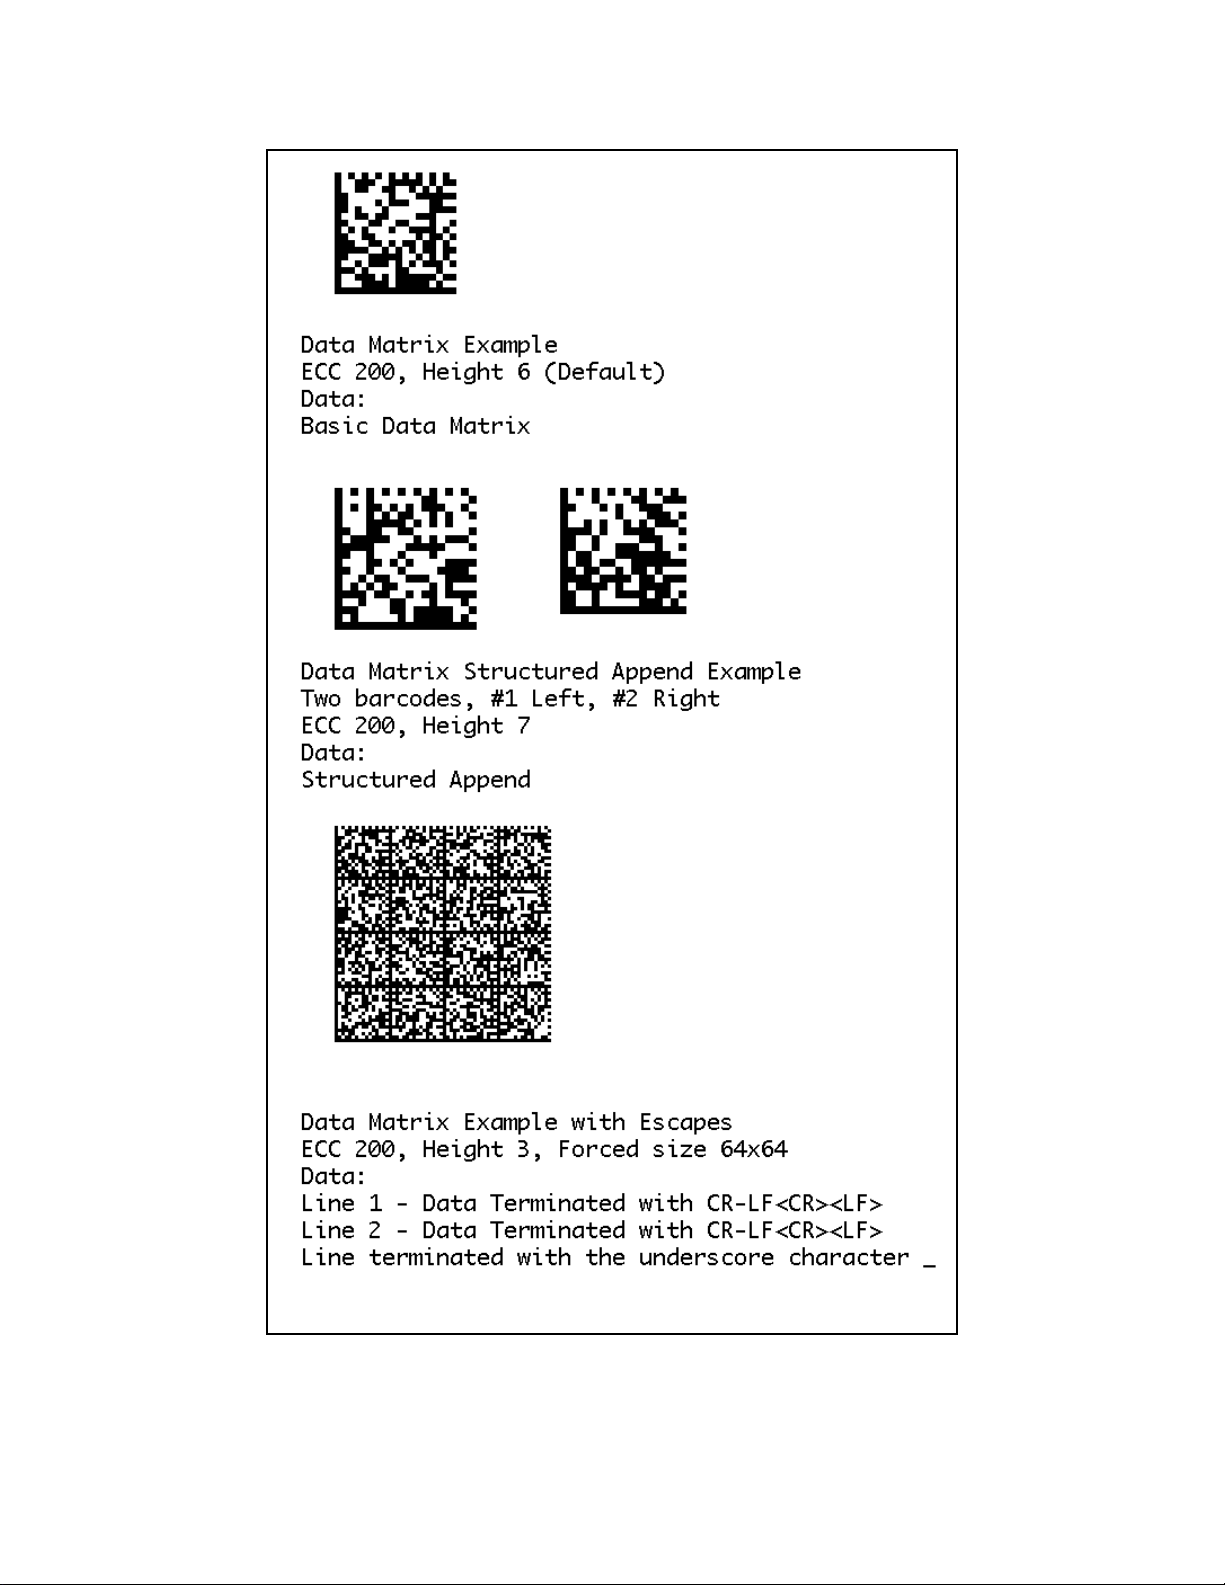
CPCL FOR LINK-OS PRINTERS
Page 57 of 329 1073699-001

Command Name
BARCODE RSS
Short Form Aliases
B RSS
Valid Session Types
Label Sessions Only
None
Linked SGD
None
Negative Aware
No
Use in Utilities Sessions for Line Print
In versions of Link-OS greater than 19.6, The BARCODE command and all its variant s can be used in a
utilities session to print a barcode in line print mode. T he pr inter does not have to be in line print mode
for this command to be used in utilities mode. The X and Y parameters of the barcode must be specified,
but have no effect, instead the X, Y, RX, RY, XY or RXY commands m ust be used to specify the location
of the barcode.
For DataMatrix barcodes, the X parameter of the X, XY, RX and RXY commands is not used, instead the X
value of the command itself is used.
Note that only the BARCODE command operates in line print mode, VBARCODE does not.
It may be necessary to use the SET-LF command to be able to see the entire height of the barcode. See
the Introduction t o Line Print on page 25 for more information.
Utilities Example:
! U1 SETLF 160<CR><LF>
! U1 B DATAMATRIX 0 0 S 200<CR><LF>
Basic Data Matrix<CR><LF>
ENDDATAMATRIX<CR><LF>
Command Notes and Interactions
The BARCODE-TEXT command cannot be used to print data representations under barcode created with
this command, no text will print.
The justify commands LEFT, RIGHT and CENTER do not have any effect on barcodes cre ated with this
command.
6.2.4 GS1 DataBar (RSS) and Composite Barcodes
BARCODE RSS [X] [Y] [Scale] [LHeight] [SHeight] [Segs] [Type] [Data]<CR><LF>
VBARCODE RSS [X] [Y] [Scale] [LHeight] [SHeight] [Segs] [Type] [Data]<CR><LF>
This command is used to print GS1 Databar (also known reduced space symbology) ba r code s in CPCL, as
well as Composite barcodes. There are 12 supported sub-types of GS1 Databar\Composite barcodes.
All barcode types supported by this command can consist of both a 1D and 2D component. If the barcode
contains a 2D component, the output is referred to as a composite barcode. The 2D portion is optiona l ,
but the 1D portion is required.
If the parameters of the barcode are incorrect, in place of the barcode, a text message indicating the
problem encountered while trying to form the barcode will be printed.
CPCL FOR LINK-OS PRINTERS
Page 58 of 329 1073699-001

Parameter
Type
Description
Valid Range
X
5 Digit Unit Number
The X position where the barcode begins
0 to 65535
Y
5 Digit Unit Number
The Y position where the barcode begins
0 to 65535
Scale
5 Digit Unit Number
The X and Y scaling factor of the barcode.
0 to 65535
LHeight
5 Digit Unit Number
Height of the linear part of the barcode
0 to 65535
SHeight
5 Digit Unit Number
Height of the separator between barcode parts
0 to 65535
Segs
5 Digit Unit Number
The maximum number of segments per row
0 to 65535
Type
5 Digit Number
The type of RSS barcode to print.
1 to 12
Data
<CR><LF> Terminated
String
1D and 2D Data to Print
8191 alphanumeric characters
Parameters Quick Reference
[X] [Y] – The X and Y coordinates, in units, specifying where the barcode is to be placed.
Note that the X position at which the barcode begins may not be the exact value you specif y. Some
barcode types are spaced for their composite component even if you do not specify the existence of one.
Scale
The offset is generally small, on the order of 5 dots (multiplied by
[Scale] – The scale of the barcode. If this value is 0, no barcode is printe d . If 1, the barcode is printed at
1x magnification, if 2 at 2x magnification and so on. The recommended range is 0 to 10.
This field is represented as a unit number, so using it in systems besides dots can result in very large
barcodes.
[LHeight] – This is the height, in units, of the linear part of the barcode in the combined symbol. This
Type
option is ignored for most values of
field in the table below to see the fixed values.
, and instead replaced with fixed values. Refer to the Height
Scale
can still be used to control the overall height,
though only in multiples.
[SHeight] – This is the height, in units of the separators between 1D and 2D composite sections, and the
height of the separators in a non-composite stacked barcode, represented in units. There is no limit on
the value but it is generally advisable to use values of 1 or 2.
This value does not apply to the separator marks on barcode types 7, 8, 9 and 10 when used in
composite mode, which are of a fixed height of 6 dots (times scale factor).
A value of 0 for height is not supported.
[Segs] – This represents the segment width. It is only used for type 6 (RSS Expanded) barcodes. The
fewer the number of segments, the taller the barcode will be, and the more separators there will be.
The recommended range of values for this parameter is even numbers from 2 to 22.
If the Type 6 barcode is composite (consisting of both 1D and 2D parts), the minimum value for
segments is 4, otherwise the minimum value is 1.
This field is represented as a unit number, so using it in systems besides dots is not recomme nde d .
The use of the value of 0 for this parameter is not supported.
CPCL FOR LINK-OS PRINTERS
Page 59 of 329 1073699-001
).
Type
Symbology
Height?
1D Data Specification
1
GS1 Databar
Fixed at 33
13 Numeric Characters. Checksum will be calculated automatically.
2
GS1 Databar Truncated
Fixed at 13
13 Numeric Characters. Checksum will be calculated automatically.
3
GS1 Databar Stacked
See Below
13 Numeric Characters. Checksum will be calculated automatically.
4
GS1 Databar Stacked Omnidirectional
Fixed at 33
13 Numeric Characters. Checksum will be calculated automatically.
5
GS1 Databar Limited
Fixed at 33
13 Numeric Characters. Checksum will be calculated automatically.
6
GS1 Databar Expanded
Fixed at 33
Up to 74 numeric or 41 alphanumeric characters.
7
UPC-A
Fixed at 74
12 Numeric Characters. Checksum will be calculated automatically.
9
EAN-13
Fixed at 74
12 Numeric Characters. Checksum will be calculated automatically.
10
EAN-8
Fixed at 60
7 Numeric Characters. Checksum will be calculated automatically.
11
GS1-128 with CC-A or CC-B (MicroPDF)
Use LHeight
Up to 48 ASCII characters less than 127.
12
GS1-128 with CC-C (PDF417)
Use LHeight
Up to 48 ASCII characters less than 127.
To represent this character
Send ASCII Code
NUL (ASCII 0)
128
FNC1
129
FNC2
130
FNC3
131
FNC4
132
[Type] – The type of the barcode to print. This is an ASCII number as represented by the data below.
For Type 11 Barcodes, the type of Code 128 barcode created is auto selected based on the data within
the Data field.
For Type 3 barcodes, the height is fixed. The first row will be 7 dots tall, and following rows will be 5 dots
tall.
For the stacked barcode types, the height will be multiplied by the number of stacks (plus the height of
the separators).
[Data] – The data for the barcode. If the barcode is composite, the 1D portion of the data comes first, as
indicated above.
Note that while the data is validated for length, it is not validated for content with this command.
Providing data which does not comply with the above table will result in unreadable barcodes or barcodes
which contain unexpecte d da ta .
For GS1-128 barcodes, substitution of the NUL character is provided along with FNC. No substitution for
CR and LF are provided and cannot be encoded in GS-128 composite barcodes. Do not put spaces or
parenthesis in the data.
2D Data
Following the 1D data, additional data for a 2D Barcode can be specified, which becomes a composite
placed at the top of the 1D Barcode above a separator. All types support the addition of composite 2D
data.
For Types 1 to 11, the 2D portion of the composite barcode is a MicroPDF barcode with either type C C-A
or CC-B, selected automatically based on the amount of data specified. For Type 12, it is a PD F417
barcode, also known as type C C-C.
CPCL FOR LINK-OS PRINTERS
Page 60 of 329 1073699-001
Encoding Type
Code Words Used
Text (Upper case)
1 per 2 characters
Binary (All characters except <NUL><CR> <LF>)
5 per 6 bytes
Numbers
Up to 15 per 44 digits
The 2D Data is speci fied after the 1D d ata by placing a pipe character “|” after the 1D dat a, and then
following it with the 2D Data. The pipe character is ASCII 124. The data may be numeric, ASCII or
binary, however it is not possible to encode the binary characters <NUL>, <CR> or <LF> in the stream;
attempting to do so will cause an invalid barcode to print with no data.
The types 1 though 11, the size of the 2D data must not exceed 167 code words if a CC-A barcodes is
required. If the data amount exceeds this, a CC-B barcode is automatically created, which may contain up
to 336 code words.
For type 12 barcodes using CC-C, the size of the 2D data must not exceed 863 encoded code words.
If the limit is exceeded, an error occurs and a message is printed indicating this. It can be difficult to
determine exactly how much data encoded code words take, but you can use the chart below as a
general guideline.
Do not exceed the codeword maximum for type 12 barcodes, or the barcode will be unreadable.
If the data exceeds the size specifications, and error message will be printed indicating so.
Example (BA RCODE-GS1-NO-CC.LBL):
This example shows GS1 Databar Barcodes w ithout composite components.
! 0 200 200 750 1<CR><LF>
JOURNAL<CR><LF>
BARCODE RSS 40 0 2 0 0 0 1 1234567890123<CR><LF>
ML 24 T 7 0 300 0<CR><LF>
GS1 Databar - Type 1<CR><LF>
No Composite - Scale 2<CR><LF>
Data:<CR><LF>
1234567890123<CR><LF>
ENDML<CR><LF>
BARCODE RSS 40 120 3 0 2 0 3 1234567890123<CR><LF>
ML 24 T 7 0 300 120<CR><LF>
GS1 Databar Stacked<CR><LF>
Type 3 - 2 Dot Seperator<CR><LF>
No Composite - Scale 3<CR><LF>
Data: 1234567890123<CR><LF>
ENDML<CR><LF>
BARCODE RSS 40 240 2 0 2 2 6 ABCDEF12345678<CR><LF>
ML 24 T 7 0 300 240<CR><LF>
GS1 Databar Expanded<CR><LF>
Type 6 - 2 Segments<CR><LF>
2 Dot Seperator<CR><LF>
No Composite - Scale 2<CR><LF>
Data: ABCDEFGHIJ1234567890<CR><LF>
ENDML<CR><LF>
BARCODE RSS 40 560 2 0 2 4 6 ABCDEF12345678<CR><LF>
ML 24 T 7 0 300 560<CR><LF>
GS1 Databar Expanded<CR><LF>
Type 6 - 4 Segments<CR><LF>
2 Dot Seperator<CR><LF>
No Composite - Scale 2<CR><LF>
CPCL FOR LINK-OS PRINTERS
Page 61 of 329 1073699-001

Data: ABCDEFGHIJ1234567890<CR><LF>
ENDML<CR><LF>
PRINT<CR><LF>
CPCL FOR LINK-OS PRINTERS
Page 62 of 329 1073699-001

Example (BA RCODE-GS1-WITH-CC.LBL):
This example shows GS1 Databar Barcodes w ith composite components.
! 0 200 200 680 1<CR><LF>
JOURNAL<CR><LF>
BARCODE RSS 40 20 2 0 2 0 1 1234567890123|2D Barcode Data<CR><LF>
ML 24 T 7 0 300 20<CR><LF>
GS1 Databar<CR><LF>
Type 1 - 2 Dot Separator<CR><LF>
With Composite - Scale 2<CR><LF>
Data: 1234567890123|2D Barcode Data<CR><LF>
ENDML<CR><LF>
BARCODE RSS 40 140 2 0 2 0 3 1234567890123|2D Barcode Data<CR><LF>
ML 24 T 7 0 300 140<CR><LF>
GS1 Databar Stacked<CR><LF>
Type 3 - 2 Dot Separator<CR><LF>
With Composite - Scale 2<CR><LF>
Data: 1234567890123|2D Barcode Data<CR><LF>
ENDML<CR><LF>
BARCODE RSS 40 260 2 0 2 0 4 1234567890123|2D Barcode Data<CR><LF>
ML 24 T 7 0 300 260<CR><LF>
GS1 Databar Stacked Omnidirectional<CR><LF>
Type 4 - 2 Dot Separator<CR><LF>
With Composite - Scale 2<CR><LF>
Data: 1234567890123|2D Barcode Data<CR><LF>
ENDML<CR><LF>
BARCODE RSS 40 480 2 0 2 4 6 ABCDEF12345678|2D Barcode Data<CR><LF>
ML 24 T 7 0 300 480<CR><LF>
GS1 Databar Expanded<CR><LF>
Type 6 - 2 Dot Separator<CR><LF>
4 Segments<CR><LF>
With Composite - Scale 2<CR><LF>
Data: ABCDEFGHIJ1234567890|2D Barcode Data<CR><LF>
ENDML<CR><LF>
PRINT<CR><LF>
CPCL FOR LINK-OS PRINTERS
Page 63 of 329 1073699-001

Example (BARCODE-UPC-EAN-CC.LBL):
This example shows UPC and EAN barcodes wit h composite components.
! 0 200 200 1000 1<CR><LF>
JOURNAL<CR><LF>
BARCODE RSS 40 20 2 0 0 0 7 123456789012|2D Barcode Data<CR><LF>
ML 24 T 7 0 300 20<CR><LF>
UPC-A<CR><LF>
Type 7<CR><LF>
With Composite - Scale 2<CR><LF>
Data: 123456789012|2D Barcode Data<CR><LF>
ENDML<CR><LF>
BARCODE RSS 40 280 2 0 0 0 8 1234567|2D Barcode Data<CR><LF>
ML 24 T 7 0 300 280<CR><LF>
UPC-E<CR><LF>
Type 8<CR><LF>
With Composite - Scale 2<CR><LF>
Data: 1234567|2D Barcode Data<CR><LF>
ENDML<CR><LF>
BARCODE RSS 40 480 2 0 0 0 9 123456789012|2D Barcode Data<CR><LF>
ML 24 T 7 0 300 480<CR><LF>
EAN-13<CR><LF>
Type 9<CR><LF>
With Composite - Scale 2<CR><LF>
CPCL FOR LINK-OS PRINTERS
Page 64 of 329 1073699-001

Data: 123456789012|2D Barcode Data<CR><LF>
ENDML<CR><LF>
BARCODE RSS 40 740 2 0 0 0 10 1234567|2D Barcode Data<CR><LF>
ML 24 T 7 0 300 740<CR><LF>
EAN-8<CR><LF>
Type 10<CR><LF>
With Composite - Scale 2<CR><LF>
Data: 1234567|2D Barcode Data<CR><LF>
ENDML<CR><LF>
PRINT<CR><LF>
CPCL FOR LINK-OS PRINTERS
Page 65 of 329 1073699-001

Example (BARCODE-GS1-128-CC.LBL):
This example shows GS1-128 Barcodes with composite components.
! 0 200 200 1000 1<CR><LF>
JOURNAL<CR><LF>
CENTER 576<CR><LF>
BARCODE RSS 40 20 2 70 2 0 11 910005886<128>100000410549<128>9905|1A1B2C3D4E5F6G7H8<CR><LF>
ML 24 T 7 0 40 220<CR><LF>
GS1-128 - Type 11 - MicroPDF (CC-A\CC-B)<CR><LF>
With Composite - Scale 2<CR><LF>
1D Data: 910005886[FNC1]100000410549[FNC1]9905<CR><LF>
2D Data: 1A1B2C3D4E5F6G7H8<CR><LF><CR><LF>
ENDML<CR><LF>
BARCODE RSS 40 340 2 70 2 0 12
910005886<128>100000410549<128>9905|ABCDEFGHIJKLMNOPQRSTUVWXYZabcd1234567ABCDEFGHIJKLMNOPQRSTUVWX
YZabcd1234567ABCDEFGHIJKLMNOPQRSTUVWXYZabcd1234567<CR><LF>
ML 24 T 7 0 40 560<CR><LF>
GS1-128 - Type 12 - PDF417 (CC-C)<CR><LF>
With Composite - Scale 2<CR><LF>
1D Data: 910005886[FNC1]100000410549[FNC1]9905<CR><LF>
2D Data (repeated 3 times):<CR><LF>
ABCDEFGHIJKLMNOPQRSTUVWXYZabcd1234567<CR><LF>
ENDML<CR><LF>
LEFT<CR><LF>
PRINT<CR><LF>
CPCL FOR LINK-OS PRINTERS
Page 66 of 329 1073699-001
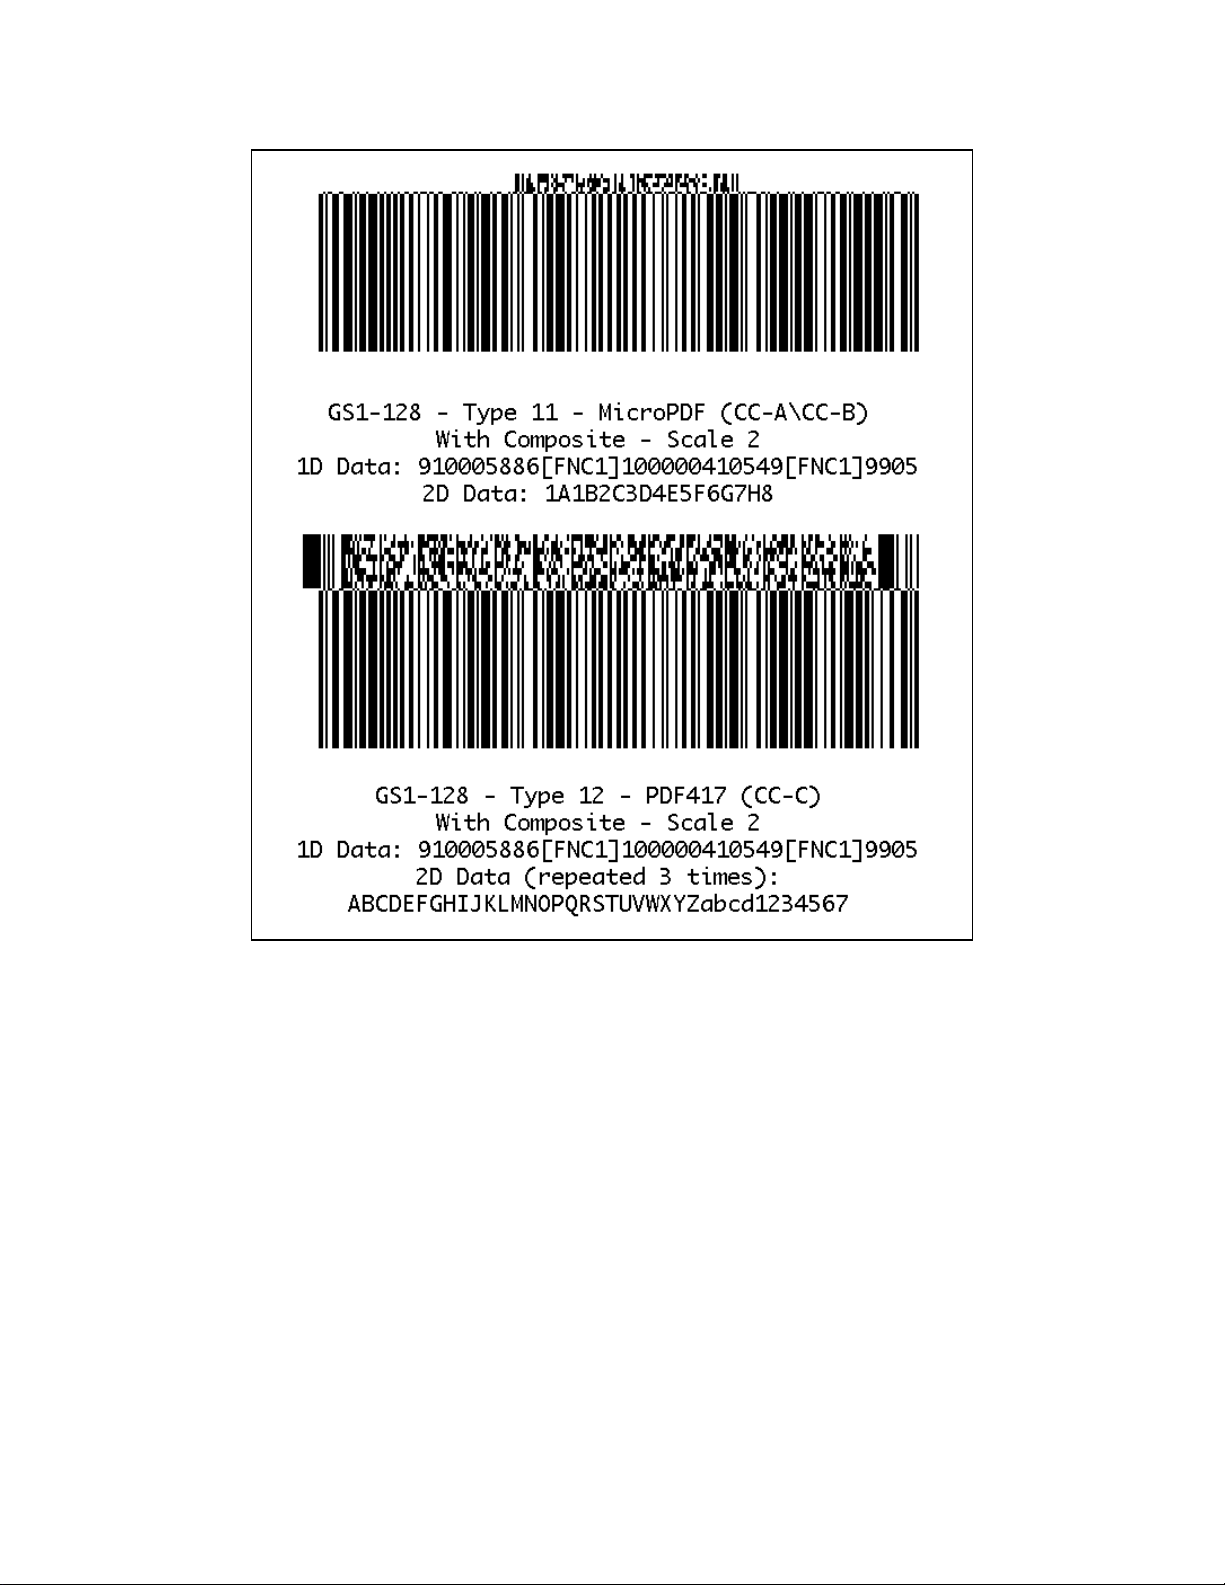
Use in Utilities Sessions for Line Print
In versions of Link-OS greater than 19.6, The BARCODE command and all its variants can be used in a
utilities session to print a barcode in line print mode. T he pr inter does not have to be in line print mode
for this command to be used in utilities mode. The X and Y parameters of the barcode must be specified,
but have no effect, instead the X, Y, RX, RY, XY or RXY commands m ust be used to specify the location
of the barcode.
Note that only the BARCODE command operates in line print mode, VBARCODE does not.
It may be necessary to use the SET-LF command to be able to see the entire height of the barcode. See
the Introduction t o Line Print on page 25 for more information.
Utilities Example:
! U1 SETLF 160<CR><LF>
! U1 BARCODE RSS 0 0 2 0 0 0 10 1234567|2D Barcode Data<CR><LF>
ENDDATAMATRIX<CR><LF>
Command Notes and Interactions
CPCL FOR LINK-OS PRINTERS
Page 67 of 329 1073699-001

The BARCODE-TEXT command cannot be used to print numeric representations under barcode created
with this command, no text will print.
The justify commands LEFT, RIGHT and CENTER do not have any effect on barcodes created with this
command.
The height of a single element within the 2D portion or a composite barcode is always 2 and cannot be
adjusted.
CPCL FOR LINK-OS PRINTERS
Page 68 of 329 1073699-001
Command Name
BARCODE MAXICODE, VBARCODE
MAXICODE
Short Form Aliases
B MAXICODE, VB MAXICODE
Valid Session Types
Label Sessions Only
Linked SGD
None
Negative Aware
No
Parameter
Type
Description
Valid Range
X
5 Digit Unit Number
The X position where the barcode begins
0 to 65535 units
Y
5 Digit Unit Number
The Y position where the barcode begins
0 to 65535 units
Field
Space Terminated String
The ratio of wide to narrow bars.
1 or 2
Data
<CR><LF> Terminated
String
Unit-width of the barcode in dots
0 to 65535 dots
6.2.5 MaxiCode Code Barcode
BARCODE MAXICODE [X] [Y]<CR><LF>
[Field] [Data]<CR><LF>
…
ENDMAXICODE<CR><LF>
VBARCODE MAXICODE [X] [Y]<CR><LF>
[Field] [Data]<CR><LF>
…
ENDMAXICODE<CR><LF>
The BARCODE MAXICODE command is used to print MaxiCode barcodes in the CPCL language. Only
type-2 MaxiCode barcodes (which contain formatted data with a structured carrier message a d numeric
postal code) can be used in CPCL.
VBARCODE MAXICODE is identical to BARCODE MAXI. MaxiCode barcodes do not print in vertical
orentation.
The barcode consists of fields that are rep r esented with a field name followed by data. This field and data
line can be repeated as many times as necessary to complete the barcode.
MaxiCode barcodes are always of a fixed size, there are no options to adjust its size.
Parameters Quick Reference
[X] [Y] – The X and Y coordinates, in units, specifying where the barcode is to be placed.
[Field] – Specifies the name of the field to be filled within the barcode. See the table below for a list o f
fields supported by the barcode. Each field name is terminated by a space, and must be followed by data.
The fields may appear in any order within the label. If a field is specified more than once, the last value
specified is used.
If an invalid field is specified, no barcode is printed.
[Data] – Specifies the data for the previously specified field. See the table below for a list of fields and
values. Each line of data must be terminated with the CR and LF characters. If the data provided is too
long, it is truncated according to the data specification.
CPCL FOR LINK-OS PRINTERS
Page 69 of 329 1073699-001
Field
Description
Data Specification
Default
X
Set X Position (Same as X above)
ASCII number, up to 5 digits, 0 to 65535
X
Y
Set Y Position (Same as X above)
ASCII number, up to 5 digits, 0 to 65535
Y
H
Parsed but has no function.
ASCII number, up to 5 digits, 0 to 65535
210
FILLC
Low priority message fill character.
One ASCII character
!
NOTEXT
Parsed but has no function.
One ASCII character
N/A
ZIPPER
Enable barcode zipper and contrast pattern.
If ASCII 1 enabled, otherwise disabled
1
UPS5
Use only UPS Tags. Disables MSG.
If ASCII 1 enabled, otherwise disabled
0
EOT
Set end of transmission character.
One ASCII character
<4>1
RS
Set record separator.
One ASCII character
<30>1
GS
Set segment separator.
One ASCII character
<29>1
LPMS
Set low priority message start character
Three ASCII characters
[)>
Field
Description
Data Specification
Default
POST
Set zip code (Zip+4)
Up to 9 ASCII characters. Padded with 0s
Empty
CC
Set country code
ASCII number, up to 5 digits, 0 to 65535
840
SC
Set service class
ASCII number, up to 5 digits, 0 to 65535
1
MSG
Set low priority message
Up to 88 ASCII characters.
Empty
Field
Description
Data Specification
Modern?
Default
SCAC
Set standard carrier alpha code
Up to 9 ASCII characters
Yes
UPSN
HEAD
Set transportation data format header
Up to 9 ASCII characters
Yes
01<29>961
SHIPPER
Set shipper number
Up to 6 ASCII characters
Yes
Empty
PICKDAY
Set Julian day of pickup
Up to 3 ASCII characters
No
Empty
SHIPID
Set shipment ID number
Up to 30 ASCII characters
No
Empty
NX
Set package number (n of x)
Up to 7 ASCII characters
No
Empty
WEIGH
Set package weight
Up to 3 ASCII characters
No
Empty
VAL
Set address validation
One ASCII character
No
Empty
STADDR
Set ship to address
Up to 35 ASCII characters
No
Empty
TN
Set tracking number
Up to 18 ASCII characters
Yes, Use 1Z then 9
ASCII Digits
Empty
CITY
Set city name
Up to 20 ASCII characters
No
Empty
ST
Set state abbreviation
2 ASCII characters
No
Empty
EXTRA
Set additional user defined fields
Up to 81 ASCII characters
Yes (Compressed)
Empty
Note that none of the fields can accept NUL within their data; it is stripped out before processing.
Configuration Fiel ds
The following fields are used to configure the barcode.
1
These are raw binary values, not ASCII text, see page 15.
The use of X and Y overrides the values specified in the BARCODE command itself.
Standard Data Fields
By default, the following fields are supported. If the UPS5 option is enabled, the MSG field is no longer
available, as it is used by the UPS data.
UPS Data Fields
The following fields are only applicable when the UPS5 option in the configuration field table is selected.
These fields replace the MSG field in the standard data field. All fields should be specified in upper case,
though it is not required.
1
The <29> is a raw binary values, not ASCII text, see page 15.
CPCL FOR LINK-OS PRINTERS
Page 70 of 329 1073699-001
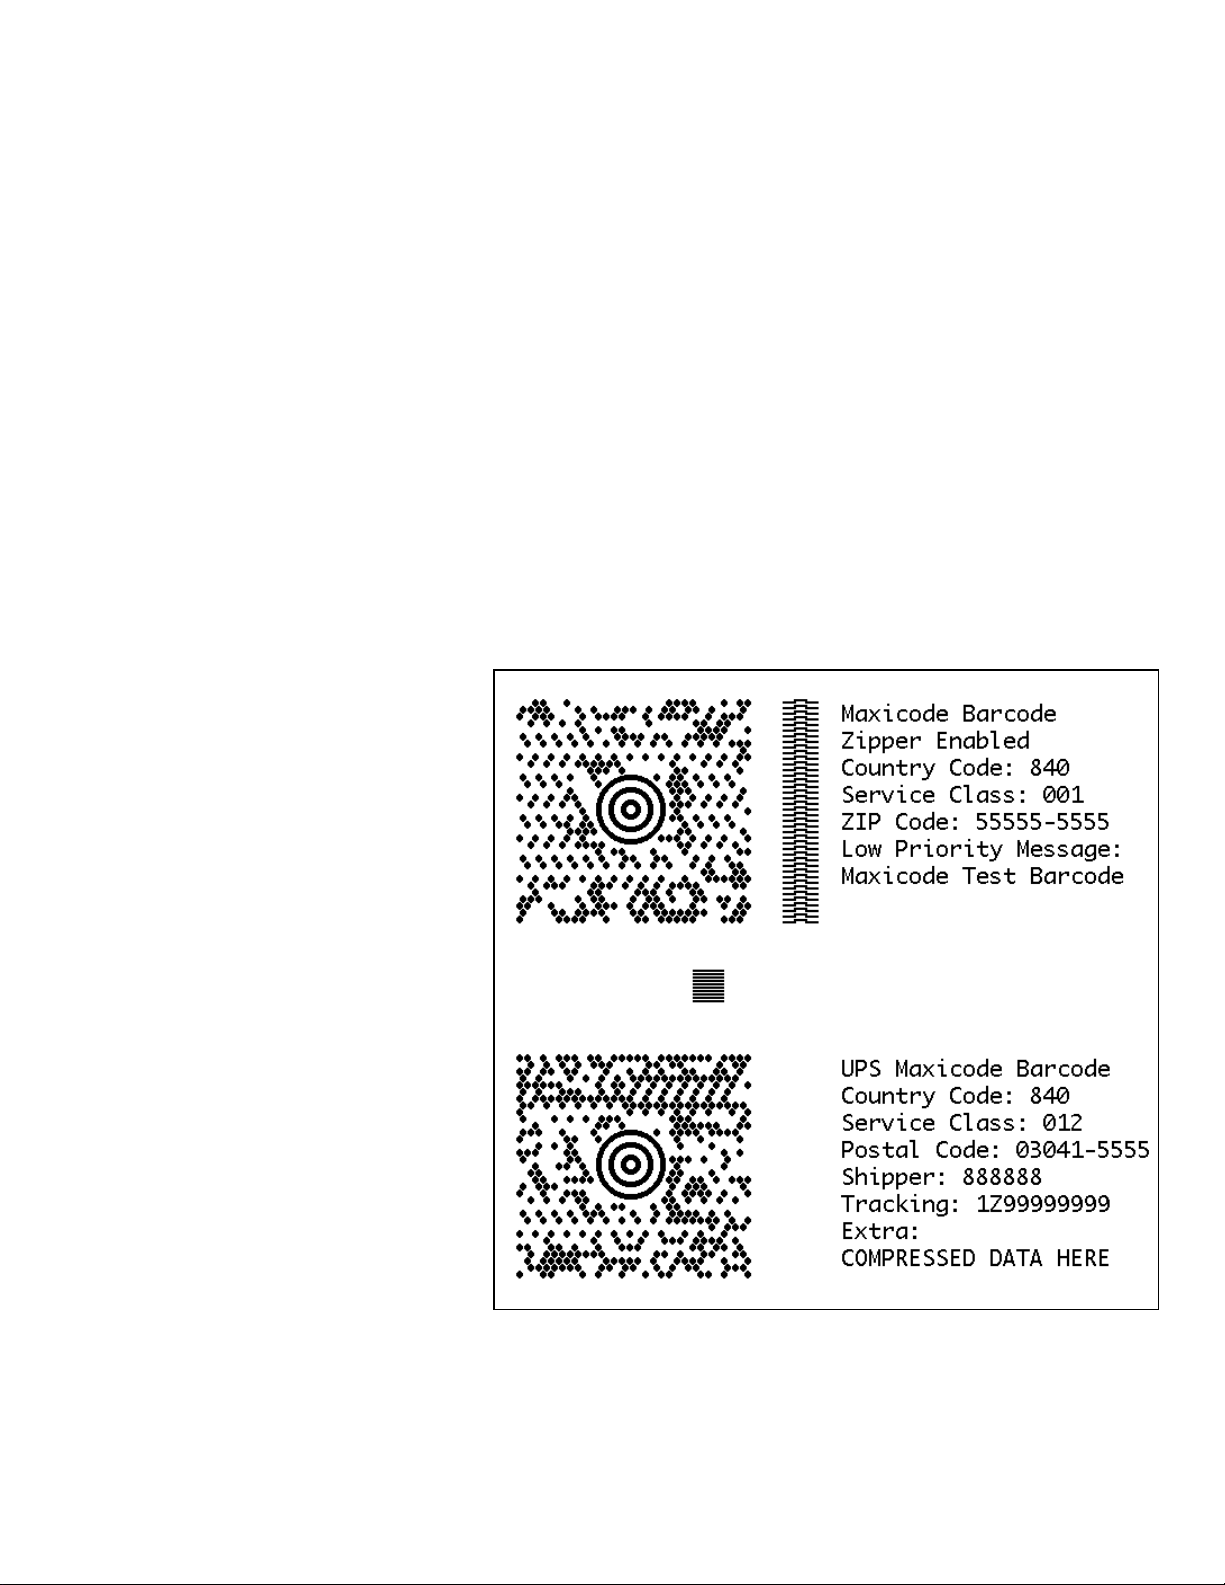
Modern UPS Barcodes
In modern UPS barcodes, not all of the above fields are used. The fields marked above are used, in
addition to the POST, CC and SC values which are part of the standard data fields. In addition, the EXTRA
field contains compressed data which contains t he remainder of the fields.
The tracking number only consists of 1Z followed by 8 digits. These are the last eight digits of the
tracking number. The full tracking number can be reassembled by taki ng 1Z, then the shipper number,
then the last two digits of the service class, then the last 8 digits of the tracking number.
Termination of Data
The data string, in either mode (manual or automatic) is terminated with the following sequence. No part
of this data is encoded in the data that is put into the barcode.
ENDMAXICODE<CR><LF>
Examples (BARCODE-MAXICODE.LBL):
! 0 200 200 600 1<CR><LF>
BARCODE MAXICODE 25 25<CR><LF>
ZIPPER 1<CR><LF>
CC 840<CR><LF>
SC 001<CR><LF>
POST 555555555<CR><LF>
MSG Maxicode Test Barcode<CR><LF>
ENDMAXICODE<CR><LF>
ML 24 T 7 0 340 25<CR><LF>
Maxicode Barcode<CR><LF>
Zipper Enabled<CR><LF>
Country Code: 840<CR><LF>
Service Class: 001<CR><LF>
ZIP Code: 55555-5555<CR><LF>
Low Priority Message:<CR><LF>
Maxicode Test Barcode<CR><LF>
ENDML<CR><LF>
BARCODE MAXICODE 50 340<CR><LF>
UPS5 1<CR><LF>
CC 840<CR><LF>
SC 012<CR><LF>
POST 030415555<CR><LF>
SHIPID 888888<CR><LF>
TN 1Z99999999<CR><LF>
EXTRA COMPRESSED DATA HERE<CR><LF>
ENDMAXICODE<CR><LF>
ML 24 T 7 0 340 340<CR><LF>
UPS Maxicode Barcode<CR><LF>
Country Code: 840<CR><LF>
Service Class: 012<CR><LF>
Postal Code: 03041-5555<CR><LF>
Shipper: 888888<CR><LF>
Tracking: 1Z99999999<CR><LF>
Extra:<CR><LF>
COMPRESSED DATA HERE<CR><LF>
ENDML<CR><LF>
PRINT<CR><LF>
CPCL FOR LINK-OS PRINTERS
Page 71 of 329 1073699-001

Use in Utilities Sessions for Line Print
In versions of Link-OS greater than 19.6, The BARCODE command and all its variant s can be used in a
utilities session to print a barcode in line print mode. The printer do es not have to be in line print mode
for this command to be used in utilities mode. The X and Y parameters of the barcode must be specified,
but have no effect, instead the X, Y, RX, RY, XY or RXY commands must be used to specify the location
of the barcode.
Note that only the BARCODE command operates in line print mode, VBARCODE does not.
It may be necessary to use the SET-LF command to be able to see the entire height of the barcode. See
the Introduction to Line Print on pag e 25 for more information.
Utilities Example:
! U1 SETLF 160<CR><LF>
! U1 BARCODE MAXICODE 0 0<CR><LF>
ZIPPER 1<CR><LF>
CC 840<CR><LF>
SC 001<CR><LF>
POST 555555555<CR><LF>
MSG Maxicode Test Barcode<CR><LF>
ENDMAXICODE<CR><LF>
Command Notes and Interactions
The BARCODE-TEXT command cannot be used to print data representations under barcode created with
this command, no text will pr i nt . The NOTEXT option, which was to be used to print barcode text in
previous printers, is not supported in Link OS.
The justify commands LEFT, RIGHT and CENTER do fu nction on barcodes created with this command,
unlike all other 2D symbologies.
VBARCODE has no effect on MaxiCode barcodes, and is treated as if the BARCODE command was used,
including orientation and coordinate system used in placement.
Using a MaxiCode barcode with a label session resolution of 100 will cause the barcode to be out of
specification and not readable.
CPCL FOR LINK-OS PRINTERS
Page 72 of 329 1073699-001

Command Name
BARCODE PDF-417
VBARCODE PDF-417
Short Form Aliases
B PDF-417
VB PDF-417
Valid Session Types
Label Sessions Only
Linked SGD
None
Negative Aware
No
Parameter
Type
Description
Valid Range
X
5 Digit Unit Number
The X position where the barcode begins
0 to 65535 units
Y
5 Digit Unit Number
The Y position where the barcode begins
0 to 65535 units
XDot
5 Digit Number
The X size of a single element in dots
0 to 65535
YDot
5 Digit Number
The Y size of a single element in dots
0 to 65535
Columns
5 Digit Number
Specifies the number of columns to use.
1 to 30
Rows
5 Digit Number
Specifies the number of rows to use.
0 to 90
ECC
5 Digit Number
Specifies the error recovery level.
1 to 8
BinaryMode
Single Digit
Force binary compaction mode
0 or 1
Data
Raw String
The data to be encoded in the barcode.
See below.
6.2.6 PDF417
BARCODE PDF-417 [X] [Y] XD [XDot] YD [YDot] C [Columns] R [Rows] S [ECC]
B[BinaryMode]<CR><LF>
[Data]<CR><LF>
ENDPDF<CR><LF>
VBARCODE PDF-417 [X] [Y] XD [XDot] YD [YDot] C [Columns] R [Rows] S [ECC]
B[BinaryMode]<CR><LF>
[Data]<CR><LF>
ENDPDF<CR><LF>
The BARCODE PDF-417 command is used to print PDF417 barcodes in the CPCL language.
The command has a number of optional parameters, any number of which may be specified. If a
parameter is specified more than once, the last value specified is used.
If a PDF-417 barcode’s parameter’s cause an error that would cause it not to print, a detailed error
message will be displayed instead.
There is no option to use structured a ppend PDF-417 barcodes in CPCL.
Parameters Quick Reference
[X] [Y] – The X and Y coordinates, in units, specifying where the barcode is to be placed.
XD [XDot] – Optionally specifies the width of a single element of the barcode. There is no limit on the
value, but the recommended range is 1 to 32. A value of 0 will pr oduce no output but will not cause an
error. If not specified, the default value is 2.
YD [YDot] – Optionally specifies the height of a single element of the barcode. There is no limit on the
value, but the recommended range is 1 to 32. A value of 0 will produce no output but will not cause an
error. If not specified, the default value is 6.
CPCL FOR LINK-OS PRINTERS
Page 73 of 329 1073699-001

Value
Code Words Consumed by ECC
Recommended For Data Of Size
0
0
Not recommended
1
2
Not recommended
2
6
1 to 40 code words
3
14
41 to 160 code words
4
30
161 to 320 code words
5
62
321 to 863 code words
6
126
No recommendation
7
254
No recommendation
8
510
No recommendation
In order for most scanners to be able to read the barcode, the value of
XDot
than the value for
.
C [Columns] – Optionally specifies the number of columns to use in the barcode. The valid range is 1 to
30. Values outside this range will cause an error message to print. If not specified, the default value is 3.
A value of 0 for columns is not supported.
If the barcode cannot be fit in the specified number of columns (usual ly only when in combination with
using rows) an error message will print.
R [Rows] – Optionally specifies the number of rows to use in the barcode. The valid range is 0 to 90,
where 0 means automatically select the number of rows to use. Values outside this range will cause an
error message to print. If not specified, the default value is 0, meaning automatic.
S [ECC] – Optionally specifies how much error correction data to encode in the barcode. The valid range
is 0 to 8. Using higher error correction levels reduce the capacity of the barcode. The barcode can have
no more than 928 code words, including data and error correction data. The error correction levels
reduce the cap acity as follo ws:
YDot
must be at least 2 greater
Values for ECC outside of the range listed above are not supported.
The default value if not specified is 1, which is minimum
B[BinaryMode] – Specifies if the compaction of data in the barcode is automatic, or explicitly set to
binary.
By default, the printer will automatically optimize the data compaction and switch between data modes to
reduce usage of code words. This behavior can be overridden and locked to binary mode with this option.
A value of B0 indi c ates the system is not forced t o binary mode. B1 indicates that it is forced to binary
mode. Note that unlike all other options, there is no space between the B and the number. B0 or B1 is
the correct format of the option.
Values besides B0 and B1 are interprete d as B0. B0 is the default.
[Data] – Specifies the data to be encoded in the barcode. The data may be any binary data, but any NUL
characters will be stripped out. It is not possible to encode NULs in PDF417 barcodes in CPCL. The dat a
parameter itself may be up to 8191 bytes, but PDF417 will not encode more than 2684 bytes in the best
case scenario (numb ers only).
PDF417 has a total of 929 code words available for use, less the amount consumed by the ECC selection.
The data rates for various types of data are as follows:
CPCL FOR LINK-OS PRINTERS
Page 74 of 329 1073699-001

Data Type
Code Words Used
Text
0.5 to 1 per character
Numeric
Up to 15 per 44 digits
Binary
5 per six bytes
Termination of Data
The data string is terminated with the following sequence. No part of this data is encoded in the data
that is put into the b arcode.
<CR><LF>ENDPDF<CR><LF>
This termination structure must appear at the end of the barcode, or the barcode is not terminated.
Examples (BARCODE-PDF417.LBL):
! 0 200 200 920 1<CR><LF>
B PDF-417 40 40 S 2<CR><LF>
1234567890<CR><LF>
ENDPDF<CR><LF>
ML 24 T 7 0 40 100<CR><LF>
Simple PDF 417 Barcode<CR><LF>
Element Size 2x6 (Default)<CR><LF>
3 Columns, Auto Rows (Default)<CR><LF>
ECC Mode 2, Automatic Compaction<CR><LF>
Data: 1234567890<CR><LF>
ENDML<CR><LF>
B PDF-417 40 260 XD 3 YD 7 C 5 R 53 S 6 B1<CR><LF>
ABCDEFGHIJKLMNOPQRSTUVWXYZabcdefghijklmnopqrstuvwxyz1234567890<CR><LF>
ABCDEFGHIJKLMNOPQRSTUVWXYZabcdefghijklmnopqrstuvwxyz1234567890<CR><LF>
ENDPDF<CR><LF>
ML 24 T 7 0 40 665<CR><LF>
PDF 417 Barcode<CR><LF>
Element Size 3x7<CR><LF>
5 Columns, 53 Rows<CR><LF>
ECC Mode 6, Force Binary Compaction<CR><LF>
Data:
ABCDEFGHIJKLMNOPQRSTUVWXYZ<CR><LF>
abcdefghijklmnopqrstuvwxyz1234567890<RAW><CR><LF><ENDRAW><CR><LF>
ABCDEFGHIJKLMNOPQRSTUVWXYZ<CR><LF>
abcdefghijklmnopqrstuvwxyz1234567890<RAW><CR><LF><ENDRAW><CR><LF>
ENDML<CR><LF>
PRINT<CR><LF>
CPCL FOR LINK-OS PRINTERS
Page 75 of 329 1073699-001

Use in Utilities Sessions for Line Print
In versions of Link-OS greater than 19.6, The BARCODE command and all its variant s can be used in a
utilities session to print a barcode in line print mode. The printer does not have to be in line print mode
for this command to be used in utilities mode. The X and Y parameters of the barcode must be specified,
but have no effect, instead the X, Y, RX, RY, XY or RXY commands must be used to specify the location
of the barcode.
CPCL FOR LINK-OS PRINTERS
Page 76 of 329 1073699-001

Note that only the BARCODE command operates in line print mode, VBARCODE does not.
It may be necessary to use the SET-LF command to be able to see the entire height of the barcode. See
the Introduction t o Line Print on page 25 for more information.
Utilities Example:
! U1 SETLF 160<CR><LF>
! U1 B PDF-417 0 0 S 2<CR><LF>
1234567890<CR><LF>
ENDPDF<CR><LF>
Command Notes and Interactions
The BARCODE-TEXT command cannot be used to print data representations under barcode created with
this command, no text will print.
The justify commands LEFT, RIGHT and CENTER do not have any effect on barcodes created with this
command.
CPCL FOR LINK-OS PRINTERS
Page 77 of 329 1073699-001

Command Name
BARCODE QR, VBARCODE QR
Short Form Aliases
B QR, VB QR
Valid Session Types
Label Sessions Only
Linked SGD
None
Negative Aw are
No
Parameter
Type
Description
Valid Range
X
5 Digit Unit Number
The X position where the barcode begins
0 to 65535 units
Y
5 Digit Unit Number
The Y position where the barcode begins
0 to 65535 units
Model
5 Digit Number
The ratio of wide to narrow bars.
1 or 2
Width
5 Digit Number
Unit-width of the barcode in dots
0 to 65535 dots
Config
Raw String
Configuration options for barcode
See Below.
Data
Raw String
Data for barcode
See Below.
Function
Required?
Options
Concatenation
No
D[This][Total][Parity], (See Below)
Error Correction
Yes
L
Low – Up to 7% Damage Recoverable
M
Medium – Up to 15% Damage Recoverable (Default)
Q
Quality – Up to 25% Damage Recoverable
H
High – Up to 30% Damage Recoverable
Mask
No
0-7
Select specific mask value
6.2.7 QR Code Barcode
BARCODE QR [X] [Y] M [Model] U [UnitWidth]<CR><LF>
[Config],[Data]<CR><LF>
ENDQR<CR><LF>
VBARCODE QR [X] [Y] M [Model] U [UnitWidth]<CR><LF>
[Config],[Data]<CR><LF>
ENDQR<CR><LF>
The BARCODE QR command is used to print QR Code barcodes in the CPCL language.
VBARCODE QR is identical to BARCODE, except it is oriented vertically.
Note that this command has optional parameters M, U. In order to use these parameters, the M or U
character must be followed by a space, then a number which complies with the table below.
Parameters Quick Reference
[X] [Y] – The X and Y coordinates, in units, specifying where the barcode is to be placed.
M [Model] – Specifies the model of QR code to print. This value must be 1 or 2. If it is outside this range,
no barcode will be printed. This parameter is optional. If not provided, model 2 is used.
U [UnitWidth] – Specifies the unit width of the QR code to print in pixels. A single on or off element of
the pattern will be this width when printed. This parameter is optional. If not provided, a value of 6 is
used. While there is no limit on this value, values greater than 32 generally do not make sense to use , as
they are too large to be printed on a label. A value of 0 results in no barcode being printed.
[Config], – Specifies configuration information about the barcode. This parame ter must be contai ns the
following options, in exactly this order. The config string must contain at least the error correcti on value
and a comma.
CPCL FOR LINK-OS PRINTERS
Page 78 of 329 1073699-001

8
No Mask
(Unspecified)
Automatic Selection (Default)
Data Input Mode
No
A
Automatic (Default)
M
Manual (See Below)
Concatenation
Concatenation mode, also known as “structured append” allows data for QR codes to be encoded acros s
multiple QR code barcodes. These barcodes can be read in any order and will be reassembled into the
complete data stream correctly. If you wish to use this mode, it must appear as the first option within the
Config
string and must be exactly 8 characters long including the trailing comma. There are no spaces or
other delimiters between the options.
The sub-parameters of the concatenation mode are as follows:
D[This][Total][Parity],
[This] – A two digit decimal number specifying which barcode in the sequence of barcodes this i s. For
example, the first barcode in a three barcode sequence would be 01, the second 02 and the third 03. The
range for this value is 1 to 16. If the value is exceeded, no barcode is printed.
[Total] – A two digit decimal number specifying the t otal number of barcodes within the sequence. In our
above example, this would be 03. The valid range for this value is 2 to 16. Values outside this range
result in no barcode being printed.
[Parity] – A two digit hexadecimal number specifying the parity calculation for the data within this
barcode. This value is calculated by taking all bytes of data to be encoded, and XORing them together.
Note that if you are using manual encoding, the data to be XORed is only the actual data bytes. Do not
include the M or A characters, or the commas used to separate data blocks in manual encoding mode.
If you are attempting to calculate parity in Kanji mode, XOR each byte individually, most significant byte
first.
Error Correction
The error correction value specifies how much of the barcode can be lost before the barcode is
unreadable. It is specified by a single letter within
Config.
to become damaged before the barcode is unreadable. If a value besides one of the values in the able
above is specified, a value of M will be used.
Specification of the error correction parameter is required.
Mask
The mask is a transpo sing of the bitma p data which represents the barcode in order to improve
scanability. In most cases it is desirable to have the printer select the best mask for the particular
barcode. The mask is represented by a single digit.
Any of 8 masks can be selected, with values from 0 to 7. Addit ionally, the mask can be disabled with the
value of 8. A mask value of 9 is interpreted as 8. If the mask value is omitted, the printer automatically
selects the best mask, which is recommended for the best results.
The default value is M, which allows up to 15%
CPCL FOR LINK-OS PRINTERS
Page 79 of 329 1073699-001
Encoding Type
Specify With
Max. Capacity
Numeric only
N
7,089
Alphanumeric
A
4,296
Binary or Byte
Bxxxx
2,953
Kanji and Kana
K
1,817
Almost all QR Code scanners cannot decode barcodes in which the mask has been disabled, so use of this
mode is not recommended.
Data Input Mode
Data
QR code barcodes can either specify automatic or manual data mode for the
Data
See the
parameter for more information. If this value is not specified, or is any value besides M (for
manual), A is used.
Config
[Data] – Following the
based on the data input mode selected as part of the
parameter, the data to be encoded is specified. The format of this data is
Config
parameter.
Manual Data
Data
If manual data input mode was specified, the
parameter is sequence of commands that indicate
encoding type and data. Each of these commands consists of a single letter follow ed by data. Multiple
encoding types can be encoded into a single barcode. To encode multiple types, end the current
encoding with a comma and then restart using the single letter to indicate the new mode, followed by
data.
The following data formats are supported within QR code:
field.
Up to 200 type changes may occur in a single barcode. Note that each type change consumes data space
within the barcode which may reduce the maximum capacity.
If the data capacity is exceeded, no barcode will be printed.
Numeric Only Encoding
In numeric mode, only the ASCII char acters 0-9 can be e ncoded. The largest possible number of digits
that can be encoded is 7,089, assuming concatenation mode was not used, and that the lo w option was
selected for error correction.
Alphanumeric Encoding
In alphanumeric encoding the ASCII characters 0-9, A-Z (uppercase only) and space as well as the
following punctuation characters:
$%*+-./:
In this mode up to 4,296 characters can be encoded assuming concatenation mode was not used, and
that the low option was selecte d for error correction.
Binary or Byte Encoding
In this encoding mode, the entire ASCII range can be represented from 0 to 255, however the CPCL
implementation does not support encoding NUL (ASCII 0) into the stream.
CPCL FOR LINK-OS PRINTERS
Page 80 of 329 1073699-001

When using this mode, the number of bytes being encoded must be specified as a four-digit ASCII
number immediately following the B character. All four characters must be provided including leading
zeros.
When binary data is scanned, it is interpreted to be ISO/IEC 8859 -1 data by most barcode scanners.
In this mode up to 2,953 characters can be encoded assuming concatena tion mode was not used, and
that the low option was selecte d for error correction.
Kanji and Kana Encoding
In this encoding mode, only Shift-JIS characters can be encoded. Each character in Shift-JIS is two bytes
in size when encoded, so the data provided must be eve n i n l ength. Note that the range of characters in
Shift-JIS encoding is very specific; this mode is not suitable for general data.
In this mode up to 1,817 characters can be encoded assuming concatena tion mode was not used, and
that the low option was selecte d for error correction.
Automatic Data
Data
If no data input mode was specified, or if the mode selected was A for automatic, the
simply represents the data to be encoded in the barcode. The printer will automatically switch between
the various modes supported within a QR Code barcode to most efficiently pack the data.
Because of the way binary and kanji QR Code encoding modes overlap, not all characters can be
represented in auto matic data mode. Kanji characters (using Shift-JIS encoding) are represented with
two bytes which start with characters between ASCII 128 and 160, or greater than 224. If automatic
detection mode encounters one of these characters, it will enter kanji encoding mode. Thus, these
characters should not be placed in an automatic data stream with the intent of encoding them in binary
mode.
If use of these characters is required, the use of manual binary mode is recommended.
Termination of Data
The data string, in either mode (manual or automatic) is terminated with the following sequence. No part
of this data is encoded in the data that is put into the barcode.
<CR><LF>ENDQR<CR><LF>
This termination structure must appear at the end of the barcode, or the barcode is not terminated.
Examples (BARCODE-QR.LBL):
! 0 200 200 1200 1<CR><LF>
B QR 50 25<CR><LF>
L,Basic QR Code<CR><LF>
ENDQR<CR><LF>
ML 24 T 7 0 270 25<CR><LF>
QR Code - Minimal Form<CR><LF>
Automatic Mode (2)<CR><LF>
Automatic Width (6)<CR><LF>
Automatic Mask<CR><LF>
Low Error Recovery<CR><LF>
parameter
CPCL FOR LINK-OS PRINTERS
Page 81 of 329 1073699-001

Auto Encoding<CR><LF>
Data: Basic QR Code<CR><LF>
ENDML<CR><LF>
B QR 50 250 M 2 U 6<CR><LF>
H4A,Basic QR Code<CR><LF>
ENDQR<CR><LF>
ML 24 T 7 0 270 250<CR><LF>
QR Code<CR><LF>
Mode 2 - Width 6 - Mask 4<CR><LF>
High Error Recovery<CR><LF>
Auto Encoding<CR><LF>
Data: Basic QR Code<CR><LF>
ENDML<CR><LF>
B QR 50 475 M 2 U 4<CR><LF>
H2M,N123456789123456789,AABCDEFGHIJKLM,B0017~_@^()[]{}abcdefg<CR><LF>
ENDQR<CR><LF>
ML 24 T 7 0 270 475<CR><LF>
QR Code<CR><LF>
Mode 2 - Width 4 - Mask 2<CR><LF>
High Error Recovery<CR><LF>
Manual Encoding<CR><LF>
Data:<CR><LF>
Numeric: 123456789123456789<CR><LF>
Alphanumeric: ABCDEFGHIJKLM<CR><LF>
Binary: ~_@^()[]{}abcdefg<CR><LF>
ENDML<CR><LF>
B QR 50 700 M 2 U 6<CR><LF>
D010276,HM,ABARCODE 1 OF 2<CR><LF>
ENDQR<CR><LF>
ML 24 T 7 0 270 700<CR><LF>
QR Code<CR><LF>
Mode 2 - Width 6 - Auto Mask<CR><LF>
Structured Append - 1 of 2<CR><LF>
Parity 0x76 (118 decimal)<CR><LF>
High Error Recovery<CR><LF>
Manual Encoding<CR><LF>
Data:<CR><LF>
Alphanumeric: BARCODE 1 OF 2<CR><LF>
ENDML<CR><LF>
B QR 50 925 M 2 U 6<CR><LF>
D020275,HM,ABARCODE 2 OF 2<CR><LF>
ENDQR<CR><LF>
ML 24 T 7 0 270 925<CR><LF>
QR Code<CR><LF>
Mode 2 - Width 6 - Auto Mask<CR><LF>
Structured Append - 2 of 2<CR><LF>
Parity 0x75 (117 decimal)<CR><LF>
High Error Recovery<CR><LF>
Manual Encoding<CR><LF>
Data:<CR><LF>
Alphanumeric: BARCODE 2 OF 2<CR><LF>
ENDML<CR><LF>
PRINT<CR><LF>
CPCL FOR LINK-OS PRINTERS
Page 82 of 329 1073699-001
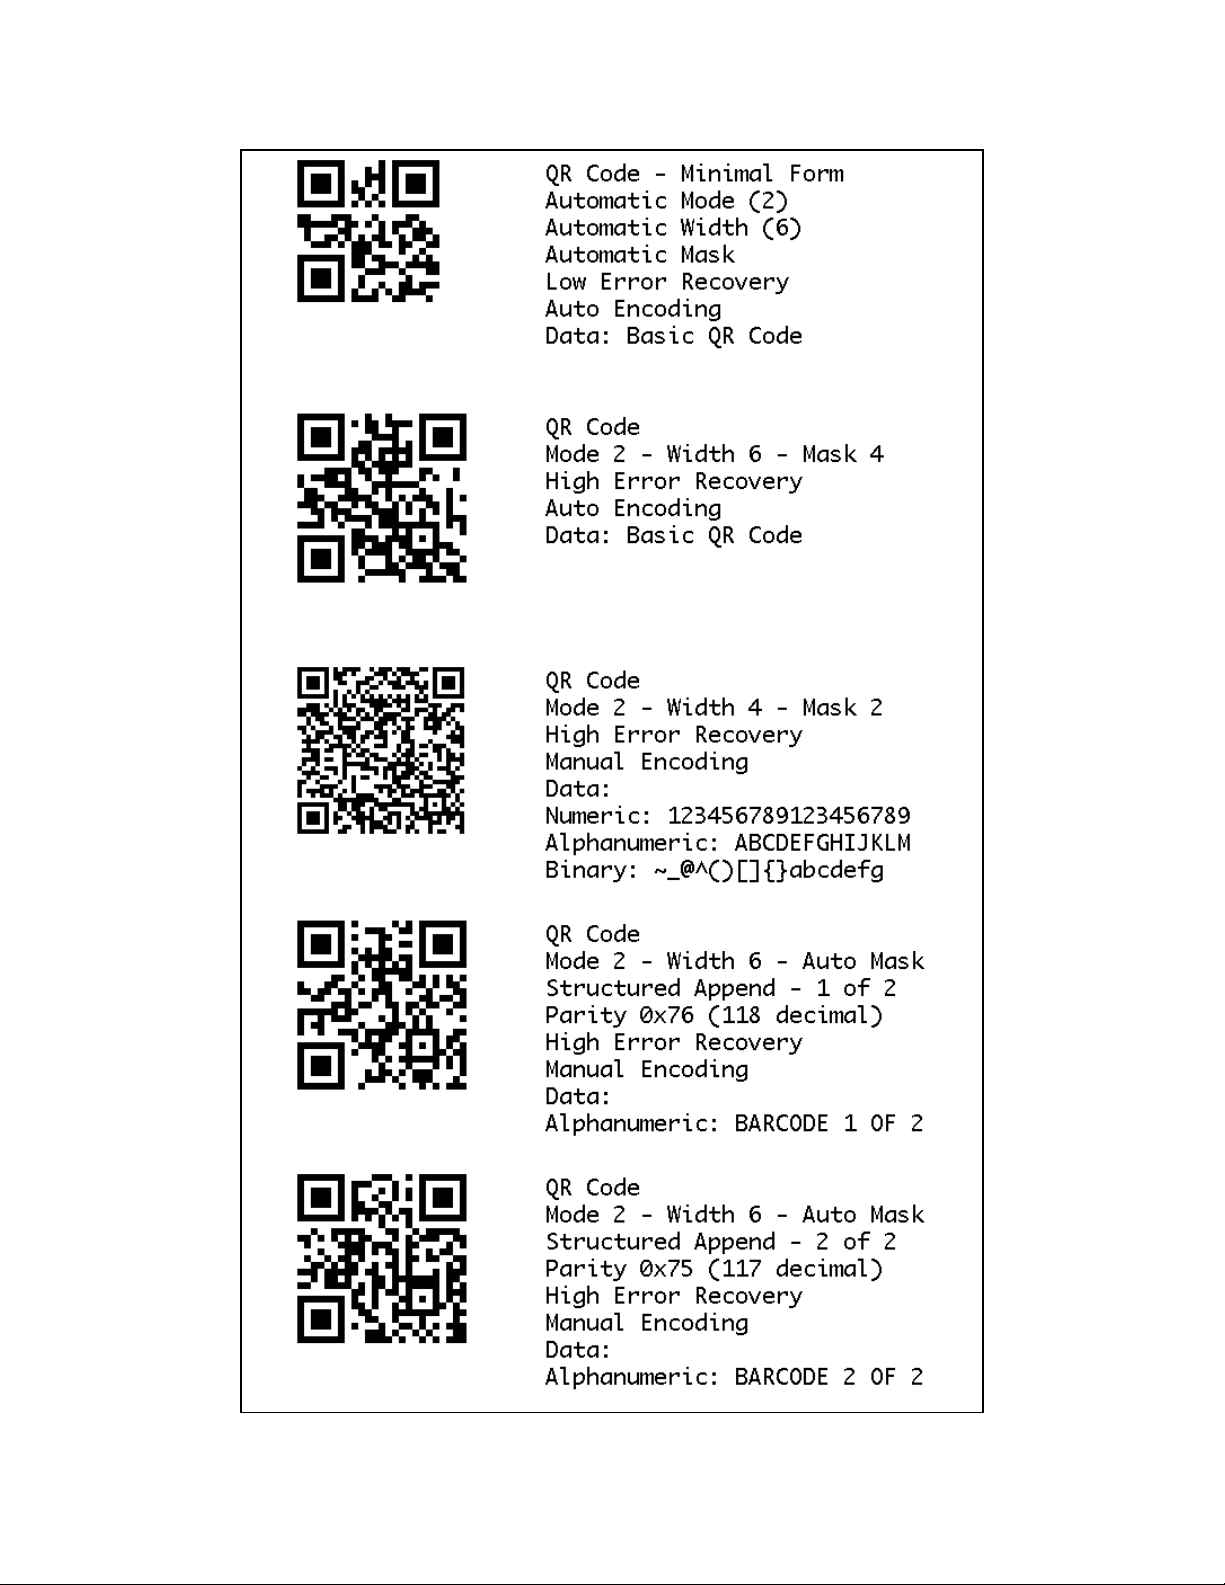
CPCL FOR LINK-OS PRINTERS
Page 83 of 329 1073699-001

Use in Utilities Sessions for Line Print
In versions of Link-OS greater than 19.6, The BARCODE command and all its variant s can be used in a
utilities session to print a barcode in line print mode. T he pr inter does not have to be in line print mode
for this command to be used in utilities mode. The X and Y parameters of the barcode must be specified,
but have no effect, instead the X, Y, RX, RY, XY or RXY commands m ust be used to specify the location
of the barcode.
It may be necessary to use the SET-LF command to be able to see the entire height of the barcode. See
the Introduction t o Line Print on page 25 for more information.
Note that only the BARCODE command operates in line print mode, VBARCODE does not.
Utilities Example:
! U1 SETLF 160<CR><LF>
! U1 B QR 0 0<CR><LF>
L,Basic QR Code<CR><LF>
ENDQR<CR><LF>
Command Notes and Interactions
The BARCODE-TEXT command cannot be used to print data representations under barcode created with
this command, no text will print.
The justify commands LEFT, RIGHT and CENTER do not have any effect on barcodes created with this
command.
CPCL FOR LINK-OS PRINTERS
Page 84 of 329 1073699-001
Command Name
BARCODE-TEXT
Short Form Aliases
BT
Valid Session Types
Label and Utilities Sessions
Linked SGD
None
Negative Aware
No
Parameter
Type
Description
Valid Range
Pre-scaled Font Syntax
FontNameOrNumber
Space-Terminated String
A font name or number to create the representation
See Below.
FontSize
3 Digit Number
The size of the font.
0 to 999
Offset
3 Digit Unit Number
How far in units the text is from the barcode
0 to 999
Alternate Syntax – TTF Font Syntax
TrueTypeFontName
Space-Terminated String
The filename of the TTF font with extension
See Below.
XScale
3 Digit Number
The X size of the font, in dots.
0 to 999
YScale
3 Digit Number
The Y size of the font, in dots
0 to 999
Offset
3 Digit Unit Number
How far in units the text is from the barcode
0 to 999
6.3 BARCODE-TEXT
BARCODE-TEXT [FontNameOrNumber] [FontSize] [Offset]<CR><LF>
BARCODE-TEXT [TrueTypeFontName] [XScale] [YScale] [Offset]<CR><LF>
BARCODE-TEXT OFF<CR><LF>
BARCODE-TEXT is used to specify if a human-readable text representation of barcode data should be
printed below 1D barcodes. This text is applied for both line-print and label-based barcodes.
The BARCODE-TEXT command has no effect on GS-1 Databar, Compsite, or 2D barcode types.
As with all commands which work with fonts, there are two formats of the command, one for pre-scaled
CPF fonts, and another for TTF fonts. You cannot use CSF fonts with BARC ODE-TEXT. See page 189 for
information on internal font numbers and using TTF files.
To turn off the addition of the text representation, use the format BARCODE-TEXT OFF with no additional
parameters.
The barcode text is always center justified under the barcode. If the text cannot fit on the page it will
wrap around the page in either direction to be able to be printed.
The command is persistent between labels. The last value set in a label will be carried to the next label.
This command can also be used as a stand-alone command in a utilities session, where it will take effect
on the next barcode printed.
Parameters Quick Reference
[FontNameOrNumber] – The name or the number of the pre-scaled or internal font to use when printing
the barcode text. This can be a numbe r defined in the font file, or the font’s name, with or without file
extension.
[FontSize] – The size of the font to print. These sizes are defined within the font specified. See page 190
for size values for built in fonts. The size selection can be overridden by SETMAG.
CPCL FOR LINK-OS PRINTERS
Page 85 of 329 1073699-001

[TrueTypeFontName] – Specifies the name of the TrueType font to use when printing the barcode text.
The entire filename of the font, including extension, must be specified. The file must have a TTF or FNT
extension.
[XScale] [YScale] – The X and Y size of the TrueType font in dots. Using the same size for the X and Y
will make the character appear proportionally normal. For most labels, this printer has 200 dots per inch,
so an X and Y of 200 will make a character approximately 1 inch high. See page 38 for more details on
label sessions.
[Offset] – Specifies the distance, in units, that the top of the human readable text is placed from the
bottom of the barcode. Note that many fonts have built in spacing at the top. This space will be included
even of the offset specified is 0.
Examples (BARCODE-TEXT.LBL):
! 0 200 200 500 1<CR><LF>
JOURNAL<CR><LF>
BARCODE-TEXT 7 0 0<CR><LF>
B 128 1 2 20 25 25 12345abc<CR><LF>
ML 24 T 7 0 270 25<CR><LF>
Barcode Text<CR><LF>
Font 7<CR><LF>
Size 0, Offset 0<CR><LF>
ENDML<CR><LF>
BARCODE-TEXT 4 1 10<CR><LF>
B 128 1 2 20 25 150 12345abc<CR><LF>
ML 24 T 7 0 270 150<CR><LF>
Barcode Text<CR><LF>
Font 4<CR><LF>
Size 1, Offset 10<CR><LF>
ENDML<CR><LF>
BARCODE-TEXT VERAMOIT.TTF 35 35 5<CR><LF>
B 128 1 2 20 25 275 12345abc<CR><LF>
ML 24 T 7 0 270 275<CR><LF>
Barcode Text<CR><LF>
Font VERAMOIT.TTF<CR><LF>
Size 35x35 points<CR><LF>
Offset 5<CR><LF>
ENDML<CR><LF>
BARCODE-TEXT OFF<CR><LF>
B 128 1 2 20 25 400 12345abc<CR><LF>
T 7 0 270 400 Barcode Text Off<CR><LF>
PRINT<CR><LF>
Command Notes and Interactions
The BARCODE-TEXT command works correctly with COUNT to change as multiple labels are printed.
CPCL FOR LINK-OS PRINTERS
Page 86 of 329 1073699-001
Command Name
BAT-INDICATOR
Short Form Aliases
BI
Valid Session Types
Label and Utilities Sessions
Linked SGD
None
Negative Aware
No
Parameter
Type
Description
Valid Range
X
5 Digit Unit Number
The X origin of the graphic.
0 to 65535
Y
5 Digit Unit Number
The Y origin of the graphic.
0 to 65535
6.4 BAT-INDICATOR
BAT-INDICATOR [X] [Y] S M L DBG P<CR><LF>
BI [X] [Y] [Size] S M L DBG P<CR><LF>
BAT-INDICATOR is used to print a graphical representation of the current charge state of the battery on
a label.
The BAT-INDICATOR command takes a series of optional parameters to specify its size and configuration.
Parameters Quick Reference
[X] [Y] – The X and Y coordinates, in units, specifying where the graphic is to be p laced.
S, M, L – An S, M, or L can be optionally added to the command to adjust the size of the printed graphic.
The default size is M if not specified, which makes an indicator 100 pixels high. The S size makes the
indicator 50 pixels high, and L makes the indicator 20 0 pixels high. Note that this is not a parameter – it
is similar in syntax to the BAT-INDICATOR command itself.
DBG, P – The P character can be added to the end of the BAT-INDICATOR command so that a text-based
percentage of the battery is printed next to the graphical indicator. The DBG option can also be used,
which provides the same text-based percentage in addition to an indication of the current batte ry voltage
level and ADC, as w ell as the current user label count (the odometer.use r_label_count SGD). Note that
this is not a parameter – it is similar in syntax to the BAT-INDICA TOR command itself.
Example
! 0 200 200 770 1<CR><LF>
BAT-INDICATOR 30 30<CR><LF>
T 7 0 30 180 Battery Indicator<CR><LF>
T 7 0 30 204 Medium Size (Default)<CR><LF>
BAT-INDICATOR 30 250 S P<CR><LF>
T 7 0 30 350 Battery Indicator<CR><LF>
T 7 0 30 374 Small Size (S) with P Option<CR><LF>
BAT-INDICATOR 30 405 L DBG<CR><LF>
T 7 0 30 655 Battery Indicator<CR><LF>
T 7 0 30 684 Large Size(L) with DBG Option<CR><LF>
PRINT<CR><LF>
CPCL FOR LINK-OS PRINTERS
Page 87 of 329 1073699-001
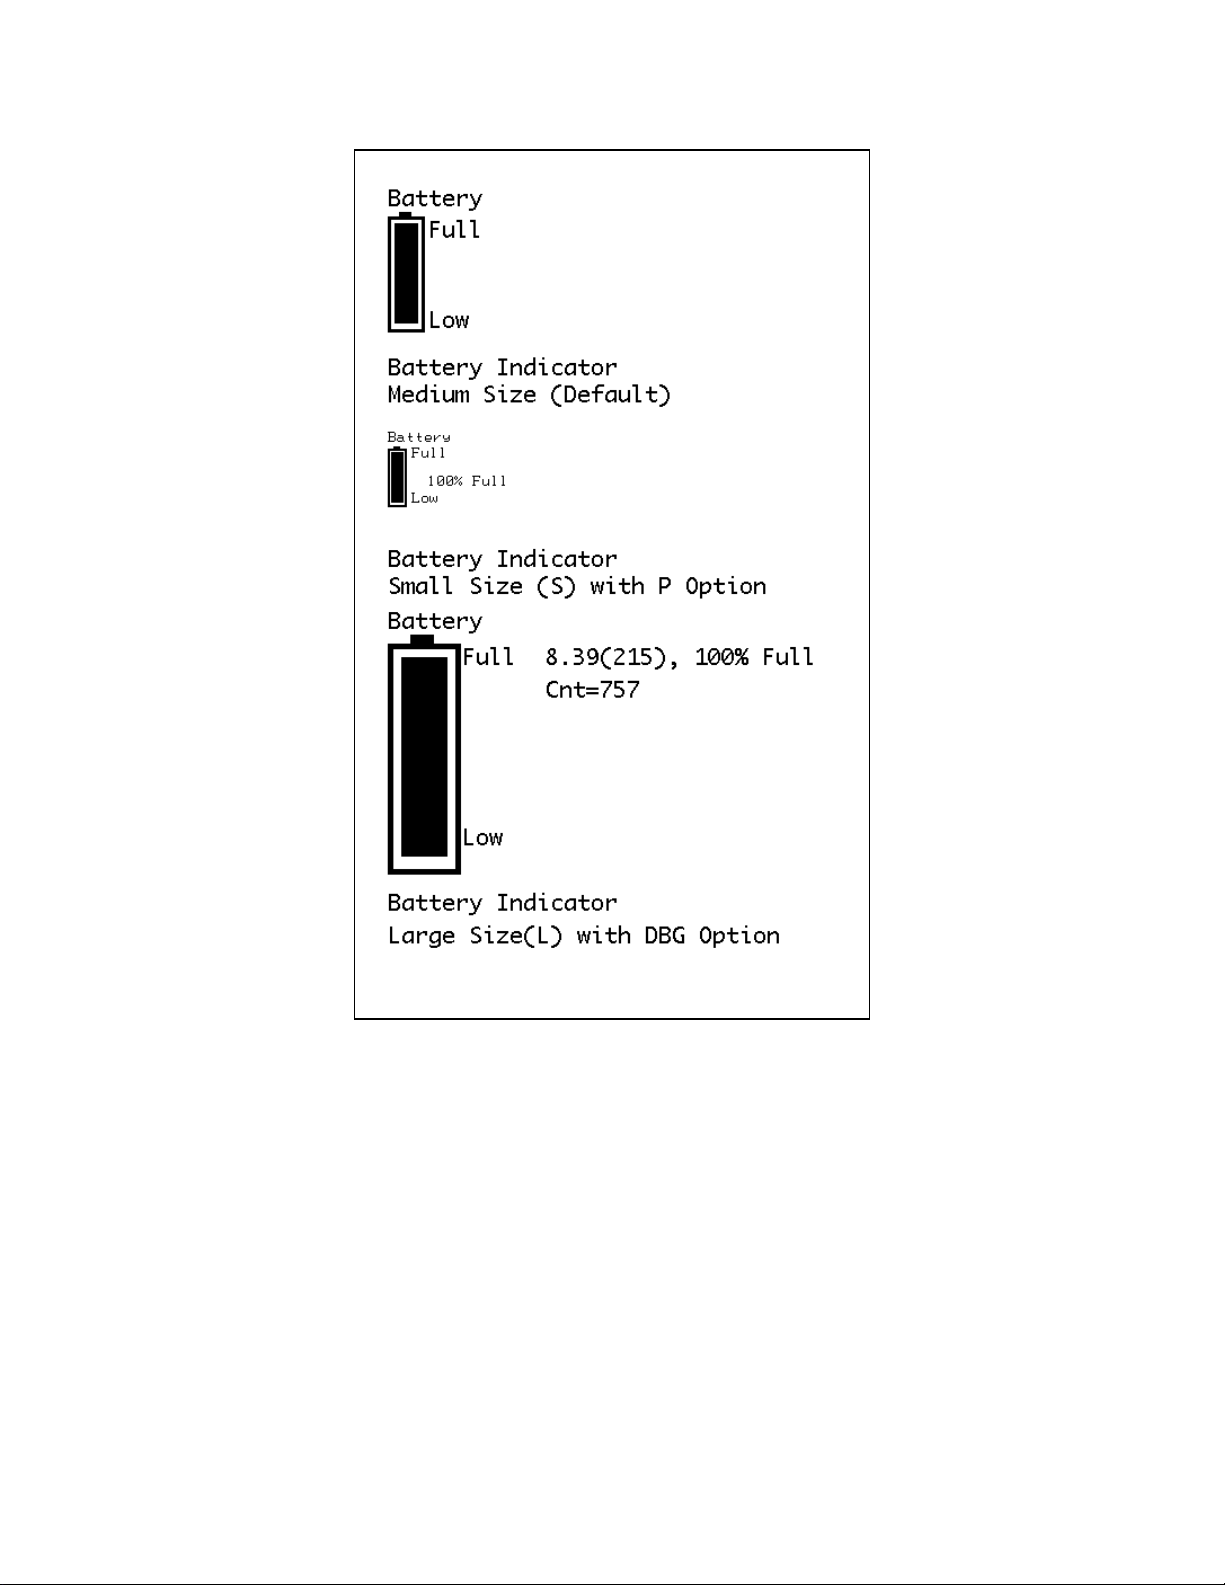
Command Notes and Interactions
None.
CPCL FOR LINK-OS PRINTERS
Page 88 of 329 1073699-001

Command Name
BOX
Short Form Aliases
None
Valid Session Types
Label Sessions Only
Linked SGD
None
Negative Aware
No
Parameter
Type
Description
Valid Range
X
5 Digit Unit Number
The X origin of the box.
0 to 65535
Y
5 Digit Unit Number
The Y origin of the box.
0 to 65535
EndX
5 Digit Unit Number
The X coordinate where the box ends.
0 to 65535
EndY
5 Digit Unit Number
The Y coordinate where the box ends.
0 to 65535
Thickness
5 Digit Unit Number
The thickness of the lines in the box.
0 to 65535
6.5 BOX
BOX [X] [Y] [EndX] [EndY] [Thickness]<CR><LF>
The BOX command is used to d raw a box.
By default, BOX draws a box in solid black, but the pattern used to fill the box can be changed with the
PATTERN comma nd.
The BOX command ca n be used with the justify commands CENTER, LEFT and RIGHT to align the box.
Parameters Quick Reference
[X] [Y] – The X and Y coordinates, in units, specifying where the box is to be placed.
[EndX] [EndY] – The X and Y coordinates, in units, specifying where the box ends. Due to a requirement
to maintain compatibility, the Y coordinate used w ill be one less dot than the value specified.
The EndX and EndY coordinates can be less than X and Y, the box will be drawn appropriately.
[Thickness] – The thickness, in units of the lines drawn when creating the box. When using dots, a value
of 0 yields a thickness of 1 dot, 1 yields a thickness of 2 dots, and so on. In this way, you can never
create an invisible box, regardless of unit selection. The thickness is drawn from the outside in, so a box
with the same coordinates but different thickness will have the same exterior size.
For efficiency and to ensure predi ctable results, Thickness should not exceed half the length of the
shortest side of the box plus one. Thickness equal to half the shortest length will create a filled box.
Examples (BOX.LBL):
! 0 200 200 570 1<CR><LF>
BOX 30 30 149 150 1<CR><LF>
ML 24 T 7 0 300 30<CR><LF>
Box from 30,30 to 149,150<CR><LF>
120x120 dot output box<CR><LF>
Thickness 1 - 2 dots thick<CR><LF>
ENDML<CR><LF>
BOX 30 180 259 240 19<CR><LF>
ML 24 T 7 0 300 180<CR><LF>
CPCL FOR LINK-OS PRINTERS
Page 89 of 329 1073699-001

Box from 30,180 to 259,240<CR><LF>
230x60 dot output box<CR><LF>
Thickness 19 - 18 dots thick<CR><LF>
ENDML<CR><LF>
BOX 30 270 109 480 46<CR><LF>
ML 24 T 7 0 300 270<CR><LF>
Box from 30,270 to 109,480<CR><LF>
80x210 dot output box<CR><LF>
Thickness 46 - 45 dots thick<CR><LF>
ENDML<CR><LF>
PRINT<CR><LF>
Command Notes and Interactions
None.
CPCL FOR LINK-OS PRINTERS
Page 90 of 329 1073699-001

CPCL FOR LINK-OS PRINTERS
Page 91 of 329 1073699-001
Command Name
CENTER
Short Form Aliases
None
Valid Session Types
Label or Utilities Sessions
Linked SGD
None
Negative Aware
No
BARCODE (all 1D types)
BARCODE MAXICODE
BOX
CONCAT
INVERSE-LINE, REVERSE-LINE
LINE
PCX, PCX90, PCX180, PCX270
PCXMAG
SCALE-TEXT
SCALE-TO-FIT
TEXT, TEXT90, TEXT180, TEXT270
COMPRESSED-G RAPHICS, EXPANDEDGRAPHICS
Parameter
Type
Description
Valid Range
Range
5 Digit Unit Number
The width of the area to center on from the left side
0 to 65535
6.6 CENTER
CENTER [Range]<CR><LF>
The CENTER command is used to change the justificat ion of supported fields. It is part of a series of
justification commands which includes LEFT, CENTER and RIGHT.
The following commands support justification:
This command takes an optional parameter range, which specifies the number of pixels, from the left
edge of the page, to use when centering.
CENTER is persistent within the label format, but the field alignment is always set to LEFT when the
session ends.
Parameters Quick Reference
[Range]
– The range parameter is an optional parameter that changes the width of the media that is
used to center over. Specifying a value of 0 means to center subsequent fields over the entire active
width (as specified by the PAGE-WIDTH command) .
If not specified, a value of 0 is used. If for some reason the value for Range is invalid, justification is
reset to LEFT.
The range can be larger than the physical page width, but this may cause tex t to wrap around the edge
of the label and appear on the other side.
If the field being centered is wider than the range, the field will not be centered and will print as if left
aligned.
Range
also performs a field specification function for FONT-GROUP, specifying the right edge for text
printed either with the TEXT command or CONCAT and used to control sizing. See the FONT-GROUP
documentation on page for more information.
Examples (CENTER.LBL):
! 0 200 200 350 1<CR><LF>
CPCL FOR LINK-OS PRINTERS
Page 92 of 329 1073699-001

T 7 0 30 30 This text has no (default left) justification.<CR><LF>
RIGHT<CR><LF>
T 7 0 30 80 This text has right justification.<CR><LF>
CENTER<CR><LF>
T 7 0 30 130 This text has center justification.<CR><LF>
LEFT<CR><LF>
T 7 0 30 180 This text has left justification.<CR><LF>
CENTER 576<CR><LF>
T 7 0 30 240 This text has center justification,<CR><LF>
T 7 0 30 264 but uses 576 as the range.<CR><LF>
PRINT<CR><LF>
Command Notes and Interactions
None.
CPCL FOR LINK-OS PRINTERS
Page 93 of 329 1073699-001

Command Name
COMPRESSED-GRAPHICS
VCOMPRESSED-GRAPHICS
Short Form Aliases
CG
VCG
Valid Session Types
Label Sessions Only
Linked SGD
None
Negative Aware
No
Parameter
Type
Description
Valid Range
ByteWidth
3 Digit Number
The byte width of the image being transmitted.
0 to 999
Height
5 Digit Unit Number
The height of the data to follow in units.
0 to 65535
X
5 Digit Unit Number
The X origin of the graphic.
0 to 65535
Y
5 Digit Unit Number
The Y origin of the graphic.
0 to 65535
Data
Raw String
The data that makes up the bitmap to be printe d.
See below.
6.7 COMPRESSED-GRAPHICS
COMPRESSED-GRAPHICS [ByteWidth] [Height] [X] [Y] [Data]<CR><LF>
VCOMPRESSED-GRAPHICS [ByteWidth] [Height] [X] [Y] [Data]<CR><LF>
The COMPRESSED-GRAPHICS command is used to print raw binary bitmap data to the label.
VCOMPRESSED-GRAPHICS is the same except it is oriented vertically.
The data itself is not compressed per say, it is just more efficiently represe nted than in the EXPANDED-
GRAPHICS command. The binary data is not compressed in this command.
Parameters Quick Reference
[ByteWidth] – Specifies the width in bytes of the data that is to be printed. If this value exceeds the
physical width of the print head, the data will wrap the edge of the page and back to the beginning.
[Height] – Specifies the height of the data to be printed in units. Use care when using non-dot unit
systems, as this value, in combination with ByteWidth, is used to determine how large the Data
parameter is. For this reason, the use of dots is recommended.
[X] [Y] – The X and Y coordinates, in units, specifying where the graphic is to be placed. The Y
coordinate in this function is reduced by one. This allows print on the very first dot row of the printout,
which is otherwise not accessible. See the note at section 6.1 on page 38 for more information.
[Data] - The raw binary da ta that contains the 1-bit image data. The size of this field must be exactly
ByteWidth times Height bytes in size. This data may contain any binary including NUL’s.
It is important to remember that a <CR><LF> must be placed after the data to terminate the command,
even though the size of Data is exact.
Use in Utilities Sessions for Line Print
The COMPRESSED-GRAPHICS command and its alias can be used in utilit ies sessions without a label
header in order to directly print graphics. When using this command in this mode, the X and Y
parameters are not used, instead use the line print X, Y and XY commands to position the graphics. See
page 181 for more information o n those commands.
CPCL FOR LINK-OS PRINTERS
Page 94 of 329 1073699-001

In this mode, the height of the graphics is also limited to the height of the line print buffer as set by
SETLP-BUFFER command (see page 179). By default, this value is set to 2400 pixels.
If, based on the current Y position, t he graphic will not fit in the remaining area in the buffer, the buffer
will be immediately printed, and the Y cursor reset to 0.
Any attempt to print more than will fit in that buffer will be parsed but disposed of.
Examples (COMPRESSED-GRAPHICS.LBL):
Be sure to see page 15 for information on how binary data is represented with SEQ.
! 0 200 200 150 1<CR><LF>
COMPRESSED-GRAPHICS 10 27 30 30
<SEQ FFFFFFFFFFFFFFFFFFFF>
<SEQ FFFFFFFFFFFFFFFFFFFF>
<SEQ FF0000000000000000FF>
<SEQ FF0000000000000000FF>
<SEQ FF0000000000000000FF>
<SEQ FF0000000000000000FF>
<SEQ FF000FF000000FF000FF>
<SEQ FF000FF000000FF000FF>
<SEQ FF000FF000000FF000FF>
<SEQ FF000FF000000FF000FF>
<SEQ FF0000000000000000FF>
<SEQ FF0000000000000000FF>
<SEQ FF0000000000000000FF>
<SEQ FF0000000000000000FF>
<SEQ FF0000000000000000FF>
<SEQ FF000FF000000FF000FF>
<SEQ FF000FF000000FF000FF>
<SEQ FF0000FFFFFFFF0000FF>
<SEQ FF0000FFFFFFFF0000FF>
<SEQ FF0000000000000000FF>
<SEQ FF0000000000000000FF>
<SEQ FF0000000000000000FF>
<SEQ FF0000000000000000FF>
<SEQ FF0000000000000000FF>
<SEQ FF0000000000000000FF>
<SEQ FFFFFFFFFFFFFFFFFFFF>
<SEQ FFFFFFFFFFFFFFFFFFFF><CR><LF>
T 7 0 270 30 Compressed Graphics Example<CR><LF>
T 7 0 270 56 10 byte width, 27 lines<CR><LF>
PRINT<CR><LF>
A second example is provided in the label files set included with the manual, named COMPRESSEDGRAPHICS-2.LBL. This example is similar in design to this one but has a larger more meaningful graphical
example. Due to its size it is not included in the text of this document.
Command Notes and Interactions
COMPRESSED-GRA PHIC S c omm and s can be aligned using o ne of the justify commands, CENTER, LEFT or
RIGHT.
CPCL FOR LINK-OS PRINTERS
Page 95 of 329 1073699-001
Command Name
CONCAT
VCONCAT
Short Form Aliases
None
Valid Session Types
Label Sessions Only
Linked SGD
None
Negative Aware
No
Data
SET commands do not take effect in the
field of this command.
6.8 CONCAT
CONCAT [X] [Y]<CR><LF>
[FontNumberOrName] [FontSize] [Offset] [Data]<CR><LF>
or any of these, in any combination, up to 40 times:
SCALE-TEXT [ScaledFontName] [XScale] [YScale] [Offset] [Data]<CR><LF>
ST [ScaledFontName] [XScale] [YScale] [Offset] [Data]<CR><LF>
VSCALE-TEXT [ScaledFontName] [XScale] [YScale] [Offset] [Data]<CR><LF>
VST [ScaledFontName] [XScale] [YScale] [Offset] [Data]<CR><LF>
FG [FontGroupNumber] [Offset] [Data]<CR><LF>
…
…
ENDCONCAT<CR><LF>
VCONCAT has the identical syntax as above, except for the VCONCAT in place of CONCAT.
The CONCAT command is used to concatenate multiple fonts and sizes of text on to a single line, and to
align their top-lines in a specific way. The command starts with a CONCAT command, followed by one or
more sub-commands. Each sub-command adds more text onto the concatenation from left t o r ight.
The basic syntax of the command is the first line of the CONCAT command followed by up to 40 subcommands in any combination. Any fields beyond 40 will parsed and ignored.
The CONCAT command supports all three font technologies supported in CPCL – pre-scaled fonts
(including internal), true-type fonts, and legacy scaled fonts. Font groups are also supported.
When using this command with ST or SCALE-TEXT in one of the sub-commands, t he vertical component
is determined by the CONCAT command itself (using CONCAT or VCONCAT), and not by the subcommands. That is to say, using VST or VSCALE-TEXT with CONCAT will not cause the subcommand to
appear vertical, and using ST or SCALE-TEXT with VCONCAT will not cause the text to appear horizontal.
In this command, there is no text version substitution of the command for true-type fonts like there is in
the TEXT command. Instead use the ST or SCALE-TEXT command. For this command,
FontNameOrNumber
must be a pre-scaled font file.
CONCAT supports the use of font groups to allow all or part of the data’s font to be selected based on
the width of the data provided. Multiple font group sub-commands work together to determine the
largest size each font-group sub-command can be, while still maintaining full size of the non-font group
elements of the command. See page 107 for more information on font groups. Note that only FG is
supported, and not t he long form FONT-GROUP.
The total size of all Data fields within a CONCAT command must not exceed 2024 bytes. If the data
exceeds this amount, any data fields or sub-commands that follow will be ignored.
CPCL FOR LINK-OS PRINTERS
Page 96 of 329 1073699-001
Parameter
Type
Description
Valid Range
Master Syntax
X
5 Digit Unit Number
The X origin of the text string.
0 to 65535
Y
5 Digit Unit Number
The Y origin of the text string.
0 to 65535
Sub-command – Standard Text (Pre-Scaled)
FontNameOrNumber
Space-Terminated String
A font name or number to create the text.
See Below.
FontSize
5 Digit Number
The size of the pre-scaled font.
0 to 65535
Offset
5 Digit Unit Number
How far from Y is the top of this text?
0 to 65535
Data
CR-LF Terminated String
The text data to be concatenated.
Up to 2024 characters1
Sub-Command – Scale-Text (all Forms – VST, ST, SCALE-TEXT, VSCALE-TEXT)
ScaledFontName
Space-Terminated String
A scaled font used to create the text.
See Below.
XPoints
5 Digit Number
The X size of the scaled font, in points.
0 to 65535
YPoints
5 Digit Number
The Y size of the scaled font, in points.
0 to 65535
Offset
5 Digit Unit Number
How far from Y is the top of this text?
0 to 65535
Data
CR-LF Terminated String
The text data to be concatenated.
Up to 2024 characters1
Sub-command – Font-Group
FontGroupNumber
Space-Terminated String
The number of the font-group to use
0 to 10
Offset
5 Digit Unit Number
How far from Y is the top of this text?
0 to 65535
Data
CR-LF Terminated String
The text data to be concatenated.
Up to 2024 characters1
Unlike many commands in CPCL which wrap around the edge of the label, if the concatenated text data
will not fit on the page (PAGE-WIDTH for CONCAT, the label session height for VCONCAT), nothing is
printed at all.
If the fit is close, the printer will automatically try to adjust the spacing of the pre-scaled fonts (in the
same way SETSP does) to try to make it fit.
Any command besides the ones listed above provided as a sub-command will be completely ignored up
to the next CR and LF, where processing will resume.
Parameters Quick Reference
1
The size of all data fields in all sub-commands must not exceed 2024 characters.
[X] [Y] – The X and Y coordinates, in units, specifying where the concatenated string is to be placed.
[FontNameOrNumber] – The name or the number of the pre-scaled or internal font to use when
rendering the current portion of the concatenated string. This can be a number defined in the font file, or
the font’s name, w ith or without file extension.
[FontSize] – The siz e of the font to print. These sizes are defined within the font specified. See page 190
for size values for built in fonts. The size selection can be overridden by SETMAG.
[Offset] – The distance, in units, that the top is of text is placed, off of the Y coordinate. This is used as
the method to align fonts of various sizes.
[ScaledFontName] – Specifies the name of the TrueType or CSF font file to use when printing thecurrent
portion of the concatenated string. The entire filename of the font, including extension, must be
specified. The file must have a TTF, CSF or FNT extension.
[XScale] [YScale] – The X and Y size of the TrueType or CSF font in point s. Using the same size for the
XPoints and YPoints will make the character appear proportionally normal. An XPoints and YPoints of 72
will make a character approximately 1 inch high.
CPCL FOR LINK-OS PRINTERS
Page 97 of 329 1073699-001

[FontGroupNumber] – The number of the font group to be used for the text. Even though this is a spaceterminated string, it must be an ASCII number of a font group, and must be in the range of 0 to 9 (the
max supported font group) and must have been previously de fi ned with a FONT-GROUP command. If
these requirements are not met, the particular CONCAT command fails, and the remainder of the text is
processed as additional label commands.
[Data] – The text data to be added to the concatenation. The text data is added left to right, so the first
sub-command will be the left-most text. The total size of all data fields (across all sub-commands) must
not exceed 2024 characters. If it does, any additional data is discarded without error.
Termination of Sub-Commands
The series of sub-commands must be terminated with the following command, which exits the CONCAT
session and renders the output.
ENDCONCAT<CR><LF>
This termination structure must appear at the end of the CONCAT command, or the command is not
terminated.
Examples (CONCAT.LBL):
! 0 200 200 950 1<CR><LF>
PW 576<CR><LF>
FG 0 0 0 0 2 0 3 0 6<CR><LF>
FG 1 0 3 0 6<CR><LF>
CONCAT 20 20<CR><LF>
7 0 30 Subscript<CR><LF>
7 1 5 Normal<CR><LF>
7 0 0 Superscript<CR><LF>
ENDCONCAT<CR><LF>
T 7 0 20 120 Concat Example<CR><LF>
T 7 0 20 144 Bitmap font superscript and subscript<CR><LF>
CONCAT 20 195<CR><LF>
7 0 59 Fnt 7 Sz 0 <CR><LF>
7 1 39 Fnt 7 Sz 2 <CR><LF>
4 1 0 Fnt 4 Sz 1 <CR><LF>
ENDCONCAT<CR><LF>
T 7 0 20 295 Concat Example - 3 Pre-scaled Fonts<CR><LF>
T 7 0 20 319 Aligned to 59, 39 and 0 (bottom aligned)<CR><LF>
CONCAT 20 369<CR><LF>
7 1 10 Text<CR><LF>
FG 1 32 Group<CR><LF>
ST VERAMONO.TTF 18 9 0 Scale<CR><LF>
5 1 12 Text<CR><LF>
ST VERAMOIT.TTF 10 9 23 Scale<CR><LF>
FG 0 14 Group<CR><LF>
ENDCONCAT<CR><LF>
T 7 0 20 459 Concat Example - Mixing Font Types<CR><LF>
T 7 0 20 483 Groups, bitmap, and scaled all bottom aligned<CR><LF>
CONCAT 20 543<CR><LF>
7 1 4 Part Number: <CR><LF>
FG 1 15 10235393 <CR><LF>
FG 0 15 Toy Cat<CR><LF>
ENDCONCAT<CR><LF>
CONCAT 20 602<CR><LF>
7 1 4 Part Number: <CR><LF>
CPCL FOR LINK-OS PRINTERS
Page 98 of 329 1073699-001

FG 1 15 10245810 <CR><LF>
FG 0 15 Huge Ceramic Cow<CR><LF>
ENDCONCAT<CR><LF>
CONCAT 20 662<CR><LF>
7 1 4 Part Number: <CR><LF>
FG 1 15 10223410 <CR><LF>
FG 0 15 Tiny Blue Ceramic Horse<CR><LF>
ENDCONCAT<CR><LF>
CONCAT 20 722<CR><LF>
7 1 4 Part Number: <CR><LF>
FG 1 15 10481842 <CR><LF>
FG 0 15 N/A<CR><LF>
ENDCONCAT<CR><LF>
ML 24 T 7 0 20 792<CR><LF>
Concat Example Using Font Groups<CR><LF>
Two Font Groups - Same groups for each label<CR><LF>
Note how the spacing of Part Number changes<CR><LF>
ENDML<CR><LF>
PRINT<CR><LF>
CPCL FOR LINK-OS PRINTERS
Page 99 of 329 1073699-001

Command Notes and Interactions
SET-MAG has non-ob vi o us e ffe ct s on font groups. See SET-MAG on page 151 for more information.
ROTATE will take effect on this command, but onl y i f the concatenation contains only scaled font
elements. Bitmap font elements cannot be rotated arbitrarily.
If the value for rotate is not 0, TTF fonts cannot be us ed with the SCA LE-TEXT commands within
CONCAT.
CPCL FOR LINK-OS PRINTERS
Page 100 of 329 1073699-001
 Loading...