

Page 1
CC600/CC6000
Customer Concierge
User Guide
for Android ™ 8.1.0 Oreo
MN-003313-01
Page 2

Copyright
ZEBRA and the stylized Zebra head are trademarks of Zebra Technologies Corporation, registered in many
jurisdictions worldwide. All other trademarks are the property of their respective owners. ©2019 Zebra
Technologies Corporation and/or its affiliates. All rights reserved. Google™, Android, Google Play™ and other
marks are trademarks of Google LLC; Oreo is a trademark of Mondelez International, Inc. group. All other
trademarks are the property of their respective owners.
COPYRIGHTS & TRADEMARKS: For complete copyright and trademark information, go to
www.zebra.com/copyright
.
WARRANTY: For complete warranty information, go to www.zebra.com/warranty
END USER LICENSE AGREEMENT: For complete EULA information, go to www.zebra.com/eula
Terms of Use
• Proprietary Statement
This manual contains proprietary information of Zebra Technologies Corporation and its subsidiaries
(“Zebra Technologies”). It is intended solely for the information and use of parties operating and maintaining
the equipment described herein. Such proprietary information may not be used, reproduced, or disclosed to
any other parties for any other purpose without the express, written permission of Zebra Technologies.
• Product Improvements
Continuous improvement of products is a policy of Zebra Technologies. All specifications and designs are
subject to change without notice.
• Liability Disclaimer
Zebra Technologies takes steps to ensure that its published Engineering specifications and manuals are
correct; however, errors do occur. Zebra Technologies reserves the right to correct any such errors and
disclaims liability resulting therefrom.
• Limitation of Liability
In no event shall Zebra Technologies or anyone else involved in the creation, production, or delivery of the
accompanying product (including hardware and software) be liable for any damages whatsoever (including,
without limitation, consequential damages including loss of business profits, business interruption, or loss of
business information) arising out of the use of, the results of use of, or inability to use such product, even if
Zebra Technologies has been advised of the possibility of such damages. Some jurisdictions do not allow
the exclusion or limitation of incidental or consequential damages, so the above limitation or exclusion may
not apply to you.
.
.
Revision History
Changes to the original guide are listed below:
Change Date Description
-01 Rev A 6/2019 Initial Release
2
Page 3

Table of Contents
Copyright ......................................................................................................................... 2
Terms of Use ..................................................................................................................2
Revision History ..............................................................................................................2
About This Guide.......................................................................................................... 8
Introduction ..................................................................................................................... 8
Configurations ................................................................................................................. 8
Software Versions ........................................................................................................... 9
Chapter Descriptions ...................................................................................................... 9
Notational Conventions ................................................................................................. 10
Related Documents ...................................................................................................... 10
Service Information ....................................................................................................... 10
Provide Documentation Feedback ................................................................................ 11
Getting Started............................................................................................................ 12
Introduction ................................................................................................................... 12
Features ........................................................................................................................ 12
Accessing Device Settings ............................................................................................ 16
Setting the Date and Time ............................................................................................ 17
Display Settings ............................................................................................................ 17
Setting the Screen Brightness ............................................................................... 17
Setting Night Light ................................................................................................. 18
Setting Screen Timeout ......................................................................................... 18
Ambient Display .................................................................................................... 19
Setting Font Size ................................................................................................... 19
Setting Touch Panel Mode .................................................................................... 20
General Sound Settings ........................................................................................ 20
Wake-Up Sources ................................................................................................. 22
3
Page 4

Table of Contents
Using the Device ......................................................................................................... 23
Introduction ................................................................................................................... 23
Google Mobile Services ................................................................................................ 23
Home Screen ................................................................................................................ 23
Customizing the Home Screen .............................................................................. 24
Status Bar .............................................................................................................. 25
Managing Notifications .......................................................................................... 27
Setting App Notifications ....................................................................................... 28
Quick Access Panel .............................................................................................. 29
Editing Icons on Quick Settings ............................................................................. 31
App Shortcuts and Widgets ................................................................................... 31
Folders .................................................................................................................. 32
Home Screen Wallpaper ....................................................................................... 33
Using the Touchscreen ................................................................................................. 33
Keyboards .....................................................................................................................34
Keyboard Configuration ......................................................................................... 34
Using the Enterprise Keyboard ............................................................................. 34
Using the Android and Gboard Keyboards ............................................................ 36
Do Not Disturb Feature ......................................................................................... 37
Limit Sounds ................................................................................................................. 37
Silence Sounds During Certain Times .................................................................. 38
Silence Sounds During Events and Meetings ....................................................... 39
Turn Sounds Back On ........................................................................................... 39
Override Do Not Disturb for Specific Apps ............................................................ 39
Apps .............................................................................................................................. 40
Accessing Apps ............................................................................................................ 43
Switching Between Recent Apps .......................................................................... 45
Un-Locking the Screen ................................................................................................. 46
Interactive Sensor Technology .............................................................................. 51
Transferring Files with a Host Computer via USB ........................................................ 51
Transferring Files .................................................................................................. 52
Transferring Photos ............................................................................................... 52
Disconnect from the Host Computer ..................................................................... 53
Applications ................................................................................................................ 54
Introduction ................................................................................................................... 54
Camera ......................................................................................................................... 54
Taking Photos ....................................................................................................... 54
Recording Videos .................................................................................................. 55
Photo Settings ....................................................................................................... 57
Adding a Contact ................................................................................................... 60
4
Page 5

Table of Contents
Editing Contacts .................................................................................................... 60
Deleting Contacts .................................................................................................. 60
DataWedge Demonstration .......................................................................................... 62
Scanner Selection ................................................................................................. 64
Diagnostic Tool ............................................................................................................ 65
Settings ........................................................................................................................ 68
System Test Information ....................................................................................... 68
WLAN Test Information ......................................................................................... 68
Bluetooth Test Information .................................................................................... 68
Files ............................................................................................................................. 69
Gallery .......................................................................................................................... 71
Working with Albums ............................................................................................. 73
Sharing an Album .................................................................................................. 73
Working with Photos .............................................................................................. 74
Working with Videos .............................................................................................. 76
Photos .......................................................................................................................... 78
Working with Albums ............................................................................................. 80
Working with Photos .............................................................................................. 81
Working with Videos .............................................................................................. 83
PTT Express Voice Client ............................................................................................ 84
PTT Express User Interface .................................................................................. 84
PTT Audible Indicators .......................................................................................... 85
PTT Notification Icons ........................................................................................... 85
Enabling PTT Communication ............................................................................... 85
Selecting a Talk Group .......................................................................................... 86
PTT Communication .............................................................................................. 86
Creating a Group Call ............................................................................................ 86
RxLogger ..................................................................................................................... 87
RxLogger Utility ............................................................................................................ 88
SimulScan Demo ......................................................................................................... 89
Printing the Sample Forms .......................................................................................... 90
Using the Postal, Transportation and Logistics Example ...................................... 91
Using the Manufacturing Example ........................................................................ 93
Creating a Demo Customization ........................................................................... 95
Default Templates ................................................................................................. 96
Settings ................................................................................................................. 96
Advanced Settings ................................................................................................ 97
Sound Recorder ........................................................................................................... 98
Wireless ..................................................................................................................... 100
Introduction ................................................................................................................. 100
5
Page 6

Table of Contents
Sharing the Mobile Data Connection .......................................................................... 100
Configuring the Access Point Name .................................................................... 102
Data Usage ......................................................................................................... 103
Setting Data Usage Warning ............................................................................... 104
Wireless Local Area Networks .................................................................................... 105
Scanning and Connecting to a Wi-Fi Network ..................................................... 105
Removing a Wi-Fi Network .................................................................................. 107
Bluetooth .....................................................................................................................107
Adaptive Frequency Hopping .............................................................................. 107
Security ............................................................................................................... 108
Bluetooth Profiles ................................................................................................ 108
Bluetooth Power States ....................................................................................... 109
Bluetooth Radio Power ........................................................................................ 110
Discovering Bluetooth Device(s) ......................................................................... 110
Changing the Bluetooth Name ............................................................................ 110
Selecting Profiles on the Bluetooth Device ......................................................... 111
Unpairing a Bluetooth Device .............................................................................. 111
Near Field Communications (CC6000 Only) ............................................................... 111
Reading NFC Cards ............................................................................................ 112
Sharing Information Using NFC .......................................................................... 113
Cast ..................................................................................................................... 114
Accessories............................................................................................................... 115
Introduction ................................................................................................................. 115
Accessories ................................................................................................................. 115
3.5 mm Audio Adapter (CC6000 Only) ....................................................................... 116
Connecting a Headset to the 3.5 mm Audio Adapter (CC6000 Only) ................. 116
USB I/O Hub ............................................................................................................... 117
Connect USB Cables .......................................................................................... 118
External USB Cable ............................................................................................ 120
Audio Headset Connection .................................................................................. 120
Maintenance and Troubleshooting ......................................................................... 121
Introduction ................................................................................................................. 121
Maintaining the Device ................................................................................................ 121
Cleaning Instructions .................................................................................................. 121
Approved Cleanser Active Ingredients ................................................................ 121
Harmful Ingredients ............................................................................................. 122
Device Cleaning Instructions ...................................................................................... 122
Special Cleaning Notes ....................................................................................... 122
6
Page 7

Table of Contents
Cleaning Materials Required ............................................................................... 122
Cleaning Frequency ............................................................................................ 122
Cleaning the Device ............................................................................................ 123
Housing ............................................................................................................... 123
Display ................................................................................................................. 123
Camera and Exit Window .................................................................................... 123
Troubleshooting ......................................................................................................... 124
Technical Specifications.......................................................................................... 126
Introduction ................................................................................................................. 126
Technical Specifications ............................................................................................. 126
CC6000 ............................................................................................................... 126
CC600 ................................................................................................................. 128
Decode Distances ...................................................................................................... 130
CC6000 - SE4710 Scan Engine .......................................................................... 130
CC600 - SE2100 Scan Engine ............................................................................ 131
Index
7
Page 8
About This Guide
Introduction
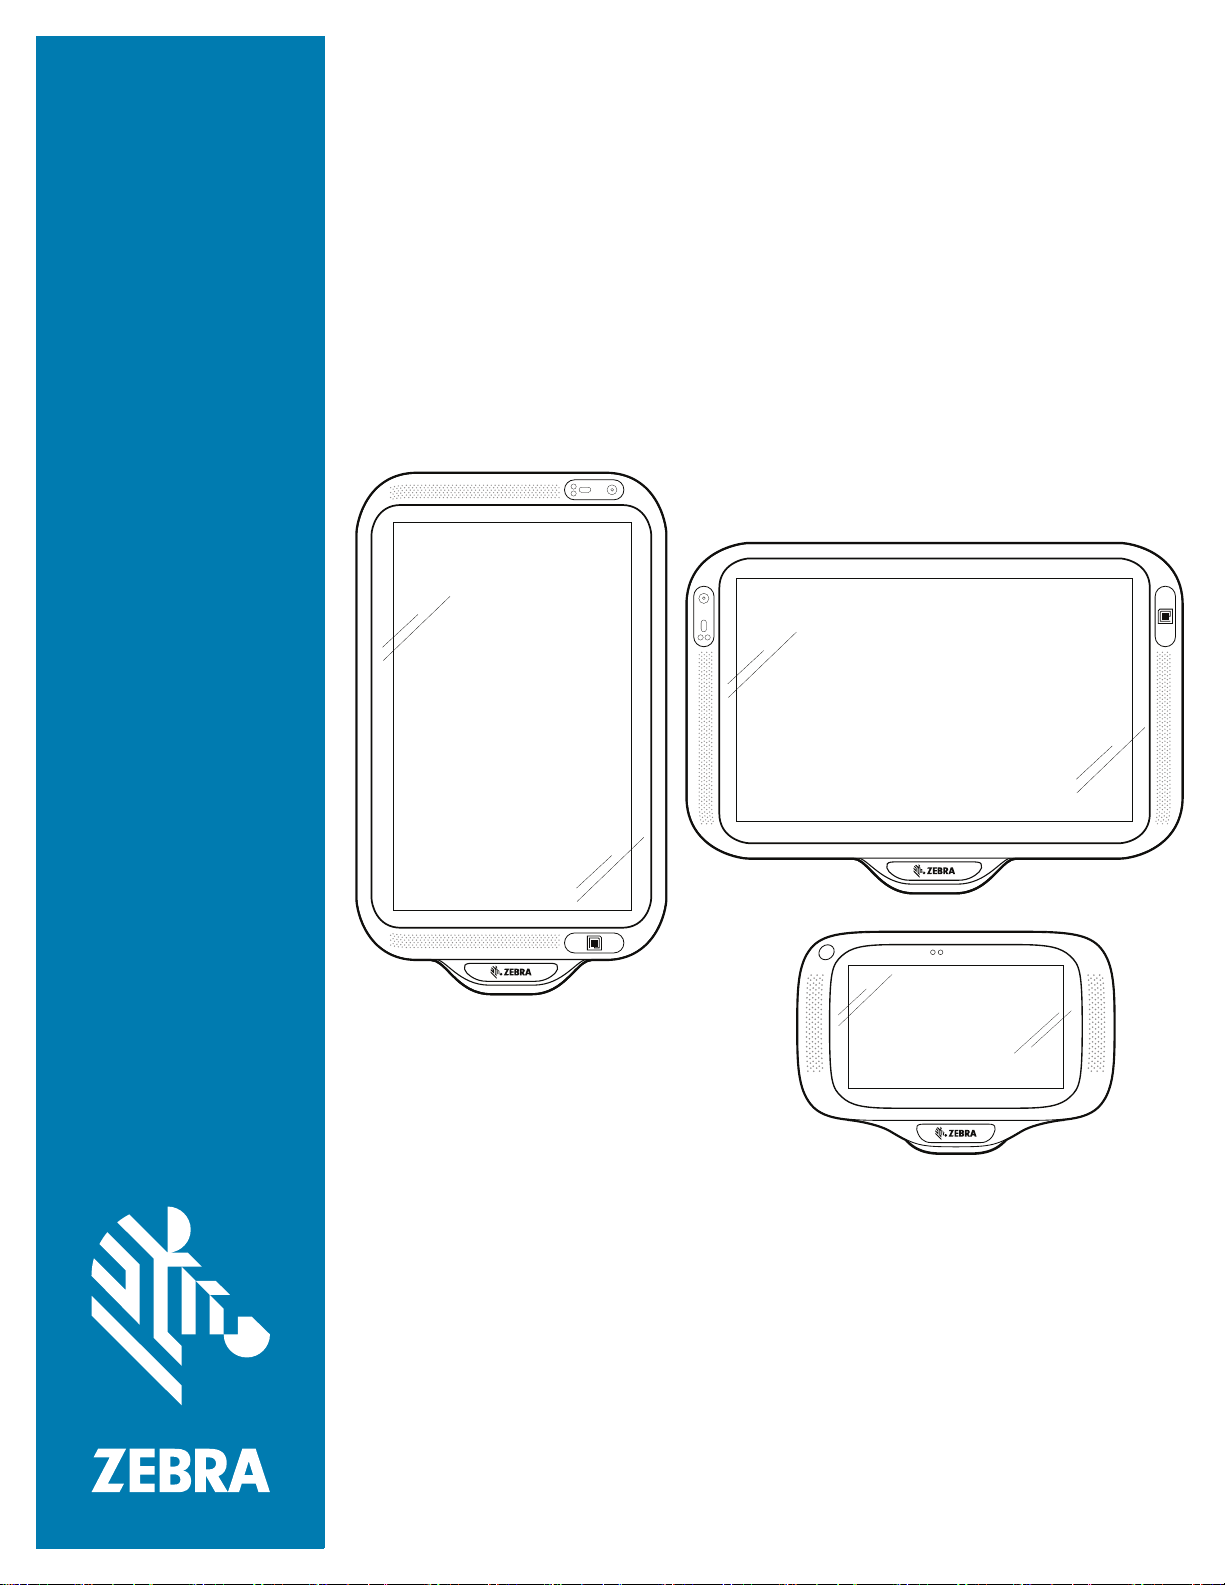
This guide provides information about using the CC600 and CC6000 Customer Concierge interactive
kiosk and accessories.
NOTE: Screens and windows pictured in this guide are samples and can differ from actual screens.
Configurations
This guide covers the configurations listed in Table 1 and Table 2.
Table 1 CC600 Device Configurations
Configuration Description
CC600-5-3200LNWW 5 inch, OS: Android ™ 8.1.0 Oreo, 32GB,
Ethernet/Wi-Fi, Imager, Worldwide
Configuration
CC600-5-3200LNNA 5 inch, OS: Android ™ 8.1.0 Oreo, 32GB,
Ethernet/Wi-Fi, Imager, North America
Configuration
CC600-5-3200LNIN 5 inch, OS: Android ™ 8.1.0 Oreo, 32GB,
Ethernet/Wi-Fi, Imager, India Configuration
Table 2 CC6000 Device Configurations
Configuration Description
CC6000-10-3200LCWW 10 inch, OS: Android ™ 8.1.0 Oreo, 32GB,
Landscape, Imager, Worldwide Configuration
CC6000-10-3200PCWW 10 inch, OS: Android ™ 8.1.0 Oreo, 32GB,
Portrait, Imager, Worldwide Configuration
Front
Camera
No SE2100
No SE2100
No SE2100
Front
Camera
No SE4710
Yes SE4710
Scan
Engine
Scan
Engine
8
Page 9

About This Guide
Table 2 CC6000 Device Configurations (Continued)
Configuration Description
CC6000-10-3200LCNA 10 inch, OS: Android ™ 8.1.0 Oreo, 32GB,
CC6000-10-3200PCNA 10 inch, OS: Android ™ 8.1.0 Oreo, 32GB,
CC6000-10-3200LNNA 10 inch, OS: Android ™ 8.1.0 Oreo, 32GB,
Software Versions
To determine the current software versions:
1. Swipe down from the top to open Quick Settings.
2. Touch > System.
3. Touch About phone.
4. The following information displays:
• Status
• SWComponents
• Legal Informaiton
• Model
• Android version
• Android security patch level
• Kernel version
• Build Fingerprint
• Build number
Portrait, Imager, North America Configuration
Portrait, Imager, North America Configuration
Landscape, Imager, North America
Configuration
Front
Camera
Yes SE4710
Yes SE4710
No SE4710
Scan
Engine
To determine the device serial number, touch About phone > Status. Serial number displays.
Chapter Descriptions
Topics covered in this guide are as follows:
• Getting Started provides information on getting the device up and running for the first time.
• Using the Device provides information for operating the device.
• Applications provides information on using applications installed on the device.
• Wireless provides information on the various wireless options.
• Accessories provides information for using the accessories for the device.
• Maintenance and Troubleshooting includes instructions on cleaning and provides troubleshooting solutions
for potential problems during device operation.
• Technical Specifications provides the technical specifications for the device.
9
Page 10

Notational Conventions
The following conventions are used in this document:
• “Device” refers to all configurations of the CC600 Customer Concierge and CC6000 Customer Concierge.
• Bold text is used to highlight the following:
• Dialog box, window and screen names
• Drop-down list and list box names
• Check box and radio button names
• Icons on a screen
• Key names on a keypad
• Button names on a screen.
• Bullets (•) indicate:
• Action items
• Lists of alternatives
• Lists of required steps that are not necessarily sequential.
• Sequential lists (e.g., those that describe step-by-step procedures) appear as numbered lists.
About This Guide
Related Documents
• CC600/CC6000Customer Concierge Quick Start Guide for Android Version 8.1, p/n MN-003314-xx.
• CC600/CC6000 Customer Concierge Integrator Guide for Android Version 8.1, p/n MN-003411-xx.
For the latest version of this guide and all guides, go to: www.zebra.com/support
Service Information
If you have a problem with your equipment, contact Customer Support for your region. Contact information is
available at: zebra.com/support
When contacting support, please have the following information available:
• Serial number of the unit (found on manufacturing label)
• Model number or product name (found on manufacturing label)
• Software type and version number
• IMEI number.
Customer Support responds to calls by email or telephone within the time limits set forth in support
agreements.
If the problem cannot be solved by Customer Support, the user may need to return the equipment for servicing
and will be given specific directions. We are not responsible for any damages incurred during shipment if the
approved shipping container is not used. Shipping the units improperly can possibly void the warranty.
Remove the SIM card and/or microSD card from the device before shipping for service.
.
.
If the device was purchased from a business partner, contact that business partner for support.
10
Page 11

About This Guide
Provide Documentation Feedback
If you have comments, questions, or suggestions about this guide, send an email to
EVM-Techdocs@zebra.com
.
11
Page 12
Getting Started
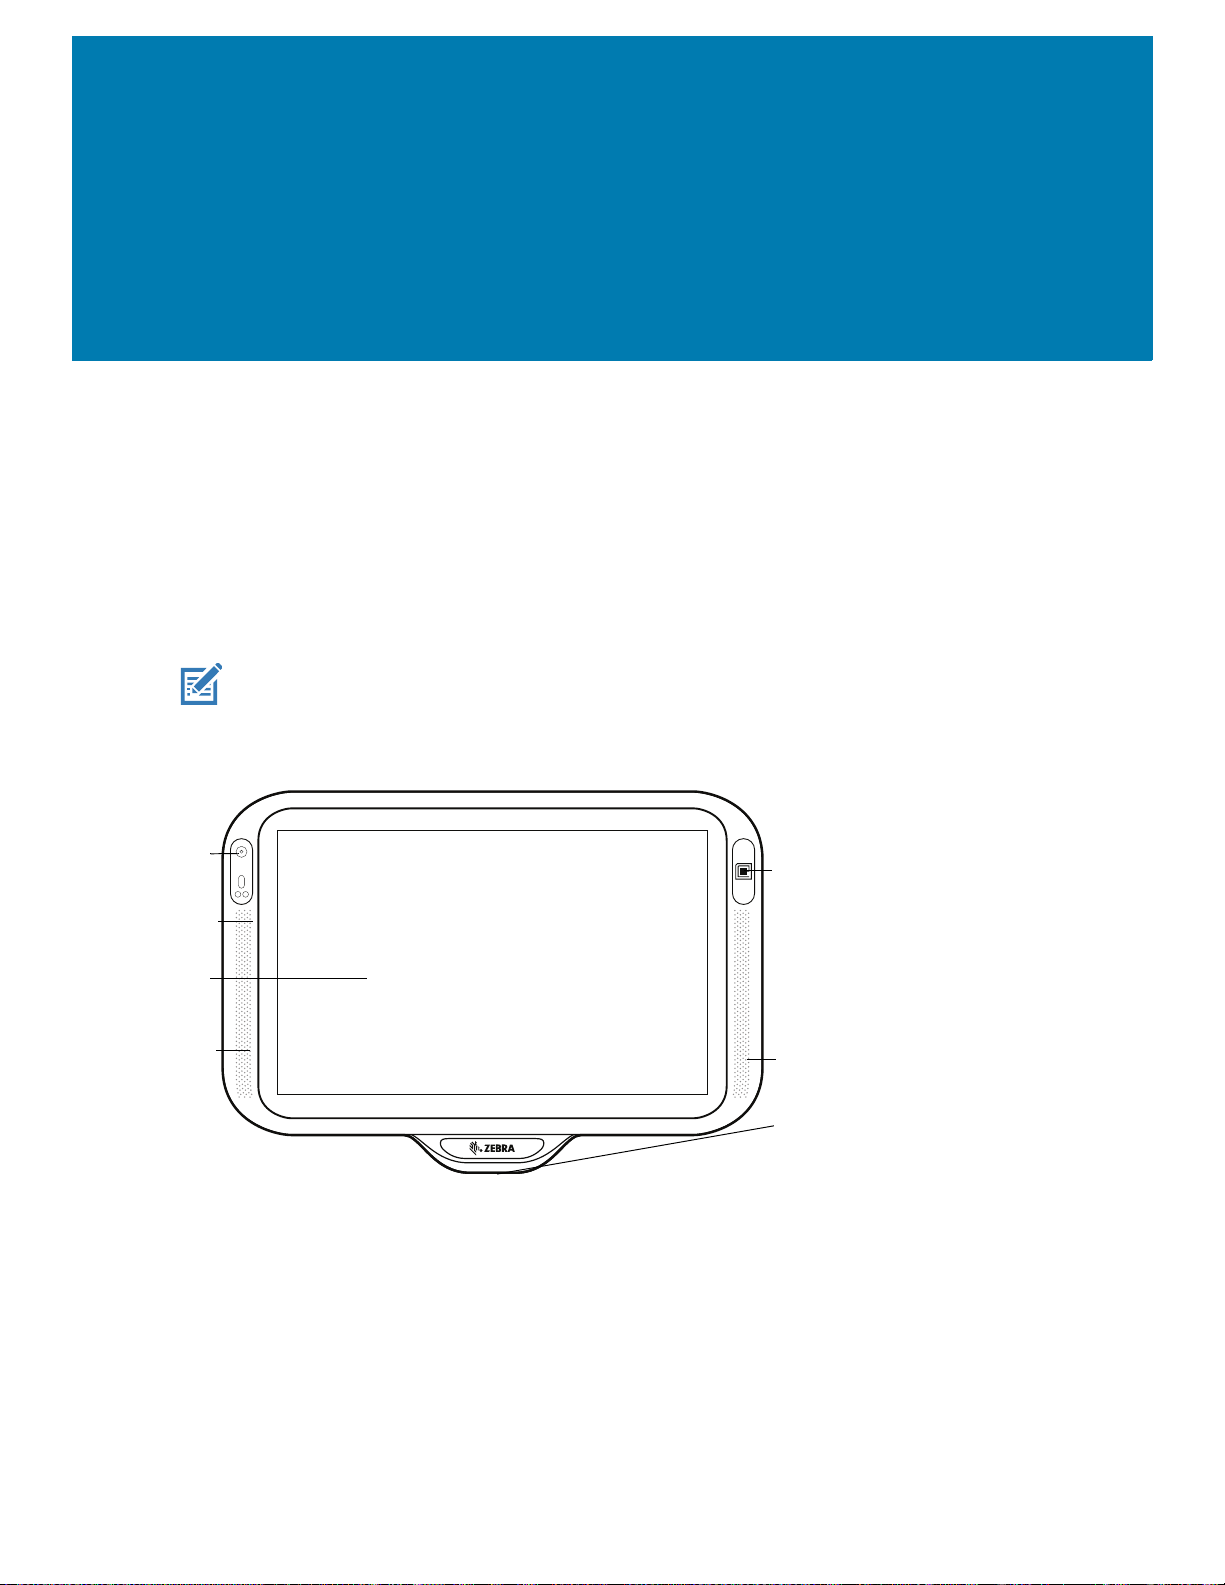
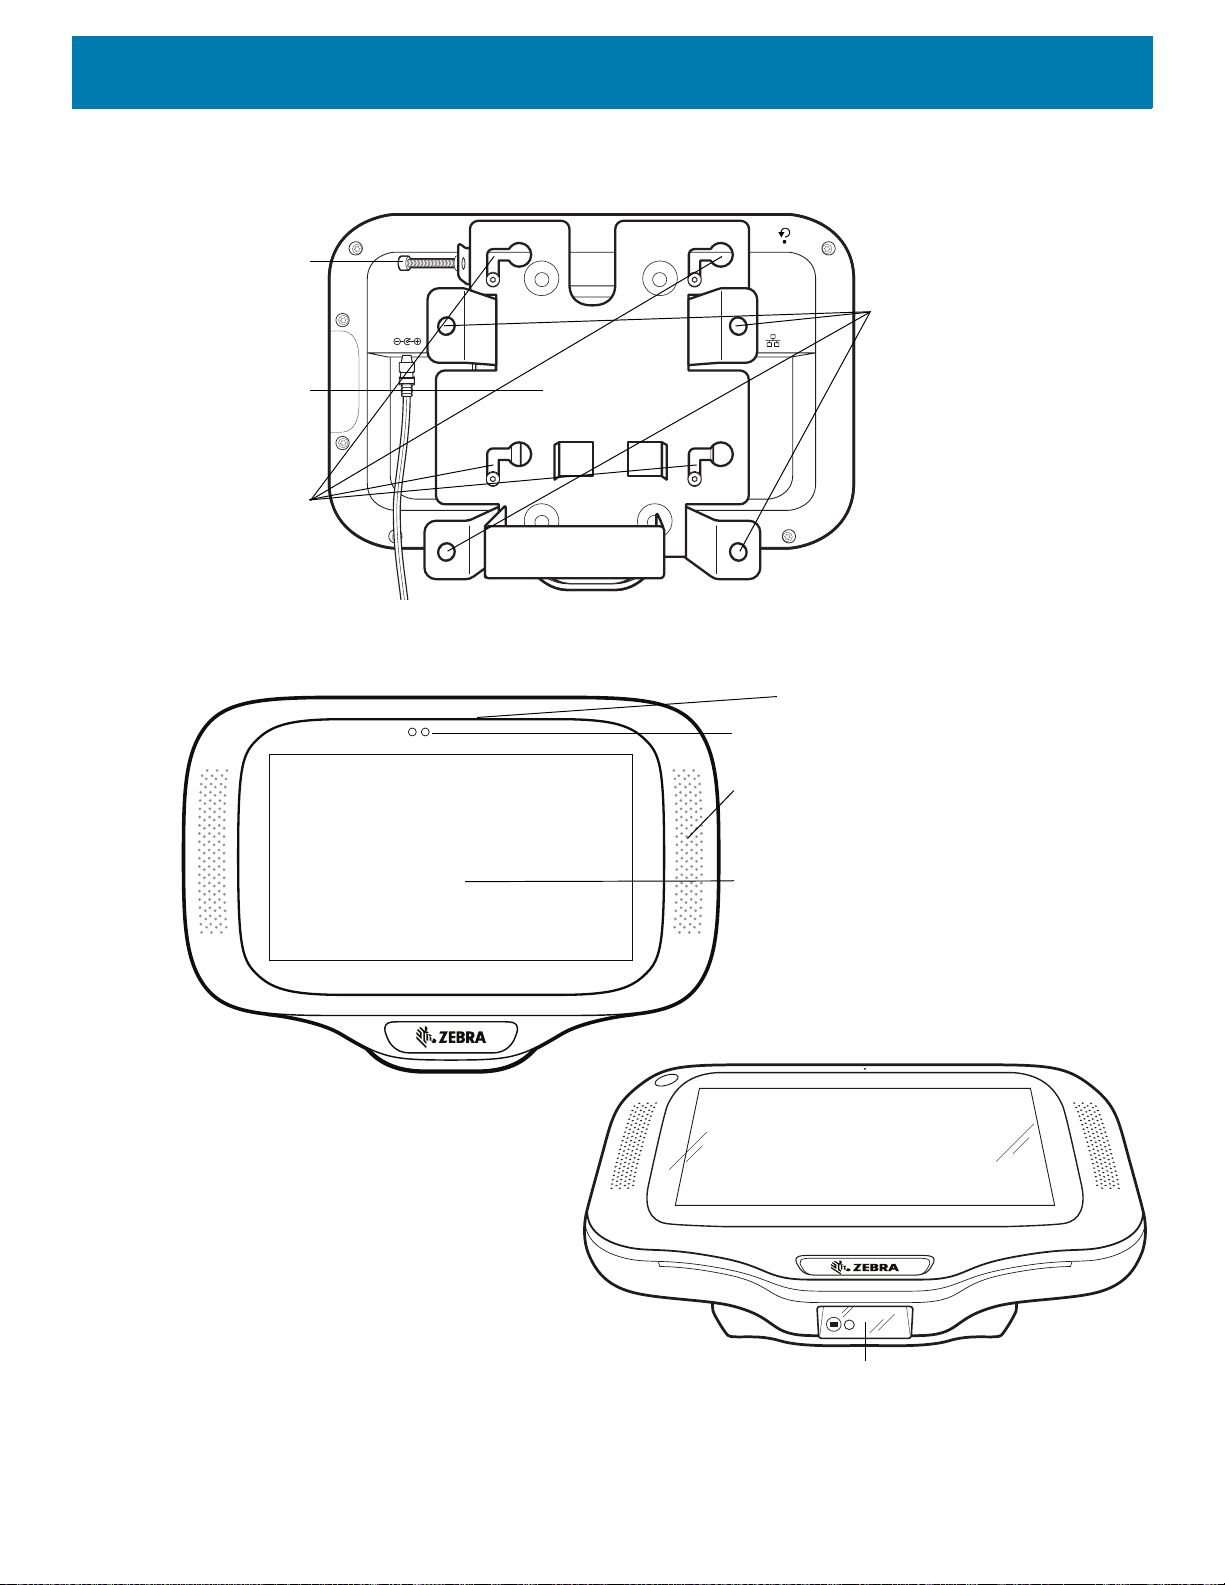
Front
Facing
Camera
Touch
Screen and
Display
Speaker
NFC
Antenna
Speaker
Exit Window (Scanner)
Microphone
Introduction
This chapter provides information to get the device up and running for the first time.
Features
NOTE: Although the orientations differ, the features on the CC6000 landscape and portrait devices are the
same.
Figure 1 CC6000 Front View
12
Page 13
Getting Started
Mounting
Bracket
Screw
Holders
Micro SD
Card Slot
Audio
Adjustment/
Programmable
Buttons
Reset Button
USB C Port
(Used for
External
display or
OTG)
Power
Port
Audio
Port
USB A
Port
USB A
Port
Ethernet with POE
Figure 2 CC6000 Back View
Figure 3 CC6000 Power and Cable Ports
13
Page 14
Getting Started
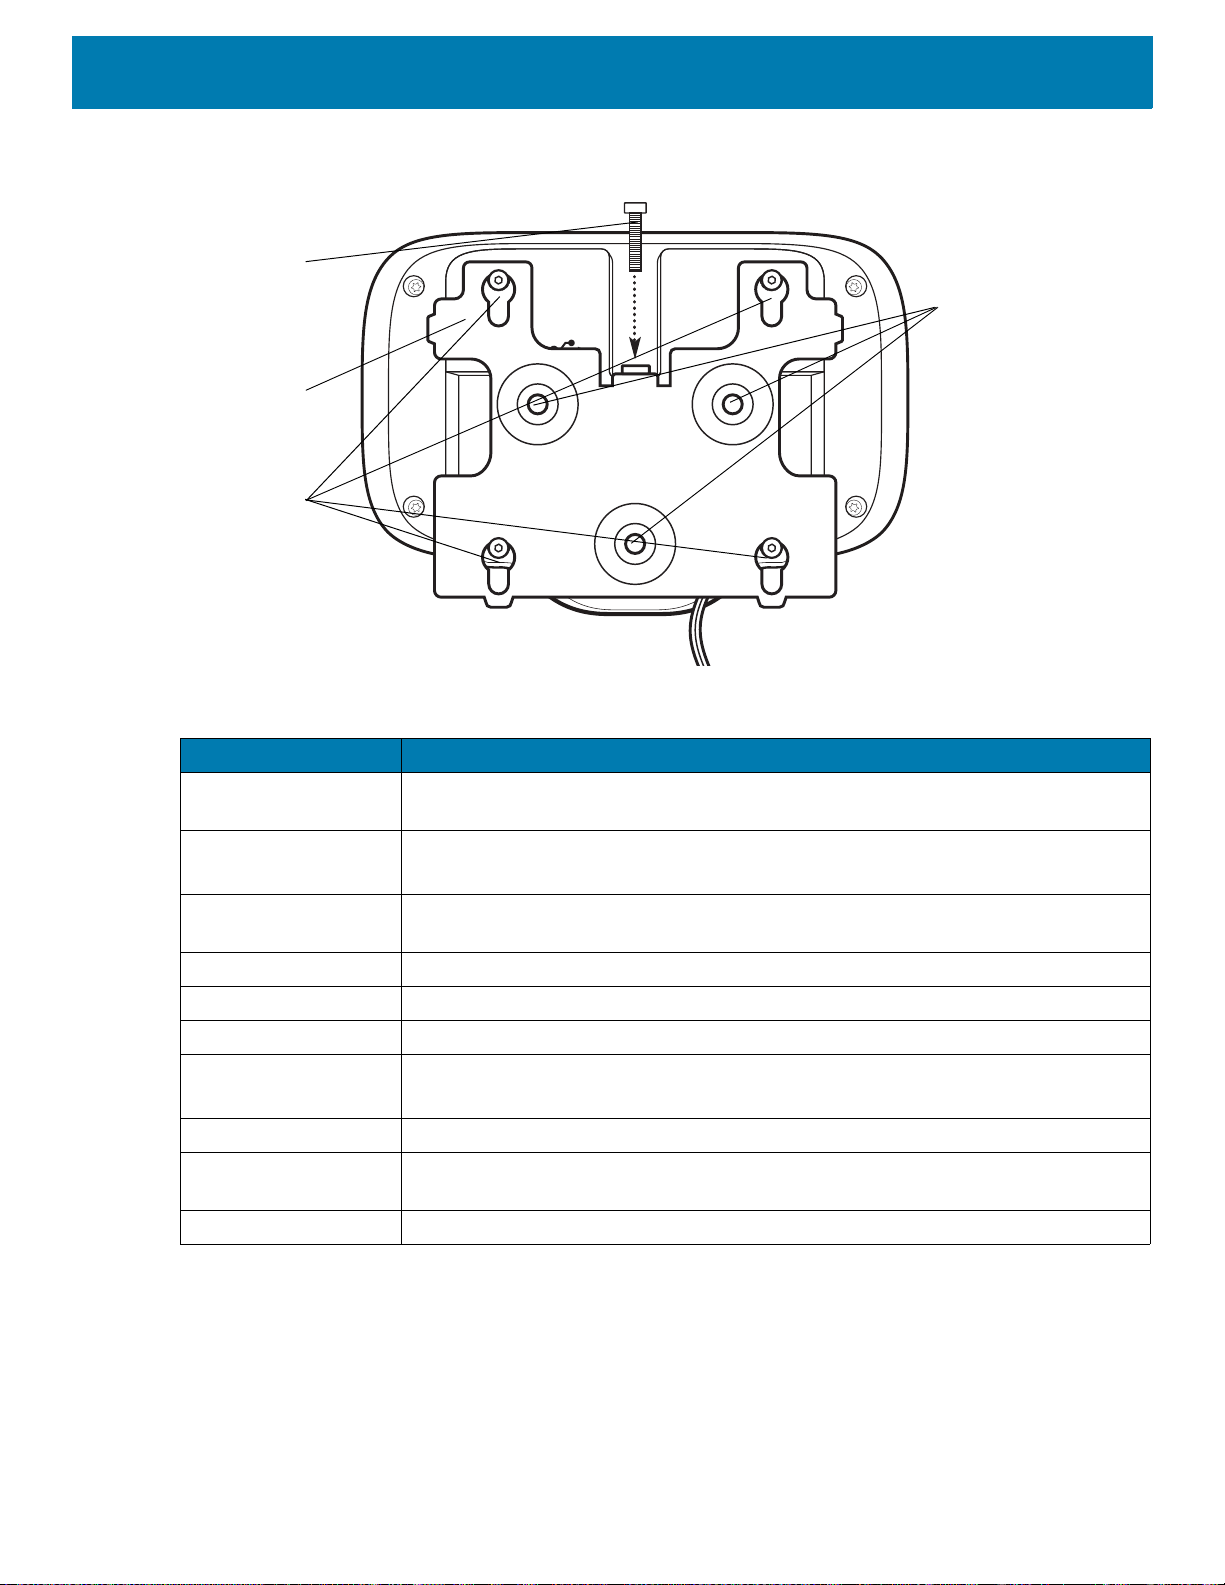
Mounting
Bracket
Mounting
Bracket Screw
Holders
Mounting
Bracket
Locking
Screw
Wall Mount
Screw
Holes
Speaker
Exit Window
(Scanner)
Proximity Sensor
Microphone
Touch
Screen and
Display
Figure 4 CC6000 Back With Bracket View
Figure 5 CC600 Front Views
14
Page 15
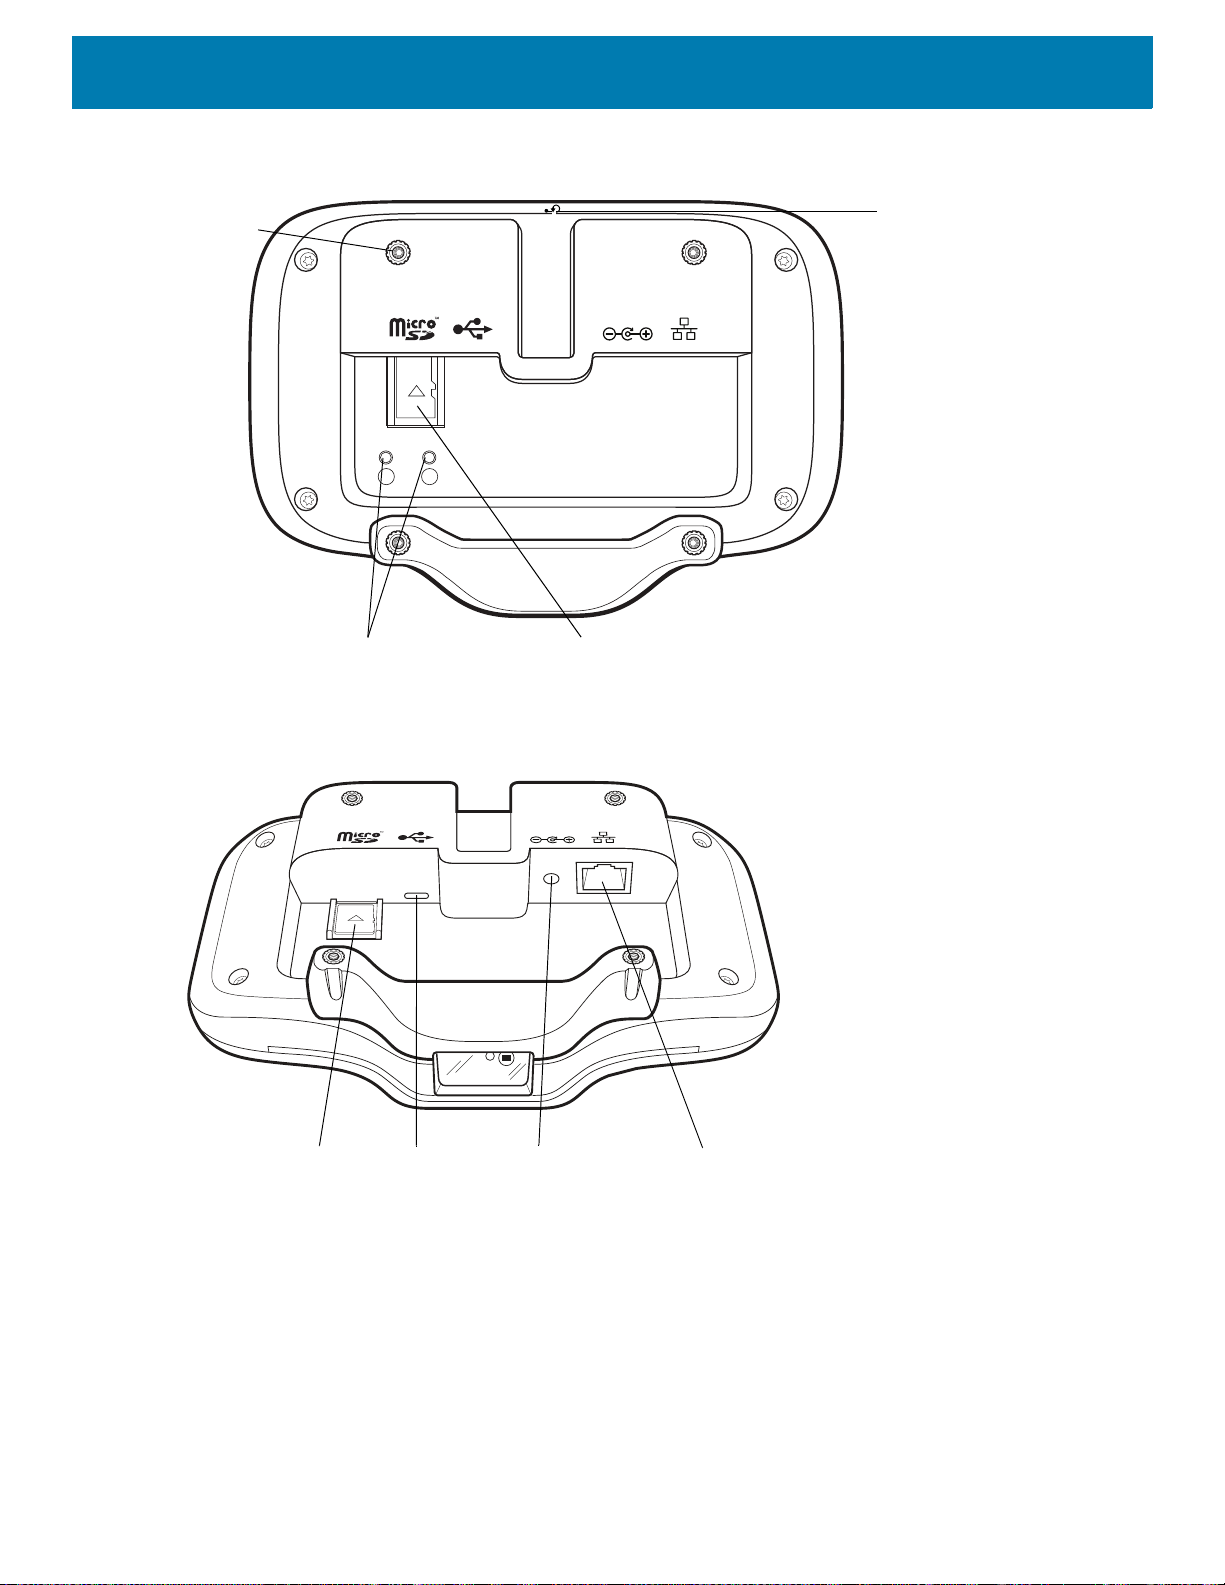
Figure 6 CC600 Back View
Reset Button
Mounting
Bracket
Screw
Holders
(4)
Micro SD
Card Slot
Audio
Adjustment/Programmable
Buttons
x
USB C Port
(Used for
External
display or
OTG and other
USB-2
peripherals)
Power
Port
Micro SD
Card Slot
Ethernet with POE
Getting Started
21
Figure 7 CC600 Power and Cable Ports
15
Page 16
Getting Started
21
Mounting
Bracket
Mounting
Bracket Screw
Holders
Mounting
Bracket
Locking
Screw
Wall Mount
Screw
Holes
Figure 8 CC600 Back With Bracket View
Table 3 Feature Descriptions
Item Function
Touch Screen and
Displays all information needed to operate the device.
Display
Exit Window
(Scanner)
Provides data capture using the imager and reads a barcode.
Note: To read a barcode, a scan-enabled app is required on the device.
Speaker Provides audio output for video and music playback. Provides audio in
speaker-phone mode.
NFC Antenna Reads NFC tags. (CC6000 Only)
Proximity Sensor Identifies the proximity of a user for turning up the display.
Microphone Use for communications in Speakerphone mode.
Front Facing Camera Captures still photos and videos.
Note: Select CC6000 devices only.
Interface Connectors See Figure 3 and Figure 7.
Volume Up/Down
Increase and decrease audio volume (programmable).
Button
External Display Designated for USB-C port utilization.
Accessing Device Settings
To access device settings:
1. Swipe up from the bottom of the screen to display the App screen.
16
Page 17

2. From the App screen swipe up from the bottom of the screen and touch .
or
1. Swipe down from the top of the screen and touch .
Setting the Date and Time
The user is only required to set the time zone or set the date and time if the wireless LAN does not support
Network Time Protocol (NTP).
To set the date and time:
1. Swipe down from the top to open Quick Settings and then touch .
2. Touch System > Date & time.
3. Touch Automatic date & time to disable automatic date and time synchronization.
4. Touch Set date.
5. In the calendar, set today’s date.
Getting Started
6. Touch OK.
7. Touch Set time.
8. Touch the hour.
9. Touch the green circle, drag to the current hour and then release.
10.Touch the minutes.
11.Touch the green circle, drag to the current minute and then release.
12.Touch AM or PM.
13.Touch OK.
14.Touch Select time zone.
15.Select the current time zone from the list.
16.Touch to return to the Home screen.
Display Settings
Use Display settings to change the screen brightness, enable night light, change the background image, set
sleep time and change font size.
Setting the Screen Brightness
To manually set the screen brightness:
1. Swipe down with two fingers from the top to open the Quick Access panel.
17
Page 18

2. Slide the icon to adjust the screen brightness level.
Figure 9 Brightness Slider
Setting Night Light
The Night Light setting tints the screen amber, making the screen easier to look at in low light.
To enable night light:
1. Swipe down from the top of the screen to open Quick Settings and then touch .
2. Touch Display.
3. Touch Night Light.
4. Touch Schedule.
5. Select one of the schedule values:
• None (default)
• Turns on at custom time
• Turns on from sunset to sunrise.
Getting Started
6. Touch Status.
By default, Night Light is disabled. Toggle the switch to enable.
7. Adjust the tint using the Intensity slider.
8. Touch to return to the Home screen.
Setting Screen Timeout
To set the screen sleep time:
1. Swipe down from the top to open the Quick Settings panel and then touch .
2. Touch Display > Advanced > Sleep.
3. Select one of the sleep values.
• 15 seconds
• 30 seconds
•1 minute
• 2 minutes
• 5 minutes
• 10 minutes
• 30 minutes
4. Touch to return to the Home screen.
18
Page 19
Ambient Display
The Ambient display setting wakes the screen when you receive notifications.
To disable ambient display:
1. Swipe down from the top to open the Quick Settings panel and then touch .
2. Touch Display > Advanced.
3. Touch Ambient display.
4. In the When to show section, touch New notifications to enable or disable.
5. Touch to return to the Home screen.
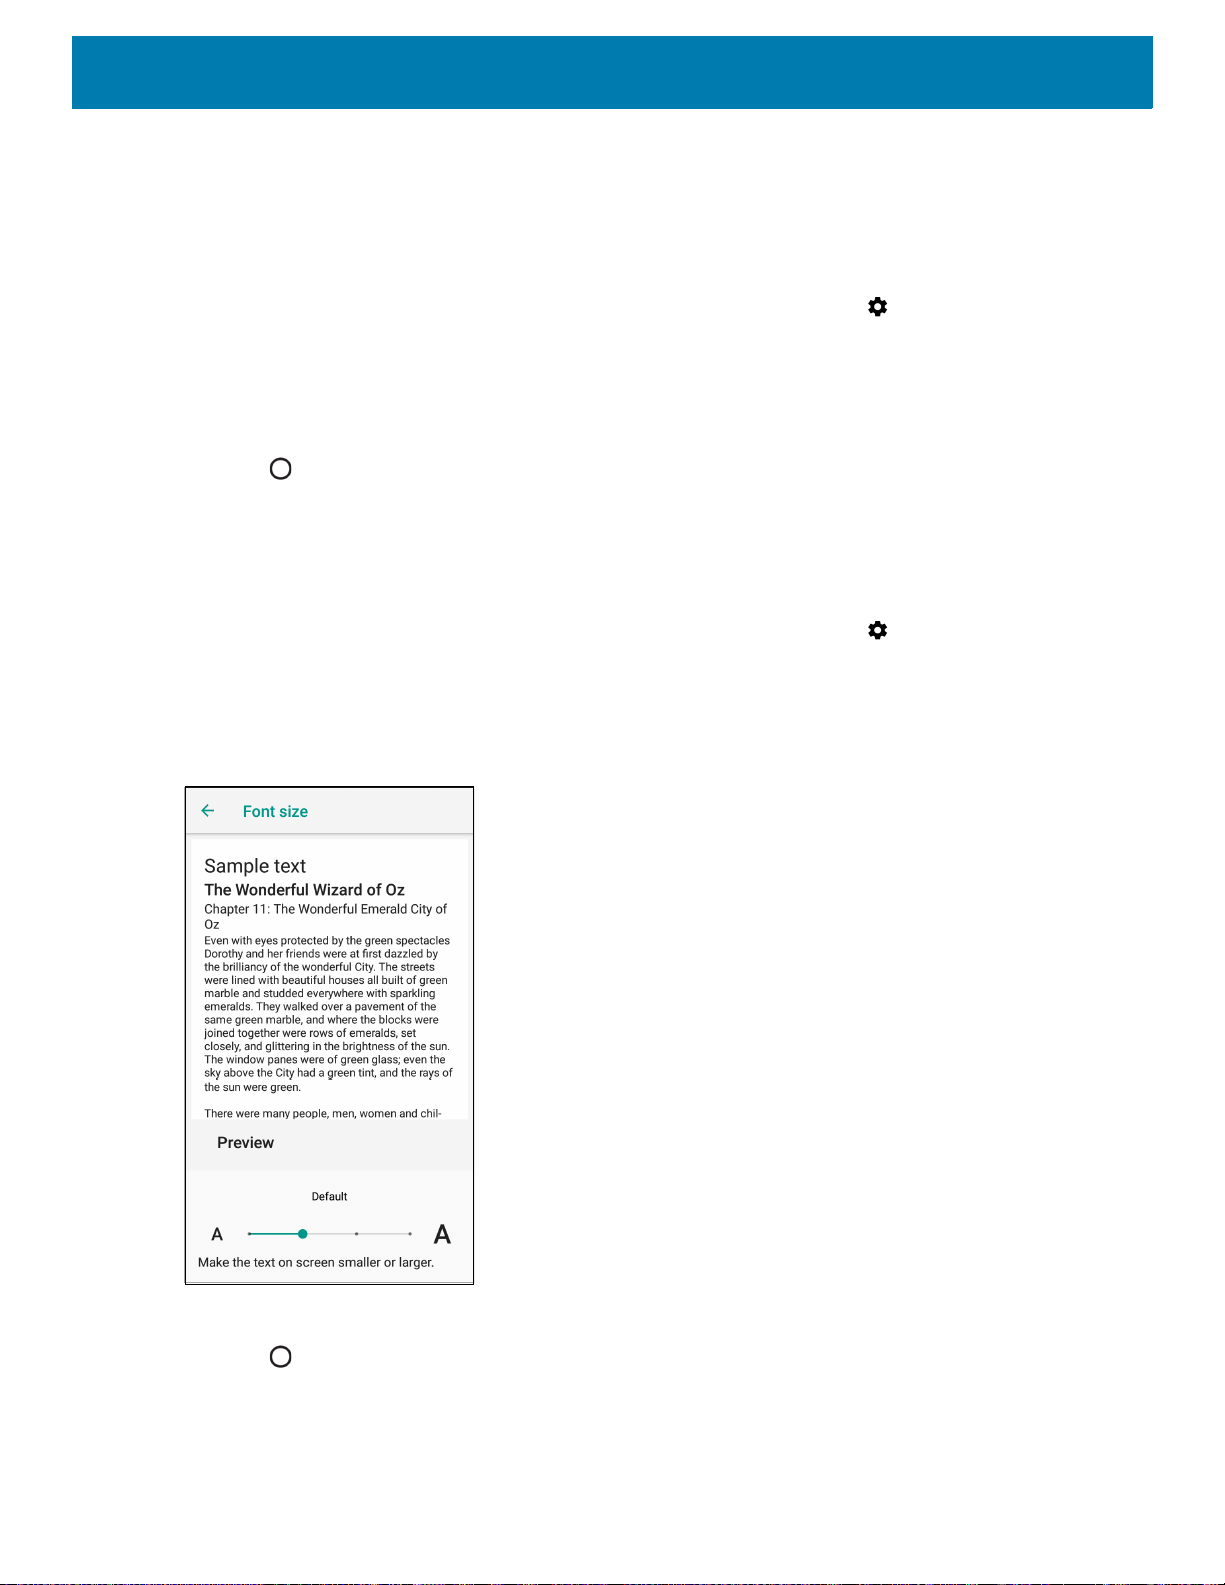
Setting Font Size
To set the size of the font in system apps:
1. Swipe down from the top to open the Quick Settings panel and then touch .
Getting Started
2. Touch Display > Advanced.
3. Touch Font size.
Figure 10 Font Settings
4. Touch the green dot and slide left or right to select a font size.
5. Touch to return to the Home screen.
19
Page 20
Setting Touch Panel Mode
Advanced
Settings
The device display is able to detect touches using a finger, or a gloved finger.
NOTE: A glove can be made of medical latex, leather, cotton, or wool. For optimal performance use a Zebra certified stylus.
To configure the touch panel mode:
1. Swipe down from the top to open the Quick Settings panel and then touch .
2. Touch Display.
3. Touch Advanced.
4. Touch Touch panel mode.
5. Select an option to choose the method by which the screen reacts to touch:
• Glove and Finger (Screen Protector off) to use a finger or a gloved finger on the screen without a screen
protector.
• Glove and Finger (Screen Protector on) to use a finger or a gloved finger on the screen with a screen
protector.
Getting Started
6. Touch to return to the Home screen.
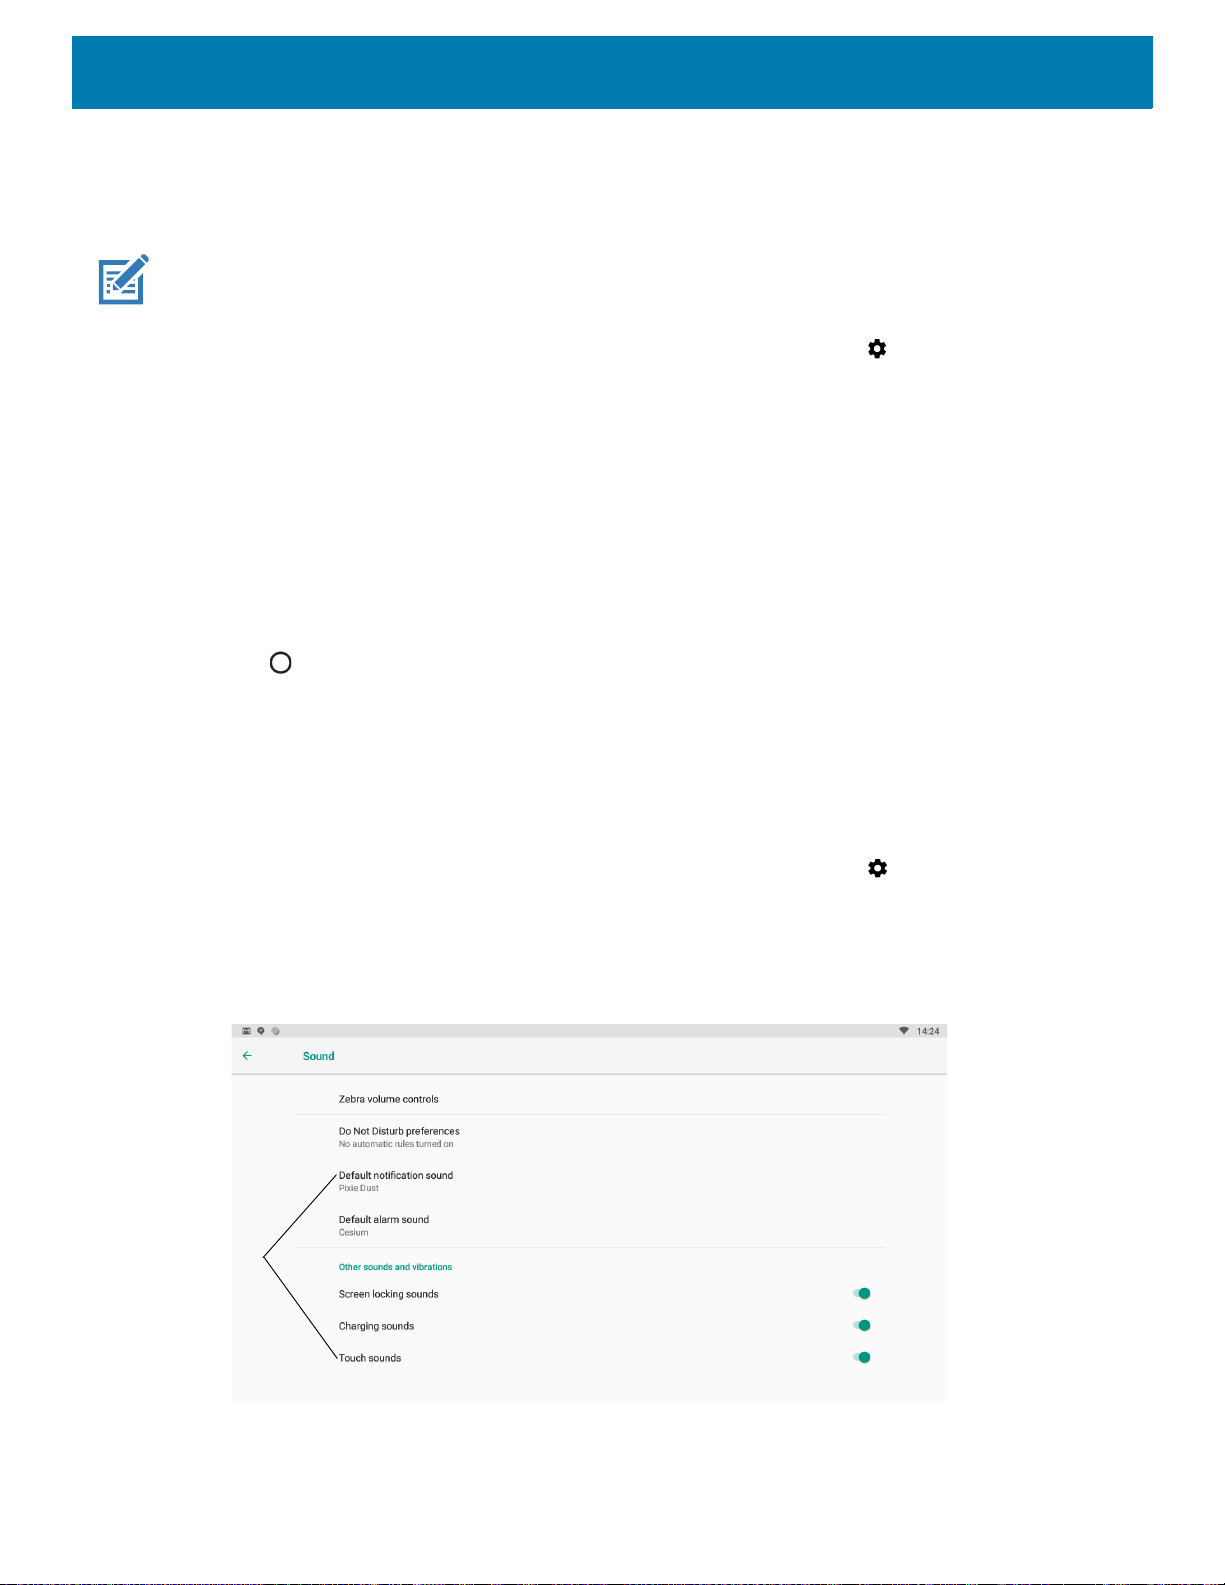
General Sound Settings
Use the Sound settings to configure media and alarm volumes.
To access sound settings:
1. Swipe down from the top to open the Quick Settings panel and then touch .
2. Touch Sound.
3. Touch an option to set sounds.
Figure 11 Sound Screen - Zebra Volume Controls and Advanced Settings
20
Page 21

Getting Started
Zebra Volume Controls
• Ring volume - Controls the ringtone volume.
• Media volume - Controls the music, games, and media volume.
• Alarm volume - Controls the alarm clock volume.
• Notifications volume - Controls the notification volume.
• Scanner volume - Controls the scanner volume.
• Volume presets
• - Mutes the ring, notifications, and scanner so that the device does not make sounds.
• - All sounds except media and alarms are silenced.
• - Enables all sounds at the user defined levels.
Do Not Disturb Preferences
• Touch Priority only allows to set the priorities for the following:
• Reminders - Switch on or off.
• Events - Switch on or off.
• Alarms - This is always enabled.
• Messages - Choose to allow messages from anyone, contacts only, starred contacts only, or none. To
star contacts, use the Contacts app.
• Repeat callers - Switch on or off.
• Touch Block visual disturbances:
• Block when screen is on - Switch on or off. This option prevents notifications from displaying over the
screen (peeking) while you are actively using the device.
• Block when screen is off - Switch on or off. This option prevents notifications from turning on the screen
or pulsing the LED light when a new notification is received while you are not using the device.
• Touch Automatic rules - Switch on or off. This option allows you to choose when to automatically silence
the device. Touch a default rule, such as Weekend or Weeknight, or create your own rule. To create your
own rule tap Add more and then Time rule.
21
Page 22
Getting Started
Advanced Sound Settings
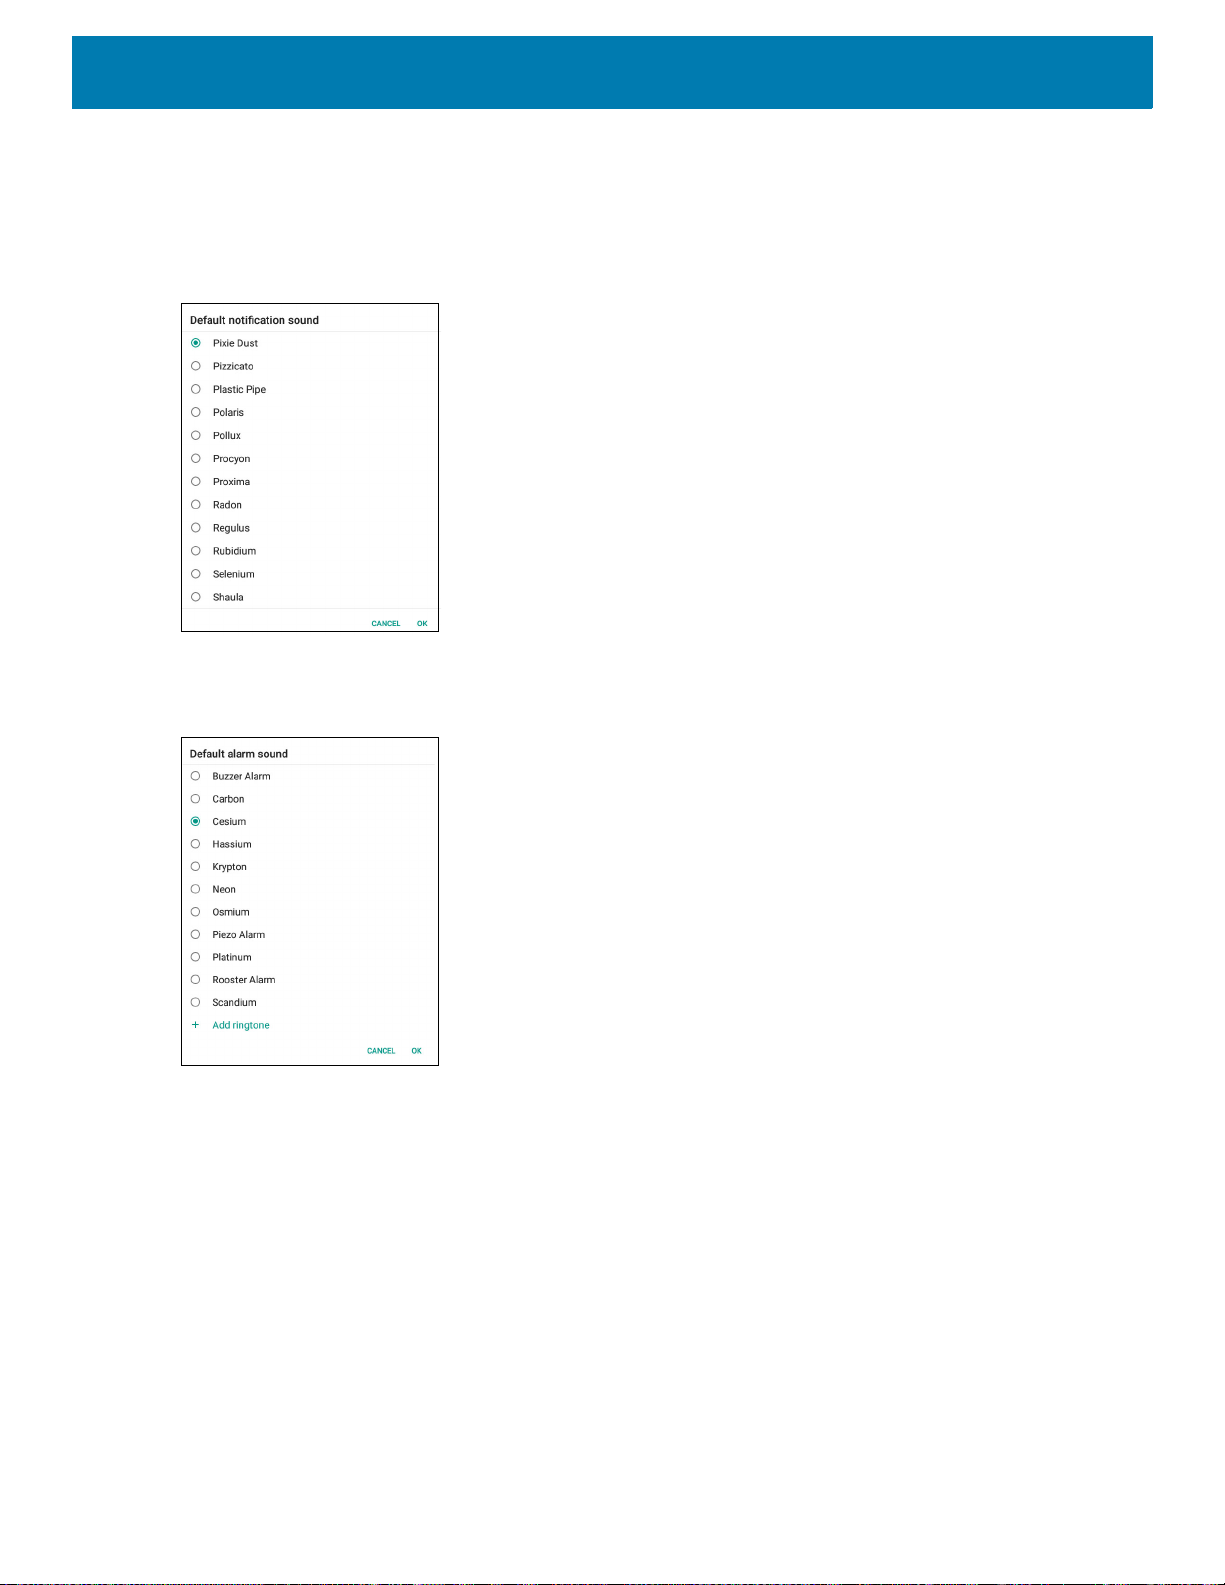
• Touch Default notification sound to select a sound to play for all system notifications. Touch a sound in
the list, then touch OK.
Figure 12 Default Notification Sounds
• Touch Default alarm sound to select a sound to play for alarms. Touch a sound in the list, then touch OK.
Figure 13 Default Alarm Sounds
• Other sounds
• Screen locking sounds - Switch on or off. - Play a sound when locking and unlocking the screen.
• Touch sounds - Switch on or off. Play a sound when making screen selections (enabled by default).
Wake-Up Sources
By default the device wakes from suspend mode when the user touches the display or scans an item.
22
Page 23

Using the Device
Introduction
This chapter explains the buttons, status icons, and controls on the device, and provides basic
instructions for using the device including resetting the device and entering data.
Google Mobile Services
NOTE: This section applies to Google Mobile Services (GMS) devices only.
Devices with GMS contain apps and services that provide additional functionality.
GMS includes:
• Apps - GMS adds a variety of Google apps and associated widgets including Chrome, Gmail,
Drive, and Maps.
• Services:
• Speech to Text - Allows for free format speech to text in many languages for both connected
and disconnected network. Launch by touching the microphone icon on the keyboard.
• TalkBack Service - Provides spoken feedback on various parts of the user interface. To enable,
go to Settings > Accessibility.
• Network Location Provider - Adds a location provider which uses mobile network tower
information and Wi-Fi access point information to provide a location. To enable, go to Settings
> Location access.
• Widevine DRM - Enables Digital Rights Management (DRM) so that protected streaming video
content can be played. Enable DRM Info from the Google Play
• Google Cloud Messaging - Allows the device to receive data from the server and other devices
on the same connection.
• Backup and Restore - Allows the users settings and apps to be backed up to a Google server
and subsequently restored from that server after a factory reset.
• Google Accounts - Create and use a Google account to synchronize mail, files, music, photos,
contacts and calendar events.
™ store.
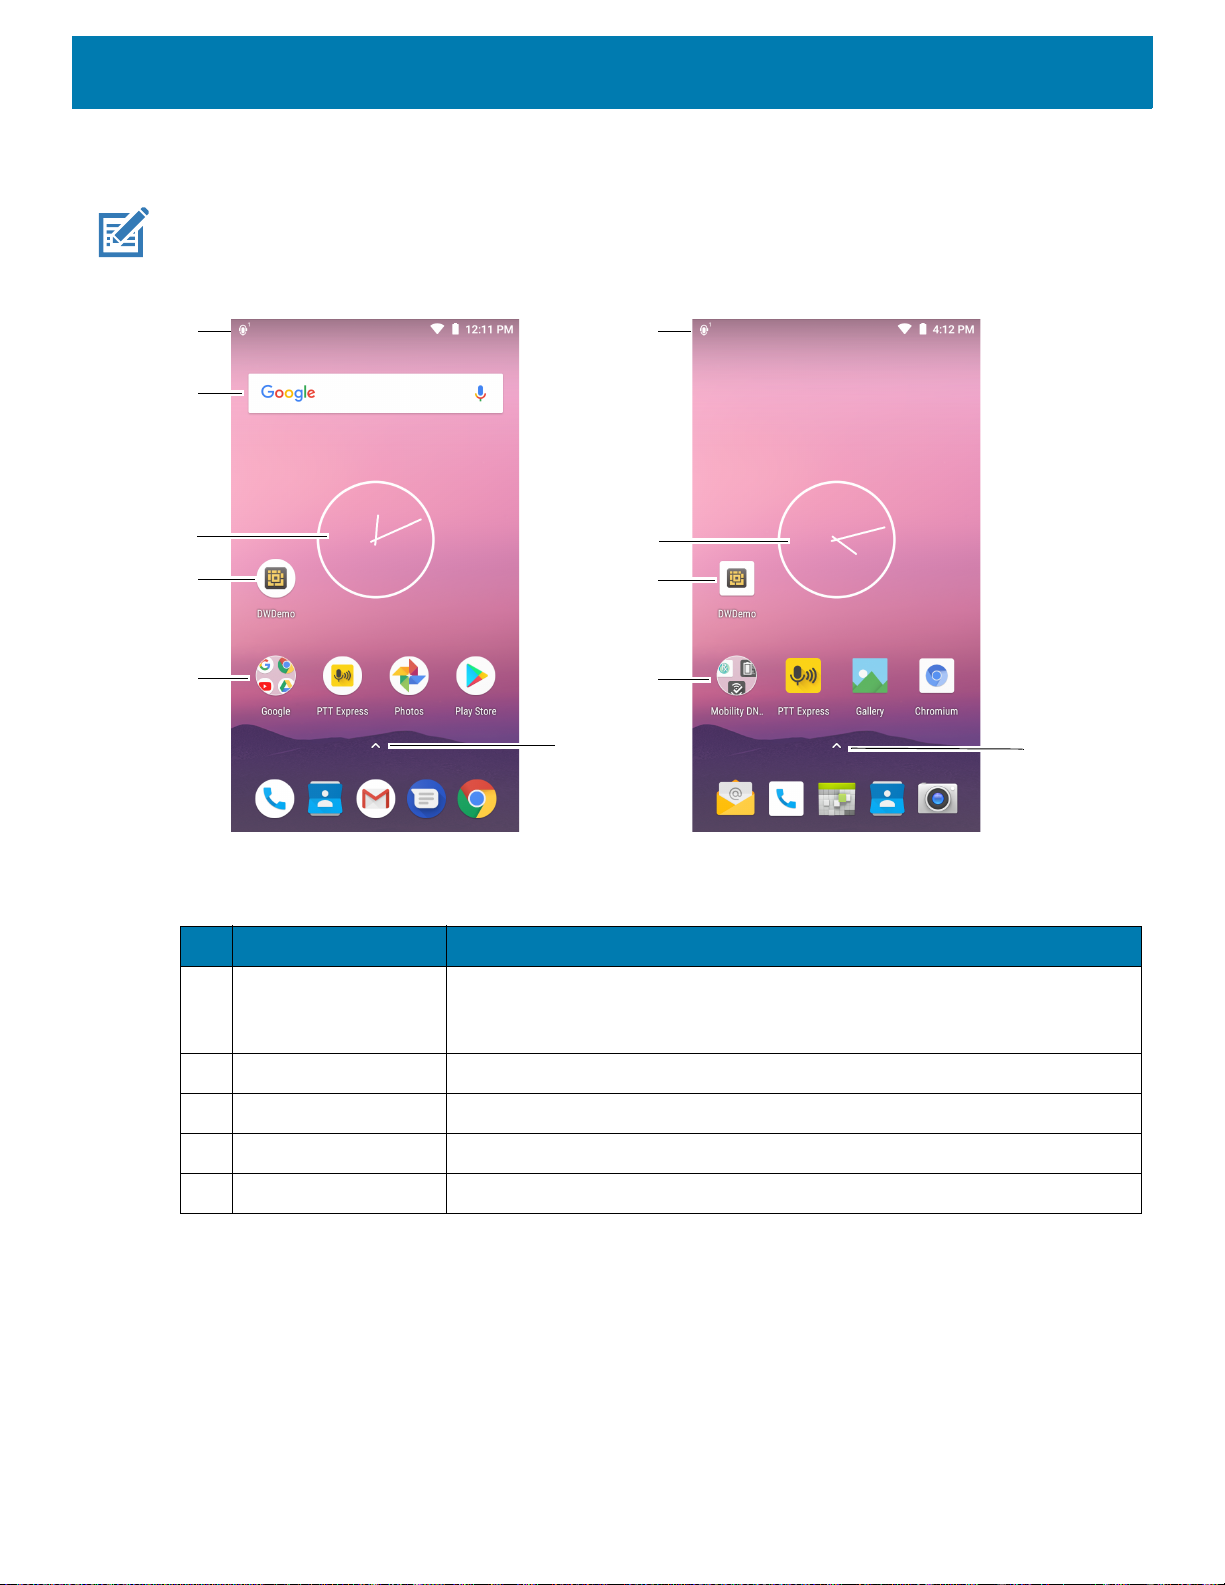
Home Screen
When the device powers on, the Home screen displays. Depending on the configuration, the Home
screen may appear different. Contact your system administrator for more information.
23
Page 24
Using the Device
GMS Non-GMS
1
4
2
5
3
1
4
2
5
3
2
After a suspend, screen time-out, or restart, the Home screen displays with the lock slider. Touch the screen
and slide up to unlock. For screen locking information see Un-Locking the Screen on page 46.
NOTE: By default, non-GMS devices do not have icons on the Home screen. Icons are shown below for example only.
Home screen icons can be configured by the user and may look different than shown.
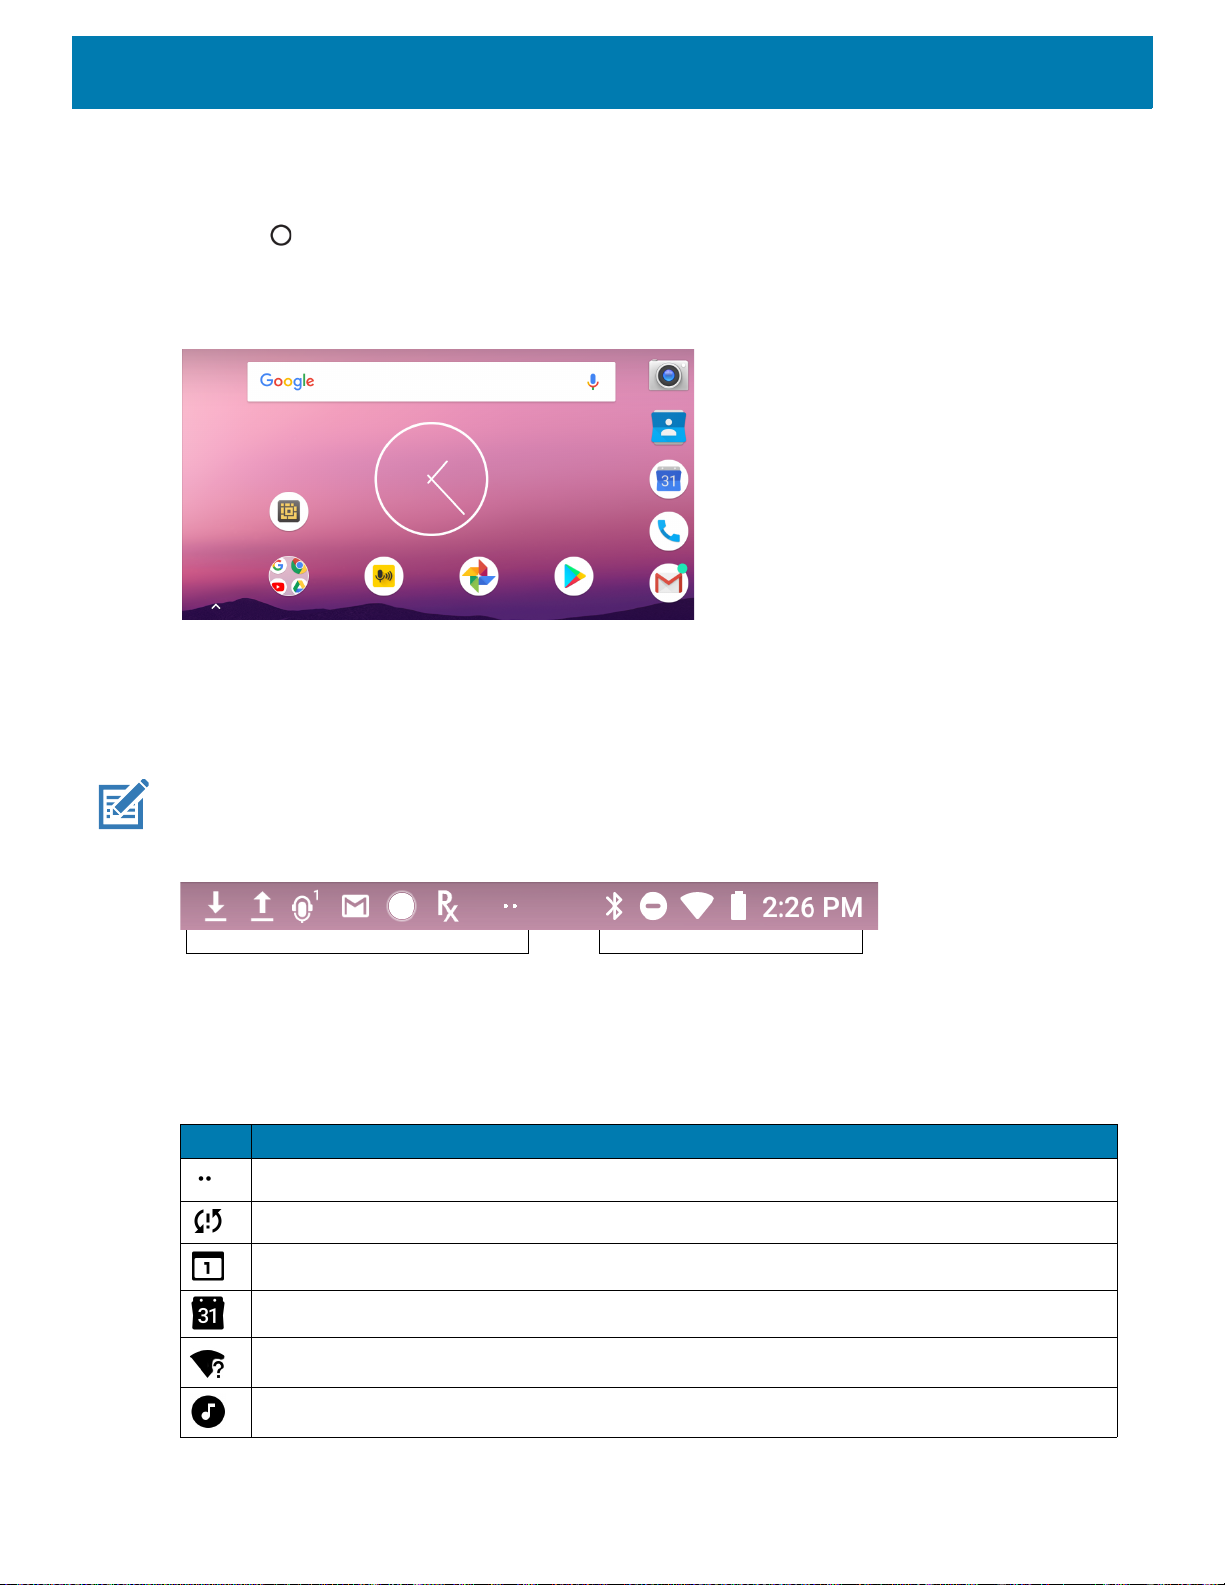
Figure 14 Home Screen
Table 4 Home Screen Features
Item Description
1 Status Bar Displays the time, status icons (right side), and notification icons (left side).
For more information see Status Icons on page 26 and Managing
Notifications on page 27.
2 Widgets Launches stand-alone apps that run on the Home screen.
3 Shortcut Icons Opens apps installed on the device.
4 Folder Contains apps.
5 All Apps Opens the APPS window.
The Home screen provides four additional screens to place widgets and shortcuts. Swipe the screen left or
right to view the additional screens.
Customizing the Home Screen
To customize the Home screen:
1. Touch and hold anywhere on the Home screen until the options appear.
24
Page 25
Using the Device
Notification Icons
Status Icons
2. Touch HOME SETTINGS.
3. Touch the Allow Home screen rotation switch.
4. Touch .
5. Rotate the device.
Figure 15 Rotated Home Screen
Status Bar
The Status bar displays the time, notification icons (left side), and status icons (right side).
NOTE: Some Status icons may not appear in the Status bar if there are too many icons to display.
Figure 16 Notification and Status Icons
If there are more notifications than can fit in the Status bar, two dots display indicating that more notifications
exist. Swipe down from the Status bar to open the Notification panel and view all notifications and status.
Table 5 Notification Icons
Icon Description
More notifications are available for viewing.
Data is syncing.
Indicates an upcoming event. Non-GMS devices only.
Indicates an upcoming event. GMS devices only.
Open Wi-Fi network is available.
Song is playing.
25
Page 26
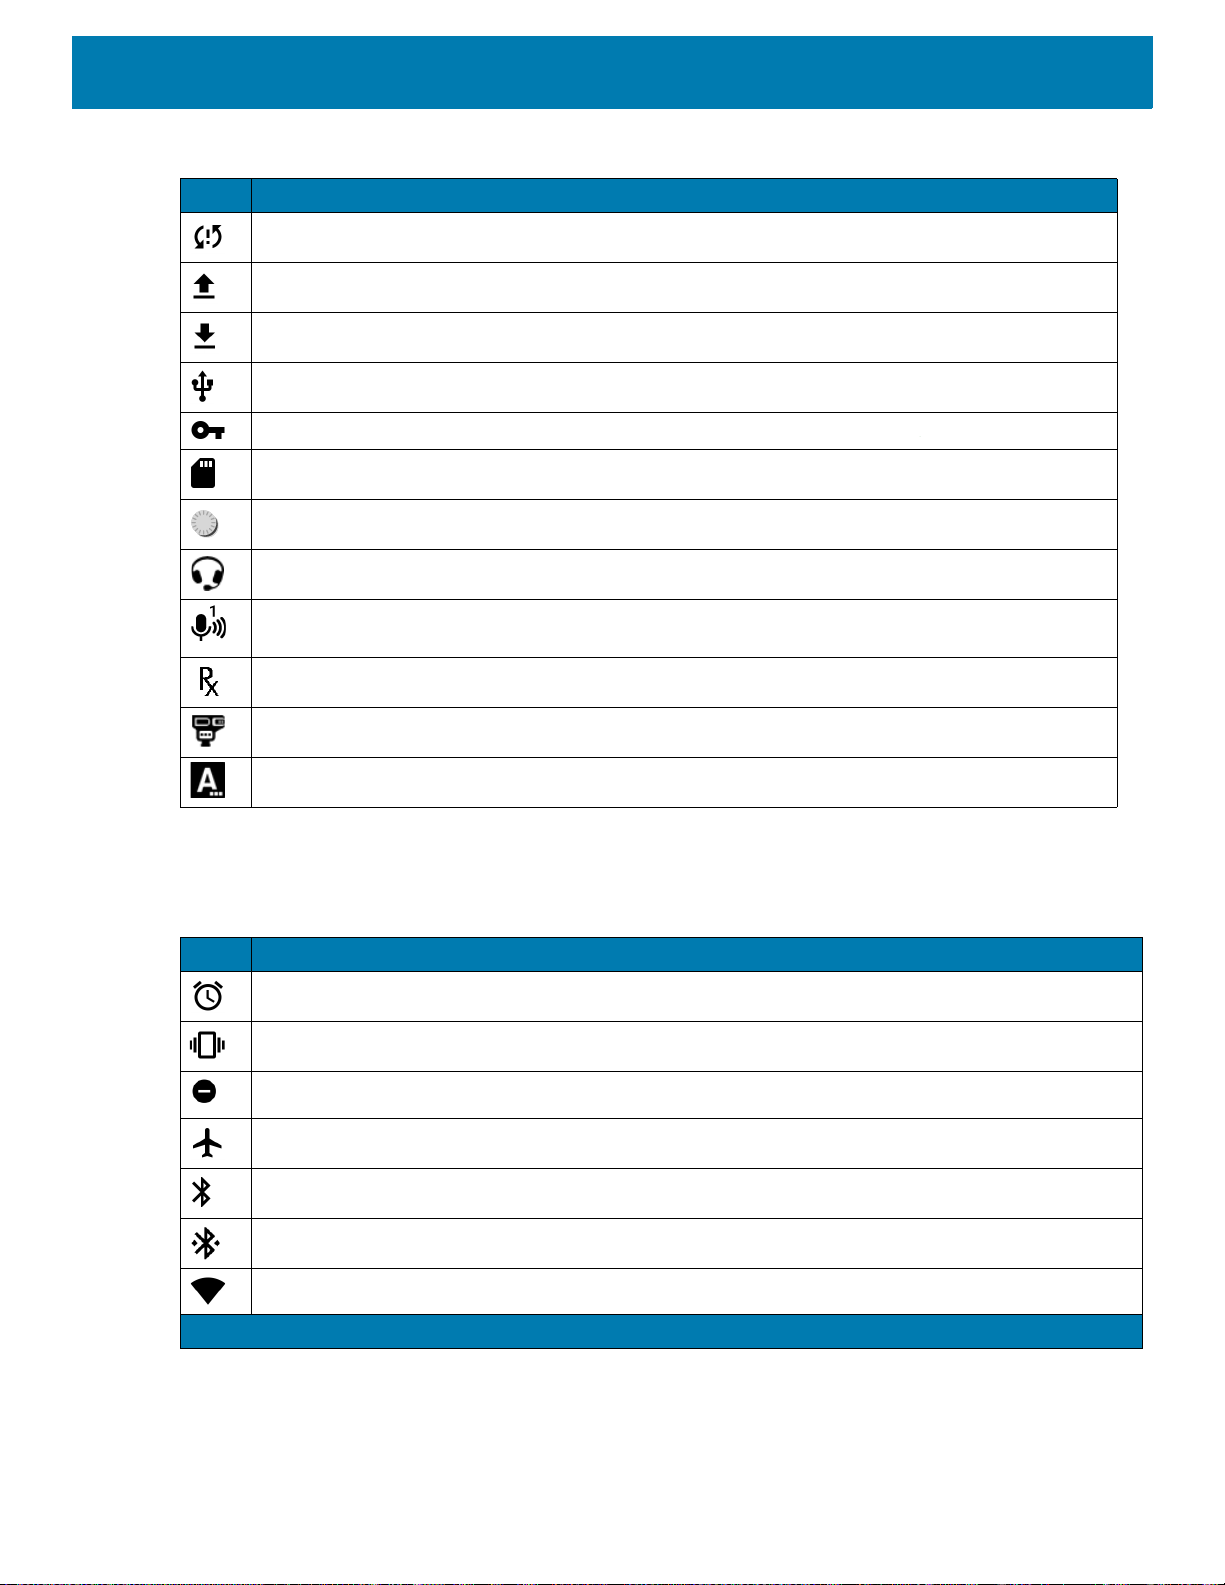
Using the Device
Table 5 Notification Icons (Continued)
Icon Description
Problem with sign-in or sync has occurred.
Device is uploading data.
Device is downloading data when animated and download is complete when static.
Device is connected via USB cable.
Device is connected to or disconnected from virtual private network (VPN).
Preparing internal storage by checking it for errors.
USB debugging is enabled on the device.
Headset is connected to the device.
PTT Express Voice client status. See the PTT Express PTT Notification Icons on page 85 for a
complete list.
Indicates that RxLogger app is running.
Indicates the RS6000 is connected to the device.
Indicates the RS507 or RS6000 is connected to the device in HID mode.
Status Icons
Table 6 Status Icons
Icon Description
Alarm is active.
All sounds, except media and alarms, are silenced and vibrate mode is active.
Do Not Disturb mode active.
Airplane Mode is active. All radios are turned off.
Bluetooth is on.
The device is connected to a Bluetooth device.
Connected to a Wi-Fi network.
1
Cellular network icon that appears is dependent upon the carrier/network.
26
Page 27
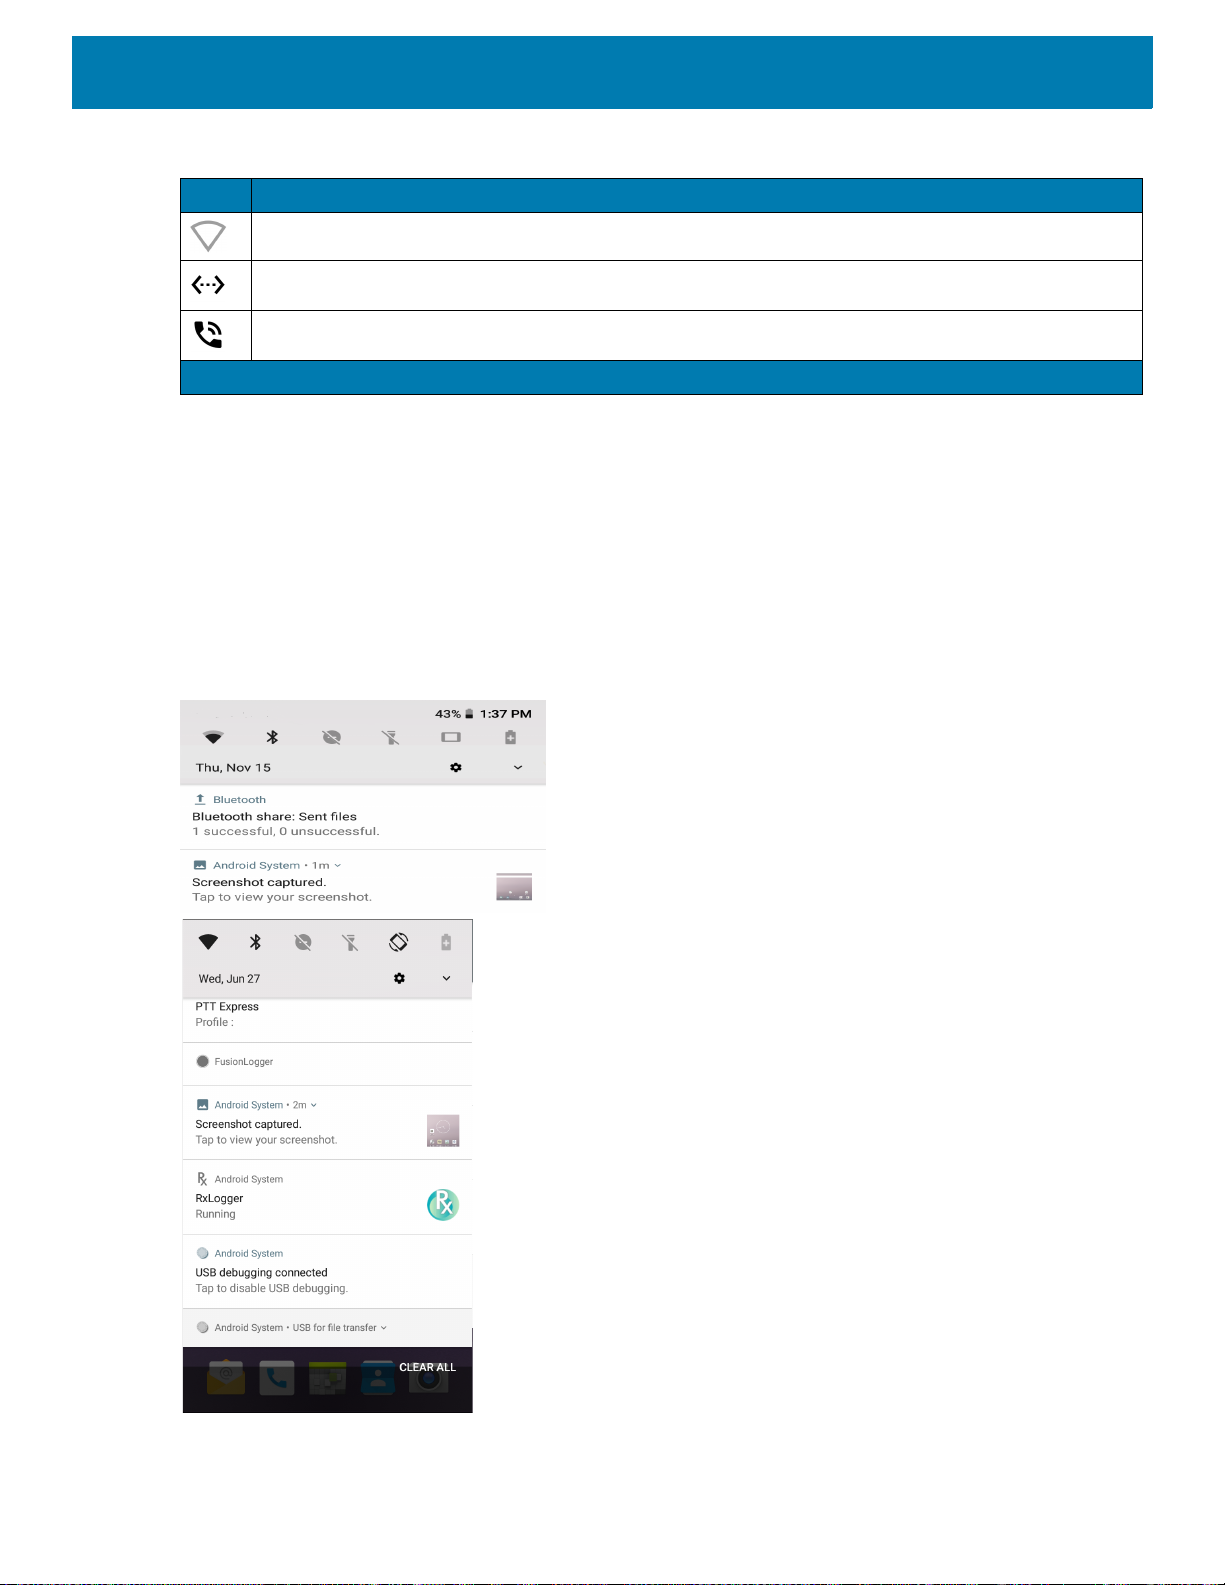
Table 6 Status Icons (Continued)
Icon Description
Not connected to a Wi-Fi network or no Wi-Fi signal.
Connected to an Ethernet network.
Speakerphone enabled.
1
Cellular network icon that appears is dependent upon the carrier/network.
Managing Notifications
Notification icons report the arrival of new messages, calendar events, alarms, and ongoing events. When a
notification occurs, an icon appears in the Status bar with a brief description. See Table 5 on page 25 for a list
of possible notification icons and their description. Open the Notification panel to view a list of all the
notifications.
To open the Notification panel, drag the Status bar down from the top of the screen.
Using the Device
Figure 17 Notification Panel
27
Page 28

To respond to a notification, open the Notification panel and then touch a notification. The Notification panel
closes and the corresponding app opens.
To clear all notifications, open the Notification panel and then touch CLEAR ALL. All event-based notifications
are removed. Ongoing notifications remain in the list.
To close the Notification panel, swipe the Notification panel up.
Setting App Notifications
To set notification settings for a specific app:
1. Swipe down from the Status bar to open the Quick Settings bar and then touch .
2. Touch Apps & notifications > Notifications > App notifications.
3. Select an app.
4. Select an available option:
• On / Off - Select to turn all notifications from this app On (default) or Off.
• Allow notification dot - Do not allow this app to add a notification dot to the app icon.
• Allow interruptions - Do not allow notifications from this app to make sound, vibrate, or pop
notifications on the screen.
• Override Do Not Disturb - Allow these notifications to interrupt when Do Not Disturb is set to Priority
Only.
• Categories - Do not allow specific types of notifications from this app.
• Additional settings in the app - Open the app settings.
Using the Device
NOTE: To change the notification settings for an app, slide the notification slightly left or right and touch .
Viewing Notification Settings for All Apps
To view the notification settings for all apps:
1. Swipe down from the Status bar to open the Quick Settings bar and then touch .
2. Touch Apps & Notifications.
3. Scroll down to Notifications to view how many apps have notifications turned off.
4. To set or view notifications settings for a specific app, see Setting App Notifications on page 28.
Controlling Lock Screen Notifications
To control whether notifications can be seen when the device is locked:
1. Swipe down from the Status bar to open the Quick Settings bar and then touch .
2. Touch Apps & notifications > Notifications.
3. Touch On the lock screen and select one of the following:
• Show all notification content (default)
• Don’t show notifications at all.
28
Page 29

Blink Light
The Charging/Notification LED lights blue when an app, such as email and VoIP, generates a programmable
notification or to indicate when the device is connected to a Bluetooth device. By default, LED notifications are
enabled.
To change the notification setting:
1. Swipe down from the Status bar to open the Quick Settings bar and then touch .
2. Touch Apps & notifications > Notifications.
3. Touch Blink light to toggle the notification on or off.
Quick Access Panel
Use the Quick Access panel to access frequently used settings (for example, Airplane mode).
Figure 18 Quick Settings Bar
Using the Device
To see the full Quick Access panel:
• If the device is locked, swipe down once.
• If the device is unlocked, swipe down once with two fingers, or twice with one finger.
• If the Quick Settings bar is open, touch the Down arrow.
Figure 19 Quick Access Panel
29
Page 30
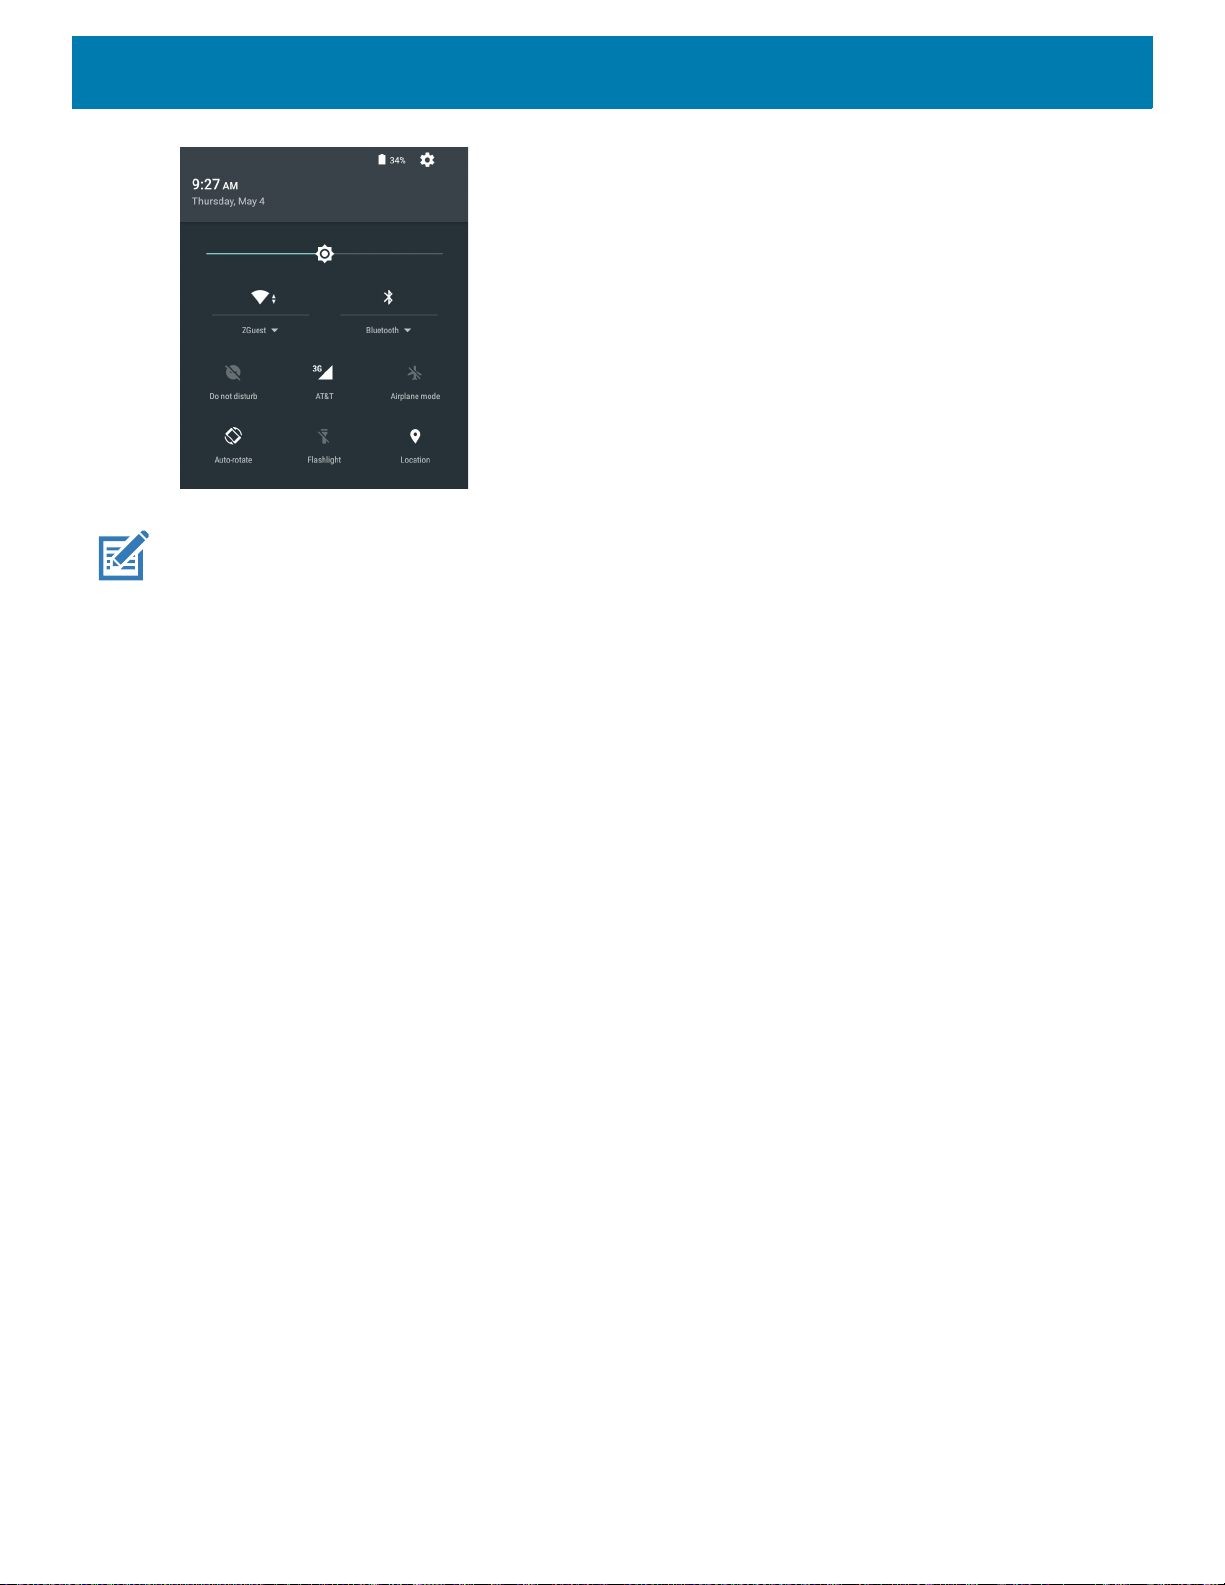
Using the Device
NOTE: Not all icons are pictured. Icons may vary.
To change a setting, touch the icon:
• Display brightness - Use the slider to decrease or increase the brightness of the screen.
• Wi-Fi network - Turn Wi-Fi on or off. To open Wi-Fi settings, touch the Wi-Fi network name.
• Bluetooth settings - Turn Bluetooth on or off. To open Bluetooth settings, touch Bluetooth.
• Battery power - Not applicable.
• Battery saver - Not applicable.
• Invert colors - Invert the display colors.
• Do not disturb - Control how and when to receive notifications.
• Airplane mode - Turn Airplane mode on or off. When Airplane mode is on the device does not connect to
Wi-Fi or Bluetooth.
• Auto-rotate - Lock the device’s orientation in portrait or landscape mode or set to automatically rotate.
• Flashlight - Turn flashlight on or off. Turn camera flash on or off.
The thermal protection safety feature for the camera provides the following behavior if the temperature
range is 40°C or above:
• If the flashlight is kept on for a certain period of time, it is automatically turned off and cannot be turned
back on for a period of time until it has cooled off.
• During the cooling off period, the camera cannot be turned on. If the user attempts to use the camera, a
message displays indicating to try again after a period of time.
• Location - Enable or disable locationing feature.
• Hotspot - Turn on to share the device’s mobile data connection with other devices.
• Data Saver - Turn on to prevent some apps from sending or receiving data in the background.
• Night Light - Tint the screen amber to make it easier to look at the screen in dim light. Set Night Light to turn
on automatically from sunset to sunrise, or at other times.
• Nearby - Helps find and interact with services and devices close to the device.
• Cast - Share phone content on Chromecast or a television with Google Cast built-in. Touch cast screen to
display a list of devices, then touch a device to begin casting.
• Screenshot - Takes a snapshot of the current screen.
30
Page 31

Editing Icons on Quick Settings
The first several setting tiles from the Quick Access panel become the Quick Settings bar.
To move a setting tile:
1. Open the Quick Access panel.
2. Touch .
3. Touch and drag a setting tile to another location.
4. Release the tile.
5. Touch to save tiles and return to the Quick Access panel.
To add a setting tile:
1. Open the Quick Access panel.
2. Touch .
3. Slide the Quick Settings panel up to reveal additional tiles.
Using the Device
4. Touch and drag a setting tile from the Drag to add tiles area to the main area.
5. Release the tile.
6. Touch to save tiles and return to Quick Access panel.
To remove a setting tile:
1. Open the Quick Access panel.
2. Touch .
3. Touch and drag a setting tile to the Drag here to remove area.
4. Release the tile.
5. Touch to save tiles and return to Quick Access panel.
App Shortcuts and Widgets
App shortcuts placed on the Home screen allow quick and easy access to apps. Widgets are self-contained
apps placed on the Home screen to access frequently used features.
Adding an App Shortcut to the Home Screen
To add an app shortcut to the Home screen:
1. Go to the desired Home screen.
2. Swipe up from the bottom of the screen.
3. Scroll through the list to find the app icon.
4. Touch and hold the icon until the Home screen appears.
5. Position the icon on the screen and then release.
31
Page 32

Using the Device
Adding a Widget to the Home Screen
To add a widget to the Home screen:
1. Go to the desired Home screen.
2. Touch and hold until the menu appears.
3. Touch WIDGETS.
4. Scroll through the list to find the widget.
5. Touch and hold the widget until the Home screen appears.
6. Position the widget on the screen and then release.
Moving Items on the Home Screen
To move app shortcuts or widgets on the Home screen:
1. Touch and hold the item until it floats on the screen.
2. Drag the item to a new location. Pause at the edge of the screen to drag the item onto an adjacent Home
screen.
3. Lift finger to place the item on the Home screen.
Removing an App Shortcut or Widget from the Home Screen
To remove an app shortcut or widget from the Home screen:
1. Go to the desired Home screen.
2. Touch and hold the app shortcut or widget icon until it floats on the screen.
3. Drag the icon to X Remove at the top of the screen and then release.
Folders
Use Folders to organize similar applications together. Tap the folder to open and display items in the folder.
Creating a Folder
There must be at least two app icons on the Home screen.
To create a folder:
1. Go to the desired Home screen.
2. Touch and hold one app icon.
3. Drag the icon and stack on top of another icon.
4. Lift and release.
Naming Folders
To name a folder:
32
Page 33

Using the Device
Title Area
1. Touch the folder.
Figure 20 Open Folder
2. Touch the title area and enter a folder name using the keyboard.
3. Touch on the keyboard.
4. Touch anywhere on the Home screen to close the folder. The folder name appears under the folder.
Removing a Folder
To remove a folder:
1. Touch and hold the folder icon until it enlarges.
X
2. Drag the folder to
Remove and release.
Home Screen Wallpaper
To change the Home screen wallpaper:
1. Touch and hold the screen until the menu appears.
2. Touch WALLPAPERS.
3. Touch Photos or Gallery to select a photo or select one of the pre-installed wallpapers.
4. Touch Set wallpaper.
Using the Touchscreen
Use the multi-tap sensitive screen to operate the device.
• Tap - Tap to:
• Select items on the screen.
• Type letters and symbols using the on-screen keyboard.
• Press on-screen buttons.
• Tap and Hold - Tap and hold:
• An item on the Home screen to move it to a new location or to the trash.
• An item in Apps to create a shortcut on the Home screen.
• The Home screen to open a menu for customizing the Home screen.
• An empty area on the Home screen until the menu appears.
33
Page 34

• Drag - Tap and hold an item for a moment and then move finger on the screen until reaching the new
position.
• Swipe - Move finger up and down or left and right on the screen to:
• Unlock the screen.
• View additional Home screens.
• View additional app icons in the Launcher window.
• View more information on an app’s screen.
• Double-tap - Tap twice on a web page, map, or other screen to zoom in and out.
• Pinch - In some apps, zoom in and out by placing two fingers on the screen and pinching them together (to
zoom out) or spreading them apart (to zoom in).
Keyboards
The device provides the following types of keyboards:
• Android Keyboard - Non-GMS devices only.
• Enterprise Keyboard.
NOTE: By default the Enterprise Keyboard is disabled.
Using the Device
Keyboard Configuration
Enabling Keyboards
To enable keyboards:
1. Swipe down from the Status bar to open the Quick Settings bar and then touch .
2. Touch System > Languages & input > Virtual keyboard > Manage keyboards.
3. Touch a keyboard to enable.
Switching Between Keyboards
To switch between keyboards, touch in a text box to display the current keyboard.
• On the Android or Gboard keyboards, touch and hold .
• On the Enterprise keyboard, touch .
Using the Enterprise Keyboard
The Enterprise Keyboard contains the following keyboards:
• Numeric
•Alpha
• Special characters
• Data capture.
34
Page 35

Using the Device
Numeric Tab
To access the numeric keyboard, touch the 123 tab. The keys displayed vary on the app being used. For
example, an arrow displays in Contacts, however Done displays in Email account setup.
Figure 21 Numeric Keyboard
Alpha Tab
To access the alpha keyboard, touch the EN tab.
Figure 22 Alpha Keyboard
Additional Character Tab
To access additional characters, touch the #*/ tab.
Figure 23 Symbols Keyboard
35
Page 36

Using the Device
Touch to enter emoji icons in a text message.
Figure 24 Emoji Keyboard
Touch ABC to return to the Symbols keyboard.
Scan Tab
The Scan tab provides an easy data capture feature for scanning barcodes.
Figure 25 Scan Keyboard
Using the Android and Gboard Keyboards
Use the Android or Gboard keyboards to enter text in a text field. To configure the keyboard settings, touch and
hold
, (comma) and then select Android keyboard settings.
Editing Text
Edit entered text and use menu commands to cut, copy, and paste text within or across apps. Some apps do
not support editing some or all of the text they display; others may offer their own way to select text.
Entering Numbers, Symbols, and Special Characters
To enter numbers and symbols:
• Touch and hold one of the top-row keys until a menu appears then select a number or special character.
• Touch the Shift key once for a single capital letter. Touch the Shift key twice to lock in uppercase. Touch the
Shift key a third time to unlock Capslock.
• Touch
• Touch the
To enter special characters, touch and hold a number or symbol key to open a menu of additional symbols. A
larger version of the key displays briefly over the keyboard.
?123 to switch to the numbers and symbols keyboard.
=\< key on the numbers and symbols keyboard to view additional symbols.
36
Page 37

Do Not Disturb Feature
This mode mutes the device so that it does not make sounds or vibrate.
For example, use Do Not Disturb to:
• Automatically limit sounds at night or during events
• Mute interruptions other than alarms
• Get alerted to messages only from favorite contacts.
Limit Sounds
Mute the device completely, or let through the important alarms or important calls.
Total Silence
To completely mute the device so that it does not make a sound or vibrate, choose Total silence.
In Total silence mode:
Using the Device
• Alarms do not make noise.
• Device does not vibrate or make sounds when receiving a message, or notification.
• Sounds from music, videos, games, and other media are muted.
NOTE: All alarms are silenced in Total silence mode.
1. Swipe down with two fingers from the Status bar to open the Quick Access panel.
2. Touch Do not disturb > Total silence.
3. Choose Until you turn it off or select a time period.
4. Touch Done.
When Total Silence is on, appears in the quick access panel and the Status bar.
To turn off Total Silence, open quick access panel and touch Total silence.
Alarms Only
To mute the device so that the user hears alarms, choose Alarms only. This option does not mute sounds
from music, videos, games, or other media.
1. Swipe down with two fingers from the status bar to open the quick access panel.
2. Touch Do not disturb > Alarms only.
3. Choose Until you turn it off or select a time period.
4. Touch Done.
When Alarms Only is on, appears in the quick access panel and the Status Bar.
To turn off Alarms Only, open the Quick Access panel and touch Alarms only.
NOTE: To quickly turn on Alarms Only, with the screen on, press and hold the Volume Down button until the volume is all
the way down. Then, press Volume Down again to turn on Alarms Only.
37
Page 38

Using the Device
To turn off Alarms Only, press either the Volume Up or Volume Down button and the touch END NOW in the
alert message.
Priority Notifications Only
To only be interrupted by important notifications, choose Priority only. This option does not mute sounds from
music, videos, games, or other media.
Before turning on Priority Only mode, set the notification priorities:
1. Swipe down from the status bar to open the quick settings bar and then touch .
2. Touch Sound > Do not disturb > Priority only allows.
3. Set priorities.
• Alarms: Disabled by default.
• Reminders and Events: Switch on or off.
• Messages and Calls: Choose From anyone, From contacts only, From starred contacts only, or
none. To star contacts, use the Contacts applications.
• Repeat callers: Choose whether to let the device ring if the same person calls again within 15 minutes.
After setting notification priorities, turn on Priority Only mode to limit interruptions. The priority notifications
make a sound or vibrate based on the current ringer volume, but other notifications will be silenced.
1. Swipe down with two fingers from the status bar to open the quick access panel.
2. Touch Do not disturb > Priority only.
3. Choose Until you turn it off or select a time period.
4. Tap Done.
When Priority Only is on, appears in the quick access panel and the Status Bar.
To turn off Priority Only, open quick access panel and touch Priority only.
Automatically Block Sounds
Automatically silence the device during certain times or events, turn sounds back on, and override Do Not
Disturb mode.
Silence Sounds During Certain Times
To automatically silence the device during certain times, like at night or on weekends:
1. Swipe down from the Status bar to open the Quick Settings bar and then touch .
2. Touch Sound > Do Not Disturb preferences.
3. Touch a default Weekend or Weeknight. Or, to make a new rule, touch Add more > Time rule.
4. Enter a rule name.
5. Touch OK.
38
Page 39

Using the Device
6. Edit the new rule:
• Rule name - Rename the rule.
• Days, Start time, and End time - Set the rule's schedule.
• Do Not Disturb preferences - Choose whether the rule uses Alarms only, Priority only, or Total
silence.
• Alarm can override end time - Allow the alarm to continue to make sound until the next alarm begins.
7. Touch the On/Off switch at the top to turn on the rule.
Silence Sounds During Events and Meetings
To automatically silence the device during events or meetings, set an event rules.
1. Swipe down from the Status bar to open the Quick Settings bar and then touch .
2. Touch Sound > Do Not Disturb preferences.
3. To edit the default rule, touch Event. Or, to create a new rule, touch Add rule > Event rule.
4. Edit the rule settings.
• Rule name - Rename the rule.
• During events for - Select which Google Calendar events the rule uses.
• Where reply is - Set to: Yes, Maybe, or Not replied, Yes or Maybe, or Yes.
• Do Not Disturb preferences - Choose whether the rule uses Priority only, Alarms only, or Total
silence.
5. Touch the On/Off switch at the top to turn on the rule.
Turn Sounds Back On
When the device is in Do Not Disturb mode, Alarms only or Priority only display as , or Total silence displays
as .
To turn off Do Not Disturb, either:
• In the Quick Access panel, touch Alarms only, Priority only, or Total silence.
• Press the Volume Down button and touch End Now.
Override Do Not Disturb for Specific Apps
To let through notifications from specific apps:
1. Swipe down from the Status bar to open the Quick Settings bar and then touch .
2. Touch Apps & notifications > Notifications > App notifications.
3. Touch an app.
4. Touch Override Do Not Disturb.
39
Page 40

Apps
Using the Device
The APPS screen displays icons for all installed apps. The table below lists the apps installed on the device.
Refer to the device Integrator Guide for Android Version 8.1 for information on installing and uninstalling apps.
Table 7 Apps
Icon Description
Battery Manager - Not applicable.
Battery Swap – Not applicable.
Bluetooth Pairing Utility – Use to pair the RS507 Hands-free Imager with the device by
scanning a barcode.
Calculator - Provides the basic and scientific arithmetic functions.
Calendar - Use to manage events and appointments. GMS devices onlyGMS/GMS-Restricted
only.
Calendar - Use to manage events and appointments. Non-GMS devices onlyAOSP only.
Camera - Take photos or record videos. For more information see Camera on page 54.
Chrome - Use to access the Internet or intranet. GMS devices onlyGMS/GMS-Restricted only.
Chromium - Use to access the Internet or intranet. AOSP only.
Clock - Use to schedule alarms for appointments or as a wake-up.
Contacts - Use to manage contact information. See Contacts on page 60 for more information.
DataWedge - Enables data capture using the imager.
Device Central - Use to display detailed information about the device and connected
peripherals.
40
Page 41

Using the Device
Table 7 Apps (Continued)
Icon Description
Diagnostic Tool - Use to diagnose the device.
Drive - Upload photos, videos, documents, and other files to personal storage site.
GMS/GMS-Restricted only.
DWDemo - Provides a way to demonstrate the data capture features using the imager. See
DataWedge Demonstration on page 62 for more information.
Email - Use to send and receive email. Non-GMS devices only.AOSP only.
Enterprise Browser - Industrial browser that provides everything needed to quickly build device
apps for barcode scanning, signature capture, payment processing, printing and most other
enterprise applications. For more information, refer to techdocs.zebra.com/enterprise-browser/.
ET5X User Guide - Opens the on-device User Guide for the device.
Files - Organize and manage files on the device. See Files on page 69 for more information.
Gallery - Use to view photos stored on the devicemicroSD card. For more information, see
Gallery on page 71 for more information. Non-GMS devices onlyAOSP only.
Gmail - Use to send and receive email using a Google email account. GMS devices
onlyGMS/GMS-Restricted only.
Google - Launches Google search app. GMS devices onlyGMS/GMS-Restricted only.
Hangouts - Use to communicate with friends using text messages and photos. GMS devices
onlyGMS/GMS-Restricted only.
Keep - Use to create, edit, and share notes. GMS devices onlyGMS/GMS-Restricted only.
License Manager - Use to manage software licenses on the device.
Maps - Use to see your location on a map (with public transit, traffic, or satellite overlays).
Search for any business or place of interest. Provides turn-by-turn navigation with voice
guidance, traffic-avoidance, and alternate routes, for drivers, cyclists, walkers, and users of
public transportation. GMS devices onlyGMS/GMS-Restricted only.
41
Page 42

Using the Device
Table 7 Apps (Continued)
Icon Description
MSRN - Use to verify authenticity of the paired Snap-on MSR and to provision the Snap-on
MSR. See device Touch Computer Integrator Guide for Android Version 8.1 for more
information.
Music - Play music stored on the devicemicroSD card. Non-GMS devices onlyAOSP only.
Notes - Use to take and save notes.Non-GMS devices onlyAOSP only
Photos - Use to sync photos with Google account. For more information, see Photos on page
78 for more information. GMS devices onlyGMS/GMS-Restricted only.
Play Movies & TV - View movies and video on your device. GMS devices
onlyGMS/GMS-Restricted only.
Play Music - Use to listen to music. GMS devices onlyGMS/GMS-Restricted only.
Play Store - Download music, movies, books, and Android apps and games from the Google
Play Store. GMS devices onlyGMS/GMS-Restricted only.
Print Station - Use to print labels and receipts directly to a Zebra ZPL printer via USB,
Bluetooth, or WLAN.
PTT Express - Use to launch PTT Express client for VoIP communication.
RxLogger - Use to diagnose device and app issues. See the device Integrator Guide for
Android Version 8.1 for more information.
RxLogger Utility - Use to view, backup, and archive RxLogger data.
Search - Use to search the Web. Requires an Internet connection. Non-GMS devices
onlyAOSP only.
Settings - Use to configure the device.
Sound Recorder - Use to record audio.
42
Page 43

Using the Device
Table 7 Apps (Continued)
Icon Description
StageNow - Allows the device to stage a device for initial use by initiating the deployment of
settings, firmware, and software.
Tap & Pair - Use to pair the device with a Zebra Bluetooth printer.
Velocity - Opens the Ivanti (formerly Wavelink) terminal emulation app.
Voice Search - Use to perform searches by asking questions. GMS devices
onlyGMS/GMS-Restricted only.
Worry Free Wifi Analyzer - A diagnostic intelligent app. Use to diagnose surrounding area and
display network stats, such as coverage hole detection, or AP in vicinity. Refer to the Worry Free
Wi-Fi Analyzer Administrator Guide for Android.
YouTube - Use to view videos on the YouTube
onlyGMS/GMS-Restricted only.
Zebra Bluetooth - Use to configure Bluetooth logging.
Zebra Utilities - Use to print barcode labels and receipts directly to a Zebra printer via Bluetooth
or WLAN.
Accessing Apps
All apps installed on the device are accessed using the APPS window.
™ web site. GMS devices
43
Page 44

Using the Device
1. On the Home screen, swipe up from the bottom of the screen.
Figure 26 APPS Window Example
44
Page 45

Using the Device
2. Slide the APPS window up or down to view more app icons. Touch an icon to open the app.
Switching Between Recent Apps
To switch between recent apps:
1. Touch . A window appears on the screen with icons of recently used apps.
Figure 27 Recently Used Apps
1
45
Page 46

Using the Device
2. Slide the window up and down to view all recently used apps.
3. Swipe left or right to remove app from the list and force close the app.
4. Touch an icon to open it or touch to return to the current screen.
Un-Locking the Screen
Use the Lock screen to protect access to data on the device. Some email accounts require locking the screen.
Refer to the device Integrator Guide for Android Version 8.1 for information on setting up the locking feature.
When locked, a pattern, PIN, or password is required to unlock the device. Press the Power button to lock the
screen. The device also locks after a pre-defined time-out.
46
Page 47

Using the Device
Press and release the Power button to wake the device. The Lock screen displays. Swipe the screen up to
unlock. If the Pattern screen unlock feature is enabled, the Pattern screen appears instead of the Lock screen.
If the PIN or Password screen unlock feature is enabled, enter the PIN or password after unlocking the screen.
Figure 28 Lock Screen
47
Page 48

Figure 29 PIN Screen
Using the Device
48
Page 49

Using the Device
Figure 30 Pattern Screen
49
Page 50

Using the Device
Figure 31 Password Screen
50
Page 51

Using the Device
Transferring Files with a Host Computer via USB
Connect the device to a host computer using a USB cable or a USB cradle to transfer files between the device
and the host computer.
When connecting the device to a host computer, follow the host computer’s instructions for connecting and
disconnecting USB devices, to avoid damaging or corrupting files.
Transferring Files
NOTE: Use Transfer files to copy files between the device (internal memory or microSD card) and the host computer.
1. Connect a USB cable to the device or place the device into a USB cradle.
51
Page 52

Using the Device
2. Pull down the Notification panel and touch USB charging this device.
By default, Charge this device is selected.
Figure 32 Use USB to Dialog Box
3. Touch Transfer files.
4. On the host computer, open a file explorer application.
5. Locate the device as a portable device.
6. Open the SD card or the Internal storage folder.
7. Copy files to and from the device or delete files as required.
Transferring Photos
To transfer photos using Photo Transfer Protocol:
NOTE: Use Photo Transfer Protocol (PTP) to copy photos from either the microSD card or internal memory to the host com-
puter.
1. Connect USB cable to the device or place the device into a USB cradle. See Accessories for setup
information.
2. Pull down the Notification panel and touch USB charging this device.
3. Touch Transfer photos (PTP).
4. On the host computer, open a file explorer application.
5. Open the SD card or the Internal storage folder.
6. Copy or delete photos as required.
52
Page 53

Using the Device
Disconnect from the Host Computer
To disconnect the device from the host computer:
CAUTION: Carefully follow the host computer’s instructions to unmount the microSD card and disconnect USB devices cor-
rectly to avoid losing information.
1. On the host computer, unmount the device.
2. Remove the USB cable from the device or remove the device from the cradle.
53
Page 54

Applications
Introduction
This section describes the applications installed on the device.
Camera
This section provides information for taking photos and recording videos using the integrated digital
cameras.
NOTE: The device saves photos and videos on the microSD card, if installed and the storage path is changed man-
ually. By default, or if a microSD card is not installed, the device saves photos and videos on the internal storage.
Taking Photos
NOTE: See Photo Settings on page 57 for camera setting descriptions.
54
Page 55

Applications
Camera Mode
Settings
HDR
Camera Switch
Scene Mode
Shutter Button
Gallery
Filters
1. Swipe up from the bottom of the Home screen and touch Camera.
Figure 33 Camera
2. If necessary, touch the Camera Mode icon and touch .
3. To switch between the rear camera and front camera (if available), touch .
4. Frame the subject on the screen.
5. To zoom in or out, press two fingers on the display and pinch or expand fingers. The zoom controls appear
on the screen.
6. Touch an area on the screen to focus. The focus circle appears. The two bars turn green when in focus.
7. Touch .
The camera takes a photo and a shutter sound plays.
The photo momentarily displays as a thumbnail in the lower left corner.
Recording Videos
1. Swipe up from the bottom of the Home screen and touch Camera.
55
Page 56

Applications
2. Touch the camera mode menu and touch .
Figure 34 Video Mode
56
Page 57

Applications
Camera Mode
Settings
Audio
Camera Switch (Available on devices
with a rear camera and front camera)
Shutter Button
Gallery
3. To switch between the rear camera and front camera (if available), touch .
4. Point the camera and frame the scene.
5. To zoom in or out, press two fingers on the display and pinch or expand fingers. The zoom controls appear
on the screen.
6. Touch to start recording.
The video time remaining appears in the top left of the screen.
7. Touch to the end recording.
The video momentarily displays as a thumbnail in the lower left corner.
Photo Settings
In Photo mode, photo settings appear on screen. Touch to display the photo settings options.
57
Page 58

Applications
Rear Camera
• Flash - Select whether the camera relies on its light meter to decide whether a flash is necessary, or to turn
it on or off for all shots.
• Off - Disable flash.
• Auto - Adjust flash automatically depending upon light meter (default).
• On - Enable flash upon taking a photo.
• Torch - Turn flash on continuously.
• Picture size - The size (in pixels) of the photo to: 13M pixels (default), 8M pixels, 5M pixels, 3M pixels,
HD 1080, 2M pixels, 1.3M pixels, HD720, 1M pixels, WVGA, VGA or QVGA.
• Picture quality - Set the picture quality setting to: Low, Standard (default) or High.
• Countdown timer - Select Off (default), 2 seconds, 5 seconds or 10 seconds.
• Storage – Set the location to store the photo to: Phone or SD Card.
• Face Detection - Select to turn face detection Off (default) or On.
• ISO - Set camera sensitivity to light to: Auto (default), ISO Auto (HJR), ISO100, ISO200, ISO400, ISO800
or ISO1600
• Exposure - Set the exposure settings to: +2, +1, 0(default), -1 or -2.
• White balance - Select how the camera adjusts colors in different kinds of light, to achieve the most
natural-looking colors:
.
• Incandescent - Adjust the white balance for incandescent lighting.
• Fluorescent - Adjust the white balance for florescent lighting.
• Auto - Adjust the white balance automatically (default).
• Daylight - Adjust the white balance for daylight.
• Cloudy - Adjust the white balance for a cloudy environment.
• Chroma Flash - Sets the camera to take two pictures, one with flash and one without flash. The two
images are combined to produce a final image with the sharpness and clarity and bright color tones from a
picture with the flash, coupled with the natural colors of a picture without a flash. Options: Off (default) or
On.
• Redeye reduction - Helps eliminate redeye effect. Options: Disabled (default), or Enable.
• Focus mode - Set the camera focus to CAF (Continuous Auto Focus).
• Focus mode - Touch to select the camera focus setting. Options: Auto, Infinity, Macro or CAF
(Continuous Auto Focus) (default). ZSL option must be set to Off.
• ZSL - Set the camera to immediately take a picture when the button is pressed (default – enabled).
• Anti Banding - Allows the camera to avoid problems caused by artificial light sources that are not constant.
These sources cycle (flicker) fast enough to go unnoticed to the human eye, appearing continuous. The
camera’s eye (its sensor) can still see this flicker. Options: Auto (default),
60 Hz, 50 Hz, or Off.
Front Camera
• Selfie Flash - Turns screen white to help produce a little extra light in dimmer settings. Options: Off
(default), or On.
• Picture size - Set the size (in pixels) of the photo to: 5M pixels (default), HD720, 1M pixels, WVGA, VGA,
or QVGA.
• Picture quality - Set picture quality setting to: Low, Standard (default) or High.
58
Page 59

Applications
• Countdown timer - Set to: Off (default), 2 seconds, 5 seconds or 10 seconds.
• Storage – Set location to store the photo to: Phone or SD Card.
• Face Detection - Select to turn face detection Off (default) or On.
• ISO - Set how sensitive the camera is to light. Options: Auto (default), ISO Auto (HJR), ISO100, ISO200,
ISO400, ISO800 or ISO1600.
• Exposure - Touch to adjust the exposure settings. Options: +2, +1, 0 (default), -1 or -2.
• White balance - Select how the camera adjusts colors in different kinds of light, to achieve the most
natural-looking colors:
• Incandescent - Adjust the white balance for incandescent lighting.
• Fluorescent - Adjust the white balance for florescent lighting.
• Auto - Adjust the white balance automatically (default).
• Daylight - Adjust the white balance for daylight.
• Cloudy - Adjust the white balance for a cloudy environment.
• Redeye reduction - Helps eliminate redeye effect. Options: Disabled (default), or Enable.
• ZSL - Set the camera to immediately take a picture when the button is pressed (default – enabled)
• Selfie Mirror - Options: Disable (default), or Enable.
• Anti Banding
These sources cycle (flicker) fast enough to go unnoticed to the human eye, appearing continuous. The
camera’s eye (its sensor) can still see this flicker. Options: Auto (default), 60 Hz, 50 Hz, or Off.
- Allows the camera to avoid problems caused by artificial light sources that are not constant.
Video Settings
In Video mode, video settings appear on screen. Touch to display the video settings options.
Rear Camera
• Flash - Select whether Rear-facing Camera relies on its light meter to decide whether a flash is necessary,
or to turn it on or off for all shots.
• Off - Disable flash (default).
• Torch - Turn flash on continuously.
• Video quality - Set video quality to: HD 1080p (default), HD 720p, or SD 480p.
• Video duration - Set to: 30 seconds (MMS), or 30 minutes (default).
• Storage – Set the location to store the photo to: Phone (default) or SD Card.
• White balance - Select how the camera adjusts colors in different kinds of light, to achieve the most
natural-looking colors.
• Incandescent - Adjust the white balance for incandescent lighting.
• Fluorescent - Adjust the white balance for florescent lighting.
• Auto - Adjust the white balance automatically (default).
• Daylight - Adjust the white balance for daylight.
• Cloudy - Adjust the white balance for a cloudy environment.
• Image Stabilization - Set to reduce blurry videos due to device movement. Options: On or Off (default).
59
Page 60

Applications
Front Camera
• Video quality - Set video quality to: HD1080HD 720p (default), HD720, or SD 480p.
• Video duration - Set to: 30 seconds (MMS) or 30 minutes (default).
• Storage – Set the location to store the photo to: Phone (default) or SD Card.
• White balance - Select how the camera adjusts colors in different kinds of light, to achieve the most
natural-looking colors.
• Incandescent - Adjust the white balance for incandescent lighting.
• Fluorescent - Adjust the white balance for florescent lighting.
• Auto - Adjust the white balance automatically (default).
• Daylight - Adjust the white balance for daylight.
• Cloudy - Adjust the white balance for a cloudy environment.
• Image Stabilization - Set to reduce blurry videos due to device movement. Options: On or Off (default).
Contacts
Use the Contacts app to manage contacts.
From a Home or Apps screen, touch Contacts to open to the main list of contacts. Contacts are listed in
alphabetical order. Swipe up or down to scroll through the list.
Adding a Contact
1. In the Contacts app, touch .
2. If there are more than one account with contacts, touch the one to use.
3. Type the contact’s name and other information. Touch a field to start typing, and swipe down to view all
categories.
4. To open a menu with preset labels, such as Home or Work for an email address, touch the label to the right
of the item of contact information. Or, to create your own label, touch Custom in the menu.
5. Touch the check mark next to Add New Contact.
Editing Contacts
1. In the Contacts app, touch a contact name to edit.
2. Touch .
3. Edit the contact information.
4. Touch SAVE.
Deleting Contacts
1. In the Contacts app, touch a contact name to delete.
2. Touch .
60
Page 61

3. Touch Delete.
4. Touch DELETE to confirm.
DataWedge Demonstration
NOTE: DataWedge is enabled on the Home screen. To disable this feature, go to the DataWedge settings and disable the
Launcher profile.
Use DataWedge Demonstration to demonstrate data capture functionality.
Figure 35 DataWedge Demonstration Window
Applications
61
Page 62

Applications
Table 8 DataWedge Demonstration Icons
Icon Description
Illumination Imager illumination is on. Touch to turn illumination off.
Imager illumination is off. Touch to turn illumination on.
Data Capture The data capture function is through the internal imager.
Data Capture Indicates a USB scanner is connected to the device.
Indicates a USB scanner is not connected to the device.
62
Page 63

Applications
Table 8 DataWedge Demonstration Icons (Continued)
Icon Description
An RS507 or RS6000 Bluetooth imagerBluetooth scanner is connected.
An RS507 or RS6000 Bluetooth imagerBluetooth scanner is not
connected.
The data capture function is through the rear camera.
Scan Mode Imager is in picklist mode. Touch to change to normal scan mode.
Imager is in normal scan mode. Touch to change to picklist mode.
Opens a menu to view the application information or to set the
application DataWedge profile.
NOTE: See the device Integrator Guide for Android Version 8.1 for information on DataWedge configuration.
Scanner Selection
To select a scanner, touch > Settings > Scanner selection.
Either press the programmable button or touch the yellow scan button to capture data. The data appears in the
text field below the yellow button.Touch the Data Capture icon to select the data capture mode.
Press the scanner trigger button or touch the on-screen yellow scan button to capture data. The data appears
in the text field below the yellow button.
63
Page 64

Diagnostic Tool
The Diagnostic Tool is a utility that determines the health of the device. Use the Diagnostic Tool to
troubleshoot the device.
1. Swipe up from the bottom of the Home screen and touch .
Figure 36 Diagnostic Tool
Applications
64
Page 65

Applications
2. Touch RUN TEST. The app tests all enabled subsystems (by default, only System tests). See Settings on
page 67 to enable subsystem tests.
Figure 37 Test Passed Screen
Figure 38 Test Failed Screen
65
Page 66

Applications
3. To view each subsystem test, touch Subsystem Tests.
Figure 39 Subsystem Screen
Table 9 Subsystem Test Result Indicators
Status Icon Description
Test passed.
Test failed.
Test not supported or not enabled.
4. Touch one of the subsystems to view details.
66
Page 67

Settings
By default only System tests are enabled. To enable other tests:
1. Touch > Settings.
2. Touch to the left of the test name. A green box with a checkmark appears.
3. Touch SAVE.
4. Touch Yes to confirm.
5. Touch .
System Test Information
Use the System Test to determine if the CPU or memory loads are too high, there are too many processes
running on the device, or storage on the device is almost full.
The System Test obtains the following information:
Applications
• CPU Load - Amount of CPU being used
• Free Physical Memory - Amount of RAM available
• Free Storage - Amount of internal Flash memory available
• Process Count - Number of processes currently running.
WLAN Test Information
If the WiFi radio is not present or disabled, skip this test. This test determines if the device’s WLAN
configuration is correct or whether there is any connection with an access point or network.
The WLAN test obtains the following information:
• WLAN Enabled - WLAN radio is enabled or disabled
• WLAN Status - Current status of association with the access point
• ESSID - Name of the wireless network
• BSSID - MAC address of the connected access point
• MAC Address - Device’s MAC address
• Signal - Strength of the Wi-Fi signal (in dBm)
• IP Address - IP address of the device.
Bluetooth Test Information
The Bluetooth Test obtains the following information:
• Enabled - Whether the Bluetooth radio is enabled or disabled
• Status - Whether the device is paired to another Bluetooth device
• Connectable/Discoverable - Whether the device is discoverable or able to connect
• Address - Bluetooth radio MAC address
• Name - Bluetooth name for the device.
67
Page 68

Files
Sort
Applications
Use the Files app to view and manage files on the device.
To open Files, swipe up from the bottom of the screen and touch .
Figure 40 Files Screen
68
Page 69

Applications
Sort
• Touch and hold an item to open the File Operations menu. Select an option:
• - Share the file with other devices.
• - Delete the file.
• - View additional options.
• Open with - Select which app is used to open the file.
• Select all - Select all folders and files.
• Copy to... - Copy the file.
• Move to... - Move the file or folder to a new location.
• Compress - Compress the selected file(s) into a ZIP file.
• Rename - Rename the file.
• Touch the Sort drop-down to sort files by name, type, size, or date.
• - View all file locations.
• - Search for a specific file on the device.
• / - Change the folder to display items as a list / grid.
• - Open the options menu.
• New Window - Create a new Files window.
• New Folder - Create a new folder.
• Select all - Select all folders and files.
• Show/Hide internal storage - Show or hide internal storage.
69
Page 70

Gallery
Applications
NOTE: The device supports the following image formats: jpeg, gif, png and bmp.
The device supports the following video formats: H.263, H.264 and MPEG4 Simple Profile.
Available on device with AOSP only.
Use Gallery to:
• View photos
• Play videos
• Perform basic editing of photos
• Set photos as wallpaper
• Set photos as a contact photo
• Share photos and videos.
Gallery presents all photos and videos stored on the microSD card and internal memory.
To open Gallery, swipe up from the bottom of the Home screen and touch Gallery, or in the camera app touch
the thumbnail image at the bottom left.
By default, Gallery opens to the Timeline view.
Figure 41 Gallery - Timeline View
70
Page 71

Applications
Touch > Albums to view photos sorted by albums or > Videos to view only videos.
Figure 42 Gallery — Albums View
• Touch an album to open it and view its contents. The photos and videos in the album are displayed in
chronological order.
• Touch a photo or video in an album to view it.
•Touch > Timeline to return to the default Gallery screen.
71
Page 72

Working with Albums
Albums are groups of images and videos in folders. Touch an album to open it. The photos and videos are
listed in a chronologically ordered grid. The name of the album displays at the top of the screen.
Figure 43 Photos Inside an Album
Applications
Swipe up or down to scroll through the images.
Sharing an Album
1. Swipe up from the bottom of the Home screen and touch Gallery.
2. Touch and hold an album to highlight it.
3. Touch other albums as required.
4. Touch . The Share menu opens.
5. Touch the app to use to share the selected albums.
6. Follow the instructions within the selected app.
Getting Album Information
1. Swipe up from the bottom of the Home screen and touch Gallery.
2. Touch and hold an album to highlight it.
3. Touch .
4. Touch Details.
72
Page 73

Deleting an Album
To delete an album and its contents:
1. Swipe up from the bottom of the Home screen and touch Gallery.
2. Touch and hold an album to highlight it.
3. Check other albums to delete.
4. Touch .
5. In the Delete selected item? menu, touch OK to delete the album.
Working with Photos
Use Gallery to view photos on the device and edit and share photos.
Viewing and Browsing Photos
To view a photo:
Applications
1. Swipe up from the bottom of the Home screen and touch Gallery.
2. Touch an album to open it.
3. Touch a photo.
Figure 44 Photo Example
4. Swipe left or right to view the next or previous photo in the album.
5. Turn the device to view the photo in upright (portrait) or sideways (landscape) orientation. The photo is
displayed (but not saved) in the new orientation.
6. Touch the photo to view the controls.
73
Page 74

Applications
7. Double-tap the screen to zoom in or pinch two fingers together or spread them apart to zoom in or out.
8. Drag the photo to view parts that are not in view.
Cropping a Photo
1. In Gallery, touch a photo to view the controls.
2. Touch > > . The cropping tool appears.
3. Use the cropping tool to select the portion of the photo to crop.
• Drag from the inside of the cropping tool to move it.
• Drag an edge of the cropping tool to resize it to any proportion.
Figure 45 Cropping Tool
4. Touch > SAVE to save a copy of the cropped photo. The original version is retained.
Setting a Photo as a Contact Icon
1. Swipe up from the bottom of the Home screen and touch Gallery.
2. Touch an album to open it.
3. Touch a photo to open it.
4. Touch .
5. Touch Set picture as.
6. Touch Contact photo.
7. In Contacts, touch a contact.
8. Touch the white box and crop the photo accordingly.
74
Page 75

Applications
9. Touch SAVE.
Sharing a Photo
1. Swipe up from the bottom of the Home screen and touch Gallery.
2. Touch an album to open it.
3. Touch a photo to open it.
4. Touch .
5. Touch the app to use to share the selected photo.
6. Follow the instructions within the selected app.
Deleting a Photo
1. Swipe up from the bottom of the Home screen and touch Gallery.
2. Touch an album to open it.
3. Touch a photo to open it.
4. Touch .
5. Touch OK to delete the photo.
Working with Videos
Use Gallery to view and share videos.
Watching Videos
1. Swipe up from the bottom of the Home screen and touch Gallery.
2. Touch an album to open it.
3. Touch a video.
4. Touch to play.
5. Touch the screen to view the playback controls.
Sharing a Video
1. Swipe up from the bottom of the Home screen and touch Gallery.
2. Touch an album to open it.
3. Touch a video to open it.
4. Touch . The Share menu appears.
5. Touch the app to use to share the selected video.
6. Follow the instructions within the selected app.
75
Page 76

Applications
Deleting a Video
1. Swipe up from the bottom of the Home screen and touch Gallery.
2. Touch an album to open it.
3. Touch a video to open it.
4. Touch .
5. Touch OK.
76
Page 77

Photos
Applications
NOTE: The device supports the following image formats: jpeg, gif, png, and bmp.
The device supports the following video formats: H.263, H.264, and MPEG4 Simple Profile.
Available on device with GMS only.
Use Photos to:
• View photos
• Play videos
• Perform basic editing of photos
• Set photos as wallpaper
• Set photos as a contact photo
• Share photos and videos.
Photos presents all photos and videos stored on the microSD card and internal memory.
To open Photos, swipe up from the bottom of the Home screen and touch Photos.
By default, Photos opens to the photos view.
Figure 46 Photos View
77
Page 78

Applications
Touch Albums to view photos sorted by albums.
Figure 47 Albums View
• Touch an album to view its contents. The photos and videos in the album appear in chronological order.
• Touch a photo or video in an album to view it.
• Touch to return to the main screen.
78
Page 79

Working with Albums
Albums are groups of images and videos in folders. Touch an album to open it. The photos and videos are
listed in a chronologically ordered grid. The name of the album displays at the top of the screen.
Figure 48 Photos Inside an Album
Applications
Swipe up to scroll through the images.
Sharing an Album
1. Swipe up from the bottom of the Home screen and touch Photos.
2. Touch Albums.
3. Touch an album.
4. Touch > Select.
5. Select all photos in the album.
6. Touch . The Share menu opens.
7. Touch an app to share the selected albums.
8. Follow the instructions within the selected app.
Deleting an Album
To delete an album and its contents:
1. Swipe up from the bottom of the Home screen and touch Photos.
2. Touch Albums.
3. Touch an album.
79
Page 80

4. Touch > Select.
5. Select all photos in the album.
6. Touch .
7. Touch Move to trash to delete the album.
Working with Photos
Use Photos to view photos on the internal memory and the microSD card.
Viewing and Browsing Photos
1. Swipe up from the bottom of the Home screen and touch Photos.
2. Touch a photo.
Figure 49 Photo Example
Applications
3. Swipe left or right to view the next or previous photo in the album.
4. Turn the device to view the photo in upright (portrait) or sideways (landscape) orientation. The photo is
displayed (but not saved) in the new orientation.
5. Touch the photo to view the controls.
6. Double-tap the screen to zoom in, or pinch two fingers together or spread them apart to zoom in or out.
7. Drag the photo to view parts that are not in view.
Cropping a Photo
1. Swipe up from the bottom of the Home screen and touch Photos.
2. Touch a photo to view the controls.
80
Page 81

Applications
3. Touch > . The cropping tool appears.
Figure 50 Cropping Tool
4. Use the cropping tool to select the portion of the photo to crop.
• Drag from the inside of the cropping area to move it.
• Drag an edge of the cropping area to resize it to any proportion.
5. Touch DONE.
6. Touch SAVE to save a copy of the cropped photo. The original version is retained.
Setting a Photo as a Contact Icon
1. Swipe up from the bottom of the Home screen and touch Photos.
2. Touch the photo to open it.
3. Touch > Use as.
4. Touch Contact photo.
5. In the Contacts app, touch a contact.
6. Touch the white box and crop the photo accordingly.
7. Touch Done.
Sharing a Photo
1. Swipe up from the bottom of the Home screen and touch Photos.
2. Touch an album to open it.
3. Touch a photo to open it.
81
Page 82

4. Touch .
5. Touch the app to use to share the selected photo.
6. Follow the instructions within the selected app.
Deleting a Photo
1. Swipe up from the bottom of the Home screen and touch Photos.
2. Touch a photo to open it.
3. Touch .
4. Touch MOVE TO TRASH.
Working with Videos
Use Photos to view and share videos.
Watching a Video
Applications
1. Swipe up from the bottom of the Home screen and touch Photos.
2. Touch a video to play.
3. Touch the screen to view the playback controls.
Sharing a Video
1. Swipe up from the bottom of the Home screen and touch Photos.
2. Touch a video to open it.
3. Touch . The Share menu appears.
4. Touch the app to use to share the selected video.
5. Follow the instructions within the selected app.
Deleting a Video
1. Swipe up from the bottom of the Home screen and touch Photos.
2. Touch a video to open it.
3. Touch .
4. Touch MOVE TO TRASH to delete the video.
82
Page 83

PTT Express Voice Client
Talk Group
Service Indication
Notification Icon
Settings
Enable/Disable Switch
NOTE: PTT Express Voice Client enables Push-To-Talk (PTT) communication between disparate enterprise devices. Le-
veraging existing Wireless Local Area Network (WLAN) infrastructure, PTT Express delivers simple PTT communication
without requiring voice communication server.
• Group Call: Press and hold the PTT (Talk) button to start communicating with other voice client users.
• Private Response: Double-press the PTT button to respond to the originator of the last broadcast or to
make a Private Response.
PTT Express User Interface
Figure 51 PTT Express Default User Interface
Applications
Table 10 PTT Express Default User Interface Descriptions
Item Description
Notification Icon Indicates the current state of the PTT Express client.
Service Indication Indicates the status of the PTT Express client. Options: Service Enabled, Service
Disabled or Service Unavailable.
Talk Groups Lists all 32 Talk Groups available for PTT communication.
Settings Opens the PTT Express Settings screen.
Enable/Disable
Switch
Turns the PTT service on and off.
83
Page 84

PTT Audible Indicators
The following tones provide helpful cues when using the voice client.
• Talk Tone: Double chirp. Plays when the Talk button is depressed. This is a prompt for the user to start
talking.
• Access Tone: Single beep. Plays when another user just finished a broadcast or response. The user is
now able to initiate a Group Broadcast or Private Response.
• Busy Tone: Continuous tone. Plays when the Talk button is depressed and another user is already
communicating on the same talkgroup. Plays after the maximum allowed talk time is reached (60 seconds).
• Network Tone:
• Three increasing pitch beeps. Plays when PTT Express acquires the WLAN connection and the service
is enabled.
• Three decreasing pitch beeps. Plays when PTT Express loses the WLAN connection or the service is
disabled.
PTT Notification Icons
Applications
Notification icons indicate the current state of the PTT Express Voice client.
Table 11 PTT Express Icon Descriptions
Status Icon Description
The PTT Express Voice client is disabled.
The PTT Express Voice client is enabled but not connected to a WLAN.
The PTT Express Voice client is enabled, connected to a WLAN, and listening on the Talk
Group indicated by the number next to the icon.
The PTT Express Voice client is enabled, connected to a WLAN, and communicating on the
Talk Group indicated by the number next to the icon.
The PTT Express Voice client is enabled, connected to a WLAN, and in a private response.
The PTT Express Voice client is enabled and muted.
The PTT Express Voice client is enabled but it is not able to communicate due to a VoIP
telephony call in progress.
Enabling PTT Communication
1. Swipe up from the bottom of the Home screen and touch .
84
Page 85

2. Slide the Enable/Disable Switch to the ON position. The button changes to ON.
Selecting a Talk Group
One of 32 Talk Groups can be selected by PTT Express users. However, only one talk group may be enabled
at a time on the device. Touch one of the 32 Talk Groups. The selected Talk Group is highlighted.
Creating a Group Call
1. Press and hold the PTT button (or the Talk button on the headset) and listen for the talk tone.
If you hear a busy tone, release the button and wait a moment before making another attempt. Ensure that
PTT Express and the WLAN are enabled.
2. Start talking after hearing the talk tone.
NOTE: Holding the button for more than 60 seconds (default) drops the call, allowing others to make Group calls. Release
the button when finished talking to allow others to make calls.
Responding with a Private Response
Applications
The Private Response can only be initiated once a Group Call has been established. The initial Private
Response is made to the originator of the Group Call.
1. Wait for an access tone.
2. Within 10 seconds, double-press the PTT button, and listen for the talk tone.
3. If you hear a busy tone, release the button and wait a moment before making another attempt. Ensure that
PTT Express and the WLAN are enabled.
4. Start talking after the talk tone plays.
5. Release the button when finished talking.
Disabling PTT Communication
1. Swipe up from the bottom of the Home screen and touch .
2. Slide the Enable/Disable Switch to the OFF position. The button changes to OFF.
3. Touch .
85
Page 86

RxLogger
RxLogger is a comprehensive diagnostic tool that provides app and system metrics. Create custom plug-ins
that work seamlessly with this tool. RxLogger diagnoses device and application issues, and tracks information
for: CPU load, memory load, memory snapshots, power states, wireless logging, cellular logging, TCP dumps,
Bluetooth logging, logcat, ANR dumps, etc. All logs and files generated are saved in flash storage on the
device (internal or external).
Figure 52 RxLogger
Applications
86
Page 87

RxLogger Utility
RxLogger Utility is a data monitoring application for viewing logs in the device while RxLogger is running.
Access the logs and RxLogger Utility features in the App View or the Overlay View.
In the App View, view logs in the RxLogger Utility.
Figure 53 RxLogger Utility App View
Applications
Refer to the device Integrator Guide for detailed information on the RxLogger Utility.
87
Page 88

Sound Recorder
Use Sound Recorder to record audio messages.
Recordings are saved on the microSD card (if installed) or the internal storage and are available in the Music
application (non-GMS devices) or the Play Music application (GMS devices).
Figure 54 Sound Recorder Application
Applications
88
Page 89

Applications
Touch to open options menu.
• File type - Select the file type for the recording file.
•AMR
•3GPP
• AAC
•WAV
•AMR-WR
• AMR-WB-3GPP.
• Storage location - Select the location for the recording file.
• Phone storage
• SD card.
89
Page 90

Data Capture
Introduction
The device supports data capture using:
• Integrated Imager
• Integrated Camera
• DS2278 Digital Scanner
• DS2208 Digital Scanner
• DS8178 Digital Scanner
• DS8108 Digital Scanner.
Integrated Imager
The device with an integrated 2D imager has the following features:
• Omnidirectional reading of a variety of barcode symbologies, including the most popular linear,
postal, PDF417, Digimarc, and 2D matrix code types.
• The ability to capture and download images to a host for a variety of imaging applications.
• Advanced intuitive laser aiming cross-hair and dot aiming for easy point-and-shoot operation.
The imager uses imaging technology to take a picture of a barcode, stores the resulting image in
memory, and executes state-of-the-art software decoding algorithms to extract the barcode data from
the image.
Operational Modes
The device with an integrated imager supports two modes of operation, listed below. Activate each
mode by pressing the Scan button.
• Decode mode - The device attempts to locate and decode enabled barcodes within its field of view.
The imager remains in this mode as long as the user holds the scan button, or until it decodes a
barcode.
NOTE: To enable Pick List Mode, configure in DataWedge or set in an application using a API command.
• Pick List mode - Selectively decode a barcode when more than one barcode is in the device’s field
of view by moving the aiming crosshair or dot over the required barcode. Use this feature for pick
102
Page 91

lists containing multiple barcodes and manufacturing or transport labels containing more than one barcode
type (either 1D or 2D).
Digital Camera
The device with an integrated camera based barcode scanning solution has the following features:
• Omnidirectional reading of a variety of barcode symbologies, including the most popular linear, postal, QR,
PDF417, and 2D matrix code types.
• Cross-hair reticle for easy point-and-shoot operation.
• Picklist mode to decode a particular barcode from many in the field of view.
The solution uses the advanced camera technology to take a digital picture of a barcode, and executes
state-of-the-art software decoding algorithms to extract the data from the image.
Scanning Considerations
Typically, scanning is a simple matter of aim, scan, and decode, with a few quick trial efforts to master it.
However, consider the following to optimize scanning performance:
Data Capture
• Range: Scanners decode best over a particular working range — minimum and maximum distances from
the barcode. This range varies according to barcode density and scanning device optics. Scan within range
for quick and constant decodes; scanning too close or too far away prevents decodes. Move the scanner
closer and further away to find the right working range for the barcodes being scanned.
• Angle: Scanning angle is important for quick decodes. When laser beams reflect directly back into the
scanner from the barcode, this specular reflection can blind the scanner. To avoid this, scan the barcode so
that the beam does not bounce directly back. Do not scan at too sharp an angle; the scanner needs to
collect scattered reflections from the scan to make a successful decode. Practice quickly shows what
tolerances to work within.
• Hold the device farther away for larger symbols.
• Move the device closer for symbols with bars that are close together.
NOTE: Scanning procedures depend on the app and device configuration. An app may use different scanning
procedures from the one listed above.
103
Page 92

Data Capture
Scanning with the Internal Imager
IMPORTANT: To read a barcode, a scan-enabled app is required on the device.
The device contains the DataWedge app that allows the user to enable the imager, decode the barcode data,
and display the barcode content.
To scan a barcode using the DataWedge app:
1. Swipe up from the bottom of the screen to display the App screen.
2. Touch to open the DataWedge Demonstration app.
3. Touch to turn on the red decode illumination.
4. Present a barcode. Use the LED dot within the illumination to position the barcode in the correct field of
view. (The aiming dot increases visibility in bright lighting conditions.)
Figure 64 Correct and Incorrect Scanning
Figure 65 Pick List Mode with Multiple Barcodes
NOTE: When the device is in Picklist mode, the imager does not decode the barcode until the aiming dot touches
the barcode.
104
Page 93

Data Capture
5. The barcode content data displays in the DataWedge Presentation screen field.
Figure 66 DataWedge Presentation Screen
Scanning with Integrated Camera
To capture bar code data:
NOTE: When capturing bar code data in poor lighting, turn on Illumination mode in the DataWedge app. See the device
Integrator Guide for detailed information on configuring DataWedge.
1. Ensure that an app is open on the device and a text field is in focus (text cursor in text field).
2. Aim the camera at a bar code.
3. Press and hold the Scan button. By default, a preview window appears on the screen. The Decode light
emitting diode (LED) lights red to indicate that data capture is in process.
NOTE: When Picklist mode is enabled, move the device until the bar code is centered under the red target on the screen.
4. Move the device until the bar code is visible on the screen.
5. The Decode LED lights green, a beep sounds and the device vibrates, by default, to indicate the bar code
was decoded successfully.
6. The captured data appears in the text field.
Scanning with the DS2208 Corded Scanner
The DS2208 digital scanner is in hands-free (presentation) mode when it is placed in the gooseneck
Intellistand. In this mode, the digital scanner operates in continuous (constant-on) mode, where it automatically
decodes a bar code presented in its field of view.
When the digital scanner is not used for a user-definable period of time, it enters a low power mode in which
the LEDs are turned off or illumination blinks at a low duty cycle until the digital scanner detects an image
change (e.g. motion).
105
Page 94

Data Capture
To scan with the DS2208:
1. Place the aiming pattern over the bar code. See DS22X8 Aiming on page 109.
Figure 67 DS2208 Aiming Pattern on Bar Code
2. Press and hold the trigger until either:
a. The digital scanner reads the bar code. The digital scanner beeps, the LED flashes, and the scan line
turns off.
or
b. The digital scanner does not read the bar code and the scan line turns off.
3. Release the trigger.
4. The captured data appears in the text field.
Scanning with the DS2278 Cordless Scanner
2D bar codes have made their way to the Point of Sale (POS), appearing on everything from customer
purchased items to printed and electronic coupons and loyalty cards. 1D scanners cannot capture the new 2D
codes, leading to exceptions that slow down the check-out process. The DS2278 digital imager scanner scans
both 1D and 2D bar codes and does not compromise performance or features.
Hand-Held Scanning
To scan with the DS2278:
1. Pair the DS2278 with the device. See Pairing a Bluetooth Scanner on page 117
for more information.
2. Ensure that an app is open on the device and a text field is in focus (text cursor in text field).
106
Page 95

Data Capture
3. Point the DS2278 at a barcode.
Figure 68 DS2278 Aiming Pattern on Bar Code - Hand-Held Mode
.
4. Press and hold the trigger until either:
a. The digital scanner reads the bar code. The digital scanner beeps, the LED flashes, and the scan line
turns off.
or
b. The digital scanner does not read the bar code and the scan line turns off.
5. Release the trigger.
6. The captured data appears in the text field.
Hands-Free Scanning
The digital scanner is in hands-free (presentation) mode when it sits in the CR2278-PC cradle. During idle
conditions the digital scanner operates in object detection mode, where it automatically wakes up to decode a
bar code presented in the field of view. In object detection mode it is normal for the illumination LEDs to be
dimly lit.
To scan:
1. Pair the cradle with the device. See Pairing a Bluetooth Scanner on page 117
2. Ensure that an app is open on the device and a text field is in focus (text cursor in text field).
3. Ensure all connections are secure (see appropriate host chapter).
for more information.
107
Page 96

Data Capture
012345
012345
4. Point the DS2278 at a barcode.
Figure 69 DS2278 Aiming Pattern on Bar Code - Hands-Free Mode
5. Upon successful decode, the digital scanner beeps and the LED flashes green. See the Product Reference
Guide for more information about beeper and LED definitions.
6. The captured data appears in the text field.
DS22X8 Aiming
When scanning, the digital scanner projects a red scan line which allows positioning the bar code within its
field of view, omnidirectionally.
Figure 70 Scanning Orientation with Aiming Line
The aiming line is smaller when the digital scanner is closer to the symbol and larger when it is farther from the
symbol. Scan symbols with smaller bars or elements (mil size) closer to the digital scanner, and those with
larger bars or elements (mil size) farther from the digital scanner.
The digital scanner beeps to indicate that it successfully decoded the bar code. For more information on
beeper and LED definitions, refer to the Product Reference Guide.
108
Page 97

Data Capture
Scanning with the DS8108 Corded Scanner
The DS8108 digital scanner is in Hands-free (presentation) mode when it is placed in the Intellistand. In this
mode, the digital scanner operates in continuous (constant-on) mode, where it automatically decodes a bar
code presented in its field of view.
When the digital scanner is not used for a user-definable period of time, it enters a low power mode in which
the LEDs are turned off or illumination blinks at a low duty cycle until the digital scanner detects an image
change (e.g. motion).
To scan with the DS8108:
1. Place the aiming dot over the bar code. See DS81X8 Aiming below.
Figure 71 DS8108 Aiming Dot on Bar Code
2. Press and hold the trigger until either:
a. The digital scanner reads the bar code. The digital scanner beeps, the LED flashes, and the scan line
turns off.
or
b. The digital scanner does not read the bar code and the scan line turns off.
3. Release the trigger.
109
Page 98

Data Capture
Scanning with the DS8178 Bluetooth Scanner
NOTE: The standard digital scanner emits a red illumination with a red aim dot. The Healthcare configuration emits a white
illumination with a green aim dot.
Hand-Held Scanning
1. Aim the digital scanner at a barcode and pull the trigger to decode.
Figure 72 DS8178 Aiming Dot on Barcode - Hand-Held Mode
2. Press the trigger until the digital scanner beeps, indicating the bar code is successfully decoded. Refer to
the Product Reference Guide for more information on beeper and LED definitions.
3. The captured data appears in the text field.
110
Page 99

Hands-Free Scanning
The scanner is in hands-free (presentation) mode when it sits in the CR8178-PC cradle. During idle conditions
the scanner operates in object detection mode, where it automatically wakes up to decode a bar code
presented in the field of view. In object detection mode it is normal for the illumination LEDs to be dimly lit.
To s c an :
Data Capture
1. Pair the DS8178 with the device. See Pairing a Bluetooth Scanner on page 117
2. Ensure that an app is open on the device and a text field is in focus (text cursor in text field).
3. Ensure all connections are secure.
4. Point the DS8178 at a barcode.
Figure 73 DS8178 Aiming Dot on Bar Code - Hands-Free Mode
for more information.
5. Upon successful decode, the scanner beeps and the LED flashes green. Refer to the Product Reference
Guide for more information about beeper and LED definitions.
6. The captured data appears in the text field.
DS81X8 Aiming
When scanning, the digital scanner projects a red LED dot which allows positioning the bar code within its field
of view.
To scan a bar code, center the symbol and ensure the entire symbol is within the rectangular area formed by
the illumination LEDs.
111
Page 100

Data Capture
1D bar code
2D bar code
The digital scanner can also read a bar code presented within the aiming dot not centered. The top examples
in Figure 75 show acceptable aiming options, while the bottom examples can not be decoded.
Figure 74 Scanning Orientation with Aiming Dot
The aiming dot is smaller when the digital scanner is closer to the symbol and larger when it is farther from the
symbol. Scan symbols with smaller bars or elements (mil size) closer to the digital scanner, and those with
larger bars or elements (mil size) farther from the digital scanner.
The digital scanner beeps to indicate that it successfully decoded the bar code. Refer to the Product Reference
Guide for more information.
Pairing Using Near Field Communication
The device provides the ability to pair the imagers using NFC.
To pair using NFC:
1. Ensure that the imager is in SSI mode. Refer to the imager Product Reference Guide for more information.
2. Ensure that NFC is enabled on the device.
3. Align the NFC icon on the RS6000 with the NFC antenna on the device.
The RS6000 Status LED blinks blue indicating that the RS6000 is attempting to establish connection with
the device. When connection is established, the Status LED turns off and the RS6000 emits a single string
of low/high beeps.
A notification appears on the Notification panel and the icon appears in the Status bar.
112
 Loading...