

Page 1

CC5000 CUSTOMER
CONCIERGE
PRODUCT REFERENCE GUIDE
Page 2

Page 3

CC5000 CUSTOMER CONCIERGE
PRODUCT REFERENCE GUIDE
MN000209A03
Revision A
August 2015
Page 4

ii CC5000 CUSTOMER CONCIERGE PRODUCT REFERENCE GUIDE
No part of this publication may be reproduced or used in any form, or by any electrical or mechanical means,
without permission in writing from Zebra. This includes electronic or mechanical means, such as photocopying,
recording, or information storage and retrieval systems. The material in this ma nual is subject to change
without notice.
The software is provided strictly on an “as i s” basis. All sof twar e, including firmware, furnished to the user is on
a licensed basis. Zebra grants to the user a non-transferable and non-exclusive license to use each software
or firmware program delivered hereunder (licensed program) . Except as n oted below, such license may not be
assigned, sublicensed, or otherwise tran sfe rr e d by th e user without prior written consent of Zebra. No right to
copy a licensed program in whole or in part is granted, exce pt as permitted unde r copyright law. The user shall
not modify , merge, or incorporate any for m or portion of a licensed program with other pro gram material, create
a derivative work from a licensed program , or us e a li censed program in a network without written permission
from Zebra. The user agrees to maintain Zebra’s copyright notice on the licensed programs delivered
hereunder , and to include the same on any authorized copies it makes, in whole or in part. The user agrees not
to decompile, disassemble, decode, or reverse engineer any licensed program delivered to the user or any
portion thereof.
Zebra reserves the right to make changes to any software or product to improve reliability, function, or design.
Zebra does not assume any product liability arising out of, or in connection with, the application or use of any
product, circuit, or application described herein.
No license is granted, either expressly or by implication, estoppel, or otherwise under any Zebra Technologies
Corporation, intellectual property rights. An implied license only exists for equipment, circuits, and subsystems
contained in Zebra products.
Page 5

Revision History
Changes to the original guide are listed below:
Change Date Description
-01 03/2014 Initial release.
-02 04/2015 Software Revision 1.2 Updates.
-03 08/2015 Updates for the 10 in. unit.
iii
Page 6

iv CC5000 CUSTOMER CONCIERGE PRODUCT REFERENCE GUIDE
Page 7

TABLE OF CONTENTS
Revision History.............................................................................................................................. iii
About This Guide
Overview......................................................................................................................................... vii
Configurations................................................................................................................................. vii
Accessories..................................................................................................................................... vii
15.6 Inch, 21.5 Inch, 27 Inch..................................................................................................... vii
10 Inch...................................................................................................................................... vii
Chapter Descriptions ...................................................................................................................... viii
Notational Conventions................................................................................................................... viii
Service Information......................................................................................................................... ix
Chapter 1: INTRODUCTION TO THE CC5000 CUSTOMER CONCIERGE
Overview ........................................................................................................................................ 1-1
Memory .................................................................................................................................... 1-1
Software ................................................................................................................................... 1-1
SDK (Developing on the CC5000) ..................................................................................... 1-1
CC5000 Customer Concierge Features ......................................................................................... 1-2
15.6 Inch, 21.5 Inch, 27 Inch Models ....................................................................................... 1-2
10 Inch Model .......................................................................................................................... 1-4
Features and Ports Descriptions .............................................................................................. 1-5
Chapter 2: USING THE CC5000 CUSTOMER CONCIERGE
Overview ........................................................................................................................................ 2-1
Navigating the CC5000 .................................................................................................................. 2-1
Home Screen ................................................................................................................................. 2-2
On-Screen Keyboard ..................................................................................................................... 2-3
Browser .......................................................................................................................................... 2-3
Admin Mode ................................................................................................................................... 2-4
Settings .......................................................................................................................................... 2-7
Users and User Sessions ........................................................................................................ 2-8
Wired Ethernet Configuration ................................................................................................... 2-9
Page 8

vi CC5000 CUSTOMER CONCIERGE PRODUCT REFERENCE GUIDE
Bluetooth .................................................................................................................................. 2-10
Storage .................................................................................................................................... 2-11
Network Time Protocol (NTP) Server ...................................................................................... 2-13
Language Settings ................................................................................................................... 2-14
Guest Mode ....................................................................................................................... 2-14
Admin Mode ....................................................................................................................... 2-15
File Browser ................................................................................................................................... 2-16
System Update .............................................................................................................................. 2-17
Enterprise Reset ............................................................................................................................ 2-19
Data Capture .............................................................................................................. ................... 2-21
Wireless Configuration ................................................................................................................... 2-22
Connecting to a Wi-Fi Network ................................................................................................ 2-22
Scanning a For Wi-Fi Networks ............................................................................................... 2-23
Adding a New Wi-Fi Network ................................................................................................... 2-24
Appendix A: MAINTENANCE AND TROUBLESHOOTING
Overview ........................................................................................................................................ A-1
Cleaning and Maintenance ............................................................................................................ A-1
Troubleshooting ............................................................................................................................. A-2
Index
Page 9

ABOUT THIS GUIDE
Overview
This guide provides information about the CC5000 Customer Concierge products which allow users to create an
electronic customer concierge capable of catering to customers’ self-service needs.
Configurations
The CC5000 is available in four display configurations: 10 in., 15.6 in., 21.5 in., and 27 in.
Additionally , two memory configurations are availa ble: 1 GB RAM / 16 GB in ternal storage , and 1 GB RAM / 64 GB
internal storage.
This guide applies to all configurations of the CC5000. For configuration specifications, refer to the CC5000
specification sheet posted online at: www.zebra.com/support.
Accessories
15.6 Inch, 21.5 Inch, 27 Inch
A country specific AC line cord is required to power the CC5000. One side of the cord must use the IEC320 C13
connector (female three prong) and the other side is the male power plug appropriate by region.
10 Inch
A country specific AC line cord is required to power the CC5000; power brick (PWRS-1400 0-148R); and, mountin g
kit (KT-152096-02).
Page 10

viii CC5000 CUSTOMER CONCIERGE PRODUCT REFERENCE GUIDE
Chapter Descriptions
Topics covered in this guide are as follows:
•
Chapter 1, INTRODUCTION TO THE CC5000 CUSTOMER CONCIERGE provides an overview of the
Concierge devices, and features and ports descriptions.
•
Chapter 2, USING THE CC5000 CUSTOMER CONCIERGE describes the various software features
available on the Concierge platform, data capture options, and how to configure the CC5000 to connect
to a wireless LAN.
•
Appendix A, MAINTENANCE AND TROUBLESHOOTING provides maintenance, and troubleshooting
information related to the CC5000.
Notational Conventions
The following conventions are used in this document:
•
The CC5000 is also referred to as Concierge.
•
Courier New font is used for code segments.
•
Italics are used to highlight:
• Chapters and sections in this and related documents
• Dialog box, window and screen names
• Drop-down list and list box names
• Screen field names
• Check box and radio button names
• File names
• Directory names.
•
Bold text is used to highlight:
• Parameter and option names
• Icons on a screen
• Key names on a keypad
• Button names on a screen.
•
bullets (•) indicate:
• Action items
• Lists of alternatives
• Lists of required steps that are not necessarily sequential
•
Sequential lists (e.g., those that describe step-by-s te p pr oc ed ur e s) ap pe a r as nu m be re d lists.
•
Notes, caution and warning statements appear as follows:
NOTE This symbol indicates something of special interest or importance to the reader. Failure to read the note
does not result in physical harm to the reader, equipment or data.
CAUTION This symbol indicates that if this information is ignored, the possibility of data or material damage may
occur.
WARNING! This symbol indicates that if this information is ignored the possibility that serious personal
injury may occur.
Page 11

Service Information
If you have a problem with your equipment, contact Zebra Technologies support for your region. Contact
information is available at: http://www.zebra.com/support.
When contacting Zebra Technologies support, please have the following information available:
•
Serial number of the unit
•
Model number or product name
•
Software type and version number
Zebra responds to calls by e-mail, telephone or fax within the time limits set forth in service agreements.
If your problem cannot be solved by Zebra Technologies support, you may need to return your equipment for
servicing and will be given specific directions. Zebra is not responsible for any damages incurred during
shipment if the approved shipping container is not used. Shipping the units improperly can possibly void the
warranty.
If you purchased your business product from a Zebra business partner, please contact that business partner
for support.
ABOUT THIS GUIDE ix
Page 12

x CC5000 CUSTOMER CONCIERGE PRODUCT REFERENCE GUIDE
Page 13

CHAPTER 1 INTRODUCTION TO THE CC5000
CUSTOMER CONCIERGE
Overview
Concierge is an end-to-end customer application platform built to enable the development of applications that
connect a customer to a retailer's digital services. Suppo rted by all the power of the world's largest mobile
platform, Android, a Concierge application provides the same intuitive user interface that consumers require.
The CC5000 kiosk includes a rich interactive platform that can be configured to allo w end user customers to
look up information, make purchases, receive special offers, and instantly connect to support, via voice or
video, for customer service.
NOTE The screen shots shown in this section are samples, and your Home screen and other icons may vary
depending on the applications enabled by your system administrator.
Memory
The CC5000 standard system configurations include 1 GB RAM / 16 GB internal storage, and 1 GB RAM / 64
GB internal storage for storing system firmware, user applications, and data.
Software
Standard supported operating system, and development tools allow for easy application development for the
Android 4.1 Jelly Bean OS based CC5000.
SDK (Developing on the CC5000)
The CC5000 SDK provides developers the ability to write custom Android applications. In addition to native
applications, the enterprise grade Concierge browser can run web applications. Information on how to de velop
applications for the CC5000 platform, including SDK documentation, sample code, and other developer facing
documentation is available at: https://developer.zebra.com/community/technologies/concierge
.
Page 14

1 - 2 CC5000 CUSTOMER CONCIERGE PRODUCT REFERENCE GUIDE
Bar Code
Scanner Window
Touchscreen Display
8 Megapixel Video
Camera
Audio Microphones
CC5000 Customer Concierge Features
NOTE Illustrations of CC5000 devices are examples only. Actual devices may differ from those pictured.
See Table 1-1 on page 1-5 for descriptions of all features.
15.6 Inch, 21.5 Inch, 27 Inch Models
Figure 1-1
Front View
Page 15

INTRODUCTION TO THE CC5000 CUSTOMER CONCIERGE 1 - 3
Power Receptacle (IEC 60320 C14 Male Inlet)
Note: 27 in. power receptacle located on right side.
Touchscreen Display (Back)
Ethernet
Port
VESA Mounting Holes (M4 Threaded)
Removable Access Panel
for Concierge HUB
Bezel Enclosure
Reset
USB
USB
OTG
HDMI
Out
RS-232
Button
1
Button
2
Ethernet
Port
Audio
In
Audio
Out
DC
Power In
GND
HUB Left
HUB Right
USB
SD Card
USB (3 Ports)
Figure 1-2
NOTE 1. The CC5000 includes the CCHUB which runs the Concierge platform software based on Android 4.1
Figure 1-3
Rear View - Access Panel to HUB In Place
Jelly Bean OS, and has expansion slots as shown below.
2. Some ports in the diagram below are not for user operation.
CCHUB Rear View - Access Panel Removed/HUB Back
Figure 1-4
CCHUB Side Views
Page 16

1 - 4 CC5000 CUSTOMER CONCIERGE PRODUCT REFERENCE GUIDE
Bar Code Scanner
Audio Microphone
10 in.Touchscreen Display
Front Facing Video
Camera
External
Speakers
VESA Mounting
Holes (M4 Threaded)
10 Inch Model
Figure 1-5
Front View
Figure 1-6
Rear View
Page 17

INTRODUCTION TO THE CC5000 CUSTOMER CONCIERGE 1 - 5
USB Ports
Diagnostic Mode Buttons
RJ45 Ethernet Port,
PoE Enabled
Micro USB
OTG Port
Micro
HDMI
Out Port
Activity
LED
Reset SD Card
Audio In/Out
DC In
Figure 2.
Ports
Features and Ports Descriptions
Table 1-1
Activity LED
Audio Microphones
Bar Code Scanner Window
Buttons
CC5000 Features
Feature Description
Displays the system status. This LED is not visible to the end user and is used for
diagnostic modes.
•
•
The CC5000 bar code imager decodes 1D bar codes, and 2D symbologies when
presented to the scanner window.
•
•
Slow Blinking = Fastboot mode
•
Fast Blinking = Recovery mode, or device booting up.
15.6 in., 21.5 in., 27 in. CC5000s:
• Three front facing microphones for vo ice ba se d us e ca ses.
10 in. CC5000:
• One audio in, and one audio out microphone on the back of the unit for voice
based use cases.
Button 1: Not user programmable.
Ethernet Port The CC5000 includes a wired port for a wired Ethernet connections.
•
Button 2: Not user programmable.
Note:
The 10 in. CC5000 supports PoE (802.3at). The 15.6 in., 21.5 in., and 27 in.
CC5000s do not support Power-over-Ethernet (PoE).
Page 18

1 - 6 CC5000 CUSTOMER CONCIERGE PRODUCT REFERENCE GUIDE
Table 1-1
External Ports The CC5000 external ports (HUB) on the back of the device are accessible by removing
CC5000 Features (Continued)
Feature Description
the back access panel.
•
15.6 in., 21.5 in., 27 in. CC5000s:
• USB Ports - These units includes a total of seven USB ports.
• Mini USB 2.0 host/client port (USB On-The-Go [OTG]) located on the back
of the device.
• Six USB 2.0 host ports for peripheral connections. Of the six USB 2.0 po rts,
two are in use for receiving inputs from the touch-screen display, and the
integrated scanner, leaving four host ports free for additional use.
• HDMI: Default output for video.
• RS-232 Serial Port: RS-232 serial port on DB9 standard connector.
• SD Card: Supports SD cards up to 256 GB.
• Audio In: External 3.5 mm port for external microphone.
• Audio Out: External 3.5 mm port for stereo analog audio out.
•
10 in. CC5000:
• USB Ports: The 10 in. CC5000 includes a total of three USB ports.
• Micro USB 2.0 host/client port (USB On-The-Go [OTG]) located on the back
of the device.
• Two USB 2.0 host ports for peripheral connections.
• Micro HDMI: Default output for video.
• SD Card: Supports SD cards up to 256 GB.
• Audio In: External 3.5 mm port for external microphone.
• Audio Out: External 3.5 mm port for stereo analog audio out.
Power Receptacle
(Not available on the 10 in.
device.)
Speakers The CC5000 includes integrated speakers that can be used for multi-media
Touch Screen Display The touch screen provides capabilities familiar to tablet us ers, and designed to provide the
VESA Mounting Holes
(M4 Threaded)
Video Camera The CC5000 includes an 8 Megapixel camera capable of 1080p high definition video.
The CC5000 includes an IEC 60320 C14 male inlet.
Note:
A country specific AC line cord is required to plug into the power receptacle.
applications.
best user experience. It supports features s uch as pin ch and zo om, vertic al an d horizontal
scrolling, swipe gestures, etc.
The CC5000 touchscreen display is shipped with a standard factory configuration for
volume, brightness, contrast, inputs, etc.
The CC5000 can be mounted on a pole, shelf, or wall using a commercially available
bracket, or stand that conforms to the 100mm X 100mm VESA Flat Panel Monitor Phy sical
Mounting Interface (FPMPMI™) mounting standards.
Refer to the
MN001103Axx; 15 in. - MN000212Axx; 22 in. - p/n MN000144Axx;
27 in. - MN000511Axx)
The video camera can be used for real time video collaboration, and other video use
cases.
Concierge CC5000-XX Set Up and Installation Guides (10 in. -
for instructions on mounting the CC5000.
Page 19

CHAPTER 2 USING THE CC5000 CUSTOMER
CONCIERGE
Overview
This chapter includes information about how to use the CC5000 and its features.
For detailed information about configuring the CC5000 devices, re fer to the Concierge CC500 0-XX Set Up and
Installation Guides (10 in. - MN001103Axx; 15 in. - MN000212Axx; 22 in. - p/n MN000144Axx;
27 in. - MN000511Axx).
Navigating the CC5000
Navigation icons display on every CC5000 screen, regardless of mode (Guest, Admin, Employee). These
icons are used to access different screens in a consistent manner.
Standard navigation icons:
•
BACK: On any screen, touch the BACK icon to go back one screen.
•
•
•
HOME: On any screen, touch the HOME icon to return to the Home screen.
END SESSION: On any screen, touch the END SESSION icon to end the current sess ion , an d
restore default settings. Default settings are determined by the system administrator. All session specific
data is erased.
Volume: On any screen, touch the Volume icon to control the volume level for that specific session.
Page 20
2 - 2 CC5000 CUSTOMER CONCIERGE PRODUCT REFERENCE GUIDE
Home Screen
The Home screen displays when the CC5000 turns on.
Figure 2-1
Any Android application built as a Home or Launcher application can be set as the Home screen on the
CC5000. Refer to the Launchpad at: https://developer.zebra.com/community/technologies/concierge for
examples, and more detailed information about downloading sample applications or writing new applications
for the CC5000.
Home Screen
NOTE By default, CC5000 units ship without any customer facing applications. On power up a blank screen with
the navigation bar displays.
Page 21

On-Screen Keyboard
Text Field
On-screen
Keyboard
The on-screen keyboard automatically displays when a user touches a text field requiring input.
USING THE CC5000 CUSTOMER CONCIERGE 2 - 3
Figure 2-2
Browser
Use the CC5000 enterprise browser to access the internet or intranet. Your system administrator may choose
to restrict the sites you can access.
On-Screen Keyboard
Page 22

2 - 4 CC5000 CUSTOMER CONCIERGE PRODUCT REFERENCE GUIDE
Pass Code
Keypad
Press and Hold
for Five Seconds
Admin Mode
Admin mode includes additional applications, and capabilities not available in Guest mode. The system
administrator controls whether or not Admin mode is available to users.
To enter Admin mode:
1. In Guest mode on the Home screen, touch and hold the icon for five to seven seconds. This
activates and displays the Admin pass code keypad.
Figure 2-3
2. Type the pass code on the keypad, and press to enter Admin mode. When the correct pass code is
Home Screen - Pass Code Keypad
entered, the Admin Home screen displays.
Figure 2-4
Admin Home Screen
NOTE The default pass code for Admin mode is 5678. Consult your system administrator for the correct pass
code for your system.
Page 23

USING THE CC5000 CUSTOMER CONCIERGE 2 - 5
Settings Menu
3. To view all applications available in Admin mode, press at the top right of the Admin Home screen.
Figure 2-5
4. To configure settings and connections (such as Ethernet, Wi-Fi, application settings, etc.) press the
Admin Applications Screen
Settings icon ( ) to display the Settings menu. (You can also press the bottom righ t of th e scr ee n to
display the Settings menu.)
Figure 2-6
NOTE Some settings may also be configurable by the system administrator using mobile device management
Admin Settings Menu
(MDM) capabilities. Check with your system administrator for the correct values for these settings.
Page 24

2 - 6 CC5000 CUSTOMER CONCIERGE PRODUCT REFERENCE GUIDE
5. To exit Admin mode, and return to Guest mode (default), press on any screen to end the session.
Figure 2-7
6. When the Session End Confirmation window displays, select the appropriate option to either End Now, or
End Session Window
Continue Session.
Page 25

Settings
Scroll Down to Additional Features
The Settings application is used to configure settings for a specific CC5000. Examples of settings include
Network settings, User T ype s, Date & Time, Language, etc. The values configured via the Settings application
is specific to the local CC5000.
To open the Settings application
1. Enter Admin mode by following the steps in Admin Mode on page 2-4.
2. If the Settings icon is not displayed, press at the top right of the Admin Home screen to display all
3. Press the Settings icon ( ) to open the Settings application screen. This screen lists the features that
USING THE CC5000 CUSTOMER CONCIERGE 2 - 7
available applications.
can be configured on the device.
Figure 2-8
4. When updates to settings are complete, press END SESSION to exit Admin mode.
5. When prompted, confirm to exit the screen.
Settings Application Screen
Page 26

2 - 8 CC5000 CUSTOMER CONCIERGE PRODUCT REFERENCE GUIDE
Users and User Sessions
CC5000 supports three types of users:
•
Guest
•
Admin
•
Employee.
The home screen for each user type can be customized to display diff erent applications.
To customize user type screens:
1. Follow steps 1 through 3 under Settings on page 2-7.
2. Select Users (see Figure 2-8), and then select Home Screen under GUEST USER on right side of screen.
Figure 2-9
3. The Select Home Screen for guest window displays.
Figure 2-10
Settings - Home Screen for Guest
Home Screen for Guest
Page 27

USING THE CC5000 CUSTOMER CONCIERGE 2 - 9
4. Select the Home screen option for each of the three user types to configure the appropriate option. The list
of options to choose from for each user type depends on the applications installed, and enabled by the
system administrator.
For example, to make the
window in
5. Repeat steps 2 through 4 to configure a different home screen for Admin and Employee users.
6. When updates are complete, press END SESSION to exit Admin mode.
7. When prompted, confirm to exit the screen.
Figure 2-10.
Browser the default application in Guest mode, select Concierge Browser in the
Wired Ethernet Configuration
The CC5000 can communicate to a host through an Ethernet cable th at plugs into the RJ45 (Ethernet) port on
the CC5000 (see
NOTE The 10 in. CC5000 supports PoE (802.3at). The 15.6 in., 21.5 in., and 27 in. CC5000s do not support
To configure Ethernet settings:
Figure 1-2 on page 1-3).
Power-over-Ethernet (PoE).
1. Select Ethernet.
2. Follow steps 1 through 3 under Settings on page 2-7.
3. Select Ethernet (see Figure 2-8), then select Ethernet Configuration to configure IP and Proxy settings.
Figure 2-11
4. When all Ethernet device information is entered, press Save.
5. Press END SESSION to exit Admin mode.
6. When prompted, confirm to exit the screen.
Configure Ethernet Device Window
Page 28

2 - 10 CC5000 CUSTOMER CONCIERGE PRODUCT REFERENCE GUIDE
Bluetooth
Turn on the Bluetooth radio to exchange information with other Bluetooth devices that are within range.
To turn on the Bluetooth radio:
1. Follow steps 1 through 3 under Settings on page 2-7.
2. Slide the Bluetooth switch to ON.
Figure 2-12
3. To make the CC5000 visible to other devices, click concierge on the right side of the screen.
4. Press END SESSION to exit Admin mode.
Bluetooth Switch
Page 29

USING THE CC5000 CUSTOMER CONCIERGE 2 - 11
Storage
Select the Storage option to view the storage capacity on the device, mount external SD cards or USB drives,
and to configure options to connect the CC5000 to a host PC to transfer files.
Figure 2-13
To auto-mount an external SD card or USB drive:
1. Click on Storage and select Storage mounting from the menu.
Device Storage Capacity
Figure 2-14
Storage Mounting
Page 30

2 - 12 CC5000 CUSTOMER CONCIERGE PRODUCT REFERENCE GUIDE
2. Check the appropriate options for auto-mounting.
Figure 2-15
3. To connect the CC5000 as a media device, select Storage and then select USB computer connection from
Storage Mounting Options
the menu. To transfer files, connect a micro USB cable between the host computer and the CC5000, select
MTP and transfer/copy/delete files between the CC5000 and the host computer as desired.
Figure 2-16
USB Computer Connection
Page 31

USING THE CC5000 CUSTOMER CONCIERGE 2 - 13
Network Time Protocol (NTP) Server
The CC5000 can be configured to connect to an NTP server to synchronize time.
To connect to an NTP server:
1. Follow steps 1 through 3 under Settings on page 2-7.
2. Select Date & time, then select Select NTP server to display the Preset NTP server window (Figure 2-18).
Figure 2-17
Figure 2-18
3. Select an NTP server from the pre-configured list that displa ys.
NTP Server.
Preset NTP server Window
4. To exit the window without exiting the session, press the BACK.
5. Press END SESSION to exit Admin mode.
6. When prompted, confirm to exit the screen.
Page 32

2 - 14 CC5000 CUSTOMER CONCIERGE PRODUCT REFERENCE GUIDE
Language Settings
Guest Mode
Users in Guest mode can select a different language than the lan guage configured as the default. This is true
when the application supports displaying strings, and prompts in multiple languages. The language setting
reverts to the default setting when the guest session ends.
To select a language:
1. In Guest mode select at the bottom right of the screen.
Figure 2-19
2. Choose from the list of languages displayed.
Figure 2-20
Guest Mode Screen
Guest Mode Languages
NOTE If only one language is enabled, the language selector option does not display.
Page 33

USING THE CC5000 CUSTOMER CONCIERGE 2 - 15
Admin Mode
A default language can be set for the CC5000 to return to this language after each u se r session completes,
regardless of the selected guest language.
To set a default language:
1. Follow steps 1 through 3 under Settings on page 2-7.
2. Select Language & input, then select Default Language.
Figure 2-21
3. Specify the default language.
4. When updates are complete, press END SESSION to exit Admin mode.
5. When prompted, confirm to exit the screen.
Default Language
Page 34

2 - 16 CC5000 CUSTOMER CONCIERGE PRODUCT REFERENCE GUIDE
Back
Device
Root
SD Card
Folder Root
Multi
Select
File Browser
In Admin mode the File Browser can be used to view, and manage files that reside on the CC5000, or on an
SD card.
To open the
1. Enter Admin mode by following the steps in Admin Mode on page 2-4.
2. If the File Browser icon is not displayed, press at the top right of the Admin Home screen to display all
File Browser:
available applications.
3. Press the File Browser icon ( ) to display the folders/files located on the device.
Figure 2-22
4. Touch and hold an icon on this screen to perform an oper at ion. For example to open a folder, touch the
File Browser View
folder icon. To see the options available for non-folder icons, touch and hold an icon until its options screen
displays. Options available on this screen include:
a. Viewing detailed information ab out a file, or folder.
b. Moving a file, or folder to a new location.
c. Copying a selected file.
d. Deleting a selected file.
e. Renaming a selected file.
f. Opening a selected file as a specific file type.
The menu provides additional capabilities such as selecting multiple files/folders, etc.
Page 35

System Update
In addition to remote software updates that can be managed by a system administrator, the CC5000 allows a
manual software update via a USB flash drive, or SD card. This can be useful during initial staging and
deployment, or when an update is needed for a small number of device s.
NOTE Visit https://developer.zebra.com/community/technologies/concierge for the instructions and tools to
Ensure to insert the USB drive, or SD card in the appropriate external port (see Figure 1-3 and Figure 1-4 on
page 1-3
To complete a manual software update:
1. Enter Admin mode by following the steps in Admin Mode on page 2-4.
2. If the Settings icon is not displayed, press at the top right of the Admin Home screen to display all
for external port locations on the device).
NOTE Ensure there is only one update file (.mdz format) in the root folder of the USB drive, or SD card. If you
available applications.
USING THE CC5000 CUSTOMER CONCIERGE 2 - 17
create an update file for the CC5000. An update file for the CC5000 has an .mdz file extension.
have multiple .mdz files, they must be renamed, or moved to another location.
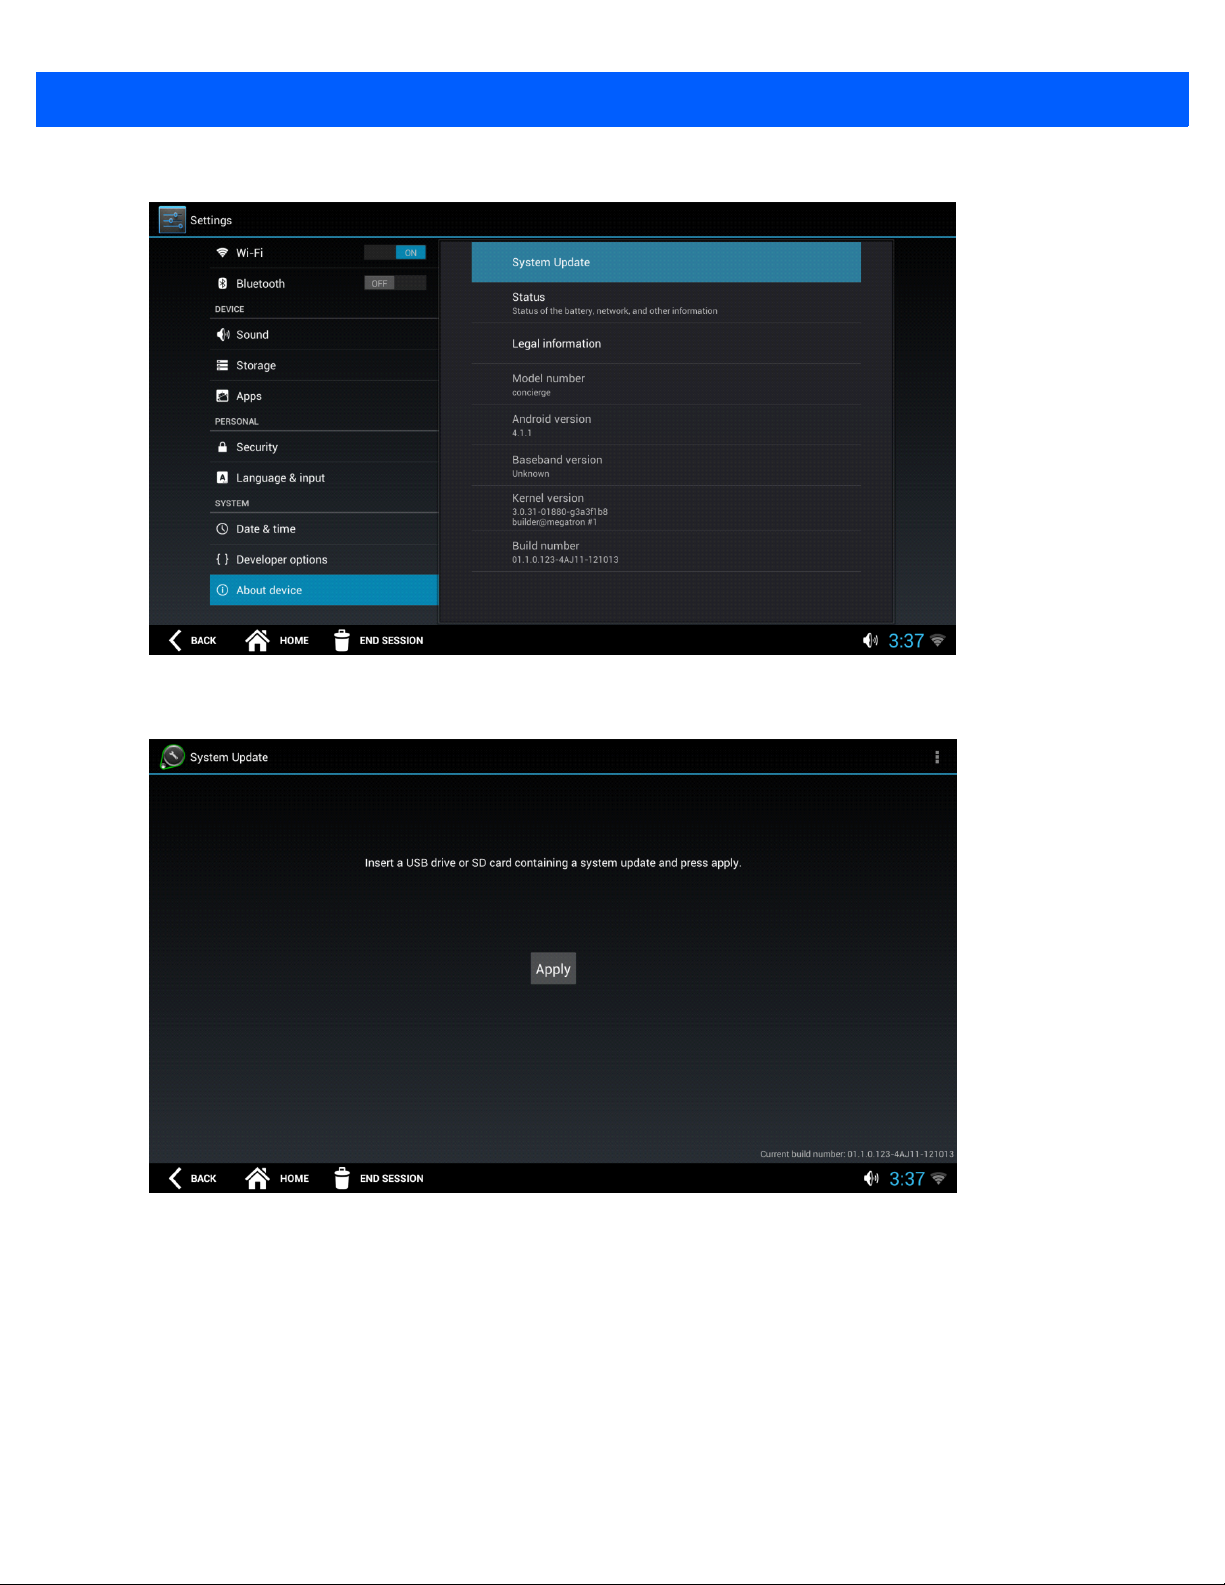
3. Press the Settings icon ( ) to open the Settings application screen.
Figure 2-23
4. In the SYSTEM section on the left side of the screen, press About device to display the System Update
Settings Application Screen
pane on the right.
NOTE The Build number attribute refers to the platform sof tware v ersion number that is currently installed on the
CC5000.
Page 36
2 - 18 CC5000 CUSTOMER CONCIERGE PRODUCT REFERENCE GUIDE
5. Press System Update.
Figure 2-24
Settings Application Screen - System Update
6. Insert the USB flash drive, or SD card with the updated file (.mdz format) into the appropriate port.
Figure 2-25
7. Press Apply, and wait for the update to complete. The CC5000 may reset several times as part of the
Settings Application Screen - System Update
update process.
Page 37

Enterprise Reset
If needed, the CC5000 can be reset to default settings.
IMPORTANT An Enterprise Reset erases all data in the /cache and /data partitions and clears all CC5000 settings,
To Enterprise Reset the device:
1. Enter Admin mode by following the steps in Admin Mode on page 2-4.
2. If the Settings icon is not displayed, press at the top right of the Admin Home screen to display all
available applications.
3. Press the Settings icon ( ) to open the Settings application screen.
USING THE CC5000 CUSTOMER CONCIERGE 2 - 19
except those in the /enterprise partition. Only use this option when it is absolutely necessary.
Figure 2-26
4. In the SYSTEM section on the left side of the screen, press About device to display the System Update
pane on the right.
Settings Application Screen
Page 38

2 - 20 CC5000 CUSTOMER CONCIERGE PRODUCT REFERENCE GUIDE
5. Press System Update.
Figure 2-27
Settings Application Screen - System Update
6. Press the Menu icon ( ) in upper right corner of the screen, and select Enterprise Reset.
Figure 2-28
7. When the Enterprise Reset Verification window displays, press OK to confirm the reset of all data.
Settings Application Screen - Enterprise Reset
Figure 2-29
8. The device goes into a reset mode.
Settings Application Screen - Verify Enterprise Reset
Page 39

Data Capture
The CC5000 offers the following data capture options:
•
Capture bar code data using the integrated 2D imaging sca nn er.
•
Capture images.
•
Record video using the 8MP HD camera.
NOTE DataWedge is enabled on the CC5000 platform software version 1.2.0.4.
NOTE Visit https://developer.zebra.com/community/technologies/concierge for information about disabling the
USING THE CC5000 CUSTOMER CONCIERGE 2 - 21
DataWedge is a utility that adds advanced bar code scanning capability to any application without wri ting
code. It runs in the background and handles the interface to both built-in and attached bar code scanners.
The captured bar code data is converted to keystrokes and sent to the target application as if it was typed
on the keypad.
For more information on using DataWedge, visit: https://developer.zebra.com/docs/DOC-1928
CC5000 platform's custom handling of scan data, and transmitting the scan data to applications as
keystrokes.
CAUTION The CC5000 scanner is programmed at the factory. Do not scan the Set Defaults bar code in the
PL3307 Decoder Integration Guide. This renders the CC5000 scanner unusable, and can only be
resolved by calling Zebra Technologies support.
When imaging, the CC5000 projects a red aiming dot which allows the user to position the bar code within the
device’s field of view. Ensure the bar code is within the decode range, and the aiming dot is centered on the
bar code.
Figure 2-30
Aiming
The aiming dot is smaller when the symbol is closer to the CC5000, and larger when it is farther away.
Page 40

2 - 22 CC5000 CUSTOMER CONCIERGE PRODUCT REFERENCE GUIDE
Wireless Configuration
A wireless network is required for scanning, and accessing various applications on the CC5000.
Connecting to a Wi-Fi Network
To connect to a Wi-Fi network:
1. Enter Admin mode by following Step 1 - Step 4 in Admin Mode on page 2-4.
2. On the Settings screen, scroll down to the WIRELESS & NETWORKS section on the left, and ensure Wi-Fi
is set to ON.
Figure 2-31
3. Select a network from the list of available Wi-Fi networks on the right side of the screen.
4. After successfully connecting to a Wi-Fi network, press END SESSION to exit Admin mode.
Settings Screen
NOTE The Wireless Fusion Enterprise Mobility Suite is supported on the CC5000 from platform software version
1.2.0.4 and higher.
To configure Fusion, press the Menu icon ( ) in upper right corner of the screen. Select Advanced
from the list of options.
Page 41

USING THE CC5000 CUSTOMER CONCIERGE 2 - 23
Scanning a For Wi-Fi Networks
If your Wi-Fi network is not listed, press the Menu icon ( ) in upper right corner of the screen to scan for a
network. Select
Scan from the list.
Figure 2-32
Scan for Networks Menu
Page 42

2 - 24 CC5000 CUSTOMER CONCIERGE PRODUCT REFERENCE GUIDE
Adding a New Wi-Fi Network
To add a network manually:
1. Touch + on the top right of the Settings screen to display the Add ne two rk window.
Figure 2-33
2. Enter the appropriate network information in the Add network window to configure, and access the
network.
3. Press END SESSION to exit.
Add Network Window
Page 43

APPENDIX A MAINTENANCE AND TROU-
BLESHOOTING
Overview
This appendix provides cleaning, maintenance, and troubleshooting for the CC5 000.
Cleaning and Maintenance
•
Always turn off the product before cleaning.
•
The touchscreen surface may be cleaned using a soft clean cloth moisten ed with mild window glass
commercial cleaners.
•
Use a soft cloth moistened with mild detergent to clean the display housing.
•
Do not touch the display screen surface with sharp or hard objects.
•
Do not use abrasive cleaners, waxes or solvents for cleaning.
•
Do not operate the product under the following conditions:
•
Extremely hot, cold, or humid environments.
•
Near any appliance generating a strong magnetic field.
•
In direct sunlight.
Page 44

A - 2 CC5000 CUSTOMER CONCIERGE PRODUCT REFERENCE GUIDE
Troubleshooting
Table A-1
No picture on the display. Check if the CC5000 is plugged into a power outlet. If not,
No picture on the display (CC5000 is plugged). Contact support. The unit may need to be replaced.
Touchscreen is non-functional. Check for any obstructions near the display. If there are any
Touchscreen is non-functional (no obstructions near the
display).
Bar code scanner does not flash red when a bar code is
placed in front of the scanner.
Bar code scanner never flashes red when a bar code is
placed in front of the scanner (even in a well-lit
environment).
Bar code scanner flashes red, but the Scan Received
message is never seen on the CC5000.
Possible Problems and Solutions
Problem Solution
plug in the unit.
obstructions, remove them and reboot the CC5000.
Contact support. The unit may need to be replaced.
Improve the lighting around the CC5000 and try again.
Continue this cycle until the scan works.
Contact support. The unit may need to be replaced.
The bar code scanner may need to be configured to handle
the type of bar code being scanned. Refer to the PL3307
Decoder Integration Guide (p/n 72E-149624-xx) to program
the bar code scanner.
If you continue to face problems, contact support.
No and/or low volume. Increase software volume to the maximum level.
Software settings are incorrect. Report the problem to your device administrator responsible
for configuring the CC5000. This may be a local admin in the
store, or a remote employee.
Wi-Fi or Ethernet connection is down. Remove any obstructions near the CC5000 and test again in
one minute.
Wi-Fi or Ethernet connection is down (no obstructions
near the CC5000).
Device is not online in MDM server. Check that Wi-Fi or Ethernet is connected.
Device is not online in MDM server (Wi-Fi or Ethernet is
connected).
Application Not Responding message displays on the
CC5000.
Application Not Responding message displays on the
CC5000 (repeated messages displayed).
CC5000 does not boot (or continuously reboots). Contact support. The unit may need to be replaced.
Report the problem to a local administrator if available. The
administrator should verify that the device is configured
properly. If the problem persists, contact your IT
administrator.
Check that the device is set to the correct date and time.
This is not necessarily a problem. Tr y clicking Wait and see if
the device continues on without issue.
Reboot the device. If problem persists, report the issue to
support.
Page 45

MAINTENANCE AND TROUBLESHOOTING A - 3
Table A-1
CC5000 defaults to an unacceptable volume. Have a device admin set the default volume in Settings >
CC5000 defaults to an unacceptable language. Have a device admin set the default language in Settings >
Any other issues. Reboot the device. If problem persists, report the issue to
Possible Problems and Solutions (Continued)
Problem Solution
Sound > Default Volume.
Language > Default Language.
support.
Page 46

A - 4 CC5000 CUSTOMER CONCIERGE PRODUCT REFERENCE GUIDE
Page 47

INDEX
A
about device . . . . . . . . . . . . . . . . . . . . . . . . . . . . . . 2-17
admin mode
apps
button
configuration button
end session
file browser
home screen
overview
apps settings
audio in
audio mics
audio out
. . . . . . . . . . . . . . . . . . . . . . . . . . . . . . . 2-5
. . . . . . . . . . . . . . . . . . . . . . . . . . . . . . . . . . 2-5
. . . . . . . . . . . . . . . . . . . . . . . . . . . . . . . . . 2-4
. . . . . . . . . . . . . . . . . . . . . . 2-5
. . . . . . . . . . . . . . . . . . . . . . . . . . . . 2-6
. . . . . . . . . . . . . . . . . . . . . . . . . . . . 2-16
. . . . . . . . . . . . . . . . . . . . . . . . . . . . 2-4
. . . . . . . . . . . . . . . . . . . . . . . . . . . . . . . 2-4
. . . . . . . . . . . . . . . . . . . . . . . . . . . . . . 2-17
. . . . . . . . . . . . . . . . . . . . . . . . . . . . . . . . . . . 1-6
. . . . . . . . . . . . . . . . . . . . . . . . . . . . . . . . . 1-5
. . . . . . . . . . . . . . . . . . . . . . . . . . . . . . . . . . 1-6
B
back button . . . . . . . . . . . . . . . . . . . . . . . . . . . .2-1, 2-16
bluetooth settings
bold text use in guide
browser
file
. . . . . . . . . . . . . . . . . . . . . . . . . . . . . . . . . . . 2-16
internet/intranet
bullets use in guide
buttons
admin mode
back
. . . . . . . . . . . . . . . . . . . . . . . . . . . . . .2-1, 2-16
device root, admin mode
display apps
end session
enter admin mode
home
. . . . . . . . . . . . . . . . . . . . . . . . . . . . . . . . . . 2-1
multi select, admin mode
SD card folder, admin mode
settings icon
. . . . . . . . . . . . . . . . . . . . . . . . . . 2-17
. . . . . . . . . . . . . . . . . . . . . . . . . viii
. . . . . . . . . . . . . . . . . . . . . . . . . . 2-3
. . . . . . . . . . . . . . . . . . . . . . . . . . . viii
. . . . . . . . . . . . . . . . . . . . . . . . . . . . 2-4
. . . . . . . . . . . . . . . . . 2-16
. . . . . . . . . . . . . . . . . . . .2-5, 2-7, 2-16,
. . . . . . . . . . . . . . . . . . . . . . . . . . .2-17, 2-19
. . . . . . . . . . . . . . . . . . . . . . . . . . . . 2-1
. . . . . . . . . . . . . . . . . . . . . . . . 2-4
. . . . . . . . . . . . . . . . . 2-16
. . . . . . . . . . . . . . . 2-16
. . . . . . . . . . . . . . . . . . . . . . . . . . . . 2-5
volume
. . . . . . . . . . . . . . . . . . . . . . . . . . . . . . . . . 2-1
C
conventions
notational
. . . . . . . . . . . . . . . . . . . . . . . . . . . . . . . .viii
D
date & time settings . . . . . . . . . . . . . . . . . . . . . . . . . 2-17
defaults
developer
device root button, admin mode
display apps button
. . . . . . . . . . . . . . . . . . . . . . . . . . . . . . . . . . 2-19
information
options settings
. . . . . . . . . . . . . . . . . 1-1, 2-2, 2-17, 2-18
. . . . . . . . . . . . . . . . . . . . . . . . . 2-17
. . . . . . . . . . . . . . . 2-16
. . . . . . . . 2-5, 2-7, 2-16, 2-17, 2-19
E
end session
button
. . . . . . . . . . . . . . . . . . . . . . . . . . . . . . . . . 2-1
window
enter admin mode button
enterprise reset
ethernet
configuration
connections
port
troubleshooting
external ports
. . . . . . . . . . . . . . . . . . . . . . . . . . . . . . . . 2-6
. . . . . . . . . . . . . . . . . . . . . . 2-4
. . . . . . . . . . . . . . . . . . . . . . . . . . . . 2-19
. . . . . . . . . . . . . . . . . . . . . . . . 2-5, 2-9
. . . . . . . . . . . . . . . . . . . . . . . . . . . . . 1-5
. . . . . . . . . . . . . . . . . . . . . . . . . . . . . . . 1-3, 1-5
. . . . . . . . . . . . . . . . . . . . . . . . . . A-2
. . . . . . . . . . . . . . . . . . . . . . . . . . . . . . . 1-6
F
features
activity LED
audio in/out
audio mics
. . . . . . . . . . . . . . . . . . . . . . . . . . . . . 1-5
. . . . . . . . . . . . . . . . . . . . . . . . . . . . . 1-6
. . . . . . . . . . . . . . . . . . . . . . . . . . . . . . 1-5
Page 48

Index - 2 CC5000 CUSTOMER CONCIERGE PRODUCT REFERENCE GUIDE
bar scanner window . . . . . . . . . . . . . . . . . . . . . . 1-5
buttons
ethernet port
external ports
front view
mounting holes
power receptacle
rear view
SD card
side view
speakers
touch screen
video camera
file browser
file updates
flash drive
font use in guide
. . . . . . . . . . . . . . . . . . . . . . . . . . . . . . . . 1-5
. . . . . . . . . . . . . . . . . . . . . . . . . . . . 1-5
. . . . . . . . . . . . . . . . . . . . . . . . . . . 1-6
. . . . . . . . . . . . . . . . . . . . . . . . . . . .1-2, 1-4
. . . . . . . . . . . . . . . . . . . . . . . . . . 1-6
. . . . . . . . . . . . . . . . . . . . . . . . . 1-6
. . . . . . . . . . . . . . . . . . . . . . . . . . . . . . . 1-3
. . . . . . . . . . . . . . . . . . . . . . . . . . . . . . . . 1-6
. . . . . . . . . . . . . . . . . . . . . . . . . . . . . . . 1-3
. . . . . . . . . . . . . . . . . . . . . . . . . . . . . . . 1-6
. . . . . . . . . . . . . . . . . . . . . . . . . . . . 1-6
. . . . . . . . . . . . . . . . . . . . . . . . . . . 1-6
. . . . . . . . . . . . . . . . . . . . . . . . . . . . . . . 2-16
. . . . . . . . . . . . . . . . . . . . . . . . . . .2-17, 2-18
. . . . . . . . . . . . . . . . . . . . . . . . . . . .2-17, 2-18
. . . . . . . . . . . . . . . . . . . . . . . . . . . . .viii
G
guest mode . . . . . . . . . . . . . . . . . . . . . . . . . . . . . . . . 2-4
H
hdmi . . . . . . . . . . . . . . . . . . . . . . . . . . . . . . . . . . . . . . 1-6
home button
home screen
features
. . . . . . . . . . . . . . . . . . . . . . . . . . . . . . . 2-1
. . . . . . . . . . . . . . . . . . . . . . . . . . . . . . . . 2-2
I
image capture . . . . . . . . . . . . . . . . . . . . . . . . . . . . . 2-21
information, service
internet/intranet browser
italics use in guide
. . . . . . . . . . . . . . . . . . . . . . . . . . . .ix
. . . . . . . . . . . . . . . . . . . . . . 2-3
. . . . . . . . . . . . . . . . . . . . . . . . . . . .viii
K
keyboard . . . . . . . . . . . . . . . . . . . . . . . . . . . . . . . . . . 2-3
keypad, pass code
. . . . . . . . . . . . . . . . . . . . . . . . . . 2-4
L
language settings . . . . . . . . . . . . . . . . . . . . . . . . . . 2-17
M
MDM . . . . . . . . . . . . . . . . . . . . . . . . . . . . . . . . . . . . . 2-5
mdz file
memory
mobile device management
modes
. . . . . . . . . . . . . . . . . . . . . . . . . . . . . .2-17, 2-18
. . . . . . . . . . . . . . . . . . . . . . . . . . . . . . . . . . . 1-1
. . . . . . . . . . . . . . . . . . . 2-5
admin
. . . . . . . . . . . . . . . . . . . . . 2-4, 2-5, 2-6, 2-16
guest
. . . . . . . . . . . . . . . . . . . . . . . . . . . . . . . . . . 2-4
mounting holes
multi select button, admin mode
. . . . . . . . . . . . . . . . . . . . . . . . . . . . . .1-6
. . . . . . . . . . . . . . . . 2-16
N
notational conventions . . . . . . . . . . . . . . . . . . . . . . . . viii
P
pass code keypad . . . . . . . . . . . . . . . . . . . . . . . . . . .2-4
power receptacle
. . . . . . . . . . . . . . . . . . . . . . . . . . . .1-6
R
reset . . . . . . . . . . . . . . . . . . . . . . . . . . . . . . . . . . . . . 2-19
rs-232
. . . . . . . . . . . . . . . . . . . . . . . . . . . . . . . . . . . . .1-6
S
sample code . . . . . . . . . . . . . . . . . . . . . . . . . . . . . . . .1-1
scanning
bar code scanner window
bar code scanning
screens
admin
. . . . . . . . . . . . . . . . . . . . . . . . . . . . . . . . . . 2-4
admin home
admin settings
end session
home
. . . . . . . . . . . . . . . . . . . . . . . . . . . . . . . . . . 2-2
home/pass code keypad
on-screen keyboard
settings
SD card
SD card folder, file browser
SDK
. . . . . . . . . . . . . . . . . . . . . . . . . . . . . . . . . . . . . .1-1
security settings
serial port
service information
settings
MDM
mobile device management
settings screen
about device
apps
bluetooth
date & time
developer options
language
security
sound
storage
wi-fi
settings, admin
software
. . . . . . . . . . . . . . . . . . . . . . . . . . . . . . .2-17
. . . . . . . . . . . . . . . . . . . . .1-6, 2-16, 2-17, 2-18
. . . . . . . . . . . . . . . . . . . . . . . . . . . . . . . . . . 1-6
. . . . . . . . . . . . . . . . . . . . . . . . . . . . . . . . . . . .2-7
. . . . . . . . . . . . . . . . . . . . . . . . . . . . . . . . . .2-5
. . . . . . . . . . . . . . . . . . . . . . . . . . . . . . . . . . 2-17
. . . . . . . . . . . . . . . . . . . . . . . . . . . . . . 2-17
. . . . . . . . . . . . . . . . . . . . . . . . . . . . . 2-17
. . . . . . . . . . . . . . . . . . . . . . . . . . . . . . 2-17
. . . . . . . . . . . . . . . . . . . . . . . . . . . . . . .2-17
. . . . . . . . . . . . . . . . . . . . . . . . . . . . . . . . . 2-17
. . . . . . . . . . . . . . . . . . . . . . . . . . . 2-11, 2-17
. . . . . . . . . . . . . . . . . . . . . . . . . . . . . . . . . .2-17
. . . . . . . . . . . . . . . . . . . . . . . . . . . . . . 2-5
. . . . . . . . . . . . . . . . . . . . . . . . . . . . . . . . . . .1-1
. . . . . . . . . . . . . . . . . . . 1-5, 2-21
. . . . . . . . . . . . . . . . . . . . . . . . . . . . .2-4
. . . . . . . . . . . . . . . . . . . . . . . . . . . 2-5
. . . . . . . . . . . . . . . . . . . . . . . . . . . . . 2-6
. . . . . . . . . . . . . . . . . . . . . . . . . . . .2-17
. . . . . . . . . . . . . . . . . . . . . . . . . . . . ix
. . . . . . . . . . . . . . . . . . . . . . . . . . . 2-17
. . . . . . . . . . . . . . . . . . . . . . . 2-17
. . . . . . . . . . . . . . . . . . 1-5
. . . . . . . . . . . . . . . . . . .2-4
. . . . . . . . . . . . . . . . . . . . . . .2-3
. . . . . . . . . . . . . . . . . . . 2-16
. . . . . . . . . . . . . . . . .2-5
Page 49

sound settings . . . . . . . . . . . . . . . . . . . . . . . . . . . . . 2-17
speakers
storage settings
storage, internal memory
system update
. . . . . . . . . . . . . . . . . . . . . . . . . . . . . . . . . . 1-6
. . . . . . . . . . . . . . . . . . . . . . . . . . . . 2-17
. . . . . . . . . . . . . . . . . . . . . 1-1
. . . . . . . . . . . . . . . . . . . . . . . . . . . . . 2-17
T
touch screen . . . . . . . . . . . . . . . . . . . . . . . . . . . . . . . 1-6
V
video . . . . . . . . . . . . . . . . . . . . . . . . . 1-1, 1-2, 1-6, 2-21
volume button
. . . . . . . . . . . . . . . . . . . . . . . . . . . . . . 2-1
W
wi-fi
adding a network manually
connecting
network search
settings
troubleshooting
. . . . . . . . . . . . . . . . . . . . . . . . . . . . 2-22
. . . . . . . . . . . . . . . . . . . . . . . . . 2-23
. . . . . . . . . . . . . . . . . . . . . . . . . . . . . . . 2-17
. . . . . . . . . . . . . . . . . . . . . . . . . . A-2
. . . . . . . . . . . . . . . . 2-24
Index - 3
Page 50

Index - 4 CC5000 CUSTOMER CONCIERGE PRODUCT REFERENCE GUIDE
Page 51

Page 52

Zebra Technologies Corporation
Lincolnshire, IL U.S.A.
http://www.zebra.com
Zebra and the stylized Zebra head are trademarks of ZIH Corp., registered in many jurisdictions
worldwide. All other trademarks are the property of their respective owners.
©2015 ZIH Corp and/or its affiliates. All rights reserved.
MN000209A03 Revision A - August 2015
 Loading...