

Page 1
Part # UMAN-CM2-3-001 Rev. A
February , 2005
User Guide
Page 2

Page 3

iii
continued next page
CONTENTS
Proprietary Statement............................................v
Introduction ........................................................O-1
Controls ..............................................................O-2
Keypad Functions .................................................... O-2
Self Test ................................................................... O-2
Batteries and Charging ............................................ O-3
Conditioning Battery Packs......................................O-3
Chargers .................................................................. O-3
Removing and Replacing Cameo 2 Battery Packs.. O-4
Removing and Replacing Cameo 3 Battery Packs.. O-5
Low Battery Shutdown............................................. O-5
Safety Warnings.......................................................O-5
Installation of Media........................................... O-7
Magnetic Stripe Reader ..................................... O-8
Smart Card Reader............................................. O-9
Maintenance ..................................................... O-11
Cleaning the Printhead .......................................... O-11
Cleaning the Platen ............................................... O-11
Cleaning the Media Sensor ................................... O-12
Linerless Media Printers ........................................ O-12
TroubleShooting............................................... O-13
Self Test ................................................................. O-13
Troubleshooting Guide...........................................O-13
Communicating to the Printer......................... O-15
Cable Communications..........................................O-16
IR Communications ............................................... O-17
Wireless Communications with Bluetooth.............. O-18
Europe – EU Declaration of Conformity.................O-19
Bluetooth Networking Overview.............................O-19
Printer Specifications ...................................... O-20
Physical ................................................................. O-20
Environmental........................................................ O-20
Printing Characteristics.......................................... O-20
Page 4

iv
Communications Specifications............................. O-20
Communications Port ............................................ O-21
Power.....................................................................O-21
Media Specifications.............................................. O-21
Resident Hardware/Memory Features................... O-22
Software Features ................................................. O-22
Accessories and Options ....................................... O-23
APPENDIX A ...................................................... A-1
APPENDIX B ...................................................... A-4
APPENDIX C ...................................................... A-4
Appendix D ......................................................... A-5
Product Support....................................................... A-5
Battery Disposal....................................................... A-6
Product Disposal...................................................... A-6
Patent Information.............................................. A-7
Page 5

v
Proprietary Statement
This manual contains proprietary information of Zebra Technologies Corporation. It is intended solely for the information and use of parties operating and maintaining the equipment
described herein. Such proprietary information may not be used, reproduced, or disclosed to
any other parties for any other purpose without the expressed written permission of Zebra
Technologies Corporation.
Product Improvements
Since continuous product improvement is a policy of Zebra Technologies Corporation, all
specifications and signs are subject to change without notice.
FCC Compliance Statement
Class B digital device. Tested to comply with FCC standards for home or office use.
WARNING: Exposure to Radio Frequency radiation. To conform to FCC RF exposure requirements this device shall be used in accordance with the operating conditions and instructions
listed in this manual. Note that there are several radio options available with this printer. Additional regulatory information is contained in later sections devoted to each radio individually .
NOTE: This unit was tested with shielded cables on the peripheral devices. Shielded cables
must be used with the unit to insure compliance.
Changes or modifications to this unit not expressly approved by Zebra Technologies Corporation could void the user’s authority to operate this equipment.
Canadian Compliance Statement
This Class B digital apparatus complies with Canadian ICES-003.
Cet appareil numérique de la classe B est conforme á la norme NMB-003 du Canada.
"IC:" before the equipment certification number signifies that the Industry Canada technical
specifications were met. It does not guarantee that the certified product will operate to the
user's satisfaction.
Agency Approvals and Regulatory Information
• Design certified by CSA • FCC part 15
• Canadian STD RSS-210 • EN55022:1998 European Immunity Standard
• EN60950: 2000 Safety Standard • NOM/NYCE (Mexico)
• C-Tick (Australia) • EN55022:1998 Class B European
Electromagnetic Radiation Standard
Liability Disclaimer
Inasmuch as every effort has been made to supply accurate information in this manual, Zebra
Technologies Corporation is not liable for any erroneous information or omissions. Zebra
Technologies Corporation reserves the right to correct any such errors and disclaims liability
resulting therefrom.
No Liability for Consequential Damage
In no event shall Zebra Technologies Corporation or anyone else involved in the creation,
production, or delivery of the accompanying product (including hardware and software) be
liable for any damages whatsoever (including, without limitation, damages for loss of business
profits, business interruption, loss of business information, or other pecuniary loss) arising out
of the use of or the results of use of or inability to use such product, even if Zebra Technologies Corporation has been advised of the possibility of such damages. Because some states
do not allow the exclusion of liability for consequential or incidental damages, the above limitation may not apply to you.
Copyrights
The copyrights in this manual and the label print engine described therein are owned by Zebra Technologies Corporation. Unauthorized reproduction of this manual or the software in the
label print engine may result in imprisonment of up to one year and fines of up to $10,000 (17
U.S.C.506). Copyright violators may be subject to civil liability .
This product may contain ZPL®, ZPL II®, and ZebraLinktm programs; Element Energy Equalizer® Circuit; E3®; and AGFA fonts. Software © ZIH Corp. All rights reserved worldwide.
ZebraLink and all product names and numbers are trademarks, and Zebra, the Zebra logo,
ZPL, ZPL II, Element Energy Equalizer Circuit, and E3 Circuit are registered trademarks of
ZIH Corp. All rights reserved worldwide.
CG Triumvirate is a trademark of AGFA Monotype Corporation. All rights reserved worldwide.
CG Triumviratetm font © AGFA Monotype Corporation. Intellifont® portion © AGFA Monotype
Corporation. All rights reserved worldwide. UFST is a registered trademark of AGFA Monotype
Corporation. All rights reserved worldwide.
All other brand names, product names, or trademarks belong to their respective holders.
©
2005 ZIH Corp.
Page 6

Page 7

Operation Section
Page 8
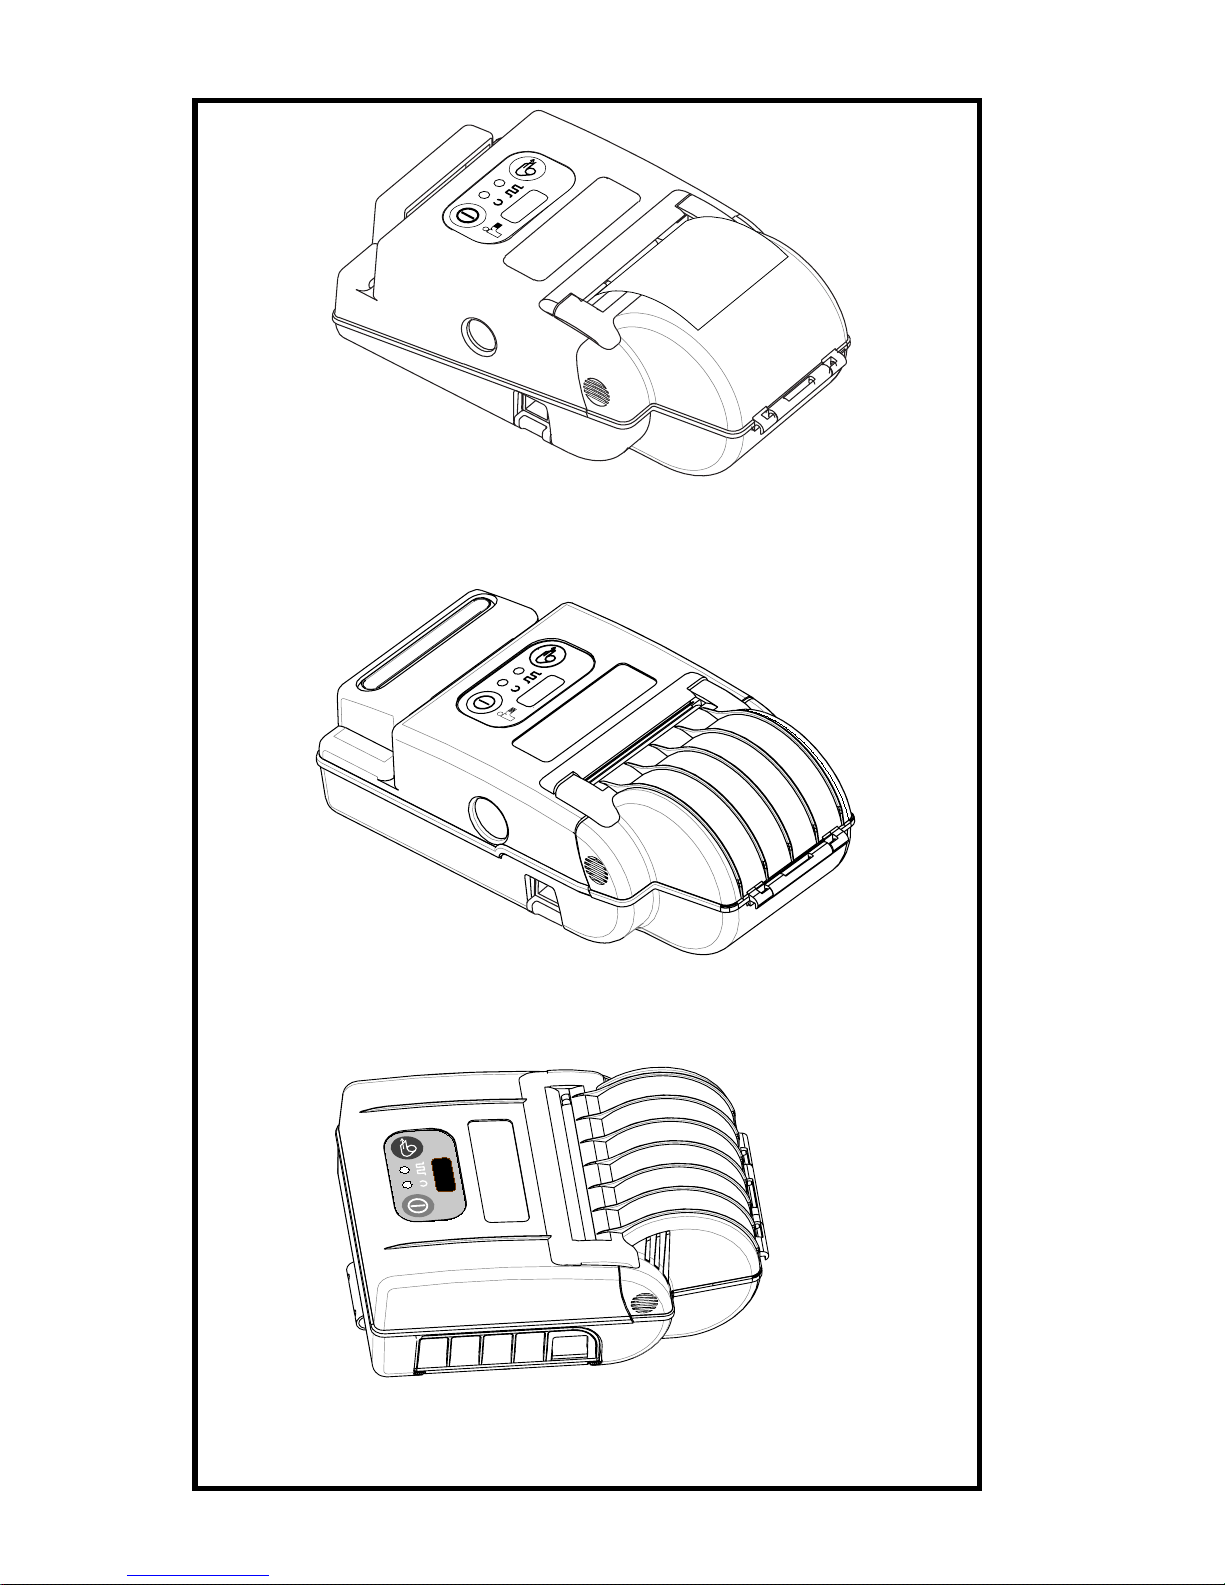
Cameo 2 with optional Mag Stripe Reader and
IR interface.
Cameo 2SC with Mag Stripe Reader, Smart
Card Reader and IR interface.
Cameo 3
Page 9

O-1 UMAN-CM2/3
INTRODUCTION
The Cameo® Series of Mobile Printers (Cameo 2SC ,
Cameo 3 and Cameo 3SC) utilize the latest in direct thermal printing technology. These products are designed for
mobile printing applications and their compact size is
ideally suited to print receipts and for many other situations where on-site printing is required.
The Cameo series also offers wireless communications
options such as Bluetooth® or infrared (IrDA) interfaces.
CameoSC printers can be ordered with an integrated
magnetic stripe reader (MSR) and/or a Smart Card
reader.
This manual should be read in its entirety before attempting operation of this product. Further information
regarding this printer series’ features and operation can
be found in the Mobile Printing Systems CPCL Programming Manual, available on our website at:
http://www.zebra.com/manuals.
Page 10
O-2
UMAN-CM2/3
CONTROLS
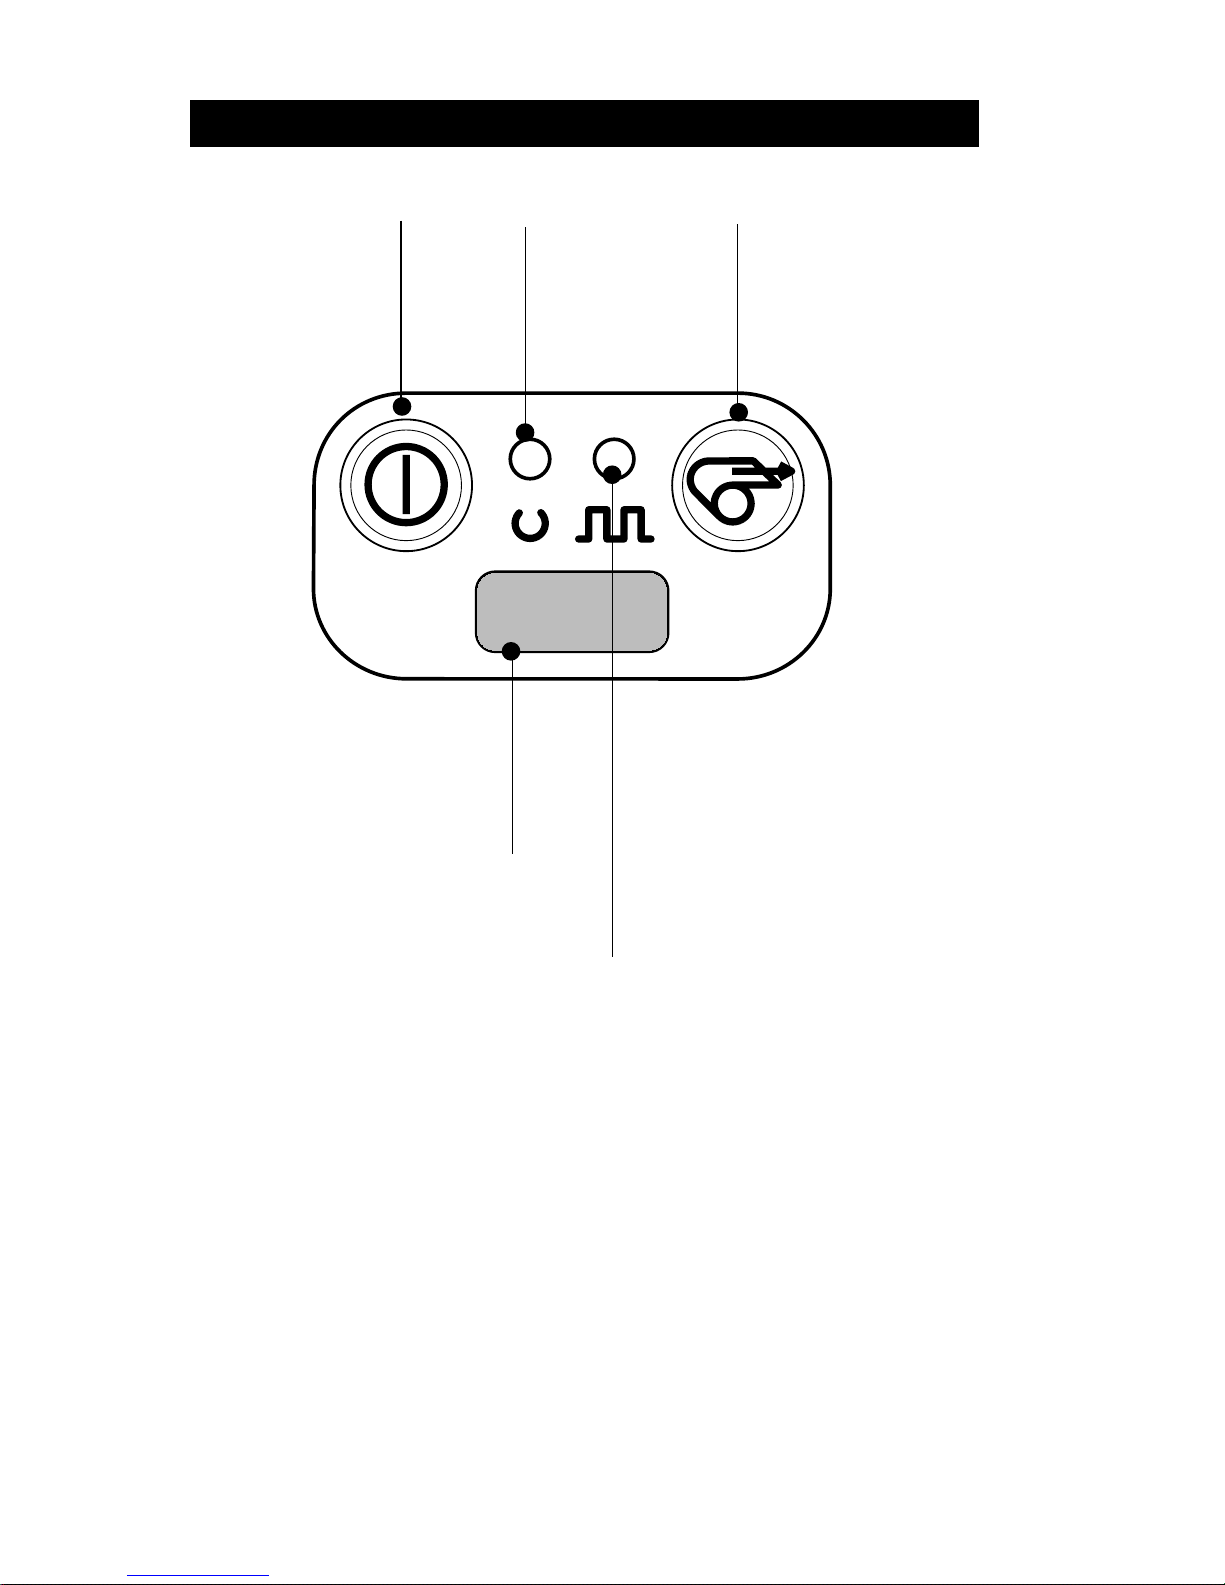
Keypad Functions
On Switch:
momentary action
turns on unit
IR Window;
must be aligned with
corresponding window on host
for IR communications to occur.
(Units with IR option only)
Feed Switch:
Advances media
when held down.
Status Light: Steady
light indicates printer is
either out of media, or
media cover is open.
Flashing during data
transmission between
host and printer
indicates normal
wireless operation.
Power Light:
Indicates unit
is turned on
Flashing light
indicates low
battery
Self Test
Cameos can perform a self test which will print a line of
interlocking “x” characters to insure all elements of the
printhead are working, and then print out the version of
software loaded in the printer. Refer to the Troubleshooting section for details on interpreting the self-test.
The self test is activated by the following key
sequence:
1.Press the "FEED" key
2.While still holding down the "FEED" key, turn on
the printer by pressing and releasing the "ON" key.
3.Continue pressing the "FEED" key until self test
starts.
The Cameo will perform the self test and remain on.
Page 11

O-3 UMAN-CM2/3
BA TTERIES AND CHARGING
Conditioning Battery Packs
Cameo batteries must be cycled several times before maximum capacity is realized.
A battery is ”cycled” by fully charging it, then fully discharging
it through normal use.
Chargers
Listed below are the specifications for the Cameo
series chargers:
Model UCN72-4:
Designed to charge up to four batteries simultaneously. Battery packs may be charged separately
or while plugged into the printer. Typical charge
time is 90 minutes. Switch selectable 110/220
V.A.C. input voltage. Supplied with line cords
compatible with most international standards.
Do not attempt to charge batteries with the UC72-4 Charger
while printing. Attempting to print while charging batteries can
result in unreliable charging.
UCN72-4 part numbers vary depending on specific
country of use. Consult factory for complete part
numbers.
Model UCN72:
A wall mounted single charger with universal 110 to
230, 50-60 Hz. VAC input. Multiple plug configurations comply with most international standards.
Do not attempt to charge batteries with the UC72N Charger
while printing. Attempting to print while charging batteries can
result in unreliable charging.
UC72N part numbers vary depending on specific
country of use. Consult factory for complete part
numbers.
Page 12
O-4
UMAN-CM2/3
continued next page
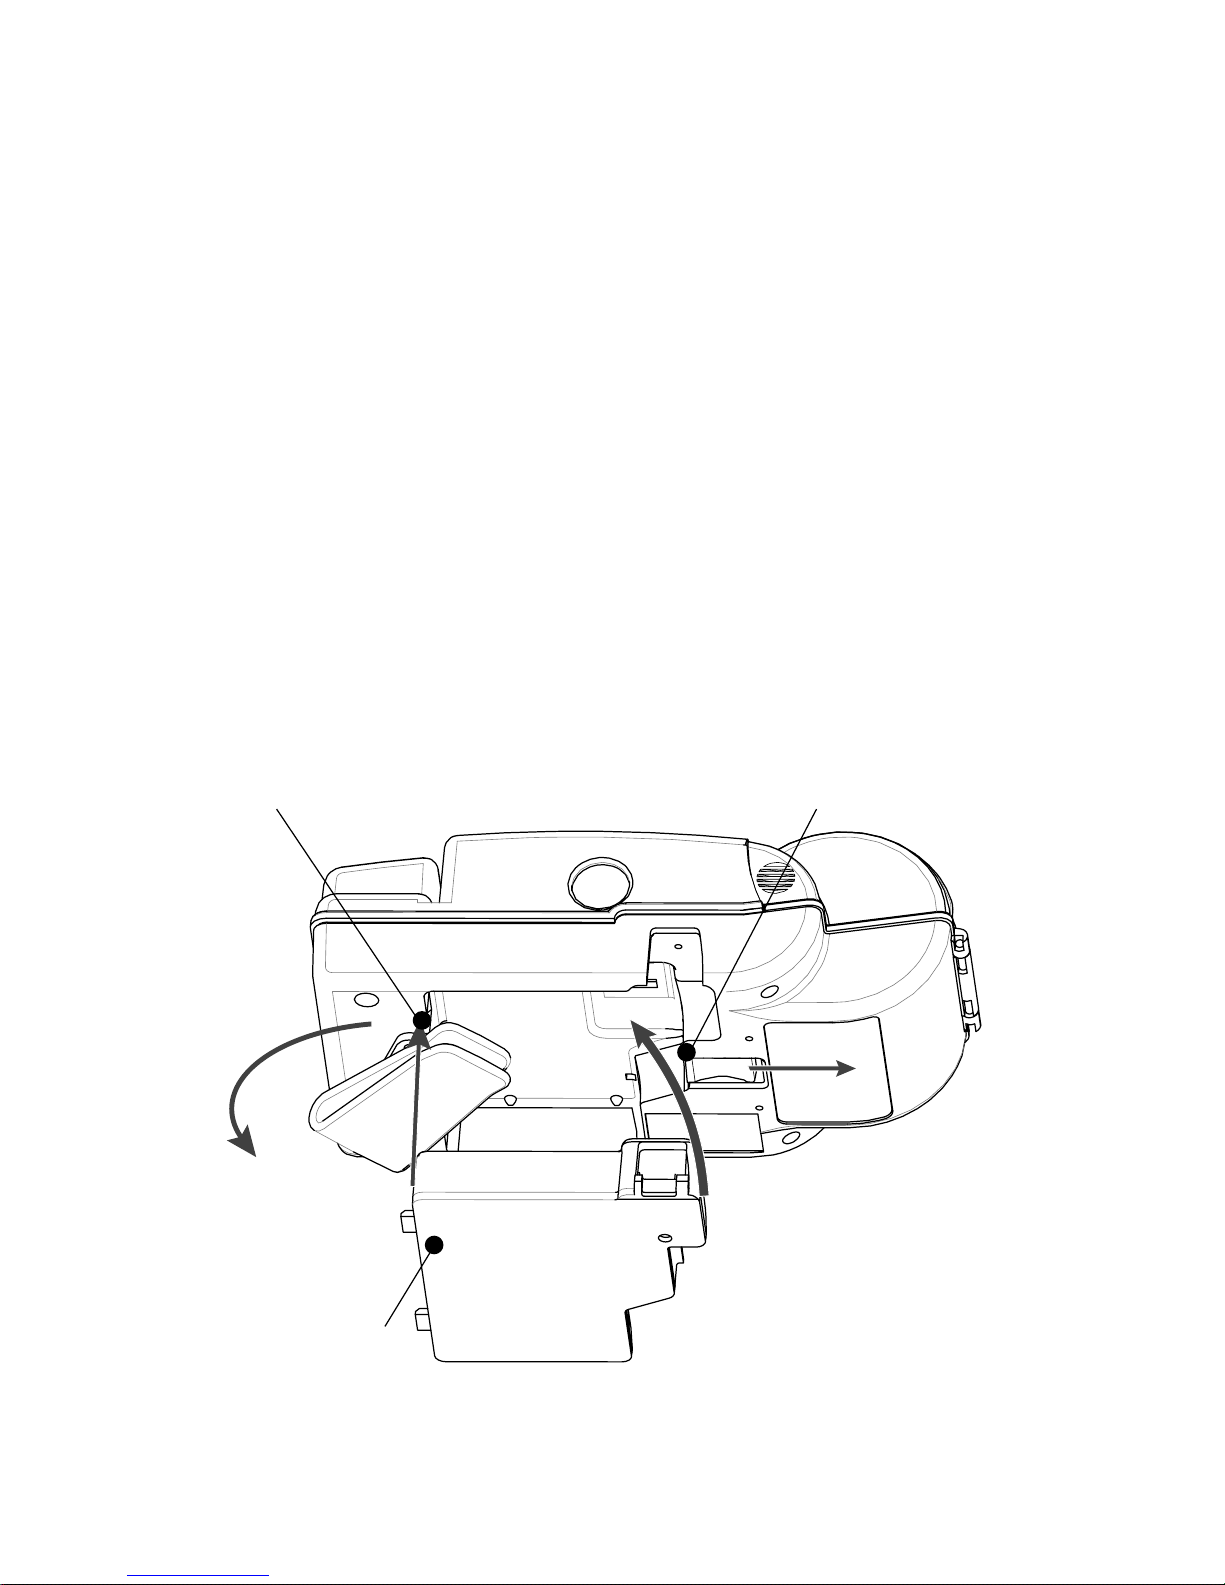
Removing and Replacing Cameo 2 Battery Packs
To remove the battery pack from the Cameo 2:
1.Push the battery release button on the bottom of
the printer towards the media compartment.
2.Rotate the belt clip as shown while,
3.Allowing the battery pack to slide out.
Battery Packs are replaced by the following procedure:
1. Rotate the Belt Clip to clear the battery
2.Align the battery pack to the bottom of the printer.
The side of the battery with the contacts will face
into the well for the battery.
3.Slide the pack completely into the printer until it
locks in place. The battery will engage with a
distinct “click”.
4. Rotate the Belt Clip back into position.
R
EMOVING AND REPLACING CAMEO
2 S
ERIES BATTERY PACKS
(C
AMEO
2
SC
SHOWN
.)
Belt Clip
Push Release Latch to
remove battery pack.
Battery Pack
Page 13

O-5 UMAN-CM2/3
Removing and Replacing Cameo 3 Battery Packs
To remove the battery pack from the Cameo 3:
Slide the Battery Latch button in the direction shown in
the top illustration below, and slide the battery out.
To replace the battery, insert the end with the contacts
into the battery well and slide the battery into the printer
until in clicks into place. Always dispose of battery packs
properly. Refer to Appendix D for more information on
battery pack disposal.
Low Battery Shutdown
As the battery charge level in becomes depleted the
Power LED will flash. At this time the printer should be
shut off and the battery pack recharged or replaced.
Cameos will automatically shut off if the batteries become
severely discharged.
Safety Warnings
Use of a charger not approved by Zebra for use with Cameo
series NiMH batteries could damage the battery pack or the
printer and will void the warranty.
Battery terminals are recessed to prevent short circuiting of the
battery. Allowing these terminals to contact conductive material
will create a short circuit which could cause burns, other injuries or
start a fire.
Battery Latch
Button
Battery Pack
R
EMOVING AND REPLACING CAMEO
3
B
ATTERY PACKS
Page 14

O-6
UMAN-CM2/3
M
EDIA INSTALLATION
(C
AMEO
2 S
HOWN
)
Squeeze finger
grips here on
both sides to
open cover
Feed media in
this direction
Adjust edge
guide to desired position
and snap into
place.
Media must
spin freely.
Edge Guide
Page 15

O-7 UMAN-CM2/3
INSTALLATION OF MEDIA
The following details media installation:
Cameo 2 is illustrated. Loading procedure is identical for all units.
1.Turn unit off.
2.Squeeze the two finger grips on either side of the
media compartment cover. Rotate the top back to
reveal the paper compartment.
3.If necessary, adjust the edge guide as shown at left
for narrow media.
The edge guide should be set into the nearest slot
in the printer body that will allow the media roll to
spin freely yet prevent it from wandering from side
to side so much that print quality is affected.
4.Drop a new roll of paper into the compartment.
Media should feed from the top of the roll and the
roll should fit between the edge guide and the right
hand wall.
The inner core on the media roll should be Ø.75” [ 19 mm]
or larger to prevent the roll from jamming.
5.Close the cover while holding the free end of the
media roll.
6.Ensure the cover is securely latched before beginning to print.
Page 16

O-8
UMAN-CM2/3
Detail "A"- Top view of printer
Flashing light
means O.K. to
scan card
MAGNETIC STRIPE READER
The optional magnetic stripe reader (MSR) is used as
follows:
1.A flashing status light indicates the printer is available to scan. Place the card into the reader slot as
shown. The magnetic stripe must face the top of
the printer, and into the body of the printer as
shown in Detail “A” below.
2.Slide the card through the slot. The card will be
read if slid in either direction. Depending on the
application software, the receiving terminal will
sound a beep on a successful scan.
3.If the card did not read, slide it back through the
slot in the opposite direction.
C
AMEO
2
WITH
MSR
OPTION
Page 17

O-9 UMAN-CM2/3
The Smart Card reader (only available on Cameo
SC
models ) is used as follows:
1.A status light indicates the Smart Card reader is
available. At this time, the Cameo is acting only as
a Smart Card reader connected to the host terminal; all other printer functions are suspended.
2.Insert the card into the reader slot as shown in
Detail “A” above. The microchip imbedded in the
card must be oriented facing the top of the printer
and must be completely inserted into the Reader
Slot to scan successfully .
3.Depending on the application software, the receiving terminal will sound a beep after a successful
transaction.
4.When the Smart Card indicator light goes out, the
Cameo can resume normal printing operations and
the Smart Card can be removed.
SMART CARD READER
D
ETAIL
“A”
MSR Slot
Smart Card Reader Slot
Smart Card Status
Indicator
C
AMEO
2SC
WITH
MSR
OPTION
Page 18

O-10
UMAN-CM2/3
Media Sensor
Printhead
Platen
C
LEANING THE CAMEO
2
C
LEANING THE CAMEO
3
Media Sensor
Printhead
Platen
Page 19

O-11 UMAN-CM2/3
MAINTENANCE
Cameo printers will provide years of reliable service
provided a few simple guidelines are followed. The
printer should be cleaned approximately every two weeks
or more often, depending on usage and the type of media
being employed. Components of the printer that require
periodic maintenance are the printhead, print roller
(platen), and the media sensor. When cleaning, please
use only isopropyl alcohol, the same type included in the
Cleaning Kit. Always use Zebra label or ticket stock for
maximum print quality and extended printer life.
Never use any sharp objects on printer mechanism as it could
damage the printhead and platen. Use only the supplied
cleaning pen or a cotton swab saturated with alcohol for
cleaning. Always turn the printer off prior to any cleaning
operation.
Cleaning the printhead
• Always turn the printer off prior to any cleaning
operation.
• Open the printer by squeezing the finger grips on
either side of the media compartment cover.
• Swing the media compartment cover open.
• Use the cleaning pen supplied with the printer and/
or alcohol and cotton swabs to clean the surface of
the printhead, the platen, and the sensor.
Cleaning the platen (print roller)
Applies to printers configured for linered media only
• Open the printer by squeezing the finger grips on
either side of the media compartment cover and
swinging it open.
• Gently clean the platen with the cleaning pen
supplied with the printer and/or alcohol and a
cotton swab while rotating the platen.
continued next page
Page 20

O-12
UMAN-CM2/3
Cleaning the Media Sensor
The Media sensor is located inside the media compartment under the printhead. Blow out any dust deposits
carefully, then finish cleaning with the cleaning pen supplied with the printer and/or alcohol and cotton swabs.
Linerless Media Printers
Printers using linerless media require more frequent
cleaning. Linerless media deposits adhesive which must
be removed for optimum performance. Linerless printers
can be identified by a platen which is
not
black, or by
reading the unit’s fifteen digit Product Configuration
Code (PCC) label on the back of the printer. PCC digit
“8” will be “B”, “”D”, “F”, or “H” for linerless printers.
It is not necessary to clean the platen on linerless units. The
platen material is self cleaning and will not require constant
maintenance.
When cleaning, use only the Cleaning Pen provided with each
printer or isopropyl alcohol.
•Open the printer by squeezing the finger grips on
either side of the media compartment cover.
•Surfaces inside the media compartment that come
in contact with the linerless media adhesive should
be cleaned, along with:
•Print mechanism area around the Sensor
•Printhead
•Inside surface of the edge guide
Allow printer to dry before resuming printing.
Page 21

O-13 UMAN-CM2/3
Self Test:
Perform the self test as described in the Controls section. The unit should print a line of interlocking “x” characters to insure all elements of the printhead are working,
print out the version of software loaded in the printer and
then print two reports. The first report indicates model,
ROM version, serial number, baud rate, etc. The second
report contains application information. If no second
report appears, there is no application loaded.
Troubleshooting Guide
No power
• Check battery, recharge or replace as necessary.
Media does not feed:
• Be sure media compartment cover is closed and latched.
Poor or faded print:
• Clean printhead.
• Check/replace battery. Refer to Appendix D for information on
proper disposal of batteries.
• Check quality of media.
Partial/missing print:
• Check media alignment
• Clean printhead.
•Verify media compartment cover is closed and latched
Prints illegible characters:
• Check baud rate.
No print:
• Check baud rate
• Replace battery. Refer to Appendix D for information on
proper disposal of batteries.
• Check cable connection to terminal
•Wireless units: verify communication link between printer and
terminal
•Wireless printers associated with a LAN: refer to the RF LAN
Information section of the Self Test printout to verify the
printer’s SSID and IP addresses are correct, and that the
printer is “associated” with the wireless LAN.
continued
TROUBLESHOOTING
Page 22

O-14
UMAN-CM2/3
• Invalid label format or command structure — use Hex Dump
Mode for troubleshooting. Refer to the Programming Manual
for more information.
Reduced battery charge life:
• Recondition (cycle) battery.
• Damaged battery-replace. Refer to Appendix D for
information on proper disposal of batteries.
• Check battery date code: if one to two years old, short charge
life may be due to normal aging.
Status light flashing and beeper chimes:
• No application: reload program.
Status light flashing
• If using SRRF communications: normal indication while data is
being received.
Status light always on:
• Check media is loaded and media compartment cover is
closed and latched
Communication Error:
• Check media is loaded, media compartment cover is closed
and latched, and error light is off.
• Check baud rate.
• Replace cable to terminal.
Never use any sharp objects on the printer mechanism as it could
damage the printhead. Use only isopropyl alcohol, the sup-
plied cleaning pen and /or a cotton swab for cleaning the
printer.
Page 23

O-15 UMAN-CM2/3
COMMUNICATING TO THE PRINTER
The printer must establish communications with a host
terminal which sends the data to be printed. Communications occur in three basic ways:
• By a cable between the printer and its host terminal
• Infrared (usually by means of the industry standard
IrDA protocol) Units with the IrDA option can be
identified by the “IR” logo on the unit’s keypad.
• Using Bluetooth wireless communications. Cameos with the Bluetooth option will have a Bluetooth
continued next page
C
AMEO
2 C
OMMUNICATIONS
IR Communications
Window
Serial Communications
(Cable) Port
C
AMEO
3 C
OMMUNICATIONS
The IrDA logo or the
Bluetooth logo will appear
here if those options are
installed.
Page 24

O-16
UMAN-CM2/3
logo on the lower left corner of the keypad.
• By means of a wireless LAN (Local Area Network)
(Cameo 3 Network Printers only) Cameo 3 Network printers are identified by a “Cameo 3N” logo,
and an extension to the bottom cover.
Cable Communications
All Cameo printers can communicate by cable; the
specific cable supplied with your printer will vary with the
host terminal. The 8- pin circular connector on your
communications cable plugs into the serial communications port on the side of the Cameo printer. (Refer to the
Specifications Section of this manual for communications
port pin assignments.)
The connector is keyed to assure correct alignment; do
not try to force it if it does not plug in. The other end of
the cable must be plugged into the host terminal. Communications between the terminal and the printer is
controlled by the applications running on the terminal and
the printer.
Page 25

O-17 UMAN-CM2/3
continued next page
IR Communications
Printers equipped for infrared (IR) communications are
identified by a small “IR” logo on the unit’s keypad. IR
allows wireless communications between the printer and
the host terminal. IR units can also communicate with a
cable as detailed above, however, IR functions are disabled when the cable is plugged in. Cameo units with the
IR option can be configured to conform to the standard
IrDA communications protocol
Linking a Printer to an IrDA Host
IrDA compliant terminals will automatically initiate
communications to the printer. First insure that there is a
direct line of sight between the printer and the terminal
that will be sending data. The IR window on the front of
the Cameo must face the corresponding window on the
terminal to properly send and receive signals. An IrDA
compliant terminal will seek out any linkable devices and
establish communications between them, even turning
the printer on if necessary.
Page 26

O-18
UMAN-CM2/3
Wireless Communications with Bluetooth using the
ZBR3 Radio
The following section only applies when the Bluetooth ZBR3 Module (FCC ID:
I28MD?BTC2TY2) is installed in the Cameo printer (note that only one of the radio options
can be installed in the printer at one time).
“Bluetooth” is a worldwide standard for the exchange of
data between two devices via radio frequencies.
Bluetooth radios are relatively low powered to help prevent interference with other devices running at similar
radio frequencies. This limits the range of a Bluetooth
device to about 10 meters (about 32 feet).
Both the printer and the device it communicates with
must follow the Bluetooth standard.
Exposure to Radio Frequency Radiation
The radiated output power of this internal Bluetooth radio is far
below the FCC radio frequency exposure limits. Nevertheless, this
Bluetooth radio must be used in such a manner that the antenna is
2.5 cm or further from the human body.
The radio and antenna are mounted internally in this printer such
that when the printer is worn with the back of the printer against
the body and the front of the printer (where paper exits) away from
the body, then the 2.5 cm distance between the antenna and the
users body will be met. Do not use the printer in an unauthorized
manner.
The internal Bluetooth radio operates within guidelines found in
radio frequency safety standards and recommendations. The level
of energy emitted is far less than the electromagnetic energy
emitted by other wireless devices such as mobile phones.
Page 27

O-19 UMAN-CM2/3
European Regulatory Information for the ZBR3 Bluetooth
Radio
This device is intended for use in all EU and EFTA member states.
Europe – EU Declaration of Conformity
This device complies with the essential requirements of the R&TTE
Directive 1999/5/EC. The following test methods have been applied in
order to prove presumption of compliance with the R&TTE Directive 1999/
5/EC:
• EN 60950: 2000
Safety of Information Technology Equipment
• EN 300 328-2 V1.4.1 (2003-04)
Technical requirements for spread-spectrum radio equipment
• EN 301 489-1/-17 V1.4.1/1.2.1 (2002-08)
EMC requirements for spread-spectrum radio equipment.
This device is a 2.4 GHz wireless LAN transceiver, intended for indoor
home and office use in all EU and EFTA member states.
Bluetooth Networking Overview
In order to exchange data, two Bluetooth enabled
devices must establish a connection. Bluetooth software
is always running in the background, ready to respond to
connection requests. One device (known as the
master
or the
client)
must request a connection with another.
The second device (the
slave
or the
server
) then accepts
or rejects the connection. A Bluetooth enabled QL 320
will normally act as a slave, but in theory any Bluetooth
device can be either a master or a slave. This miniature
network is sometimes referred to as a “piconet” and can
consist of several Bluetooth enabled devices.
Each Bluetooth enabled Cameo printer has a unique
Bluetooth Device Address (BDA) loaded into its radio
module when manufactured. For the most part, communications using the Bluetooth protocol are initiated and
processed without any operator intervention, much like
the IrDA system described previously.
0336
Important Notice:
This device is a portable RF printer intended for
commercial and industrial use in all EU and
EFTA member states.
Page 28

O-20
UMAN-CM2/3
PRINTER SPECIFICATIONS
Physical
Cameo 2 Cameo 2
SC
Cameo 3/ 3SC/ 3N
Height 6.6" (168 mm) 7.3” (185 mm) 6.2” (158 mm) (3)
8.2” (208 mm)(3SC,N)
Width 3.7" (94 mm) 3.7" (94 mm) 4.6” (117 mm)
Depth 2.6" (66 mm) 2.6" (66 mm) 2.6” (66 mm)(3, 3SC)
3.5” (89 mm) (3N)
Weight* 1.15 lbs. (.5 kg) 1.35 lbs (.6 Kg) 1.4 lbs. (.64 kg) (3)
1.6 lbs (.73 kg) (3SC)
* Weight is with battery , no media loaded 1.9 lbs. (.86 kg.) (3N)
Environmental
Operating temperature: 5° to 122°F (-15° to 50°C)
Storage temperature: -13° to 158°F (-25° to 70°C)
Relative humidity: 10%-90% non-condensing
Cameos automatically compensate for head temperature when printing. Protection circuitry
prevents damage due to excessive printhead temperatures.
Printing Characteristics
Cameo 2, 2
SC
Cameo 3/3N
Printhead Width: 1.9" (48 mm) 2.83” (72 mm)
Number of Dots: 384 574
Printhead Life 1,950,000" (50 Km nominal)
(estimated)
Technology Direct Thermal
Print Speed up to 3 IPS (76.2 mm/sec.)
Printhead Density 203 DPI (8 dots/mm)
Communications Specifications
Standard Built-in RS-232 port for one or two-way
Communications cable communication to terminal or other
host up to 38.4K BPS.
Programmable RTS/CTS (hardware) and XON/
XOFF protocols are supported. Default
communications parameters are:
Handshaking = RTS/CTS, Baud Rate = 19,200
Parity = None; Data Bits = 8; Stop Bits = 1
Optional Wireless Optional infrared communications via industry
Communications standard IrDA specifications.
Optional Bluetooth radio
Wireless LAN via 802.11b protocol (Cameo 3
only)
Page 29

O-21 UMAN-CM2/3
Communications Port
Pin Pin Signal Signal
Number Name Type Description
1RXD input Receive Data
2 TXD output Transmit Data
3 CTS input Clear To Send from host
4RTS output Request To Send
set high when printer
is ready to accept command/
data
5 GND Ground
6NC No Connect
7DSR input Data Set Ready: Low to high
transition turns printer on,
High to low transition turns
printer off (if enabled)
8 DTR output Data Terminal Ready
high when printer is on (set at
battery voltage for “S” models)
8
7
6
4
2
1
5
3
C
OMMUNICATIONS PORT
(8
PIN CIRCULAR
DIN)
Power
Cameos utilize removable NiMH battery packs. If not connected to a
terminal with DTR present, the Cameo will automatically power off to
conserve battery life. The time-out value can be programmed from the
host terminal; the factory default time-out is two minutes.
Additional power features include:
• Low battery indicated by flashing LED and reported to terminal on demand
• Power On/Off controlled from terminal or keypad
Media Specifications
Cameo 2 Cameo 3
Max. Print Width 1.9" (48.3 mm) 2.83” (71.9 mm)
Max. Roll O.D. 2.25” [57 mm] 2.25” [57 mm]
Core Diameter .75” [19 mm] min. .75” [19 mm] min.
continued
Page 30

O-22
UMAN-CM2/3
Media Width Settings
(all dimensions ±.05” [±1.3 mm]
Cameo 2 series Cameo 3 series
0.72 (18.2 mm) 1.47 (37.3 mm)
0.85 (21.6 mm) 1.60 (40.64 mm)
0.97 (24.6 mm) 1.72 (43.7 mm)
1.10 (27.9 mm) 1.85 (47.0 mm)
1.22 (31.0 mm) 1.97 (50.0 mm)
1.35 (34.3 mm) 2.10 (53.3 mm)
1.47 (37.3 mm) 2.22 (56.4 mm)
1.60 (40.64 mm) 2.35 (59.7 mm)
1.72 (43.7 mm) 2.47 (62.7 mm)
1.85 (47.0 mm) 2.60 66.0 mm)
1.97 (50.0 mm) 2.72 (69.1 mm)
2.13 (54.1 mm)
1
2.85 (72.4 mm)
2.97 (75.4 mm)
3.10 (78.7 mm)
1
1. This width available only with edge guide removed.
Media T ype
• Paper Journal
• Two-part thermal receipts
• Linerless labels (on linerless models only)
• Drop-in stock loading
Resident Hardware/Memory Features
• 25 Resident fonts
• Optional international character fonts
• Flash memory for down-loadable programs, label formats, fonts and
graphics
• Fully scalable fonts
• Built-in graphics support
Software Features
•Vertical or horizontal printing
• Left, right, or center justification
• Scale to fit
•Concatenation
• Line print mode- ideal for receipt printing
• Programmable label odometer with on-demand terminal reporting
• Serial number reporting to terminal on demand
• Automatic printhead temperature compensation
• Programmable inactivity shut-off
• Out of paper/open cover error LED indicator
• Power On/Off from terminal or built-in keypad
continued
Page 31

O-23 UMAN-CM2/3
Accessories and Options
• Single battery pack fast charger/conditioner
• Four battery pack fast charger/conditioner
•Vehicle Charger
• Extra NiMH battery pack
•Variety of interface cables
• IrDA Option
• Bluetooth wireless interface option
• Soft carrying case
• Protective rubber boots for severe use
Page 32

Page 33

A-1
APPENDIX A
INTERFACE CABLES
Pin 1
Pin 9
DB-9 Pin
Female Plug
(to P.C.)
8 Pin
Male Plug
(to printer)
(TXD)
(RXD)
(RTS)
(CTS)
(GND)
(DTR)
(DSR)
Shield
(RXD)
(TXD)
(CTS)
(RTS)
(GND)
(DSR)
(DTR)
Shield
3
2
7
8
5
4
6
1
2
3
4
5
7
8
1
4
6
7
3
5
8
2
PC Signals Printer Signals
Part Number BL11757-000
8-Pin DIN to 9-Pin DB PC Cable
This part is also available as a coiled cable under
Part Number BL15063-1.
For Use With a Personal Computer
Page 34

A-2
APPENDIX A
INTERF ACE CABLES
Cable Cord Terminal Printer
Terminal Part Number Lgth/Type Connector Connector Notes
COMPSEE
Apex II BL12093-3 8’ Coiled RJ45 8 Pin DIN
NORAND
RT1100/1700 Series BL11537-1 8’ /Coiled 6 Pin MinDIN 8 Pin DIN Over-molded
RT1100/1700 Series BL11537-2 12’/Coiled 6 Pin MiniDIN 8 Pin DIN Over-molded
RT5900 Series BL12803-1 8’ /Coiled 15 Pin D-Sub 8 Pin DIN
RT1100/1700 Series BL12804-1 8’ /Coiled 6 Pin MiniDIN 8 Pin DIN -Locking
RT1100/1700 Series BL13298-1 8’ /Coiled 6 Pin MiniDIN 8 Pin DIN Over-molded Auto ON/OFF
RT1100/1700 Series BL13309-1 8’ /Coiled 6 Pin Mini DIN 8Pin DIN Auto ON/OFF
SYMBOL
PDT3300 Series BL11391-000 8’ /Coiled DB25 male 8 Pin DIN
PDT4100 Series BL11757-000 6’ /Straight 9 Pin DB Fem. 8 Pin DIN Must be used with Symbol RS232
Adapter - Symbol PN#25-12059-01
PDT3100/3500 BL12093-1 8’ /Coiled RJ45 8 Pin DIN a. Power On/Off (+5V) b. Used for the
/6100 Series Percon Falcon
PDT3100 Series BL12093-2 8’ /Coiled RJ45 8 Pin DIN Power On/Off (DTR Line)
SPT1700 Series BL15483-1 9’ /Coiled Cradle 8 Pin DIN No Power On/Of f (DTR Line)
SPT2700 Series BL15482-1 9’ /Coiled Cradle 8 Pin DIN Power On/Off (DTR Line)
LRT/LDT3800 Series CC11371-3 6’ /Coiled PIM Optical 8 Pin DIN “S” Printers Only
LRT/LDT3800 Series CC11371-4 6’ / Coiled PIM Optical 8 Pin DIN “S” Printers Only
(2 Way)
Page 35

APPENDIX A
INTERFACE CABLES (continued)
A-3
Cable Cord Terminal Printer
Terminal Part Number Lgth/Type Connector Connector Notes
SYMBOL (CONT.)
LRT/LDT3800 CC11371-5 6’ / Coiled PIM Optical 8 Pin DIN “S” Printers Only
& 6800 Series
TEKLOGIC
7030 ILR BL13285-2 Coiled 36 Pin IDC Fem 8 Pin DIN
7025 ILR BL13285-1 Coiled 15 Pin DB male 8 Pin DIN
TELXON
960 BL11122-1 8’ /Coiled RJ45 8 Pin DIN
960SL Adapter CC13711-1 n/a n/a n/a
for BL1 1122-1
960 (BL1 1122-1) CP74005 n/a n/a n/a
& 960SL (CC13711-1)
960 BL12996-1 8’ /Coiled RJ45 8 Pin DIN-Locking
860 & 912 CL11314-000 8’ /Coiled DB25 8 Pin DIN
Page 36

APPENDIX C
MAINTENANCE SUPPLIES
In addition to using quality media provided by Zebra, it is
recommended that the printhead be cleaned as prescribed in the maintenance section. The following items
are available for this purpose:
• Cleaning Pen (10 pack), Reorder No. AN11209-1
• Cleaning Kit with Cleaning Pen, and Cotton Swabs,
Reorder No. AT702-1
A-4
APPENDIX B
MEDIA SUPPLIES
To insure maximum printer life and consistent print quality
and performance for your individual application, it is
recommended that only media produced by Zebra be
used. These advantages include:
• Consistent quality and reliability of media products.
• Large range of stocked and standard formats.
• In-house custom format design service.
• Large production capacity which services the needs
of many large and small media consumers including
major retail chains world wide.
•Media products that meet or exceed industry standards.
For more information call Zebra Technologies Corporation at +1.866.230.9495 (U.S., Canada and Mexico) and
ask to speak to a Media Sales Representative.
Page 37

Serial
Number
Label
Product
Configuration Code
(PCC) Label
A-5
APPENDIX D
PRODUCT SUPPORT
When calling with a specific problem regarding your
printer, please have the following information on hand:
• Model number/type (e.g. Cameo 2)
• Unit serial number
• Product Configuration Code (PCC)
For product support, contact Zebra Technologies at:
www.zebra.com
Zebra Technologies International, LLC
333 Corporate Woods Parkway
Vernon Hills, Illinois 60061-3109 USA
Phone: +1.847.793.2600 or
+1.800.423. 0422
Fax: +1.847.913.8766
Zebra Technologies Europe Limited
Zebra House
The Valley Centre, Gordon Road
High Wycombe
Buckinghamshire HP13 6EQ, UK
Phone: +44.1494.472872
Fax: +44.1494.450103
Zebra Technologies
Latin American Sales Office
9800 NW 41ST Street
Suite 220
Doral, Florida 33178 USA
Phone: +1.305.558.8470
Fax: +1.305.558.8485
Zebra Technologies Asia Pacific, LLC
1 Sims Lane, #06-11
Singapore 387355
Phone: +65-68580722
Fax: +65-68850838
Page 38

A-6
APPENDIX D
BATTERY DISPOSAL
The EPA certified RBRC® Battery Recycling Seal on the Nickel-Metal Hydride
(Ni-MH) battery supplied with your printer
indicates Zebra Technologies Corporation
is voluntarily participating in an industry
program to collect and recycle these batteries at the end of their useful life, when taken out of
service in the United States or Canada. The RBRC
®
program provides a convenient alternative to placing
used Ni-MH batteries into the trash or the municipal
waste stream, which may be illegal in your area.
Please call 1-800-8-BATTERY for information on Ni-MH
battery recycling and disposal bans/restrictions in your
area. Zebra Technologies Corporation’s involvement in
this program is part of our commitment to preserving our
environment and conserving our natural resources.
Outside North America, please follow local battery recycling guidelines.
PRODUCT DISPOSAL
Do not dispose of this product in unsorted
municipal waste. This product is recyclable. Please recycle according to your
local standards. For more information,
please see our web site at:
http://www.zebra.com/recycle
Page 39

A-7
D275,286
D347,021
D389,178
D430,199
D433,702
3,964,673
4,019,676
4,044,946
4,360,798
4,369,361
4,387,297
4,460,120
4,496,831
4,593,186
4,607,156
4,673,805
4,736,095
4,758,717
4,816,660
4,845,350
4,896,026
4,897,532
4,923,281
4,933,538
4,992,717
5,015,833
5,017,765
5,021,641
5,029,183
5,047,617
5,103,461
5,113,445
5,140,144
5,132,709
5,142,550
5,149,950
5,157,687
5,168,148
5,168,149
5,180,904
5,229,591
5,230,088
5,235,167
5,243,655
5,247,162
5,250,791
5,250,792
5,262,627
5,267,800
5,280,163
5,280,164
5,280,498
5,304,786
5,304,788
5,321,246
5,335,170
5,364,133
5,367,151
5,372,439
5,373,148
5,378,882
5,396,053
5,396,055
5,399,846
5,408,081
5,410,139
5,410,140
5,412,198
5,415,482
5,418,812
5,420,411
5,436,440
5,444,231
5,449,891
5,449,893
5,468,949
5,479,000
5,479,002
5,479,441
5,486,057
5,503,483
5,504,322
5,528,621
5,532,469
5,543,610
5,545,889
5,552,592
5,570,123
5,578,810
5,589,680
5,612,531
5,642,666
5,657,066
5,768,991
5,790,162
5,791,796
5,806,993
5,813,343
5,816,718
5,820,279
5,848,848
5,860,753
5,872,585
5,874,980
5,909,233
5,976,720
5,978,004
5,995,128
5,997,193
6,004,053
6,010,257
6,020,906
6,034,708
6,036,383
6,057,870
6,068,415
6,070,805
6,095,704
6,109,801
6,123,471
6,147,767
6,151,037
6,201,255 B1
6,231,253 B1
6,261,009
6,261,013
6,267,521
6,270,072 B1
6,285,845 B1
6,292,595
6,296,032
6,364,550
6,379,058 B1
6,409,401 B1
6,411,397 B1
6,428,227 B2
6,530,705
6,540,122
6,607,316
6,609,844
This product and/or its use may be covered by one or more of the
following US patents and corresponding international patents
worldwide
PATENT INFORMATION
Page 40

 Loading...