

Page 1

Page 2

Zebra® A100
User’s Guide
Customer order # 55501L
Manufacturer part # 55501LB Rev. 3
Page 3

ZebraA100 Users Guide
Proprietary Statement
This manual contain s proprietary i nf ormati on of Zebra Technologies Corporati on. It is intended solely for the information and
use of parties operating and maintaining the equipment described herein. Such proprietary information may not be used, reproduced, or disclosed to any other parties for any other purpose without the expressed written permission of Zebra Technologies
Corporation.
Product Improvements
Continuous improvement of products is a policy of Zebra Technologies Corporation. All specifications and signs are subject to
change without notice.
FCC Compliance Statement
Note: T his equipment has been tested and found to comply with the limits for a Class A digital Device, pursuant to Part 15 of
the FCC Rules. These limit s are designed to provide reasonable protectio n against harmful interference when the equipment is
operated in a commercial environment. This equipme nt generates, uses and can radiate radio frequency energy and, i f not
installed and used in accordance w ith the instructions manual, may cause harmful interference to radio communications. Operation of this equipment in a residential area is likely to cause harmful interfer e nce in which case the user will be required to correct the interference at his own expense.
In order to insure compliance, this printer must be used with Shielded Commu n ication C ables.
“The user is cautioned that any changes or modifications not expressly approved by Zebra Technologies Co rporation could void
the user’s authority to operate the equipment.”
Canadian DOC Compliance Statement
This digital apparatus does not exceed the Class A limits for radio noise emi ssi ons from digital apparatus as set out in the radio
interference regulations of the Canadian Department of Communications.
CE Compliance
If the accompanying printer displays the CE mark, it also meets EMC directive 89/336/EEC, with ammendments effective at the
time of manufacture.
Liability Disclaimer
Zebra Technologies Corporation takes steps to assure that its published Engineering specifications a nd Manuals are correct;
however, errors do occur. Zebra Technologies Corporation has been advised of the possibility of such damages. Because so me
states do not al low the exclusion or limitation of li a bility for consequential or i ncidental damages, the above limitation may not
apply to you.
Copyrights
This copyrighted manual and the label printer described herei n are owned by Zebra Technologies Corporation. All rights are
reserved. Unauthorized reproducti on of t his manual or t he software in the label printer may result in imprisonment of up to one
year and fines of up to $10,000 (17 U.S.C.506). Copyrig ht violators may be subject to civil liability.
All trademarks are the property of their respective owner s. Zebra, ZPL, and ZPL II are registered trademarks of Zebra Technologies Corporation. Windows is a trademark of Microsoft Corporation. IBM is a registered trademark of International Business
Machines Corp.
© Zebra Technologies Corporation. All rights reserved.
Page 4

ZebraA100 Us er s Guid e
Contents
Introduction. . . . . . . . . . . . . . . . . . . . . . . . . . . . . . . . . . . . . . . . . . . . . . . . . . 1
Unpacking and Inspection . . . . . . . . . . . . . . . . . . . . . . . . . . . . . . . . . . . . . . . 1
Additional Requirements. . . . . . . . . . . . . . . . . . . . . . . . . . . . . . . . . . . . . . . . 1
Setting Up the Zebra A100 Printer . . . . . . . . . . . . . . . . . . . . . . . . . . . . . . . . 2
Setting Up the Software . . . . . . . . . . . . . . . . . . . . . . . . . . . . . . . . . . . . . . . 11
Operating the Syst em . . . . . . . . . . . . . . . . . . . . . . . . . . . . . . . . . . . . . . . . . 1 4
Prevent ive Maint ena nce . . . . . . . . . . . . . . . . . . . . . . . . . . . . . . . . . . . . . . . 16
Troubleshooting. . . . . . . . . . . . . . . . . . . . . . . . . . . . . . . . . . . . . . . . . . . . . . 17
Specificatio ns . . . . . . . . . . . . . . . . . . . . . . . . . . . . . . . . . . . . . . . . . . . . . . . 1 8
Software L icense Agreement . . . . . . . . . . . . . . . . . . . . . . . . . . . . . . . . . . . 21
Warrant y . . . . . . . . . . . . . . . . . . . . . . . . . . . . . . . . . . . . . . . . . . . . . . . . . . . 22
i
Page 5

ZebraA100 Users Guide
1
2
3
4
3
5
6
14
13
12
11
10
6
1
Media cover
2
Media holder
3
Media guides
4
Tear bar
5
Printhead
6
Print mechanism latches
7
Peel-of f r oller
9
8
8
Peel-off door latches
9
Platen roller
10
Power/fault lights
11
Feed button
12
Printhead op en sensor
13
Paper out sensor
14
Label presentation sensor
7
ii
Figure 1: Printer Overview
Page 6

ZebraA100 Us er s Guid e
Introduction
This manual provides all of the information you w ill need to operate your
printer on a dail y basis. T o print labels, tags, or tickets with the A100 printer,
refer to the instru ct ion s inclu d ed wit h the soft ware yo u are usi ng to crea te
the label.
Unpacking and Inspection
Save the carto n and all packin g materia ls in case shippi ng is ever require d .
Inspect the printer for possible damage incurred during shipment. xIf you
discover shipping dam age upon inspection:
• Immediately not ify the shippi n g compan y of the damage .
• Retain all pack aging materi al for shippin g compan y inspec tio n.
• File a damage repo rt wit h the shippin g compan y and no tify your lo cal
distribut or and Zebra Techn olog ies Corpo rat ion of the damag e.
Zebra Tec hnol ogi es Co rpora ti on is not respon sibl e for any damage incurred
during shipment of the equip men t and will no t rep a ir this damage un der warranty. Immediate notification of damage to the shipping company or its
insuring agen cy will generally result in ensuring any damage claim validity
and ult im at e mo net ary compen s a tion.
Addition al Requirements
• Shielded parallel data cable
• Power cord—f o r 230 VAC operation only (120 VAC units come with a
power cord)
1
Page 7

ZebraA100 Users Guide
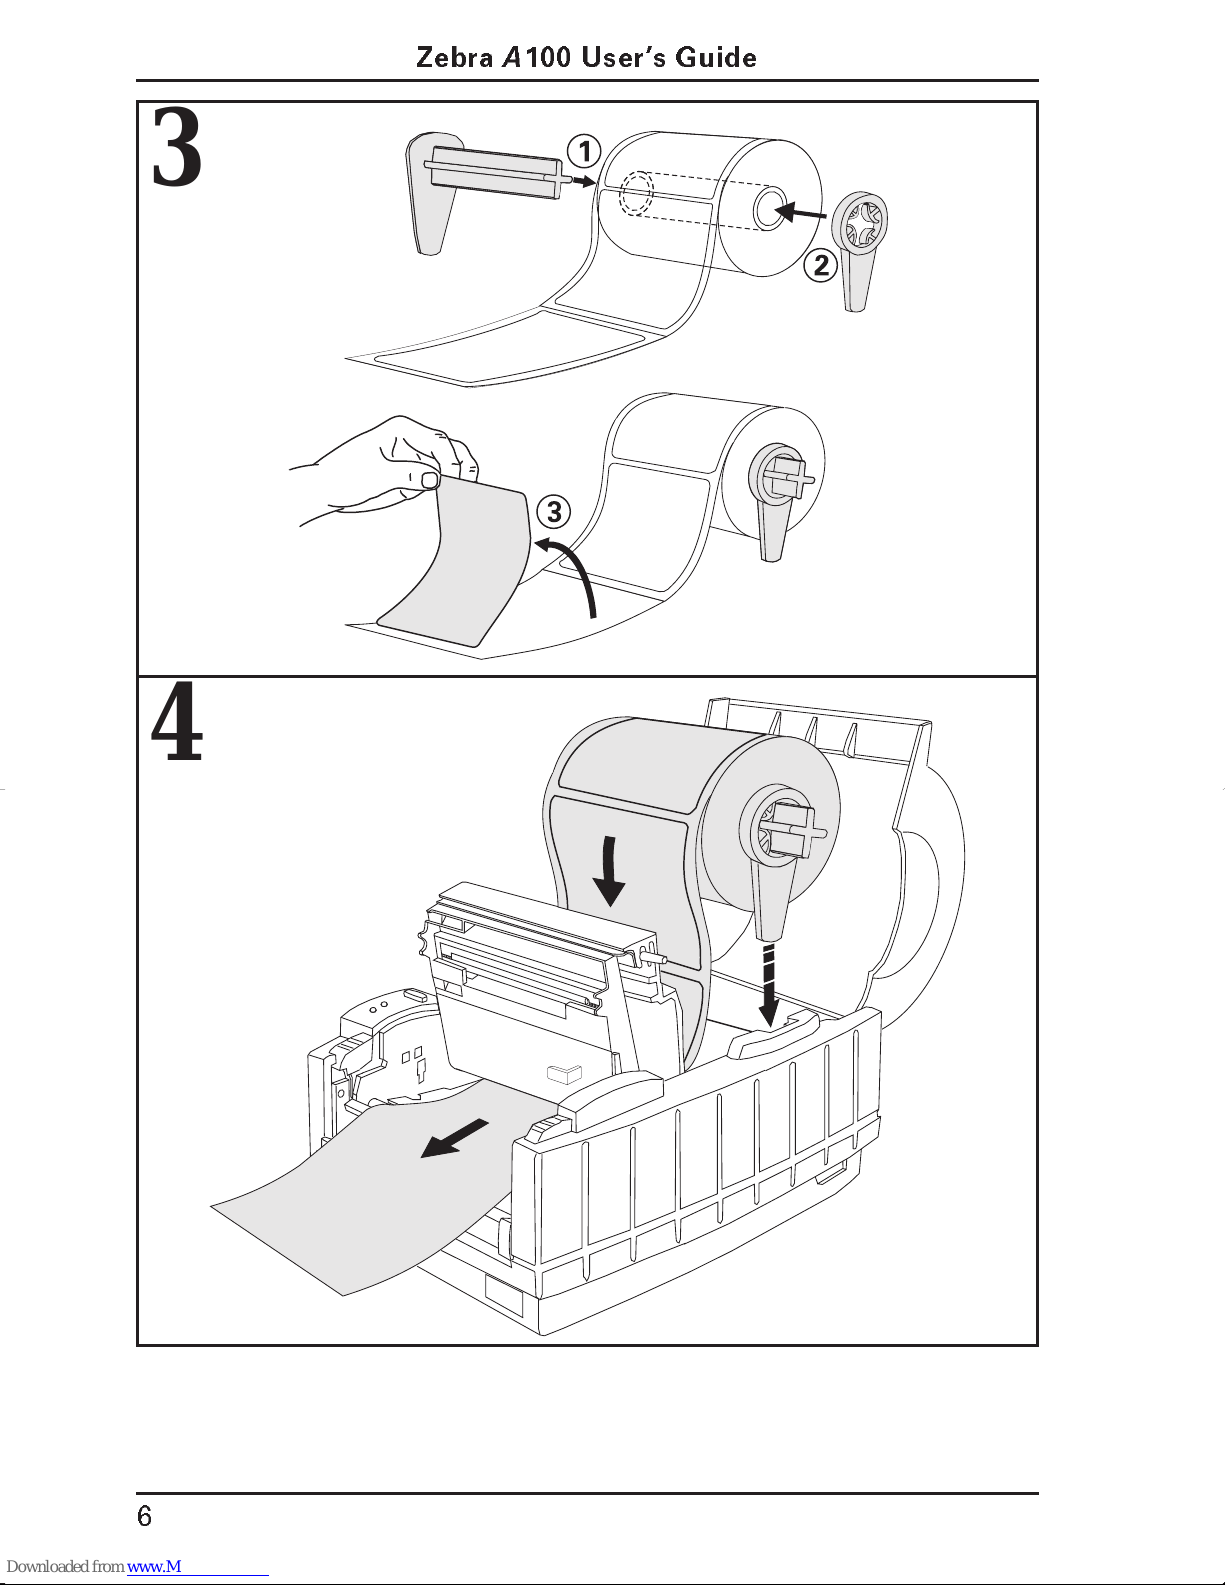
Setting Up the Zebra
Tear-Off Mode of Operation
1
A
100 Printer
2
2
Page 8

3
4
ZebraA100 Us er s Guid e
3
Page 9

ZebraA100 Users Guide
5
1
2
3
6
7
4
Page 10

ZebraA100 Us er s Guid e
Peel-Off Mode of Operation
1
2
5
Page 11
3
ZebraA100 Users Guide
4
6
Page 12

ZebraA100 Us er s Guid e
5
1
2
3
6
7
Page 13

7
ZebraA100 Users Guide
8
8
Page 14

ZebraA100 Us er s Guid e
Fanfold Media Loading
1
2
9
Page 15

ZebraA100 Users Guide
Connecting the ZebraA100 Printer to the Computer
Figure 2: Parallel Connection
10
Page 16
ZebraA100 Us er s Guid e
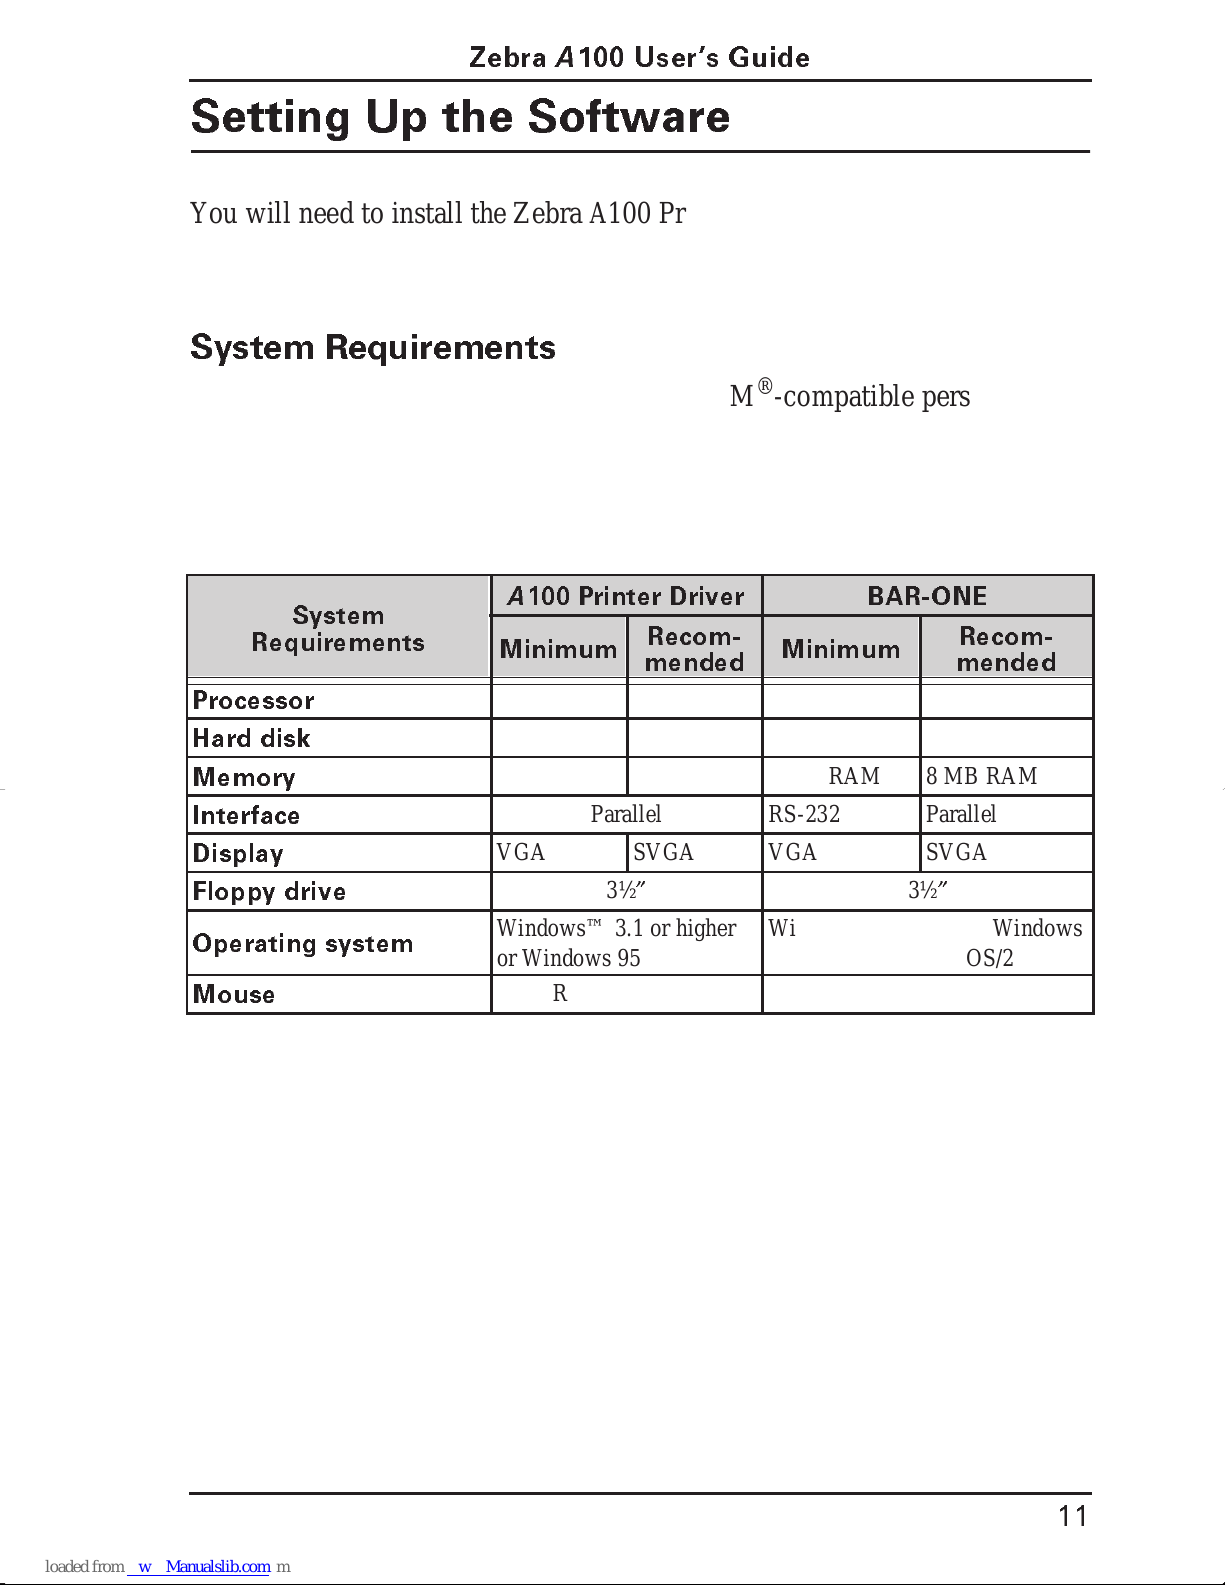
Setting Up the Software
You will nee d to install the Zebra A100 Printer Drive r on yo ur com puter
before you can operate your printer. Also included for your use with the
Zebra A100 printer is BAR-ONE software, a powerful label design program.
System Requirements
The Zebra A100 software works with most IBM®-compatible personal computers available today. The software ma y be installed and up-and-running
within a few minutes. Ref er to the on-line help sy stem and to the Read-Me
file for fur t her in formation and / or last-minute upda tes. The softwa re may be
installed on any com put er th at mee ts the follow i ng sy stem requireme nts:
A
System
Requirements
100 Printer Driver
Minimum
Recom-
mended
Minimum
BAR-ONE
Recom-
mended
Processor
Hard disk
Memory
Interfac e
Display
Floppy drive
Operating system
Mouse
* A 386 16MHz computer will work but print speed may be slightly reduced.
486SX* 486SX 486SX 486SX
3 MB 10 MB 3 MB 10 MB
4 MB RAM 8 MB RAM 4 MB RAM 8 MB RAM
Parallel RS-232 Parallel
VGA SVGA VGA SVGA
3½
²
Windows™ 3.1 or higher
or Windows 95
RS-232 or PS/2 RS-232 or PS/2
Windows 3.1 or higher, Windows
NT, or Windows 95; OS/2
3½
²
11
Page 17
ZebraA100 Users Guide
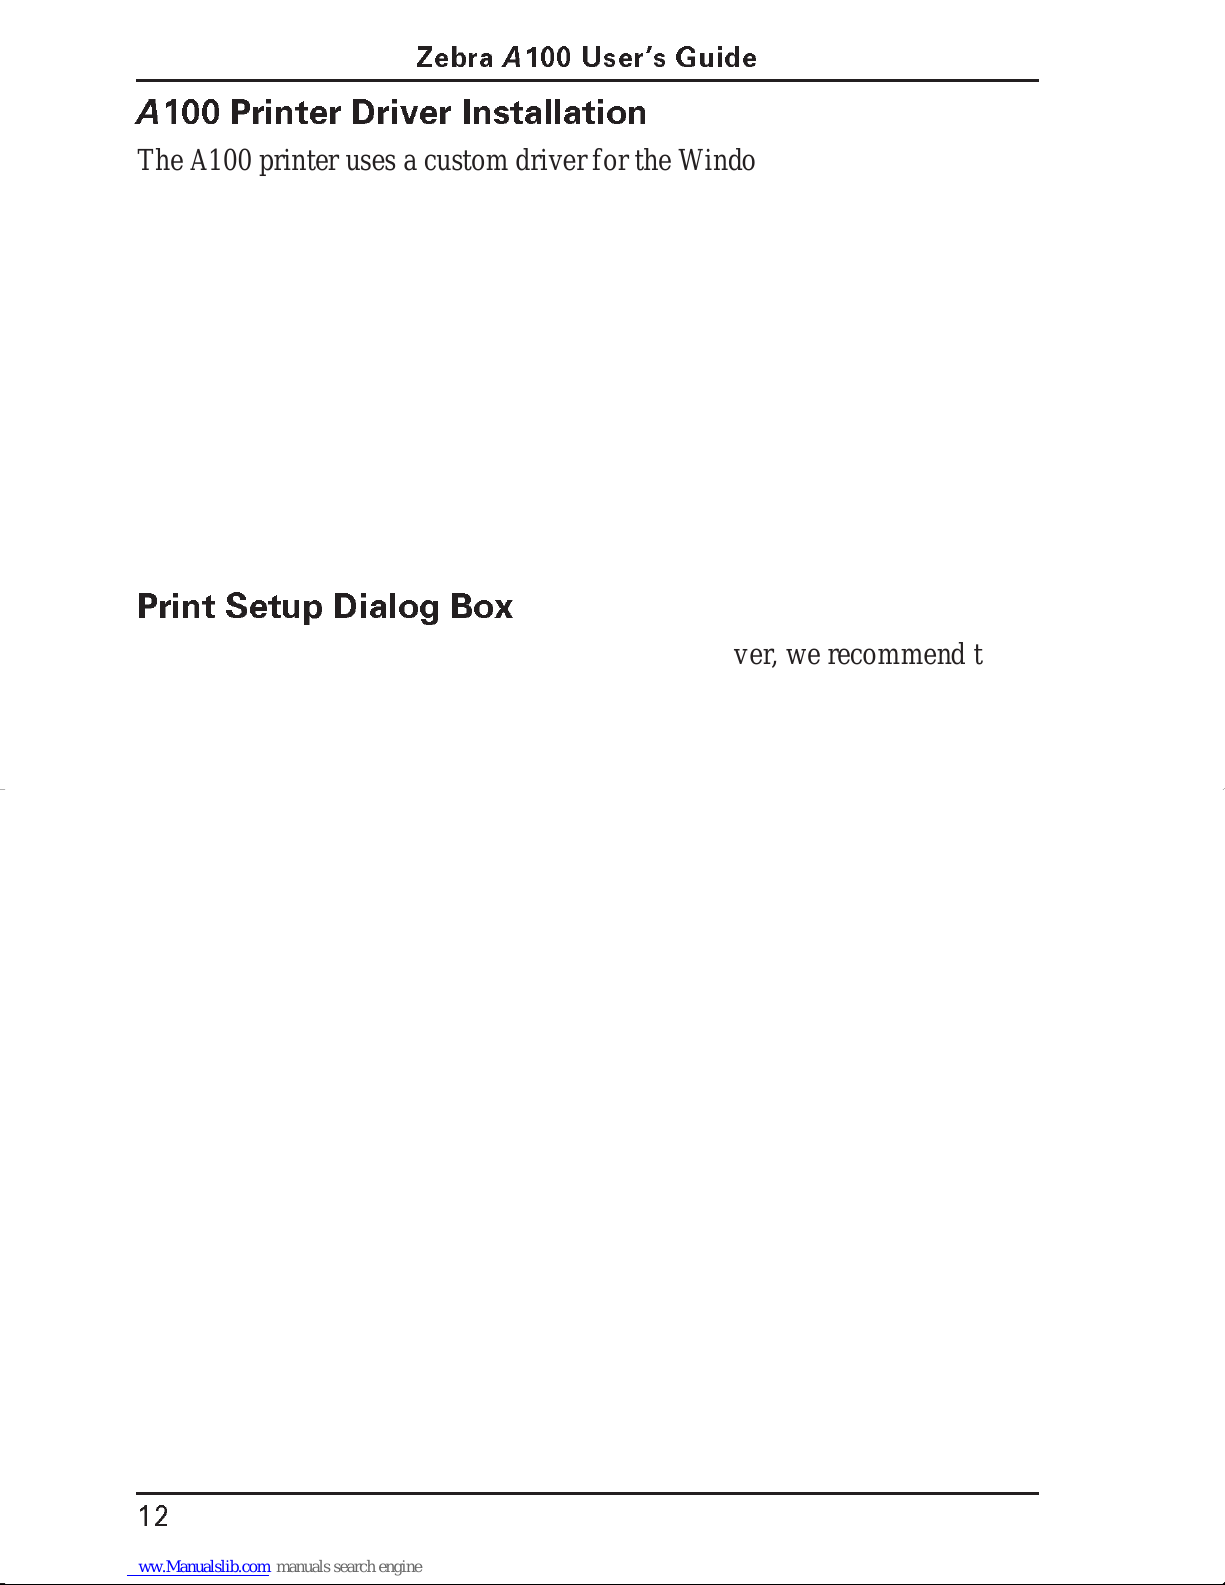
A
100 Printer Driver Installation
The A100 printer us es a custom driver for the Windows operating system
that allows your Windows appl ication s to print to it.
1. Start Windows.
2. Insert the Zebra A100 Printer Drive r diskette in your floppy disk drive
(A: or B:).
3. In Progr am Manag er, click on th e File menu. Select Run. (Windows 95
users: select Run fro m th e Start menu)
4. Type A:\SETUP (or B:\SETUP) and then press OK.
5. Follow the on-screen instructions to complete the installation.
Important: You must restart Windows to activate this driver!
Print Setup Dialog Box
After you have installed the Zebra A100 printe r driv e r, we recomme nd th a t
you use the W indo ws Printers Control Panel to configure it befor e you tr y to
pr in t. From t he Main Pro gram Grou p in Windows 3 .1, sel ect Cont rol Panel,
then Print ers, then Zebra A100, then Setup. (Windows 95 users select Start,
then Settings, then Printers , then Zebra A100 then File Properties, then
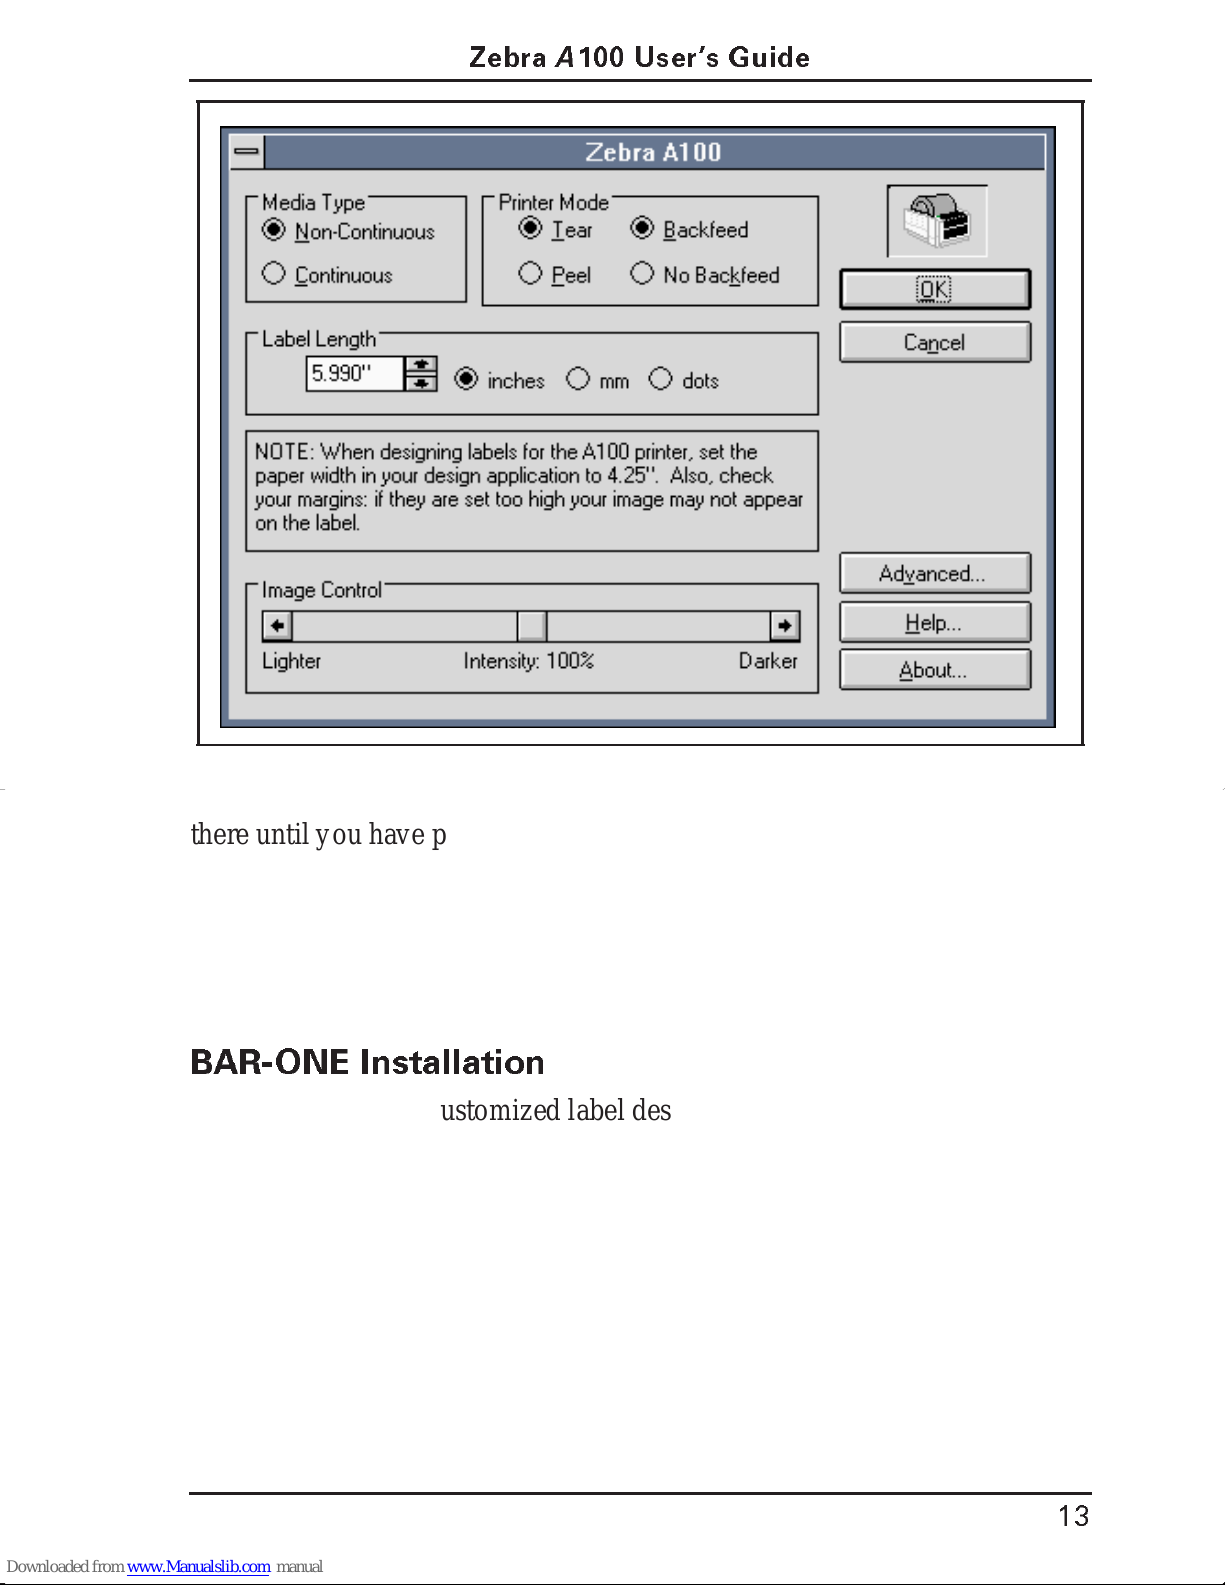
Details, then Setup.) You will then see the Z ebra A100’s Setup Dialog:
If you will use die cut labels or notched tickets or tags, then the Non-Continuous Media Type button is already selected f or you. If instead you are using
continu ous media havin g no gaps or notc hes to ident ify the sta rt and end of
each label, tag, or ticket, then click the Continuous Media Type button.
If you plan to tear off labels, tickets, tags, or strips as they are printed, then
the Tear Mode is already selec te d for y o u . If in st ead yo u are usi ng d ie cut
pressu re se nsit ive labels an d wan t the print er to peel them fro m the backing
and wait for y ou to take them, then click the Peel button. (See “Peel Off
Mode Operation” for instruct ions on proper loading of peel off m edia.)
Enter th e len gth of yo ur label, tag, or ti cke t int o the Label Len gth box by
overtyping or using the up and down arrows. If y ou are using continuous
media, enter the length you want y our label, ticket, or tag to be.
Before printing, the Zebra A100 printer will normally reverse feed slightly to
begin printing at the very top of the next label. If you wish to disable this
feature to save tim e, click the No Backfeed button.
The Image Control slider sets th e darkness of the printed image. The 100%
setting is correct for most thermal media. We suggest you leave the slider set
12
Page 18
ZebraA100 Us er s Guid e
Figure 3: Print Se tup Dialog Bo x
there until you have printed some labels and see a need to change it.
When you are satisfied with y our settings, Click OK.
You can return to the A100’s Setup Dial og at a ny time fr om the Print er s Con-
trol Panel (or Printer Settings in Win dow s 95) and from the print dialog of
most Windows applications.
BAR-ONE Installation
If you wish to use a customized label design pack age to crea te lab els fo r use
with your A100 printer, you may also install BAR-ONE software. However,
this so ftware is optional: you will not need to use BAR-ONE software if you
are printing label formats created in another Windows-compatible application.
1. If you have not installed the A100 Prin ter Dri ver, do so now.
2. Start Windows.
3. In ser t d is k 1 of the BAR-ONE sof t war e in your fl op p y dis k dr ive (A: or
B: ).
4. In Progr am Manag er, cli ck on th e File menu. Select Run. (Windows 95
13
Page 19

ZebraA100 Users Guide
users: select Run fro m th e Start menu.)
5. Type A:\SETUP (or B:\SETUP) and t hen pr ess OK.
6. Follow the on-screen instructions to complete the installation.
Operating the System
To create a label for the A100 printer, you will need to design the label in a
Windows application (such as BAR-ONE) and use that application’s print
setup to select the Zebra A100 printer bef ore y ou print. Alternatively, you
may use the Windows Printe rs Control Panel to select the Z ebra A100 as
your defaul t prin ter for all your Window s applic ati ons. The Zebra A100
printer driver works like any other printer driver: by selecting the Zebra
A100 prin ter in Pr int Set up or in the Windows Printers Co ntro l P anel you ca n
print from most Windows applicat ions to this print er.
Printer Operating Mode s
Tear-O ff M ode.
it is printed.
Peel-Off Mo d e .
is pr inted, the print er wa it s u ntil t he o per a tor rem ove s th e la bel, t he n the ne xt
label is printed.
The ope rator tears off each la bel (o r a strip of labels) as
The backing material is peeled away from the label as it
Operator Controls
Power S witch.
back. The power switch should be turned off before connecting or disconnecting any cables.
Feed Key.
idle (not print ing ) will cause the p rinte r to feed a blank label . H old ing the
Feed Key while turning the power on and for 2 seconds afterward causes a
test pattern to print . See Figure 4. This test pattern al lows you r to quick ly
confirm that the print er is wo rki n g with ou t con n ecti n g it to a comput e r.
In normal use, pressing the Feed Key onc e when the printer is
Located on the right-hand side of the printer near the
14
Page 20

ZebraA100 Us er s Guid e
Figure 4: A1 00 Test Label
Printer Indi c ator Light s.
Po wer
Light
Printer Conditi on
n
O
Power is off or pri nter not receiving power • •
Power is on • •
Communication error or
printhead is over temperature
Paper out or not sensed or
printhead is ope n
••
••
Fault Light
f
f
n
O
O
g
n
i
h
s
f
a
f
l
F
O
Initial Printer Power-Up
Turn the print er on by pre ssi ng the Pow e r Sw i tc h on the rig ht side o f the
print er. The Power and Fault lig hts wil l tur n on. The pr inter per forms a set of
internal diagnostics, and after the diagnostics have been completed (within
1 - 10 seconds) the Fault light will turn off.
If loading the printer with die-cut labels for the first time, press the Feed ke y
once to position the media.
Adjusting the Darkness of the Printing
Use the Windows Prin t ers Set up dia log fro m your Window s appl icat ion or
from the Windows Printers Control Panel to adjust the slide bar labeled
“Relative Darkness”. See “Print Setup Dialog Box” on page 12. Print sample
labels an d adj u st the dark nes s further if nec essa ry.
15
Page 21
ZebraA100 Users Guide
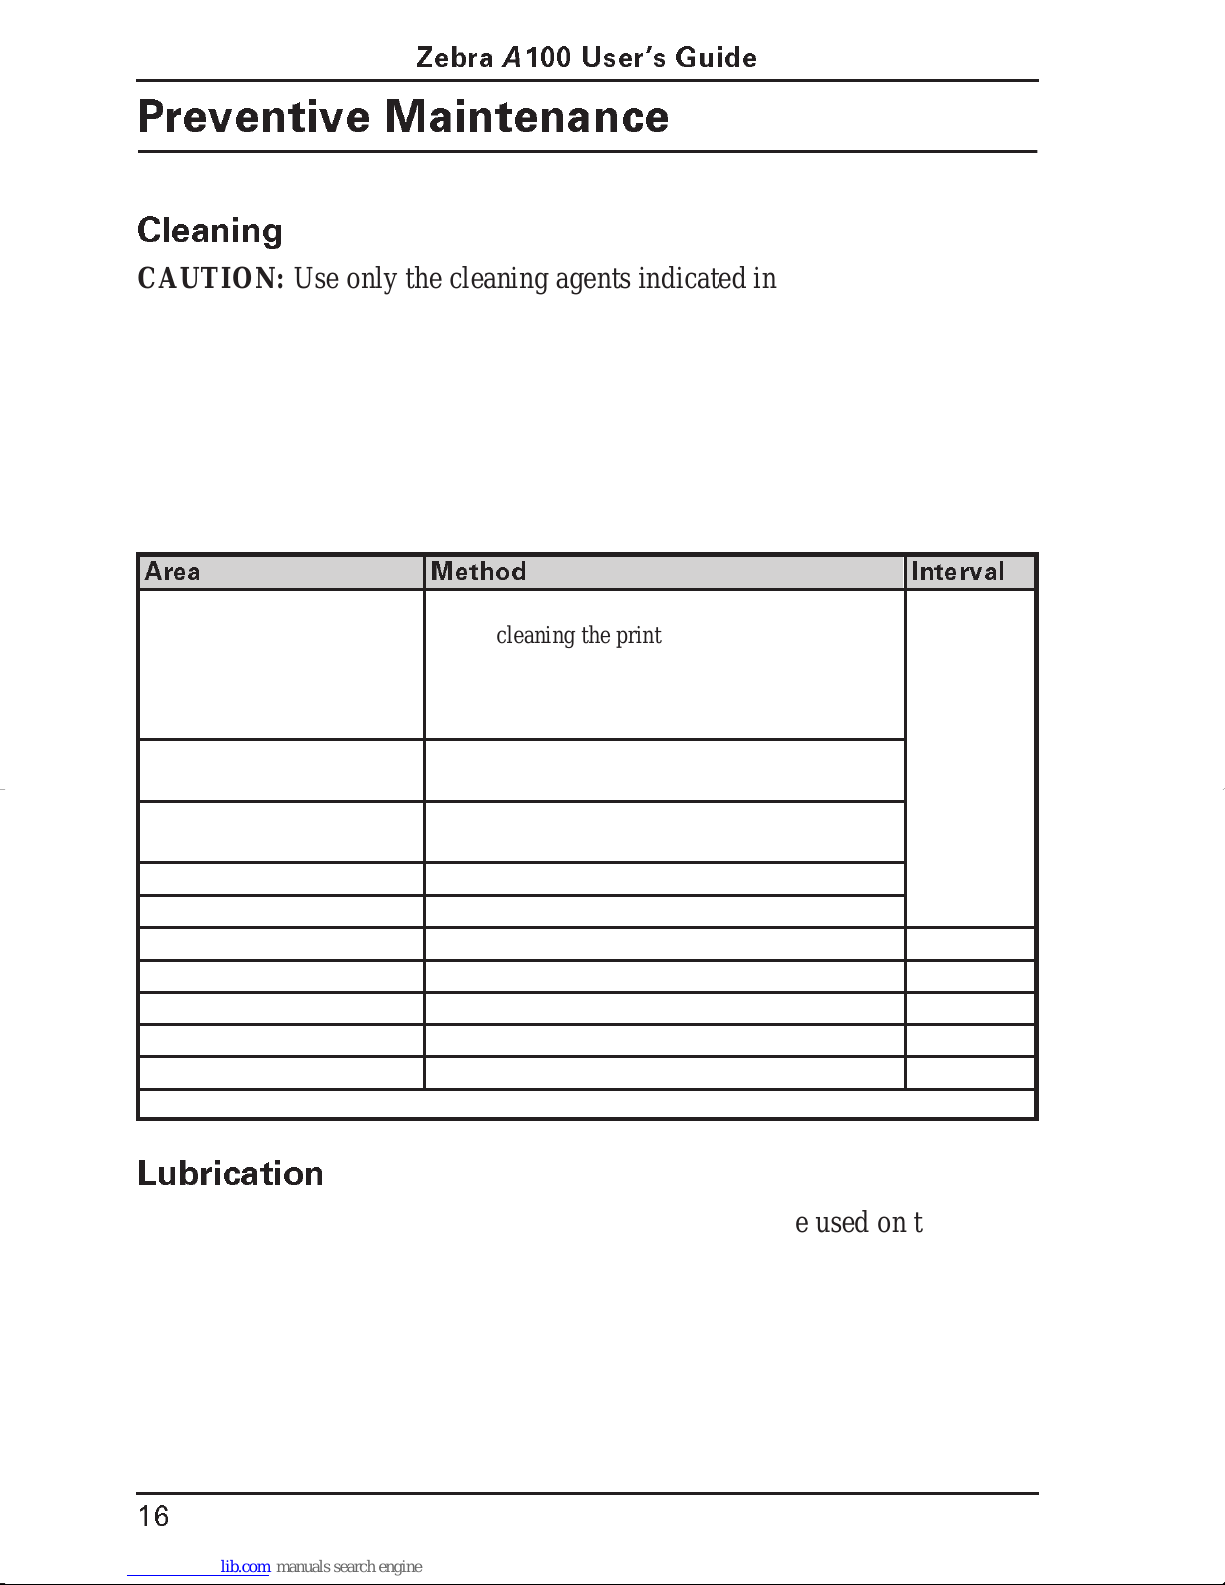
Preventive Maintenance
Cleaning
CAUTION: Use only the cleani ng agents indi ca ted in Table 1. Zeb ra Tech nologies Corpora tio n will not be responsibl e for any other fluid s being used
on this printer.
Inconsistent print quality, such as voids in bar codes or graphics, may indicate a dirty print hea d. For best result s, perf orm the clea ning procedu res in
Table 1. For the location of these printer parts, refer to Figure 1 on page ii.
Table 1. Cleaning Schedule
Area Method Interval
Printhead Note: You do not need to turn the printer off
before cleaning t he printhead. Use solvent* on a
cotton swab to clean the print elements from end
to end. (The print elements are the thin gray line
on the printhead.)
Platen Roller Rotate the platen roller and clean it thoroughly
with solvent* and a cotton swab.
Peel-Off Roller Rotate the peel-off roller and clean it thoroughly
with solvent* and a cotton swab.
Transmissive Media Sensor Air blow
Media Path Solvent*
Peel/Tear Bar Solvent* As needed.
Label Av ailable Sensor Air blow Monthly.
Printhead Open Sensor Air blow As needed.
Exterior Mild detergent or desktop cleaner. As needed.
Interior Brush/vacuum cleaner As needed.
* Zebra rec omm end s usi ng solven t co ntai nin g 70 % isop rop yl al coh ol.
After every
roll of
media (or
500 ft of
fanfold
media)
Lubrication
CAUTION! No lubrica ting age nts of any kind sho uld be used on this
printer! If used, some commercially available lubricants will damage the finish and the mechanical parts.
16
Page 22

ZebraA100 Us er s Guid e
Troubleshooting
Table 2. Troubleshooting
Symptom Diagnosis Action
Power light does not
turn on when Power
switch is turned on.
When printer is first
powered on, the Fault
light remains on.
Fault light is on. Printhead is open. Close printhead.
Printer is not receiving
power.
Printer failed an internal diagnostic test.
Make sure that the power supply is plugged
into the printer and into a wall outlet, power
strip, or other source of power.
Turn printer off and then back on. If the
symptom persists, call a service technician.
Out of media or media
incorrectly loaded.
Fault light is flashing. Printhead is over-
heated.
Communication error:
printer and host computer are not communicating correctly.
Long tracks of missing
print (blank vertical
lines) on several labels.
Printer appears to operate, but nothing prints.
Printhead is dirty. Clean the printhead. See Table 1 on page 16.
Print element is dam-
aged.
Non-thermally sensi-
tive material.
Load media correctly. Mak e sure that the
media is placed on the inside edge of the
platen roller and that it feeds straight
through the printhead otherwise it may not
be detected by the media sensor.
Allow printer to cool. Printing resumes
automatically when the printhead element
cools to operating temperature.
Make sure the printer cable is installed correctly.
Call a service technician to replace the printhead.
Make sure that you are using direct thermal
label, ticket, or tag stock. Zebra recommends using genuine Zebra media in your
printer for best results.
17
Page 23

ZebraA100 Users Guide
Specificati o n s
Print density 203 dots/inch 8 dots/mm
Print width 1² to 4.125
Print speed 2²/sec 51 mm/sec
Label width (including backing
material, if any)
Label length 0.5² to 8
Interlabel gap 0.08² to 0.16
Label thickness (including backing
material, if any)
Label roll size Maximum outer
diameter
Minimum inner
core diameter
Registration tolerance
First dot location (from outer media
edge)
Fonts available All Windows fonts resident in the host computer or Win-
Bar codes available All bar codes available in the Windows application.
Media requirements Zebra recommends use of Zebra brand media. All media
Physical size (L ´ W ´ H) 9.7² ´ 7.0² ´ 6.0
Weight (without media) 3.35 lb 1.52 kg
Temperature
range
Relative humidity, operation and
storage
Electrical External 120 or 230 VAC power supply, depending on
Communications 36-pin Centronics™-compatible parallel port
Horizontal ± 0.059
Vertical ± 0.0393
Operating 50° to 104° F 10° to 40° C
Storage - 4° to 140° F -20° to 60° C
1² to 4.25
0.003² to 0.010
5.0
²
1.0
²
0.125² to 0.140
dows application.
must be direct thermal media. Media may be continuous,
die-cut, or notched. Notched media must have a notch
which is 1/4² wide ´3/
of the label as it feeds through the printer.
10 to 90% R.H.
which model you order. Additional custom line cords
may also be available.
²
²
²
²
²
²
²
²
²
25.6 to 105.0 mm
25 to 108 mm
12.7 to 203 mm
2 to 4 mm
0.076 to 0.254 mm
127 mm
25.4 mm
± 1.5 mm
± 1.0 mm
3.17 to 3.56 mm
32²
long located on the left side
249 mm ´ 179 mm ´
154 mm
18
Page 24

ZebraA100 Us er s Guid e
Agency approvals •UL 544 Medical Equipment S tandard Part 42.5
•CSA 22.2 No. 950 Canadian Safety Standard
•IEC 950/EN 60950 International Safety Standard
•FCC Part 15 Subpart B level A Electromagnetic Radiation Standard
•AAME 4.3.2 Medical Standard
•UL 1950 Domestic Safety Standard
•SOR/88-475 Canadian Electromagnetic Radiation
Standard
•EN50082-1 International Immunity Standard
•C.I.S.P.R.-22 Class B European Electromagnetic Radiation Standard
Processor 8-bit microcontroller
Power line cord •The overall length must be less than 12.5 ft (3.8 meters)
•It must be rated for at least 3 A, 250 V.
•The chassis ground (earth) MUST be connected to
assure safety and reduce electromagnetic interference.
The ground connection is handled by the third wire
(earth) in the power line cord. See Figure 5.
The AC power plug and IEC 320 connector must bear
the certification mark of at least one international safety
organization. See Figure 6.
Parallel data cable For maximum reliability, use a parallel data cable no
longer than 6 ft (1.8 m).
Figure 6. Examples of International Safety Organizations
Figure 5. 230 VAC Power Line Cord
19
Page 25

ZebraA100 Users Guide
Table 3. Parallel Pinouts
Pin No. Description
1Strobe
2-9 Data Bits 0-7
10 Acknowledge
11 Busy
12 Paper end
13 Select
14-17 Not used
18 +5 V @ 0.75 A
19-30 Ground
31 Not used
32 Error/fault
33 Ground
34 Not used
35 +5 V through 3.3 K
36 Select
20
Page 26
ZebraA100 Us er s Guid e
Software Licen se Ag r eeme nt
The enclosed software and documentation are protected by the United States copyright law and international treaty, and therefore you must treat them like a book, with the exception that you may make copies to protect yourself again s t loss of the orig inal.
Your right to use the enclosed software and documentation as described below is non-exclusive and non-transferable. Zebra
retain s ownership in the software and documentation and all other right, title and interest. The enclosed software and documentation may be used by any number of people and may be freely m ov ed from one c omputer to ano ther as long a s t here is no possibility of their being used by more than one person on more than one computer at the sa me time.
Machine readable files representing graphics or fonts which you have created independently may be converted to ZPL format
files using the enclosed software and such files may be used, copied onto diskettes or font cards, given away , or sold without
paying license fees to Zebra.
Pictorial or graphic images and machine readable files representing them may be protected by United States copyright law and
internat ional treaty provisions which p rohibits you from transcribing or scanning such images or using copying, or converting
such files without permissio n of the copyright owner. You may not use this software in violation of U.S. copyright law or international tr eaty. By using this software, you agree to be bound by these terms.
Zebra Technologies Corporation (“Zebra”) warrants the enclosed diskette to be free of defects in material and workmanship for
a period of 60 days from the date of purchase. In the event of notification within the warranty period of defects in material and
workmanship , Zebra will replace the defective diskette or documentation. Zebra specifically disclaims all other warranties,
expressed or implied , including but not limited to imp lied warranties of merchantability and fitness for a particular purpose. IN
NO EVENT WILL ZEBRA TECHNOLOGIES BE LIABLE F O R LOST PROFITS, LOST DATA, OR ANY OTHER INCIDENTAL OR CONSEQUENTIAL DAMAGES CAUSED BY ABUSE OR MISAPPLICA TION OF THE SOFTW ARE OR B Y
ITS USE IN VIOLATION OF THE U.S. COPYRIGHT LAW OR INTERNATIONAL TREA TY.
21
Page 27

ZebraA100 Users Guide
Warranty
1. Printer Warranty
ZEBRA printers, exclu ding thermal pri ntheads which are warranted separately below, are warranted against defects in material
or workmanship for twelve (12) months from the date of purchase by the end user. This warranty does not cover normal wear
and tear and shall be null and void if the equipment is modified, improp e rly ins tal led or used, dama ged by accident or neglect, or
in the event any parts are improperly installed or replaced by the user. Proof of purchase or product registration is required. If
proof of purchas e or prod uct reg istration cannot be established, shipment date to the or iginal buyer (dealer or distributor) will be
used to establish the warranty period.
Since print head wear is part of normal operations, the original prin thead and replacement printhea ds are covered by a limited
warranty of six (6) months from the date of purchase by the end user. T o qua lify for this warranty, the printer must be returned to
the factory or other authorized service center. Although the user is not required to purchase ZEBRA brand supplies (media ), to
the extent it is determined that the use of other supplies (media) shall have caused any defect to the thermal printhead for which
a warranty claim is made, the user shall be responsi ble for ZEBRA Technologies’ customary charges for labor and materials to
repair such defect. To the extent that it is determined that fa ilure to follow the preventive maintenance schedule and procedures
listed in the User’s Guide shall have caused any defect to the thermal printhead for which a warranty claim is made, this limited
warranty shall be void.
ZEBRA TECHNOLOGIES’ SOLE OBLIGATION UNDER THIS WARRANTY SHALL BE TO FURNISH PARTS AND
LABOR FOR T HE REPAIR OR REPLACEMENT OF PRODU CTS FOUND TO BE DEFECTIVE IN MATERIAL OR
WORKMANSHIP DURING THE WARRANTY PERIOD.
As a condition of this warranty, the user must: (a) obtain a ZEBRA Return Authorization for the printer, or subassembly(s); (b)
ship the printer or subassembly(s), transportation prepaid to t he authorized service location; and (c) include with the Product or
subassembly(s) a written descript ion of the claimed defect. Unless ZEBRA Technologies authorizes return of the entire Product,
the user shall return only the subassemb ly(s). Products returned shall be packaged in the original packing and shipping container
or comparable container. I n the event equipment is not so packaged or if shipping damage is evident, it will not be accepted for
service under warra nty. Surface transportation charges for the return of the printer to the customer shall be pai d by Z EBRA
Technologies within the 48 contiguous states and the District of Columbia. Customer shall pay shipping costs, customs clearance, and other related charges outside the designated area. If ZEBRA Technologies determines that the Product returned to it
for warranty service or replacement is not defective as herei n defin e d, BUYE R shal l pa y all costs of handling and transportation.
2. Supplies Warranty
ZEBRA supplies are warranted to be free from defects in materials or workmanship for a period of either the stated material
shelf lif e or 6 months from date of shipment, whichever occurs first, provided that the BUYER has complie d with ZEBRA
T echnologies’ guid e lines on storage, handling, and usage of the labeling supplies in ZEBRA printers. ZEBRA Technologies
does not warrant the performance of ZEBRA labeling supplies on non-ZEBRA printers.
Any supplies product shown to the satisfaction of ZEBRA Technologies, within the time pr ovided, to be so defective shall be
replaced without charge, or ZEBRA Technologies may issue a credit in such an amount as it deems reasonable.
3. Warranty Exclu sions and Conditions
The above warranties are in lieu of all other warranties, expressed or implied, oral or written, statutory or otherwise, including
any implied warranty of merchant-ability or fitness for a particular purpose.
ZEBRA Technologi es shall not be respo nsible f or the specific a ppli cati on to which any Products are applied, including but not
limited to compatibility with other equipment.
All statements, technical i nformation and recommendations relating to ZEBRA Products are based upon tests bel ieved to be
reliable but do not consti tute a guarantee or warranty.
ZEBRA TECHNOLOGIES SHALL NOT, UNDER ANY CIRCUMST ANCES WHATSOEVER, BE LIABLE TO BUYER OR
ANY OT HE R PARTY FOR LOST PROFITS, DIMINUTION OF GOOD WIL L OR ANY OTHER SPECIAL OR CONSEQUENTIAL DAMAGES WHATSOEVER WITH RESPECT TO ANY CLAIM HEREUNDER. IN ADDITION, ZEBRA
TECHNOLOGIES’ LIABILITY FOR WARRANTY CLAIMS SHALL NOT, IN ANY EVENT, EXCEED THE INVOICE
PRICE OF THE PRODUCT CLAIMED DEFECTIVE, NOR SHALL ZEBRA TECHNOLOGIES BE LIABLE FOR DELAYS
IN REPLACEMENT OR REPAIR OF PRODUCTS.
No salesperson, representative or agent of Z E BRA Technologies is authorized to make any guarantee, warra nty, or representation in addi tion to the foregoing warranty.
NO WAIVER, ALTERATION, ADDITION, OR MODIFICATION OF THE FOREGOING WA RRANTIES SHALL BE
VALID UNLESS MADE IN WRITING AND SIGNED BY AN EXECUTIVE OFFICER OF ZEBRA TECHNOLOGIES.
22
Page 28

 Loading...