

Zanussi ZWS 688 User Manual

EN
User manual
Washing Machine
ZWS 688

Contents
Safety information _ _ _ _ _ _ _ _ _ _ _ _ _ _ _ 2
Safety instructions _ _ _ _ _ _ _ _ _ _ _ _ _ _ 3
Product description _ _ _ _ _ _ _ _ _ _ _ _ _ _ 5
Control panel _ _ _ _ _ _ _ _ _ _ _ _ _ _ _ _ _ 6
First use _ _ _ _ _ _ _ _ _ _ _ _ _ _ _ _ _ _ _ _ 7
Daily use _ _ _ _ _ _ _ _ _ _ _ _ _ _ _ _ _ _ _ _ 8
Helpful hints and tips _ _ _ _ _ _ _ _ _ _ _ _ _ 9
Programmes _ _ _ _ _ _ _ _ _ _ _ _ _ _ _ _ _ 11
Consumption values _ _ _ _ _ _ _ _ _ _ _ _ _ 13
What to do if… _ _ _ _ _ _ _ _ _ _ _ _ _ _ _ 13
Technical data _ _ _ _ _ _ _ _ _ _ _ _ _ _ _ _ 16
Care and cleaning _ _ _ _ _ _ _ _ _ _ _ _ _ _ 16
Installation _ _ _ _ _ _ _ _ _ _ _ _ _ _ _ _ _ _ 19
Environment concerns _ _ _ _ _ _ _ _ _ _ _ _ 21
Subject to change without notice.
Safety information
Before the installation and use of the appliance, carefully read the
supplied instructions. The manufacturer is not responsible if an incorrect installation and use causes injuries and damages. Always keep
the instructions with the appliance for future reference.
Children and vulnerable people safety
Warning! Risk of suffocation, injury or permanent disability.
• Do not let persons, children included, with reduced physical sensory, reduced mental functions or lack of experience and knowledge use the appliance. They must have supervision or instruction
for the operation of the appliance by a person who is responsible
for their safety.
• Do not let children play with the appliance.
• Keep all packaging away from children.
• Keep all detergents away from children.
• Keep children and pets away from the appliance door when it is
open.
• If the appliance has a child safety device, we recommend you activate it.
General Safety
• Before maintenance, deactivate the appliance and disconnect the
mains plug from the mains socket.
• Do not change the specification of this appliance.
2
www.zanussi.com

• Obey the maximum load volume of 6 kg (refer to the “Programme
chart” chapter).
• If the supply cord is damaged, it must be replaced by the manufacturer, its service agent or similarly qualified persons in order to
avoid a hazard.
•The operating water pressure (minimum and maximum) must be
between 0,5 bar (0,05 MPa) and 8 bar (0,8 MPa)
• The ventilation openings in the base (if applicable) must not be obstructed by a carpet.
• The appliance is to be connected to the water mains using the
new supplied hose-sets. Old hose sets must not be reused.
Safety instructions
Installation
• Remove all the packaging and the transit
bolts.
• Keep the transit bolts. When you move the
appliance again you must block the drum.
• Do not install or use a damaged appliance.
• Do not install or use the appliance where the
temperature is less than 0 °C or where it is
exposed to the weather.
• Obey the installation instruction supplied with
the appliance.
• Make sure that the floor where you install the
appliance is flat, stable, heat resistant and
clean.
• Do not install the appliance where the appli-
ance door can not be fully opened.
• Always be careful when you move the appli-
ance because it is heavy. Always wear safety
gloves.
• Make sure that there is air circulation be-
tween the appliance and the floor.
• Adjust the feet to have the necessary space
between the appliance and the carpet.
Electrical connection
Warning! Risk of fire and electrical shock.
• The appliance must be earthed.
• Make sure that the electrical information on
the rating plate agrees with the power supply.
If not, contact an electrician.
• Always use a correctly installed shockproof
socket.
• Do not use multi-plug adapters and extension
cables.
• Make sure not to cause damage to the mains
plug and to the mains cable. Contact the
Service or an electrician to change a damaged mains cable.
• Connect the mains plug to the mains socket
only at the end of the installation. Make sure
that there is access to the mains plug after
the installation.
• Do not pull the mains cable to disconnect the
appliance. Always pull the mains plug.
• Do not touch the mains cable or the mains
plug with wet hands.
• This appliance complies with the E.E.C. Directives.
Water connection
• Make sure not to cause damage to the water
hoses.
• The appliance is to be connected to the water mains using the new supplied hose-sets.
Old hose sets must not be reused.
3
www.zanussi.com

• Before you connect the appliance to new
pipes or pipes not used for a long time, let
the water flow until it is clean.
• The first time you use the appliance, make
sure that there is no leakage.
Use
Warning! Risk of injury, electrical shock,
fire, burns or damage to the appliance.
• Use this appliance in a household environment.
• Obey the safety instructions on the detergent
packaging.
• Do not put flammable products or items that
are wet with flammable products in, near or
on the appliance.
• Do not touch the glass of the door while a
programme operates. The glass can be hot.
• Make sure that you remove all metal objects
from the laundry.
• Do not put a container to collect possible water leakage under the appliance. Contact the
Service to ensure which accessories can be
used.
Care and Cleaning
Warning! Risk of injury or damage to the
appliance.
• Do not use water spray and steam to clean
the appliance.
• Clean the appliance with a moist soft cloth.
Only use neutral detergents. Do not use
abrasive products, abrasive cleaning pads,
solvents or metal objects.
Disposal
Warning! Risk of injury or suffocation.
• Disconnect the appliance from the mains
supply.
• Cut off the mains cable and discard it.
• Remove the door catch to prevent children
and pets to get closed in the appliance.
4
www.zanussi.com
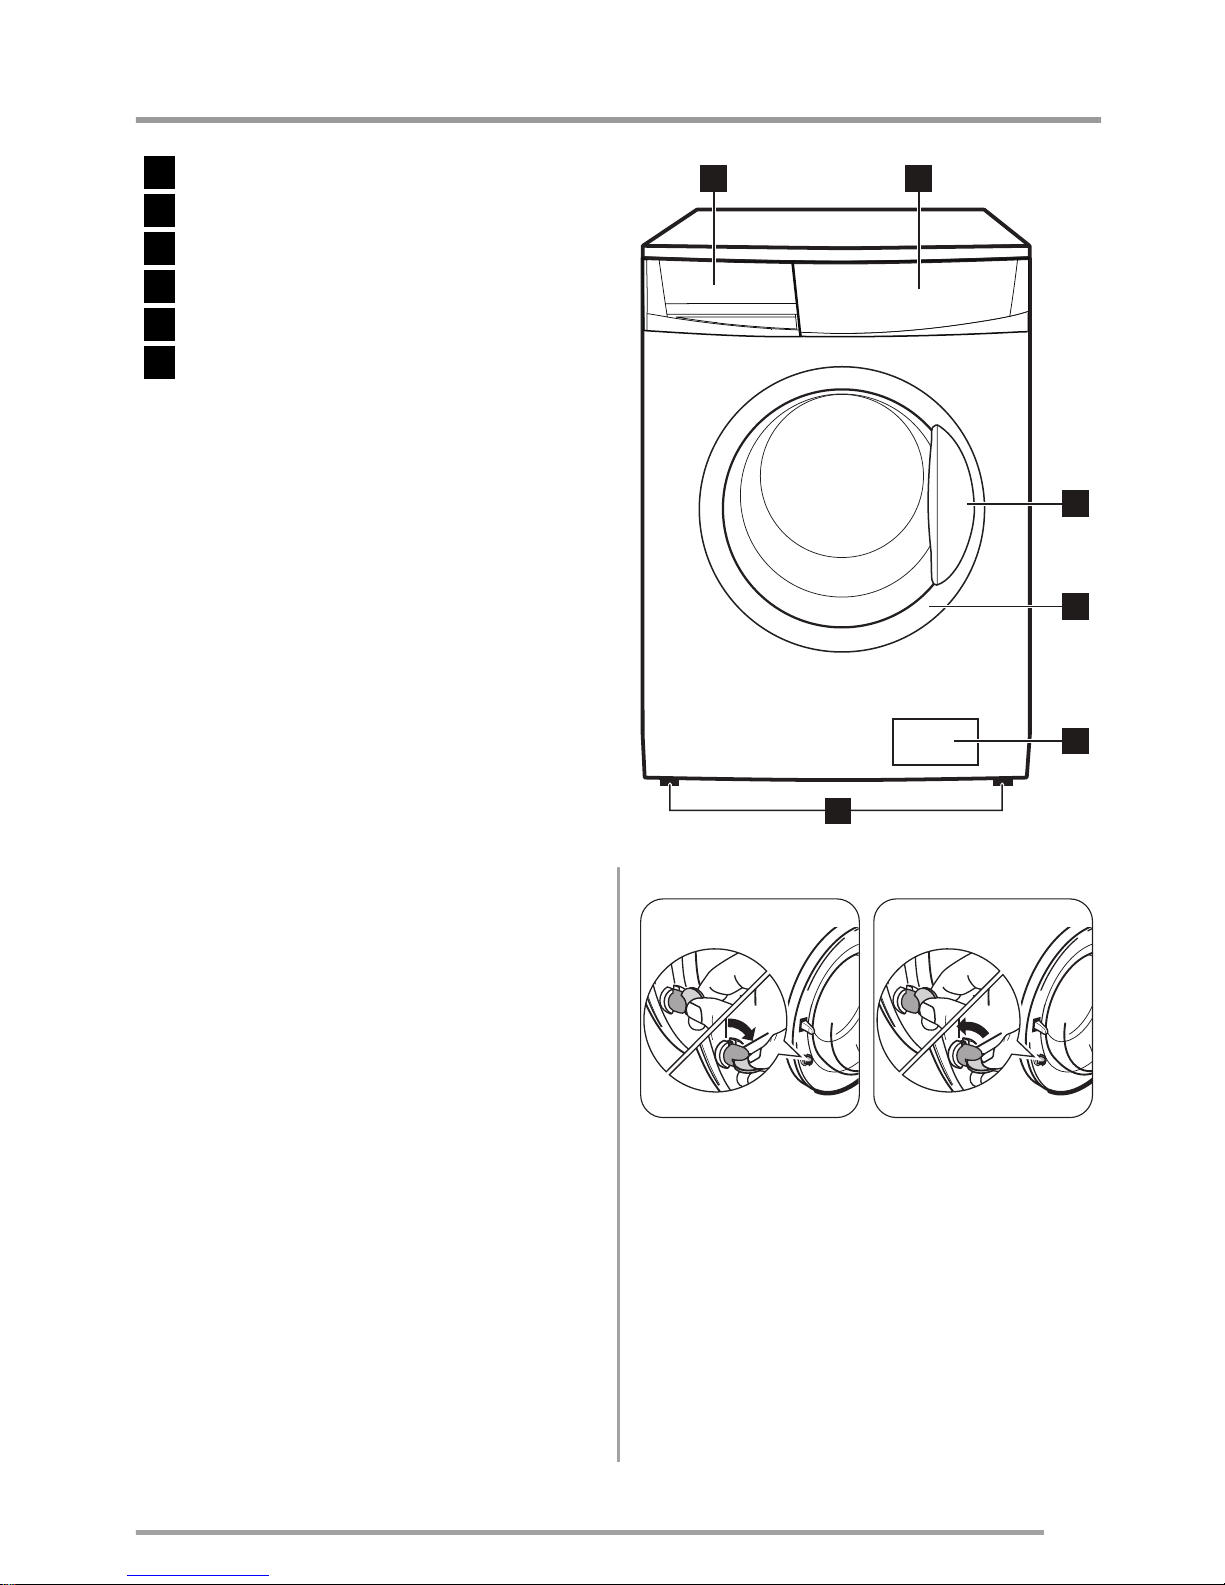
Product description
1
Detergent dispenser drawer
2
Control panel
3
Door opening handle
4
Rating plate
5
Drain pump
6
Adjustable feet
1
2
3
4
5
6
Rubber feet kit (4055126249)
Available from your authorized dealer.
The rubber feet are particularly recommended
on floating, slippery and wooden floors.
Mount the rubber feet to prevent vibration,
noises and displacement of the appliance during operation.
Read carefully the instructions supplied with the
kit.
Fixing plate kit (4055171146)
Available from your authorized dealer.
If you install the appliance on a plinth, secure
the appliance in the fixing plates.
Follow the instructions supplied with the kit.
Child safety
Make sure that children or pets do not climb into the drum. To prevent children and pets becoming trapped inside the drum this machine incorporates a special feature.
To activate this device, rotate the button
(without pressing it)
inside the door clockwise until the groove
is horizontal. If necessary use a coin.
To disable this device and restore the
possibility of closing
the door, rotate the
button anti-clockwise
until the groove is vertical.
5
www.zanussi.com

Detergent dispenser drawer
Compartment for detergent used for prewash
and soak phase or for stain remover used during
the stain action phase (if available). The prewash
and soak detergent is added at the beginning of
the wash programme. The stain remover is added during the stain action phase.
Compartment for powder or liquid detergent
used for main wash. If using liquid detergent
pour it just before starting the programme.
Compartment for liquid additives (fabric softener, starch).
Follow the product manufacturer’s recommendations on quantities to use and do not exceed the
«MAX» mark in the detergent dispenser drawer. Any fabric softener or starching additives must
be poured into the compartment before starting the wash programme.
Control panel
Below is a picture of the control panel. It shows the programme selector dial as well as the
buttons and pilot lights. These are presented by relevant numbers on the following pages.
1 2 3 4 5 6
B
C
A
7
1
Programme selector dial
2
SPIN reduction button
3
OPTIONS button
4
EXTRA RINSE button
5
START/PAUSE button
6
DELAY START button
7
Indicator pilot lights
Table of symbols
Cold water
No spin
Rinse Hold
6
www.zanussi.com
Programme selector dial, spin speed button and available options
Programme Selector Dial
It allows you to switch the appliance on/off and/
or to select a programme.
Available options:
Spin Reduction
By pressing this button you can change the spin
speed of the selected programme or to select
Rinse Hold or No Spin option.
No spin
By selecting this option, all spinning phases are
suppressed and replaced by a drain, so as not
to wrinkle the laundry. Recommended for extremely delicate fabrics. On some programmes
the rinses will be performed with more water.
Rinse hold
By selecting this function the water of the last
rinse is not emptied out to prevent the fabrics
from creasing. Before opening the door it will be
necessary to empty out the water. To empty out
the water, please read the paragraph «At the
end of the programme».
Prewash
By selecting this option the machine performs a
prewash cycle before the main wash phase. The
washing time will be prolonged. This option is
recommended for heavily soiled laundry.
Super Quick
Short cycle for lightly soiled items or for laundry
which needs only freshening up. We recommend you to reduce the fabrics loading.
Extra Rinse
This appliance is designed to save energy. If it
necessary to rinse the laundry using an extra
quantity of water (extra rinse), select this option.
Some additional rinses will be performed. This
option is recommended for people who are allergic to detergents, and in areas where the water is very soft.
Start Pause
This button allows you to start or to interrupt the
selected programme.
Delay Start
The start of the programme can be delayed by
3, 6 or 9 hours by means of this button.
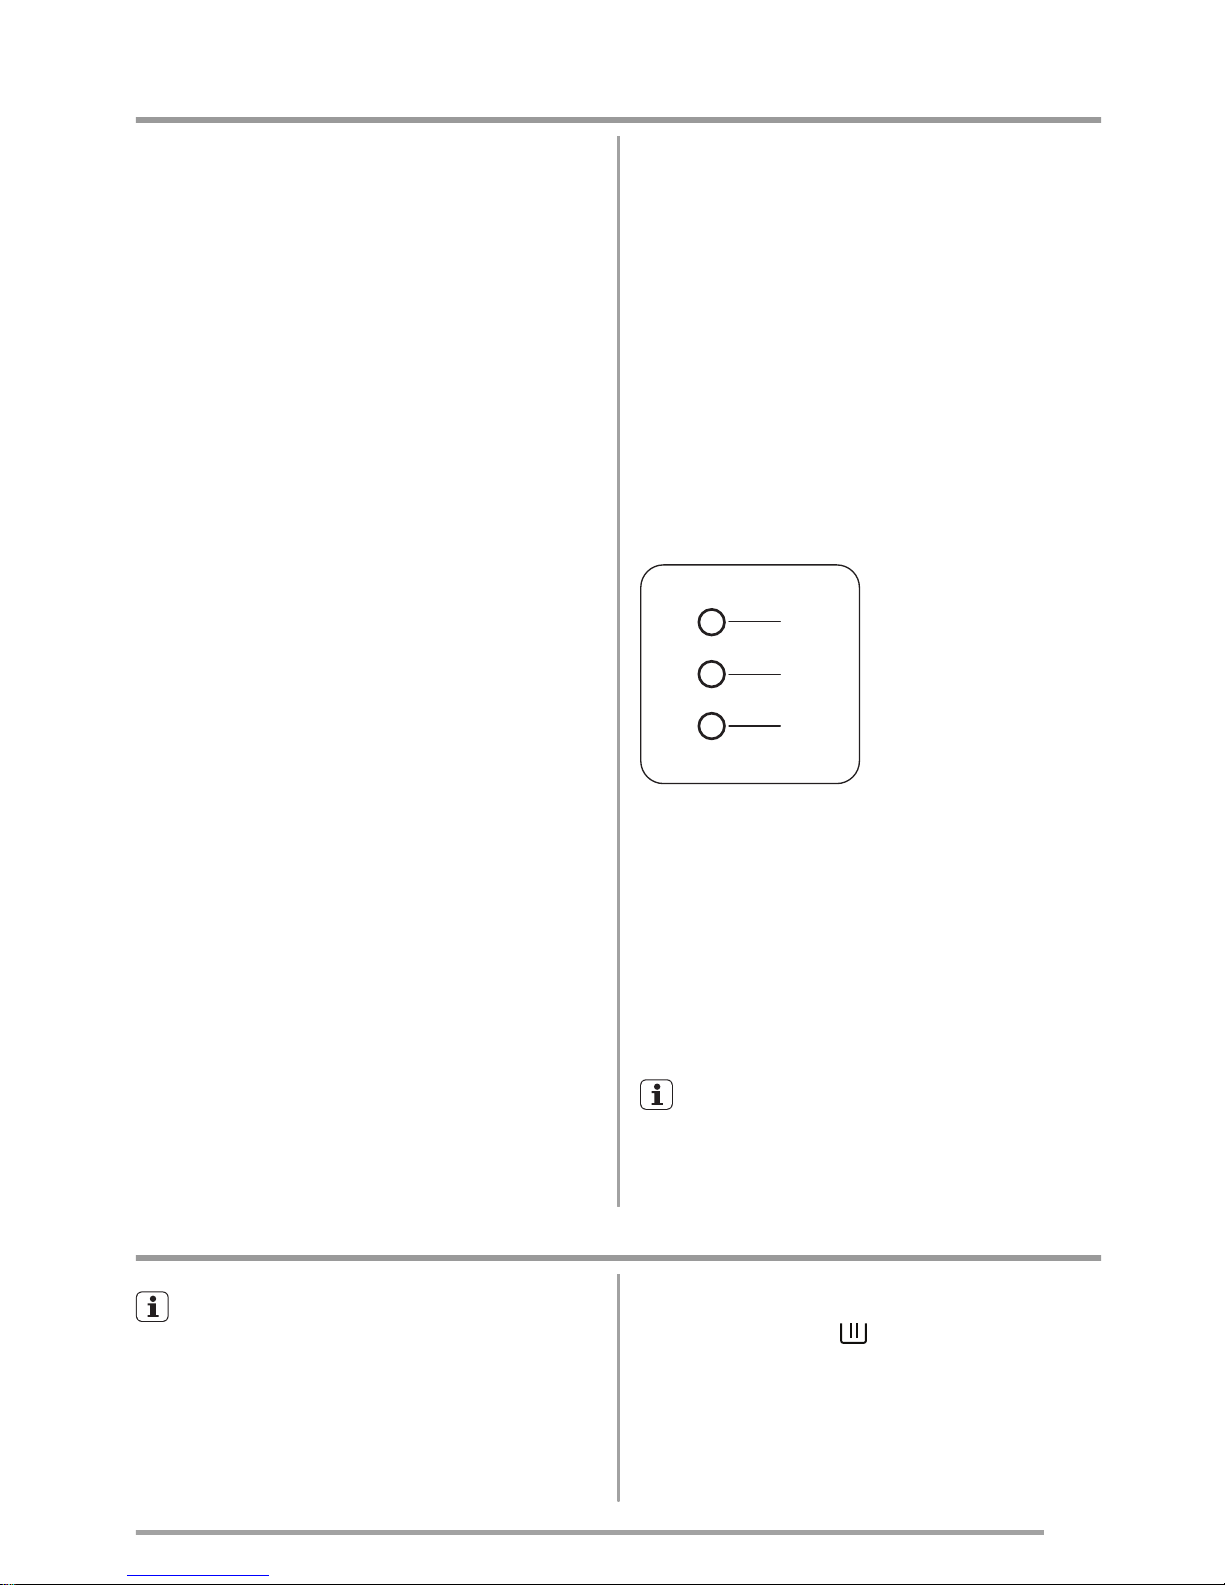
Indicator pilot light
B
C
A
When selecting a washing programme both
lights A and B illuminate.
After having pressed the button 5 the only
light corresponding to the running phase
stays on. The machine starts working and the
door is locked.
The light C illuminates at the end of the washing cycle. After a few minutes the door can be
opened.
If the draining programme is selected any
light will illuminate.
First use
• Ensure that the electrical and water connections comply with the installation instructions.
• Remove the polystyrene block and any
material from the drum.
• Pour 2 litres of water into the main wash
compartment
of the detergent drawer
in order to activate the ECO valve. Then
run a cotton cycle at the highest temperature without any laundry in the machine,
to remove any manufacturing residue
from the drum and tub. Pour 1/2 a
7
www.zanussi.com
measure of detergent into the main wash
compartment and start the machine.
Daily use
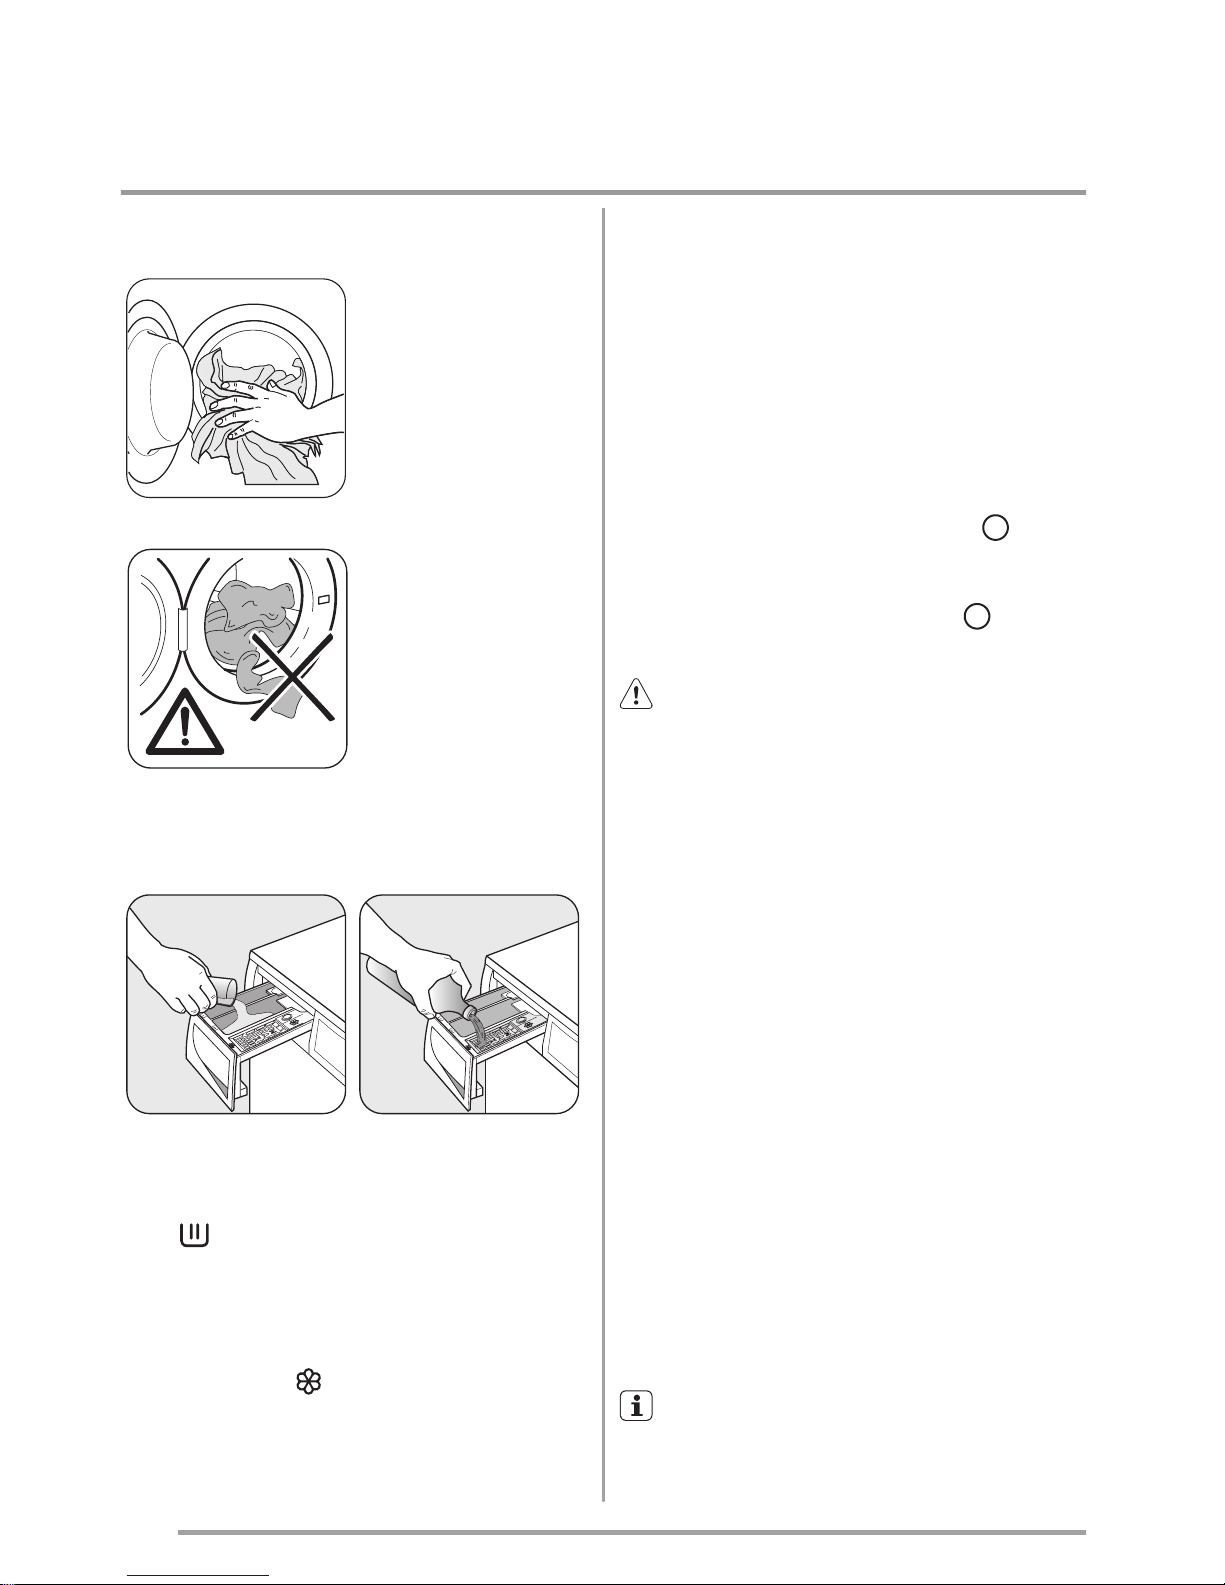
Load the laundry
Open the door by
carefully pulling the
door handle outwards. Place the
laundry in the drum,
one item at a time,
shaking them out as
much as possible.
Close the door.
Make sure that no
laundry stays between the seal and
the door. There is a
risk of water leakage
or damage to the
laundry.
Measure out the detergent and the fabric
softener
Pull out the dispenser drawer until it stops.
Measure out the amount of detergent required, pour it into the main wash compart-
ment
or in the appropriate compartment if
the selected programme/option it requires
(see more details in "Detergent dispenser
drawer").
If required, pour fabric softener into the com-
partment marked
(the amount used must
not exceed the «MAX» mark in the drawer).
Close the drawer gently.
Select the required programme by turning
the programme selector dial (1)
Turn the programme selector dial to the required programme. The washing machine will
automatically select the maximum spin value
provided for the programme you have chosen.
You can change this value by pressing the corresponding button. The green pilot light of the
button 5 starts to flash.
The selector dial can be turned either clockwise
or counterclockwise. Turn to position
to re-
set programme/Switching the machine off.
At the end of the programme the selector
dial must be turned to position
, to
switch the machine off.
Caution! If you turn the programme
selector dial to another programme when
the machine is working, the red pilot light of
button 5 will blink 3 times to indicate a wrong
selection. The machine will not perform the new
selected programme.
Select the spin speed, No Spin or Rinse
Hold option by pressing button 2
The relevant light will light up.
When selecting a programme, the light corresponding to the maximum speed allowed for
that programme will illuminate.
Select the available options by pressing
buttons 3 and 4
Depending on the programme, different functions can be combined. These must be selected
after choosing the desired programme and before starting the programme.
When these buttons are pressed, the corresponding pilot lights illuminate. When they are
pressed again, the pilot lights go out. If an incorrect option is selected, the integrated red pilot
light of the button 5 flashes for 3 times.
For the compatibility among the washing
programmes and the options see chapter
«Washing Programmes».
8
www.zanussi.com
 Loading...