

Zanussi ZWH 7160 P User Manual

EN
User manual
Washing Machine
ZWH 7160 P
Contents
Safety information _ _ _ _ _ _ _ _ _ _ _ _ _ _ 2
Safety instructions _ _ _ _ _ _ _ _ _ _ _ _ _ _ 3
Frost precaution _ _ _ _ _ _ _ _ _ _ _ _ _ _ _ 4
Environment concerns _ _ _ _ _ _ _ _ _ _ _ _ 4
Product description _ _ _ _ _ _ _ _ _ _ _ _ _ 5
Technical data _ _ _ _ _ _ _ _ _ _ _ _ _ _ _ _ 6
Installation _ _ _ _ _ _ _ _ _ _ _ _ _ _ _ _ _ _ _ 6
First use _ _ _ _ _ _ _ _ _ _ _ _ _ _ _ _ _ _ _ 11
Personalisation _ _ _ _ _ _ _ _ _ _ _ _ _ _ _ 11
Daily use _ _ _ _ _ _ _ _ _ _ _ _ _ _ _ _ _ _ _ 12
Washing programmes _ _ _ _ _ _ _ _ _ _ _ 21
Consumption values _ _ _ _ _ _ _ _ _ _ _ _ 23
Care and cleaning _ _ _ _ _ _ _ _ _ _ _ _ _ 24
What to do if… _ _ _ _ _ _ _ _ _ _ _ _ _ _ _ 26
Subject to change without notice.
Safety information
Before the installation and use of the appliance, carefully read the
supplied instructions. The manufacturer is not responsible if an incorrect installation and use causes injuries and damages. Always
keep the instructions with the appliance for future reference.
Children and vulnerable people safety
Warning! Risk of suffocation, injury or permanent disability.
• Do not let persons, children included, with reduced physical sensory, reduced mental functions or lack of experience and knowledge use the appliance. They must have supervision or instruction
for the operation of the appliance by a person who is responsible
for their safety.
• Do not let children play with the appliance.
• Keep all packaging away from children.
• Keep all detergents away from children.
• Keep children and pets away from the appliance door when it is
open.
• If the appliance has a child safety device, we recommend you activate it.
General Safety
• Before maintenance, deactivate the appliance and disconnect the
mains plug from the mains socket.
• Do not change the specification of this appliance.
2
www.zanussi.com

• Obey the maximum load volume of 7 kg (refer to the “Programme
chart” chapter).
Safety instructions
Installation
• Remove all the packaging and the transit
bolts.
• Keep the transit bolts. When you move the
appliance again you must block the drum.
• Do not install or use a damaged appliance.
• Do not install or use the appliance where the
temperature is less than 0 °C or where it is
exposed to the weather.
• Obey the installation instruction supplied
with the appliance.
• Make sure that the floor where you install the
appliance is flat, stable, heat resistant and
clean.
• Do not install the appliance where the appli-
ance door can not be fully opened.
• Always be careful when you move the appli-
ance because it is heavy. Always wear safety
gloves.
• Make sure that there is air circulation be-
tween the appliance and the floor.
• Adjust the feet to have the necessary space
between the appliance and the carpet.
Electrical connection
Warning! Risk of fire and electrical shock.
• The appliance must be earthed.
• Make sure that the electrical information on
the rating plate agrees with the power supply. If not, contact an electrician.
• Always use a correctly installed shockproof
socket.
• Do not use multi-plug adapters and exten-
sion cables.
• Make sure not to cause damage to the mains
plug and to the mains cable. Contact the
Service or an electrician to change a damaged mains cable.
• Connect the mains plug to the mains socket
only at the end of the installation. Make sure
that there is access to the mains plug after
the installation.
• Do not pull the mains cable to disconnect
the appliance. Always pull the mains plug.
• Do not touch the mains cable or the mains
plug with wet hands.
• This appliance complies with the E.E.C. Directives.
Water connection
• Make sure not to cause damage to the water
hoses.
• The appliance is to be connected to the water mains using the new supplied hose-sets.
Old hose sets must not be reused.
• Before you connect the appliance to new
pipes or pipes not used for a long time, let
the water flow until it is clean.
• The first time you use the appliance, make
sure that there is no leakage.
Use
Warning! Risk of injury, electrical shock,
fire, burns or damage to the appliance.
• Use this appliance in a household environment.
• Obey the safety instructions on the detergent
packaging.
• Do not put flammable products or items that
are wet with flammable products in, near or
on the appliance.
• Do not touch the glass of the door while a
programme operates. The glass can be hot.
• Make sure that you remove all metal objects
from the laundry.
• Do not put a container to collect possible
water leakage under the appliance. Contact
3
www.zanussi.com

the Service to ensure which accessories can
be used.
Care and Cleaning
Warning! Risk of injury or damage to the
appliance.
• Do not use water spray and steam to clean
the appliance.
• Clean the appliance with a moist soft cloth.
Only use neutral detergents. Do not use
abrasive products, abrasive cleaning pads,
solvents or metal objects.
Disposal
Warning! Risk of injury or suffocation.
• Disconnect the appliance from the mains
supply.
• Cut off the mains cable and discard it.
• Remove the door catch to prevent children
and pets to get closed in the appliance.
Service
• Contact the Service to repair the appliance.
We recommend only the use of original
spare parts.
Frost precaution
If the appliance is installed in a place where the
temperature could drop below 0°C, proceed as
follows to remove any water remaining inside
the appliance:
1. unplug the appliance;
2. turn off the water tap;
3. unscrew the water inlet hose from the tap;
4. unscrew the drain hose from the rear support and unhook it from sink or spigot;
5. place a bowl on the floor;
6. let the drain hose run along the floor, place
the external extremities of the drain and inlet hoses in the bowl placed on the floor
and let water drain out completely;
7. screw the water inlet hose to the tap and
the drain hose to the rear of the appliance
again;
When you intend to start the appliance up
again, make sure that the room temperature is
above 0°C.
Environment concerns
The symbol on the product or on its
packaging indicates that this product may not
be treated as household waste. Instead it
should be taken to the appropriate collection
point for the recycling of electrical and
electronic equipment. By ensuring this product
is disposed of correctly, you will help prevent
potential negative consequences for the
environment and human health, which could
otherwise be caused by inappropriate waste
handling of this product. For more detailed
information about recycling of this product,
please contact your local council, your
household waste disposal service or the shop
where you purchased the product.
4
www.zanussi.com
Packaging materials
The materials marked with the symbol
are
recyclable.
>PE<=polyethylene
>PS<=polystyrene
>PP<=polypropylene
This means that they can be recycled by disposing of them properly in appropriate collection containers.
Ecological hints
To save water, energy and to help protect the
environment, we recommend that you follow
these tips:
• Normally soiled laundry may be washed without prewashing in order to save detergent,
water and time (the environment is protected
too!).
• The machine works more economically if it is
fully loaded.
• With adequate pre-treatment, stains and limited soiling can be removed; the laundry can
then be washed at a lower temperature.
• Measure out detergent according to the water hardness, the degree of soiling and the
quantity of laundry being washed.
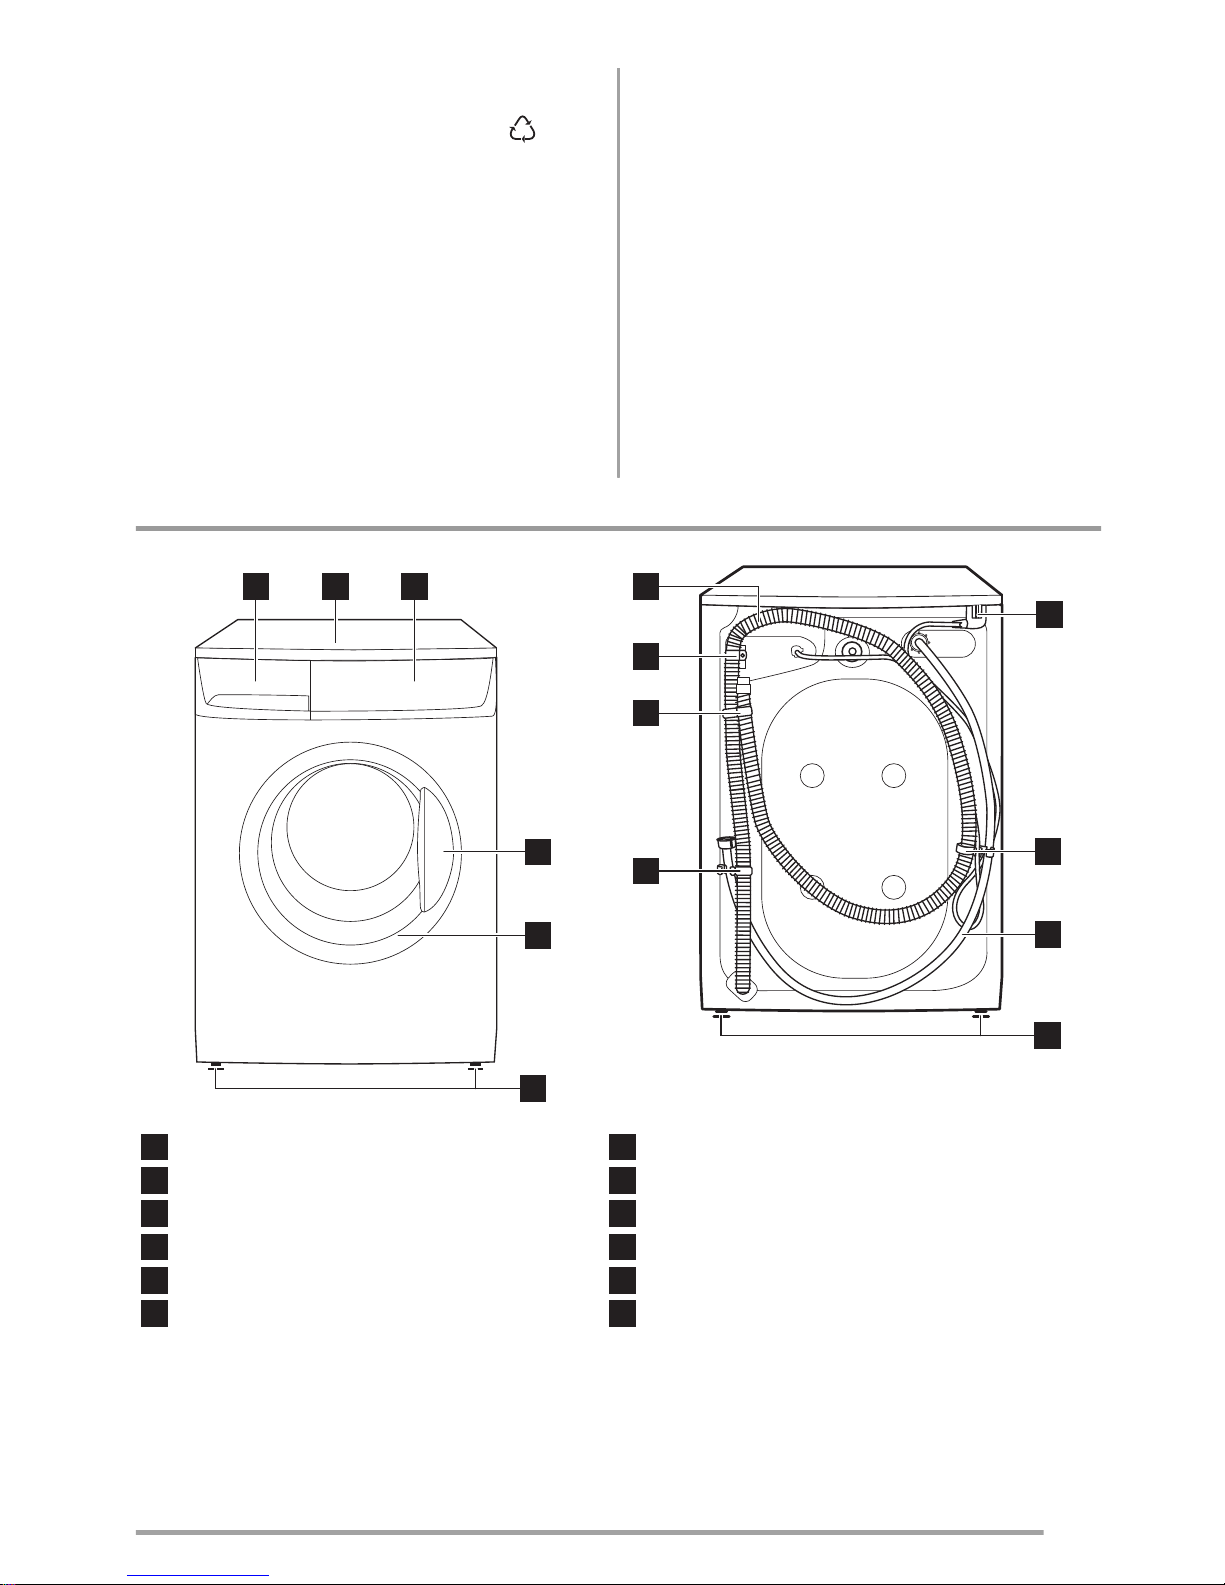
Product description
1 2 3
4
5
6
11
9
10
9
9
8
7
12
1
Detergent dispenser drawer
2
Worktop
3
Control panel
4
Door opening handle
5
Rating plate (on the inner edge)
6
Front adjustable feet
7
Water drain hose
8
Drain hose support
9
Hose holders
10
Water inlet hose
11
Mains cable
12
Back feet
5
www.zanussi.com

Child safety device
To activate this device, rotate the button
(without pressing it) inside the door clockwise
until the groove is horizontal. If necessary use a
coin.
To disable this device and restore the possibility of closing the door, rotate the button anticlockwise until the groove is vertical.
Technical data
Dimensions Width
Height
Depth
Depth (Overall dimensions)
60 cm
85 cm
50 cm
54 cm
Electrical connection
Voltage - Overall power - Fuse
Information on the electrical connection is given on the rating plate, on
the inner edge of the appliance door.
Water supply pressure Minimum
Maximum
0,05 MPa
0,8 MPa
Maximum Load Cotton 7 kg
Spin Speed Maximum 1600 rpm
Installation
Unpacking
Warning!
• Read carefully the "Safety information"
chapter before installing the appliance.
x 3
x 3
x 2
x 1
B
A
C
Warning! Remove and keep all
transit devices so that they can be re-
fitted if the appliance ever has to be transported again.
Necessary tools
10 mm
30 mm
6
www.zanussi.com
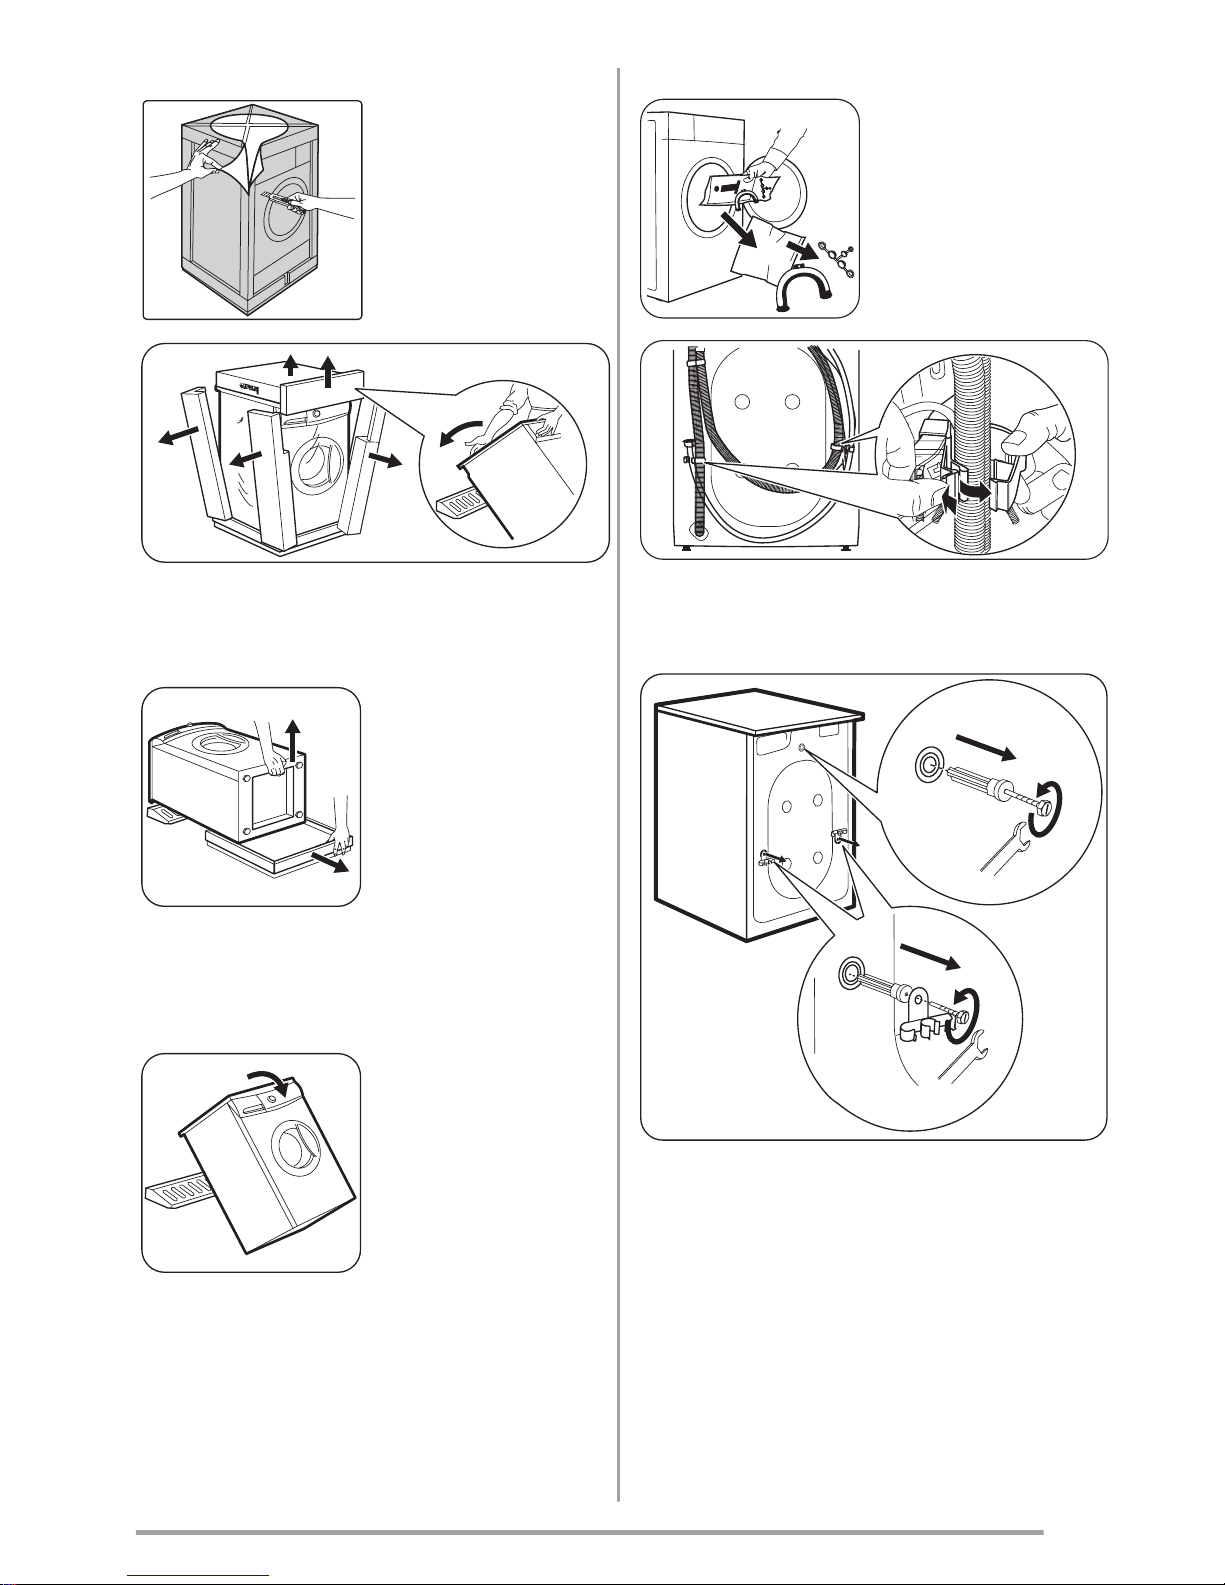
• Remove the external film. Use a cutter, if necessary.
• Remove the cardboard top.
• Remove the polystyrene packaging materials.
2
1
• Spread the front
piece on the floor
behind the appliance and then lay
the appliance carefully rear side down
on it. Make sure
that no hoses are
crushed in the
process.
• Remove the polystyrene base from the bottom.
• Return appliance
to it's upright position.
• Open the door and
remove the plastic
hose guide, the
bag containing the
instruction booklet
and the plastic
plug caps from the
drum.
• Remove the power supply cable and the
draining and inlet hose from the hose holders on the rear of the appliance.
• Unscrew the three bolts and remove the
hose holders.
• Slide out the relevant plastic spacers.
7
www.zanussi.com
Warning! Do
not remove
the drain hose
from the rear support. Remove this
hose only if it is
necessary to drain
the water. Refer to
"Frost precaution"
and "What to do if".
• Plug the smaller upper hole and the two
large ones with the corresponding plastic
plug caps.
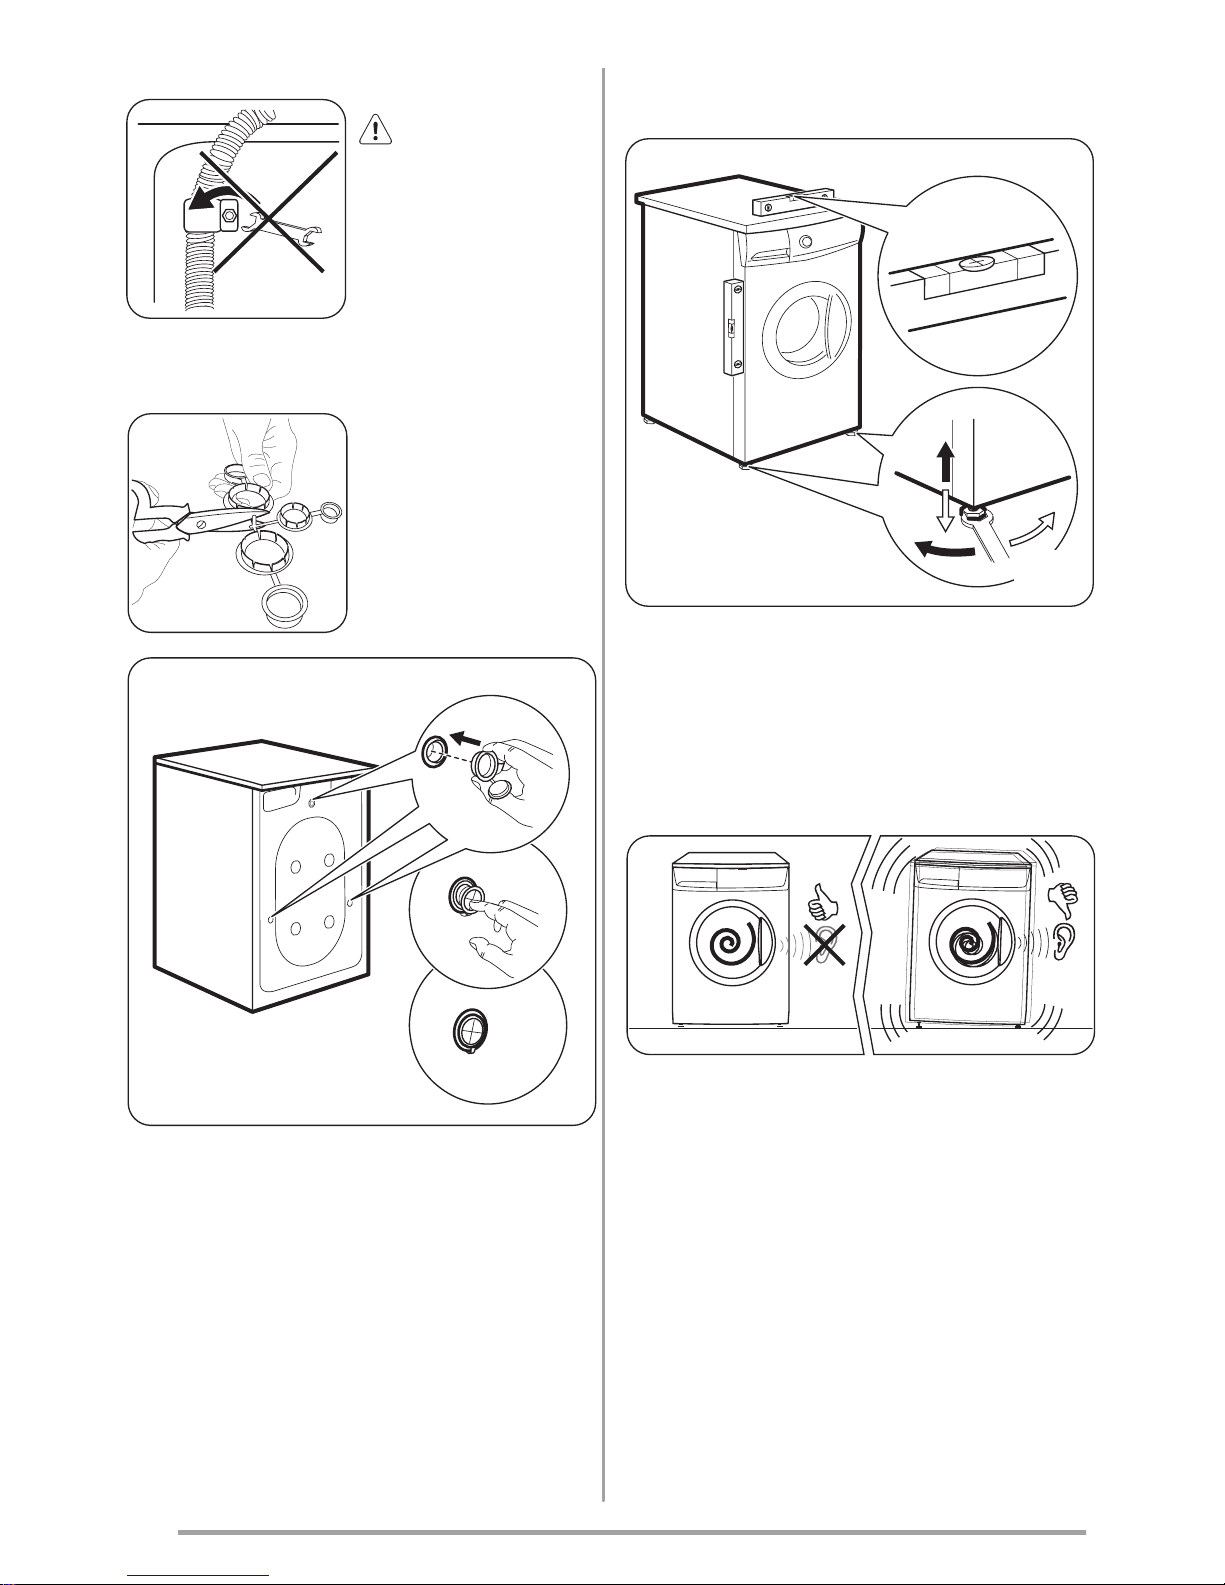
Positioning and levelling
x 4
Level the appliance by raising or lowering the
feet.
The appliance MUST be level and stable on a
flat hard floor. If necessary, check the setting
with a spirit level. Any necessary adjustment
can be made with a spanner.
Accurate levelling prevents vibration, noise
and displacement of the appliance during operation.
Repeat the levelling action, if the appliance is
not level and stable.
8
www.zanussi.com
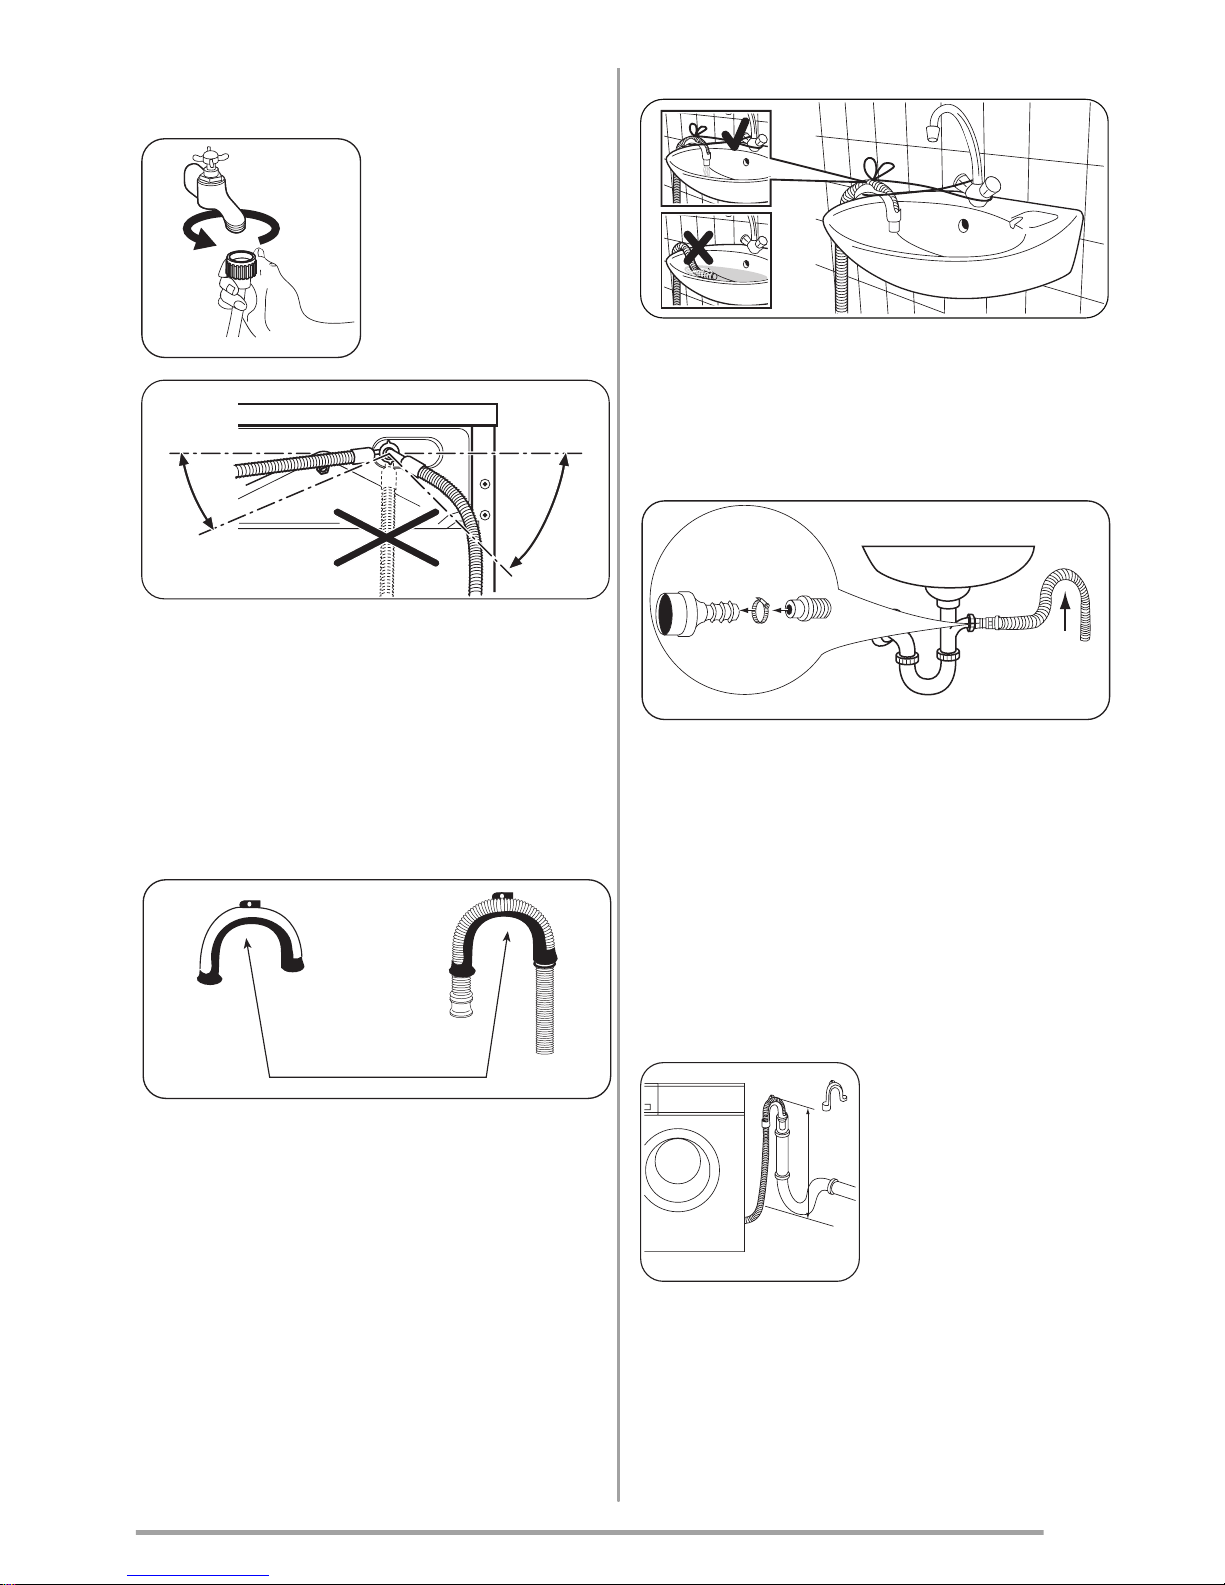
Water inlet
Connect the hose to
a tap with a 3/4”
thread.
35°
45°
Loosen the ring nut to angle the hose to the
left or right depending on the position of your
water tap. Do not place the inlet hose
downwards. After positioning the inlet hose,
be sure to tighten the ring nut again to prevent leaks.
Water drainage
Firstly form a hook in the end of the drain
hose using the plastic hose guide supplied
with the appliance .
The end of the drain hose can be positioned
in four ways:
• Hooked over the edge of a sink using
the plastic hose guide.
Tie the plastic hose guide to the tap with a
string to prevent that the drain hose unhooks
when the appliance is emptying.
• Onto a sink outlet spigot.
Push the drain hose onto the spigot and secure with a clip, ensure a loop is formed in
the drain hose to prevent waste from the sink
entering the appliance.
If the outlet spigot has not been used before,
remove any blanking plug that may be in
place.
• Directly into a drain pipe at a height of
not less than 60 cm and not more than
100 cm.
MAX 100cm
The end of the drain
hose must always be
ventilated, i.e. the
inside diameter of the
drain pipe must be
larger than the outside diameter of the
drain hose. The drain
hose must not be
kinked.
9
www.zanussi.com
If your drain hose
looks like this (see
beside) you do not
require the “U”
piece”. Just push the
hose firmly in to the
standpipe.
• Directly to a built-in drain pipe in the
room wall.
The drain hose may be extended to a maxi-
mum of 4 metres. An additional drain hose
and joining piece is available from your Local
Centre.
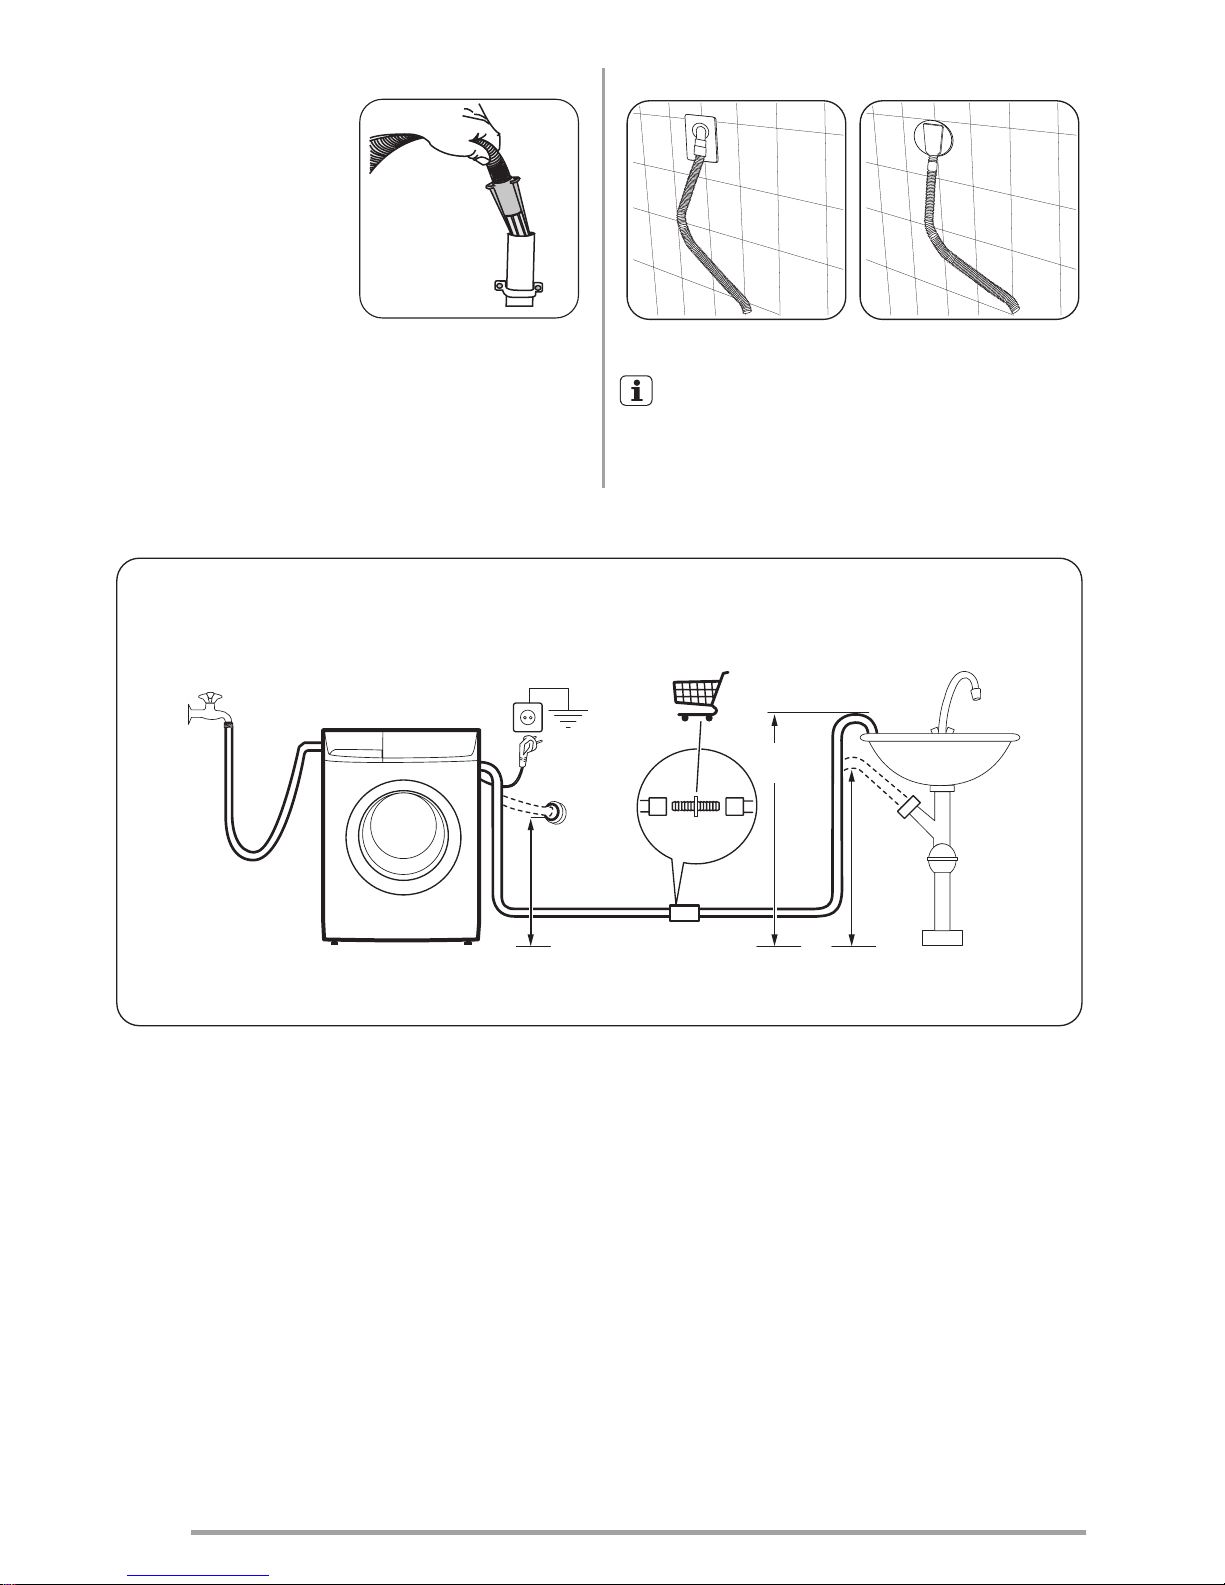
Connections overview
~max.400 cm
min. 60 cm
max. 100 cm
0.5 bar (0.05 MPa)
8 bar (0.8 MPa)
min.
60 cm
max.
100 cm
In the interest of the environment
The appliance should be connected to the
FOUL drainage system, the water will then be
taken to a sewage works for treatment before
being discharged safely into a river.
It is essential that these appliances are not connected to the surface water drainage system as
this water is discharged directly into a river or
stream and may cause pollution.
If you require any further advice please contact
your local water authority.
10
www.zanussi.com
 Loading...