

Zanussi ZWH 7140 AP, ZWH 7160 AP User Manual

EN
User manual 2
DE
Benutzerinformation 29
Washing Machine
Waschmaschine
ZWH 7140 AP
ZWH 7160 AP

Contents
Safety information
Important!
General safety
Installation
DO NOT
DO NOT
2
Safety information _ _ _ _ _ _ _ _ _ _ _ _ _ _ _ _ _ _ 2
Frost precaution _ _ _ _ _ _ _ _ _ _ _ _ _ _ _ _ _ _ _ 4
Environment concerns _ _ _ _ _ _ _ _ _ _ _ _ _ _ _ _ 4
Product description _ _ _ _ _ _ _ _ _ _ _ _ _ _ _ _ _ 5
Technical data _ _ _ _ _ _ _ _ _ _ _ _ _ _ _ _ _ _ _ 5
Installation _ _ _ _ _ _ _ _ _ _ _ _ _ _ _ _ _ _ _ _ _ 6
Special accessories _ _ _ _ _ _ _ _ _ _ _ _ _ _ _ _ 10
• The safety of your appliance complies with the industry
• It is most important that this instruction book should
• You MUST read them carefully before installing or us-
• Before first starting up, check the appliance for any
• If the appliance is delivered in the winter months when
• This appliance is made for use in a normal domestic
• It is dangerous to alter the specifications or attempt to
• During high temperature wash programmes the door
• Make sure that small children and pets do not climb
Read carefully and keep for future reference.
standards and with legal requirements on the safety of
appliances. However, as manufacturers, we feel it is
our duty to provide the following safety notes.
be retained with the appliance for future reference.
Should the appliance be sold or transferred to another
owner, or should you move house and leave the appliance, always ensure that the book is supplied with the
appliance in order that the new owner can get to know
the functioning of the appliance and the relevant warnings.
ing the appliance.
damage incurred during transport. Never connect up a
damaged appliance . If parts are damaged, contact your
supplier.
there are minus temperatures. Store it at room temperature for 24 hours before using for the first time.
situation. The manufacturer is not responsible for
freezing damages. Read "Frost precaution".
modify this product in any way.
glass may get hot. Do not touch it!
into the drum. To avoid this, please check inside the
drum before using.
First use _ _ _ _ _ _ _ _ _ _ _ _ _ _ _ _ _ _ _ _ _ _ 10
Personalisation _ _ _ _ _ _ _ _ _ _ _ _ _ _ _ _ _ _ 10
Daily use _ _ _ _ _ _ _ _ _ _ _ _ _ _ _ _ _ _ _ _ _ 11
Washing programmes _ _ _ _ _ _ _ _ _ _ _ _ _ _ _ 19
Consumption values _ _ _ _ _ _ _ _ _ _ _ _ _ _ _ _ 21
Care and cleaning _ _ _ _ _ _ _ _ _ _ _ _ _ _ _ _ _ 22
What to do if… _ _ _ _ _ _ _ _ _ _ _ _ _ _ _ _ _ _ 24
Subject to change without notice
• Any objects such as coins, safety pins, nails, screws,
stones or any other hard, sharp material can cause extensive damage and must not be placed into the appliance.
• Only use the advised quantities of fabric softener and
detergent. Damage to the fabric can ensue if you overfill. Refer to the manufacturer’s recommendations of
quantities.
• Wash small items such as socks, laces, washable belts
etc in a washing bag or pillow case as it is possible for
such items to slip down between the tub and the inner
drum.
• Do not use your appliance to wash articles with whalebones, material without hems or torn material.
• Always unplug the appliance and turn off the water
supply after use, cleaning and maintenance.
• Under no circumstances should you attempt to repair
the appliance yourself. Repairs carried out by inexperienced people may cause injury or serious malfunctioning. Contact your local Service Centre. Always insist on genuine spare parts.
• This appliance is heavy. Care should be taken when
moving it.
• All packing and transit bolts must be removed before
use. Serious damage can occur to the product and to
property if this is not adhered to. See relevant section
in the user manual.
• This appliance is free standing only.
under a counter and D
any reason.
• After having installed the appliance, check that it is not
standing on the inlet and drain hose and the worktop is
remove the worktop for
build it in

not pressing the electrical supply cable against the
This appliance must be connected to a cold water sup-
ply.
Use
Child safety
3
wall.
• Install the appliance on a flat hard floor.
• Never place cardboard, wood or similar materials under the appliance to compensate for any unevenness in
the floor.
• If the appliance is situated on a carpeted floor, please
adjust the feet in order to allow air to circulate freely
under the appliance.
• Check that the appliance does not touch the wall or
other kitchen units.
•T
• Do not use the hose from your previous appliance to
connect to water supply. Always use the hose supplied
with the appliance.
• The inlet hose must not be lengthened. If it is too short
and you do not wish to move the tap, you will have to
purchase a new, longer hose specially designed for
this type of use.
• Always be sure, that there is no water leakage from hoses and their connections after the installation.
• If the appliance is installed in a location subject to
frost, please read the “Frost precaution” chapter. Manufacturer decline any responsibility for freezing damages.
• Any plumbing work required to install this appliance
should be carried out by a qualified plumber or competent person.
• Any electrical work required to install this appliance
should be carried out by a qualified electrician or competent person.
• This appliance is designed for domestic use. It must
not be used for purposes other than those for which it
was designed.
• Only wash fabrics which are designed to be machine
washed. Follow the instructions on each garment label.
• Do not overload the appliance. See the "Washing Programme Chart".
• Before washing, ensure that all pockets are empty and
buttons and zips are fastened. Avoid washing frayed or
torn articles and treat stains such as paint, ink, rust,
and grass before washing. Underwired bras must NOT
be machine washed.
• The detergent dispenser drawer is provided with an insert for liquid detergent. Do not use the insert downwards for gelatinous detergents, with programmes including prewash, with the delay start option. In all
these cases you can use metering balls or sachets provided with the detergent, Take out the metering aid at
the end of the washing cycle.
• Garments which have been in contact with volatile petroleum products should not be machine washed. If
volatile cleaning fluids are used, care should be taken
to ensure that the fluid is removed from the garment
before placing in the appliance.
• Never pull the power supply cable to remove the plug
from the socket; always take hold of the plug itself.
• Never use the appliance if the power supply cable, the
control panel, the working surface or the base are damaged so that the inside of the appliance is accessible.
• This appliance is not intended for use by persons (including children) with reduced physical sensory or
mental capabilities or lack of experience and knowledge unless they have been given supervision or instruction concerning use of the appliance by a person
responsible for their safety.
• Children should be supervised to ensure that they do
not play with the appliance.
• The packaging components (e.g. plastic film, polystyrene) can be dangerous to children - danger of suffocation! Keep them out of children’s reach.
• Keep all detergents in a safe place out of children’s
reach.
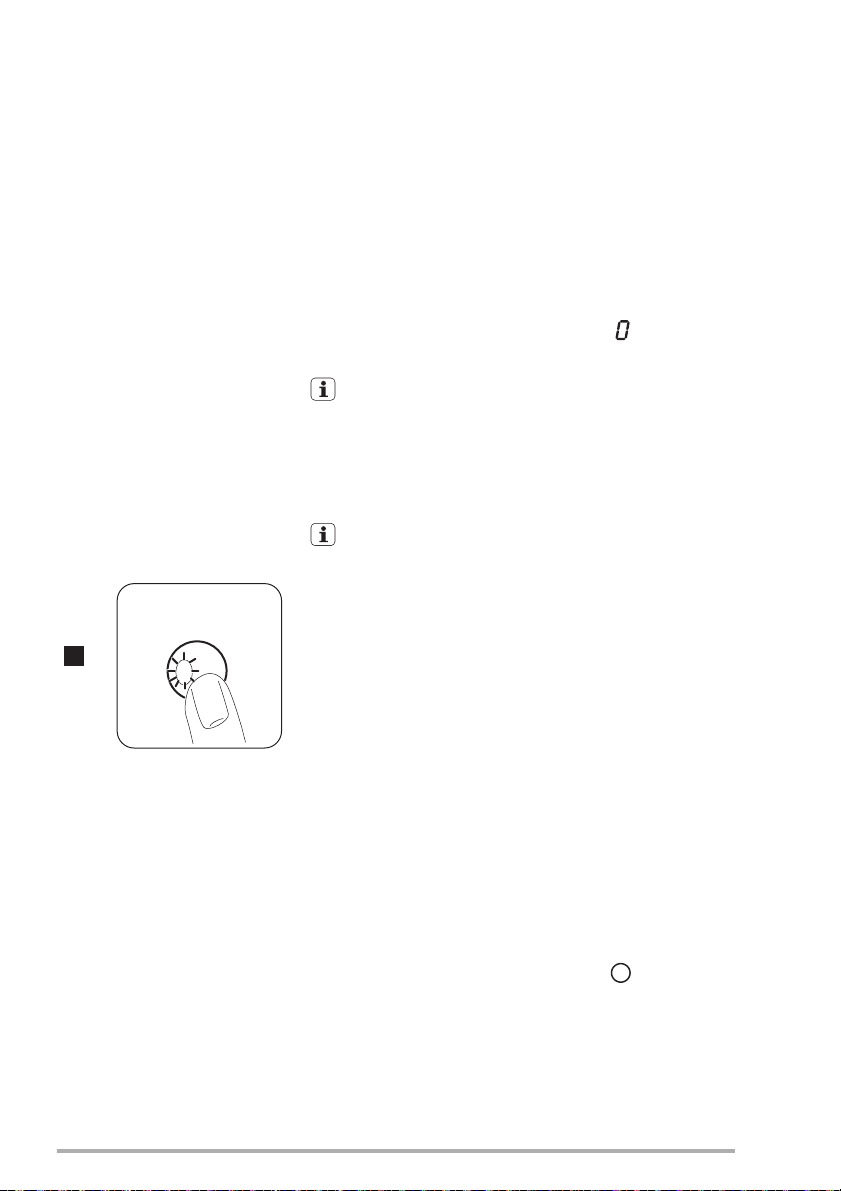
• Make sure that children or pets do not climb inside the
drum. To prevent children and pets becoming trapped
inside the drum this appliance incorporates a special
feature.
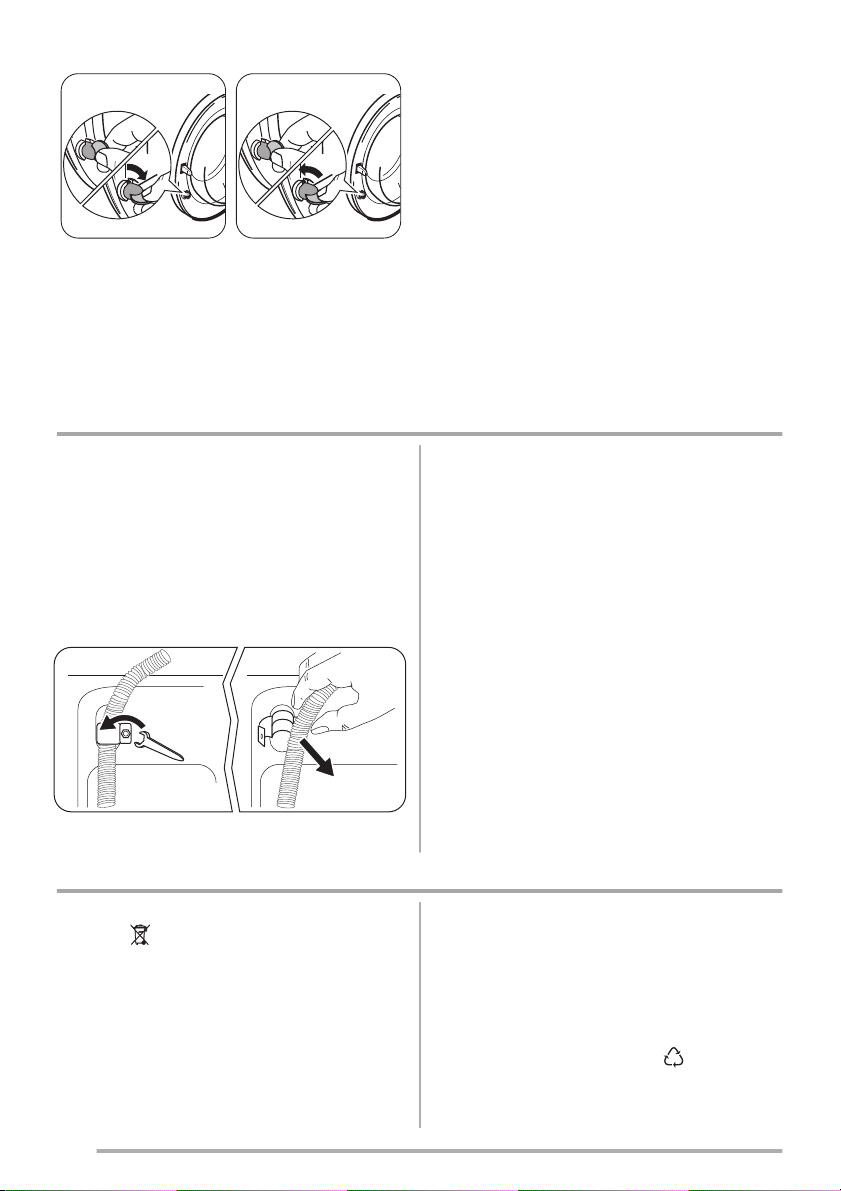
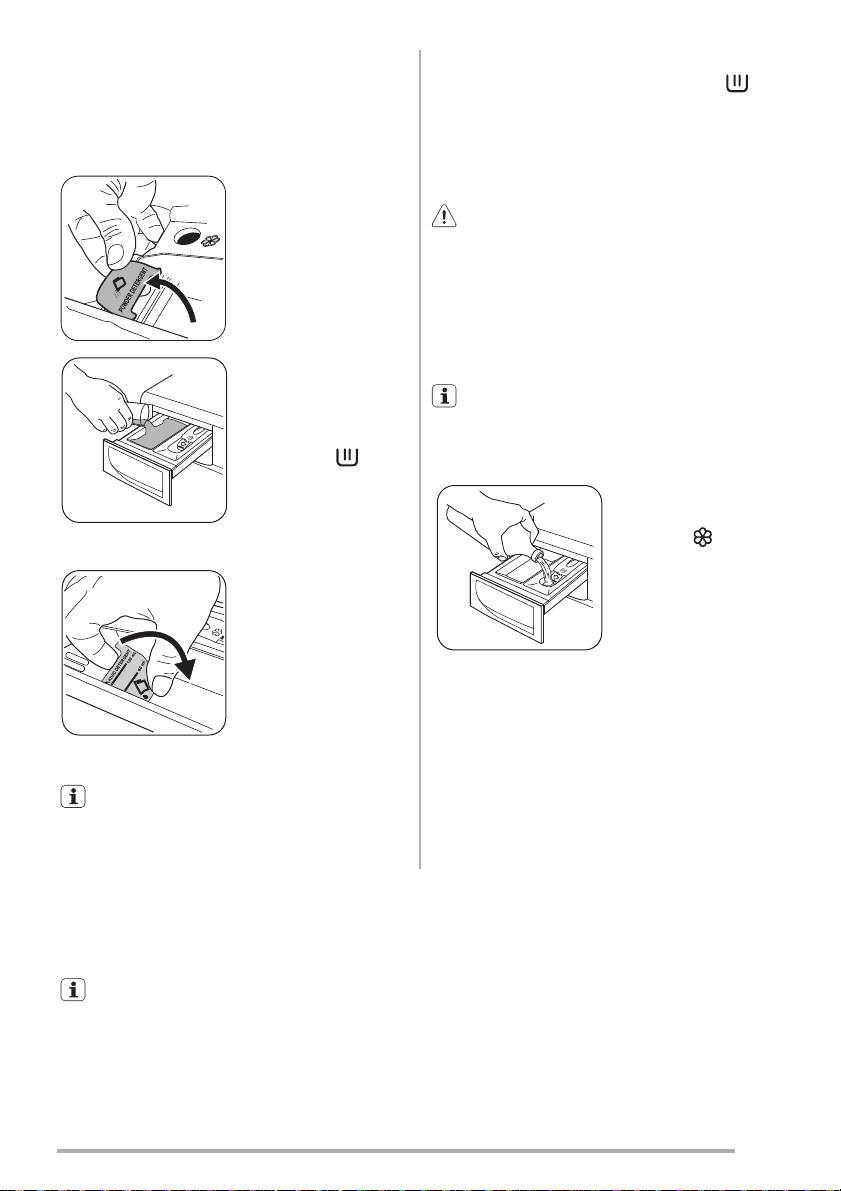
To a
activate
disable
Frost precaution
Environment concerns
Packaging materials
4
this device, rotate the button (without
pressing it) inside the
door clockwise until the
groove is horizontal. If
necessary use a coin.
To d
this device and
restore the possibility of
closing the door, rotate the
button anti-clockwise until
the groove is vertical.
If the appliance is installed in a place where the temperature could drop below 0°C, proceed as follows to remove
any water remaining inside the appliance:
1. unplug the appliance;
2. turn off the water tap;
3. unscrew the water inlet hose from the tap;
4. unscrew the drain hose from the rear support and unhook it from sink or spigot;
5. place a bowl on the floor;
E
The symbol on the product or on its packaging
indicates that this product may not be treated as
household waste. Instead it should be taken to the
appropriate collection point for the recycling of electrical
and electronic equipment. By ensuring this product is
disposed of correctly, you will help prevent potential
negative consequences for the environment and human
health, which could otherwise be caused by inappropriate
6. let the drain hose run along the floor, place the external extremities of the drain and inlet hoses in the
bowl placed on the floor and let water drain out completely;
7. screw the water inlet hose to the tap and the drain
hose to the rear of the appliance again;
When you intend to start the appliance up again, make
sure that the room temperature is above 0°C.
waste handling of this product. For more detailed
information about recycling of this product, please contact
your local council, your household waste disposal service
or the shop where you purchased the product.
The materials marked with the symbol are recyclable.
>PE<=polyethylene
>PS<=polystyrene
>PP<=polypropylene
Ecological hints
Product description
Technical data
5
This means that they can be recycled by disposing of
them properly in appropriate collection containers.
To save water, energy and to help protect the environment,
we recommend that you follow these tips:
• Normally soiled laundry may be washed without prewashing in order to save detergent, water and time (the
environment is protected too!).
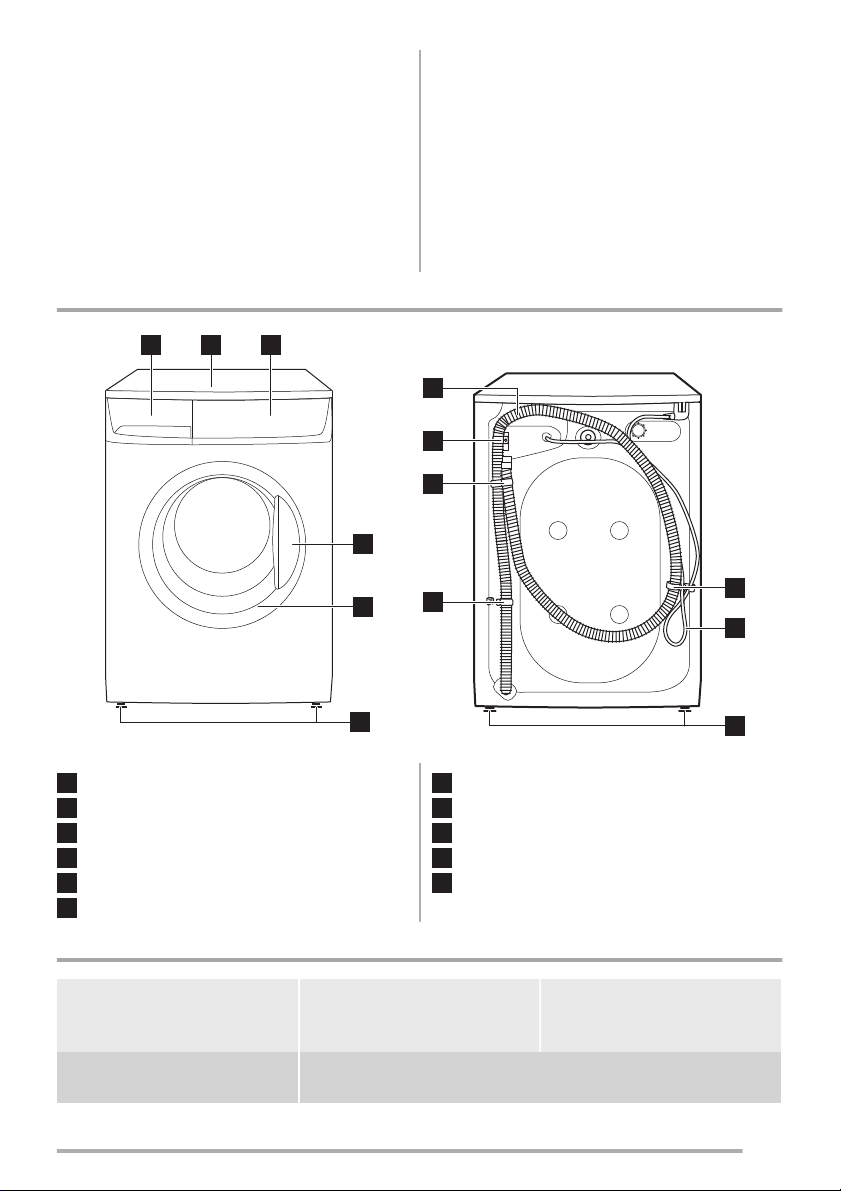
1 2 3
4
• The machine works more economically if it is fully loaded.
• With adequate pre-treatment, stains and limited soiling
can be removed; the laundry can then be washed at a
lower temperature.
• Measure out detergent according to the water hardness, the degree of soiling and the quantity of laundry
being washed.
7
8
9
9
7
Water drain hose
8
Drain hose support
9
Hose holders
10
Mains cable
11
Back feet
60 cm
85 cm
50 cm
1
Detergent dispenser drawer
2
Worktop
3
Control panel
4
Door opening handle
5
Rating plate (on the inner edge)
6
Front adjustable feet
T
Dimensions Width
Height
Depth
5
6
Electrical connection Information on the electrical connection is given on the rating plate, on the
inner edge of the appliance door.
9
10
1

Water supply pressure Minimum
Installation
Unpacking
Warning!
Warning! RRemove
keep all transit devices
Necessary tools
6
Maximum
0,05 MPa
0,8 MPa
Maximum Load Cotton 7 kg
Spin Speed Maximum 1400 rpm (ZWH7140AP)
1600 rpm (ZWH7160AP)
• Read carefully the "Safety information" chapter
before installing the appliance.
x 3
A
C
to be transported again.
B
x 3
x 1
x 2
W
and k
so
that they can be refitted if the appliance ever has
10 mm
• Remove the cardboard top.
• Remove the polystyrene packaging materials.
• Spread the front piece
1
on the floor behind the
appliance and then lay
the appliance carefully
rear side down on it.
Make sure that no ho-
2
ses are crushed in the
process.
• Remove the polystyrene base from the bottom.
• Return appliance to it's
upright position.
30 mm
• Remove the external
film. Use a cutter, if
necessary.
• Open the door and remove the plastic hose
guide, the bag containing the instruction
booklet, the water inlet
hose and the plastic
plug caps from the
drum.
6
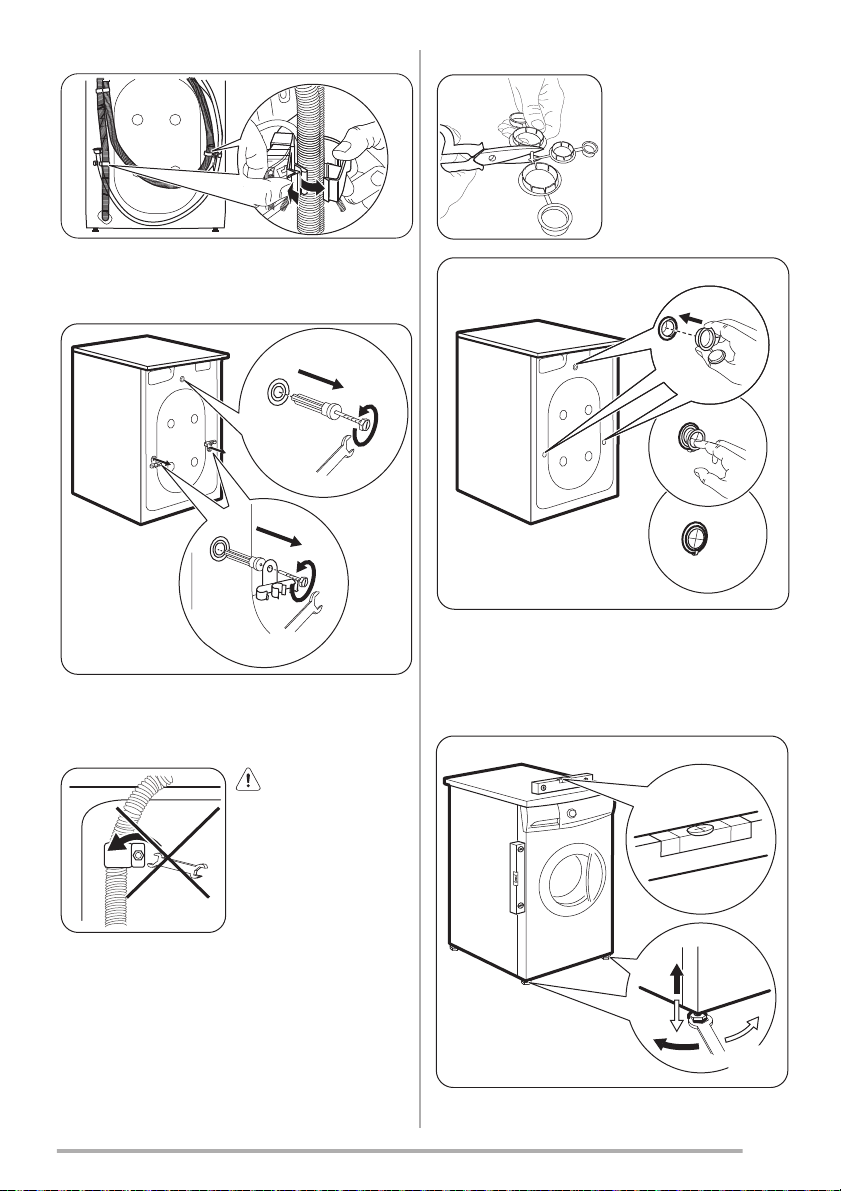
• Remove the power supply cable and the draining and
C
C
B
Warning! DDo not re-
move the drain hose
from the rear support. Remove this hose only if it is
necessary to drain
the water. Refer to "Frost precaution" and "What to do if".
Positioning and levelling
7
inlet hose from the hose holders (C
the appliance.
) on the rear of
• Plug the smaller upper hole and the two large ones
with the corresponding plastic plug caps.
• Unscrew the three bolts (AA) and remove the hose
holders (C
• Slide out the relevant plastic spacers (B
).
).
W
P
x 4
7
Level the appliance by raising or lowering the feet.
MUST
Water inlet
Caution!
1.
2.
4.
Water-stop device
Water drainage
Hooked over the edge of a sink using the plastic
hose guide.
8
The appliance M
floor. If necessary, check the setting with a spirit level.
Any necessary adjustment can be made with a spanner.
Accurate levelling prevents vibration, noise and displacement of the appliance during operation.
Repeat the levelling action, if the appliance is not level
and stable.
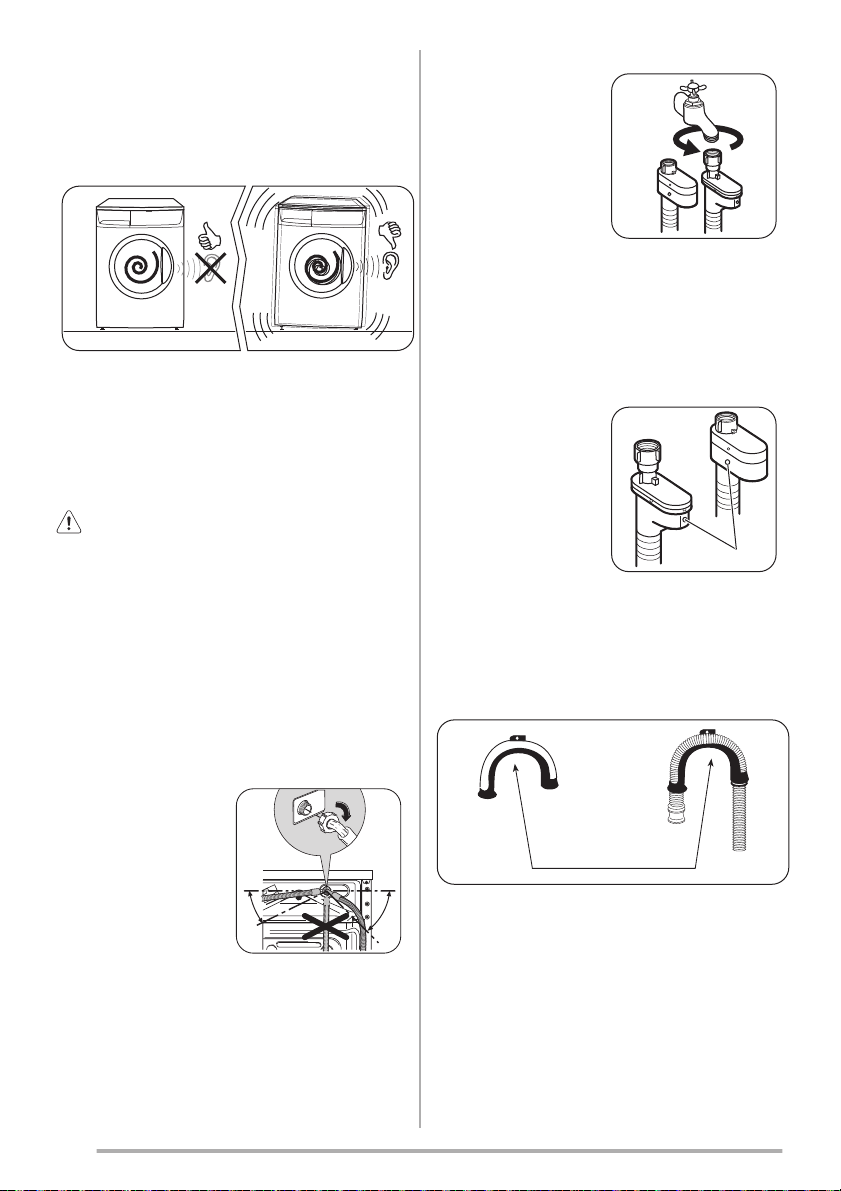
W
cold water supply
Before connecting up the appliance to new pipework or to
pipework that has not been used for some time, run off a
reasonable amount of water to flush out any debris that
may have collected
The inlet hose is supplied and can been found inside the
machine drum.
Do not use the hose from your previous appliance to connect to water supply.
be level and stable on a flat hard
This appliance must be connected to a
Connect the hose to a
tap with a 3/4” thread.
The inlet hose must not be lengthened. If it is too short
and you do not wish to move the tap, you will have to purchase a new, longer hose specially designed for this type
of use.
W
The inlet hose is provided
with a water stop device,
which protects against
damage caused by water
leaks in the hose which
could develop due to natural ageing of the hose.
This fault is shown by a red sector in the window «A».
Should this occur, turn the water tap off and refer to
your Service Centre to replace the hose.
W
A
Open the porthole and extract the inlet hose.
Connect the hose with
the angled connection to
the machine. Do not place
the inlet hose downwards.
Angle the hose to the left
or right depending on the
position of your water tap.
33. Set the hose correctly by loosening the ring nut. After
positioning the inlet hose be sure to tighten the ring nut
again to prevent leaks.
35°
Firstly form a hook in the end of the drain hose using
45°
the plastic hose guide supplied with the appliance .
The end of the drain hose can be positioned in four
ways:
•H
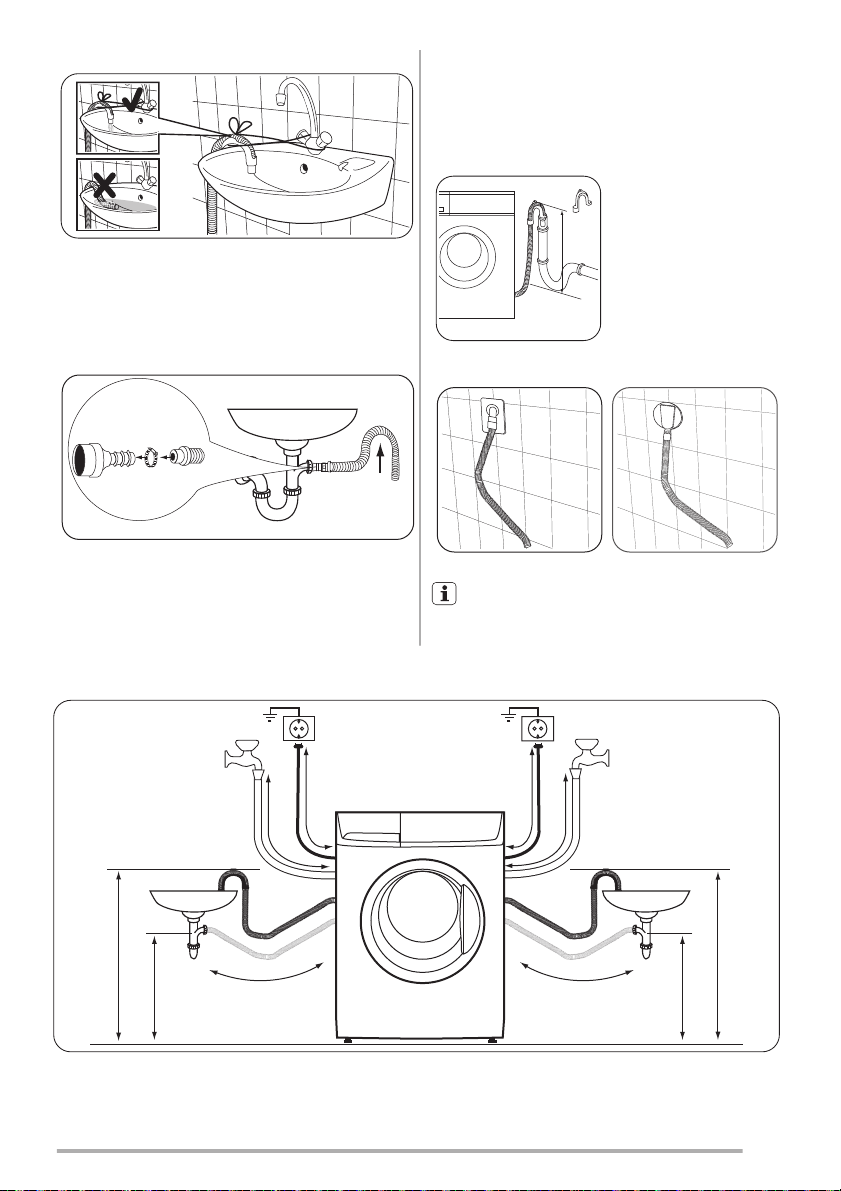
Tie the plastic hose guide to the tap with a string to pre-
Onto a sink outlet spigot.
Directly into a drain pipe at a height
ventilated
Directly to a built-in drain pipe
Connections overview
9
vent that the drain hose unhooks when the appliance is
emptying.
•O
Push the drain hose onto the spigot and secure with a
clip, ensure a loop is formed in the drain hose to prevent waste from the sink entering the appliance.
C
If the outlet spigot has not been used before, remove
any blanking plug that may be in place.
•D
60 cm and not more than 100 cm.
MAX 100cm
•D
The drain hose may be extended to a maximum of 4
metres. An additional drain hose and joining piece
is available from your Local Centre.
of not less than
The end of the drain hose
must always be v
i.e. the inside diameter of
the drain pipe must be
larger than the outside diameter of the drain hose.
The drain hose must not
be kinked.
in the room wall.
,
max 100 cm
min. 60 cm
115 cm 140 cm
mc9 0 mc115
mc150mc100
max 100 cm
min. 60 cm
9
Electrical connection
Special accessories
Rubber feet kit
First use
Personalisation
Buzzer
5
6 seconds
Child safety lock
9
9
2
10
• The appliance must be earthed.
• Make sure that the electrical information on the rating
plate agree with your domestic power supply.
• Always use a correctly installed shockproof socket.
• Do not use multi-way plugs, connectors and extension
cables. There is a risk of fire.
• Do not replace or modify the mains cable yourself.
Contact the After Sales Service.
• Make sure that the mains plug and cable is not
squashed or damaged by the back of the appliance.
• Make sure that the mains plug is accessible after installation.
• Do not pull the mains cable to disconnect the appliance. Always pull the mains plug.
• This appliance complies with the E.E.C. Directives.
Available from your authorized dealer.
The rubber feet are particularly recommended on floating,
slippery and wooden floors.
• Ensure that the electrical and water connections
comply with the installation instructions.
• Ensure that the drum is empty.
• Before the first wash, run a cotton cycle at the
highest temperature without any laundry in the
The appliance is provided with an acoustic device, which
sounds in the following cases:
• at the end of the cycle;
• if there is a fault.
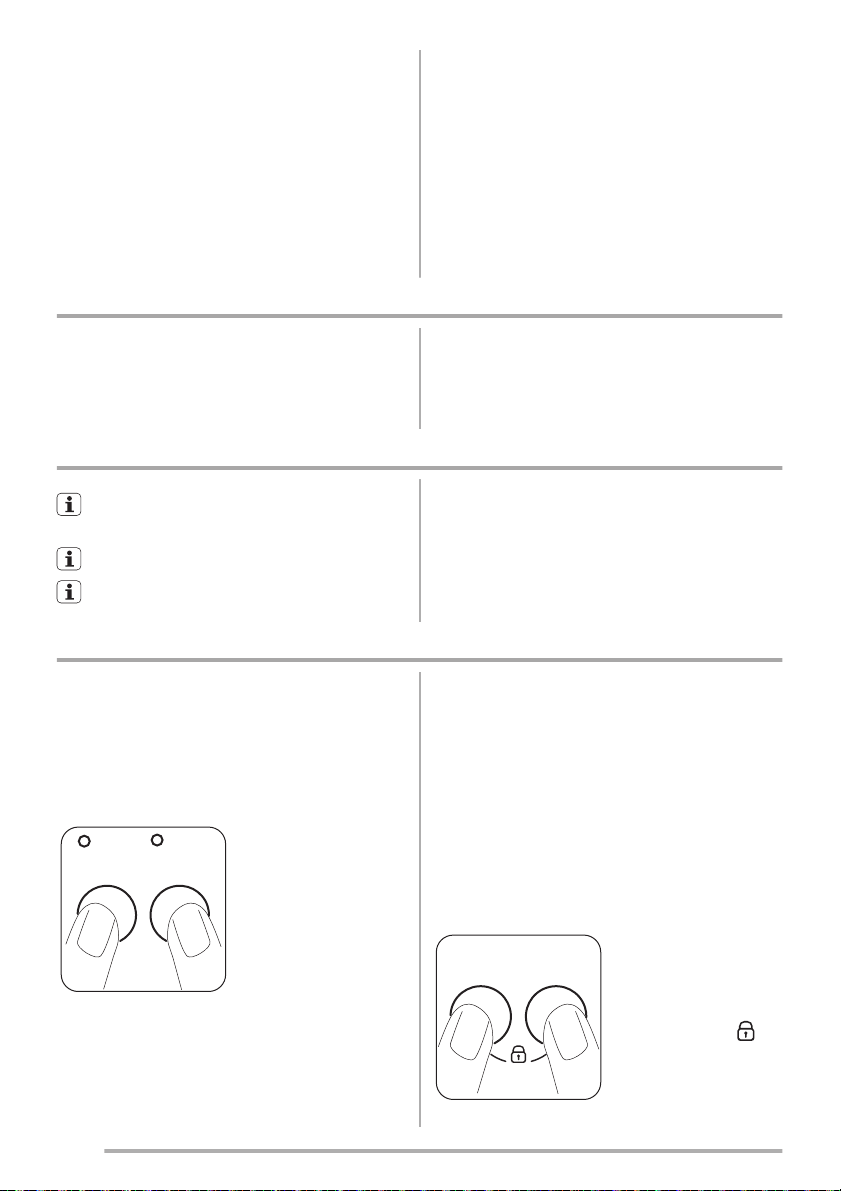
By pressing the 44 and 5
S
r
f-
i
t
n
A
e
di
pa
R
egassio
about 6
buttons simultaneously for
l
le
e
n
n
sr
sre
ep
p
u
uS
S
po
t
s
l
e
o
p
acoustic signal is deactivated (except if there is a
fault).
By pressing these 2 buttons again, the acoustic signal
is reactivated.
, the
Mount the rubber feet to prevent vibration, noises and displacement of the appliance during operation.
Read carefully the instructions supplied with the kit.
machine, to remove any manufacturing residue
from the drum and tub. Pour 1/2 a measure of
detergent into the main wash compartment and
start the machine.
This device permits you to leave the appliance unattended
so you do not need to worry that children might be injured
by or cause damage to the appliance. This function remains enabled also when the appliance is not working.
There are two different ways to set this option:
1. Before pressing button 9
the appliance.
2. After pressing button 9
change any other programme or option.
n
e
C
s
E
.
p
m
e
T
: it will be impossible to start
: it will be impossible to
To enable or disable this
n
ere
g
u
f
i
rt
option press simultane-
eg
a
ros
ously for about 6 seconds
buttons 2
the display, the icon
appears or disappears.
and 33 until on
Daily use
Sort out the laundry
Before Loading The Laundry
Important!
Remove stubborn stains before washing:
Blood
Oil based paint
Dried grease stains
Rust
Mould stains
Grass
Ball point pen and glue
Lipstick
Red wine
Ink
Tar stains
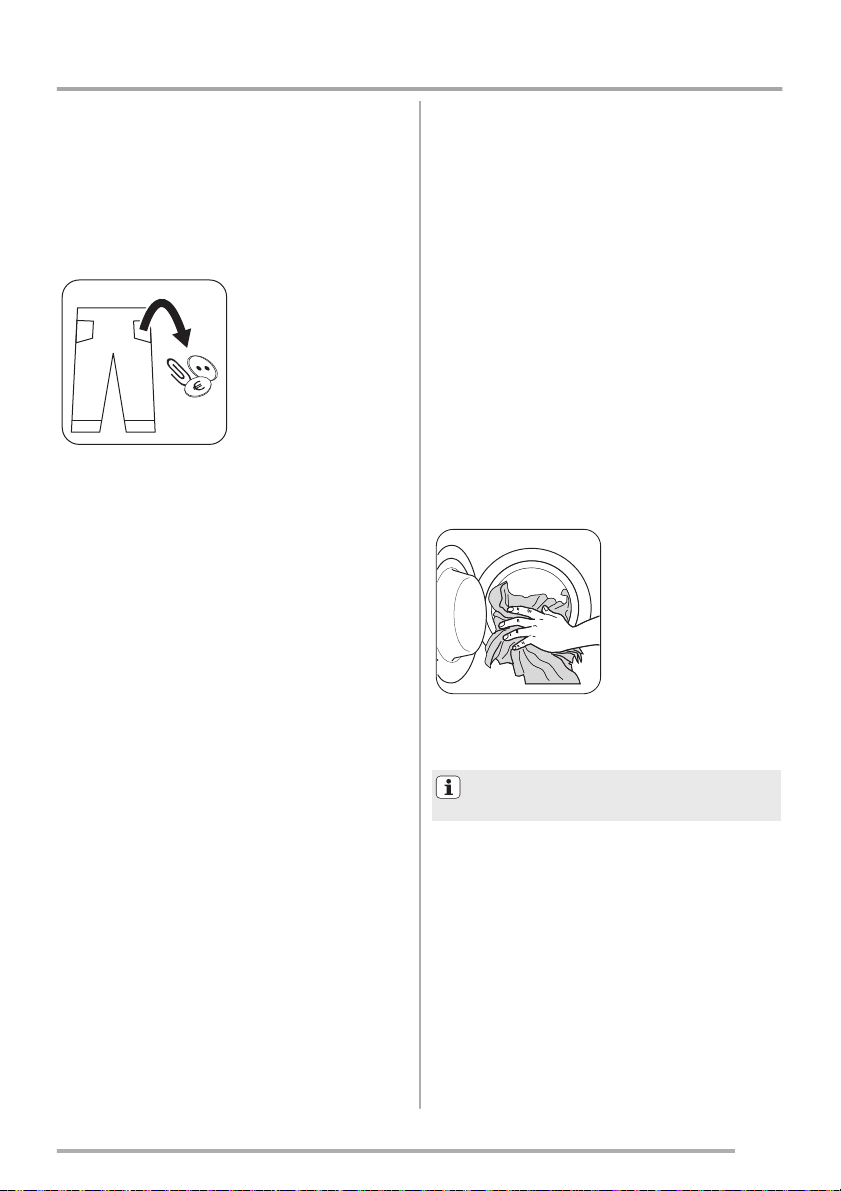
Open the door by carefully pulling the door handle
outwards
Load the laundry
Maximum Loads
Cotton, linen
Synthetics
Delicate fabrics and woollens
11
Follow the wash code symbols on each garment label and
the manufacturer’s washing instructions. Sort the laundry
as follows: whites, coloureds, synthetics, delicates, woollens.
I
no metal objects are left in
the laundry (e.g. hair clips,
safety pins, pins). Button
up pillowcases, close zip
fasteners, hooks and poppers. Tie any belts or long
tapes. Remove any hooks
(e.g curtains).
• Never wash whites and coloureds together. Whites may
lose their «whiteness» in the wash.
• New coloured items may run in the first wash; they
should therefore be washed separately the first time.
• Rub particularly soiled areas with a special detergent or
detergent paste.
• Treat curtains with special care.
• Wash the socks and the gloves inside the bag or a net.
: treat fresh stains with cold water. For dried stains,
soak overnight in water with a special detergent then rub
in the soap and water.
the garment on a soft cloth and dab the stain; treat several
times.
ment on a soft surface and dab the stain with the fingertips
and a cotton cloth.
: oxalic acid dissolved in hot water or a rust removing
product used cold. Be careful with rust stains which are
not recent since the cellulose structure will already have
been damaged and the fabric tends to hole.
coloureds only).
coloureds only).
: moisten with benzine stain remover, lay
: moisten with turpentine, lay the gar-
: treat with bleach, rinse well (whites and fast
: soap lightly and treat with bleach (whites and fast
Make sure that
garment on a soft cloth and dab the stain.
: moisten with acetone as above, then treat stains
with methylated spirits. Treat any residual marks with
bleach.
: soak in water and detergent, rinse and treat with
acetic or citric acid, then rinse. Treat any residual marks
with bleach.
: depending on the type of ink, moisten the fabric first
with acetone
marks on white fabrics with bleach and then rinse thoroughly.
or benzine, then rub with detergent paste.
1)
: first treat with stain remover, methylated spirits
: moisten with acetone1), lay the
, then with acetic acid; treat any residual
Place the laundry in the
drum, one item at a time,
shaking them out as much
as possible.
M
Recommended loads are indicated in the «Washing Programmes».
General rules:
•C
•S
•D
third full.
: drum full but not too tightly packed;
: drum no more than half full;
: drum no more than one
1) do not use acetone on artificial silk.
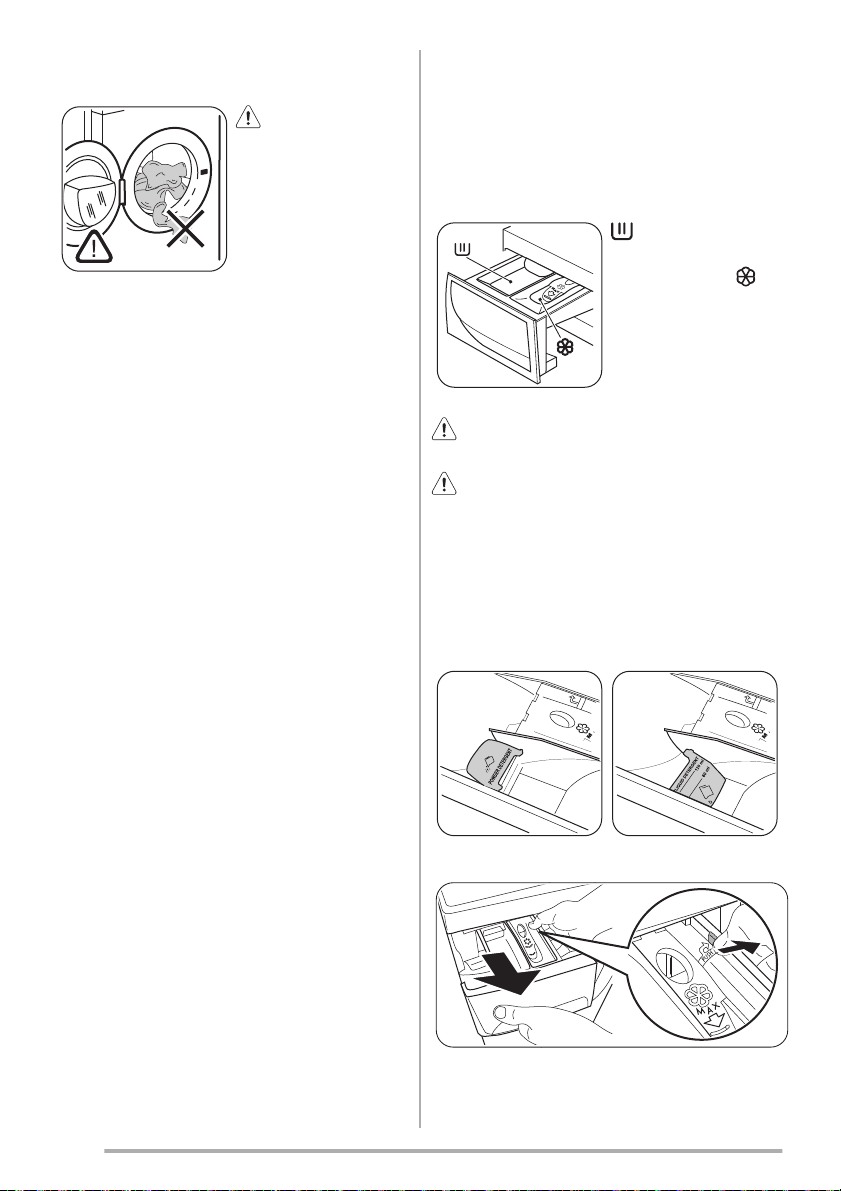
Close the door gently
Warning!
Detergents and additives
Quantity of detergent to be used
Degrees of water hardness
Open the detergent dispenser drawer
Warning!
Warning!
Flap for powder or liquid detergent
UP- Flap position if using
POWDER detergent
DOWN - Flap position if
using LIQUID detergent
during main wa
sh
If the flap is not in the desired position
12
W
Make sure
that any fabrics were
not trapped when closing
the door.
Good washing results also depend on the choice of detergent and use of the correct quantities to avoid waste and
protect the environment.
Although biodegradable, detergents contain substances
which, in large quantities, can upset the delicate balance
of nature.
The choice of detergent will depend on the type of fabric
(delicates, woollens, cottons, etc.), the colour, washing
temperature and degree of soiling.
All commonly available washing machine detergents may
be used in this appliance:
• powder detergents for all types of fabric,
• powder detergents for delicate fabrics (40°C max) and
woollens,
• liquid detergents, preferably for low temperature wash
programmes (60°C max) for all types of fabric, or special for woollens only.
The type and quantity of detergent will depend on the type
of fabric, load size, degree of soiling and hardness of the
water used.
For the quantity of detergent, refer always to what is written on the product packing.
Use less detergent if:
• you are washing a small load,
• the laundry is lightly soiled,
• large amounts of foam form during washing.
Water hardness is classified in so-called “degrees” of
hardness. Information on hardness of the water in your
area can be obtained from the relevant water supply company, or from your local authority.
If the water hardness degree is medium or high we suggest you to add a water softener following always the
manufacturer’s instructions.
When the degree of hardness is soft, readjust the quantity
of the detergent.
Compartment for
powder or liquid detergent
used for main wash.
Compartment for liquid
additives (fabric softener,
starch).
If you wish to carry out the prewash, pour
W
the detergent among washing items into the drum.
Depending on the type detergent you use
(powder of liquid), ensure that the flap, placed in the
main wash compartment, is in the desired position.
N
VE
O
LEA
C
EM
R
TO
I
PUSH
:
VE
PUSH
EAN
CL
REMO
TO
1
• Remove the drawer. Push the drawer edge outwards
The flap is down and you wish to use powder detergent:
The flap is up and you wish to use liquid detergent:
Warning!
"DOWN"
"UP"
Measure out the fabric softener
Close the detergent dispenser drawer
Set your washing programme
9
Err
13
where indicated by the arrow (PUSH) to facilitate
drawer removal.
• Rotate the flap upwards. Ensure to fit the
flap completely in.
• Carefully put the drawer
back.
• Measure out the detergent.
• Pour the powder detergent into the main wash
compartment
T
• Rotate the flap downwards.
• Carefully put the drawer
back.
.
•
Pour the liquid detergent in the compartment
without exceeding the limit indicated in the flap. The
detergent must be placed in the appropriate compartments of the dispenser drawer before starting the
wash programme.
W
Do not use the flap in "
with:
• Gelatinous detergent or thick detergent.
• Powder detergent.
• With programmes with prewash.
• Do not use liquid detergent if the washing programme
doesn't start immediately.
In all above listed cases, use the flap in "
tion .
position
posi-
Pour fabric softener or any
additives into the compartment marked
exceed the «MAX» mark
in the drawer). Any additives must be placed in the
appropriate compartments
of the dispenser drawer
just before starting the
wash programme.
(do not
C
• Measure out the detergent.
For the quantity of detergent, refer always to what
is written on the product packing and ensure that
the detergent can be poured in the drawer.
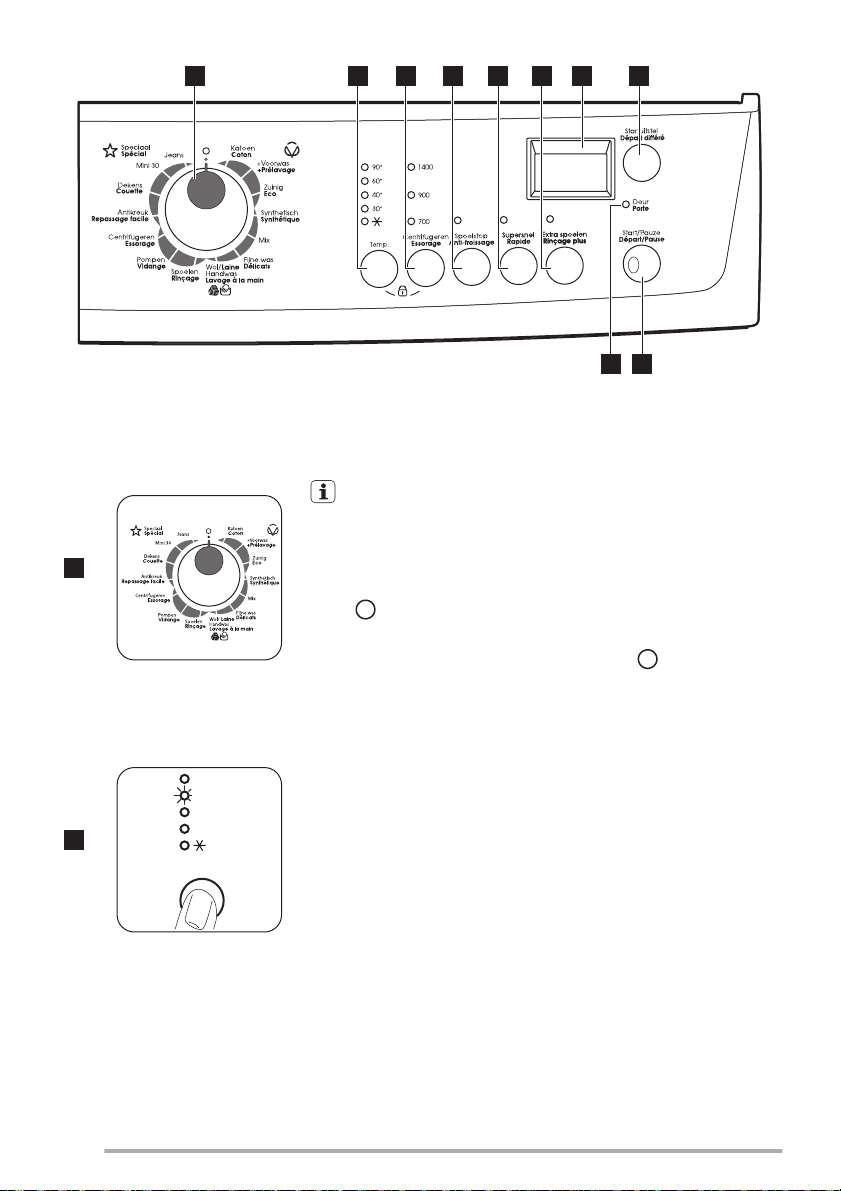
The control panel permits to select a washing programmes and different options.
When an option button is selected, the corresponding pilot light is on. Otherwise it is off.
For compatibility among washing programmes and options, see the "Washing Programmes". If an incorrect option is selected, the integrated red pilot light of the button 9
.
flashes 3 times and the display shows the message
P
Programme selector dial
Turn the programme selector dial to the required programme. The selector
dial can be turned either clo
ckwise or counter-clockwise.
9
9
Err
switch the appliance off
cancel
change
9
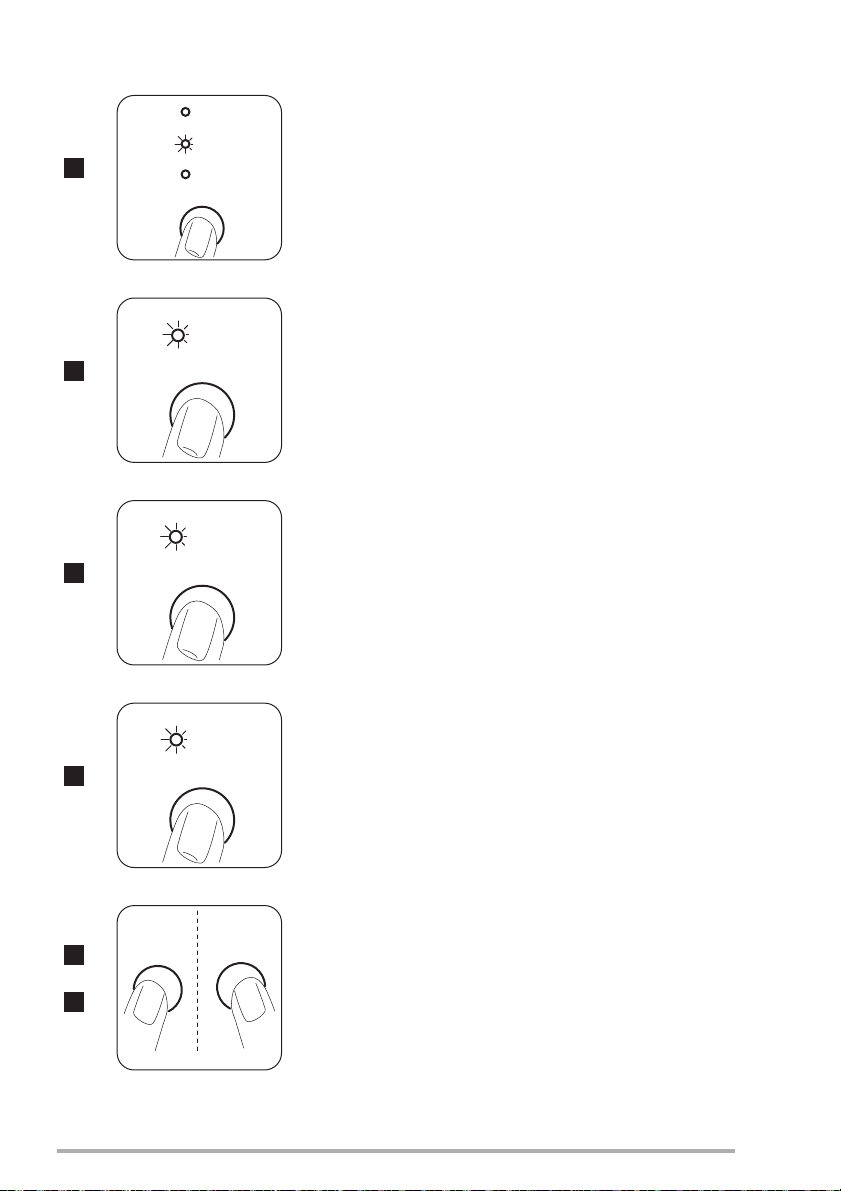
Temperature button
Push the temperature button to select the most suitable temperature for
washing your laundry .
14
1
2
1 2 3 4 5 6 7
T
light of the button 9
starts flashing: the appliance is now switched on.
If you turn the programme selector dial to another programme when
the appliance is working, the red pilot light of the button 9
times and the message E
is displayed to indicate a wrong selection. The
appliance will not perform the new selected programme.
• To s
.
tion
• To c
or c
, turn the programme selector dial to the posi-
a running programme, switch the appliance off by
turning the programme selector dial to the position
programme by turning the selector to the desired programme. Start the
new programme by pressing the button 9
be not emptied out.
90°
60°
40°
30°
P
Temp.
8
910
The green pilot
will flash 3
. Select the new
again. The water in the tub will
Spin Reduction
Rinse Hold
To empty out the water, please read the paragraph «At the end of the pro-
gramme».
Super Quick
Extra Rinse
+
Extra Rinse
6
remove
6
15
1400
900
3
700
e
gu
fir
tn
eC
e
g
a
ro
ss
E
R
n
er
By selecting a programme, the appliance proposes automatically the maximum spin speed provided for that programme.
Press this button repeatedly to change the spin speed, if you want your laundry to be spun at a different speed. The relevant light illuminates.
By pressing this button the corresponding pilot light illuminates.
By selecting this function the water of the last rinse is not emptied out to
po
t
s
l
e
o
p
4
S
nA
e
g
a
s
sio
r
f
-
i
t
prevent the fabrics from creasing. Before opening the door it will be necessary to empty out the water.
T
By pressing this button the corresponding pilot light illuminates.
Short cycle for lightly soiled items or for laundry which needs only freshen-
l
l
e
e
n
n
sr
sre
ep
p
u
u
S
S
e
d
i
pa
5
R
ing up.
With this option, a reduced load of laundry is recommended:
• Cottons 3,5 kg
• Synthetics and delicates 2 kg
E
n
nele
el
e
o
op
p
s
s ar
a
rtx
t
xE
6
E
i
iR
R
s
sul
ul
p
p
e
eg
gaçn
açn
Press this button to perform an additional rinse. The corresponding light illuminates. In this case, the option doesn't stay permanently on.
This appliance is designed for saving water. However, for people with very
delicate skin (allergic to detergents) it may be necessary to rinse the laundry
S
eg
a
ss
i
o
rf
-
4
+
i
tn
A
6
s
su
u
l
l
p
p
e
e
gaçn
gaçniR
i
R
Press simultaneously the buttons 44 and 66 for some seconds:
• the pilot light of button 6
illuminates;
• the extra rinse option is activated and it stays permanently on.
To r
it press the same buttons again until the pilot light of button 6
using an extra quantity of water.
nel
n
e
l
eo
eop
ps
s a
a
r
rtxE
txE
p
o
t
s
l
e
o
p
goes off.
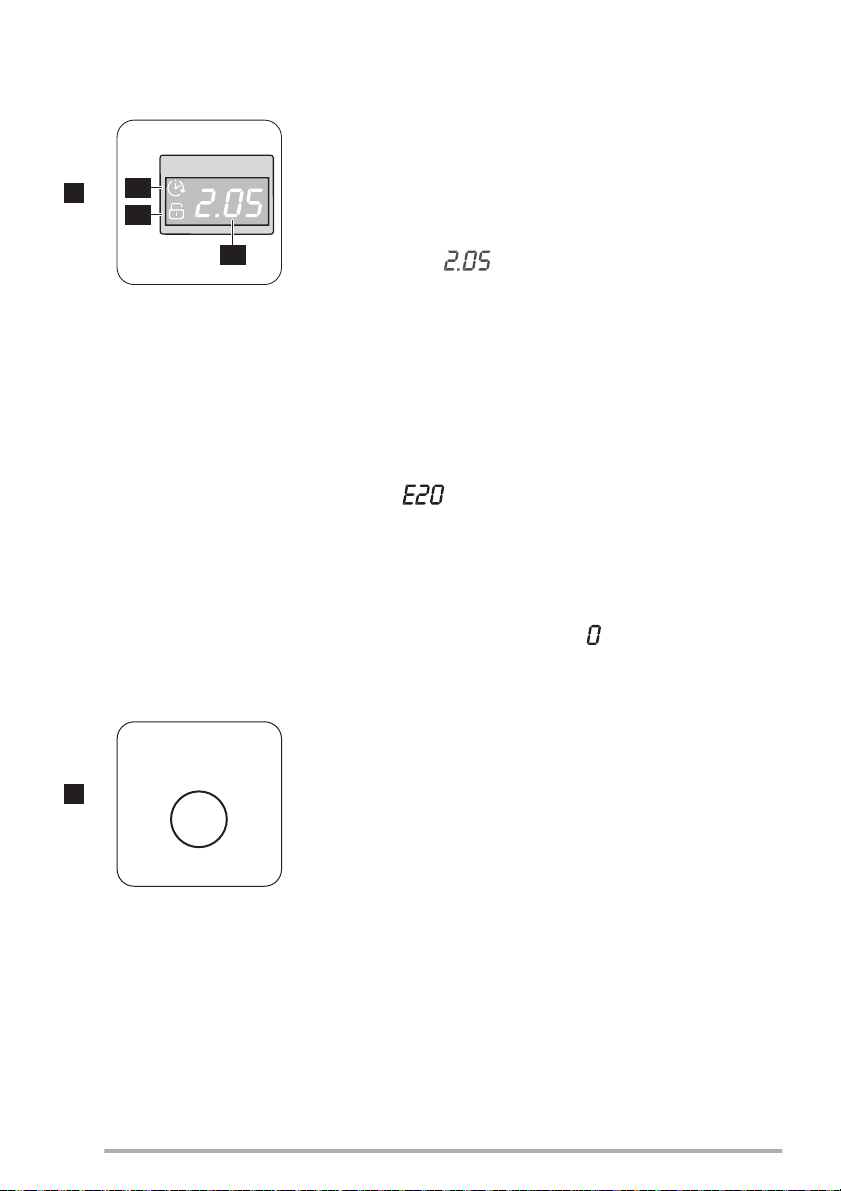
Display
The display shows the following information:
7.1 DDelay Start icon
7.2
Child safety lock
7.3
Duration of the selected programme
Delayed start
Alarm codes
Incorrect option selection
Err
9
End of programme
10
Delay Start
16
7
C
This device permits you to leave the appliance unattended during it's functioning.
7.1
7
7.2
•D
After selecting a programme, the duration is displayed in hours and mi-
7.3
nutes (for example
the basis of the maximum recommended load for each type of fabric. After
the programme has started, the time remaining is updated every minute.
•D
The selected delay set by pressing the relevant button appears on the display for a few seconds, then the duration of the selected programme is
displayed again. The delay time value decreases by one unit every hour
and then, when 1 hour remains, every minute.
•A
In the event of operating problems, some alarm codes can be displayed,
for example
•I
If an option which is not compatible with the set wash programme is selected, the message E
seconds and the integrated red light of button 9
•E
When the programme has finished a zero (
lot light 1
opened.
The programme can be delayed from 30 min - 60 min - 90 min, 2 hours and
then by 1 hour up to a maximum of 20 hours by means of this button.
let
sti
u
t
rat
S
éré
f
fi
d
t
r
ap
é
8
D
Before you start the programme, if you wish to delay the start, press this button to select the desired delay.
The selected delay time value will appear on the display for a few seconds,
then the duration of the programme will appear again.
You must select this option after you have set the programme and before you
start the programme.
and the pilot light of button 99 go out and the door can be
). The duration is calculated automatically on
(see paragraph «What to do if...»).
is displayed at the bottom of the display for a few
start flashing.
) is displayed, the door pi-
1
You can cancel or modify the delay time at any moment, before you press
9
8
9
9
8
9
9
cannot
Start/Pause
Start the programme by pressing the button 9
start
10
interrupt
change
restart
9
open the door
9
pay attention to the water level and tempera-
ture!
9
17
.
button 9
Selecting the delay start :
• Select the programme and the required options.
• Select the delay start by pressing button 8
• Press button 9
:
.
– the appliance starts its hourly countdown.
– the programme will start after the selected delay has expired.
Cancelling the Delay Start after having started the programme:
• Set the appliance to PAUSE by pressing button 9
•
Press button 8
• Press button 9
once. On the display will appear
again to start the programme.
.
''.
• The selected delay can be changed only after selecting the washing
programme again.
• The door will be locked throughout the delay time. If you need to
open the door, you must first set the appliance to PAUSE by pressing button 9
and wait a few minutes before opening the door. After
you have closed the door, press the same button again.
The Delay Start c
be selected with the draining programme.
S
• To s
ez
u
a
P
/
tra
t
S
es
uaP/t
ra
p
éD
9
green pilot light stops flashing. The pilot light 1
that the appliance starts operating and the door is locked. If you have
chosen a delayed start, the appliance will begin the countdown.
• To i
sponding green pilot light starts flashing. It is possible to c
options of a running programme before the programme carries them out.
• To r
the button 9
• After the programme has started the door is locked. If, for any reason, you
need to o
button 9
If the door remains locked, this means that the appliance is already heating or that the water level is too high. In any case, do not try to force the
door!
If you cannot open the door but you need to open it you have to switch
the appliance off by turning the selector dial to
the door can be opened (p
options again and to press the button 9
the selected programme, press the button 99, the corresponding
illuminates to indicate
a programme which is running, press the button 99: the corre-
some
the programme from the point at which it was interrupted, press
.
. After a few minutes it will be possible to open the door.
, set firstly the appliance to PAUSE by pressing the
. After a few minutes
). After closing the door, it is necessary to select the programme and
.
10
Door light
At the end of the programme
9
10
9
Warning!
activate the child safety device
Stand by
9
Door seal
18
Deur
e
troP
aP
/
t
ratS
P
/
t
rap
é
D
The pilot light 110 illuminates when the programme starts and indicates if the
door can be opened:
• light on: the door cannot be opened. The appliance is working or has
e
zu
esua
stopped with water left in the tub.
• light off: the door can be opened. The programme is finished or the water
has been emptied out.
• light blinking: the door is opening in a few minutes.
The appliance stops automatically. The pilot light of the
and the pilot light 110 go off. The display shows
button 9
.
If a programme or an option that ends with water left in the
tub has been selected, the pilot light 1
the door is locked to indicate that the water must be emptied out before opening the door.
Follow the below instructions to empty out the water:
•
Turn the programme selector dial to
• Select the draining or spinning programme.
• Reduce the spin speed if needed, by pressing the rele-
vant button.
• Press the button 9
.
At the end of the programme, the door can be now
opened. Turn the programme selector dial to
the appliance off.
Remove the laundry from the drum and carefully check
that the drum is empty. If you do not intend to carry out
another wash, close the water tap. Leave the door open to
prevent the formation of mildew and unpleasant smells.
If there are children or pets in the house,
remains on and
.
to switch
in the inner side of
the door frame (for more details read " Child safety" in the
chapter "Safety Information").
: during programme setting up and once the programme has finished, if the programme selector dial and
any button are not touched, after a few minutes the energy
saving system is enabled. The pilot lights and the display
go off. The green pilot light of the button 9
flashes with a
low frequency. By pressing any button the appliance will
come out of the energy saving status.
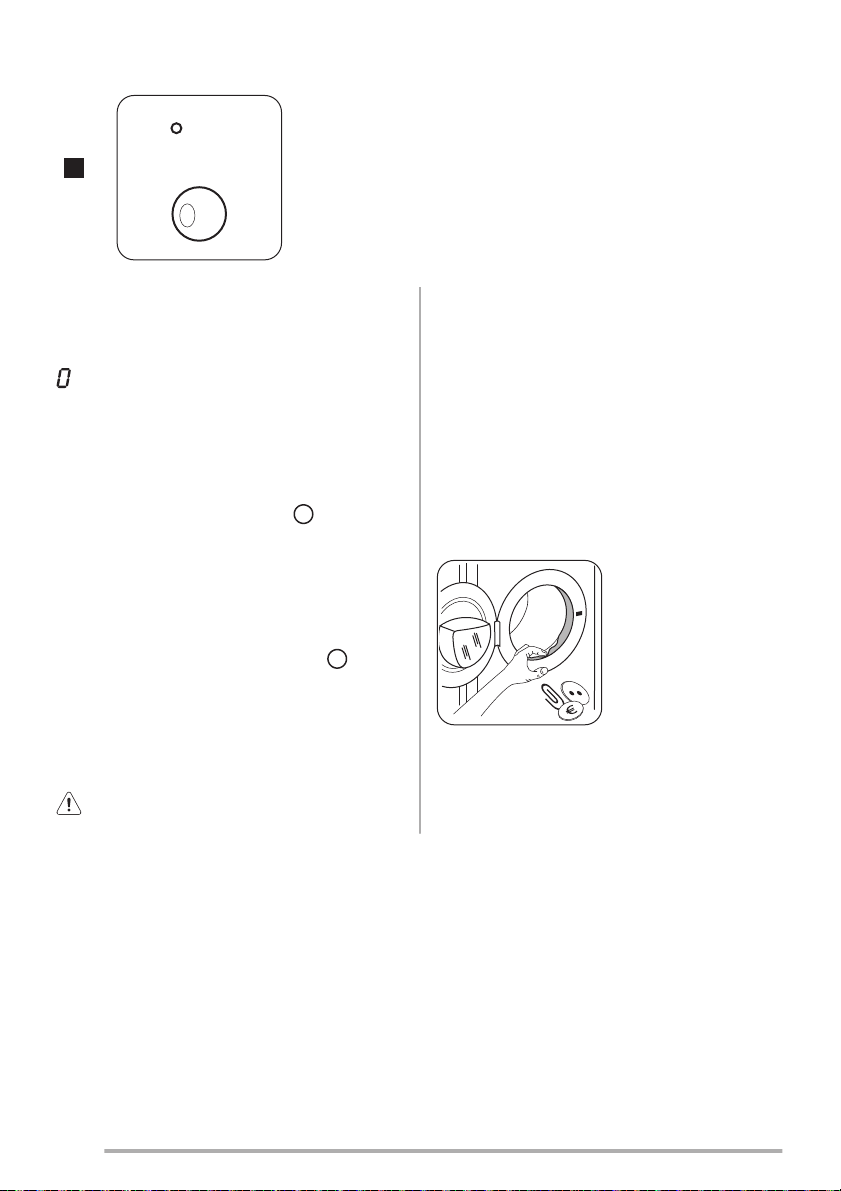
At the end of every cycle,
check from the door seal
and remove objects that
could be trapped in the
fold.
1
 Loading...