

Page 1

EN
User manual 2
DE
Benutzerinformation 14
DA
Brugsanvisning 28
Exhaust Dryer
Ablufttrockner
Aftrækstørretumbler
ZTAB 250
Page 2

Contents
Important safety information _ _ _ _ _ _ _ _ _ 2
Product description _ _ _ _ _ _ _ _ _ _ _ _ _ _ 4
Control panel _ _ _ _ _ _ _ _ _ _ _ _ _ _ _ _ _ 4
Before first use _ _ _ _ _ _ _ _ _ _ _ _ _ _ _ _ 5
Sorting and preparing laundry _ _ _ _ _ _ _ _ 5
Programme chart _ _ _ _ _ _ _ _ _ _ _ _ _ _ _ 6
Daily use _ _ _ _ _ _ _ _ _ _ _ _ _ _ _ _ _ _ _ _ 6
Important safety information
Important! In the interest of your safety
and to ensure the correct use, before
installing and first using the appliance,
read this user manual carefully, including
its hints and warnings. To avoid
unnecessary mistakes and accidents, it is
important to ensure that all people using
the appliance are thoroughly familiar with
its operation and safety features. Save
these instructions and make sure that
they remain with the appliance if it is
moved or sold, so that everyone using it
through its life will be properly informed
on appliance use and safety.
General safety
• It is dangerous to alter the specifications or
attempt to modify this product in any way.
• This appliance is not intended for use by persons (including children) with reduced physical, sensory or lack of experience and knowledge, unless they have been given supervision or instruction concerning use of the appliance by a person responsible for their safety.
• Make sure that small pets do not climb into
the drum. To avoid this, please check into the
drum before using.
• Any objects such as coins, safety pins, nails,
screws, stones or any other hard, sharp material can cause extensive damage and must
not be placed into the machine.
• In order to avoid danger of fires caused by
excessive drying, do not use appliance to dry
2
Care and cleaning _ _ _ _ _ _ _ _ _ _ _ _ _ _ _ 8
What to do if ... _ _ _ _ _ _ _ _ _ _ _ _ _ _ _ _ 9
Machine settings _ _ _ _ _ _ _ _ _ _ _ _ _ _ _ 9
Technical data _ _ _ _ _ _ _ _ _ _ _ _ _ _ _ _ 10
Installation _ _ _ _ _ _ _ _ _ _ _ _ _ _ _ _ _ _ 10
Environment _ _ _ _ _ _ _ _ _ _ _ _ _ _ _ _ _ 12
Service _ _ _ _ _ _ _ _ _ _ _ _ _ _ _ _ _ _ _ _ 13
Subject to change without notice.
the following items: Cushions, quilts and the
like (these items accumulate heat).
• Items such as foam rubber (latex foam),
shower caps, waterproof textiles, rubber
backed articles and clothes or pillows fitted
with foam rubber pads should not be dried in
the tumble dryer.
• Always unplug the appliance after use, clean
and maintenance.
• Under no circumstances should you attempt
to repair the machine yourself. Repairs carried out by inexperienced persons may cause
injury or serious malfunctioning. Contact your
local Service Centre. Always insist on genuine spare parts.
• Items that have been soiled with substances
such as cooking oil acetone, petrol, kerosene,
spot removers, turpentine, waxes and wax removers should be washed in hot water with
an extra amount of detergent before being
dried in the tumble dryer.
• Danger of explosion: Never tumble dry
items that have been in contact with inflammable solvents (petrol, methylated spirits, dry
cleaning fluid and the like). As these substance are volatile, they could cause an explosion. Only tumble dry items washed with
water.
• Risk of fire: items that have been spotted or
soaked with vegetable or cooking oil constitute a fire hazard and should not be placed in
the tumble dryer.
• If you have washed your laundry with stain remover you must execute an extra rinse cycle
before loading your tumble dryer.
www.zanussi.com
Page 3

• Please make sure that no gas lighters or
matches have accidentally been left in pockets of garments to be loaded into appliance
Warning! Never stop a tumble dry before the end of the drying cycle unless
all items are quickly removed and spread
out so that the heat is dissipated. Risk of
fire!
• Risk of electric shock! Do not spray down
the appliance with jets of water.
• The final part of a tumble dryer cycle occurs
without heat (cool down cycle) to ensure that
the items are left at a temperature that ensures that items will not be damaged.
• Ensure you have adequate ventilation in the
installation room to avoid the back flow of
gases into the room from appliances burning
other fuels, including open fires.
Installation
• This appliance is heavy. Care should be taken
when moving it.
• When unpacking the appliance, check that it
is not damaged. If in doubt, do not use it and
contact the Service Centre.
• All packing and transit bolts must be removed
before use. Serious damage can occur to the
product and to property if this is not adhered
to. See relevant section in the user manual.
• Any electrical work required to install this appliance should be carried out by a qualified
electrician or competent person.
• Care must be taken to ensure that the appliance does not stand on the electrical supply
cable.
• If the machine is situated on a carpeted floor,
please adjust the feet in order to allow air to
circulate freely.
• After having installed the appliance, check
that it is not pressing or standing on its electrical supply cable or/and inlet hose.
• If the tumble dryer is placed on top of a
washing machine, it is compulsory to use the
stacking kit (optional accessory).
Use
• This appliance is designed for domestic use.
It must not be used for purposes other than
those for which it was designed.
• Only wash fabrics which are designed to be
machine dried. Follow the instructions on
each garment label.
• Do not dry unwashed items in the tumble dryer.
• Do not overload the appliance. See the relevant section in the user manual.
• Clothes which are dripping wet should not be
placed in the dryer.
• Garments which have been in contact with
volatile petroleum products should not be
machine dried. If volatile cleaning fluids are
used, care should be taken to ensure that the
fluid is removed from the garment before
placing in the machine.
• Never pull the power supply cable to remove
the plug from the socket; always take hold of
the plug itself.
• Never use the tumble dryer if the power supply cable, the control panel, the working surface or the base are damaged so that the inside of the tumble dryer is accessible.
• Fabric softeners, or similar products should
be used as specified by the fabric softener instructions.
• Caution - hot surface : Do not touch the
door light cover surface when the light is
switched on.
•
Hot surface: Do not touch the back of
1)
the appliance while it is operating!
Child safety
• This machine is not intended for use by
young children or infirm persons without supervision.
• Children should be supervised to ensure that
they do not play with the appliance.
• The packaging components (e.g. plastic film,
polystyrene) can be dangerous to children danger of suffocation! Keep them out of children’s reach.
1) Only dryers equipped with internal drum light.
www.zanussi.com
3
Page 4
• Keep all detergents in a safe place out of
children’s reach.
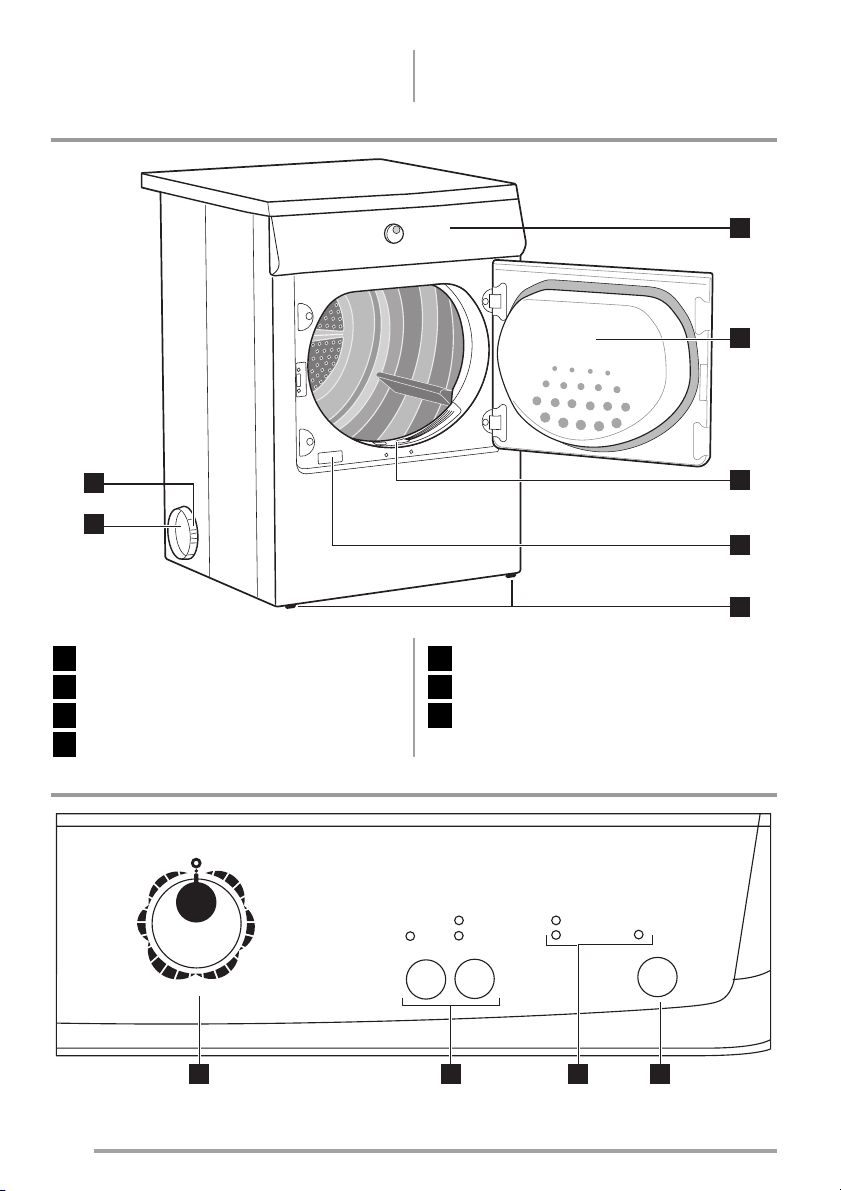
Product description
• Make sure that children or pets do not climb
into the drum.
1
2
7
6
Control panel
1
Door
2
Fluff filter
3
Rating plate
4
Control panel
Adjustable feet
5
Sideways vent outlets / back vent outlet
6
Ring nut
7
3
4
5
1 2 43
4
www.zanussi.com
Page 5
Programme knob and - OFF switch
1
Function buttons
2
Function status led
3
- DRYING light
Before first use
- END light
- FILTER light
START PAUSE
4
button
In order to remove any residues which may have
been produced during production, wipe the dryer drum with a damp cloth or carry out a brief
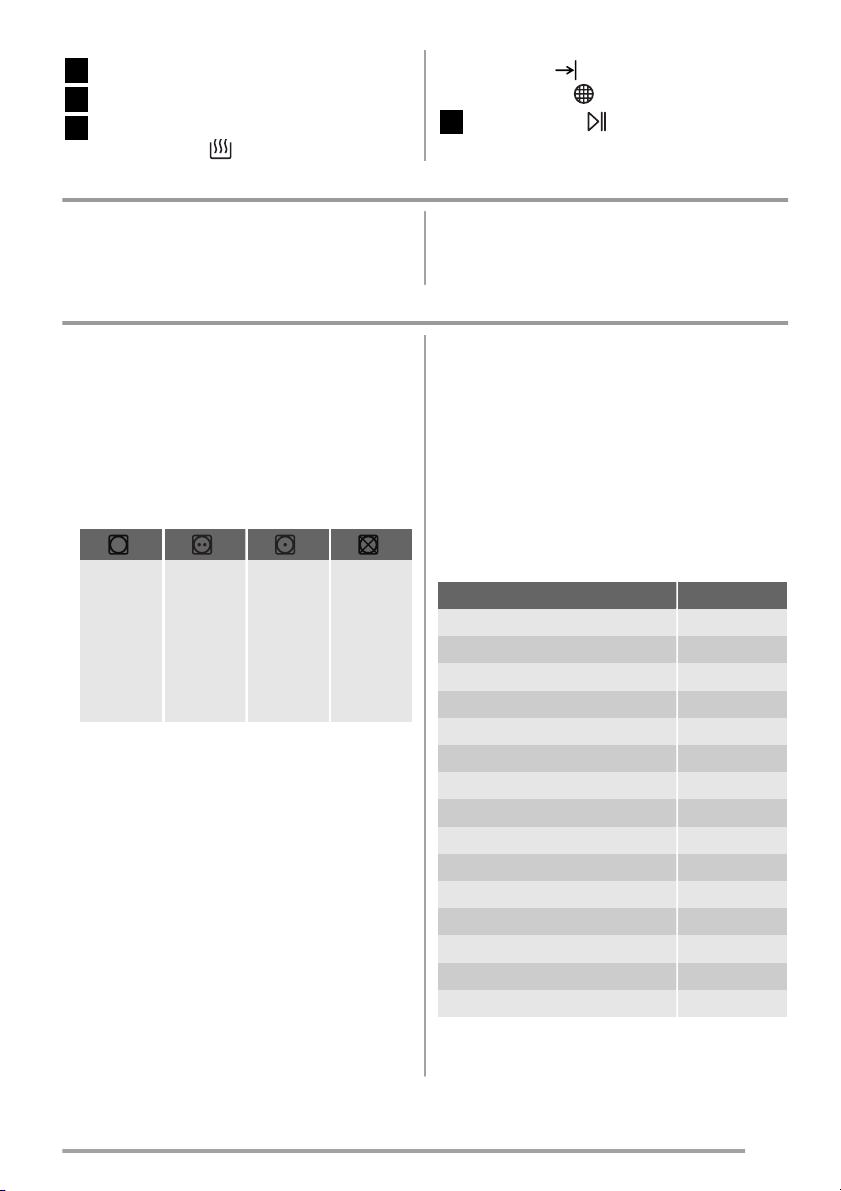
Sorting and preparing laundry
Sorting laundry
• Sort by fabric type:
– Cotton/linen for programmes in COTTONS
programme group.
– Mixtures and synthetics for programmes in
SYNTHETICS programme group.
• Sorting by care label. The care labels mean:
Dry at re-
Drying in
the tumble
dryer pos-
sible in
principle
Dry at
normal
tempera-
ture
Important! Do not place in the appliance any
wet laundry which is not specified on the care
label as being suitable for tumble-drying.
This appliance can be used for all wet laundry
items which are labelled as suitable for tumbledrying.
• Do not dry new, coloured textiles together
with light-coloured laundry items. Textile colours may bleed.
• Do not dry cotton jersey and knitwear with
the EXTRA programme. Items may shrink!
Preparing laundry
• To avoid laundry becoming tangled: close
zips, button up duvet covers and tie loose ties
or ribbons (e.g. of aprons).
duced
tempera-
ture
(press
DELI-
CATE
button!)
Drying in
the tumble dryer
not pos-
sible
drying cycle (ca. 30 min.) with damp cloths in
the machine.
• Empty pockets. Remove metal items (paper
clips, safety pins, etc).
• Turn items with double-layered fabrics inside
out (e.g. with cotton-lined anoraks, the cotton
layer should be outermost). These fabrics will
then dry better.
Important! Do not overload the appliance.
Observe max. loading volume of 7 kg.
Laundry weights
Type of laundry Weight
Bathrobe 1200 g
Napkin 100 g
Quilt cover 700 g
Sheet 500 g
Pillow case 200 g
Tablecloth 250 g
Towelling towel 200 g
Tea cloth 100 g
Night dress 200 g
Ladies' briefs 100 g
Man's work shirt 600 g
Man's work shirt 200 g
Man's pyjamas 500 g
Blouse 100 g
Men's underpants 100 g
www.zanussi.com
5
Page 6
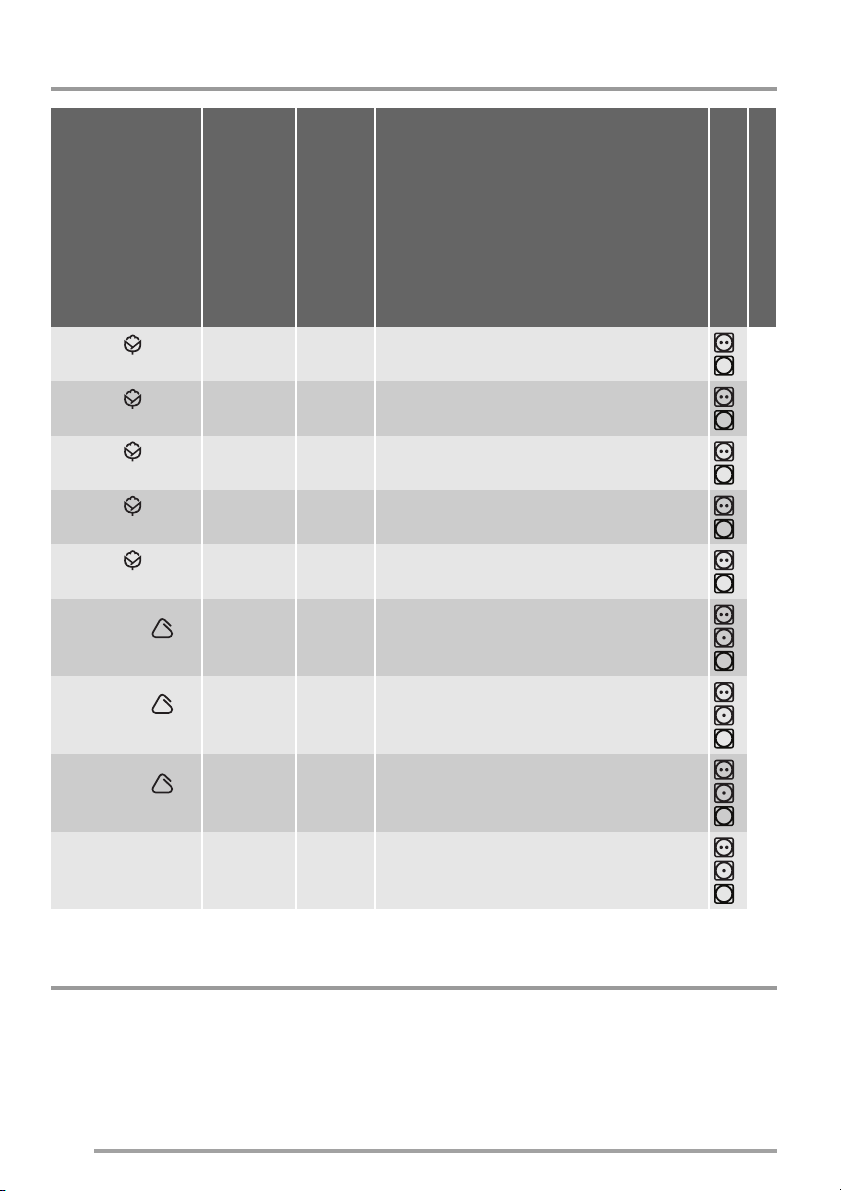
Programme chart
Time in
Programmes
COTTON EXTRA DRY
COTTON
STRONG DRY
COTTON
STORAGE DRY
COTTON DAMP
1)
minutes
(about)
140 7 kg
130 7 kg
1)
125 7 kg
105 7 kg
Application/properties
Care mark
max. load (weight when dry)
Thorough drying of thick or multi- layered fabrics,
e.g. terry towelling items, bathrobes.
Thorough drying of thick or multi- layered fabrics,
e.g. terry towelling items, bathrobes.
Thorough drying of fabrics of even thicknesses,
e.g. terry towelling items, knitwear, towels.
For thin textiles which are still to be ironed, e.g.
knitted items, cotton shirts.
COTTON IRON
1)
DRY
SYNTHETICS
EXTRA DRY
SYNTHETICS
STORAGE DRY
SYNTHETICS
IRON DRY
JEANS 125 7 kg
1) In accordance with IEC61121
1)
85 7 kg
45 3 kg
40 3 kg
30 3 kg
Daily use
Switching appliance on
Turn the programme dial to one of the programmes. The appliance is on.
6
For thin fabrics which are also to be ironed, e.g.
knitwear, cotton shirts.
Thorough drying of thick or multi-layered fabrics,
e.g. pullovers, bedding, table linen.
For thin fabrics which are not ironed, e.g. easy
care shirts, table linen, baby clothes, socks, lingerie with bones or wires.
For thin fabrics which are also to be ironed, e.g.
knitwear, cotton shirts.
For leisure clothing, such as jeans, sweat-shirts,
etc., of different material thicknesses (e.g. at the
neck, cuffs and seams).
www.zanussi.com
Page 7
64
5
31 2
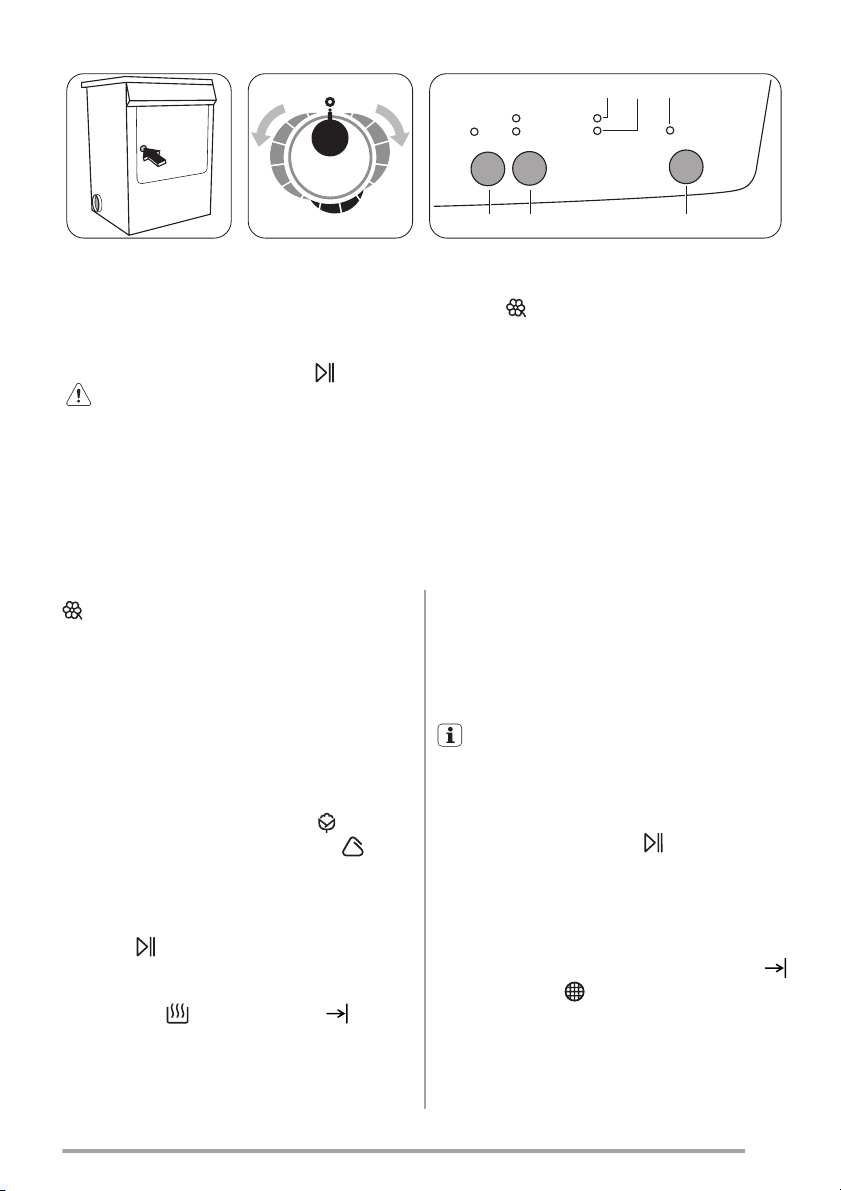
Door opening and
laundry loading
1. Open the door.
2. Load your laundry
(do not force it in).
Caution! Do not
Selecting the programme
Turn the programme
selector dial to the required programme.
The light
START
PAUSE starts to flash.
jam laundry in between the loading
door and rubber seal.
3. Close loading
door securely.
Lock must audibly
lock.
DELICATE
Pressing this button allows drying to be performed at a lower temperature, for delicate
items. The corresponding pilot light comes on.
This option can be used for time controlled drying.
TEXTILE
Press the Textile button repeatedly, to select the
desired option. The relevant light will light up.
You can select 2 different options:
TON cycle: to be used for cotton, and
COT-
SYNTHETICS : to be used for synthetic or delicate
items.
Starting the programme
Press the
START PAUSE button. The programme is started.
The programme phase is shown by appropriate
lights; light 6-
DRYING , light 5- ANTI-
CREASE-END .
Selecting additional functions
You can choose from the additional functions:
button 1 -
DELICATE
button 2 - TEXTILE
Changing programme
To change a programme which has been selected by mistake once the programme has started,
first turn the programme selector to "O" - (OFF)
position. The programme is cancelled.
The programme can no longer be changed
directly once the programme has started. If
nevertheless there is an attempt to change the
programme on the programme knob or if an
function button (excluding the BUZZER but-
2)
) is pressed, led on the START PAUSE
ton
button starts flashing temporarily in red. The
drying programme is not however affected by
this (laundry protection).
Drying cycle complete / removing laundry
Once the drying cycle is complete, the lights
END and light 4- FILTER are on. If the buz-
zer is active, an acoustic signal sounds intermittently for about one minute.
2) Only dryers with buzzer button
www.zanussi.com
7
Page 8
The drying cycles are automatically fol-
lowed by an anti-crease phase which lasts
around 30 minutes. The drum rotates at intervals during this phase. This keeps the laundry
loose and free of creases. The laundry can be
removed at any time during the anti-crease
phase. (The laundry should be taken out towards the end of the anti-crease phase at the
latest to prevent creases from forming.)
1. Open door.
2. Remove laundry.
Care and cleaning
3. Remove filter after clothes has been removed. Clean the filter.
Warning! Before You place the filter ,
please check it there is nothing inside the
filter seat.
4. Turn the programme selector to - OFF .
Important! Clean the filter after each drying cycle.
5. Close the door.
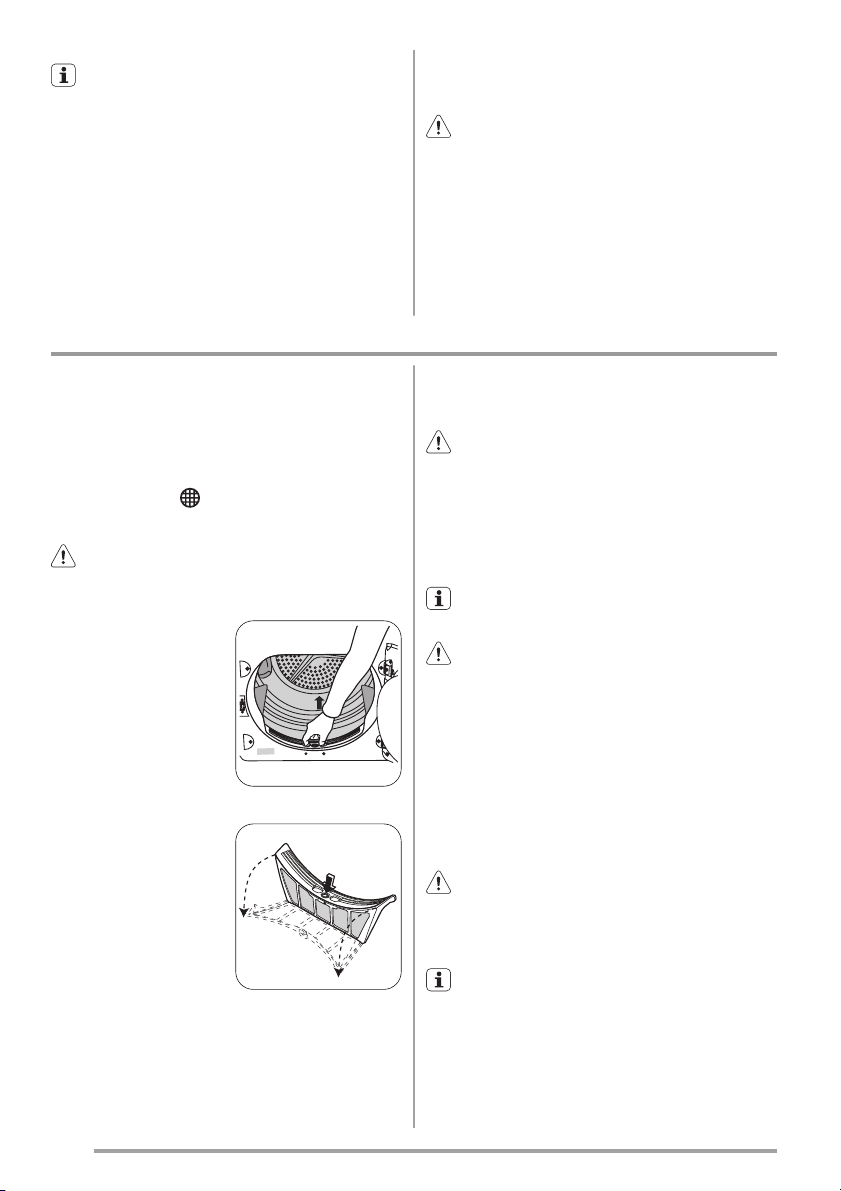
Cleaning fluff filter
The filter collect all the fluff which accumulates
during drying. To ensure that the dryer works
perfectly, the fluff filter must be cleaned after every drying cycle.
The warning light
you this operation.
Caution! Never operate the dryer without
fluff filter or with damaged or blocked fluff
filter.
1. Open loading
door and remove laundry.
2. Remove the
filter which is
built into the
lower part of
the loading
aperture.
3. Open the filter
pressing the
button, among
two slots on
fingers. Clean
the filter using
dump hand or
cloth. After a
period of time,
a patina due to detergent residue on laundry forms on the filters. When this occurs,
clean the filter with warm water using a
brush.
FILTER , is on to remind
Close the filter and do not forget to put it
back.
Warning! Before You place the filter,
please check it there is nothing inside the
filter seat.
4. The filter can be positioned only to one
side. If position is wrong, the filter overhangs.
If the filter will not snap into place, the
loading door cannot be closed.
Warning! You must DISCONNECT the
appliance from the electricity supply,
before you can carry out any cleaning or
maintenance work.
Cleaning the door
Clean periodically the interior part of the door to
remove any fluff. Accurate cleaning ensures correct drying.
To clean the drum
Caution! Do not use abrasive materials to
clean the drum. Use a soft detergent to
clean the inner side of the drum and the drum
blades.
Keep the inner surface of the drum and the
drum blades clean. The minerals from the
water or cleaning agents can collect on the inner surface of the drum. This cause that the
laundry is not sufficient dry.
8
www.zanussi.com
Page 9
Clean operating screen and housing
Caution! Do not use furniture cleaners or
aggressive cleaning agents to clean the
appliance.
What to do if ...
Problem Possible cause Remedy
Mains plug is not plugged in or
fuse is not working correctly.
Dryer does not work.
Drying results unsatisfactory.
Loading door does not close.
Drying cycle ends shortly after programme starts.
Drying cycle lasts an unusually
long time. Note: After around 5
hours the drying cycle ends automatically.
1) Only dryers with conductance programming
2) Only dryers with removable filter
Loading door is open. Close loading door.
Have you pressed the START
PAUSE button?
Wrong programme selected.
Fluff filter clogged. Clean fluff filter.
Overloading of laundry.
Ventilation slots covered up. Uncover ventilation slots.
Residue on inside surface of drum
or drum ribs.
Conductance of water at installa-
tion site differs from standard setting of machine.
Filter not in place2). Install filter into place2).
Not enough washing loaded or
washing loaded is too dry for selected programme.
Filter clogged. Clean filter.
Load volume too big. Reduce load volume.
Laundry insufficiently spun. Laundry must be adequately spun.
Use a damp cloth to wipe down the operating
screen and housing.
Plug in at mains socket. Check
fuse in fuse box (domestic installation).
Press the START PAUSE button again.
Select a different programme the
next time you dry (see “Programme
chart” chapter).
Observe recommended loading
volumes.
Clean inside surface of drum and
drum ribs.
Re-programme standard setting
1)
for degree of drying (see ‘Machine
settings’ chapter)
Select time programme or higher
drying level (e.g. EXTRA DRY instead of CUPBOARD DRY ).
1)
.
Machine settings
BUZZER permanent off
1. Turn the programme selector to any programme.
www.zanussi.com
2.
Press simultaneously the
DELICATE
and TEXTILE buttons and hold down for
approx. 5 seconds.
3. The buzzer is by default always off.
9
Page 10

Technical data
Dimensions (mm) Width / Height / Depth 850 x 600 x 580 mm
Max. depth
(with the appliance door open)
Max. width
(with the appliance door open)
Electrical connection Voltage 230 V
Frequency 50 Hz
Fuse 16 A
Total power 2600 W
Drum volume 108 l
Weight of the appliance 32,5 kg
Laundry: max. weight 7 kg
Type of use Household
Ambient temperature Min. 5 °C
Max. 35 °C
Energy consumption
Annual energy consumption
Energy efficiency class C
Power consumption Left-on mode 0,70 W
Off-mode 0,70 W
1) With reference to EN 61121. 7 kg of cotton and a spin speed at 1000 rpm.
2) Energy consumption per year in kWh, based on 160 drying cycles of the standard cotton programme at full
and partial load, and the consumption of the low-power modes. Actual energy consumption per cycle will
depend on how the appliance is used (REGULATION (EU) No 392/2012).
1)
2)
1090 mm
950 mm
kWh/cycle 4,25 kWh
512 kWh
Installation
Appliance positioning
• It is recommended that, for your convenience,
the appliance is positioned close to your
washing machine.
• The tumble dryer must be installed in a clean
place, where dirt does not build up.
• Air must be able to circulate freely all round
the appliance. Do not obstruct the front ventilation grille or the air intake grilles at the back
of the appliance.
• To keep vibration and noise to a minimum
when the tumble dryer is in use, it should be
placed on a firm, level surface.
10
• Once in its permanent operating position,
check that the tumble dryer is absolutely level
with the aid of a spirit level. If it is not, raise or
lower the feet until it is.
• The feet must never be removed. Do not restrict the floor clearance through deep pile
carpets, strips of wood or similar. This might
cause heat built-up which would interfere
with the operation of the appliance.
www.zanussi.com
Page 11

Important!
• The hot air emitted by the tumble dryer can
reach temperatures of up to 60°C. The appliance must therefore not be installed on floors
which are not resistant to high temperatures.
• When operating the tumble dryer, the room
temperature must not be lower than +5°C
and higher than +35°C, as it may affect the
performance of the appliance.
• Should the appliance be moved, it must be
transported vertically.
• The appliance must not be installed behind a
lockable door, a sliding door a door with a
hinge on the opposite side to that of the appliance in such a way that a full opening of
the tumble dryer is restricted.
Removing transport safety packaging
Caution! Before use all parts of the
transport packaging must be removed.
1. Open loading door.
2. Pull off adhesive
strips from inside machine on top of drum.
Fitting the vent hose
To simplify the installation, there is a choice of
vent outlets: one at the back, the others in the
left and right-hand side. Connect the hose to
whichever is the more convenient by pulling the
ring nut (A) from the vent outlet at the back,
screwing it on to the hose and pushing it firmly
back into place. The unused vents should now
be sealed with the special snap covers provided.
www.zanussi.com
3. Remove foil hose
and polystyrene padding from the machine.
A
A
If the hose is long and
the room temperature
low, the moisture might
condense to water
inside the hose. This is
an unavoidable natural
phenomenon. To
prevent this water from
Iying in the hose or
flowing back into the tumble dryer, it is
advisable to drill a small hole (via. 3 mm) in the
lowest point of the hose and to place a small
container below it. (See picture, point B).
Once connected to the dryer, run the vent hose
to the desired outlet point, ensuring that the
run’s overall length is less than 2 m, and that it
contains no more than two bends. As to the
outlet itself, if you have decided on a fixed wall/
window grille, a good local builder’s merchant
should be able to supply you with the necessary
fittings and installation advice.
Warning!
It is important not to
connect the vent hose
to, for example, a
cooker hood, or a
chimney or flue pipe
designed to carry the
exhaust from a fuel
burning appliance.
Note that to avoid condensation problems, it is essential that the dryer
be fitted with the flexible hose to carry its “exhaust” at least beyond the kitchen units; preferable outside the kitchen. In order to prevent
the appliance from overheating, it is important
that the steam exhaust is unobstructed. Therefore, in case of a permanent hose fitted to an
B
11
Page 12
exterior wall or ceiling, it must be ensured an exhaust capacity of at least 150 m3/h. If the dryer
is fitted next to kitchen units, make sure that the
vent hose is not squashed. If the hose is partially squashed, drying efficiency will be reduced,
resulting in longer drying times and higher energy consumption. If the hose is completely
squashed, the safety cut-outs with which the
machine is fitted may operate. When operating
the tumble dryer, the room temperature must
not be lower than +5°C and higher than +35°C,
as it may affect the performance of the appliance.
Electrical connection
Details on mains voltage, type of current and the
fuses required should be taken from the type
plate. The type plate is fitted near the loading
aperture (see “Product description” chapter).
Connect the machine to an earthed socket, in accordance with current wiring regulations.
Warning! The manufacturer declines
any responsibility for damage or
injury through failure to comply with the
above safety precautions.
Should the appliance power supply cable
need to be replaced, this must be carried
out by our Service Centre
Warning! Make sure not to cause
damage to the mains plug and to the
mains cable.
Connect the mains plug to the mains
socket only at the end of the installation.
Make sure that there is access to the
mains plug after the installation.
Door reversal
To make it easier to load or unload the laundry,
the door can be reversed. The door must only
be reversed by an authorised service engineer.
Please contact your local Service Force Centre.
The engineer will carry out the door reversal at
your cost.
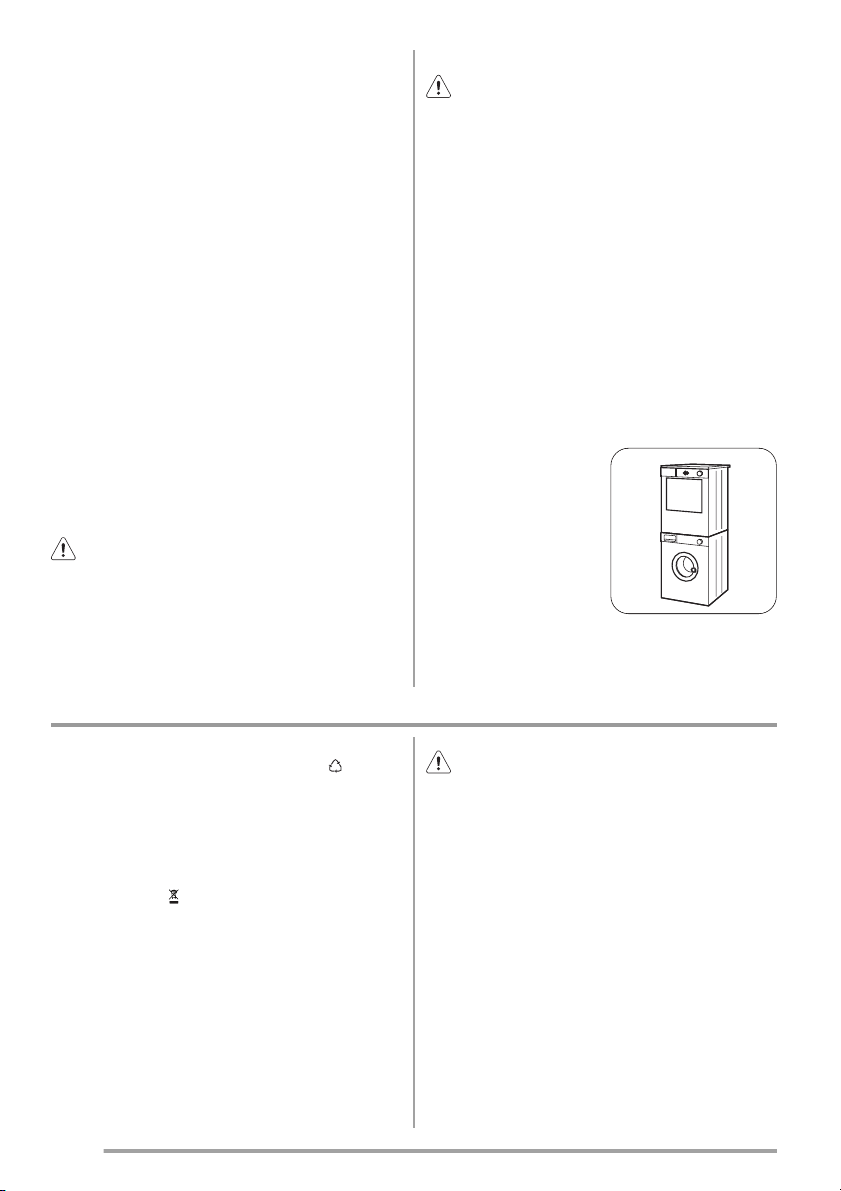
Special accessories
Stacking kit
A special stacking kit is
available through your
dealer, to enable the
mounting of the dyer on
top of a front loading
washing machine with
cover’s depth between
48 and 60 cm. Read
carefully the instructions supplied with the kit.
Environment
Recycle the materials with the symbol . Put
the packaging in applicable containers to
recycle it.
Help protect the environment and human health
and to recycle waste of electrical and electronic
appliances. Do not dispose appliances marked
with the symbol
Return the product to your local recycling facility
or contact your municipal office.
Packaging material
The packaging materials are environmentally
friendly and can be recycled. The plastic components are identified by markings, e.g. >PE<,
>PS<, etc. Please dispose of the packaging
materials in the appropriate container at the
community waste disposal facilities.
12
with the household waste.
Warning! When disposing of old
appliances, remove the mains cable and
dispose of together with the plug. Remove the
door hook and ensure it is no longer lockable to
prevent young children being trapped inside.
Environmental tips
• In the dryer, laundry becomes fluffy and soft.
Fabric softeners are not therefore needed
when washing.
• Your dryer will function most economically if
you:
– always keep the ventilation slots on the
base of the dryer unobstructed;
– use the loading volumes specified in the
programme overview;
www.zanussi.com
Page 13

– clean the filter after each drying cycle; – spin the laundry well before drying.
Service
In the event of technical faults, please first
check whether you can remedy the problem
yourself with the help of the operating instructions (Chapter “What to do if…”).
– Any error messages displayed by the appliance
So that you have the necessary reference num-
bers from your appliance at hand,
If you were not able to remedy the problem
yourself, please contact your local service centre.
In order to be able to assist you quickly, we require the following information:
– Model description
– Product number (PNC)
– Serial number (S No.) (for numbers, see rating
plate)
– Type of fault
Model description: .................................................................................
PNC: .................................................................................
S No.: .................................................................................
we recommend that you write them in here:
www.zanussi.com
13
Page 14

Inhalt
Wichtige Sicherheitshinweise _ _ _ _ _ _ _ _ 14
Gerätebeschreibung _ _ _ _ _ _ _ _ _ _ _ _ 16
Bedienblende _ _ _ _ _ _ _ _ _ _ _ _ _ _ _ _ 17
Vor der ersten Inbetriebnahme _ _ _ _ _ _ _ 17
Sortieren und Vorbereiten der Wäsche _ _ _ 17
Programmübersicht _ _ _ _ _ _ _ _ _ _ _ _ _ 18
Täglicher Gebrauch _ _ _ _ _ _ _ _ _ _ _ _ _ 19
Wichtige Sicherheitshinweise
Wichtig! Lesen Sie zu Ihrer Sicherheit und
für eine optimale Nutzung des Geräts vor
der Installation und dem ersten Gebrauch
die vorliegende Gebrauchsanweisung
aufmerksam durch, einschließlich der
Ratschläge und Warnungen. Es ist wichtig,
dass zur Vermeidung von Fehlern und
Unfällen alle Personen, die das Gerät
benutzen, mit der Bedienung und den
Sicherheitsvorschriften vertraut sind.
Heben Sie die Gebrauchsanweisung gut
auf und übergeben Sie sie bei einem
Weiterverkauf des Geräts dem neuen
Besitzer, so dass jeder während der
gesamten Lebensdauer des Geräts über
Gebrauch und Sicherheit informiert ist.
Allgemeine Sicherheitshinweise
• Aus Sicherheitsgründen dürfen keine Änderungen am Gerät vorgenommen werden.
• Personen (einschließlich Kinder), die aufgrund ihrer physischen, sensorischen oder
geistigen Fähigkeiten oder ihrer Unerfahrenheit oder Unkenntnis nicht in der Lage sind,
das Gerät sicher zu benutzen, dürfen dieses
Gerät nicht ohne Aufsicht oder Anweisung
durch eine für ihre Sicherheit verantwortliche
Person benutzen.
• Stellen Sie sicher, dass keine kleinen Haustiere in die Trommel klettern. Kontrollieren Sie
daher vor dem Gebrauch die Trommel.
• Alle harten und scharfen Gegenstände wie
Münzen, Sicherheitsnadeln, Nägel, Schrauben usw. können das Gerät schwer beschädigen und gehören nicht in die Maschine.
Reinigung und Pflege _ _ _ _ _ _ _ _ _ _ _ _ 21
Was tun, wenn... _ _ _ _ _ _ _ _ _ _ _ _ _ _ _ 22
Programmiermöglichkeiten _ _ _ _ _ _ _ _ _ 23
Technische Daten _ _ _ _ _ _ _ _ _ _ _ _ _ _ 23
Aufstellen _ _ _ _ _ _ _ _ _ _ _ _ _ _ _ _ _ _ 24
Entsorgung _ _ _ _ _ _ _ _ _ _ _ _ _ _ _ _ _ 26
Kundendienst _ _ _ _ _ _ _ _ _ _ _ _ _ _ _ _ 26
Änderungen vorbehalten.
• Trocknen Sie zur Vermeidung von Brandgefahr durch zu langes Trocknen keine der folgenden Wäschestücke in dem Gerät: Kissen,
Schlafdecken und ähnliche Dinge (die Wärme speichern können).
• Artikel wie Schaumgummi (Latexschaumgummi), Duschhauben, imprägnierte Textilien,
gummibeschichte Wäschestücke, Kleider
oder Kissen mit Schaumgummipolster dürfen
in dem Gerät nicht getrocknet werden.
• Ziehen Sie nach dem Trocknen und zum Reinigen und Warten des Gerätes immer den
Netzstecker.
• Versuchen Sie unter keinen Umständen, das
Gerät selbst zu reparieren. Reparaturen
durch unerfahrene Personen können zu Verletzungen und schweren Funktionsstörungen
führen. Wenden Sie sich an Ihren Kundendienst. Bestehen Sie immer auf Original-Ersatzteilen.
• Wäschestücke, die mit Speiseöl verschmutzt
sind oder die mit Aceton, Benzin, Kerosin,
Fleckentfernern, Terpentin und Wachsentfernern behandelt worden sind, müssen vor dem
Trocknen in dem Wäschetrockner in heißem
Wasser und zusätzlichem Waschmittel gewaschen werden.
• Explosionsgefahr: Trocknen Sie keine Wäschestücke, die mit entflammbaren Stoffen
(Benzin, denaturiertem Alkohol, Trockenreinigungsmittel oder Ähnlichem) in Berührung
gekommen sind. Da diese Stoffe flüchtig
sind, besteht Explosionsgefahr. Trocknen Sie
nur mit Wasser gewaschene Wäschestücke.
14
www.zanussi.com
Page 15

• Brandgefahr: Wäschestücke, die mit Speise- oder Pflanzenöl befleckt oder getränkt
sind, stellen eine Brandgefahr dar und gehören nicht in den Wäschetrockner.
• Für Wäsche, die mit Fleckenentferner behandelt wurde, muss vor dem Trocknen ein zusätzlicher Spülgang durchgeführt werden.
• Vergewissern Sie sich, dass keine Feuerzeuge oder Streichhölzer in den Taschen von
Wäschestücken geblieben sind, bevor Sie
die Wäsche in die Trockentrommmel legen
Warnung! Wenn Sie den Trockner or
dem Ende des Trockengangs anhalten
müssen, entnehmen Sie bitte sofort die
gesamte Wäsche und breiten Sie diese
zur Wärmeableitung aus. Brandgefahr!
• Stromschlaggefahr! Spritzen Sie das Gerät
nicht mit einem Wasserstrahl ab.
• Der letzte Teil eines Trocknerzyklusses findet
ohne Hitze statt (Abkühlzyklus), um sicherzustellen, dass die Wäsche auf einer Temperatur bleibt, bei der sie nicht beschädigt wird.
• Stellen Sie sicher, dass der Aufstellraum aus-
reichend belüftet wird, damit keine Gase von
Geräten in den Raum gelangen können, die
Treibstoffe verbrennen oder offene Flammen
erzeugen.
Allgemeine Sicherheitshinweise
• Aus Sicherheitsgründen dürfen keine Ände-
rungen am Gerät vorgenommen werden.
• Personen (einschließlich Kinder), die auf-
grund ihrer physischen, sensorischen oder
geistigen Fähigkeiten oder ihrer Unerfahrenheit oder Unkenntnis nicht in der Lage sind,
das Gerät sicher zu benutzen, dürfen dieses
Gerät nicht ohne Aufsicht oder Anweisung
durch eine für ihre Sicherheit verantwortliche
Person benutzen.
• Stellen Sie sicher, dass keine kleinen Hausti-
ere in die Trommel klettern. Kontrollieren Sie
daher vor dem Gebrauch die Trommel.
• Alle harten und scharfen Gegenstände wie
Münzen, Sicherheitsnadeln, Nägel, Schrauben usw. können das Gerät schwer beschädigen und gehören nicht in die Maschine.
• Trocknen Sie zur Vermeidung von Brandgefahr durch zu langes Trocknen keine der folgenden Wäschestücke in dem Gerät: Kissen,
Schlafdecken und ähnliche Dinge (die Wärme speichern können).
• Artikel wie Schaumgummi (Latexschaumgummi), Duschhauben, imprägnierte Textilien,
gummibeschichte Wäschestücke, Kleider
oder Kissen mit Schaumgummipolster dürfen
in dem Gerät nicht getrocknet werden.
• Ziehen Sie nach dem Trocknen und zum Reinigen und Warten des Gerätes immer den
Netzstecker.
• Versuchen Sie unter keinen Umständen, das
Gerät selbst zu reparieren. Reparaturen
durch unerfahrene Personen können zu Verletzungen und schweren Funktionsstörungen
führen. Wenden Sie sich an Ihren Kundendienst. Bestehen Sie immer auf Original-Ersatzteilen.
Einsatzbereich
• Dieses Gerät ist zur Verwendung im Haushalt
bestimmt. Es darf nicht für andere Zwecke
benutzt werden.
• Trocknen Sie nur Textilien, die trocknergeeignet sind. Beachten Sie die Pflegekennzeichen
auf den Textiletiketten.
• Trocknen Sie keine ungewaschenen Wäschestücke im Trockner.
• Überfüllen Sie das Gerät nicht. Siehe den
entsprechenden Abschnitt in der Gebrauchsanweisung.
• Tropfnasse Kleidung darf nicht in den Wäschetrockner geladen werden.
• Textilien, die mit flüchtigen Erdölerzeugnissen
in Kontakt gekommen sind, dürfen nicht in
dem Gerät getrocknet werden. Wenn flüchtige Reinigungsflüssigkeiten verwendet wurden, müssen diese Flüssigkeiten ausgewaschen werden, bevor das Kleidungsstück in
das Gerät gegeben wird.
• Ziehen Sie niemals am Netzkabel, um den
Stecker aus der Steckdose zu ziehen; sondern immer am Stecker.
• Benutzen Sie den Wäschetrockner niemals,
wenn das Stromkabel, die Bedienblende, die
www.zanussi.com
15
Page 16

Arbeitsplatte oder der Sockel beschädigt ist,
so dass das Geräteinnere frei liegt.
• Weichspüler oder ähnliche Produkte dürfen
nur entsprechend den Herstelleranweisungen
benutzt werden.
• Vorsicht - Heiße Oberfläche : Berühren
Sie bei eingeschalteter Innenbeleuchtung
nicht die Abdeckung der Glühlampe.
•
Heiße Oberfläche: Die Rückseite des
3)
Gerätes während des Betriebs nicht berühren!
Sicherheit von Kindern
• Dieses Gerät darf ohne Aufsicht nicht von
kleinen Kindern oder Behinderten bedient
werden.
Gerätebeschreibung
• Kinder sollten sorgsam beaufsichtigt werden,
so dass sie nicht dem Gerät spielen können.
• Verpackungen (z.B. Folien, Polystyrol) können
eine Gefahr für Kinder darstellen - Erstickungsgefahr! Halten Sie solche Materialien
von Kindern fern.
• Bewahren Sie Waschmittel außer Reichweite
von Kindern auf.
• Stellen Sie sicher, dass Kinder oder Kleintiere
nicht in die Trommel klettern.
1
7
6
Bedienblende
1
Tür
2
Flusenfilter
3
Typenschild
4
3) Nur Trockner mit Innenbeleuchtung.
16
Einstellbare Schraubfüße
5
Entlüftungsauslässe seitlich / Entlüftungs-
6
auslass hinten
Ringmutter
7
www.zanussi.com
2
3
4
5
Page 17

Bedienblende
1 2 43
Programm-Wahlschalter und AUS "O"
1
Schalter
Funktionstasten
2
Betriebsanzeige
3
- BEENDET Kontrolllampe
- BITTE DIE SIEBE REINIGEN. Kontrolllampe
START/PAUSE
4
- TROCKNEN Kontrolllampe
Vor der ersten Inbetriebnahme
Reinigen Sie die Trommel des Trockners mit einem feuchten Tuch oder führen Sie ein kurzes
Trockenprogramm (ca. 30 Min.) mit feuchter
Wäsche aus, um alle fertigungsbedingten Rückstände aus der Trommel zu entfernen.
Sortieren und Vorbereiten der Wäsche
Sortieren der Wäsche
• Sortieren nach Gewebeart:
– Baumwolle/Leinen für Programme in der
Programmgruppe Baumwolle .
– Mischgewebe und synthetische Stoffe für
Programme in der Programmgruppe
Mischgewebe .
• Sortieren nach Pflegekennzeichen. Die Pflegekennzeichen bedeuten:
www.zanussi.com
Trocknen
im Wäschetrockner grund-
sätzlich
möglich
Wichtig! Geben Sie keine feuchte Wäsche in
das Gerät, die nicht laut Pflegekennzeichen für
die Trocknung in einem Trockner geeignet ist.
In diesem Gerät können alle Wäschestücke getrocknet werden, die entsprechend den Pflegekennzeichen trocknergeeignet sind.
• Trocknen Sie neue farbige Textilien nicht zusammen mit hellen Wäschestücken. Die Textilien könnten abfärben.
Trocknen
mit nor-
maler
Tempera-
tur
Taste
Trocknen
mit niedri-
ger Tem-
peratur
(drücken
Sie die
Schon !)
Taste
Trocknen
im Wä-
schetrock-
ner nicht
möglich
17
Page 18

• Trocknen Sie Trikotwäsche und Strickwaren
nicht mit dem Programm EXTRA. Die Textilien
können einlaufen!
Vorbereiten der Wäsche
• Um Wäscheknäuel zu verhindern: Reißverschlüsse schließen, Kopfkissenbezüge zuknöpfen, lose Gürtel oder Bänder (z. B. von
Schürzen) zusammenbinden.
• Taschen leeren. Metallteile entfernen (z. B.
Büroklammern, Sicherheitsnadeln).
• Gefütterte Kleidung nach links wenden (z. B.
sollte bei mit Baumwolle gefütterten Anoraks
die Baumwollschicht außen liegen). Diese
Gewebe trocknen dann besser.
Wichtig! Überfüllen Sie das Gerät nicht.
Beachten Sie die maximale Wäschefüllmenge
von 7 kg.
Wäschegewichte
Wäscheart Gewicht
Bademantel 1.200 g
Programmübersicht
Wäscheart Gewicht
Windeln 100 g
Bettbezug 700 g
Bettlaken 500 g
Kissenbezug 200 g
Tischtuch 250 g
Frottierhandtuch 200 g
Geschirrtuch 100 g
Nachthemd 200 g
Damenunterwäsche 100 g
Arbeitshemd 600 g
Arbeitshemd 200 g
Herrenschlafanzug 500 g
Bluse 100 g
Herrenunterwäsche 100 g
Programme
BAUMWOLLE
Extratrocken
BAUMWOLLE
Starktrocken
18
Zeit in Minuten (un-
gefähr)
140 7 kg
130 7 kg
Anwendung/Eigenschaften
Pflegekennzeichen
max. Wäschemenge (Trockengewicht)
Durchtrocknen von dicken oder mehrlagigen Textilien wie z. B. Frotteehandtüchern, Bademänteln,
Baumwolle.
Durchtrocknen von dicken oder mehrlagigen Textilien wie z. B. Frotteehandtüchern, Bademänteln,
Baumwolle.
www.zanussi.com
Page 19

Programme
BAUMWOLLE
Schranktrocken
BAUMWOLLE
Leichtrocken
BAUMWOLLE
Bügeltrocken
1)
1)
1)
Zeit in Minuten (un-
gefähr)
125 7 kg
105 7 kg
85 7 kg
Anwendung/Eigenschaften
Pflegekennzeichen
max. Wäschemenge (Trockengewicht)
Durchtrocknen von gleichmäßig dicken Textilien
wie z. B. Frotteehandtüchern, Strickwaren, Handtüchern.
Für dünne Textilien, die noch gebügelt werden
müssen, z. B. Strickwaren, Baumwollhemden.
Für dünne Textilien, die noch gebügelt werden
müssen, z. B. Strickwaren, Baumwollhemden.
MISCHGEWEBE
Extratrocken
MISCHGEWEBE
Schranktrocken
1)
MISCHGEWEBE
Bügeltrocken
JEANS 125 7 kg
1) Gemäß IEC61121
45 3 kg
40 3 kg
30 3 kg
Durchtrocknen von dicken oder mehrlagigen Textilien wie z. B. Pullover, Bett-, Tischwäsche.
Für dünne Textilien, die nicht gebügelt werden
müssen, z. B. bügelfreie Hemden, Tischwäsche,
Babykleidung, Socken, Damenunterwäsche mit
Korsettstangen oder Drahteinlagen.
Für dünne Textilien, die noch gebügelt werden
müssen, z. B. Strickwaren, Baumwollhemden.
Für Freizeitkleidung wie Jeans, Sweatshirts usw.
mit unterschiedlicher Materialstärke (z. B. am
Kragen, an den Manschetten und Nähten).
Täglicher Gebrauch
Einschalten des Gerätes
Drehen Sie den Programm-Wahlschalter auf ein
beliebiges Programm. Das Gerät ist jetzt eingeschaltet.
www.zanussi.com
19
Page 20

64
5
31 2
Öffnen der Tür und
Einlegen der Wäsche
1. Einfülltür öffnen.
2. Legen Sie die
Wäsche locker in
die Trommel.
Vorsicht! Achten
Auswahl des Programms
Drehen Sie den Programm-Wahlschalter
auf das gewünschte
Programm. Die Kontrolllampe START
PAUSE
beginnt zu
blinken.
Sie darauf, dass
die Wäsche nicht zwischen Tür und Gummidichtung eingeklemmt wird.
3. Drücken Sie die
Tür fest zu. Das
Schloss muss
hörbar einrasten.
SCHON
Drücken Sie diese Taste, um Feinwäsche mit einer niedrigeren Temperatur zu trocknen. Die
entsprechende Kontrolllampe leuchtet. Diese
Option kann auch für zeitgesteuertes Trocknen
eingesetzt werden.
TEXTIL
Drücken Sie wiederholt die Taste Textilien, um
die gewünschte Option auszuwählen. Die entsprechende Kontrolllampe leuchtet auf. Sie haben die Wahl zwischen 2 Optionen: BAUMWOLLE
und MISCHGEWEBE
Programm: für Baumwollwäsche,
: für Synthetik oder
Feinwäsche.
Starten des Programms
Drücken Sie die START PAUSE
Taste. Das
Programm läuft an.
Auswahl von Zusatzfunktionen
Sie können unter folgenden Zuatzfunktionen
wählen:
Taste 1 - FEINWÄSCHE
Taste 2 - TEXTIL
Die Programmphase wird durch die entsprechenden Kontrolllampen angezeigt; Kontrolllampe
6 - Trocknen
, Kontrolllampe 5- ENDE .
Ändern eines Programms
Um ein irrtümlich gewähltes Programm nach
dem Start zu ändern, drehen Sie den Programm-Wahlschalter zuerst auf "O" - Aus . Das
Programm wird gelöscht.
Nach dem Programmstart kann ein Pro-
gramm nicht mehr direkt geändert werden.
Wird dennoch versucht, das Programm mit dem
Programm-Wahlschalter zu ändern, oder wird
eine Funktionstaste gedrückt (mit Ausnahme
der Taste SIGNAL button 4)) beginnt die LED
über der Taste START PAUZE rot zu blinken.
Das Trockenprogramm wird davon jedoch nicht
beeinflusst (Wäscheschutz).
4) Nur Trockner mit Signal-Taste
20
www.zanussi.com
Page 21

Programmende/Entnehmen der Wäsche
Nach dem Ende des Trocknerprogramms leuchten die Kontrolllampen ENDE
. Bei aktiviertem Signal ertönt für ca. eine Mi-
nute ein akustisches Signal.
Dem Trockenvorgang folgt automatisch ein
30 Minuten dauerndes Knitterschutzprogramm. Die Trommel dreht sich in dieser Phase
in kurzen Abständen. Die Wäsche bleibt dadurch locker und knitterfrei. Die Wäsche kann
während des Knitterschutzprogramms jederzeit
entnommen werden. (Die Wäsche sollte spätestens nach dem Ende des Knitterschutzprogramms entnommen werden, um Knitterbildung
zu vermeiden.)
und 4 SIEB
Reinigung und Pflege
1. Öffnen Sie die Tür.
2. Entnehmen Sie die Wäsche.
3. Entnehmen Sie den Filter, nachdem Sie die
Wäsche entnommen haben. Filter reinigen.
Warnung! Bitte prüfen Sie, ob der Filtersitz ganz frei ist, bevor Sie den Filter wie-
der einsetzen.
4. Drehen Sie den Programm-Wahlschalter
auf "O" - Aus .
Wichtig! Reinigen Sie den Filter nach jedem
Trockenprogramm.
5. Die Tür schließen.
Reinigung der Flusenfilter
Der Filter sammelt die Flusen, die sich beim
Trocknen absetzen. Der Flusenfilter muss nach
jedem Trockengang gereinigt werden, um einen
einwandfreien Betrieb des Trockners zu gewährleisten.
Die Warnleuchte Sieb erinnert Sie daran.
Vorsicht! Benutzen Sie den Trockner nie
ohne Flusenfilter oder mit beschädigtem
oder verstopftem Flusenfilter.
1. Öffnen Sie die
Einfülltür und
entnehmen
Sie die Wäsche.
2. Entfernen Sie
den Filter, der
im unteren Teil
der Einfüllöffnung sitzt.
3. Öffnen Sie
den Filter
durch Drücken
der Taste zwischen zwei
Schlitzen mit
den Fingern.
Reinigen Sie
den Filter mit
www.zanussi.com
einer Bürste oder mit der Hand. Nach einer
gewissen Zeit bildet sich ein weißlicher Belag auf den Filtern, der durch Waschmittelrückstände in der Wäsche verursacht wird.
Reinigen Sie in diesem Fall den Filter mit
warmem Wasser und einer Bürste.
Schließen Sie den Filter, und vergessen Sie
nicht, den Filter danach wieder einzusetzen.
Warnung! Bitte prüfen Sie, ob der Filtersitz ganz frei ist, bevor Sie den Filter wie-
der einsetzen.
4. Der Filter kann nur auf einer Seite eingesetzt werden. Ist die Lage des Filters nicht
richtig, gibt es einen Überstand.
Wenn der Filter nicht einrastet, kann die
Einfülltür nicht geschlossen werden.
Warnung! Vor Reinigungs- und
Wartungsarbeiten immer das Gerät vom
Stromnetz trennen.
Reinigen der Tür
Reinigen Sie regelmäßig die Innenseite der Tür,
um alle Flusen zu entfernen. Sorgfältiges Reinigen gewährleistet gute Trockenergebnisse.
21
Page 22

Trommel reinigen:
Vorsicht! Benutzen Sie keine
Scheuermittel zum Reinigen der Trommel.
Benutzen Sie zur Reinigung des Innenraums
und der Trommeleinteilungen ein mildes
Reinigungsmittel.
Halten Sie die Trommel und die Trommel-
einteilungen sauber. Die Mineralien im
Wasser oder im Waschmittel können auf der Innenseite der Trommel Rückstände bilden. Diese
Was tun, wenn...
Störung Mögliche Ursache Abhilfe
Netzstecker nicht eingesteckt oder
Sicherung durchgebrannt.
Der Trockner läuft nicht.
Nicht zufriedenstellende Trockenergebnisse.
Einfülltür schließt nicht.
Der Trockenzyklus hält kurz nach
dem Programmstart an.
Trockenzyklus dauert ungewöhnlich lange. Hinweis: Nach ca. 5
Stunden wird der Trockengang automatisch abgebrochen.
Einfülltür geöffnet. Die Tür schließen.
Haben Sie die Taste START/
PAUSE gedrückt?
Wahl eines falschen Programms.
Flusensieb verstopft. Flusensieb reinigen.
Falsche Füllmenge.
Lüftungsschlitze bedeckt.
Rückstände auf der Innenfläche
der Trommel oder den Trommelrippen.
Der Leitwert der Wasserversorgung vor Ort weicht von der Stan-
dardeinstellung des Gerätes ab.
Filter nicht eingesetzt 2). Filter korrekt einsetzen 2).
Zu wenig Wäsche eingelegt oder
Wäsche für das gewählte Programm zu trocken.
Filter verstopft. Filter reinigen.
Trommel überladen. Wäschemenge verringern.
führen dazu, dass die Wäsche nicht angemessen trocknet.
Reinigen der Bedienblende und des
Gerätegehäuses
Vorsicht! Verwenden Sie zum Reinigen
des Gehäuses keine Möbelputzmittel oder
andere aggressive Reinigungsmittel.
Wischen Sie mit einem feuchten Tuch die
Bedienblende und das Gehäuse ab.
Netzstecker in die Steckdose stecken. Die Sicherung der Hausinstallation kontrollieren.
Drücken Sie die Taste START/
PAUSE erneut.
Bei der nächsten Trocknung ein
anderes Programm wählen (siehe
Abschnitt "Programmtabelle").
Die empfohlenen Füllmengen beachten.
Lüftungsschlitze am Geräteboden
freilegen.
Innenfläche der Trommel und
Trommelrippen reinigen.
Standardeinstellung für den Trockengrad neu programmieren (siehe Abschnitt "Programmiermög-
1)
lichkeiten")
Ein Zeitprogramm oder eine höhere Trocknungsstufe wählen (z. B.
EXTRATROCKEN anstelle von
SCHRANKTROCKEN ).
1)
.
22
www.zanussi.com
Page 23

Störung Mögliche Ursache Abhilfe
Wäsche unzureichend geschleudert.
1) Nur Trockner mit Leitwert-Programmen
2) Nur Trockner mit austauschbarem Filter
Programmiermöglichkeiten
Die Wäsche vor dem Trocknen
ausreichend schleudern.
SIGNAL dauerhaft deaktiviert
1. Drehen Sie den Programm-Wahlschalter
3. Das Signal ist nun standardmäßig deaktiviert.
auf ein beliebiges Programm.
2.
Drücken Sie gleichzeitig die Tasten
SCHON und TEXTIL und halten Sie diese
gedrückt für ca. 5 Sekunden.
Technische Daten
Abmessungen (mm) Breite / Höhe / Tiefe 850 x 600 x 580 mm
Max. Tiefe
(bei geöffneter Gerätetür)
Max. Breite
(bei geöffneter Gerätetür)
Elektrischer Anschluss Spannung 230 V
Frequenz 50 Hz
Sicherung 16 A
Gesamte Leistungsaufnahme 2600 W
Trommelvolumen 108 Liter
Gerätegewicht 32,5 kg
Wäsche: max. Gewicht 7 kg
Verwendungsart Haushalt
Umgebungstemperatur min. 5 °C
max. 35 °C
Energieverbrauch
Jährlicher Energieverbrauch
Energie-Effizienzklasse C
Leistungsaufnahme Im eingeschalteten Zustand 0,70 W
Im ausgeschalteten Zustand 0,70 W
1) Gemäß EN 61121; bei einer Ladung von 7 kg Baumwolle und einer Drehzahl von 1000 U/min.
2) Jährlicher Energieverbrauch in kWh, ausgehend von 160 Trockenprogrammen mit dem Standard-
Baumwollprogramm bei voller Beladung und bei Teilbeladung und vom Verbrauch der energiesparenden
Betriebsmodi. Der tatsächliche Energieverbrauch pro Trockenprogramm hängt davon ab, wie das Gerät
verwendet wird (VERORDNUNG (EU) Nr. 392/2012).
1)
2)
1090 mm
950 mm
kWh/Programm 4,25 kWh
512 kWh
www.zanussi.com
23
Page 24

Aufstellen
Aufstellen der Maschine
• Aus praktischen Gründen sollte der Trockner
neben der Waschmaschine aufgestellt werden.
• Der Wäschetrockner muss in einem sauberen
und staubfreien Raum installiert werden.
• Am Gerät muss genügend Freiraum für die
Luftzirkulation vorhanden sein. Die vorderen
Lüftungsgitter und die hinteren Lufteinlassgitter dürfen nicht zugestellt werden.
• Das Gerät auf festem ebenem Boden aufstellen, um Vibrationen und das Betriebsgeräusch so gering wie möglich zu halten.
• Kontrollieren Sie nach dem Aufstellen den
waagrechten Stand des Gerätes mit einer
Wasserwaage. Richten Sie es gegebenenfalls mit den Schraubfüßen aus.
• Die Schraubfüße dürfen nicht entfernt werden. Auf keinen Fall den Bodenabstand durch
Florteppiche, Holzleisten oder ähnliche Materialien einschränken. Der mögliche Hitzestau
kann den Gerätebetrieb beeinträchtigen.
Wichtig!
• Die vom Wäschetrockner austretende Heißluft kann Temperaturen bis zu 60° C erreichen. Das Gerät muss daher auf hochtemperaturbeständigen Böden aufgestellt werden.
• Während des Betriebs des Trockners muss
die Raumtemperatur im Bereich zwischen
+5° C und +35° C liegen. Andernfalls wird
die Funktion des Gerätes beeinträchtigt.
• Das Gerät darf nur aufrecht stehend transportiert werden, wenn es versetzt werden
muss.
• Das Gerät darf nicht hinter einer verschließbaren Tür, einer Schiebetür oder einer Tür mit
einem Scharnier installiert werden, das dem
Scharnier des Gerätes so gegenüber liegt,
daß die Tür des Trockners nicht vollständig
geöffnet werden kann.
Entfernen der Transportsicherungen
Vorsicht! Entfernen Sie vor dem
Gebrauch das gesamte
Verpackungsmaterial.
1. Öffnen Sie die Einfülltür.
2. Ziehen Sie das
Klebeband von der
Trommel in der Maschine ab.
Montage des Entlüftungsschlauchs
Für eine vereinfachte Installation gibt es verschiedene Entlüftungsöffnungen: eine auf der
Rückseite, die anderen auf der linken und der
rechten Seite. Schließen Sie den Entlüftungsschlauch an die für Sie am besten geeignete
Öffnung an. Ziehen Sie dazu die Ringmutter (A)
aus der Entlüftungsöffnung an der Rückseite,
schrauben Sie diese auf den Entlüftungsschlauch, und drücken Sie ihn fest zurück. Die
nicht benutzten Entlüftungsöffnungen können
jetzt mit den Spezial-Einrastkappen abgedichtet
werden.
3. Entfernen Sie den
Folienschlauch und
den Polystyrolblock
aus dem Gerät.
A
A
24
www.zanussi.com
Page 25

Ist der
Entlüftungsschlauch
lang und die
Raumtemperatur
niedrig, kann die
Feuchtigkeit im
Schlauchinneren
kondensieren. Dies ist
ein unvermeidlicher,
natürlicher Vorgang. Damit das Wasser nicht im
Entlüftungsschlauch steht oder zurück in den
Trockner fließen kann, sollte eine kleine Öffnung
hinein gebohrt werden (ca. 3 mm), und zwar an
der niedrigsten Stelle des Schlauchs. Stellen
Sie dann dort einen kleinen Behälter darunter.
(Siehe Abbildung, Punkt B).
Sobald Sie den Entlüftungsschlauch am Trockner angeschlossen haben, verlegen Sie ihn zum
gewünschten Punkt. Stellen Sie dabei sicher,
dass die Gesamtlänge der Verlegung unter 2 m
liegt und nicht mehr als zwei Biegungen beinhaltet. Falls Sie sich bezüglich der Entlüftungsöffnung für das feste Gitter in der Wand/Aussparung entschieden haben, sollten Sie in Ihrem
Baumarkt vor Ort die notwendigen Anschlüsse
und Installationsempfehlungen erhalten.
Warnung!
Es muss beachtet
werden, dass der
Entlüftungsschlauch
nicht beispielsweise an
eine
Dunstabzugshaube
oder einen Kamin o.ä.
angeschlossen wird,
durch den auch die
Abgase eines Gerätes abgeleitet werden, das
mit einem Kraftstoff/Treibstoff betrieben wird.
Achtung! Um Kondensationsprobleme zu vermeiden, ist es unerlässlich, den Trockner mit einem flexiblen Entlüftungsschlauch auszustatten,
dessen "Auslassöffnung" mindestens hinter die
Küchenmöbel reicht; noch besser aber aus der
Küche selbst hinaus führt. Damit das Gerät
nicht überhitzt, muss dieser Dampfauslass stets
frei von Verstopfungen sein. Wird ein Entlüftungsschlauch an der Außenwand oder an der
Decke fest installiert, muss eine Auslasskapazi-
www.zanussi.com
B
tät von mindestens 150 m3/h gewährleistet
sein. Wird der Trockner neben Küchenmöbeln
aufgestellt, muss sichergestellt sein, dass der
Entlüftungsschlauch nicht eingequetscht ist.
Wird der Entlüftungsschlauch teilweise eingequetscht, reduziert sich die Trockenleistung,
und es kommt zu längeren Trockenzeiten und
einem höheren Energieverbrauch. Wird der Entlüftungsschlauch komplett eingequetscht, können die Sicherheits-Ausschalter aktiviert werden, mit denen das Gerät ausgestattet ist. Während des Betriebs des Trockners muss die
Raumtemperatur im Bereich zwischen +5 °C
und +35 °C liegen. Andernfalls wird die Funktion des Gerätes beeinträchtigt.
Elektrischer Anschluss
Angaben über Netzspannung, Stromart und die
erforderliche Absicherung sind dem Typenschild zu entnehmen. Das Typenschild ist neben
der Einfüllöffnung angebracht (siehe Kapitel
"Gerätebeschreibung").
Der Anschluss darf nur über eine vorschriftsmäßig installierte und geerdete
Steckdose erfolgen.
Warnung! Der Hersteller übernimmt
keinerlei Haftung für Schäden oder
Verletzungen, die durch Missachtung der
Sicherheitshinweise entstehen sollten.
Falls das Netzkabel des Geräts ersetzt
werden muss, lassen Sie dies durch
unseren Kundendienst durchführen.
Warnung! Achten Sie darauf,
Netzstecker und Netzkabel nicht zu
beschädigen.
Stecken Sie den Netzstecker erst nach
Abschluss der Montage in die Steckdose.
Stellen Sie sicher, dass der Netzstecker
nach der Montage noch zugänglich ist.
Wechsel des Türanschlags
Der Türanschlag kann umgesetzt werden, um
das Einlegen und Entnehmen der Wäsche zu
erleichtern. Der Wechsel des Anschlags muss
von einem Fachmann ausgeführt werden. Wenden Sie sich an den lokalen Kundendienst.
Sonderzubehör
Bausatz Wasch-Trocken-Säule
25
Page 26

Sie können bei Ihrem
Händler einen Bausatz
erwerben, mit dem Sie
den Trockner platzsparend auf einer Frontlader-Waschmaschine
mit einer Tiefe zwischen 48 und 60 cm
installieren können. Le-
Entsorgung
sen Sie aufmerksam die dem Bausatz beiliegende Aufstellanweisung.
Recyceln Sie Materialien mit dem Symbol .
Entsorgen Sie die Verpackung in den
entsprechenden Recyclingbehältern.
Recyceln Sie zum Umwelt- und
Gesundheitsschutz elektrische und
elektronische Geräte. Entsorgen Sie Geräte mit
diesem Symbol
Bringen Sie das Gerät zu Ihrer örtlichen
Sammelstelle oder wenden Sie sich an Ihr
Gemeindeamt.
Verpackungsmaterial
Das Verpackungsmaterial ist umweltfreundlich
und recycelbar. Kunststoffteile sind mit internationalen Abkürzungen wie z. B. >PE<, >PS<
usw. gekennzeichnet. Entsorgen Sie das Verpackungsmaterial in den dafür vorgesehenen Behältern der städtischen Müllentsorgung.
Warnung! Wenn Sie ein Altgerät
entsorgen möchten, entfernen Sie das
nicht mit dem Hausmüll.
Kundendienst
Prüfen Sie bei einer technischen Störung zunächst, ob Sie anhand der Bedienungsanleitung
den Fehler selbst beheben können (siehe Kapitel "Was tun, wenn ...").
Können Sie die Störung nicht selbst abstellen,
wenden Sie sich bitte an Ihren Kundendienst
vor Ort.
Um Ihnen schnell helfen zu können, benötigen
wir folgende Angaben:
– Modellbeschreibung
– Produktnummer (PNC)
– Seriennummer (S No.) (diese Nummern finden Sie auf dem Typenschild)
– Art der Störung
26
Netzkabel und entsorgen Sie das Gerät mit dem
Stecker. Entfernen Sie den Türhaken und stellen
Sie sicher, dass sich die Tür nicht mehr
verriegeln lässt, damit sich Kleinkinder oder
Haustiere nicht im Innern einschließen können.
Umwelttipps
• Die Wäsche wird im Trockner flauschig und
weich. Weichspüler beim Waschen ist deshalb nicht nötig.
• Ihr Trockner arbeitet am wirtschaftlichsten,
wenn Sie:
– darauf achten, dass die Lüftungsschlitze im
Gerätesockel immer frei sind;
– die in der Programmtabelle aufgeführten
Füllmengen einhalten;
– den Filter nach jedem Trockengang reini-
gen;
– die Wäsche vor dem Trocknen ausrei-
chend schleudern..
– Eventuelle Fehlermeldungen, die das Gerät
anzeigt
Tragen Sie die erforderlichen Gerätenummern
hier ein,
so dass Sie diese immer zur Hand haben:
www.zanussi.com
Page 27

Modellbeschreibung: .................................................................................
Produkt-Nr. (PNC): .................................................................................
Serien-Nr. (S-No.): .................................................................................
www.zanussi.com
27
Page 28

Indhold
Vigtige sikkerhedsoplysninger _ _ _ _ _ _ _ 28
Beskrivelse af maskinen _ _ _ _ _ _ _ _ _ _ _ 30
Betjeningspanel _ _ _ _ _ _ _ _ _ _ _ _ _ _ _ 30
Før ibrugtagning _ _ _ _ _ _ _ _ _ _ _ _ _ _ _ 31
Sortering og forberedelse af tøjet _ _ _ _ _ _ 31
Programoversigt _ _ _ _ _ _ _ _ _ _ _ _ _ _ _ 32
Daglig brug _ _ _ _ _ _ _ _ _ _ _ _ _ _ _ _ _ 32
Vigtige sikkerhedsoplysninger
Vigtigt Læs denne brugsanvisning
igennem (inkl. tips og advarsler), før
maskinen installeres og tages i brug. Det
forebygger ulykker og sikrer, at maskinen
bruges korrekt. For at undgå unødvendige
fejl og uheld er det vigtigt at sikre, at alle,
der bruger maskinen, er fuldstændigt
fortrolige med dens drift og
sikkerhedsfunktioner. Gem denne
brugsanvisning, og sørg for, at den følger
med maskinen, hvis den bliver flyttet eller
solgt, så alle, der bruger maskinen, er
fortrolige med dens betjening og
sikkerhed.
Generelt om sikkerhed
• Det er farligt at ændre maskinens specifikationer eller forsøge at ombygge den på nogen
måde.
• Maskinen er ikke beregnet til at bruges af
personer (herunder børn) med fysiske eller
sensoriske handicaps, eller med manglende
erfaring og viden, med mindre de er under
opsyn af den, der har ansvaret for deres sikkerhed, eller har fået vejledning i maskinens
brug af den pågældende person.
• Pas på, at husdyr ikke kravler ind i tromlen.
Kontrollér derfor tromlen inden brug.
• Genstande som mønter, sikkerhedsnåle, søm,
skruer, sten eller andre hårde, skarpe ting kan
medføre stor skade og må ikke kommes i maskinen.
• For at undgå brandfare pga. for megen tørring
må følgende genstande ikke tørres i en tørre-
28
Vedligeholdelse og rengøring _ _ _ _ _ _ _ _ 34
Når der opstår fejl _ _ _ _ _ _ _ _ _ _ _ _ _ _ 35
Maskinindstillinger _ _ _ _ _ _ _ _ _ _ _ _ _ _ 35
Tekniske data _ _ _ _ _ _ _ _ _ _ _ _ _ _ _ _ 35
Opstilling _ _ _ _ _ _ _ _ _ _ _ _ _ _ _ _ _ _ _ 36
Miljø _ _ _ _ _ _ _ _ _ _ _ _ _ _ _ _ _ _ _ _ _ 38
Service _ _ _ _ _ _ _ _ _ _ _ _ _ _ _ _ _ _ _ _ 39
Ret til ændringer uden varsel forbeholdes.
tumbler: Puder, vattæpper og lignende (disse
genstande akkumulerer varmen).
• Genstande som skumgummi (latexgummi),
badehætter, vandtætte tekstiler, ting med
gummibagside og tøj eller puder forsynet
med skumgummiindlæg må ikke tørres i tørretumbleren.
• Tag altid stikket ud af stikkontakten efter brug
og før rengøring eller vedligeholdelse.
• Forsøg aldrig selv på at reparere maskinen.
Reparationer udført af uerfarne personer kan
medføre alvorlig fejlfunktion og ulykker. Kontakt Electrolux Service A/S. Kræv altid, at der
anvendes originale reservedele.
• Hvis tøjet er tilsmudset med substanser som
for eksempel madolie, acetone, benzin, petroleum, pletfjerner, terpentin, voks og voksfjerner, skal det vaskes i varmt vand tilsat ekstra
vaskemiddel, før det tørres i tørretumbleren.
• Eksplosionsfare: Tørre genstande, der har
været i kontakt med antændelige opløsningsmidler (benzin, metylalkohol, rensemidler og
lignende), må ikke tørretumbles. Disse midler
er dampholdige og kan forårsage eksplosioner. Kun genstande, der er vasket med vand,
må tørretumbles.
• Brandfare: Tøj, der er plettet eller gennem-
blødt med vegetabilsk olie eller madolie, udgør en brandfare og må ikke lægges i tørretumbleren.
• Hvis tøjet er vasket med pletfjerner, skal det
skylles en ekstra gang, før det kommes i tørretumbleren.
• Sørg for, at der ikke er glemt gaslightere eller
tændstikker i tøj, der kommes i tumbleren
www.zanussi.com
Page 29

Advarsel Stands aldrig tørretumble-
ren, før tørreprogrammet er helt slut,
med mindre alt tøjet tages ud med det
samme og bredes ud, så varmen spredes.
Brandfare!
• Risiko for elektrisk stød! Maskinen må ik-
ke spules med vandstråle.
• Varmelegemet er slået fra i sidste del af tørre-
programmet (nedkølingstrin). Det sikrer, at tøjet efterlades i maskinen med en temperatur,
der ikke kan skade tøjet.
• Sørg for tilstrækkelig ventilation i det lokale,
hvor tørretumbleren installeres, så der ikke
kan samles gasser i rummet fra andre apparater, der bruger brændstof som f.eks gas, eller
fra åbne ildsteder.
Opstilling
• Denne maskine er tung. Der skal udvises stor
forsigtighed ved flytning af maskinen.
• Når maskinen pakkes ud, skal man kontrolle-
re, om den er ubeskadiget. I tvivlstilfælde må
man ikke tage den i anvendelse men skal kontakte Electrolux Service A/S.
• Alle emballagedele og transportsikringer skal
fjernes før brug. Det kan medføre stor skade
på maskinen og andre ejendele, hvis dette ikke overholdes. Se det pågældende afsnit i
brugsanvisningen.
• Eventuelt elarbejde skal udføres af en autori-
seret installatør eller en anden fagkyndig person.
• Vær omhyggelig med at sørge for, at maski-
nen ikke er anbragt oven på strømforsyningsledningen.
• Hvis maskinen står på et gulv med gulvtæp-
pe, skal benene justeres, så der er fri luftcirkulation.
• Når maskinen er stillet op, skal man kontrolle-
re, at den ikke klemmer eller står på netledningen og/eller tilløbsslangen.
• Hvis tørretumbleren står oven på en vaskema-
skine, skal tørretumbleren sikres mod at falde
ned. Sammenbygningbeslag kan med fordel
anvendes.(ekstraudstyr).
Brug
• Denne maskine er kun til husholdningsbrug.
Den må ikke anvendes til andre formål end
det, den er beregnet på.
• Tør kun tøj, der er beregnet på at blive maskintørret. Følg instruktionerne på hvert vaskemærke.
• Tør ikke uvasket tøj i tørretumbleren.
• Fyld ikke for meget i maskinen. Se det pågældende afsnit i brugsanvisningen.
• Tøj, der er drivvådt, må ikke anbringes i tørretumbleren.
• Tøjstykker, der har været i kontakt med flygtige opløsningsmidler, må ikke maskintørres.
Hvis der er anvendt flydende rensevæsker,
skal man sørge for, at væsken er fjernet fra tøjet, før det kommes i maskinen.
• Træk aldrig i ledningen for at tage stikket ud
af stikkontakten; Tag altid fat i selve stikket.
• Brug aldrig tørretumbleren, hvis strømkablet,
betjeningspanelet, toppladen eller soklen er
beskadiget, så der er fri adgang til maskinens
indre.
• Skyllemidler og lignende produkter skal bruges som angivet på produktets emballage.
• Forsigtig - varm overflade: Berør ikke
dækslet på lugens lampe, når lyset er tændt.
5)
•
Varm overflade: Berør ikke maskinens
bagside, mens den er i gang!
Børns sikkerhed
• Maskinen er ikke beregnet til at blive betjent
af mindre børn eller funktionshæmmede uden
opsyn.
• Børn skal være under opsyn for at sikre, at de
ikke leger med maskinen.
• Emballagen (f.eks. plastfilm, polystyren) kan
være farlig for børn - fare for kvælning! Opbevar materialet utilgængeligt for børn.
• Opbevar altid vaskemidler et sikkert sted og
utilgængeligt for børn.
• Sørg for, at børn eller husdyr ikke kravler ind i
tromlen.
5) Kun tørretumblere med belysning i tromlen.
www.zanussi.com
29
Page 30

Beskrivelse af maskinen
1
2
7
6
Betjeningspanel
1
Luge
2
Fnugfilter
3
Typeplade
4
Betjeningspanel
Justérbare ben
5
Udluftninger i side / udluftning bag på ma-
6
skinen
Ringmøtrik
7
3
4
5
1 2 43
Programknap og - Off -knap
1
Funktionsknapper
2
30
Kontrollampe
3
- TØRRING lampe
www.zanussi.com
Page 31

- PROGRAMSLUT lampe
- RENGØR FILTRENE lampe
Før ibrugtagning
START PAUSE
4
knap
Der kan være belægninger fra fremstillingsprocessen i maskinen. Tør derfor tromlen af med en
Sortering og forberedelse af tøjet
Sortering af tøjet
• Sortér efter stoftype:
– Bomuld/lærred til programmer i program-
gruppen Bomuld
– Blandede fibre og syntetiske stoffer til pro-
grammer i programgruppen Syntetisk
• Sortering efter vaskemærke: Vaskemærkerne
betyder:
Kan principielt tørres i tørretumbler
Tørring ved normal temperatur
Tørring ved lav temperatur (tryk på Finvask -knappen!).
Må ikke tørres i tørretumbler
Vigtigt Anbring ikke vådt tøj i tørretumbleren,
hvis vaskemærket ikke udtrykkeligt angiver, at
det er egnet til tørring i tørretumbler.
Denne maskine kan anvendes til alt vådt tøj, der
er mærket som egnet til tørring i tørretumbler.
• Tør ikke nyt, kulørt tøj sammen med lyst tøj.
Tekstilfarver kan smitte af.
• Tør ikke bomuldsjersey og strik med Ekstra
tørt -programmet. Tøjet kan krybe!
Forberedelse af tøj
• Undgå at tøjet bliver filtret: Luk lynlåse, knap
dynebetræk, og bind alle bånd (for eksempel
på forklæder).
• Tøm lommerne. Fjern metaldele (sikkerhedsnåle, clips o.lign.).
.
.
fugtig klud, eller kør et kort tørreprogram (ca. 30
min.) med fugtige klude i maskinen.
• Vend vrangen ud på tolaget stof (for eksempel skal bomuldslaget på bomuldsforede anorakker vende yderst). Tøjet vil herefter tørre
bedre.
Vigtigt Fyld ikke for meget i maskinen.
Overhold tumblerens maks. kapacitet på 7 kg.
Tøjets vægt
Tøjets art Vægt
Badekåbe 1200 g
Serviet 100 g
Dynebetræk 700 g
Lagen 500 g
Pudebetræk 200 g
Dug 250 g
Frottehåndklæde 200 g
Viskestykke 100 g
Natkjole 200 g
Dametrusser 100 g
Herrearbejdsskjorte 600 g
Herrearbejdsskjorte 200 g
Herrepyjamas 500 g
Bluse 100 g
Herreunderbukser 100 g
www.zanussi.com
31
Page 32

Programoversigt
Tid i mi-
Programmer
Bomuld Ekstra
Tørt
Bomuld Meget
Tørt
Bomuld Skabs-
1)
tørt
Bomuld Rulletørt
1)
nutter
(ca.)
140 7 kg
130 7 kg
125 7 kg
105 7 kg
Anvendelse/funktioner
Vaskemærkat
Maks. tøjmængde (tør vægt)
Gennemtørring af tykke eller flerlagede stoffer, f.eks.
frottéstof, badekåber.
Gennemtørring af tykke eller flerlagede stoffer, f.eks.
frottéstof, badekåber.
Gennemtørring af stoffer med ensartet tykkelse, f.eks.
frottéstof, strik, håndklæder.
Til tynde tekstiler, der skal stryges, som f.eks. strikkede ting, bomuldsskjorter.
Bomuld Stryge-
1)
tørt
Syntetisk Ekstra
Tørt
Syntetisk Skabs-
1)
tørt
Syntetisk Strygetørt
Jeans 125 7 kg
1) Iht. IEC61121
85 7 kg
45 3 kg
40 3 kg
30 3 kg
Til tynde stoffer, der skal stryges bagefter, f.eks. strik,
bomuldsskjorter.
Gennemtørring af tykke eller flerlagede stoffer, f.eks.
sweatere, sengelinned, duge.
Til tynde stoffer, der ikke skal stryges, for eksempel
strygefri skjorter, duge, tøj til babyer, sokker, undertøj
med stivere eller bøjler.
Til tynde stoffer, der skal stryges bagefter, f.eks. strik,
bomuldsskjorter.
Til fritidstøj, f.eks. jeans, sweatshirts og lignende med
forskellig stoftykkelse (f.eks. i manchetter og sømme).
Daglig brug
Tænd for apparatet
Drej programvælgeren til et program. Apparatet
er tændt.
32
www.zanussi.com
Page 33

64
5
31 2
Åbning af lugen og
ilægning af tøj
1. Åbn lugen.
2. Læg tøjet i (men
pres det ikke ind i
maskinen).
Valg af program
Drej programvælgeren
til det ønskede program. Lampen START
PAUSE
begynder
at blinke.
Bemærk Pas på,
at tøjet ikke kommer i klemme mellem
lugen og pakningen.
3. Luk lugen, så den
låses. Der lyder et
klik fra låsen.
SART TØJ
Når der trykkes på denne knap, sker tørringen
ved lavere temperatur - bruges til sarte ting. Den
tilhørende kontrollampe tændes. Dette tilvalg
kan også bruges til tidsstyret tørring.
TEKSTIL
Tryk en eller flere gange på Tekstil-knappen for
at vælge det ønskede tilvalg. Den tilhørende
lampe tændes. Der kan vælges mellem 2 forskellige funktioner Bomulds
til bomuld og Syntetisk
program: bruges
: bruges til syntetiske
eller sarte stoffer.
Start af programmet
Tryk på START PAUSE
-knappen. Programmet starter.
Programfasen vises af relevante lamper: lampe
6- Tørring
, lampe 5- Antikrøl-slut .
Ændring af program
Hvis et program skal ændres, efter at det er
startet, sættes programvælgeren først på "O" -
(sluk). Programmet annulleres.
6) Kun tørretumblere med alarm-knap (summer)
www.zanussi.com
Valg af ekstrafunktioner (tilvalg)
Du kan vælge mellem ekstrafunktionerne:
knap 1 - SART TØJ
knap 2 - TEKSTIL
Programmet kan ikke ændres direkte, når
først det er startet. Hvis der alligevel bliver
gjort forsøg på at ændre program med programvælgeren, eller hvis der trykkes på en funktions-
6)
knap (undtagen knappen SIGNAL
lampen på knappen START PAUSE
) begynder
midlertidigt at blinke rødt. Det påvirker dog ikke tørreprogrammet (beskyttelse af vasketøj).
Tørreprogram slut / udtagning af tøj
Når tørreprogrammet er slut, lyser lamperne Slut
og lampe 4- Filter . Hvis alarmen er i
gang, lyder der et signal i ca. et minut
Tørreprogrammet efterfølges automatisk af
en antikrølfase, der varer ca. 30 minutter. I
denne fase drejer tromlen med mellemrum. Det
holder tøjet løst og forebygger krøl. Tøjet kan
tages ud når som helst under antikrølfasen. (Tøjet bør tages ud, når antikrølfasen er ved at være
slut, så det ikke bliver krøllet).
1. Åbn lugen.
2. Tag tøjet ud.
33
Page 34

3. Fjern filteret, når tøjet er taget ud Rens filteret.
Advarsel Se efter, at der ikke sidder fnug i
filtersædet, inden filteret sættes i igen
Vedligeholdelse og rengøring
4. Drej programvælgeren på - Sluk .
Vigtigt Rens filteret efter hvert tørreprogram.
5. Luk lugen.
Advarsel Tørretumbleren må ikke bruges
til tørring af tøj, hvis der er anvendt
industrikemikalier til rengøring af tøjet!
Rengøring af fnugfilter
Filteret opfanger alle de fnug, der samler sig under tørringen. For at sikre, at tørretumbleren virker perfekt, skal filteret renses efter hvert tørreprogram.
Advarselslampen Filter
skal gøres.
Bemærk Start aldrig tørretumbleren uden
korrekt isat fnugfilter eller med defekt eller
tilstoppet filter.
1. Åbn lugen, og
tag tøjet ud.
2. Tag det filter
ud, der er indbygget i nederste del af
lugeåbningen.
3. Åbn filteret
ved at trykke
på knappen,
mellem de to
åbninger.
Rens filteret
med en fugtig
hånd eller en
klud. Efter et
stykke tid dannes der en belægning på filtrene, der stammer fra sæberester i tøjet.
Når dette sker, skal filteret renses med en
børste og varmt vand.
minder om, at det
Luk filteret, og husk at sætte det på plads.
Advarsel Se efter, at der ikke sidder fnug i
filtersædet, inden filteret sættes i igen.
4. Filteret kan kun sættes i på én måde. Hvis
filteret sættes forkert i, stikker det ud.
Hvis filteret ikke vil gå i hak, kan lugen ikke
lukkes.
Rengøring af lugen
Rens jævnlig lugen for fnug på indersiden. Omhyggelig rengøring sikrer en korrekt tørring.
Rengøring af tromlen
Bemærk Brug ikke skuremiddel eller
stålsvampe til rengøring af tromlen.
Kalken i vandet eller vaskemidler kan danne
en næsten usynlig belægning på tromlens
inderside. Det betyder, at maskinens følere ikke
længere kan registrere, hvor tørt tøjet er. Tøjet er
fugtigere end forventet, når det tages ud af tumbleren.
Rengør tromlens inderside og tromlebladene
med et almindeligt rengøringsmiddel til husholdningsbrug (f.eks. eddikebaseret rengøringsmiddel).
Rensning af betjeningspanel og kabinet
Bemærk Brug ikke møbelrens eller
skrappe rengøringsmidler til at rengøre
maskinen.
Betjeningspanel og kabinet aftørres med en
fugtig klud.
34
www.zanussi.com
Page 35

Når der opstår fejl
Problem Mulig årsag Afhjælpning
Stikket er ikke sat i stikkontakten,
eller en sikring virker ikke korrekt.
Tørretumbleren virker ikke.
Tørringen er utilfredsstillende.
Lugen lukker ikke.
Tørreprogrammet ender kort efter,
at det er startet.
Tørreprogrammet varer usædvanligt længe. Bemærk: Efter ca. 5 timer slutter tørreprogrammet automatisk.
1) Kun tørretumblere med programmering af ledningsevne
2) Kun tørretumblere med udtageligt filter
Lugen er åben. Luk lugen.
Er der trykket på knappen
START PAUSE ?
Der er valgt forkert program.
Fin- og grovfiltre er tilstoppet. Rens fin- og grovfiltre.
Maskinen er overfyldt.
En eller flere udluftninger er tildækket.
Aflejringer på indersiden af tromlen
eller dens ribber.
Ledningsevnen for vandet på
brugsstedet passer ikke til maski-
nens standardindstilling.
Filteret er ikke sat i 2). Monter filteret 2).
Ikke nok vasketøj i tumbleren, eller
tøjet er for tørt til det valgte program.
Filteret er tilstoppet. Rens filteret.
For stor fyldning. Reducer fyldningen.
Tøjet er ikke centrifugeret nok.
Sæt stikket i stikkontakten. Kontrollér sikringerne i husholdningens
sikringsboks.
Tryk igen på START PAUSE knappen.
Vælg et andet program, næste
gang der tørres (se tabellerne over
programmer).
Overhold de anbefalede mængder
vasketøj.
Sørg for, at ventilationsristene i
soklen ikke er tildækket.
Rengør tromlen indvendigt og rens
dens ribber.
Genprogrammér standardindstillin-
1)
gerne for tørhedsgrad (se afsnittet
'Maskinindstillinger')
Vælg et tidsstyret program eller
højere tørhedsgrad (f.eks. Ekstra
tørt i stedet for SKABSTØRT ).
Tøjet skal være centrifugeret tilstrækkeligt.
1)
.
Maskinindstillinger
SIGNAL permanent slået fra
1. Drej programvælgeren hen på et program.
2.
Tryk samtidig på knapperne SART TØJ
og TEKSTIL , og hold dem nede i ca. 5 sekunder.
3. Som standard er summeren altid slået fra.
Tekniske data
Mål (mm) Bredde / Højde / Dybde 850 x 600 x 580 mm
www.zanussi.com
35
Page 36

Maks. dybde
(med åben apparatluge)
Maks. bredde
(med åben apparatluge)
Tilslutning, el Spænding 230 V
Frekvens 50 Hz
Sikring 16 A
Tilsluttet effekt i alt 2600 W
Tromlens rumfang 108 l
Apparatets vægt 32,5 kg
Vasketøj: maks. vægt 7 kg
Type af anvendelse Husholdning
Omgivelsestemperatur Min. 5 °C
Maks. 35 °C
Energiforbrug
Årligt energiforbrug
Energiklasse C
Strømforbrug Tændt-tilstand 0,70 W
Slukket-tilstand 0,70 W
1) Med reference til EN 61121. 7 kg bomuld og en centrifugeringshastighed på 1000 o/m.
2) Energiforbrug pr. år i kWh, baseret på 160 tørrecyklusser i standardprogrammet for bomuld, helt og halvt fyldt
op, og forbruget i sparefunktionerne. Aktuelt energiforbrug pr. cyklus afhænger af, hvordan apparatet bruges
(FORORDNING (EU) nr. 392/2012).
1)
2)
1090 mm
950 mm
kWh/cyklus 4,25 kWh
512 kWh
Opstilling
Anbringelse af maskinen
• Af praktiske årsager anbefales det at anbringe tørretumbleren i nærheden af vaskemaskinen.
• Tørretumbleren skal opstilles et rent sted,
hvor der ikke hober sig snavs op.
• Luften skal kunne cirkulere frit hele vejen omkring apparatet. Den forreste ventilationsrist
og luftindtaget bag på apparatet må ikke blokeres.
• For at minimere støj og vibrationer, når tørretumbleren er i brug, skal den placeres på en
fast, plan overflade.
• Når først tørretumbleren står i den endelige
position, kontrolleres det, at den er i vater.
Hvis ikke: Skru benene op og ned, til maskinen er i vater.
36
• Maskinens ben må aldrig fjernes. Afstanden
mellem maskinens bund og gulvet må ikke
formindskes af f.eks. et langluvet tæppe, træeller pladestykker eller lignende. Det kan
medføre, at der ophobes varme, der kan påvirke maskinens funktion.
www.zanussi.com
Page 37

Vigtigt
• Den varme luft, som tørretumbleren producerer, kan nå op på temperaturer omkring 60°C.
Apparatet må derfor ikke installeres på et
gulv, der ikke kan tåle høje temperaturer.
• Når tørretumbleren bruges, må temperaturen i
rummet ikke være under +5 °C eller over +35
°C, da dette kan påvirke apparatets funktion.
• Hvis apparatet skal flyttes, skal det transporteres i stående stilling.
• Apparatet må ikke installeres bag en dør, der
kan låses, en skydedør eller en dør med
hængsel i den modsatte side af apparatet, på
en sådan måde, at tørretumblerens luge ikke
kan åbnes helt.
Fjernelse af transportemballage og sikringer
Bemærk Inden ibrugtagning skal al
transportemballage og -sikringer fjernes.
1. Åbn lugen.
2. Træk klæbestrimlerne af, der sidder
øverst på tromlen indvendigt i maskinen.
Montering af udluftningsslange
For at forenkle installationen er der flere udluftningsåbninger: en bag på maskinen, de andre
på højre og venstre side. Tilslut slangen til den
mest praktiske åbning ved at trække ringmøtrikken (A) af udluftningsåbningen bagpå, skrue
den på slangen og trykke den godt fast igen. De
udluftningsåbninger, der ikke bruges, skal lukkes
med de særlige klikdæksler (medfølger).
www.zanussi.com
3. Fjern slangefolie og
flamingofyld fra maskinen.
A
A
Hvis slangen er lang,
og rumtemperaturen er
lav, kan fugten
kondenseres til vand i
slangen. Det er
naturligt og kan ikke
undgås. For at undgå,
at vandet ligger i
slangen eller løber
tilbage i tumbleren, er det tilrådeligt at bore et
lille hul (ca. 3 mm) på slangens laveste punkt og
sætte en lille beholder under den. (Se
tegningen, pkt. B).
Når slangen er sluttet til tørretumbleren, føres
den frem til det ønskede aftræk. Den må ikke føres længere end 2 meter og må højst bøje to
steder. Mht. selve aftrækket: Hvis du har besluttet at have en fast rist i væggen eller vinduet,
kan du normalt finde de nødvendige fittings i et
lokalt byggemarked, hvor du også kan få råd om
installationen.
Advarsel
Det er vigtigt, at
udluftningsslangen ikke
tilsluttes f.eks. en
emhætte, en skorsten
eller et afgangsrør til en
kedel eller lignende
udstyr, der bruger
brændsel.
Bemærk, at for at undgå kondensproblemer er det afgørende, at tørretumbleren forsynes med en bøjelig slange, der
kan lede dens "udstødning" væk, i hvert fald bort
fra køkkenmodulerne; og helst helt ud af køkkenet eller bryggerset. For at undgå, at maskinen
bliver overophedet, er det vigtigt, at dampen kan
slippe uhindret væk. Hvis en slange er fast mon-
B
37
Page 38

teret til en ydervæg eller et loft, skal det derfor
sikres, at den har en kapacitet på mindst 150
m3/time. Pas på, at udluftningsslangen ikke
kommer i klemme, hvis tørretumbleren monteres
ved siden af køkkenmoduler. Hvis slangen er
mere eller mindre klemt sammen, nedsættes
tumblerens tørrekapacitet, så tøjet er længere
om at tørre, og maskinen bruger mere strøm.
Hvis slangen er klemt helt sammen, kan det betyde, at tumblerens sikkerhedsafbryder bliver
udløst. Når tørretumbleren bruges, må temperaturen i rummet ikke være under +5°C eller over
+35°C, da dette kan påvirke tumblerens funktion.
Tilslutning, el
Kontrollér angivelserne vedr. netspænding,
strømtype og sikringer på typepladen Typepladen sidder tæt ved lugeåbningen (se afsnittet
"Produktbeskrivelse")
Forbind kun apparatet til en stikkontakt
med en passende jordforbindelse i henhold til aktuelle regler for ledningsføring.
Advarsel Producenten fralægger sig
ethvert ansvar for skader på personer
eller ting, der skyldes manglende
overholdelse af disse sikkerhedsregler.
Hvis det bliver nødvendigt at udskifte
apparatets netledning, skal det udføres af
Electrolux Kundeservice
Advarsel Pas på, du ikke beskadiger
vægstikket og ledningen.
Sæt først netstikket i stikkontakten ved
installationens afslutning.
Sørg for, at der er adgang til elstikket
efter installationen.
Vending af luge
Lugen kan vendes for at gøre det nemmere at
fylde eller tømme tørretumbleren. Lugen må kun
vendes af en autoriseret servicemontør. Kontakt
Electrolux Service A/S. Montøren vender lugen
på kundens regning.
Specielt tilbehør
Sammenbygningssæt
Hos forhandleren fås
som ekstraudstyr et
specielt sammenbygningssæt med en dybde mellem 48 og 60
cm, som gør det muligt
at montere tørretumbleren oven på en frontbetjent vaskemaskine.
Læs omhyggeligt de anvisninger, der følger med
sættet.
Miljø
Genbrug materialer med symbolet . Anbring
emballagematerialet i passende beholdere til
genbrug.
Hjælp med at beskytte miljøet og menneskelig
sundhed samt at genbruge affald af elektriske
og elektroniske apparater. Kasser ikke
apparater, der er mærket med symbolet
sammen med husholdningsaffaldet. Lever
produktet tilbage til din lokale genbrugsplads
eller kontakt din kommune.
Emballagemateriale
Emballagematerialet er miljøvenligt og kan genanvendes. Plastdelene er forsynet med mærkning, f.eks. >PE<, >PS< osv. Aflever emballa-
38
,
gens dele i den rigtige container på kommunens
genbrugsstation.
Advarsel Inden en kasseret maskine
bortskaffes, skal netledningen fjernes (inkl.
stik) og afleveres sammen med maskinen Fjern
lugens lukkemekanisme, og kontroller, at
maskinen ikke mere kan låses, så børn ikke kan
komme til at smække sig inde i den
Miljøtips
• Tøjet bliver luftigt og blødt i tørretumbleren.
Derfor er der ikke behov for skyllemidler ved
vask.
• Sådan bruges tumbleren så økonomisk som
muligt:
www.zanussi.com
Page 39

– Sørg for, at der altid er fri lufttilførsel til ven-
tilationsspalterne i maskinens sokkel;
– Ilæg de tøjmængder, der er angivet under
programoversigten;
– Rens filteret efter hvert tørreprogram;
Service
– Centrifugér tøjet godt inden tørring. Ek-
sempel: Forbrugsoplysninger – afhængigt
af centrifugeringshastighed – for 6 kg vasketøj, tørret med Bomuld Skabstørt -programmet.
I tilfælde af teknisk fejl: Undersøg først, om du
selv kan løse problemet med hjælp fra brugsan-
Det er en god idé at skrive oplysningerne her, så
de er lige ved hånden,
visningen (afsnittet "Når der opstår fejl").
Hvis det er umuligt at afhjælpe problemet selv:
Kontakt Electrolux Service A/S.
For at kunne give hurtig hjælp skal vi bruge følgende oplysninger:
– Modelbeskrivelse
– Produktnummer (PNC)
– Serienummer (S No.) (tallene står på typepladen)
– Fejlens art
hvis der bliver brug for dem:
– Eventuelle fejlmeddelelser, der bliver vist på
maskinen
Modelbeskrivelse: .................................................................................
PNC: .................................................................................
S No.: .................................................................................
www.zanussi.com
39
Page 40

www.zanussi.com/shop
136926930-A-122013
 Loading...