

Zanussi ZDF18001XA, ZDF18001WA User Manual

NL
Gebruiksaanwijzing 2
EN
User manual 14
FR
Notice d'utilisation 26
DE
Benutzerinformation 39
ES
Manual de instrucciones 52
TR
Kullanma Kılavuzu 64
Afwasautomaat
Dishwasher
Lave-vaisselle
Geschirrspüler
Lavavajillas
Bulaşık Makinesi
ZDF18001WA
ZDF18001XA
Inhoud
Veiligheidsvoorschriften _ _ _ _ _ _ _ _ _ _ _ 2
Bedieningspaneel _ _ _ _ _ _ _ _ _ _ _ _ _ _ 4
Programma’s _ _ _ _ _ _ _ _ _ _ _ _ _ _ _ _ _ 4
Opties _ _ _ _ _ _ _ _ _ _ _ _ _ _ _ _ _ _ _ _ 5
Voor het eerste gebruik _ _ _ _ _ _ _ _ _ _ _ 6
Dagelijks gebruik _ _ _ _ _ _ _ _ _ _ _ _ _ _ 7
Aanwijzingen en tips _ _ _ _ _ _ _ _ _ _ _ _ _ 9
Onderhoud en reiniging _ _ _ _ _ _ _ _ _ _ 10
Probleemoplossing _ _ _ _ _ _ _ _ _ _ _ _ 11
Technische informatie _ _ _ _ _ _ _ _ _ _ _ 12
Milieubescherming _ _ _ _ _ _ _ _ _ _ _ _ _ 13
Wijzigingen voorbehouden.
Veiligheidsvoorschriften
Lees zorgvuldig de meegeleverde instructies
voor installatie en gebruik van het apparaat. De
fabrikant is niet verantwoordelijk voor letsel en
schade veroorzaakt door een foutieve installatie. Bewaar de instructies van het apparaat
voor toekomstig gebruik.
Veiligheid van kinderen en kwetsbare
mensen
Waarschuwing! Gevaar voor verstikking,
letsel of permanente invaliditeit.
• Mensen, met inbegrip van kinderen, met beperkte lichamelijke, zintuiglijke of verstandelijke vermogens of gebrek aan ervaring en
kennis, mogen dit apparaat niet bedienen.
Zij moeten onder toezicht staan of instructies krijgen over het gebruik van dit apparaat
van iemand die verantwoordelijk is voor hun
veiligheid.
• Laat kinderen niet met het apparaat spelen.
• Houd alle verpakkingsmaterialen uit de buurt
van kinderen.
• Houd alle reinigingsmiddelen uit de buurt
van kinderen.
• Houd kinderen en huisdieren uit de buurt
van het apparaat als de deur open is.
Installatie
• Verwijder alle verpakkingsmaterialen.
• Installeer en gebruik geen beschadigd apparaat.
• Installeer of gebruik het apparaat niet op
een plek waar de temperatuur onder de 0
°C komt.
• Volg de installatie-instructies op die zijn
meegeleverd met het apparaat.
Aansluiting op het elektriciteitsnet
Waarschuwing! Gevaar voor brand en
elektrische schokken.
• Dit apparaat moet worden geaard.
• Controleer of de elektrische informatie op
het typeplaatje overeenkomt met de stroomvoorziening. Zo niet, neem dan contact op
met een elektromonteur.
• Gebruik altijd een correct geïnstalleerd,
schokbestendig stopcontact.
• Gebruik geen meerwegstekkers en verlengsnoeren.
• Zorg dat u de hoofdstekker en kabel niet
beschadigt. Indien de voedingskabel moet
worden vervangen, dan MOET dit gebeuren
door onze Klantenservice.
• Steek de stekker pas in het stopcontact als
de installatie is voltooid. Zorg ervoor dat het
netsnoer na installatie bereikbaar is.
• Trek niet aan het aansluitnoer om het apparaat los te koppelen. Trek altijd aan de stekker.
• Raak de stroomkabel of stekker niet aan met
natte handen.
• Dit apparaat voldoet aan de EU-richtlijnen.
Aansluiting aan de waterleiding
• Zorg dat u de waterslangen niet beschadigt.
• Laat het water stromen tot het schoon is
voordat u het apparaat aansluit op nieuwe
2
www.zanussi.com
leidingen of leidingen die lang niet zijn gebruikt.
• Zorg dat er geen lekkages zijn als u het apparaat de eerste keer gebruikt.
•
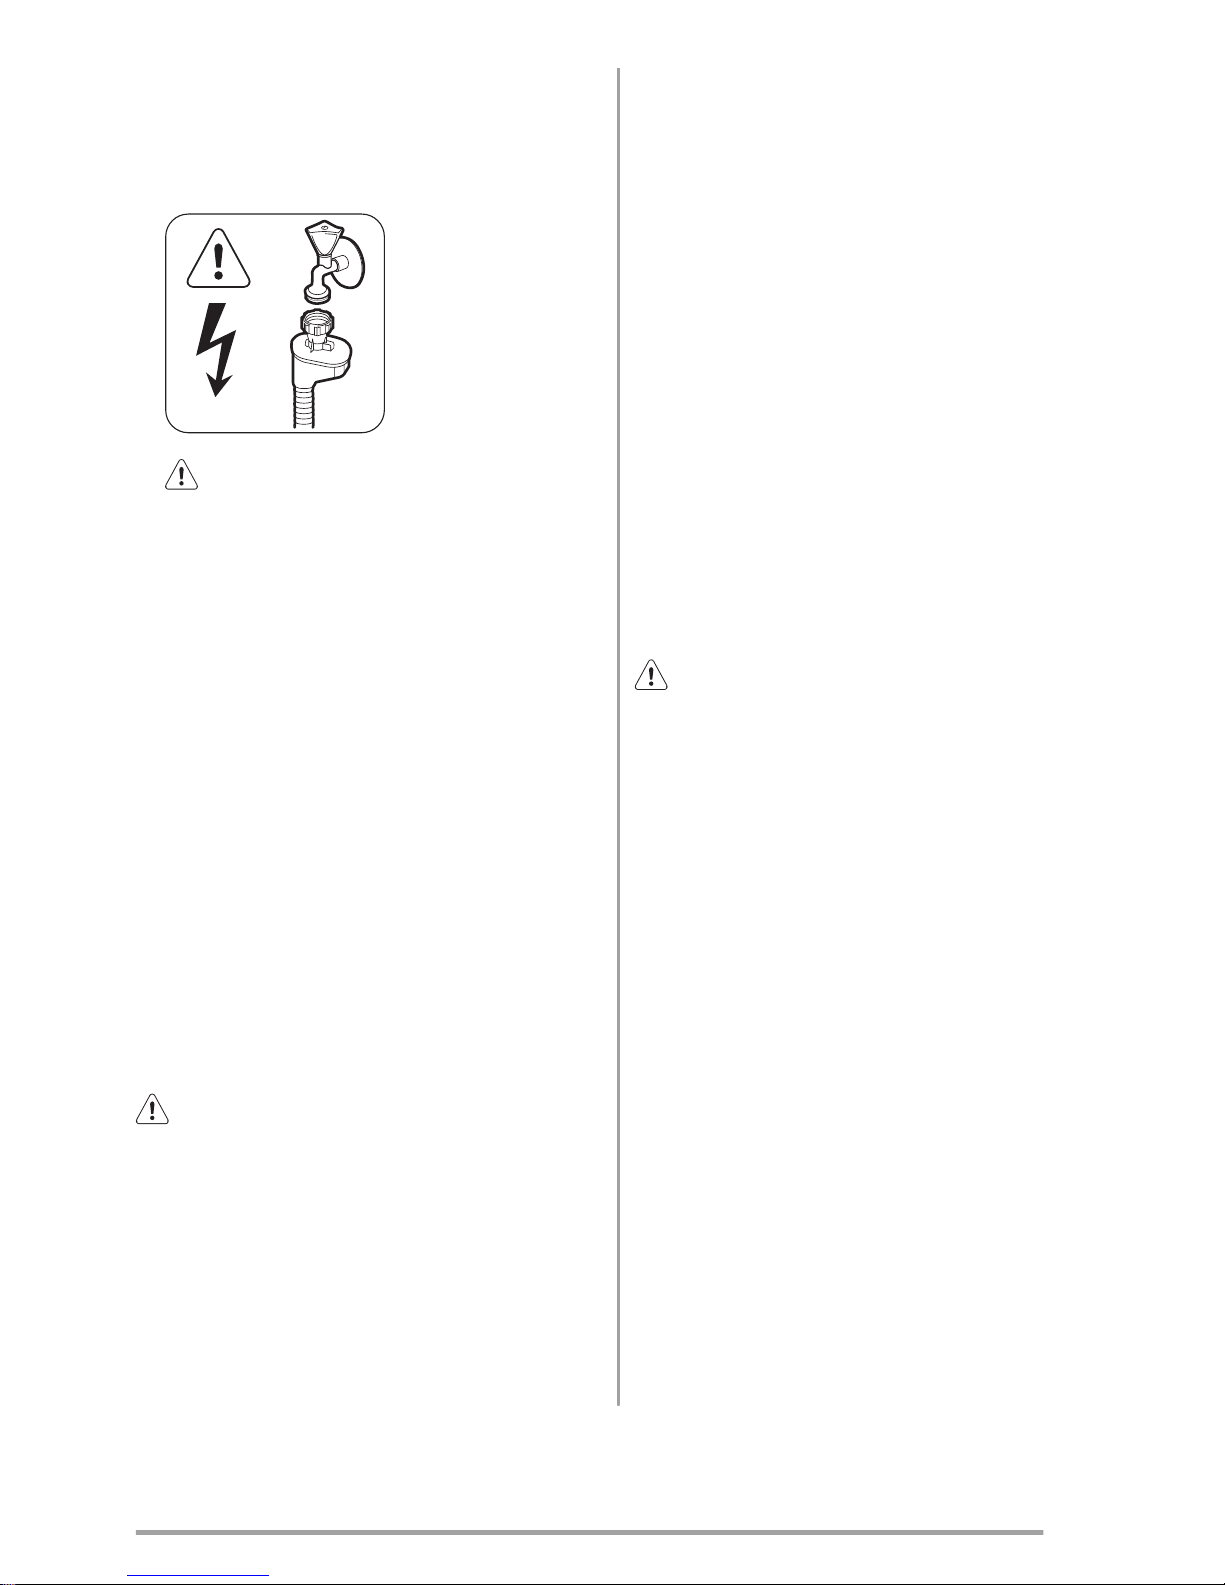
Waarschuwing! Gevaarlijke spanning.
De watertoevoerslang heeft een veiligheidsventiel en een omhulsel met een hoofdkabel
aan de binnenkant.
• Als de watertoevoerslang beschadigd is,
haal dan onmiddellijk de stekker uit het
stopcontact. Neem contact op met de service-afdeling om de watertoevoerslang te vervangen.
Gebruik van het apparaat
• Dit apparaat is bedoeld voor huishoudelijk
gebruik of gelijksoortige toepassingen zoals:
– Personeelskeukens in winkels, kantoren
of andere werkomgevingen
– Boerderijen
– Door gasten in hotels, motels en andere
woonomgevingen
– Bed-and-breakfast-accommodatie.
Waarschuwing! Gevaar op letsel,
brandwonden of elektrische schokken.
• De specificatie van het apparaat mag niet
worden veranderd.
• Doe messen en bestek met scherpe punten
in het bestekmandje met de punten omlaag
in horizontale positie.
• Laat de deur van het apparaat niet open
staan zonder toezicht om te voorkomen dat
er iemand over struikelt.
• Ga niet op de open deur zitten of staan.
• Vaatwasmiddel is gevaarlijk. Volg de veiligheidsinstructies op de verpakking van het
vaatwasmiddel op.
• Speel niet met het water van het apparaat
en drink het niet op.
• Verwijder de borden pas uit het apparaat als
het programma is voltooid. Er kan vaatwasmiddel op de borden zitten.
• Het apparaat kan hete stoom laten ontsnappen als u de deur opent terwijl er een programma wordt uitgevoerd.
• Plaats geen ontvlambare producten of items
die vochtig zijn door ontvlambare producten
in, bij of op het apparaat.
• Gebruik geen waterstralen of stoom om het
apparaat te reinigen.
Verwijdering
Waarschuwing! Gevaar voor letsel of
verstikking.
• Haal de stekker uit het stopcontact.
• Snijd het netsnoer van het apparaat af en
gooi dit weg.
• Verwijder de deurgreep om te voorkomen
dat kinderen en huisdieren opgesloten raken
in het apparaat.
Servicedienst
• Contact opnemen met de klantenservice
voor reparatie van het apparaat. Wij raden
uitsluitend het gebruik van originele onderdelen aan.
• Zorg er als u contact opneemt met de klantenservice voor dat u de volgende informatie
heeft van het typeplaatje.
Model:
Productnummer:
Serienummer:
3
www.zanussi.com

Bedieningspaneel
2
1
3
45
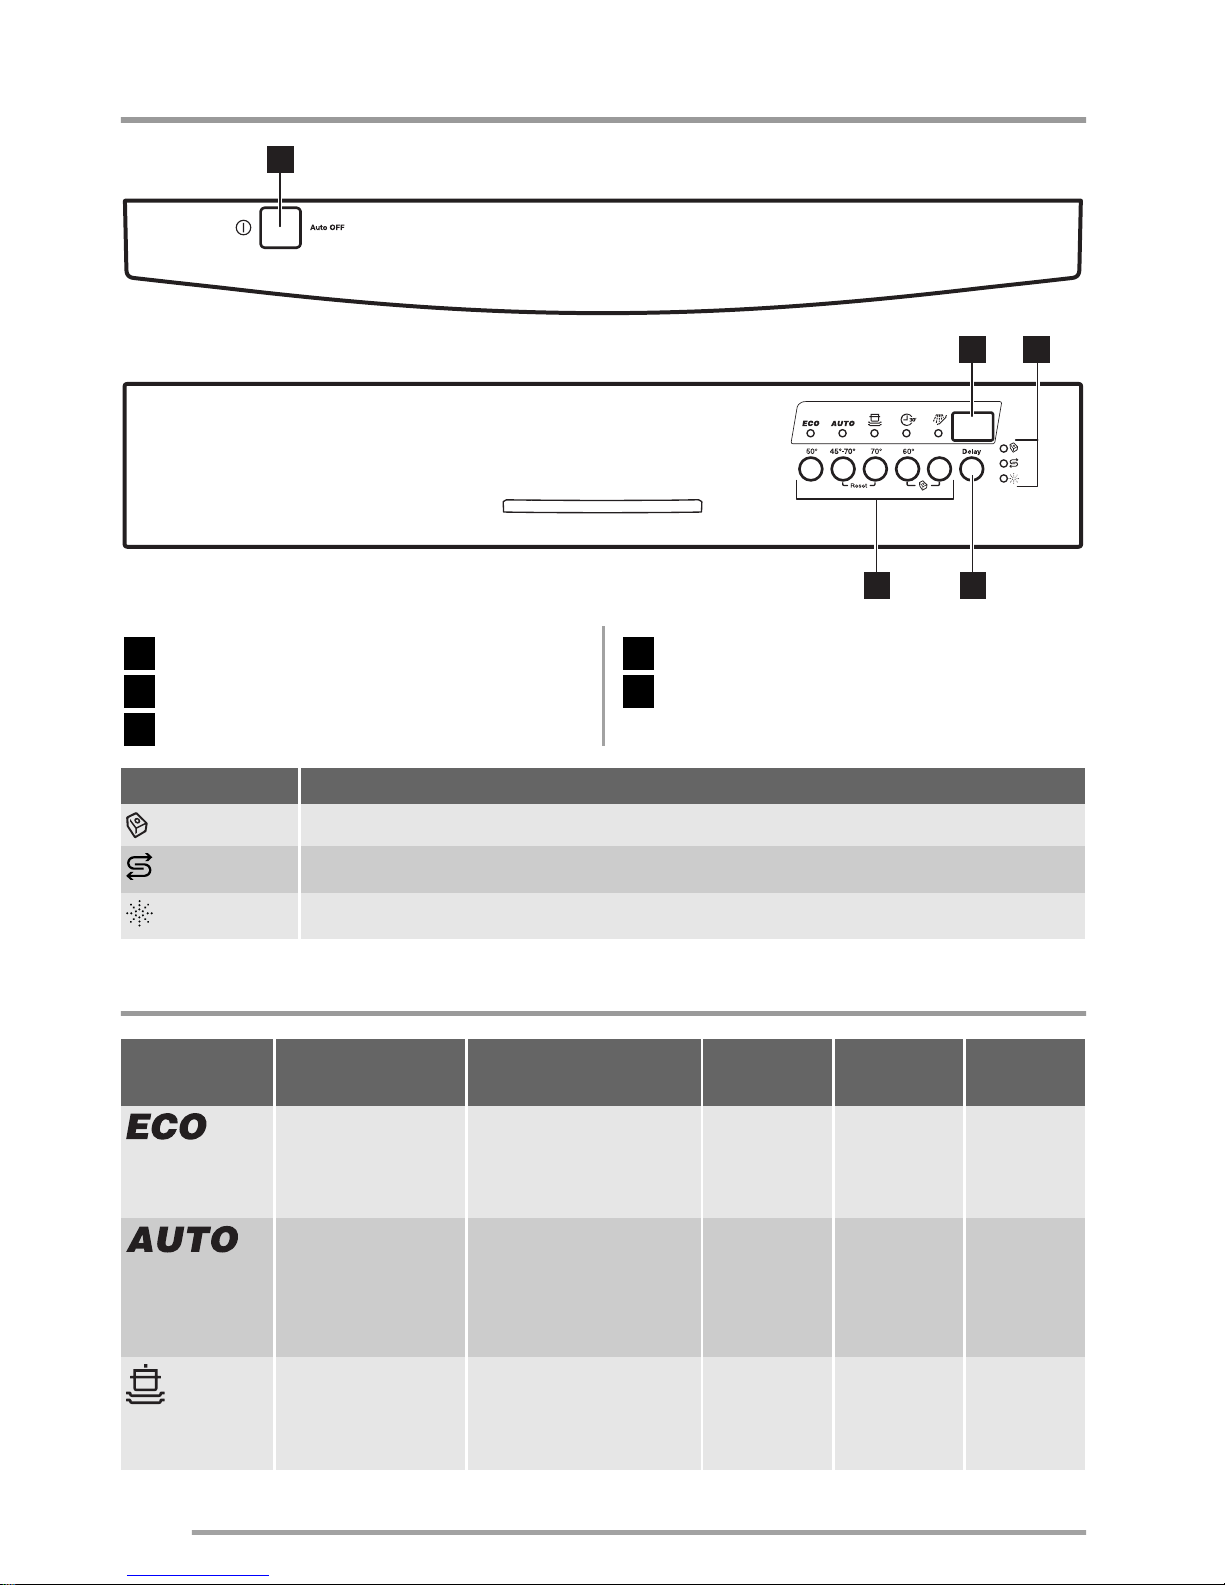
1
Aan/uit-toets
2
Weergave
3
Indicatielampjes
4
Delay-toets
5
Programmakeuzetoetsen
Indicatielamp-
jes
Omschrijving
Multitab-indicatielampje.
Zoutindicatielampje. Dit indicatielampje is uit als het programma werkt.
Glansmiddelindicatielampje. Dit indicatielampje is uit als het programma werkt.
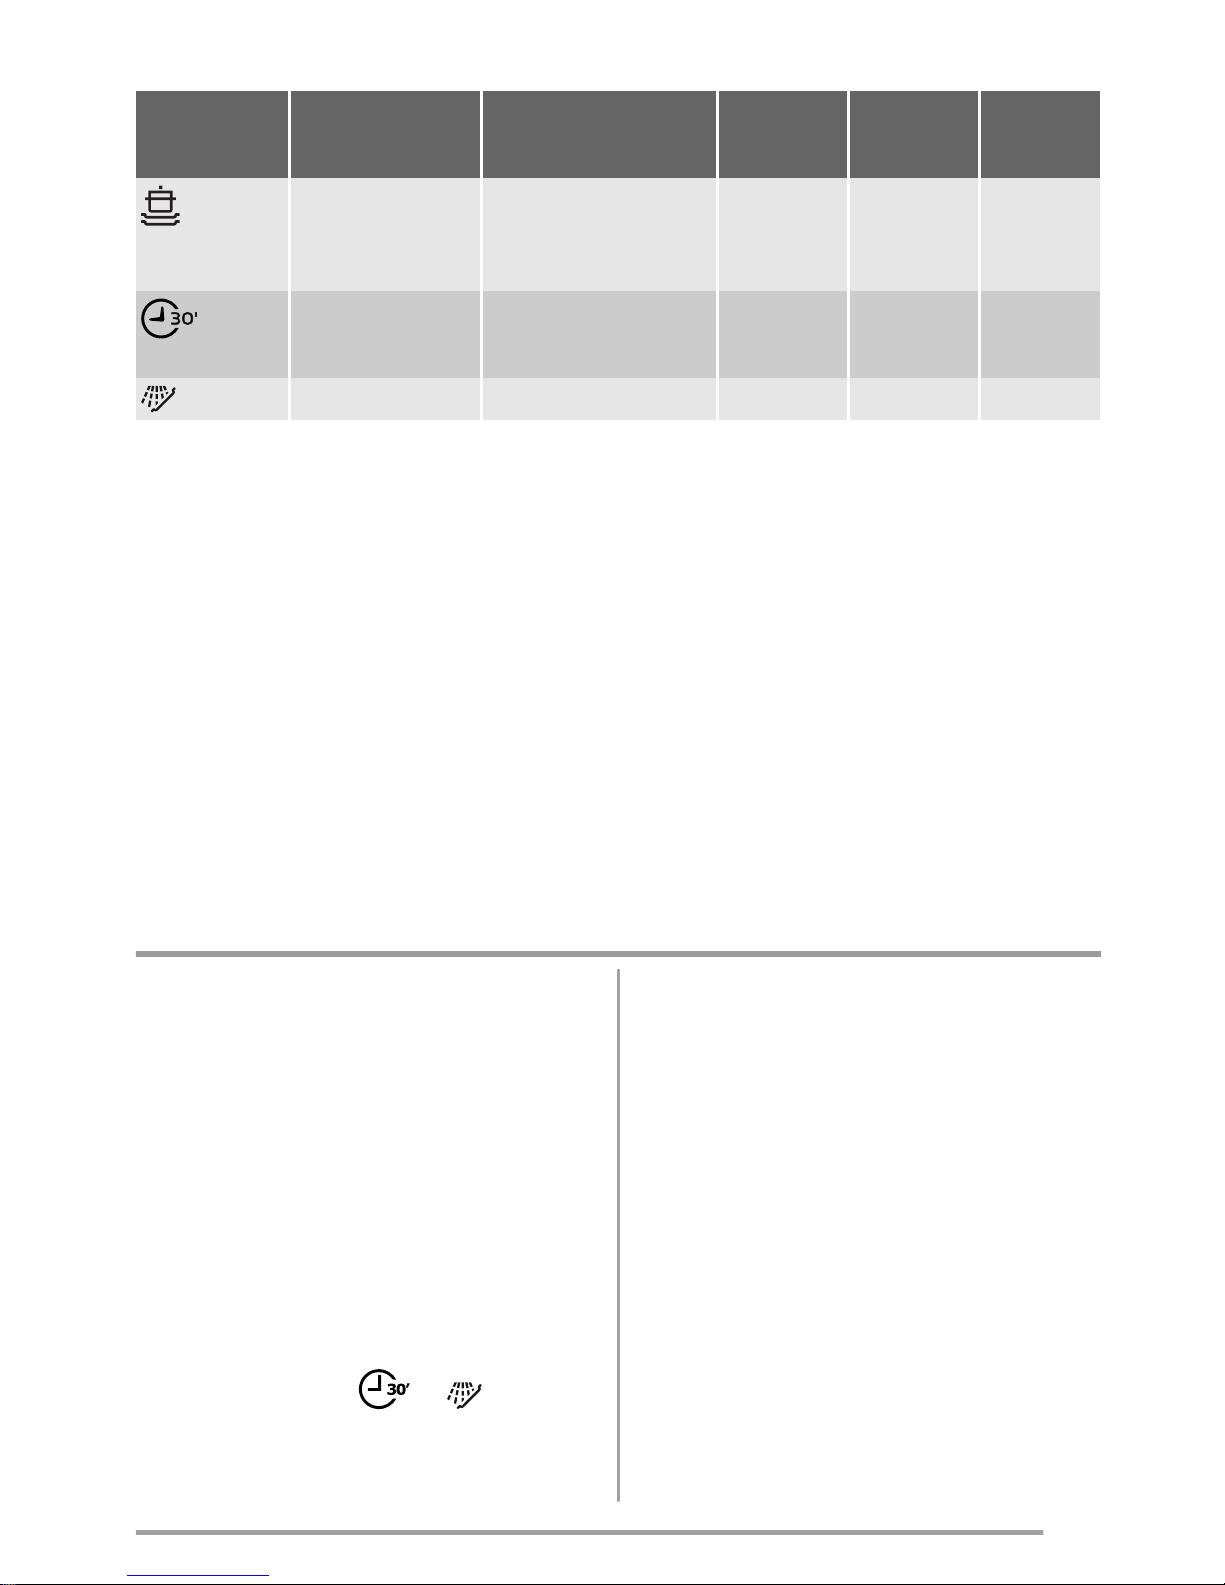
Programma’s
Programma
1)
Mate van vervui-
ling
Type lading
Programma
fasen
Berei-
dingsduur
(min)
Energie
(kWh)
Water
(l)
2)
Normaal bevuild
Serviesgoed en
bestek
Voorspoelen
Afwassen 50 °C
Spoelgangen
Drogen
195 0.91 9.9
3)
Alles
Serviesgoed, bestek en pannen
Voorspoelen
Wassen van 45 °C tot
70 °C
Spoelgangen
Drogen
40 - 150 0.6 - 1.4 8 - 14
4
www.zanussi.com
Programma
1)
Mate van vervui-
ling
Type lading
Programma
fasen
Berei-
dingsduur
(min)
Energie
(kWh)
Water
(l)
Sterk bevuild
Serviesgoed, bestek en pannen
Voorspoelen
Afwassen 70 °C
Spoelgangen
Drogen
130 - 150 1.3 - 1.4 13 - 15
4)
Pas bevuild
Serviesgoed en
bestek
Afwassen 60 °C
Spoeling
30 0.8 9
5)
Alles Voorspoelen 14 0.1 4
1) De druk en temperatuur van het water, de variaties in stroomtoevoer, de opties en de hoeveelheid vaat kan
de verbruikswaarden veranderen.
2) Dit programma biedt het meest efficiënte water- en energieverbruik voor normaal bevuild serviesgoed en
bestek. (Dit is het standaard programma voor testinstituten.)
3) Het apparaat detecteert de mate van vervuiling en de hoeveelheid serviesgoed in de korven. De
temperatuur en hoeveelheid water, het energieverbruik en de programmaduur worden automatisch
aangepast.
4) Met dit programma kunt u een pas bevuilde lading afwassen. Het biedt goede afwasresultaten in een kort
tijdsbestek.
5) Gebruik dit programma om het serviesgoed snel te spoelen. Hierdoor kunnen voedselresten niet aan het
serviesgoed vastkoeken en ontstaan er geen vieze geurtjes in het apparaat.
U hoeft voor dit programma geen afwasmiddel te gebruiken.
Aanwijzingen voor testinstituten
Stuur voor alle benodigde informatie over testprestaties een e-mail naar:
info.test@dishwasher-production.com
Schrijf het productnummer (PNC) op dat u op het typeplaatje vindt.
Opties
Multitab
Activeer deze optie alleen als u alles-in-1-tabletten gebruikt.
Deze optie stopt de stroom van glansmiddel
en zout. De bijbehorende indicatielampje gaan
uit.
De programmaduur kan toenemen.
1. Druk op de aan-/uittoets om het apparaat
te activeren.
2. Zorg ervoor dat het apparaat in de instelmodus staat, zie ‘Een programma instellen
en starten'.
3.
Houd tegelijkertijd
en ingedrukt
tot het multitab-indicatielampje gaat branden.
Voer deze stappen uit als u stopt met het
gebruik van gecombineerde
afwastabletten en voordat u begint met
het gebruik van afzonderlijk
afwasmiddel, glansmiddel en
regenereerzout:
1. Stel de waterontharder in op het hoogste
niveau.
2. Zorg ervoor dat het zoutreservoir en het
glansmiddeldoseerbakje gevuld zijn.
3. Start het kortste programma met een
spoelfase, zonder afwasmiddel en zonder
vaat.
4. Stel de waterontharder af op de waterhardheid in uw omgeving.
5. Stel de hoeveelheid glansmiddel in.
5
www.zanussi.com
Deze optie is niet van toepassing op .
Voor het eerste gebruik
1. Controleer of het ingestelde niveau van de
waterontharder juist is voor de waterhardheid in uw omgeving. Als dat niet het geval
is, stelt u de waterontharder in. Neem contact op met uw plaatselijke waterinstantie
voor informatie over de hardheid van het
water in uw omgeving.
2. Vul het zoutreservoir.
3. Vul het glansmiddeldoseerbakje.
4. Draai de waterkraan open.
5. Er kunnen afwasmiddelen in het apparaat
achtergebleven zijn. Start een programma
om dit te verwijderen. Gebruik geen afwasmiddel en gebruik de mandjes niet.
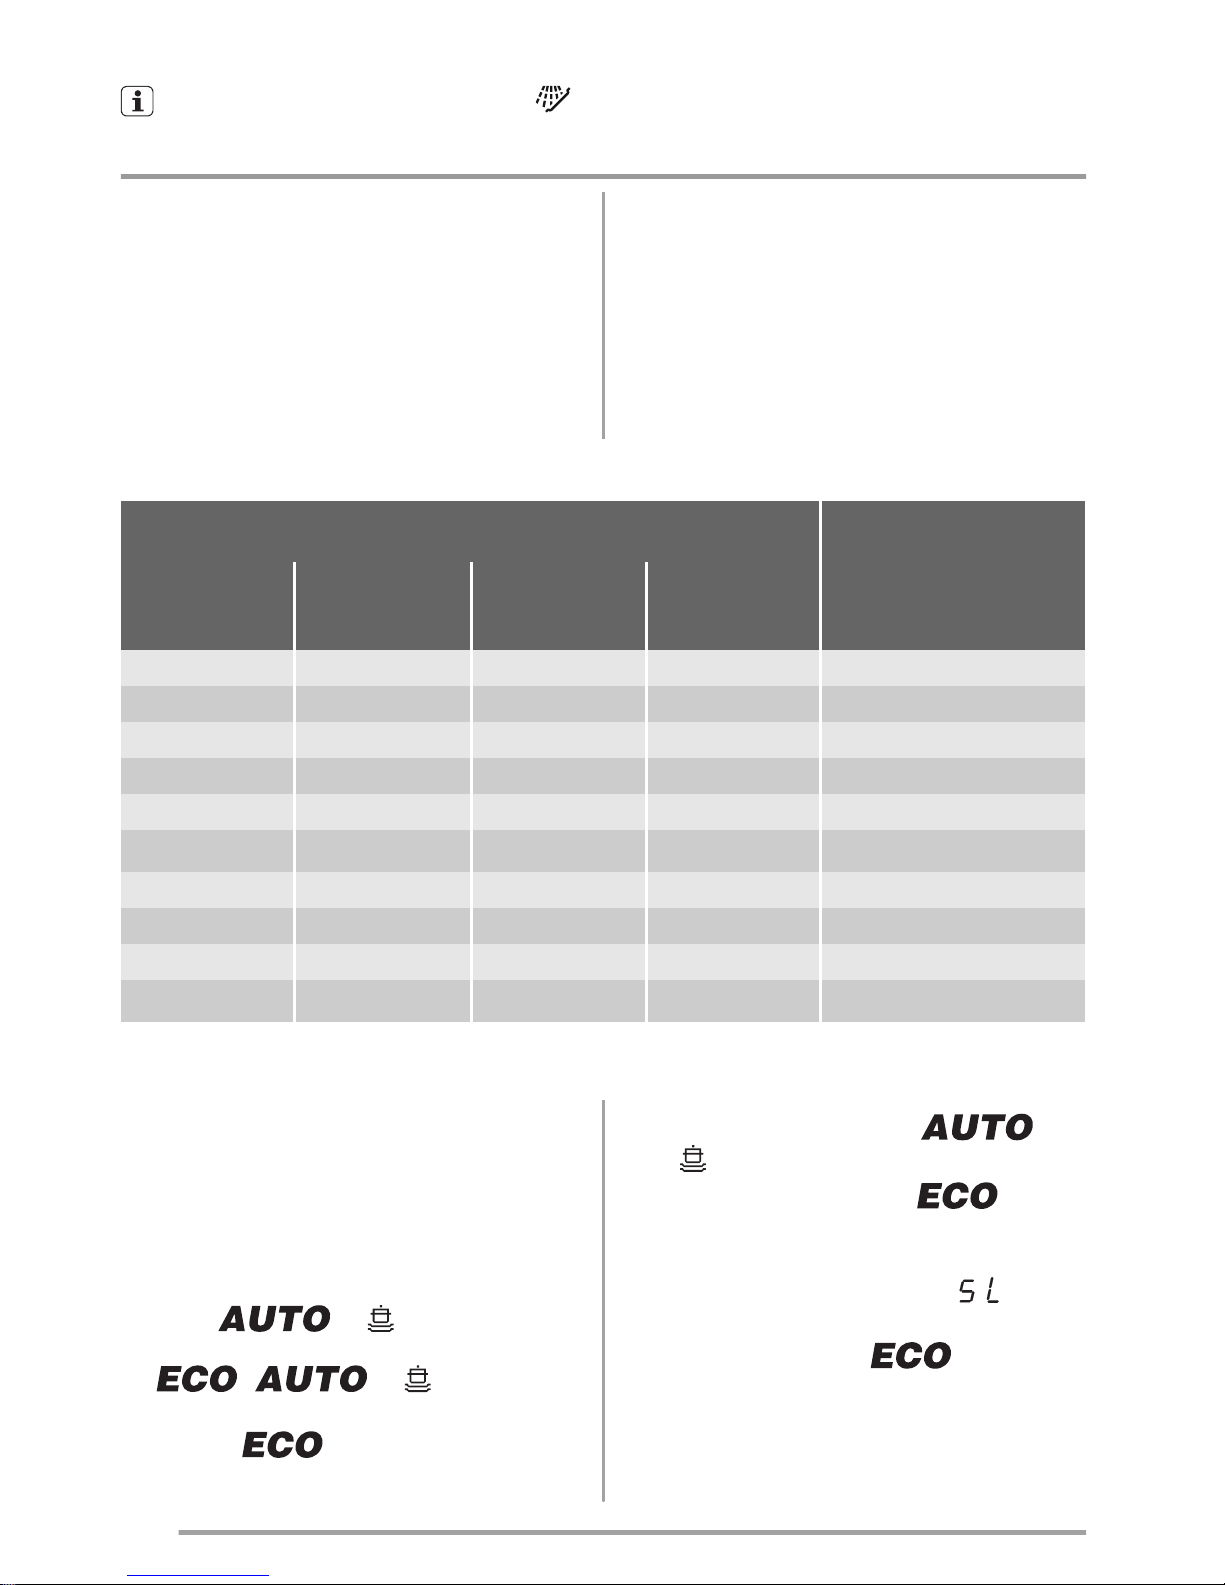
De waterontharder instellen
Waterhardheid
Waterontharder
afstelling
Duitse
graden
(°dH)
Franse
graden
(°fH)
mmol/l Clarke-
graden
Niveau
47 - 50 84 - 90 8.4. - 9.0 58 - 63 10
43 - 46 76 - 83 7.6 - 8.3 53 - 57 9
37 - 42 65 - 75 6.5 - 7.5 46 - 52 8
29 - 36 51 - 64 5.1 - 6.4 36 - 45 7
23 - 28 40 - 50 4.0 - 5.0 28 - 35 6
19 - 22 33 - 39 3.3 - 3.9 23 - 27
5
1)
15 - 18 26 - 32 2.6 - 3.2 18 - 22 4
11 - 14 19 - 25 1.9 - 2.5 13 - 17 3
4 - 10 7 - 18 0.7 - 1.8 5 - 12 2
< 4 < 7 < 0.7 < 5
1
2)
1) Fabrieksinstelling
2) Gebruik geen zout op dit niveau.
Het instellen van het niveau van de
waterontharder
1. Druk op de aan-/uittoets om het apparaat
te activeren. Zorg dat het apparaat in de
instelmodus staat. Zie 'Een programma instellen en starten'.
2.
Houd
en tegelijkertijd inge-
drukt totdat de indicatielampjes van
, en beginnen te
knipperen.
3.
Druk op
.
•
De indicatielampjes van
en
gaan uit.
•
Het indicatielampje van
blijft
knipperen.
• Het display toont de huidige instelling
van de waterontharder, bijv.
= ni-
veau 5.
4.
Druk herhaaldelijk op
om de instelling te wijzigen. Telkens als u op toets
drukt, gaat de instelling naar het volgende
niveau.
6
www.zanussi.com
5. Schakel het apparaat uit om de instelling te
bevestigen.
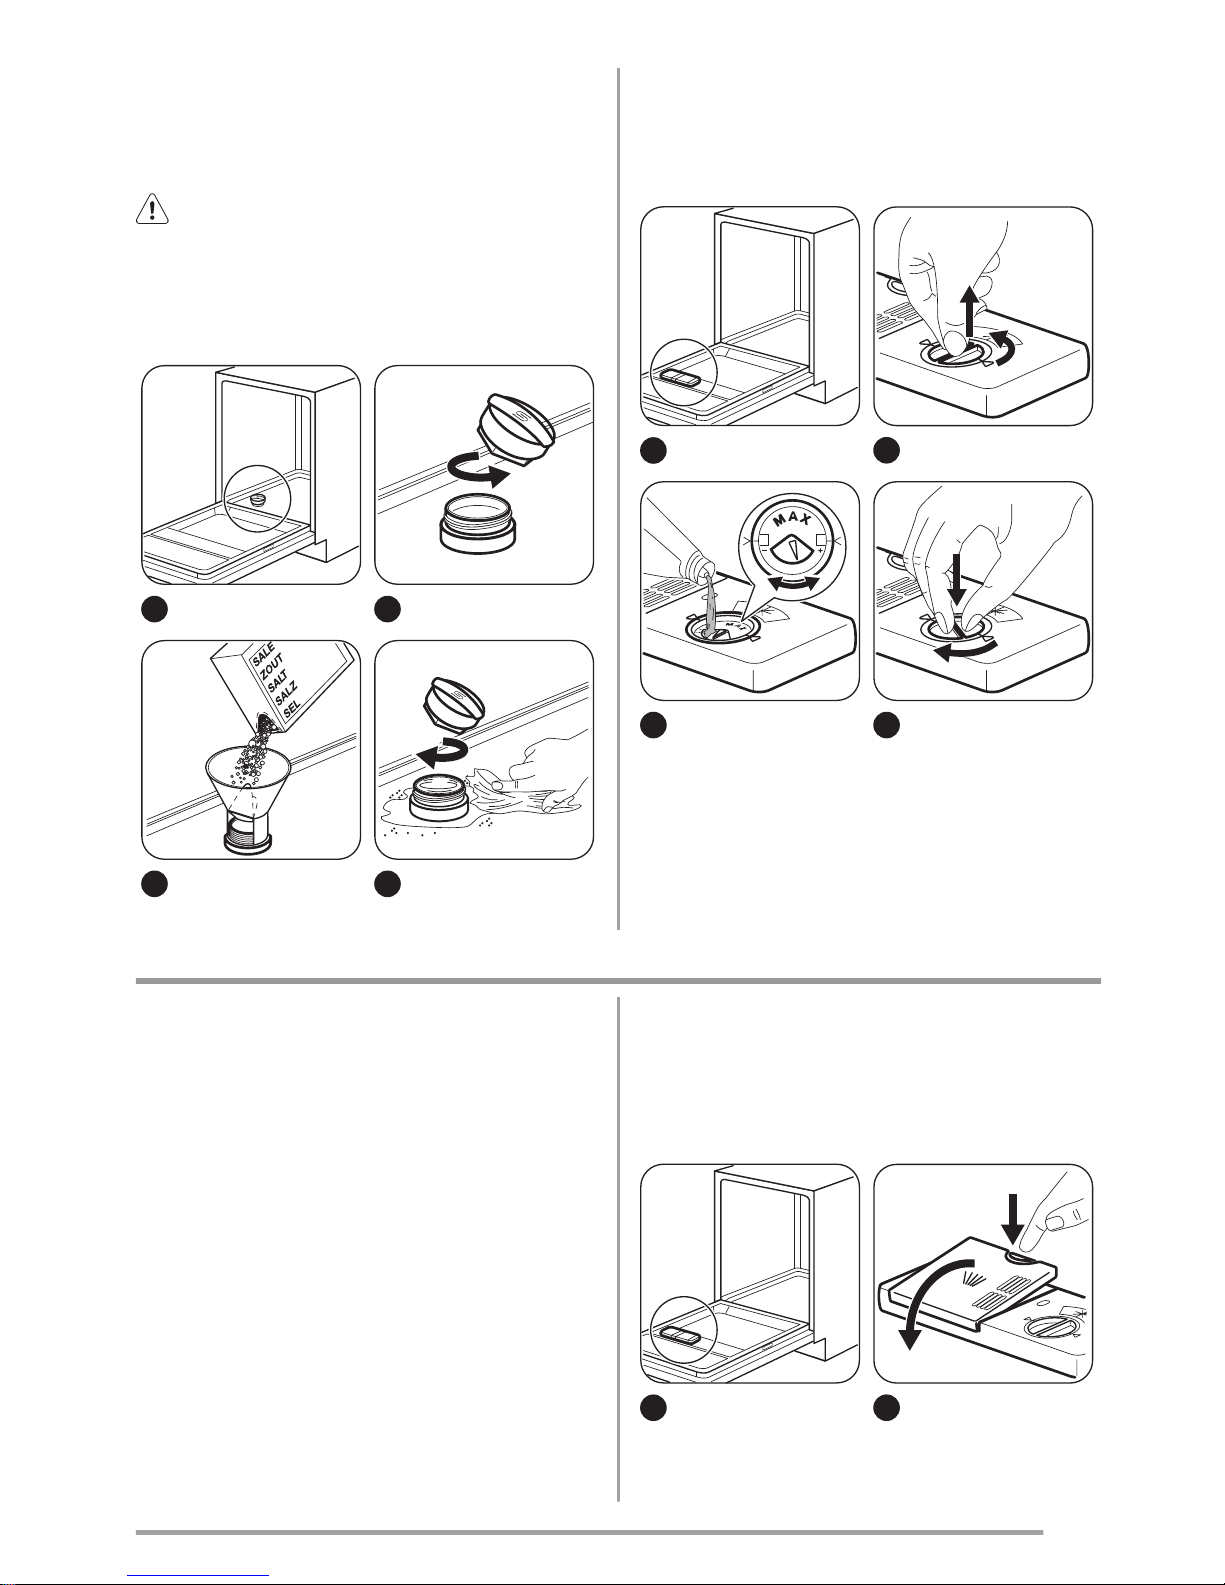
Het zoutreservoir vullen
Let op! Water en zout kunnen uit het
zoutreservoir stromen als u het bijvult.
Gevaar voor roest. Start om dit te voorkomen
een programma nadat u het zoutreservoir heeft
bijgevuld.
1
2
3
4
Doe 1 liter water in het zoutreservoir (alleen de
eerste keer).
Het glansmiddeldoseerbakje vullen
1
2
1
2
1
2
3
4
3
2
1
4
U kunt het schuifje voor de vrij te geven hoeveelheid instellen tussen stand 1 (laagste hoeveelheid) en stand 4 (hoogste hoeveelheid).
Dagelijks gebruik
1. Draai de waterkraan open.
2. Druk op de aan-/uittoets om het apparaat
te activeren. Zorg dat het apparaat in de
instelmodus staat. Zie 'Een programma instellen en starten'.
• Vul het zoutreservoir als het zoutindicatielampje brandt.
• Vul het glansmiddeldoseerbakje als het
indicatielampje van het glansmiddel
brandt.
3. Ruim de korven in.
4. Voeg vaatwasmiddel toe.
• Activeer de Multitabfunctie als u gecombineerde afwastabletten gebruikt.
5. U dient het juiste programma in te stellen
en te starten voor het type lading en de
mate van vervuiling.
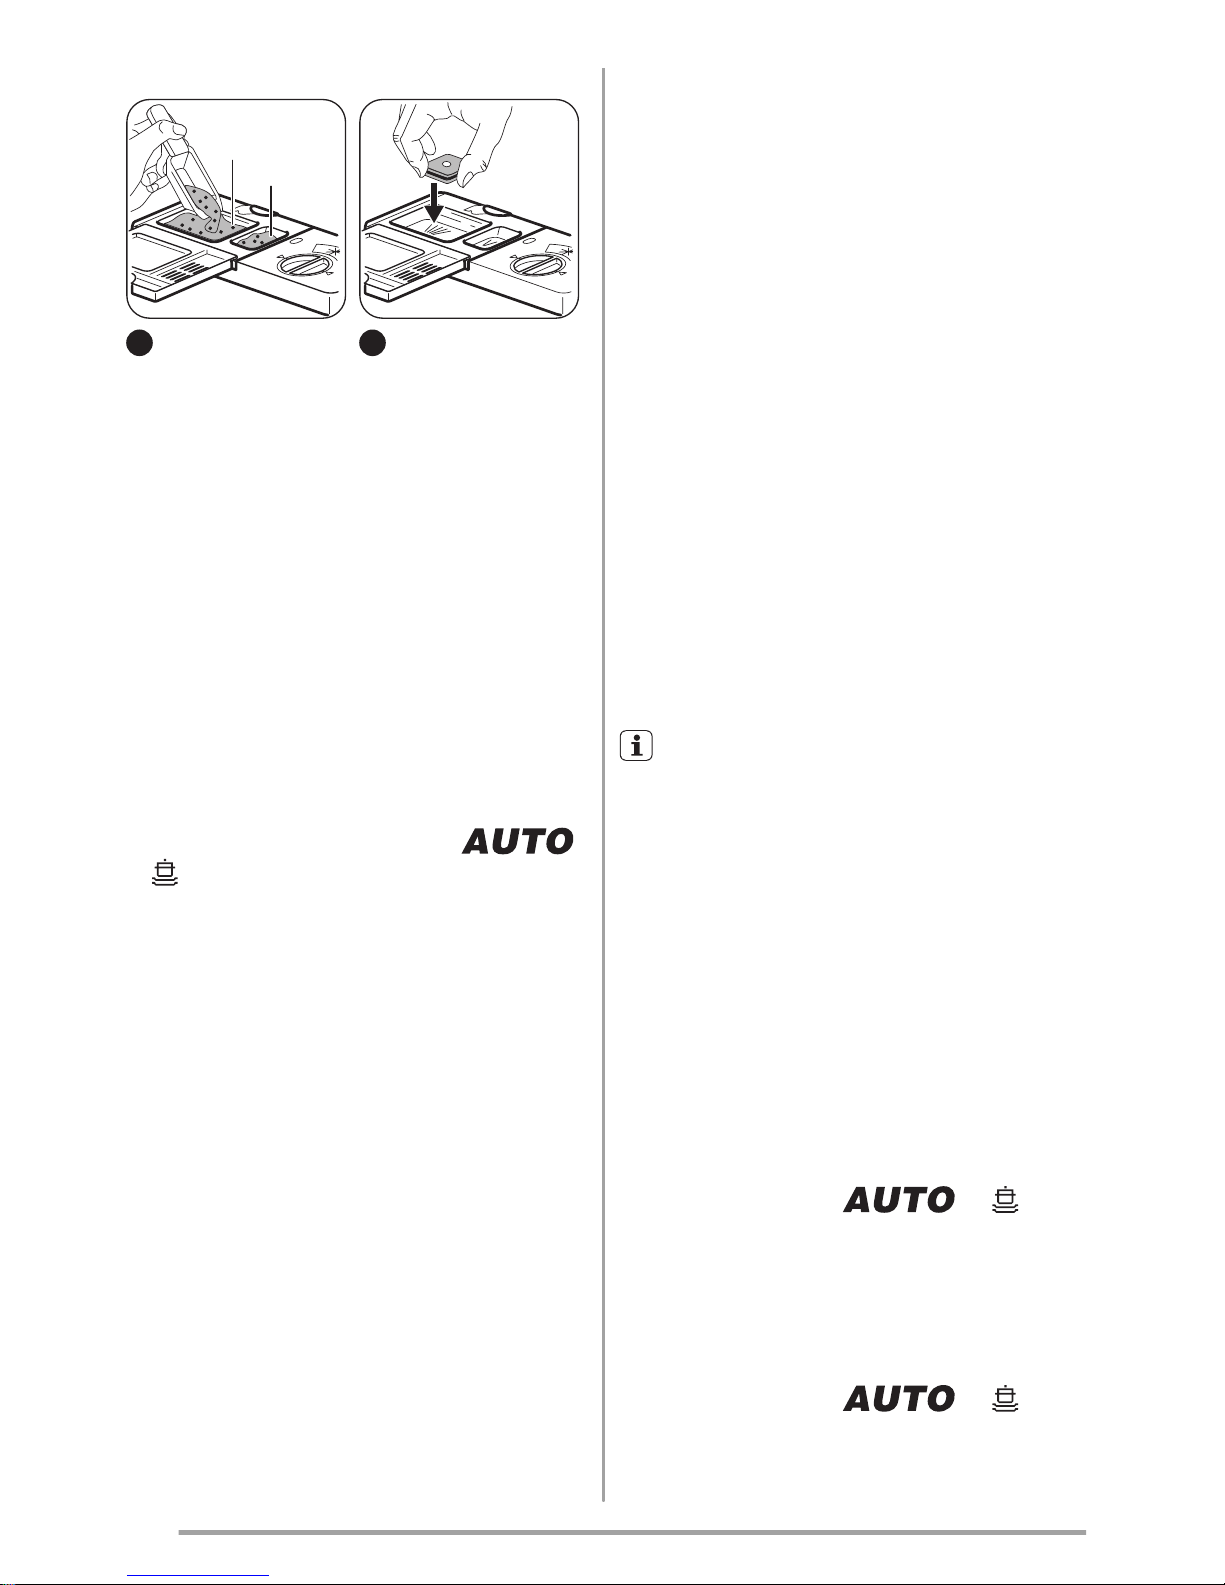
Vaatwasmiddel gebruiken
1
2
1
2
7
www.zanussi.com
2
0
3
0
A
B
3
2
0
3
0
4
Doe de vaatwastablet in het doseerbakje (A)
Als het programma over een voorspoelfase
beschikt, plaats dan een kleine dosis afwasmiddel in doseerbakje (B).
Een programma instellen en starten
Instelmodus
Bij sommige instellingen moet het apparaat in
de instelmodus worden gezet.
Druk op de aan-/uittoets om het apparaat te
activeren. Het apparaat staat in de instelmodus als alle programmalampjes gaan branden
en het display 2 horizontale statusbalkjes
weergeeft.
Als dit niet op het bedieningspaneel wordt
aangegeven, houdt u tegelijkertijd
en ingedrukt totdat het apparaat in de in-
stelmodus staat.
Een programma starten zonder een
uitgestelde start
1. Draai de waterkraan open.
2. Druk op de aan-/uittoets om het apparaat
te activeren. Zorg dat het apparaat in de
instelmodus staat.
3. Druk op de toets van het programma dat u
wilt instellen.
• Het bijbehorende programmalampje
knippert terwijl alle andere programmalampjes uit gaan.
• Het display geeft de programmaduur
weer.
4. Sluit de deur van de afwasmachine, het
programma start.
• Het bijbehorende programma-indicatie-
lampje gaat branden.
• De programmaduur neemt af in stappen
van 1 minuut
Een programma starten met een
uitgestelde start
1. Stel het programma in.
2. Blijf op de toets uitgestelde start drukken
tot het display de uitgestelde tijd toont die
u wilt instellen (van 1 tot 24 uur).
• De uitgestelde tijd gaat aan op het dis-
play.
• Het bijbehorende indicatielampje knip-
pert.
3. Sluit de deur van het apparaat, het aftellen
start.
• Het aftellen vindt plaats in stappen van 1
uur.
• Het bijbehorende indicatielampje gaat
branden.
Als het aftelproces voltooid is, wordt het programma gestart.
U kunt ook een programma, opties en de
uitgestelde start instellen met de deur gesloten. U heeft nu maar 3 seconden na elke instelling voordat het apparaat automatisch gaat
werken.
De deur openen als het apparaat in
werking is
Als u de deur opent, stopt het apparaat. Als u
de deur weer sluit, gaat het apparaat verder
vanaf het punt van onderbreking.
De uitgestelde start annuleren tijdens
het aftellen
Als de startuitstel wordt geannuleerd, wordt
ook het programma geannuleerd.
1.
Houd tegelijkertijd
en ingedrukt totdat alle programma-indicatielampjes gaan branden en er 2 horizontale statusstreepjes op het display worden weergegeven.
Het programma annuleren
1.
Houd tegelijkertijd
en ingedrukt totdat alle programma-indicatielampjes gaan branden en er 2 horizontale sta-
8
www.zanussi.com

tusstreepjes op het display worden weergegeven.
Controleer of er afwasmiddel in het afwasmiddeldoseerbakje aanwezig is voor-
dat u een nieuw programma start.
Aan het einde van het programma.
• Op het display verschijnt 0:00.
1. Druk op de aan/uit-toets om het apparaat
te deactiveren.
2. Draai de waterkraan dicht.
Als u niet op de aan/uit-toets drukt, schakelt de functie Auto Off het apparaat een
paar minuten na het einde van het programma
automatisch uit.
Dit helpt het energieverbruik te verminderen,
Let op
• Laat de borden afkoelen voordat u deze uit
het apparaat neemt. Hete borden zijn gevoelig voor beschadigingen.
• Ruim eerst het onderrek en dan het bovenrek uit.
• Er kan water liggen aan de zijkanten en op
de deur van het apparaat. Roestvrij staal
koelt sneller af dan borden.
Aanwijzingen en tips
De waterontharder
Hard water bevat een grote hoeveelheid mineralen die schade aan het apparaat en slechte
schoonmaakresultaten kan veroorzaken. De
waterontharder neutraliseert deze mineralen.
Het regenereerzout houdt de waterontharder
schoon en in goede staat. Het is belangrijk om
het correcte niveau voor de waterontharder in
te stellen. Dit zorgt ervoor dat de waterontharder de juiste hoeveelheid regenereerzout en
water gebruikt.
Met behulp van zout, glansmiddel en
afwasmiddel
• Gebruik alleen zout, glansmiddel en afwasmiddel voor afwasautomaten. Andere producten kunnen het apparaat beschadigen.
• Het glansmiddel helpt om tijdens de laatste
spoelfase het servies te drogen zonder strepen en vlekken.
• Gecombineerde afwastabletten bevatten
vaatwasmiddel, glansmiddel en andere middelen. Zorg ervoor dat deze tabletten geschikt zijn voor de waterhardheid in uw omgeving. Zie de instructies op de verpakking
van de producten.
• Vaatwastabletten worden bij korte programma's niet helemaal opgelost. Wij bevelen u
aan de tabletten alleen bij lange programma's te gebruiken, om restjes afwasmiddel
op uw serviesgoed te voorkomen.
Gebruik niet meer dan de juiste hoeveelheid vaatwasmiddel. Zie de instructies
van de vaatwasmiddelfabrikant.
De korven inruimen
Zie de meegeleverde folder voor voorbeelden van het inruimen van de korven.
• Gebruik het apparaat alleen om voorwerpen
af te wassen die vaatwasbestendig zijn.
• Doe geen voorwerpen in het apparaat die
gemaakt zijn van hout, hoorn, aluminium, tin
en koper.
• Plaats geen voorwerpen in het apparaat die
water kunnen absorberen (sponzen, keukenhanddoeken).
• Verwijder alle voedselresten van de voorwerpen.
• Voor het gemakkelijk verwijderen van aangebrande voedselresten weekt u de pannen
eerst in water voordat u ze in het apparaat
plaatst.
• Plaats holle voorwerpen (bijv. kopjes, glazen
en pannen) met de opening naar beneden.
• Zorg ervoor dat serviesgoed en bestek niet
in elkaar schuiven. Meng lepels met ander
bestek.
• Zorg er voor dat glazen andere glazen niet
aanraken
• Leg kleine voorwerpen in de bestekmand.
9
www.zanussi.com

• Leg lichte voorwerpen in de bovenste korf.
Zorg ervoor dat de voorwerpen niet verschuiven.
• Zorg er voor dat de sproeiarmen vrij kunnen
ronddraaien voordat u een programma start.
Voor het starten van een programma
Controleer of:
• De filters schoon zijn en correct zijn geplaatst.
• De sproeiarmen niet zijn verstopt.
• De positie van de items in de mandjes correct is.
• Het programma van toepassing is op het type lading en de mate van bevuiling.
• De juiste hoeveelheid afwasmiddel is gebruikt.
• Er regenereerzout en glansmiddel is toegevoegd (tenzij u gecombineerde afwastabletten gebruikt).
• De dop van het zoutreservoir goed dicht zit.
Onderhoud en reiniging
Waarschuwing! Schakel het apparaat
uit en trek de stekker uit het stopcontact
voordat u onderhoudshandelingen verricht.
Vuile filters en verstopte sproeiarmen ver-
minderen de wasresultaten.
Controleer regelmatig de filters en reinig deze
zo nodig.
De filters reinigen
1
C
B
A
2
3
4
5
D
6
7
8
Draai om de filters (B) en (C) te verwijderen de
hendel naar links. Haal filter (B) en (C) uit elkaar. Reinig de filters met water.
Verwijder filter (A). Reinig het filter met water.
Zorg er voordat u het filter (A) terugplaatst
voor dat er geen etensresten of vuil in en rond
de rand van de opvangbak zit.
Zorg ervoor dat het filter (A) juist wordt geplaatst onder de 2 geleiders (D).
Zet filters (B) en (C) in elkaar. Plaats ze op hun
plek in filter (A). Draai de hendel rechtsom
draaien tot het vastzit.
10
www.zanussi.com
Een onjuiste plaatsing van de filters kan
leiden tot slechte wasresultaten en het
apparaat beschadigen.
De sproeiarmen reinigen
Probeer niet de sproeiarmen te verwijderen.
Als etensresten de openingen in de sproeiarmen hebben verstopt, verwijder deze dan met
een smal en puntig voorwerp.
Buitenkant reinigen
Maak het apparaat schoon met een vochtige,
zachte doek.
Gebruik alleen neutrale schoonmaakmiddelen.
Gebruik geen schuurmiddelen, schuursponsjes of oplosmiddelen.
De binnenkant van de machine reinigen
Als u regelmatig korte programma's gebruikt
dan kunnen er vetresten en kalkaanslag achterblijven in het apparaat.
Om dit te voorkomen raden we aan minstens 2
keer per maand progamma's met een lange
duur te gebruiken.
Probleemoplossing
Het apparaat start of stopt niet tijdens de
werking.
Raadpleeg voordat u contact opneemt met de
klantenservice de informatie over het oplossen
van problemen.
Bij sommige problemen wordt er op de
display een alarmcode weergegeven:
•
- Het apparaat wordt niet gevuld met
water.
•
- Het apparaat pompt geen water weg.
•
- Het bescherminssysteem tegen wa-
terlekkage is in werking getreden.
Waarschuwing! Schakel het apparaat
uit voordat u controles uitvoert.
Storing Mogelijke oplossing
U kunt het apparaat niet inschakelen. Zorg dat de stekker in het stopcontact is gestoken.
Zorg ervoor dat er geen beschadigde zekering in de zeke-
ringkast is.
Het programma start niet. Zorg ervoor dat de deur van het apparaat dicht is.
Annuleer als de uitgestelde start is ingesteld deze instelling
of wacht tot het aftellen is afgelopen.
Het apparaat wordt niet met water gevuld. Controleer of de waterkraan is geopend.
Zorg ervoor dat de druk van het water niet te hoog is.
Neem, indien nodig, contact op met het lokale waterschap.
Controleer of de waterkraan niet verstopt is.
Zorg ervoor dat het filter in de toevoerslang niet verstopt is.
Zorg ervoor dat de toevoerslang niet is geknikt of gebogen.
Het apparaat pompt geen water weg. Controleer of de afvoer van de gootsteen niet verstopt is.
Zorg ervoor dat de afvoerslang niet is geknikt of gebogen.
Het beschermingssysteem tegen lekkage is
aan.
Draai de waterkraan dicht en neem contact op met de servi-
ce-afdeling.
Schakel het apparaat na de controles in. Het
programma gaat verder vanaf het punt waar
het werd onderbroken.
Als het probleem opnieuw optreedt, neemt u
contact op met onze service-afdeling.
11
www.zanussi.com
Als de display andere alarmcodes aangeeft,
neemt u contact op met onze service-afdeling.
Als de afwas- en droogresultaten niet
naar wens zijn
Witte strepen of een blauwe waas op
glazen en serviesgoed.
• De vrijgegeven hoeveelheid glansmiddel is
te hoog. Stel de keuzeschakelaar van het
glansmiddel in op een lagere stand.
• Er is te veel vaatwasmiddel gebruikt.
Vlekken en droog water komen op
glazen en serviesgoed terecht.
• De vrijgegeven hoeveelheid glansmiddel is
niet voldoende. Stel de keuzeschakelaar van
het glansmiddel in op een hogere stand.
• De kwaliteit van het vaatwasmiddel kan de
oorzaak zijn.
Het serviesgoed is nat.
• Het afwasprogramma bevatte geen droogfase of een droogfase op lage temperatuur.
• Het glansmiddeldoseerbakje is leeg.
• De kwaliteit van het glansmiddel kan de oorzaak zijn.
• De kwaliteit van de gecombineerde vaatwastabletten kan de oorzaak zijn. Probeer
een ander merk of activeer het glansmiddeldoseerbakje en gebruik het glansmiddel samen met de gecombineerde afwastabletten.
Zie 'AANWIJZINGEN EN TIPS' voor andere mogelijke oorzaken.
Het inschakelen van het
glansmiddeldoseerbakje
1. Druk op de aan-/uittoets om het apparaat
te activeren. Zorg dat het apparaat in de
instelmodus staat. Zie 'Een programma instellen en starten'.
2.
Houd
en tegelijkertijd inge-
drukt totdat de indicatielampjes van
, en beginnen te
knipperen.
3.
Druk op
.
•
De indicatielampjes van
en
gaan uit.
•
Het indicatielampje van
blijft
knipperen.
• Het display toont de huidige instelling.
Glansmiddeldoseerbakje uit.
Glansmiddeldoseerbakje aan.
4.
Druk op
om de instelling te wij-
zigen.
5. Druk op de aan/uit-toets om het apparaat
te deactiveren en om de instelling te bevestigen.
6. Stel de hoeveelheid glansmiddel in.
7. Vul het glansmiddeldoseerbakje.
Technische informatie
Afmeting Breedte / hoogte / diepte (mm) 600 / 850 / 625
Aansluiting op het elektriciteits-
net
Zie het typeplaatje.
Voltage 220-240 V
Tijd 50 Hz
Waterdruk Min. / max. (bar / MPa) (0.5 / 0.05 ) / (8 / 0.8 )
Watertoevoer
1)
Koud water of warm water
2)
max. 60 °C
Vermogen Couverts 12
12
www.zanussi.com

Energieverbruik Modus aan 0.99 W
Modus uit 0.10 W
1) Sluit de slang aan op een kraan met 3/4”-schroefdraad.
2) Als het hete water door alternatieve, milieuvriendelijkere energiebronnen geproduceerd wordt (bijv.
zonnepanelen en windenergie), gebruik dan een heetwatervoorziening om het energieverbruik te
verminderen.
Typeplaatje
Mod. ... ... ...
Prod. No. ... ... ...
Ser. No. ...
Milieubescherming
Recycle de materialen met het symbool .
Gooi de verpakking in een geschikte
verzamelcontainer om het te recyclen.
Help om het milieu en de volksgezondheid te
beschermen en recycle het afval van
elektrische en elektronische apparaten. Gooi
apparaten gemarkeerd met het symbool
niet
weg met het huishoudelijk afval. Breng het
product naar het milieustation bij u in de buurt
of neem contact op met de gemeente.
• Gooi het verpakkingsmateriaal op juiste wijze weg. Recycle de materialen met het sym-
bool
.
13
www.zanussi.com
Contents
Safety instructions _ _ _ _ _ _ _ _ _ _ _ _ _ 14
Control panel _ _ _ _ _ _ _ _ _ _ _ _ _ _ _ _ 16
Programmes _ _ _ _ _ _ _ _ _ _ _ _ _ _ _ _ 16
Options _ _ _ _ _ _ _ _ _ _ _ _ _ _ _ _ _ _ _ 17
Before first use _ _ _ _ _ _ _ _ _ _ _ _ _ _ _ 17
Daily use _ _ _ _ _ _ _ _ _ _ _ _ _ _ _ _ _ _ 19
Hints and tips _ _ _ _ _ _ _ _ _ _ _ _ _ _ _ 21
Care and cleaning _ _ _ _ _ _ _ _ _ _ _ _ _ 22
Troubleshooting _ _ _ _ _ _ _ _ _ _ _ _ _ _ 23
Technical information _ _ _ _ _ _ _ _ _ _ _ 24
Environment concerns _ _ _ _ _ _ _ _ _ _ _ 25
Subject to change without notice.
Safety instructions
Before the installation and use of the appliance, carefully read the supplied instructions.
The manufacturer is not responsible if an incorrect installation and use causes injuries and
damages. Always keep the instructions with
the appliance for future reference.
Children and vulnerable people safety
Warning! Risk of suffocation, injury or
permanent disability.
• Do not let persons, children included, with
reduced physical sensory, reduced mental
functions or lack of experience and knowledge use the appliance. They must have supervision or instruction for the operation of
the appliance by a person who is responsible for their safety.
• Do not let children play with the appliance.
• Keep all packaging away from children.
• Keep all detergents away from children.
• Keep children and pets away from the appliance door when it is open.
Installation
• Remove all the packaging.
• Do not install or use a damaged appliance.
• Do not install or use the appliance where
the temperature is less than 0 °C.
• Obey the installation instruction supplied
with the appliance.
Electrical connection
Warning! Risk of fire and electrical
shock.
• The appliance must be earthed.
• Make sure that the electrical information on
the rating plate agrees with the power supply. If not, contact an electrician.
• Always use a correctly installed shockproof
socket.
• Do not use multi-plug adapters and extension cables.
• Make sure not to cause damage to the
mains plug and to the mains cable. Should
the appliance power supply cable need to
be replaced, this must be carried out by our
Service Centre.
• Connect the mains plug to the mains socket
only at the end of the installation. Make sure
that there is access to the mains plug after
the installation.
• Do not pull the mains cable to disconnect
the appliance. Always pull the mains plug.
• Do not touch the mains cable or the mains
plug with wet hands.
• This appliance complies with the E.E.C. Directives.
Water connection
• Make sure not to cause damage to the water hoses.
• Before you connect the appliance to new
pipes or pipes not used for a long time, let
the water flow until it is clean.
• The first time you use the appliance, make
sure that there is no leakage.
14
www.zanussi.com
•
Warning! Dangerous voltage.
The water inlet hose has a safety valve and
a sheath with an inner mains cable.
• If the water inlet hose is damaged, immediately disconnect the mains plug from the
mains socket. Contact Service to replace
the water inlet hose.
Use
• This appliance is intended to be used in
household and similar applications such as:
– Staff kitchen areas in shops, offices and
other working environments
– Farm houses
– By clients in hotels, motels and other resi-
dential type environments
– Bed and breakfast type environments.
Warning! Risk of injury, burns, electrical
shock or fire.
• Do not change the specification of this appliance.
• Put knives and cutlery with sharp points in
the cutlery basket with the points down or in
a horizontal position.
• Do not keep the appliance door open without supervision to prevent to fall on it.
• Do not sit or stand on the open door.
• Dishwasher detergents are dangerous.
Obey the safety instructions on the detergent packaging.
• Do not drink and play with the water in the
appliance.
• Do not remove the dishes from the appliance until the programme is completed.
There can be detergent on the dishes.
• The appliance can release hot steam if you
open the door while a programme operates.
• Do not put flammable products or items that
are wet with flammable products in, near or
on the appliance.
• Do not use water spray and steam to clean
the appliance.
Disposal
Warning! Risk of injury or suffocation.
• Disconnect the appliance from the mains
supply.
• Cut off the mains cable and discard it.
• Remove the door catch to prevent children
and pets to get closed in the appliance.
Service
• Contact the Service to repair the appliance.
We recommend only the use of original
spare parts.
• When you contact the Service, ensure that
you have the following information that is
available on the rating plate.
Model :
PNC :
Serial Number :
15
www.zanussi.com
Control panel
2
1
3
45
1
On/off button
2
Display
3
Indicators
4
Delay button
5
Programme buttons
Indicators Description
Multitab indicator.
Salt indicator. This indicator is off while the programme operates.
Rinse aid indicator. This indicator is off while the programme operates.
Programmes
Programme
1)
Degree of soil
Type of load
Programme
phases
Duration
(min)
Energy
(kWh)
Water
(l)
2)
Normal soil
Crockery and cutlery
Prewash
Wash 50 °C
Rinses
Dry
195 0.91 9.9
3)
All
Crockery, cutlery,
pots and pans
Prewash
Wash from 45 °C to 70
°C
Rinses
Dry
40 - 150 0.6 - 1.4 8 - 14
Heavy soil
Crockery, cutlery,
pots and pans
Prewash
Wash 70 °C
Rinses
Dry
130 - 150 1.3 - 1.4 13 - 15
16
www.zanussi.com
Programme
1)
Degree of soil
Type of load
Programme
phases
Duration
(min)
Energy
(kWh)
Water
(l)
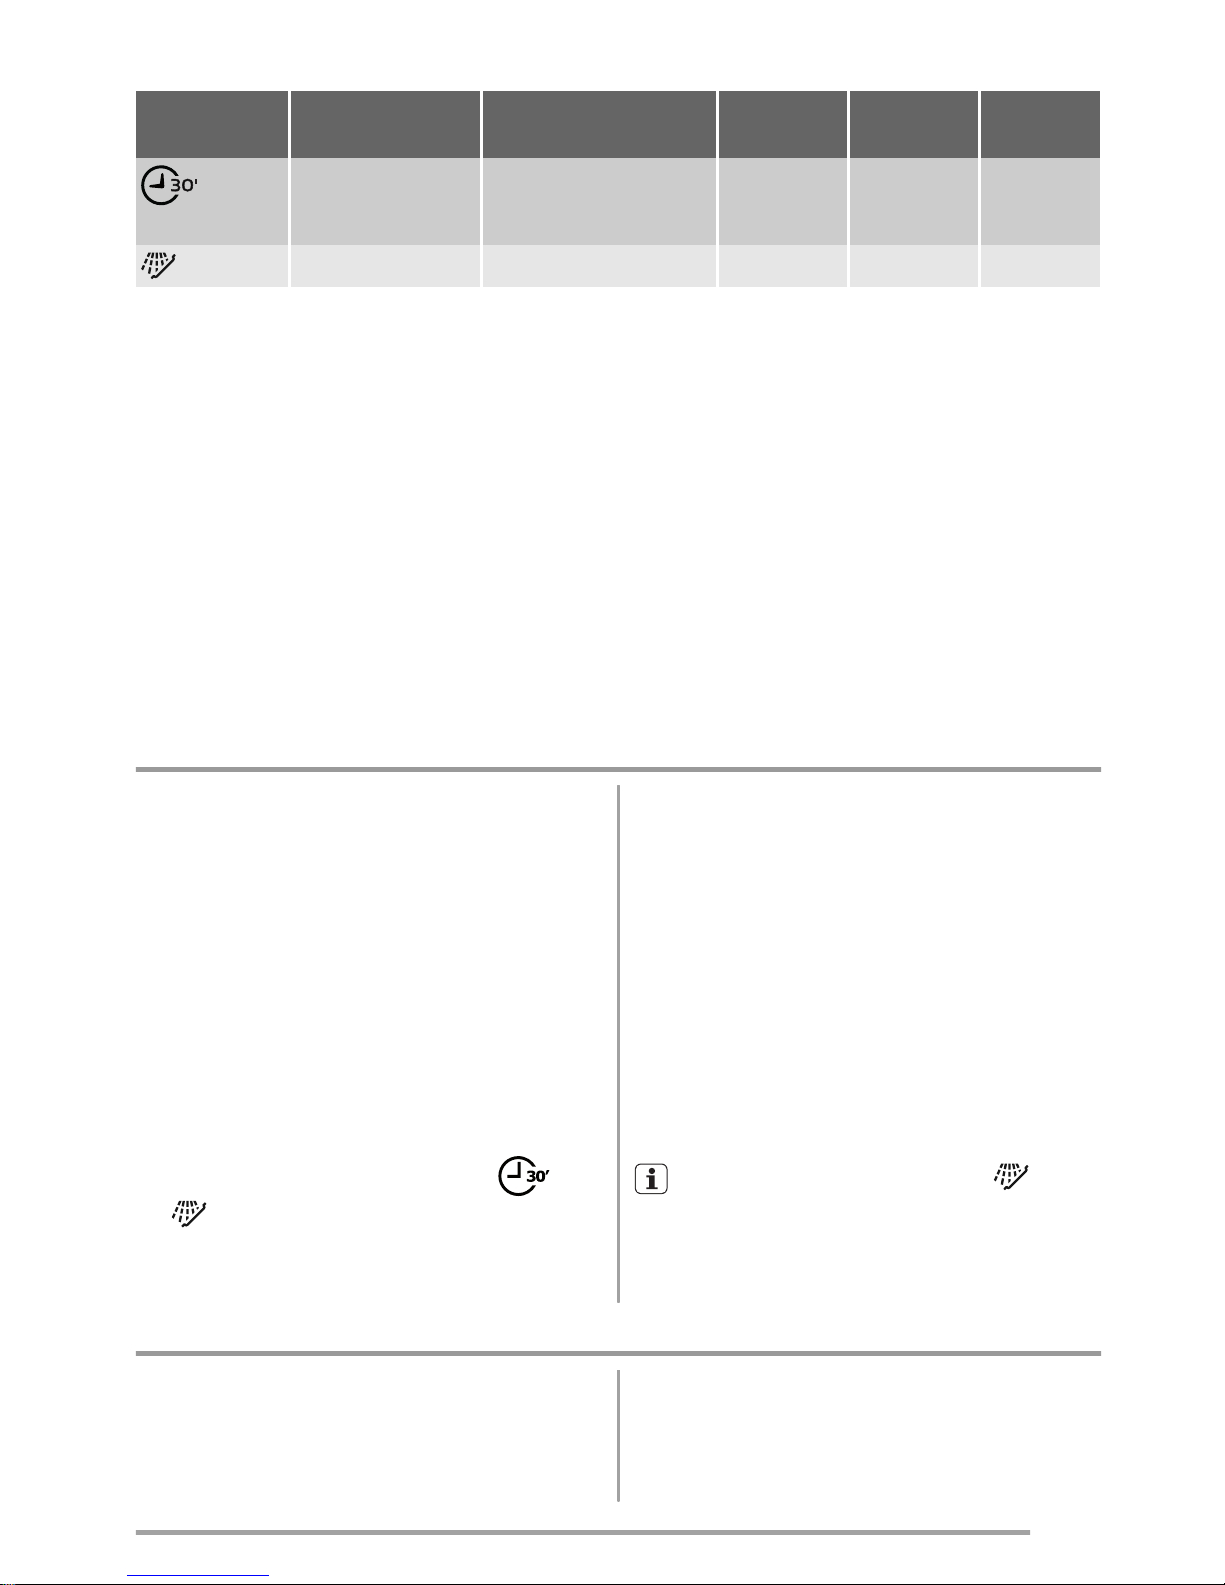
4)
Fresh soil
Crockery and cutlery
Wash 60 °C
Rinse
30 0.8 9
5)
All Prewash 14 0.1 4
1) The pressure and the temperature of the water , the variations of the mains supply, the options and the
quantity of dishes can change the values.
2) With this programme you have the most efficient use of water and energy consumption for crockery and
cutlery with normal soil. (This is the standard programme for test institutes).
3) The appliance senses the degree of soil and the quantity of items in the baskets. It automatically adjusts
the temperature and quantity of the water, the energy consumption and the programme duration.
4) With this programme you can wash a load with fresh soil. It gives good washing results in a short time.
5) Use this programme to quickly rinse the dishes. This prevents the remaining food to bond on the dishes
and bad odours to come out from the appliance.
Do not use detergent with this programme.
Information for test institutes
For all the necessary information for test performance. send an email to:
info.test@dishwasher-production.com
Write down the product number (PNC) that is on the rating plate.
Options
Multitab
Activate this option only when you use the
combi detergent tablets.
This option deactivates the flow of rinse aid
and salt. The related indicators are off.
The programme duration can increase.
1. Press the on/off button to activate the appliance.
2. Make sure that the appliance is in setting
mode, refer to ‘Setting and starting a programme'.
3.
Press and hold at the same time
and
until the multitab indicator comes on.
If you stop to use the combi detergent
tablets, before you start to use
separately detergent, rinse aid and
dishwasher salt, do these steps:
1. Set the water softener to the highest level.
2. Make sure that the salt container and the
rinse aid dispenser are full.
3. Start the shortest programme with a rinsing phase, without detergent and without
dishes.
4. Adjust the water softener to the water
hardness in your area.
5. Adjust the released quantity of rinse aid.
This option is not applicable to
.
Before first use
1. Make sure that the set level of the water
softener agrees with the water hardness in
your area. If not, adjust the water softener.
Contact your local water authority to know
the water hardness in your area.
2. Fill the salt container.
17
www.zanussi.com

3. Fill the rinse aid dispenser.
4. Open the water tap.
5. Processing residues can stay in the appliance. Start a programme to remove them.
Do not use detergent and do not load the
baskets.
Adjusting the water softener
Water hardness
Water softener
adjustment
German
degrees
(°dH)
French
degrees
(°fH)
mmol/l Clarke
degrees
Level
47 - 50 84 - 90 8.4. - 9.0 58 - 63 10
43 - 46 76 - 83 7.6 - 8.3 53 - 57 9
37 - 42 65 - 75 6.5 - 7.5 46 - 52 8
29 - 36 51 - 64 5.1 - 6.4 36 - 45 7
23 - 28 40 - 50 4.0 - 5.0 28 - 35 6
19 - 22 33 - 39 3.3 - 3.9 23 - 27
5
1)
15 - 18 26 - 32 2.6 - 3.2 18 - 22 4
11 - 14 19 - 25 1.9 - 2.5 13 - 17 3
4 - 10 7 - 18 0.7 - 1.8 5 - 12 2
< 4 < 7 < 0.7 < 5
1
2)
1) Factory position.
2) Do not use salt at this level.
How to adjust the level of the water
softener
1. Press the on/off button to activate the appliance. Make sure that the appliance is in
setting mode, refer to “Setting and starting
a programme”.
2. Press and hold, at the same time,
and until the indicators of
, and start to flash.
3.
Press
.
•
The indicators of
and go
off.
•
The indicator of
continues to
flash.
• The display shows the current setting of
the water softener, e.g.
= level 5.
4.
Press
again and again to change
the setting. Each time you press the button
you select the next level.
5. Deactivate the appliance to confirm the
setting.
Filling the salt container
Caution! Water and salt can come out
from the salt container when you fill it.
Risk of corrosion. To prevent it, after you fill
the salt container, start a programme.
1
2
18
www.zanussi.com

3
4
Put 1 litre of water in the salt container (only
for the first time).
Filling the rinse aid dispenser
1
2
1
2
1
2
3
4
3
2
1
4
To adjust the released quantity of rinse aid,
turn the selector between position 1 (lowest
quantity) and position 4 (highest quantity).
Daily use
1. Open the water tap.
2. Press the on/off button to activate the appliance. Make sure that the appliance is in
setting mode, refer to “Setting and starting
a programme”.
• If the salt indicator is on, fill the salt con-
tainer.
• If the rinse aid indicator is on, fill the
rinse aid dispenser.
3. Load the baskets.
4. Add the detergent.
• If you use the combi detergent tablets,
activate the Multitab option.
5. Set and start the correct programme for
the type of load and the degree of soil.
Using the detergent
1
2
1
2
19
www.zanussi.com
2
0
3
0
A
B
3
2
0
3
0
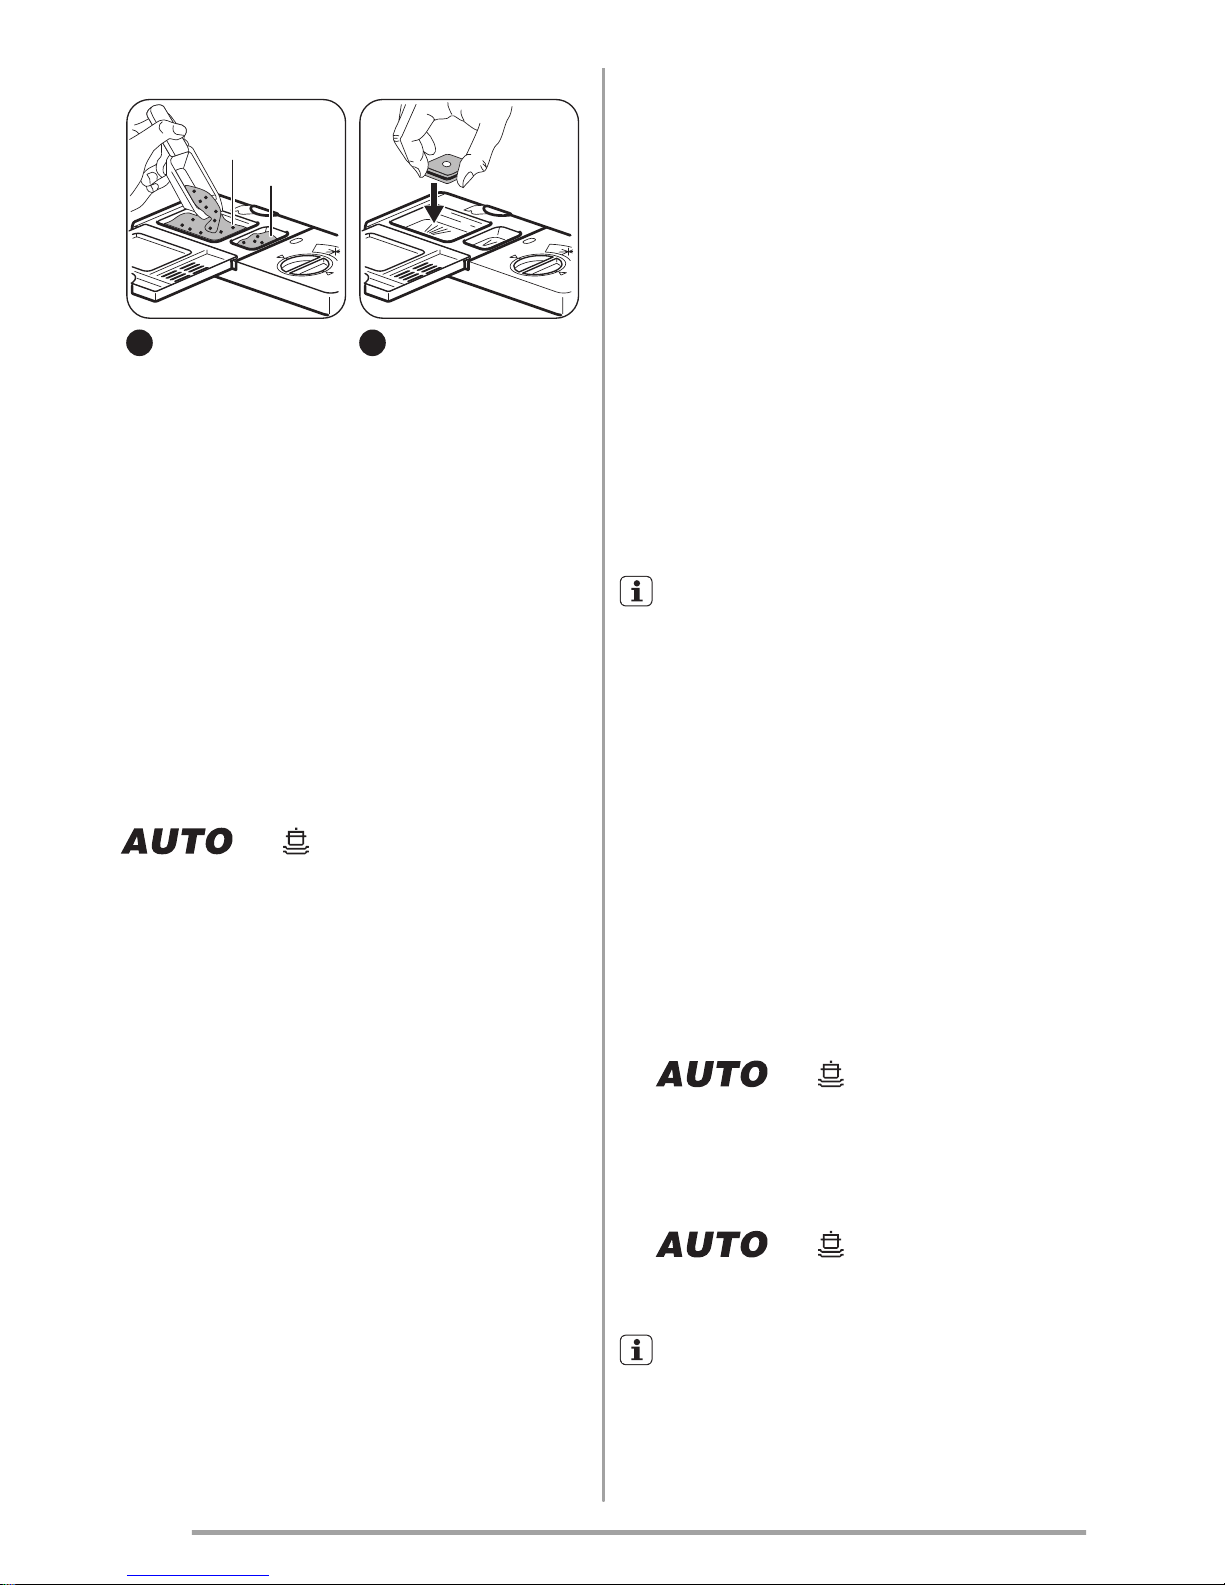
4
Put the detergent or the tablet in compartment
(A) If the programme has a prewash phase,
put a small quantity of detergent in compartment (B).
Setting and starting a programme
Setting mode
For some settings it is necessary that the appliance is in setting mode.
Press the on/off button to activate the appliance. The appliance is in setting mode when
all the programme indicators come on and the
display shows 2 horizontal status bars.
If the control panel does not show this condition, press and hold at the same time
and until the appliance is in
setting mode.
Starting a programme without delay start
1. Open the water tap.
2. Press the on/off button to activate the appliance. Make sure that the appliance is in
setting mode.
3. Press the button of the programme you
want to set.
• The related programme indicator flashes
while all the other programme indicators
go off.
• The display shows the programme dura-
tion.
4. Close the appliance door, the programme
starts.
• The related programme indicator comes
on.
• The programme duration starts to de-
crease with steps of 1 minute
Starting a programme with delay start
1. Set the programme.
2. Press the delay start button again and
again until the display shows the delay time
you want to set (from 1 to 24 hours).
• The delay time comes on in the display.
• The related programme indicator flashes.
3. Close the appliance door, the countdown
starts.
• The countdown decreases with steps of
1 hour.
• The related programme indicator comes
on..
When the countdown is completed, the programme starts.
You can set a programme, applicable op-
tions and the delay start also with the appliance door closed. In this condition, you only
have 3 seconds after each setting before the
appliance starts to operate automatically.
Opening the door while the appliance
operates
If you open the door, the appliance stops.
When you close the door, the appliance continues from the point of interruption.
Cancelling the delay start while the
countdown operates
When you cancel the delay start, also the programme is cancelled.
1. Press and hold at the same time
and until all the programme
indicators come on and the display shows
2 horizontal status bars.
Cancelling the programme
1. Press and hold at the same time
and until all the programme
indicators come on and the display shows
2 horizontal status bars.
Make sure that there is detergent in the
detergent dispenser before you start a
new programme.
At the end of the programme
• The display shows 0:00.
20
www.zanussi.com

1. Press the on/off button to deactivate the
appliance.
2. Close the water tap.
If you do not press the on/off button, the
Auto Off function automatically deactivates the appliance a few minutes after the
end of the programme.
This helps to decrease the energy consumption,
Important
• Let the dishes become cold before you re-
move them from the appliance. Hot dishes
can be easily damaged.
• First remove the items from the lower basket, then from the upper basket.
• There can be water on the sides and on the
door of the appliance. Stainless steel becomes cool more quickly than the dishes.
Hints and tips
The water softener
Hard water contains a high quantity of minerals that can cause damage to the appliance
and bad washing results. The water softener
neutralises these minerals.
The dishwasher salt keeps the water softener
clean and in good conditions. It is important to
set the right level of the water softener. This
makes sure that the water softener uses the
correct quantity of dishwasher salt and water.
Using salt, rinse aid and detergent
• Only use salt, rinse aid and detergent for
dishwasher. Other products can cause
damage to the appliance.
• The rinse aid helps, during the last rinsing
phase, to dry the dishes without streaks and
stains.
• Combi detergent tablets contain detergent,
rinse aid and other added agents. Be sure
that these tablets are applicable to the water hardness in your area. Refer to the instructions on the packaging of the products.
• Detergent tablets do not fully dissolve with
short programmes. To prevent detergent
residues on the tableware, we recommend
that you use the tablets with long programmes.
Do not use more than the correct quantity
of detergent. Refer to the instructions on
the detergent packaging.
Loading the baskets
Refer to the supplied leaflet with examples of the load of the baskets.
• Only use the appliance to wash items that
are dishwasher-safe.
• Do not put in the appliance items made of
wood, horn, aluminium, pewter and copper.
• Do not put in the appliance items that can
absorb water (sponges, household cloths).
• Remove remaining food from the items.
• To remove easily remaining burned food,
soak pots and pans in water before you put
them in the appliance.
• Put hollow items (cups, glasses and pans)
with the opening down.
• Make sure that cutlery and dishes do not
bond together. Mix spoons with other cutlery.
• Make sure that glasses do not touch other
glasses.
• Put the small items in the cutlery basket.
• Put the light items in the upper basket.
Make sure that they do not move.
• Make sure that the spray arms can move
freely before you start a programme.
Before starting a programme
Make sure that:
• The filters are clean and correctly installed.
21
www.zanussi.com
• The spray arms are not clogged.
• The position of the items in the baskets is
correct.
• The programme is applicable for the type of
load and for the degree of soil.
• The correct quantity of detergent is used.
• There is dishwasher salt and rinse aid (unless you use combi detergent tablets).
• The cap of the salt container is tight.
Care and cleaning
Warning! Before maintenance,
deactivate the appliance and disconnect
the mains plug from the mains socket.
Dirty filters and clogged spray arms de-
crease the washing results.
Make a check regularly and, if necessary,
clean them.
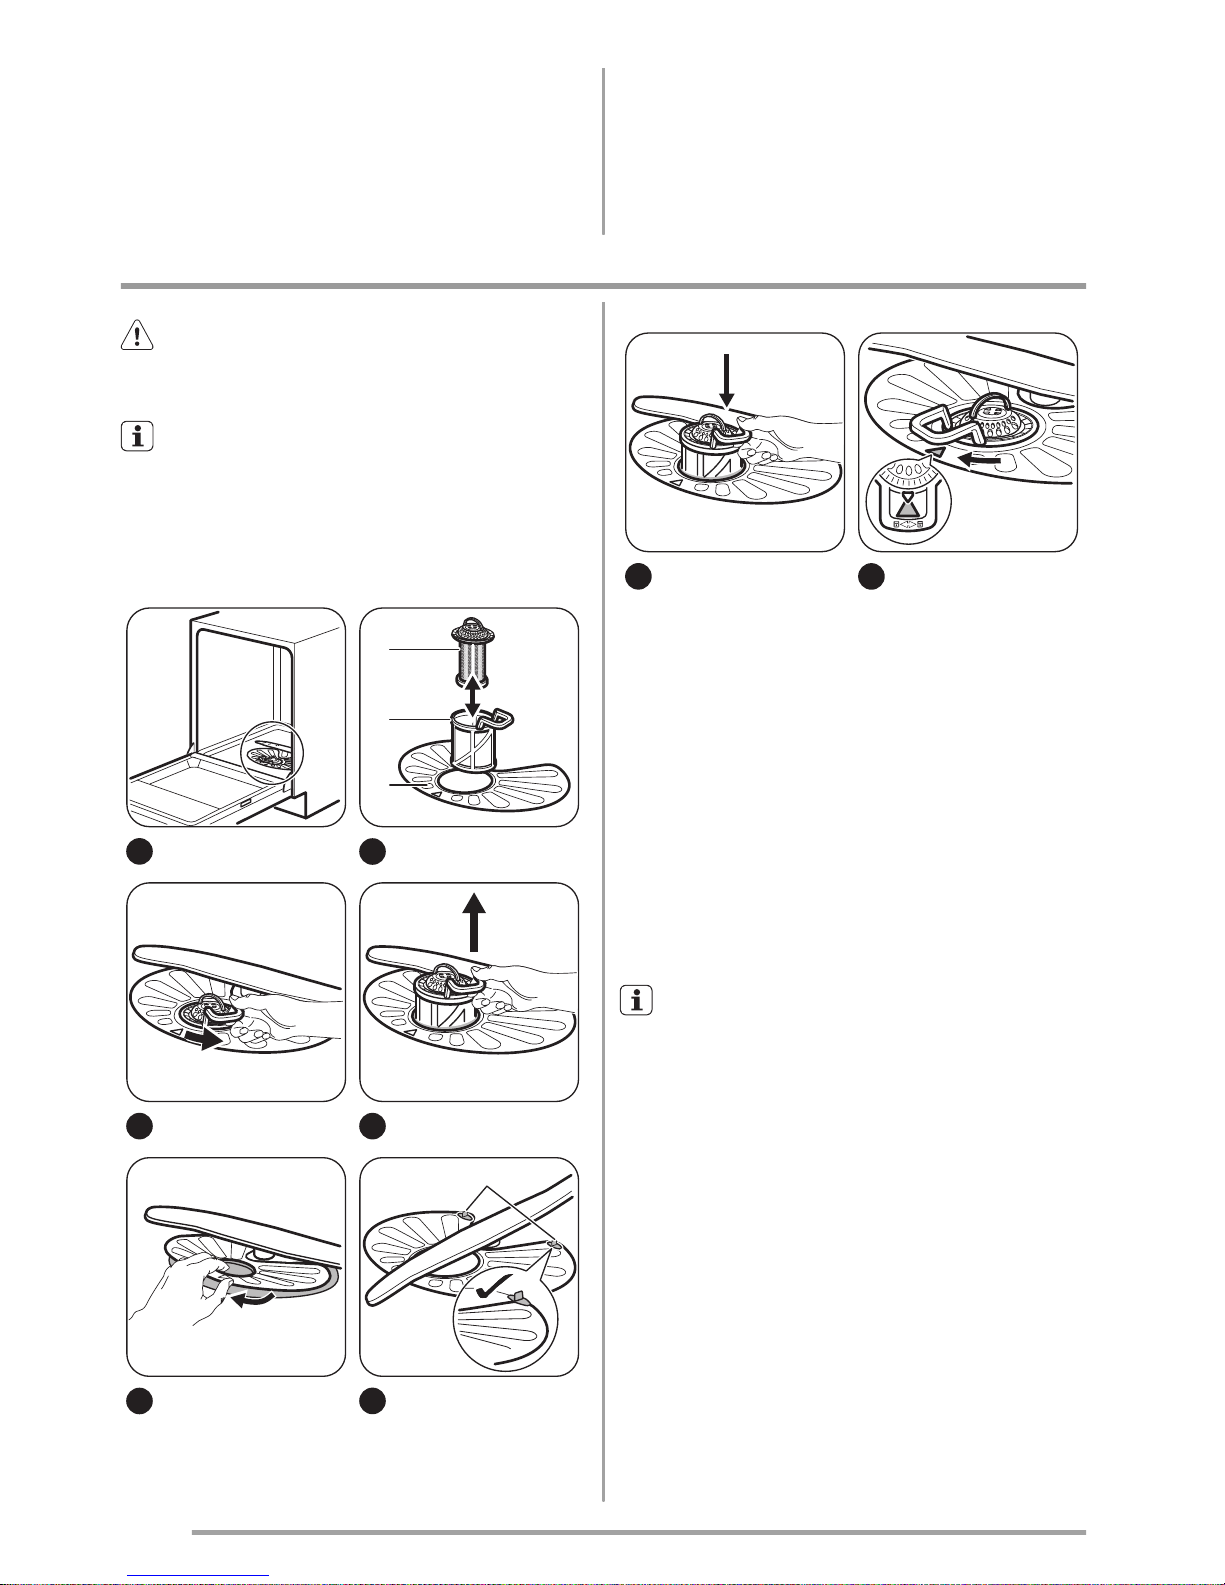
Cleaning the filters
1
C
B
A
2
3
4
5
D
6
7
8
To remove filters (B) and (C), turn the handle
counterclockwise and remove. Pull apart filter
(B) and (C). Wash the filters with water.
Remove filter (A). Wash the filter with water.
Before you put the filter (A) back, make sure
that there are no residues of food or soil in or
around the edge of the sump.
Make sure that filter (A) is correctly positioned
under the 2 guides (D).
Assemble filters (B) and (C). Put them back in
filter (A). Turn the handle clockwise until it
locks.
An incorrect position of the filters can
cause bad washing results and damage
to the appliance.
Cleaning the spray arms
Do not remove the spray arms.
If the holes in the spray arms are clogged, remove remaining parts of soil with a thin pointed object.
External cleaning
Clean the appliance with a moist soft cloth.
Only use neutral detergents. Do not use abrasive products, abrasive cleaning pads or solvents.
22
www.zanussi.com
Internal cleaning
If you regularly use short duration programmes, these can leave deposits of grease
and limescale inside the appliance.
To prevent this, we recommend to run long
duration programmes at least 2 times per
month.
Troubleshooting
The appliance does not start or it stops during
operation.
Before you contact the Service, refer to the information that follows for a solution to the
problem.
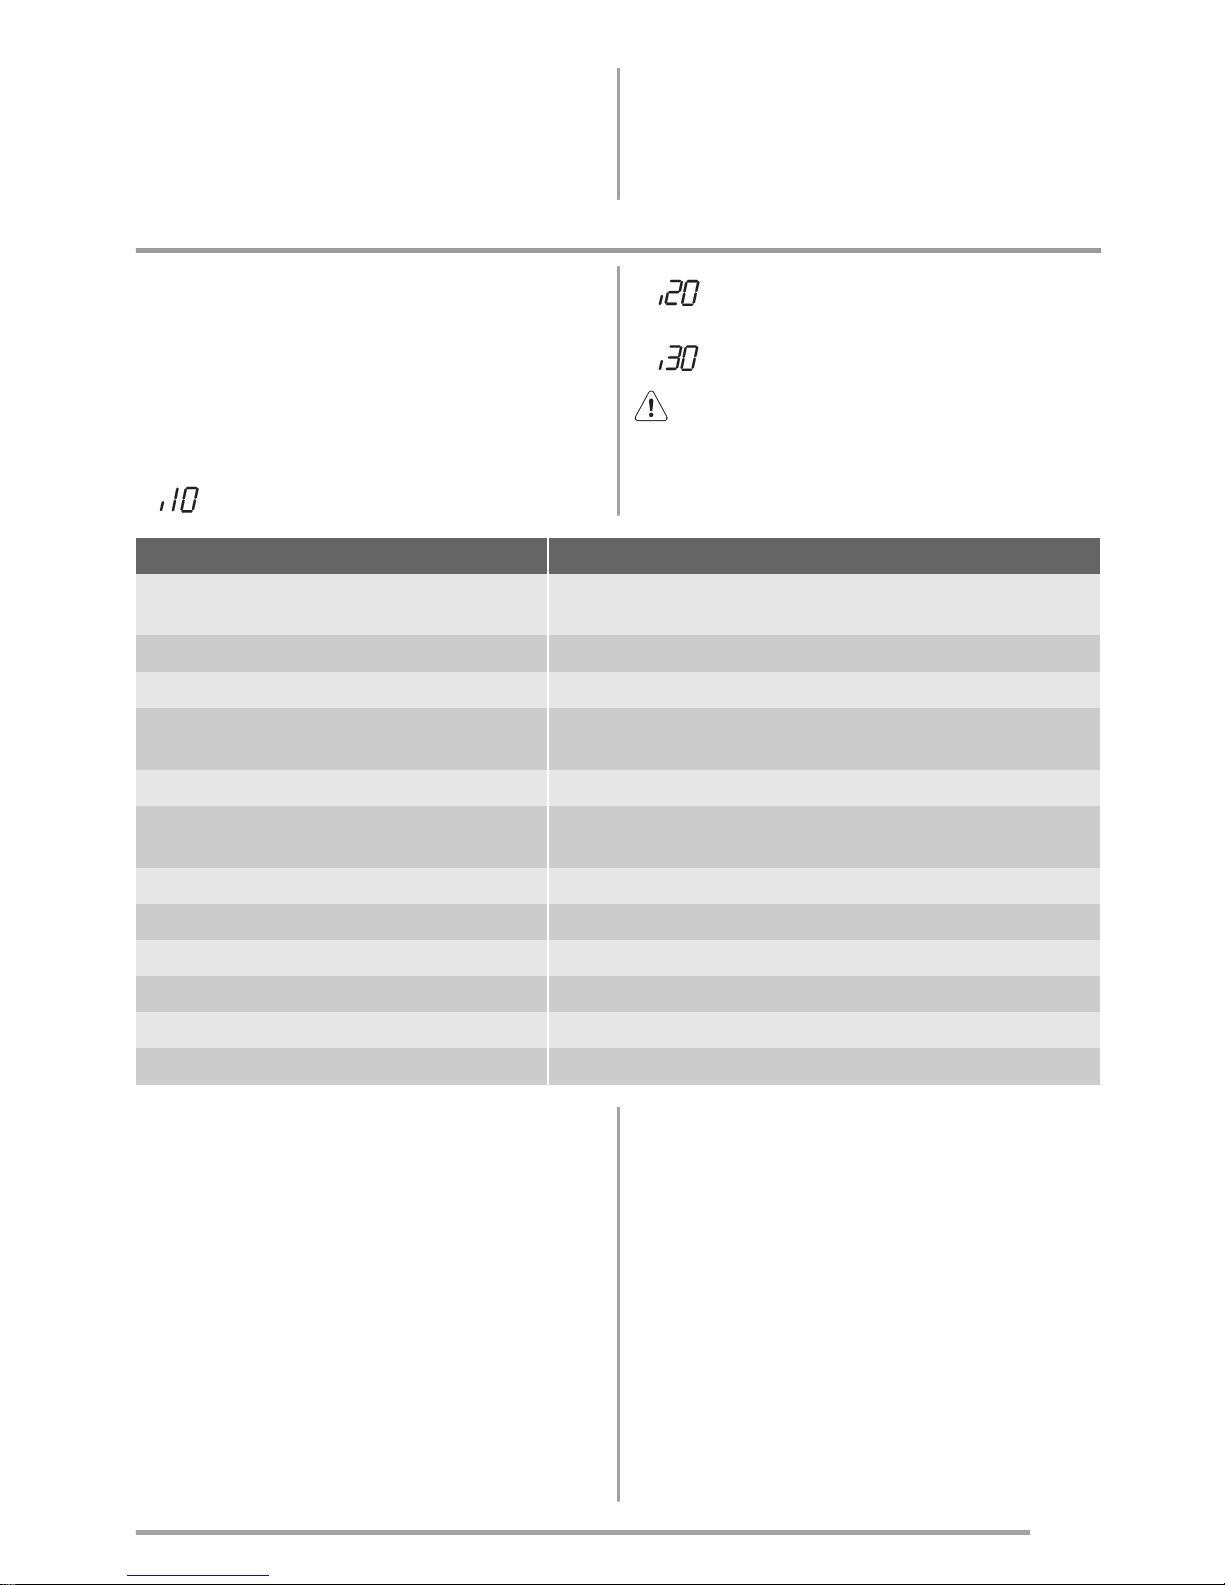
With some problems, the display shows
an alarm code:
•
- The appliance does not fill with water.
•
- The appliance does not drain the wa-
ter.
•
- The anti-flood device is on.
Warning! Deactivate the appliance
before you do the checks.
Problem Possible solution
You cannot activate the appliance. Make sure that the mains plug is connected to the mains
socket.
Make sure that there is not a damaged fuse in the fuse box.
The programme does not start. Make sure that the appliance door is closed.
If the delay start is set, cancel the setting or wait for the end
of the countdown.
The appliance does not fill with water. Make sure that the water tap is open.
Make sure that the pressure of the water supply is not too
low. For this information, contact your local water authority.
Make sure that the water tap is not clogged.
Make sure that the filter in the inlet hose is not clogged.
Make sure that the inlet hose has no kinks or bends.
The appliance does not drain the water. Make sure that the sink spigot is not clogged.
Make sure that the drain hose has no kinks or bends.
The anti-flood device is on. Close the water tap and contact the Service.
After the checks are completed, activate the
appliance. The programme continues from the
point of interruption.
If the problem occurs again, contact the Service.
If the display shows other alarm codes, contact the Service.
If the washing and drying results are not
satisfactory
Whitish streaks or bluish layers on
glasses and dishes
• The released quantity of rinse aid is too
much. Adjust the rinse aid selector to a lower position.
• The quantity of detergent is too much.
23
www.zanussi.com
 Loading...