

Zanussi Z814W85BI, Z712W43BI, Z714W43BI User Manual
GETTING
STARTED?
EASY.
User Manual
Z814W85BI
EN User Manual
Washing Machine

SAFETY INFORMATION
Before the installation and use of the appliance, carefully read the
supplied instructions. The manufacturer is not responsible for any
injuries or damages that are the result of incorrect installation or
usage. Always keep the instructions in a safe and accessible
location for future reference.
CHILDREN AND VULNERABLE PEOPLE SAFETY
• This appliance can be used by children aged from 8 years and
above and persons with reduced physical, sensory or mental
capabilities or lack of experience and knowledge if they have
been given supervision or instruction concerning the use of the
appliance in a safe way and understand the hazards involved.
• Children between 3 and 8 years of age and persons with very
extensive and complex disabilities shall be kept away unless
continuously supervised.
• Children of less than 3 years of age should be kept away
unless continuously supervised.
• Do not let children play with the appliance.
• Keep all packaging away from children and dispose of it
appropriately.
• Keep detergents away from children.
• Keep children and pets away from the appliance when the door
is open.
• If the appliance has a child safety device, it should be activated.
• Children shall not carry out cleaning and user maintenance of
the appliance without supervision.
GENERAL SAFETY
• Do not change the specification of this appliance.
• This appliance is intended to be used in household and similar
applications such as:
– staff kitchen areas in shops, offices and other working
environments;
– by clients in hotels, motels, bed & breakfast and other
residential type environments;
2

– areas for communal use in blocks of flats or in launderettes.
• Do not exceed the maximum load of 8 kg (refer to the
"Programme chart" chapter).
• The operating water pressure at the water entry point from the
outlet connection must be between 0.5 bar (0.05 MPa) and 8
bar (0.8 MPa).
• The ventilation opening in the base must not be covered by a
carpet, mat, or any floor covering.
• The appliance must be connected to the water mains using the
new supplied hose sets, or other new hose sets supplied by
the Authorised Service Centre.
• Old hose sets must not be reused.
• If the mains power supply cable is damaged, it must be
replaced by the manufacturer, its Authorised Service Centre or
similarly qualified persons to avoid an electrical hazard.
• Before any maintenance operation, deactivate the appliance
and disconnect the mains plug from the socket.
• Do not use high pressure water sprays and/or steam to clean
the appliance.
• Clean the appliance with a moist cloth. Use only neutral
detergents. Do not use abrasive products, abrasive cleaning
pads, solvents or metal objects.
SAFETY INSTRUCTIONS
INSTALLATION
The installation must comply with
relevant national regulations.
• Remove all the packaging and the transit bolts
including rubber bush with plastic spacer.
• Keep the transit bolts in a safe place. If the
appliance is to be moved in the future they must
be reattached to lock the drum to prevent an
internal damage.
• Always take care when moving the appliance as
it is heavy. Always use safety gloves and
enclosed footwear.
• Do not install or use a damaged appliance.
• Follow the installation instructions supplied with
the appliance.
• Do not install or use the appliance where the
temperature can be less than 0°C or where it is
exposed to the weather.
• The floor area on which the appliance is to be
installed must be flat, stable, heat resistant and
clean.
• Make sure that there is air circulation between
the appliance and the floor.
• When the appliance is in its permanent position,
check if it is levelled correctly with the aid of a
spirit level. If it is not, adjust the feet accordingly.
• Do not install the appliance directly above a
floor drain.
• Do not spray water on the appliance and do not
expose it to excessive humidity.
• Do not install the appliance where the appliance
door cannot be fully opened.
• Do not put a closed container to collect
possible water leakage under the appliance.
Contact the Authorised Service Centre to
ensure which accessories can be used.
3
ELECTRICAL CONNECTION
WARNING! Risk of fire and electric
shock.
• The appliance must be earthed.
• Always use a correctly installed shockproof
socket.
• Make sure that the parameters on the rating
plate are compatible with the electrical ratings
of the mains power supply.
• Do not use multi-plug adapters and extension
cables.
• Make sure not to cause damage to the mains
plug and to the mains cable. Should the mains
cable need to be replaced, this must be carried
out by our Authorised Service Centre.
• Connect the mains plug to the mains socket
only at the end of the installation. Make sure that
there is access to the mains plug after the
installation.
• Do not touch the mains cable or the mains plug
with wet hands.
• Do not pull the mains cable to disconnect the
appliance. Always pull the mains plug.
• UK and Ireland only. This appliance is fitted with
a 13 A mains plug. If it is necessary to change
the mains plug fuse, use only a 13 A ASTA (BS
1362) fuse.
• This appliance complies with the E.E.C.
Directives.
WATER CONNECTION
• Do not cause damage to the water hoses.
• Before connection to new pipes, pipes not used
for a long time, where repair work has been
carried out or new devices fitted (water meters,
etc.), let the water flow until it is clean and clear.
• Ensure that there are no visible water leaks
during and after the first use of the appliance.
• Do not use an extension hose if the inlet hose is
too short. Contact the Authorised Service
Centre for the replacement of the inlet hose.
• It is possible to see water flowing from the drain
hose. This is due to the testing of the appliance
with the use of water in the factory.
• You can extend the drain hose to maximum 400
cm. Contact the Authorised Service Centre for
the other drain hose and the extension.
USE
WARNING! Risk of injury, electric
shock, fire, burns or damage to the
appliance.
• Follow the safety instructions on the detergent
packaging.
• Do not put flammable products or items that are
wet with flammable products in, near or on the
appliance.
• Make sure that all metal objects are removed
from the laundry.
• Do not wash fabrics which are heavily soiled
with oil, grease or other greasy substances. It
can damage rubber parts of the washing
machine. Prewash such fabrics by hand before
loading them into the washing machine.
• Do not touch the glass door while a programme
is in operation. The glass can get hot.
SERVICE
• To repair the appliance contact an Authorised
Service Centre.
• Use original spare parts only.
DISPOSAL
WARNING! Risk of injury or
suffocation.
• Disconnect the appliance from the mains
electrical and water supplies.
• Cut off the mains electrical cable close to the
appliance and dispose of it.
• Remove the door catch to prevent children or
pets from becoming trapped in the drum.
• Dispose of the appliance in accordance with
local requirements for the disposal of Waste
Electrical and Electronic Equipment (WEEE).
INSTALLATION
WARNING! Refer to Safety chapters.
BE PREPARED FOR INSTALLATION
It is recommended that installation is
carried out by two persons.
4
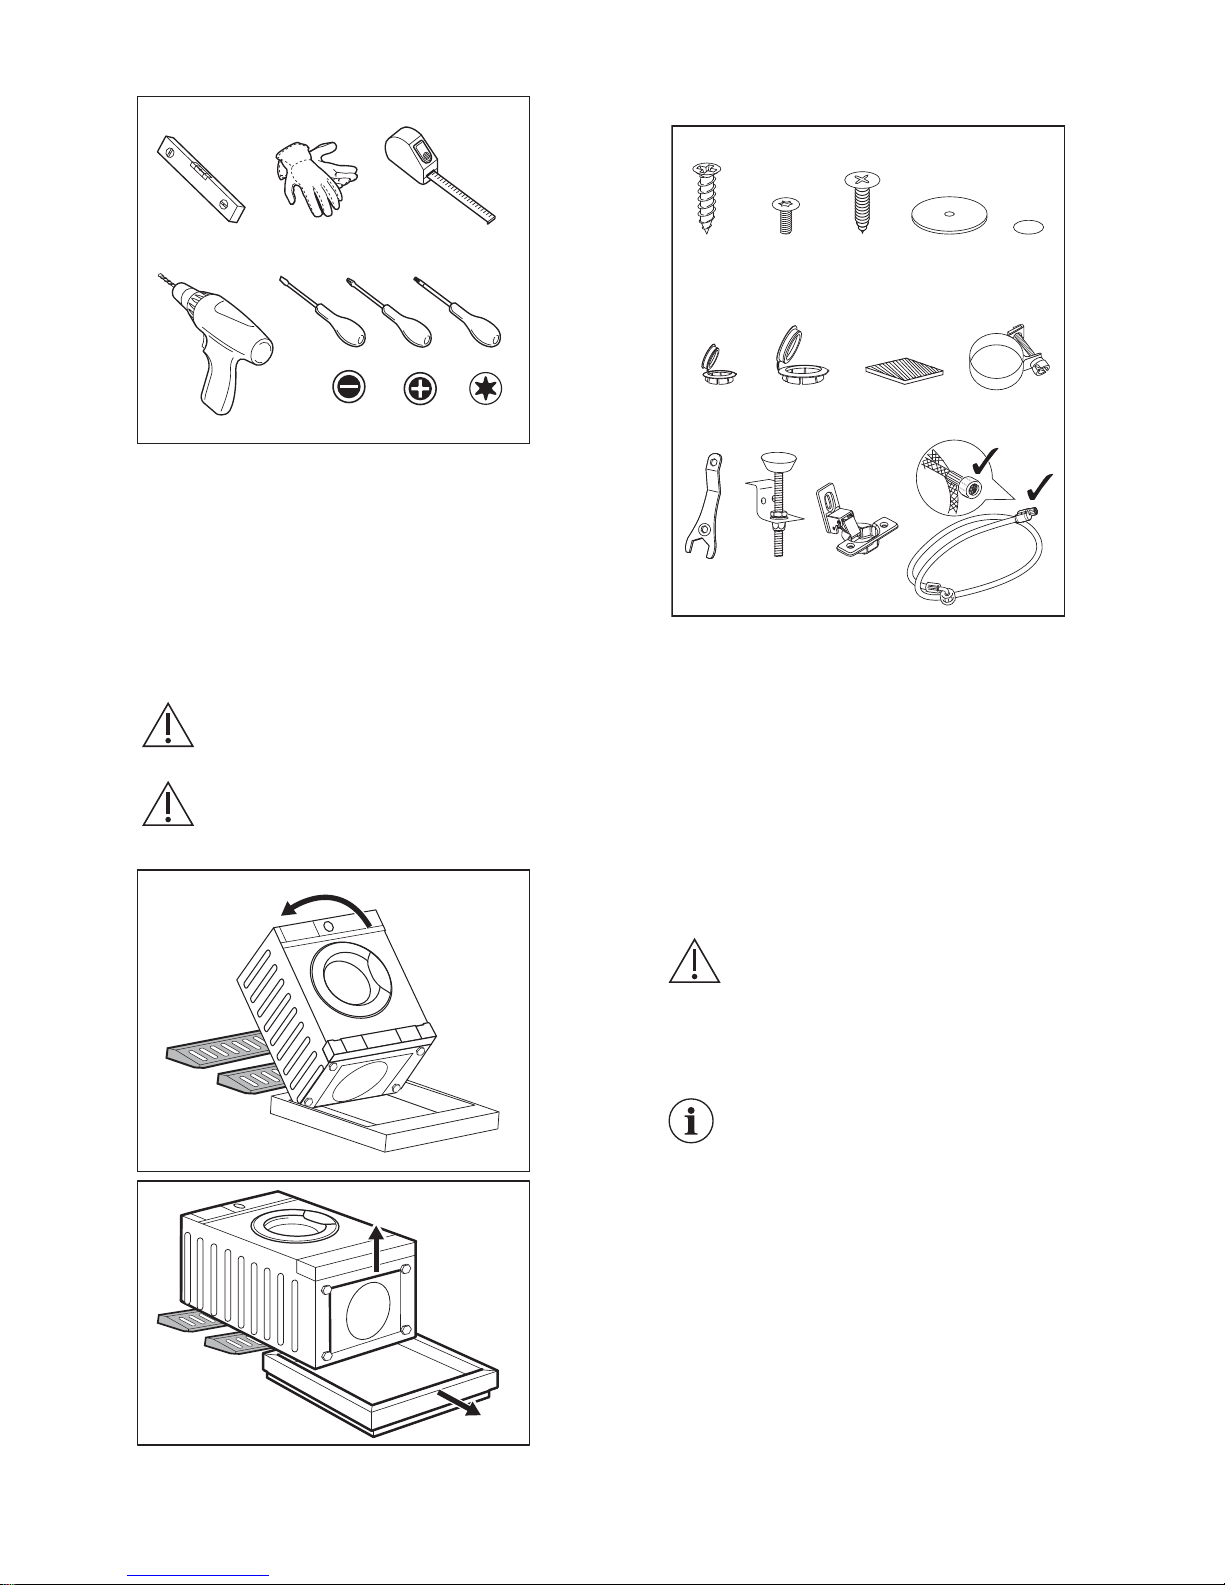
THE APPLIANCE IS EQUIPPED WITH ...
x1 x2
x1
E
x2
x1 x1
x1 x2
x4 x1 x1
BA C D
F G H L
UNPACKING
WARNING! Use the gloves.
WARNING! Remove all the packaging and the transit bolts before installing the appliance.
1. Put two polystyrene packaging elements on
the floor under the appliance.
WARNING! It is strongly recommended that this action is carries
out by two persons.
2. Carefully put the appliance down on its rear
side.
Make sure not to damage the hoses.
1
2
3. Remove the polystyrene protection from the
bottom.
5
1
2
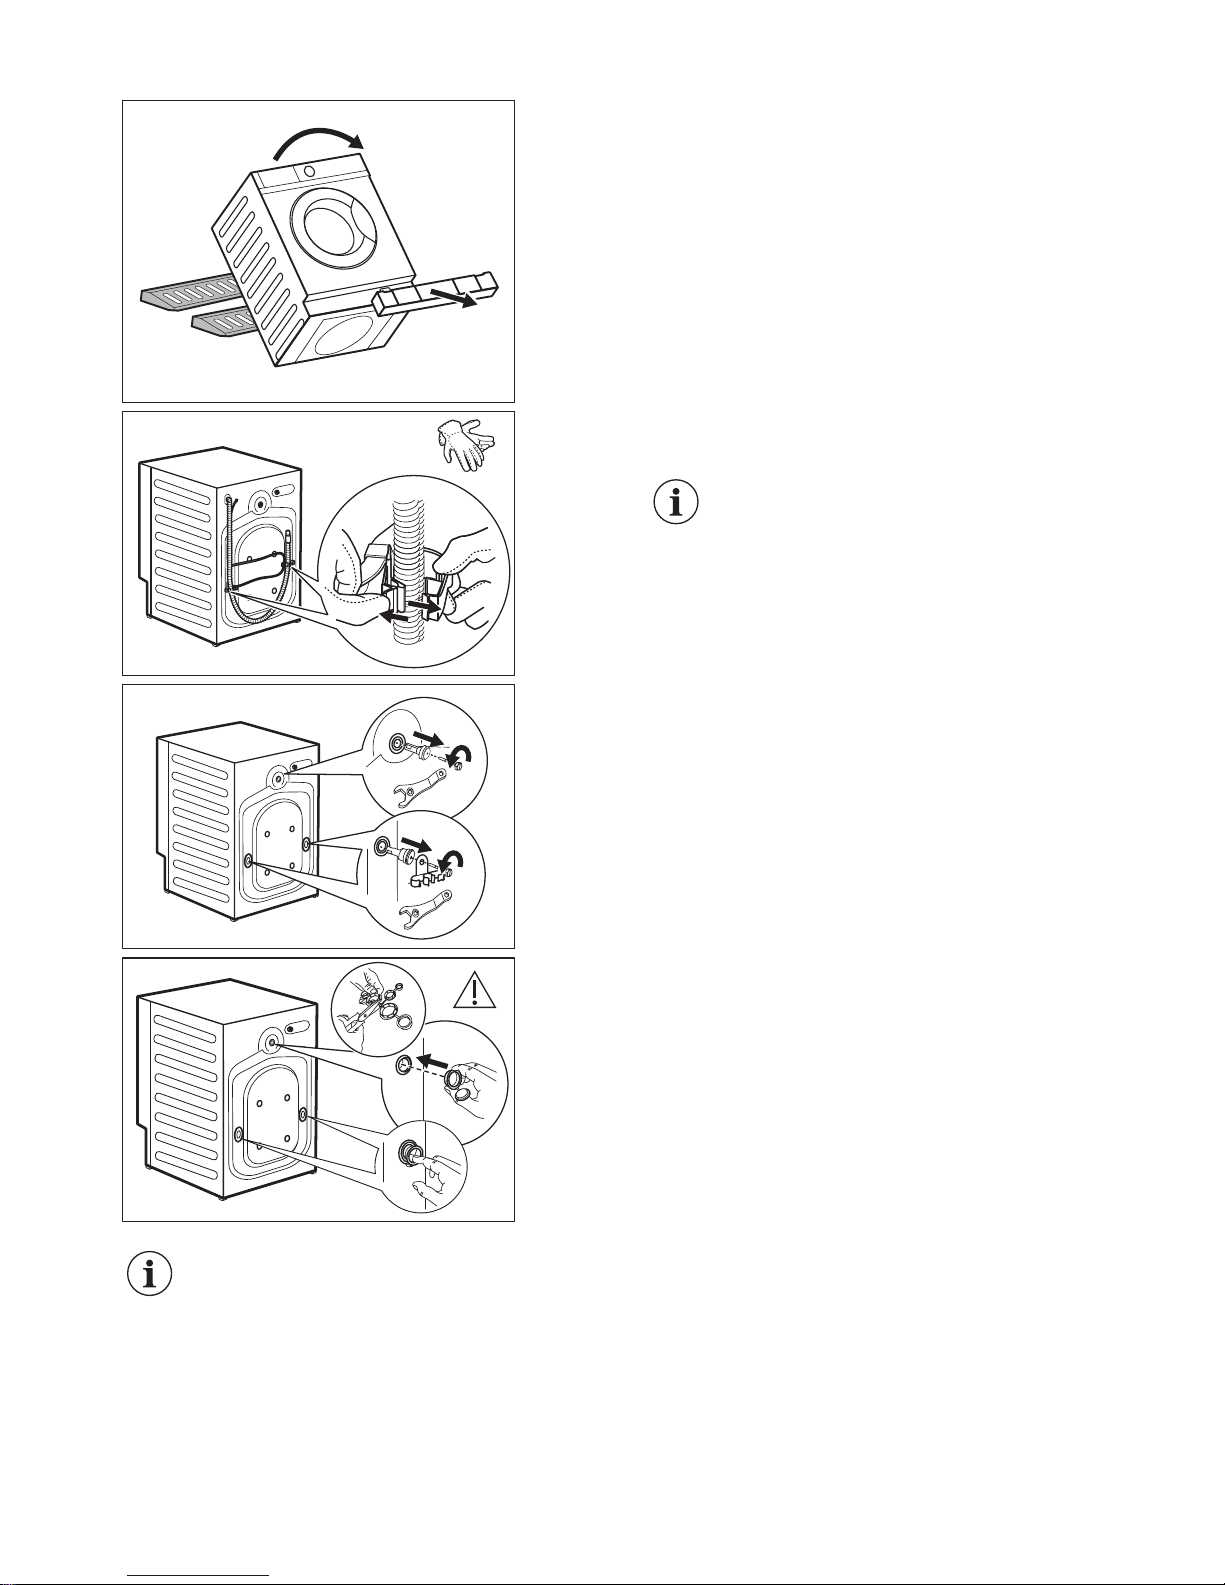
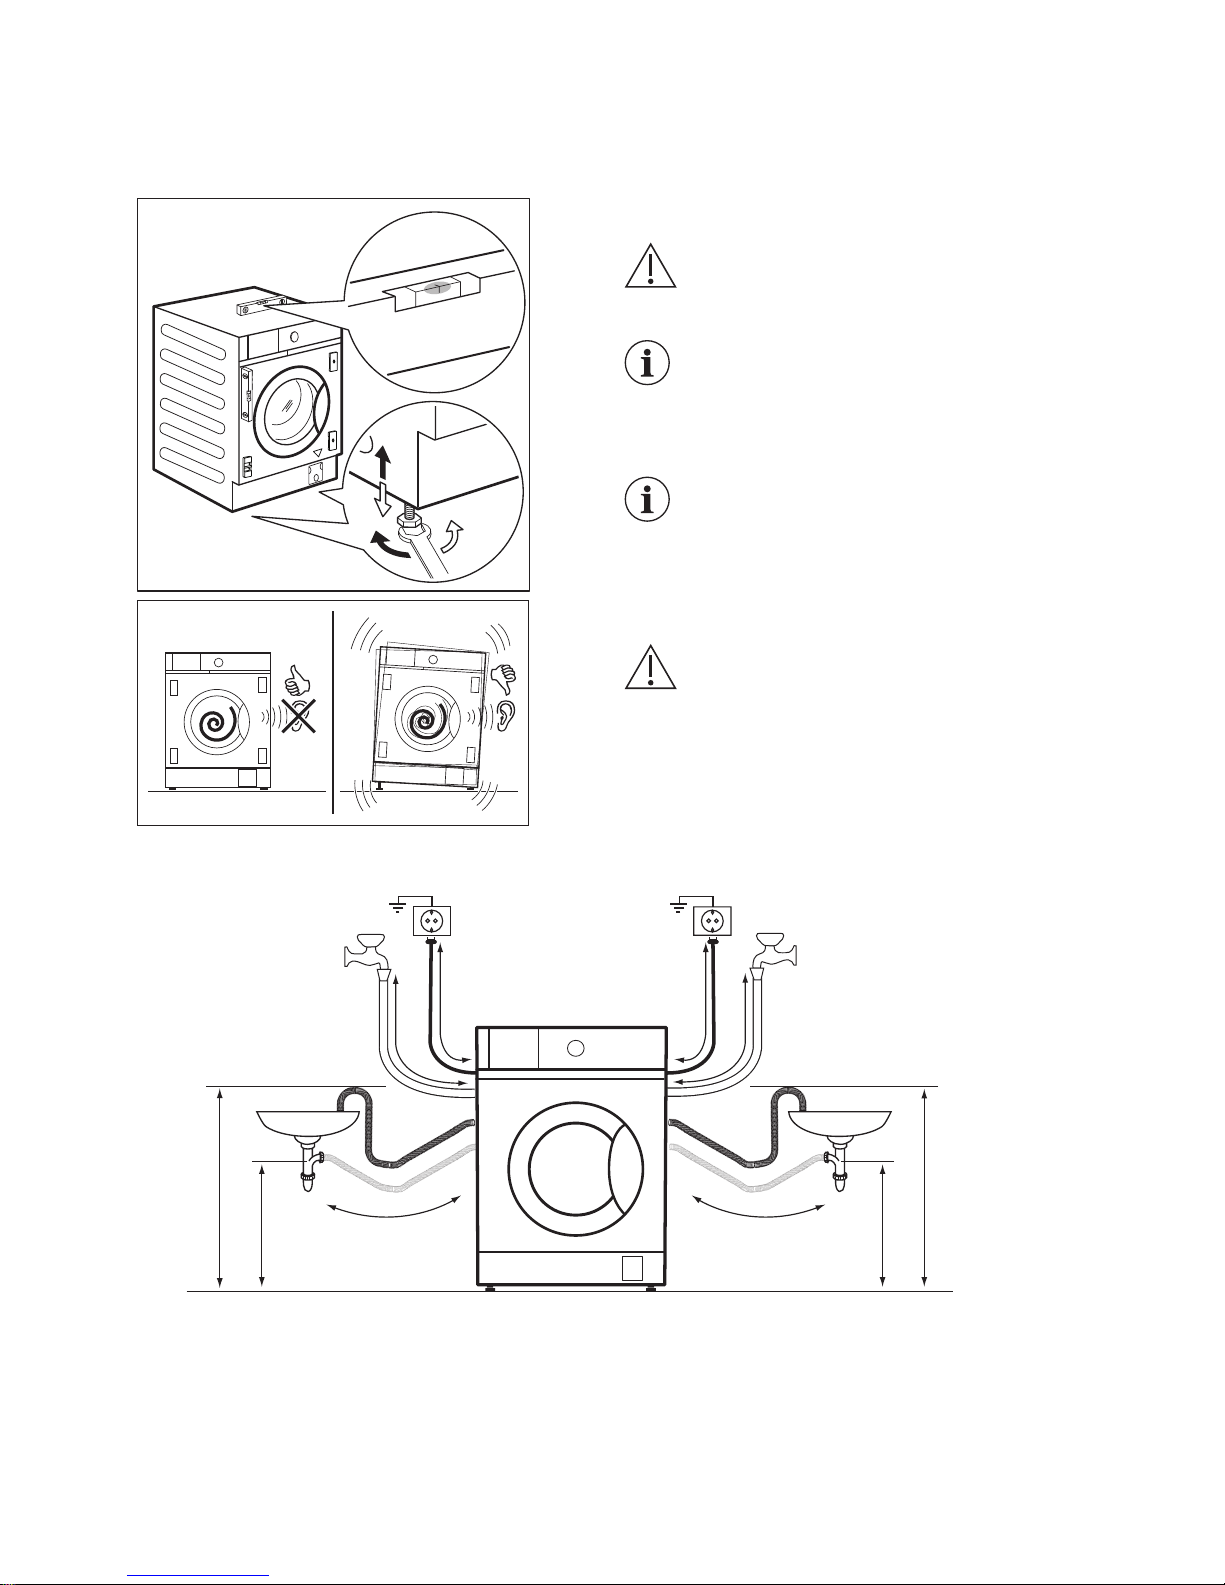
4. Return the appliance in vertical position and
remove the socket polystyrene protection.
5. Remove the power supply cable and the drain
hose from the hose holders.
It is possible to see water flowing
from the drain hose. This is due to
the testing with water of the appliance in factory.
6. Remove the three bolts, the hose holders and
plastic spacers by using the spanner supplied
with the appliance.
F
G
7. Close the holes with the plastic caps you find
in the user manual bag. Put the smallest cap F
in upper hole and the two bigger caps G in lower holes.
We recommend that you keep the packaging and the transit bolts for any movement of the
appliance.
INSTALLATION ON SUSPENDED FLOORING
Suspended wooden floors are particularly
susceptible to vibration.
To limit vibration we recommend placing a
waterproof wooden panel, at least 15 mm thick,
under the appliance. It should be screwed to at
least 2 floor beams and should extend beyond the
front feet.
6
If possible, install the appliance where the floor is
more stable.
POSITIONING AND LEVELLING
x4
1. Install the appliance on a flat hard floor.
WARNING! Make sure that carpets do
not stop the air circulation below the appliance.
Bring the appliance near the furniture
recess before levelling it. For more details, refer to paragraph "Building in".
2. Loosen or tighten the feet to adjust the level.
A correct adjustment of the appliance
level prevents the vibration, noise and
the movement of the appliance when in
operation.
The appliance must be level and stable.
CAUTION! Do not put cardboard, wood
or equivalent materials below the appliance feet to adjust the level.
HOSE AND CABLE CONNECTION
1100 mm 1450 mm
960 mm1230 mm
900 mm
1360 mm
max 1000 mm
min. 600 mm
max 1000 mm
min. 600 mm
7
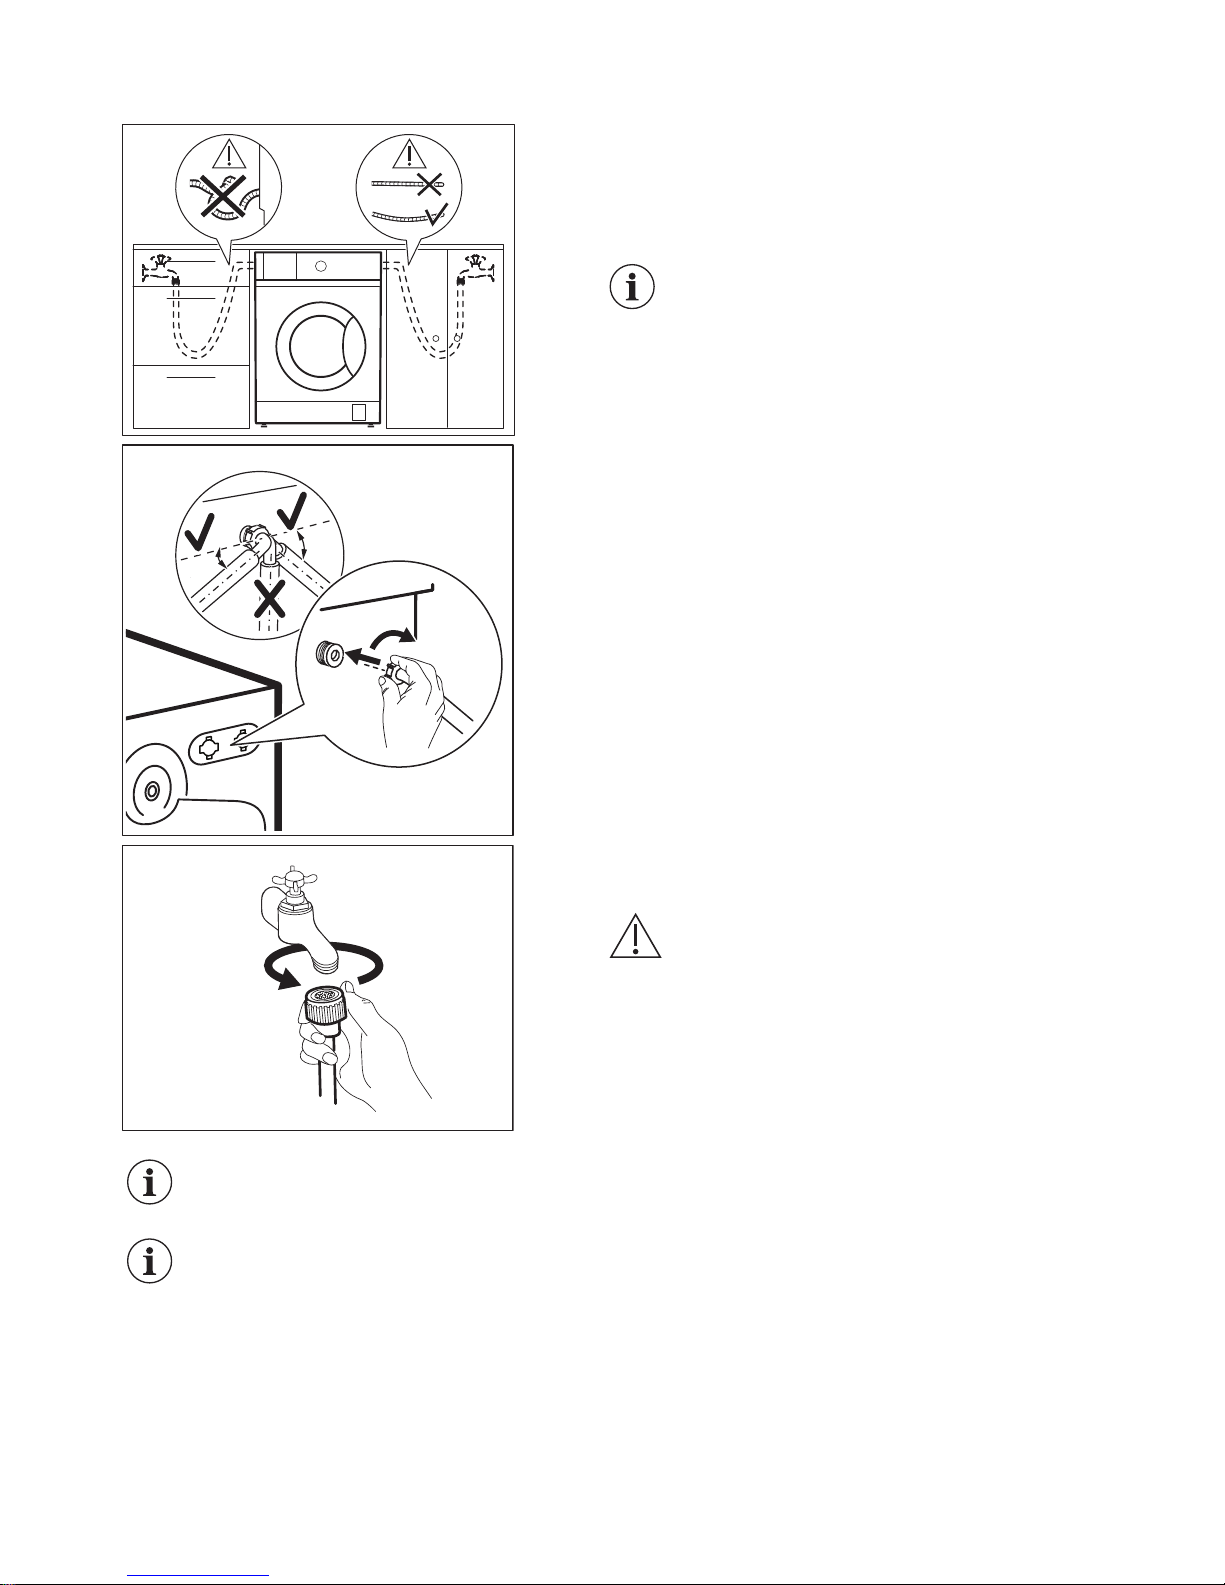
The inlet hose
1. Remove the inlet hose from inside the drum.
2. To connect the water inlet hose towards the prop-
er direction and with the proper inclination, check the
position of the water tap before connecting it to the
back of the appliance.
Make sure the hose is nor kinked,
squashed but neither tensed.
20O20
O
45O45
O
3. Connect the hose to the back of the appliance. Do
not turn the inlet hose downwards, but turn it left or
right depending on the position of your water tap.
4. Loosen the ring nut to fix it in the correct position.
5. Connect the water inlet hose to the cold water tap
with 3/4 thread.
WARNING! Make sure that there are no
leaks from the couplings.
Use the hose supplied with appliance.
Do not use an extension hose if the inlet hose is too short. Contact the Authorised Service
Centre for an inlet hose replacement.
Water drainage
The drain hose can be connected:
8

Ø 40 mm
To a stand pipe with vent-hole
Directly into a drain pipe at a height of not less than
60 cm (23.6”) and not more than 100 cm (39.3”).
The end of the drain hose must always be ventilated ,
i.e. the inner diameter of the drain pipe (min. 40 mm min. 1.6”) must be larger than the external diameter
of the drain hose.
max.
600 mm
To a sink spigot
Put the drain hose in the spigot and tighten it with
the supplied cable tie L.
Make sure that the drain hose makes a loop to prevent particles going into the appliance from the sink.
L
To a wall-pipe
Directly to a built-in drain pipe in the room wall and
tighten it with the supplied cable tie L.
You can extend the drain hose to maximum 400 cm. Contact the service centre for the other
drain hose and the extension.
BUILDING IN
600 mm
min.
820 mm
min.
560 mm
16-22 mm
min.
This appliance has been designed to be built into the
kitchen furniture. The recess should have the dimensions shown in this picture.
For recess with a height different than
820 mm, it is possible to buy the appropriate kit on the website.
9

553 mm
596 mm
140 mm
76 mm
50 mm
50 mm
819 mm
If hoses run behind the appliance, make
sure that nothing closes the small recess indicated with the measures 50 x
50 mm.
The appliance is also equipped with an adhesive
sponge pad H that you can find inside the drum.
Attach it on the top of the appliance where indicated
in the drawing.
When levelling the appliance under the furniture, DO
NOT squeeze the sponge pad.
Before proceeding with appliance building in, bring it
near the recess and preposition the inlet hose, the
drain hose and the mains cable.
WARNING! Make sure they are not
kinked or squashed.
INSTALLING ANTI-TILTING DEVICE
If the height of the counter is 820 mm or lower, you cannot install the anti-tilting device.
10
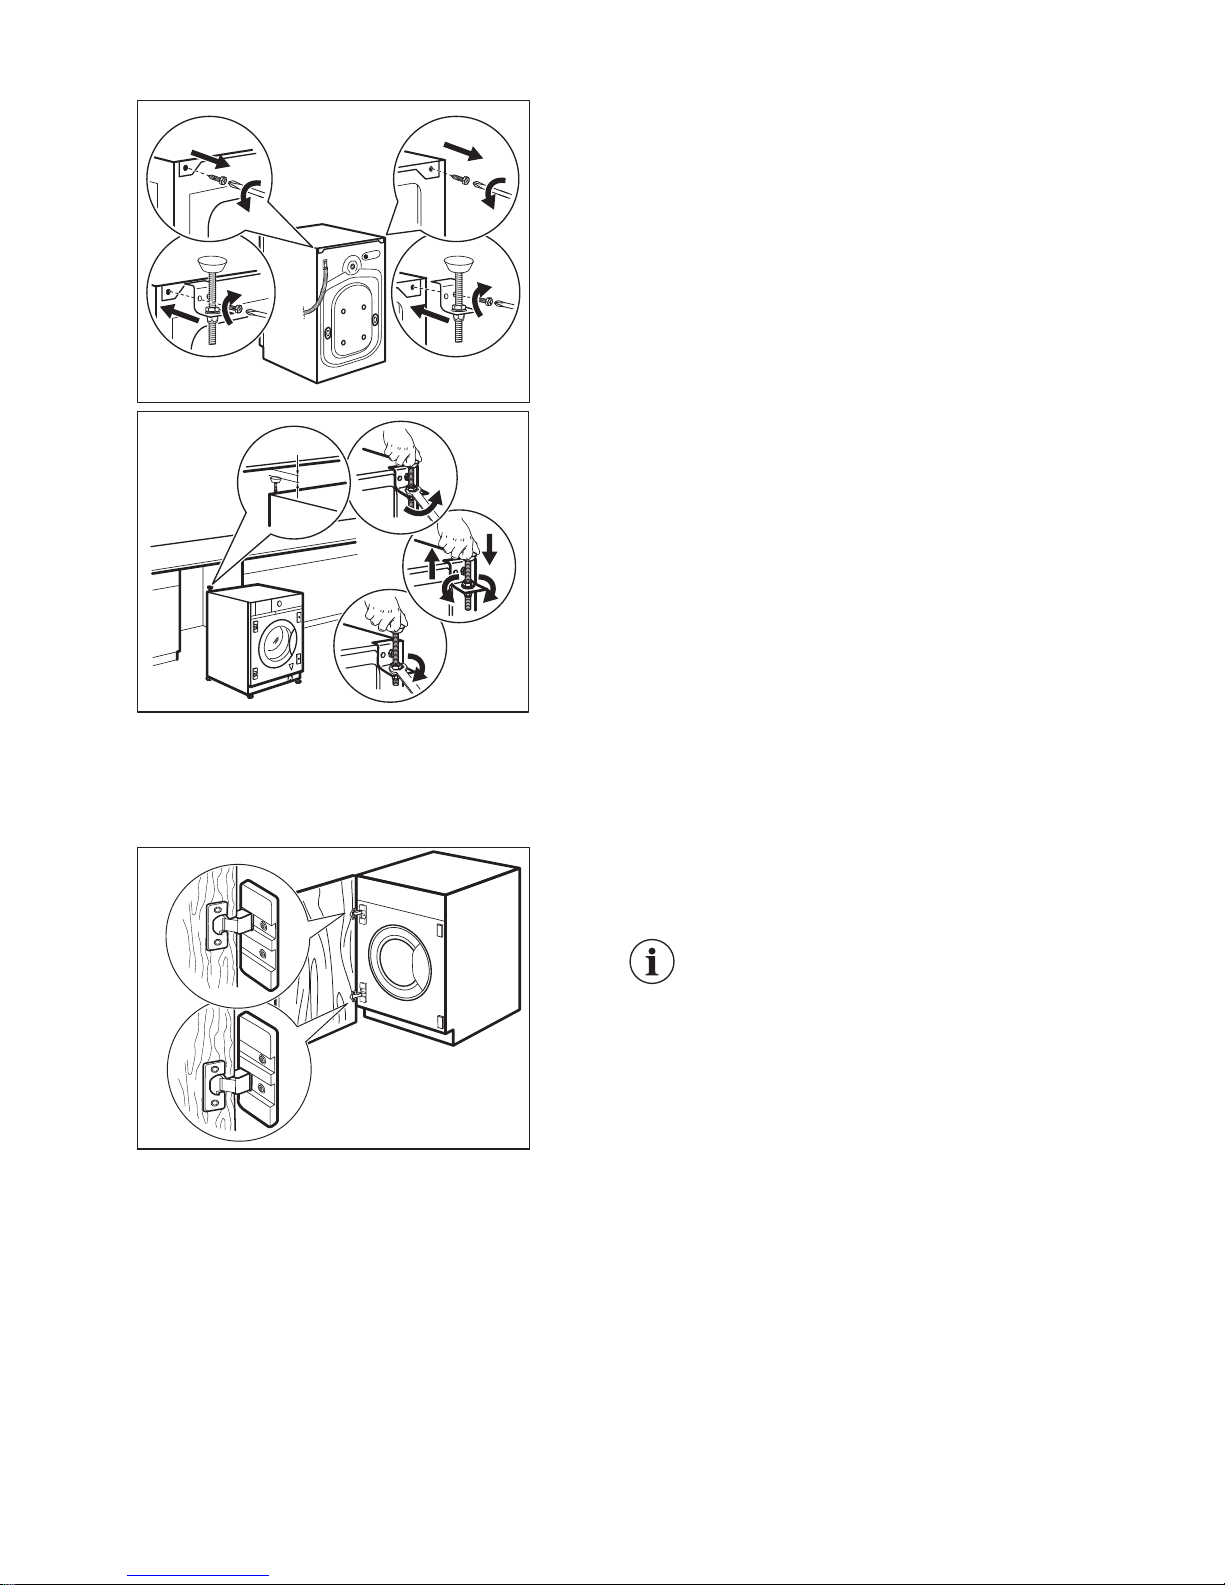
1. Remove the screws of the top cover on the rear of
the appliance and install the anti-tilting device as
shown in the drawing.
~10mm
2. Adjust the anti-tilting device so that the distance
from the counter is 10mm. Loosen the nut counterclockwise with a 3mm wrench. Adjust the height and
turn the nut clockwise to fix it.
PREPARATION AND ASSEMBLY OF THE CUPBOARD DOOR
The dimensions of the cupboard door should be:
• width min. 595 - max. 598 mm;
• thickness 16-22 mm.
Factory pre setting
The appliance is originally pre set for the assembly of
a cupboard door opening from right to left.
The best solution would be to screw
the upper hinge to the upper hole of the
top plate and the lower hinge to the
lower hole of the bottom plate.
11
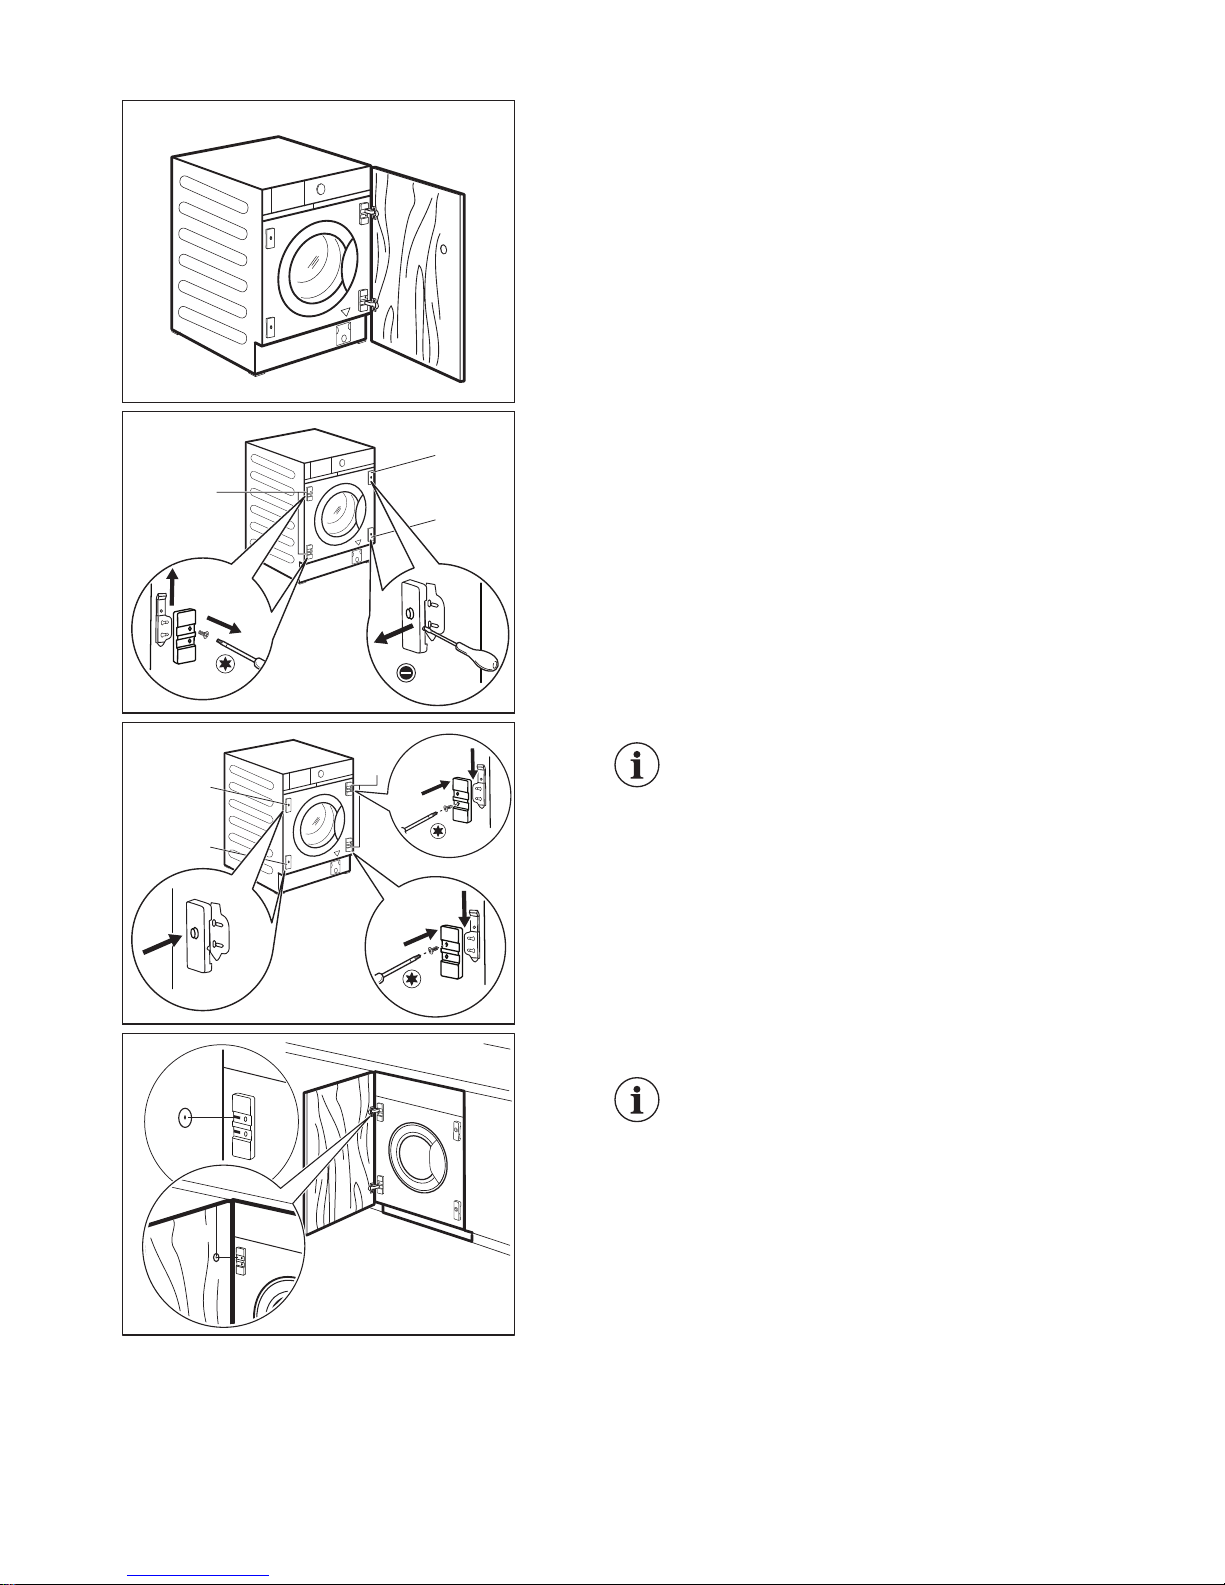
Reversibility of the cupboard door
Carry out the cupboard door reversibility before the
appliance is built in completely.
M
N
O
If the cupboard door has to be opened from left to
right, invert the position of the hinge supports M with
the magnetic plate N and lower plate O.
M
N
O
Make sure that the plate with magnet is
on the upper position.
x
y
y
Cupboard door preparation
For countersinking the door, it is recommended to call a professional.
Align the cupboard door to the furniture correctly.
Measure the distance X to fix the height of the hole
to countersink the upper hinge. The centre of the
hole Y should be at the same height of the stroke on
the hinge support.
12
 Loading...