

TABLE OF CONTENTS
HOW DOES THE YORK P30 WORK?
Parts
Wearing the YORK P30
P30
P30
2
2
2
2
QUICK START
33
CARE AND MAINTENANCE
TROUBLESHOOTING
TECHNICAL DATA
DISCLAIMER
HEART RATE ZONE SELECTION GUIDELINES
Calculating your Maximum Heart Rate
Selecting the Zone
Target Zone
USING YOUR YORK P30 HEART RATE MONITOR
Determine your readiness for physical activity
P30
HOW TO USE THE SCAN
Current Session Scan
Previous Session Scan
USING THE P30 HEART RATE MONITOR
Activating Heart Rate Mode
De-Activating Heart Rate Mode
Out of Zone Alarm
Heart Rate Recovery Alarm
Using the Stopwatch
Using the Countdown Timer
P30
2121
2121
2222
2222
18
18
18
18
15
15
15
15
11
11
12
13
13
14
11
11
12
13
13
14
19
19
20
19
19
20
SETTING THE P30 HEART RATE MONITOR
Setting Loop
Setting the Time of Day & the Date
Setting the Alarm
Hourly Alarm
Daily Alarm
Setting the Heart Rate Zone
Setting the Heart Rate Recovery
Setting the Count Down Timer
Setting the Calorie Counter
P30
3
4
6
6
6
7
8
9
10
3
4
6
6
6
7
8
9
10
HOW TO USE TIME IN ZONE
1616
HOW TO USE CALORIE COUNTER
1616
CALORIE COUNTER AMIBIENT HEART RAGE QUICK START
1717
YORK P30 HRM / 1
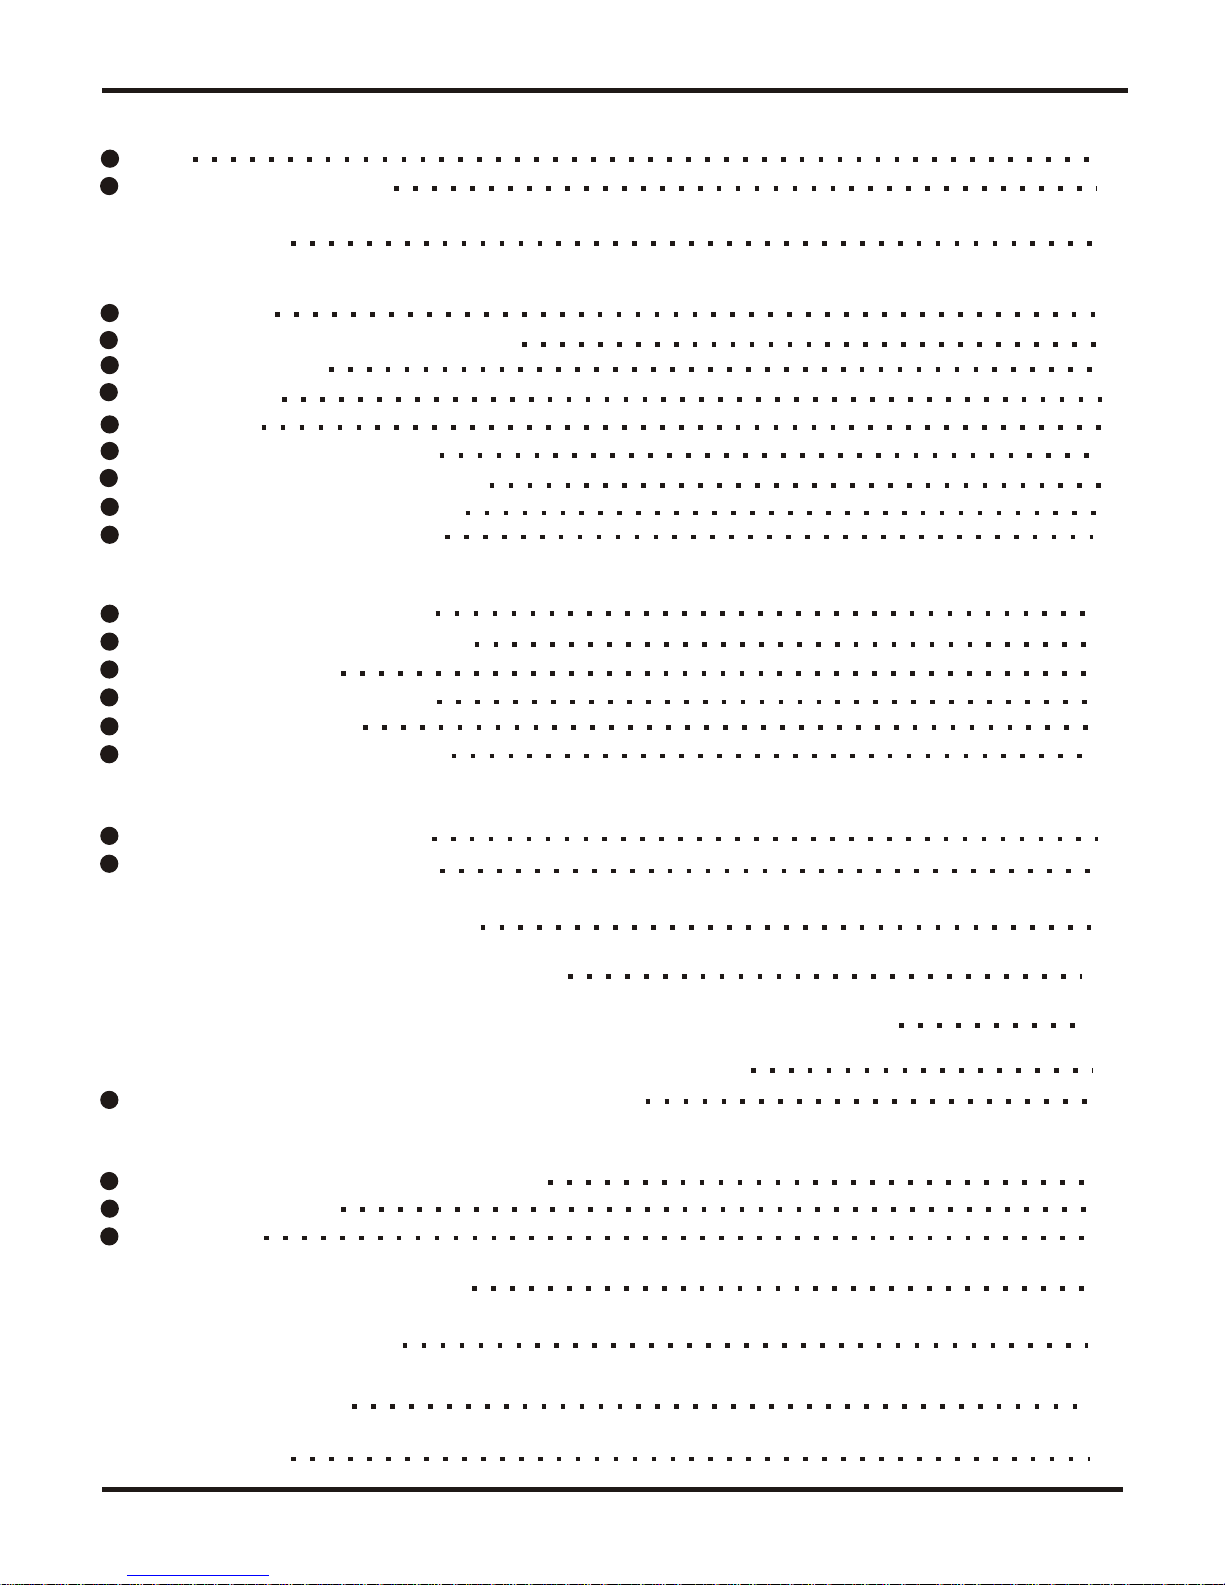
Parts.
YORK P30 consists of
three parts:
P30
The transmitter ( )
Grooved electrode
areas are on the
back
The elastic strap
The watch
Wearing the YORK P30P30
1. Attach the P30
transmitter to the elastic strap.
2. Adjust the strap length to fit
snugly and comfortably.
3. Wet the grooved electrode
areas on the back of the
YORK P30 transmitter ( ).
4. Secure the transmitter around
your chest with the elastic strap.
5. Check that the grooved and wet
electrode areas are against your
skin and the YORK logo is
in a central upright position.
TO MAXIMISE EFFECTIVE USE
WET THE GROOVED
ELECTRODE AREAS
CAREFULLY.
P30
P30
grooved electrode
areas
TO MAXIMISE EFFECTIVE USE
WET THE GROOVED
ELECTRODE AREAS
CAREFULLY.
It is recommended that you wear the transmitter
against your bare skin.
However if you wish to wear the transmitter over
a shirt, moisten the shirt well under the electrodes.
6. Put on the receiver as you would
put on an ordinary watch.
HOW DOES THE YORK P30 WORK? P30
YORK P30 HRM / 2
TM
SYSTEM 122
TM
SYSTEM 122
LI GH TLI GH T
SS
TT
..
//
FF
WW
DD
SS
CC
AA
NN
SS
EE
LL
EE
CC
TT
MM
OO
DD
EE
LI GH TLI GH T
SS
TT
..
//
FF
WW
DD
SS
CC
AA
NN
SS
EE
LL
EE
CC
TT
MM
OO
DD
EE
MODE
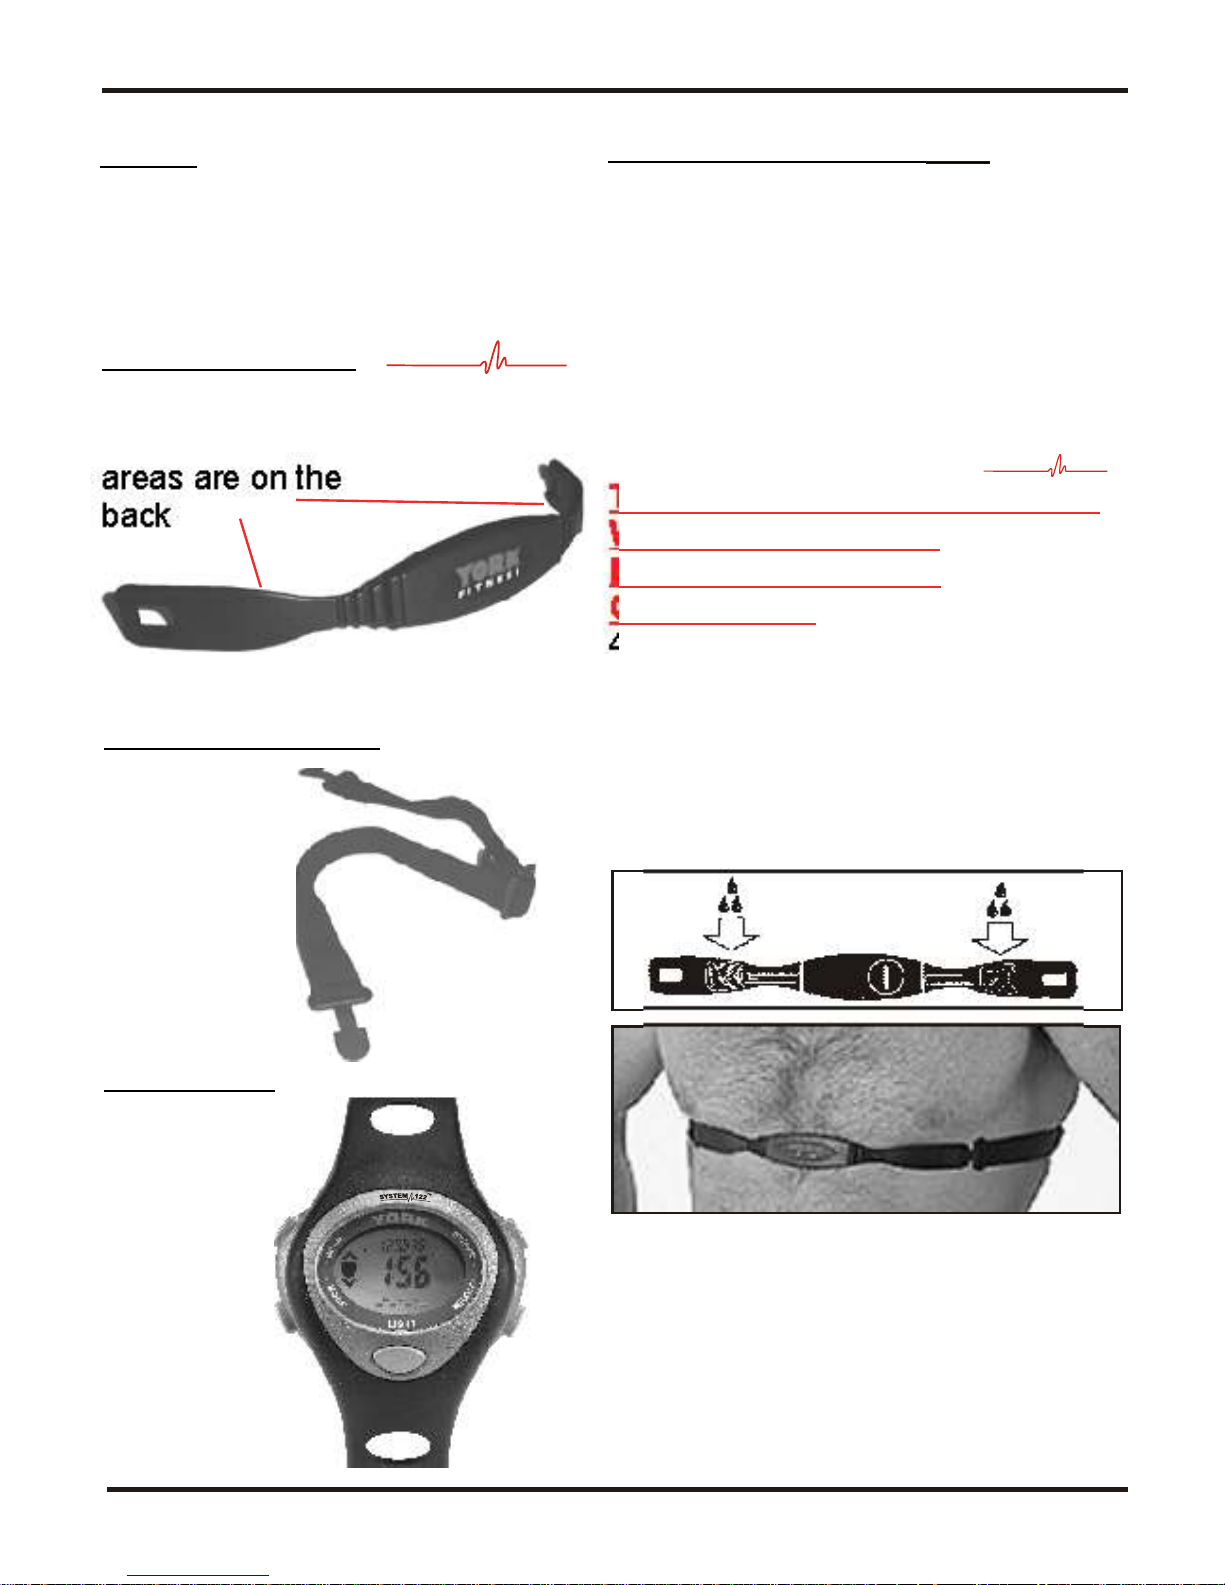
QUICK START
The YORK P30 has a variety of features.
To set these up you will need to read the
instructions. However, if you just want to
see how the hear rate feature works,
follow those steps:
1. Put on the transmitter.
2. Attach the monitor to your wrist.
3. Press and hold the MODE key until
the heart symbol appears.
4. After a few seconds the heart symbol
will start flashing and your hear rate
will appear.
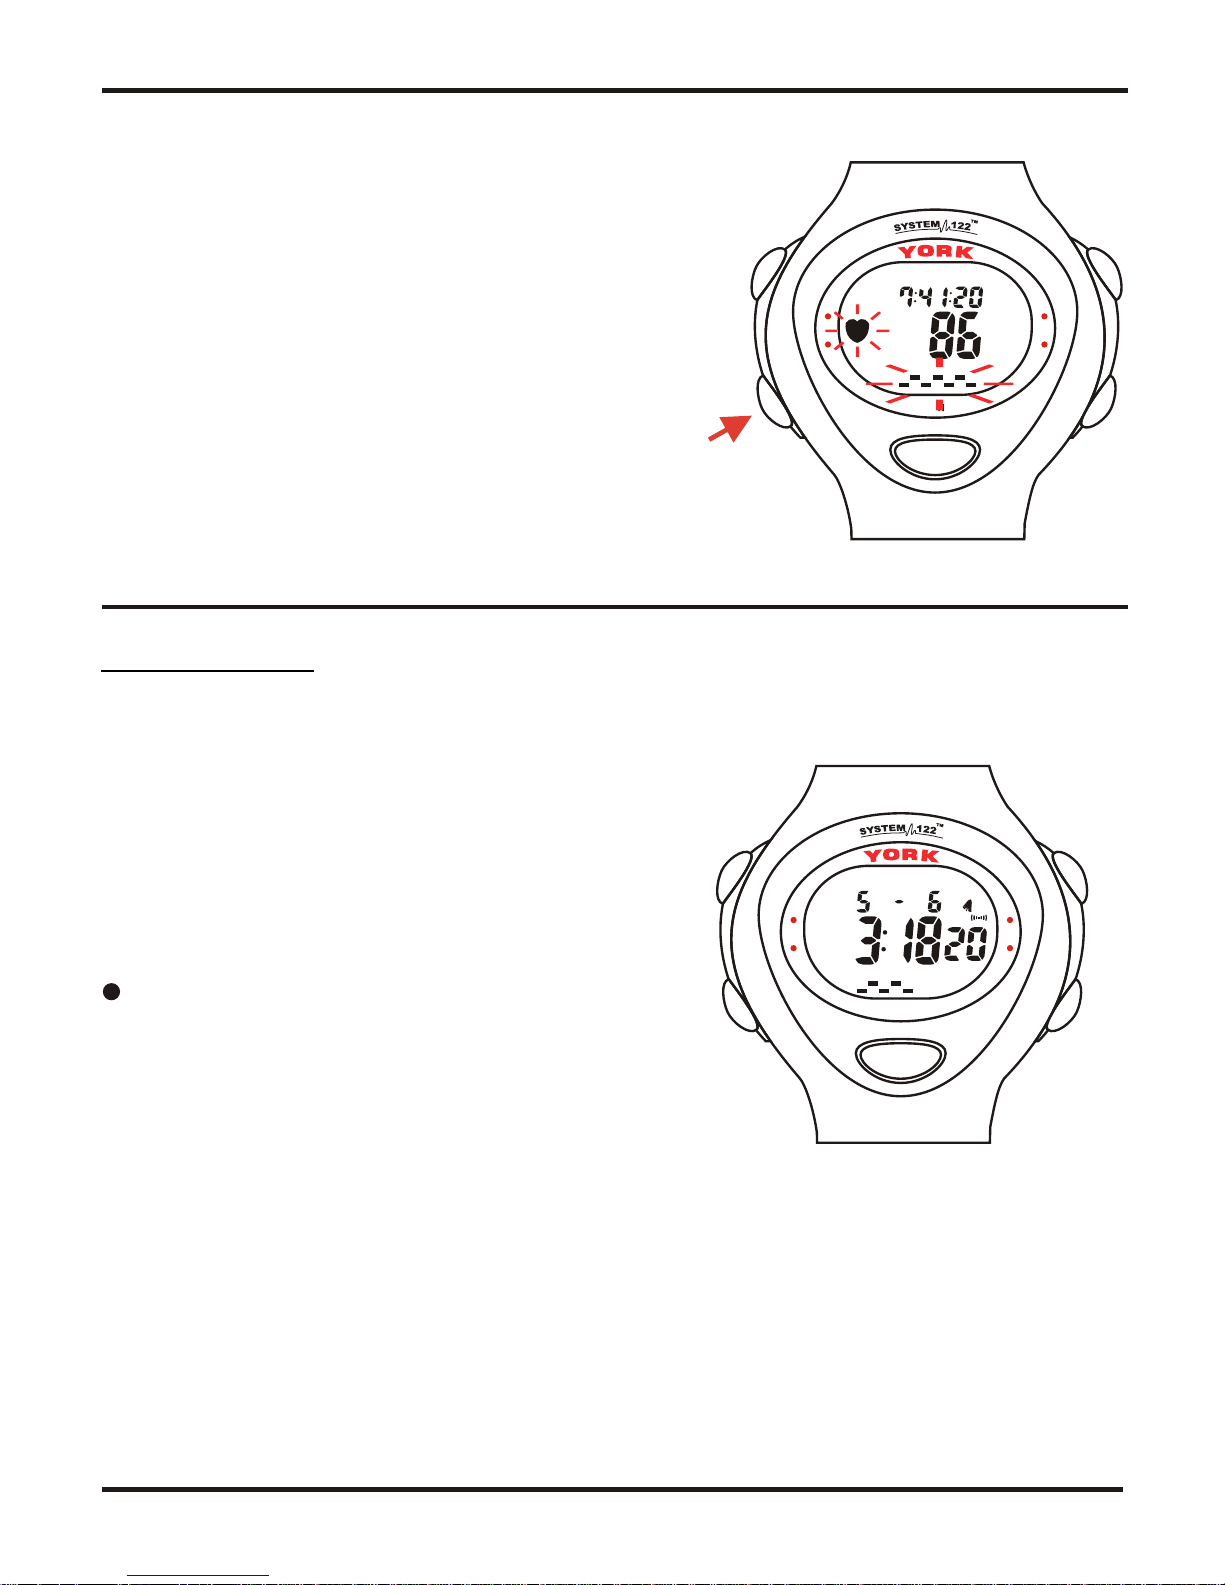
SETTING THE P30 HEART RATE MONITORP30
Setting Loop
The York P30 has one setting loop,
which is entered from the
(Time of Day) screen.
Once you enter the loop, each
press and release of SELECT takes
you to the next setting in the loop
and finally returns to the time of day
screen.
The setting loop for P30 is seconds,
hours, minutes, day of week, month,
date, alarm mode, daily alarm hour,
daily alarm minute, heart zone high
limit, heart zone low limit, countdown
timer single or auto-repeat, countdown
timer hours, minutes, seconds, heart
rate recovery high, heart rate recovery
low, ambient hear rate, weight, age
then back to time of day.
p
p
YORK P30 HRM / 3
LI GH TLI GH T
SS
TT
..
//
FF
WW
DD
SS
CC
AA
NN
SS
EE
LL
EE
CC
TT
MM
OO
DD
EE
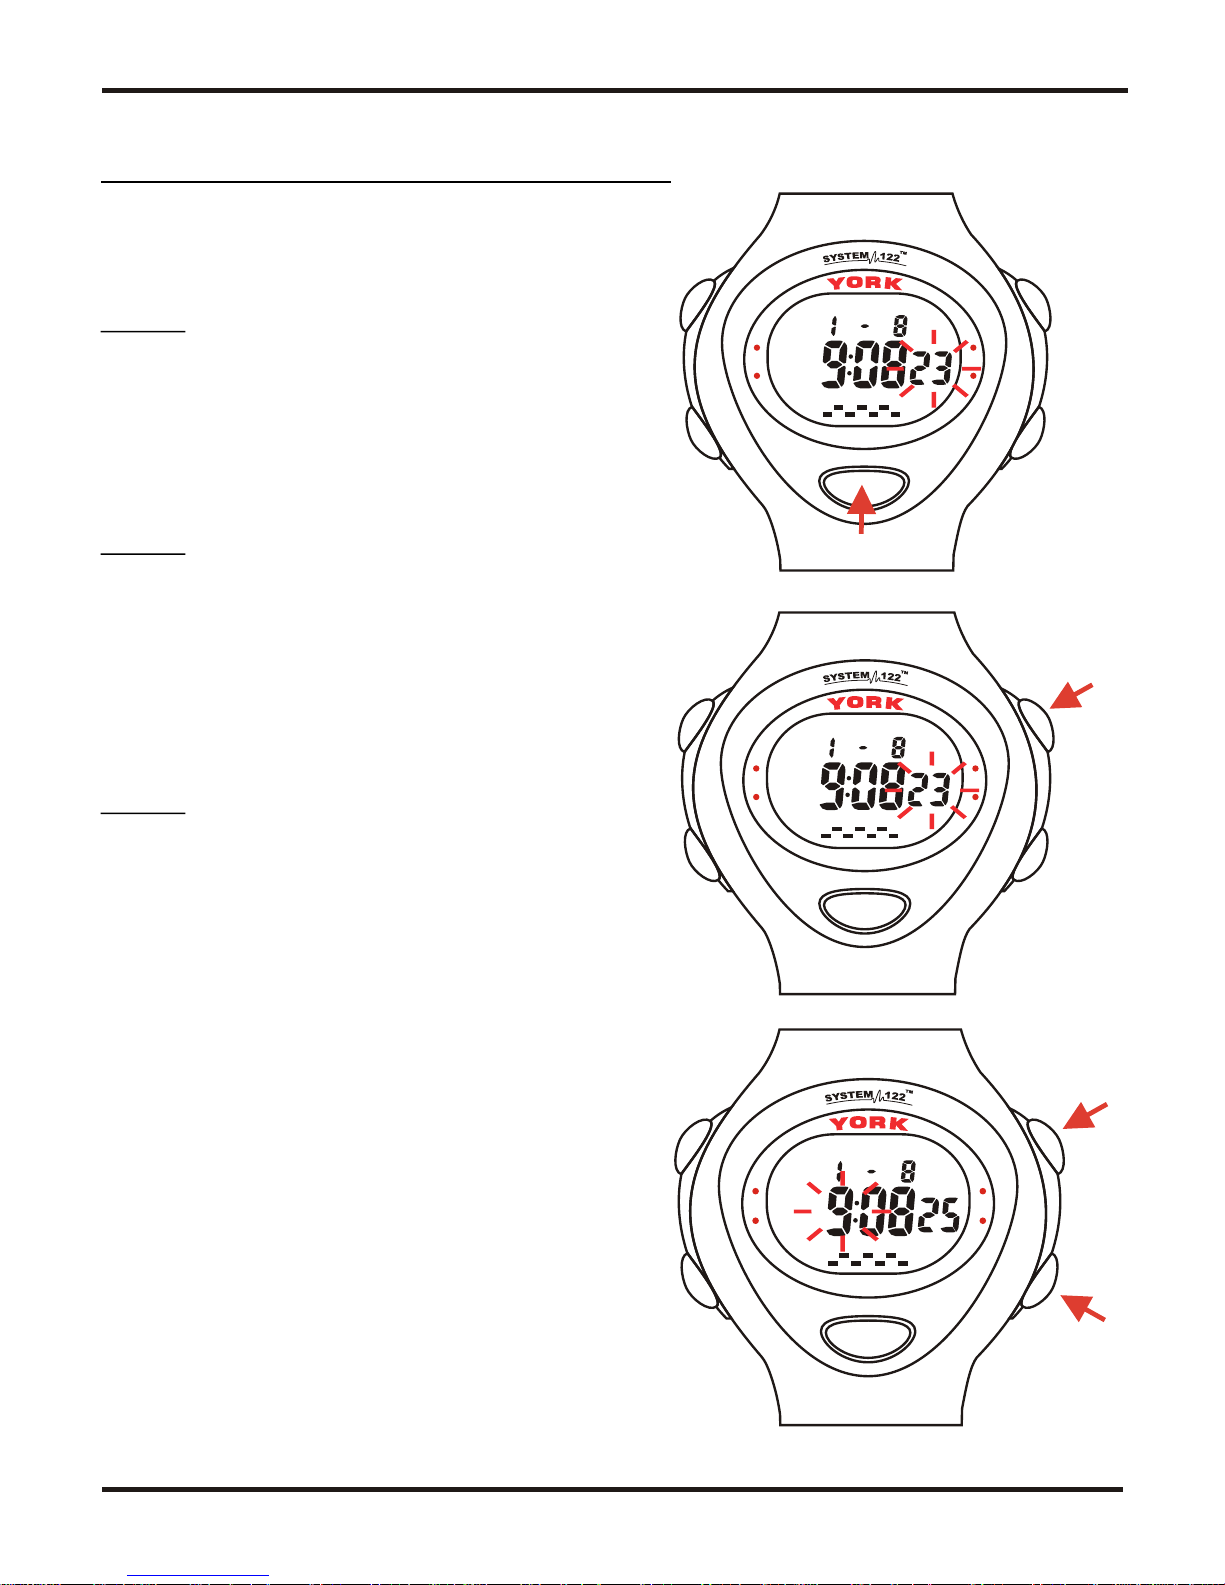
Setting the Time of Day & the Date
1. In the time of day screen, press
and hold SELECT until the
seconds flash.
Note: A press of the MODE button
at any stage in the setting
loop takes you back to the
time of day screen.
2. Press and release ST./FWD or
SCAN to reset seconds to zero.
Note: If seconds are over 30
when you reset, minutes
will advance by 1.
3. Press SELECT to move to hours.
4. Press and release ST./FWD to
increase, or SCAN to decrease
the hours.
Note: A press and hold of ST./FWD
will 'fast forward' or SCAN
will 'fast reverse' the number.
p
1.
LI GH TLIGHT
SS
TT
..
//
FF
WW
DD
SS
CC
AA
NN
SS
EE
LL
EE
CC
TT
MM
OO
DD
EE
LI GH TLI GH T
SS
TT
..
//
FF
WW
DD
SS
CC
AA
NN
SS
EE
LL
EE
CC
TT
MM
OO
DD
EE
p
2.
3.
4.
p
YORK P30 HRM / 4
SETTING THE P30 HEART RATE MONITORP30
LI GHTLI GHT
SS
TT
..
//
FF
WW
DD
SS
CC
AA
NN
SS
EE
LL
EE
CC
TT
MM
OO
DD
EE
LI GHTLI GHT
SS
TT
..
//
FF
WW
DD
SS
CC
AA
NN
SS
EE
LL
EE
CC
TT
MM
OO
DD
EE
LI GHTLI GHT
SS
TT
..
//
FF
WW
DD
SS
CC
AA
NN
SS
EE
LL
EE
CC
TT
MM
OO
DD
EE
LI GHTLI GHT
SS
TT
..
//
FF
WW
DD
SS
CC
AA
NN
SS
EE
LL
EE
CC
TT
MM
OO
DD
EE
LI GHTLI GHT
SS
TT
..
//
FF
WW
DD
SS
CC
AA
NN
SS
EE
LL
EE
CC
TT
MM
OO
DD
EE
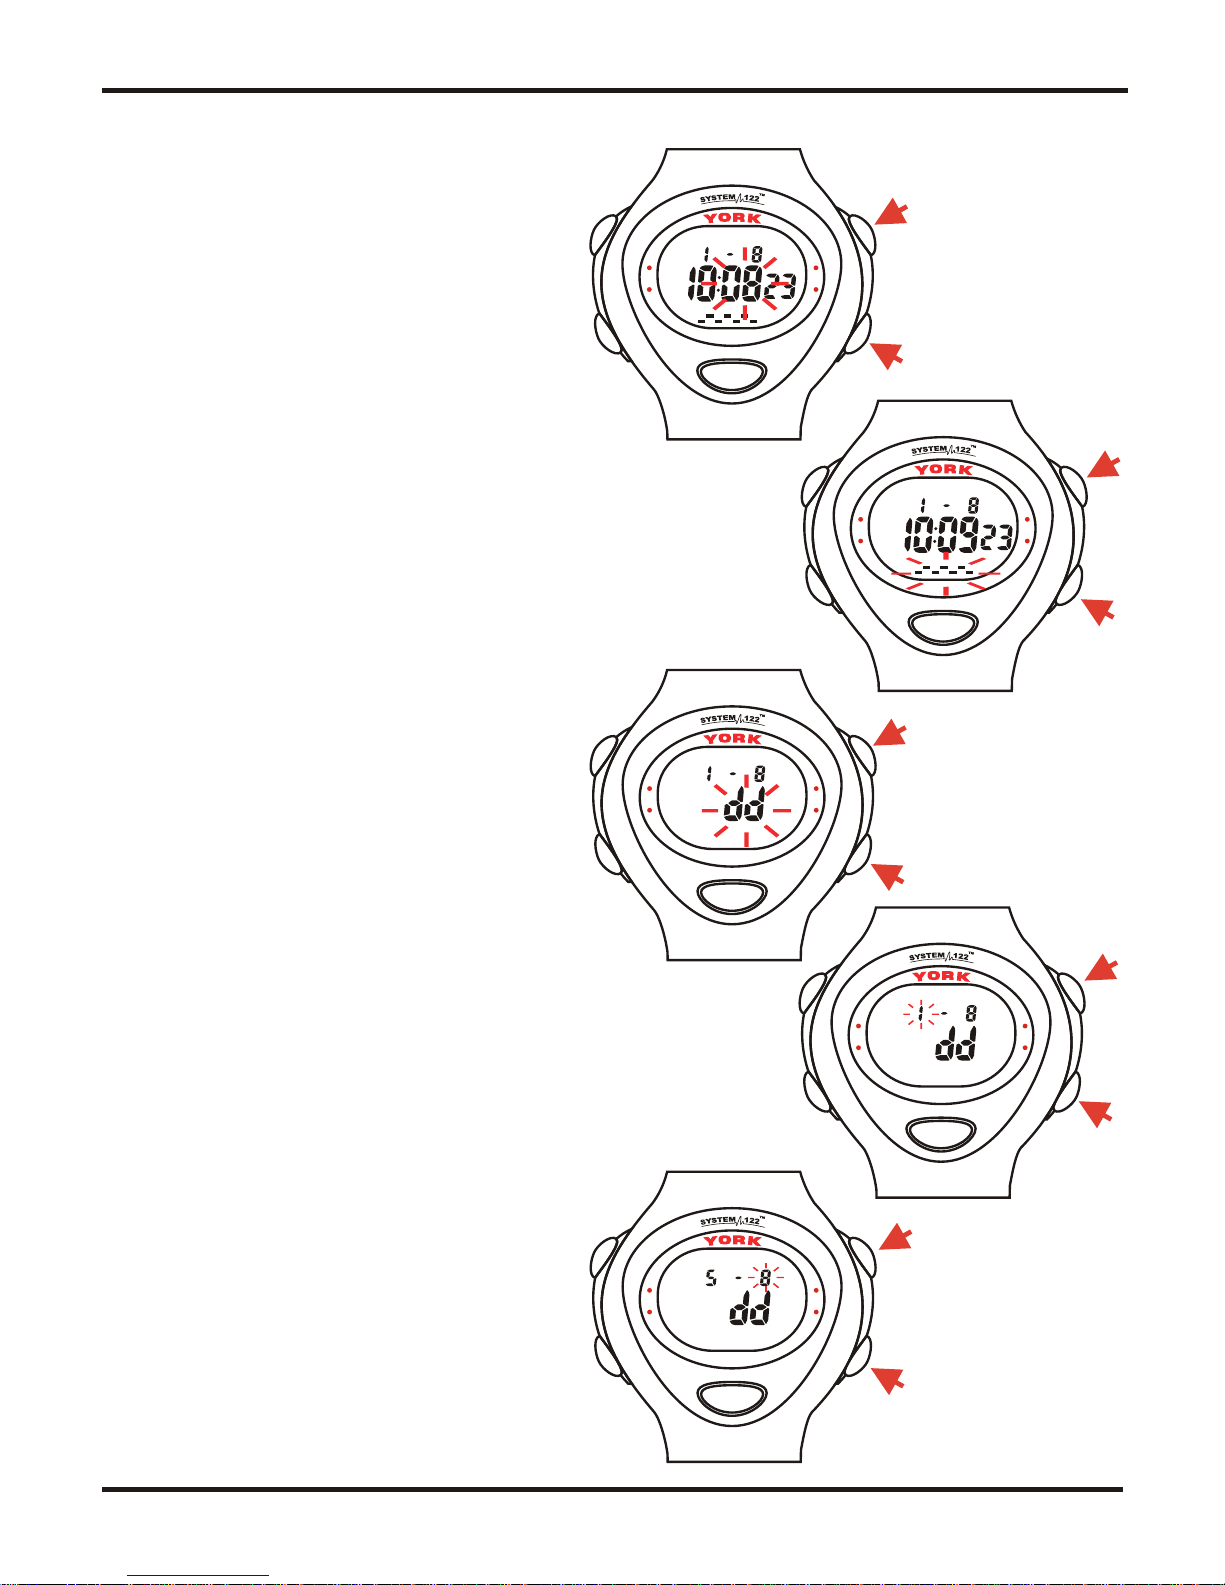
5. Press SELECT to move to
minutes.
6. Press and release ST./FWD
to increase, or SCAN to
decrease the minutes.
7. Press SELECT to move to
day of the week.
8. Press and release ST./FWD
to advance, or SCAN to move
back the day of the week.
9. Press SELECT to move to
date display.
10. Press and release ST./FWD
to change display
arrangement between
date/month and month/date.
11. Press SELECT to move to
month.
12. Press and release ST./FWD
to increase, or SCAN to
decrease the month.
13.Press SELECT to move
to date.
14.Press and release ST./FWD
to increase, or SCAN to
decrease the date.
5.
6.
SS
TT
..
p
7.
8.
p
9.
10.
14.
11.
12.
13.
YORK P30 HRM / 5
SETTING THE P30 HEART RATE MONITORP30

LI GH TLI GH T
SS
TT
..
//
FF
WW
DD
SS
CC
AA
NN
SS
EE
LL
EE
CC
TT
MM
OO
DD
EE
LI GHTLI GHT
SS
TT
..
//
FF
WW
DD
SS
CC
AA
NN
SS
EE
LL
EE
CC
TT
MM
OO
DD
EE
LI GHTLI GHT
SS
TT
..
//
FF
WW
DD
SS
CC
AA
NN
SS
EE
LL
EE
CC
TT
MM
OO
DD
EE
LI GHTLI GHT
SS
TT
..
//
FF
WW
DD
SS
CC
AA
NN
SS
EE
LL
EE
CC
TT
MM
OO
DD
EE
Setting the Alarm
1.Press and hold SELECT to
move to daily/hourly alarm.
2.Press and release ST./FWD to
select the alarm from either
hourly chime only; daily alarm
only; both ON; both OFF.
3.Press SELECT to move to daily
alarm hours.
4.Press and release ST./FWD to
increase, or SCAN to decrease
the hours.
5.Press SELECT to move to daily
alarm minutes.
6.Press and release ST./FWD to
increase, or SCAN to decrease
the minutes.
Hourly Alarm
This will give two beeps on the hour.
Daily Alarm
To view the current alarm setting
(displayed for 2 seconds) press
and release ST./FWD.
The alarm sounds for thirty
seconds. To silence the alarm,
press any button.
Note: The button pressed will not
perform its usual function.
1.
2.
3.
4.
5.
6.
Hold for
2 second.
YORK P30 HRM / 6
SETTING THE P30 HEART RATE MONITORP30

LI GH TL IG HT
SS
TT
..
//
FF
WW
DD
SS
CC
AA
NN
SS
EE
LL
EE
CC
TT
MM
OO
DD
EE
LI GH TL IG HT
SS
TT
..
//
FF
WW
DD
SS
CC
AA
NN
SS
EE
LL
EE
CC
TT
MM
OO
DD
EE
Setting the Heart Rate Zone
1.Press and hold SELECT to move
to the high heart zone setting.
2.Press and release ST./FWD to
increase or SCAN to decrease,
to set the required number.
3.Press SELECT to move to the
low heart zone setting.
4.Press and release ST./FWD to
increase or SCAN to decrease,
to set the required number.
Note: There is a minimum 5 beat
per minute difference
between the high and
low limit.
1.
2.
3.
4.
YORK P30 HRM / 7
SETTING THE P30 HEART RATE MONITORP30

Setting Heart Rate Recovery (HRR)
The YORK P30 automatically
measures HRR. HRR refers to
the time it takes for your heart
rate to drop from the preset high
to the preset low recovery limit
after you have finished your workout.
In general, as your recovery time
decreases, your fitness level is
improving.
However, it is only a
comparative value with your
earlier efforts, and not a
meaningful number itself.
1. After setting your heart zone low,
press SELECT to move to HRR high.
2. Press and release ST./FWD to
increase or SCAN to decrease,
to set the required number.
Note: It is suggested that this be
set 5bpm below the heart
zone high limit.
3. Press SELECT to move to HRR low.
4. Press and release ST./FWD to
increase or SCAN to decrease,
to set the required number.
Note: As a guideline, note what
your heart rate drops to at
the end of your workout after
2 minutes (using the stopwatch),
and use this value as your HRR
low setting.
LI GH TLI GH T
SS
TT
..
//
FF
WW
DD
SS
CC
AA
NN
SS
EE
LL
EE
CC
TT
MM
OO
DD
EE
RHR
1.
2.
LI GH TLI GH T
SS
TT
..
//
FF
WW
DD
SS
CC
AA
NN
SS
EE
LL
EE
CC
TT
MM
OO
DD
EE
R
H
R
3.
4.
YORK P30 HRM / 8
SETTING THE P30 HEART RATE MONITORP30

Setting the Count Down Timer
Press and hold SELECT to move
to countdown timer. The repeat icon
will be flashing around TMR.
The countdown timer counts down
from up to 10 hours.
You can set it so that it automatically
resets and continues counting down
repeatedly, or times a single event.
1. Press ST./FWD or SCAN to select
repeat (both the repeat and TMR
icon will be displayed).
2. Press ST./FWD or SCAN to select
single countdown (just the TMR
icon will be displayed).
Note: The maximum actual time that
can be set is 9 hours 59 minutes
59 seconds.
3. Press SELECT to move to
countdown timer hours.
4. Press and release ST./FWD to
increase, or SCAN to decrease
the hours.
5. Press SELECT to move to
countdown timer minutes.
6. Press and release ST./FWD to
increase, or SCAN to decrease
the minutes.
7. Press SELECT to move to
countdown timer seconds.
8. Press and release ST./FWD to
increase, or SCAN to decrease
seconds.
9. A further press of SELECT to
move to Ambient Heart Rate (AHR).
LI GHTLI GHT
SS
TT
..
//
FF
WW
DD
SS
CC
AA
NN
SS
EE
LL
EE
CC
TT
MM
OO
DD
EE
TMR
LI GHTLI GHT
SS
TT
..
//
FF
WW
DD
SS
CC
AA
NN
SS
EE
LL
EE
CC
TT
MM
OO
DD
EE
TMR
LI GHTLI GHT
SS
TT
..
//
FF
WW
DD
SS
CC
AA
NN
SS
EE
LL
EE
CC
TT
MM
OO
DD
EE
LI GHTLI GHT
SS
TT
..
//
FF
WW
DD
SS
CC
AA
NN
SS
EE
LL
EE
CC
TT
MM
OO
DD
EE
LI GHTLI GHT
SS
TT
..
//
FF
WW
DD
SS
CC
AA
NN
SS
EE
LL
EE
CC
TT
MM
OO
DD
EE
LI GHTLI GHT
SS
TT
..
//
FF
WW
DD
SS
CC
AA
NN
SS
EE
LL
EE
CC
TT
MM
OO
DD
EE
TMR
TMR
1.
TMR
2.
TMR
3.
4.
5.
6.
7. / 9.
8.
YORK P30 HRM / 9
SETTING THE P30 HEART RATE MONITORP30

Setting the Calorie Counter
The calorie counter shows the
number of calories burnt during
exercise, using heart rate intensity.
You need to enter:
Your Ambient Heart Rate (AHR)
value this is your typical heart rate
at rest before starting exercise
Your weight
Your age
Note: You can also use the Quick
Set feature in the main calorie
screen to set AHR (see
operating the Calorie Counter).
1. Press and hold SELECT to move
to ambient heart rate (AHR)
Note: Once set, calorie expenditure
will be calculated from 5 beats
per minute above this figure.
2. Press ST./FWD to increase
(120bpm maximum) or SCAN
to decrease the ambient heart
rate (30bpm minimum).
3. Press SELECT to move to set
weight. The kilogram value will
be flashing.
Note: The weight range is from
20~150kg (44~330lbs).
4. Press and release ST./FWD to
increase or SCAN to decrease,
to set your weight.
Note: “kg” and “lbs” are displayed
and changed at the same time.
5. Press SELECT to move to set age.
6. Press and release ST./FWD to
increase or SCAN to decrease,
to set your age.
7. A further press of SELECT
takes you back to Time of Day.
LI GH TLI GHT
SS
TT
..
//
FF
WW
DD
SS
CC
AA
NN
SS
EE
LL
EE
CC
TT
MM
OO
DD
EE
AHR
LI GH TLI GHT
SS
TT
..
//
FF
WW
DD
SS
CC
AA
NN
SS
EE
LL
EE
CC
TT
MM
OO
DD
EE
lb
KG
LI GH TLI GHT
SS
TT
..
//
FF
WW
DD
SS
CC
AA
NN
SS
EE
LL
EE
CC
TT
MM
OO
DD
EE
AGE
LI GH TLI GHT
SS
TT
..
//
FF
WW
DD
SS
CC
AA
NN
SS
EE
LL
EE
CC
TT
MM
OO
DD
EE
p
1.
2.
3.
4.
5.
6.
7.
YORK P30 HRM / 10
SETTING THE P30 HEART RATE MONITORP30

LI GH TLI GH T
SS
TT
..
//
FF
WW
DD
SS
CC
AA
NN
SS
EE
LL
EE
CC
TT
MM
OO
DD
EE
LI GH TLI GH T
SS
TT
..
//
FF
WW
DD
SS
CC
AA
NN
SS
EE
LL
EE
CC
TT
MM
OO
DD
EE
Activating Heart Rate Mode
The YORK P30 has five main screens:
Time of Day, Stopwatch, Countdown
Timer, Time in Zone and Calorie
Counter.
1. Press and hold MODE in any
main screen to turn on and
display your heart rate. The
heart icon and a zero heart rate
value will appear in the lower
row of the display.
2. After a few seconds (provided
you are wearing the chest
transmitter) the heart icon will
begin to flash, followed by your
current heart rate being displayed.
3. An up arrow (displayed to the
left of the heart icon) means you
are above your zone.
4. A down arrow means you are
below your zone.
5. A double arrow means you
are within your zone.
MODE
USING THE P30 HEART RATE MONITORP30
LI GHTLI GH T
SS
TT
..
//
FF
WW
DD
SS
CC
AA
NN
SS
EE
LL
EE
CC
TT
MM
OO
DD
EE
De-Activating Heart Rate Mode
1. The YORK P30 also features an
Auto-Off function. After 2
minutes if a heart rate signal is
not received, it will switch off
the heart rate.
2. Press and hold the MODE to take
you back to time of day.
2.
YORK P30 HRM / 11
LI GHTLI GHT
SS
TT
..
//
FF
WW
DD
SS
CC
AA
NN
SS
EE
LL
EE
CC
TT
MM
OO
DD
EE
p

LI GH TLI GH T
SS
TT
..
//
FF
WW
DD
SS
CC
AA
NN
SS
EE
LL
EE
CC
TT
MM
OO
DD
EE
Out of Zone Alarm
The out of zone alarm will sound
in rhythm with your heart rate
when you go above or below the
zone limits.
Note: To turn on the alarm, heart
rate must be activated.
1.Press and hold SELECT. An
alarm icon “ “ will appear.
2.To turn off the alarm press and
hold SELECT until the icon “ “
disappears.
2. Hold for disappear
1. Hold for appear
YORK P30 HRM / 12
LI GH TLI GH T
SS
TT
..
//
FF
WW
DD
SS
CC
AA
NN
SS
EE
LL
EE
CC
TT
MM
OO
DD
EE
USING THE P30 HEART RATE MONITORP30

Heart Rate Recovery Alarm
The YORK P30 automatically records
the amount of time it takes your heart
to drop from a pre-set upper limit to a
pre-set lower limit. Timing begins
automatically when your heart rate
passes through the upper limit, and
continues until your heart rate drops
below the lower limit. When timing
stops, the Heart Rate Recovery alarm
gives four continuous beeps whenever
a heart rate recovery is completed.
The alarm cannot be switched off.
Note: To view the HRR time, move
to the TiZ main screen and
press SELECT.
Using the Stopwatch
Stopwatch can be used with or
without heart rate activated, and
is operated in the same way for
either modes.
1. Press MODE until you reach the
stopwatch screen.
2. The letter “STW” will appear.
To start stopwatch, press and
release ST./FWD.
3. To stop stopwatch, press and
release ST./FWD.
4. To reset stopwatch, press and
hold ST./FWD when the stopwatch
is not running.
Note: Maximum stopwatch time is
9 hours, 59 minutes, 59.9
seconds.
LI GHTLIGH T
SS
TT
..
//
FF
WW
DD
SS
CC
AA
NN
SS
EE
LL
EE
CC
TT
MM
OO
DD
EE
S
T
W
LI GHTLIGH T
SS
TT
..
//
FF
WW
DD
SS
CC
AA
NN
SS
EE
LL
EE
CC
TT
MM
OO
DD
EE
W
ST
LI GHTLIGH T
SS
TT
..
//
FF
WW
DD
SS
CC
AA
NN
SS
EE
LL
EE
CC
TT
MM
OO
DD
EE
S
T
W
LI GHTLIGH T
SS
TT
..
//
FF
WW
DD
SS
CC
AA
NN
SS
EE
LL
EE
CC
TT
MM
OO
DD
EE
MODE
ST./FWD
ST./FWD
ST./FWD
S
T
W
LI GHTLIGH T
SS
TT
..
//
FF
WW
DD
SS
CC
AA
NN
SS
EE
LL
EE
CC
TT
MM
OO
DD
EE
LI GHTLIGH T
SS
TT
..
//
FF
WW
DD
SS
CC
AA
NN
SS
EE
LL
EE
CC
TT
MM
OO
DD
EE
MODE
SELECT
TIZ
HRR
YORK P30 HRM / 13
USING THE P30 HEART RATE MONITORP30
1.
2.
3.
4.

Using Countdown Timer
Countdown timer can be used with
or without heart rate activated.
When the time has counted down
to zero, an audible alarm sounds
for 10 seconds.
1. Press MODE until you are in the
timer screen (TMR).
2. To start countdown timer, press
and release ST./FWD.
3. To stop countdown timer, press
and release ST./FWD.
4. To reset countdown timer, press
and hold ST./FWD when the
countdown timer is not running.
Note: Maximum countdown time is
9 hours, 59 minutes, 59.9
seconds
LI GH TLI GH T
SS
TT
..
//
FF
WW
DD
SS
CC
AA
NN
SS
EE
LL
EE
CC
TT
MM
OO
DD
EE
TMR
LI GH TLI GH T
SS
TT
..
//
FF
WW
DD
SS
CC
AA
NN
SS
EE
LL
EE
CC
TT
MM
OO
DD
EE
TMR
LI GH TLI GH T
SS
TT
..
//
FF
WW
DD
SS
CC
AA
NN
SS
EE
LL
EE
CC
TT
MM
OO
DD
EE
TMR
MODE
ST./FWD
ST./FWD
YORK P30 HRM / 14
2.
4.
1.
USING THE P30 HEART RATE MONITORP30

HOW TO USE SCAN
Previous Session Scan
In any main screen, a press
and release of SCAN starts
a single scan through
maximum, average and
minimum heart rate for the
previous session.
· This is stored in memory,
and cleared automatically
when heart rate is next
switched on.
SELEC TSELEC T
SS
TT
..
//
FF
WW
DD
SS
CC
AA
NN
MM
OO
F
F
O
N
/
O
F
F
O
N
/
O
D
D
E
E
MINAVG
MAX
SELEC TSELEC T
SS
TT
..
//
FF
WW
DD
SS
CC
AA
NN
MM
OO
FF
ON
/
O
FF
ON
/
O
D
D
E
E
p
Current Session Scan
When heart rate is activated,
a press and release of SCAN
starts a scan through the
maximum, average and
minimum heart rates
(3 seconds for each) since
heart rate was switched on.
A press and release of SCAN
during the scan takes you back
to the main screen you were in.
SELEC TSELEC T
SS
TT
..
//
FF
WW
DD
SS
CC
AA
NN
MM
OO
F
F
O
N
/
O
F
F
O
N
/
O
D
D
E
E
MINAVG
MAX
SELEC TSELEC T
SS
TT
..
//
FF
WW
DD
SS
CC
AA
NN
MM
OO
F
F
ON
/
O
F
F
ON
/
O
D
D
E
E
p
YORK P30 HRM / 15

Using the Calorie Counter
The calorie counter accumulates
all the calories you have burned
while heart rate is activated.
This is done automatically.
1. To view the calories burned,
press MODE until the CAL icon
appears
2. To reset calories to zero, press
and hold ST./FWD until the display
shows zero.
Note: If you just want the calories
for your actual workout, reset
just as you begin the session.
Using the Time in Zone (TiZ)
Time in Zone is a heart rate
controlled feature that displays
the amount of time you have
spent in your heart zone.
Typically, exercise programs
comprise a warm-up, workout for
a specified time (in a zone) and
cool down.
The TiZ feature can be used to
show the time in your zone as
you actually workout.
If you go above or below your zone,
the timer will stop until you are back
in your zone.
1.To view TiZ, press MODE until
the TiZ icon appears.
LI GH TLI GH T
SS
TT
..
//
FF
WW
DD
SS
CC
AA
NN
SS
EE
LL
EE
CC
TT
MM
OO
DD
EE
ZTI
LI GH TLI GH T
SS
TT
..
//
FF
WW
DD
SS
CC
AA
NN
SS
EE
LL
EE
CC
TT
MM
OO
DD
EE
A
C
L
LI GH TLI GH T
SS
TT
..
//
FF
WW
DD
SS
CC
AA
NN
SS
EE
LL
EE
CC
TT
MM
OO
DD
EE
CAL
ST./FWD
MODE
MODE
YORK P30 HRM / 16

Calorie Counter Ambient Heart
Rate (AHR) Quick Set
The P30 has a quick set feature,
allowing you to set your AHR
quickly just before you begin your
workout.
Calories will be counted from 5bpm
above this value.
You need to be wearing the
transmitter and monitor, and have
heart rate switched on.
1. Move to the CAL main screen.
Press and hold SCAN to set the
current displayed heart rate as
your AHR.
Note: If your heart rate is above
120bpm, the monitor will
default to the setting already
stored.
LI GH TLI GH T
SS
TT
..
//
FF
WW
DD
SS
CC
AA
NN
SS
EE
LL
EE
CC
TT
MM
OO
DD
EE
CAL
LI GH TLI GH T
SS
TT
..
//
FF
WW
DD
SS
CC
AA
NN
SS
EE
LL
EE
CC
TT
MM
OO
DD
EE
AHR
MODE
SCAN
YORK P30 HRM / 17

USING YOUR YORK P30 HEART RATE MONITORP30
By exercising regularly you can sustain and improve your health as
well as feel and look better. Your heart rate tells you the exertion level
of your body during exercise. Your changes in heart rate can be
monitored by a YORK heart rate monitor wirelessly, continuously and
accurately during most types of activities.
The following steps will help you to get the most out of your
YORK P30 heart rate monitor and to achieve your targets.P30
Determine your readiness for physical activity
If you have any signs or symptoms of any disease
or if you use a pacemaker or another implanted electronic device.
If you have signs of high blood cholesterol.
If you have signs of high blood pressure.
If you smoke.
If you have not been following a regular exercise program during
the past 5 years.
if you are over 35 years of age.
Before beginning any type of exercise program consult your doctor,
this is particularly IMPORTANT:
YORK P30 HRM / 18

HEART RATE ZONE SELECTION GUIDEINGS
In order to set your personal target heart zone, you will need to:
- Calculate your maximum heart rate.
- Select a zone based on your current fitness level.
The standard method for calculating heart rate training zones is based
on estimating maximum heart rate using the formula 220 minus the
persons age in years. A woman’s estimated maximum heart rate
can be calculated more accurately by using 226 instead of 220.
The important issue with all estimating calculations is that in reality
they can vary by plus or minus 15 bpm and at best are only an
indication of actual results.
Estimated Maximum Heart Rate = 220 - Age (Years)
SELECTING THE ZONE
If you have not exercised for some time begin your exercise program
in the Healthy Heart Zone. Start slowly for the first few weeks, and
gradually progress up to the zone that meets your personal fitness goal.
ZONE 1. - Healthy Heart - 50 to 59% of Max Heart Rate.
If you are a beginner with the goal of improving overall fitness, losing
weight or reducing stress, exercise in this zone.
ZONE 2. - Weight Management - 60 to 69% of Max Heart Rate.
If you already exercise regularly with the aim of losing body fat,
exercise in this zone.
ZONE 3. - Aerobic - 70 to 79% of Max Heart Rate.
Progress to this zone if your goal is to improve your aerobic
conditioning.
ZONE 4. - Anaerobic Threshold - 80 to 89% of Max Heart Rate.
This is the zone in which to improve anaerobic threshold. Exercising in
this zone requires a high degree of fitness, and should not be used by
those who are unfit.
ZONE 5. - Red Line - 90 to 100% of Max Heart Rate.
For professional supervised athletes only.
Calculating your maximum heart rate
YORK P30 HRM / 19

SELECTING THE ZONE
ZONE 1 ZONE 2 ZONE 3 ZONE 4 ZONE 5
50 - 59% 60 - 69% 70 - 79% 80 - 89% 90 - 100%
155 65 78 - 93 94 - 109 110 - 124 125 - 139 140 - 155
160 60 80 - 96 97 - 112 113 - 128 129 - 144 145 - 160
165 55 83 - 99 100 - 116 117 - 132 133 - 148 149 - 165
170 50 85 - 102 103 - 119 120 - 136 137 - 153 154 - 170
175 45 88 - 105 106 - 123 124 - 140 141 - 157 158 - 175
180 40 90 - 108 109 - 126 127 - 144 145 - 162 163 - 180
185 35 93 - 111 112 - 129 130 - 147 148 - 166 167 - 185
190 30 95 - 114 115 - 133 134 - 152 153 - 171 172 - 190
195 25 98 - 117 118 - 137 138 - 156 157 - 175 175 - 195
Max
HR
Age
Percentage of Max Heart rate (Beats per Minute)
HEART RATE
200
180
160
140
120
100
80
60
200
180
160
140
120
100
80
60
20 30 40 50 60 70 AGE
A
H
O
E 8A
N ERO
B
IC
T R
ESHO
L
D Z N 0-
9
0
%
MHR
1
R
D
L
I
NE O E
9
0
- 0
%
H
E -
Z
N
0 M R
WE
IG MA
G
E
ME
N
T
O
E
6 -
7
MHHT
N
A
Z N
0
0% R
E
-
A
R
OB
I
C
Z
O
E
70
80 M
RN
%
H
Y HEA
N
6
0
% H
HEALTH
RT
ZO
E
5
0
-
M
R
Maximum Heart Rate (MHR) = 220 - AGE
HEART RATE
TARGET ZONE
200 20 100 - 120 121 - 140 141 - 160 161 - 180 181 - 200
205 <18 101 -121 122 - 141 142 - 162 162 - 182 183 - 205
Healthy Heart Weight Loss Aerobic Anaerobic Red line
YORK P30 HRM / 20

CARE AND MAINTENANCE
Clean the transmitter with mild soap and water regularly after use to
remove dirt. Do not expose to direct sunlight or temperatures above
122 degrees Fahrenheit ( 50 degrees Celsius) or below 14 degrees
Fahrenheit ( -10 degrees Celsius).
Never store the YORK P30 wet.P30
To replace the transmitter battery, undo the battery hatch with a suitable
coin and remove the old battery. Ensure that the new battery is inserted
into the hatch correctly with the plus sign facing the battery hatch.
Check the rubber gasket is clean, correctly fitted and not damaged,
then close the hatch securely, the watch receiver should be returned
to a jewellery shop for battery replacement.
TROUBLE SHOOTING
YOU DON‘T KNOW WHERE YOU ARE IN THE SETTING PROCEDURE
A long press of the MODE button will return you to a main screen.
HEART RATE VERY HIGH (ABOVE 200BPM)
Your YORK P30 is a very sensitive piece of equipment and
may be temporary affected by strong electromagnetic signals. This
may cause erratic and often elevated heart rate displays. Common
sources of electromagnetic interference include televisions,
computers, TV antennas high voltage power lines and motor driven
exercise equipment. Signals from other YORK heart rate monitors
may also cause interference. Check your surroundings and move
away from the source of interference.
P30
HEART RATE READING IS ERRATIC
(HEART SYMBOL FLASHES IRREGULARY)
1.Check that the receiver is within the 80cm maximum distance
from the transmitter.
2.Check that the transmitter strap is tight.
3.Check that the electrodes are moistened.
MONITOR DISPLAY IS FADED OR BLANK.
Have the batteries checked.
NO HEART RATE READING
1.Check that the elastic strap is tight enough.
2.Check that the electrodes of the YORK P30 Transmitter
are wet and that you are wearing it as described.
3.Check that the transmitter electrodes are clean.
P30
YORK P30 HRM / 21

TECHNICAL DATA
YORK P30 monitor
Heart rate accuracy
Heart rate range
Stopwatch resolution
Maximum stopwatch time
Heart zone high limit value
Heart zone low limit value
Transmitter
Emitted frequency
Battery life
Range
This manual is intended for informational use only and YORK make no
representations or warranties with respect to the contents described
herein. In such an event YORK shall not be liable for any damages,
direct or incidental, consequential or special, arising out of or related
to the use of this material or the products described herein.
DISCLAIMER
± 1bpm
30-240 beats per minute
0.1 sec
9 hr 59 min 59.9 sec
80 to 240 bpm in 1bpm increments
30 to high limit value minus 5bpm in
1bpm increments
5kHz +/- 10%
Approx 2 yrs when used 60 min/day
Up to 80cm ( 31.5 inches ) watch to
receiver
YORK P30 HRM / 22

Produced under licence of the owner of the trademark
MADE IN TAIWAN
0 6
14 96 1 0 5 6 7 1
TWN 13A430
 Loading...