

Page 1
User ’s
Manual
Model GX20W
Paperless Recorder
Wireless Model
User’s Manual
Contents
Introduction ................................................................................. 1
Checking the Package Contents ................................................. 3
GX20W Overview....................................................................... 4
Specications ............................................................................. 4
Protection of Environment ........................................................... 7
External Dimensions and Panel Cut Dimensions.......................... 7
How to Connect with Wireless Field Equipment ........................... 9
IM 04L51B11-01EN
7th Edition
Page 2

Page 3

User Registration
Thank you for purchasing YOKOGAWA products.
We invite you to register your products in order to receive the most up to date product
information. To register, visit the following URL.
http://www.yokogawa.com/ns/reg/
PRS 108-02E
Page 4

Page 5

Introduction
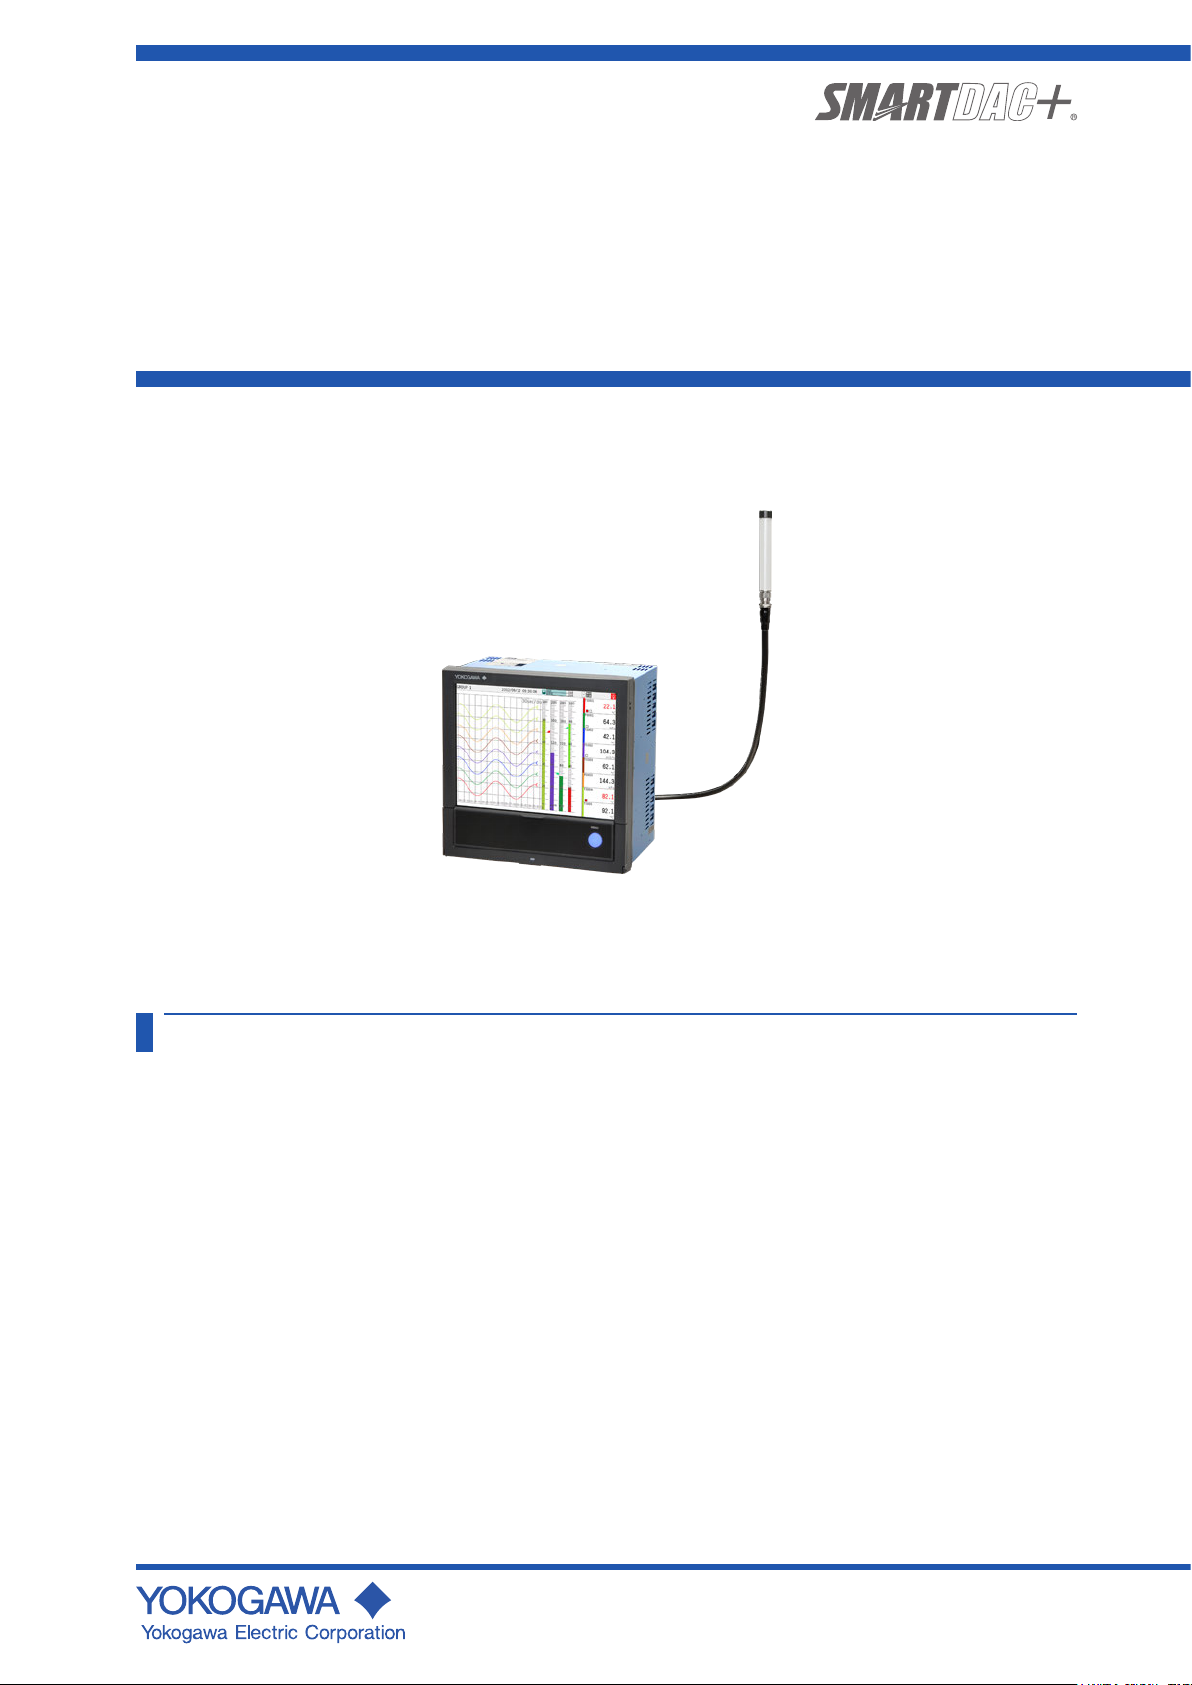
Thank you for purchasing the SMARTDAC+ GX20W
wireless model of Paperless Recorder (hereafter referred
to as the GX20W). This manual explains the specifications
and functions of the GX20W that are different from those
of the GX20.
This manual supports the following products.
Model Product Name
GX20W Paperless Recorder (Wireless model, panel mount type)
How to Use the Manual
The wireless gateway function is equivalent to
YOKOGAWA’s YFGW710 Field Wireless Integrated
Gateway (hereafter referred to as the YFGW710).
For details on the wireless gateway function, see the
YFGW710 Field Wireless Integrated Gateway User’s
Manual (IM 01W01F01-01EN), which is on the supplied
DVD-ROM.
The paperless recorder functions are the same as those
of the GX20 (Firmware version number ʺ3.02ʺ.)
For details on the paper recorder functions, see the
relevant GX20 User’s Manuals. The GX20 User’s Manual
contains descriptions of functions that are not available on
the GX20W. The following table lists such functions.
Functions Not Available on the GX20W (firmware
version number 3.02)
Function GX20W-2 specifications
High withstand
voltage AI module
(GX90XA-10-V1)
High-speed AI
module
(GX90XA-04-H0)
4-wire RTD/
resistance module
(GX90XA-06-R1)
PID control module
(GX90UT)
Measuremet mode Measurement mode is not
Custom display
(/CG option)
components
Initialize function Initialize function added to the
Math function (/MT) Variable constant is not
Logic math Logic math added to the
Preset action (At
power on ) of
internal switch
settings
Control fuction Control function added to the
Event action Event action function added to
Control event action Control event action added to
Operation lock/ user
property
DARWIN
compatible
communication
command
Program control
(/PG)
(firmware version number
3.02)
Not supported Supported
Not supported Supported
Not supported Supported
Not supported Supported
available on the GX20W.
Control components added to
the GX20 are not available on
the GX20W.
GX20 are not available on the
GX20W.
available on the GX20W.
GX20 are not available on the
GX20W.
Can not setting on the GX20W. Select from Last vale, Off (0),
GX20 are not available on the
GX20W.
the GX20 are not available on
the GX20W.
the GX20 are not available on
the GX20W.
Not available on the GX20W. Control operation are available.
Commands added to the
GX20 are not available on the
GX20W.
Not supported Supported
GX20-2 specifications
(firmware version number
4.03)
Select from Normal, High
speed, Dual interval.
Controller, control alarm
indicator, components were
added.
Control settings, individual
settings (display group settings,
recording channel settings) are
available.
Variable constant (W001 to
W100) was added.
Logic math function was added.
On (1)
Control settings
Prpgram pattern settings
Control display (control group,
tuning, program select, program
operation, control over view,
control alarm summary, control
summary) were added
program pattern load/ save
Group select of event trigger (
(dual interval measurement )
Load pattern file
Control event function was
added.
Handling depending on the
high-speed AI, 4-wire RTD/
resistance module
Command that runs when the
measurement mode is set to
dual Interval
Support DR comman (SZ, SC,
PT ) are added
Handling of Settings Available
on the GX/GP but Not on
DARWIN
Handling depending on the
Measurement Mode
IM 04L51B11-01EN
1
Page 6
To ensure correct use, please read this manual and the
following manuals thoroughly before beginning operation.
For specifications, refer to General Specifications.
Paper Manuals
Manual Title Manual No.
Model GX20W
Paperless Recorder Wireless Model User’s manual
Model GX10/GX20/GP10/GP20
Paperless Recorder First Step Guide
Precaution on the use of SMARTDAC+
(Only delivered with each module or GX60)
IM 04L51B11-01EN
(This manual)
IM 04L51B01-02EN
IM 04L51B01-91EN
Online Manuals (included on the supplied DVDROM)
Manual Title Manual No.
YFGW710 Field Wireless Integrated Gateway IM 01W01F01-01EN
Electronic Manuals
You can download these manuals from the following web
page:
www.smartdacplus.com/manual/en/
Manual Title Manual No.
Model GX20W
Paperless Recorder Wireless Model User’s manual
Model GX10/GX20/GP10/GP20
Paperless Recorder First Step Guide
Model GX10/GX20/GP10/GP20
Paperless Recorder User’s Manual
Model GX10/GX20/GP10/GP20/GM10
Communication Command User’s Manual
SMARTDAC+ STANDARD Universal Viewer
User’s Manual
SMARTDAC+ STANDARD Hardware Configurator
User’s Manual
Model GX10/GX20/GP10/GP20/GM10
Multi-batch Function (/BT) User’s Manual
Model GX10/GX20/GP10/GP20/GM10
EtherNet/IP communication (/E1) User’s Manual
Model GX10/GX20/GP10/GP20/GM10
WT communication (/E2) User’s Manual
Model GX10/GX20/GP10/GP20/GM10
OPC-UA Server (/E3) User’s Manual
Model GX10/GX20/GP10/GP20/GM10
SLMP Communication (/E4) User’s Manual
Model GX10/GX20/GP10/GP20/GM10
LOG scale (/LG) User’s Manual
DXA170 DAQStudio User’s Manual IM 04L41B01-62EN
Precaution on the use of SMARTDAC+ IM 04L51B01-91EN
IM 04L51B11-01EN
IM 04L51B01-02EN
IM 04L51B01-01EN
IM 04L51B01-17EN
IM 04L61B01-01EN
IM 04L61B01-02EN
IM 04L51B01-03EN
IM 04L51B01-18EN
IM 04L51B01-19EN
IM 04L51B01-20EN
IM 04L51B01-21EN
IM 04L51B01-06EN
Notes
•
The contents of this manual are subject to change without
prior notice as a result of continuing improvements to the
instrument’s performance and functions.
• Every effort has been made in the preparation of
this manual to ensure the accuracy of its contents.
However, should you have any questions or find any
errors, please contact your nearest Yokogawa dealer.
• Copying or reproducing all or any part of the contents
of this manual without the permission of Yokogawa is
strictly prohibited.
• Please pass this manual to the end user. We also ask
you to store this manual in a safe place.
Notice
NO RIGHTS OR LICENSES, EXPRESS OR IMPLIED,
ARE GRANTED TO USE THIRD-PARTY DEVICES
IN COMBINATION WITH THESE PRODUCTS IN A
WIRELESS MESH NETWORK, OR TO USE THIRDPARTY SERVICES TO ACCESS, MONITOR OR
CONTROL THESE PRODUCTS IN A WIRELESS
MESH NEWORK VIA THE INTERNET OR ANOTHER
EXTERNAL WIDE AREA NETWORK.
Patent Marking
Covered by one or more claims of patents: http://sipcollc.
com/patent-list/ and http://intusiq.com/patent-list/.
Authorised Representative in the EEA
The Authorised Representative for this product in the EEA is:
Yokogawa Europe B.V.
Euroweg 2, 3825 HD Amersfoort,The Netherlands
Revisions
December 2014 1st Edition June 2017 5th Edition
November 2015 2nd Edition June 2018 6th Edition
May 2016 3rd Edition July 2018 7th Edition
February 2017 4th Edition
Genaral Specifications
Title General specifications No.
GX20W Paperless Recorder Wireless Model
GX90XA/GX90XD/GX90YD/GX90WD/GX90XP/
GX90YA I/O modules
GS 04L51B11-01EN
GS 04L53B01-01EN
* The last two characters of the manual number and
general specification number indicate the language in
which the manual is written.
Notes on Attached Software
The accompanying software on the DVD-ROM is shared
with YFGW710. For details on the software product and
software licensing agreement, see the Please Read This
First User’s Manual (IM 01W01F01-11EN) on the DVDROM.
2
GX20W Versions and Functions
Edition Product Addition and Change
1 Version 2.02 -
2 Same above The explanation of EU Battery Directive has been corrected.
3 Version 3.02 Update to the Version 3.02
4 Same above Additions of Optional Code (Conformity to CE marking)
5 Same above Difference function from Version 4.01.
6 Same above Additions of “Proper Disposal of This Product”
7 Same above Difference function from Version 4.03.
IM 04L51B11-01EN
Page 7
Safety Precautions
Read the precautions provided in the Model GX10/GX20/
GP10/GP20 Paperless Recorder First Step Guide (IM
04L51B01-02EN, paper manual), and use it correctly.
Conventions Used in This Manual
Calls attentions to actions or conditions
that could cause light injury to the user
or damage to the instrument or user’s
data, and precautions that can be taken
to prevent such occurrences.
Indicates important information required
to understand operations or functions.
Checking the Package Contents
After receiving the product and opening the package,
check the items described below. If the wrong items
have been delivered, if items are missing, or if there is a
problem with the appearance of the items, contact your
nearest Yokogawa dealer.
Check that the product that you received is what you
ordered by referring to the model name and suffix code
given on the name plate on the GX20W.
NO. (Instrument Number)
When contacting the dealer from which you purchased the
instrument, please give them the instrument number.
MODEL and SUFFIX Codes
GX20W
Model Code Optional
Code
GX20W-2E/BC
/D5/FL/UH
Optional features /AH Aerospace heat treatment
/BT Multi-batch function
/C3 RS-422/485
/CE Conform to CE marking (R&TTE, RoHS)
/CEN Not conform to CE marking
/CG Custom display function
/E1 EtherNet/IP communication
/E2 WT communication
/E3 OPC-UA server
/E4 SLMP communication (Mitsubishi PLC)
/LG LOG scale
/MT Mathematical function (with report function)
Description
Paperless Recorder, Panel mount type,
Large display, Wireless Model with
Communication Channel Function
-2: Large Memory Type (max. no. of
measurement ch : 500)
E: Display Language: English, degF, DST
(summer/winter time)
/BC: Black cover
/D5: VGA output
/FL: Fail output, 1 point
/UH: USB Interface (host 2 ports)
3
1
1
1
1
4
2, 5
1
8
8
6 7
5 Includes the basic right to use the accompanying software.
6 Optional code /MT (MATH) required if using the GX90XD’s or GX90WD’s pulse
input.
7 The /MT option (computation) is required to perform pulse integration on
GX90XP pulse input modules.
8 Either /CE or /CEN option is mandatory to be specified
Standard Accessories
The instrument is shipped with the following accessories.
Make sure that all accessories are present and
undamaged.
No. Name Part Number/Model Qty. Notes
1 Mounting
bracket
2 SD memory
card
3 Dummy cover B8740CZ For empty slots
4 Tag plate B8740FE 1
5 Sheet B8740FF 1
6 Stylus B8740BZ 1
7 +2dBi Antenna
8 Manual IM 04L51B01-02EN 1 First Step Guide
9 DVD-ROM F9193LA 1 YFGW710 Online
1 Use the supplied antenna.
If you have any questions, contact your nearest YOKOGAWA dealer.
B8740DY 2
773001 1 1GB
1
F9193DH 1
IM 04L51B01-04Z1 1 Quick, Easy Steps
IM 04L51B11-01EN 1 (This manual)
Manual
Field Wireless
Configurator
Field Wireless
Management Tool
Optional Accessories (Sold separately)
Name Part Number/
Remote antenna cable
(With remote antenna
mounting bracket.)
1 Use of remote antenna cable is limited by local regulation of radio and
telecommunication law. Consult Yokogawa for details..
Name Part Number/
Mounting bracket B8740DY 2
SD memory card 773001 1 1GB
Stylus B8740BZ 1
Shunt resistor
(for M3 screw terminal)
Shunt resistor
(for clamp terminal)
Dummy cover B8740CZ - For empty slots
Model
1
F9193UA 1 1m
F9193UB 1 3m
F9193UC 1 4 m (1 m+3 m)
F9193UD 1 6 m (3 m+3 m)
F9193UE 1 13 m (3 m+10 m)
Model
415940 1 250 Ω ± 0.1%
415941 1 100 Ω ± 0.1%
415942 1 10 Ω ± 0.1%
438920 1 250 Ω ± 0.1%
438921 1 100 Ω ± 0.1%
438922 1 10 Ω ± 0.1%
Minimum.
Q’ty
Minimum.
Q’ty
Notes
with arrestor.
with arrestor.
with arrestor.
Notes
1 /BC, D5, /FL, and /UH are standard functions on GX20W.
2 The expandable I/O (GX60) cannot be connected to the GX20W.
3 The Display language is selectable from English, German, French, Russian,
Korean, Chinese, Japanese.
To confirm the current available languages, please visit the following website.
URL: www.yokogawa.com/ns/language/
4 Creating custom displays requires DXA170 DAQStudio (sold separately).
(GX20W does not have a creation function.)
IM 04L51B11-01EN
3
Page 8
field wireless devices
GX20W Overview
The GX20W is a paperless recorder equipped with a
gateway function for the ISA100 field wireless network.
It can (1) display in real time on its touch screen
measurement data from compatible field wireless
devices, such as the YTMX580 Multi-input Temperature
Transmitter, and I/O modules installed in the GX20W and
(2) save the data in an SD card.
Up to 50 field wireless devices can be connected.
Up to 500 channels (I/O channels) can be measured.
The wireless gateway function receives Publish1 data
from field wireless devices and stores it in the Modbus
registers.
The wireless gateway function is connected internally to
the Ethernet interface. The Modbus client function can be
used to assign Modbus register data to communication
channels (C001 to C500) and record and display process
data.
1 Action to measure the process value at intervals preset
in the field wireless device itself and transmit it via
wireless communication.
Specifications
The following specifications differ from those of the GX20.
Functional specifications
• Wireless communication (GX20W only)
Communication protocol: ISA100 Wireless
(IEEE802.15.4)
Frequency: 2400 - 2483.5 MHz license free ISM band
RF Transmitter power: Max. 11.6 dBm (fixed)
Reception sensitivity: -95 dBm or less
Data rate: 250 kbps
Antenna: +2 dBi Omni directional type
Radio security: AES 128 bit codified
Communication range: 500 m outdoors, line of site A
value under ideal line-of-site conditions.
The value varies (decreases) greatly depending on the
environmental conditions at the installation location.
Number of field wireless device connections: Up to 50
• Communication channel function (standard)
Numebr of Communication channels: 500 (C001 to
C500)
The Modbus client function is used to read the Modbus
registers and assign them to communication channels.
• System information disply
In the version information display, “BXXXXXXXX”
appears after the version.
GX20W
Never update the firmware. The GX20W
firmware is not available on the website
for downloading.
Be careful not to update using GX20
firmware.
• Expandable I/O connection
The expansion module (GX90EX) and the expandable
I/O (GX60) cannot be connected to the GX20W.
Hardware specification
• Wireless antenna
Antenna connector type: N type jack
Matched antenna impedance: 50 Ω
• Power Supply
• Rated supply voltage: 100 to 240 VAC
• Allowable power supply voltage range: 90 to 132,
180 to 264 VAC
• Rated power supply frequency: 50/60 Hz
• Power consumption:
Supply
voltage
100 V AC 38 VA 47 VA 90 VA
240 V AC 50 VA 59 VA 11 0 VA
* The following combinations are assumed for LCD
backlight off and normal operation.
5 AI modules, 4 DO modules, 1 DI module
• Module power supply voltage: The total allowable power
consumption of respective modules is up to 20 W.
• Allowable interruption time: Less than 1 cycle of the
power supply frequency.
LCD backlight oNormal
operation
Maximum
4
IM 04L51B11-01EN
Page 9

REGULATORY COMPLIANCE STATEMENTS
GX20W satisfies the following standards.
GX20W contains the wireless module.
Please confirm that a installation
region fulfills a standards, require
additional regulatory information and
approvals, contact to Yokogawa Electric
Corporation.
• CSA: CSA22.2 No.61010-1, installation category II
pollution degree 22, and CSA-C22.2 NO. 61010-2-03012
• UL: UL61010-1, UL 61010-2-030 (CSA NRTL/C)
• CE marking
(Only the models with /CE option)
R&TTE Directive :
Radio Spectrum: EN 300 328
EMC: EN 301 489-1, EN301 489-17, EN61326-1
Class A Table 2 (For use in industrial locations), EN
61000-3-2, EN 61000-3-3
Safety: EN 61010-1, EN 62331, EN 61010-2-
030, Installation category II
Measurement category
1
Pollution degree 22
3
We, Yokogawa Electric Corporation hereby declare
that this equipment, model GX20W Paperless
recorder is in compliance with the essential
requirements and other relevant provisions of
Directive 1999/5/EC
The EU declaration of conformity for R&TTE for this
product can be found at
< http://www.field-wireless.com/ >
• EMC and Radio communication compliance in Australia
and New Zealand (RCM):
AS/NZS 4268, AS/NZS 2772.2, EN 61326-1, Class A
• FCC compliance
GX20W contains transmitter module FCC ID:
SGJWFC001. (Part15 Subpart C)
This device complies with part 15 of the FCC Rules.
Operation is subject to the following two conditions: (1)
This device may not cause harmful interference, and
(2) this device must accept any interference received,
including interference that may cause undesired
operation.
Co-located:
This transmitter must not be co-located or operated
in conjunction with any other antenna or transmitter.
FCC CAUTION
Changes or modifications not expressly approved by
the party responsible for compliance could void the
user’s authority to operate the equipment.
Note: This equipment has been tested and found to
comply with the limits for a Class A digital device, pursuant
to part 15 of the FCC Rules. These limits are designed to
provide reasonable protection against harmful interference
when the equipment is operated in a commercial
environment. This equipment generates, uses, and can
radiate radio frequency energy and, if not installed and
used in accordance with the instruction manual, may
cause harmful interference to radio communications.
IM 04L51B11-01EN
1
Operation of this equipment in a residential area is likely
to cause harmful interference in which case the user will
be required to correct the interference at his own expense.
RF Exposure Compliance:
This equipment complies with FCC radiation exposure
limits set forth for an uncontrolled environment and
meets the FCC radio frequency (RF) Exposure
Guidelines. This equipment has very low levels of RF
energy that it deemed to comply without maximum
permissive exposure evaluation (MPE). [*But it is
desirable that it should be installed and operated
keeping the radiator at least 20cm or more away from
person’s body.]
• Industry Canada (IC) compliance
GX20W contains transmitter module IC :
8999A-WIC001. ( RSS-Gen, RSS-210)
This Class A digital apparatus complies with Canadian
ICES-003.
This device complies with Industry Canada license
exempt RSS standard(s). Operation is subject to the
following two conditions: (1) this device may not cause
interference, and (2) this device must accept any
interference, including interference that may cause
undesired operation of the device.
Under Industry Canada regulations, this radio
transmitter may only operate using an antenna of a
type and maximum (or lesser) gain approved for the
transmitter by Industry Canada. To reduce potential
radio interference to other users, the antenna type
and its gain should be so chosen that the equivalent
isotropically radiated power (e.i.r.p.) is not more than
that necessary for successful communication.
This radio transmitter IC Number 8999A-WIC001 has
been approved by Industry Canada to operate with
the antenna types listed below with the maximum
permissible gain and required antenna impedance
for each antenna type indicated. Antenna types not
included in this list, having a gain greater than the
maximum gain indicated for that type, are strictly
prohibited for use with this device.
Antenna type: Gain:
COLLINEAR 9dBi, 50Ω
Sleeve 2.14dBi, 50Ω
French: Cet appareil numérique de la classe A est
conforme à la norme NMB-003 du Canada.
Le présent appareil est conforme aux CNR d’Industrie
Canada applicables aux appareils radio exempts de
licence. L’exploitation est autorisée aux deux conditions
suivantes : (1) l’appareil ne doit pas produire de
brouillage, et (2) l’utilisateur de l’appareil doit accepter
tout brouillage radioélectrique subi, même si le brouillage
est susceptible d’en compromettre le fonctionnement.
Conformément à la réglementation d’Industrie Canada,
le présent émetteur radio peut fonctionner avec une
antenne d’un type et d’un gain maximal (ou inférieur)
approuvé pour l’émetteur par Industrie Canada. Dans le
but de réduire les risques de brouillage radioélectrique
à l’intention des autres utilisateurs, il faut choisir le type
d’antenne et son gain de sorte que la puissance isotrope
rayonnée équivalente (p.i.r.e.) ne dépasse pas l’intensité
nécessaire à l’établissement d’une communication
satisfaisante.
5
Page 10

Le présent émetteur radio IC Number 8999A-WIC001 a
été approuvé par Industrie Canada pour fonctionner avec
les types d’antenne énumérés ci-dessous et ayant un gain
admissible maximal et l’impédance requise pour chaque
type d’antenne. Les types d’antenne non inclus dans
cette liste, ou dont le gain est supérieur au gain maximal
indiqué, sont strictement interdits pour l’exploitation de
l’émetteur.
Antenne type: Gain:
COLLINEAR 9dBi, 50Ω
Sleeve 2.14dBi, 50Ω
RF Exposure Compliance:
This equipment complies with IC radiation exposure
limits set forth for an uncontrolled environment and
meets RSS-102 of the IC radio frequency (RF)
Exposure rules. This equipment has very low levels
of RF energy that it deemed to comply without
maximum permissive exposure evaluation (MPE). But
it is desirable that it should be installed and operated
keeping the radiator at least 20cm or more away from
person’s body (excluding extremities: hands, wrists,
feet and ankles).
Cet équipement est conforme aux limites d’exposition
aux rayonnements énoncées pour un environnement
non contrôlé et respecte les règles d’exposition aux
fréquences radioélectriques (RF) CNR-102 de l’IC. Cet
équipement émet une énergie RF très faible qui est
considérée conforme sans évaluation de l’exposition
maximale autorisée. Cependant, cet équipement doit
être installé et utilisé en gardant une distance de 20
cm ou plus entre le dispositive rayonnant et le corps (à
l’exception des extrémités : mains, poignets, pieds et
chevilles).
• Wireless module is compliant with ISA100 Wireless
(IEEE802.15.4)
1 Installation category (overvoltage category) II:
Describes a number which defines a transient
overvoltage condition.
Implies the regulation for impulse withstand voltage.
“II” applies to electrical equipment which is supplied
from the fixed installation like a distribution board.
2 Pollution degree 2:
Describes the degree to which a solid, liquid, or
gas which deteriorates dielectric strength or surface
resistivity is adhering.
“2” applies to normal indoor atmosphere.
Normally, only non-conductive pollution occurs.
3 Measurement category: Depends on the specification
of each modules
Category
II CAT II Available in the testing
III CAT III Available in the testing
IV CAT IV Available in the testing
Measurement
category
Description Remarks
and measuring circuits
directly connected
to a usage location
(receptacle or the like)
of a low-voltage main
power supply facility.
and measuring circuits
connected to a power
distribution portion of
a low-voltage main
power supply facility.
and measuring circuits
connected to a power
source of a lowvoltage
main power supply
facility.
Radio Wave
• The operating frequency bandwidth of
this transmitter may overlap the same
range as industrial devices, scientic
devices, medical devices, microwave
ovens, licensed premises radio sta-
tions and non-licensed specied low-
power radio stations for mobile object
identication systems used in factory
production lines.
• Before using this transmitter, ensure
that neither a premises radio station
nor specied low power radio station
for mobile object identication sys-
tems is in use nearby.
• If this transmitter causes radio wave
interference to a wireless station for
mobile object identication systems,
promptly change the frequency being
used or turn o the source of radio
wave emissions.
Then, contact a Yokogawa oce regarding countermeasures to prevent interference, such as setting up partitions.
Appliances,
portable
equipment,
etc.
Distribution
board,
circuit
breaker,
etc.
verhead
wire, cable
systems,
etc.
6
IM 04L51B11-01EN
Page 11

280.2 (11.03)
(11.06)
RS-422A/485 terminal (/C3)
FAIL/STATUS terminal (/FL)
VGA output terminal (/D5)
Protection of Environment
Proper Disposal of This Product
This is an explanation of how to dispose of
this product based on Waste Electrical and
Electronic Equipment (WEEE), Directive.
This directive is only valid in the EU.
• Marking
This product complies with the WEEE
Directive marking requirement. This
marking indicates that you must not
discard this electrical/electronic product
in domestic household waste.
• Product Category
With reference to the equipment types
in the WEEE directive, this product
is classified as a “Small equipment”
product.
Do not dispose in domestic household
waste.
When disposing products in the EU,
contact your local Yokogawa Europe B.V.
office.
How to Dispose the Batteries
This is an explanation about the new EU Battery
Directive. This directive is only valid in the EU.
Batteries are included in this product. Batteries
incorporated into this product cannot be removed by
yourself. Dispose them together with this product.
When you dispose this product in the EU, contact
your local Yokogawa Europe B.V.office. Do not
dispose them as domestic household waste.
Battery type: Lithium battery
Notice: The symbol (see above) means they shall
be sorted out and collected as ordained in the EU
Battery Directive.
External Dimensions and Panel Cut Dimensions
GX20W
Unit: mm (approx. inch)
Unless otherwise specified,
tolerance is ±3% (however,
tolerance is ±0.3 mm when
below 10 mm).
(Dimensions before attaching
the mounting bracket)
(*3)
(*1)
(*2)
295.2 (11.62)
288 (11.34)
144 (5.67)
Panel cut dimensions
360 min.
(1.417)
0
+2
281
(11.06)
+2
0
281
288 (11.34)
148 (5.83)
361 min.
28 (1.11)
295.2 (11.62)
(14.21)
MIN 293 (11.54)
MAX 219.3 (8.63)
168.8 (6.65)
152.6 (6.01)
2 to 26
(Allowable
panel thickness)
32.3 (1.27)
247.3 (9.74)
(Dimensions after attaching
the mounting bracket)
*1: With module
*2: Without module
*3: When fixing cable
7.5 (0.30) 9.4 (10.37)280.2 (11.03)
IM 04L51B11-01EN
I/O module (slot 9)
I/O module (slot 8)
I/O module (slot 7)
I/O module (slot 6)
I/O module (slot 5)
I/O module (slot 4)
I/O module (slot 3)
I/O module (slot 2)
I/O module (slot 1)
I/O module (slot 0)
Power supply terminal
USB port (/UH)
Ethernet port
Remote antenna connector
7
Page 12

□ Remote anttena
Unit: mm (approx. inch)
□ Antenna cable
Main unit
<Without arrester>
Main unit
(selectable)
292(11.50)
Unit: mm (approx. inch)
Remote Antenna
Anttena
• Non-direction antenna
• Gain : +2 dBi
• Part number: F9193DH
Ø20.5(0.81)
150(5.91)
Remote Antenna Cable
High-frequency coaxial cable
• Sheath dia : 11.11mm
Unless otherwise specified,
tolerance is ±3% (however,
tolerance is ±0.3 mm when
below 10 mm).
<With arrester>
Antenna
Remote Antena Bracket
Unless otherwise specified, tolerance is ±3% (however, tolerance
is ±0.3 mm when below 10 mm).
135(5.31)
87.7(3.45)
17.5(0.69)
minimum R67
17(0.67)
71.7(2.82)
37.3(1.47)
Attach the arrester in the middle of the antenna extension
cable. Ground the arrester ground terminal.
Connect the grounding wire to the GX20W’s protective
ground terminal.
Antenna
Cable
Length: 1m or 3m
(selectable)
Cable 2
Length: 3 m or10m
(selectable)
Arrester
Cable 1
Length: 1m or 3 m
98(3.86)
2-intch pipe
8
IM 04L51B11-01EN
Page 13

•Default Gateway: 192.168.200.253
Wireless communication
Infrared
adapter
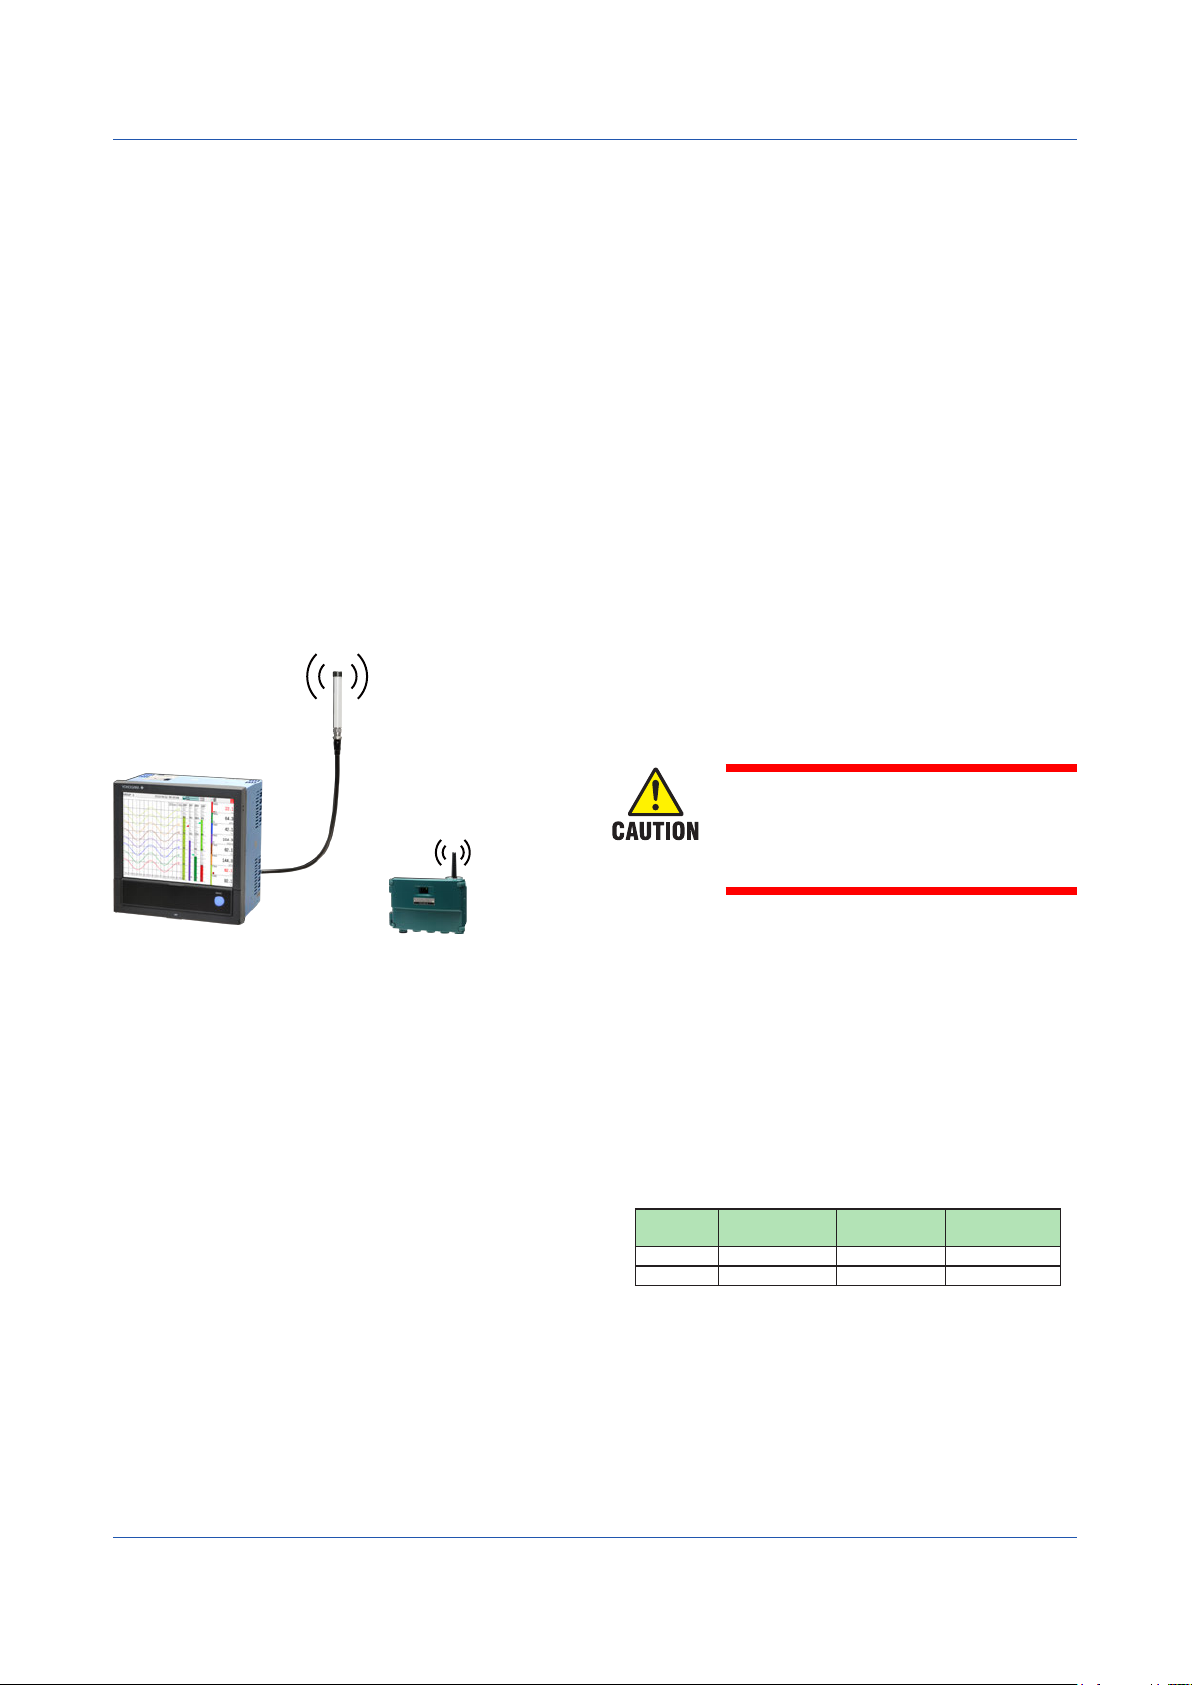
How to Connect with Wireless Field Equipment
Here we will describe the procedure to connect field
wireless devices to the GX20W (paperless recorder
wireless model).
Overview
To explain the connection procedure, we will use an
example of configuring a new system consisting of a
single GX20W (wireless gateway; hereafter referred to
as the built-in GW) and a single field wireless device
(YTMX580), as shown in figure 1.
Figure 2 shows the internal configuration of the GX20W.
The connection from the external Ethernet device
(configuration PC) passes via connector PORT1 and is
distributed to the recorder CPU and the built-in GW via
internal connector PORT2. The measurement data from
the wireless device is collected through Ethernet via the
built-in GW.
Network ID: 100
Infrared
communication
IrDA
Configuration PC
•IP Address: 192.168.200.101
•Subenet Mask: 255.255.255.0
•Default Gateway: 192.168.200.253
YTMX580
Ethernet communication
HUB
GX20W
•IP Address: 192.168.200.100
•Subenet Mask: 255.255.255.0
•Default Gateway: 192.168.200.253
Built-in GW
•IP Address: 192.168.200.200
•Subenet Mask: 255.255.255.0
GX20W
For details on how to configure field wireless devices and
GX20Ws from the configuration PC, see the following
manuals.
Manual Title Manual No.
YTMX580
IM 04R01B01-01EN
Multi-Input Temperature Transmitter
FieldMate
IM 01R01A01-01E
Versatile Device Management Wizard
Model GX10/GX20/GP10/GP20
IM 04L51B01-01EN
Paperless Recorder User’s Manual
Equipment Used
Name (Hardware) Manufacturer Details Remarks
GX20W Yokogawa
YTMX580 Yokogawa
Infrared adapter ACTiSYS ACT-IR224UN-
Configuration PC — Windows 7 or later
Ethernet hub — 2 ports or more
LAN cable — 2 straight cables
Name (Software) Manufacturer Details Remarks
Infrared adapter
driver
IR224UN
FieldMate Yokogawa
FieldMate
Provisioning
Device Tool
Field Wireless
Configurator
Field Wireless
Management Tool
CF/DD Files(for
YTMX580)
Electric
Corporation
Electric
Corporation
ACTiSYS — Supplied with the
Electric
Corporation
Yokogawa
Electric
Corporation
Yokogawa
Electric
Corporation
Yokogawa
Electric
Corporation
Yokogawa
Electric
Corporation
Table 1 Equipment used
Paperless Recorder
(wireless model)
Multi-input
Temperature
Transmitter
LN96-LE
R2.06.00 or later F9197DS, sold
— Supplied with
R1.02.01 or later GX20W
R1.02.00 or later GX20W
0018 or later Number:0x1802
GW built in
(YFGW710
equivalent)
Infrared/USB
infrared adapter
separately
FieldMate
accompanying
DVD-ROM
accompanying
DVD-ROM
GX20W
accompanying
DVD-ROM
CPU
GX20W
IM 04L51B11-01EN
Ethernet
Switch
PORT2
Ethernet communication
Built-in gateway
Figure 1
PORT1
Figure 2
LAN cable
Configuration
PC
Ethernet communication
Wireless communication
Antenna
Wireless
device
YTMX580
9
Page 14

Workflow
Figure 3 provides a workflow up to the starting of a
measurement. We will explain the procedure according to
this workflow.
Start wireless connection
configuration
(1) Preparation
Prepare the devices to connect
and configuration software.
Decide on setup conditions.
Save
(7) Provisioning
information file
Load
(2) Provisioning (using the
Provisioning Device Tool)
Device
Provisioning
OK
(4) Setting measurement
parameters
(using FieldMate)
(5) Installing the devices
(6) Creating a project
(using the Field Wireless
Configurator)
(7) Downloading
the project
OK
(8) Checking the Operation
(9) Display Settings
Using the GX20W touch screen
End configuration
Start measurement
Figure 3
NG
NG
(1) Preparation
Prepare the devices shown in figure 1 and the software
applications that you will be using, and decide on the
setup conditions. (For details, see (1) Preparation in the
setup procedure.)
(2) Provisioning (YTMX580 wireless communication
configuration)
Provisioning involves assigning a device tag, network
ID, and Join Key to the YTMX580 using the provisioning
function of FieldMate.
(3) Creating a provisioning information file
Create and save a file containing the information you
assigned in step (2).
(4) Setting YTMX580 measurement parameters
Set the YTMX580 temperature measurement parameters
using FieldMate.
(5) Installing the Devices
Install the YTMX580 within the wireless communication
range of the GX20W.
(6) Creating a project
(Creating a wireless communication configuration file for
the GX20W built-in GW and wireless connection device)
Using the Field Wireless Configurator, configure the
wireless communication settings of the built-in GW
and configure the connected device according to the
information file of step (3).
(7) Downloading the project
(Writing the wireless communication configuration file in
the GX20W built-in GW)
Download the project setting data to the built-in GW to
enable wireless communication.
(8) Operation check
Check that the YTMX580 is connected to the built-in GW
using the Field Wireless Management Tool.
(9) GX20W display settings
In the Ethernet settings of the GX20W, connect to the
built-in GW as a Modbus client. In addition, to display
and record the YTMX580 measurement values on the
GX20W, you need to set the communication channels of
the GX20W.
Note that the YTMX580 is configured in step (2)
Provisioning and (4) Setting measurement parameters.
The built-in GW is configured in step (6) Creating a
project. And, the GX20W is configured in step (9) Display
settings.
Step Setup items Tool used Setup medium
(2), (3) Network ID, device tag,
Join Key, setting file
exporting
(4) Device input parameters FieldMate Infrared adapter
(6), (7) Setting file importing,
Publish Period, Publish
Item, Device Role, device
registration
(8) Wireless connection
device check
Table 2 Tools used during configuration
Provisioning
Device Tool
Field Wireless
Configurator
Field Wireless
Management tool
Infrared adapter
Ethernet
Ethernet
10
IM 04L51B11-01EN
Page 15

(1) Preparation
To configure the network shown in figure 1, prepare the hardware and configuration software listed in table 1.
First, in order to configure the field wireless network and Modbus communication, decide on the network ID (group
number of the devices to connect wirelessly), the device tag of the field wireless device (YTMX580), network parameters
for the Ethernet connection, and so on. In this guide, the connection setup example shown in table 3 will be configured.
Item before change GX20W Built-in GW YTMX580 Configuration PC
Network ID 2 to 65535 — 100 1 —
EUI64 Unique to each device — Device-specific value Device-specific value —
Device tag For each device (up to 16 characters) — YFGW-GW001 Not set —
Ethernet parameter IP Address 192.168.200.100 192.168.200.200 — —
Join Key Shared by GW and YTMX (32 characters) — Not set Not set —
Modbus register Register map assignment Not set Not set — —
indicates factory default value. indicates not changeable.
Item after change GX20W Built-in GW YTMX580 Configuration PC
Network ID 2 to 65535 — 100 100 —
EUI64 EUI64 for each device — Device-specific value Device-specific value —
Device tag For each device (up to 16 characters) — YFGW-GW001 YTMX-TEST01 —
Ethernet parameter IP Address 192.168.200.100 192.168.200.200 — 192.168.200.101
Join Key Shared by GW and YTMX (32 characters) — [C0 C1 C2 C3 C4 C5 C6 C7 C8 C9 CA CB
Modbus register Register map assignment See step (9)
Subnet Mask 255.255.255.0 255.255.255.0 — —
Default Gateway 192.168.200.253 192.168.200.253 — —
Subnet Mask 255.255.255.0 255.255.255.0 — 255.255.255.0
Default Gateway 192.168.200.253 192.168.200.253 — 192.168.200.253
CC CD CE CF]*
Display settings.
See step (6) Creating
a project.
— —
—
indicates no change from factory default setting. indicates a value changed from its factory default.
indicates not changeable.
* Join Key is a unique value assigned automatically by the configuration software and cannot be viewed.
Table 3 Connection setup example
The Ethernet parameters on the configuration PC must
be set in order for it to connect to the GX20W via Ethernet
and configure the GX20W. Table 4 lists the configuration
tools and the like used in this guide. Install the software
tools in the configuration PC.
Tool Name Manufacturer Revision Remarks
Infrared adapter driver
IR224UN
FieldMate Yokogawa
FieldMate Provisioning
Device Tool
Field Wireless
Configurator
Field Wireless
Management Tool
CF/DD Files(for
YTMX580)
Communication DTM for
YFGW710
DeviceDTM for YTA
(YTA ISA100 DTM)
ACTiSYS — Supplied with the
Electric
Corporation
Yokogawa
Electric
Corporation
Yokogawa
Electric
Corporation
Yokogawa
Electric
Corporation
Yokogawa
Electric
Corporation
Yokogawa
Electric
Corporation
Yokogawa
Electric
Corporation
R2.06.00 or
later
— R2.06.00 is
R1.02.01 or
later
R1.02.00 or
later
0018 or later Number:0x1802
1.01.00 or
later
3.1.1.48 GX20W
infrared adapter
F9197DS, sold
separately
supplied with
FieldMate
GX20W
accompanying
DVD-ROM
GX20W
accompanying
DVD-ROM
GX20W
accompanying
DVD-ROM
GX20W
accompanying
DVD-ROM
accompanying
DVD-ROM
Table 4 Software used
(2) Provisioning
Provision the YTMX580.
Prepare a configuration PC, YTMX580, and infrared
adapter as shown in figure 1.
For the preparation procedure of FieldMate (use the
Provisioning Device Tool for R2.06.00) and infrared
adapter, see the relevant manuals.
The provisioning procedure is described in steps to .
Start FieldMate.
Select the ISA100(Infrared) option, and check
that the a COM port is displayed for the applicable
ISA100(Infrared). If it is not displayed, click Setting, and
select the port that the infrared adapter is connected to.
Point the infrared adapter to the YTMX580 infrared
port, and click Login (figure 4).
IM 04L51B11-01EN
11
Page 16

(3)
Figure 4
As shown in figure 5, the icon of the detected YTMX
appears in the Segment Viewer. Click Provisioning to
open a Provisioning dialog box shown in figure 6.
The dialog box shown in figure 7 appears. Click Yes to
begin provisioning.
Figure 7
When provisioning is finished, the dialog box shown in
figure 8 appears. Click OK to finish.
Figure 5
Set the device tag to a name of your choice (e.g.,
YTMX-TEST01) and the network ID to 100 as shown
in figure 6. Point the infrared adapter to the YTMX580
infrared port, and click OK.
Figure 6
Figure 8
(3) Creating a Provisioning Information File
After provisioning, save the results to YTMX-TEST01.ypif
(example). (The provisioning data will be used later.)
To save the results, click Export Provisioning Device
Information File on the File menu (see figure 5), and
specify the file name.
(4) Changing Device Parameters
Set the device parameters according to table 5 using DTM
Works of FieldMate.
The steps are to . If you are continuing from step (3),
begin from step .
For details on the parameters, see section 7.3.2 and
chapter 9 in the YTMX580 Multi-input Temperature
Transmitter User’s Manual (IM 04R01B01-01EN).
Item Parameter AI1 Temp to AI8 Temp
Scale Upper Scale.EU at 100% 100.0
Scale Lower Scale.EU at 0% 0.0
Unit Scale Unit Index °C (deg C)
Input type Lin Type Type T
Data type Process Value Type Direct
Table 5 Device parameter setting example
12
IM 04L51B11-01EN
Page 17

Start FieldMate according to step in (2) Provisioning
(figure 9).
Figure 9
As shown in figure 10, the icon of the detected YTMX
appears in the Segment Viewer. Double-click the icon.
In the dialog box that appears (figure 11), select the
Load Default Data option, and then click OK to start
DTM Works.
Click Menu(Online), Device Configuration, AI1
Temp, and then Configure/Setup. Then, select the
Configuration tab (figure 12).
Figure 12
Under Block Mode, set Mode.Target to O/S. Set the
parameters according to table 5, “Device parameter
setting example,” and then click Download to device.
Next, under Block Mode, set Mode.Target to Auto.
Then click Download to device (figure 13).
Figure 10
Figure 11
Figure 13
Repeat steps and for AI2 Temp to AI8 Temp.
When you are finished, click the Connect/Disconnect
button of DTM Works, and close it.
Figure 14
When the message “Do you want to save DTM Data to
Database?” appears, click No.
IM 04L51B11-01EN
13
Page 18

(5) Installing the Devices
Install the GX20W and YTMX580 to configure the network
shown in figure 1.
First, to establish wireless communication between the
GX20W’s built-in GW and YTMX580, install them within
the wireless communication range.
(6) Creating a project
Create a project describing the network configuration.
To create a project, use the Field Wireless Configurator.
The procedure is given in steps to .
Starting the Field Wireless Configurator
When you start the Field Wireless Configurator, you will
be prompted to enter the password. Set User Name to
admin and Password to !admin.
Creating a new project
On the File menu, click New Project.
Network ID:100 is added to the Networks tree. Select it,
and check that the settings on the Network Information
tab are as shown in figure 15 (see the built-in GW
settings in table 3). You do not need to change the
settings from their default values.
Figure 16
A dialog box shown in figure 17 appears. Click OK to
add the wireless device to the list on the Devices tab as
shown in figure 18.
Figure 15
Adding the wireless device (YTMX580)
Click the Devices tab and then the yellow file open
icon. Open the provisioning information file (YTMX-
TEST01.ypif) that you created in step (3) (figure 16).
The provisioning file is in C:\FM\Export\PD.
Figure 17
Figure 18
14
IM 04L51B11-01EN
Page 19

Setting the wireless device (YTMX580) CF/DD file
Double-click the Device Tag cell of the added device. A
dialog box shown in figure 19 appears. Click Load CF/
DD to set the wireless device (YTMX580) CF/DD file.
By default, the YTMX580 CF/DD file is in C:\
Program Files\Yokogawa\DTM\DTMev\EV\
ISA100\00594543\1802.
Figure 19
When you set the file, the Sampling data tab is added as shown
in figure 20. Device Role becomes editable. Change it to IO
Figure 21
Setting the Modbus registers
Map the PV sent from the wireless device (YTMX580)
to the built-in GW registers. By doing this, you will be
able to read the data from the GX20W using Modbus
communication.
Parameter Input Register Number
UAPMO_01 DIAG_STATUS 0
AI_01 PV 3
AI_02 PV 6
AI_03 PV 9
AI_04 PV 12
AI_05 PV 15
AI_06 PV 18
AI_07 PV 21
AI_08 PV 24
.
Figure 20
Setting the Publish Period
Publish is a function that the wireless device
(YTMX580) uses to periodically send PV and device
status (DIAG_STATUS) and the like to the built-in GW.
The YTMX580 publish settings are specified on the
Sampling data tab shown in figure 21.
Figure 21 shows the settings for sending the PV
and DIAG_STATUS of parameter AI_01 to AI_08 at
an update period of 5 seconds. After changing the
settings, click Apply.
On the Modbus Configuration tab of figure 18, map the
parameters by dropping them to the Input Registers
number positions.
Figure 22 shows the DIAG_STATUS and PV of the
wireless device (YTMX580) mapped to the built-in GW
registers.
When you are finished, click Apply Changes (figure 23)
to update the settings.
Figure 22
IM 04L51B11-01EN
Figure 23
15
Page 20

(7) Downloading the project
After saving the project that you created in step (6) (File >
Save Project As), download it to the built-in GW. (The file
name is GX20W-TEST01.yep (example).)
To download a project, use the Field Wireless
Configurator.
The steps are to .
On the Field Wireless Configurator, click Download on
the Tools menu to open a dialog box shown in figure
24.
Check that the IP Address is set to 192.168.200.200.
Then click Test connection to check that the message
“Connection succeed!” appears.
Figure 24
Under Data to download, clear the Devices check box,
and then click Start download (figure 25).
When downloading completes successfully, a dialog
box shown in figure 26 appears.
Figure 26
Click Close to close the dialog box. Select the Devices
check box, and then click Start download (figure 27).
Figure 25
You will be asked to save the project again, so save it
to GX20W-TEST01.yep (example).
When a write confirmation message appears, click Yes.
16
Figure 27
IM 04L51B11-01EN
Page 21

When downloading completes successfully, a dialog
box shown in figure 28 appears.
If the project is successfully downloaded to the built-in
GW and the wireless device (YTMX580) is running, the
GX20W and the wireless device will join automatically.
If an error occurs, please run the download again.
* After joining, you will need to wait 5 or 6 minutes
before you can begin changing parameters through
wireless communication.
Figure 28
8. Checking the Operation
Use the Field Wireless Management Tool to check the
operation.
The steps are and .
Start the Field Wireless Management Tool.
• Connection: GX20W-TEST01
• IP Address: 192.168.200.200
• User name: admin
• Password: !admin
Use the above settings.
Check the network connection status.
Click the Network Topology tab. If the displayed
content is like what is shown in figure 29, YTMX580 is
registered to the network and the parameters can be
changed through wireless communication.
(It will take 5 to 30 minutes to reach this status.)
Click the Refresh button to refresh the displayed
information.
Figure 29
While waiting, perform the procedure in (9) Display
Settings.
(9) Display Settings
Assign the wireless device (YTMX580) PV, which
are mapped to the GX20W’s built-in GW registers, to
communication channels by configuring the GX20W’s
Modbus client.
Display settings are specified from the GX20W front panel
screen.
The steps are to .
Communication (Ethernet) settings
Select Communication (Ethernet) settings and then
Basic settings. Check the IP address, subnet mask,
and default gateway (figure 30).
IM 04L51B11-01EN
Figure30
17
Page 22

-1
-2
-3
Modbus client settings
Select Communication (Ethernet) settings, Modbus
client settings ( in figure 30), and then Basic settings
(-1 in figure 31). Set Modbus client function to On
and Communication Interval to 2s. Then, save the
settings (figure 31).
Command
No.
1
2 30008 0002
3 30011 0003
4 30014 0004
5 30017 0005
6 30020 0006
7 30023 0007
8 30026 0008
Type Server Unit No. Data Type Register First
channel
30005 0001
Read 1 1 FLOAT_B
Figure 31
Next, select Modbus server settings (-2 in figure 31)
under Modbus client settings. For the GX20W’s built-in
GW, set Server number to 1 (a unique number for each
server), Server name to 192.168.200.200, and Port
number to 502. Then save the settings (figure 32).
Figure 32
Next, select Command settings (-3 in figure 31) under
Modbus client settings. Assign the register contents
of the GX20W’s built-in GW to the communication
channels (figure 33).
Figure 33
18
IM 04L51B11-01EN
Page 23

Communication channel settings
Select Communication channel settings and then On/
Off, Span. Set the first channel, last channel, on/off,
decimal place, span lower, span upper, and unit. Then
save the settings (figure 34).
First
channel
C001* C008* On* 1* 0.0* 100.0* °C*
Last
channel
On/Off Decimal
place
Span
Lower
Span
Upper
Unit
* Setting example
Figure 34
Display settings
Select Display settings, Group settings, and
then Channel set. From List Selection, select
Communication channel, and set C001 to C008. Then
save the settings (figure 35).
Recording settings
Select Recording settings, Recording channel settings,
and then Display data, Trend waveform. From List
Selection, select Communication channel, and set
C001 to C008. Then save the settings (figure 36).
Figure 36
Screen sample showing the wireless device
(YTMX580) PV on the GX20W (digital display)
Figure 35
Figure 37
IM 04L51B11-01EN
19
Page 24

Blank
 Loading...