

Page 1

Emission Thermometer
User’s Manual
Model: 53008
Tachihi bldg, No.2, 6-1-3 Sakaecho, Tachikawa-shi, Tokyo, 190-8586 Japan
Phone:+81-42-534-1413 Facsimile:+81-42-534-1438
YOKOGAWA EUROPE B. V. (THE NETHERLANDS)
Euro weg 2, 3825HD, Amersfoot, THE NETHERLANDS
Phone: 31-88-4 641000, Facsimile: 3 1-88-4641111
Compliance with the Radio Waves Act (Republic of Korea)
This product complies with the Radio Waves Act (Republic of Korea).
Note the following when using the product in Republic of Korea.
The product is for business use (Class A) and meets the electromagnetic
compatibility requirements.The seller and the user must note the above
point and use the product in a place except for home.
Printed in JAPAN 2012/05
Registration No:
Equipment Name:
Trade Name:
Manufacturer:
Country of Origin:
┏
KCC-REM-IMY-EEN326
Emission Thermometer
Yokogawa Meter & Instruments Corporation
Yokogawa Meter & Instruments Corporation
Japan
Page 2

Introduction
• Please make sure the model you purchased is the one you specified.
• Please read the manual thoroughly before using the Products for
correct usage.
• After reading this manual, please retain it for future reference.
• YO KOGAWA is not liable for any incidental or consequential damages
or losses including losses of data or chances of measurement, arising
from accident, misuse or abnormal conditions of operation or handling.
Thank you very much for purchasing Thermometers products. This device is a noncontact thermometer to convert the infrared energy emitted from the surface of an object into temperature. This thermometer measures the surface temperature of solid and
liquid without contacting them. The temperature of gas cannot be measured by this
thermometer.
Contents
Introduction ······································································································
Safe Usage ······································································································
Warnings & Cautions on Environment and Usage ······································
Specifications ··································································································
Name of Components ·····················································································
Operation ········································································································
Normal Measurement / Continuous Measurement ·····································
Field of View ·······························································································
Memory Function ························································································
Settings ···········································································································
Setting "High Limit Temperature for Alarm" ·················································
Setting "Low Limit Temperature for Alarm" ··················································
Setting "Emissivity Ratio (DARK/BRIGHT mode)" ······································
"Record Erasing" ·······················································································
Setting "Hold mode Selections" ·································································
Troubleshooting ·······························································································
Maintenance / Battery ·····················································································
Measures for Adoministration of the Pollution Control of
Electronic Information Products of the People's Republic of China ··················
2
3
4
5
6
8
8
9
10
11
12
13
14
14
15
15
16
18
2
Page 3
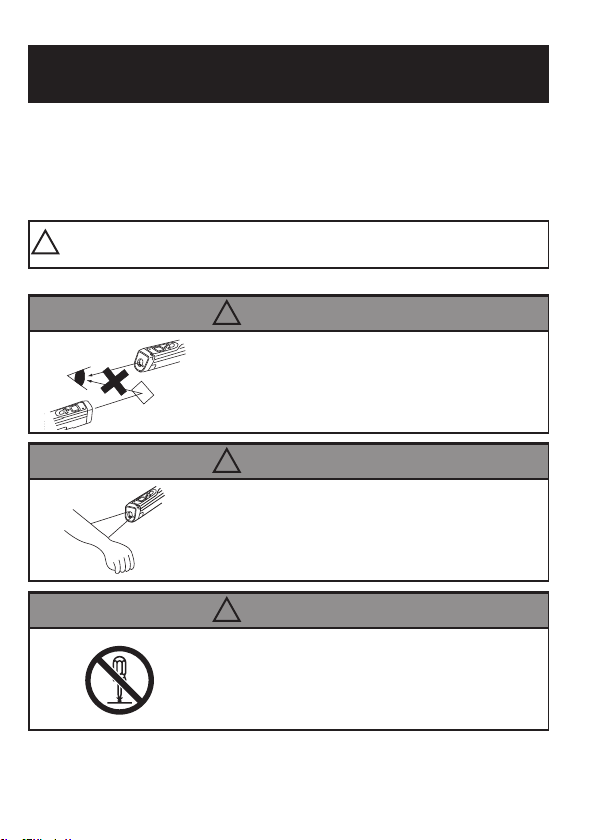
This product is not a clinical thermometer
and therefore, can not be used for medical
purposes.
Do not look into the laser beam, nor point it
directly at eyes.Even the reflection is
harmful.This laser may cause eye injury or
damage to your health.
Use of controls or adjustments or performance of procedures other than those
specified herein may result in hazardous
radiation exposure.
Safe Usage
When operating the instrument, be sure to observe the cautionary notes given below to
ensure correct and safe use of the instrument. If you use the instrument in any way other
than as instructed in this manual, the instrument's protective measures may be impaired.
Yo kogawa is by no means liable for any damage resulting from use of the instrument in
contradiction to these cautionary notes.
!CAUTION:
This symbol signifies that improper usage may
result in injuries or damage.
!
CAUTION
!
CAUTION
!
CAUTION
3
Page 4

Safe Usage –– Warnings & Cautions on Environment and Usage
Environmental Warnings / Cautions –– Warning –– Caution
KEEP THE THERMOMETER
AWAY FROM DROPPING WATER
AND DO NOT USE IN WATER.
This thermometer has waterproofing, but it cannot be operated in the
water. Water drops on the filter or
the area around it may cause incorrect measurement. Wipe up the filter and the area around it completely
before taking measurement.
KEEP THE THERMOMETER
AWAY FROM DIRECT SUNLIGHT,
DUST, HIGH TEMPERATURES
AND HIGH HUMIDITY DURING
USE AND STORAGE.
This may cause irreparable damage or
incorrect measurement.
e.g. Leaving the thermometer in a car
under a burning sun for long may result
in damage as it will get hot inside the car.
Usage Warnings / Cautions –– Warning –– Caution
4
DO NOT EXPOSE THE THERMOMETER TO SUDDEN TEMPERATURE CHANGES.
Sudden temperature changes may
cause incorrect measurement.
Leave the thermometer for a while
to let it reach stable temperature
before taking measurement.
AVOID MEASURING SHINY OBJECTS.
Shiny objects, of which emissivity value
is near 0, reflect surrounding temperatures. As this thermometer's sensitivity to emissivity is fixed at 0.95 / 0.70,
the displayed temperature could differ
from the actual temperature of objects,
which has different emissivity value.
(See "Emissivity" on page 14)
DO NOT USE ANY BATTERY
OTHER THAN SPECIFIED.
This may cause irreparable damage or incorrect measurement.
DO NOT TOUCH THE FILTER.
Do not touch the filter with something hard or things with sharp
points, which may damage the filter. Damaged filter causes incorrect measurement.
DO NOT LET THE THERMOMETER TOUCH THE OBJECT THAT
IS BEING MEASURED.
The unit is a non-contact thermometer. Touching or getting too close
to the objects with high temperatures may cause irreparable damage or incorrect measurement.
DO NOT OPERATE THE THERMOMETER NEAR LARGE ELECTROMAGNETIC FIELDS.
Usage in such environments may
cause irreparable damage or incorrect measurement.
KEEP THE THERMOMETER
AWAY FROM CHARGED OBJECTS.
This may cause irreparable damage or incorrect measurement.
DO NOT DROP THE THERMOMETER OR APPLY VIOLENT
SHOCKS.
This product has shock resistant
structure to survive under normal
usage, but throwing or falling the
unit intentionally with force may
cause irreparable damage.
GGGGGGGGG
Page 5

Accessories : 9V layer-built alkaline dry battery (1 piece)
Quick Reference Card, user’s Manual
Option : Blackbody tape (Maximum available temperature 250˚C)
Compliant standards.
IEC 60825-1
EN 60825-1
US 21 CFR 1040.10 and 1040.11
EN 61326-1
※ Specifications may change without prior notice.
Specifications
5
Model 53008-E
Measurement range 0 to 500 ˚C
Display range –10 to 650 ˚C
Field of view
φ
25 / 300mm (D : S=15 : 1
)
Optics mirror / silicon filter
Sensing element Thermopile
Spectral response 8 to 14 µ m
Response time 0.7 sec. / 90%
Accuracy ( ε≒0.95) 0to200 ˚C : �2 ˚C , 201 to 500 ˚C : �1 %
Repeatability �1 ˚C of reading value
Display resolution 1˚C
Sighting method Non-coaxial laser marker (Class 2)
HOLD time 15 seconds
Continuous measurement mode ON / OFF Switchable
Memory 99-point memory
High / Low Limit Temp. for Alarm LED / Buzzer
ON / OFF Switchable
Emissivity(
ε
) Adjustment DARK(
ε
=0.95) / BRIGHT( 0.70) Switchable
Power supply 9V layer-built alkaline dry battery (1 piece)
Battery life Approx. 12 Hours (With max load)
Ambient temperature 0 to 50 ˚C
Ambient humidity 35% to 85%Rh (Without due condensation)
Storage temperature –10 to 60 ˚C
Protective structure IP67
Material ABS (Antibacterial)
Dimension H x W x D = Approx. 160 x 44 x 42mm
Weight Approx. 200g (Including Battery)
Page 6
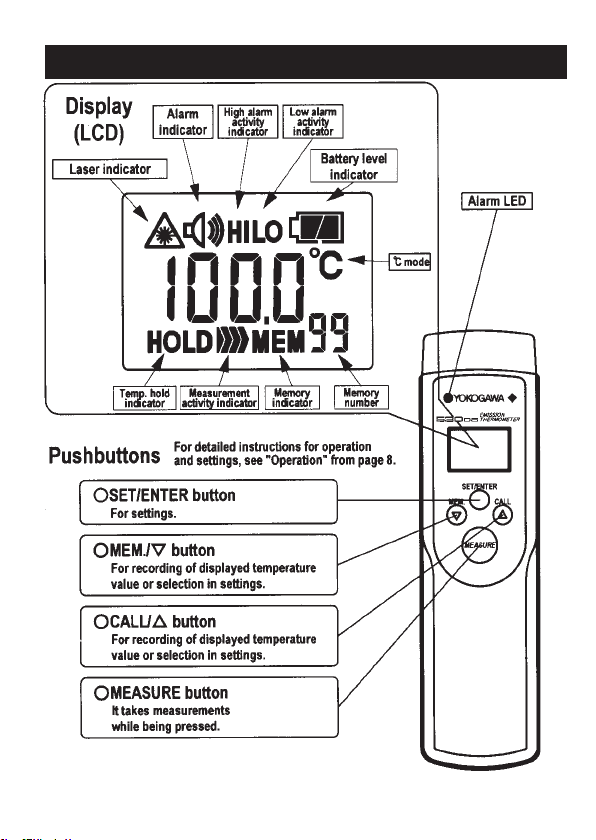
* There is no button to turn ON/OFF the power supply.
Pressing MEASURE button wakes up the thermometer.
The power supply turns off automatically after 15 seconds' absence of pressing any button.
Name of Components
6
Page 7

7
Satety Precautions for Laser Products
This Instrument uses a laser light source. This instrument is a Class 2 laser product as defined by IEC60825-1 Safety of Laser Products-Part1: Equipment classification and requirements. In addition, this instrument complies with 21 CFR 1040.10
except for deviations pursuant to Laser Notice No.50, dated June 24, 2007.
DO NOT STARE INTO BEAM.
CLASS 2 LASER PRODUCT.
Page 8

Operation
¡¡
¡¡
¡Normal Measurement
[Starting Normal Measurement]
q
Press MEASURE button to turn on the power supply. A laser
beam is emitted and the measurement starts. (In the Normal Measurement mode, the unit takes measurements while MEASURE
button is pressed.)
w
Point the laser beam at a measuring object and aim it at the
center of the area to be measured. For the distance from this
thermometer to the measuring object, refer to page 9.
e
In the Normal Measurement mode, the measurement indication
" " is shown on the LCD display and a laser indicator blinks.
[Quitting Normal Measurement / HOLD mode]
q
Release MEASURE button. Then, the laser beam turns off and
a value measured last is displayed for 15 seconds (HOLD mode).
The power supply turns off automatically after 15 seconds.
* NOR HOLD can be changed into MAX/MIN HOLD.
(See "Setting" on page 15)
¡¡
¡¡
¡Continuous Measurement
[Starting Continuous Measurement]
q
Press and hold both of MEASURE button and SET/ENTER button simultaneously for two seconds or
more, then the Continuous Measurement mode switched on. (In the Continuous Measurement mode, the
thermometer keeps measuring temperatures without pressing MEASURE button.)
w
During the Continuous Measurement mode, LCD display shows
" ".
[Quitting Continuous Measurement]
q
To quit the Continuous Measurement mode, press and hold SET/ENTER button for two seconds or
more. Then, it switches to HOLD mode. The power supply turns off automatically after 15 seconds
in the HOLD mode.
CAUTION : The laser beam is constantly emitted during Continuous Measurement mode.
Be careful of it while operating the thermometer.
Set the battery supplied as an accessory and operate the unit according to the following procedure:
8
Page 9

For the non-contact thermometer (infrared ther mometer), the field of view (spot size) is specified
depending on the distance from the thermometer to the measuring object as shown below. The
temperature value displayed is the average temperature within the spot size. To take an accurate
measurement, check the correlation between the size of object and the distance to it.
[Field of View]
* Remarks
ex.) The average temperature of surface of the circle 25 mm in diameter is measured at a distance of 300 mm
away from the measuring object.
* The laser beam points 13mm off to the left from the center of the field of view. The laser marker functions as a
sighting method and not a sensing element.
* It is possible to take temperatures with this thermometer at a distance of 1,000 mm or more away from the
measuring object, unless there is any obstacle. However, please note that the measuring field of view enlarges
in proportion to the measuring distance. This thermometer has an optical resolution of 15:1 [D(Distance to the
measuring object):S(Spot size)].
[For Correct Measurement]
The optical resolution values stated in "Field of View" are at minimum 90% energy. The size of measuring object
should be sufficiently larger than the field of view (spot size) shown in the above illustration.
Note. If any water drop is on the filter and/or the area around it, the thermometer measures temperature
of the water drop, which results in incorrect measurement. Wipe up the filter and the area around
it completely before taking measurement. (See "Maintenance" on page 16)
Field of View
9
INCORRECT
The measuring object is smaller
than the field of view. The temperature of background influences on the measuring value.
CORRECT
The measuring object is bigger than the field of view.
OK NG
Page 10

Memory Function
[Recording / MEM. mode]
q
Press and hold MEM./ button for two seconds or more to record the tem-
perature value displayed at the time when you start pressing the button. Memory
function is available in Normal Measurement mode, Continuous Measurement
mode or HOLD mode (refer to page 8).
w
When the temperature data is recorded, "MEM" sign and the
memory number (01 to 99) on LCD display blink.
e
A maximum of 99 points of temperature data can be recorded
in the memory.
r
When you try to enter the memory over 100 points, the dis-
play shows "FULL".
[Recalling / CALL Mode]
q
Press and hold CALL/ button for two seconds or more in
HOLD Mode (refer to page 8), and "CALL" sign appears on the
LCD display. In CALL (recalling) mode, the last record of tem-
perature data and the corresponding memory number are shown
on the display.
* Data cannot be called during the continuous measurement mode.
w
By pressing MEM./ or CALL/ button, you can select the
memory number to show the stored temperature value corre-
sponding to the memory number.
e
To quit CALL mode, press SET/ENTER or MEASURE button.
You can enter HOLD mode by pressing SET/ENTER button, or
Normal Measurement mode by pressing MEASURE button.
* To erase all the stored records, see "Record Erasing" on page 14.
53008 can store 99-point temperature data in memory.
Operate according to the following procedure:
10
Page 11

Settings
[Selecting Functions]
q
Press and hold SET/ENTER button for one second or more in
the HOLD Mode (refer to page 8), and "SET" sign appears on
the LCD display. (Function selecting mode follows.)
w
By pressing CALL/ or MEM./ button, you can select func-
tions as shown in the right illustrations.
e
When the name of the function you desire appears on the display, press SET/ENTER button to set. Then, you can enter the
detailed setting mode.
� "High Limit Temperature for Alarm" : refer to page 12.
� "Low Limit Temperature for Alarm" : refer to page 13.
� "Emissivity Ratio (DARK/BRIGHT mode)"
� "˚C mode" : refer to page 14.
� "Record Erasing"
� "HOLD mode Selections" : refer to page 15.
r
When each setting is completed, it automatically tur ns to the
next setting mode. (For example, when setting of "High Limit
Temperature for Alarm" is completed, it comes to the setting
mode for "Low Limit Temperature for Alarm".)
t
To quit the setting mode, press MEASURE button.
This section gives you an explanation on how to set the following functions: "High Limit Temperature
for Alarm", "Low Limit Temperature for Alarm", "Emissivity Ratio (DARK/BRIGHT mode)", "˚C mode"
and "Recorded Erasing" "HOLD mode Selections".
11
Setting mode for "High Limit
Temperature for Alarm"
Setting mode for "Low Limit
Temperature for Alarm"
Setting mode for "HOLD
mode Selections
"
Setting mode for "Emissivity
Ratio (DARK/BRIGHT mode)"
Setting mode for
"Record Erasing"
Page 12

When the measured temperature exceeds the High Limit value, the alarm LED blinks in red and
buzzer (high tone) sounds.
[Setting "High Limit Temperature for Alarm"]
q
Enter the setting mode for "High Limit Temperature for Alarm"
according to the procedure described in page 11. The initial
setting is at 500 ˚C.
w
Press or button in the detailed setting mode to change
the temperature vale, which your need alarm at.
e
Press SET/ENTER button to set the displayed value as the
High Limit Temperature for Alarm.
Note: The "High Limit Temperature for Alarm" cannot be set
at lower temperature than "Low Limit Temperature for
Alarm".
[Turning ON/OFF Alarm Function]
q
When the High Limit Temperature setting is completed, the
setting mode for ON/OFF Alarm Function appears. Press
. or button to select ON or OFF.
w
Press SET/ENTER button to set ON or OFF. While the Alarm
function is OFF, the Alarm function does not work even if the
measuring temperature goes higher than a preset level.
Setting mode for
"High Limit Temperature for Alarm"
(Initial setting: 500 ˚C)
Setting –– "High Limit Temperature for Alarm"
12
Changing the temperature value to 200
˚C by using
/
button.
Setting the temperature value with
SET/ENTER button.
Alarm function: ON
Alarm function: OFF
Page 13

When the measured temperature is below the Low Limit value, the alarm LED blinks in green and
buzzer (low tone) sounds.
[Setting "Low Limit Temperature for Alarm"]
q
Enter the setting mode for "Low Limit Temperature for Alarm"
according to the procedure described in page 11. If you have
already set the High Limit Temperature as in page 12, the setting mode for "Low Limit Temperature for Alarm" turns up automatically. The initial set ting is at 0 ˚C.
w
Press or button in the detailed setting mode to change
the temperature vale, which your need alarm at.
e
Press SET/ENTER button to set the displayed value as the
Low Limit Temperature for Alarm.
Note: The "Low Limit Temperature for Alarm" cannot be set
at higher temperature than "High Limit Temperature for
Alarm".
[Turning ON/OFF Alarm Function]
q
When the Low Limit Temperature setting is completed, the
setting mode to ON/OFF Alarm Function appears. Press
. or button to select ON or OFF.
w
Press SET/ENTER button to set ON or OFF. While the Alarm
function is OFF, the Alarm function does not work even if the
measuring temperature goes higher than a preset level.
Setting mode for
"High Limit Temperature for Alarm"
(Initial setting: 0 ˚C)
Setting –– "Low Limit Temperature for Alarm"
13
Changing the temperature value to 10
˚C by using
/
button.
Setting the temperature value with
SET/ENTER button.
Alarm function: ON
Alarm function: OFF
Page 14

[Emissivity Ratio (DARK/BRIGHT mode)]
q
Enter the setting mode for "Emissivity Ratio (DARK/BRIGHT
mode)" according to the procedure described in page 11.
The initial setting is DARK (ε=0.95).
w
Press or button in the setting mode to change the
emissivity ratio (DARK or BRIGHT).
e
Press SET/ENTER button to set the emissivity ratio.
[Record Erasing]
Note this function is to erase all the stored records in memory.
It is not able to erase data one by one.
q
Enter the setting mode for "Record Erasing" according to the
procedure described in page 11.
w
Press or button in the setting mode to select "CLR" sign on
the display.
e
Press SET/ENTER button, and all the recorded data are erased.
* If you wish to cancel the Record Erasing, press button to select "ESC" sign on the
display and press SET/ENTER button. Then, you can return to the setting mode again.
* Please note that Yokogawa M&C is not liable for any loss of data.
Emissivity (ε)
Emissivity is a value that indicates the infrared energy emitted from the surface of an object. Every object has its own emissivity
value and it varies depending on the surface condition or the temperature of the object. The emissivity ratio of PT-5LD is fixed at two
points, i.e., DARK (ε=0.95) and BRIGHT (ε=0.70).
Example : DARK (ε=0.95): Food, rubber, plastic, paintwork, etc.
BRIGHT (ε=0.70): Oxidized metal, etc.
If the object has different emissivity value from either of the above ratio, there could be some possibilities that the measured
temperature value on the display shows different from the actual temperature value of the object. Refer to the above examples as
a guideline for setting DARK/BRIGHT mode. When you wish to measure shiny object like metals, put a piece of optional blackbody
tape (ε=0.95) on the surface of the measuring object to cover the measuring area, if possible.
Setting ––
"Emissivity Ratio (DARK/BRIGHT mode)", "Record Erasing"
14
[BRIGHT mode]
"brt" and "0.70" are displayed in turn.
[DARK mode]
"drk" and "0.95" are displayed in turn.
[Record Erasing mode]
[Record Erasing Cancel mode]
Page 15

When the above symptoms are not removed even after the corresponding countermeasure has been taken,
the thermometer may have a fault. In such cases, contact the vendor from purchased the product.
Setting ––
"HOLD made Selections"
15
Symptom Cause Things to Check
Display dose not
appear.
Laser beam is not
radiated.
Measured value is
incorrect.
Measured value is
unstable.
The batteries have been exhausted.
Battery installation is incorrect.
Replace the batteries.
Re-install the batteries correctly.
The laser ejection exit is
stained.
Clean the laser ejection exit referring
“Body” of “Maintenance” described in page 16.
Voltage necessary for lighting
up laser beam is not satisfied.
Replace the batteries, (The -b- sign blinks.) or
re-install the batteries correctly.
The filter unit is stained. Clean the filter referring “Filter” of
“Maintenance” described in page 16.
Field of view is deviated
from the measuring object.
Center the laser beam on the measuring object by
referring “Field of View” described in page 9.
The measured object is
smaller than the field of view.
Adjust the measuring distance referring to the
“Field of view” described in page 9.
The thermometer is affected
by a nearby heating source.
Cut off the heat sources with a shield or such.
A shiny metal surface is
being measured.
This thermometer causes an error when measuring a shiny metal surface.
Perform measurement after putting optional blackbody tape onto the
object.
The thermometer is affected by
considerable temperature fluctuation.
Wait until the temperature of
thermometer stabilizes.
Troubleshooting
[Setting "HOLD mode Selections"]
q
Enter the setting mode for "HOLD mode Selections" according
to the procedure described in page 11.
w
Press or button in the setting mode to select ON or OFF.
The initial setting is OFF. (NOR HOLD)
e
Press SET/ENTER button to set ON or OFF.
r
In case of ON, "HOLD mode Selections" can be available.
Press or button to select the HOLD mode. (MAX or MIN).
t
Press SET/ENTER button to set the HOLD mode.
NOR HOLD : A value measured last is displayed.
MAX HOLD ("Hi" on display) : The maximum value is displayed
during the measurement.
MIN HOLD ("Lo" on display) : The minimum value is displayed during the measurement.
[MAX HOLD]
[MIN HOLD]
Page 16

Maintenance
[Filter]
Dust, stain or scratch on the filter causes incorrect measurement. If the filter is stained, clean the filter
with a lens-cleaning blower or wash it with clean water.
If the filter is still stained, gently wipe the stain off with a cotton swab or lens cleaning cloth, which may
be moistened with ethyl alcohol.
Note. If any water drop is on the filter and/or the area around it, the thermometer measures temperature
of the water drop, which results in incorrect measurement. Wipe up the filter and the area around
it completely before taking measurement.
[Body]
This thermometer has waterproofing; therefore, it can be washed with clean water.
If the thermometer is stained considerably, wash it with a little neutral detergent diluted with clean
water. After cleaning the thermometer by washing, wipe it completely before use.
Note. Do not use hot water exceeding 50˚C and chemicals such as thinner and benzene, which may
cause fading of characters, deformation, or damage.
[Periodical Inspection]
It is recommended that the thermometer be calibrated annually.
For further information, please contact the vendor from which you purchased the product.
Battery
[Battery replacement]
When the battery level indicator shows little electricity left and/or "-b-" sign
on the display blinks, replace the battery with a new one.
Note. Upon replacing the battery, keep the battery compartment out of
the water. Wipe the main unit completely.
q
Tu rn the lock for battery cover at the back of main unit counterclockwise
to open the battery compartment.
w
Much the"" "" polarities of the battery with the signs on the battery
compartment.
e
Close the battery cover and turn the lock clockwise to fix it.
Note. If the compartment cover is not locked properly, water penetrates the
inside and the waterproofing does not work. Be sure to lock it completely.
Maintenance / Battery
Precaution when handling batteries
¡Do not dispose exhausted batteries in a fire, nor recharge them.
¡Please dispose of depleted batteries in accordance with environmental protection regula-
tions of region.
¡Remove batteries when the thermometer is not used for along term.
16
Lock
!
Page 17

17
Page 18

18
 Loading...