

Page 1
Page 2

Contents
Introduction.................................................................................................. 5
Hardware Overview............................................................................................................................. 5
MCore....................................................................................................................................... 5
UVC80..................................................................................................................................... 6
UVC50.......................................................................................................................................7
UVC30 Room............................................................................................................................8
CP960....................................................................................................................................... 8
MShare(Optional)......................................................................................................................9
Related Documentations................................................................................................................... 10
Technical Specifications.....................................................................................................................11
Deployment and Connection....................................................................12
ZVC800 Zoom Rooms Kit................................................................................................................. 13
ZVC500 Zoom Rooms Kit................................................................................................................. 14
ZVC300 Zoom Rooms Kit................................................................................................................. 15
Recommended Deployment Solution................................................................................................ 15
Deployment Solutions of Different Meeting Rooms................................................................15
Camera Installation.................................................................................................................17
Recommendations of MCore Installation.............................................................................. 19
Conference Room Wiring....................................................................................................... 19
| Contents | ii
Initial Setup................................................................................................ 19
ZoomRooms Account........................................................................................................................ 20
ZoomRoomsAdmin Account..............................................................................................................20
Wireless Network Connection for CP960................................................ 20
Pairing the Zoom Rooms with CP960..................................................... 20
Using CP960 as an Audio Input and Output Device.............................. 21
Using CP960 as Zoom Rooms Controller............................................... 24
Signing Into Your Zoom Rooms Account..........................................................................................24
Signing Out of Your Zoom Account from Your Phone...................................................................... 25
Basic Features on the Phone........................................................................................................... 25
Controlling UVC80/UVC50/UVC30 Camera......................................................................................26
Setting the UVC80/UVC50/UVC30 as the Default Camera................................................... 26
Controlling UVC80/UVC50/UVC30 Room Camera Position...................................................27
Creating the Preset Position for UVC30.................................................................................27
Resetting the Preset Position for UVC30............................................................................... 28
Renaming the Preset Position for UVC30..............................................................................28
Setting UVC30 Camera to Preset Position............................................................................ 28
Enabling/Disabling Auto-framing for UVC30...........................................................................28
Page 3

| Contents | iii
Content Sharing......................................................................................... 29
Wired Content Sharing......................................................................................................................29
Sharing Content with WPP20 Wireless Presentation Pod...............................................................29
Pairing the WPP20 with the MShare..................................................................................... 29
Sharing Content via WPP20.................................................................................................. 29
Stopping Sharing Content via WPP20................................................................................... 30
Stopping Sharing Content................................................................................................................. 30
Using Hybrid Mode....................................................................................30
Enabling the Hybrid Mode.................................................................................................................31
Switching Between SIP Mode and Zoom Rooms Mode...................................................................31
Basic Settings on the Phone................................................................... 31
Setting the Language.......................................................................................................................31
Setting the Input Method...................................................................................................................32
Time and Date Display......................................................................................................................32
Setting the Time and Date Manually......................................................................................32
Changing the Time and Date Format................................................................................... 32
Changing the Screen Backlight Brightness and Time...................................................................... 33
Changing the Screen Saver Type and Waiting Time....................................................................... 33
Setting the Signal Port of Yealink Plugin.......................................................................................... 33
Using the CP Wireless Expansion Mic CPW90...................................... 34
Registering the CPW90.....................................................................................................................34
Unregistering the CPW90................................................................................................................. 34
Viewing CPW90 Information............................................................................................................. 35
Finding the CPW90........................................................................................................................... 35
Switching Between ZoomRooms Account And ZoomRoomsAdmin
Account................................................................................................... 35
ZoomRoomsAdmin Sign-in................................................................................................................35
ZoomRooms Account Sign-in............................................................................................................35
Logging into Yealink Management Cloud Service/Yealink Device
Management Platform............................................................................36
Troubleshooting........................................................................................36
Upgrading System Software..............................................................................................................37
Enabling Windows Update Service........................................................................................ 37
Update the Devices................................................................................................................ 37
Upgrading the CP960........................................................................................................................38
Accessing the Web User Interface.........................................................................................38
Update the Firmware Manually via Web User Interface.........................................................38
Firmware for Each Device.................................................................................................................39
Checking Whether the Phone Can Access to the External Network................................................ 39
General Issues.................................................................................................................................. 40
Any Anti-virus Software Needed to Be Installed on the MCore?........................................... 40
Page 4

The display does not display the shared content...................................................................40
Page 5

Introduction
The Yealink ZVC series of video solution is designed for immersive (intelligent) Zoom meetings in various
sizes meeting rooms. The ZVC series is a bundle video solution that includes everything you need to
seamlessly and smartly meet, connect, and collaborate with internal and external users. The ZVC series
delivers premium audio and video quality thanks to its Yealink audio devices and UVC series of optical PTZ
cameras. Featuring Yealink HD audio and Noise Proof technology, everyone’ s voice in the room can be
heard clearly. In addition, Yealink’ s complete solution provides users with a flexible deployment that adapts
to your specific room layout. This solution gives organizations a native and easy Zoom Rooms meeting
experience.
UVC80 is a 12x optical zoom PTZ camera, supports 1080P/60FPS video calls to make your business
discussion be as life-like and interactive as possible. CP960 is uniting microphones, speaker, and meeting
console all in one. All combine to make ZVC800 Zoom Rooms one of the perfect solutions for the medium
and large meeting rooms.
UVC50 is a 5x optical zoom PTZ camera, supports 1080P/60FPS video calls to make your business
discussion be as life-like and interactive as possible. CP960 is uniting microphones, speaker, and meeting
console all in one. All combine to make ZVC500 Zoom Rooms one of the perfect solutions for the small
and medium meeting rooms.
| Introduction | 5
The Yealink ZVC300 Zoom Rooms includes a UVC30 ultra HD 4K camera with auto framing feature and
CP960 uniting microphones, speaker, and meeting console all in one.ZVC300 Zoom Rooms is a perfect
suit for the huddle and small meeting room.
The Zoom Rooms system also supports connecting to the Yealink Management Cloud Service or Yealink
Device Management Platform for unified management, as well as diagnosis and alarm for all devices in the
Zoom Rooms system.
• Hardware Overview
• Related Documentations
• Technical Specifications
Hardware Overview
This chapt provides an overview of hardware.
• MCore
• UVC80
• UVC50
• UVC30 Room
• CP960
• MShare(Optional)
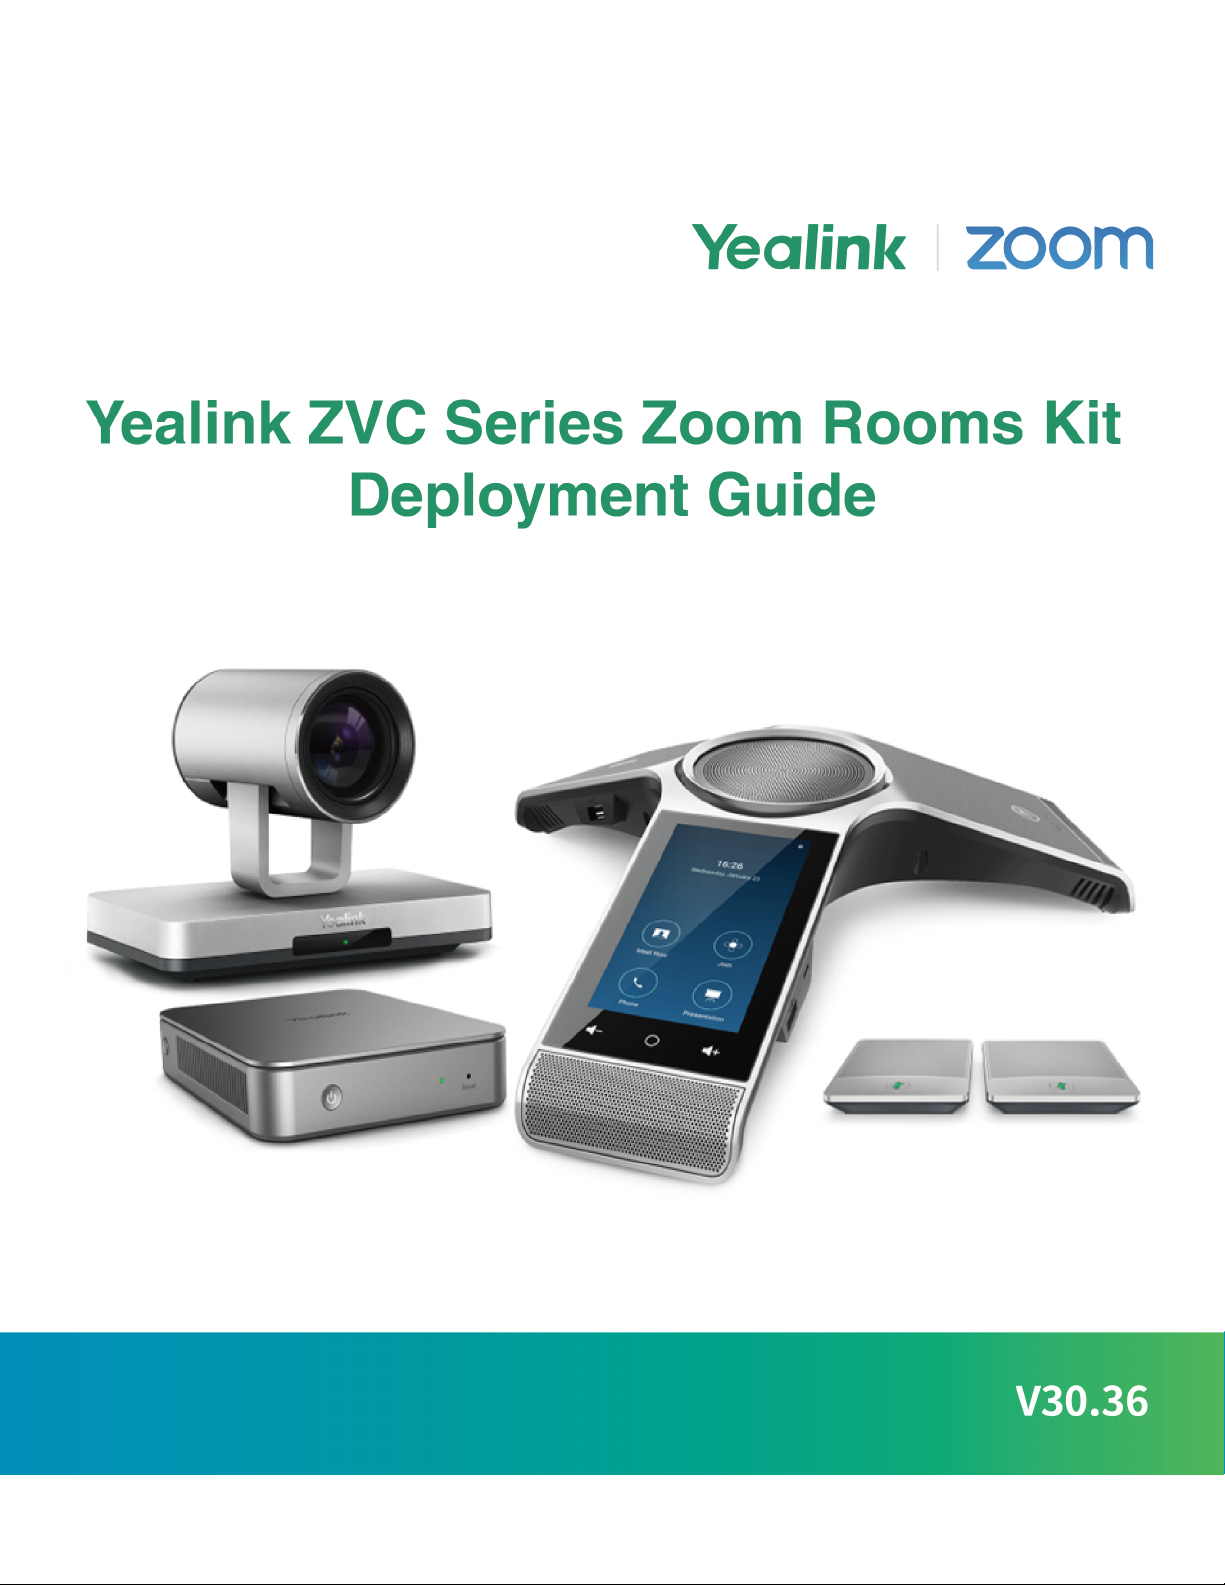
MCore
The following describes the corresponding ports of MCore:
Page 6
Port Name Description
| Introduction | 6
①
②
③
④
⑤
⑥
⑦
Power Powers on or powers off.
Reset Key
HDMI Connects to a display.
USB 3.0 Port
VCH port /
Internet Connects to the network device.
DC19V Connects to the power adapter.
Reset the MCore to factory defaults.
• Connects to the UVC80/UVC50/UVC30 Room.
• Connects to a wireless USB dongle to use the wireless
keyboard or the mouse.
• Connects to other USB devices.
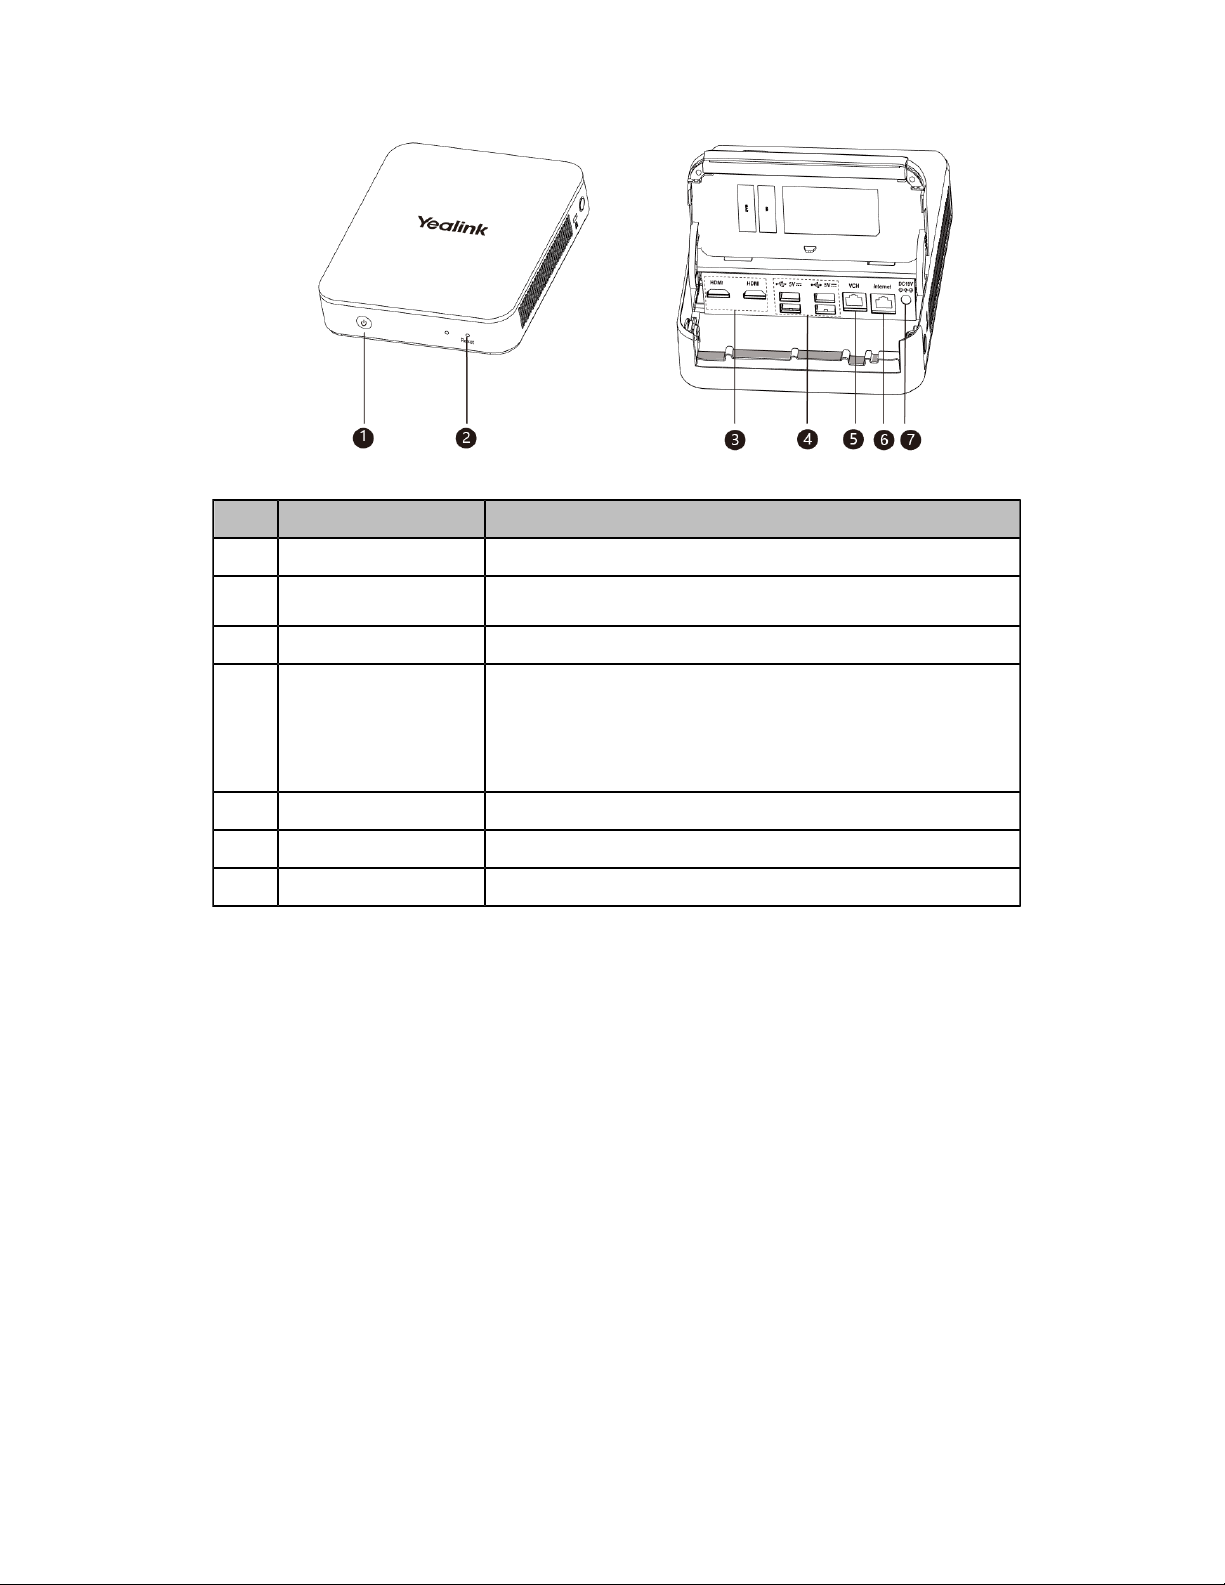
UVC80
The following describes the corresponding ports of UVC80:
Page 7
Port Name Description
| Introduction | 7
Line Out Connects to an audio output device using a
①
3.5mm audio cable, for example MSpeaker
Line In
②
③
④
⑤
⑥
⑦
⑧
USB(Optional)
Video Out Connects to a PC as a video output.
Microphone Connects to a microphone.
DC48V Connects to the power adapter.
Reset Resets the UVC80 to factory defaults.
Security Slot Creates a secure connection to the UVC80 with a
Connects to an audio input device using a 3.5mm
audio cable.
/
universal security cable to lock UVC80 down.
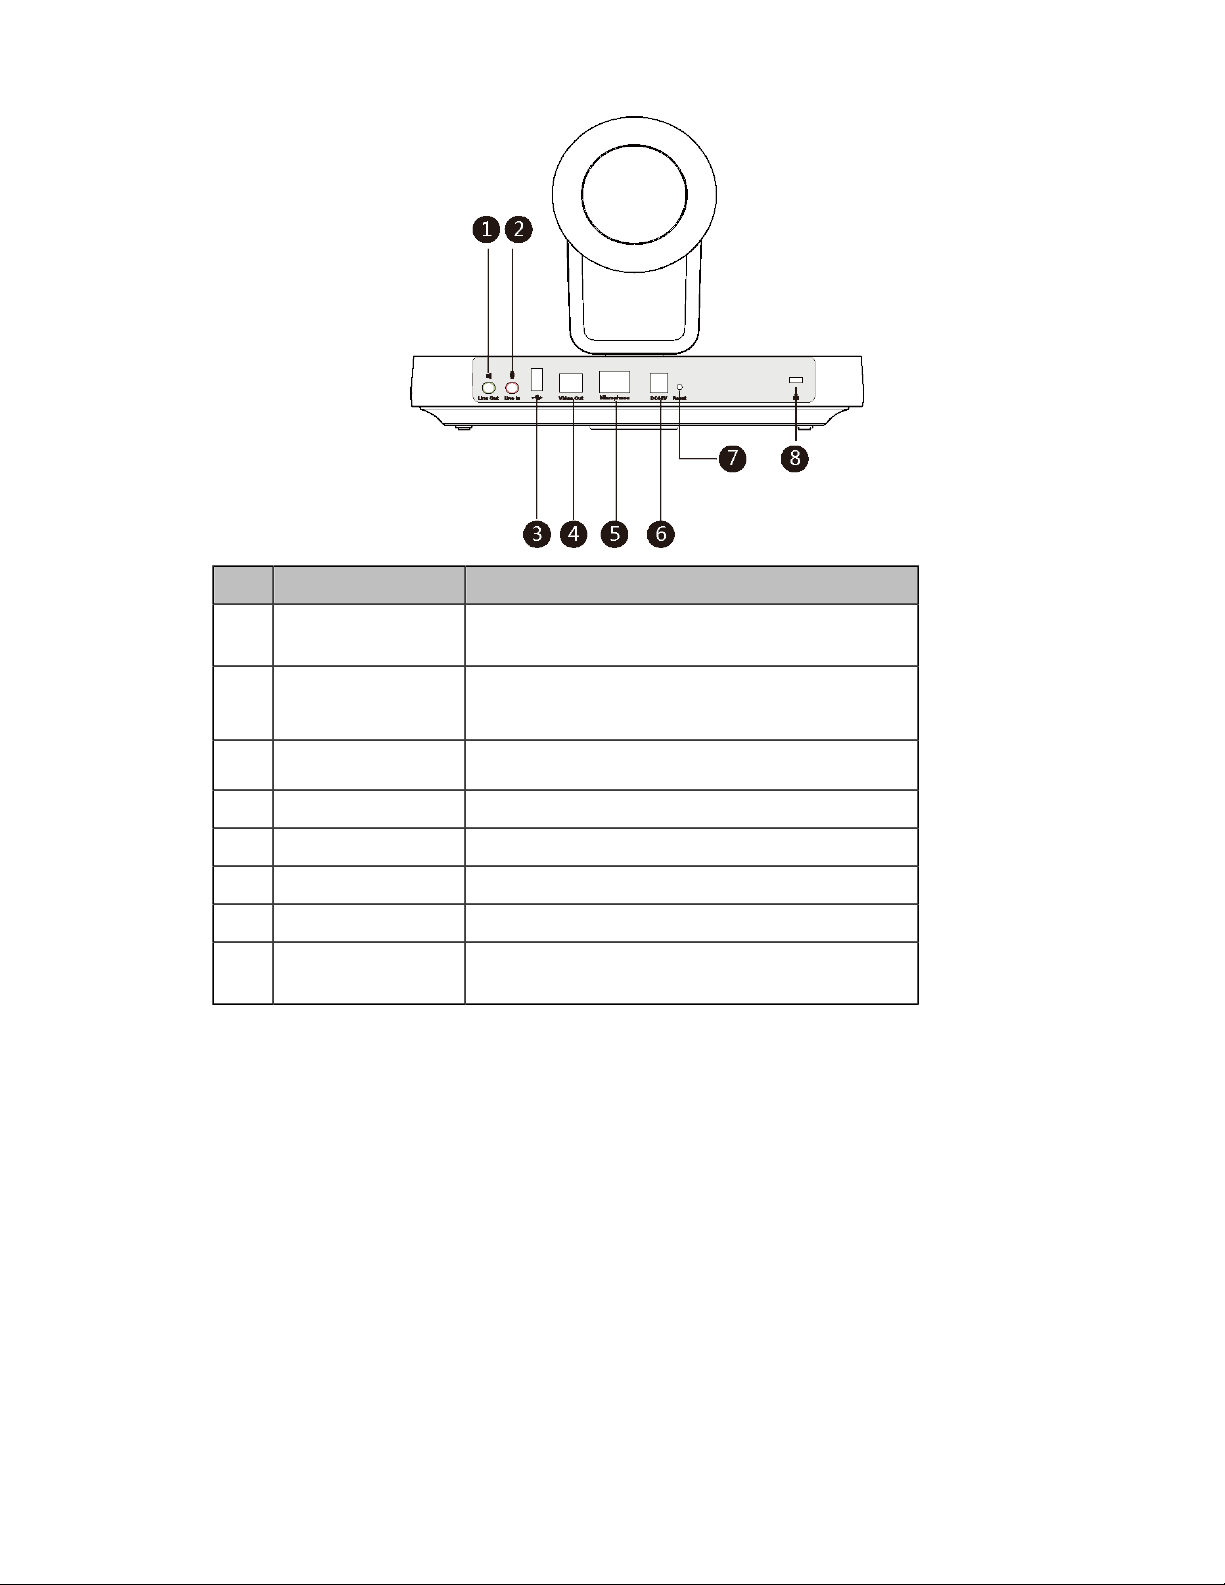
UVC50
The following describes the corresponding ports of UVC50:
Ⅱ.
Page 8
①
| Introduction | 8
Port Name Description
USB(Optional) /
Microphone Connects to a microphone.
②
Video Out Connects to a PC as a video output.
③
Line In
④
⑤
⑥
⑦
⑧
Line Out Connects to an audio output device using a 3.5mm
DC48V Connects to the power adapter.
Reset Resets the UVC50 to factory defaults.
Security slot Creates a secure connection to the UVC50 with a
Connects to an audio input device using a 3.5mm
audio cable.
audio cable, for example MSpeaker
universal security cable to lock UVC50 down.
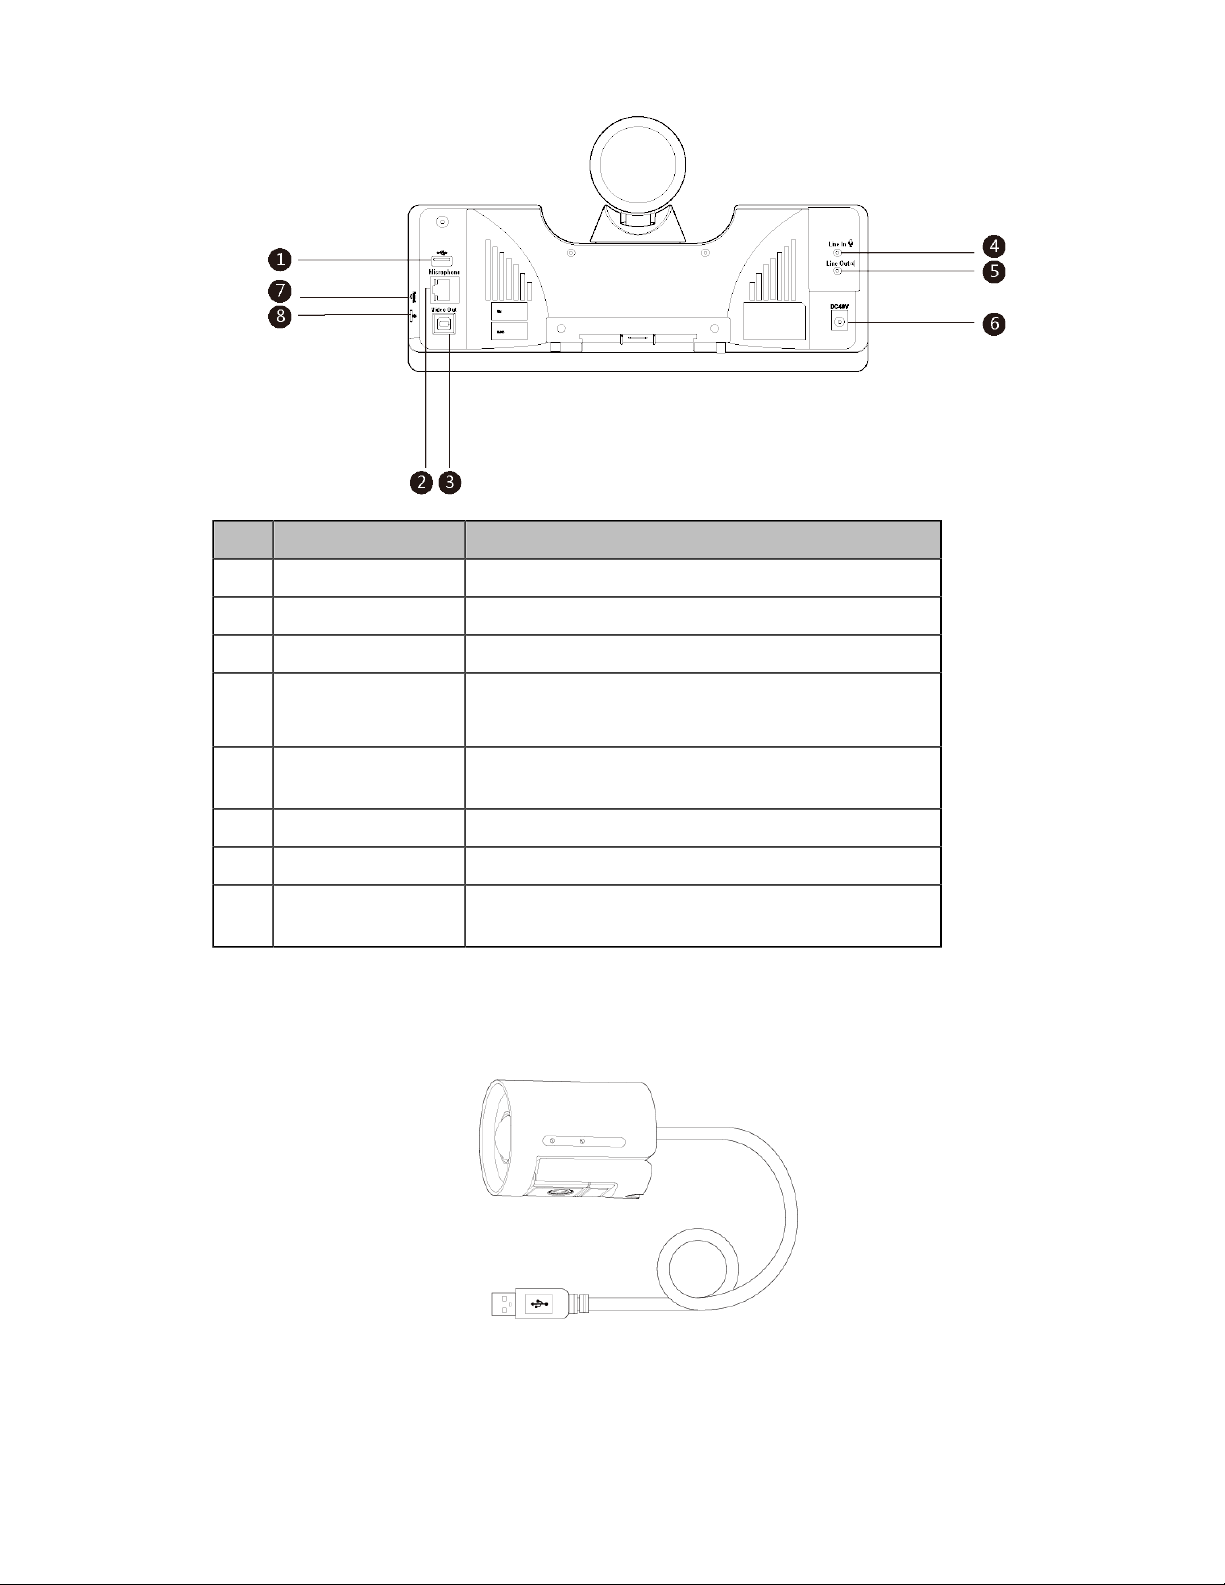
UVC30 Room
The UVC30 Room is directly connected to the MCore via USB cable.
Ⅱ.
CP960
The following describes the hardware of CP960:
Page 9
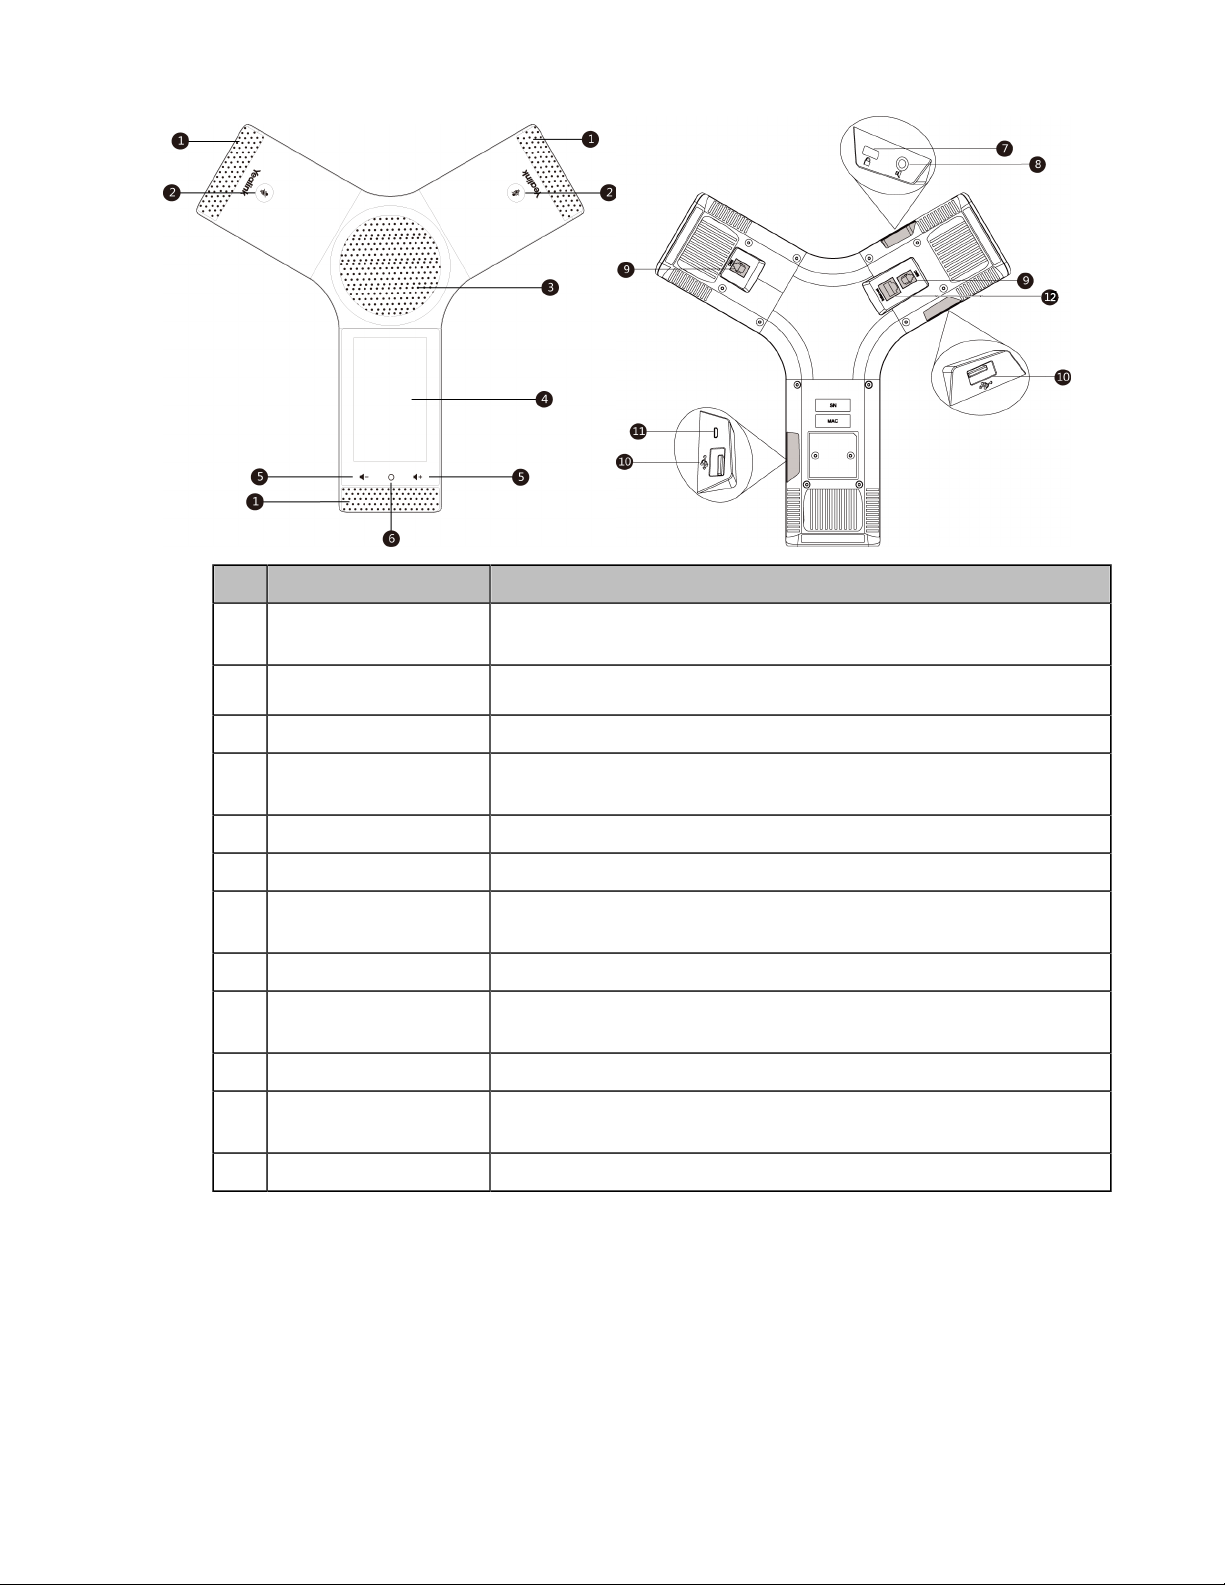
Item Description
| Introduction | 9
1 Three Internal
Microphones
2 Mute Touch Keys
3 Speaker Provides hands-free (speakerphone) audio output.
4 Touch Screen Allows you to select items and navigate menus on the touch-
5 Volume Touch Keys Adjust the volume of the speaker or the ringer.
6 HOME Touch Key Tap it to return to the idle screen.
7 Security Slot Enables you to attach a universal security cable lock to your phone
8 3.5mm Audio-out Port Enables you to connect an optional external speaker.
9 Wired Mic Ports Comes ready for the future connection of CPE90 wired expansion
10 USB Ports CPW90 charging cradle.
11 Micro USB Port Comes ready for the future PC connection that your phone will work
12 Network Port Enables you to connect the phone to wired network.
Provide 20-feet and 360-degree coverage to transmit sound to other
phones.
Toggle mute feature.
sensitive screen. Tap toselect items and navigate menus.
so you can secure it to a desktop.
microphones.
as an external speaker and a microphone for your PC.
MShare(Optional)
The following describes the corresponding ports of MShare:
Page 10

| Introduction | 10
Port Name/Indicator Name Description
①
②
③
④
⑤
⑥
LED Indicator Indicates the working status of MShare.
Mini DP Connects to PC to share contents.
HDMI Connects to PC to share contents.
USB Connects to WPP20 to pair the WPP20 with the MShare.
Wi-Fi AP LED Indicator Indicates the status of MShare connected to the WPP20.
USB Connects to MCore.
Related Documentations
The following related documents are available:
• Yealink ZVC Series Zoom Rooms Kit Quick Start Guide (EN, CN)
• Yealink UVC80 Quick Start Guide(EN&CN)
• Yealink UVC50 Quick Start Guide(EN&CN)
• Yealink UVC30 Room Quick Start Guide(EN&CN)
Page 11

• Yealink MShare Quick Start Guide(EN&CN)
• Yealink MCore Quick Start Guide (EN, CN)
Technical Specifications
Operating System Windows 10 IoT Enterprise
Software Zoom Rooms
| Introduction | 11
Processor / SSD /
RAM
Ports
Buttons Power On button on the front
UVC80
UVC50
8th Gen Intel® QUAD-Core™ i5/128GB/8GB (2 x 4GB)
• 2 x HDMI video output
• Bluetooth and Wi-Fi
• 1x Yealink VCH port, for connecting MTouch II
• 4 x USB3.0 Type-A
• 1 x 10/100/1000M Ethernet port
• 1 x Power port
• Built-in cable management
• 1920 x 1080 video resolution
• 60 frame rate
• 12x optical zoom
• Field of view (diagonal): 78.5°
• Pan angle range: 200°
• Tilt angle range: 60°
• 1920 x 1080 video resolution
• 60 frame rate
• 5x optical zoom
• Field of view (diagonal): 91°
• Pan range: 60°
• Tilt range: 40°
UVC30 Room
MShare
• 4K video resolution
• Maximum 60FPS
• 3x digital zoom
• Field of view (diagonal): 120°
• Facial detection and Auto framing
• 1 x 3m USB 2.0 cable
• 1080P/30FPS FHD
• Support wired and wireless content sharing
• Built-in Wi-Fi AP for Yealink wireless presentation device
Page 12

| Deployment and Connection | 12
CP960
• Optimal HD audio
• 20-foot (6-meter) microphone pickup ran
• Built-in 3-microphone array, 360-degree voice pickup
• 5” 720x1280 capacitive touch screen
• Full-duplex technology
• Noise suppression (NS)
Deployment and Connection
The following contents describe the deployment and connection of Yealink Solution for Zoom Rooms, which
consists of CP960, UVC80/UVC50/UVC30 camera, and MCore.
The CP960 with Zoom Rooms version, can communicate with the MCore connected to the same LAN and
can be used as Zoom Rooms controller, speaker, and microphone.
Yealink Plugin for Zoom Rooms and Zoom Rooms app have been installed on the MCore.
And the UVC80/UVC50/UVC30 camera is Plug-and-play. Make sure your phone and MCore can access
the Internet.
Note: Make sure the display device is connected first. When starting up the system for the first
time, you need to connect a mouse to complete the initial configuration. We recommend using the
wireless mouse kit.
• ZVC800 Zoom Rooms Kit
• ZVC500 Zoom Rooms Kit
• ZVC300 Zoom Rooms Kit
• Recommended Deployment Solution
Page 13

ZVC800 Zoom Rooms Kit
| Deployment and Connection | 13
Note: For more information about the installation and deployment of accessories (for example,
the installation of MCore or UVC80 camera), refer to the Quick Start Guide of the corresponding
accessory.
Page 14

ZVC500 Zoom Rooms Kit
| Deployment and Connection | 14
Note: For more information about the installation and deployment of accessories (for example,
the installation of MCore or UVC50 camera), refer to the Quick Start Guide of the corresponding
accessory.
Page 15

ZVC300 Zoom Rooms Kit
| Deployment and Connection | 15
Note: For more information about the installation and deployment of accessories (for example,
the installation of MCore or UVC30 camera), refer to the Quick Start Guide of the corresponding
accessory.
Recommended Deployment Solution
• Deployment Solutions of Different Meeting Rooms
• Camera Installation
• Recommendations of MCore Installation
• Conference Room Wiring
Deployment Solutions of Different Meeting Rooms
Yealink ZVC Zoom Rooms system supports different camera devices (UVC80/UVC50/UVC30 Room)
according to the conference requirements. Deployment solutions for different camera devices are as
follows:
Page 16

| Deployment and Connection | 16
Medium-to-large room
(8-18 People)
ZVC800 Zoom Rooms Kit ZVC500 Zoom Rooms Kit ZVC300 Zoom Rooms Kit
For Focus and small room(2-7 People)
Small-to-medium
meeting room
(5-11 People)
Focus and small
room(2-7 People)
(2-7 People)
For Small conference room (5-11 people)
For Medium-to-large conference room (8-18 people)
Page 17

| Deployment and Connection | 17
• CPW90 wireless microphones support 360-degree audio pickup at a radius of up to 3 meters.
• Place the CPW90 wireless microphones on a stable surface and keep them away from obstacles, so
that they can pick up sounds effectively.
Camera Installation
You can mount the UVC80/UVC50 on the top of the TV, on the wall, on the ceiling, or onto a TV Stand or a
Tripod.
You can mount the UVC30 on the top of the TV, on the wall, or onto a TV Stand or a Tripod.
The installation methods are as follows:
For UVC80:
For UVC50:
Page 18

For UVC30:
| Deployment and Connection | 18
• Recommendations of Camera Installation
Recommendations of Camera Installation
The following is an example of installing UVC80:
• Install the LCD TV and video camera relative to the center of the participants. Ensure that the
participants face the camera and LCD TV directly during calls.
• The camera should be mounted on the wall, about 1.5 m to 1.8 m above the ground. Install the LCD TV
below the camera.
Page 19

• The camera should not face the light source directly, to prevent bad experience caused by dazzling
light.
Recommendations of MCore Installation
You can mount the MCore on the wall near the TV, or stick it to the table or the backside of the TV cart.
For more information on how to install the MCore, please refer to Yealink Mcore Quick Start Guide (EN,CN).
Conference Room Wiring
| Initial Setup | 19
If the conference room has a dedicated routing channel, you can follow the way as it is. If not, follow the
way below to route and fix the wire.
Note: If you require longer cable length for connecting the camera, you can use the USB extension
cables for wiring.
Initial Setup
Once the MCore is powered on, the MCore will load the Microsoft Windows 10 IoT Enterprise operating
system. By default, there are two Windows accounts (ZoomRooms account and ZoomRoomsAdmin
account) built into the Zoom Rooms system. After the initial setup, the Zoom Rooms system is
automatically run with the ZoomRooms account.
Page 20

| Wireless Network Connection for CP960 | 20
Note: Starting the MCore for the first time may take a long time to configure the Windows
system and we recommend using the wireless mouse and keyboard to complete the Windows
configuration.
• ZoomRooms Account
• ZoomRoomsAdmin Account
ZoomRooms Account
ZoomRooms account is the default account from which the Zoom Rooms app runs. This account
is limited to running the Zoom Rooms app. The default password is “zoom123” without quotes. No
administrator privileges are available from this account. The default account to run the Zoom Rooms Room
is “ZoomRooms ”, and this account will be automatically signed in when the system boots.
ZoomRoomsAdmin Account
The administrator user account is privileged, meaning you can perform any action on the system, with
minimal restriction(usually requiring a password for confirmation). The default password is “zoom123”
without quotes. The admin account is only used for device management, such as upgrading devices. For
daily use such as Zoom Rooms meetings, the administrator credentials are not needed.
Related information
Upgrading System Software
Wireless Network Connection for CP960
Before you begin
Ensure that the CP960 and MCore are connected to the same LAN.
Procedure
1. Swipe down from the top of the screen to enter the device setting screen.
2. Tap Settings > Baisc Settings > Wi-Fi.
3. Turn Wi-Fi on.
The phone will automatically search for available wireless networks in your area.
4. Tap an available wireless network from the list of networks.
5. If the network is secure, enter its password in the Password field and then tap Connect.
Pairing the Zoom Rooms with CP960
Before using CP960 as the Zoom Rooms controller, you need to pair the CP960 (preload the Zoom Rooms
Controller) with the MCore (preload the Zoom Rooms app).
Before you begin
Ensure that the plugin is in operation.
Page 21

| Using CP960 as an Audio Input and Output Device | 21
Procedure
1. After the MCore is powered on, the Zoom Rooms app will be started automatically.
The pairing code will be displayed on the screen. Otherwise, you need to open the Zoom Rooms app
manually.
2. Enter the pairing code on the touch screen of the CP960.
Then the CP960 (Zoom Rooms Controller) is paired with theMCore (Zoom Rooms app) successfully.
Using CP960 as an Audio Input and Output Device
After your phone is paired with MCore, it can be used as a default audio input and output device for the
system.
Procedure
1.
Tap on the touch screen.
2. Disable Lock Settings.
You need to enter the room password to change the setting.
Page 22

| Using CP960 as an Audio Input and Output Device | 22
3. Tap the Microphone field and then select Echo Cancelling Speakerphone (Yealink CP960
Speakerphone) as your audio input device from the SOURCE field.
Page 23

| Using CP960 as an Audio Input and Output Device | 23
4. Tap the Speaker field and then select Echo Cancelling Speakerphone (Yealink CP960
Speakerphone) as your audio output device from the SOURCE field.
Page 24

| Using CP960 as Zoom Rooms Controller | 24
Using CP960 as Zoom Rooms Controller
After your phone is paired with theMCore, it can be used as a Zoom Rooms controller.
• Signing Into Your Zoom Rooms Account
• Signing Out of Your Zoom Account from Your Phone
• Basic Features on the Phone
• Controlling UVC80/UVC50/UVC30 Camera
Signing Into Your Zoom Rooms Account
Procedure
1. Tap Sign In on the touch screen.
2. Enter the email and password.
3. Tap Sign In.
The account is signed into the Zoom Room app synchronously.
Page 25

| Using CP960 as Zoom Rooms Controller | 25
Signing Out of Your Zoom Account from Your Phone
Procedure
1.
Tap > Sign Out on the touch screen.
2. Enter the room password to sign out.
3. Tap OK.
If you have disabled the Lock Settings before, the account will be signed out directly once you tap Sign
Out.
Basic Features on the Phone
After you sign into an account on your phone, more features are available on the phone.
• Meet Now: Tap Meet Now to create an instant meeting.
• Join: Tap Join to join a meeting by entering the meeting ID or personal link name.
Page 26

| Using CP960 as Zoom Rooms Controller | 26
• Phone: Tap Phone to place a call.
• Presentation: Tap Presentation to start a presentation.
•
: Tap to check the status of the connected microphone, speakerand camera, and configure basic
settings.
You can also view the Controller version, Zoom Rooms version and Controller IP at the path of >
About .
• In-Meeting Controls, you can do the following:
• Mute/Unmute microphones in the room
• Show/Hide local video
• Share content or camera
• Camera control
• Change video layout (choose Thumbnail, Gallery, or Active Speaker)
• View and manage meetng participants
• Invite other participants to the meeting
• Device
• Leave the meeting or end the meeting if host
• Control the meeting volume
Settings(Set
the microphone, speaker and
camera)
For more information on specific features, please refer to Zoom Rooms Controller Features.
Controlling UVC80/UVC50/UVC30 Camera
Zoom Rooms supports basic PTZ control for your UVC80/UVC50/UVC30 camera during meeting after
setting the UVC80/UVC50/UVC30 camera as the default camera. In addition, the UVC30 also supports
camera presets and auto-framing feature.
Note: The Yealink RoomConnect plug-in running under Windows supports advanced settings for
UVC80/UVC50/UVC30 Room cameras. After logging in to the Windows system as an administrator,
you can configure the camera parameters including exposure, graphic, white balance mode, people
counting, and configuration hangup mode and camera pan direction.
For more information on how to configure camera parameters on the Yealink RoomConnect plug-in,
please refer to Yealink RoomConnect User Guide.
• Setting the UVC80/UVC50/UVC30 as the Default Camera
• Controlling UVC80/UVC50/UVC30 Room Camera Position
• Creating the Preset Position for UVC30
• Resetting the Preset Position for UVC30
• Renaming the Preset Position for UVC30
• Setting UVC30 Camera to Preset Position
• Enabling/Disabling Auto-framing for UVC30
Setting the UVC80/UVC50/UVC30 as the Default Camera
Procedure
1.
Tap on the touch screen.
2. Disable Lock Settings.
You need to enter the room password to change the setting.
Page 27

| Using CP960 as Zoom Rooms Controller | 27
3. Tap the Camera field and then select Yealink UVC80/UVC50/UVC30 Camera as your default camera
from the SOURCE field.
Controlling UVC80/UVC50/UVC30 Room Camera Position
Procedure
1. During a meeting, tap Camera Control.
2.
Tap / to zoom camera out/in.
3. Tap the arrow keys to pan/tilt the camera.
Creating the Preset Position for UVC30
Presets specify the settings of both the angle and the focal length for the camera that can be used to
quickly point a camera at a pre-defined location.
Procedure
1. During a meeting, tap Camera Control.
2.
Tap / to zoom camera out/in.
3. Tap the arrow keys to pan/tilt the camera.
4. Long tap Preset1/Preset2/Preset3 to create a new preset.
Page 28

5. If the Lock Settings is enabled, enter the room passcode.
6. Long tap the corresponding preset and then select Save position.
Resetting the Preset Position for UVC30
Procedure
1. During a meeting, tap Camera Control.
2.
Tap / to zoom camera out/in.
3. Tap the arrow keys to pan/tilt the camera.
4. Long tap Preset1/Preset2/Preset3 to reset the preset.
5. If the Lock Settings is enabled, enter the room passcode.
6. Long tap the corresponding preset and then select Save position.
Renaming the Preset Position for UVC30
Procedure
| Using CP960 as Zoom Rooms Controller | 28
1. During a meeting, tap Camera Control.
2. Long tap Preset1/Preset2/Preset3 to rename the preset.
3. If the Lock Settings is enabled, enter the room passcode.
4. Long tap the corresponding preset and then select Rename.
5. Enter the new name.
6. Tap OK.
Setting UVC30 Camera to Preset Position
Procedure
1. During a meeting, tap Camera Control.
2. Select Preset1/Preset2/Preset3 to set the camera to the preset position.
Enabling/Disabling Auto-framing for UVC30
Auto-framing is mainly based on face detection, which provides real-time detection and position tracking on
all faces in the conference room. All participants in the output screen are covered and the camera can be
automatically adjusted according to the number of participants and the position changes.
About this task
When the auto-framing feature is enabled, you can not control the UVC30 camera position.
Procedure
1. During a meeting, tap Camera Control.
2. Enable/Disable Auto-framing.
Page 29

Content Sharing
You can present the content while the device is idle or during a meeting.
• Wired Content Sharing
• Sharing Content with WPP20 Wireless Presentation Pod
• Stopping Sharing Content
Wired Content Sharing
After the MShare is connected to the PC, you can use MShare for wired content sharing.
Procedure
Normally, it will start presentation automatically. If you stop content sharing manually on the touch
screen, do one of the following:
• From the idle screen, tap Presentation to start content sharing.
• During a meeting, tap Share Content or Camera > Start sharing to start content sharing with the
participants.
| Content Sharing | 29
Sharing Content with WPP20 Wireless Presentation Pod
You can use Yealink WPP20 wireless presentation pod for wireless content sharing. Before content
sharing, you should pair the WPP20 with the MShare and then connect it to the computer.
• Pairing the WPP20 with the MShare
• Sharing Content via WPP20
• Stopping Sharing Content via WPP20
Pairing the WPP20 with the MShare
Procedure
1. Connect the WPP20 to the USB port of the MShare.
2. Wait for about 3 seconds, and the WPP20 LED indicator glows green.
The WPP20 is paired with the MShare successfully.
Sharing Content via WPP20
Before you begin
Make sure the WPP20 has been paired with the MShare.
Procedure
1. Connect the WPP20 wireless presentation pod to your computer.
2. If the WPP20 is first connected to the computer, you need to manually start the Yealink Wireless
Presentation Pod software from This PC in Windows 10 or from My Computer in Windows 7 and then
upgrade the WPP20.
Page 30

• After starting the software, if it prompts that the firmware version is different from the host version,
you need to upgrade the WPP20 according to the prompts.
• For the WPP20 running old versions, after starting the software, you need to manually upgrade the
firmware on the software at the path ->Version Update.
After the upgrade is successful, the WPP20 is ready for content sharing.
3. Do one of the following:
• On the WPP20, press the presentation button to share the full screen.
• On the WPP20, long press the presentation button for 3 seconds and then release this button. Select
the file or the window you want to share and then click Start Sharing.
• On the Yealink Wireless Presentation Pod software, click Contents Share and choose the file you
want to share, and then click Start Sharing.
The content you want to share is automatically projected to the display device.
Tip: Go to Yealink website for the latest version of the firmware.
Related tasks
Pairing the WPP20 with the MShare
Stopping Sharing Content via WPP20
| Using Hybrid Mode | 30
Procedure
Do one of the following:
• On your computer, remove the WPP20.
• On the WPP20, press the presentation button.
• On the Yealink Wireless Presentation Pod software, click Stop Sharing.
Stopping Sharing Content
Procedure
Do one of the following:
• Tap Presentation > Stop Sharing on the presentation screen to stop sharing content when the
device is idle.
• During a meeting, tap Share Content or Camera > Stop Current Sharing to stop sharing content
with the participants.
Note: After stopping content sharing, you can start presenting again as you need.
Using Hybrid Mode
Yealink Solution for Zoom Rooms supports the hybrid mode that allows you to switch between SIP mode
and Zoom Rooms mode to experience Zoom video conferences as well as SIP calls and conferences.
In SIP mode, you can use basic call features, including placing/answering calls, initiating a conference,
recording calls, and so on.
• Enabling the Hybrid Mode
• Switching Between SIP Mode and Zoom Rooms Mode
Page 31

| Basic Settings on the Phone | 31
Enabling the Hybrid Mode
The CP960 uses the Zoom Rooms mode by default. You can enable the hybrid mode to use so that you
can both the Zoom Rooms mode and SIP mode.
Procedure
1. Swipe down from the top of the screen to enter the device setting screen.
2. Tap Settings > Advanced Settings (default password: admin).
3. Turn Hybrid Mode on.
It prompts that if you are sure to switch mode.
4. Tap OK.
This configuration will take effect after a reboot.
Switching Between SIP Mode and Zoom Rooms Mode
After the hybrid mode is enabled, you can switch between SIP mode and Zoom Rooms mode quickly on
the phone when you are not in a call.
Procedure
1. Under the Zoom Rooms mode, tap the floating circle to switch to the SIP mode.
2. Under the SIP mode, tap the floating circle or tap the Zoom Rooms app icon to switch back to the
Zoom Rooms mode.
Related tasks
Enabling the Hybrid Mode
Basic Settings on the Phone
• Setting the Language
• Setting the Input Method
• Time and Date Display
• Changing the Screen Backlight Brightness and Time
• Changing the Screen Saver Type and Waiting Time
• Setting the Signal Port of Yealink Plugin
Setting the Language
Procedure
1. Swipe down from the top of the screen to enter the device setting screen.
2. Tap Settings > Basic Settings > Language & Input > Language.
3. Select the desired language.
4. Save the change.
Page 32

| Basic Settings on the Phone | 32
Setting the Input Method
Before using the on-screen keyboard to enter data, you can set the input method. The CP960 supports the
English (US)-Android Keyboard (AOSP) input method and Google Pinyin input method.
Procedure
1. Swipe down from the top of the screen to enter the device setting screen.
2. Tap Settings > Basic Settings > Language & Input.
3. Tap the Current Input and then select a desired input.
Time and Date Display
You can set the time and date manually. The time and date formats are also variable.
• Setting the Time and Date Manually
• Changing the Time and Date Format
Setting the Time and Date Manually
If your phone cannot obtain the time and date automatically, you can set it manually.
Procedure
1. Swipe down from the top of the screen to enter the device setting screen.
2. Tap Settings > Basic Settings > Time & Date > General.
3. Tap the Type field and select Manual Settings from the pop-up dialog box.
4. Enter the specific date and time in the corresponding fields.
5. Save the change.
Changing the Time and Date Format
You can set the phone to display the time in 12-hour format or 24-hour format. You can also change the
date format, including the options to display the day (D), month (M), and year (Y).
About this task
The built-in date formats are listed as below:
Date Format Example(2019-05-29)
WWW MMM DD Wed May 29
DD-MMM-YY 29-May-19
YYYY-MM-DD 2019-05-29
DD/MM/YYYY 29/05/2019
MM/DD/YY 05/29/19
DD MMM YYYY 29 May 2019
WWW DD MMM Wed 29 May
Page 33

| Basic Settings on the Phone | 33
Procedure
1. Swipe down from the top of the screen to enter the device setting screen.
2. Tap Settings > Basic Settings > Time & Date > Time & Date Format.
3. Select the desired date format from the Date Format field.
4. Select the desired time format from the Time Format field.
5. Save the change.
Changing the Screen Backlight Brightness and Time
You can change the backlight brightness of the LCD backlight when the phone is active (in use). The
backlight brightness automatically changes after the phone has been idle for a specified time.
Procedure
1. Swipe down from the top of the screen to enter the device setting screen.
2. Tap Settings > Basic Settings > Display > Language > Backlight.
3. Slide the Active Level slider to change brightness of the LCD backlight.
4. Tap the Backlight Time field and select the desired time.
5. Save the change.
Changing the Screen Saver Type and Waiting Time
The screen saver automatically starts each time your phone is idle for a certain amount of time. You can
stop the screen saver at any time by pressing any key or tapping the touch screen. When your phone is
idle again for a preset waiting time, the screen saver starts again.
About this task
Active Level: The intensity of the phone screen when the phone is active.
Backlight Time: The delay time to change the brightness of the phone screen when the phone is inactive.
Backlight time includes the following settings:
• Always On: Backlight is on permanently.
• 15s, 30s, 1min, 2min, 5min, 10min or 30min: Backlight is changed when the phone is inactive after
the designated time.
Procedure
1. Swipe down from the top of the screen to enter the device setting screen.
2. Tap Settings > Basic Settings > Display > Screen Saver.
3. Tap the Screensaver Waiting Time field and select the desired time from the pop-up menu.
4. Select the desired background.
5. Save the change.
Setting the Signal Port of Yealink Plugin
Page 34

| Using the CP Wireless Expansion Mic CPW90 | 34
Before you begin
Make sure that the signal port of Yealink Plugin you set on the phone is the same as the Yealink Plugin on
your MCore.
Procedure
1. Swipe down from the top of the screen to enter the device setting screen.
2. Tap Settings > Advanced Settings (default password: admin) > Yealink Plug-in Setting > Signal
Port.
3. Save the change.
Using the CP Wireless Expansion Mic CPW90
The Yealink CPW90 is a CP Wireless Expansion Mic which works as an audio input device for CP960
phone. It features superior audio technology and supports 360-degree voice pickup range at a radius of up
to 10 feet (3 meters) without any wiring troubles.
• Registering the CPW90
• Unregistering the CPW90
• Viewing CPW90 Information
• Finding the CPW90
Registering the CPW90
To use the CPW90 as the external audio input device, you need to register the CPW90 first.
Procedure
1. Put the CPW90 on a charging cradle, the CPW90 starts up automatically.
2. Connect the micro USB port on the charging cradle to the USB port on the CP960 using a 0.3m USB
cable.
The CPW90 enters the registration mode automatically. And the mute LED indicator on the CPW90 fast
flashes yellow.
3. Swipe down from the top of the screen to enter the device setting screen.
4.
Tap Settings > Basic Settings > MIC > .
5. Long press the mute key on the CPW90 for 5 seconds.
The CPW90 is registered with the CP960 conference phone automatically.
Unregistering the CPW90
When you no longer need the CPW90 as the external audio input device, you can unregister it.
Procedure
1. Swipe down from the top of the screen to enter the device setting screen.
2. Tap Settings > Basic Settings > MIC.
3. Select the desired microphone and then tap Detail.
4. Tap Unbind to deregister the CPW90.
Page 35

| Switching Between ZoomRooms Account And ZoomRoomsAdmin Account | 35
Viewing CPW90 Information
When the CPW90 is registered with the IP phones, you can view CPW90 status on the phone.
Procedure
1. Swipe down from the top of the screen to enter the device setting screen.
2. Tap Settings > Basic Settings > MIC.
3. Tap Detail from the desired microphone block.
Finding the CPW90
You can find the CPW90 which has registered with the phone.
Procedure
1. Swipe down from the top of the screen to enter the device setting screen.
2. Tap Settings > Basic Settings > MIC.
3. Tap Find from the desired microphone block.
The mute key LED indicator on the registered CPW90 flashes red and green alternately.
Switching Between ZoomRooms Account And ZoomRoomsAdmin Account
• ZoomRoomsAdmin Sign-in
• ZoomRooms Account Sign-in
ZoomRoomsAdmin Sign-in
You can sign in as an administrator and manage the device with administrator privileges.
Procedure
1. Tap Settings on the touch screen.
2. If the Lock Settings is enabled, enter the room password.
3. Tap Windows Settings.
4. Select the ZoomRoomsAdmin account from the bottom-left corner and then enter the password
(default: zoom123) to return to the desktop of the MCore.
ZoomRooms Account Sign-in
If you switch to the administrator account to perform any action on the system, you can switch back to the
ZoomRooms account.
Page 36

| Logging into Yealink Management Cloud Service/Yealink Device Management Platform | 36
Procedure
1.
Click the button, and then go to > Sign out .
2. Select the ZoomRooms account from the bottom-left corner and then enter the password (default:
zoom123) to enter the Zoom Rooms app.
Logging into Yealink Management Cloud Service/Yealink Device Management Platform
The Yealink RoomConnect plugin running under Windows automatically detect all devices in the Zoomm
Rooms system. After logging to the Yealink Management Cloud Service or Yealink Device Management
Platform via Yealink RoomConnect, you can manage all devices in the Zoom Rooms system, including the
centralized upgrade, as well as diagnosis and alarm.
Procedure
1. Sign in your system as an administrator.
2. Run the Yealink RoomConnect plugin.
3.
Tap on the home page.
4. Select a desired platform to connect.
5. Depend on your choice:
• If you select Yealink Management Cloud Service, enter the enterprise ID.
The enterprise ID can be obtained from the Account Settings on your Yealink Management Cloud
Service.
• If you select Yealink Device Management Platform, enter the server address.
6. Enter your meeting room.
7. Select the desired device model.
8. Tap Confirm.
The system will connect to the Yealink Management Cloud Service/Yealink Device Management
Platform.
Related tasks
ZoomRoomsAdmin Sign-in
Troubleshooting
This section describes solutions to common issues that may occur while using the Yealink CP960-UVC
Zoom Rooms kit. Upon encountering a case not listed in this section, contact your Yealink reseller for
further support.
• Upgrading System Software
• Upgrading the CP960
• Firmware for Each Device
• Checking Whether the Phone Can Access to the External Network
• General Issues
Page 37

Upgrading System Software
Windows Update is a service provided by Microsoft which provides security updates and functionality
updates to Windows operating systems and its installed components. ZoomRooms account is the default
account from which the Zoom Rooms app runs, so you need to switch to the ZoomRoomsAdmin account
which has access to return to the desktop of the MCore to manage the devices (including the Windows, the
UVC80/UVC50/UVC30 and the MShare). After switching the user account to ZoomRoomsAdmin, you can
enable Windows Update service to update the devices.
You can also upgrade the devices on the Yealink RoomConnect plug-in under Windows or on the Yealink
Management Cloud Service/Yealink Device Management Platform.
For more information on how to upgrade the devices on Yealink RoomConnect plug-in, please refer to
Yealink RoomConnect Userguide.
For more information on how to upgrade the devices on Yealink Management Cloud Service/Yealink
Device Management Platform, please refer to Yealink Management Cloud Service for Enterprise Administrator
Guide/Yealink Device Management Platform Administrator Guide.
• Enabling Windows Update Service
• Update the Devices
| Troubleshooting | 37
Enabling Windows Update Service
Before you begin
Sign in as an administrator(ZoomRoomsAdmin Sign-in ).
Procedure
1. Open a command prompt window on your MCore.
2. Type services.msc, and press Enter.
3. Find Windows Update service, and double-tap to open Properties.
4. Enable Windows Update service from the Startup type field.
5. Click OK.
Update the Devices
The devices can be upgraded manually or can be automatically upgraded if you enable automatical
Windows Update.
• Enabling Automatically Windows Update
• Manually Windows Update
Enabling Automatically Windows Update
Before you begin
ign in as an administrator (ZoomRoomsAdmin Sign-in ).
Procedure
1.
Click the button, and then go to > Upgrade & Security > Windows Update, and select
Advanced options.
2. Enable Automatically download updates, even over metered data connections(charge may
apply).
Page 38

Manually Windows Update
Before you begin
Sign in as an administrator(ZoomRoomsAdmin Sign-in ).
Procedure
Do one of the following:
•
Press the Windows key + X or right-click the button to open the Power User Menu and then
select Device Manager.
Right click the desired device and then select Update driver.
Select the desired way to update.
•
Click the button , and then go to > Upgrade & Security > Windows Update, and select
Check for updates.
Select the plugin or UVC80/UVC50/UVC30 camera and then complete the installation.
| Troubleshooting | 38
Upgrading the CP960
About this task
There are three ways to update the firmware:
• Update the firmware manually via web user interface
• Batch update a group of phones on the Yealink device management platform or Yealink Management
Cloud Service
• Update the firmware manually Yealink RoomConnect plug-in
Note: For more information on how to update a batch of phones on the Yealink device
management platform or Yealink Device Management Cloud Service, refer to Yealink device
management platform Administrator Guide or Yealink Management Cloud Service for Enterprise
Administrator Guide.
For more information on how to upgrade the CP960 on Yealink RoomConnect plug-in, please refer
to Yealink RoomConnect Userguide.
• Accessing the Web User Interface
• Update the Firmware Manually via Web User Interface
Accessing the Web User Interface
Procedure
1. Swipe down from the top of the screen to enter the device setting screen.
2. Tap Status to obtain the IP address of the phone.
3. Open a web browser on your computer, enter the IP address into the address bar (For example.,
"http://192.168.0.10" or “192.168.0.10”).
4. Enter the user name (default: admin) and password (default: admin) in the login page and then click
Login.
Update the Firmware Manually via Web User Interface
Page 39

| Troubleshooting | 39
Procedure
1. Download the latest version of CP960 Zoom edition from the Yealink Support Website.
2. On the web user interface(https://IP address of the CP960), navigate to Settings > Upgrade >
Upgrade.
3. Upload the firmware.
After the update, the CP960 will reboot automatically.
Firmware for Each Device
The firmware of the CP960, MShare, Yealink Plugin for Zoom Rooms plug-in and the Yealink
RoomConnect plug-in the ZVC series Zoom Rooms Kit must match each other.
The following table lists the associated and latest firmware name for each device:
Device Model Firmware Name
CP960 73.30.0.36.rom
UVC80/UVC50 92.420.0.15.rom
UVC30 105.420.0.10.rom
MShare 94.420.0.5.rom
Yealink Plugin for Zoom Rooms 1.0.24.0
Yealink RoomConnect 2.0.14.0
Checking Whether the Phone Can Access to the External Network
If it prompts that your phone is failed to pair, make sure that this tablet is connected to the internet. After
you enter the pairing code on the phone, you need to check whether the phone can access the external
network.
Procedure
1. On the web user interface, click Network > Diagnosis.
2. Select Ping from the drop-down menu of the Command field.
Page 40

3. Enter Zoom.us in the IP address field.
4. Click Start.
| Troubleshooting | 40
General Issues
• Any Anti-virus Software Needed to Be Installed on the MCore?
• The display does not display the shared content
Any Anti-virus Software Needed to Be Installed on the MCore?
Microsoft itself has Windows Defender, a legitimate antivirus protection plan already built into Windows
10. But not all antivirus software is the same, and you can choose antivirus software based on its ability to
defend against threats.
The display does not display the shared content
• Make sure you have signed in the ZoomRooms account
• Make sure the Yealink UVC80/UVC50/UVC30 Camera is set as the default camera
Related tasks
Signing Into Your Zoom Rooms Account
Setting the UVC80/UVC50/UVC30 as the Default Camera
 Loading...