

Page 1

Safety • Assembly • Operation • Tips & Techniques • Maintenance • Troubleshooting • Parts Lists • Warranty
OF A'rO AL
21" Rotary Mower- Model Series 560
iMPORTANT
READ SAFETY RULES AND iNSTRUCTiONS CAREFULLY BEFORE OPERATION
Warning: Thisunitisequippedwithaninternalcombustionengineandshouldnotbeusedon or nearanyunimprovedforest-covered,brush-
coveredor grass-coveredlandunlesstheengine'sexhaustsystemisequippedwitha sparkarrestermeetingapplicablelocalor statelaws(if any).
If a sparkarresterisused,it shouldbemaintainedineffectiveworkingorderby theoperator.IntheStateofCaliforniatheaboveisrequiredbylaw
(Section4442oftheCaliforniaPublicResourcesCode).Otherstatesmayhavesimilarlaws.Federallawsapplyonfederallands.A sparkarrester
forthemufflerisavailablethroughyournearestengineauthorizedservicedealeror contactthe servicedepartment,RO.Box361131Cleveland,
Ohio44136-0019.
FORMNO.770-10347F
PRINTEDIN U.S.A.
MTD LLC, P.O. BOX 361131 CLEVELAND, OHIO 44136-0019
10/18/2005
Page 2
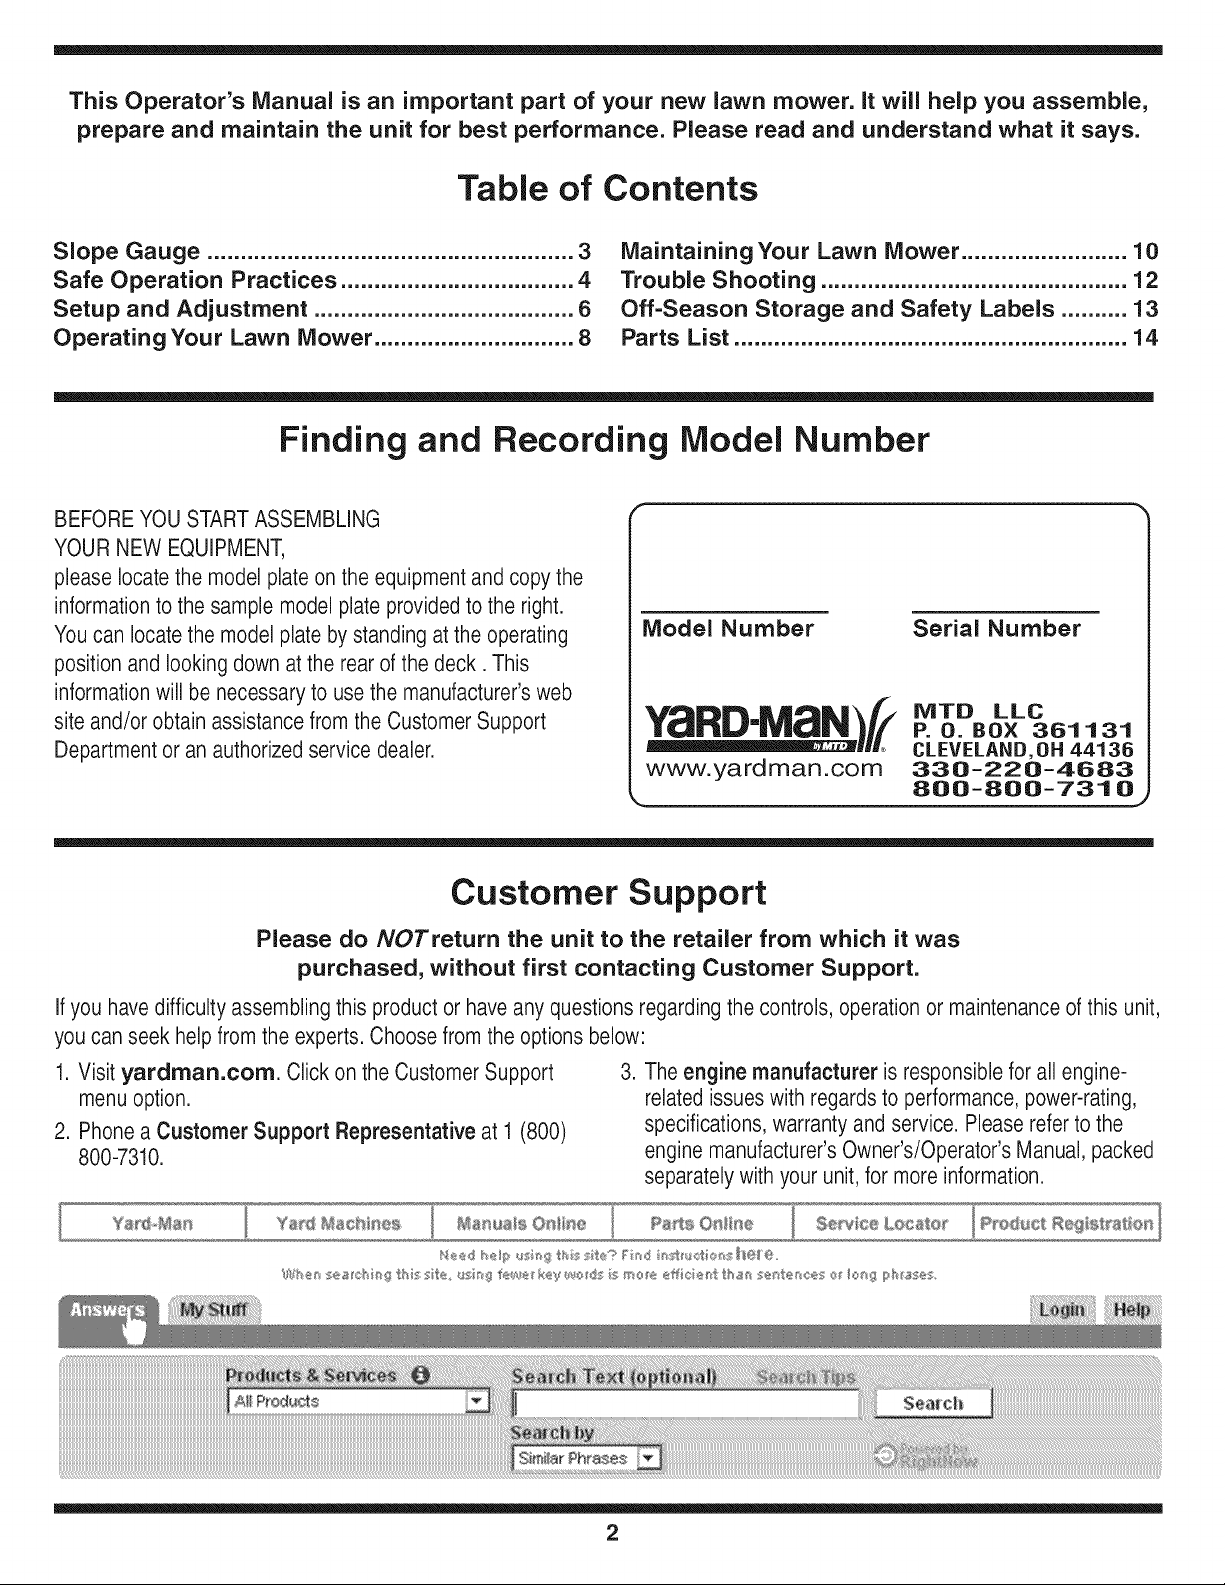
This Operator's Manual is an important part of your new lawn mower, it will help you assemble,
prepare and maintain the unit for best performance. Please read and understand what it says.
Table of Contents
Slope Gauge ....................................................... 3
Safe Operation Practices ................................... 4
Setup and Adjustment ....................................... 6
Operating Your Lawn Mower .............................. 8
Finding and Recording Model Number
BEFOREYOUSTARTASSEMBLING
YOURNEW EQUIPMENT,
please locatethe modelplate onthe equipmentand copythe
informationtothe sample modelplate providedtothe right.
Youcan locatethe model plate by standing at the operating
position and lookingdown atthe rear of the deck. This
informationwill be necessaryto usethe manufacturer'sweb
site and/or obtain assistancefrom theCustomerSupport
Departmentor an authorizedservice dealer.
Maintaining Your Lawn Mower ......................... 10
Trouble Shooting .............................................. 12
Off-Season Storage and Safety Labels .......... 13
Parts List ........................................................... 14
Model Number
YaRD-MaN)/f
www.yardman.com 330-220-4683
Serial Number
P. O. BOX 361131
CLEVELAND,OH44136
800-800-7310
Customer Support
Please do NOTreturn the unit to the retailer from which it was
purchased, without first contacting Customer Support.
Ifyou havedifficulty assembling this productor haveany questionsregarding the controls, operationor maintenanceof this unit,
youcan seek helpfrom the experts. Choosefromthe optionsbelow:
1. Visit yardman.com. Click on the CustomerSupport
menuoption.
2. Phonea Customer Support Representativeat 1 (800)
800-7310.
3. Theengine manufactureris responsiblefor all engine-
relatedissueswith regardsto performance,power-rating,
specifications,warrantyand service. Pleasereferto the
enginemanufacturer'sOwner's/Operator's Manual,packed
separatelywithyour unit, for more information.
2
Page 3
O
o
1=
Sightandholdthis levelwith a verticaltree...
o
>:.
(13
O3
(13
(13
O-
O
O
(--
O5
E
O
(13
(13
also
o3
(13
O-
O
o3
(13
I
E
o5
(]3
(13
(13
O-
O
O3
o
(13
-5
C5
O3
('5
O
O3
O5
(13
O
E
t"b
(13
O9
15°
Page 4
WARNING: EngineExhaust,some of its constituents,andcertain vehicle compo-
nentscontain or emit chemicals knownto Stateof Californiato cause cancerand
birth defects or other reproductiveharm.
DANGER: This machinewas builtto beoperatedaccordingto the rulesfor safe operationin this
manual.As with anytypeof power equipment,carelessnessor error on the part of the operator can
result in seriousinjury.This machine iscapableof amputatinghands andfeet andthrowing objects.
Failureto observethe followingsafetyinstructionscould result in serious injury or death.
RNING
This symbol points
i out important safety
instructionswhich, if
notfollowed, could
endangerthe personal
i safetyand/or property
I ofyourselfand others.
Readand follow all
instructionsinthis man-
ualbefore attempting to
operatethis machine.
Failureto complywith
these instructionsmay
i resultin personal injury.
i When youseethis
_symbol.
HEED ITS WARNING
Your
Responsibility
Restrictthe use
i of this powermachine
i to personswho read,
understand
andfollow the warnings
and instructions
inthis manual
andon the machine.
Children
Tragicaccidentscanoccurifoperatorisnotalertto presence
ofchildren.Childrenareoftenattractedtomowerandmowing
activity.Theydonot understandthe dangers.Neverassume
thatchildrenwill remainwhereyoulastsawthem.
1. Keepchildrenoutof the mowingareaandunderwatchful
careof a responsibleadultotherthanthe operator.
2. Bealert andturn moweroff if a childentersthearea.
3. Beforeandwhilemovingbackwards,lookbehindanddown
forsmallchildren.
4. Useextremecarewhenapproachingblindcorners,
doorways,shrubs,trees,or otherobjectsthatmayobscure
yourvisionofachild whomayrunintothe mower.
5. Keepchildrenawayfromhotorrunningengines.Theycan
sufferburnsfroma hotmuffler.
6. Neverallowchildrenunder14yearsoldto operateapower
mower.Children14yearsoldandovershouldreadand
understandoperationinstructionsandsafetyrulesinthis
manualandshouldbetrainedandsupervisedbya parent.
General Operation
1. Readthis operator'smanualcarefullyin its entiretybefore
attemptingtoassemblethismachine.Read,understand,
andfollowall instructionsonthemachineandin the
manual(s)beforeoperation.Becompletelyfamiliarwith
thecontrolsandthe properuseofthis machinebefore
operatingit.Keepthis manualin asafeplaceforfuture
andregularreferenceandfor orderingreplacementparts.
2. Thismachineisaprecisionpieceof powerequipment,
nota plaything.Therefore,exerciseextremecautionat all
times.Yourunithas beendesignedto performonejob: to
mowgrass.Do notuseitfor anyotherpurpose.
3. Neverallow childrenunder 14yearsoldto operatethis
machine.Children14yearsoldand overshould readand
understandthe instructionsinthismanualandshould
betrainedand supervisedbya parent.Onlyresponsible
individualswhoarefamiliarwiththeserulesofsafe
operationshouldbeallowedto usethis machine.
4. Thoroughlyinspectthe areawherethe equipmentisto
beused.Removeallstones,sticks,wire,bones,toysand
otherforeignobjectswhichcouldbetrippedoverorpicked
upandthrownby the blade.Thrownobjectscancause
seriouspersonalinjury.Planyourmowingpatternto avoid
dischargeof materialtowardroads,sidewalks,bystanders
andthe like.Also,avoiddischargingmaterialagainsta
wallorobstructionwhichmaycausedischargedmaterial
toricochetbacktowardtheoperator.
5. Tohelpavoidbladecontactorathrownobjectinjury,
stayinoperatorzone behindhandlesand keepchildren,
bystanders,helpers,and petsat least75feetfrommower
whileitis inoperation.Stopmachineifanyoneenters
area.
6. Alwayswearsafetyglassesor safetygogglesduringopera-
tionandwhile performinganadjustmentor repairto protect
youreyes.Thrownobjectswhichricochetcancauseserious
injurytothe eyes.
7. Wearsturdy,rough-soledworkshoesand close-fitting
slacksandshirts. Shirtsand pantsthatcoverthe armsand
legsandsteel-toedshoesarerecommended.Neveroperate
thismachinein barefeet,sandals,slipperyorlightweight
(e.g.canvas)shoes.
8. Do notputhandsorfeet nearrotatingpartsor undercutting
deck.Contactwithbladecanamputatehandsandfeet.
9. A missingor damageddischargecovercancauseblade
contactor thrownobject injuries.
10.Manyinjuriesoccuras a resultofthemowerbeing pulled
overthefoot duringa fall causedbyslippingor tripping.
Do notholdontothe mowerifyouarefalling;releasethe
handleimmediately.
11.Neverpullthe mowerbacktowardyouwhileyouare
walking.Ifyoumust backthe mowerawayfroma wallor
obstructionfirstlookdownandbehindtoavoidtrippingand
thenfollowthesesteps:
a. Stepbackfrommowertofullyextendyourarms.
b. Besure youarewellbalancedwithsurefooting.
c. Pullthe mowerbackslowly,no morethan half way
towardyou.
d. Repeatthesestepsas needed.
12.Donotoperatethe mowerwhileunderthe influenceof
alcoholordrugs.
13.Donotengage theself-propelledmechanismon unitsso
equippedwhilestartingengine.
14.Thebladecontrolhandleisasafetydevice.Neverattempt
tobypassitsoperation.Doingso makesthe safetydevice
inoperativeandmayresult in personalinjurythrough
contactwiththe rotatingblade.Thebladecontrolhandle
mustoperateeasily in bothdirectionsandautomatically
returntothe disengagedpositionwhenreleased.
15.Neveroperatethe mowerinwetgrass.Alwaysbesureof
yourfooting. A slipandfall cancauseseriouspersonal
injury.If youfeelyouarelosingyourfooting,releasethe
bladecontrolhandleimmediatelyand the bladewillstop
rotatingwithinthreeseconds.
16.Mowonlyin daylightor goodartificiallight.Walk,neverrun.
17.Stopthe bladewhencrossinggraveldrives,walksor roads.
18.Iftheequipmentshouldstartto vibrateabnormally,stopthe
engineandcheckimmediatelyforthe cause.Vibrationis
generallya warningoftrouble.
19.Shutthe engineoff andwaituntilthebladecomesto a
completestopbeforeremovingthegrasscatcheror unclog-
gingthechute.
4
Page 5
The cuttingbladecontinuesto rotatefor a fewsecondsafter
the engineisshutoff.Neverplaceany partofthe bodyin
the bladearea untilyou are surethe blade hasstopped
rotating.
20. Neveroperatemowerwithoutpropertrailshield,discharge
cover,grasscatcher,bladecontrolhandle,or othersafety
protectivedevicesin placeandworking.Neveroperate
mowerwithdamagedsafetydevices.Failuretodo so can
resultin personalinjury.
21. Mufflerandenginebecomehotandcan causeaburn.Do
nottouch.
22.Onlyusepartsand accessoriesmadeforthis machineby
manufacturer.Failuretodo so canresultinpersonalinjury.
23. Ifsituationsoccurwhicharenotcoveredinthis manual,
usecareand goodjudgment.Contactyourdealerfor
assistance.Telephone1-800-800-7310forthe nameofyour
nearestdealer.
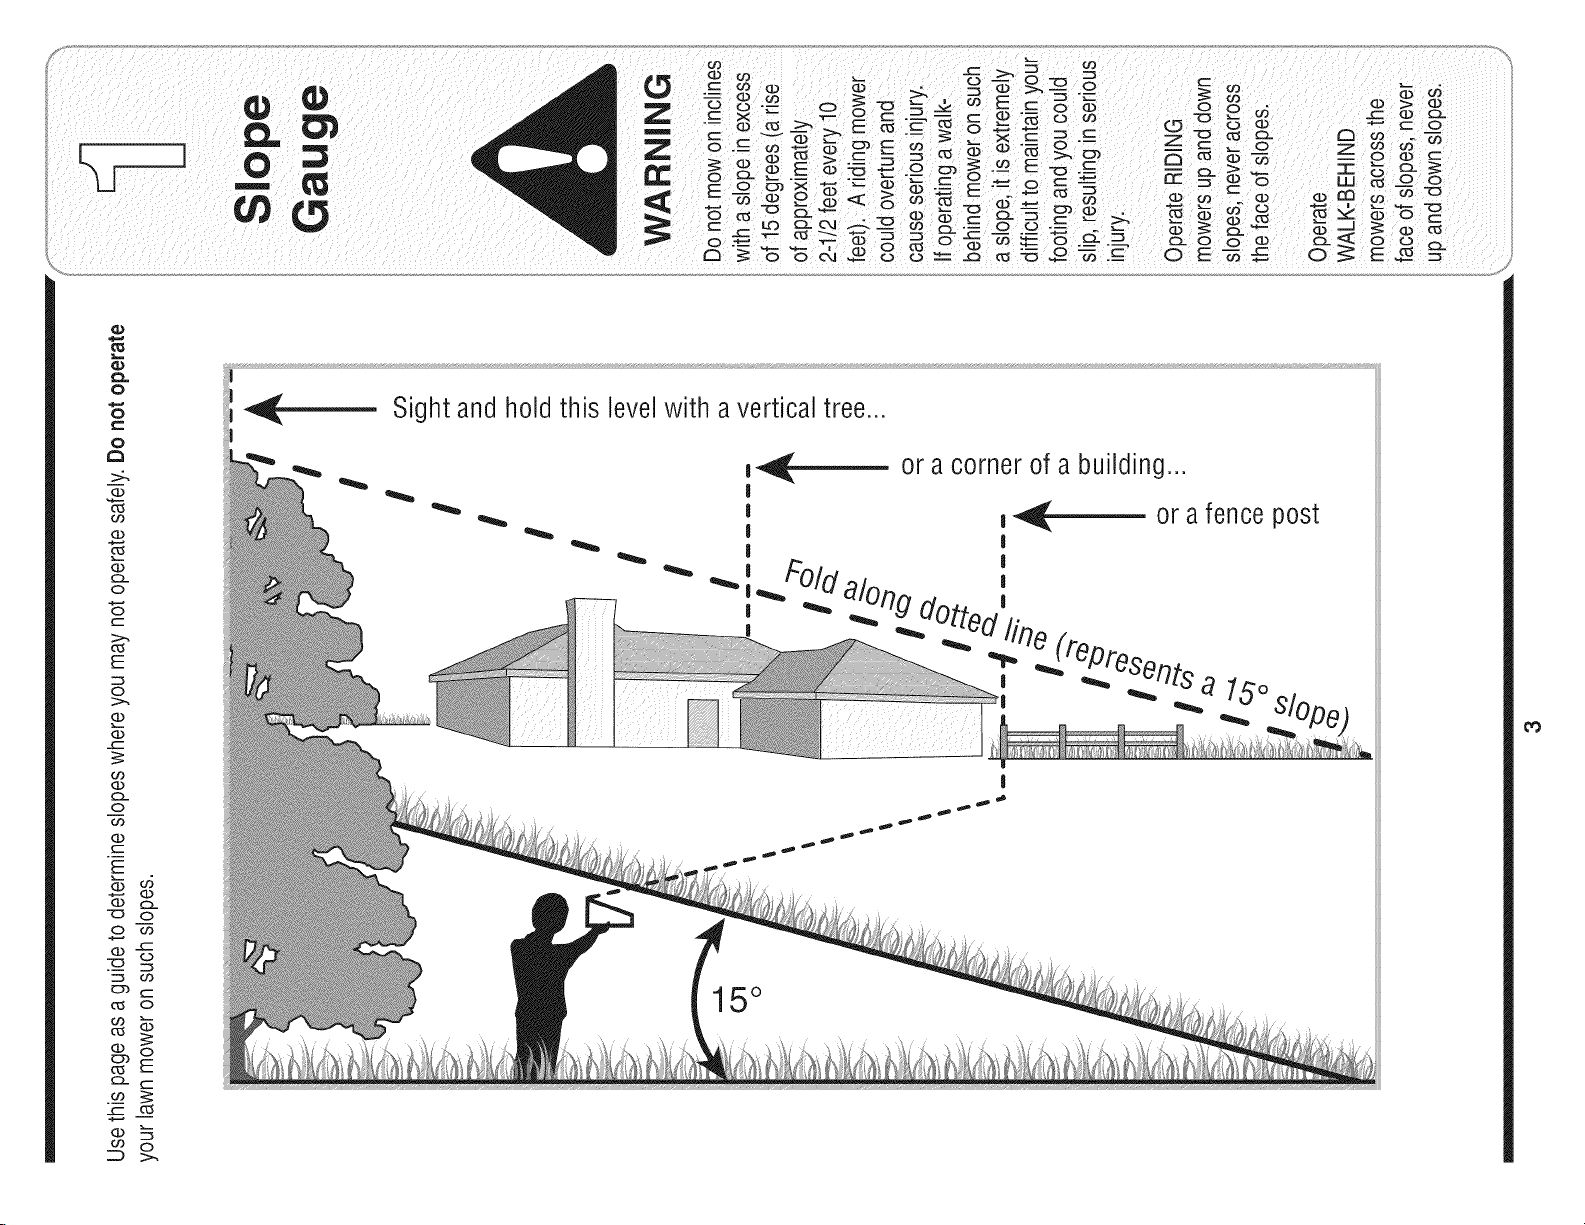
Slope Operation
Slopesare amajorfactorrelatedto slipandfallaccidentswhich
can resultinsevereinjury.Operationonslopesrequiresextra
caution.Ifyoufeeluneasyona slope,do notmowit.Foryour
safety,usetheslopegaugeincludedaspartof this manualto
measureslopesbeforeoperatingthis unitonaslopedor hilly
area.Iftheslopeisgreaterthan 15degrees,donot mowit.
Do:
1. Mowacrossthefaceofslopes; neverup anddown.
Exerciseextremecautionwhenchangingdirectionon
slopes.
2. Watchfor holes,ruts,rocks, hiddenobjects,or bumpswhich
can causeyouto slipor trip.Tallgrass canhideobstacles.
3. Alwaysbesureofyourfooting.A slip andfallcancause
seriouspersonalinjury.Ifyoufeelyouare losingyour
balance,releasethebladecontrolhandleimmediately,and
the bladewill stoprotatingwithin 3seconds.
Do Not:
1. Donot mowneardrop-offs,ditchesorembankments,where
you couldloseyourfootingor balance.
2. Donot mowslopesgreaterthan 15degreesasshownon
the slopegauge.
3. Donot mowon wetgrass.Unstablefootingcouldcause
slipping.
Service
Safe HandlingOf Gasoline:
1. To avoidpersonalinjury orpropertydamageuseextreme
care inhandlinggasoline.Gasolineisextremelyflammable
andthevaporsareexplosive.Seriouspersonalinjurycan
occurwhengasolineisspilledonyourselforyourclothes
whichcanignite.
2. Wash yourskin andchangeclothesimmediately.
3. Useonly anapprovedgasolinecontainer.
4. Neverfillcontainersinsideavehicleoron atruckor trailer
bedwitha plasticliner.Alwaysplacecontainersonthe
groundawayfromyourvehicle beforefilling.
5. Removegas-poweredequipmentfromthetruck ortrailer
andrefuelit onthe ground.Ifthis is notpossible,thenrefuel
suchequipmenton a trailerwitha portablecontainer,rather
thanfroma gasoline dispensernozzle.
6. Keepthe nozzleincontactwiththe rimofthefueltank or
containeropeningat alltimesuntil fuelingis complete.Do
notuseanozzlelock-opendevice.
7. Extinguishallcigarettes,cigars, pipesandothersources
ofignition.
8. Neverfuel machineindoorsbecauseflammablevaporswill
accumulatein thearea.
9. Neverremovegascap oraddfuelwhileengineishot or
running. Allowengineto coolatleasttwo minutesbefore
refueling.
10.Neveroverfillfueltank.Filltankto nomorethanY2inch
belowbottomoffiller neckto providefor fuelexpansion.
11.Replacegasolinecap andtightensecurely.
12.Ifgasolineis spilled,wipeitoff theengineandequipment.
Moveunitto anotherarea.Wait5minutesbeforestarting
engine.
13.Neverstorethe machineorfuel containernearanopen
flame,sparkor pilot lightasona waterheater,space
heater,furnace,clothesdryer,orothergasappliances.
14.Toreducefire hazard,keepmowerfreeof grass,leaves,
orotherdebrisbuild-up.Cleanupoil orfuelspillageand
removeanyfuel soakeddebris.
15.Allowa mowertocool at least5 minutesbeforestoring.
GeneralService:
1. Neverrunanengineindoorsorina poorlyventilatedarea.
Engineexhaustcontainscarbonmonoxide,anodorlessand
deadlygas.
2. Beforecleaning,repairing,orinspecting,makecertainthe
bladeandall movingpartshavestopped.Disconnectthe
sparkplugwireandgroundagainstthe engineto prevent
unintendedstarting.
3. Checkthebladeandenginemountingboltsatfrequent
intervalsfor propertightness.Also,visuallyinspectbladefor
damage(e.g.,bent,cracked,worn)Replacebladewiththe
originalequipmentmanufacture's(O.E.M.)bladeonly,listed
inthismanual."Useof partswhichdo notmeetthe original
equipmentspecificationsmayleadto improperperformance
andcompromisesafety!"
4. Mowerbladesaresharpandcancut.Wrapthebladeor wear
gloves,anduseextracautionwhenservicingthem.
5. Keepallnuts,bolts,andscrewstightto besurethe equip-
mentis insafeworkingcondition.
6. Nevertamperwithsafetydevices.Checktheirproperopera-
tionregularly.
7. Afterstrikingaforeignobject,stopthe engine,discon-
nectthesparkplugwireandgroundagainsttheengine.
Thoroughlyinspectthemowerforanydamage.Repairthe
damagebeforestartingandoperatingthemower.
8. Neverattemptto makeawheelor cuttingheightadjustment
whiletheengineis running.
9. Grasscatchercomponents,dischargecover,andtrail
shieldaresubjecttowear anddamagewhichcouldexpose
movingpartsor allowobjectsto bethrown.Forsafety
protection,frequentlycheckcomponentsandreplaceim-
mediatelywithoriginal equipmentmanufacturer's(O.E.M.)
partsonly,listedinthis manual."Useofpartswhich do
notmeetthe originalequipmentspecificationsmayleadto
improperperformanceandcompromisesafety!"
10.Donotchangetheenginegovernorsettingor overspeedthe
engine.Thegovernorcontrolsthe maximumsafeoperating
speedoftheengine.
11.Maintainorreplacesafetylabels,asnecessary.
12.Observeproperdisposallawsand regulations.Improper
disposaloffluidsand materialscanharmtheenvironment.
Practices
WARNING
Thissymbol points
out importantsafety
instructionswhich, if
notfollowed,could
endangerthe personal
safety and/or property
of yourselfand others.
Readand followall
instructions inthis man-
ual before attemptingto
operatethis machine.
Failuretocomply with
these instructionsmay
result in personalinjury.
Whenyou see this
symbol.
HEED iTS WARNING
Your
Responsibility
Restrictthe use
ofthis powermachine
to personswho read,
understand
and follow thewarnings
and instructions
inthis manual
and on the machine.
5
Page 6
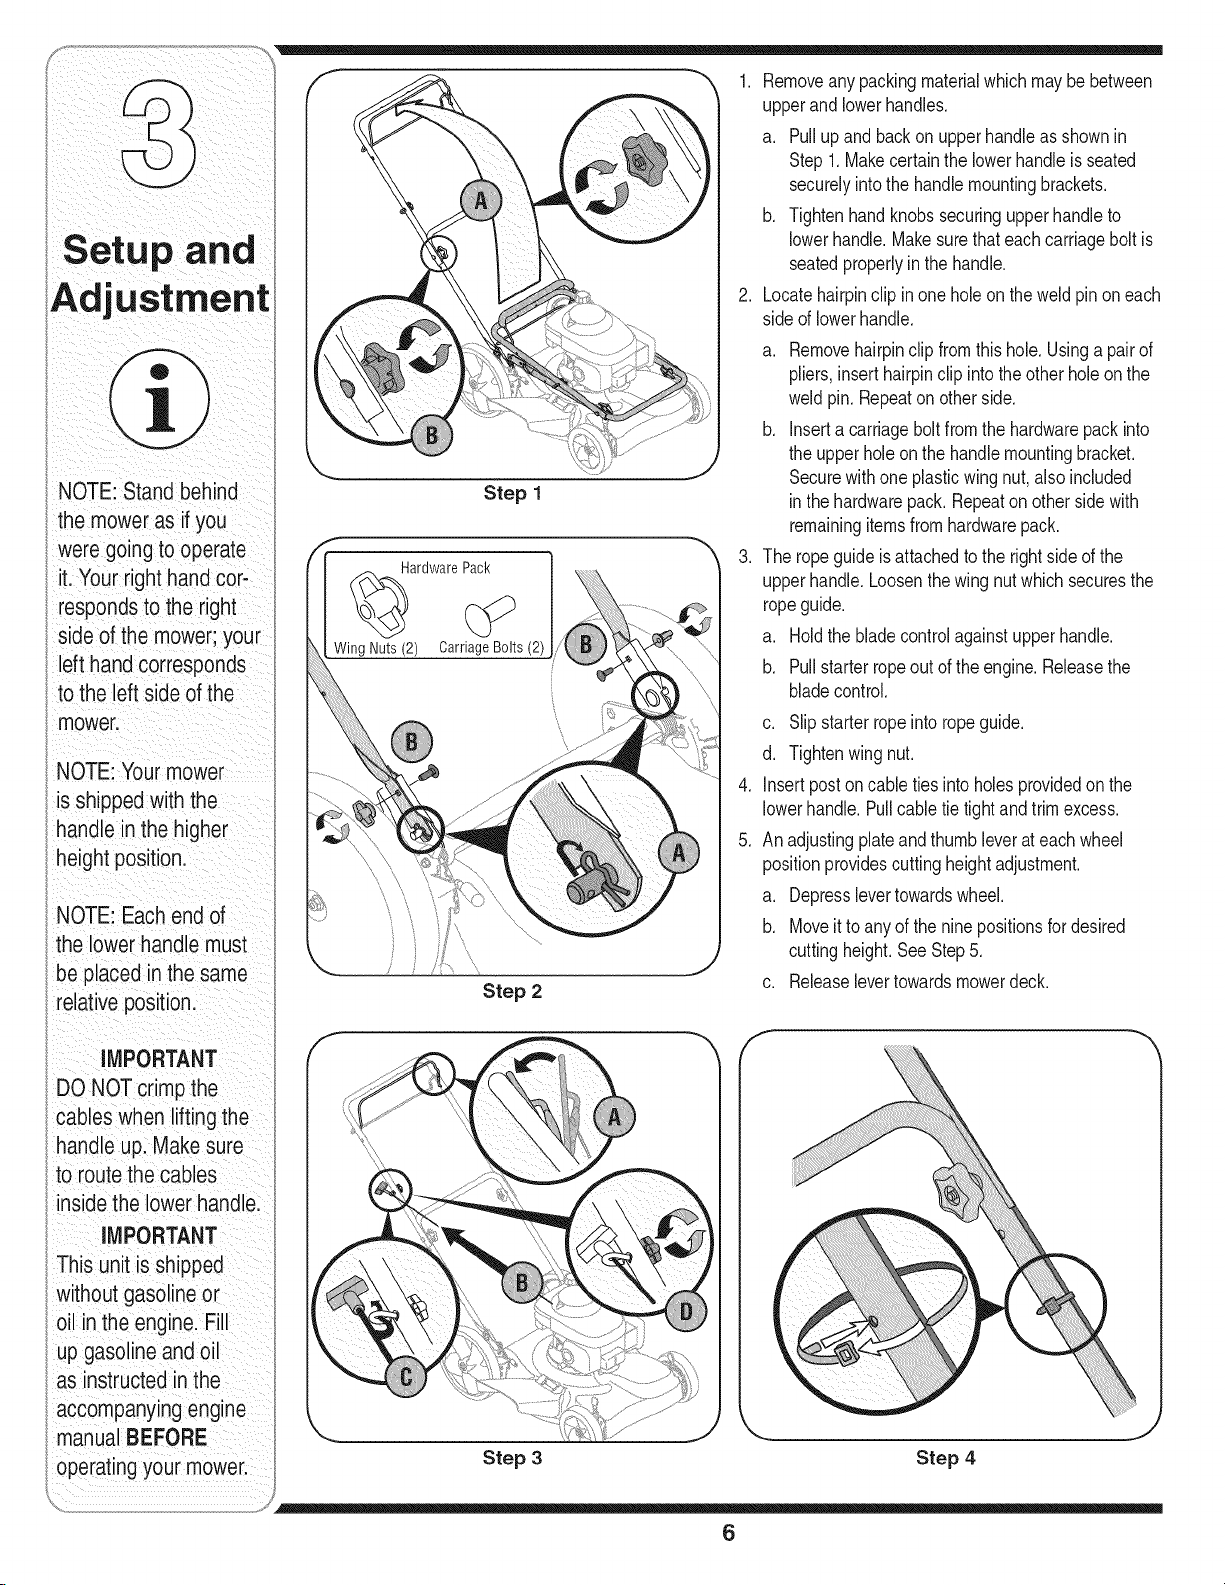
NOTE:Standbehind
themowerasifyou
weregoingtooperate
it.Yourrighthandcor-
respondstotheright
sideofthemower;your
lefthandcorresponds
totheleftsideofthe
mower.
NOTE:Yourmower
i isshippedwiththe
handleinthehigher
I heightposition.
NOTE:Eachendof
thelowerhandlemust
beplacedinthesame
relativeposition.
iMPORTANT
DO NOTcrimp the
cableswhen liftingthe
handleup.Makesure
to routethe cables
i insidethe lowerhandle.
HardwarePack
WingNuts (2)
Step 1
Step 2
1. Removeanypackingmaterialwhichmaybebetween
upperandlowerhandles.
a. Pullupand backon upperhandleasshownin
Step1.Makecertainthe lowerhandleis seated
securelyintothehandlemountingbrackets.
b. Tightenhandknobssecuringupperhandleto
lowerhandle.Makesurethateachcarriageboltis
seatedproperlyinthehandle.
2. Locatehairpinclip inone holeon theweldpinon each
sideof lowerhandle.
a. Removehairpinclipfromthis hole.Usingapairof
pliers,inserthairpinclipintotheotherholeon the
weldpin. Repeaton otherside.
b. Insertacarriageboltfromthehardwarepackinto
theupperholeonthehandlemountingbracket.
Securewithone plasticwingnut,alsoincluded
inthehardwarepack.Repeatonothersidewith
remainingitemsfromhardwarepack.
.
Theropeguideisattachedtotherightsideofthe
upperhandle.Loosenthewingnutwhichsecuresthe
ropeguide.
a. Holdthebladecontrolagainstupperhandle.
b. Pullstarterropeoutofthe engine.Releasethe
bladecontrol.
c. Slipstarterropeintoropeguide.
d. Tightenwingnut.
.
Insertpostoncabletiesintoholesprovidedon the
lowerhandle.Pullcabletietightandtrimexcess.
5.
Anadjustingplateandthumbleverateachwheel
positionprovidescuttingheightadjustment.
a. Depresslevertowardswheel.
b. Moveit to anyoftheninepositionsfordesired
cuttingheight.SeeStep5.
c. Releaselevertowardsmowerdeck.
f
iMPORTANT
Thisunit isshipped
} without gasolineor
oil inthe engine. Fih
up gasolineandoil
as instructedin the
accompanyingengine
manual BEFORE
operatingyour mower.
Step 3 Step 4
6
Page 7

6. Followstepsbelowto assemblethegrasscatcher:
a. Placebagoverframesothat itsblackplasticside
is at thebottom.
b. Slip plasticchannelof grassbagoverhooksonthe
frame.SeeStep6.All theplasticchannelsexcept
centertopof bagattachfromoutsideofbag.
c. Attachcentertopofbagfrominsideofbag.
7. Followstepsbelowto attachgrasscatcher:
a. Liftreardischargedoor.
b. Placegrasscatcheron thepivotrod.Letgo
ofdischargedoorsothatit restson thegrass
catcher.SeeStep7.
Toremovegrasscatcherorconverttoa mulcher(if
equipped),liftreardischargedooronthe moweras
showninStep8. Liftgrasscatcherupandoutofthe pivot
rod.Releasereardischargedoorto allowittocloserear
openingofmower.
_ WARNING:Neveroperatemower
8. Ifcovertingtosidedischarge,makesuregrass
catcheris off unitand reardischargedooris closed.
a. Liftmulchingplugontherightsideof mower.
b. Slidetwohooksofsidedischargechuteunder
NOTE:Donotremovethesidemulchingplugat anytime,
evenwhenyouarenotmulching.
unlessthe hookson the grass catcher
arefirmly seatedinthe slotson the
handle bracketassemblies, and the rear
discharge door rests firmly against top
of the grass catcher.
thehingepinonthe mulchingplugassemblyand
lowerthe sidemulchingplug.SeeStep8.
Step 5
Step 6
uStment
CUTTING HEIGHT
Step5
All wheels mustbe
placedin the same
relative positionl
GRASSCATCHER
Stepe
Makecertain bagis
turned right side out
before assembling
(warninglabel Willbe
onthe outside):
WARNING
f
....... i ..........
Step 7
Step 8
7
Never operate mower
unlessthe hooks on
the grasscatcher are
firmly seated in the
_lots on the handle
bracket assemblies,
and the rear dis-
:barge door rests
firmly against top of
the grasscatcher.
Page 8

Recoil
Starter
Know Your Lawn Mower
BladeControl
Control
WARNING
The blade control
mechanism is a
safety device. Never
attempt to bypass its
operations.
I Use extreme care
when handling
gasoline.Gasoline is
extremely flammable
and the vapors are
explosive. Never fuel
the machine indoors
or while the engine
is hot or running.
Extinguish cigarettes,
cigars, pipes and
other sources of
ignition.
Keep hands and feet
away from the chute
area on cutting deck.
Referto warning
label onthe unit.
Grass--_
Bag
Mulchinc
Plug Levers
Figure 1
Now that you have set up your lawn mower for op- Cutting Height Adjustment Levers
eration, get aquainted with its controls and features. One adjustment lever is located on each wheel and
These are described below and illustrated on this is used to adjust the cutting height. All four levers
page. This knowledge will allow you to use your have to be at the same relative position to ensure a
new equipment to its fullest potential, uniform cut.
Blade Control
The blade control is attached to the upper handle
of the mower. Depress and squeeze it against the
upper handle to operate the unit. Release it to stop
engine and blade.
GasolineFill
Heigh!Adjustment
Recoil Starter
The recoil starter is attached to the right upper
handle. Stand behind the unit and pull the recoil
starter rope to start the unit.
Gas and Oil Fill-Up
1. Check oil level and add oil if necessary. Follow engine
nism isa safetydevice. Neverattempt
__k WARNING:This blade control mecha-
to bypass itsoperations.
Drive Control
The drive control is located on the underside of
the upper handle and is used to engage the drive.
Squeeze it against the upper handle to engage the
drive; release it to slow down or stop mower from
propelling. See Figure 1.
Mulching Plug
The mulching plug is used only for mulching
purposes. Instead of collecting the grass clippings
in the grass catcher, your mower has the option of
recirculating the clippings back to the lawn. Make
sure that the rear discharge door is closed and the
grass catcher is removed from unit while mulching.
manual for this. See Figure 1 above for location of the
oil fill.
2. Servicethe enginewithgasolineasinstructedinthe
enginemanual. SeeFigure1abovefor locationof
gasfill.
WARNING:Useextremecarewhen han-
dling gasoline.Gasolineis extremely
flammableand the vapors areexplosive.
Neverfuel the machine indoorsor while
the engine is hot or running. Extinguish
cigarettes, cigars, pipesandother
sources of ignition.
WARNING:Theoperation of any lawn
mower can result in foreign objects
being thrown into the eyes,which can
damageyour eyesseverely.Always
wearsafety glasses while operating
the mower, or while performing any
adjustments or repairs on it.
8
Page 9

Starting Engine
WARNING:Besureno one otherthan
theoperatorisstandingnearthe lawn
mowerwhilestartingengineor operat-
ingmower.Neverrun engineindoors
or in enclosed,poorlyventilatedareas.
Engineexhaustcontainscarbonmonox-
ide,an odorlessand deadly gas. Keep
hands, feet,hair and loose clothing
awayfromany moving partson engine
and lawnmower.
1. Placethefuel valveleverfoundontheleft sideof the
engineintotheONposition.SeeFigure2 inset.
2. Movethechokeleverall thewaybackwardintothe
chokeposition.Oncetheengineiswarm,theleverwill
automaticallyrevertto the RUNposition.Refertothe
enginemanualforfurtherdetails.
3. Standingbehindthe mower,squeezethebladecontrol
againstupperhandle.SeeFigure2.
4. Holdingthesetwo handlestogetherfirmly,grasp recoil
starterhandleand pullropeoutwitha rapid,continu-
ous,fullarmstroke.SeeFigure2.Keepinga firm
grip onthestarterhandle,letthe roperewindslowly.
Repeatuntilenginecranks.Letthe roperewindeach
timeslowly.
Stopping Engine
1. Releasebladecontrolto stoptheengineand blade.
2. Disconnectsparkplugwirefromsparkplugand
groundagainsttheengine.
__ ARNING:Waitfor the blade to stop
completelybeforedoing any work
on the mower or to removethegrass
catcher.
UsingYour Lawn Mower
_ ARNING:Neveroperateyour mower
Besurelawnisclearof stones,sticks,wire,or other
objectswhichcoulddamagelawnmowerorengine.
Suchobjectscouldbe accidentlythrownbythemower
in anydirectionandcauseseriouspersonalinjurytothe
operatorandothers.
without eitherthe rear door or the entire
grass catcher assembly firmly secured.
Figure 2
_ ARNING:ifyou strikeaforeign
1. Oncetheengineis running,squeezethedrive
controlagainsttheupperhandleto propelmower.
2. Forbest results,do notcut wetgrass.
3. Fora healthierlawn,nevercut offmorethanone-
thirdof thetotallengthofthegrass.
object, stop the engine. Remove
wire from the spark plug, thoroughly
inspect mowerfor anydamage,and
repair damagebefore restarting and
operating. Extensive vibration of
mower during operation is an indica-
tion of damage.The unit should be
promptly inspected and repaired.
Using as Mulcher
Formulchinggrass,removethegrasscatcherfromthe
mower.The reardischargedoorshouldbeclosed.
1. Foreffectivemulching,do notcut wetgrass.
2. Newor thick grassmayrequirea narrowercut.
Adjustgroundspeedaccordingtoconditionoflawn.
3. If thegrasshasbeenallowedto growinexcessof
4 inches,mulchingisnotrecommended.Usethe
grasscatcherto bagclippingsinstead.
Using Grass Catcher
Youcanusethegrasscatchertocollectclippingswhile
youareoperatingthemower.
1. Attachgrasscatcherfollowinginstructionson page
7.Grassclippingswill automaticallycollectinbagas
yourunmower.Operatemowertillgrassbagisfull.
2. Stopenginecompletelybyreleasingtheblade
controlhandle.Makesurethattheunithascometo
a completestop.
3. Liftdischargedoorandpullgrassbagup andaway
fromthe mowertodisposeofthegrassclippings.
Mower
WARNING
The operation of any
lawn mower can result
inforeign objects
being thrown into
the eyes, which can
damage your eyes
severely. Always wear
safety glasseswhile
operating the mower,
or while performing
any adjustments or
repairs on it.
Be sureno one other
than the operator is
standing near the lawn
mower while starting
engine or operating
mower. Never run
engine indoorsor
n enclosed, poorly
ventilated areas. En-
gineexhaust contains
carbon monoxide, an
odorless and deadly
gas. Keep hands,feet,
hair and loose clothing
away from any moving
partson engine and
lawn mower.
9
Page 10

Maintaining
reassembly.
Lubrication
1. Lubricatepivotpointson thebladecontrolatleast
oncea seasonwithlightoil.Thebladecontrolmust
operatefreelyinbothdirections.SeeFigure3.
2. Lubricatethewheelsatleastonceaseasonwith
lightoil (ormotoroil). If wheelsareremovedforany
reason,lubricatesurfaceof thepivotarmandinner
surfaceof thewheelwithlightoil.SeeFigure3.
3. Lubricatethetorsionspringandpivotpointoneach
endofthereardischargedoorandthesidemulching
plugperiodicallywithlightoil topreventrust.See
Figure3.
4. Thetransmissionis pre-lubricatedandsealedatthe
factoryanddoesnotrequirelubrication.
5. Followtheaccompanyingenginemanualforlubrica-
tionscheduleandinstructionforenginelubrication.
WARNING
i
A vaysstopengine;
disconnect spark
pluglandground
againstenginebefore
cleaning,lubricating
ordoinganyk ndof
maintenance on your
machine!
We do not recommend
the useof pressure
Washersor garden
hose to cleanyour
unit.These may cause
damagetoelectric
Componentsspindles
pulleyslbearingsl or
the engine:The Use
Of WaterWillresultin
shortened lifeand
reduce serViceabilityl
Figure 3
Figure 4
General Recommendations
1. Alwaysobservesafetyruleswhen performing
anymaintenance.
2. Thewarrantyonthislawnmowerdoesnotcover
itemsthathavebeensubjectedtooperatorabuse
ornegligence.Toreceivefullvaluefromwarranty,
operatormustmaintainthelawn moweras
instructedhere.
.
Changingof engine-governedspeedwillvoid
enginewarranty.
4.
Alladjustmentsshouldbecheckedat leastonce
eachseason.
5.
Periodicallycheckallfastenersandmakesurethese
aretight.
WARNING:Alwaysstop engine,
disconnect spark plug, andground
against enginebeforecleaning,
lubricating or doing any kind of
maintenanceon your machine.
Deck Care
1. Disconnectsparkplugwire.Draingasolinefromlawn
mower,or placeapieceof plasticunderthegascap.
2. Tip mowersothat it restsonthe housing.Keepthe
sidewiththeaircleanerfacingup.Hold mowerfirmly.
than 90 degrees in anydirections and
__IL ARNING:Nevertip the mowermore
3. Scrapeandcleantheundersideofthedeckwitha
suitabletool.Donotspraywithwater.
4. Putthemowerbackonits wheelsontheground.If
youhadputplasticunderthegascapearlier,make
sureto removeitnow.
do not leavethe mower tipped for any
length of time. Oil can drain intothe
upper partof the engine causing a
starting problem.
Engine Care
1. Maintainoillevelasinstructedin enginemanual.
2. Serviceaircleanerevery25hoursundernormal
conditions.Cleaneveryfewhoursunderextremely
dustyconditions.Refertoenginemanual.
3. Cleansparkplugandresetthegaponcea season.
Checkenginemanualforcorrectplugtypeandgap
specifications.
4. Cleanengineregularlywitha clothorbrush.Keepthe
coolingsystem(blowerhousingarea)cleantopermit
properaircirculation.Removeall grass,dirtand
combustibledebrisfrommufflerarea.
Replacing Rear Flap
1. Toremoverearflap,cutoffthe flatendofthewire rod
whichsecuresit tothedeck.SeeFigure4.
2. Attachthenewflapand newrodto deck,bendingthe
endsof thenewrodovertosecureto deck.
10
Page 11

Blade Care
__k ARNING:Whenremovingcutting
1. Disconnectsparkplugwirefromsparkplug.Turn
moweron itssidemakingsurethatthe airfilterand
thecarburetorareup.
2. Removebolt,bladebellsupport,blade,andblade
adapterfromthe enginecrankshaft.SeeFigure5.
NOTE:Whenremovingtheblade,bladeadapter,etc.,be
carefulnotto removeorlosepartsaboveit associated
withtheenginepulley.
3. The bladecanbe sharpenedwithafileor on a grind-
ing wheel.Donotattempttosharpenthebladewhile
it is stillonthemower.Whensharpeningblade,follow
originalangleofgrind.Grindcuttingedgesequallyto
keepbladebalanced.
4. Removebladefromtheadapterfortestingbalance.
Balancethebladeona roundshaftscrewdriverto
check.Removemetalfromtheheavysideuntilit
balancesevenly.
_ WARNING:Anunbalanced bladewill
5. Lubricatetheenginecrankshaftandthe innersurface
ofthebladeadapterwithlightoil. Slidetheblade
adapterontotheenginecrankshaft.Placetheblade
on theadaptersuchthatthesideoftheblademarked
"Bottom"(orwithpartnumber)facesthegroundwhen
themowerisintheoperatingposition.Makesurethat
bladeisalignedandseatedon bladeadapterflanges.
6. Placebladebellsupportonthe blade.Alignnotches
on thebladebell supportwith smallholesinblade.
Replacehexboltandtightenhexboltto torque:450
in.Ibs.min.,600in.Ibs.max.
Toensuresafeoperationofyourmower,periodically
checkthe bladeboltforcorrecttorque.
bladefor sharpeningor replacement,
protectyourhandswitha pairof heavy
gloves or usea heavy ragto hold blade.
causeexcessivevibration whenrotating
athigh speeds. It may causedamage
to mower,andcould break causing
personalinjury.
Belt Care
1. Removetwoshoulderscrewssecuringfrontdrive
covertomowerdeck.SeeFigure6. Pressinwardon
sidesoffrontdrivecoverand releasetabsthatsecure
it to theheightadjusterbrackets.Removedrivecover
frommower.
.
Loosenscrewholdingbelttensionspringtotrans-
mission.SeeFigure6 inset.Donotremovescrew
completely.As youloosenit,tensiononthebeltwillbe
released.
Figure 5
Figure 6
Figure 7
3. Pushtransmissionupa littleandslidebeltoffthe
transmissionpulley.Liftmowertoaccessbeltfrom
undersideofmower.Slidebeltoffofenginepulley
andaroundtheblade.SeeFigure7.
4. Replacewithnewbelt,workingaroundblade.Make
surebelt isfirmlyseatedonenginepulleywhile
pullingfromtheothersideand slidingitaroundthe
transmissionpulley.Tightenscrewloosenedearlier
tosecurebelttensionspringtothetransmission.
Reassemblefrontdrivecover.
_ / i i i iii _ _ ii _i ii ii
Maintaining
You r LaWn
MOwer
WARNING
When removing
the cutting blade
for sharpening or
replacement or
when sliding the belt
around it, protect
your hands with a
pair of heavy gloves
or use a heavy rag to
hold the blade.
An unbalanced blade
will cause excessive
vibrationwhen rotat-
ing at high speeds. It
may cause damage
to mower, and could
break causing per-
sonal injury.
NOTE: Makecertainthat
belt is seated€0rieCtlyand
that it isridingSmoothlyon
the enginepulleyandis not
pinchedbetweenthelower
and uppei pulleyhalve&
11
Page 12

Problem Cause Remedy
Enginefailsto start I ii Biadecontroldisengaged. Engage bladecontro!.
sparkplugWiredisconnected: i 21 c0nnect wireto sPa[kpiugl
For repairs beyond
the minor adjustments
listedhere, contact
an authorized service
!iiii iLi i iiiii I
Engineruns erratic
1. Sparkplugwireloose.
2. Blockedfuel lineor stalefuel.
3. Ventingascap plugged.
4. Wateror dirt infuel system.
5. Dirtyair cleaner.
6. Carburetorout ofadjustment.
1. Connectandtightensparkplugwire.
2. Cleanfuelline;fill tank withclean,
freshgasoline.
3. Clearvent.
4. Drainfueltank. Refillwithfreshfuel.
5. Referto enginemanual.
6. Referto enginemanual.
Engineoverheats 1. Engineoil levellow. 1. Fillcrankcasewithproperoil
I 2. Airflowrestricted. 2. Removeblowerhousing
I andclean.
I 3. Carburetornotadjustedpropery. 3. Referto engne manua.
I I
Occasionalskips 1. Sparkpluggap tooclose. 1. Adjust gapto .030".
(hesitates)at 2. Carburetoridlemixtureadjustment 2. Referto enginemanual.
highspeed improperlyset.
Idlesnoorlv 1 Sparkplugfouled,faultyor gap I 1. Resetgapto .030"orreplace
r i I too wide. sparkplug.
I 2. Carburetorimproperlyadjusted. 2 Referto enginemanual.
3. Drtyarceaner, . 3. Refertoengnemanua.
i_i i i ii i i i
Excessive 1. Cuttingbladelooseorunbalanced. 1. Tightenbladeandadapter.Balance
Vibration blade.
2. Bentcuttingblade. 2. See anauthorizedservicedealer.
Mowerwillnot I 1. Wetgrass. 1. Donot mowwhengrassiswet;wait
much _rass' f i , untillaterto cut,
E uy _d,t I 2. Excessivelyhighgrass. I 2. Mowonce atahigh cuttingheight
q PP ) I then mowagainatdesiredheightor
I I makea narrowercuttingpath,
I 3. Du bado. 3. Sharpenor replaceblade.
Unevencut 1. Wheelsnotpositionedcorrectly. 1. Placeallfour wheelsinsame
heightposition.
2. Dullblade. 2. Sharpenor replaceblade.
Mowerwillnot I 1. Beltnotinstalledproperly. I 1. Checkbeltfor properpuleyinstallation
seIfpropeI ' andmovement.
I 2. Debrsclogg ngdriveoperation. 2, Stopengine,disconnectsparkplug
I wireand cleanoutdebris.
. 3. Damagedorworn belt. . 3. Inspectand replacebelt.
12
Page 13

Off-Season Storage
Thefollowingstepsshouldbetakentoprepareyourlawn
mowerforstorage.
1. Cleanandlubricatemowerthoroughlyasdescribedin
thelubricationinstructions.
2. We donotrecommendtheuseofa pressurewasher
or gardenhoseto cleanyour unit.
3. Referto enginemanualforcorrectengine
storageinstructions.
Safety Labels Found On Your Lawn Mower
4. Coatmower'scuttingbladewithchassisgreaseto
preventrusting.
5. Storemowerinadry,cleanarea.Donotstorenext
tocorrosivematerials,suchas fertilizer.
Whenstoringanytypeof powerequipmentina poorly
ventilatedor metalstorageshed,careshouldbetaken
torust-prooftheequipment.Usingalightoil or silicone,
coattheequipment,especiallycablesandall moving
partsofyourlawnmowerbeforestorage.
_i _i i _iii i__ i iii ii_
DONOTremove safety
(or any) labelsfrom
mower for any reason.
13
Page 14

iVlodel Series 560
14
Page 15

1 747-1214 DriveControl
2 749-0928A LowerHandle
3 710-0703 CarriageBolt1/4-20
4 750-04162 Spacer.375x.50x 1.02"Lg.
5 731-04134A RearDischargeDoor
6 731-2626 DeluxeBailCover
7 747-1161A BladeControl
8 749-1092A UpperHandle
9 731-04177 ChuteDeflector
10 687-02055 MulchPlugComplete
11 732-04090A TorsionSpring- RH
12 712-04064 FlangeLockNut,1/4-20
13 720-0279 HandleKnob
14 720-04072 HandleKnob
15 710-1205 EyeBolt
16 746-1113 ControlCable-37.75"
17 710-1174 CarriageBolt5/16-18x2.0
18 732-04089A TorsionSpring- LH
19 726-0240 CableTie
20 714-0104 CotterPin
21 710-0654A Self-TappingSeresScrew
22 746-04203 DriveCable-51"
23 664-04027 GrassbagAssembly
24 710-1650 ShoulderScrew# 12-24
25 747-0996 PivotRod
26 710-04371 Screw,1/4-15x 1.25
27 710-0286 Screw,1/4-20x.500
28 731-04998 RearTrailingShield
29 731-04150C RearBaffle
30 732-0700 Wire
31 712-0397 WingNut
32 750-04438A SleeveSpacer
33 756-04161 UpperHalf Pulley
34 756-04160 KeyHalfPulley
35 731-05021A TransmissionCover
36 736-04173 SprgWasher,1.005x1.825x .048
37 736-0250 FiatWasher,1.00x 1.75x .107
38 748-04082 BladeAdapterw/Star
39 742-0741 21"MulchingBlade
40 736-0524B BladeBellSupport
41 710-1257 HexScrew3/8-24x 2.50
42 747-04080 GrassBagFrame
43 754-04101 V-Belt
44 732-1043 BeltTensionSpring
MPORTANT
Fora properWorking
machine; use Factory
Approved Partsl
V,.BELTSareSpecially
designed to engage
and disengage safelyl
A substitute (nOnOEM)
ViBelt canbedangeri
ousby not disengaging
Toorder replacement
parts, contact
1-800-800-7310
or visit
www.yardman.com.
15
Page 16

Model Series 560
16
Page 17

1 710-0599 TTScrew1/4-20x 0.5
2 736-0270 BellWasher.265x0.75
3 17032A DeflectorChuteAdapter
4 732-1014 TorsionSpring
5 747-0710 HingePin
6 687-02192 HandleBracket-RH
687-02191 HandleBracket- LH
7 748-0355 BearingSupport
8 741-0604A BearingSleeve
9 732-0708 BearingRetainer
10 787-01278 21"Deck
11 618-04376 TransmissionAssembly
12 750-04595 Slev.Spacer1.4"Lg.
13 710-0216 HexScrew,3/8-16x.75
14 712-04065 FlangeLockNut,3/8-16
15 782-5002B FrontBaffle
16 736-0447 WaveWasher
17 750-04594 SleeveSpacer8.985"Lg.
18 687-02044 PivotPlateAssembly
19 720-0426 AdjustmentKnob
20 634-04100 FrontWheel8x 1.8
21 710-04531 Screw,1/4-20x.390
22 717-1762 Gear14TRHFWD
717-1761 Gear14TLHFWD
23 710-1652 TTScr.w/Washer1/4-20x.625
24 687-02057 HandleBracketAssembly-LH
687-02056 HandleBracketAssembly-RH
25 715-0221 DowelPin
26 736-0474 Washer
27 687-02039A PivotArmAssembly-RH
687-02040A PivotArmAssembly-LH
28 732-0866 RearSpringLever
29 720-0312 FoamGrip
30 738-0507B ShoulderScr.500Dia.x.434
31 734-04089 RearWheel, 12x 1.8
32 787-01298 HeightAdjusterPlate- RH
787-01299 HeightAdjusterPlate- LH
33 732-0706 FrontLever- RH
732-0707 FrontLever- LH
34 716-0102 SnapRing
35 782-7551A WheelDustCap
36 687-02194 HeightAdjustmentAssembly- RH
687-02193 HeightAdjustmentAssembly- LH
37 721-04107 OilSeal
38 721-04110 O-ring
39 741-04106 PlasticBushing
40 736-04224 FiatWasher
41 736-0572 FiatWasher
42 711-04429 OutputShaft
43 710-04329 TorxScrew
44 731-04883 LowerHousing
45 731-04931A UpperHousing
46 717-04156 28ToothGear
47 732-04290 CompressionSpring
48 715-0129 SpirolPin
49 715-04030 DowelPin
50 711-04317 PinionShaft
51 741-04116 BallBearing
52 707-04409A ShifterFork
53 710-04374 HexScrew
54 710-0969 Screw,#12-16x 1.00
55 731-04932 ClutchLever
56 736-04178A SlottedWasher
57 726-04043 PushNut
58 756-04132 Pulley,3.82x.313x.68
59 736-0105 BellWasher.325x.930x.45
60 712-0214 HexLockNut,3/8-24
To order replacement
parts, contact
1-800-800o7310
or visit
www.yardman.com.
17
Page 18

Use this page to make
notes and write down
important information:
18
Page 19

U_e_¸pagetoma_
notesandwritedown
important information:
i
19
Page 20

MANUFACTURER'S LiMiTED WARRANTY FOR
ThelimitedwarrantysetforthbelowisgivenbyMTDLLCwithrespectto
newmerchandisepurchasedandusedin theUnitedStates,itsposses-
sionsandterritories.
"MTD"warrantsthisproductagainstdefectsin materialandworkmanship
fora periodoftwo(2)yearscommencingonthe dateof originalpurchase
andwill,atits option,repairor replace,freeof charge,anypartfoundto
bedefectiveinmaterialsor workmanship.Thislimitedwarrantyshallonly
applyif this producthasbeenoperatedandmaintainedinaccordance
withtheOperator'sManualfurnishedwiththeproduct,andhasnotbeen
subjectto misuse,abuse,commercialuse,neglect,accident,improper
maintenance,alteration,vandalism,theft,fire,water,ordamagebecause
ofotherperilornaturaldisaster.Damageresultingfromtheinstallationor
useof anypart,accessoryorattachmentnotapprovedbyMTDforuse
withtheproduct(s)coveredbythis manualwillvoidyourwarrantyasto
anyresultingdamage.
Normalwearpartsarewarrantedto befreefromdefectsinmaterialand
workmanshipfora periodofthirty(30)daysfromthedateof purchase.
Normalwearpartsinclude,butarenotlimitedto itemssuchas:batteries,
belts,blades,bladeadapters,grassbags,riderdeckwheels,seats,snow
throwerskidshoes,shaveplates,augerspiralrubberandtires.
HOWTOOBTAINSERVICE:Warrantyserviceisavailable,WITH
PROOFOFPURCHASE,throughyourlocalauthorizedservicedealer.To
locatethedealerin yourarea,checkyourYellowPages,orcontactMTD
LLCat RO.Box361131,Cleveland,Ohio44136-0019,or call1-800-800-
7310or logon toourWebsiteat www.mtdproducts.com.
Thislimitedwarrantydoesnot providecoverageinthefollowingcases:
a. Theengineorcomponentpartsthereof.Theseitemsmay
carryaseparatemanufacturer'swarranty.Refertoapplicable
manufacturer'swarrantyfortermsandconditions.
b. Logsplitterpumps,valves,andcylindershavea separateone
yearwarranty.
c. Routinemaintenanceitemssuchas lubricants,filters,blade
sharpening,tune-ups,brakeadjustments,clutch adjustments,
deckadjustments,andnormaldeteriorationoftheexteriorfinish
duetouseorexposure.
d. Servicecompletedbysomeoneotherthananauthorizedservice
dealer.
e.
MTDdoesnotextendanywarrantyforproductssoldor
exportedoutsideoftheUnitedStates,itspossessionsand
territories,exceptthosesoldthroughMTD'sauthorized
channelsofexportdistribution.
f.
g.
ReplacementpartsthatarenotgenuineMTDparts.
Transportationchargesand servicecalls.
No impliedwarranty, includinganyimpliedwarranty of merchant-
ability of fitness for a particularpurpose,applies afterthe applicable
periodof expresswritten warranty above as to the partsas identi-
fied. Noother expresswarranty, whether written or oral, exceptas
mentionedabove,given by any personor entity,includingadealer
or retailer,with respect to anyproduct,shallbind MTD.Duringthe
periodof the warranty, the exclusiveremedyisrepairor replacement
of the productas setforth above.
Theprovisionsas setforth inthis warrantyprovidethesoleand
exclusiveremedyarising from the sale.MTDshallnot be liable
for incidentalorconsequentialloss or damageincluding,without
limitation, expensesincurredfor substituteorreplacement lawncare
servicesor for rentalexpensesto temporarily replacea warranted
product.
Somestatesdo not allowtheexclusionor limitationofincidentalor
consequentialdamages,or limitationson howlonganimpliedwarranty
lasts,sotheaboveexclusionsor limitationsmaynotapplytoyou.
Innoeventshallrecoveryofany kindbegreaterthantheamountof the
purchasepriceof theproductsold.Alterationof safetyfeatures of the
productshall void this warranty. Youassumetheriskandliabilityfor
loss,damage,orinjuryto youandyourpropertyand/ortoothersandtheir
propertyarisingout ofthemisuseor inabilitytousetheproduct.
Thislimitedwarrantyshallnotextendto anyoneotherthantheoriginal
purchaseror tothepersonforwhomitwaspurchasedasa gift.
HOWSTATELAWRELATESTOTHISWARRANTY: Thislimitedwar-
rantygivesyouspecificlegalrights,andyou mayalsohaveotherrights
whichvaryfromstatetostate.
IMPORTANT:OwnermustpresentOriginalProofofPurchasetoobtain
warrantycoverage.
MTD LLC, P.O. BOX 361131 CLEVELAND, OHIO 44136=0019; Phone: 1=800=800=7310
 Loading...