

Page 1

Page 2
Page 3

Page 4
Page 5
Congratulations! …and thank you for purchasing the
Yamaha P-150. The P-150 is a high-performance
electronic piano with full-scale, weighted action
keyboard, a selection of high quality piano and other
useful instrument voices, and versatile performance
and other advanced features which make it ideal for
professional stage and studio applications, as well as
for home entertainment and music study use. The P150’s main features include:
■ High quality AWM piano
and other sounds
The P-150 features a selection of twelve high quality instrument
voices generated by Yamaha’s patented AWM (Advanced Wave
Memory) sound generation technology. There are several piano
sounds—including a concert grand piano, with full-bodied bass
tones and reverberating high notes, that accurately captures the
natural characteristics of a real grand piano—plus various
electric pianos, vibes, organ combinations, strings and electric
and upright bass. With a maximum simultaneous “polyphonic”
note output of 32 notes, the P-150 delivers uncompromising
performance capabilities.
■ Organ combination editing
The P-150 comes equipped with two preset organ voices, plus
organ combination editing features which let you create your
own organ sounds and store them in Performances for instant
recall. The organ combination editing features give you precise
control over flute footages as well as attack settings.
■ Digital signal processing
The P-150 has a built-in digital signal processor that lets you
apply stereo reverb, chorus, symphonic and tremolo effects to
the voices, and lets you tailor the quality of the voices to suit
your needs with an internal equalizer, as well as a three-band
graphic equalizer on the upper panel.
■ Touch-sensitive keyboard with velocity
scaling
The P-150’s full-range 88-key, weighted action piano keyboard
incorporates Yamaha’s unique Action Effect II keyboard
technology, which gives it the genuine feel and response of a
real piano keyboard. You can even adjust the keyboard’s
sensitivity level, or velocity scaling, to suit your playing style, for
both internal tone generator and MIDI message transmission.
■ Dual and Split voice modes
The P-150’s Dual and Split modes let you play two voices at
once, a “main” voice and a “sub” voice, either by layering the two
voices of your choice (Dual mode) or by assigning a different
voice to each end of the keyboard (Split mode). In Split mode,
the key transposition values can be set independently for both
main and sub voices.
■ One-touch Performance recall
The P-150 features a Performance Play mode that lets you store
up to 24 Performances, or configurations of all voice, MIDI and
other parameter settings, for recall at the touch of a button. This
lets you instantly change your sound and entire setup as you
play, or between songs in a live set. The P-150 is set at the
factory with 24 Preset Performances, but you can overwrite them
and store User Performances which you create yourself. The P150 features extensive editing and storing capabilities.
■ Master keyboard features
The P-150 offers many of the control features standard in a MIDI
master keyboard, including velocity sensitivity, pitch bend and
modulation wheels, an assignable CS (continuous slider),
program change send and receive capabilities, MIDI transpose
and merge functions, and bulk dumping and multitimbral
capabilities. Plus, the P-150 gives you the option of connecting a
foot controller (FC) that can be assigned MIDI and other
functions in the same manner as the CS. With its powerful MIDI
capabilities, the P-150 can easily feature at the heart of an
expanded MIDI system.
1
How to Use this Manual
This owner’s manual is organized and designed to help you get set
up and begin enjoying the P-150 as quickly as possible, as well as
to easily locate and learn about any feature you need.
The GETTING STARTED section briefly but thoroughly explains the
proper procedure for setting up the instrument, listening to the onboard Demo songs, and exploring the basic voices.
The VOICE PLAY MODE, PERFORMANCE PLAY MODE and EDIT
MODE sections include explanations of each feature and step-bystep details about how to access and manipulate the many
parameters.
An APPENDIX provides Voice and Performance lists and other
technical information, including descriptions of error messages and
a troubleshooting guide, plus MIDI specifications and other MIDI
related information.
Finally, an alphabetical INDEX lets you quickly reference the page
number of any feature you want to locate.
Special Symbols
Throughout this manual two special symbols are used to connote
additional information.
Indicates an important cautionary note for the feature being
described.
Indicates a supplementary explanation for the feature being
described.
Page 6
2
■ Location
Do not use the P-150 in locations where it will be exposed to
direct sunlight, extreme temperatures, high humidity or
excessive dust or vibration.
■ Handling
Avoid rough handling. Do not drop the P-150 or subject it to
shock, as these can damage the instrument’s internal circuitry.
Also, do not apply excessive force to the controls or terminals.
When moving the P-150, first unplug the AC power cord and all
other cables to prevent damage to the cords and jacks. When
removing plugs from terminals, always grip the plugs directly
rather than pulling on the cord.
■ Cleaning
To clean the P-150, use a slightly moist cloth and a neutral
cleanser. Do not use abrasive cleansers, waxes, solvents, or
chemically treated cloths, as these may damage the cabinet’s
finish or dull the keys.
■ AC Power
The power requirements of your P-150 has been set to match
the main power supply voltage in your area. Make sure that your
local AC mains voltage matches the voltage as specified on the
name plate located on the rear panel of your P-150. If you plan
to use your P-150 in an area with a different voltage, be sure to
use an appropriate converter. If you have any doubts about
voltage compatibility, please consult your local Yamaha dealer.
■ Electromagnetic Interference
Avoid using your P-150 near televisions, radios or other devices
which generate electromagnetic fields, as electromagnetic
interference can cause the P-150 to malfunction, and may
generate interference noise in the other devices as well.
■ Extended Disuse
Electrical storms can cause power surges which can damage the
P-150’s circuitry even if the power switch is turned off. Therefore,
it is best to disconnect the P-150’s power cord from the AC outlet
when you will not be using it for an extended period of time.
■ Service and Modification
The P-150 contains no user serviceable parts, so never open the
instrument’s cabinet or tamper with the internal circuitry or
mechanisms in any way. Doing so can result in electrical shock
or damage to the P-150. Refer all servicing to qualified Yamaha
service personnel.
■ Backup Battery
The P-150’s internal settings are preserved by a lithium backup
battery which has a life span of approximately five years. (The
battery’s life span may differ, depending on the time elapsed
between your P-150’s date of manufacture and the date you
purchased it.) When the battery charge runs low, the “ERROR1
REPLACE BATTERY” error message will appear in the LCD
screen. If this message appears, save any settings you may
want to keep to an external data storage device (such as the
Yamaha MDF2 Data Filer) using the bulk dump procedure, then
contact a qualified Yamaha service center to have the battery
replaced. Do not attempt to replace the backup battery yourself!
YAMAHA CANNOT BE HELD RESPONSIBLE FOR DAMAGE
CAUSED BY IMPROPER HANDLING OR OPERATION OF THE
P-150!
The LCD screen displays as illustrated in this manual are for instructional
purposes only, and may appear somewhat different from your P-150’s.
Page 7

INTRODUCTION............................................................................................................ 1
PRECAUTIONS............................................................................................................. 2
UPPER PANEL.............................................................................................................. 4
REAR PANEL ................................................................................................................ 9
P-150 OVERVIEW....................................................................................................... 10
GETTING STARTED ................................................................................................... 14
Setting up the P-150............................................................................................................. 14
Turning on the Power ........................................................................................................... 16
Playing the Demo Songs...................................................................................................... 17
Playing the Voices................................................................................................................ 18
VOICE PLAY MODE.................................................................................................... 19
Single Mode.......................................................................................................................... 20
Stereo/Mono Piano...............................................................................................................21
Electric/Upright Bass ............................................................................................................ 21
Reverb Effects ...................................................................................................................... 22
Modulation Effects................................................................................................................ 23
Panel Equalizer..................................................................................................................... 25
Main and Sub Voices............................................................................................................ 25
Dual Mode ............................................................................................................................ 26
Split Mode............................................................................................................................. 28
Transpose............................................................................................................................. 33
MIDI Transmit Enable........................................................................................................... 36
MIDI Panic ............................................................................................................................ 37
PERFORMANCE PLAY MODE................................................................................... 38
Selecting Single Voices........................................................................................................ 39
Selecting Dual Voices...........................................................................................................40
Selecting Split Voices........................................................................................................... 40
EDIT MODE................................................................................................................. 42
System.................................................................................................................................. 44
MIDI Filter ............................................................................................................................. 46
Program Change (PC) Table................................................................................................ 46
Channel ................................................................................................................................ 47
Local..................................................................................................................................... 48
Continuous Slider (CS) / Foot Controller (FC)...................................................................... 48
Panel Switch (PS)................................................................................................................. 50
Name.................................................................................................................................... 50
Organ Combination...............................................................................................................50
Pitch Bend Wheel (PB) / Modulation Wheel (MW) ............................................................... 51
Keyboard Sensitivity............................................................................................................. 51
Internal Equalizer.................................................................................................................. 52
Reverb.................................................................................................................................. 52
Modulation ............................................................................................................................ 52
STORE......................................................................................................................... 53
APPENDIX................................................................................................................... 55
Bulk Dump .............................................................................................................................55
Initialize................................................................................................................................. 56
Using MIDI............................................................................................................................ 57
Error Messages .................................................................................................................... 60
Troubleshooting.................................................................................................................... 61
Specifications.........................................................................................................................63
Factory Default Settings ........................................................................................................64
Blank Chart............................................................................................................................70
MIDI Data Format ..................................................................................................................72
MIDI Implementation Chart....................................................................................................81
Index......................................................................................................................................82
3
UPPER PANEL
REAR PANEL
P-150 OVERVIEW
GETTING STARTED
VOICE PLAY MODE
PERFORMANCE
PLAY MODE
EDIT MODE
STORE
APPENDIX
Page 8
4
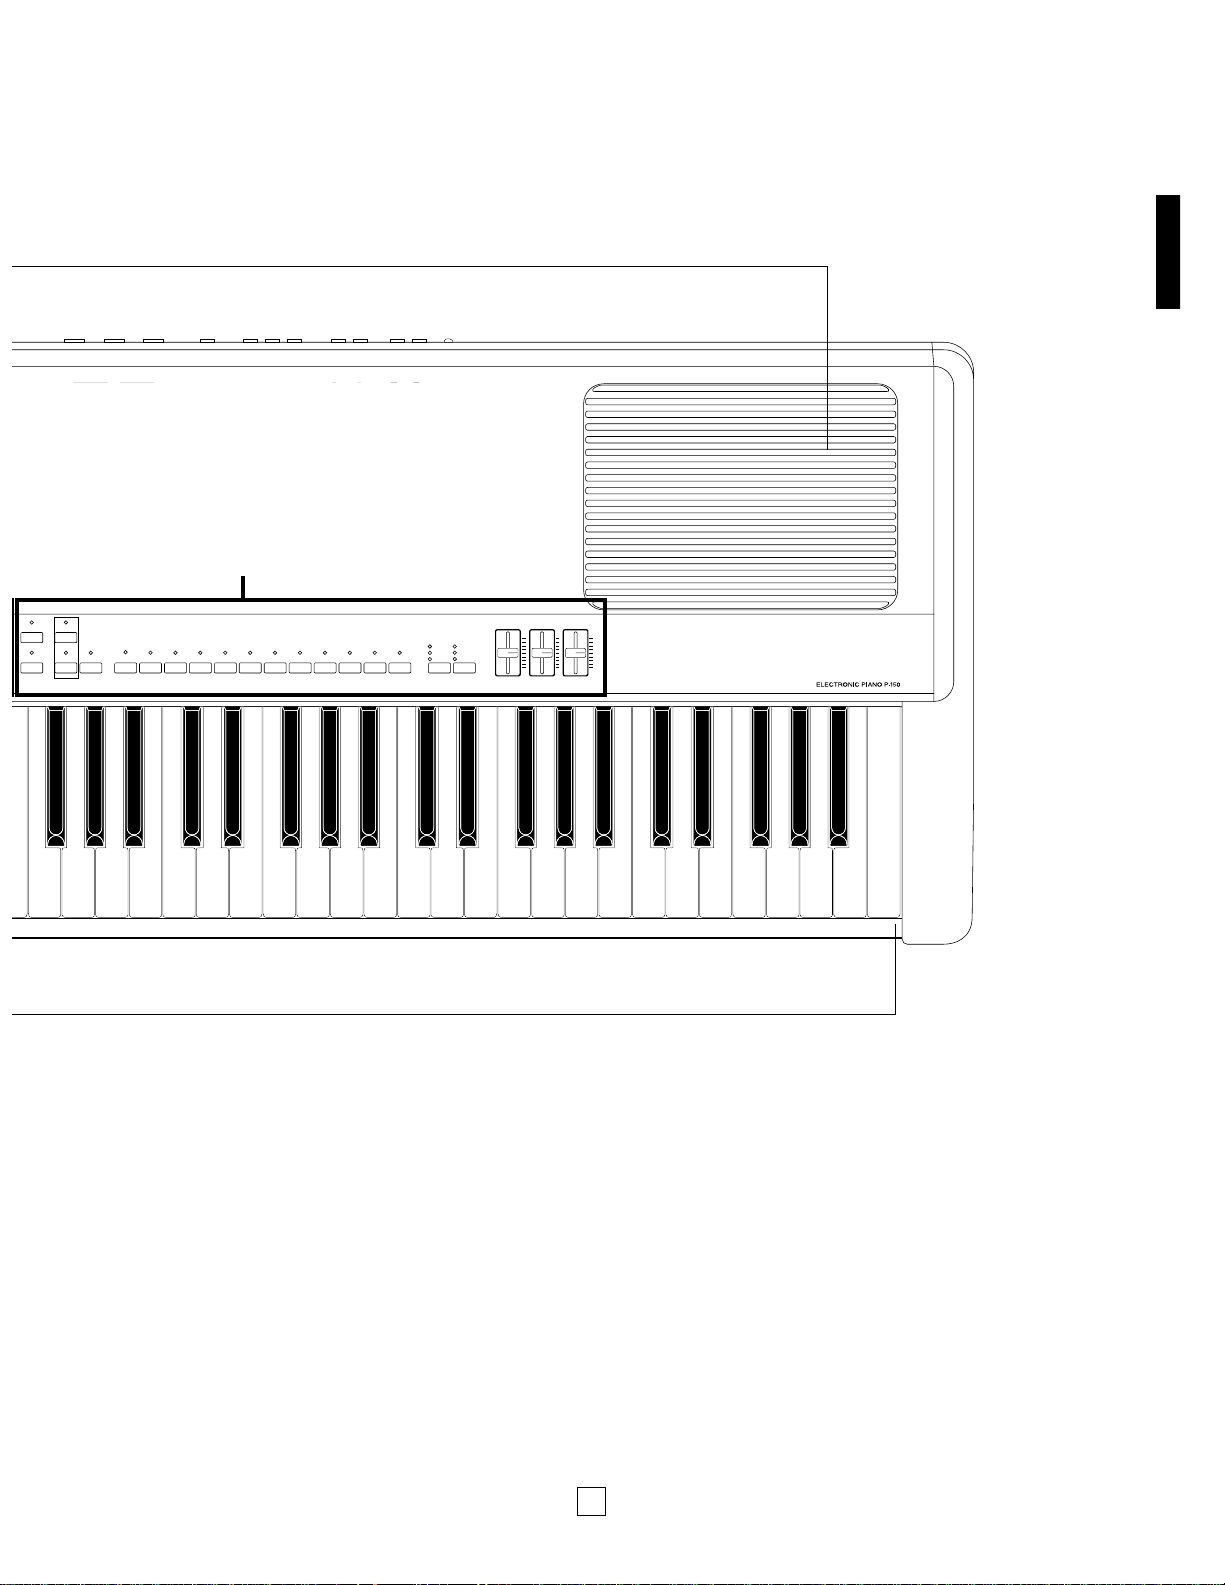
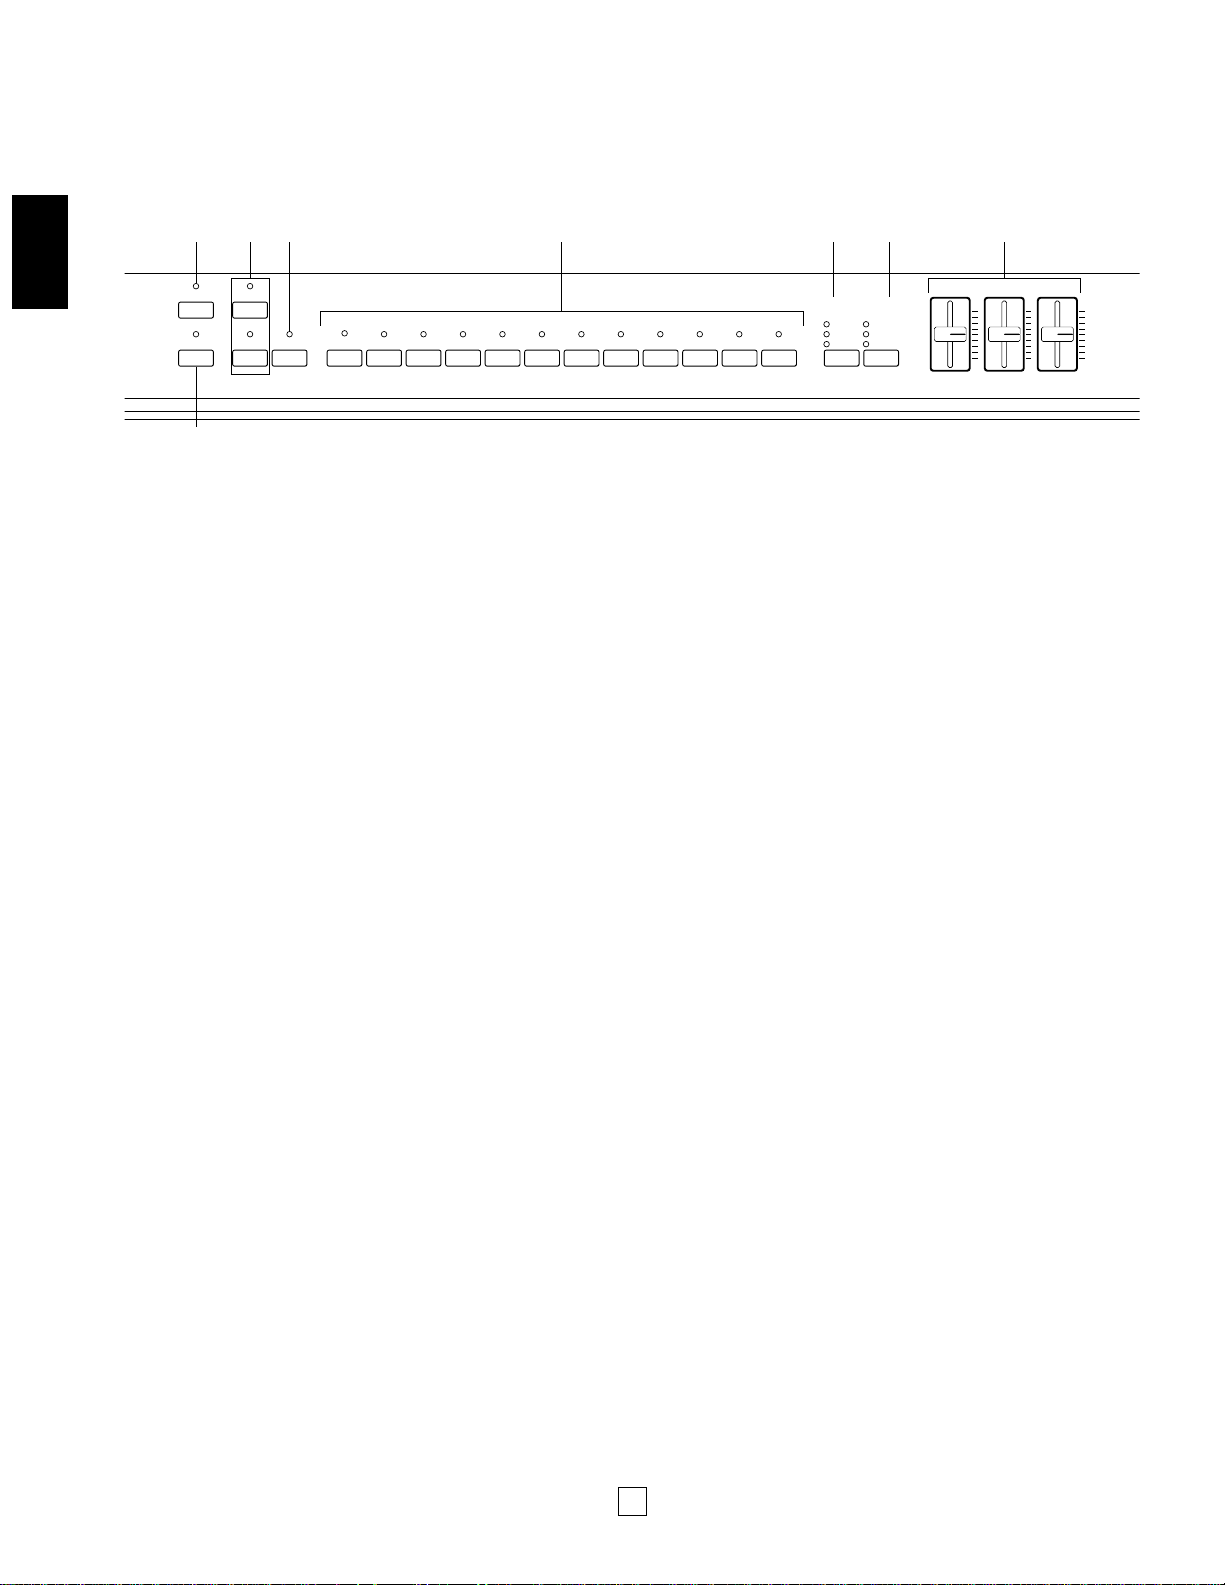
UPPER PANEL
ON/ OFF
POWER
CONTRAST
PITCH
MODULATION
MIN
MAX
VOLUME
-1/NO +1/YES
BALANCE DETUNE
PAGE
PS1 PS2 SPLIT TRANSPOSE MIDI
C3
DATA ENTRY
CS
A
B
1
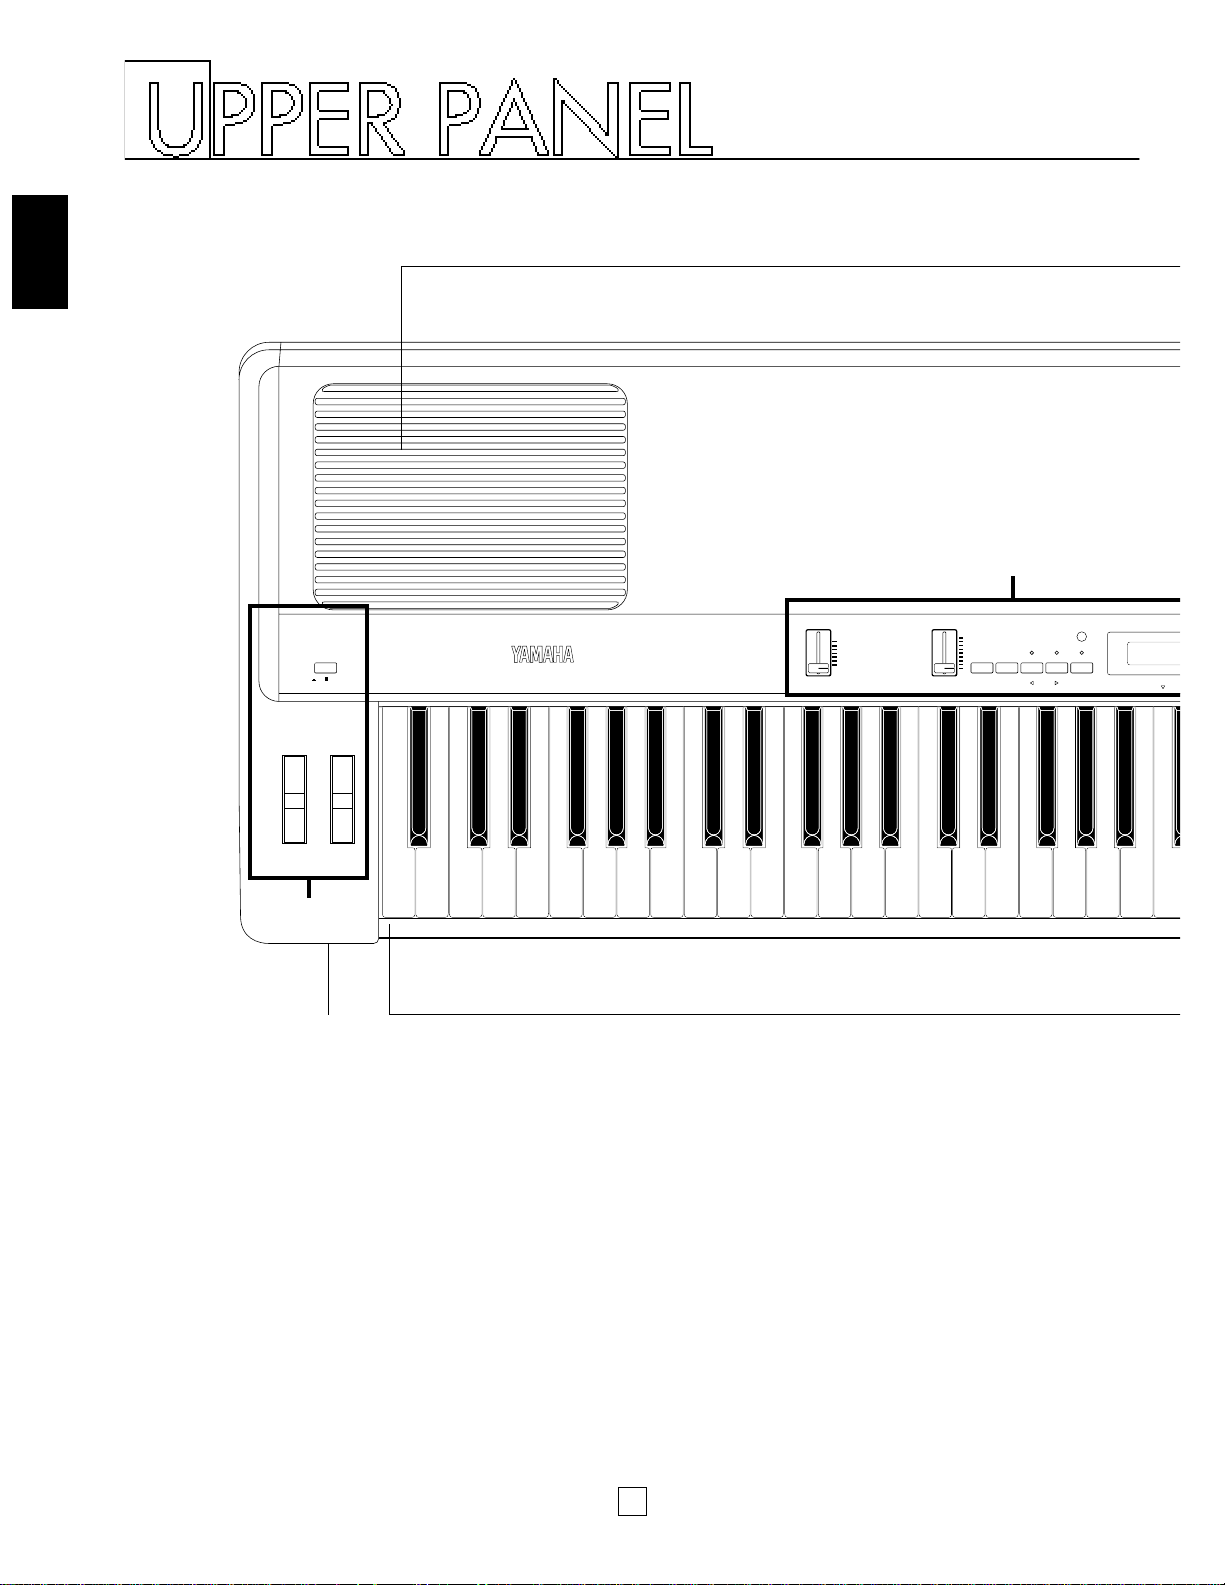
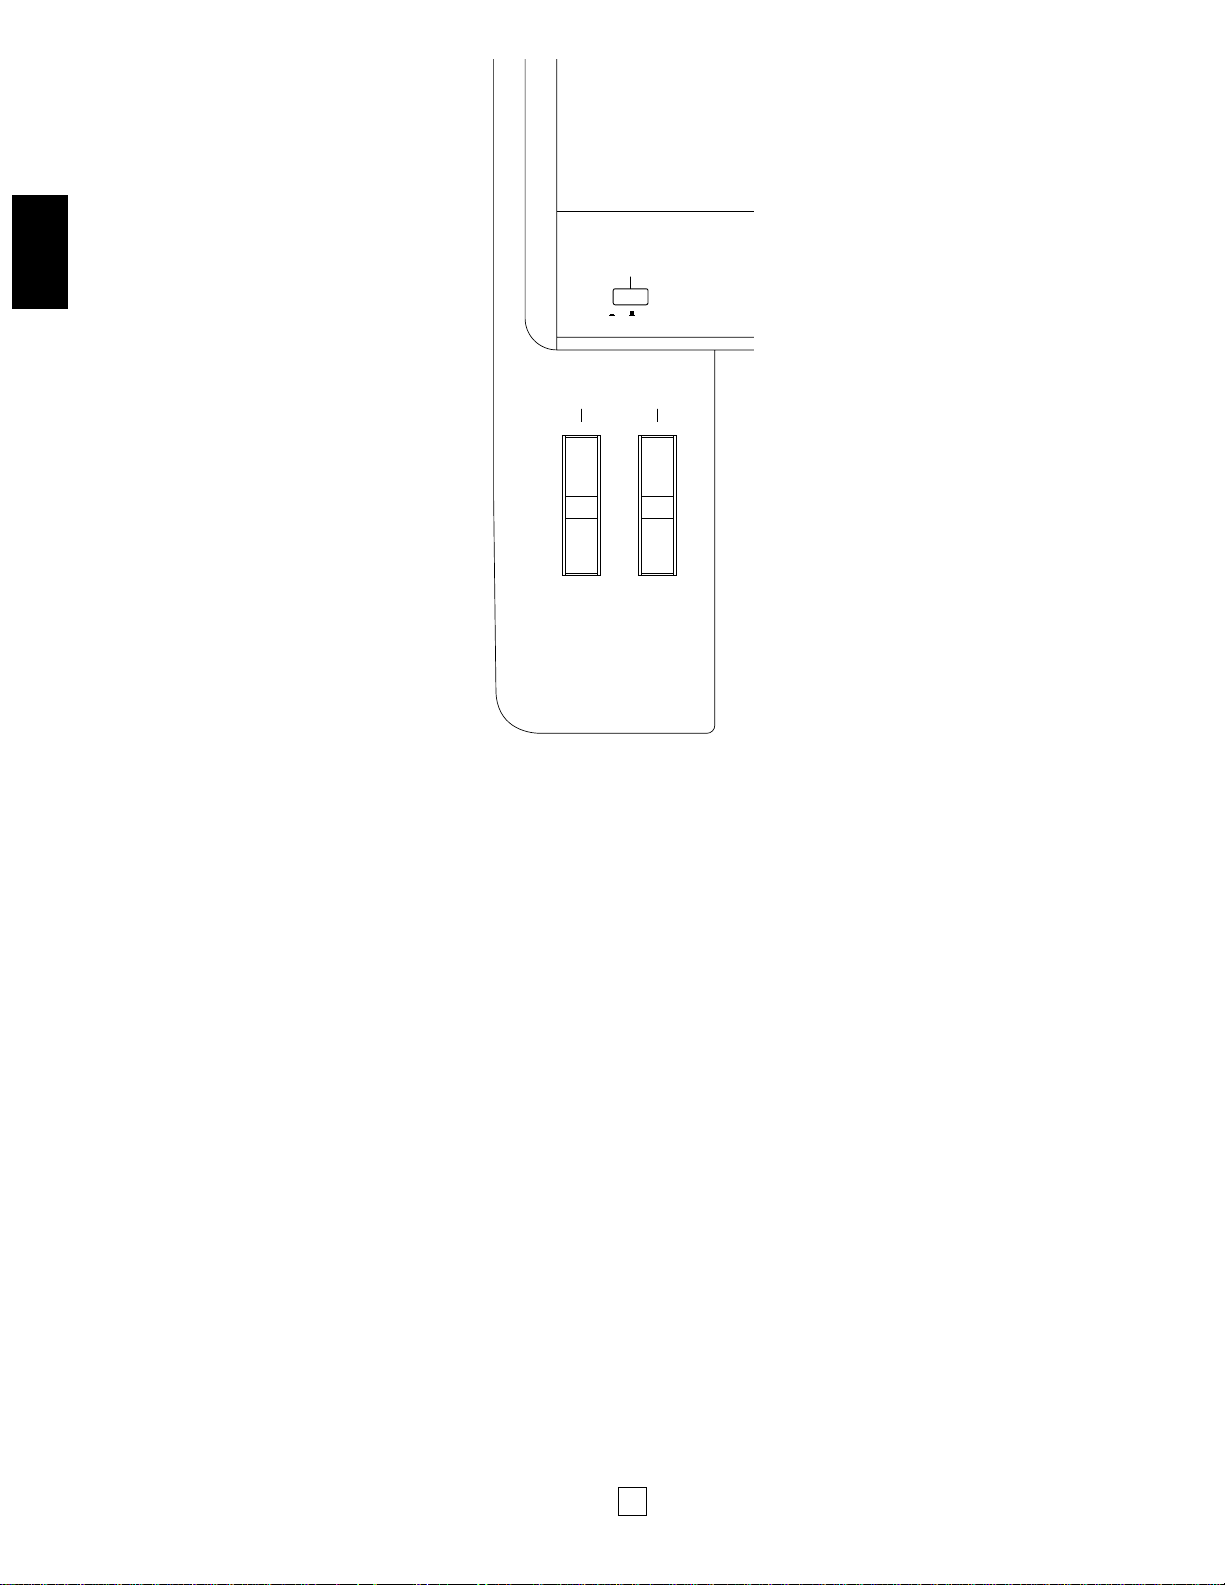
1 [PHONES] jack
This jack on the front panel lets you connect a pair of stereo
headphones to the P-150 for private listening. The internal
speakers will automatically be disconnected when you plug in
the headphones. The sound of the internal voices output from
the [OUTPUT] jacks is not affected.
2 Keyboard
This 88-key weighted action, touch-sensitive keyboard
incorporates Yamaha’s unique Action Effect II keyboard
technology, which gives it the genuine feel and response of a
real piano keyboard.
3 Speakers
These two built-in 13 cm speakers each provide an output of 20
watts. If you connect the P-150 to an external monitor system,
you may choose to turn the speakers off using the [SPEAKER]
switch located on the rear panel.
Page 9
5
UPPER PANEL
OUT
MIDI
IN THRU FOOT CONTROLLER SOFT SOSTENUTO SUSTAIN
ONOFF
SPEAKEROUTPUT
L/MONO R
INPUT
L/MONO
L/MONO R
EDIT PERF.B VOICE
STORE PERF.A
SYSTEM
MIDI FILTER PC TABLE CHANNEL LOCAL CS FC PS NAME ORGAN
COMBINATION
PB MW KBD SENS. INT.EQ
PIANO 1
123456789101112
PIANO 2 PIANO 3 PIANO 4 E.PIANO 1 E.PIANO 2 E.PIANO 3 VIBES ORGAN1 ORGAN2 STRINGS BASS HALL
STAGE
ROOM
TREMOLO
SYMPHONIC
CHORUS
REVERB MODULATION
HIGHMIDDLELOW
EQUALIZEREFFECT
C
3
2
Page 10
6
UPPER PANEL
ON/ OFF
POWER
PITCH
MODULATION
1
2 3
1 [POWER] switch
This switch turns the power on and off. When the power is
turned on, the mode and status designated when the power was
previously turned off will still be active.
2 [PITCH] wheel
This wheel can be used to bend the pitch of the notes that you
play, up or down; the wheel automatically returns to the center
position when you release it. (In Dual mode, both voices are
affected; in Split mode, only the main voice is affected.) When
the MIDI Transmit Switch is enabled, you can use it to transmit
pitch bend messages to other instruments. You can assign the
pitch bend range to any value within a one-octave range.
3 [MODULATION] wheel
This wheel can be used in various ways. Normally you will use it
to apply a vibrato effect to the notes that you play, with
increasing intensity as you roll it upwards; the wheel remains at
the specific position that you set it when you let go of it. (In Dual
mode, both voices are modulated; in Split mode, only the main
voice is modulated. The vibrato effect cannot be applied to Piano
voices 1 ~ 4.) You can also assign it to control reverb depth or
modulation speed. When MIDI transmission is enabled, you can
use it to transmit modulation messages to other instruments.
■UPPER PANEL—A
Page 11
7
UPPER PANEL
1 [VOLUME] slider
This slider adjusts the overall volume of sound output from the
internal speakers (or headphones, if connected) as well as the
sound output from the [OUTPUT] jacks on the rear panel.
Moving the slider upward increases volume level, while moving
the slider downward decreases volume level.
2 [CS, DATA ENTRY] slider
This is a multiple function slider. As a [CS] (continuous slider),
you can assign it to control a variety of functions. As a [DATA
ENTRY] slider, you can use it to change specific settings and
parameters, depending on the current mode and status. Moving
the slider upward increases the specified value, while moving the
slider downward decreases the specified value.
3 [PS1, –1/NO] button
This is a dual function button. As a [PS1] (Panel Switch 1)
button, you can assign it to control various functions of the
internal voices as well as connected MIDI devices, as set by the
PS Edit function. As a [–1/NO] button, you can use it to change
parameter settings in decrements.
4 [PS2, +1/YES] button
This is a dual function button. As a [PS2] (Panel Switch 2)
button, you can assign it to control various functions of the
internal voices as well as connected MIDI devices, as set by the
PS Edit function. As a [+1/YES] button, you can use it to change
parameter settings in increments.
5 [SPLIT, BALANCE, 1] button
This is a multiple function button. As a [SPLIT] button, you can
use it to enter Split mode, whether in Voice Play or Performance
Play mode, determine the split point and assign the keyboard
area for the main and sub voices. As a [BALANCE] button, you
can use it to set the relative volume levels of each Split and Dual
voice, by holding the [BALANCE] button and moving the [DATA
ENTRY] slider ". As a [1] (cursor left) button in Edit mode, you
can use it to move the cursor to the left in the LCD screen in
order to position it over a desired parameter.
6 [TRANSPOSE, DETUNE, q] button
This is a multiple function button. As a [TRANSPOSE] button,
you can use it to set the keyboard transpose value for single as
well as both Dual voices or Split voices. As a [DETUNE] button,
you can use it to set the detune value for the two Dual voices, by
holding it and moving the [DATA ENTRY] slider ". As a [q]
(cursor right) button in Edit mode, you can use it to move the
cursor to the right in the LCD screen in order to position it over a
desired parameter.
7 [MIDI, PAGE] button
This is a dual function button. As a [MIDI] transmit button, you
can use it to quickly enable or disable the P-150’s transmission
of MIDI messages. You can also hold the [MIDI] button while
pressing other buttons to access certain features. As a [PAGE]
button, you can use it to step through the various pages of Edit
functions when the P-150 is in Edit mode.
8 [CONTRAST] dial
This dial lets you adjust the contrast of the LCD screen for
optimum visibility. Rotating it to the left will decrease screen
contrast, while rotating it to the right will increase screen
contrast.
9 LCD screen
This backlit 32-character Liquid Crystal Display screen provides
various information about the modes and operating status of the
P-150. Certain messages are displayed only temporarily, but you
can designate the “Popup Time” according to your preference.
CONTRAST
MIN
MAX
VOLUME
-1/NO
+1/YES
BALANCE DETUNE
PAGE
PS1 PS2 SPLIT TRANSPOSE MIDI
C3
DATA ENTRY
CS
1 2 3 4 5 6789
■ UPPER PANEL— B
Page 12
8
UPPER PANEL
1 [STORE] button
This button lets you store changes that you make to a
Performance, as well as copy the current Performance into
any Performance memory. The P-150 can store 24
Performances.
2 [EDIT] button
This button lets you enter Edit mode and access the various
Edit functions. After pressing it once, the LED above the
[EDIT] button will begin blinking, as will the light above the
currently selected [EDIT SELECT] button % . Pressing it again
will return you to the previous Play mode.
3 [PERF. A, B] buttons
These buttons let you enter Performance Play mode and
select any of the 24 Performances. The P-150 is set at the
factory with 24 Preset Performances, but you can overwrite
them and store User Performances which you create yourself.
The [PERF. A] and [PERF. B] banks hold 12 Performances
each, and a lit LED above one of the buttons indicates the
currently active bank.
4 [VOICE] button
This button lets you enter Voice Play mode by pressing
[VOICE] and then pressing a [VOICE SELECT] button % . A lit
LED above the [VOICE] button indicates you’re in Voice Play
mode.
5 [VOICE, PERFORMANCE, EDIT SELECT] buttons
These 12 buttons each have multiple functions, depending on
the current mode. In Voice Play mode you can use them to
select any of the 12 preset AWM instrument voices you want
to play; the voice names are printed in red above the buttons.
In Performance Play mode you can use them to select any of
the 24 Performances (12 Performances per bank); the
Performance numbers are printed above the buttons. In Edit
mode, you can use them to select the Edit functions; the Edit
function names are printed in green below the buttons.
6 [REVERB] button
This button lets you select either a Room, Stage or Hall reverb
effect, or no reverb effect, to apply to the currently selected
voice. Each voice has a default reverb setting preprogrammed
at the factory which you can change.
7 [MODULATION] button
This button lets you select either a Chorus, Symphonic or
Tremolo modulation effect, or no modulation effect, to apply to
the currently selected voice. Each voice has a default
modulation setting preprogrammed at the factory which you
can change.
8 [EQUALIZER] sliders
These sliders let you graphically adjust the level of the sound
output of the P-150 in three bands: High, Middle and Low. In
Dual and Split modes, the changes you make will affect both
voices.
EDIT PERF.B VOICE
STORE PERF.A
SYSTEM
MIDI FILTER PC TABLE CHANNEL LOCAL CS FC PS NAME ORGAN
COMBINATION
PB MW KBD SENS. INT.EQ
PIANO 1
123456789101112
PIANO 2 PIANO 3 PIANO 4 E.PIANO 1 E.PIANO 2 E.PIANO 3 VIBES ORGAN1 ORGAN2 STRINGS BASS HALL
STAGE
ROOM
TREMOLO
SYMPHONIC
CHORUS
REVERB MODULATION
HIGHMIDDLELOW
EQUALIZEREFFECT
1
3 456 7 8
2
■UPPER PANEL—C
Page 13
1 2 3 5 64
9
1 [SPEAKER] switch
This switch lets you turn off the P-150’s internal speakers. It
does not affect the output from the [OUTPUT] jacks or the
[PHONES] jack.
2 [INPUT] jacks
These jacks let you input line-level signals from another
electronic instrument, such as a rhythm programmer, external
tone generator, or synthesizer, and monitor it through the P150’s internal speakers. Use the [L/MONO] jack when
connecting only a single line.
3 [OUTPUT] jacks
These jacks output line-level signals which can be input directly
to an external amplifier, mixer or other audio device. Use the
[L/MONO] jack if your audio equipment has only one input.
4 Pedal jacks
These jacks let you connect up to three foot pedals and use
them as sustain, sostenuto and soft pedals. A single FC4
footswitch is included with your P-150. If you wish to attach
additional foot pedals, be sure to use only Yamaha models FC4
or FC5.
5 [FOOT CONTROLLER] jack
This jack lets you connect a foot controller (Yamaha FC7,
available separately) for use as an auxiliary controller. The [FC]
foot controller can be assigned to control a variety of functions,
including reverb depth or modulation speed, which lets you
change these parameters by foot as you play.
6 [MIDI] terminals
These terminals allow the P-150 to communicate with other MIDI
devices, using standard MIDI cables. To control the P-150 using
a sequencer or another keyboard, connect the MIDI out jack of
the external device to the [MIDI IN] jack of the P-150. To control
another device (such as a synthesizer or tone generator) using
the P-150, connect the [MIDI OUT] jack of the P-150 to the MIDI
in jack of the external device. The [MIDI THRU] jack simply
passes the data received at the P-150’s [MIDI IN] jack through
unaffected, and is used when connecting three or more MIDI
devices in a series.
SPEAKER
ON OFF
INPUT
R L/MONO
OUTPUT
R L/MONO
SOFTSOSTENUTOSUSTAIN FOOT CONTROLLER
MIDI
OUT
THRU IN
Page 14
10
P-150 OVERVIEW
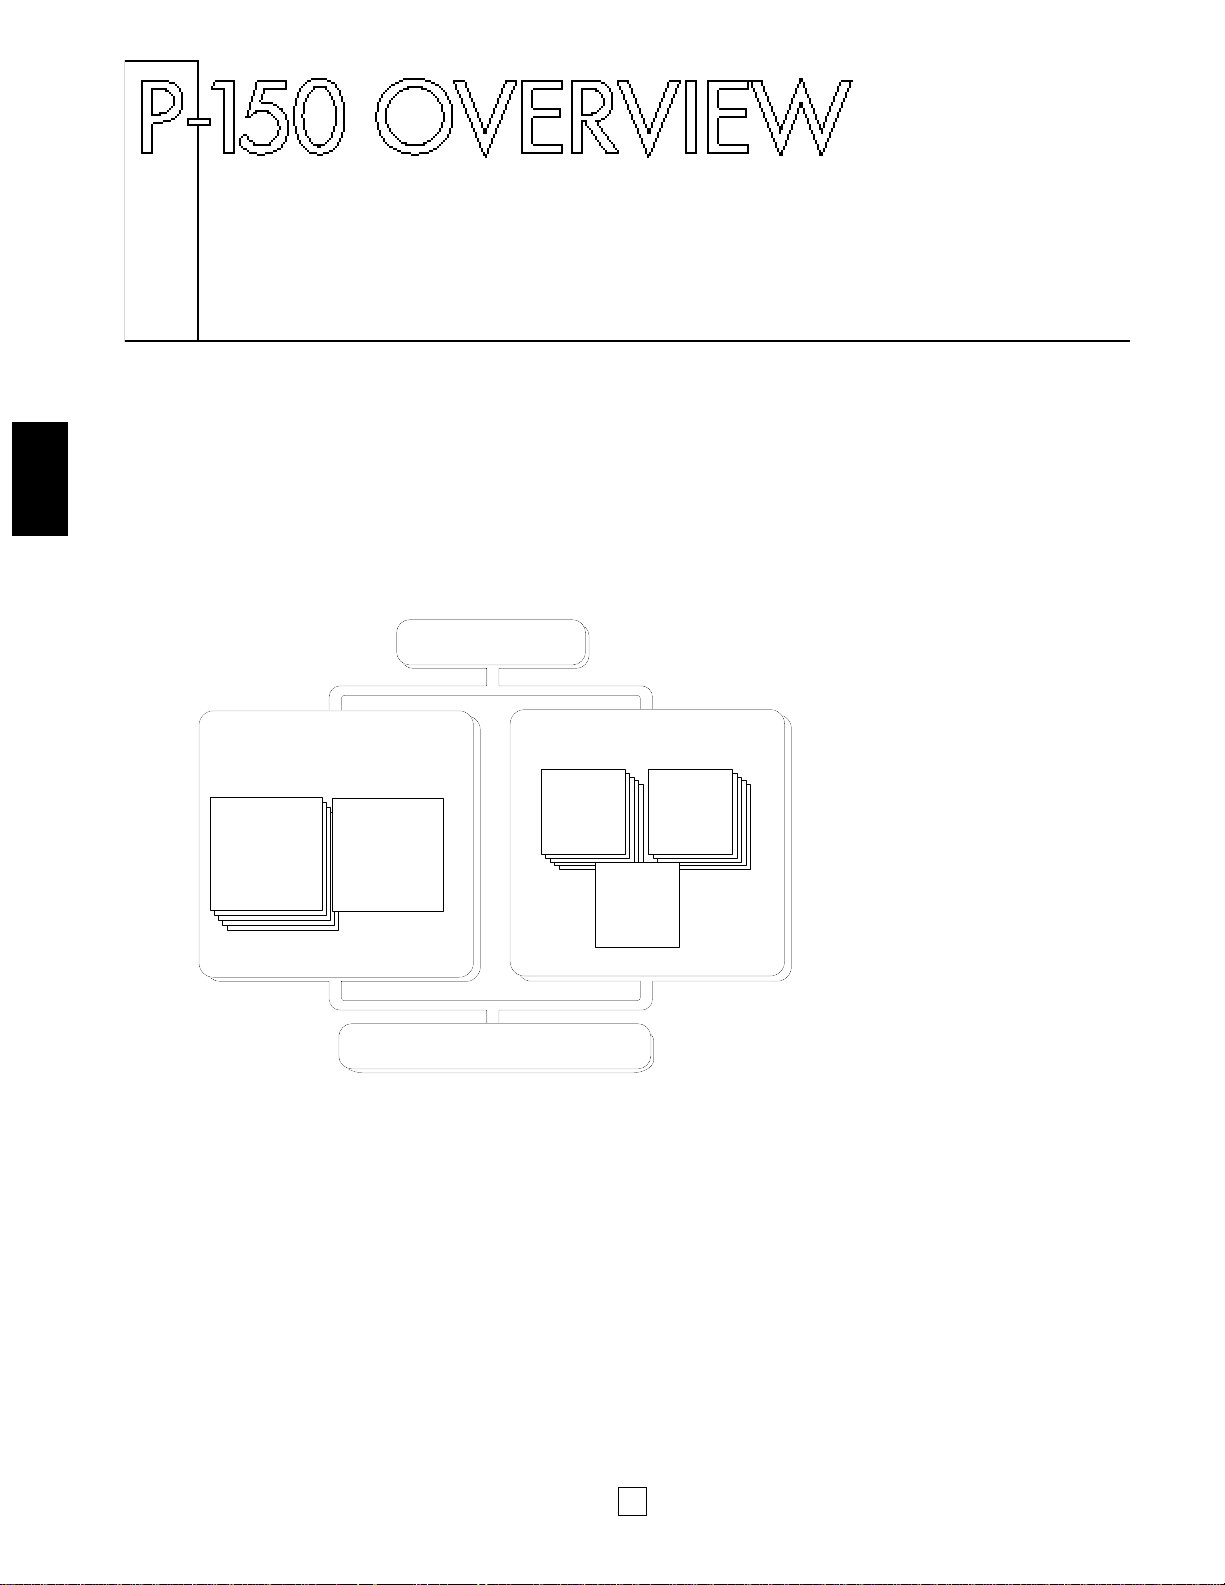
■Voice Play and Performance Play Modes
The P-150 has two basic Play modes, Voice Play mode and Performance Play
mode. Within each mode are various Voice and Performance parameters, or
settings that you can change, which make up the sound of the selected voice and
the specific operating status of the P-150.
A group of overall System settings apply to both Voice Play and Performance Play
modes, and Edit mode lets you access and edit a wide variety of System and other
functions, as shown in the following illustration.
As the above illustration shows, the primary difference between Voice Play mode
and Performance Play mode is:
■ In Voice Play mode, a single set of Performance parameter settings apply to any
voice (and its specified Voice parameter settings) which you select.
■ In Performance Play mode, a complete set of Performance parameters can be
configured specifically for any particular voice (and its specified Voice parameter
settings). The P-150 can store up to 24 Performances for instant recall.
Normally you will operate in Voice Play mode, Auto Store status (See “About Store
Type”, next page)—as you select sounds and make parameter assignments as
dictated by your current music session. Then you can store those settings to any
of the 24 Performances, which you can then access at any time by the press of a
[PERFORMANCE SELECT] button in Performance Play mode. (You can also
perform bulk dump operations of Performance data to and from an external MIDI
device such as the Yamaha MDF2 MIDI Data Filer.)
PERFORMANCE PLAY MODEVOICE PLAY MODE
SYSTEM
EDIT MODE / STORE FUNCTIONS
PERF.A
01~12
PERF.B
01~12
VOICE
PARAMETERS
VOICE 01~12
PAFORMANCE
PARAMETERS
Page 15

11
P-150 OVERVIEW
■ Voice Parameters
In Voice Play mode, each of the P-150’s AWM instrument voices have a set of
Voice parameters that are initially set at the factory, but which you can change to
suit your needs.
These include controller parameters such as pitch bend range and modulation
wheel assignment, keyboard sensitivity parameters for internal or MIDI
applications, and effect parameters such as reverb type and depth, modulation
type and speed, and internal equalizer settings.
In Voice Play mode you can access a single set of Performance parameters and in
Performance Play mode you can access 24 sets of Performance parameters.
Although you can freely change the voices in Performance Play mode, only a
single set of Voice parameters is available for each Performance.
VOICE PARAMETERS
CONTROLLERS
• Pitch Bend Range
• Modulation Wheel Assign
KEYBOARD SENSITIVITY
• Internal
• MIDI
EFFECT
• Reverb Type, Speed
• Modulation Type, Speed
• Equalizer (Internal) Low, Mid, High
ABOUT STORE TYPE
You can choose the Store Type—Non Auto Store and Auto Store.
When Non Auto Store is selected, the store operation is always required
(except when modifying System related parameters; see page 13) if you want
to save the current settings.
When Auto Store is selected, all changes you make will automatically be
stored without the need to perform a specific storing procedure.
The default setting for a new (or initialized) P-150 is Non Auto Store. (For
information about changing the Store Type, see page 45.)
Explanations in this Owner’s Manual assume that Auto Store is selected.
Therefore, the LCD illustrations herein may be slightly different than the
screens on your P-150.
Page 16
12
P-150 OVERVIEW
■Performance Parameters
In Performance Play mode, the P-150 has 24 sets of Performance parameters
which let you configure settings for specific music situations (i.e., for a certain style
of music, or a particular song, or for a practice session, or a live set, etc.). This
affords you the convenience of being able to recall those settings instantly at the
press of a button when in Performance Play mode.
Performance parameters include the voice selection (a set of voice parameters),
keyboard Single, Dual or Split mode and settings, main and sub voice
assignments, User organ combination values, transposition values, keyboard local
on or off setting, MIDI transmit and receive channel numbers, plus function
assignments for [PS1], [PS2], [CS] and [FC] (foot controller), the Performance
name and others.
In Voice Play mode you can specify settings for a single set of Performance
parameters.
Performance Parameters
VOICE SELECT
12 voices
(A set of voice parameters)
KEYBOARD MODE Single, Dual, Split
VOICE Main, Sub
PIANO 1/2 Stereo, Mono
BASS Electric, Upright
ORGAN COMBINATION
• Footage
• Response,
Attack (Length and Mode)
BALANCE –16 ~ 15
DETUNE 0 ~ 7
SPLIT POINT
• A-1 ~ C7
• MAIN VOICE (Upper, Lower)
TRANSPOSE
• Enable Switch
• Internal Main, Sub
• MIDI Main, Sub
MIDI CHANNEL
• Transmit
• Receive
LOCAL On, Off
CONTROLLERS
• PS 1/2 Assign
• CS Assign, Range
• FC Assign, Range
NAME Character select
Page 17
13
P-150 OVERVIEW
Descriptions of all parameters and
details about how to access and
manipulate them are provided in the
appropriate sections herein. Also see
the Blank Chart on page 65.
■ System Settings
The P-150’s overall System settings encompass those “global” parameters which
are related to the instrument as a whole, and which therefore affect both Voice
Play and Performance Play modes.
These include master tuning, MIDI transmit enable, MIDI filter transmit and receive
parameter settings, MIDI program change table settings, and others.
SYSTEM
MIDI TRANSMIT ENABLE On, Off
• Master Tune
• Reverb Bypass
• Device Number
SYSTEM • MIDI Merge
• Performance Enable
• Popup Time
• Store Type
MIDI FILTER
• Transmit
• Receive
PROGRAM CHANGE TABLE
• Transmit Number, Bank
Select Number
• Receive Number
■Editing and Storing Features
When the P-150 is in Edit mode, you can access and modify the System and other
parameters.
A convenient Auto Store feature (which you can disengage) automatically stores
the System settings and other parameters as you change them. Within either
Voice Play mode or Performance Play mode, you can store the current set of all
settings as a User Performance.
There is a fine distinction between Voice Play mode store and Performance Play
mode store functions. In Voice Play mode, you can overwrite the current set of
Voice and Performance parameter settings. In Performance Play mode, you can
select a specific destination Performance in which to store the current
Performance parameter settings. Therefore, if you select a destination
Performance in which to store the current Voice Play mode Performance
parameter settings, you are storing it in the Performance Play mode.
You will find it most convenient to set up your Performances in Voice Play mode,
Auto Store status, since voice selection is so simple, then copy it to one of the 24
Performance memories for instant recall when you need it.
By switching into Non Auto Store status, you can be sure that your Performances
are protected, and any changes you make in one will not be applied unless you
specifically store, or overwrite, it. In Edit mode, the P-150 will prompt you
automatically whether or not to overwrite the current changes.
You can also dump Performance data to and from external MIDI devices.
Page 18
14
GETTING STARTED
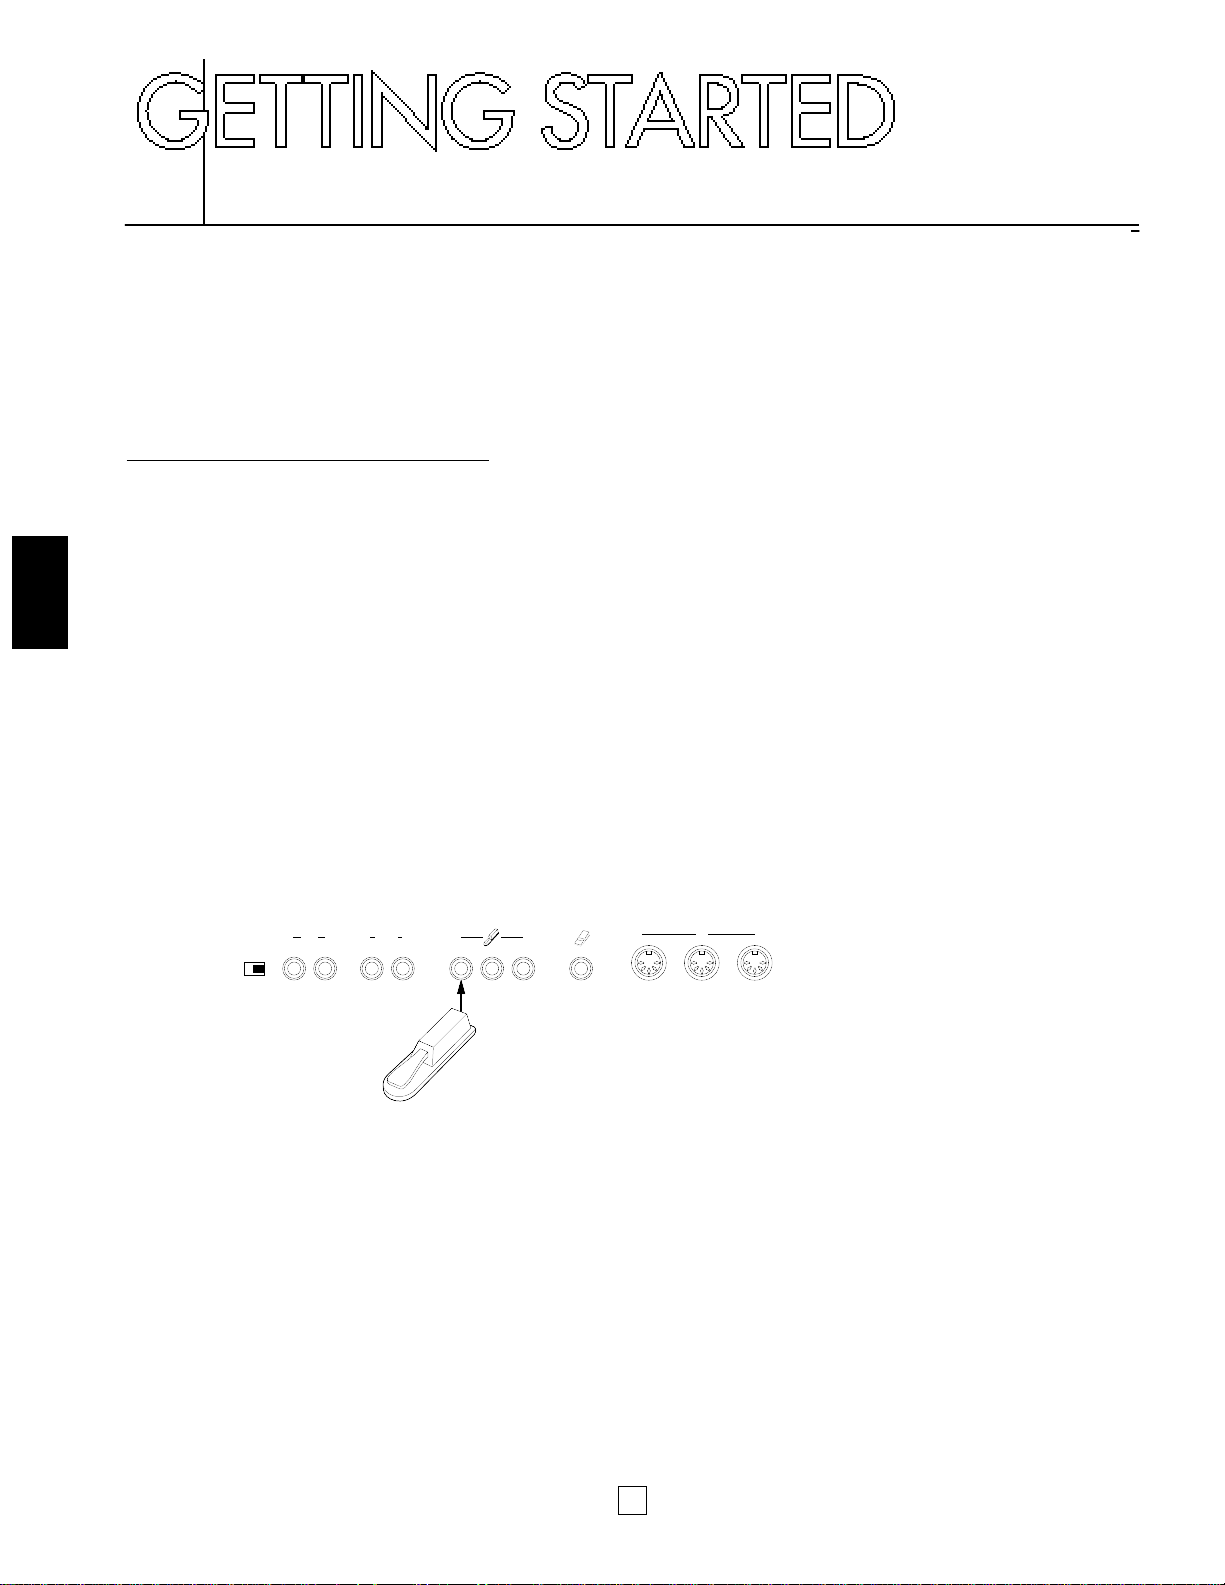
■Setting up the P-150
Although setting up the P-150 for basic play is easy and straightforward, be sure to
take heed of the Precautions on page 2 before you begin, then carefully follow the
simple steps as outlined below.
P-150 SETUP PROCEDURE
1.
Prepare a suitable location.
The P-150 is relatively small for an 88-key instrument, but it is very solidly
built and therefore quite heavy. First you’ll want to prepare a suitable location
for your P-150. Please do not hesitate to ask someone to help you take it out
of the box and carefully place it on an optionally available Yamaha LP-3
keyboard stand or a sturdy table.
2.
Plug in the power cord.
Next plug the P-150’s power cord into an AC outlet. Do not turn on the
[POWER] switch until you have made all connections as described below.
3.
Connect the sustain pedal.
Next plug the supplied FC4 footswitch into the [SUSTAIN] jack on the rear
panel, so you can use it as a sustain pedal. If you have purchased additional
FC4 or FC5 footswitches, connect them to the [SOSTENUTO] and [SOFT]
jacks.
SPEAKER
ON OFF
R L/MONO
SOFTSOSTENUTOSUSTAIN FOOT CONTROLLER
MIDI
OUT
THRU IN
R L/MONO
INPUT
Footswitch FC4
OUTPUT
Page 19
15
GETTING STARTED
Before connecting the P-150 to any
external device, be sure that the
power switches of all devices are
turned off.
4.
Connect external line-level components.
If you wish to monitor the P-150’s output using an external line-level mixer or
amplifier, connect the input of the external component to the P-150’s
[OUTPUT] jacks on the rear panel. (Use both jacks for stereo output; use the
[L/MONO] jack for mono output.)
If you wish to listen to your P-150 using headphones, connect a pair of
stereo headphones to the [PHONES] jack located on the left side of the front
panel. The P-150’s internal speakers will automatically be disconnected
whenever headphones are plugged into the [PHONES] jack.
If you wish to monitor the output of an external line-level device (such as a
rhythm programmer, tone generator or synthesizer) via the P-150’s internal
speakers, connect the output of the external device to the P-150’s [INPUT]
jacks on the rear panel. (Use both jacks for stereo input; use the [L/MONO]
jack for mono input.)
OUTPUT R
OUTPUT L/MONO
P-150
Amp
Speaker (L) Speaker (R)
P-150
INPUT R
INPUT L/MONO
P-150
Tone Generator
Page 20

16
GETTING STARTED
5.
Connect MIDI devices.
If you wish to connect the P-150 to external MIDI devices such as a
rhythm programmer, tone generator or synthesizer, you will need special
MIDI cables which plug into the [MIDI] jacks on the rear panel. First,
however, you must determine a MIDI system configuration, based on your
particular needs or desires. Some examples of MIDI system connections,
along with information about MIDI, are provided on page 57.
6.
Attach the music stand.
Finally, attach the supplied music stand to the P-150 by carefully inserting
it into the groove located along the rear edge of the upper panel.
■ Turning on the Power
After setting up the P-150, you’re ready to turn on the power and begin enjoying
the instrument’s great sounds and many versatile performance and other features.
MIDI Cable
MIDI OUT
MIDI IN
P-150
Sequencer
Switch on the [POWER] button, then gradually raise the [VOLUME] slider until you
obtain a comfortable listening level.
ON/ OFF
POWER
PITCH
MODULATION
MIN
MAX
VOLUME
Always turn the P-150 on first, and
then turn on external MIDI and audio
devices last. However, if a line-level
device is plugged into the P-150’s
[INPUT] jacks, turn it on before
turning on the P-150. When turning
off the power of each device, simply
reverse the process.
Page 21

17
GETTING STARTED
■ Playing the Demo Songs
After setting up the P-150 and switching on the power, and before you begin
exploring the instrument’s various features, you may want to listen to the three
preprogrammed Demo songs which demonstrate the P-150’s exceptional sound
and performance capabilities. To do so, follow the steps below.
HOW TO PLAY THE DEMO SONGS
1.
Enter Demo Play mode.
Press the [REVERB] and [MODULATION] buttons simultaneously. The
following screen appears.
2.
Select and play a Demo song.
Immediately after pressing [REVERB] and [MODULATION] (step 1, above), press the
[MODULATION] button once or more to select a Demo song. For example, press the
button once to select the first Demo song (“Song 1 Play”), or twice to select the
second Demo song (“Song 2 Play”), or three times to select the third Demo song
(“Song 3 Play”). The song you select will begin playing automatically.
DEMO
Song 1 Play
HALL
STAGE
ROOM
TREMOLO
SYMPHONIC
CHORUS
REVERB MODULATION
EFFECT
DEMO
Song Select
HALL
STAGE
ROOM
TREMOLO
SYMPHONIC
CHORUS
REVERB MODULATION
EFFECT
If you press the [MODULATION] button four times, the message “Song all”
will appear in the LCD screen, and the P-150 will play all three Demo songs
continuously, one after the other.
If you don’t press the
[MODULATION] button quickly after
having entered Demo Play mode, the
P-150 will automatically exit Demo
Play mode.
DEMO
Song all
Page 22

18
GETTING STARTED
You can assign a specific effect to
the [MODULATION] wheel in Edit
mode (see page 51) which is
completely unrelated to the
modulation effects available by
pressing the [MODULATION] button
(see page 23) once or more. Note
that when the vibrato effect is
assigned to the [MODULATION]
wheel, you cannot apply vibrato
modulation to the Piano voices 1 ~ 4.
Also note that the reverb depth or
modulation speed may be set at 0 for
certain voices, and therefore produce
no noticeable effect. (For information
about changing reverb depth, see
page 22. For information about
changing modulation speed, see
page 23.)
3.
Exit Demo Play mode.
If you select “Song 1 Play”, “Song 2 Play” or “Song 3 Play” the P-150 will exit the
Demo Play mode automatically when the selected song finishes playing.
To exit Demo Play mode while a song is playing, simply press the [REVERB] button.
HALL
STAGE
ROOM
TREMOLO
SYMPHONIC
CHORUS
REVERB MODULATION
EFFECT
You cannot enter Demo Play mode
(or any other Play mode) when the P150 is in Edit mode. (The LED above
the [EDIT] button will blink when the
P-150 is in Edit mode.) To exit Edit
mode, simply press the [EDIT] button.
Also note that you will not be able to
play the P-150 or use any of the Edit
mode functions while a Demo song is
playing.
■Playing the Voices
Selecting and playing the voices of a new P-150 is simple, since by default the
instrument starts up for the first time in Voice Play mode with initialized parameter
settings, PIANO 1 voice selected.
Therefore, all you have to do is press a [VOICE SELECT] button and start playing
the keyboard. Take a few minutes and try playing each of the voices and notice
the rich quality and dimension of the P-150’s AWM sound, complete with the
nuance of natural expression via the keyboard.
As you play, try out the [PITCH] wheel, which lets you bend notes up or down.
Also try out the [MODULATION] wheel, which lets you add varying degrees of
vibrato (or other effects) to the voices.
While you’re at it, try out the various reverb and modulation effects, by pressing
the [REVERB] and [MODULATION] buttons once or more.
When you’re ready for more, turn the page, and find out about all the P-150 has in
store.
Page 23
19
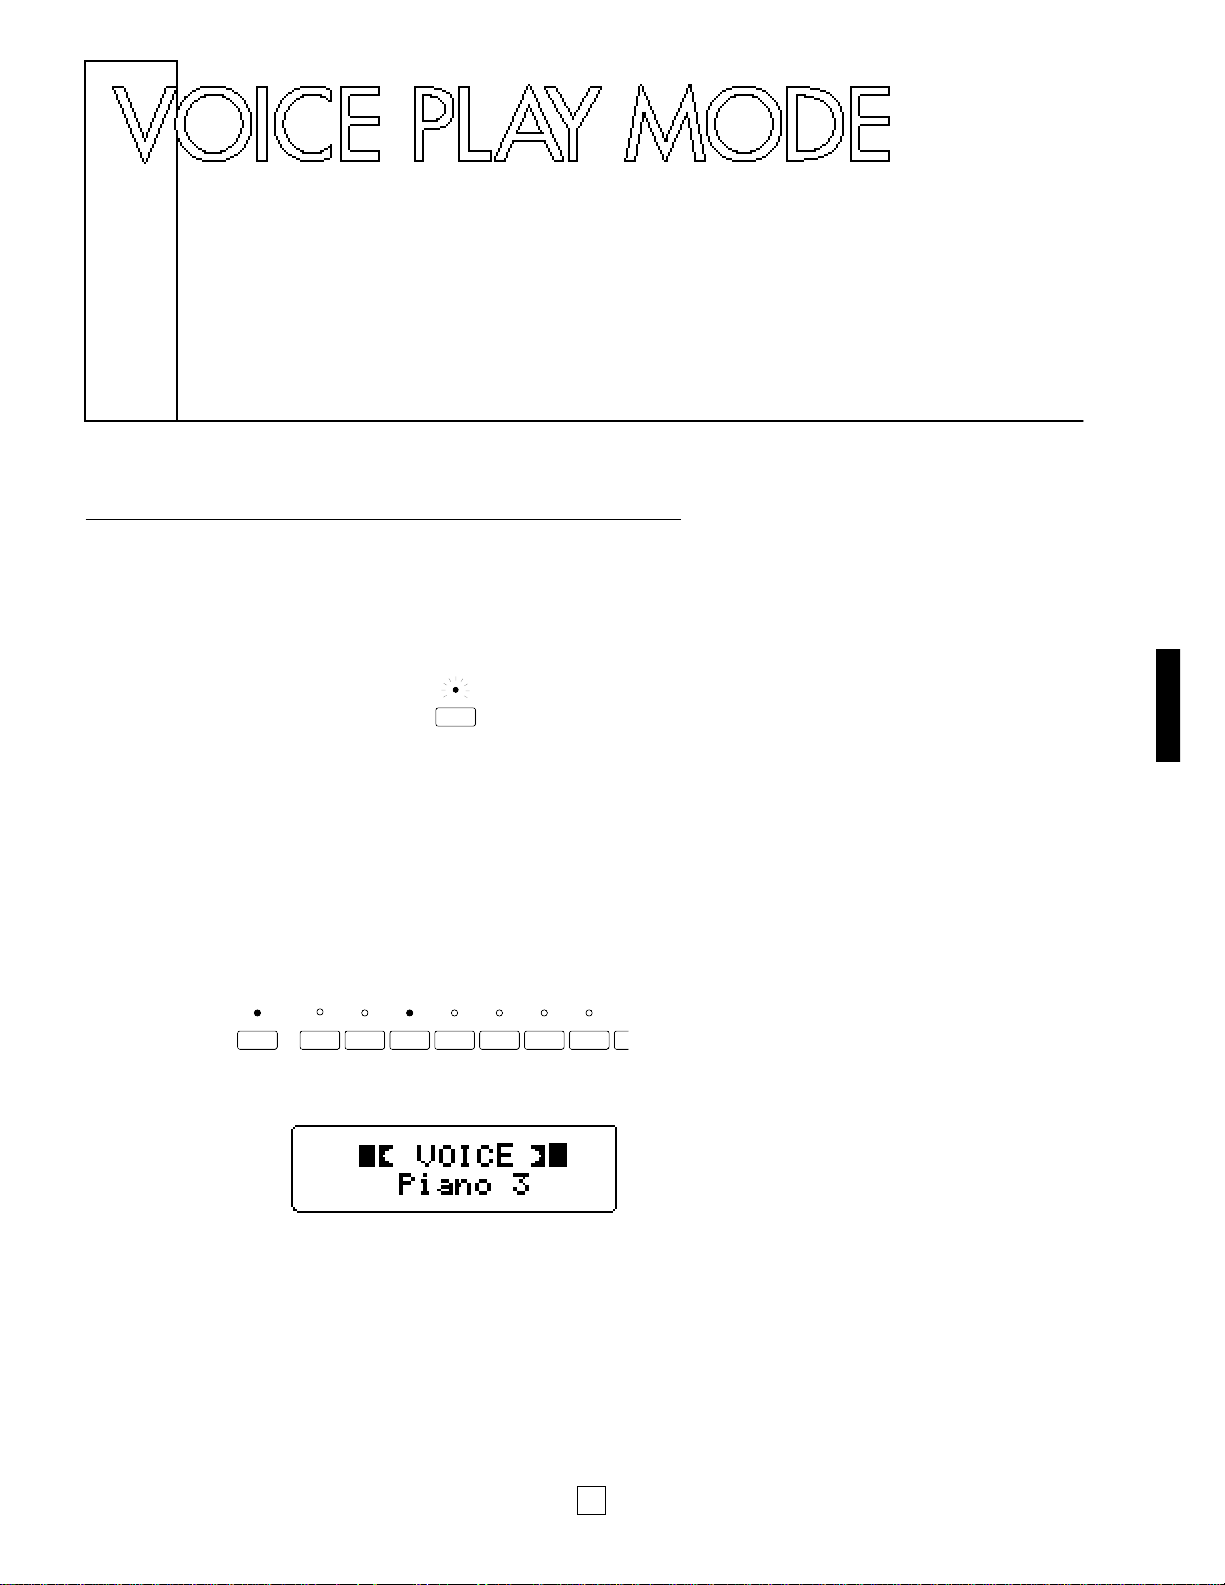
VOICE PLAY MODE
ENTERING AND EXITING VOICE PLAY MODE
1.
Press the [VOICE] button.
When you press the [VOICE] button while the P-150 is in Performance Play
mode, the LED above the [VOICE] button starts blinking, indicating that
Voice Play mode is standing by waiting to be activated.
2.
Press a [VOICE SELECT] button.
As soon as a [VOICE SELECT] button is pressed, Voice Play Single mode is
activated.
The LED above the [VOICE] button and the selected [VOICE SELECT]
button will light.
From within Single mode you can easily activate Dual mode (see page 26)
or Split mode (see page 28).
To exit Voice Play mode, simply enter Performance Play mode. For details,
see page 38.
VOICE
1234567
VOICE
PIANO 1
PIANO 2 PIANO 3 PIANO 4 E.PIANO 1 E.PIANO 2 E.PIANO 3 V
MIDI FILTER PC TABLE CHANNEL LOCAL CS FC PS N
SYSTEM
Page 24
20
VOICE PLAY MODE
■ Single Mode
When the P-150 is in Single mode, you can select and play any one of the 12
voices over the full range of the keyboard. You can also apply and adjust reverb
and modulation effects, and adjust the graphic equalizer settings.
In Single mode, the LED above the currently selected [VOICE SELECT] button
lights, and the name of the currently selected Single voice appears in the LCD
screen.
SELECTING A SINGLE VOICE
Press a [VOICE SELECT] button.
To select a voice you need only press any of the 12 [VOICE SELECT] buttons.
Voices and Polyphony
The P-150’s voices are high quality samples of real musical instruments
generated by Yamaha’s exclusive AWM (Advanced Wave Memory) tone
generation process.
All of the voices have 32-note polyphony, which means that a maximum
number of 32 notes can be played simultaneously. This is crucial for achieving
uncompromising sound and performance when using a sustain pedal, where
certain notes must hold over others as you play, until you release the sustain
pedal.
There is an extra dimension to some of the P-150’s voices. Two of the PIANO
voices have special stereo settings, which are capable of 16-note polyphonic
output. Also, the BASS voice has both ELECTRIC BASS and acoustic
UPRIGHT BASS settings.
The following table provides an overview of each preset AWM voice.
NO. VOICE DESCRIPTION SAMPLE TYPE POLYPHONY
Acoustic grand piano, suitable
1 PIANO 1 for various types of music, Mono / Stereo 32 / 16
from classical to jazz.
Acoustic grand piano, with
2 PIANO 2 sophisticated and deeper Mono / Stereo 32 / 16
resonance and body.
3 PIANO 3
Bright acoustic grand piano,
Mono 32
ideal for rock as well as jazz.
4 PIANO 4
Bright electric grand piano,
Mono 32
ideal for pop ballads.
5 E. PIANO 1
Standard electric piano
Mono 32
with a sharp attack sound.
6 E. PIANO 2
Conventional, all-purpose
Mono 32
electric piano sound.
7 E. PIANO 3
Bright and sparkling,
Mono 32
DX-type electric piano sound.
8 VIBES
Full-bodied vibraphones
Mono 16 (2 layered)
with sharp attack.
Full-set organ combination sound
9 ORGAN 1 with editable footage lengths Mono 8
and other parameters.
10 ORGAN 2 Standard jazz organ sound. Mono 32
11 STRINGS Full orchestral string ensemble. Mono 32
Deep Electric Bass with punch,
12 BASS and full-bodied, resonating Mono 32
Upright Bass.
The Organ 1 voice can be edited and
reconfigured in Edit mode (see page
50).
Page 25
21
VOICE PLAY MODE
Once you have modified certain
parameters in Voice Play or
Performance Play mode,
QE (Quick
Edit) will display in the upper right
corner to remind you that you have
modified the original settings.
Parameters include the following:
reverb and modulation setting,
stereo/mono setting for Piano1 and
Piano2, electric/upright setting for
Bass, plus Balance, Dual Detune,
Split, and Transpose settings.
■ Stereo/Mono Piano
Pressing and holding the [PIANO 1] (or [PIANO 2]) button for a few moments
alternately selects the stereo and mono settings.
The initial default setting for the PIANO 1 (and PIANO 2) voice is stereo, and
polyphony is 16 notes.
CHANGING THE PIANO VOICE SETTING
Press and hold [PIANO 1] (or [PIANO 2]) for a few moments.
After a moment, the MONO screen briefly appears.
As you play the keyboard, the output of the PIANO 1 voice will be in mono, and
polyphony will be 32 notes.
To return the PIANO 1 voice to its stereo setting, simply press and hold [PIANO 1]
for a few moments again. The STEREO screen briefly appears.
■ Electric/Upright Bass
Pressing and holding the [BASS] button for a few moments alternately selects the
Electric and Upright settings.
The initial default setting for the BASS voice is Electric Bass.
CHANGING THE BASS VOICE SETTING
Press and hold [BASS] for a few moments.
After a moment, the UPRIGHT BASS screen briefly appears.
Piano1 16/32 QE
mono
Piano1 16/32 QE
stereo
Elec./Upright QE
Upright Bass
SYSTEM MIDI FILTER
PIANO 1
12
PIANO 2
or
INT.EQ
12
BASS
Page 26
22
VOICE PLAY MODE
As you play the keyboard, you will hear the Upright Bass voice.
To change back to the ELECTRIC BASS voice, simply press and hold [BASS] for a
few moments again. The ELECTRIC BASS screen briefly appears.
■Reverb Effects
The P-150’s internal DSP digital signal processor generates three types of realistic
reverb effects, or simulated ambient environments, which you can apply to the
voices.
These include ROOM, which simulates the natural reverberations of sound in a
normal-sized room, STAGE, which simulates the natural reverberations of sound
in a night club, and HALL, which simulates the natural reverberations of sound in a
relatively large concert hall.
As you select each voice you will notice that a specific reverb effect is already
assigned to it, indicated by a lit LED to the left of the name of the selected reverb
type. These are the initial default assignments set at the factory, but you can select
any reverb effect you wish for each voice, or even turn the reverb effect off. You
can also change reverb depth on the spot.
SELECTING A REVERB TYPE
Press the [REVERB] button once or more.
When you press the [REVERB] button repeatedly, the reverb types will be selected
in order as follows: ROOM, STAGE, HALL, then OFF. (No lit LED represents Off status.)
Note that each time you select a reverb type, a message will briefly display in the
LCD screen, as follows.
This temporary message displays the current depth level for the reverb type that
you just selected, between 0 and 7.
You can easily change the depth level for the currently selected reverb type.
REVERB DEPTH QE
2 <>
Elec./Upright QE
Elec.Bass
HALL
STAGE
ROOM
TREMOLO
SYMPHONIC
CHORUS
REVERB MODULATION
EFFECT
You can also select the reverb type
and depth settings in Edit mode (see
page 52).
Page 27
23
VOICE PLAY MODE
CHANGING REVERB DEPTH
1.
Hold the [REVERB] button and move the [DATA ENTRY] slider
(or press [–1/NO] or [+1/YES]).
As soon as you move the [DATA ENTRY] slider (or press [–1/NO] or
[+1/YES]) the REVERB DEPTH screen appears.
If you move the [DATA ENTRY] slider upward, the depth level increases; if
you move the [DATA ENTRY] slider downward, the depth level decreases.
A value of 7 will produce the largest number of reverberations, whereas a
value of 0 will effectively turn the reverb off.
2.
Release the [REVERB] button.
After a moment, the voice name will reappear in the screen.
Try different settings and play the keyboard and notice the difference
between high and low reverb depth level settings, and the P-150’s wide
variety of reverb options.
-1/NO +1/YES
PS1 PS2
DATA ENTRY
CS
HALL
STAGE
ROOM
TREMOLO
SYMPHONIC
CHORUS
REVERB MODULATION
EFFECT
+
or
■ Modulation Effects
The P-150’s internal DSP digital signal processor generates three types of
modulation effects which you can apply to the voices. (Note: These modulation
effects are unrelated to the vibrato effect which you can apply to voices using the
[MODULATION] wheel. For details about the vibrato effect, see page 52.)
These include CHORUS, a modulated delay which effectively makes a voice
sound like more than one instrument is being played, SYMPHONIC, a more
pronounced chorus effect, and TREMOLO, a rotating speaker effect.
As you select each voice you will notice that most have a specific modulation
effect already assigned to them, indicated by a lit LED to the left of the name of the
selected modulation effect type. These are the initial default assignments set at the
factory, but you can select any modulation effect you wish for each voice, or even
turn the modulation effect off. You can also change modulation speed on the spot.
SELECTING A MODULATION TYPE
Press the [MODULATION] button once or more.
When you press the [MODULATION] button repeatedly, the modulation types will
be selected in order as follows: CHORUS, SYMPHONIC, TREMOLO, then OFF.
(No lit LED represents Off status.)
HALL
STAGE
ROOM
TREMOLO
SYMPHONIC
CHORUS
REVERB MODULATION
EFFECT
In Voice Play mode, a different reverb
type and depth can be selected for
each voice. When you play two
voices in either Dual or Split mode,
the P-150 will apply the main voice
reverb type and depth setting to both
voices, and ignore any settings which
you may have made for the sub
voice. For more information about
main and sub voices, see page 25.
You can also select the modulation
type and speed settings in Edit mode
(see page 52).
Page 28

24
VOICE PLAY MODE
A different modulation type and
speed can be selected for each
voice. When you play two voices in
either Dual or Split mode, the P-150
will apply the main voice modulation
type and speed setting to both
voices, and ignore any settings which
you may have made for the sub
voice. For more information about
main and sub voices, see page 25.
Note that each time you select a modulation type, a message will briefly
display in the LCD screen, as follows.
This temporary message displays the current speed level for the modulation
type that you just selected, between 0 and 7. You can easily change the
speed level for the currently selected modulation type.
CHANGING MODULATION SPEED
1.
Hold the [MODULATION] button and move the [DATA ENTRY]
slider (or press [–1/NO] or [+1/YES]).
As soon as you move the [DATA ENTRY] slider (or press [–1/NO] or
[+1/YES]) the MODULATION SPEED screen appears.
If you move the [DATA ENTRY] slider upward, the speed level increases; if
you move the [DATA ENTRY] slider downward, the speed level decreases.
A value of 7 will produce the largest number of modulations, whereas a
value of 0 will effectively turn the modulation off.
2.
Release the [MODULATION] button.
After a moment, the voice name will reappear in the screen.
Try different settings and play the keyboard and notice the difference
between high and low modulation speed level settings.
-1/NO +1/YES
PS1 PS2
DATA ENTRY
CS
HALL
STAGE
ROOM
TREMOLO
SYMPHONIC
CHORUS
REVERB MODULATION
EFFECT
+
or
MOD SPEED QE
3
Page 29

25
VOICE PLAY MODE
ADJUSTING THE EQUALIZATION
Move an [EQUALIZER] slider up or down.
Move either the [LOW], [MIDDLE] or [HIGH] slider upward to increase the level of
output for that range, or move it downward to decrease the level of output for that
range.
The graph below shows how the equalizer modifies the sound output of each range.
■Main and Sub Voices
The P-150 is capable of generating two different AWM voices at once, either in
Dual mode or Split mode. These are divided into main and sub voice areas of the
keyboard which can be assigned to either end of the keyboard.
In Dual mode, the order that you press the [SELECT] buttons will determine which
voice is the main voice and which is the sub voice. Since both voices are sounded
simultaneously, the distinction between the main voice and sub voice is not
important when you play the keyboard, but you’ll need to keep it in mind when
setting the detune relationship and balance levels. (For details about Dual mode,
see page 26.)
In Split mode, the main and sub voices each are assigned to separate areas of the
keyboard, known as the main and sub keyboard areas. The two keyboard areas
are separated at a specified key known as the split point. You can determine the
split point, assign the main and sub voices to either end of the keyboard, and
adjust the volume balance of the two voices in relation to each other. In general,
the main keyboard area is normally above the split point; however, there may be
cases when you’ll want to play the main voice below the split point. (For details
about Split mode, see page 28.)
Note that when you play two voices in either Dual or Split mode, the P-150 will
apply the main voice reverb type and depth setting and modulation type and speed
setting to both voices, and ignore any settings which you may have made for the
sub voice.
■Panel Equalizer
The P-150’s three-band equalizer works just like a graphic equalizer found on
many home stereo amplifiers. The three sliders provide direct access to the P150’s output in LOW, MIDDLE and HIGH frequency ranges, which gives you
considerable control over the quality of the sound.
flat (normal)
HIGHMIDDLELOW
EQUALIZER
maximum
minimum
LOW MIDDLE
NORMAL
HIGH
An Internal Equalizer accessible in
Edit mode lets you adjust the
frequency ranges for each voice. For
details, see page 52.
Page 30

26
VOICE PLAY MODE
■Dual Mode
When the P-150 is in Dual mode, you can play two voices at the same time—a
main voice and a sub voice—over the full range of the keyboard. For example, you
can blend electric piano and strings sounds together to add depth and texture to a
melody line.
You can adjust the volume balance of the Dual voices in relation to each other, as
well as detune the voices in order to enrich the sound by bringing out the individual
characteristics of each Dual voice. You can also transpose each Dual voice (for
details, see page 35).
In Dual mode, voice polyphony is
determined by the voices you select.
For example, if you select two 32note polyphonic voices, polyphony
will be reduced to 16 notes. If you
select a 32-note voice and a 16-note
(stereo) voice, polyphony will be
reduced to 10 notes. Likewise, if you
select two 16-note (stereo) voices,
polyphony will be reduced to 8 notes.
ENTERING AND EXITING DUAL MODE
1.
Main Voice: Press and hold a [VOICE SELECT] button.
2.
Sub Voice: While still holding the first button, simply press
another [VOICE SELECT] button.
The LED above each [VOICE SELECT] button lights, and those two voices
will sound when you play the keyboard.
The order that you press the buttons will determine which voice is the main
voice and which voice is the sub voice. For example, if you press and hold
[E. PIANO 3] and then press [STRINGS], the ELECTRIC PIANO 3 voice will
be the main voice, and the STRINGS voice will be the sub voice.
In Dual mode, since both voices are sounded simultaneously, the distinction
between the main voice and sub voice is not important when you play the
keyboard. However, you will want to keep it in mind when adjusting the voice
balance and detune settings, as described below.
When you select voices in Dual mode, the P-150 will apply the main voice
reverb type and depth setting and modulation type and speed setting to both
voices, and ignore any settings which you may have made for the sub voice.
Also, [PITCH] and [MODULATION] wheels apply to both voices equally, with
the values as set for the main voice.
To exit Dual mode, simply press a single [VOICE SELECT] button to return
to Single mode, or press [SPLIT] and enter Split mode.
SYSTEM MIDI FILTER PC TABLE CHANNEL LOCAL CS FC PS NAME ORGAN
COMBINATION
PB MW KBD SENS. INT. EQ
PIANO 1
123456789101112
PIANO 2 PIANO 3 PIANO 4 E.PIANO 1 E.PIANO 2 E.PIANO 3 VIBES ORGAN1 ORGAN2 STRINGS BASS
!"
[ VOICE ]
E.P.3 +Strings
Main Voice Sub Voice
In Dual mode you cannot select the
Organ 1 voice.
Page 31

27
VOICE PLAY MODE
ADJUSTING THE BALANCE OF THE DUAL VOICES
1.
Hold the [BALANCE] button and move the [DATA ENTRY] slider.
As you move the [DATA ENTRY] slider, the DUAL BALANCE screen appears.
Moving the slider upwards increases the level of the main voice while
decreasing the level of the sub voice. Conversely, moving the slider
downwards increases the level of the sub voice while decreasing the level of
the main voice. You can set the balance to any value between -16 and 15.
Two indicators to the right of the numeric value display the relative balance
of sub and main voices.
DUAL BALANCE QE
0..
Sub Main
BALANCE
SPLIT
DATA ENTRY
CS
+
You’ll find it convenient to set the desired balance by holding the [BALANCE]
button and moving the [DATA ENTRY] slider with one hand, and then
playing the keyboard with the other hand.
2.
Release the [BALANCE] button.
After a moment, the Dual voice names will reappear in the screen.
If you choose different Dual voices, the balance relationship will remain the
same as determined above, until you change the balance setting again.
DETUNING THE DUAL VOICES
1.
Hold the [DETUNE] button and move the [DATA ENTRY] slider.
As you hold the [DETUNE] button, do not press a key on the keyboard until
you move the [DATA ENTRY] slider. (Note: If you press a key on the
keyboard before moving the [DATA ENTRY] slider, you will change the
Transpose setting. For information about the Transpose feature, see page 33.)
DATA ENTRY
CS
+
DETUNE
TRANSPOSE
In this case you cannot use the
[–1/NO] and [+1/YES] buttons to
change data.
Page 32

28
VOICE PLAY MODE
As you move the [DATA ENTRY] slider, the DUAL DETUNE screen appears.
You can set the detune to any value between 0 (no detuning) and 7
(maximum detuning). Moving the slider upwards increases the detune value.
Conversely, moving the slider downwards decreases the detune value.
DUAL DETUNE QE
4/\
2.
Release the [DETUNE] button.
After a moment, the Dual voice names will reappear in the screen.
If you select different Dual voices, the detune relationship will remain the
same as determined above, until you change the detune setting again.
● Main and Sub Voice Detune Relationship
When you detune two voices in Dual mode, the main voice is raised above the
keyboard’s standard pitch by a certain amount and the sub voice is lowered below
the keyboard’s standard pitch by an equal amount. The result is that the individual
characteristics of each Dual voice are emphasized. The amount of pitch
adjustment depends on the value you select. At the maximum detune setting, the
voices are each detuned by about one-third of a semitone.
■Split Mode
When the P-150 is in Split mode, you can play two voices at the same time—one
voice on the left side of the keyboard, and another voice on the right side of the
keyboard. For example, you can play a strings pad with one hand, while playing a
piano melody with the other; or you can play an electric bass line with your left
hand, while playing an organ riff with your right hand.
The two voices you play in Split mode are referred to as the main and sub voices.
These voices are assigned to separate areas of the keyboard, known as the main
and sub keyboard areas, which are separated at a specific key known as the split
point.
You can determine the split point and assign the main and sub voices to either end
of the keyboard. You can also adjust the volume balance of the two voices in
relation to each other (for details, see page 30.)
In this case you cannot use the
[–1/NO] and [+1/YES] buttons to
change data.
Page 33

29
VOICE PLAY MODE
If you enter Split mode directly from
Dual mode, and then choose the
Organ 1 voice as the main voice,
when you press the [SPLIT] button to
exit Split mode, the P-150 will
automatically switch to Single mode.
In Split mode, the [PITCH] and
[MODULATION] wheels, as well as
the sustain, soft and sostenuto
pedals, will only affect the main voice.
ENTERING AND EXITING SPLIT MODE
Press the [SPLIT] button.
When you press the [SPLIT] button, the LED above it will light, and the keyboard
will split into two areas, one playing the main voice you selected in Single or Dual
mode, and the other playing the voice which was last selected as the Split mode
sub voice. (ELECTRIC BASS is the default sub voice designated at the factory.)
The current split point designation and keyboard area assignments briefly
appear in the screen.
The first line of the above screen indicates that the current split point area is
designated at key C2 (the initial default setting). The second line indicates
that the sub voice is assigned to the left side of the split point, while the main
voice is assigned to the right side of the split point.
After a few moments, the names of two voices will appear in the LCD screen.
The P-150 will now play the two voices using the current split point
designation and keyboard area assignments.
To exit Split mode, simply press the [SPLIT] button again. The P-150 will
return to Single or Dual mode, depending on which one was active before
you entered Split mode, playing the voice you have selected as the main
voice.
SPLIT POINT=C 2
KBD AREA=Sub/Man
Left side Right side
Current split point
[VOICE]
Bass / Piano1
Sub Voice Main Voice
BALANCE
SPLIT
Split Point (included in main area)
Sub Voice (C2) Main Voice
Page 34

30
VOICE PLAY MODE
SELECTING SPLIT VOICES
1.
Main Voice: Press a [VOICE SELECT] button.
When you press the [SPLIT] button to enter Split mode, the voice you were
playing in Single mode (or the main voice you were playing in Dual mode)
will be assigned by default to the main keyboard area.
To change the main voice, simply press any [VOICE SELECT] button, the
same as you would in Single mode.
2.
Sub Voice: Hold the [SPLIT] button and press a [VOICE SELECT] button.
Note that you can assign the same voice to both main and sub keyboard
areas. This is useful in such cases where you want to use the same voice on
each end of the keyboard, but with different Transpose settings (for details,
see page 33), or at different volume balance levels.
You’ll find it convenient that the procedure for selecting voices is separate
from that for entering and leaving Split mode, since this lets you switch the
sub keyboard area on and off as needed. For example, you can play the
main voice in Single Play mode (or Dual voices) across the entire keyboard
during a song’s verse and chorus, then switch into Split mode to add the sub
voice for an intricate two-part solo, then switch the Split mode off to play
remaining verses and choruses.
ADJUSTING THE BALANCE OF THE SPLIT VOICES
1.
Hold the [BALANCE] button and move the [DATA ENTRY] slider.
As you move the [DATA ENTRY] slider, the SPLIT BALANCE screen appears.
SPLIT BALANCE QE
..0
Sub Main
SYSTEM MIDI FILTER PC TABLE CHANNEL LOCAL CS FC PS NAME ORGAN
COMBINATION
PB MW KBD SENS. INT.EQ
PIANO 1
123456789101112
PIANO 2 PIANO 3 PIANO 4 E.PIANO 1 E.PIANO 2 E.PIANO 3 VIBES ORGAN1 ORGAN2 STRINGS BASS
SYSTEM MIDI FILTER PC TABLE CHANNEL LOCAL CS FC PS NAME ORGAN
COMBINATION
PB MW KBD SENS. INT.EQ
PIANO 1
123456789101112
PIANO 2 PIANO 3 PIANO 4 E.PIANO 1 E.PIANO 2 E.PIANO 3 VIBES ORGAN1 ORGAN2 STRINGS BASS
BALANCE
SPLIT
+
BALANCE
SPLIT
CS
+
Page 35

31
VOICE PLAY MODE
Moving the slider upwards increases the level of the main voice while decreasing
the level of the sub voice. Conversely, moving the slider downwards increases the
level of the sub voice while decreasing the level of the main voice. You can set the
balance to any value between -16 and 15. Two indicators to the right of the
numeric value display the relative balance of sub and main voices.
2.
Release the [BALANCE] button.
After a moment, the Split voice names will reappear in the screen.
If you choose different Split voices, the balance relationship will remain the
same as determined above, until you change the balance setting again.
CHANGING THE SPLIT POINT
1.
Hold the [SPLIT] button and press a key on the keyboard.
The key that you press will become the new split point. The SPLIT POINT
screen appears.
As long as you hold the [SPLIT] button, the note name of the key that you
pressed will blink; pressing another key will change the split point still again,
and the name of the new split point will likewise appear in the screen.
You can also raise or lower the current split point setting one semitone at a
time by holding the [SPLIT] button and pressing the [–1/NO] or [+1/YES]
buttons.
SPLIT POINT QE
G 3
In this case you cannot use the
[–1/NO] and [+1/YES] buttons to
change data.
BALANCE
SPLIT
+
(G3)
Page 36

32
VOICE PLAY MODE
2.
Release the [SPLIT] button.
After a moment, the Split voice names will reappear in the screen.
The split point will remain where you set it until you change it again, even if
you exit and reenter Split mode.
As you change the split point you can specify whether the main voice will
play above or below the split point.
In general, the main keyboard area is normally above the split point;
however, there may be cases when you’ll want to play the main voice below
the split point. For example, say you’re playing a song where the verses and
choruses call for a piano in the bass and strings on top, and an instrumental
part calls for a piano solo that sweeps from one end of the keyboard to
another. You can do this by selecting the piano as the main voice and
assigning it to the lower keyboard area. You will then be able to switch from
Split mode for the verses and choruses to Single mode form the solo, then
back to split mode again, simply by pressing the [SPLIT] button.
CHANGING MAIN AND SUB KEYBOARD AREAS
1.
Hold the [SPLIT] button, then press and hold the split point
key.
2.
Press a second key below or above the split point key.
The SPLIT AREA screen appears.
As you hold the [SPLIT] button and split point key, pressing a second key
below the split point will designate the left area of the keyboard as the main
area. Pressing a second key above the split point will again designate the
right area of the keyboard as the main area.
Note that the key that you press to select the split point will always be
included in the main keyboard area. Thus, if you select F4 as the split point
and then set the main keyboard area below this point, the main voice will
play all notes up to and including F4, whereas the sub voice will play all
notes from F#4 on. If you set the main keyboard area above this point,
however, the sub voice will play all notes up to E4, and the main voice will
play all notes from F4 on.
SPLIT AREA QE
Main/Sub
When you select voices in Split
mode, the P-150 will apply the main
voice reverb type and depth setting
and modulation type and speed
setting to both voices, and ignore any
settings which you may have made
for the sub voice. (For more
information about main and sub
voices, see page 25.)
Main
BALANCE
SPLIT
Press and hold
+
+
C3 (Split point key)
C3 (Split point key)
B2 (Select key)
Select lower key
D3 (Select key)
Select upper key
Press and hold
Press and hold
Sub Main
Sub
+
+
Page 37

33
VOICE PLAY MODE
■ Transpose
The P-150 has a multi-faceted transpose feature that lets you transpose the pitch
at the touch of a button while you play.
The P-150 has four independent transpose paths, which let you set transpose
values for the internal main voice as well as the sub voice, and which also let you
set transpose values for the MIDI main and sub voices which will affect external
devices.
Transpose is particularly useful in the Dual and Split modes. In the Dual mode, for
example, you can play two different voices at the same time, each having a
different pitch.
The P-150’s default main voice transpose setting is 12, which means the pitch will
transpose up one octave when you press the [TRANSPOSE] button. The default
sub voice transpose amounts are set to 0 for Dual and Split modes.
USING THE TRANSPOSE FEATURE
1.
Press the [TRANSPOSE] button to transpose the pitch of the keyboard.
The LED above the [TRANSPOSE] button lights and the TRANSPOSE screen with current transpose value appears.
Depending on the current status and mode, the TRANSPOSE screen will be
different. For example, if the P-150 is in Split mode and the MIDI transmit
switch is enabled, the screen will display internal and MIDI main and sub
voice transposition values.
Main voice internal transposition
Sub voice MIDI transposition
Sub voice MIDI transposition
Sub voice internal transposition
DETUNE
TRANSPOSE
Page 38

34
VOICE PLAY MODE
As you play in Split mode, the pitch of both voices will transpose according
to main and sub voice settings when you press the [TRANSPOSE] button.
You can play two-handed duets with different instruments by transposing the
sub voice up or down two octaves to match the pitch range of the main
voice.
If the P-150 is in Dual mode and the MIDI transmit switch is enabled, the
TRANSPOSE screen will display internal and MIDI main voice and internal
sub voice transposition values.
As you play in Dual mode, the pitch of both voices will transpose according
to independent main and sub voice settings when you press the
[TRANSPOSE] button. Thus, you can create two-note harmonies by
lowering the sub voice so that it plays a fifth or an octave below the main
voice.
If the P-150 is in Single mode and the MIDI transmit switch is enabled, the
TRANSPOSE screen will display internal and MIDI main voice transposition
values.
As you play in Single mode, the pitch of the entire keyboard will transpose
according to the main voice setting when you press the [TRANSPOSE]
button. (The sub voice is not active in Single mode.)
If the MIDI transmit switch is disabled, only the main voice (and sub voice,
depending on mode) transposition value will be displayed.
2.
Press the [TRANSPOSE] button again to return the keyboard
to normal pitch.
The LED above the [TRANSPOSE] button goes out and the keyboard
returns to normal pitch.
SETTING THE TRANSPOSE AMOUNT
1.
When the transpose function is on, hold the [TRANSPOSE]
button and press a key on the keyboard.
The key that you press becomes the new transpose amount. The TRANSPOSE screen appears.
+
DETUNE
TRANSPOSE
TRANSPOSE QE
MAIN +12
Page 39

35
VOICE PLAY MODE
In this case you cannot use the [CS]
slider to change the transpose value.
(Trying to do so in Dual mode will
activate the detune function.)
When the transpose setting exceeds
the legal range (A–1 ~ C7) the P-150
plays and repeats the one octave
higher (or lower) range. Also note
that MIDI notes will not be transmitted
if the data exceeds MIDI note values
0 ~ 127.
C3 (middle C) is the normal pitch, or 0 value, so all you need to do is press
any key above or below C3 to set the transpose amount. For example, if you
want the transpose amount to be one octave below normal keyboard pitch,
simply press C2. To return the transpose amount to normal pitch, simply
press C3 again.
You can also change the transpose amount setting one semitone at a time
by holding the [TRANSPOSE] button and pressing the [–1/NO] and [+1/YES]
buttons.
You can set the transpose amount anywhere within a range of four octaves,
from -24 (C1) to 24 (C5). If you try to set the transpose amount by pressing a
key below C1 or above C5 on the keyboard, the P-150 will react as though
you pressed C1 or C5.
2.
Release the [TRANSPOSE] button.
The P-150 will assume that you want to transpose using this value, and
leave the transpose function turned on after you complete the setting.
In a similar way, internal sub voice and MIDI transpose signals for the MIDI
main and sub voice can be set independently, as explained below.
INTERNAL SPLIT SUB VOICE: To set the transpose value for the internal
split sub voice, in Split mode, press and hold [TRANSPOSE], then hold [SPLIT], then
press a key on the keyboard (or press the [–1/NO] or [+1/YES] buttons).
INTERNAL DUAL SUB VOICE: To set the transpose value for the internal
dual sub voice, in Dual mode, press and hold [TRANSPOSE], then hold [SPLIT], then
press a key on the keyboard (or press the [–1/NO] or [+1/YES] buttons).
BALANCE
SPLIT
+
+
DETUNE
TRANSPOSE
12
3
TRANSPOSE QE
SPLIT SUB +12
TRANSPOSE QE
DUAL SUB +12
Page 40

36
VOICE PLAY MODE
■MIDI Transmit Enable
You can enable or disable MIDI transmission by pressing the [MIDI] button. The
LED above the [MIDI] button remains lit while this function is enabled.
It will not block the reception of data from the [MIDI IN] jack.
Note that you cannot enable transmission if the [MIDI] button has been turned off.
Also note that setting (in Edit mode) the MIDI transmit channel to Off and setting
all the MIDI Filters to On will have the same effect as disabling the MIDI transmit
switch. The significance in this case is that turning the [MIDI] button off affects all
of the Performances, whereas the aforementioned Edit mode settings can be
assigned to individual Performances.
For details about the P-150’s MIDI capabilities, see page 57.
MIDI MAIN VOICE: To set the transpose value for the MIDI main voice, press
and hold [TRANSPOSE], then hold [MIDI], then press a key on the keyboard (or
press the [ –1/NO] or [+1/YES] buttons).
MIDI SUB VOICE: To set the transpose value for the MIDI sub voice, press and
hold [TRANSPOSE], followed by [SPLIT], then [MIDI], then press a key on the
keyboard (or press the [–1/NO] or [+1/YES] buttons).
TRANSPOSE QE
MIDI SUB +12
DETUNE
TRANSPOSE
PAGE
MIDI
+
+
1 2
3
TRANSPOSE QE
MIDI MAIN +12
PAGE
MIDI
When changing the internal main or
sub voice’s transpose value, the MIDI
main or sub voice will change
accordingly.
+
+
PAGE
MIDI
BALANCE
SPLIT
+
DETUNE
TRANSPOSE
321
4
Page 41

37
VOICE PLAY MODE
■MIDI Panic
Although MIDI is very reliable, it is in fact so sophisticated that it is not without its
occasional faults. For example, sometimes a connected tone generator or
synthesizer responds to a Note On message, but not a Note Off message, thus
causing a note to get stuck, which can be quite frustrating, especially in a live
performance setting.
Unexpected sustained notes, sudden losses of volume, and “hanging” pitch bends
are also common MIDI problems that can happen when using a sequencer with
the P-150 and other MIDI instruments.
The P-150’s MIDI Panic feature lets you instantly send note off and other
messages to all connected MIDI devices.
ACTIVATING MIDI PANIC
Hold the [MIDI] button, then press the [REVERB] and
[MODULATION] buttons at the same time.
The MIDI PANIC SEND screen appears briefly when MIDI Panic is activated.
When MIDI Panic is activated, the following messages are sent in sequence over
all MIDI channels: All Notes Off; All Sounds Off; Channel Pressure off; Sustain
Pedal Off; Modulation Off; Pitch Bend (Center); Reset All Controllers.
MIDI Panic has no effect during sending/receiving bulk data or while MIDI Merge is
on.
+
PAGE
MIDI
HALL
STAGE
ROOM
TREMOLO
SYMPHONIC
CHORUS
REVERB MODULATION
EFFECT
MIDI PANIC
SEND
Page 42

38
PERFORMANCE PLAY MODE
ENTERING AND EXITING PERFORMANCE PLAY MODE
1.
Press the [PERF. A] or [PERF. B] button.
If you press the [PERF. A] button, the LED above it will start blinking to indicate that
the P-150 is standing by to enter the PERFORMANCE-A bank. Likewise, if you press
the [PERF. B] button, the LED above it will start blinking to indicate that the P-150 is
standing by to enter the PERFORMANCE-B bank.
2.
Press a [PERFORMANCE SELECT] button.
Pressing a [PERFORMANCE SELECT] button activates Performance
mode. The LEDs above the [PERFORMANCE SELECT] and [PERF.]
buttons light, and the name of the Performance appears in the LCD screen.
To exit Performance Play mode, simply press the [VOICE] button, followed
by a [VOICE SELECT] button, which will return you to Voice Play mode.
VOICE
PERF.B
PERF.A
PERF.B
PERF.A
PERFORMANCE<A01>
Piano 1
12345678
PIANO 1
PIANO 2 PIANO 3 PIANO 4 E.PIANO 1 E.PIANO 2 E.PIANO 3 VIBES
SYSTEM MIDI FILTER PC TABLE CHANNEL LOCAL CS FC PS NAME
Page 43

39
PERFORMANCE PLAY MODE
SELECTING A PERFORMANCE
Press a [PERFORMANCE SELECT] button.
Pressing any of the 12 [PERFORMANCE SELECT] buttons will access a
Performance in the currently selected Performance bank. The name of the
Performance appears in the LCD screen.
The P-150 comes with 24 Preset Performances designed for various musical
purposes. Take a moment and try out each one in both A and B banks. For a list of
the Preset Performances, see page 64.
Just as in Voice Play mode, Performance Play mode lets you select Single voices
as well as activate Dual mode and Split mode.
■Selecting Single Voices
Within Performance Play mode you can easily select Single voices in the current
Performance. The procedure is slightly different than in Voice Play mode.
SELECTING SINGLE VOICES IN
PERFORMANCE PLAY MODE
Hold the [EDIT] button, then press a [VOICE SELECT] button.
The name of the voice appears in the LCD screen.
SYSTEM MIDI FILTER PC TABLE CHANNEL LOCAL CS FC PS NAME ORGAN
COMBINATION
PB MW KBD SENS. INT.EQ
PIANO 1
123456789101112
PIANO 2 PIANO 3 PIANO 4 E.PIANO 1 E.PIANO 2 E.PIANO 3 VIBES ORGAN1 ORGAN2 STRINGS BASS
EDIT
+
PERFORMANCE<A01>
Piano 1
Only a single set of Voice parameters
is available for each Performance.
Therefore, the Voice parameters set
for one voice will also be effective
when you select other voices.
In Peformance Play mode, a lit LED
above a voice button does not
indicate the selected voice(s). It
indicates the currently selected
performance.
Page 44

40
PERFORMANCE PLAY MODE
■ Selecting Dual Voices
Within Performance Play mode you can easily select Dual voices in the current
Performance. The procedure is slightly different than in Voice Play mode.
SELECTING DUAL VOICES IN
PERFORMANCE PLAY MODE
Hold the [EDIT] button, then press two [VOICE SELECT] buttons.
This activates Dual mode from within Performance Play mode. The names of the
voices appear in the LCD screen.
Note that the order in which you press the [VOICE SELECT] buttons
determines the main and sub voices, just as in Voice Play mode. For details,
see Dual Mode, page 26.
■ Selecting Split Voices
Within Performance Play mode you can easily select Split voices in the current
Performance. The procedure is slightly different than in Voice Play mode.
SELECTING SPLIT VOICES IN
PERFORMANCE PLAY MODE
1.
Press the [SPLIT] button.
This activates Split mode from within Performance Play mode. The names of
the voices appear in the LCD screen.
SYSTEM MIDI FILTER PC TABLE CHANNEL LOCAL CS FC PS NAME ORGAN
COMBINATION
PB MW KBD SENS. INT.EQ
PIANO 1
123456789101112
PIANO 2 PIANO 3 PIANO 4 E.PIANO 1 E.PIANO 2 E.PIANO 3 VIBES ORGAN1 ORGAN2 STRINGS BASS
EDIT
+
PERFORMANCE<A01>
Piano1 +Strings
BALANCE
SPLIT
Page 45

41
PERFORMANCE PLAY MODE
2.
Main Voice: Hold the [EDIT] button, then press a [VOICE
SELECT] button.
3.
Sub Voice: Hold the [SPLIT] button and press a [VOICE
SELECT] button.
SYSTEM MIDI FILTER PC TABLE CHANNEL LOCAL CS FC PS NAME ORGAN
COMBINATION
PB MW KBD SENS. INT EQ
PIANO 1
123456789101112
PIANO 2 PIANO 3 PIANO 4 E.PIANO 1 E.PIANO 2 E.PIANO 3 VIBES ORGAN1 ORGAN2 STRINGS BASS
BALANCE
SPLIT
+
PERFORMANCE<A01>
Bass / Piano1
SYSTEM MIDI FILTER PC TABLE CHANNEL LOCAL CS FC PS NAME ORGAN
COMBINATION
PB MW KBD SENS. INT.EQ
PIANO 1
123456789101112
PIANO 2 PIANO 3 PIANO 4 E.PIANO 1 E.PIANO 2 E.PIANO 3 VIBES ORGAN1 ORGAN2 STRINGS BASS
+
EDIT
Page 46

42
EDIT MODE
10. PITCH BEND (PB)/MODULATION WHEEL (MW)
Page 1.PB RANGE
2.MW ASSIGN
11. KEYBOARD SENSITIVITY
Page 1.KEYBOARD SENSITIVITY INTERNAL
2.KEYBOARD SENSITIVITY MIDI
3.KEYBOARD RANGE
MIN/MAX *
12. INTERNAL EQUALIZER
Page 1.EQ
LOW *
MID *
HIGH *
REVERB
Page 1.REVERB TYPE
TYPE *
DEPTH *
MODULATION
Page 1.MODULATION TYPE
TYPE *
SPEED *
VOICE MENUS
SYSTEM MENUS
1. SYSTEM
Page 1.MASTER TUNE
2.REVERB
3.DEVICE NUMBER
4.MIDI MERGE
5.PERFORMANCE ENABLE
MIDI CHANNEL *
LOCAL *
CONTROLLER ASSIGN *
6.POPUP TIME
PROGRAM CHANGE *
OTHERS *
7.STORE TYPE
2. MIDI FILTER
Page 1.TRANSMIT FILTER
MESSAGE TYPE *
ON/OFF *
2.RECEIVE FILTER
MESSAGE TYPE *
ON/OFF *
3. PROGRAM CHANGE TABLE
Page 1.PROGRAM CHANGE TRANSMIT
VOICE/PERFORMANCE NO. *
MSB/LSB *
PROGRAM CHANGE NUMBER *
2.PROGRAM CHANGE RECEIVE
PROGRAM CHANGE NUMBER *
VOICE/PERFORMANCE NO. *
PERFORMANCE MENUS
4. CHANNEL
Page 1.CHANNEL
TRANSMIT *
RECEIVE *
5. LOCAL
Page 1.LOCAL
6. CONTINUOUS SL IDER(CS) / FOOT CONTROLLER(F C)
Page 1.CS ASSIGN
2.CS RANGE
MIN/MAX *
3.FC ASSIGN
4.FC RANGE
MIN/MAX *
7. PANEL SWITCH (PS)
Page 1.PANEL SWITCH 1 ASSIGN
2.PANEL SWITCH 2 ASSIGN
8. NAME
Page 1.PERFORMANCE NAME
CHARACTER SELECT (16 characters) *
9. ORGAN COMBINATION
Page 1.FOOTAGE
8 FOOTAGE TYPES *
2.RESPONSE, ATTACK
RESPONSE, 3 ATTACK TYPES, ATTACK LENGTH/MODE *
■ Edit Menu Tree
Edit mode lets you access and edit functions related to
System parameters (1. ~ 3.), Performance parameters (4. ~
9.) and Voice parameters (10. ~ 12. plus REVERB and
MODULATION).
The Edit Menu Tree below outlines the Edit mode functions
and pages. (Pages can be selected with the [PAGE] button
or by pressing the specific [EDIT SELECT] button
continually. Items marked with an asterisk* can be selected
using the [1]/[q] buttons.)
Page 47

SELECTING AN EDIT FUNCTION
Press an [EDIT SELECT] button.
The LED above the button you press starts blinking, and the
name of the currently active parameter page appears in the
LCD screen.
SELECTING EDIT FUNCTION PAGES
Press the [PAGE] button once or more.
Each time you press the [PAGE] button a page will appear in
the LCD screen.
You can also select Edit function pages by pressing the
same [EDIT SELECT] button once or more. For example, if
you select the System function, you can simply press the
[SYSTEM] button as many times as necessary to access the
System function page you want.
The name of each page, as well as the accessible
parameters within it, appears in the LCD screen as you step
through the pages.
EDITING PARAMETERS
Note that some pages contain several parameters, which
you can access with the cursor buttons. (See asterisk* items
on the Edit Menu Tree, page 42.)
1.
If necessary, press the [<] or [>] buttons to
position the cursor over the desired
parameter.
The currently selected parameter will blink on and off
in the LCD screen.
43
EDIT MODE
The Edit function page numbers appear in the upper right corner of the
screen. When Non Auto Store is selected and Edit mode is engaged, the
letter S, P or V will appear to the right of the page number to indicate
which type of parameters you are editing System, Performance or Voice
parameters, respectively.
Channel, Local, CS FC and PS settings are basically classified as
Performance parameters, though they are treated as System parameters
when Sys is selected for MIDI Channel, Local or Controller Assign in the
Performance Enable function (System Menu), see page 45. When Sys
has been selected, the letter S will appear to the right of the page
number, replacing the letter P.
ENTERING AND EXITING EDIT MODE
Press the [EDIT] button.
The LED above the [EDIT] button starts blinking, as does the
LED above the [EDIT SELECT] button which was active the
last time you exited Edit mode. The name of the currently
active parameter page appears in the LCD screen.
Each of the 12 [EDIT SELECT] buttons is dedicated to one
or more Edit functions, as indicated by a name printed in
green below each button.
To exit Edit mode, simply press the [EDIT] button again,
which returns you to the previous Play mode.
EDIT VOICE
SYSTEM
PIANO 1
1
PERF.B
PERF.A
MASTER TUNE 1
440.0Hz
PAGE
MIDI
POPUP TIME 6
PC=off OTHERS= 3
BALANCE DETUNE
SPLIT TRANSPOSE
MASTER TUNE 1s
440.0Hz
LOCAL 1s
on
SYSTEM
PIANO 1
1
MASTER TUNE 1
440.0Hz
POPUP TIME 6
PC=off OTHERS= 3
Page 48

● ACTIVE
When the Active setting is selected, the P-150’s on-board reverb
effects will function as normal.
● BYPASS
When the Bypass setting is selected, the P-150’s on-board
reverb effects will be disengaged.
DEVICE NUMBER
The Device Number function lets you match the MIDI device
number with the device number of an external instrument.
This is necessary when transmitting and receiving bulk data
and parameter change data.
● OFF
When set to Off, the P-150 will ignore incoming MIDI device
number messages.
● 1 ~ 16
When a specific MIDI device number is selected, the P-150 will
only receive bulk data on the corresponding MIDI device
number.
● ALL
When set to All, the P-150 will receive bulk data on any device
number. (When set to All, the P-150 will transmit on device
number 1.)
MIDI MERGE
The MIDI Merge function lets you merge all data received at
the [MIDI IN] terminal with the data generated by the P-150,
for combined transmission at the [MIDI OUT] terminal.
Instruments which receive merged MIDI data from the P-150
can be controlled by the P-150 as well as other devices
connected to the P-150’s [MIDI IN] terminal.
Note that when performing bulk dump operations, the MIDI
Merge function must be turned off. For details, see page 55.
● OFF
When set to Off (default), only internal MIDI data will be
transmitted from the P-150’s [MIDI OUT] terminal.
● ON
When set to On, any MIDI data received at the [MIDI IN] terminal
will be transmitted as is from the [MIDI OUT] terminal together
with data transmitted by the P-150.
2.
Change the parameter using the [–1/NO] and
[+1/YES] buttons, or by moving the [DATA
ENTRY] slider up or dow n.
Parameters may consist of numeric values or specific
settings which you can select.
If the P-150 is in Auto Store status, the changes you make
will be stored automatically in the current location. If the P150 is in Non Auto Store status, when you change a
parameter and press the [EDIT] button to exit Edit mode, the
STORE? confirmation screen appears.
In this case you will need to store the current
Performance by either overwriting it in its current
location, or copy it in another Performance bank and
number.
Regardless of the Auto Store/Non Auto Store status, the parameter
changes made in the System menus (System, MIDI Filter, PC Table) are
always stored automatically. (For details about store functions, see page
53.)
■ System
System parameters which you can select and edit include
Master Tune, Reverb Bypass, Device Number, MIDI Merge,
Performance Enable, Popup Time, and Store Type.
MASTER TUNE
The Master Tune function lets you fine-tune the basic pitch
of the keyboard.
As an electronic instrument, the P-150 is set to optimum
tuning at the factory, with a default pitch value of 440.0 Hz at
A3. You can, however, fine-tune the P-150’s keyboard
upward or downward within a range of about 100 cents.
● MASTER TUNE (424.0Hz~440.0~456.3Hz)
You can change the master tuning between 424.0Hz and
456.3Hz.
REVERB
The Reverb Bypass function lets you disengage the reverb
effect. You will find the Reverb Bypass useful to disengage
the P-150’s internal DSP when you want to use an external
effector.
44
EDIT MODE
REVERB 2
active
STORE? (YES/NO)
Voices -›Voices
MASTER TUNE 1s
440.0Hz
DEVICE NUMBER 3
1
MIDI MERGE 4
off
Page 49

PERFORMANCE ENABLE
The Performance Enable function lets you switch between
System (“Sys”) settings and Performance (“Perf”) settings for
MIDI channel assignments, local on/off status and controller
assignments. This function lets you apply the System
settings designated in Voice Play mode to all of the
Performances.
● PERFORMANCE MIDI CHANNEL (Perf, Sys)
When Perf is selected, the MIDI transmit and receive channels
designated for the currently selected Performance will be effective. When
Sys (default) is selected, the MIDI transmit and receive channels
designated for the Voice Play mode will affect the entire system.
● PERFORMANCE LOCAL (Perf, Sys)
When Perf is selected, the Local On/Off setting designated for
the currently selected Performance will be effective. When Sys
(default) is selected, the Local On/Off setting designated for the
Voice Play mode will affect the entire system.
● PERFORMANCE CONTROL (Perf, Sys)
When Perf is selected, the controller assignments designated for
the currently selected Performance will be effective. When Sys
(default) is selected, the controller assignments designated for
the Voice Play mode will affect the entire system.
POPUP TIME
The Popup Time function lets you set the number of seconds
a temporary message displays in the screen.
The P-150 has a number of messages which appear in the
screen depending on which feature you access. By setting
the Popup Time, you can determine how long the message
stays in the screen.
You can also set the Program Change message screen to
temporarily display when you change voices or
Performances.
● PC (OFF, 1 ~ 5)
You can either turn the Program Change popup screen off or
have it display between one and five seconds. (The default
setting is Off.)
● OTHERS (1 ~ 5)
You can have all other popup screens display between one and
five seconds. (The default setting is 3.)
STORE TYPE
The Store Type function lets you designate Auto Store or
Non Auto Store status. (For information about storing, see
page 53.)
● NON AUTO STORE
In Non Auto Store (default) status, only System, MIDI Filter and
PC Table parameters you change will automatically be stored.
Any other changes in Edit mode will cause the STORE?
(YES/NO) screen to display to prompt you for confirmation
before exiting the Edit mode. Any other changes made in Voice
Play mode and Performance Play mode will be ignored unless
you specifically perform the store operation.
● AUTO STORE
In Auto Store status, all settings you change will automatically
be stored.
When Non Auto Store is selected and Edit mode is engaged, the letter S,
P or V will appear to the right of the page number in the upper right hand
corner to indicate which type of parameters you are editing
System,
Performance or Voice parameters, respectively.
Channel, Local, CS FC and PS settings are basically classified as
Performance parameters, though they are treated as System parameters
when Sys is selected for MIDI Channel, Local or Controller Assign in the
Performance Enable function (System Menu); see left. When Sys has
been selected, the letter S will appear to the right of the page number,
replacing the letter P.
PERF.MIDI CH 5
sys/ sys/ sys
PERF.CTRL. 5
sys/ sys/ sys
POPUP TIME 6
PC=off OTHERS= 3
PERF.LOCAL 5
sys/ sys/ sys
POPUP TIME 6
PC=off OTHERS= 3
STORE TYPE 7
auto store
45
EDIT MODE
Page 50

■ Program Change (PC) Table
The Program Change Table function lets you assign
program change numbers to incoming and outgoing program
change messages.
PROGRAM CHANGE TRANSMIT
The Program Change Transmit function lets you assign
program change transmit numbers to each voice or
Performance. You can also assign bank numbers
(MSB/LSB) as bank select messages.
Your P-150 can transmit a program change message each
time you press a [SELECT] button in Voice or Performance
mode. (You can have the number of the program change
message display briefly when you select a voice or
Performance. For details, see page 45.)
At the factory your P-150 was preset so that each [SELECT]
button will send the program change number corresponding
to the number above the button in Voice mode (1 ~ 12),
followed by subsequent numbers in Performance mode, for
A and B banks (13 ~ 36).
Therefore, when the P-150 is in Voice mode, an external
tone generator connected to the P-150 will receive
messages selecting program 1 when you press the [PIANO
1] button, program 2 when you press the [PIANO 2] button,
and so on. When the P-150 is in Performance mode and
bank A is selected, an external tone generator will receive
messages selecting program 13 when you press [PIANO 1].
Likewise, when bank B is selected, program 25 will be
selected when you press [PIANO 1].
The settings for which program change number is assigned to which
[SELECT] button are grouped in a table known as the program
change transmit table, which you can access to assign a program
change number (between 1 and 128, or Off) to each of the
[SELECT] buttons according to Play mode.
You can also select a bank number combining the MSB (Most
Significant Byte) and LSB (Least Significant Byte). This makes it
possible to select any program on a MIDI device that has more than
128 programs.
● SELECT ASSIGN (V01~V12, A01~A12, B01~B12)
These parameters let you access each [SELECT] button, with
V01 ~ V12 representing the Voice Play mode [VOICE SELECT]
buttons, and A01 ~ A12 representing the Performance Play
mode A bank [PERFORMANCE SELECT] buttons, and B01 ~
B12 representing the Performance Play mode B bank
[PERFORMANCE SELECT] buttons. As you step through each
one, the name will appear in the first line of the screen, and the
current assignments will appear in the second line.
You can choose a specific Voice button number by holding [VOICE] and
pressing the desired [VOICE SELECT] button. You can choose a specific
Performance A bank button number by holding [PERF. A] and pressing
the desired [PERFORMANCE SELECT] button. You can choose a
specific Performance B bank button number by holding [PERF. B] and
pressing the desired [PERFORMANCE SELECT] button.
46
EDIT MODE
■ MIDI Filter
The MIDI Filter function lets you select the various types of
MIDI data which will be transmitted or received. (Note: The
abbreviation “TX” stands for “Transmit” and the abbreviation
“RX” stands for “Receive”.) Position the cursor over the
Message type or on/off status using the [1] and [q] buttons.
TRANSMIT FILTER
The Transmit Filter settings let you determine which types of
MIDI messages are transmitted from the P-150.
● MESSAGE TYPES
Message types inculude Note On/Off, Control Change, Program
Change, Aftertouch, Pitch Bend, Channel Mode Message,
Parameter Change and Bulk and FA/FB/FC. (Select the
message types with the [-1/NO] and [+1/YES] buttons.)
● ON, OFF
Setting the message type to On status will filter this particular
data, and therefore it will not be transmitted via the [MIDI OUT]
terminal. Setting the message type to Off status will allow the
particular data to be transmitted.
The default setting for Parameter Change is set to On; all others are set
to Off. When controlling external devices such as a tone generator,
Exclusive and Bulk should be set to On. When you record your P-150
Performance to an external sequencer and play it back, Exclusive and
Bulk should be set to Off.
RECEIVE FILTER
The MIDI Receive Filter settings let you determine which
types of incoming MIDI messages are received. When set to
On, the specific data can be protected.
● MESSAGE TYPES
Message types include Note On/Off, Control Change, Program
Change, Pitch Bend, Channel Mode Message, Parameter
Change and Bulk. (Select the message types with [-1/NO] and
[+1/YES] buttons.)
● ON, OFF
Setting the message type to On status will filter this particular
data, and therefore it will not be received at the [MIDI IN]
terminal. Setting the message type to Off status will allow the
particular data to be received.
TX FILTER 1
note on/off=off
Message type
RX FILTER 1
note on/off=off
Message type
PC TX 1
V01=(OFF/OFF) 1
Select assign
Page 51

● MSB/LSB (Off, 0 ~ 127)
This parameter lets you designate the MSB/LSB bank select
number. When set to Off (default), the P-150 will not transmit the
bank select number.
Pressing the [1/NO] button lets you select Off for MSB/LSB and Program
Change Number. When Off is selected for MSB, LSB will also switch off,
and vice-versa.
Bank Select (PC Table)
BANK PROGRAM MSB LSB
Bank 1 1 ~ 128 1 1
Bank 2 1 ~ 128 1 2
Bank 3 1 ~ 128 1 3
Bank 4 1 ~ 128 1 4
““““
““““
● PROGRAM CHANGE NUMBER (Off, 1 ~ 128)
This parameter lets you designate the program change number
for the currently accessed [SELECT] button. When set to Off, no
program change numbers will be transmitted.
PROGRAM CHANGE RECEIVE
The Program Change Receive function lets you assign
program change receive numbers to the internal voices and
Performances, according to the [SELECT] buttons.
The P-150 can receive a program change message from an
external MIDI device, in order to select any of the 12 voices
or 24 Performances.
At the factory your P-150 was preset so that each [SELECT]
button will receive the program change number message
corresponding to the number above the button in Voice
mode (1 ~ 12), followed by subsequent numbers in
Performance mode, for A and B banks (13 ~ 36).
Therefore, when the P-150 is in Voice mode, when an
external controller connected to the P-150 sends a program
change number 1 message, the PIANO 1 voice will be
selected; if it sends a program change number 2 message,
the PIANO 2 voice will be selected, and so on. If it sends a
program change number 13 message, Performance A01 will
be selected; if it sends a program change number 25
message, Performance B01 will be selected, and so on.
Whenever the P-150 receives a program change message, it
will check the program change receive table to determine
whether a voice or Performance has been assigned to the
Received program change number. If so, the main voice will
automatically switch to the voice indicated by the program
change receive table. (If the P-150 is in Dual mode, this will
cause it to shift to Single mode.) If the program change
function has been turned off for that number the message
will simply be ignored.
●
PROGRAM CHANGE NUMBER (1~128)
This parameter lets you designate a program change receive
number. As you step through each one, the SELECT
assignment will appear to the right.
● SELECT ASSIGN
(V01~V12, A01~A12, B01~B12, Off)
This parameter lets you assign which [SELECT] button to assign
to the currently designated Program Change Number.
You can choose a specific Voice button number by holding [VOICE] and
pressing the desired [VOICE SELECT] button. You can choose a specific
Performance A bank button number by holding [PERF. A] and pressing
the desired [PERFORMANCE SELECT] button. You can choose a
specific Performance B bank button number by holding [PERF. B] and
pressing the desired [PERFORMANCE SELECT] button.
Pressing the [1/NO] button lets you select Off for Program Change
Number and Select Assign.
■ Channel
The Channel function lets you assign the P-150’s MIDI
transmit and receive channel numbers or status.
When connecting the P-150 to an external MIDI device, such
as a multitimbral tone generator or synthesizer, you will need
to set the P-150’s transmit channel to the same number as
the external device’s receive channel, in order to play the
external instrument with the P-150’s keyboard. Likewise, you
will need to set the P-150’s receive channel to the same
number as an external keyboard’s transmit channel in order
to play the P-150’s internal voices from an external
keyboard. (For more information, see Using MIDI, page 57.)
PC RX 2
1=V01
Program Change number
CHANNEL TRNS 1
TX= 1 RX= 1
PC TX BankMSB 1
V01=( 1/ 1) 1
LSB numberMSB number
PC TX 2
V01=( 1/ 1) 1
Program Change number
PC RX 2
1=V01
Select Assign
47
EDIT MODE
Page 52

48
EDIT MODE
● TRANSMIT CHANNEL (Off, 1 ~ 16)
The P-150 can be set to transmit MIDI messages on any one of
16 MIDI channels. When set to Off the P-150 will not transmit
MIDI messages.
● RECEIVE CHANNEL (Off, 1 ~ 16, All)
The P-150 can be set to receive MIDI messages on any one of
16 MIDI channels. When set to Off, all incoming MIDI messages
will be ignored. When set to All, MIDI messages can be received
on all 16 channels at once. In Dual and Single modes, all
channel messages will be transmitted via the channel specified
here. In Split mode, the main voice will be transmitted via the
channel specified here and the sub voice will be transmitted via
the next highest channel number than the main voice.
When you set the transmit channel to Off, the MIDI transmit button will be
disabled for the currently selected Performance.
If you select Sys for MIDI CHANNEL in the Performance Enable function
(System menu), the MIDI transmit/receive channel you have previously
set for the currently selected Performance may actually be different, since
the current setting (System setting) in the Voice Play mode will be active.
You can change the System setting, and you can easily find which setting
(Sys or Perf) is selected in the Performance Enable function, as the letter
P will display to the left of the page number if Perf is selected.
■ Local
The Local control function lets you disconnect the P-150’s
keyboard from its internal tone generator.
It is usually turned on so the internal voices will sound when
you play the keyboard. When turned off, the internal tone
generator will not respond to the notes you play, but the
keyboard will still transmit messages via the [MIDI OUT]
terminal, and the internal tone generator will respond to
messages received at the [MIDI IN] terminal if the transmit
channels or receive channels are appropriately set. This is
essential when using the P-150 as a master keyboard
controller in an expanded MIDI system.
● LOCAL (On, Off)
When set to On, the internal tone generator will respond to notes
you play on the P-150’s keyboard. When set to Off, the internal
tone generator will not respond to notes you play on the P-150’s
keyboard.
If you select Sys for LOCAL in the Performance Enable function (System
menu), the Local On/Off setting you have designated previously for the
currently selected Performance may actually be different, since the
current setting (System setting) in the Voice Play mode will be active. You
can change the System setting, and you can easily find which setting
(Sys or Perf) is selected in the Performance Enable function, as the letter
P will display to the left of the page number if Perf is selected.
■ Continuous Slider (CS) /
Foot Controller (FC)
This function lets you assign a function and range to the [CS]
and [FC] assignable continuous controllers, for realtime
control during performance of the P-150 and/or an external
MIDI device.
Once you assign a function to the [CS], the function will be
controlled by the [CS] slider on the panel. Once you assign a
function to the [FC], the function will be controlled by the
Foot Controller, if it is properly connected to the [FOOT
CONTROLLER] jack on the rear panel. The Yamaha FC-7
Foot Controller (continuous type) and FC4/FC5 Footswitch
(on/off; discrete type) are optionally available.
For example, you can have the [CS] (or [FC]) control the
total volume, main or sub voice volume, or control the reverb
depth or modulation speed, or transmit aftertouch messages
to tone generators capable of receiving them, or send a
particular type of control change message to external MIDI
devices. The types of functions which can be assigned, and
a brief explanation of each, are shown in the following chart.
LOCAL 1
on
CHANNEL TRNS %1p
TX= 1 RX= 1
CS ASSIGN 1
main volume:007
Page 53

INTERNAL CONTROL
Off No function assigned
Reverb Depth Controls the reverb depth level
Mod. Speed Controls the modulation speed level
Total Volume Controls the P-150’s overall volume
Main Volume Controls the main voice volume
Sub Volume Controls the sub voice volume
MIDI CONTROL CHANGE MESSAGES
Modulation 001 Sends a modulation message
Breath Control 002 Sends a breath control message
Foot Control 004 Sends a foot control message
Porta. Time 005 Sends a portamento time message
Data Entry 006 Sends a data entry message
Volume 007 Sends a volume message
Balance Control 008 Sends a balance control message
Panpot 010 Sends a stereo panning message
Expression 011
Sends a volume expression message
Sustain 064 Sends a sustain message
Portamento Sw 065
Sends a portamento switch message
Sostenuto 066 Sends a sostenuto message
Soft Pedal 067 Sends a soft pedal message
Legato Foot 068 Sends a legato foot message
Hold 2 069 Sends a hold 2 message (such as
“freezing” the operation of a
synthesizer’s envelope until the
Footswitch is released)
Harm. Content 071
Sends a harmonic content message
Release Time 072 Sends a release time message
Attack Time 073 Sends an attack time message
Brightness 074 Sends a brightness message
Eff. 1 Depth 091 Sends an effect 1 depth message
Eff. 2 Depth 092 Sends an effect 2 depth message
Eff. 3 Depth 093 Sends an effect 3 depth message
Eff. 4 Depth 094 Sends an effect 4 depth message
Eff. 5 Depth 095 Sends an effect 5 depth message
Inc. Sw 096
Sends an increment switch message
Dec. Sw 097
Sends a decrement switch message
NRPN LSB 098 Sends a Non Registered
Parameter number LSB bank
select message
NRPN MSB 099 Sends a Non Registered
Parameter number MSB bank
select message
RPN LSB 100 Sends a Registered Parameter
Number LSB bank select message
RPN MSB 101 Sends a Registered Parameter
Number MSB bank select
message
Aftertouch Sends a channel aftertouch message
● CONTINUOUS SLIDER ASSIGN (see chart)
For assigning a specific function to the CS. (Default is main
volume.)
● CONTINUOUS SLIDER RANGE MINIMUM (1~128)
/ MAXIMUM (1~128)
The values set here determine the minimum and maximum
volume range when you move the [CS] slider. (You cannot set
the minimum number to exceed the maximum number.)
● FOOT CONTROLLER ASSIGN (see chart)
For assigning a specific function to the foot controller (FC).
(Default is sub volume.)
● FOOT CONTROLLER RANGE MINIMUM
(1~128) / MAXIMUM (1~128)
The values set here determine the minimum and maximum
volume range when you press the [FC] controller. (You cannot
set the minimum number to exceed the maximum number.)
If you select Sys for CONTROL in the Performance Enable function
(System menu), the controller assignment you have previously set for the
currently selected Performance may actually be different, since the
current setting (System setting) in the Voice Play mode will be active. You
can change the System setting, and you can easily find which setting
(Sys or Perf) is selected in the Performance Enable function, as the letter
P will display to the left of the page number if Perf is selected.
The actual range (1 ~ 128) may actually be different depending on the
selected function type. If the maximum range of the selected function is
less than 128, the available range will be recognized and divided equally
into 128 units, and the setting for Min/Max will be executed.
CS RANGE MIN 2
1#128
FC ASSIGN 3
total volume
FC RANGE MIN 4
1#128
CS ASSIGN 1
main volume:007
49
EDIT MODE
Page 54

■ Panel Switch (PS)
The Panel Switch function lets you assign a function to each
of the two Panel Switches for realtime control of an external
MIDI sequencer.
This gives you the flexibility to send Start, Stop or Continue
commands to external devices like sequencers and rhythm
programmers from the P-150’s panel, i.e., you can start and
stop the external device simply by pressing the [PS]
switches.
● PS1 ASSIGN (Off, Start, Continue, Stop)
When set to Off, the [PS1] will have no specific Play function. When set to
Start, Continue or Stop, you can control an external MIDI device by
pressing [PS1]. (The default setting for [PS1] is Start.)
● PS2 ASSIGN
Same as for PS1 ASSIGN, above. (The default setting for [PS2] is Stop.)
If you select Sys for CONTROL in the Performance Enable function
(System menu), the Panel Switch assignment you have previously set for
the currently selected Performance may actually be different, since the
current setting (System setting) in the Voice Play mode will be active. You
can change the System setting, and you can easily find which setting
(Sys or Perf) is selected in the Performance Enable function, as the letter
P will display to the left of the page number if Perf is selected.
■ Name
The Name function lets you input a name (up to 16
characters in length) for your Performances.
● PERFORMANCE NAME
The available characters include upper and lower case Roman letters,
numbers 0 ~ 9, a space and various symbols. Position the cursor with the
[1]/[q] buttons and choose the desired character with the [1/NO]/[+1/YES]
buttons or the [DATA ENTRY] slider.
, ! , " , # , $ , % , & , ' , ( , ) ,
* , + , , , - , . , / , 0 ~ 9 ,
: , ; , < , = , > , ? , @ , A ~ Z ,
[ , , ] , ^ , _, ` , a ~ z
{ , | , } , › , ‹
(Space)
50
EDIT MODE
■ Organ Combination
The Organ Combination function lets you freely edit the
Organ 1 voice. This feature gives you considerable control
over the timbre and characteristics of the organ sound, so
that the range of possibilities are practically limitless.
With this feature you can literally recreate all of the classic
organ sounds, from theatre organ to rock and jazz organ, by
adjusting the flute footage levels and the attack settings, just
like on conventional organs.
To edit the organ sound, you must first select the Organ1
voice before entering Edit mode. Otherwise the CANNOT
EDIT message will display when you select the Organ 1
Combination function in Edit mode. (If this happens, simply
exit Edit mode, select the Organ 1 voice, and then reenter
Edit mode.)
● FOOTAGE (16’, 8’, 5-1/3’, 4’, 2-2/3’, 2’, 1-1/3’, 1’)
There are eight flute footages. The larger footages generate the
bass characteristics of the sound, the smaller footages generate
the treble characteristics of the sound, and those footages in
between generate the mid-range characteristics of the sound.
You can adjust the volume level of each flute footage between 0
(no volume) and 7 (maximum volume).
When only the lowest or highest footage is activated, some notes which
exceeds the legal range will not produce any sound.
● RESPONSE, ATTACK (4’, 2-2/3’, 2’, Length, Mode)
The left-most parameter, RSP (Response) determines how fast
the overall organ combination (footages in page 1) volume
reaches maximum level, between a range of 0 (fastest) and 7
(slowest). There are three Attack footages which determine the
character of the percussive portion of the organ voice. You can
adjust the volume level of each Attack footage between 0 (no
volume) and 7 (maximum volume).
PS1 ASSIGN 1
start:FA
PERF.NAME 1
PERFORMANCE<***>
COMBI. 16'=7 1
■ ■ ■ ■ ■ ■ ■ ■
16' 8' 5-1/3' 4' 2-2/3' 2' 1-1/3' 1'
COMBI. RESP.=7 2
RSP ■ ■ ■ ■ ■ E
Response
PS2 ASSIGN 2
stop:FC
COMBI. LENG.=3 2
ATK ■ ■ ■ ■ ■ E
Attack Length
COMBI. 4'=7 2
ATK ■ ■ ■ ■ ■ E
4' 2-2/3' 2'
Attack Footages
Page 55

The right-most parameter, Attack mode, determines which notes
in a held cluster of notes are given an attack sound. With the
(first) setting, only the first note played will have an attack; all
other notes played while the first note is held will have no attack.
With the [E] (Each) setting, all notes played will have an attack sound.
■ Pitch Bend (PB)/Modulation
Wheel (MW)
This function lets you set the maximum range that the pitch
will bend when you use the [PITCH] wheel, as well as
determine the type of effect assigned to the [MODULATION]
wheel.
● PITCH BEND RANGE (0 ~ 12)
You can set the pitch to bend up or down for each voice within one
octave, where 0 represents no pitch bend, and 12 represents one octave.
(The default for each voice is set to 2.) Each unit is one semitone.
Moving the [PITCH] wheel to its extreme position while playing the lowest
or highest note on the keyboard may exceed the P-150’s legal range (A-1
~ C7). In such a case, the P-150 will play and repeat the one octave
higher or lower range. (This also occurs if the Transpose setting causes
the pitch bend to exceed the legal range.)
● MODULATION WHEEL ASSIGN (Off, Reverb
Depth, Modulation Speed, Vibrato)
You can assign one of three effects for each voice to the
[MODULATION] wheel, or turn the effect off.
The vibrato effect is internally set and cannot be modified. Note that trying
to apply the vibrato effect to the Piano 1 ~ 4 voices will have no effect.
■ Keyboard Sensitivity
The Keyboard Sensitivity function lets you control how the
volume of the internal voices and connected MIDI
instruments respond to your playing.
The P-150 lets you designate independent Keyboard
Sensitivity settings for the internal tone generator (each
voice) and external MIDI devices, as well as the minimum
and maximum range of the keyboard volume.
● KEYBOARD SENSITIVITY INTERNAL (Normal,
Soft-1~3, Hard-1~3, Fixed-1~3)
This setting determines how the P-150’s keyboard affects the
internal voices. There are ten different types of sensitivity
settings. (For details, see Velocity Curves, below.)
● KEYBOARD SENSITIVITY MIDI (Normal, Soft-1~3,
Hard-1~3, Fixed-1~3)
This setting determines how the P-150’s keyboard affects
external MIDI devices, such as a tone generator. There are ten
different types of sensitivity settings. (For details, see Velocity
Curves, next page.)
● KEYBOARD RANGE (Minimum, Maximum)
The values set here determine the minimum and maximum
volume range of the keyboard, between 1 and 128. (You cannot
set the minimum number to exceed the maximum number.)
When both minimum and maximum are set to 1, no sound will be
produced.
MW ASSIGN 2
vibrato
PB RANGE 1
2
KBD SENS.INT. 1
normal/
KBD SENS.MIDI 2
normal/
KBD RANGE MIN 3
1-128
51
EDIT MODE
COMBI. FIRST 3
ATK ■ ■ ■ ■ ■ E
Attack Mode
Page 56

Velocity Curves
The P-150 has 10 different types of sensitivity settings for
both internal voices and external MIDI instruments,
organized in four categories: Normal, Soft-1~3, Hard-1~3,
and Fixed-1~3.
These give you wide and flexible control over how the
strength of your playing affects the volume of the internal
voices and external MIDI instruments.
❏ NORMAL
The P-150’s Normal setting represents the standard linear “velocityto-volume” relationship.
On a conventional acoustic instrument such as an acoustic piano,
the harder you play, the louder the resulting sound. Generally, this
velocity-to-volume relationship is linear, i.e., the sound becomes
louder in direct proportion to the strength with which you play, as
shown in the following graph.
❏ Soft-1, Soft-2, Soft-3
The Soft curves are designed to increase the level of the
sound with a softer playing style.
❏ Hard-1, Hard-2, Hard-3
The Hard curves are designed to increase the level of the
sound with a stronger playing style.
❏ Fixed-1, Fixed-2, Fixed-3
The Fixed curves create flat velocity response. The volume
of the sound remains the same, no matter how softly or
strongly the keys are played.
■ Internal Equalizer
The Internal Equalizer function lets you adjust the volume of
the low, middle and high EQ ranges for the currently
selected internal voice.
● EQ (Low, Mid, High)
You can boost (increase) or cut (decrease) the volume of each
range independently, with -16 representing maximum volume
cut, 16 representing maximum volume boost, and 0 representing
normal volume. (The default for each voice is 0.)
■ Reverb
When the P-150 is in Edit mode, pressing [REVERB]
accesses the Reverb Type and Depth settings for the
currently selected voice.
● REVERB TYPE (Room, Stage, Hall, Off)
You can select one of the three reverb types for the currently
selected voice or turn the reverb off.
● DEPTH (0 ~ 7)
You can set the reverb depth value between 0 (no effect) and 7
(maximum effect).
You can also access the Reverb Type and Depth parameters in Voice
Play mode (see page 22).
■ Modulation
When the P-150 is in Edit mode, pressing [MODULATION]
accesses the Modulation Type and Speed settings for the
currently selected voice.
● MODULATION TYPE (Chorus, Symphonic,
Tremolo, Off)
You can select one of the three modulation types for the
currently selected voice or turn the modulation off.
● SPEED (0 ~ 7)
You can set the modulation speed value between 0 (no effect)
and 7 (maximum effect).
You can also access the Modulation Type and Speed parameters in
Voice Play mode (see page 23).
52
EDIT MODE
EQ LOW= 0 1
REVERB TYPE 1
T=room D=4
Reverb type Depth
MOD. TYPE 1
T=tremolo S=2
Modulation type Speed
Volume
Max.
Min.
Soft Hard
Velocity
(playing strength)
KBD SENS.INT %
soft-2e
KBD SENS.INT 1
hard-1h
KBD SENS.INT 1
fixed-1i
Page 57

53
STORE
OVERWRITING IN PLAY MODE
1.
In Voice Play mode, press the [STORE]
button. The LED above the [STORE] button starts
blinking. The following screen appears.
2.
Press [+1/YES] if you want to overwrite the
current Voice and Performance parameter
settings. (Press [–1/NO] if you want to
cancel the store operation and return to the
previous mode.) The STORE
COMPLETED screen briefly appears to confirm the
store operation.
STORING A PERFORMANCE
1.
In either Voice Play mode or Performance
Play mode, press the [STORE] button.
The LED above the [STORE] button starts blinking.
The following screen appears.
STORE
-1/NO +1/YES
PS1 PS2
STORE? (YES/NO)
Voices -› Voices
** STORE **
** COMPLETED **
STORE? (YES/NO)
A01 -› A01
When Auto Store is designated all parameter changes are
stored automatically as you make them. Thus, you can jump
back and forth between voices and Voice and Performance
modes freely as you play, since all settings will remain as
you set them. In this case, necessary storing is literally a
matter of copying one Performance to a specific
Performance bank and number.
When Non Auto Store is designated, in general the changes
you make to voices such as reverb and modulation settings
will be lost as soon as you change voices, Performances or
modes. After making changes in Edit mode, however, the P150 will prompt you and give you the opportunity to overwrite
the current edit when you try to leave Edit mode.
You will find it most convenient to set up your Performances
in Voice Play mode, Auto Store status, since voice selection
is so simple, then copy it to one of the 24 Performance
memories for instant recall when you need it.
By switching into Non Auto Store status, you can be sure
that your Performances are protected, and any changes you
make in one will not be applied unless you specifically store
it.
For details about changing the Store status, see page 11.
Note that there is a fine distinction between Voice Play mode
store and Performance Play mode store functions. In Voice
Play mode, you can overwrite the current set of Voice and
Performance parameter settings. In Performance Play mode,
you can select a specific destination Performance in which to
make a duplicate, or copy the current Performance
parameter settings. Therefore, if you select a destination
Performance in which to store the current Voice Play mode
Performance parameter settings, you are storing it in the
Performance Play mode.
Regardless of the Auto Store/Non Auto Store status, the parameter
changes made in the System, MIDI Filter and PC Table functions are
always stored automatically.
Page 58

54
STORE
2.
To overwrite the current Performance:
Press [+1/YES]. (Press [–1/NO] if you want to
cancel the store operation and return to the
previous mode.) This effectively stores the
changes you have made in Edit mode (except for
changes made in the overall System settings in the
System, MIDI Filter and PC Table functions, which are
stored automatically) in the current Performance
location, and thus will be retained the next time you
enter Performance Play mode.
3.
To copy the current Performance into
another Performance location: First press
[PERF. A] or [PERF. B] to designate the
destination Performance bank, then press
the desired [PERFORMANCE SELECT]
button to designate the Performance
number. (You can also designate the
destination Performance bank and number
by moving the [DATA ENTRY] slider.)
The name of the Performance bank and number
appears in the screen.
4.
Press [+1/YES] to store the current
Performance into the designated
Performance bank and number. (Press
[–1/NO] if you want to cancel the store
operation and return to the previous mode.)
The STORE COMPLETED screen briefly appears to
confirm the store operation.
SYSTEM MIDI FILTER PC TABLE CHANNEL LOCAL CS FC PS NAME ORGAN
COMBINATION
PB MW KBD SENS. INT.EQ
PIANO 1
123456789101112
PIANO 2 PIANO 3 PIANO 4 E.PIANO 1 E.PIANO 2 E.PIANO 3 VIBES ORGAN1 ORGAN2 STRINGS BASS
or
PERF.A
PERF.B
PERF.A
STORE? (YES/NO)
A01 -› B10
Page 59

55
APPENDIX
■ Bulk Dump
The Bulk Dump feature lets you offload parameter settings
by sending it to an external MIDI data storage device (such
as the Yamaha MDF2 MIDI Data Filer), as well as load it
back into the P-150 by receiving it from an external storage
device.
This gives you the luxury of being able to build a library of P150 settings by storing them on floppy disks.
The P-150 can send and receive four types of data in bulk:
All data (the P-150’s entire settings); Voice data (Voice
settings only); Performance Bank A data (Performance
settings for the A bank only); and Performance Bank B data
(Performance settings for the B bank only).
Send Bulk Data
A send bulk data operation must be initiated from the P-150.
First, however, make sure the P-150’s MIDI Merge function
is off (see page 44).
Next, match the device number of the P-150 (see page 44)
with the external storage device by assigning the same
device number to each. Then, set the external device so that
it is standing by waiting for a bulk dump receive message.
(For details about how to set the device number and bulk
receive standby for the external device, consult the external
device’s owner’s manual.)
SENDING BULK DATA
1.
Voice Data: Hold the [MIDI] button and
press the [VOICE] button.
2.
Performance Bank A Data: Hold the [MIDI]
button and press the [PERF. A] button.
3.
Performance Bank B Data: Hold the [MIDI]
button and press the [PERF. B] button.
4.
All Data: Hold the [MIDI] button and press
the [PIANO 1 SELECT] button.
The BULK SEND screen appears while the operation
is in progress.
When the operation is finished, the BULK SEND
COMPLETED screen briefly appears.
To cancel the operation while it is still in progress,
press the [–1/NO] button. The BULK SEND EXIT
screen briefly appears.
The send bulk data operation cannot be executed when the MIDI
Transmit Filter (bulk) is set to On, or the device number is set to Off.
Bulk Data Receive
Bulk data receive operations must be initiated from the
external device. First, however, make sure the P-150’s MIDI
Receive Filter (bulk) function is off (see page 46). Next,
make sure the device numbers of both devices are set to the
same number (see page 44).
Once you have made these preliminary preparations, exit the
Edit mode and return to the Voice Play or Performance Play
mode. Now you’re ready to send data to the P-150 using the
external device’s send bulk data operation. The P-150 will
automatically accept the data. (For details about setting the
device number of the external device and initiating a send
bulk data operation, see the external device’s owner’s
manual.)
MIDI
VOICE
SYSTEM
PIANO 1
1
+
PERF.B
PERF.A
MIDI
VOICE
SYSTEM
PIANO 1
1
+
PERF.B
PERF.A
MIDI
VOICE
SYSTEM
PIANO 1
1
+
PERF.B
PERF.A
BULK SEND
Voices
** BULK SEND **
** COMPLETED **
** BULK SEND **
** EXIT **
MIDI
VOICE
SYSTEM
PIANO 1
1
+
PERF.B
PERF.A
Page 60

56
APPENDIX
■ Initialize
The Initialize feature lets you restore the initial factory default
settings with a quick and simple operation.
Before initializing the settings, make sure to first offload any
data that you want to save using the Bulk Dump operation.
Otherwise, the Voice and Performance data you have
created will be lost permanently.
INITIALIZING THE DEFAULT SETTINGS
1.
Press the [POWER] switch to turn off the
power.
2.
To initialize all the default settings, hold
both the [MIDI] and [EDIT] buttons, then
press the [POWER] switch to turn on the
power.
The INITIALIZE ALL screen briefly appears.
PERFORMANCE A (or B) BANK: You can also
initialize only the Performance A bank (or B bank)
default settings. To do so, first turn the power off, then
hold both the [MIDI] and [PERF. A] (or [PERF. B])
buttons and turn the power back on.
VOICE SETTINGS: Similarly, you can initialize only
the Voice parameter default settings. To do so, first
turn the power off, then hold both the [MIDI] and
[VOICE] buttons and turn the power back on.
Factory Default Settings
The default settings are shown in Factory Default Settings
lists on pages 64, 65 and 66.
** INITIALIZE **
** All **
** INITIALIZE **
** Perf.A **
** INITIALIZE **
** Voices **
ON/ OFF
POWER
MIDI EDIT
++
ON/ OFF
POWER
MIDI VOICE
++
ON/ OFF
POWER
MIDI
++
PERF A
Page 61

57
APPENDIX
System messages also come in a number of varieties.
SYSTEM REALTIME messages are used to start, stop and
synchronize the sequencing devices in a MIDI system.
SYSTEM EXCLUSIVE messages allows for the transmission
of data specific to individual devices. This data can be either
individual parameter settings, which are transmitted as
PARAMETER CHANGE messages, or large blocks of
settings, which are usually referred to as BULK DUMPS.
When using the P-150’s MIDI functions, you will be mainly
concerned with channel voice messages and system
exclusive messages. For detailed information about other
types of messages the P-150 supports, and how their
corresponding functions are implemented, refer to the MIDI
Data Format and MIDI Implementation Chart sections.
■ Using MIDI
MIDI is an acronym that stands for Musical Instrument Digital
Interface, an international standard in use since the 1980s
for the purpose of allowing electronic musical instruments—
such as synthesizers, tone generators, rhythm programmers,
digital keyboards like the P150, and others—to
“communicate” with each other by sending and receiving
compatible note, controller and other MIDI data.
With MIDI, instruments made by different manufacturers can
easily be connected to each other using special MIDI cables,
and configured to work together in a variety of ways that
greatly expands your music composing, performing and even
learning capabilities.
Following is an outline of the basic concepts about MIDI
you’ll need to know to get up and running in short order. Also
included are a few examples of MIDI system connections.
MIDI Channels
The MIDI standard provides 16 different channels for the
transmission of data between musical instruments. A MIDI
KEYBOARD is capable of transmitting data on at least one
of these channels. Sequencers and MIDI-equipped
computers with music sequencing software (both of which
are generally capable of recording, editing and playing back
MIDI note, controller and other data) usually transmit data on
several channels at once, each channel being designated for
a different part of an ensemble performance. For example, a
Piano part might be assigned to channel 1, a bass part to
channel 2, a horn part to channel 3, and so on.
MIDI devices known as TONE GENERATORS, which are
literally synthesizers without a keyboard, can receive MIDI
data from keyboards, sequencers, or computers and
produce sounds in response. MULTITIMBRAL tone
generators can play more than one voice at a time, since
they can receive data on more than one channel at a time.
MIDI Messages
Data which is transmitted between MIDI devices takes the
form of MIDI messages. There are various types of
messages. Messages most closely associated with the
actual performance of music are called CHANNEL VOICE
messages; these include NOTE ON and NOTE OFF
messages, which tell a tone generator which notes to play,
and when to start and stop playing them. CONTROL
CHANGE, PITCH BEND, and AFTERTOUCH or key
pressure messages indicate how a keyboard’s control
functions are being operated. PROGRAM CHANGE
messages tell a tone generator to switch to another voice.
Channel voice messages are transmitted on a specific
channel which will be received by the tone generator for
which they are intended. They are different from SYSTEM
messages, which are transmitted on all channels and
received by all of the devices in a MIDI system.
Channel
Messages
System
Messages
VOICE
MODE
Note On/Off, Control Change,
Program Change, Pitch Bend,
Channel Pressure*
All Note Off
REALTIME
Start*/Stop*/Continue*,
Active Sensing
End of Exclusive (F7)COMMON
EXCLUSIVE System Exclusive (F0)
*Transmit only.
Page 62

58
APPENDIX
MIDI Terminals
MIDI devices transmit messages to each other via special
MIDI cables, which are connected to special MIDI terminals
on each device. There are three types of MIDI terminals: IN,
OUT, and THRU.
Not all MIDI devices have three MIDI terminals, but most,
including the P-150, do. A device with all three terminals will
receive incoming data via its MIDI IN terminal, and output its
own data via the MIDI OUT terminal. The MIDI THRU
terminal merely echoes, or passes, the data received at the
MIDI IN terminal unaffected. This allows a device to be
connected in the middle of a series (or “daisy chain”) of
instruments, so that the third instrument in the chain will
receive the data transmitted by the first instrument rather
than that transmitted by the second.
Some MIDI instruments, such as the P-150, have a MIDI
merge feature which essentially combines the functions of
the MIDI OUT and MIDI THRU terminals. For example, when
the P-150’s MIDI merge function is turned on, the MIDI OUT
terminal will output a combination of the P-150’s own data
plus the messages it receives via its MIDI IN terminal. An
instrument receiving this merged data will be controlled by
both the P-150 and the device connected to the P-150’s
MIDI IN terminal.
MIDI System Connections
One of the simplest MIDI setups is to connect the P-150 to
one or more tone generators (such as the Yamaha MU80),
as shown in the following example.
In this case, you can select the voices of both external tone
generators directly from the P-150’s panel. In Single or Dual
mode, the notes you play on the P-150’s keyboard will play
designated voices in the external tone generators, so long as
their MIDI receive channels are assigned to the same
number as the P-150’s MIDI transmit channel number. In
Split mode, the P-150 can transmit on two MIDI channels at
the same time (one for the main and one for the sub voice),
so you can set one tone generator to respond to only the
main voice notes and the other tone generator to respond
only to the sub voice notes. You can also take advantage of
the P-150’s ability to have independent transpose and
keyboard sensitivity settings for its internal tone generator
and MIDI transmit note messages.
P-150 MIDI Controllers
The P-150’s MIDI controllers include the two [PS] buttons,
the [CS] slider, [PITCH] and [MODULATION] wheels and
[FC] Footswitch. You can set the controllers to transmit
specific control messages, and assign the external tone
generators to respond accordingly. The [PITCH] wheel is
dedicated to pitch bend and cannot be assigned otherwise.
Connecting a Sequencer
Another simple MIDI setup is to connect the P-150 to a
sequencer, as shown in the following example.
In this case, the sequencer is used to record the note,
program change, controller, etc. data as you play the P-150,
and then play it back using the P-150’s internal voices. You
can start and stop the sequencer using the P-150’s [PS]
buttons (see page 50). Some sequencers have extensive
note and other data editing features. The setup shown above
will also work for bulk data storage operations (see page 55).
Use a sequencer or a special MIDI data storage device
(such as the Yamaha MDF2 MIDI Data Filer) to save data
from and restore data to the P-150.
MIDI OUT
MIDI IN
MIDI IN
P150
MU80(A)
MIDI THRU
MU80(B)
(For recording)
MIDI IN
MIDI OUT
MIDI IN MIDI OUT
(For playback)
Sequencer (QY300)
P150
Page 63

59
APPENDIX
Besides eliminating the possibility of MIDI delays, a MIDI
patch bay is essential in a larger setup where you frequently
need to perform bulk dump and other operations with
specific devices, and don’t want to waste time plugging and
unplugging cables accordingly. A MIDI patch bay lets you
instantly reconfigure the way all MIDI cables are connected
for a given application.
MIDI
THRU 2
MIDI
IN 2
MIDI
OUT
MIDI
OUT
MIDI
IN
MIDI
THRU 3
MIDI
IN
MIDI
THRU 4
MIDI
IN
MIDI
THRU 5
MIDI
IN
MIDI
THRU 6
MIDI
IN
MIDI
IN
MIDI
IN 1
MIDI
THRU 1
P150
SPX-990
MU80(A)
MU80(C)
MU80(B)
QY300
MJC 8 MIDI Patch Bay
A more sophisticated MIDI setup is required if you want to
connect a sequencer, several tone generators and perhaps
an effects device. The series, or “daisy chaining” method is
shown in the following illustration.
In this case, the sequencer is used to record the note,
program change, controller, etc. data as you play the P-150,
and then play it back using the voices in the external tone
generators, as well as the P-150’s internal voices.
Multitimbral tone generators (such as the Yamaha MU80)
can play more than one voice at a time, so you can configure
them for layering several voices by assigning the same MIDI
channel to more than one voice, or build up a complex
ensemble by assigning a different MIDI channel to each
voice that makes up a part in your composition.
You can send program change messages directly to the
external tone generators and the effects device (such as the
SPX-990) from the P-150, or record these messages in the
sequencer at specific locations in the song, so that voices
and effects will change “on cue” during sequencer
playback—thus giving you enormous music production
power. Note that since you would be recording each music
part using a different voice, you would need to set the P150’s keyboard Local feature to Off status (see page 48).
Be aware that the longer your daisy chain becomes (and
also depending on how long your MIDI cables are), the
higher the chances that a noticeable “MIDI delay” will occur
during play, caused by the time it takes for the MIDI data to
reach each device. To avoid such a potentially annoying
problem, you can use a MIDI patch bay (such as the
Yamaha MJC 8), which is equipped with multiple MIDI IN
and MIDI THRU terminals, as shown in the following
illustration.
MIDI IN
MIDI
IN
MIDI
IN
MIDI IN
MIDI OUT
MIDI
THRU
MIDI THRU
P150
QY300
MU80(A) MU80(B)
SPX-990
Page 64

■ Error Messages
Occasionally you may encounter certain error messages which appear in the LCD screen. Below is a list with descriptions of
each.
The internal backup battery charge is low and the battery should be replaced. (See page 2.)
Too much MIDI data is being received at once. Reception of data is interrupted and cannot be
continued. Reduce the amount of data and attempt the operation again.
An error occurred during reception of MIDI data. Check all MIDI connections, settings, etc., and
attempt the operation again.
An error occurred during reception of bulk data. Check all MIDI connections, settings, etc., and
attempt the operation again.
Certain data cannot be transmitted or received because a MIDI Filter is set to On. Check each
MIDI Filter setting in Edit mode. (See page 46.)
Bulk data cannot be transmitted or received because the Device Number parameter is either
turned off or does not match that of the connected device. (See page 55.)
The Send Bulk Data operation cannot be executed when MIDI Merge is on. (See page 44.)
60
APPENDIX
*** ERROR1 ***
REPLACE BATTERY
*** ERROR2 ***
MIDI RX OVERFLOW
*** ERROR4 ***
MIDI BULK ERROR
*** ERROR5 ***
MIDI FILTER ON !
*** ERROR6 ***
DEVICE NO. ERROR
*** ERROR7 ***
MERGE SW ON !
*** ERROR3 ***
MIDI DATA ERROR
Page 65

61
APPENDIX
■ Troubleshooting
The P-150 is a rather sophisticated electronic instrument with many parameter settings which affect its operation status. As
such, occasionally you may find that it does not function as you think it should.
If this happens, before rushing the P-150 to the service center, carefully and methodically try to isolate the problem. Most of the
time you’ll find the problem to be of an extremely simple nature.
• The first thing you should do is check whether the problem is in the P-150 itself, or in one of the connected devices, or in any
of the audio or MIDI cables.
• Also try changing the voices or Performances on the P-150 and check if the problem persists. If the problem occurs with only
one specific voice or Performance, check each of its parameters to see if you can isolate the specific cause. If the problem
occurs regardless of which voice or Performance is selected, check the System parameters to see if a particular global
setting is the cause.
Possible Cause and Solution
No sound is output Check that:
from the P-150 • The [SPEAKER] switch on the rear panel is turned on.
• The [VOLUME] slider is turned up.
• The Foot Controller that is assigned to Volume or Expression (011) is
pressed down.
• The Local On/Off feature is set to On. (See page 48.)
• (If the Local On/Off feature is set to Off and you’re using the P-150 with a sequencer), the
Transmit Channel is set to the same number as the Receive Channel. (See page 48.)
Little or no sound is output Check that the Keyboard Sensitivity setting is appropriate. (See page 51.)
Depending on which keys of the Check that in Split mode, the Balance setting is appropriate. (See page 30.)
keyboard are played, no sound
(or only a very soft sound) is
output
The pitch of the P-150 is off Check that:
or out of tune (compared • The Master Tune parameter is set correctly. (See page 44.)
to standard pitch or other • The Transpose feature is turned off. (See page 33.)
instruments) • The Detune (Dual mode) is set to 0. (See page 27.)
The pitch of the P-150 Check that the modulation settings are turned off, and the [MODULATION] wheel position is
not pure set to minimum.
The sound is too thin, or too Check the Internal EQ as well as the Panel Equalizer settings. Adjust one or the other to flat,
“boomy”, or radically different or normal settings. (See pages 24, 52.) Also check the [MODULATION] wheel position, or
in timbre than expected the effect settings, as these can drastically alter the sound. (See pages 22, 23, 51.)
Some notes of a chord or You may have played more notes than the maximum polyphony of the P-150. Remember that
sustained passage polyphony is decreased when Dual or Split mode is active, or a stereo Piano is selected.
(See (held with the Footswitch) page 21.) The situation may also occur when playing the P-150’s keyboard at the same
time cannot be heard a sequencer is playing internal voices.
The reverb or modulation effect Check that:
cannot be heard • The Reverb is set to Active and not Bypass. (See page 44.)
• The Reverb Depth setting or Modulation Speed setting is not 0. (See page 52.)
No sound is output from the Check that:
connected MIDI instruments • All MIDI connections have been properly made. (See pages 58, 59.)
• The receive channel of the connected device matches that of the Transmit Channel for
the P-150. (See page 47.)
• The MIDI Transmit switch is enabled. (See page 36.)
• The Volume level settings of connected devices are at appropriate levels.
Page 66

62
APPENDIX
Cannot transmit MIDI messages Check that message types are turned off in the MIDI Filter menu of Edit mode, and that the
even though the MIDI Transmit Transmit channel is not set to off in Edit mode. (See page 47.)
switch is on
The sound of the connected Check that the Keyboard Sensitivity settings are appropriate. (See page 51.)
MIDI instruments is too soft
(or too loud)
Connected MIDI instruments Check that the program change receive (or the equivalent parameter) on the receiving MIDI
sound, but do not change instrument has not been turned off.
programs when changing voices
or Performances on the P-150
Sustain (Footswitch pedal Check that the Footswitch is properly connected to the [SUSTAIN] jack.
operation) doesn’t work properly
Cannot select the Organ 1 voice The Organ 1 voice is not accessible in Dual mode.
Transpose value or split point You cannot use the [DATA ENTRY] slider to change the transpose value or split point; you
cannot be changed by using must hold the [TRANSPOSE] or [SPLIT] button and use the [-1/NO] or [+1/YES] buttons.
the [DATA ENTRY] slider, Likewise, you cannot use the [-1/NO] or [+1/YES] buttons to change the balance or detune
or balance and detune values; you must hold the [BALANCE] or [DETUNE] button and move the [DATA ENTRY]
be values cannot changed by slider.
the [-1/NO] or [+1/YES] buttons
Page 67

63
APPENDIX
■ Specifications
Keyboard 88-key (A-1 to C7), velocity sensitive, Action Effect II
Tone Generator AWM; 32-note maximum polyphony
Voices PIANO 1 ~ 2 (STEREO/MONO); PIANO 3 ~ 4; ELECTRIC PIANO 1 ~ 3; VIBES; ORGAN 1 ~ 2; STRINGS; BASS (ELECTRIC/UPRIGHT)
Play Modes Voice Play mode; Performance Play mode
Performances Performance Bank A (1 ~ 12); Performance Bank B (1 ~ 12)
Effects REVERB (ROOM, STAGE, HALL, OFF); MODULATION (CHORUS, SYMPHONIC, TREMOLO, OFF)
Panel Equalizer LOW; MIDDLE; HIGH
Edit SYSTEM MASTER TUNE 424.0Hz ~ 456.3Hz
REVERB bypass, active
DEVICE NUMBER off; 1 ~ 16; all
MIDI MERGE off; on
PERFORMANCE ENABLE
MIDI CHANNEL (sys; perf); LOCAL (sys; perf); CONTROLLER ASSIGN (sys; perf)
POPUP TIME PC (off; 1 ~ 5); OTHERS (1 ~ 5)
STORE TYPE auto store; non auto store
MIDI FILTER TRANSMIT FILTER Message Types; on/off
RECEIVE FILTER Message Types; on/off
PC TABLE PROGRAM CHANGE TRANSMIT VOICE/PERFORMANCE NO.(1 ~ 12); MSB/LSB (off; 0 ~ 127);
PROGRAM CHANGE NUMBER (off; 0 ~128)
PROGRAM CHANGE RECEIVE VOICE/PERFORMANCE NO. (off; 1 ~ 12);
PROGRAM CHANGE NUMBER (1 ~128)
CHANNEL TRANSMIT (off; 1 ~ 16); RECEIVE (off; 1 ~ 16; all)
LOCAL on; off
CS FC CS ASSIGN (functions) CS RANGE MIN (1 ~ 128); MAX (1 ~ 128)
FC ASSIGN (functions) FC RANGE MIN (1 ~ 128); MAX (1 ~ 128)
PS PS1 ASSIGN (off; start:FA; continue:FB; stop:FC)
PS2 ASSIGN (off; start:FA; continue:FB; stop:FC)
NAME PERFORMANCE NAME
ORGAN COMBINATION FOOTAGE 16’, 8’, 5-1/3’, 4’, 2-2/3’, 2’, 1-1/3’, 1’; (0 ~ 7)
RESPONSE (0 ~ 7)
ATTACK 4’, 2-2/3’, 2’; (0 ~ 7)
LENGTH (0 ~ 7)
Mode (First, Each)
PB MW PITCH BEND RANGE (0 ~ 12) MODULATION WHEEL ASSIGN (off; reverb depth; mod. speed; vibrato)
KBD SENS.
KEYBOARD SENSITIVITY INTERNAL
normal; soft-1~3; hard-1~3; fixed-1~3
KEYBOARD SENSITIVITY MIDI normal; soft-1~3; hard-1~3; fixed-1~3
KEYBOARD RANGE MIN (1 ~ 128); MAX (1 ~ 128)
INT. EQ LOW (-16 ~ 16); MID (-16 ~ 16); HIGH (-16 ~ 16)
REVERB TYPE (ROOM, STAGE, HALL, OFF); DEPTH (0 ~ 7)
MODULATION TYPE (CHORUS, SYMPHONIC, TREMOLO, OFF); SPEED (0 ~ 7)
Controls POWER; VOLUME; CS (DATA ENTRY); PS1 (-1/NO); PS2 (+1/YES); SPLIT (BALANCE, 1); TRANSPOSE (DETUNE, q);
MIDI (PAGE); LCD CONTRAST; PITCH WHEEL; MODULATION WHEEL; STORE; EDIT; PERF. A; PERF. B; VOICE; SELECT 1 ~ 12;
REVERB, MODULATION; EQUALIZER; SPEAKER ON/OFF
LCD screen 16-character x 2-row, backlit
Button Lamps SPLIT, TRANSPOSE, MIDI enable, STORE, EDIT, PERF. A, PERF. B, VOICE, 1 ~ 12 buttons, EFFECT x 6
Input Jacks FOOT CONTROLLER, SUSTAIN, SOSTENUTO, SOFT; LINE IN (L/MONO, R; 1/4” phone)
Output Jacks LINE OUT (L/MONO, R; unbalanced, 1/4” phone); PHONES
MIDI Terminals MIDI IN / OUT / THRU
Electrical Characteristics
Power Consumption: 70 W; Output Impedance: 600Ω; Input Impedance: 10 kΩ
Amplifiers 30 W x 2
Speakers 13 cm (5-1/8”) x 2
Dimensions 1385(W) x 424(D) x 159(H) mm (54-1/2” x 16-3/4” x 6-1/4”)
Weight 33.7kg (74 lbs.)
Included Accessory FC4 Footswitch
Optional Accessories
Yamaha FC4, FC5 Footswitches; Yamaha FC7 Foot Controller; Yamaha Keyboard Stand LP-3
Specifications and descriptions in this Owner’s Manual are for information purpose only. Yamaha Corp. reserves the right to change or modify products or
specifications at any time without prior notice. Since specifications, equipment or options may not be the same in every locale, please check with you Yamaha
dealer.
Page 68

64
APPENDIX
MIDI CHANNEL
LOCAL ON/OFF
ASSIGN
PC SEND
OTHERS
Note On/Off
Control Change
Program Change
Aftertouch
Pitch Bend Change
Channel Mode Message
Parameter Change
Bulk
FA/FB/FC
Note On/Off
Control Change
Program Change
Pitch Bend Change
Channel Mode Message
Parameter Change
Bulk
NUMBER
BANK LSB
BANK MSB
NUMBER
MIDI TRANSMIT ENABLE SW
SYSTEM
MIDI FILTER
PROGRAM
CHANGE
TABLE
MASTER TUNE
REVERB
DEVICE NUMBER
MIDI MERGE
PERFORMANCE
ENABLE
POPUP TIME
STORE TYPE
TRANSMIT
RECEIVE
TX
RX
on
440.0
active
1
off
sys
sys
sys
off
3
non auto store
off
off
off
off
off
off
on
off
off
off
off
off
off
off
on
off
Voice 01,..,Perf. A01,..,Perf. B12 = 1,..,13,..,36
Voice 01,..,Perf. A01,..,Perf. B12 = off
Voice 01,..,Perf. A01,..,Perf. B12 = off
1,..,36 = Voice 01,..,Perf. B12
SYSTEM
■ FACTORY DEFAULT SETTINGS
Page 69

65
APPENDIX
PRESET VOICE LIST
PITCH BEND
MODULATION WHEEL
INTERNAL
MIDI
REVERB
MODULATION
INTERNAL EQUALIZER
CONTROLLERS
KBD SENS.
EFFECT
RANGE
ASSIGN
TYPE
TYPE
RANGE MIN
RANGE MAX
TYPE
DEPTH
TYPE
SPEED
LOW
MID
HIGH
Piano 1
2
mod.speed
normal
normal
1
128
hall
1
off
2
0
0
+3
Piano 2
2
mod.speed
normal
normal
1
128
stage
3
off
1
-3
0
0
Piano 3
2
mod.speed
soft-2
soft-2
1
128
stage
3
off
2
+5
-3
+10
Piano 4
2
mod.speed
soft-1
soft-1
1
128
stage
2
off
3
+2
-5
+3
E.Piano1
2
mod.speed
hard-2
hard-2
1
128
room
2
chorus
2
-9
0
+5
E.Piano2
2
mod.speed
soft-3
soft-3
1
128
stage
1
chorus
3
-7
0
-3
E.Piano3
2
mod.speed
hard-1
hard-1
1
128
hall
3
symphonic
3
+7
-11
+6
VIBES
2
vibrato
hard-2
hard-2
1
128
hall
2
tremolo
3
-7
+6
0
ORGAN 1
2
mod.speed
fixed-1
fixed-1
1
128
hall
2
tremolo
0
0
0
0
ORGAN 2
2
mod.speed
fixed-1
fixed-1
1
128
room
4
tremolo
0
+4
0
+2
STRINGS
2
mod.speed
hard-3
hard-3
1
128
hall
5
off
1
+3
0
+7
BASS
2
off
normal
normal
1
128
room
3
chorus
2
-2
0
0
SINGLE DUAL SPLIT
Bass
0
C2
Higher Note Range
0
0
SINGLE
Piano1
Strings
stereo
stereo
electric
6
5
5
0
0
0
0
0
0
0
5
0
3
Each
0
0
off
+12
0
+12
1
1
on
off
off
main volume : 007
1
128
sub volume (internal)
1
128
PLAY MODE
VOICE
PIANO 1 STEREO/MONO
PIANO 2 STEREO/MONO
BASS ELECTRIC/UPRIGHT
ORGAN COMBINATION
BALANCE
DETUNE
SPLIT POINT
SPLIT MAIN VOICE AREA
TRANSPOSE
MIDI CHANNEL
LOCAL
CONTROLLERS
HOLD
ATTACK
ENABLE SWITCH
INTERNAL
MIDI
TX CHANNEL
RX CHANNEL
PS1
PS2
CS
FC
MAIN
SUB
16'
8'
5-1/3'
4'
2-2/3'
2'
1-1/3'
1'
RESPONSE
4'
2-2/3'
2'
LENGTH
EACH/FIRST
MAIN
SUB
MAIN
SUB
ASSIGN
ASSIGN
ASSIGN
RANGE MIN
RANGE MAX
ASSIGN
RANGE MIN
RANGE MAX
Page 70

66
APPENDIX
MAIN
SUB
16'
8'
5-1/3'
4'
2-2/3'
2'
1-1/3'
1'
RESPONSE
4'
2-2/3'
2'
LENGTH
EACH/FIRST
MAIN
SUB
MAIN
SUB
ASSIGN
ASSIGN
ASSIGN
RANGE MIN
RANGE MAX
ASSIGN
RANGE MIN
RANGE MAX
HOLD
ATTACK
ENABLE SWITCH
INTERNAL
MIDI
TX CHANNEL
RX CHANNEL
PS1
PS2
CS
FC
PLAY MODE
VOICE
PIANO 1 STEREO/MONO
PIANO 2 STEREO/MONO
BASS ELECTRIC/UPRIGHT
ORGAN COMBINATION
BALANCE
DETUNE
SPLIT POINT
SPLIT MAIN VOICE AREA
TRANSPOSE
MIDI CHANNEL
LOCAL
CONTROLLERS
PERFORMANCE NAME
PITCH BEND
MODULATION WHEEL
INTERNAL
MIDI
REVERB
MODULATION
INTERNAL EQUALIZER
CONTROLLERS
KEYBOARD SENSITIVITY
EFFECT
RANGE
ASSIGN
TYPE
TYPE
RANGE MIN
RANGE MAX
TYPE
DEPTH
TYPE
SPEED
LOW
MID
HIGH
SINGLE DUAL
SINGLE
Piano1
Strings
stereo
stereo
electric
6
5
5
0
0
0
0
0
0
0
5
0
3
Each
0
0
off
+12
0
+12
1
1
on
off
off
main volume : 007
1
128
sub volume (internal)
1
128
Room Acoustic
2
mod.speed
normal
normal
1
128
room
6
off
3
0
0
0
PERF. A 01
SPLIT
Bass
0
C2
0
0
Higher Note
Range
Higher Note
Range
Higher Note
Range
Higher Note
Range
Higher Note
Range
SINGLE DUAL
PERF. A 02
SPLIT SINGLE DUAL
PERF. A 03
SPLIT
DUAL
Piano3
Piano2
stereo
stereo
electric
6
5
5
0
0
0
0
0
0
0
5
0
3
Each
0
6
off
+12
0
+12
1
1
on
off
off
main volume : 007
1
128
sub volume (internal)
1
128
Honky Tonk
2
mod.speed
hard-2
hard-2
1
128
room
2
off
0
-12
+16
-12
Bass
0
C2
0
0
SINGLE
Piano3
Strings
stereo
stereo
electric
6
5
5
0
0
0
0
0
0
0
5
0
3
Each
0
0
off
+12
0
+12
1
1
on
off
off
main volume : 007
1
128
sub volume (internal)
1
128
Pan Piano
2
mod.speed
normal
normal
1
128
stage
4
tremolo
0
-13
+7
-12
Bass
0
C2
0
0
SINGLE DUAL
PERF. A 04
SPLIT
SINGLE
Piano4
Strings
stereo
stereo
electric
6
5
5
0
0
0
0
0
0
0
5
0
3
Each
0
0
off
+12
0
+12
1
1
on
off
off
main volume : 007
1
128
sub volume (internal)
1
128
Chorus Piano
2
reverb depth
hard-2
hard-2
1
128
hall
7
chorus
7
-1
-16
+5
Bass
0
C2
0
0
SINGLE DUAL
PERF. A 05
SPLIT
DUAL
Piano1
E.P.1
stereo
stereo
electric
6
5
5
0
0
0
0
0
0
0
5
0
3
Each
-2
3
off
+12
0
+12
1
1
on
off
off
main volume : 007
1
128
sub volume (internal)
1
128
Ballad Piano
2
mod.speed
hard-2
hard-2
1
128
stage
3
off
2
0
0
+7
Bass
0
C2
0
0
PRESET PERFORMANCE LIST
Page 71

Higher Note
Range
Higher Note
Range
Higher Note
Range
Higher Note
Range
Higher Note
Range
Higher Note
Range
Higher Note
Range
SINGLE DUAL
PERF. A 06
SPLIT SINGLE DUAL
PERF. A 07
SPLIT SINGLE DUAL
PERF. A 08
SPLIT SINGLE DUAL
PERF. A 09
SPLIT SINGLE DUAL
PERF. A 10
SPLIT
DUAL
E.Piano1
Piano4
stereo
stereo
electric
6
5
5
0
0
0
0
0
0
0
5
0
3
Each
+2
0
off
+12
0
+12
1
1
on
off
off
main volume : 007
1
128
sub volume (internal)
1
128
Fusion Piano
2
mod.speed
normal
normal
1
128
room
3
chorus
3
-5
0
+1
Bass
0
C2
0
0
DUAL
E.Piano1
E.P.2
stereo
stereo
electric
6
5
5
0
0
0
0
0
0
0
5
0
3
Each
-4
1
off
+12
0
+12
1
1
on
off
off
main volume : 007
1
128
sub volume (internal)
1
128
Vintage EP
2
mod.speed
normal
normal
1
128
stage
2
tremolo
3
+2
+3
-8
Bass
0
C2
0
0
DUAL
E.Piano1
E.P.2
stereo
stereo
electric
6
5
5
0
0
0
0
0
0
0
5
0
3
Each
+3
0
off
+12
0
+12
1
1
on
off
off
main volume : 007
1
128
sub volume (internal)
1
128
Dynamic EP
2
mod.speed
hard-2
hard-2
1
128
stage
2
chorus
4
-9
+6
+6
Bass
0
C2
0
0
DUAL
E.Piano3
E.P.1
stereo
stereo
electric
6
5
5
0
0
0
0
0
0
0
5
0
3
Each
-5
0
off
+12
0
+12
1
1
on
off
off
main volume : 007
1
128
sub volume (internal)
1
128
Ballad EP
2
mod.speed
hard-1
hard-1
1
128
hall
3
chorus
5
+5
-2
+6
Bass
0
C2
0
0
DUAL
E.Piano3
Piano1
stereo
stereo
electric
6
5
5
0
0
0
0
0
0
0
5
0
3
Each
0
0
off
+12
0
+12
1
1
on
off
off
main volume : 007
1
128
sub volume (internal)
1
128
Bell EP
2
mod.speed
hard-1
hard-1
1
128
hall
4
symphonic
4
-1
+1
+6
Bass
0
C2
0
0
SINGLE DUAL
PERF. A 11
SPLIT
DUAL
Bass
E.P.1
stereo
stereo
upright
6
5
5
0
0
0
0
0
0
0
5
0
3
Each
-4
2
off
+12
0
+12
1
1
on
off
off
main volume : 007
1
128
sub volume (internal)
1
128
Woody EP
2
mod.speed
normal
normal
1
128
room
2
off
0
-5
0
+5
Bass
0
C2
0
0
SINGLE DUAL
PERF. A 12
SPLIT
SINGLE
E.Piano2
Strings
stereo
stereo
electric
6
5
5
0
0
0
0
0
0
0
5
0
3
Each
0
0
off
+12
0
+12
1
1
on
off
off
main volume : 007
1
128
sub volume (internal)
1
128
Tremolo EP
2
mod.speed
normal
normal
1
128
room
2
tremolo
4
-2
+2
0
Bass
0
C2
0
0
67
APPENDIX
Page 72

68
APPENDIX
MAIN
SUB
16'
8'
5-1/3'
4'
2-2/3'
2'
1-1/3'
1'
RESPONSE
4'
2-2/3'
2'
LENGTH
EACH/FIRST
MAIN
SUB
MAIN
SUB
ASSIGN
ASSIGN
ASSIGN
RANGE MIN
RANGE MAX
ASSIGN
RANGE MIN
RANGE MAX
HOLD
ATTACK
ENABLE SWITCH
INTERNAL
MIDI
TX CHANNEL
RX CHANNEL
PS1
PS2
CS
FC
PLAY MODE
VOICE
PIANO 1 STEREO/MONO
PIANO 2 STEREO/MONO
BASS ELECTRIC/UPRIGHT
ORGAN COMBINATION
BALANCE
DETUNE
SPLIT POINT
SPLIT MAIN VOICE AREA
TRANSPOSE
MIDI CHANNEL
LOCAL
CONTROLLERS
PERFORMANCE NAME
PITCH BEND
MODULATION WHEEL
INTERNAL
MIDI
REVERB
MODULATION
INTERNAL EQUALIZER
CONTROLLERS
KEYBOARD SENSITIVITY
EFFECT
RANGE
ASSIGN
TYPE
TYPE
RANGE MIN
RANGE MAX
TYPE
DEPTH
TYPE
SPEED
LOW
MID
HIGH
SINGLE DUAL
SINGLE
Organ1
Strings
stereo
stereo
electric
6
6
0
2
2
0
0
0
2
0
0
0
3
Each
0
0
off
+12
0
+12
1
1
on
off
off
main volume : 007
1
128
sub volume (internal)
1
128
Jazz Organ
2
mod.speed
normal
normal
1
128
room
2
symphonic
0
-5
+4
-4
PERF. B 01
SPLIT
Bass
0
C2
0
0
SINGLE DUAL
PERF. B 02
SPLIT SINGLE DUAL
PERF. B 03
SPLIT
SINGLE
Organ1
Strings
stereo
stereo
electric
5
7
6
0
0
0
0
0
1
0
2
0
1
Each
0
0
off
+12
0
+12
1
1
on
off
off
main volume : 007
1
128
sub volume (internal)
1
128
Pop Organ
2
mod.speed
normal
normal
1
128
stage
4
tremolo
0
+1
+3
+2
Bass
0
C2
0
0
SINGLE
Organ1
Strings
stereo
stereo
electric
7
7
7
0
0
0
7
0
1
0
0
0
4
Each
0
0
off
+12
0
+12
1
1
on
off
off
main volume : 007
1
128
sub volume (internal)
1
128
Blues Organ
2
mod.speed
normal
normal
1
128
stage
4
symphonic
4
0
0
0
Bass
0
C2
0
0
SINGLE DUAL
PERF. B 04
SPLIT
SINGLE
Organ1
Strings
stereo
stereo
electric
7
5
0
0
3
5
7
7
3
0
0
0
3
Each
-2
0
off
+12
0
+12
1
1
on
off
off
main volume : 007
1
128
sub volume (internal)
1
128
Theater Organ
2
mod.speed
normal
normal
1
128
stage
7
chorus
5
0
0
0
Bass
0
C2
0
0
SINGLE DUAL
PERF. B 05
SPLIT
SINGLE
Organ1
Strings
stereo
stereo
electric
0
7
0
0
1
0
0
0
1
0
0
0
5
First
0
0
off
+12
0
+12
1
1
on
off
off
main volume : 007
1
128
sub volume (internal)
1
128
Accomp. Organ
2
mod.speed
normal
normal
1
128
stage
4
chorus
3
0
0
+4
Bass
0
C2
0
0
Higher Note
Range
Higher Note
Range
Higher Note
Range
Higher Note
Range
Higher Note
Range
Page 73

SINGLE DUAL
PERF. B 06
SPLIT SINGLE DUAL
PERF. B 07
SPLIT SINGLE DUAL
PERF. B 08
SPLIT SINGLE DUAL
PERF. B 09
SPLIT SINGLE DUAL
PERF. B 10
SPLIT
DUAL
Vibes
E.P.1
stereo
stereo
electric
6
5
5
0
0
0
0
0
0
0
5
0
3
Each
-2
2
off
+12
0
+12
1
1
on
off
off
main volume : 007
1
128
sub volume (internal)
1
128
Metal Attack
2
mod.speed
hard-2
hard-2
1
128
stage
2
off
2
-1
-3
+5
Bass
0
C2
0
0
SINGLE
Strings
Strings
stereo
stereo
electric
6
5
5
0
0
0
0
0
0
0
5
0
3
Each
0
0
off
+12
0
+12
1
1
on
off
off
main volume : 007
1
128
sub volume (internal)
1
128
Strings Orchestra
2
mod.speed
hard-2
hard-2
1
128
hall
7
symphonic
3
+3
0
+2
Bass
0
C2
0
0
DUAL
Piano1
Strings
stereo
stereo
electric
6
5
5
0
0
0
0
0
0
0
5
0
3
Each
+6
2
off
+12
0
+12
1
1
on
off
off
main volume : 007
1
128
sub volume (internal)
1
128
Romantic Piano
2
mod.speed
hard-3
hard-3
1
128
hall
3
off
0
+3
+5
+1
Bass
-3
C2
0
0
SPLIT
Piano2
Strings
stereo
stereo
upright
6
5
5
0
0
0
0
0
0
0
5
0
3
Each
0
0
off
+12
0
+12
1
1
on
off
off
main volume : 007
1
128
sub volume (internal)
1
128
Acoustic Duo
2
mod.speed
hard-1
hard-1
1
128
stage
2
off
0
0
0
-3
Bass
0
C2
0
0
SPLIT
E.Piano1
Strings
stereo
stereo
electric
6
5
5
0
0
0
0
0
0
0
5
0
3
Each
0
0
off
+12
0
+12
1
1
on
off
off
main volume : 007
1
128
sub volume (internal)
1
128
Electric Duo
2
mod.speed
hard-2
hard-2
1
128
stage
1
chorus
5
0
+2
+4
Bass
0
C2
0
0
SINGLE DUAL
PERF. B 11
SPLIT
SPLIT
Vibes
Strings
stereo
stereo
upright
6
5
5
0
0
0
0
0
0
0
5
0
3
Each
0
0
off
+12
0
+12
1
1
on
off
off
main volume : 007
1
128
sub volume (internal)
1
128
Jazz Duo
2
vibrato
hard-2
hard-2
1
128
hall
2
symphonic
3
-2
0
0
Bass
-2
C2
0
0
SINGLE DUAL
PERF. B 12
SPLIT
SPLIT
Organ2
Strings
stereo
stereo
electric
6
5
5
0
0
0
0
0
0
0
5
0
3
Each
0
0
off
+12
0
+12
1
1
on
off
off
main volume : 007
1
128
sub volume (internal)
1
128
Rock Duo
2
vibrato
normal
normal
1
128
room
4
chorus
4
+2
0
-7
Bass
-3
C2
0
0
Higher Note
Range
Higher Note
Range
Higher Note
Range
Higher Note
Range
Higher Note
Range
Higher Note
Range
Higher Note
Range
69
APPENDIX
Page 74

70
APPENDIX
MIDI CHANNEL
LOCAL ON/OFF
ASSIGN
PC SEND
OTHERS
Note On/Off
Control Change
Program Change
Aftertouch
Pitch Bend Change
Channel Mode Message
Parameter Change
Bulk
FA/FB/FC
Note On/Off
Control Change
Program Change
Pitch Bend Change
Channel Mode Message
Parameter Change
Bulk
NUMBER
BANK LSB
BANK MSB
NUMBER
NUMBER
BANK LSB
BANK MSB
NUMBER
NUMBER
BANK LSB
BANK MSB
NUMBER
MIDI TRANSMIT ENABLE SW
SYSTEM
MIDI FILTER
PROGRAM CHANGE TABLE
PROGRAM CHANGE TABLE
PROGRAM CHANGE TABLE
MASTER TUNE
REVERB
DEVICE NUMBER
MIDI MERGE
PERFORMANCE
ENABLE
POPUP TIME
STORE TYPE
TRANSMIT
RECEIVE
TX
RX
TX
RX
TX
RX
424.0Hz ~ 440.0Hz ~ 456.3Hz
active, bypass
off, 1~16, all
on, off
sys, perf
sys, perf
sys, perf
off, 1~5
1~5
auto store, non auto store
on, off
on, off
on, off
on, off
on, off
on, off
on, off
on, off
on, off
on, off
on, off
on, off
on, off
on, off
on, off
on, off
off, 1~128
off, 0~127
off, 0~127
off/1 ~128
off, 1~128
off, 0~127
off, 0~127
off/1 ~128
off, 1~128
off, 0~127
off, 0~127
off/1 ~128
PARAMETERS
on, off
SYSTEM
Voice 02Voice 01 Voice 04Voice 03 Voice 06Voice 05 Voice 08Voice 07 Voice 10Voice 09 Voice 12Voice 11Voice 02Voice 01 Voice 04Voice 03 Voice 06Voice 05 Voice 08Voice 07 Voice 10Voice 09 Voice 12Voice 11
Perf. A02Perf. A01 Perf. A04Perf. A03 Perf. A06Perf. A05 Perf. A08Perf. A07 Perf. A10Perf. A09 Perf. A12Perf. A11
Perf. B02Perf. B01 Perf. B04Perf. B03 Perf. B06Perf. B05 Perf. B08Perf. B07 Perf. B10Perf. B09 Perf. B12Perf. B11
■ Blank Chart
Page 75

71
APPENDIX
MAIN
SUB
16'
8'
5-1/3'
4'
2-2/3'
2'
1-1/3'
1'
RESPONSE
4'
2-2/3'
2'
LENGTH
EACH/FIRST
MAIN
SUB
MAIN
SUB
ASSIGN
ASSIGN
ASSIGN
RANGE MIN
RANGE MAX
ASSIGN
RANGE MIN
RANGE MAX
HOLD
ATTACK
ENABLE SWITCH
INTERNAL
MIDI
TX CHANNEL
RX CHANNEL
PS1
PS2
CS
FC
PLAY MODE
VOICE
PIANO 1 STEREO/MONO
PIANO 2 STEREO/MONO
BASS ELECTRIC/UPRIGHT
ORGAN COMBINATION
BALANCE
DETUNE
SPLIT POINT
SPLIT MAIN VOICE AREA
TRANSPOSE
MIDI CHANNEL
LOCAL
CONTROLLERS
PERFORMANCE NAME
PERFORMANCE
PARAMETERS
SINGLE, DUAL, SPLIT
(1) Piano 1 ~ (12) Bass
(1) Piano 1 ~ (12) Bass
stereo, mono
stereo, mono
electric, upright
0~7
0~7
0~7
0~7
0~7
0~7
0~7
0~7
0~7
0~7
0~7
0~7
0~7
0~7
-16~+15
0~7
A-1 ~ C7
-16~+15
on, off
-24~+24
-24~+24
-24~+24
-24~+24
off, 1~16
off, 1~16, ALL
on, off
off, FA, FB, FC
off, FA, FB, FC
off, rev depth, mod speed, main, sub, ....., etc.
1~128
1~128
off, rev depth, mod speed, main, sub, ....., etc.
1~128
1~128
A~Z, a~z, 0~9, others
PITCH BEND
MODULATION WHEEL
INTERNAL
MIDI
REVERB
MODULATION
INTERNAL EQUALIZER
CONTROLLERS
KEYBOARD SENSITIVITY
EFFECT
RANGE
ASSIGN
TYPE
TYPE
RANGE MIN
RANGE MAX
TYPE
DEPTH
TYPE
SPEED
LOW
MID
HIGH
SINGLE DUAL SPLIT
Page 76

■ MIDI DATA FORMAT
1. MIDI DATA FLOW
KEYBOARD
INTERNAL VELOCITY
CURVE
KBD OFFSET Min/Max
MIDI VELOCITY
CURVE
MIDI TRANSPOSE
Tx FILTER
2. MIDI TRANSMISSION/RECEPTION
2.1 MIDI Transmission Condition
ACTIVE SENSING FE
PANIC
NOTE ON/OFF
PITCH BEND
MODULATION
PS 1/2
CONTINUOUS
SLIDER
FOOT
CONTROLLER
PROGRAM CHANGE
PARAMETER CHANGE
BULK DUMP
MIDI In
9n
En
Bn (01H)
FA, FB, FC
Bn (00~77H)
Dn, (F0)
Bn (00~78H)
Dn, (F0)
Cn
Split
P.C. Tx
TABLE
Device No.
Device No.
Tx+1ch
Tx Filter
Txch
MERGE SW
MERGE SW
MIDI SW
OUT
LOCAL
MIDI IN MIDI OUT
Rx FILTER
INTERNAL
TRANSPOSE
MERGE
MIDI SW
P-150 TG
2.2 MIDI Reception Conditions
Rxch
Split
Rx+1ch
Rxch
Rx Filter
IN
Split
Split
Rx+1ch
Rxch
Rx+1ch
Rxch
P.C. Rx
TABLE
FE ACTIVE SENSING
MERGE
8n NOTE OFF
9n NOTE ON/OFF
Bn ,01 Modulation
,07 Volume
,40 Sustain
,42 Sostenuto
,43 Soft
Cn PROGRAM CHANGE
00H~0BH * (Voice)
0CH~23H * (Performance)
En PITCH BEND
APPENDIX
72
Split
Rx+1ch
Device No.
* (Voice) : Voice Play Mode (single) only
* (Performance) : Performance Play Mode only
BULK DUMP
BULK DUMP REQ.
PARAMETER CHANGE
Page 77

3. CHANNEL MESSAGES
3.1 Transmission
3.1.1 Note On/Off
[9nH]->[kk]->[vv]
9nH : Note on/off Status
n : Channel No.
kk : Key No.
Transpose : 21 (A-1) -108 (C7)
vv : V elocity
Key on : 0-127
Key off : 0
* Note range can be extended to 0-127 with MIDI T R ANSPOSE
3.1.2 Control Change
Control Change No.
01
64
66
67
0 -119
0 -119
3.1.3 Program Change
● When you choose a voice in Voice Play mode, a P rogram Change
Number corresponding to each selected button is transmitted.
● In Single mode, the Program Change Number corresponding to the
button according to the transmit channel is transmitted via the transmit
channel.
● In Dual mode, no sub voice Program Change Number is transmitted even
if you select the sub voice.
(Corresponding to Parameter Change (E xclusive))
● In Split mode, a Program Change Number is transmitted from the
transmit channel for the main voice and on the next highest channel
(Txch+1) for the sub voice according to the selected button.
3.1.4 Aftertouch
When Aftertouch is assigned to the CS or FC assignable controller, Channel
Pressure Data is transmitted.
3.1.5 Pitch Bend
Pitch Bend is transmitted with 7-bit resolution.
3.1.6 Channel Mode Message
When you press [P anic] switch (SW ), <all sounds off>, <all notes off>,
<reset all controllers> will be transmitted.
See page 37 for detail.
Controller
Modulation Wheel
Sustain Pedal
Sostenuto Pedal
Soft Pedal
FC
CS
Value
0 - 127
0 - 127
0 - 127
0 - 127
0 - 127
0 - 127
3.2 Reception
3.2.1 Note On/Off
1. [9nH]->[kk]->[vv] n : channel no.
9nH : Note on/off status
kk : Key note
Reception : 0 (C-2) — 127 (G8)
vv : V elocity
Key on : 1-127
Key off : 0
2. [8nH]->[kk]->[vv] n : channel no.
8nH : Note off Status
kk : Key note
Reception : 0 (C-2) — 127 (G8)
vv : V elocity
Key off : 0-127
* Note range can be extended to 0-127 with MIDI T R ANSPOSE
* The notes lower than 21 (A-1) and higher than 108 (C7) will repeat one-
octave higher and lower, respectively.
3.2.2 Control Change
[BnH]->[cc]->[vv]
BnH : Control Change Status
n : Channel No.
cc : Control No.
vv : V alue
Control Change No.
01
07
64
66
67
Parameter
Modulation Depth
Main Volume
Sustain
Sostenuto
Soft
3.2.3 Program Change
* In Voice Play mode if a Program Change Number from 1 to 12 is received,
the voice changes to one of the following voices from the next Key On
message.
RX Program
Change No.
1
2
3
4
5
6
7
8
9
10
11
12
Voice
Piano 1
Piano 2
Piano 3
Piano 4
E. Piano 1
E. Piano 2
E. Piano 3
Vibes
Organ 1
Organ 2
Strings
Bass
Value
0 - 127
0 - 127
0 - 127
0 - 127
0 - 127
APPENDIX
* In Performance Play mode if a P rogram Change Number from 1 to 12 is
received, the mode changes to Voice Play mode. If a P rogram Change
Number from 13 to 36 is received, the mode changes to Performance Play
mode and the Performance Number changes accordingly.
73
Page 78

RX Program
Change No.
13
14
Voice
Perf. A01
Perf. A02
4. SYSTEM REAL TIME MESSAGES
When Start, Continue, or Stop is assigned to PS1/2 controller, System
Realtime messages are transmitted.
5. System Exclusive Messages
35
36
* Any Bank Select message is ignored.
Perf. B11
Perf. B12
3.2.4 Aftertouch
Aftertouch is not received.
3.2.5 Pitch Bend
Only the MSB of the Pitch Bend is received.
3.2.6 Channel Mode
Channel Mode messages are received.
Control Change No.
78
79
7B
● Channel Mode messages are received by the Receive channel while
Omni Off is selected.
● All Sounds Off —
Reception is while Omni Off is selected only.
While Omni Off is selected, reception only occurs on the same Receive
channel, and Key On sounds are quickly silenced.
Different from All Notes Off, a dump is forcibly taken and sound is
silenced even when a damper or Sostenuto causes the sound after a Key
Off to continue or reduce slowly.
● All Notes Off —
While Omni Off is selected, only those sounds that occur during Key On
in the Receive Channel are silenced. Nothing is done while Omni On is
selected.
● Reset All Controllers —
While Omni Off is selected, only the Receive channel is reset to its initial
value. Nothing is done while Omni On is selected.
At reception, the status of the following items are reset to their initial
values:
Modulation Depth, Main Volume, Sustain, Soft, S ostenuto, and Pitch
Bend Depth. (Reverb Depth remains unchanged.)
Modulation Depth: Off Main Volume: Max
Sustain: Off Soft: Off
Sostenuto: Off Pitch Bend Depth (Center)
APPENDIX
Parameter
All Sounds Off
Reset all Controllers
All notes off
Value
00H
00H
00H
5.1 Parameter Change
5.1.1 System Setup
11110000 F0
01000011 43H
0001nnnn nnnn=Device Number
00101010 2A
00100000 20
00000000 00
00000000 00
0ppppppp ppppppp=N2
00000000 00
0vvvvvvv vvvvvvv=Data Value
11110111 F7
5.1.2 Voice
11110000 F0
01000011 43
0001nnnn nnnn=Device Number
00101010 2A
00100010 22
00000000 00
00000000 00
0ppppppp ppppppp=N2
00000000 00
0vvvvvvv vvvvvvv=Data Value
11110111 F7
5.1.3 Keyboard Mode
11110000 F0
01000011 43
0001nnnn nnnn=Device Number
00101010 2A
00100110 26
00000000 00
00000000 00
0ppppppp ppppppp=N2
00000000 00
0vvvvvvv vvvvvvv=Data Value
11110111 F7
5.1.4 Controller
11110000 F0
01000011 43
0001nnnn nnnn=Device Number
00101010 2A
00100111 27
00000000 00
00000000 00
0ppppppp ppppppp=N2
00000000 00
0vvvvvvv vvvvvvv=Data Value
11110111 F7
74
Page 79

5.1.5 MIDI Filter Table
11110000 F0
01000011 43
0001nnnn nnnn=Device Number
00101010 2A
00101100 2C
00000000 00
00000000 00
0ppppppp ppppppp=N2
0000000i i=Send switch
0vvvvvvv vvvvvvv=Data Value
11110111 F7
● For more information about bulk dump format, see page 77.
● You can assign the device number in Edit mode, System function; see
page 44.
● When the device number is set to Off, bulk dump send and receive
operations cannot be executed.
● When MIDI Merge (E dit mode, System function) is set to On, the P-150
cannot send bulk dump messages.
● When the device numbers of the P -150 and the external device are not
matched, the P-150 cannot receive bulk dump messages.
● Bulk dump messages cannot be sent and received at the same time.
● When the MIDI Filter bulk setting (Edit mode, MIDI F ilter function) is set
to On, bulk dump operations cannot be executed.
5.1.6 Program Change Transmit Table
11110000 F0
01000011 43
0001nnnn nnnn=Device Number
00101010 2A
00101110 2E
00000000 00
0iiiiiii iiiiiii=N1
0ppppppp ppppppp=N2
0000000i i=Send switch
0vvvvvvv vvvvvvv=Data Value2
11110111 F7
5.1.7 Program Change Receive Table
11110000 F0
01000011 43
0001nnnn nnnn=Device Number
00101010 2A
00101111 2F
00000000 00
00000000 00
0ppppppp ppppppp=N2
00000000 00
0vvvvvvv vvvvvvv=Data Value
11110111 F7
5.2 BULK DUMP (SYSTEM EXCLUSIVE MESSAGES)
The system is capable of sending and receiving the following types of
bulk dump messages:
1. System Setup Bulk Dump
2. Voice Bulk Dump
3. Keyboard Mode Bulk Dump
4. MIDI Filter Table Bulk Dump
5. Program Change T ransmit Table Bulk Dump
6. Program Change R eceive Table Bulk Dump
5.3 MIDI MERGE
The MIDI Merge function enables you to merge data received from the
MIDI IN termimal with data generated by the P-150, and transmits this
merged data. This function works as follows:
MIDI IN
BULK DUMP
1. Some features, such as Controller, might not operate as expected
because channel messages can also be transmitted on the same
channel as the MIDI channel that the P-150 uses for transmission.
(For example, in the case of Controller, an external device connected
to MIDI OUT uses the value determined by the most recently used
instrument, P-150 or an external device connected to MIDI IN. T he
sounds from the P -150's tone generator might sometimes cut off
when receiving an All Notes Off message.)
2. A received Active Sensing message is never transmitted.
3. When an interrupt of the received Active S ensing is detected, transmission of
Active Sensing through MIDI OUT is interrupted after 500msec.
4. When the P-150 receives 32 or more bytes of System E xclusive
Messages, the MIDI messages transmitted by the P-150 might cause
an interruption.
(When System E xclusive Messages from MIDI IN are received, the MIDI
messages that the P-150 attempted to transmit are held temporarily;
however, if the data exceeds 31 bytes, the hold is released and after an
EOX is forcibly transmitted, the P-150 MIDI messages are transmitted.
In this case the data bytes being received are not transmitted until
reception of the status byte of non-S ystem Realtime Messages, and are
discarded.)
5. When the MIDI Merge function is On, Bulk Dumps cannot be sent
from the P-150.
6. After the P -150 receives one status byte of the System Exclusive
Messages, if the status of other channel messages, etc., are received
before an EOX is received, the EOX is transmitted and other messages
(for example, channel messages) are separated from the System
Exclusive Messages and are transmitted.
* When MIDI Merge is On, the MIDI P anic feature does not work.
MERGE ON/OFF SWITCH
ON
OFF
MIDI OUT
The following three types of bulk dumps are sent and received:
1. All Bulk Dump
All six types of bulk dumps as listed above will be sent.
2. Performance Bulk Dump
Types 2 and 3, listed above, will be sent, for Performance Play mode
Performances A01 ~ A12 or B01 ~ 12.
3. Voice Bulk Dump
Types 2 and 3, listed above, will be sent, for Voice Play mode V oices 1 ~ 12
and Performance parameters.
The above six types of bulk dump messages can be received independently.
5.4 MIDI Panic
With the P-150, pressing the [MIDI]+[REV ER B]+[MODULATION] buttons
suppresses MIDI transmission as an emergency method to shut down all sound.
● MIDI transmission
The following messages are transmitted :
Modulation Depth Off, Sustain Pedal Off, All Sound Off, All Note Off,
Reset All Controllers, Pitch Bend Depth (Center) and Channel Pressure
Off, for all channels.
● MIDI Panic transmission is not possible when the MIDI Merge function is On.
● MIDI Panic transmission is not possible during sending/receiving bulk data.
* The MIDI Panic feature is an emergency measure of last resort, so sound
sometimes might not stop.
75
APPENDIX
Page 80

6. PARAMETER CHANGE TABLE
6.1 System Setup
F0H, 43H, 1nH, 2AH, 20H, 00H, 00H, N2H, 00H, V2H, F7H
n : Device Number
N2H : Parameter Number
V2H : Parameter Value 2
N2 data name V2 (dat a range) note
0 00 MTUNE -64 – +63 (o/b) Master Tuning
1 01 MENABSW off/on MIDI Tx Enable SW
2 02 MREVSW bypass/active Reverb Bypass SW
3 03 MERGSW off/on Merge SW
4 04 PERFCHSW sys/perf
5 05 PERFLOSW sys/perf Performance Local Enable SW
6 06 PERFASSSW sys/perf
7 07 POPUPPC off, 1, ....., 5 Popup Time P.C. Send
8 08 POPUPOTHER 1, ...., 5 Popup Time Other
9 09 STORETYPE auto store/ Store Type
non auto store auto store / non auto store
10 0A DEVNUM 1–16, all, off Device Number
6.2 Voice
F0H, 43H, 1nH, 2AH, 22H, 00H, 00H, N2H, 00H, V2H, F7H
n : Device Number
N2H : Parameter Number
V2H : Parameter Value 2
N2 data name V2 (dat a range) note
0 00 PBRANGE 0–12 PB Range
1 01 MODASS 0–3 Modulation Wheel Assign
2 02 INTVELCRV 0–9 Int. KBD Sens.Type
3 03 RXVELCRV 0–9 MIDI KBD Sens. Type
4 04 VELMIN 0–127 KBD Range Min
5 05 VELMAX 0–127 KBD Range Max
6 06 REVTYPE 0–3 Effect Reverb Type
7 07 REVDPT 0–7 Effect Reverb Depth
8 08 MODTYPE 0–3 Effect Modulation Type
9 09 MODSPD 0–7 Effect Modulation Speed
10 0A INTEQL -16 – +16 (o/b) Internal Equalizer Low
11 0B INTEQM -16 – +16 (o/b) Internal Equalizer Mid
12 0C INTEQH -16 – +16 (o/b) Internal Equalizer High
6.3 Keyboard Mode
F0H, 43H, 1nH, 2AH, 26H, 00H, 00H, N2H, 00H, V2H, F7H
n : Device Number
N2H : Parameter Number
V2H : Parameter Value 2
Performance Channel Enable SW
Performance Controller Assign Enable SW
19 13 ORGRESPONSE 0–7 Organ Combination Response
20 14 ORG.EF each/first Organ Attack Each/First
21 15 reserve
22 16 reserve
23 17 reserve
24 18 reserve
25 19 BAL DUAL -16 – +15 (o/b) Dual Balance
26 1A BAL SPLIT -16 – +15 (o/b) Split Balance
27 1B DETUNE 0–7 Dual Detune
28 1C SPOINT A-1–C7 Split Point
29 1D SAREA upper/lower Split Main Voice Area
30 1E SFTSW off/on Transpose Switch
31 1F SFTMAIN -24 – +24 (o/b) Main Voice Transpose
32 20 SFTSUB D -24 – +24 (o/b) Sub Voice Transpose (Dual)
33 21 SFTSUB S -24 – +24 (o/b) Sub Voice Transpose (Split)
34 22 SFTMAIN MD -24 – +24 (o/b) Main Voice MIDI Transpose
35 23 SFTSUB MD -24 – +24 (o/b) Sub Voice MIDI Transpose
36 24 LOCALSW off/on Local on/off Switch
37 25 TXCH 0–15, off TX Channel
38 26 RXCH 0–15, off, all Rx Channel
39 27 reserve
40 28 ASSPS1 0–3 PS1 Assign
41 29 ASSPS2 0–3 PS2 Assign
42 2A ASSCS 0–126 CS Assign
43 2B ASSCSMIN 0–127 CS Range Min
44 2C ASSCSMAX 0–127 CS Range Max
45 2D ASSFC 0–126 FC Assign
46 2E ASSFCMIN 0–127 FC Range Min
47 2F ASSFCMAX 0–127 FC Range Max
48 30 PERFNAME1 32–127 Performance Name 1
49 31 PERFNAME2 32–127 Performance Name 2
50 32 PERFNAME3 32–127 Performance Name 3
51 33 PERFNAME4 32–127 Performance Name 4
52 34 PERFNAME5 32–127 Performance Name 5
53 35 PERFNAME6 32–127 Performance Name 6
54 36 PERFNAME7 32–127 Performance Name 7
55 37 PERFNAME8 32–127 Performance Name 8
56 38 PERFNAME9 32–127 Performance Name 9
57 39 PERFNAME10 32–127 Performance Name 10
58 3A PERFNAME11 32–127 Performance Name 11
59 3B PERFNAME12 32–127 Performance Name 12
60 3C PERFNAME13 32–127 Performance Name 13
61 3D PERFNAME14 32–127 Performance Name 14
62 3E PERFNAME15 32–127 Performance Name 15
63 3F PERFNAME16 32–127 Performance Name 16
*1 Not possible for Dual mode with Organ 1 and another voice.
*2 Execute transmission only.
N2 data name V2 (dat a range) note
0 00 PMODE 0–2 Play Mode
1 01 VMAIN 0–11 Main Voice Number *1 2*
2 02 VDUAL 0–11 Sub Voice Number (Dual) *1
3 03 VSPLIT 0–11 Sub Voice Number (Split) 2*
4 04 VP1MONO stereo/mono Piano1 stereo/mono
5 05 VP2MONO stereo/mono Piano2 stereo/mono
APPENDIX
6 06 VBASSEW elec./upright Bass elec./upright
7 07 ORGCMB16 0–7 Organ Combination 16'
8 08 ORGCMB8 0–7 Organ Combination 8'
9 09 ORGCMB513 0–7 Organ Combination 5+1/3'
10 0A ORGCMB4 0–7 Organ Combination 4'
11 0B ORGCMB223 0–7 Organ Combination 2+2/3'
12 0C ORGCMB2 0–7 Organ Combination 2'
13 0D ORGCMB113 0–7 Organ Combination 1+1/3'
14 0E ORGCMB1 0–7 Organ Combination 1'
15 0F ORGATK4 0–7 Organ Attack 4'
16 10 ORGATK223 0–7 Organ Attack 2+2/3'
17 11 ORGATK2 0–7 Organ Attack 2'
18 12 ORGATKLEN 0–7 Organ Attack Length
0: Single/ 1: Dual/ 2: Split
6.4 Controller
F0H, 43H, 1nH, 2AH, 27H, 00H, 00H, N2H, 00H, V2H, F7H
n : Device Number
N2H : Parameter Number
V2H : Parameter Value 2
N2 data name V2 (data range) note
0 00 reserve
1 01 reserve
2 02 VOL TTL 0–127 Total Volume
3 03 VAL MAIN 0–127 Main Voice Volume
4 04 VUL SUB 0–127 Sub Voice Volume
5 05 VIBSPD 0–127 Vibrato Speed Control
6 06 REVDEP 0–7 Reverb Depth Control
7 07 MODSPD 0–7 Modulation Speed Control
* Transmitted and received when allocated to the assignable Controller.
76
Page 81

6.5 MIDI Filter
F0H, 43H, 1nH, 2AH, 2CH, 00H, 00H, N2H, 00H, 2V H, F7H
n : Device Number
N2H : Parameter Number
V2H : Parameter Value 2
N2 data name V2 (dat a range) note
0 00 TXMFILNOTE off/on Tx MIDI Filter Note on/off
1 01 TXMFILCTRL off/on Tx MIDI Filter Ctrl Change
2 02 TXMFILPC off/on Tx MIDI Filter Prog. Change
3 03 TXMFILAFT off/on Tx MIDI Filter Aftertouch
4 04 TXMFILPB off/on Tx MIDI Filter Pitch Bend
5 05 TXMFILCH off/on Tx MIDI Filter Channel Message
6 06 TXMFILPRM off/on Tx MIDI Filter Exclusive
7 07 TXMFILBULK off/on Tx MIDI Filter Bulk
8 08 TXMFILSYS off/on Tx MIDI Filter FA/FB/FC
9 09 RXMFILNOTE off/on Rx MIDI Filter Note on/off
10 0A RXMFILCTRL off/on Rx MIDI Filter Ctrl Change
11 0B RXMFILPC off/on Rx MIDI Filter Prog. Change
12 0C reserve
13 0D RXMFILPB off/on Rx MIDI Filter Pitch Bend
14 0E RXMFILCH off/on Rx MIDI Filter Channel Message
15 0F RXMFILPRM off/on Rx MIDI Filter Exclusive
16 10 RXMFILBULK off/on Rx MIDI Filter Bulk
6.6 Program Change Transmit Table
F0H, 43H, 1nH, 2AH, 2EH, 00H, N1H, N2H, V1H, V2H, F 7H
n : Device Number
N1H : Parameter Number
N2H : Parameter Number
V1H : Parameter Value 1 (= 1 don't send P .C.)
V2H : Parameter Value 2
7. BULK DUMP
7.1 System Setup & Dump Request
SYSTEM SETUP
data
0 F0H
143H
2 0 NH
3 7 AH
4
5
6S
7K
8910 2
11 4
12 9
13 0
14 S
15 Y
16
↓ 00H
31
Supplement: Parameter Change
1. 00H–0AH of system setup
32 M TUNE
↓
42 DEVNUM
43 ch eck_sum
44 F7H
byt es
DUM P REQUEST
data
0 F0H
143H
2 2NH
3 7AH
4S
5K
6782
94
10 9
11 0
12 S
13 Y
14
↓ 00H
29
30 F7H
N2 data name V2 (dat a range) note
0 00 TXPGM1 0–127 Voice 01
: : : 0–127 :
: : : 0–127 :
11 03 TXPGM12 0–127 Voice 12
12 04 TXPGM13 0–127 Perf. A01
: : : 0–127 :
: : : 0–127 :
23 17 TXPGM24 0–127 Perf. A12
24 18 TXPGM25 0–127 Perf. B01
: : : 0–127 :
: : : 0–127 :
35 23 TXPGM36 0–127 Perf. B12
N1 data name
00 TX P.C. Data
01 Bank Select MSB
02 Bank Select LSB
6.7 Program Change Receive Table
F0H, 43H, 1nH, 2AH, 2FH, 00H, 00H, N2H, 00H, V2H, F7H
n : Device Number
N2H : Parameter Number.
V2H : Parameter Value 2
N2 data nam e V2 (data range) note
0 00 RXPGM1 Voice 01–Perf. B12, off Program Change Number1
1 01 RXPGM2 Voice 01–Perf. B12, off Program Change Number 2
2 02 RXPGM3 Voice 01–Perf. B12, off Program Change Number 3
:: : : :
:: : : :
:: : : :
126 7E RXPGM127 Voice 01–Perf. B12, off
127 7F RXPGM128 Voice 01–Perf. B12, off
Program Change Number 127
Program Change Number 128
APPENDIX
77
Page 82

7.2 Voice
type 1: 00H
type 2: Voice Number
typ e2 VOICE NUMBER
00H Vo ice 01
01H Vo ice 02
02H Vo ice 03
03H Vo ice 04
04H Vo ice 05
05H Vo ice 06
06H Vo ice 07
07H Vo ice 08
08H Vo ice 09
09H Vo ice 10
0AH Voice 11
0BH Voice 12
0CH Perf. A01 Voice
0DH Perf. A02 Voice
0EH Perf. A03 Voice
0FH Perf . A04 Voice
10H Per f. A05 Voice
11H Per f. A06 Voice
12H Per f. A07 Voice
13H Per f. A08 Voice
14H Per f. A09 Voice
15H Per f. A10 Voice
16H Per f. A11 Voice
17H Per f. A12 Voice
18H Per f. B01 Voice
19H Per f. B02 Voice
1AH Perf. B03 Voice
1BH Perf. B04 Voice
1CH Perf. B05 Voice
1DH Perf. B06 Voice
VOICE
data
0 F0H
1 4 3H
2 0 NH
3 7 AH
4
5
6S
7K
8910 2
11 4
12 9
13 0
14 V
15 0
16
↓ 00H
29
30 type 1
31 type 2
Supplement: Par ameter Change
2. 00H–12H of Voice
32 PBRANGE
↓
44 INTEQH
45 ch eck_sum
46 F7H
bytes
DUM P REQUEST
data
0 F0H
143H
2 2NH
3 7AH
4S
5K
6782
94
10 9
11 0
12 V
13 0
14
↓ 00H
27
28 ty pe 1
29 ty pe 2
30 F7H
1EH Perf. B07 Voice
1FH Perf . B08 Voice
20H Per f. B09 Voice
21H Per f. B10 Voice
22H Per f. B11 Voice
23H Per f. B12 Voice
APPENDIX
78
Page 83

7.3 Keyboard Mode
7.4 MIDI Filter Table Bulk Dump
type 1: 00H
type 2: Performance Number
typ e2 PERFORM ANCE NUMBER
00H Per f. A01
::
::
0BH Perf. A12
0CH Perf. B01
::
::
17H Per f. B12
18H Vo ices
KEYBOARD MODE
data
0 F0H
1 43H
2 0NH
3 7AH
4
by tes
5
6S
7K
8910 2
11 4
12 9
13 0
14 K
15 B
16
↓ 00H
29
30 ty pe 1
31 ty pe 2
Supplement: Parameter Change
3. 00H–3FH of Keyboard Mode
32 PM ODE
↓
95 PERFNAME 16
96 check_sum
97 F7H
DUM P REQUEST
data
0 F0H
1 4 3H
2 2 NH
3 7 AH
4S
5K
6782
94
10 9
11 0
12 K
13 B
14
↓ 00H
27
28 type 1
29 type 2
30 F7H
P.C. TX TABL E
data
0 F0H
143H
2 ONH
3 7 AH
4
by tes
5
6S
7K
8910 2
11 4
12 9
13 0
14 M
15 F
16
↓ 00H
31
Supplement: Parameter Change
4. 00H–10H of MIDI Filter Table
32 TXM FILNOTE
↓
48 RXM FI LBULK
49 ch eck_sum
50 F7H
DUM P REQUEST
data
0 F0H
143H
2 2NH
3 7AH
4S
5K
6782
94
10 9
11 0
12 M
13 F
14
↓ 00H
29
30 F7H
APPENDIX
79
Page 84

7.5 Program Change Transmit Table Bulk Dump
type 1: 00H
type 2: Voice No.
typ e 2 VOICE NUMBER
00H P.C.Data
01H Bank Select MSB
02H Bank Select LSB
P.C. Tx TABLE
data
0 F0H
1 43H
2 0NH
3 7AH
4
by tes
5
6S
7K
8910 2
11 4
12 9
13 0
14 P
15 T
16
↓ 00H
29
30 ty pe 1
31 ty pe 2
Supplement: Parameter Change
5. 00H–35H of Program Change
32 TXPGM 1 (M SB)
33 TXPGM 1 (L SB)
↓
102 TXPGM 36 (M SB)
103 TXPGM 36 (L SB)
104 check_sum
105 F7H
Transmit Table
DUM P REQUEST
data
0 F0H
1 4 3H
2 2 NH
3 7 AH
4S
5K
6782
94
10 9
11 0
12 P
13 T
14
↓ 00H
27
28 type 1
29 type 2
30 F7H
7.6 Program Change Receive Table Bulk Dump
P.C. Tx TABLE
data
0 F0H
1 4 3H
2 0 NH
3 7 AH
4
by tes
5
6S
7K
8910 2
11 4
12 9
13 0
14 P
15 R
16
↓ 00H
31
Supplement: Parameter Change
6. 00H–7FH of Program Change
Receive Table
32 RXPGM 1
↓
159 RXPGM128
160 check_su m
161 F7H
DUM P REQUEST
data
0 F0H
143H
2 2NH
3 7AH
4S
5K
6782
94
10 9
11 0
12 P
13 R
14
↓ 00H
29
30 F7H
APPENDIX
80
Page 85

Page 86

N
Name (Performance)...........................................................50
O
Organ Combination .............................................................50
P
Panel Switch (PS)................................................................50
PERFORMANCE PLAY MODE...........................................38
Performance Enable............................................................45
Performance Name .............................................................50
Performance Parameters ....................................................12
Pitch Bend Range................................................................51
Play Modes..........................................................................10
Popup Time .........................................................................45
PRECAUTIONS.....................................................................2
Preset Performance List......................................................64
Preset Voice List..................................................................63
Program Change (PC) Table...............................................46
Program Change Receive ...................................................47
Program Change Transmit ..................................................46
R
REAR PANEL........................................................................9
Receive Filter.......................................................................46
Reverb...........................................................................22, 52
Reverb Bypass ....................................................................44
S
Single Mode.........................................................................20
Specifications ......................................................................63
Split Mode............................................................................28
Split point.......................................................................29, 31
Stereo/Mono Piano..............................................................21
STORE ................................................................................53
Store Type...........................................................................45
System.................................................................................44
System Settings...................................................................13
T
Transmit Filter......................................................................46
Transpose............................................................................33
Troubleshooting...................................................................61
U
UPPER PANEL .....................................................................4
V
Velocity Curves....................................................................52
VOICE PLAY MODE ...........................................................19
Voice Parameters................................................................11
Voices and Polyphony.........................................................20
82
APPENDIX
■ INDEX
A
APPENDIX ..........................................................................55
Auto Store............................................................................45
B
Backup Battery ......................................................................2
Balance (Dual).....................................................................27
Balance (Split) .....................................................................30
Bank Select (PC Table).......................................................47
Bass, Electric/Upright ..........................................................21
Blank Chart..........................................................................64
Bulk Dump...........................................................................55
C
Channel ...............................................................................47
Continuous Slider (CS)........................................................48
CS FC..................................................................................48
D
Demo Songs........................................................................17
Detune.................................................................................27
Device Number....................................................................44
Dual Mode ...........................................................................26
E
EDIT MODE.........................................................................42
Edit Menu Tree....................................................................42
Equalizer (Internal) ..............................................................52
Equalizer (Panel).................................................................24
Error Messages ...................................................................60
F
Foot Controller (FC).............................................................48
G
GETTING STARTED...........................................................14
I
Initialize................................................................................56
Internal Control Functions ...................................................49
Internal Equalizer.................................................................52
K
Keyboard Sensitivity............................................................51
L
Local....................................................................................48
M
Main and Sub Voices.....................................................25, 32
Master Tune ........................................................................44
MIDI (Using MIDI)................................................................57
MIDI Control Change Messages .........................................49
MIDI Data Format................................................................72
MIDI Filter............................................................................46
MIDI Implementation Chart..................................................81
MIDI Merge..........................................................................44
MIDI Panic...........................................................................37
MIDI System Connections...................................................58
MIDI Transmit Enable..........................................................36
Modulation.....................................................................23, 52
Modulation Wheel Assign....................................................51
Page 87

Page 88

documentation manual, user maintenance, brochure, user reference, pdf manual
This file has been downloaded from:
User Manual and User Guide for many equipments like mobile phones, photo cameras, monther board, monitors, software, tv, dvd, and othes..
Manual users, user manuals, user guide manual, owners manual, instruction manual, manual owner, manual owner's, manual guide,
manual operation, operating manual, user's manual, operating instructions, manual operators, manual operator, manual product,
 Loading...