

Page 1

OWNER’S MANUAL
P-100
Page 2

FCC INFORMATION (U.S.A.)
1.
IMPORTANT NOTICE: DO NOT MODIFY THIS UNIT!
This product, when installed as indicated in the instructions contained in this manual, meets FCC requirements. Modifications not expressly approved by
Yamaha may void your authority, granted by the FCC, to use the product.
IMPORTANT: When connecting this product to accessories and/or another product use only high quality shielded cables. Cable/s supplied with this
2.
product MUST be used. Follow all installation instructions. Failure to follow instructions could void your FCC authorization to use this product in
the USA.
3.
NOTE: This product has been tested and found to comply with the requirements listed in FCC Regulations, Part 15 for Class “B” digital devices.
Compliance with these requirements provides a reasonable level of assurance that your use of this product in a residential environment will not result in
harmful interference with other electronic devices. This equipment generates/uses radio frequencies and, if not installed and used according to the
instructions found in the users manual, may cause interference harmful to the operation of other electronic devices. Compliance with FCC regulations
does not guarantee that interference will not occur in all installations. If this product is found to be the source of interference, which can be determined by
turning the unit “OFF” and “ON”, please try to eliminate the problem by using one of the following measures:
Relocate either this product or the device that is being affected by the interference.
Utilize power outlets that are on different branch (circuit breaker or fuse) circuits or install AC line filter/s.
In the case of radio or TV interference, relocate/reorient the antenna. If the antenna lead-in is 300 ohm ribbon lead, change the lead-in to co-axial type
If these corrective measures do not produce satisfactory results, please contact the local retailer authorized to distribute this type of product. If you can
not locate the appropriate retailer, please contact Yamaha Corporation of America, Electronic Service Division, 6600 Orangethorpe Ave, Buena Park, CA
90620
* This applies only to products distributed by YAMAHA CORPORATION OF AMERICA.
Dette apparat overholder det gaeldende EF-direktiv
vedrørrende radiostørj.
Cet appareil est conforme aux prescriptions de la directive communautaire 87/308/CEE.
Diese Geräte entsprechen der EG-Richtlinie
82/499/EWG und/oder 87/308/EWG.
This product complies with the radio frequency
interference requirements of the Council Directive
82/499/EEC and/or 87/308/EEC.
Questo apparecchio è conforme al D.M.13 aprile 1989
(Direttiva CEE/87/308) sulla soppressione dei radiodisturbi.
Este producto está de acuerdo con los requisitos sobre
interferencias de radio frequencia fijados por el Consejo
Directivo 87/308/CEE.
YAMAHA CORPORATION
IMPORTANT NOTICE FOR THE UNITED KINGDOM
Connecting the Plug and Cord
IMPORTANT
THE WIRES IN MAINS LEAD ARE COLOURED IN
ACCORDANCE WITH THE FOLLOWING CODE:
Blue:
Brown: LIVE
As the colours of the wires in the mains lead of this apparatus
may not correspond with the coloured markings identifying
the terminals in your plug, proceed as follows: The wire which
is coloured BLUE must be connected to the terminal which is
marked with the letter N or coloured BLACK. The wire
which is coloured BROWN must be connected to the terminal which is marked with the letter L or coloured RED.
Making sure that neither core is connected to the earth terminal of the three pin plug.
NEUTRAL
CANADA
THIS DIGITAL APPARATUS DOES NOT EXCEED THE
"CLASS B" LIMITS FOR RADIO NOISE EMISSIONS
FROM DIGITAL APPARATUS SET OUT IN THE RADIO
INTERFERENCE REGULATION OF THE CANADIAN
DEPARTMENT OF COMMUNICATIONS.
LE PRESENT APPAREIL NUMERIQUE N´EMET PAS DE
BRUITS RADIOELECTRIQUES DEPASSANT LES LIMITES
APPLICABLES AUX APPAREILS NUMERIQUES DE LA
"CLASSE B" PRESCRITES DANS LE REGLEMENT SUR LE
BROUILLAGE RADIOELECTRIQUE EDICTE PAR LE
MINISTERE DES COMMUNICATIONS DU CANADA.
* This applies only to products distributed by YAMAHA
CANADA MUSIC LTD.
Litiumbatteri!
Bör endast bytas av servicepersonal.
Explosionsfara vid felaktig hantering.
VAROITUS!
Lithiumparisto, Räjähdysvaara.
Pariston saa vaihtaa ainoastaan alan
ammattimies.
ADVARSEL!
Lithiumbatteri!
Eksplosionsfare. Udskiftning má kun foretages
af en sagkyndig, – og som beskrevet i
servicemanualen.
Page 3
SPECIAL MESSAGE SECTION
PRODUCT SAFETY MARKINGS: Yamaha electronic
products may have either labels similar to the graphics
shown below or molded/stamped facsimiles of these
graphics on the enclosure. The explanation of these
graphics appears on this page. Please observe all cautions
indicated on this page and those indicated in the safety instruction section.
CAUTION: TO REDUCE THE RISK OF
ELECTRIC SHOCK DO NOT REMOVE
COVER (OR BACK). NO USER-SERVICEABLE
PARTS INSIDE. REFER SERVING TO
QUALIFIED SERVICE PERSONNEL.
The exclamation point within the
equilateral triangle is intended to alert
the user to the presence of important
operating and maintenance (servicing)
instructions in the literature accompanying the product.
The lightning flash with arrowhead
symbol within the equilateral triangle is
intended to alert the user to the presence
of uninsulated “dangerous voltage”
within the product’s enclosure that may
be of sufficient magnitude to constitute a
risk of electrical shock.
IMPORTANT NOTICE: All Yamaha electronic products
arc tested and approved by an independent safety testing
laboratory in order that you may be sure that when it is
properly installed and used in its normal and customary
manner all forcecable risks have been eliminated. DO NOT
modify this unit or commission others to do so unless
specifically authorized by Yamaha. Product performance
and/or safety standards may be diminished. Claims filed
under the expressed warranty may be denied if the unit
is/has been modified. Implied warranties may also be
affected.
ENVIRONMENTAL ISSUES: Yamaha strives to produce
products that are both user safe and environmentally
friendly. We sincerely believe that our products and the
production methods used to produce them, meet these
goals. In keeping with both the letter and the spirit of the
law we want you to be aware of the following:
Battery Notice: This product MAY contain a small nonrechargeable battery which (if applicable) is soldered in
place. The average life span of this type of battery is
approximately five years. When replacement becomes
necessary, contact a qualified service representative to perform the replacement.
Warning: Do not attempt to recharge, disassemble, or
incinerate this type of battery. Keep all batteries away
from children. Dispose of used batteries promptly and as
regulated by applicable laws. Note: In some areas, the
servicer is required by law to return the defective parts.
However, you do have the option of having the servicer
dispose of these parts for you.
Disposal Notice: Should this product become damaged beyond repair or for some reason its useful life is considered
to be at an end please observe all local, state, and federal
regulations that relate to the disposal of products that
contain lead, batteries, plastics, etc.
NOTICE: Service charges incurred due to lack of knowl-
edge relating to how a function or effect works (when the
unit is operating as designed), are not covered by the manu-
facturer’s warranty,and are therefore the owners
responsibility. Please study this manual carefully and con-
sult your dealer before requesting service.
NAME PLATE LOCATION: The graphic below indicates
the location of the name plate. The model number, serial
number, power requirements, etc., are located on this plate.
You should record the model number, serial number, and
the date of purchase in the spaces provided below and retain
this manual as a permanent record of your purchase.
SPECIFICATIONS SUBJECT TO CHANGE: The information contained in this manual is believed to be correct at
the time of printing. However. Yamaha reserves the right
to change or modify any of the specifications without
notice or obligation to update existing units.
92-469
Page 4

IMPORTANT
SAFETY AND INSTALLATION INSTRUCTIONS
INFORMATION RELATING TO POSSIBLE PERSONAL INJURY, ELECTRIC SHOCK, AND
FIRE HAZARD POSSIBILITIES HAS BEEN INCLUDED IN THIS LIST.
WARNING —
product, basic precautions should always be followed.
These precautions include, but are not limited to, the
following:
1.
Read all Safety Instructions, Installation
Instructions, Special Message Section items, and any
Assembly Instructions found in this manual BEFORE
making any connections, including connection to the
main supply.
2. Main Power Supply Verification: Yamaha products
are manufactured specifically for the supply voltage in
the area where they are to be sold. If you should move,
or if any doubt exists about the supply voltage in your
area, please contact your dealer for supply voltage
verification and (if applicable) instructions. The required supply voltage is printed on the name plate. For
name plate location, please refer to the graphic found
in the Special Message Section of this manual.
3. This product may be equipped with a polarized plug
(one blade wider than the other). If you are unable to
insert the plug into the outlet, turn the plug over and
try again. If the problem persists, contact an electrician to have the obsolete outlet replaced. Do NOT defeat the safety purpose of the plug.
4. Some electronic products utilize external power supplies or adapters. DO NOT connect this type of product to any power supply or adapter other than one
described in the owners manual, on the name plate, or
specifically recommended by Yamaha.
5. WARNING: Do not place this product or any other
objects on the power cord or place it in a position
where anyone could walk on, trip over, or roll any-
thing over power or connecting cords of any kind. The
U
se of an extension cord is not recommended! If you
must
U
a 25’ cord (or less) is 18 AWG. NOTE: The smaller
the AWG number, the larger the current handling
capacity. For longer cxtcnsion cords, consult a local
electrician.
6. Ventilation: Electronic products, unless specifically
designed for enclosed installations, should be placed in
locations that do not interfere with proper ventila-
tion. If instructions for enclosed installations are not
provided, it must be assumed that unobstructed ventilation is required.
7. Temperature considerations: Electronic products
should be installed in locations that do not signifi-
cantly contribute to their operating temperature.
Placement of this product close to heat sources such
as: radiators, heat registers and other devices that product heat should be avoided.
When using any electrical or electronic
se an extension cord, the minimum wire size for
8. This product was NOT designed for use in wet/damp
locations and should not be used near water or exposed
to rain. Examples of wet/damp locations are: near a
swimming pool, spa, tub, sink, or wet basement.
9. This product should be used only with the components
supplied or; a cart, rack, or stand that is recommended
by the manufacturer. If a cart, rack, or stand is used.
please observe all safety markings and instructions
that accompany the accessory product.
10. The power supply cord (plug) should be disconnected
from the outlet when electronic products are to be left
unused for extended periods of time. Cords should
also be disconnected when there is a high probability
of lightening and/or electrical storm activity.
11. Care should be taken that objects do not fall and
liquids are not spilled into the enclosure through any
openings that may exist.
12. Electrical/electronic products should be serviced by a
qualified service person when:
a.
The power supply cord has been damaged; or
b. Objects have fallen, been inserted, or liquids have been
spilled into the enclosure through openings; or
c.
The product has been exposed to rain; or
d. The product does not operate, exhibits a marked change
in performance; or
c. The product has been dropped, or the enclosure of the
product has been damaged.
13. Do not attempt to service this product beyond that
described in the user-maintenance instructions. All
other servicing should be referred to qualified service
personnel.
14. This product, either alone or in combination with an
amplifier and headphones or speaker/s, may be capable
of producing sound levels that could cause permanent
hearing loss. DO NOT operate for a long period of
time at a high volume level or at a level that is uncom-
fortable. If you experience any hearing loss or ringing
in the ears, you should consult an audiologist.
IMPORTANT: The louder the sound, the shorter the
time period before damage occurs.
15. Some Yamaha products may have benches and/or accessory mounting fixtures that are either supplied as a
part of the product or as optional accessories. Some of
these items are designed to be dealer assembled or installed. Please make sure that benches are stable and
any optional fixtures (where applicable) are well
secured BEFORE using Benches supplied by Yamaha
are designed for seating only No other uses are
recommended.
PLEASE KEEP THIS MANUAL
92-469-2
Page 5

THANK YOU! ... for purchasing the Yamaha Clavinova PF Series P-100. The P-100 is a high-performance
electronic piano with ten voices and a host of functions that make it an ideal instrument for professional
stage and studio applications, as well as for use at home. Its features include the following:
ll
High quality AWM sound
ll
The P-100 features a selection of ten voices and a
maximum simultaneous note output of 32 polyphonic notes. All of the voices were recorded using the latest sampling techniques, then processed
using Yamaha’s patented AWM sound generation
technology.
Dual and Split voice modes
The P-100 features Dual and Split voice modes
that let you play combinations of two voices
at once. In Split mode, the key transpose values
can even be set independently for each voice.
The P-100 thus gives you a wide range of performance flexibility in a single piano keyboard.
ll
Superior piano sound
Among the P-100’s voices are two authentic piano
sounds that are samples of actual acoustic instruments. One is a grand piano sound, with rich bass
tones and sparkling high notes that capture the
natural reverb characteristics of a real grand piano.
The other is a bright contemporary piano that will
make a perfect addition to any band.
ll
Digital signal processing
The P-100 has a built-in digital signal processor
unit that provides full stereo reverb, chorus,
symphonic, and tremolo effects, as well as an
easy-to-control three-band equalizer that lets you
tailor the P-100’s sound to suit your taste.
ll
Touch-sensitive keyboard
The P-100’s full-sized 88-note piano keyboard
incorporates Yamaha’s Action Effect keyboard
technology, which gives it the feel and response of
a real piano keyboard. You can even adjust the
keyboard’s sensitivity to suit your playing style,
selecting from Normal, Soft, Hard, or Fixed
settings.
ll
MIDI control capability
The P-100 offers many of the control features
found on a MIDI master keyboard: velocity sensi-
tivity, pitch bend and modulation wheels, an
assignable data slider, program change send and
receive capabilities, and MIDI transpose and
MIDI merge functions. Also, in addition to jacks
for sustain, soft, and sostenuto pedals, the P-100
gives you the option of connecting a MIDI foot
controller that can be assigned in the same manner
as the continuous slider.
Page 6

CONTENTS
PRECAUTIONS
INTRODUCING THE
Upper panel
Rear panel ............................................................
SETTING UP THE
PLAYING THE DEMO
PLAYING THE P-100
Selecting a voice
Using the reverb effect
Using the modulation
Adjusting the equalization
DUAL MODE
Selecting voices
Adjusting the voice balance
Detuning the voices
SPLIT MODE
Entering Split mode
Selecting voices in Split mode
Changing the split point
ADJUSTING THE
Tuning the P-100
Selecting a velocity curve
Using the transpose function
Setting the transpose
Transposing in Dual and Split modes
....................................................
P-100
.........................................................
P-100
..................................................
........................................................
in Dual mode
.............................................
........................................................
.............................................
KEYBOARD
.................................................
................................
.....................................
SONGS
...........................................
........................................
effects
......................................
amount
..........................
...............................
...................................
............................
................................
............................
........................
....................................
...............................
...............................
..................
1
2
2
4
5
6
7
7
9
10
11
12
12
13
14
15
15
16
17
19
19
20
21
22
23
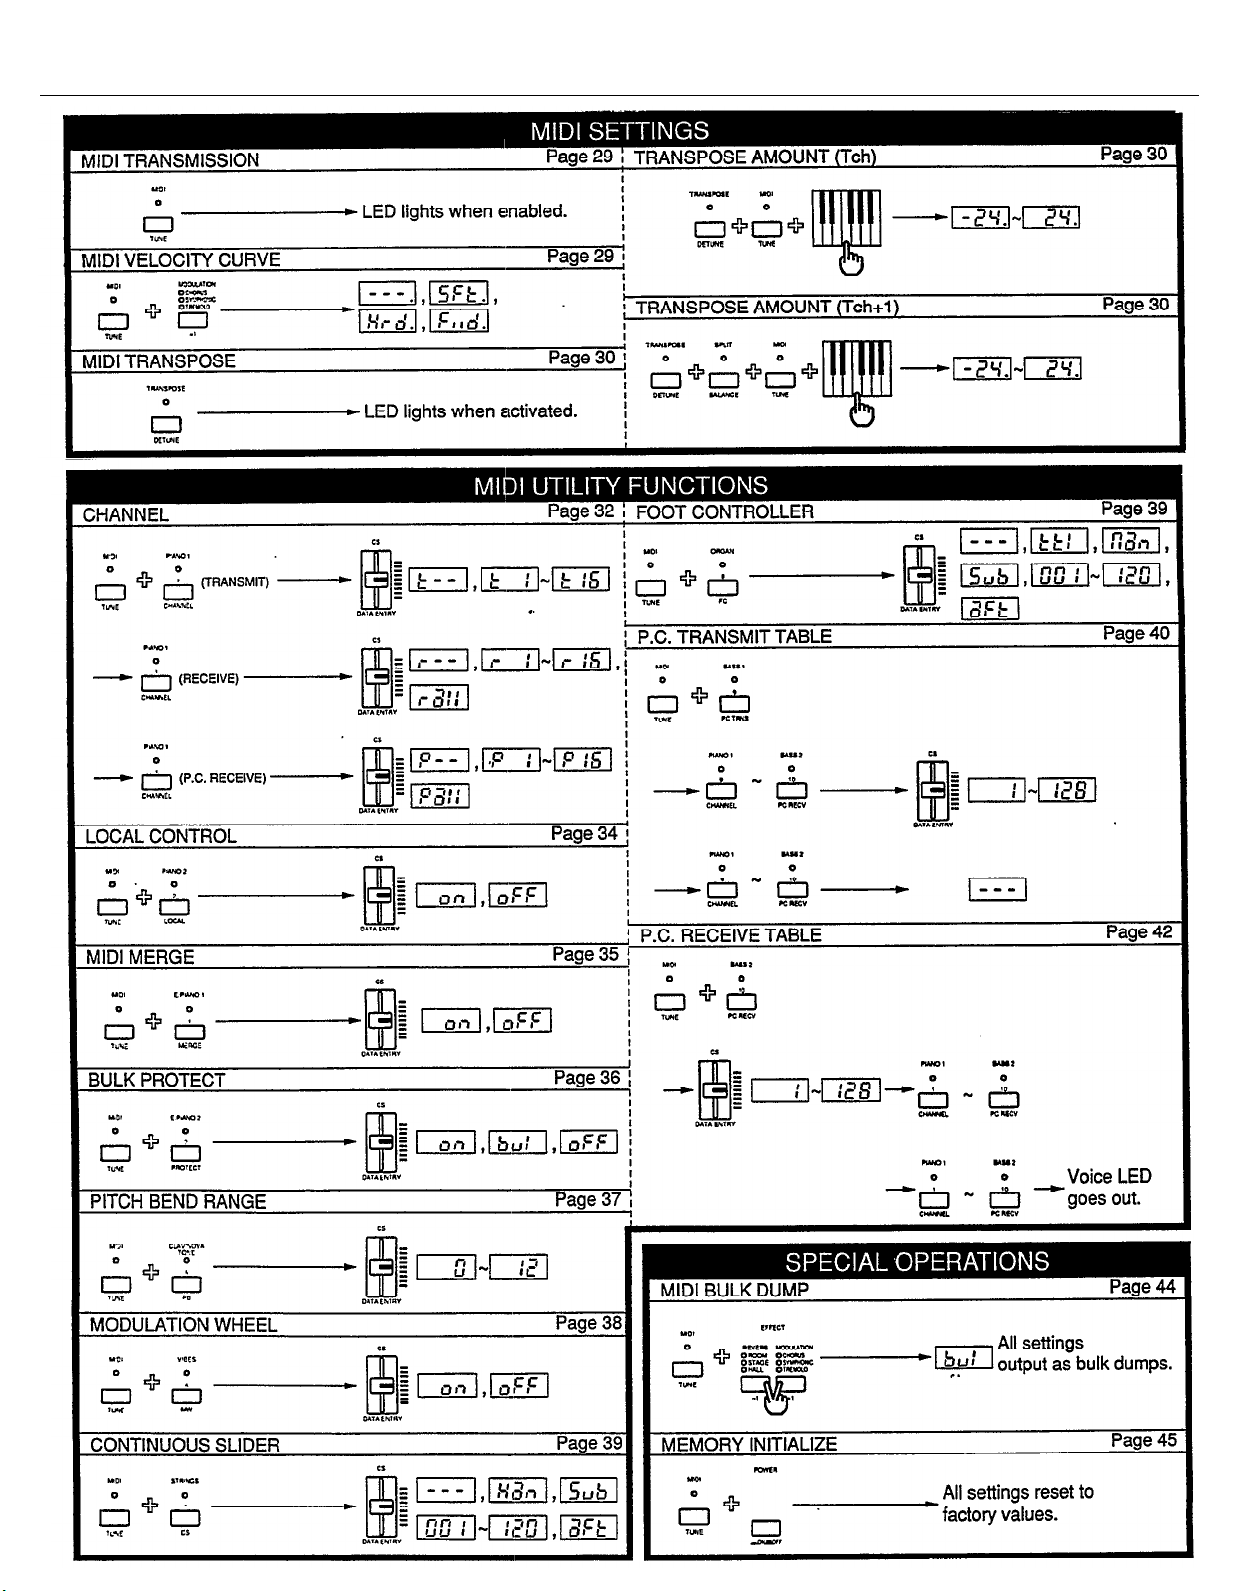
MIDI UTILITY MODE SETTINGS
MIDI Utility mode
Transmit and receive
Local control
MIDI merge
Bulk protect
Pitch bend range
Modulation wheel
Assignable
Program change transmit table
Program change receive table
SPECIAL OPERATIONS
Bulk dumps
Memory
SYSTEM APPLICATIONS
Using the P-100 with a tone generator
Using the P-100 with another MIDI
keyboard
Using the P-100 in an extended MIDI
system
Using the P-100 with a MIDI data
recorder
ERROR MESSAGES
SPECIFICATIONS
INDEX
MIDI DATA FORMAT
controllers .........................................
initialization ..........................................
..............................................................
............................................................
....................................................................
...............................................
channels
........................................................
.........................................................
.........................................................
..................................................
................................................
..........................................................
..........................................................
............................................
...............................................
.........................................
............................
............................
..............................
.....................................
..................................
...................
................ 46
31
31
32
34
35
36
37
38
39
40
42
44
44
45
46
47
48
49
50
51
52
54
MIDI KEYBOARD CONTROL
FUNCTIONS
What is MIDI?
The P-100’s MIDI
Enabling MIDI
Selecting a MIDI
Using the
.......................................................
.....................................................
configuration
transmission
velocity curve
transpose function
MIDI
.........................
...............................
.........................
.....................
25
25
27
29
29
30
MIDI IMPLEMENTATION
CHART .................
58
Page 7
Clavinova PF P-100 Operation Guide
Page 8
Clavinova PF P-100 Operation Guide
Page 9

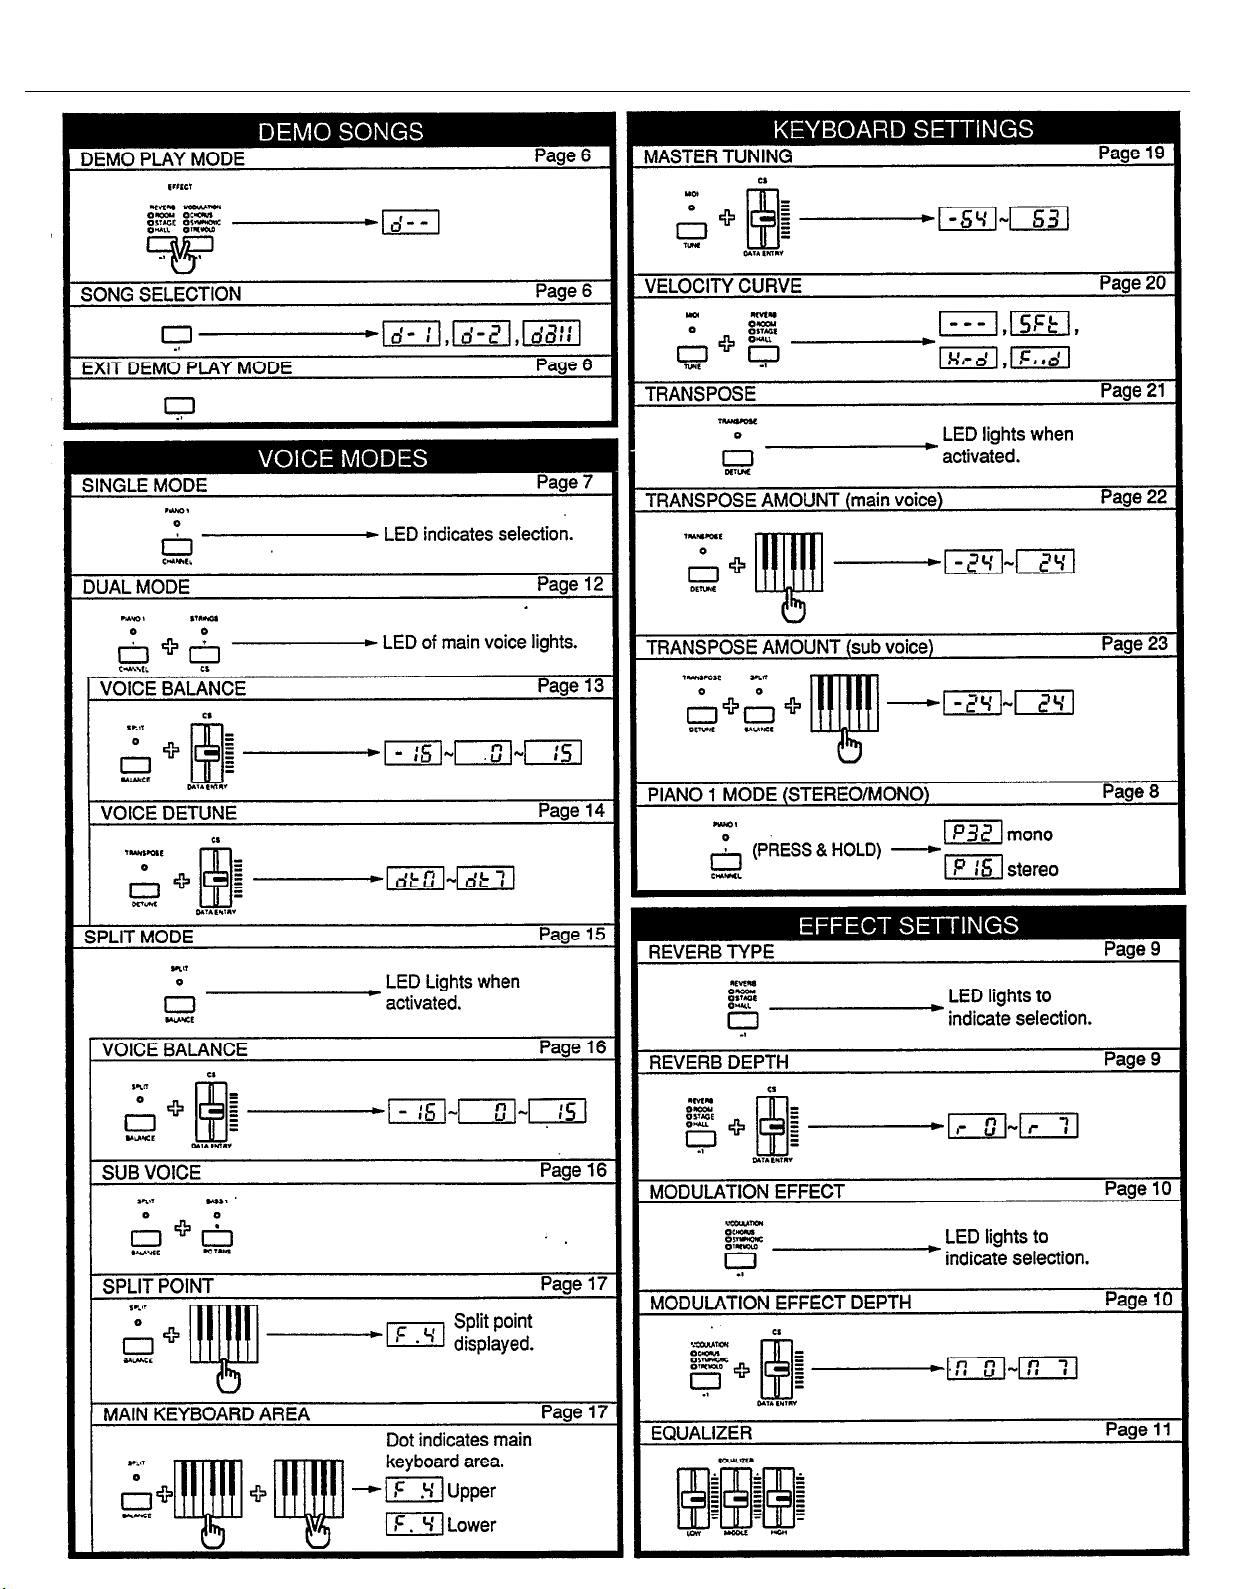
PLAYING THE DEMO SONGS
PLAYING THE P-100
DUAL MODE
SPLIT MODE
ADJUSTING THE KEYBOARD
MIDI KEYBOARD CONTROL FUNCTIONS
MIDI UTILITY MODE SETTINGS
SPECIAL OPERATIONS
Page 10

PRECAUTIONS
The P-100 is a fine musical instrument composed of sensitive mechanisms and delicate digital circuitry. To ensure a
long lifetime of reliable service, observe these precautions when installing, moving, or handling the P-100.
l
l l
Location
Do not use the P-100 in locations where it will be
exposed to direct sunlight, extremes of temperature or humidity, or excessive dust or vibration.
l l
Handling
Avoid rough handling. Do not drop the P-100 or
subject it to shock, as these can damage the
piano’s internal circuitry. Also, do not apply
excessive force to controls or terminals. When
moving the P-100. first unplug the AC power cord
and all other cables to prevent damage to cords
and jacks. When removing plugs from terminals,
always grip them directly rather than pulling on
the cords.
l l
Cleaning
Use a slightly moist cloth and a neutral cleanser to
clean the P-100. Do not use abrasive cleaners,
waxes, solvents, or chemically treated cloths to
clean the P-100, as these may damage the cabi-
net’s finish or dull the keys.
l l
AC Power
The power requirement of your P-100 has been set
to match the mains power supply voltage in your
area. Make sure that your local AC mains voltage
matches the voltage specified on the name plate
on the rear panel of your P-100. If you have any
doubts about voltage compatibility. please consult
your local Yamaha dealer. If you plan to use your
P-100 in an area with a different voltage. be sure
to use an appropriate converter.
Extended disuse
Electrical storms can cause power surges which
can damage the P-100’s circuitry even if the
power switch is turned off. Therefore, it is best to
disconnect the P-100’s power cord from the AC
outlet when you will not be using it for an
extended period of time.
l
Service and Modification
The P-100 contains no user serviceable parts.
Never open the piano’s cabinet or tamper with it in
any way, as doing so can result in electrical shock
or damage to the P-100. Refer all servicing to
qualified YAMAHA service personnel.
l
Backup battery
The P-100’s internal settings are preserved by a
lithium backup battery which has a life of approximately 5 years. (The battery’s life may be somewhat shorter, depending on the time elapsed
between your P- 100’s date of manufacture and the
date you purchased it.) When the battery charge
runs low, the “Er1” error message will appear in
the LED display. If this display appears. save any
settings you may want to keep using the bulk
dump procedure, if possible, then contact your
Yamaha dealer or a Yamaha service center to have
the battery replaced.
l l
Electromagnetic interference
Avoid using your P-100 near televisions. radios. or
other equipment generating electromagnetic fields.
Proximity to such equipment can cause the P-100
to malfunction. and may generate interference
noise in the other appliance as well.
1
Page 11
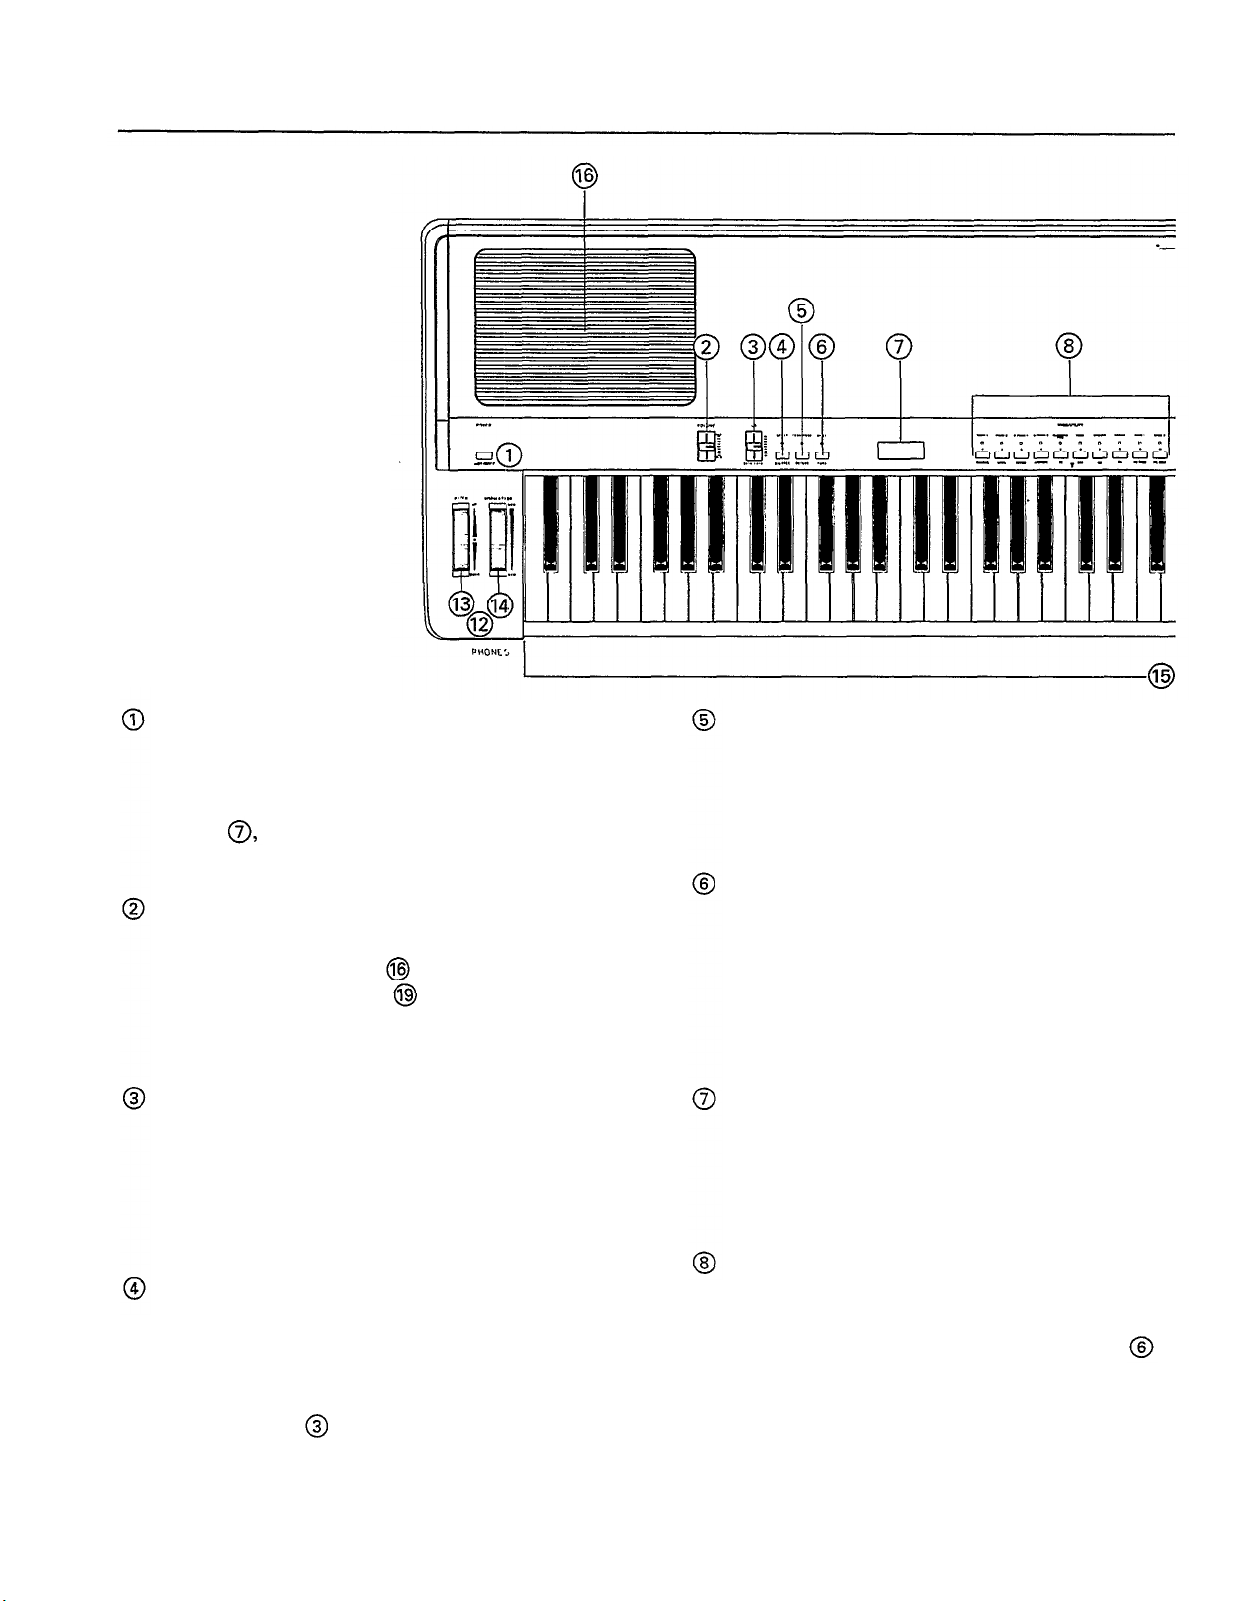
Upper panel
INTRODUCING THE P-100
[POWER] switch
This switch turns the P-100’s power supply on and
off. When the power is turned on, the number of
the voice last selected will appear in the LED
display
[VOICE/UTILITY] button will light.
[VOLUME] slider
This slider controls the overall volume of sound
output from the speakers
via the LINE OUT jacks
the P-100. Move the slider up to increase the
volume, or down to decrease the volume.
[CS (DATA ENTRY)] slider
This continuous slider can be assigned to control
data transmission for a variety of MIDI functions.
It is also used to select a desired value when
changing P-100 settings other than the current
voice selection.
[SPLIT (BALANCE)] button
This button turns the Split voice mode on and off.
and allows you to make settings related to Split
mode operation. Also. in Dual or Split modes.
it can be used in combination with the [DATA
ENTRY] slider
the main and sub voices.
and the LED above the corresponding
as well as that output
on the rear panel of
to adjust the balance between
[TRANSPOSE (DETUNE)] button
The [TRANSPOSE] button turns the transpose
function on and off, and lets you make settings
related to this function. In Dual mode, it can be
used to adjust the detune amount.
[MIDI (TUNE)] button
This button enables the P-100’s transmission of
MIDI messages. You will use it to select the MIDI
Utility mode functions, and to transmit the P-100’s
current settings to another MIDI device as a MIDI
bulk dump. It is also used to adjust the P-100’s
tuning and select keyboard velocity curve settings.
LED display
This three-digit numeric LED display shows the
current main voice selection in Single, Dual, and
Split modes. It also shows the values of various
parameters when you change the P-100’s settings.
[VOICE/UTILITY] buttons
These buttons let you select the voices you wish to
play in Single. Dual. and Split modes. They are
also used together with the [MIDI] button
select the MIDI utility functions.
to
2
Page 12
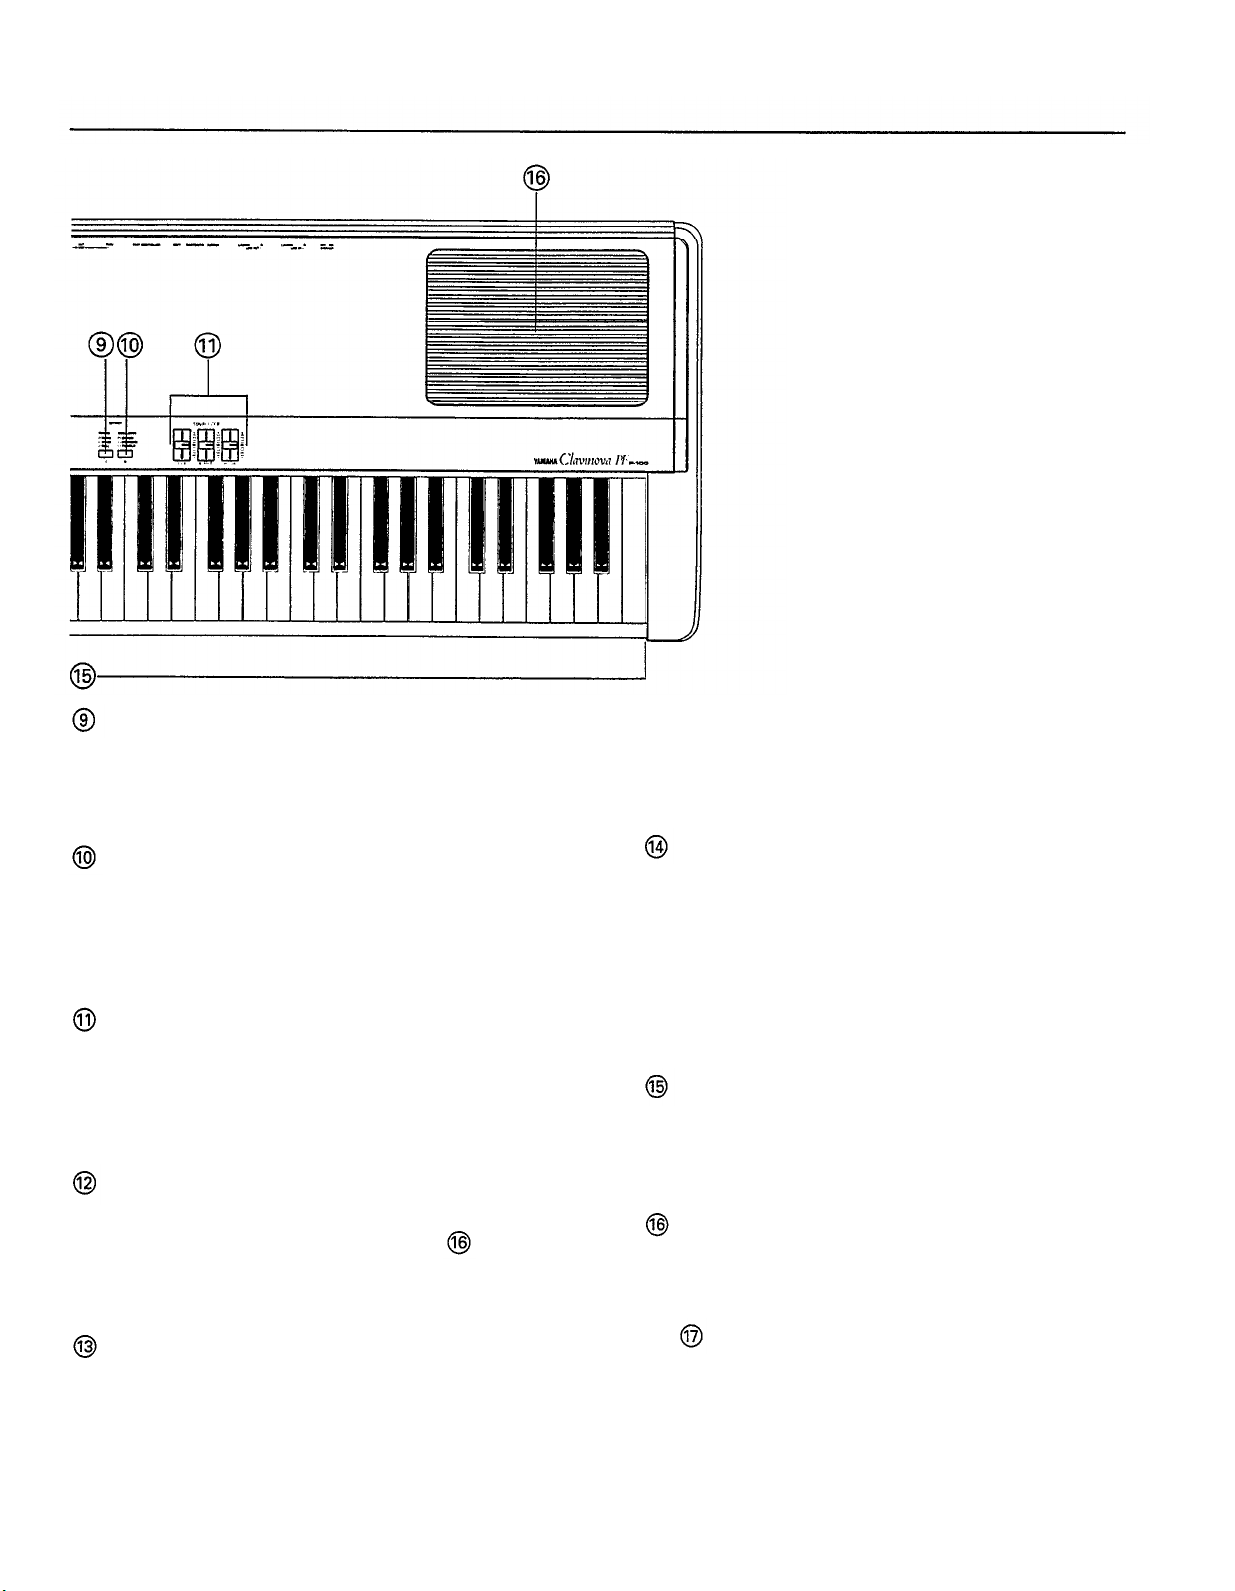
[REVERB (-1)] button
This button is used to change the reverb type and
depth. It is also used to lower Utility mode and
transpose function settings one step at a time.
Dual mode. In Split mode, only the main voice is
affected. A Utility mode function lets you change
the pitch bend range to any value within a range of
one octave.
[MODULATION (+1)] button
This button lets you change the modulation effect
type and depth. Also, you can use it to raise Utility
mode and transpose function settings one step at a
time.
[EQUALIZER] sliders
These sliders adjust the level of the sound output
by the P-100 in three bands: high, middle, and
low. In Dual and Split modes, the changes you
make will affect both voices being played.
PHONES jack
You can connect a stereo headphone set to the
P-100 using this jack. The speakers
will turn
off automatically when you plug in your headphones.
[PITCH] wheel
This wheel bends the pitch of notes you play up or
down, returning automatically to the center position when you release it. It also transmits pitch
bend messages to other instruments when MIDI
transmission is enabled. Both voices are bent in
[MODULATION] wheel
This wheel applies a vibrato effect to the notes
you play when you roll it upward. (This effect
does not apply to the two acoustic piano voices.)
It also transmits modulation messages to other
instruments when MIDI transmission is enabled.
Both voices are modulated in Dual mode: only the
main voice is affected in Split mode.
Keyboard
This 88-note Action Effect keyboard simulates the
action and response of an acoustic piano keyboard.
Speakers
The P-100’s two built-in 13 cm speakers each pro-
vide an output of 20 watts. If you wish, you can
turn the speakers off using the SPEAKER switch
on the rear panel.
3
Page 13
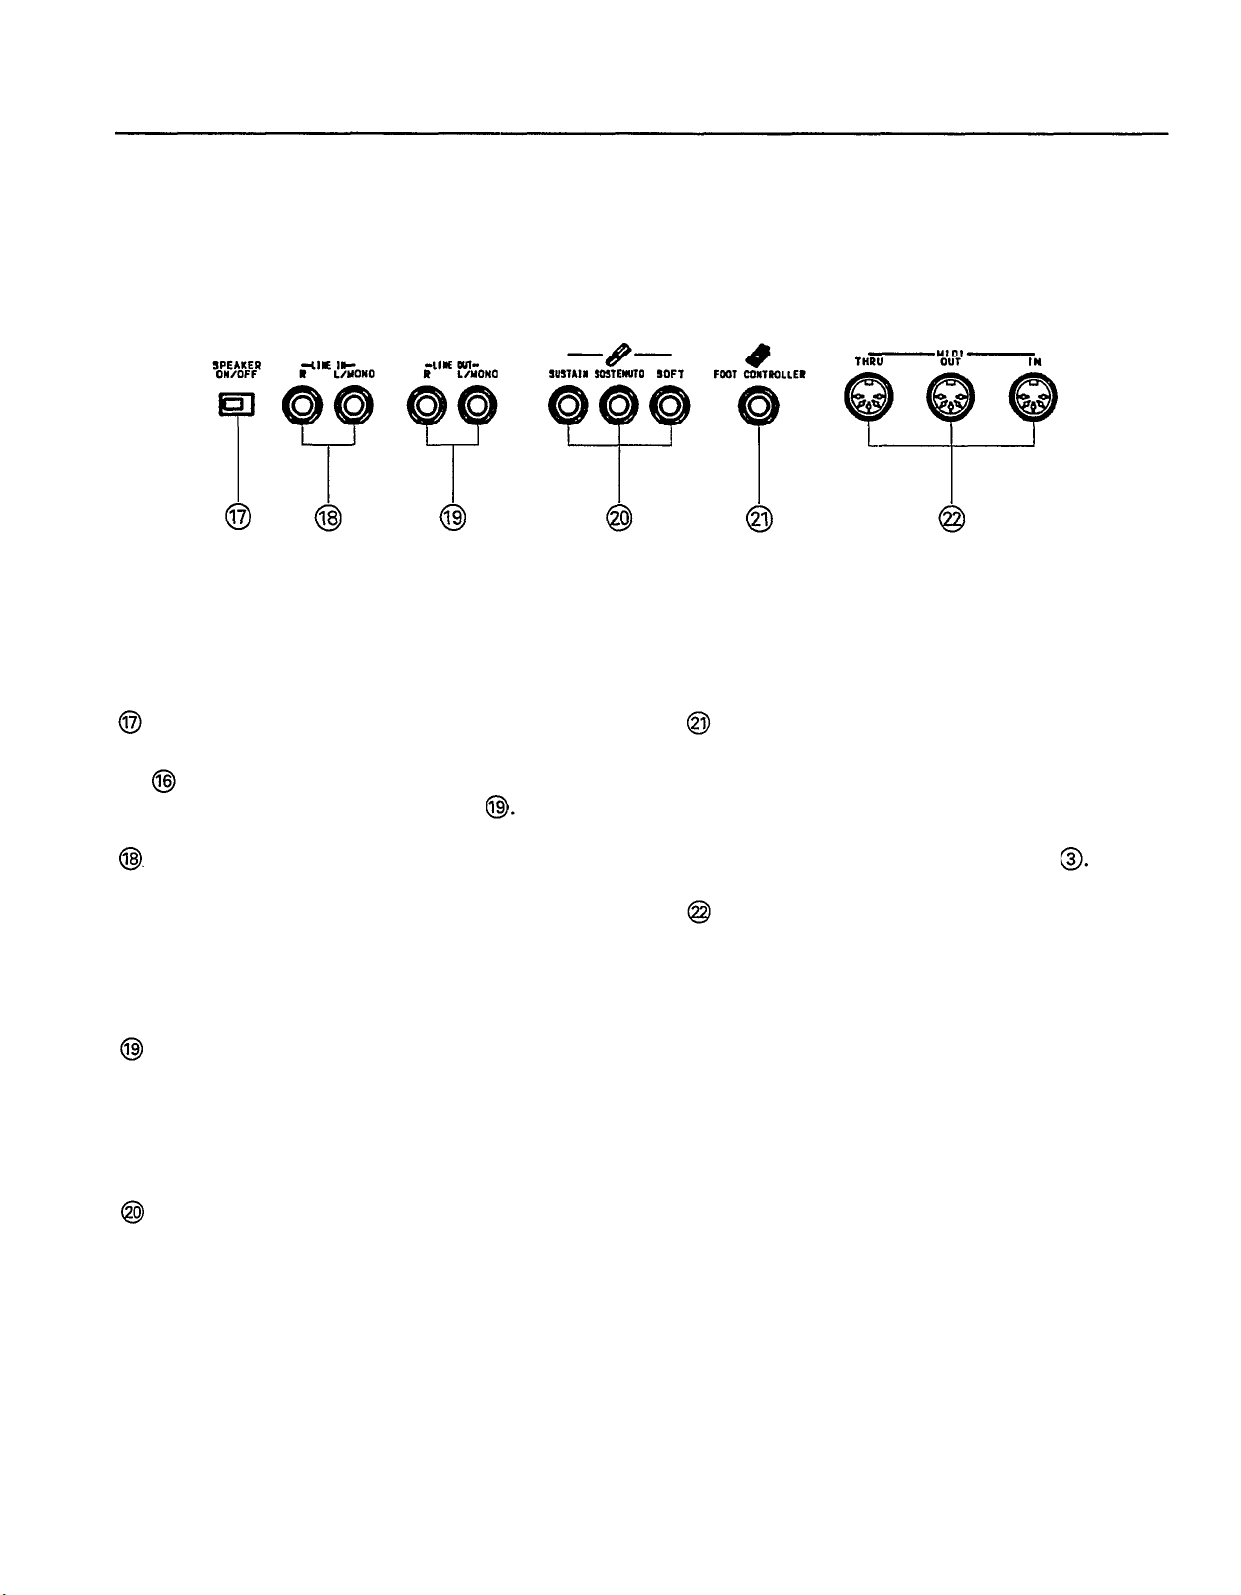
Rear panel
SPEAKER switch
This switch lets you turn off the internal speakers
mounted on the upper panel. It does not affect
the output from the LINE OUT jacks
LINE IN jacks
You can use these jacks to input line-level signals
from another instrument, such as a drum machine,
tone generator, or synthesizer, which you wish to
play through the P-100’s built-in speakers. Use the
L/MONO jack when connecting only a single line.
LINE OUT jacks
These jacks output line-level signals which can be
fed into an external amplifier, mixer, or other
audio device. Use the L/MONO jack if your audio
equipment has only one input.
Pedal jacks
These jacks let you connect up to three foot pedals
and use them as sustain, sostenuto, and soft
pedals. A single FC4 pedal is included with your
P-100. If you wish to purchase additional foot
pedals, be sure to use only Yamaha models FC4 or
FC5.
FOOT CONTROLLER jack
This jack allows you to connect a foot controller
(Yamaha FC7, available separately) for use as an
auxiliary controller. The foot controller can be assigned to a variety of MIDI functions in the same
manner as the [DATA ENTRY] slider
MIDI terminals
These terminals allow the P-100 to communicate
with other MIDI devices. To control the P-100 using a sequencer or another keyboard, connect the
device in question to the MIDI IN jack. To control
another device (such as a synthesizer or tone
generator) using the P-100, connect the device to
the MIDI OUT jack. The MIDI THRU jack simply echoes the data the P-100 receives from the
MIDI IN jack, and is used to connect three or
more MIDI devices in series.
4
Page 14
SETTING UP THE P-100
To prepare the P-100 for playing, follow the steps below to set it up and connect any peripheral equipment.
1.
Plug in the power cord.
Plug the P-100’s power cord into an AC outlet.
Do not turn on, the [POWER] switch until you
have finished making all of the connections below.
2.
Connect the sustain pedal.
To use the supplied FC4 footswitch as a sustain
pedal, insert its plug in the SUSTAIN jack on the
rear panel. If you have purchased additional FC4
or FC5 footswitches, you should connect them to
the SOSTENUTO and SOFT jacks at this time.
3.
Connect a foot controller.
If you have purchased an FC7 foot controller for
use as a MIDI foot controller, insert the plug of
the switch in the FOOT CONTROLLER jack on
the rear panel.
Connect external amplifiers.
4.
If you wish to amplify the P-100 through an exter-
nal audio system, connect the amplifiers to the
LINE OUT jacks on the rear panel. Use the
L/MONO jack for mono output, or both jacks for
stereo output.
6.
Connect MIDI devices.
Connect the P-100 to other devices using the
MIDI terminals on the rear panel. Some examples
of MIDI system connections are given on pages
46 through 49.
Connect headphones.
7.
To listen to your P-100 through headphones,
connect a stereo headphone set to the PHONES
jack on the front panel. The built-in speakers will
turn off automatically whenever headphones are
connected to this jack.
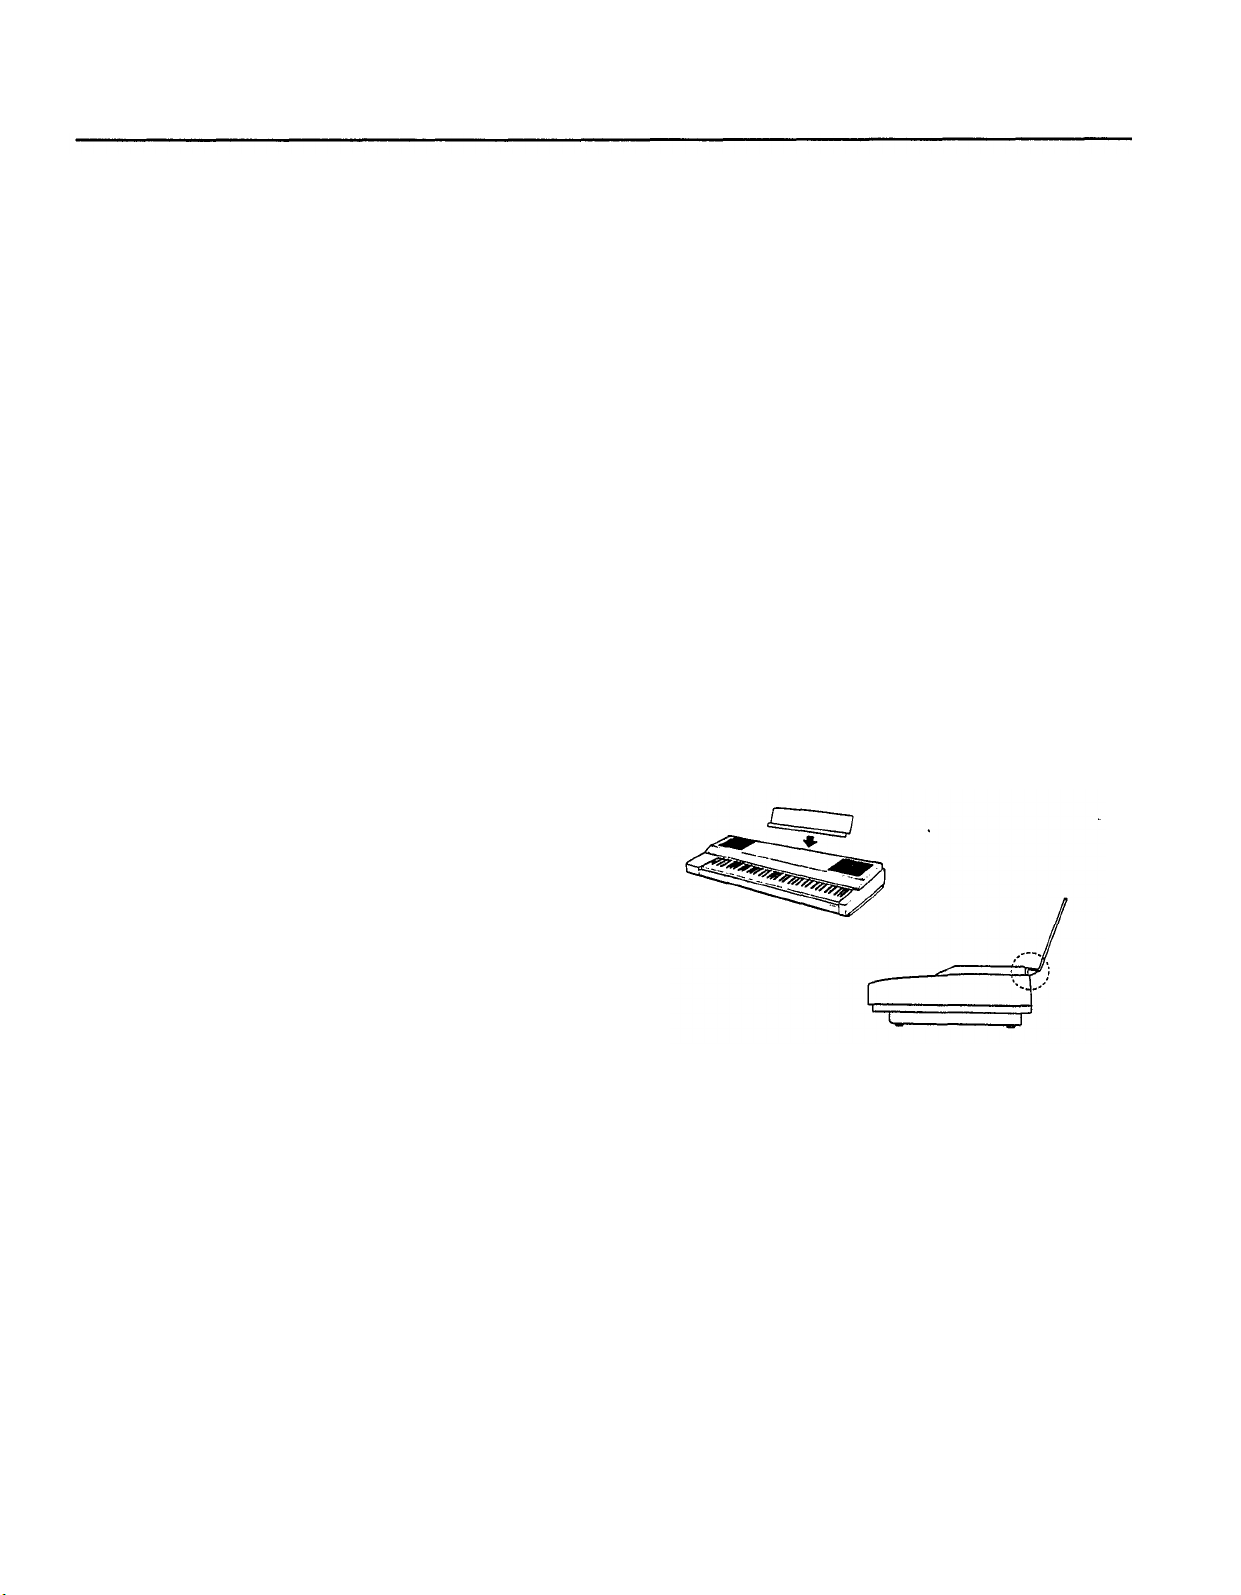
8.
Attach the music stand.
Attach the supplied music stand to the P-100 by
inserting it into the groove along the rear edge of
the upper panel. You can set the music stand at
any desired position along the groove.
5.
Connect other external audio equipment.
To amplify a device which outputs line-level audio
signals (such as a drum machine, tone generator,
or synthesizer) through the P-100’s built-in
speakers, connect cables from the output jacks of
the device in question to the LINE IN jacks on the
rear panel. Use the L/MONO jack for mono input,
or both jacks for stereo input.
5
Page 15
PLAYING THE DEMO SONGS
Your P-100 is programmed with two songs that demonstrate the instrument’s capabilities. You might want to try
playing these songs to set the volume level and make sure that everything is working properly after you finish setting
up the P-100. To do so, follow the steps below.
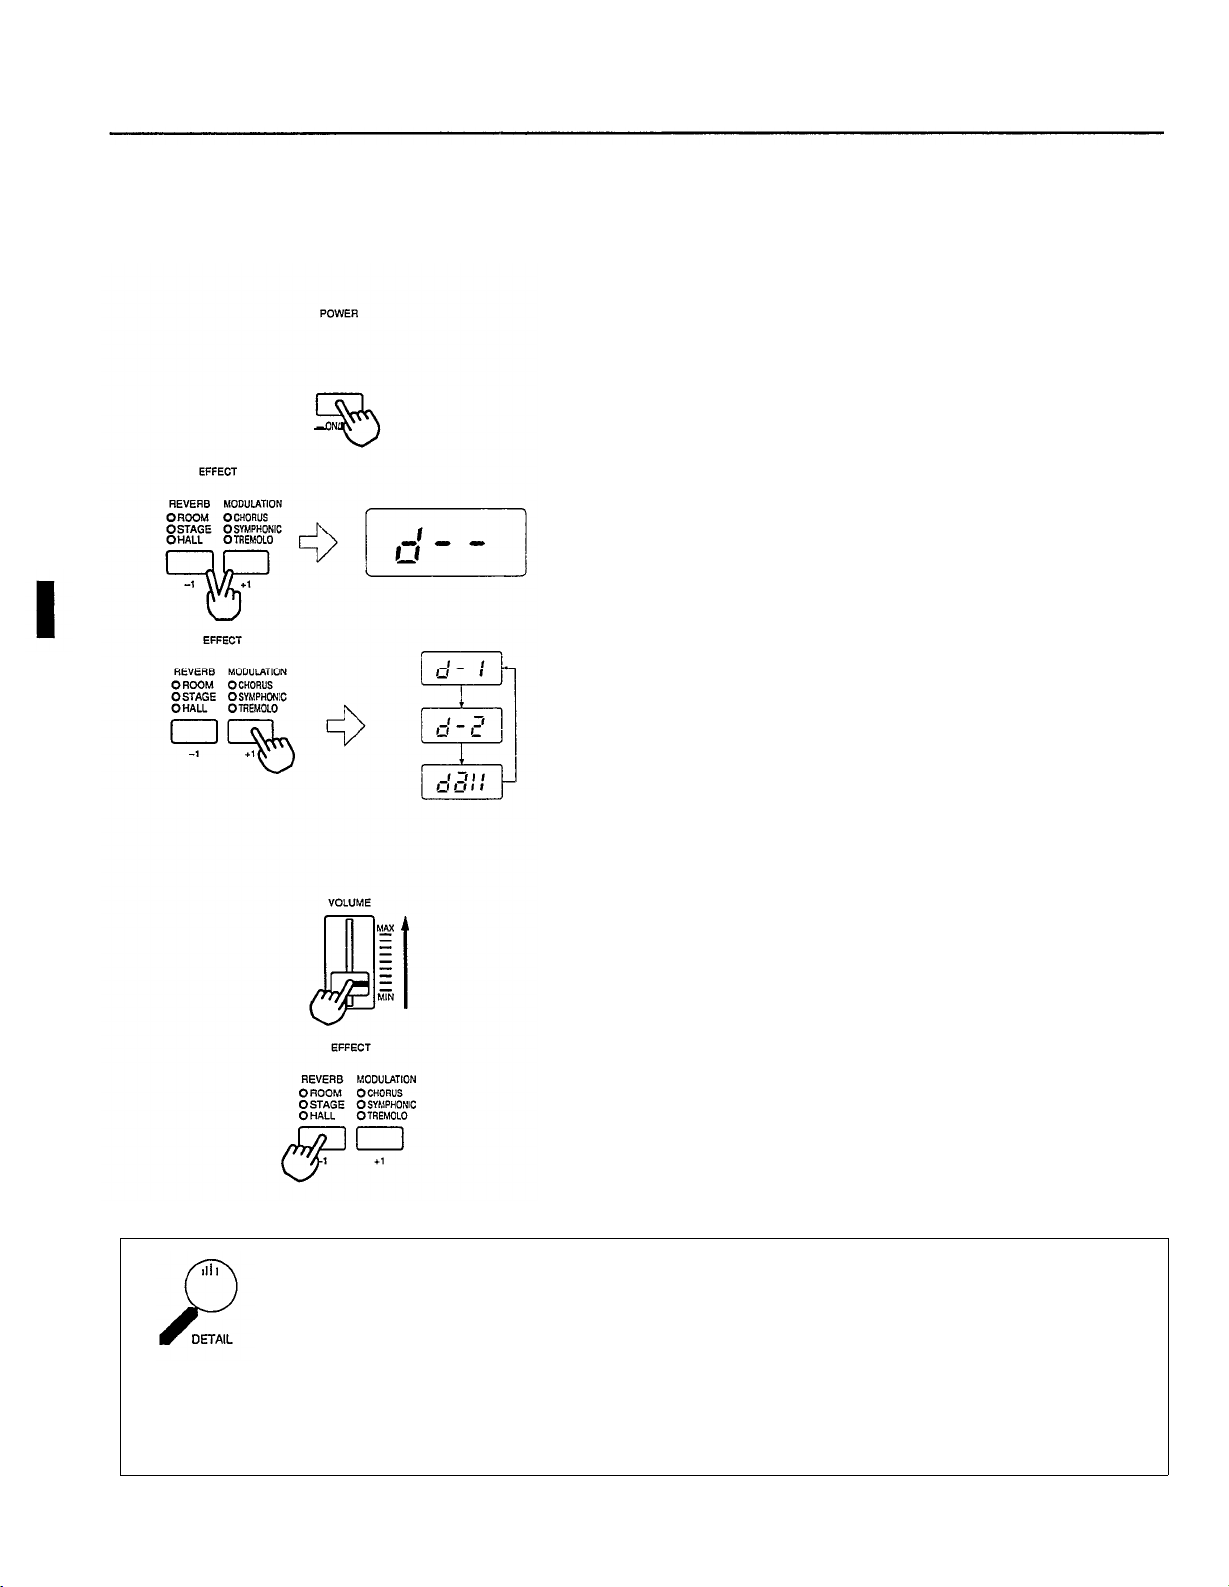
Turn on the P-100.
1.
Move the [VOLUME] slider down to a low level, then press the
[POWER] switch to turn on the P-100. If you have connected
your P-100 to an external amplifier, you should turn the amplifi-
er on after the P-100 in order to avoid damaging the speakers.
Enter Demo Play mode.
2.
Press the [-1] and [+l] buttons simultaneously. The letter “d”
appear in the display, followed by a pair of dashes.
3.
Play a demo song.
Press the [+l] button once to select the first demo song, or twice
to select the second song. The song you select will begin
playing.
If you press the [+l] button three times, the word “all” will
appear in the display and the P-100 will play all two demo
songs in an endless loop.
If you don’t press the [+l] button within three seconds, the
P-100 will automatically exit the Demo Play mode.
4.
Adjust the volume.
Move the [VOLUME] slider up while a demo song is playing to
raise the volume to a suitable level.
Exit Demo Play mode.
5.
If you select one of the two demo songs to listen to, the P-100
will exit the Demo Play mode automatically as soon as it
finishes the song. To exit Demo play mode while a song is
playing, the press the [-l] button.
Switching between modes
You will not be able to enter the Demo Play mode — or any of the other play modes. for that
matter — when the P-100 is in Utility mode. (The LED above the [MIDI] button will blink
when the P-100 is in Utility mode.) To exit Utility mode, simply press the [MIDI] button.
Also. you will not be able to play the P-100 or use any of the Utility mode functions while the demo songs are
playing. Be sure to press the [-l] button to leave the Demo Play mode when you are done listening to the demo
songs.
6
Page 16

PLAYING THE P-100
Selecting a voice
Once you’ve set up the P-100 and adjusted the volume level, you’re ready to start making music. The standard mode
for playing the P-100 is known as Single mode. In this mode, as its name implies, the P-100 plays only a single voice.
Playing the P-100 in Single mode is thus much like playing a normal acoustic piano. The biggest difference between
the P-100 and an acoustic piano is the fact that the P-100 lets you choose between ten different voices.
NO.
PIANO 1
1
PIANO 2
2
3
E.PIANO
4
E.PIANO
5
CLAVINOVA TONE
6
VIBES
7
STRINGS
8
ORGAN
9
BASS 1
10 BASS 2
VOICE
1
2
DESCRIPTION
Acoustic grand piano
Bright rock piano
Traditional electric piano
DX electric piano
A blend of harp and strings
Vibraphone
Orchestral strings
Jazz organ
Acoustic wood bass
Electric bass
To play the P-100 in Single mode, you need only press the
[VOICE/UTILITY] button for the voice you wish to play. The
MIDI program change number assigned to the button you press
will appear briefly in the display, followed by the number of the
voice you’ve selected. (For details regarding the assignment of
program change numbers to the [VOICE/UTILITY] buttons, refer
to the explanation of the program change transmit table on pages
40 and 41.)
Stereo/Mono
Mono
Mono
Mono
Layered
Layered
Mono
Mono
Mono
Mono
SAMPLE TYPE
POLYPHONY
16/32
32
32
32
16
16
32
32
32
32
7
Page 17
Voice polyphony
As the table above shows, the P-100 produces 32 notes of polyphonic sound for seven of its
voices. For convenience, we will refer to these voices as
32-note
voices.
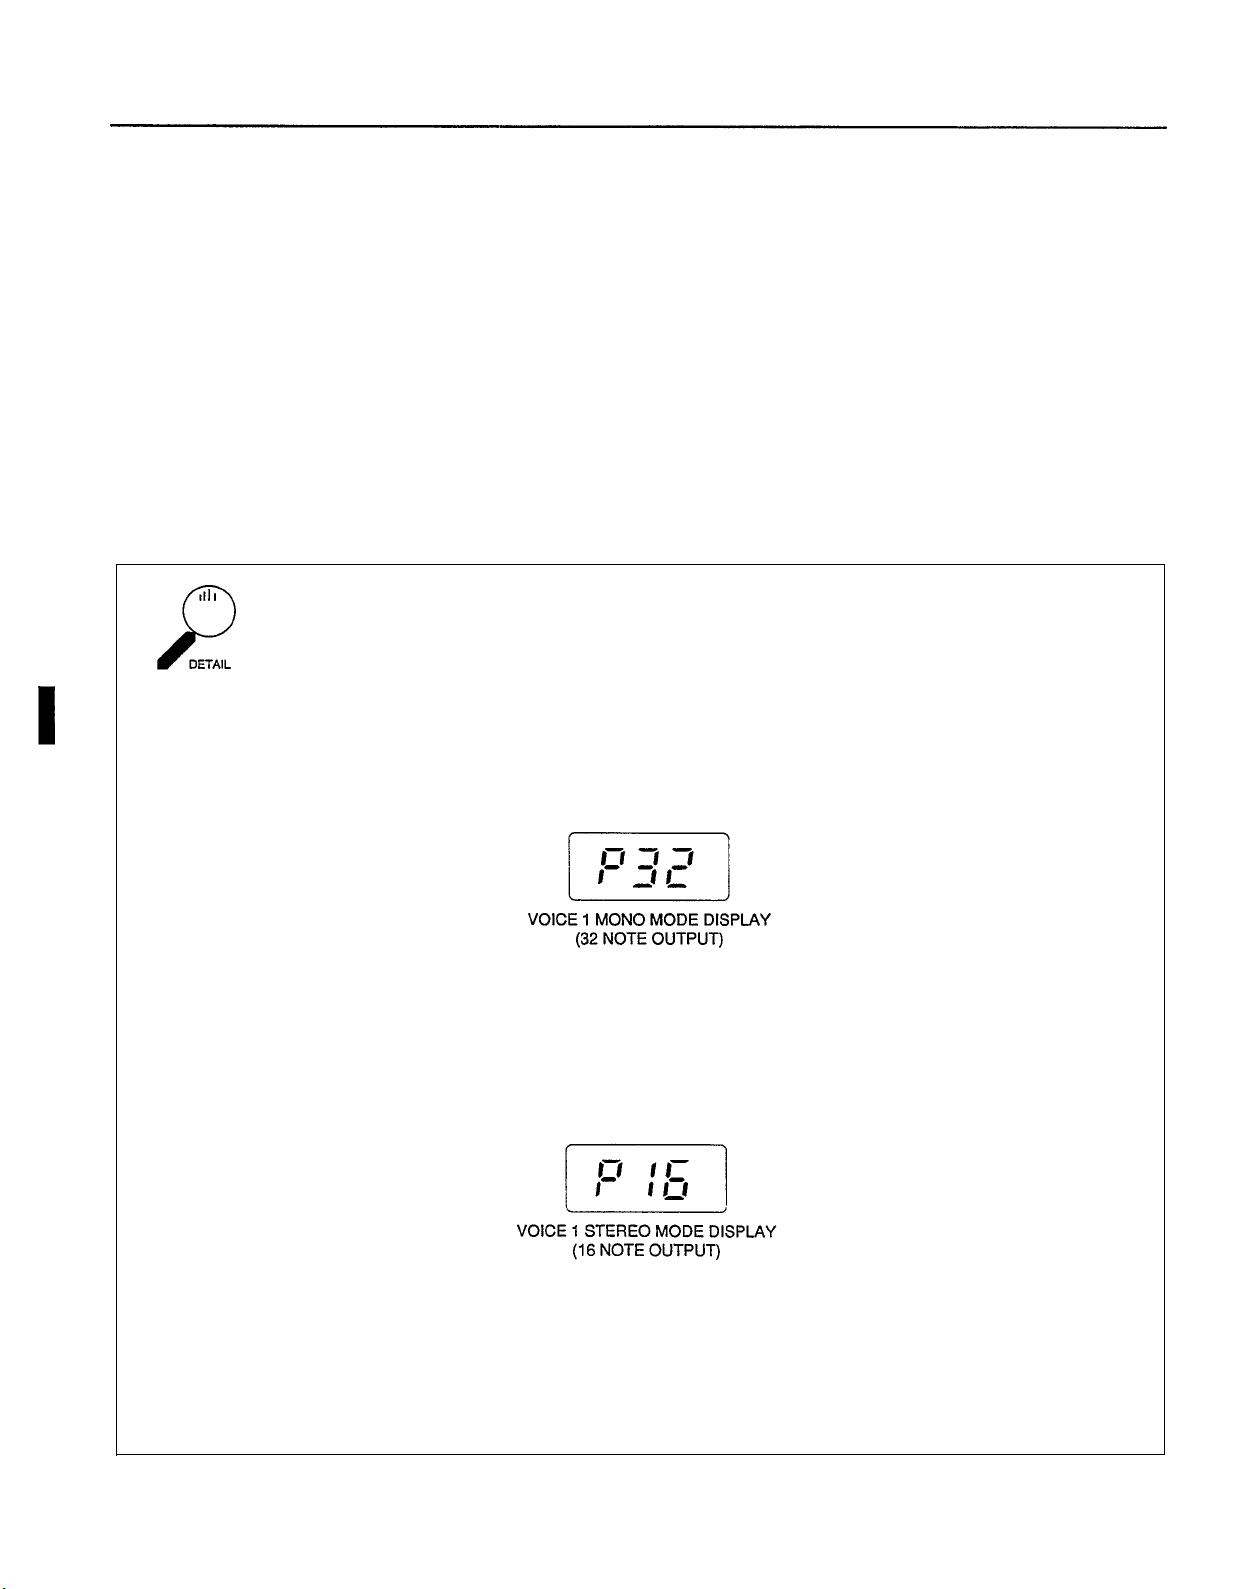
The remaining three voices can produce only 16 simultaneous notes. The first voice, PIANO
1, is a stereo voice, created using stereo sampling techniques. If you wish, however, you can switch it to mono
(for 32 notes output) by pressing and holding the [PIANO l] button for a few moments. When you do so, the
following display will appear briefly:
This display indicates that PIANO 1 has been switched to mono mode. This voice will remain in mono mode
even if you select a different voice and come back to it (although the P32 display will not reappear). To switch it
back to stereo mode, press and hold the [PIANO l] button again. The display below will appear briefly.
The voice is also switched to stereo mode automatically each time you turn on the power to the P- 100.
The other two voices, CLAVINOVA TONE and VIBES, are actually layered sounds which combine two
different tones in a single voice. They can produce a maximum of 16 simultaneous notes, and so are known
(together with the PIANO 1 voice in stereo mode) as
8
16-note
voices.
Page 18
Using the reverb effect
Reverb adds warmth to sounds by creating the impression of an acoustic environment. The P-100 lets you select one of
three different types of reverb to apply to each voice. The ROOM setting simulates the reverberation characteristics of
a normal-sized room. STAGE reproduces the reverberations you would hear during a live on-stage performance.
HALL gives a sense of a room with more space between the walls. Finally, the OFF setting — a fourth option which
does not appear as a label on the upper panel — lets you play voices without any reverb.
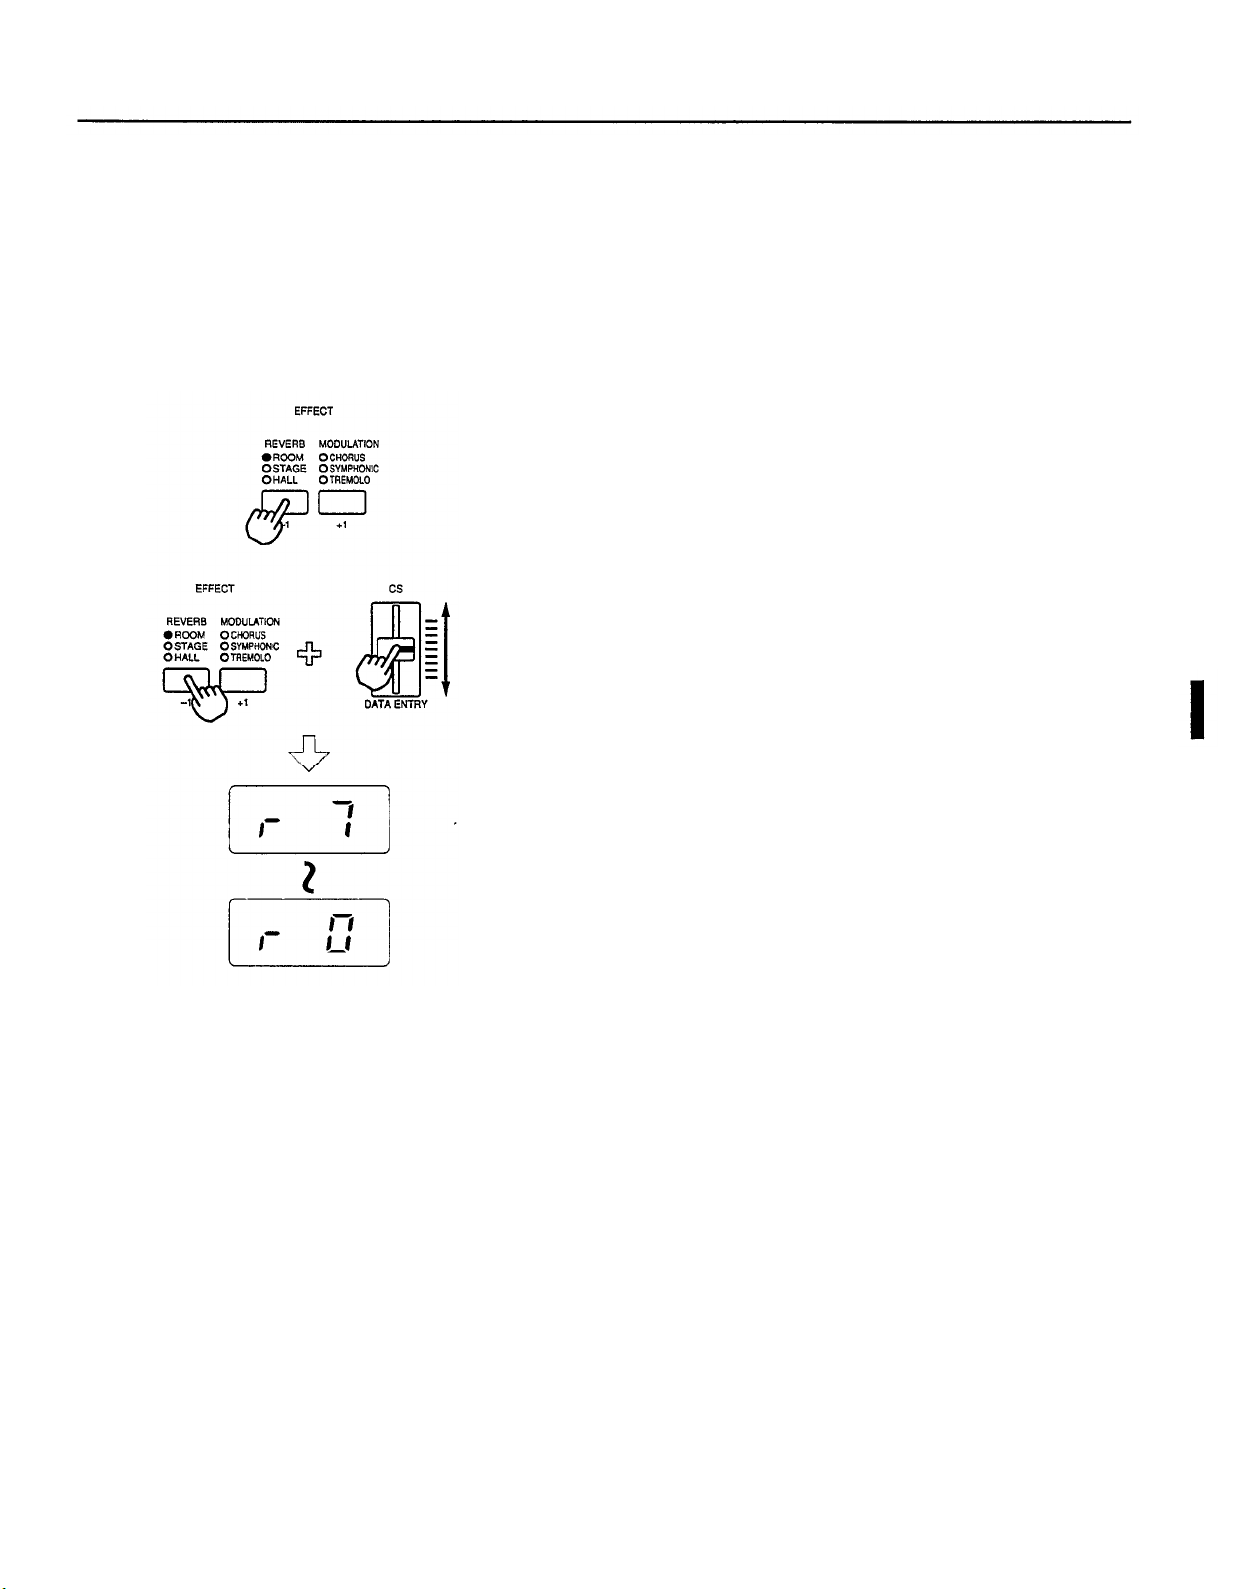
To change the reverb setting, simply press the [REVERB] button
repeatedly. The P-100 will cycle through the possibilities, the LED
next to the name of each reverb type lighting in turn to indicate
your selection. (None of the LEDs will light when the OFF setting
is selected.)
The P-100 also lets you set the
depth
or level of the reverb effect
for each voice. The depth value appears in the display each time
you select a different reverb type. To change the depth setting,
move the [DATA ENTRY] slider while holding down the
[REVERB] button.
You can set the reverb depth to a level between 0 and 7. Setting the
depth to 0 will effectively turn the reverb off, while a value of 7
will produce the most noticeable reverb.
The P-100 will remember your reverb type and depth settings individually for each of the ten voices. If, for example,
you set the HALL effect at depth 6 for the PIANO 1 voice, then try playing the vibes using ROOM reverb at depth 4,
the P-100 will automatically switch back to HALL depth 6 when you next select PIANO 1.
When you play two voices in Dual or Split modes, the P-100 will apply the main voice reverb type and depth settings
to both voices, ignoring any settings which you may have made for the sub voice.
9
Page 19
Using the modulation effects
In addition to the reverb effect, the P-100 lets you apply one of three different modulation effects to its voices.
CHORUS is a modulated delay effect that adds thickness to a voice, making it sound as though more than one
instrument is being played. The SYMPHONIC effect is a heavier chorus. TREMOLO applies a tremolo effect to
voices by modulating their output level. Finally, an OFF setting allows you to play without modulation.
These modulation effects have nothing to do with the vibrato effect which you can apply to voices using the
[MODULATION] wheel. The procedure for turning this vibrato effect on and off is described on page 38.
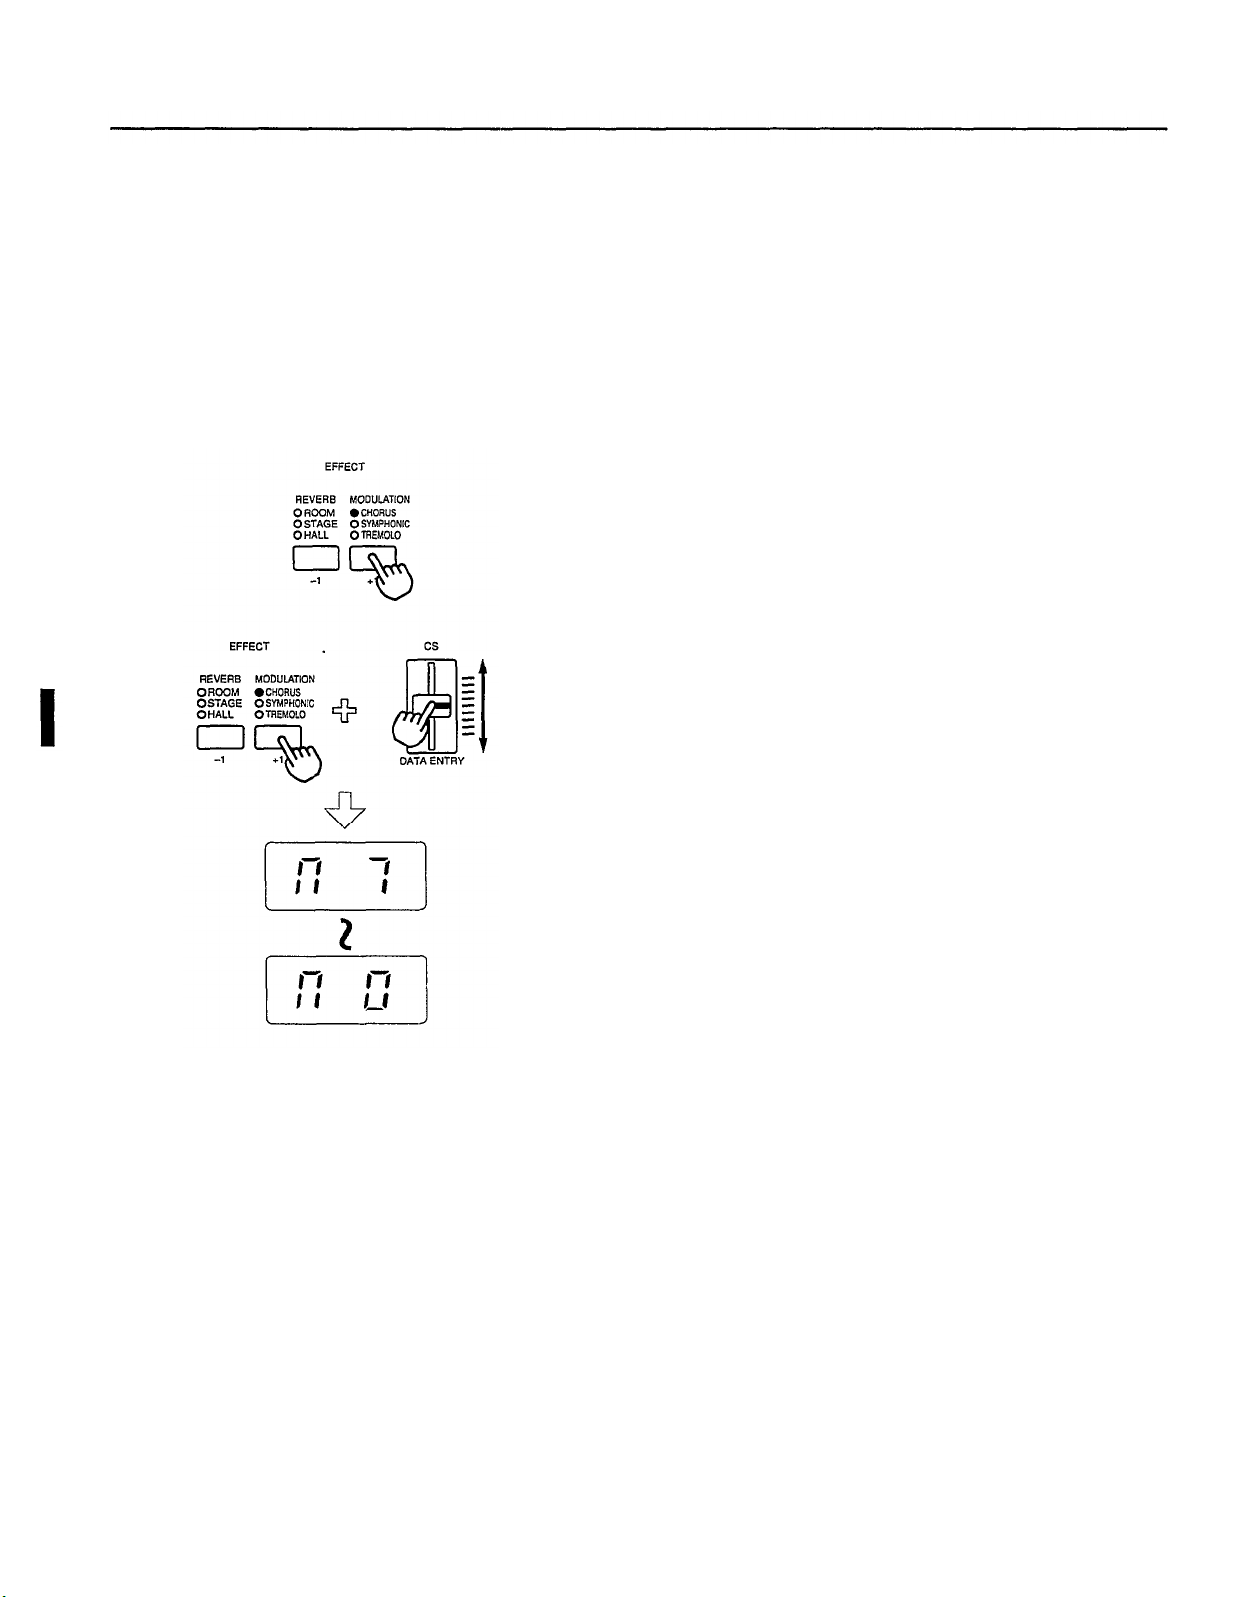
To change the current modulation effect setting, simply press the
[MODULATION] button repeatedly. The LED next to the name of
each modulation effect type will light in turn to indicate your
selection. (None of the LEDs will light when the OFF setting is
selected.)
The P-100 also lets you set the depth of the modulation effect.
The depth value appears in the display each time you select a
different effect type. To do so, move the [DATA ENTRY] slider
while holding down the [MODULATION] button.
You can set the modulation depth to a level between 0 and 7.
Setting the depth to 0 will reduce the modulation depth to a minimum, whereas a value of 7 will result in the heaviest modulation.
The P-100 will remember modulation type and depth settings for each of the ten voices. When you play two voices in
Dual or Split modes, the P-100 will apply the main voice modulation settings to both voices. ignoring any settings you
have made for the sub voice.
10
Page 20
Adjusting the equalization
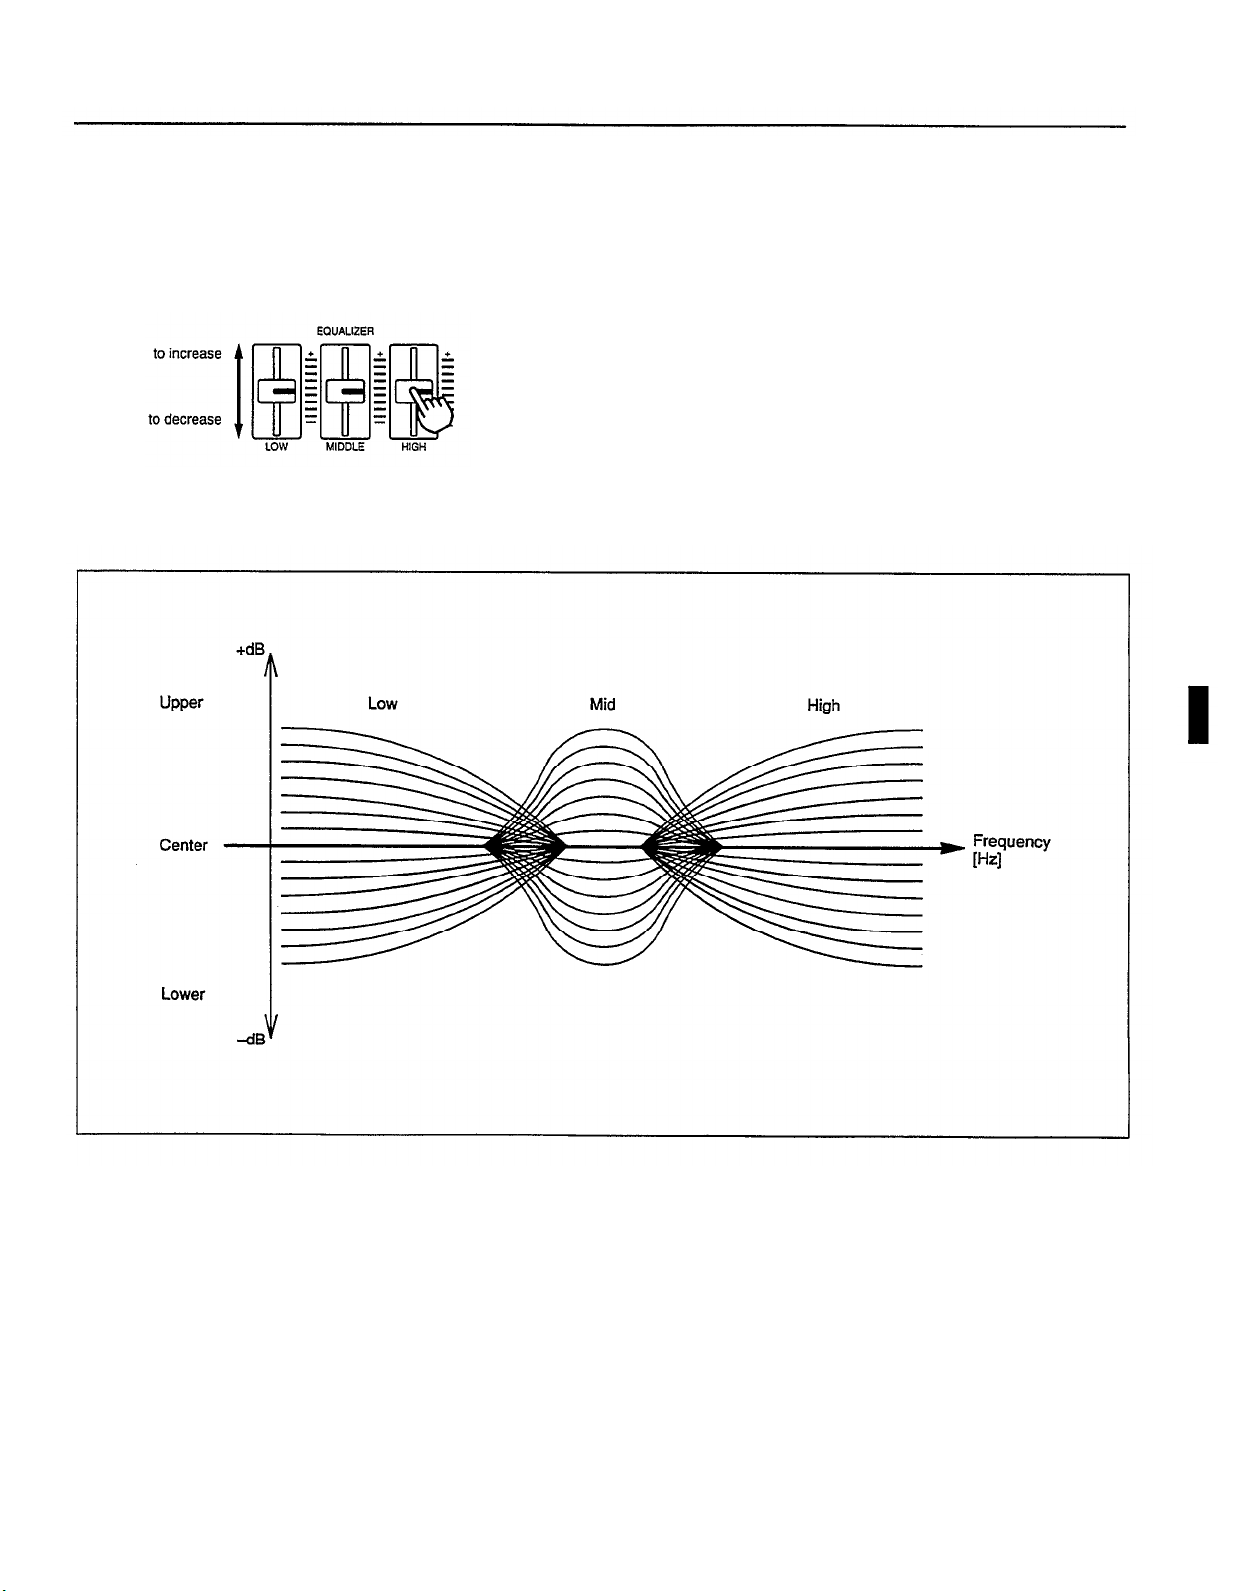
The P-100’s equalizer works much like the three-band graphic equalizers found on many portable stereo sets. It allows
you to adjust the P-100’s output in three frequency ranges, LOW, MIDDLE and HIGH.
Slide the slider for each range up to increase the level of output, or
down to decrease output in that range. The graph below should
give you an idea how you can use the equalizer to modify the
sound output by the P-100.
11
Page 21
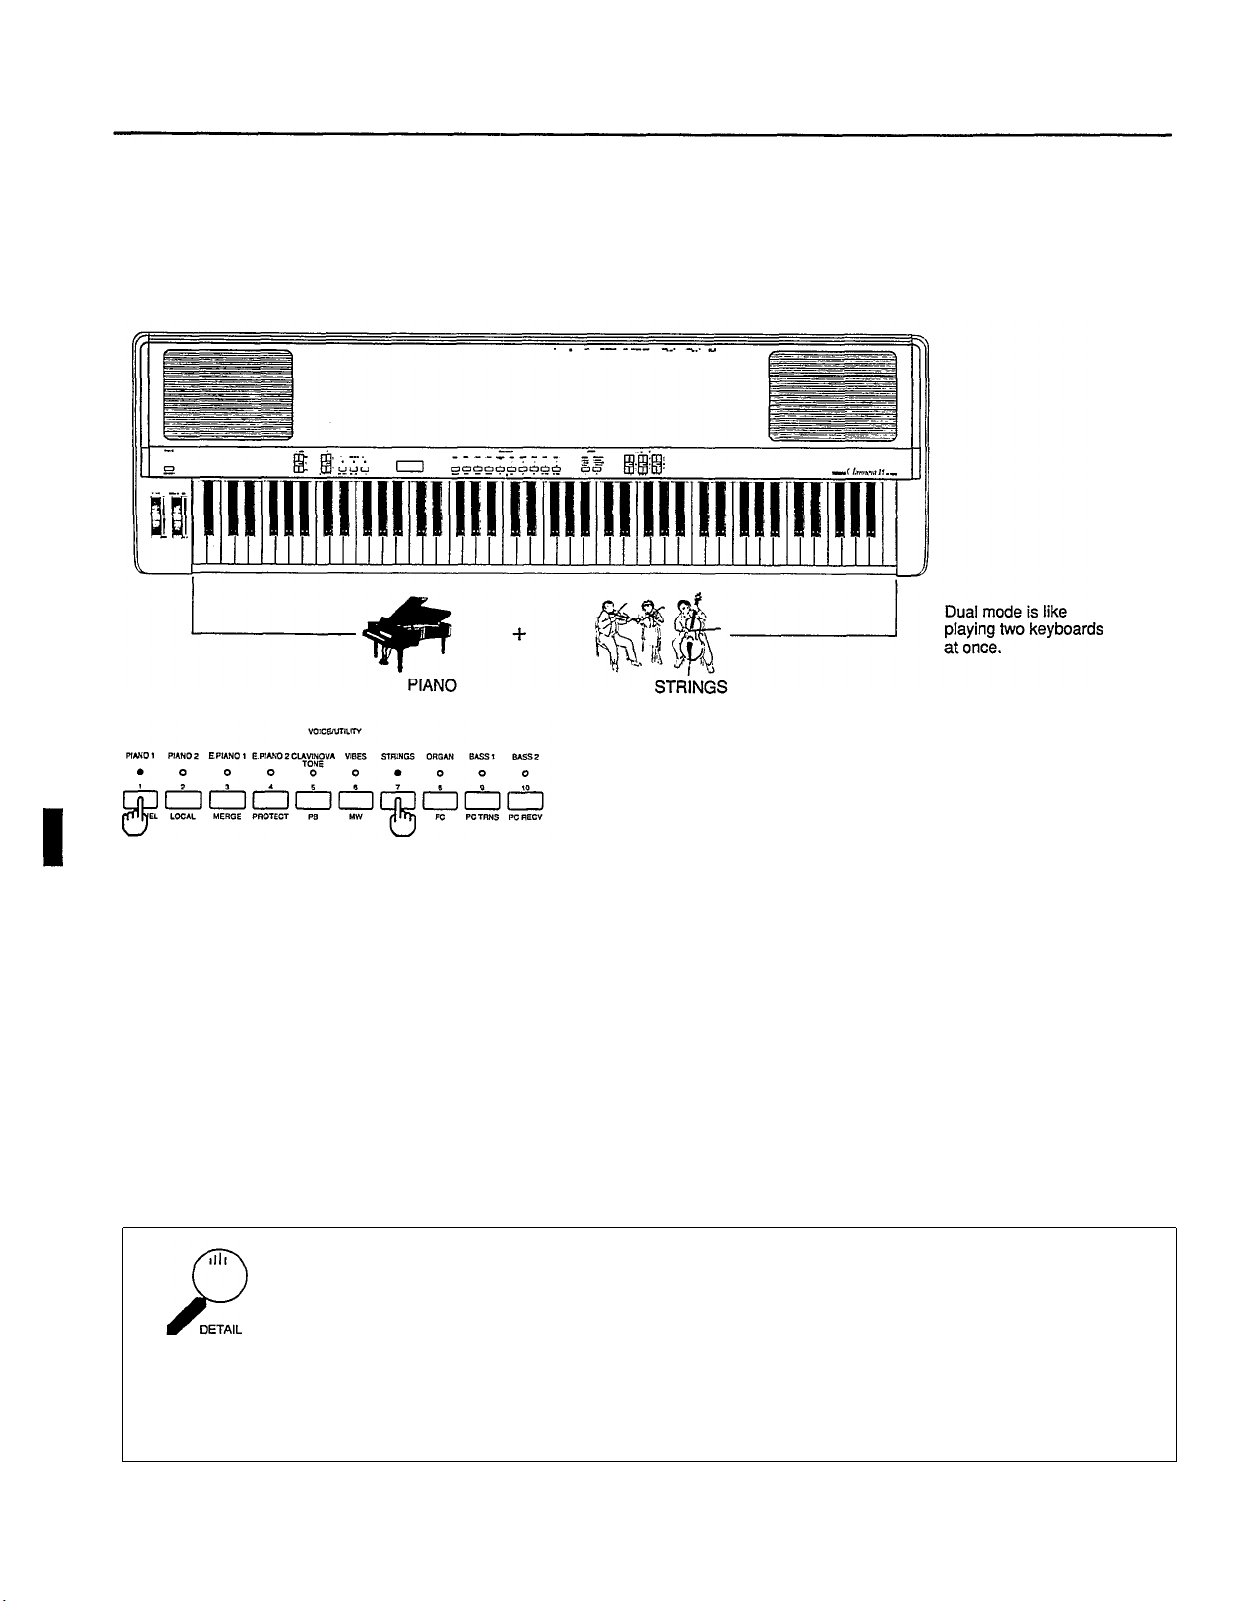
DUAL MODE
Selecting voices in Dual mode
In Dual mode, the P-100 sounds two of its voices in response to every note you play. Playing the P-100 in Dual mode
is therefore like playing two keyboards at once. You could use this mode, for example, to play a melody with a piano
underscored with the sound of strings.
To enter Dual mode, press the [VOICE/UTILITY] button for one
of the two voices you wish to play while holding down the button
for the other voice. The MIDI program change number assigned to
the button you press first will appear briefly in the display,
followed by the number of the voice selected by that button. (For
details regarding the assignment of program change numbers to the
[VOICE/UTILITY] buttons, refer to the explanation of the program change transmit table on pages 40 and 41.)
When you select two voices to play in Dual mode, the voice you select first is known as the
sub
second voice is called the
simultaneously. However, you will want to keep it in mind when adjusting the voice balance and detune settings using
the methods described on the following pages.
Polyphonic capacity in Dual mode
Since the P-100 sounds two voices in response to every note you play, its voicing capacity in
this mode will be lower than its normal capacity of 32 or 16 simultaneous notes.
voice. This distinction is not important for playing, since both voices are produced
main
voice, whereas the
When you play two 32-note voices in Dual mode, the P-100 will give you the same voicing
capacity as when you play a 16-note voice in Single mode. Selecting one 32-note voice and one 16-note voice,
however, will reduce the voicing capacity to 10 notes. Selecting two 16-note voices will cut it further, to only 8
notes.
12
Page 22

Adjusting the voice balance
The P-100’s Dual mode is a useful feature. However, you may not always want to give the two voices equal emphasis.
When playing a piano voice with strings, for example, you might want the strings to be little more than a murmur in
the background, adding a delicate nuance to the piano without overwhelming it. You can accomplish this by adjusting
the
voice balance.
To change the voice balance, move the [DATA ENTRY] slider
while holding down the [BALANCE] button.
You can set the balance to a value from –16 to 15. Raising the
balance value will make the main voice louder; lowering it will
make the sub voice louder.
When you have set the balance at the desired level, release the
[BALANCE] button. The P-100 will display the new setting for
about a second, then exit the function automatically.
13
Page 23

Detuning the voices
The
voice detune
Dual mode. This is especially useful when playing two similar voices, such as two piano sounds, together in Dual
mode. By detuning the voices, you can produce a richer sound that will bring out the characteristics of the dual voices.
setting allows you to detune two voices slightly with respect to one another when playing them in
To detune two voices, move the [DATA ENTRY] slider while holding down the [DETUNE] button.
You can set a detune value from 0 to 7. With a value of 0, the
voices are played at the same pitch; a value of 7 produces maximum detune.
When you have selected the desired detune setting, release the
[DETUNE] button. The P-100 will display the new setting for
about a second, then exit the function automatically.
What happens when you detune voices
When you detune two voices in Dual mode, the main voice is raised above the keyboard’s
standard pitch by a certain amount, whereas the sub voice is lowered by an equal amount.
The amount of pitch adjustment depends on the value you select, as shown in the following
table. (Pitch adjustment values in the table are given in cents.)
VOICE
0
MAIN
SUB
0
0
At the maximum detune setting. the voices are each detuned by about one-sixth of a semitone.
14
1
2
+1.56 +3.12
–1.56
–3.12
DETUNE SETTING
3
4
+4.68 +6.24 +8.58
–4.68
–6.24
5
–8.58
6 7
+11.70 +15.60
–11.70 –15.60
Page 24

SPLIT MODE
Entering Split mode
The P-100’s Split mode, like its Dual mode, lets you play two voices at once. In this mode. however. the two voices
are played independently rather than together. You could use this mode, for example. to play the vibes with your right
hand and a wood bass with your left.
As in Dual mode, the two voices you play in Split mode are referred to as the main and sub voices. These voices are
assigned to separate areas of the keyboard, known as the
known as the
To enter Split mode, simply press the [SPLIT] button. The keyboard will split into two areas, one playing the main
voice you selected in Single or Dual mode, and the other playing the voice which was last selected as the Split mode
sub voice. (BASS 1 was selected as the default sub voice when your P-100 left the Yamaha factory.)
The fact that the procedure for selecting voices is separate from that for entering and leaving Split mode makes this
mode more convenient. It means that you can switch the sub keyboard area on and off as needed, playing the main
voice across the entire keyboard during a song’s verse and chorus. for example, then adding the sub voice for an
intricate two-part solo.
split point.
main
and
sub keyboard areas,
When you turn Split mode on, the LED above the [SPLIT] button
will light, and the current split point key will appear briefly in the
display. The P-100 will now play two voices using the current sub
voice and split point settings.
To turn Split mode off, press the [SPLIT] button again. The LED
above the [SPLIT] button will go out and the P-100 will return to
Single or Dual mode, playing the voice you have selected as the
main voice.
which are separated at a key
The method for selecting voices in Split mode is described on the following page. You can also change the location of
the split point, and determine whether the main keyboard area will be above or below this point, using the procedure
on pages 16 and 17.
Please note that the pitch bend and modulation wheels and the sustain. soft, and sostenuto pedals will only effect the
main voice when you use these controls in Split mode.
15
Page 25

Selecting voices in Split mode
When you press the [SPLIT] button to enter Split mode, the voice you were playing in Single mode (or the main voice,
if you were playing in Dual mode) will be assigned by default to the main keyboard area. At the same time, the voice
which was last selected as the Split mode sub voice will be assigned to the sub keyboard area.
Once you have entered Split mode, however, you can change the main and sub voices independently of one another.
The procedure for changing the main voice is exactly the same as that for selecting a voice in Single mode.
To change the main voice, press the [VOICE/UTILITY] button for
the voice you wish to play. The MIDI program change number as-
signed to that button will appear briefly in the display, followed by
the number of the voice you’ve selected. (For details regarding the
assignment of program change numbers to the [VOICE/ UTILITY]
buttons, refer to the explanation of the program change transmit
table on pages 40 and 41.)
To select the sub voice, press a [VOICE/UTILITY] button while
holding down the [SPLIT] button. The MIDI program change
number assigned to the [VOICE/UTILITY] button you press will
appear briefly in the LED display, followed by the number of the
currently selected main voice.
You can select a Split mode sub voice while the P-100 is in Single or Dual modes, if you wish. If you do so, the P-100.
will remain in Split mode after you make your selection. This lets you change the sub voice selection as you enter Split
mode, for smooth transitions between parts of a song.
Adjusting the voice balance
The need for adjusting the balance between two voices in Split mode may not seem as obvious
as in Dual mode. After all, you will probably play the voices with different hands. Still,
playing different voices in Split mode may sometimes call for you to play very softly with one
hand while playing loudly with the other. Should you find this difficult, you might find it easier to set the level
for each voice using the balance function.
If you would like to give this shortcut a try, adjust the balance value using the method described on page 13.
Raising the balance value will increase the volume of the voice in the upper keyboard area, whereas lowering it
will increase the voice in the lower keyboard area.
16
Page 26

Changing the split point
By adjusting the location of the split point, you can adjust the note ranges of the main and sub keyboard areas to suit
the parts you’re playing. Also, the adjustment operation also allows you to specify whether the main voice will play
above or below the split point. The main keyboard area is normally above the split point. However, there may be cases
when you’ll want to play the main voice below the split point.
Imagine, for example, a song arrangement which calls for you to play the vibes with a piano bass line. The P-100’s
Split mode can handle this requirement quite well. After the bridge, however, there is a flashy piano solo with
sweeping runs that take you from one end of the keyboard to the other. You can do this by selecting the piano as the
main voice, and assigning it to the lower keyboard area. You will then be able to switch from Split mode to the Single
mode for the solo, then back to Split mode again, by simply pressing the [SPLIT] button.
To change the split point, press the key on the keyboard where you
want to locate the split point while holding down the [SPLIT]
button. To set the split point at F4, for example, you would press
the F4 key while holding down the [SPLIT] button.
The new split point setting will then appear in the display.
(You can also raise or lower the current split point setting one
semitone at a time by pressing the [-l] or [+l] buttons while
holding down the [SPLIT] button.)
If you want to change the location of the main keyboard area, you must do so when you change the split point. This is
done by simply pressing a key above or below the split point.
To play the main voice below the split point, for example, first set
the split point as described above. Then, while still holding the
[SPLIT] button and the split point key, press a key anywhere below
the split point on the keyboard.
The dot which appear in the display will move to a position just
after the letter.
17
Page 27

To return the main voice to the area above the split point, the
second key you press should be above rather than below the split
point. The dot in the display will move back to its normal position
before the number.
W hat about the spli t point ke y?
The key that you press to select the split point will always be included in the main keyboard
area. Thus, if you select F4 as the split point and then set the main keyboard below this point,
the main voice will play all notes up to and including F4, and the sub voice will play any notes
from F#4 on. If you set the main keyboard above this point, however, the sub voice will play any notes up to E4,
and the main voice will play notes from F4 up.
18
Page 28

ADJUSTING THE KEYBOARD
Tuning the P-100
Electronic pianos have one advantage over their acoustic counterparts: they are much easier to tune. You can fine-tune
the P-100’s keyboard upward or downward within a range of about 100 cents.
You can set the tuning to a value from –64 to 63. Each step raises
or lowers the tuning by about 0.78 cents. The default value is 0,
which corresponds to 440 Hz at A3.
When you locate an appropriate tuning value, release the [TUNE]
button. The P-100 will display the new value for about a second,
then exit the function automatically.
19
Page 29

Selecting a velocity curve
Although the P-100’s keyboard feels like an acoustic piano keyboard, it works on quite different principles. Since the
P-100 is an electronic piano, it must determine how fast a key is being pressed — that is, the
order to know how hard the note was played.
velocity
of a note — in
The P-100 can respond to your playing velocity in a number of ways, depending on your selection of a
velocity curve.
This feature lets you adjust the keyboard response to suit your playing style. The P-100 has four different velocity
curve settings: NORMAL, SOFT, HARD, and FIXED.
The NORMAL velocity curve is a linear progression: the harder you hit a key, the louder the resulting sound will be.
The SOFT curve produces loud volume with a relatively soft touch. The HARD curve, on the other hand, requires that
you hit the keys fairly hard to produce loud notes. Finally, the FIXED velocity curve produces the same volume no
matter how hard you hit the keys. This last option is useful when playing the organ voice.
To select a different velocity curve, press the [REVERB] button
while holding down the [TUNE] button. The current velocity curve
setting will appear in the display.
Press the [REVERB] button repeatedly without releasing the
[TUNE] button. The P-100 will cycle through the possible velocity
curve settings.
When the name of the desired curve appears, release the [TUNE]
button. The P-100 will display the new setting for about a second,
then exit the function automatically.
20
Page 30

Using the transpose function
The P-100 has a transpose function which makes transposing between keys easy. To use this function, you may want to
first set the transpose amount using the procedure described on the following page. Once you have set the transpose
amount to the desired value, you can turn the transpose function on and off as needed using the [TRANSPOSE]
button.
To turn the transpose function on, press the [TRANSPOSE] button.
The LED above this button will light, indicating that the P-100 is
transposing.
To turn the transpose function off, press the [TRANSPOSE] button
once again. The LED above the button will go out and the P-100
will stop transposing.
Transpose amount settings
It is worth noting at this point that the P-100 actually has five transpose amount settings.
The first, described on the following page, sets the transpose amount for the entire keyboard in
Single mode, and for the main voice in Dual and Split modes. The second and third settings,
described on page 23, control the transpose amounts for the sub voice in Dual and Split modes. The fourth and
fifth transpose amount settings control the transposition of note information transmitted to external instruments
as MIDI messages. These settings are described in detail on page 30.
All five of the transpose amount settings are activated as a group when you press the [TRANSPOSE] button.
They cannot be turned on independently of one another. You will not be able to turn the transpose function on if
you set all of the transpose amounts to zero.
21
Page 31

Setting the transpose amount
The P-100’s default main voice transpose setting is 12. This means the P-100 will transpose the notes you play up an
octave after you press the [TRANSPOSE] button to activate the transpose function.
To change the transpose amount, hit one of the keys between C1
and C5 on the keyboard while holding the [TRANSPOSE] button
down. The key you hit should be a number of semitones above or
below C3 (middle C) equal to the number of semitones you wish to
transpose the notes you play. To transpose up five semitones from
C to F, for example, you would hit F3, which is five semitones
above middle C on the keyboard.
You can also change the transpose amount setting by pressing the
[+1] or [-1] buttons while holding down the [TRANSPOSE]
button. Each time you press one of these buttons, you will raise or
lower the transpose amount by a semitone.
The P-100 can only transpose within a range of four octaves, from
-24 (C1) to 24 (C5). If you press a key below C1 or above C5, the
P-100 will set the transpose value to -24 or 24.
When you have set the transpose amount to the desired value, release the [TRANSPOSE] button. The P-100 will
display the new value for about a second, then show the number of the currently selected voice.
If you set the transpose amount before actually turning the transpose function on, the P-100 will assume that you want
to transpose using this value, and leave the transpose function turned on after you complete the setting.
This convenient feature allows you to turn on the transpose function and set the transpose amount in a single
operation.
Notes at the end of the keyboard
The P-100 can only play notes which fall within its 88-key range. When you use the transpose
function, therefore, a number of keys at one end of the keyboard will not fall within this range.
When you transpose up. the keys at the upper end of the keyboard which do not fall within this
range will repeat the uppermost octave (C#6 to C7). When you transpose down, the keys at the lower end of the
keyboard will repeat the lowermost octave (A-1 to G#0).
22
Page 32

Transposing in Dual and Split modes
Transposing is a little more complex in Dual and Split modes than it is in Single mode, because the P-100 allows you
to transpose the sub voice independently of the main voice. The default sub voice transpose amounts are set to 12 for
Dual mode, and 0 for Split mode.
The procedure for changing the sub voice transpose amounts is similar to that described for the main voice, except that
you must press and hold the [TRANSPOSE] and [SPLIT] buttons rather than just the [TRANSPOSE] button. Use the
operation below while the P-100 is in Dual mode to change the setting for the Dual mode sub voice, or in Split mode
to change the setting for the Split mode sub voice. You cannot change the sub voice settings while the P-100 is in
Single mode.
Press and hold first the [TRANSPOSE] button, then the [SPLIT]
button. Then adjust the transpose amount by pressing one of the
keys on the keyboard, or using the [-1] or [+1] buttons, as
described on the preceding page.
You can set the transpose amount for the sub voice anywhere
within a range of four octaves, from –24 (C1) to 24 (C5). As with
the main voice transpose amount, if you try to set the transpose
amount by pressing a key below C1 or above C5 on the keyboard,
the P-100 will react as though you pressed C1 or C5.
When you have set the sub voice transpose amount to the desired value, release the [TRANSPOSE] and [SPLIT]
buttons. The P-100 will display the new value for about a second, then show the number of the currently selected
voice. As with the main voice setting, the P-100 will assume that you want to transpose using this value, and leave the
transpose function turned on after you complete the setting.
Please note that the Dual mode sub voice setting will change automatically to match the main voice whenever you
change the main voice transpose setting while the P-100 is in Dual mode. This allows you to change the transpose
setting for both voices with a single operation.
Once you have set transpose amounts for both the main and sub voices, pressing the [TRANSPOSE] button will turn
the transpose function on and off for both voices in Dual or Split mode. It is not possible to turn the function off for
only one of the two voices in these modes.
23
Page 33

Why transpose the sub voice?
This function may not seem very necessary at first glance. After all, transposing one voice up
or down a few semitones while leaving the other untransposed would only complicate playing
unnecessarily — unless you want to try sightreading a part written for. say, a saxophone with
your right hand and a bass line with your left.
However, there are in fact many interesting ways to use this feature. In Dual mode, for example, you could use
it to play two-note harmonies, lowering the sub voice so that it plays a fifth or an octave below the main voice.
In Split mode, too, you could transpose the sub voice up or down two octaves and play it in the same pitch range
as the main voice. This would allow you to play a two-handed duet, for example, performing a melody with one
hand and echoing it using a different voice played by the other.
24
Page 34

MIDI KEYBOARD CONTROL FUNCTIONS
What is MIDI?
MIDI is an acronym for Musical Instrument Digital Interface. This is the name of an international standard which was
instituted during the 1980s to provide for the communication of data between electronic musical instruments.
The MIDI standard allows instruments such as synthesizers, tone generators, and drum machines — not to mention
electronic pianos such as the P-100 —
computers.
MIDI is a rather involved standard, and we will not attempt to explain all of its provisions in this short manual. You
will find it easier to put MIDI to work, however, if you understand a few of the basic concepts behind the standard.
Two of the most important concepts in MIDI are those of
Channels
The MIDI standard provides 16 different channels for
the transmission of data between musical instruments.
All
MIDI keyboards
on at least one of these channels. Sequencers and
MIDI-equipped computers, by contrast, generally
transmit data on several channels at once, each chan-
nel being assigned to a different part of an ensemble
performance.
It is the task of
from keyboards, sequencers, or computers and
produce sounds in response. Some tone generators,
known as multitimbral tone generators, can play
different sounds in response to data received on more
than one channel. If this makes you think of the P-
100’s Dual and Split modes, then you’re right on
target: the P-100 actually consists of a MIDI keyboard
and a multitimbral tone generator capable of
producing two timbres simultaneously. We’ll take a
detailed look at how these hardware elements work
together in the next section.
Messages
All of the data which is transmitted between MIDI
devices takes the form of MIDI messages of one sort
or another. The messages most closely associated with
the actual performance of music are called
voice
messages. These include
messages, which tell a tone generator which notes to
play, and when to start and stop playing them:
change, pitch bend,
messages, which indicate how a keyboard’s control
functions are being operated: and
messages. which tell a tone generator to switch to
another sound or set of sounds.
are capable of transmitting data
tone generators
and
aftertouch
to receive MIDI data
note on
to communicate with each other, and to be controlled by sequencers or
channel
and
note off
control
or
key pressure
program change
channels
and
messages.
Channel voice messages must be transmitted on a
channel which will be received by the tone generator
for which they are intended. They are thus different
system
from
channels and received by all of the devices in a MIDI
system.
System messages, too, come in a number of varieties.
There are
to start, stop, and synchronize the sequencing devices
in a MIDI system. Another variety,
messages, allows for the transmission of data specific
to individual devices. This data can be either individual parameter settings, which are transmitted as
parameter change messages, or large blocks of
settings, which are usually referred to as
There are several other kinds of MIDI messages that
we will not go into here. When using the P-100’s
MIDI functions, you will be concerned mainly with
only two types of messages: channel voice messages
and system exclusive messages. To learn what other
sorts of messages the P-100 supports, and how their
corresponding functions are implemented, you can
refer to the MIDI Data Format and MIDI
Implementation Chart sections at the back of this
manual.
messages, which are transmitted on all
system realtime
messages, which are used
system exclusive
bulk dumps.
25
Page 35

Terminals
Before we jump into a detailed description of the
P-100’s MIDI configuration, we should consider the
hardware used to communicate MIDI data. MIDI
devices transmit messages to each other via cables,
which are connected to the devices using speciallyshaped sockets called MIDI terminals. There are three
types of MIDI terminals:
IN, OUT,
and
THRU.
Not all MIDI devices have three MIDI terminals; but
most, like the P-100, do. A device with all three terminals will receive incoming data through its MIDI IN
terminal, and output its own data through the MIDI
OUT terminal. The MIDI THRU terminal merely
echoes the data received at the MIDI IN terminal.
This allows the device to be connected in the middle
of a “daisy chain” of instruments, so that the third
instrument in the chain will receive the data transmitted by the first instrument rather than that transmitted by the second.
Some MIDI instruments, such as the P-100, have a
MIDI merge
feature which essentially combines the
functions of the MIDI OUT and MIDI THRU
terminals in a single terminal. In the case of the P-100,
when the MIDI merge function is turned on, the MIDI
OUT terminal will output a combination of the
P-100’s own data and the messages it receives from
the MIDI IN terminal. Any instrument receiving this
data will be controlled by both the P-100 and the
device connected to the P-100’s MIDI IN terminal.
One possible application of this handy feature is given
on page 48.
26
Page 36

The P-100’s MIDI configuration
Now that we have gone over the basic concepts involved, you might be interested to take a look at the way the P-100
uses MIDI to produce music. We mentioned on the previous page that the P-100 consists of a MIDI keyboard
connected to a multitimbral tone generator, which is capable of producing two timbres at once. In fact, the P-100’s
three playing modes —
hardware elements.
Single, Dual, and Split — are nothing more than different ways of combining these MIDI
In
Single mode,
the P-100 uses only one of its two timbres. The keyboard sends MIDI channel voice messages to the
tone generator to control the main voice timbre. It also outputs the same messages from the MIDI OUT terminal on the
channel you select as the transmit channel (Tch). Channel voice messages which are input at the MIDI IN terminal
using the channel designated as the receive channel (Rch) will also be sent to the tone
generator to control the main
voice.
Both timbres are used in
Dual mode.
Since the two timbres play in unison, both the main voice and the sub voice will
respond in the same way to any channel voice messages that are received from the P-100’s keyboard or the MIDI IN
receive channel.
27
Page 37

SPLIT MODE
The situation becomes more complex in
Split mode.
Since the two timbres play independently rather than in unison,
two MIDI channels are needed to control them. For this reason, the P-100 divides its keyboard into two areas, known
as the main and sub keyboard areas. Channel voice messages from the main keyboard area are sent to the main voice
and output on the transmit channel (Tch) as in Single mode. Messages from the sub keyboard area are sent to the sub
voice and output using the next higher MIDI channel (Tch+l). Since the P-100 thus outputs its messages on two MIDI
channels in Split mode, you can use the P-100’s keyboard in this mode to control two of an external tone generator’s
timbres.
Data received at the MIDI IN terminal is handled in the same manner: channel voice messages on the receive channel
(Rch) are sent to the main voice, whereas messages on the next channel up (Rch+l) are sent to the sub voice.
In any of the P-100’s three modes, you can turn off the connection between the P-100’s keyboard and tone generator
sections by setting the
local control
function off. Doing so will stop the P-100’s tone generator from responding to
notes played on the keyboard, however, the keyboard will still transmit messages via the MIDI OUT terminal, and the
tone generator will respond to messages received at MIDI IN. The procedure for turning off the local control function
is described in the next chapter.
28
Page 38

Enabling MIDI transmission
We described in the previous section how the P-100 normally transmits channel voice messages for the notes you play
on the keyboard. The LED above the [MIDI] button remains lit while this function is enabled to remind you that the
P-100 is transmitting. Should you wish to turn this function off for some reason, there is an easy way to do so: just
press the [MIDI] button.
When you press the [MIDI] button, the LED will go out, indicating
that MIDI transmission has been disabled. This will prevent
transmission of channel voice messages on both channels (Tch and
Tch+l) when you’re playing in Split mode. It will not affect the
transmission of bulk dumps, however; nor will it block the reception of data from the MIDI IN jack.
To re-enable transmission, simply press the [MIDI] button again.
Keep in mind, though, that you cannot enable transmission by
pressing the [MIDI] button if the transmit channel (Tch) has been
turned off. (The procedure for selecting a transmit channel is
described on page 32.)
Selecting a MIDI velocity curve
The P-100 lets you assign a separate velocity curve for data transmitted from the MIDI OUT terminal. This allows the
P-100 to interpret the velocities of the notes you play differently for an external tone generator than it does for its
internal voices.
You might want to try this feature, for example, to play the internal STRINGS voice together with a brass sound
produced by an external tone generator. By using the SOFT velocity curve with the STRINGS voice and the HARD
curve with the brass, you could have the brass keep a low profile while you’re playing normally, then suddenly blare
out when you hit a note hard, creating a dramatic orchestral effect.
The procedure for selecting a MIDI velocity curve is the same as
that described on page 20, except that you must press
[MODULATION] rather than the [REVERB] button while holding
down the [MIDI] button. A dot will appear in the lower right
comer of the display to indicate that you have selected the MIDI
velocity curve setting.
Press the [MODULATION] button repeatedly without releasing the
[MIDI] button. The P-100 will cycle through the possible velocity
curve settings: normal, soft, hard, and fixed.
When the name of the desired curve appears, release the [MIDI]
button. The P-100 will display the new setting for about a second,
then exit the function automatically.
29
Page 39

Using the MIDI transpose function
In addition to the transpose settings for the two voices produced by its internal tone generator, the P-100 lets you
assign separate transpose amounts for notes it transmits from the MIDI OUT terminal. This gives you a total of five
transpose settings: three for the internal main and sub voices, one for messages transmitted on the transmit channel
(Tch), and one more for the messages transmitted on the Tch+l channel (which corresponds to the Split mode sub
voice) in Split mode. By dividing the transpose function into five separate settings, the P-100 gives you full control
over the pitch of notes produced by external tone generators as well as those it plays itself.
The procedures for setting the MIDI transpose amounts are similar to those described on pages 22 and 23, except that
you must press and hold the [MIDI] button together with the other buttons.
To set the Tch transpose amount, press and hold first the
[TRANSPOSE] button, then the [MIDI] button. Then, without
releasing these buttons, set the transpose amount by pressing a key
on the keyboard or using the [-l] and [+l] buttons.
When setting the Tch+l transpose amount, press and hold the
[TRANSPOSE] button, then the [MIDI] and [SPLIT] buttons,
before you make the adjustment.
You can set the MIDI transpose amounts anywhere within a range
of four octaves, from –24 (Cl) to 24 (C5). (In either case, a dot
will appear in the lower right comer of the display to indicate that
you have selected one of the MIDI transpose function settings.)
When you set the transpose amount, remember that the P-100 will
react to keys below Cl or above C5 as though you had pressed Cl
or C5.
Once you have set the desired transpose amount, release the [MIDI] and [TRANSPOSE] buttons. The P-100 will
display the new value for a moment, then exit the function automatically. The transpose function will remain turned on
for all notes until you turn it off again.
Whenever you press the [TRANSPOSE] button thereafter, you will turn the transpose function on and off for all
voices, both internal and external, at once. It is not possible to turn the MIDI transpose function on and off
independently of the internal transpose settings.
Do I have to change all the transpose settings?
Not necessarily. The P-100 was designed so that the MIDI transpose amount settings will
follow the internal transpose settings when you make any changes. Whenever you change the
main voice transpose setting. the MIDI Tch transpose setting will automatically be set to the
same value. Moreover. if you change the sub voice transpose setting while playing in Split mode, the Tch+l
transpose setting will also be set to the new amount. This at least ensures that any external tone generators will
at least be playing the same notes as the P-100’s internal voices. If you want your external tone generator to play
at a different octave, though. you will have to make that setting by hand.
30
Page 40

MIDI UTILITY MODE SETTINGS
MIDI Utility mode
In addition to its Single, Dual, Split, and Demo Play modes, the P-100 has a MIDI Utility mode which allows you to
make a number of settings related to MIDI control functions. Below is a listing of the settings available in this mode:
SETTING DESCRIPTION
Transmit and receive channels MIDI + CHANNEL
Local control on/off MIDI + LOCAL
MIDI merge function on/off
Bulk protect on/off
Pitch bend range
Modulation wheel on/off
CS slider assignment
Foot controller assignment MIDI + FC
Program change transmit table
Program change receive table
You can enter MIDI Utility mode by pressing the appropriate [VOICE/UTILITY] buttons while holding down the
[MIDI] button.
When you do so, the LEDs above both the [MIDI] button and the [VOICE/UTILITY] button you pressed will begin
blinking, and the current setting for the parameter you selected will appear in the display. You can use either the
[DATA ENTRY] slider or the [-1] and [+l] buttons to change this setting.
BUTTONS
MIDI + MERGE
MIDI + PROTECT
MIDI + PB
MIDI + MW
MIDI + CS
MIDI + PC TRNS
MIDI + PC RECV
When you’ve finished making your settings, press the [MIDI] button once again to exit MIDI Utility mode. Most of
the functions described previously (i.e., the voice selection, tuning
the P-100 is in MIDI Utility mode; therefore. you will have to leave this mode in order to use these functions.
and transpose functions, etc.) will not work while
31
Page 41

Transmit and receive channels
This is actually a group of three settings. In addition to the MIDI transmit and receive channels described on page 25,
the P-100 lets you specify a separate channel to receive program change messages.
Enter MIDI Utility mode.
1.
Press the [CHANNEL] button while holding down the [MIDI]
button The current transmit channel setting will appear in the
display.
2.
Select a setting to change.
Press the [CHANNEL] button once or twice more to select the
setting you wish to change.
The transmit channel is indicated in the display by the letter “t”,
the receive channel by the letter “r”, and the program change
receive channel by the letter “p”. If you press the [CHANNEL]
button a fourth time, the display will cycle back to the transmit
channel setting.
3.
Set the desired value.
Use the [DATA ENTRY] slider or the [-1] and [+l] buttons to
select the desired value.
32
Page 42

Each of these channel settings can be set to any one of the 16
MIDI channels, or they can be turned off, in which case dashes
will be displayed. The two receive channels can also be set to
receive messages from all 16 MIDI channels at once, a condition which is known in MIDI parlance as “omni on”.
The omni on setting is represented in the P-100’s display by the
word “all”.
4.
Exit MIDI Utility mode.
Press the [MIDI] button to exit MIDI Utility mode. (If you
wish, you can return to step 2 to change other settings before
you leave this mode.)
Program change receive channel
The P-100 can be set to receive program change messages on a channel other than the normal
receive channel. When you select a channel from 1 through 16, or “all”, as the program
change receive channel, the P-100 will receive program change messages on the selected
channel only. It will not accept program change messages on the receive channel, unless the
receive channel and program change receive channel settings happen to coincide.
If you set the program change receive channel to “off’, the P-100 will accept program change messages
transmitted on the receive channel. When you use this setting
change receive table settings. (The program change receive table is described on pages 42 and 43.) Instead,
program change messages 1 through 10 will select the corresponding
messages above 10 will be ignored.
The separate program change receive channel setting makes for greater flexibility when using the P-100’s MIDI
merge function in an extended MIDI system. This extra flexibility is convenient, but it would be less useful if it
meant having to change two receive channels rather than just one all the time.
Fortunately, the P-100 is designed so that whenever you alter the receive channel setting. the program change
receive channel will automatically shift to the same value. Thus, when you want to set both to the same value.
you need only change one. When setting them to different values, though, be sure to change the receive channel
first!
however, the P-100 will ignore any program
P-100 voices, and any program change
33
Page 43

Local control
This setting allows you to disconnect the P-100’s keyboard from its internal tone generator. It is usually turned on so
that the P-100 will function normally, producing music in response to the notes you play on the keyboard. When you
turn the local control off, the internal tone generator will no longer respond to notes you play. However, the keyboard
will still transmit messages via the MIDI OUT terminal, and the tone generator will respond to messages received at
the MIDI IN terminal.
1.
Enter MIDI Utility mode.
Press the [LOCAL] button while holding down the [MIDI]
button. The current local control setting will appear in the
display.
Set the desired value.
2.
Use the [DATA ENTRY] slider or the [-l] and [+1] buttons to
switch the setting on or off.
34
Exit MIDI Utility mode.
3.
Press the [MIDI] button to exit MIDI Utility mode.
Page 44

MIDI merge
When the MIDI merge function is turned on, any MIDI data received at the MIDI IN terminal will be echoed through
the MIDI OUT terminal together with data transmitted by the P-100, allowing instruments receiving this data to be
controlled by both the P-100 and other devices connected to the P-100’s MIDI IN terminal.
1.
Enter MIDI Utility mode.
Press the [MERGE] button while holding down the [MIDI]
button. The current MIDI merge setting will appear in the
display.
2.
Set the desired value.
Use the [DATA ENTRY] slider or the [-l] and [+l] buttons to
switch the setting on or off.
3.
Exit MIDI Utility mode.
Press the [MIDI] button to exit MIDI Utility mode.
35
Page 45

Bulk protect
The bulk protect function protects the P-100’s internal settings against incoming system exclusive messages.
When this function is turned on, as is normally the case, the P-100 will not accept any incoming bulk dump or parameter change messages. When it is set to bulk (“bul”), the P-100 will accept parameter change messages, but protect
against bulk messages. Finally, when turned off, the P-100 will allow its memory to be overwritten by incoming bulk
dumps and system exclusive messages.
1.
Enter MIDI Utility mode.
Press the [PROTECT] button while holding down the [MIDI]
button. The current bulk protect setting will appear in the
display.
2.
Set the desired value.
Use the [DATA ENTRY] slider or the [-l] and [+l] buttons to
switch the setting to the desired value.
36
3.
Exit MIDI Utility mode.
Press the [MIDI] button to exit MIDI Utility mode.
Page 46

Pitch bend range
This setting lets you specify how far the pitch of sounds produced by the P-100 will bend when you roll the [PITCH]
wheel all the way in either direction. The range you set here applies only to the P-100’s internal voices. External tone
generators may interpret pitch bend messages from the P-100 in a different manner, depending on their own internal
settings.
1.
Enter MIDI Utility mode.
Press the [PB] button while holding down the [MIDI] button.
The current pitch bend range setting will appear in the display.
2.
Set the desired value.
Use the [DATA ENTRY] slider or the [-l] and [+l] buttons to
select the desired value.
You can set a value from 0 to 12 for the pitch bend range.
The number you select is the number of semitones by which the
[PITCH] wheel will raise or lower the pitch of a note when it is
rolled all the way up or all the way down. Setting a range of 0
will effectively disable the [PITCH] wheel, while a value of 12
will enable the wheel to bend notes up or down an entire octave.
3.
Exit MIDI Utility mode.
Press the [MIDI] button to exit MIDI Utility mode.
37
Page 47

Modulation wheel
The modulation wheel setting lets you turn off the vibrato produced by the [MODULATION] wheel. The setting you
make here applies only to the P-100’s internal voices, however. Even when the modulation is turned off, you can still
use the P-100’s [MODULATION] wheel to send modulation messages to an external tone generator, which will
naturally interpret these messages according to its own internal settings.
The modulation wheel setting does not affect the P-100’s PIANO 1 and PIANO 2 voices, as the vibrato effect is turned
off at all times for these voices.
Please keep in mind that the vibrato effect controlled by the [MODULATION] wheel has nothing to do with the
modulation effects which you can select using the [MODULATION] button. The procedures for selecting a
modulation effect and setting its depth are described on page 10.
1.
Enter MIDI Utility mode.
Press the [MW] button while holding down the [MIDI] button.
The current modulation range setting will appear in the display.
2.
Set the desired value.
Use the [DATA ENTRY] slider or the [-l] and [+l] buttons to
switch the setting on or off.
38
3.
Exit MIDI Utility mode.
Press the [MIDI] button to exit MIDI Utility mode.
Page 48

Assignable controllers
You can assign one of a number of MIDI functions to the P-100’s [CS] slider for realtime control during performances.
You can use this slider to independently control the volume of the main or sub voices, to transmit aftertouch messages
to tone generators capable of receiving them, or to send any of 120 different types of control change messages (with
the exception of control changes 0 and 32, which are used for bank select messages).
If you purchase an optional foot controller (Yamaha FC7), you can assign a function to it as well. In addition to the full
range of functions mentioned above, the foot controller can be assigned as an overall volume control. You can then use
it instead of the [VOLUME] slider, leaving your hands free to do other things. Adding a second realtime controller to
your P-100 will thus allow you to increase your P-100’s performance flexibility.
1.
Enter MIDI Utility mode.
Press the [CS] button while holding down the [MIDI] button.
The current [CS] slider function assignment will appear in the
display. (To assign a function to the foot controller, press the
[FC] button instead of the [CS] button.)
2.
Select the desired setting.
Use the [DATA ENTRY] slider or the [-l] and [+1] buttons to
select the function you wish to assign to the controller.
The table below shows the possible assignment values.
(Note that overall volume control can only be assigned to the
foot controller, and not to the [CS] slider.)
DISPLAY FUNCTION
Off (no assignment)
P-100 overall volume (FC only)
INTERNAL
VOLUME
P-100 main voice volume
P-100 sub voice volume
Control change 001
MIDI
: :
CONTROL
CHANGE
Control change 120
Aftertouch (channel)
The P-100 displays only the control change numbers for control
change messages 001 through 120. For the meaning of these
numbers, refer to the MIDI Data Format on page 54.
3.
Exit MIDI Utility mode.
Press the [MIDI] button to exit MIDI Utility mode.
39
Page 49

Program change transmit table
Your P-100 generally transmits a program change message each time you press a [VOICE/UTILITY] button to select a
voice. The number of the program change message that is sent is displayed for a second after you press the button,
before being replaced by the number of the voice you selected.
When your P-100 left the Yamaha factory, it was preset so that each [VOICE/UTILITY] button will send the program
change number corresponding to the number above the button. Thus, an external tone generator connected to the
P-100 will receive messages selecting program 1 when you press the [PIANO l] button, program 2 when you press the
[PIANO 2] button, and so on.
These settings are grouped in a table known as the
program change transmit table.
This is merely a table of one-toone correspondences which assigns a program change number to each of the P-100’s ten [VOICE/UTILITY] buttons.
You can change the assignments in this table using the procedure described below.
1.
Enter MIDI Utility mode.
Press the [PC TRNS] button while holding down the [MIDI]
button. The LED above the button for the currently selected
voice (the main voice in Dual or Split mode) will light steadily,
and the current transmit table setting for this button will appear
in the display.
Select a [VOICE/UTILITY] button.
2.
Press the [VOICE/UTILITY] button for which you wish to
change the setting. The current transmit table setting for that
button will appear in the display. (If you want to change the
transmit table setting for the currently selected button, you can
skip to step 3.)
40
3.
Set the desired value.
Use the [DATA ENTRY] slider or the [-l] and [+l] buttons to
select the desired value.
You can set a program change number from 1 to 128 for each of
the P-100’s [VOICE/UTILITY] buttons. If you wish, you can
make this setting using a MIDI message instead of the [DATA
ENTRY] slider. To do so, have an external device transmit the
desired program change number on the P-100’s program change
receive channel. The number of the message you send will
appear in the P-100’s display.
Page 50

You can also press the selected [VOICE/UTILITY] button to
turn the program change transmit function on or off for that
button. When you turn the function off, the program change
number in the display will be replaced by a row of dashes.
4.
Exit MIDI Utility mode.
Press the [MIDI] button to exit MIDI Utility mode. (If you
wish, you can return to step 2 to change other settings before
you leave this mode.)
Whenever you press a [VOICE/UTILITY] button to select a voice (other than the Dual mode sub voice), the P-100
will check the program change transmit table to determine whether a program change number has been assigned to
that button. If so, and if MIDI transmission is enabled, it will transmit the program change number in question from
the MIDI out terminal.
When the program change message is transmitted, the program change number which was sent will appear in the LED
display briefly each time you press the button to select a voice. However, you will not notice this display unless you
change the transmit table settings, since the program change number assigned to each button in the Yamaha factory is
the same as the number of the P-100 voice selected by that button.
41
Page 51

Program change receive table
The P-100 is also capable of changing its current voice selection in response to program change messages it receives
from external devices. Before it left the Yamaha factory, your P-100 was set so that program change numbers 1
through 10 will select the corresponding voices: program change 1 will select PIANO 1, program change 2 will select
PIANO 2, and so on. Program change numbers above 10 were set to have no effect.
These settings are grouped in a table known as the
program change receive table.
This is a table which assigns a
P-100 voice selection to each of the 128 program change numbers. The procedure for changing the assignments in this
table is described below.
1.
Enter MIDI Utility mode.
Press the [PC RECV] button while holding down the [MIDI]
button. A program change number will appear in the display,
and the LED above the [VOICE/UTILITY] button which has
been assigned to this program change number will light. (If no
button has been assigned to the program change number in
question, none of the [VOICE/UTILITY] button LEDs will
light.)
2.
Select a program change number.
Use the [DATA ENTRY] slider or the [-1] and [+l] buttons to
select the desired program change number, or jump to step 3 if
you wish to change the setting for the current program change
number.
You can select any program change number from 1 to 128.
If you wish, you can make your selection using a MIDI message
instead of the [DATA ENTRY] slider. To do this, have an
external device transmit the desired program change number on
the P-100’s program change receive channel. The number of the
message you send will appear in the P-100’s display.
When you select a program change number, the LED above the
[VOICE/UTILITY] button for the voice which has been
assigned to that number will light. (Again, if no button has been
assigned to the program change number in question, none of the
[VOICE/UTILITY] button LEDs will light.)
42
3. Select a voice.
Press the [VOICE/UTILITY] button for the voice you wish to
assign to the program change number you have selected.
The LED above the button you press will light.
You can also turn the program change receive function off for
the selected program change number by pressing the button a
second time. When you do so, the LED above the button will go
out.
Page 52

4.
Exit MIDI Utility mode.
Press the [MIDI] button to exit MIDI Utility mode. (If you
wish, you can return to step 2 to change other settings before
you leave this mode.)
Whenever the P-100 receives a program change message, it will check the program change receive table to determine
whether a voice has been assigned to the received program change number. If so, the main voice will automatically
switch to the voice indicated by the program change receive table. (If the P-100 is in Dual mode, this will cause it to
shift to Single mode.) If the program change function has been turned off for that number, the message will simply be
ignored.
Keep in mind that the assignments you make in the program change receive table are only valid as long as a channel
has been selected as the program change receive channel. The procedure for selecting a program change receive
channel is described on pages 32 and 33.
43
Page 53

SPECIAL OPERATIONS
Bulk dumps
The preceding chapters have shown you how much performance flexibility the P-100 has to offer. But this flexibility
comes with a small drawback: to use it effectively, you have to make a large number of settings. If you’re like most
musicians, you’ll find there are certain settings that work best with each song you play. These can include simple voice
and mode selections, reverb and modulation effect settings, [PITCH] and [MODULATION] wheel settings, and even
program change transmit or receive table assignments.
Of course, changing all of these settings between songs can require a lot of time. While this can be inconvenient for
anyone, it is downright frustrating for stage performers who feel acutely the eyes of a waiting audience upon them.
To make the transition between songs smooth and easy, you will want to make use of the P-100’s bulk dump function,
The bulk dump operation lets you store the contents of the P-100’s setup memory in an external device with MIDI data
recorder (MDR) capability, like that built into many sequencers, Yamaha’s SY99 Music Synthesizer, or our MDF2
MIDI Data Filer. This lets you save an entire bundle of settings, such as those you use when playing a particular song,
for fast recall.
To execute a bulk dump, you must first make sure that the MIDI merge function is off. (The procedure for turning the
MIDI merge function off is described on page 35.) Also make a note of the P-100’s current transmit channel setting, as
you will need this information when you attempt to load the data back into the P-100.
Simultaneously press the [REVERB] and [MODULATION]
buttons while holding down the [MIDI] button. The P-100 will
automatically send three bulk dumps containing (1) all of the
P-100’s current settings except for the program change transmit
and receive tables, (2) the program change transmit table, and (3)
the program change receive table.
The bulk dump will require only about a second, during which the
letters “bul” will appear in the display. When it is done, the P-100
will return automatically to the previous mode.
Receiving bulk dumps
Dumping the P-100’s memory to an external device for storage would not be very useful, of
course, if you had no way of loading that data back into the P-100. The reloading of stored
data is done by means of a bulk dump executed from the storage device.
To prepare the P-100 to accept a bulk dump, first turn the bulk protect function off using the procedure
described on page 36. Also, the P-100 must be set to receive on the channel that was set as the transmit channel
when the P-100 dumped the data in question. (This is because the P-100 uses its current transmit and receive
channel settings in lieu of a device number when transmitting and receiving bulk dumps.) The procedure for
changing the receive channel setting is described on page 32.
Once you have made these preliminary settings, send data to the P-100 using the external device’s bulk dump
operation. The P-100 will automatically accept the new data.
44
Page 54

Memory initialization
After you’ve been using the P-100 for a while, you may find yourself wishing that you could erase all your settings
and start again with a fresh slate. After all, the P-100 lets you make enough settings that changing the majority of them
can be a time-consuming process. Under such circumstances you should use the memory initialization procedure to
return the P-100’s settings to their initial values, or
factory settings.
The procedure for initializing the P-100’s memory is very simple.
Just turn the [POWER] switch off, then turn it on again while
holding down the [MIDI] button. This will clear the P-100’s RAM
and restore it to the condition it was in when you purchased it.
Be sure that you don’t need the current settings —
or save them using a bulk dump operation, if possible — before you
perform this operation. Once you initialize the memory, you will not be able to recall the previous settings.
P-100 factory settings
The The table below lists the p-100’s factory settings.
* OFF is selected as the modulation type for asterisked voices. If a different
modulation type is selected for these voices, however, the indicated modulation depth will be used.
The program change transmit table is set so that the program change number sent by each [VOICE/UTILITY]
button matches the number of the voice selected by that button. The program change receive table is set so that
program change numbers 1 through 10 select voices 1 through 10, and program change numbers above 10 have
no effect.
45
Page 55

SYSTEM APPLICATIONS
Using the P-100 with a tone generator
You can use the P-100’s keyboard and MIDI control functions to control tone generators such as Yamaha’s TG77.
To do so, connect the P-100’s MIDI OUT terminal of the P-100 to the MIDI IN terminal of the tone generator as
shown below. When two instruments are linked in this manner, the controlling and controlled instruments are referred
to as the
When using the P-100 to control a single voice of a slave tone generator, set the P-100’s transmit channel and the
slave’s receive channel to the same channel number. Any notes you play on the P-100’s keyboard in Single or Dual
modes will be transmitted to the slave using this channel, together with any messages produced by operation of the
[PITCH] and [MODULATION] wheels and the foot pedals. If you assign MIDI control functions to the P-100’s [CS]
slider and the foot controller, these controls will also send messages on the channel you select.
master
and
slave
devices, respectively.
If your slave is a multitimbral tone generator, as the TG77 is when you switch it to Multi mode, you may want to play
two of the voices using the P-100 in Split mode. Assign the receive channel for one of the tone generator’s voices to
the P-100’s transmit channel (Tch), and that for another of its voices to the next higher channel (Tch+l). Thereafter the
tone generator will respond to notes you play in the main keyboard area using the first voice, and notes you play in the
sub keyboard area using the second voice.
The P-100 will send program change messages on either of these channels each time you press one of the
[VOICE/UTILITY] buttons to select a new main or sub voice. The P-100 is thus able to select up to ten of the slave’s
voices or multiple-voice selections (such as the TG77’s multis), depending on your program change transmit table
settings. (Note that the way the slave responds to these messages can also depend on its own settings. The TG77, for
example, can be set to respond to program change messages in a number of different ways.)
If you need to amplify your tone generator’s output, you can do so by connecting its output jacks to the P-100’s LINE
IN jacks. If you try this, remember that the P-100’s reverb, modulation, and equalization effects will not affect the
sound output by the tone generator.
46
Page 56

Using the P-100 with another MIDI keyboard
Yamaha’s SY99 synthesizer incorporates a multitimbral tone generator similar to the TG77. It can therefore be slaved
to the P-100 as described above. However, it also has a MIDI keyboard with a broad range of control features and a
powerful l6-track sequencer, making it an excellent master device.
To make full use of the more powerful control capabilities of a MIDI synthesizer like the SY99, you will probably
want to connect it to the P-100 with two MIDI cables: one to carry data from the P-100 to the synthesizer, and another
to carry it in the other direction. When you connect the P-100 to an external keyboard in this way, either keyboard will
be able to control the other device’s tone generator, as well as its own.
Set the synthesizer’s receive channel (or channels) to match the P-100’s transmit channel settings (Tch and Tch+l) as
described for the TG77. Then set the P-100’s receive channel (Rch) and the synthesizer’s keyboard transmit channel to
the same number. (You can use the same channel number for Tch and Rch, if you wish, since each of the two MIDI
cables actually constitutes a separate MIDI system. Remember to turn the P-100’s MIDI merge function off, however,
or the P-100 will echo synthesizer’s data back to it, causing notes to double up unnecessarily.)
Once you have made these settings, you will be able to control the synthesizer’s tone generator from the P-100 as
described above. You will also be able to play the P-100 using the synthesizer’s keyboard, should that be more
convenient. If the keyboard has a built-in sequencer, as the SY99 does, then the sequencer will also be able to control
the P-100.
When in Single or Dual mode, the P-100 will respond normally to notes received from the synthesizer. In Split mode,
it will play notes received on the receive channel (Rch) with the main voice, and notes received on the next channel up
(Rch+l) with the sub voice selection.
If you set the P-100’s program receive channel to the channel on which the synthesizer is transmitting, the P-100 will
receive program change messages whenever you select one of the synthesizer’s voices, and respond to them as
specified by your program change receive table settings. This will allow you to control the P-100’s voice selection
from the synthesizer. It will also make changing your transmit and receive table settings easier, as you will be able to
simply select one of the synthesizer’s voices instead of using the [DATA ENTRY] slider to set program change
number values.
47
Page 57

Using the P-100 with an extended MIDI system
Thanks to the great variety of MIDI devices now available, extended MIDI systems come in such a variety of shapes
and degrees of complexity that we cannot fully cover all the possibilities here. However, we would like to give you an
example of how the P-100’s MIDI merge function might be used in a fairly simple extended system consisting of the
P-100, a tone generator, and a synthesizer.
The illustration above shows the SY99, the P-100, and the TG77 hooked up in series, or what is known as a
chain.
This setup constitutes a lot of performance power, as it includes three multitimbral tone generators, two of
daisy
which — the P-100 and the TG77 — can be controlled by either of the two keyboards, or by the SY99’s sequencer.
When the SY99’s keyboard or sequencer transmits on the P-100’s receive channel, the P-100 will respond as described
on the previous page. Since its MIDI merge function is turned on, however, it will also pass messages it receives on all
sixteen MIDI channels along to the TG77. The SY99 will thus be able to control both the P-100’s two voices and any
of the TG77’s 16 timbres.
You could achieve the same result by connecting the TG77 to the P-100’s MIDI THRU terminal instead of the MIDI
OUT. But then, you would not be able to control the TG77 using the P-100’s keyboard. That is the charm of MIDI
merge function: it allows you to control a single device with either (or both) of two other devices. In the system
pictured above, the P-100 will control the TG77 as described previously, letting you play both of these instruments
without affecting the SY99. (You might be tempted to connect the TG77’s MIDI THRU terminal to the SY99’s MIDI
IN in order to let the P-100 control the SY99, but you shouldn’t. The P-100’S MIDI merge function would end up
passing data received from the SY99 through the TG77 and back to the SY99, causing all of the notes to double up.)
To sum this system up, then, all three instruments, will respond when you play the SY99, and only two will respond
when you play the P-100. By turning off some of the timbres in the SY99 and the TG77, you could come up with a
number of variations that will let you play only one of the three instruments at any given time.
48
Page 58

Using the P-100 with a MIDI data recorder
If you perform on stage and want to make the most of the P-100’s versatility, you will probably find a device with
MIDI data recorder (MDR) capability to be a necessity. Such a device will let you store your P-100 setups
— including voice selections, DSP effect and MIDI settings, controller assignments, and transmit and receive tables —
for fast and easy recall, thus saving you the trouble of changing a host of settings between every song.
There are many devices, including sequencers, synthesizers such as Yamaha’s SY99, and peripheral devices such as
the MDF2 MIDI Data Filer, which possess MDR capability. The illustration above shows how you would connect the
P-100 to Yamaha’s MDF2, a compact, portable data filer suitable for use with the P-100.
With this arrangement, you would use the P-100’s bulk dump procedure to send its settings to the MDF2, which would
record this data in MDR mode. You could then transmit the data back to the P-100 at any time, as long as the bulk
protect function is turned off. Since the MDF2 can store up to 99 different MDR files on a single 3.5” floppy disk, one
disk would probably be enough to store your song setups for an entire show.
The MDF2 also has an easy-to-use sequencer function that you could use to record songs you play on the P-100. When
playing back songs recorded with this function, you would want to be sure to turn off the P-100’s MIDI merge
function, to prevent received sequence data from echoing back to the MDF2.
49
Page 59

ERROR MESSAGES
Whenever a problem occurs, the P-100 will display an error message to alert you to the nature of the trouble.
The meanings of the error messages are described below, together with the action you should take in response to each.
(The error messages themselves will be cleared from the display automatically as soon as you operate one of the
controls on the P-100’s upper panel.)
Backup battery low
The charge of the internal backup battery is running low. All of
your P-100’s setup data will be lost if the battery charge runs down
completely. Save any settings you may want to keep using the bulk
dump procedure, if possible, then contact your Yamaha dealer or a
Yamaha service center to have the battery replaced.
MIDI buffer full
The P-100 has received a greater volume of MIDI data than it can
process at one time. Take steps to reduce the amount of data the
P-100 is receiving.
MIDI data error
The P-100 had trouble receiving MIDI data. Check your cable
connections and try the operation again.
MIDI checksum error
The P-100 had trouble receiving a MIDI bulk dump. Check your
cable connections and try the operation again.
Bulk protected
The P-100 could not receive an incoming bulk dump because the
bulk protect function has not been turned off. Turn the bulk protect
off using the procedure described on page 36, then try the bulk
dump operation again.
Device number mismatch
The P-100 could not receive an incoming bulk dump because the
current receive channel (Rch) setting does not match the device
number recorded in the bulk data. The bulk data device number is
set equal to the P-100’s transmit channel (Tch) setting at the time
the data is dumped. Set the receive channel to this value using the
procedure described on page 33, then try the bulk dump operation
again.
50
Page 60

SPECIFICATIONS
Keyboard:
Tone Generator:
Built-in DSP Effects:
Pitch control range:
Controls:
Indicators:
88-key (A-1 to C7) Action Effect, velocity sensitive
Tone generation method: AWM
Voices:
Maximum simultaneous notes: 32/16
Digital reverb: ROOM, STAGE, HALL
Modulation: CHORUS, SYMPHONIC, TREMOLO
Equalizer: 3-band graphic equalizer
Tuning:
Transposition: –24 to +24 semitones
Panel switches:POWER, SPLIT (BALANCE), TRANSPOSE (DETUNE),
Sliders:
Wheels:
Panel display: red three-digit numeric LED
Switch lamps:
PIANO 1, PIANO 2, E.PIANO 1, E.PIANO 2, CLAVINOVA TONE,
VIBES, STRINGS, ORGAN, BASS 1, BASS 2
approx. –50 to +50 cents (increment approx. 0.78 cents)
MIDI (TUNE), VOICE/UTILITY x 10, REVERB (-l),
MODULATION (+l), SPEAKER
VOLUME, CS (DATA ENTRY), EQUALIZER x 3
(LOW, MIDDLE, HIGH)
PITCH, MODULATION
red LED x 19 (SPLIT, TRANSPOSE, MIDI,
VOICE/UTILITY x 10, REVERB x 3, MODULATION x 3)
Connectors:
output:
Dimensions (W x D x H):
Weight:
Accessories:
Phone jacks: PHONES (stereo), LINE IN (R, L/MONO), LINE OUT
MIDI terminals: IN, OUT, THRU
Amplifiers:
Speakers:
1385 x 424 x 157.5 mm (54-1/2" x 16-3/4" x 6-1/4")
34 kg (75 lbs.)
FC4 Footswitch, music stand
(R, L/MONO), SUSTAIN, SOSTENUTO, SOFT,
FOOT CONTROLLER
20 watts x 2
13 cm (5") x 2
* Specifications are subject to change without notice.
51
Page 61

INDEX
–1 button 3
+l button 3
A
After-touch, assignable controllers 39, messages 25
Assignable controllers 39
B
Balance, assignable controllers 39, Dual mode voices
13, Split mode voices 16
Backup battery, error message 50, life 1
BALANCE button 2
Bulk, dump 44, protect 36
C
Channels 25, main voice 27-28, sub voice 28
Control change, assignable controllers 39, messages
25
CS slider 2, assignment 39
D
DATA ENTRY slider 2
Demo songs 6
Detune 14
DETUNE button 3
Device number, for bulk dumps 44, error message 50
Dual mode 12, polyphonic capacity 12, MIDI con-
figuration 27, selecting voices 12, transposing 23,
voice balance 13, voice detune 14
K
Keyboard 3, main and sub areas 15, P-100 configrua-
tion 27-28, split point 17, MIDI system applications 46-48, tuning 19, velocity curve 20
L
LED display 2
LINE IN jacks 4
LINE OUT jacks 4
Local control 34
M
Master, device 46, tuning 19
Memory, battery backup 1, initialization 45
Merge, MIDI 25, 35
Messages 25
MIDI 25, bulk protect 36, channel settings 32-33, CS
slider 39, Data Format 54, data recorder 49,
enabling transmission of channel messages 29, foot
controller 39, Implementation Chart 58, local control 34, MODULATION wheel 38, P-100 configuration 27-28, pitch bend range 37, system applications 46-48, terminals 4,26, transpose 30, Utility
mode functions 31, velocity curve 29
MIDI button 2
MIDI merge 25, during bulk dumps 44, setting 35,
system applications 48
MDF2 44, 49
Modulation, effect setting 10, wheel setting 38
MODULATION button 3
MODULATION wheel 2
E
Equalizer effect 11
EQUALIZER sliders 3
Error messages 50
F
Factory settings 45
Foot controller, assignment 39, connection 5
FOOT CONTROLLER jack 4
Foot pedals, connection 5, jacks 4
I
Initialization 45
52
0
Omni on 33
P
Parameter change, bulk protect 36, messages 25
Pedal jacks 4
Pitch bend range 37
PITCH wheel 2
PHONES jack 4
Polyphonic capacity 8, in Dual mode 12
POWER switch 2
Precautions 1
Program change, messages 25, receive channel 32-33,
receive table 42-43, transmit table 40-41
Page 62

Protect, bulk protect setting 36, during dumps 44,
error message 50
R
Rear panel 4
Reception, bulk
program change receive table 42-43, receive chan-
nel settings 32-33
Reverb 9
REVERB button 3
dumps44,
channels
used27-28,
S
Sequencer 47
Single mode 7, MIDI configuration 27
Slave device 46
SOFT jack 4
SOSTENUTO jack 4
SPEAKER switch 4
Speakers 3
SPLIT button 2
Split mode 15, MIDI configuration 28, selecting
voices 16, transposing 23, voice balance 16
Split point 17
SUSTAIN jack 4
SY99 44, 47-48
U
Upper panel
Utility mode 31
2
V
Vibrato 38
Voice, balance in Dual mode 13, balance in Split
mode 16, detune in Dual mode 14, list 7, selection
in Dual mode 12, selection in Single mode 7,
selection in Split mode 16
VOICE/UTILITY buttons 2
Volume, assignable controllers 39, voice balance in
Dual mode 13, voice balance in Split mode 16
VOLUME slider 2
T
Table, program change receive 42-43, program change
transmit 40-41
Terminals, MIDI 4, 26
TG77 46, 48
Timbres 25
Transmission, bulk dumps 44, channels used 27-28,
enabling transmission 29, program change transmit
table 40-41, transmit channel setting 32-33
Transpose, main voice 22, MIDI 30, sub voice 23,
turning function on and off 21
TRANSPOSE button 2
Tone generator, P-100 configuration 27-28, system
applications 46-48
TUNE button 2
Tuning 19
53
Page 63

MIDI DATA FORMAT
1. Midi Transmission/Reception Block Diagrams
1.1 Reception Flow Diagram
2. Channel Messages
2.1 Transmission
2.1.1
Note On/Off
Transmitted note range:
Velocity range:
The transmitted note number value can be adjusted within the range from 0
(C-2) to 127 (G8) using the MIDI Tch and Tch+l transpose settings.
2.1.2 CONTROL CHANGE
The P-100’s controllers transmit MIDI data as described in the table
below.
2.1.3 PITCH BEND
Pitch bend messages are transmitted with 7-bit resolution.
2.1.4AFTERTOUCH
Aftertouch messages are transmitted by the CS slider or the foot controller
when these controllers are assigned to the aftcrtouch function.
2.1.5 PROGRAM CHANGE
Program change messages arc transmitted on the transmit channel (Tch) as
specified by the program change transmit table when a main voice is
selected in any mode. Program change messages arc transmitted on the sub
voice transmit channel (Tch+l) according to the program change transmit
table settings when the Split mode sub voice is selected. No program
change message is transmitted when the Dual mode sub voice is selected.
21 (A-1)~108 (C7)
0~127 (0 = note off)
1.2 Transmission Flow Diagram
2.1.6 CHANNEL MODE
No channel mode messages are transmitted.
2.2 RECEPTION
2.2.1 NOTE ON/OFF
Transmitted note range:
Velocity range:
Note numbers below 21 (A-1) are played as the corresponding note of the
lowermost octave (A-l to G#0). Note numbers above 108 (C7) are played
as the corresponding note of the uppermost octave (C#6 to C7).
Velocity is received for note on messages only.
2.2.2 CONTROL CHANGE
The parameters in the table control arc controlled by received control
change messages.
2.2.3 PITCH BEND
Pitch is controlled by the MSB of received pitch bend messages only.
2.2.4 AFTERTOUCH
Aftertouch messages arc not recognized.
0 (C-2)~127 (G8)
1~127
54
Page 64

2.2.5 PROGRAM CHANGE
Program change messages received on the program change receive channel select a P-100 main voice as specified by the program change receive
table. If the P-100 is in Dual mode. the reception of a program change
message will cause it to enter Single mode.
Program change messages are received on the receive channel (Rch) only
as if the program changes receive channel is off. Under this condition, program change messages 000 through 009 will select voices 1 through 10 as
the main voice. If the P-100 is in Dual mode. the reception of a program
change message will cause it to enter Single mode.
Program change messages are received on the Split mode sub voice
receive channel (Rch+l) only when the P-100 is in Split mode, and only if
this channel is not the same as the program change receive channel. If the
program change receive channel is the same as the receive channel (Rch).
program change messages received on the Rch+l channel will select a
Split mode sub voice as specified by the program change receive table.
If the program change receive channel and the receive channel (Rch) are
different. program change messages 000 through 009 received on the
Rch+l channel will select voices 1 through 10 as the Split mode sub voice.
The P-100 does not recognize bank select messages.
2.2.6 CHANNEL MODE
The P-100 recognizes All Notes Off and Reset All Controllers messages
only in omni off mode (i.e., when the receive channel is set to “all”).
When the Reset All Controller message is received, the volume is set to
maximum, the pitch bend is centered, and all other controllers are set to
minimum or turned off.
2.3
Configuration of Keyboard and Tone Generator
MIDI messages received on the channel which has been set as the P-100’s
MIDI transmit channel (Tch) are transmitted without alteration. As a
result, operation of controllers may not product the expected results when
the MIDI merge function is used, since both the P-100’s tone generator
and any devices receiving the merged data can be controlled by the
controllers of either the P-100 or the merged device. As a rule, the lastreceived control messages will always take priority. Also, notes being
sounded by the P-100 may be turned off by received All Notes Off
messages.
Although the P-100 is not capable of transmitting its own bank select
messages, it will pass on received bank change messages, Any program
change messages transmitted by the P-100 will thus apply to the bank
selected by received select messages.
The P-100 will never pass on received active sensing messages. Also, if it
detects an interruption in active sensing message reception, it will stop
transmitting its own active sensing messages from the MIDI OUT terminal
for an interval of 500 msec. This may cause devices receiving the merged
data to interrupt their processing of note messages transmitted by the
P-100.
When system exclusive messages having a length of greater than 32 bytes
are received, the relaying of these messages may be cut off by the P-100’s
own MIDI messages. (The P-100 puts a temporary hold on the transmission of MIDI messages when it receives a system exclusive message.
However, as soon as the length of the received system exclusive message
exceeds 31 bytes, the hold is cleared. The P-100 then transmits an EOX to
end the system exclusive message before transmitting its own data. When
this happens, the P-100 will not pass on any received data until it receives
data with a status byte indicating a status other than system realtime
message.
The P-100’s bulk dump function cannot be used while the MIDI merge
function is turned on.
2.4 MIDI MERGE FUNCTION
The P-100 possesses a MIDI merge function which allows it to merge the
MIDI information it products with data received at the MIDI IN terminal.
then transmit the combined data from the MIDI OUT terminal. This function operates as described below. (In this explanation, the term “merged
device” refers to the device which is connected to the P-100’s MIDI IN
terminal, and whose data is merged with that produced by the P-100.)
3. SYSTEM EXCLUSIVE MESSAGES
3.1 PARAMETER CHANGE MESSAGES
The P-100 is capable of receiving and transmitting the following four
types of parameter change messages:
1. System Setup bulk dump
2. Program change transmit table dump
3. Program change receive table bulk dump
4. Switch Remote parameter change
The P-100 uses its current transmit channel (Tch) setting as its device
number when transmitting these parameter change messages, and its
current receive channel (Rch) setting when receiving them.
It can therefore transmit or receive these messages only as long as the
transmit and receive channels are not turned off.
Switch remote parameter change messages arc an cxception to this rule,
however: they may be received at any time, regardless of the receive
channel setting.
3.1.1 SYSTEM SETUP
55
Page 65

When a parameter change message indicating the voice mode parameter
(VMODE, ppppppp=03) is received, the P-100 will enter the specified
voice mode, Any other system setup parameter change message will
simply change the indicated parameter to the specified value.
3.1.2 PROGRAM CHANGE TRANSMIT TABLE
Received program change transmit table parameter change messages will
change the indicated parameter to the specified value. regardless of the P100’s current mode.
3.1.3
PROGRAM CHANGE RECEIVE TABLE
Received program change receive table parameter change messages will
change the indicated parameter to the specified value, regardless of the
P-100’s current mode.
<TABLE 1-1 >
MIDI PARAMETER CHANGE TABLE (SYSTEM SETUP)
$F0, $43, $1n, $2A, $00, $00, $00, N2, $00, V2, $F7
Notes) n
= device number (i.e., transmit/receive table)
N2 = parameter number
V2 = parameter value
3.1.4 SWITCH REMOTE
Remote switch parameter change messages arc recognized but not
transmitted. These messages allow remote control of the functions
controlled by the P-100’s panel switches, and product the same results as
if the actual switches had been pressed. All switch remote parameter
change messages are recognized. regardless of the device number
specification.
3.2 BULK DUMPS
The P-100 is capable of transmitting and receiving the following three
types of bulk dumps:
1.
System Setup bulk dumps
Program change transmit table dumps
2.
3.
Program change receive table bulk dumps
The P-100 will transmit each of these three bulk dumps. in sequence, when
the MIDI. REVERB. and MODULATION buttons arc pressed
simultaneously. It can receive any one of the three bulk dump types
independently of the others.
The P-100 uses its current transmit channel (Tch) setting as its device
number when transmitting bulk dumps. and its current receive channel
(Rch) setting when receiving them.
For the formats of these bulk dumps. refer to Table 2-l through 2-3 below.
o/b = offset binary
Note)
Parameters with a data range of “off/on” are off when V2 equals
Note)
0, on otherwise.
Note)
The Effect Select and Depth parameters each consist of two 4-bit
nibbles. The lower 3 bits of the MS nibble indicate tch reverb
setting, while the lower 3 bits of the LS nibble indicate the
modulation setting.
Note) Asterisked items arc received but not transmitted.
< TABLE 1-2 >
MIDI PARAMETER CHANGE TABLE
(PROGRAM CHANGE TRANSMIT TABLE)
$F0, $43, $1n, $2A, $0E, $00, $00, N2, V1, V2, $F7
Notes: n
= device number (i.e., transmit/receive table)
= parameter number
N2
= parameter value ( 1 = transmit off)
V1
V2
= parameter value
56
Page 66

<TABLE l-3 >
MIDI PARAMETER CHANGE TABLE
(PROGRAM CHANGE RECEIVE TABLE)
$F0, $43, $1n, $2A, $0F, $00, $00, N2, $00, V2, $F7
n = device number (ie., transmit/receive table)
Notes:
N2
= parameter number
V2
= parameter value
Note:
The indicated parameter is considered to be off when any value
greater than 9 is received for V2.
<TABLE l-4>
MIDI PARAMETER CHANGE TABLE (SWITCH REMOTE)
$F0, $43, $1n, $2A, $0D, $00, $00, N2, $00, V2, $F7
Notes: n
= device number (i.e., transmit/receive table)
N2 = parameter number
V2 = parameter value
<TABLE 2-2 >
MIDI BULK DUMP FORMAT
(PROGRAM CHANGE TRANSMIT TABLE)
(DUMP REQUEST)
<TABLE 2-3 >
MIDI BULK DUMP FORMAT (SYSTEM SETUP)
(DUMP REQUEST)
< TABLE 2-l >
MIDI BULK DUMP FORMAT
(SYSTEM SETUP)
(DUMP REQUEST)
57
Page 67

YAMAHA
[ Electronic Piano P-100
Model
P-100
MIDI Implementation Chart
]
Date
:17-APR-1992
Version : 1.0
Function ...
Basic Default
Channel
Changed
Default
Mode
Messages
Altered
Note
Number
True voice
Velocity Note ON
Note OFF
After Key's
Touch
Ch's
Pitch Bender
1
7
Control
64
66
Change
1
67
- 120
121
Transmitted
- 16
1
- 16
1
3
1
1
1, 3
x x
**************
- 127
0
**************
o
9nH,v=l-127*1
x
9nH,v=0 *1
x
o
o
M.Wheel *1
o
o
Foot volume*1
Sustain *1
o
Sostenute *1
o
Soft
o
Assignable *1
o
x
x
0 - 127
21
o
x
x
*2
x
*1
o
o
o
o
o
o
*1
x
o
Recognized
- 16
memorized
- 16
memorized
- 108
v=l-127
0-12 semi
7 bit resolution
Modulation
Volume
Sustain
Sostenute
Soft
Reset All Cont.
Remarks
Prog
Change
True #
System Exclusive
System
Song Pos
Song Sel
Common
System
Real Time
Aux
Tune
Clock
Commands
Local ON/OFF
A11 Notes OFF
ActiveSense
sages
Notes:
Reset
Received messages are merged to MIDI OUT when MIDI merge switch
o0-127
************
o
x x
x
x
x
x
x
x
o
x
is on.
*1,2=Transmit when MIDI switch is on.
*2
=
Transmit when FC/CS is assigned to AT. (Don't send by keyboard)
Mode 1 : OMNI ON,
58
Mode 3 :
OMNI OFF, POLY
POLY
*1
assignable
0-127
o
0-9
o
voice etc.
x
x
x
x
x
o
(123)
o
x
Mode 2 : OMNI ON,
MONO
Mode 4 :OMNI OFF, MONO
o
x
: Yes
: No
Page 68

For details of products, please contact your nearest Yamaha or
the authorized distributor listed below.
Die Einzelheiten zu Produkten sind bei Ihrer unten aufgeführten Niederlassung und bei Yamaha Vertragshändlern in
den jeweiligen Bestimmungsländern erhältlich.
Pour plus de détails sur les produits, veuillez-vous adresser à
Yamaha ou au distributeur le plus proche de vous figurant
dans la liste suivante.
Para detalles sobre productos, contacte su tienda Yamaha más
cercana o el distribuidor autorizado que se lista debajo.
NORTH AMERICA
CANADA
Yamaha Canada Music Ltd.
135 Milncr Avcnuc. Scarborough. Ontario. MIS 3Rl,
Canada
Tel: 416-298-1311
U.S.A.
Yamaha Corporation of America
6600 Orangcthorpc Ave., Buena Park, Calif. 90620.
U.S.A.
Tel: 714-522-9011
MIDDLE & SOUTH AMERICA
MEXICO
Yamaha De Mexico S.A. De C.V.,
Departamento de ventas
Javier Rojo Gomez No. 1149. Col. Gpc Del Moral,
Deleg. Iztapalapa, 09300 Mexico, D.F.
Tel: 686-00-33
BRASIL
Yamaha Musical Do Brasil LTDA.
Ave. Reboucas 2636, Säo Paulo, Brasil
Tel: 55-11 853-1377
PANAMA
Yamaha De Panama S.A.
Edificio Interseco, Calle Elvira Mendez no. 10, Piso
3, Oficina #l05, Ciudad de Panama, Panama
Tel: 507-69-5311
OTHER
LATIN AMERICAN COUNTRIES
AND CARIBBEAN COUNTRIES
Yamaha Music Latin America Corp.
6101 Blue Lagoon Drive, Miami, Florida 33126,
U.S.A.
Tel: 305-261-4111
EUROPE
THE UNITED KINGDOM/IRELAND
Yamaha-Kemble Musics (U.K.) Ltd.
Sherbourne Drive, Tilbrook, Milton Keynes, MK7
8BL, England
Tel: 0908-366700
GERMANY/SWITZERLAND
Yamaha Europa GmbH.
Siemensstraße 22-34, D-2084 Rellingen, F.R. of
Germany
Tel: 04l0l-3030
AUSTRIA/HUNGARY
Yamaha Music Austria GmbH.
Schleiergasse 20, A-1 100 Wien Austria
Tel: 0222-60203900
THE NETHERLANDS
Yamaha Music Benelux B.V.,
Verkoop Administratie
Kanaalweg l8G, 3526KL, Utrecht, The Netherlands
Tel: 030-828411
BELGIUM/LUXEMBOURG
Yamaha Music Benelux B.V.,
Brussels-office
Keiberg Imperiastraat 8, 1930 Zaventern, Belgium
Tel: 02-7258220
FRANCE
Yamaha Musique France, Division Claviers
BP 70-77312 Marne-la-Valfée Cedex 2, France
Tel: 01-64-6l-4000
ITALY
Yamaha Musica Italia S.P.A.,
Home Keyboard Division
Viale Italia 88, 20020 Lainate (Milano), Italy
Tel: 02-937-4081
SPAIN
Yamaha-Hazen Electronica Musical, S.A.
Jorge Juan 30, 2800l, Madrid, Spain
Tel: 91-577-7270
PORTUGAL
Valentim de Carvalho CI SA
Estrada de Porto Salvo, Paco de Arcos 2780 Oeiras,
Portugal
Tel: 0l-443-3398/4030/1823
GREECE
Philippe Nakas S.A.
Navarinou Street 13. P. Code 10680, Athens, Greece
Tel: 01-364-7111
SWEDEN
Yamaha Scandinavia AB
J.A. Wettergrens gata 1. Box 30053, 400 43
Göteborg, Sweden
Tel: 031-496090
DENMARK
Yamaha Scandinavia Filial Denmark
Finsensvej 86, DK-2000 Frederiksberg, Denmark
Tel: 31-87 30 88
FINLAND
Fazer Music Inc.
Länsituulentie 1A, SF-02100 Espoo, Finland
Tel: 90-435 011
NORWAY
Narud Yamaha AS
Østerndalen 29, 1345 Østeras
Tel: 02-24 47 90
ICELAND
Páll H. Pálsson
P.O. Box 85, Reykjavik, Iceland
Tel: 01-19440
EAST EUROPEAN COUNTRIES
(Except HUNGARY)
Yamaha Europa GmbH.
Siemensstraße 22-34, D-2084 Rellingen, F.R. of
Germany
Tel: 04101-3030
AFRICA
Yamaha Corporation,
International Marketing Division
Nakazawa-cho 10-1, Hamamatsu, Japan 430
Tel: 053-460-2311
MIDDLE EAST ASIA
ISRAEL
R.B.X. International Co., Ltd.
P.O. Box 11136, Tel-Aviv 61111, Israel
Tel: 3-298-251
TURKEY/CYPRUS
Yamaha Musique France, Division Export
BP70-77312 Marne-la-Valee Cedex 2, France
Tel: 01-64-61-4000
OTHER COUNTRIES
Yamaha Corporation,
International Marketing Division
Nakazawa-cho 10-1, Hamamatsu, Japan 430
Tel: 053-460-231 I
ASIA
HONG KONG
Tom Lee Music Co., Ltd.
15/F., World Shipping Centre, Harbour City, 7
Canton Road, Kowloon, Hong Kong
Tel: 3-722-1098
INDONESIA
PT. Yamaha Music Indonesia (Distributor)
PT. Nusantik
Gedung Yamaha Music Center, Jalan Jend, Gatot
Subroto Kav, 4, Jakarta 12930, Indonesia
Tel: 21-520-2577
MALAYSIA
Yamaha Music Malaysia, Sdn., Bhd.
16-28, Jalan SS 2/72, Petaling Jaya Sclangor,
Malaysia
Tel: 3-717-8977
PHILIPPINES
Yupangco Music Corporation
339 Gil J. Puyat Avenue, Makati, Metro Manila
1200, Philippines
Tel: 2-85-7070
SINGAPORE
Yamaha Music Asia Pte., Ltd.
80 Tannery Lane, Singapore 1334. Singapore
Tel: 747-4374
TAIWAN
Kung Hsue She Trading Co., Ltd.
KHS Fu Hsing Building, 322, Section 1, Fu-Hsing
S Road, Taipei 10640, Taiwan, R.O.C.
Tel: 20-709-1266
THAILAND
Siam Music Yamaha Co., Ltd.
933/1-7 Rama I Road, Patumwan, Bangkok,
Thailand
Tel: 2-215-0030
THE PEOPLE’S REPUBLIC OF CHINA
AND OTHER ASIAN COUNTRIES
Yamaha Corporation,
International Marketing Division
Nakazawa-cho 10-1, Hamamatsu, Japan 430
Tel: 053-460-2311
OCEANIA
AUSTRALIA
Yamaha Music Australia Pty. Ltd.
17-33 Market Street, South Melbourne, Vic. 3205,
Australia
Tel: 3-699-2388
NEW ZEALAND
Music Houses of N.Z. Ltd.
146/148 Captain Springs Road, Te Papapa,
Auckland, New Zealand
Tel: 9-640-099
COUNTRIES AND TRUST
TERRITORIES IN PACIFIC OCEAN
Yamaha Corporation,
International Marketing Division
Nakazawa-cho 10-1, Hamamatsu, Japan 430
Tel: 053-460-2311
This product is supported by YAMAHA’s worldwide network
of factory trained and qualified dealer service personnel. In
the event of a problem, contact your nearest YAMAHA
dealer.
HEAD OFFICE
SERVICE
Yamaha Corporation, Electronic Musical Instrument Divison
Nakazawa-cho 10-1, Hamamatsu, Japan 430
Tel: 053-460-2445
Page 69

Page 70

documentation manual, user maintenance, brochure, user reference, pdf manual
This file has been downloaded from:
User Manual and User Guide for many equipments like mobile phones, photo cameras, monther board, monitors, software, tv, dvd, and othes..
Manual users, user manuals, user guide manual, owners manual, instruction manual, manual owner, manual owner's, manual guide,
manual operation, operating manual, user's manual, operating instructions, manual operators, manual operator, manual product,
 Loading...