

Page 1
mLAN INTERFACE CARD
MY16-mLAN
Owner’s Manual
English
Bedienungsanleitung
Mode d’emploi
DeutschFrançais
Page 2
PRECAUTIONS
PLEASE READ CAREFULLY BEFORE PROCEEDING
* Please keep this manual in a safe place for future reference.
WARNING
Always follow the basic precautions listed below to avoid the possibility of serious injury or even death
from electrical shock, short-circuiting, damages, fire or other hazards. These precautions include, but
are not limited to, the following:
English
• Before installing the MY16-mLAN in an audio device please check to make sure that the device is
compatible with the MY16-mLAN, and check possible restrictions regarding the maximum number of
Yamaha and third-party expansion cards that can be simultaneously installed. Refer to the operation manual
supplied with the audio device, and/or the Yamaha Pro Audio web site at: http://www.yamahaproaudio.com/
• Do not install the MY16-mLAN card in any Yamaha products not specified by Yamaha for use with the
MY16-mLAN to avoid possible electrical shock, fire, or equipment damage.
• Do not attempt to disassemble or modify the card. Do not apply excessive force to card connectors or other
card components. Mishandling of the card may lead to shock, fire hazard, or equipment failure.
• Be sure to disconnect the power cable of the main unit before installing this card (in order to eliminate
shock hazard).
• Turn off all peripheral devices of the host device before installation and unplug all cables connecting the
host device to all peripheral devices.
CAUTION
Always follow the basic precautions listed below to avoid the possibility of physical injury to you or
others, or damage to the device or other property. These precautions include, but are not limited to, the
following:
• Do not touch the metallic leads (pins) of the circuit board when handling the card. The pins are sharp and
may cause hand cuts.
• Wear a pair of heavy gloves during installation to avoid scratching or cutting your hands on sharp edges.
• Avoid touching exposed connectors and metal parts to minimize the possibility of bad connections.
• Drain all static electricity from your clothing and body before handling the card. Static electricity can
damage the card. Touch an exposed metal part of the host device or other grounded object beforehand.
• Do not drop the card or subjecting it to shock, which can cause breakage and/or malfunction.
• Do not drop screws or other small parts inside the card. If power is applied while screws or similar metal
objects are loose inside the unit the card may malfunction or be damaged. If you cannot retrieve dropped
objects yourself, refer the problem to qualified Yamaha service personnel.
Yamaha cannot be held responsible for damage caused by improper use or modifications to the device, or
data that is lost or destroyed.
2
Page 3

Introduction
Thank you for purchasing the Yamaha MY16-mLAN.
The MY16-mLAN is an interface card that features an mLAN interface. mLAN is a digital
network designed for music and is based on the IEEE1394 high performance serial bus
and data communication protocol. mLAN makes it easy to construct sophisticated networks for IEEE1394 (FireWire/i.LINK) audio and MIDI signals without having to re-configure the cabling, as was necessary in older, conventional systems.
This interface card adds two mLAN connectors to MY16-mLAN compatible devices
such as the 02R96 and 01V96 digital mixing consoles, or the DM2000 and DM1000
digital production consoles.
In order to take full advantage of the MY16-mLAN’s functionality, please read this manual carefully. After reading this manual, please keep it available for future reference.
Package Contents
• MY16-mLAN unit
• Tools for MY16-mLAN (CD-ROM)
• Owner’s Manual (this document)
• Tools for MY16-mLAN Installation Guide
English
If you’re using the 01V
If the MY16-mLAN is installed in the 01V, the MY16-mLAN will operate in maximum
audio input/output 8-in/8-out, wordclock 44.1 kHz / 48 kHz only, and transmission
speed 400 Mbps. Also, it will be shown as MY8-mLAN in the 01V’s display (page 7).
About the included CD-ROM
The MY16-mLAN is shipped with a CD-ROM that contains software that is useful
when used in conjunction with the MY16-mLAN. This software includes drivers that
are required to connect the MY16-mLAN to a computer. It also includes “mLAN
Graphic Patchbay,” which enables you to route audio and MIDI signals between
mLAN devices. For more information, refer to the separate “Tools for MY16-mLAN
Installation Guide” and the mLAN Graphic Patchbay PDF manuals.
3
Page 4

Yamaha is not held responsible for damage caused by improper use of or modifications to the device or for data that is lost or destroyed.
• The illustrations and LCD screens shown in this Owner’s Manual are for instructional
purposes only and may appear somewhat different from those on your device.
• mLAN is a trademark of Yamaha Corporation.
• Company names and product names in this Owner’s Manual are the trademarks or
registered trademarks of their respective owners.
English
Features
■ Fast data transfer via mLAN
mLAN is a digital network designed for music. It uses the IEEE1394 high performance
serial bus and allows you to construct systems that are more sophisticated yet simpler
than ever before. The MY16-mLAN can transmit data at a transfer rate of up to
400Mbps (S400).
■ Set up mLAN connections intuitively using a graphical user inter-
face
From your computer you can specify the audio/MIDI signal flow and make synchronization settings intuitively and easily; the “mLAN Auto Connector” software makes it
easy to connect mLAN devices to your computer, and “mLAN Graphic Patchbay” lets
you connect multiple mLAN devices simply by making settings on your computer
screen.
■ Up to 16 channels of audio I/O and one MIDI I/O port
When the device in which the MY16-mLAN is installed is connected to other mLAN
devices, you have up to 16-in and 16-out channels of audio, plus 1-in and 1-out MIDI
port.
NOTE
If the MY16-mLAN is installed in the 01V, the maximum number of audio channels is 8-in and 8-out.
4
Page 5
Table of Contents
Introduction............................................................................. 3
Package Contents .................................................................... 3
Features ................................................................................... 4
Fundamentals of mLAN............................................................ 5
Operational Flow for Sound Output .........................................6
Devices that are compatible with the MY16-mLAN .................. 7
Installing the MY16-mLAN ....................................................... 8
Names and Functions .............................................................. 9
Connections .......................................................................... 10
System Examples ...................................................................11
Making mLAN Connections ................................................... 14
Troubleshooting .................................................................... 15
Specifications......................................................................... 20
Fundamentals of mLAN
English
mLAN is a digital network for music that was developed based on IEEE1394, an industry-standard high-performance data communications protocol.
Digital music environments that do not feature mLAN require dozens of cables for various devices and purposes, including MIDI cables and audio cables to route MIDI and
audio signals. If you wish to make changes to such systems, you must physically disconnect and re-connect these cables.
For example, adding another synthesizer to a system requires two MIDI cables and two
or more cables for audio (for stereo equipment). Making the appropriate connections
may require special knowledge of inputs, outputs, stereo settings, and perhaps connector impedance.
5
Page 6

The larger the system, the more complicated and expensive these connections
become, increasing the likelihood of errors and difficulties. It takes time and effort to
investigate such errors and their underlying causes. You may have already experienced
the unpleasantness of tracking various cables through a spider’s web of connections.
mLAN simplifies cable connections by using only one type of IEEE1394 cable, thus
enabling you to configure extremely sophisticated systems. There is no need to repatch cables to change routings of MIDI and audio signals between mLAN devices.
English
Operational Flow for Sound Output
1. Install the MY16-mLAN into your device.
..............See page 8.
2. Install Tools for MY16-mLAN.
..............See “Installing the Software” in the Installation Guide.
3. Connect the computer and mLAN devices using the IEEE1394 cables.
..............See page 10.
4. Turn on mLAN Manager (Windows only).
..............See “Confirming the installation” in the Installation Guide.
5. To connect a computer to a single mLAN device directly, first start mLAN
Auto Connector. To connect a computer to multiple mLAN devices, start
mLAN Graphic Patchbay.
..............See page 14.
6. Configure connections in mLAN Auto Connector or mLAN Graphic Patchbay.
..............Using Auto Connector: See “Connecting a Computer to an mLAN
device via mLAN” in the Installation Guide.
..............Using Graphic Patchbay: See “mLAN Connection Settings” in the
Graphic Patchbay Online Manual.
7. Make settings for audio and MIDI input/output as described in the owner’s
manual for your DAW (Digital Audio Workstation) or your connected
device(s).
For subsequent steps, refer to the owner’s manual for the software and connected
devices.
NOTE
In this manual, setting up audio, MIDI, and wordclock routings is referred as
“mLAN connection.”
6
Page 7
Devices that are compatible with the MY16-mLAN
If you’re using a device that has more than one mini-YGDAI slot
If you will be handling MIDI data in your mLAN system, install the MY16-mLAN into “slot 1”
of your device. If it is installed in other than “slot 1,” you won’t be able to transmit or receive
MIDI.
Compatible devices
The MY16-mLAN can be installed in the following devices. This table also shows the
maximum number of audio input and output channels and MIDI ports that can be
used with the MY16-mLAN.
English
Compatible
device
01V
(Ver. 1.06 or later)
01V96
(Ver. 2.01 or later)
02R96
(Ver. 2.11 or later)
DM1000
(Ver. 2.01 or later)
DM2000
(Ver. 2.11 or later)
NOTE
NOTE
Maximum number of audio channels
Fs: 44.1kHz/48kHz Fs: 88.2kHz/96kHz
8In / 8Out Not supported
16In / 16Out 8In / 8Out
If you’re using the 01V
If the MY16-mLAN is installed in the 01V, the MY16-mLAN will operate in maximum audio input/output 8-in/8-out, wordclock 44.1 kHz / 48 kHz only, and
transmission speed 400 Mbps. Also, it will be shown as MY8-mLAN in the
01V’s display.
If you’re using a 01V96/DM1000 system version earlier than 2.01,
or 02R96/DM2000 system version earlier than 2.11
In order to allow it to operate as the MY16-mLAN, you will need to update your
device. For details on updating, refer to the following URL.
Yamaha Pro Audio
http://www.yamahaproaudio.com/
Number of
MIDI ports
1In / 1Out
7
Page 8
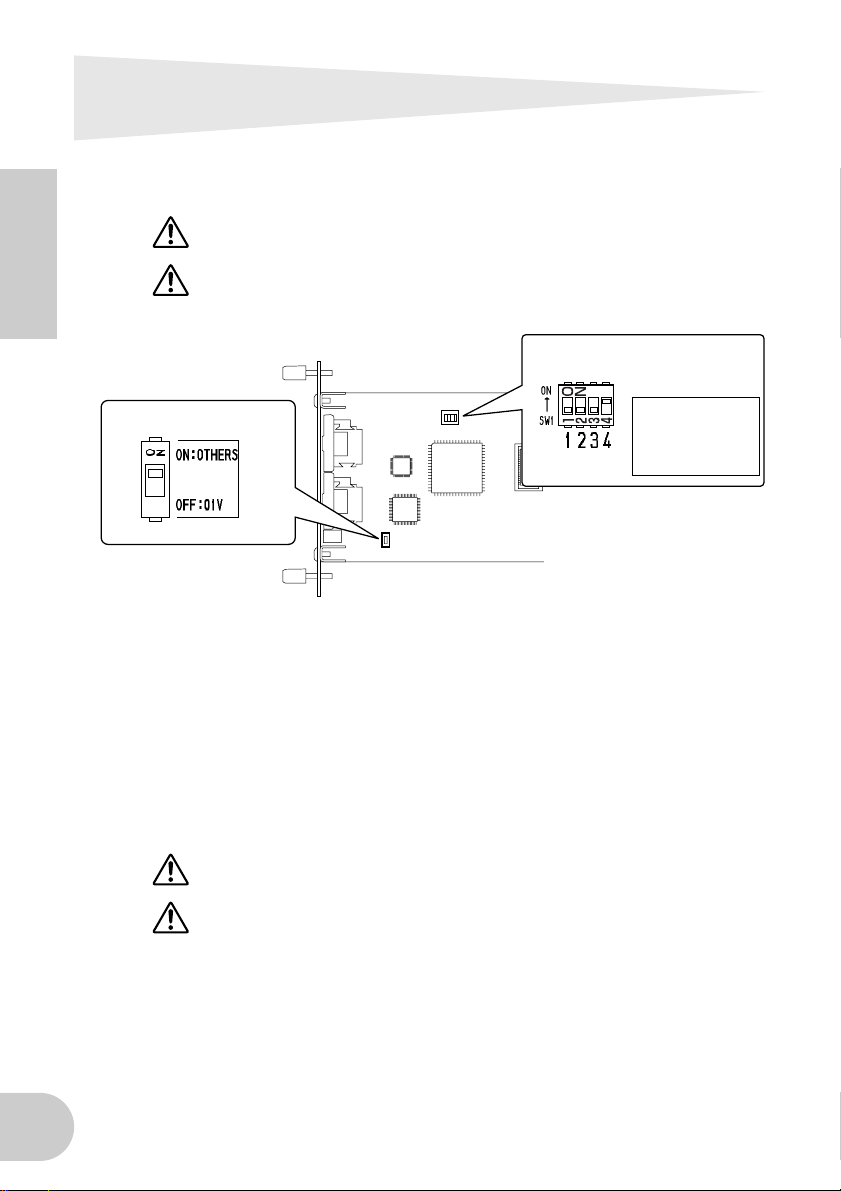
Installing the MY16-mLAN
Here’s how to install the MY16-mLAN in your device. You should also refer to the
owner’s manual of the device into which you’re installing the MY16-mLAN.
Before you begin the installation, carefully read the “PRECAUTIONS” on
page 2.
Don’t change the setting of DIP switch SW1. The unit may no longer operate
English
SW2
1. Set the MY16-mLAN’s DIP switch SW2 as appropriate for your device. If
you’re installing the MY16-mLAN in a device other than the 01V, set this
switch to “ON:OTHERS.” If you’re installing the MY16-mLAN in the 01V, set
this switch to “OFF:01V.”
You must set the DIP switch before installing the MY16-mLAN in your device. You
won’t be able to change the DIP switch setting once you’ve installed the MY16mLAN. If you need to change the setting, turn off the power of your device,
remove the MY16-mLAN, and then change the setting.
2. Install the MY16-mLAN in your device. For details, refer to the owner’s man-
ual of the device in which you’re installing it.
correctly if you move SW1. If you inadvertently move it, restore the factory settings as described below.
SW1
Before you install the card, you must power off any peripheral equipment connected to the device in which you’re installing it, and disconnect all cables.
The screws also function as an electrical ground, so be sure to tighten them
securely.
Factory settings:
1–3: OFF
4: ON
A switch is “OFF”
when the white
slider is moved
toward the number.
The device in which you’re installing the MY16-mLAN must remain power off
while you install the MY16-mLAN.
3. Connect the device in which the MY16-mLAN is installed to your mLAN
devices or IEEE1394-compatible computer (page 10).
8
Page 9

Names and Functions
1 2
A mLAN (IEEE1394) jacks
These 6-pin IEEE1394 standard jacks enable you to connect mLAN devices or
IEEE1394-compatible (FireWire/i.LINK) computers.
If the connecting device features a 6-pin IEEE1394 jack, use a standard 6-pin to 6pin IEEE1394 cable. If it features a 4-pin IEEE1394 jack, use a standard 6-pin to 4-pin
IEEE1394 cable. Do not connect the cables in a loop. (See page 17).
NOTE
B ACTIVE indicator
This indicator lights up when the MY16-mLAN is operating.
The indicator turns off when an error occurs during an operation.
When you click the [ID (Identify)] button in mLAN Auto Connector or mLAN
Graphic Patchbay (page 14) to identify the corresponding mLAN device in the network, the indicator flashes.
NOTE
We recommend S400 compatible IEEE1394 cables (mLAN cables) that are
no longer than 4.5 meters.
The indicator also lights up if an mLAN cable is not connected to the unit.
English
9
Page 10

Connections
This section explains how to connect the MY16-mLAN to other mLAN devices and to
your computer.
Connecting an mLAN (IEEE1394) device
Connect the mLAN (IEEE1394) connector on the mLAN device and IEEE1394-compati-
English
ble computer to the mLAN connector on the MY16-mLAN using IEEE1394 (FireWire/
i.LINK) cables. At this time, you do not have to turn off the power to the mLAN device
or the MY16-mLAN-equipped device.
mLAN16E
MY16-mLAN
mLAN (IEEE1394) device
IEEE1394-compatible computer
IEEE1394
cable
IEEE1394 cable
10
Page 11

System Examples
This section introduces typical system examples that feature the MY16-mLAN. Refer to
these examples for information on connecting external devices, such as microphones,
musical instruments, and computers.
Using the MY16-mLAN connected to your computer
Use an IEEE1394 cable to connect the IEEE1394 connector on an IEEE1394-compatible computer to the mLAN connector on an MY16-mLAN-equipped device. Use the mLAN Auto
Connector or mLAN Graphic Patchbay software application (See page 14) on the computer
to patch the audio and MIDI signals and to set up the wordclock. By making an mLAN connection between your computer and the MY16-mLAN-equipped device, you’ll be able to
transfer multiple channels of audio in realtime between your computer and the device.
NOTE
Like example below, we recommend that you use the USB cable in the operation of Studio Manager. If you use the mLAN/MIDI cable to transmit or receive
MIDI, operating Studio Manager may require more time.
IEEE1394-compatible
computer
DAW
English
mLAN Auto
Connector/
mLAN Graphic
Patchbay
*2
AUDIO
IEEE1394
cable
Digital mixer such
as the 01V96
*1: The 01V is not supplied with editor software for a computer.
*2: The 01V is limited to 44.1 kHz / 48 kHz, and 8-in/8-out.
MY16-mLAN
44.1kHz/48kHz:
16In / 16Out
88.2kHz/96kHz:
8In / 8Out
MIDI
1port
MIDI
1port
Studio
Manager
Editor
connector
*1
USB
cable
USB
11
Page 12

System configured around Yamaha 01V96 Digital Mixing Console
Use IEEE1394 cables to connect an MY16-mLAN-equipped 01V96, an i88X audio MIDI
interface, an mLAN16E-equipped MOTIF ES music production synthesizer, and an
IEEE1394-compatible computer. Use mLAN Graphic Patchbay (See page 14) on the
computer to patch the audio and MIDI signals and to set up the wordclock. Configuring an mLAN system around the 01V96 enables you to do the following:
• Transfer audio and MIDI data between mLAN devices simply by connecting them via
IEEE1394 cables
• Set up and modify audio and MIDI signal patches between mLAN devices in various
English
situations using mLAN Graphic Patchbay, without physically re-patching cables
NOTE
Like example below, we recommend that you use the USB cable in the operation of Studio Manager. If you use the mLAN/MIDI cable to transmit or receive
MIDI, operating Studio Manager may require more time.
USB
cable
DAW
Studio Manager
mLAN Graphic
Patchbay
IEEE1394
cable
IEEE1394-compatible
computer
IEEE1394 cable
Monitor system
MY16mLAN
01V96
VOL VOL
IEEE1394
cable
ADAT recorder/Mixer
mLAN16E
i88X
MicrophoneGuitar/Bass Synthesizer
12
MOTIF ES
Page 13

NOTE
Wordclocks
In a system that features multiple digitally-connected devices, all digital devices
must be synchronized when digital audio signals are transferred from one device to
another.
Even if the devices use matching sampling frequencies, if their audio processing timing is not synchronized, they might not receive signals correctly, and audible noise,
glitches or clicks may occur. Synchronization is achieved using a wordclock
(a clock signal that synchronizes all digital audio signals in a system).
In a typical digital audio system, one device operates as the wordclock “master” and
transmits a wordclock signal. The other devices operate as wordclock “slaves,” synchronizing to the wordclock master. To connect the MY16-mLAN to external devices
via mLAN, you must first make clock settings for the device in which the MY16mLAN is installed. Then in mLAN Auto Connector or mLAN Graphic Patchbay, select
a device to be the master, and set the other devices as slaves. If the MY16-mLAN is
used as a wordclock slave, it can operate at a sampling frequency of 44.1 kHz,
48 kHz, 88.2 kHz or 96 kHz. If the MY16-mLAN is used as the wordclock master, it
will operate at the wordclock used by the MY16-mLAN-equipped device.
The number of available input and output channels may vary depending on
the specific mLAN devices connected. For the best performance, it is recommended that you connect up to four mLAN devices (including a computer) in a
network. If the network contains an mLAN device that is only compatible with
a low transfer rate (200 Mbps (S200)), the number of devices and channels
available for connection will be reduced.
English
For information on setting the sampling frequency and wordclock, refer to the
Installation Guide, or to the mLAN Graphic Patchbay Online Manual, or the owner’s
manual for your device.
13
Page 14

Making mLAN Connections
In an mLAN system, you can easily configure and maintain the system, connect or disconnect the mLAN connectors on the computer and each mLAN device (virtual audio /
MIDI input and output connectors), and make various mLAN connection settings (such
as synchronization) by using the mLAN Graphic Patchbay and mLAN Auto Connector
software applications. There is no need to re-patch audio and MIDI cables to accommodate various music production environments.
English
mLAN Auto Connectors
This software application enables you to
connect a computer to a single mLAN
device.
It enables you to easily select wordclock and
audio input and output channels.
For information on installing and using the
software, refer to the separate Installation
Guide.
NOTE
mLAN Graphic Patchbay
This graphic software application enables
you to manage mLAN connection settings
for the connected computer and multiple
mLAN devices. You can immediately grasp
connections in their entirety by viewing displayed mLAN system configuration graphics. You can also intuitively modify
wordclock settings and audio and MIDI signal routing, much as if you were connecting
physical cables.
For information on installing and using the
software, refer to the separate Installation
Guide and the mLAN Graphic Patchbay
Online Manual.
You can also use mLAN Graphic
Patchbay to connect a computer
to a single mLAN device.
Saving mLAN connection settings to the corresponding mLAN device
When you make mLAN connections on the computer, the connection settings will be automatically saved in the corresponding mLAN devices. Therefore, if you used mLAN Graphic Patchbay to configure a network that excludes a computer, the next time you use the network, you
will be able to activate the network just by turning on the power to the network’s mLAN devices
(without starting the computer).
14
Page 15

Troubleshooting
If you encounter a problem...
If you hear no sound or a strange sound, first check the items described below and take
appropriate action. If the problem persists, consult your Yamaha dealer.
■ No sound or very low volume level
• Are speakers or headphones connected correctly to the MY16-mLAN-equipped device?
• Are your amp and other external devices for the MY16-mLAN-equipped device turned on?
• Are all the level settings (of any tone generators, playback devices and the application itself)
appropriate?
• The connection cable from the external device to the MY16-mLAN-equipped device may be
broken.
• Is the wordclock setting correct for both the MY16-mLAN and the external device(s)?
.......Refer to “Connecting a Computer to an mLAN device via mLAN” in the
Installation Guide, and “Wordclock Settings” in the mLAN Graphic Patchbay
Online Manual.
• (For Windows) Is mLAN (mLAN Driver) set to “ON”? From the task bar, right click on the
mLAN Manager (mLAN icon).
• Are the other settings of mLAN appropriate?
.......Refer to “Unable to communicate via mLAN (page 17).”
• If there are more than four devices (including a computer) on the network, the limit of the
IEEE1394 BUS bandwidth may be exceeded.
• The limit of the IEEE1394 BUS bandwidth may have been exceeded. Check the current bandwidth using mLAN Graphic Patchbay, and disconnect some devices if necessary.
.......Refer to “Menu Bar” in the mLAN Graphic Patchbay Online Manual.
• If there is an mLAN device that supports only S200 on the mLAN network, the IEEE1394 BUS
bandwidth may be reduced and its limit exceeded. Reduce the number of mLAN devices connected to the network, or disconnect some devices as necessary.
.......Refer to “Menu Bar” in the mLAN Graphic Patchbay Online Manual.
■ Distorted sound
• The connection cable from the external device may be broken.
• Is the wordclock setting correct for both the MY16-mLAN and the external device(s)?
.......Refer to “Connecting a Computer to an mLAN device via mLAN” in the
Installation Guide and “Wordclock Settings” in the mLAN Graphic Patchbay
Online Manual.
• Make sure audio data was recorded at an appropriate level.
■ Noise is audible
• Is the latency setting of the mLAN Driver appropriate?
.......Refer to “mLAN Driver Setup” and “ASIO mLAN Control Panel” in the Instal-
lation Guide.
• (For Windows) Setting Hyper Threading to off in the BIOS settings may solve the problem.
• Is the wordclock setting correct for both the MY16-mLAN and the external device(s)?
.......Refer to “Connecting a Computer to an mLAN device via mLAN” in the
Installation Guide and “Wordclock Settings” in the mLAN Graphic Patchbay
Online Manual.
• If the speed of your computer’s hard disk is slow, problems may occur during recording and
playback.
English
15
Page 16

• If you connect/disconnect the LAN, USB or the cables to the mini jacks terminals on the Macintosh you are using when using mLAN, some noise may be caused and/or data may be cut off.
Make sure that you do not insert or unplug any connections when using mLAN.
• Is the number of audio channels appropriate? The amount of audio channels that can be used
simultaneously differs depending on the computer capacity and speed.
.......Refer to “Connecting a Computer to an mLAN device via mLAN” in the
Installation Guide and “mLAN Connection Settings” in the mLAN Graphic
Patchbay Online Manual.
• Is the sampling rate (wordclock) appropriate? A high sampling rate can be the cause of the
noise depending on the computer capacity and speed.
English
• Make sure that the appropriate number of devices is connected to the computer. Connection
of too many devices may cause noise, depending on the capacity of the computer.
• Are there any noise-producing devices (such as those containing power inverters, etc.) near the
cables? Move all cables away from any possible noise sources.
• Make sure the mLAN cable is not damaged. Cables that do not satisfy IEEE1394 standards may
cause noise.
• (For Windows) Do not run applications, such as anti-virus software, in the background. While
using the mLAN system, turn off all applications that run in background. If these applications
remain on, driver operation may become unstable and cause noise. If you do not plan to use
the mLAN system, you can turn these applications on. (You can turn the mLAN driver on and
off using mLAN Manager.)
.......Refer to “Connecting a Computer to an mLAN device via mLAN” in the
Installation Guide and “mLAN Connection Settings” in the mLAN Graphic
Patchbay Online Manual.
■ Insufficient tracks for recording or playback
• Is the number of channels for mLAN audio receiving/sending (set on the mLAN Auto Connector and mLAN Graphic Patchbay) appropriate?
.......Refer to “Connecting a Computer to an mLAN device via mLAN” in the
Installation Guide and “mLAN Connection Settings” in the mLAN Graphic
Patchbay Online Manual.
■ Unable to transfer MIDI data or Program Changes
• Are the mLAN cables connected correctly?
• An mLAN cable may be broken.
• Is the power turned on for the transmitting and receiving devices?
• Make sure the transmission and reception channels match.
■ Incorrect pitch
• Is the unit operating on the same sampling frequency as the synchronized external device?
.......Refer to “Connecting a Computer to an mLAN device via mLAN” in the
Installation Guide and “Wordclock Settings” in the mLAN Graphic Patchbay
Online Manual.
• Is the master device operating in a stable way?
■ Cannot change the wordclock
• While using the mLAN system, make wordclock settings using mLAN Auto Connector or mLAN
Graphic Patchbay.
.......Refer to “Connecting a Computer to an mLAN device via mLAN” in the
Installation Guide and “Wordclock Settings” in the mLAN Graphic Patchbay
Online Manual.
16
Page 17

■ Unable to communicate via mLAN
• Has the driver been installed? ................................................... Refer to the Installation Guide.
• Is the mLAN cable properly connected? Check the connection; disconnect the mLAN cable
once, then insert it again.
• (For Windows) Is mLAN set to “ON”? From the task bar, right click on the mLAN Manager
icon. .......Refer to “Confirming the installation” in the Installation Guide.
• (For Windows) When adding a new IEEE1394 card, right click on the mLAN Manager icon in
the task bar and select “ON”.
.......Refer to “Confirming the installation” in the Installation Guide.
• Is the ACTIVE lamp on the rear panel of the MY16-mLAN lit (in blue)? If it is not lit, check the
followings:
- In mLAN Driver Setup, is the Status indicator blue? If not, restart the MY16-mLAN-equipped
device and re-enable connection by using mLAN Auto Connector or mLAN Graphic Patch-
bay. .......Refer to “Connecting a Computer to an mLAN device via mLAN” in the
Installation Guide and “mLAN Connection Settings” in the mLAN Graphic
Patchbay Online Manual.
• Has connection been enabled with mLAN Auto Connector and/or Graphic Patchbay? Reenable connection if necessary.
.......Refer to “Connecting a Computer to an mLAN device via mLAN” in the
Installation Guide and “mLAN Connection Settings” in the mLAN Graphic
Patchbay Online Manual.
• Have you changed the device? Even if the model is the same, if the actual device is different, it
is necessary to re-enable connection by using Auto Connector and/or Graphic Patchbay.
.......Refer to “Connecting a Computer to an mLAN device via mLAN” in the
Installation Guide and “mLAN Connection Settings” in the mLAN Graphic
Patchbay Online Manual.
• Is there a loop connection? Check the cabling and make sure none of the devices are connected in a loop.
Computer
mLAN device
Computer
mLAN device
: IEEE 1394-equipped device
English
• There may be a limit on the IEEE1394 interface of your computer as to the number of ports
that can be used simultaneously. Check how many ports can be used simultaneously.
.......Refer to “Maximum Number of Connected Node” in the mLAN Graphic
Patchbay Online Manual.
•Turn off all devices on the mLAN network (except the computer) and re-connect each device
one-by-one until the device causing the problem is found.
• (For Windows) (When removing the mLAN bus from the [Safely Remove Hardware] setting of
the task bar.) Restart the computer when using mLAN again.
•With Macintosh notebook computers such as the iBook and PowerBook, always first connect
the MY16-mLAN-equipped device and mLAN cable then turn on the power of the MY16mLAN-equipped device, before starting up the computer.
• Make sure that you set up the wordclock correctly. Also, make sure that one node is assigned as
master and the other nodes are assigned as slaves.
.......Refer to “mLAN Connection Settings” in the mLAN Graphic Patchbay Online
Manual.
17
Page 18

■ An application, such as a DAW, fails to recognize the mLAN driver (MIDI/audio).
• (For Windows) Make sure mLAN has not been turned off. On the task bar, right-click mLAN
Manager ( ), then select ON.
.......Refer to “Confirming the installation” in the Installation Guide and “mLAN
Connection Settings” in the mLAN Graphic Patchbay Online Manual.
• Make sure the MY16-mLAN is connected to the mLAN cable and is powered on. Start mLAN
Auto Connector or mLAN Graphic Patchbay, then re-connect the device.
.......Refer to “Confirming the installation” in the Installation Guide and “mLAN
Connection Settings” in the mLAN Graphic Patchbay Online Manual.
• (For Macintosh) To use an iBook or PowerBook in the system, connect the MY16-mLAN-
English
equipped device to the Macintosh using an mLAN cable, turn on the power to the MY16mLAN-equipped device, then start the Macintosh.
• Make sure the mLAN settings are correct.
.......Refer to “Unable to communicate via mLAN” on page 17.
■ The computer processing speed is too slow.
■ The computer’s CPU meter indicates a heavy processing load.
■ Playback response is delayed.
• Make sure your computer satisfies the system requirements.
.......Refer to “System Requirements” in the Installation Guide.
• (For Windows) If you do not use the mLAN system, on the task bar right-click mLAN Manager
( ), then select OFF (mLAN quits).
.......Refer to “Confirming the installation” in the Installation Guide.
•Try reducing the number of audio channels in mLAN Auto Connector or Graphic Patchbay.
.......Refer to “Connecting the Computer and mLAN devices via mLAN” in the
Installation Guide and “mLAN Connection Settings” in the mLAN Graphic
•Try increasing the latency value.
• (For Windows) Refer to “Hints when using audio data (Windows).”
• (For Windows) The condition may improve if you set “Hyper Threading” to “Disable.”
• Using mLAN Graphic Patchbay, try reducing the number of devices connected to the com-
puter. .......Refer to “mLAN Connection Settings” in the mLAN Graphic Patchbay Online
• If multiple S200-compatible devices are connected to the network, connecting mLAN devices
in mLAN Graphic Patchbay may require more time.
Patchbay Online Manual.
..........Refer to “Changing the Settings after Installation” in the Installation Guide.
.......Refer to the Installation Guide.
Manual.
■ Inconsistency in wordclock, or unable to exit from Auto Connector
• (For Windows) Mobile computers with Intel CPU
SpeedStep™ technology is applied for some CPU’s (CPU for notebook PC). Please disable the
SpeedStep™ technology when mLAN is employed. SpeedStep™ technology changes CPU
clock dynamically depending on the loading on the CPU to save the power consumption.
- How to disable the SpeedStep™ technology;
In almost all of the PC’s, BIOS has a function to select enabling or disabling the SpeedStep™
technology. Please refer to the PC’s operating manual, or make inquiry to the PC manufacturer.
18
Page 19

■ Unable to close the application or operating system
■ Unable to change the mLAN settings
■ Unable to uninstall mLAN Applications for Yamaha or mLAN Tools 2.0
• (For Windows) Is the mLAN (WDM) driver selected as the default audio device for the system?
- Select [Start | Control Panel | Sounds and Audio Devices | Voice].
Make sure that something other than “mLAN Audio 01” is selected for the [Voice playback]
and [Voice recording] settings.
- Select [Start | Control Panel | Sounds and Audio Devices | Audio].
Make sure that something other than “mLAN Audio 01” is selected for the [Sound playback] and [Sound recording] settings.
- In “MIDI music playback,” select any option other than the range of options from “mLAN
MIDI Out” through “mLAN MIDI Out (8).”
• (For Windows) Select [Start | Control Panel | Sounds and Audio Devices | Sounds]. And select
“No sounds” in the [Sound scheme], then execute again.
• (For Windows) If you cannot quit mLAN (by selecting “OFF” after right clicking the mLAN icon
in the task bar), end the processes listed below manually. ([Ctrl] + [Alt] + [Delete] → [Processes]
→ select process → [End process]) When finished, start mLAN Manager to change the mLAN
settings again.
- mLANVDevice.exe
- mLANTFamily.exe
- mLANSoftPH.exe
- mLANManager.exe
To change mLAN settings, select [Start | (All) Programs | Start Up], then start mLAN Manager.
- (When a message such as “file cannot be found” appears when uninstalling:)
Try executing the installation once more, then uninstall again.
■ (Windows) mLAN Manager (the mLAN icon in the Task bar) has disappeared.
• Select [Start | (All) Programs | Start Up (or mLAN Tools)], then select mLAN Manager.
■ Launching mLAN Graphic Patchbay or updating to the latest information takes a
while.
• When you try to update the network information after connecting or disconnecting an mLAN
device that does not support S400, the system adjusts the mLAN transfer speed, and requires
more time to process your request. However, this will not affect any subsequent operations.
• If five or more mLAN devices (including a computer) have been connected to a network, the
total number of transmission channels of all devices will be limited. You can connect up to 86
channels in Windows and up to 98 channels in a Macintosh system.
English
19
Page 20

Specifications
01V96, DM1000, 02R96 (up to 3 cards), DM2000 (up to 3
Supported Host
products
English
Data Rate S400,S200
Audio
MIDI
Wordclock Transition Speed setting
Indication LED ACTIVE (Blue)
Host device detection switch
Others number of node: Up to 5 nodes
Connectors To IEEE1394: 6 Pin x 2
Power Requirement
Dimension
(WxDxH)
cards), 01V
01V96 and DM1000: Supported in V2.01 or later.
02R96 and DM2000: Supported in V2.11 or later.
01V: Supported in V1.06 or later; operates as MY8-mLAN
I/O: 16In/16Out @ 48kHz / 44.1kHz (8In/8Out @ 88.2kHz /
96kHz)
Fs: 44.1kHz-10% to 48kHz+6% (88.2kHz-10% to 96kHz+6%)
Resolution: 24bit
1In/1Out, Baudrate: 31.25kbps
Necessary for USB connections for using Multi Port MIDI
(SLOT1 is available for Digital console within multi SLOTs)
Slow/Fast
Specified by included mLAN Graphic Patchbay or Auto Connector.
01V/Others
740mA (Max.) / +5V
120 mm x 176.1 mm x 40 mm
(4-3/4" x 6-15/16" x 1-9/16")
Specifications and appearance subject to change without notice.
20
Page 21

MEMO
English
21
Page 22

FCC INFORMATION (U.S.A.)
1. IMPORTANT NOTICE: DO NOT
MODIFY THIS UNIT!
This product, when installed as indicated in
the instructions contained in this manual,
meets FCC requirements. Modifications not
expressly approved by Yamaha may void
your authority, granted by the FCC, to use
the product.
2. IMPORTANT: When connecting this
product to accessories and/or another
product use only high quality shielded
cables. Cable/s supplied with this product
MUST be used. Follow all installation instructions. Failure to follow instructions
could void your FCC authorization to use
this product in the USA.
3. NOTE:This product has been tested and
found to comply with the requirements listed
in FCC Regulations, Part 15 for Class “B”
digital devices. Compliance with these
requirements provides a reasonable level of
assurance that your use of this product in a
residential environment will not result in
harmful interference with other electronic
devices. This equipment generates/uses
radio frequencies and, if not installed and
used according to the instructions found in
the users manual, may cause interference
harmful to the operation of other electronic
This applies only to products distributed by YAMAHA CORPORATION OF AMERICA.
*
devices. Compliance with FCC regulations
does not guarantee that interference will not
occur in all installations. If this product is
found to be the source of interference,
which can be determined by turning the unit
“OFF” and “ON”, please try to eliminate the
problem by using one of the following
measures:
Relocate either this product or the device
that is being affected by the interference.
Utilize power outlets that are on different
branch (circuit breaker or fuse) circuits or
install AC line filter/s.
In the case of radio or TV interference,
relocate/reorient the antenna. If the antenna
lead-in is 300 ohm ribbon lead, change the
lead-in to co-axial type cable.
If these corrective measures do not produce
satisfactory results, please contact the local
retailer authorized to distribute this type of
product. If you can not locate the
appropriate retailer, please contact Yamaha
Corporation of America, Electronic Service
Division, 6600 Orangethorpe Ave, Buena
Park, CA90620
The above statements apply ONLY to those
products distributed by Yamaha Corporation
of America or its subsidiaries.
(class B)
CANADA
This Class B digital apparatus complies with Canadian ICES-003.
Cet appareil numérique de la classe B est conforme à la norme NMB-003 du Canada.
• This applies only to products distributed by Yamaha Canada Music Ltd.
• Ceci ne s’applique qu’aux produits distribués par Yamaha Canada Musique Ltée.
(class B)
Page 23

For details of products, please contact your nearest Yamaha
representative or the authorized distributor listed below.
Pour plus de détails sur les produits, veuillez-vous adresser à Yamaha ou
au distributeur le plus proche de vous figurant dans la liste suivante.
Die Einzelheiten zu Produkten sind bei Ihrer unten aufgeführten
Niederlassung und bei Yamaha Vertragshändlern in den jeweiligen
Bestimmungsländern erhältlich.
Para detalles sobre productos, contacte su tienda Yamaha más cercana
o el distribuidor autorizado que se lista debajo.
NORTH AMERICA
CANADA
Yamaha Canada Music Ltd.
135 Milner Avenue, Scarborough, Ontario,
M1S 3R1, Canada
Tel: 416-298-1311
U.S.A.
Yamaha Corporation of America
6600 Orangethorpe Ave., Buena Park, Calif. 90620,
U.S.A.
Tel: 714-522-9011
CENTRAL & SOUTH AMERICA
MEXICO
Yamaha de México S.A. de C.V.
Calz. Javier Rojo Gómez #1149,
Col. Guadalupe del Moral
C.P. 09300, México, D.F., México
Tel: 55-5804-0600
BRAZIL
Yamaha Musical do Brasil Ltda.
Av. Reboucas 2636-Pinheiros CEP: 05402-400
Sao Paulo-SP. Brasil
Tel: 011-3085-1377
ARGENTINA
Yamaha Music Latin America, S.A.
Sucursal de Argentina
Viamonte 1145 Piso2-B 1053,
Buenos Aires, Argentina
Tel: 1-4371-7021
PAN AMA AND OTHER LATIN
AMERICAN COUNTRIES/
CARIBBEAN COUNTRIES
Yamaha Music Latin America, S.A.
Torre Banco General, Piso 7, Urbanización Marbella,
Calle 47 y Aquilino de la Guardia,
Ciudad de Panamá, Panamá
Tel: +507-269-5311
EUROPE
THE UNITED KINGDOM
Yamaha-Kemble Music (U.K.) Ltd.
Sherbourne Drive, Tilbrook, Milton Keynes,
MK7 8BL, England
Tel: 01908-366700
GERMANY
Yamaha Music Central Europe GmbH
Siemensstraße 22-34, 25462 Rellingen, Germany
Tel: 04101-3030
SWITZERLAND/LIECHTENSTEIN
Yamaha Music Central Europe GmbH,
Branch Switzerland
Seefeldstrasse 94, 8008 Zürich, Switzerland
Tel: 01-383 3990
AUSTRIA
Yamaha Music Central Europe GmbH,
Branch Austria
Schleiergasse 20, A-1100 Wien, Austria
Tel: 01-60203900
THE NETHERLANDS
Yamaha Music Central Europe,
Branch Nederland
Clarissenhof 5-b, 4133 AB Vianen, The Netherlands
Tel: 0347-358 040
BELGIUM/LUXEMBOURG
Yamaha Music Central Europe GmbH,
Branch Belgium
Rue de Geneve (Genevastraat) 10, 1140 - Brussels,
Belgium
Tel: 02-726 6032
FRANCE
Yamaha Musique France
BP 70-77312 Marne-la-Vallée Cedex 2, France
Tel: 01-64-61-4000
ITALY
Yamaha Musica Italia S.P.A.
Combo Division
Viale Italia 88, 20020 Lainate (Milano), Italy
Tel: 02-935-771
SPAIN/PORTUGAL
Yamaha-Hazen Música, S.A.
Ctra. de la Coruna km. 17, 200, 28230
Las Rozas (Madrid), Spain
Tel: 91-639-8888
SWEDEN
Yamaha Scandinavia AB
J. A. Wettergrens Gata 1
Box 30053
S-400 43 Göteborg, Sweden
Tel: 031 89 34 00
DENMARK
YS Copenhagen Liaison Office
Generatorvej 6A
DK-2730 Herlev, Denmark
Tel: 44 92 49 00
NORWAY
Norsk filial av Yamaha Scandinavia AB
Grini Næringspark 1
N-1345 Østerås, Norway
Tel: 67 16 77 70
OTHER EUROPEAN COUNTRIES
Yamaha Music Central Europe GmbH
Siemensstraße 22-34, 25462 Rellingen, Germany
Tel: +49-4101-3030
Yamaha Corporation,
Asia-Pacific Music Marketing Group
Nakazawa-cho 10-1, Hamamatsu, Japan 430-8650
Tel: +81-53-460-2313
AFRICA
MIDDLE EAST
TURKEY/CYPRUS
Yamaha Music Central Europe GmbH
Siemensstraße 22-34, 25462 Rellingen, Germany
Tel: 04101-3030
OTHER COUNTRIES
Yamaha Music Gulf FZE
LB21-128 Jebel Ali Freezone
P.O.Box 17328, Dubai, U.A.E.
Tel: +971-4-881-5868
THE PEOPLE’S REPUBLIC OF CHINA
Yamaha Music & Electronics (China) Co.,Ltd.
25/F., United Plaza, 1468 Nanjing Road (West),
Jingan, Shanghai, China
Tel: 021-6247-2211
INDONESIA
PT. Yamaha Music Indonesia (Distributor)
PT. Nusantik
Gedung Yamaha Music Center, Jalan Jend. Gatot
Subroto Kav. 4, Jakarta 12930, Indonesia
Tel: 21-520-2577
KOREA
Yamaha Music Korea Ltd.
Tong-Yang Securities Bldg. 16F 23-8 Yoido-dong,
Youngdungpo-ku, Seoul, Korea
Tel: 02-3770-0660
MALAYSIA
Yamaha Music Malaysia, Sdn., Bhd.
Lot 8, Jalan Perbandaran, 47301 Kelana Jaya,
Petaling Jaya, Selangor, Malaysia
Tel: 3-78030900
SINGAPORE
Yamaha Music Asia Pte., Ltd.
#03-11 A-Z Building
140 Paya Lebor Road, Singapore 409015
Tel: 747-4374
TAIWAN
Yamaha KHS Music Co., Ltd.
3F, #6, Sec.2, Nan Jing E. Rd. Taipei.
Taiwan 104, R.O.C.
Tel: 02-2511-8688
THAILAND
Siam Music Yamaha Co., Ltd.
891/1 Siam Motors Building, 15-16 floor
Rama 1 road, Wangmai, Pathumwan
Bangkok 10330, Thailand
Tel: 02-215-2626
OTHER ASIAN COUNTRIES
Yamaha Corporation,
Asia-Pacific Music Marketing Group
Nakazawa-cho 10-1, Hamamatsu, Japan 430-8650
Tel: +81-53-460-2317
OCEANIA
AUSTRALIA
Yamaha Music Australia Pty. Ltd.
Level 1, 99 Queensbridge Street, Southbank,
Victoria 3006, Australia
Tel: 3-9693-5111
COUNTRIES AND TRUST
TERRITORIES IN PACIFIC OCEAN
Yamaha Corporation,
Asia-Pacific Music Marketing Group
Nakazawa-cho 10-1, Hamamatsu, Japan 430-8650
Tel: +81-53-460-2313
ASIA
HEAD OFFICE Yamaha Corporation, Pro Audio & Digital Musical Instrument Division
PA11
Nakazawa-cho 10-1, Hamamatsu, Japan 430-8650
Tel: +81-53-460-2441
Page 24

This document is printed on recycled chlorine free
(ECF) paper with soy ink.
Auf Recycling-Umweltpapier gedruckt.
Ce document a été imprimé sur du papier recyclé non
blanchi au chlore.
Yamaha Manual Library
http://www2.yamaha.co.jp/manual/english/
WD50910 409APAP1.2-01A0
U.R.G., PA•DMI Division, Yamaha Corporation
©2004 Yamaha Corporation
Page 25

documentation manual, user maintenance, brochure, user reference, pdf manual
This file has been downloaded from:
User Manual and User Guide for many equipments like mobile phones, photo cameras, monther board, monitors, software, tv, dvd, and othes..
Manual users, user manuals, user guide manual, owners manual, instruction manual, manual owner, manual owner's, manual guide,
manual operation, operating manual, user's manual, operating instructions, manual operators, manual operator, manual product,
 Loading...