

Yamaha Audio DVD-S700 User Manual

DVD/VIDEO CD/CD PLAYER
DVD-S700
Before attempting to connect, operate or adjust this product,
please read this Operating Instructions manual completely.
Please save this manual.
Operating Instructions
Safety information
Note:
For Continental Europe, United Kingdom and
Australia models
This unit can be used only where the power supply
is AC 220– 240 V, 50 Hz. It cannot be used elsewhere.
For other models
This unit can be used only where the power supply
is AC 110–240 V, 50/60 Hz. It cannot be used elsewhere.
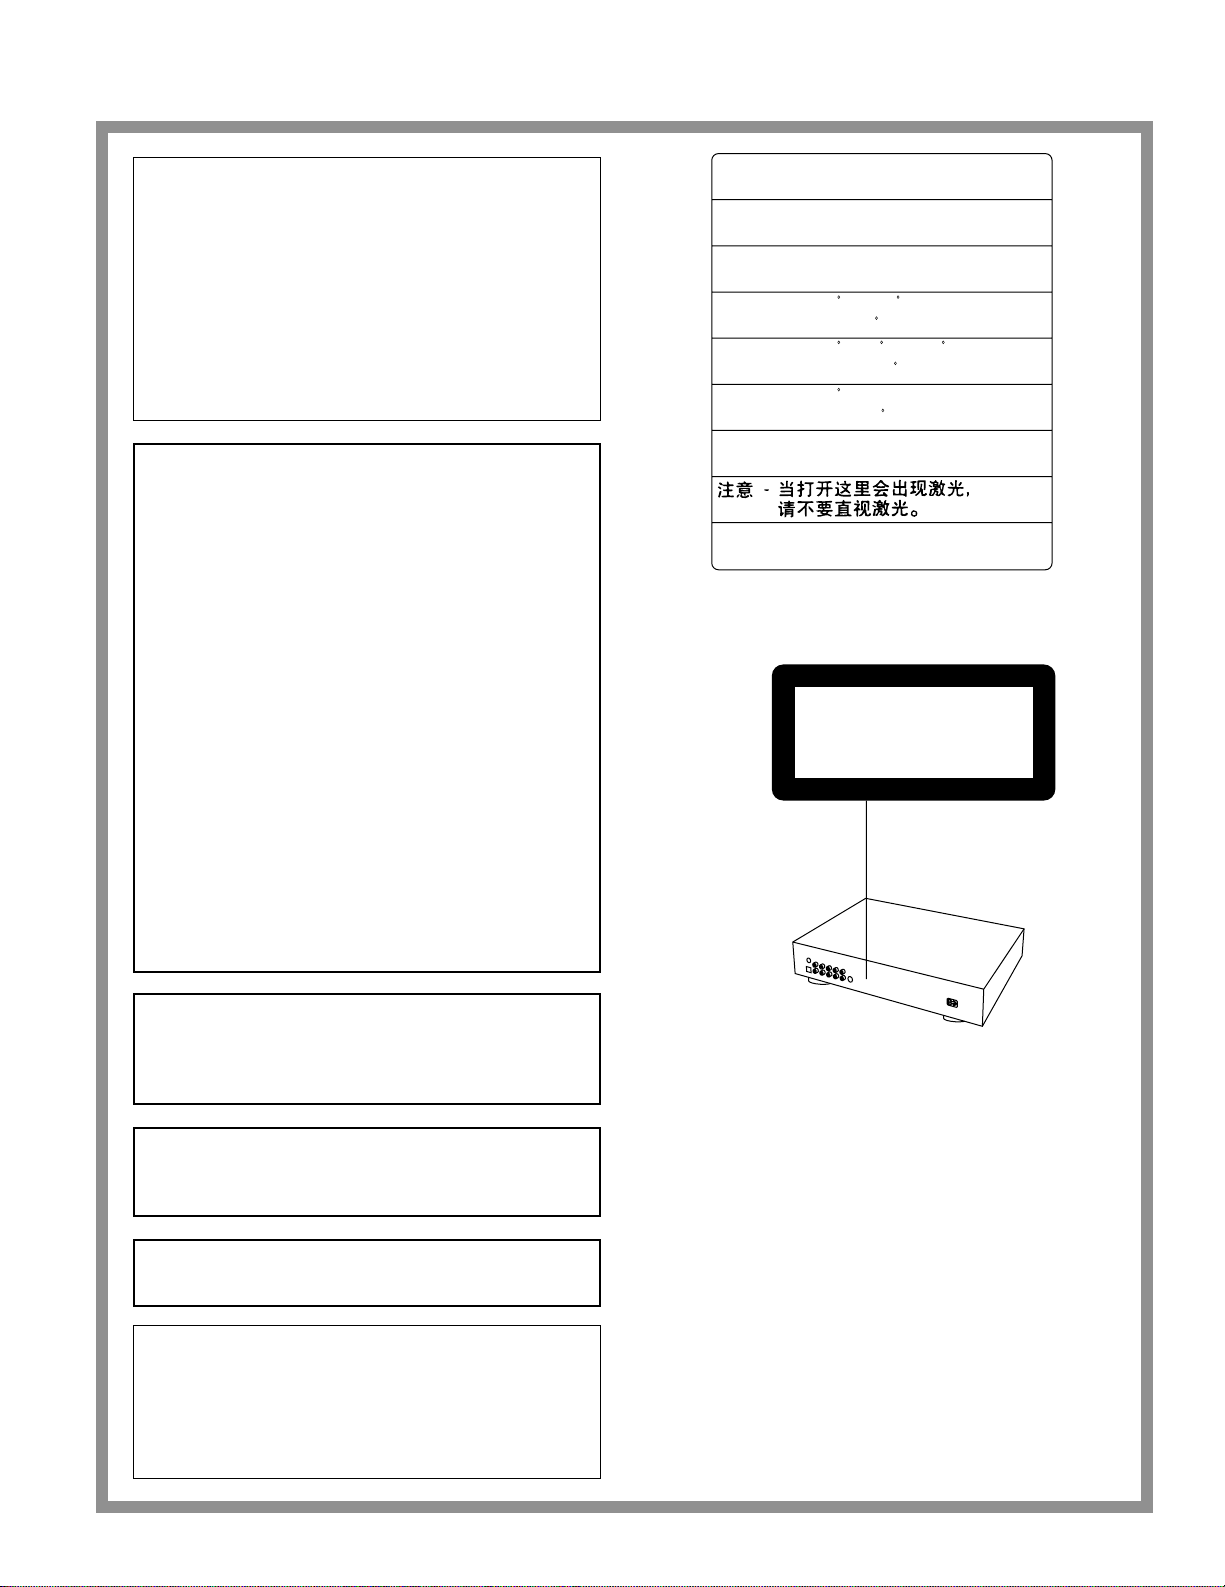
CAUTION:
DVD/VIDEO CD/CD PLAYER IS A CLASS 1
LASER PRODUCT. HOWEVER THIS DVD/VIDEO
CD/CD PLAYER USES A VISIBLE LASER BEAM
WHICH COULD CAUSE HAZARDOUS RADIATION EXPOSURE IF DIRECTED. BE SURE TO
OPERATE THE DVD/VIDEO CD/CD PLAYER
CORRECTLY AS INSTRUCTED.
WHEN THIS DVD/VIDEO CD/CD PLAYER IS
PLUGGED TO THE WALL OUTLET, DO NOT
PLACE YOUR EYES CLOSE TO THE OPENING
OF THE DISC TRAY AND OTHER OPENINGS TO
LOOK INTO THE INSIDE OF THIS PLAYER.
CAUTION -LASER RADIATION WHEN OPEN.
DO NOT STARE INTO BEAM.
ATTENTION-RAYONNEMENT LASER EN CAS D'OUVERTURE.
NE PAS REGARDER DANS LE FAISCEAU.
VORSICHT -LASERSTRAHLUNG, WENN ABDECKUNG GEÖFFNET.
NICHT IN DEN STRAHL BLICKEN.
ADVARSEL -LASERSTRÅLING VED ÅBNING.
SE IKKE IND I STRÅLEN.
ADVARSEL -LASERSTRÅLING NÅR DEKSEL ÅPNES.
STIRR IKKE INN I STRÅLEN.
VARNING -LASERSTRÅLNING NÄR DENNA DEL ÄR ÖPPNAD.
STIRRA EJ IN I STRÅLEN.
VARO! -AVATTAESSA OLET ALTTIINA LASERSÄTEILYLLE.
ÄLÄ TUIJOTA SÄTEESEEN.
(Inside of product)
CLASS 1
LASER PRODUCT
USE OF CONTROLS OR ADJUSTMENTS OR
PERFORMANCE OF PROCEDURES OTHER
THAN THOSE SPECIFIED HEREIN MAY RESULT
IN HAZARDOUS RADIATION EXPOSURE.
DO NOT OPEN COVERS AND DO NOT REPAIR
YOURSELF. REFER SERVICING TO QUALIFIED
PERSONNEL.
WARNING:
TO REDUCE THE RISK OF FIRE OR ELECTRIC
SHOCK, DO NOT EXPOSE THIS EQUIPMENT TO
RAIN OR MOISTURE.
TO REDUCE THE RISK OF FIRE OR ELECTRIC
SHOCK, AND ANNOYING INTERFERENCE, USE
THE RECOMMENDED ACCESSORIES ONLY.
THIS DEVICE IS INTENDED FOR CONTINUOUS
OPERATION!
This unit is not disconnected from the AC power
source as long as it is connected to the wall outlet,
even if this unit itself is turned off. This state is called
the standby mode.
In this state, this unit is designed to consume a very
small quantity of power.
(Back of product)
2
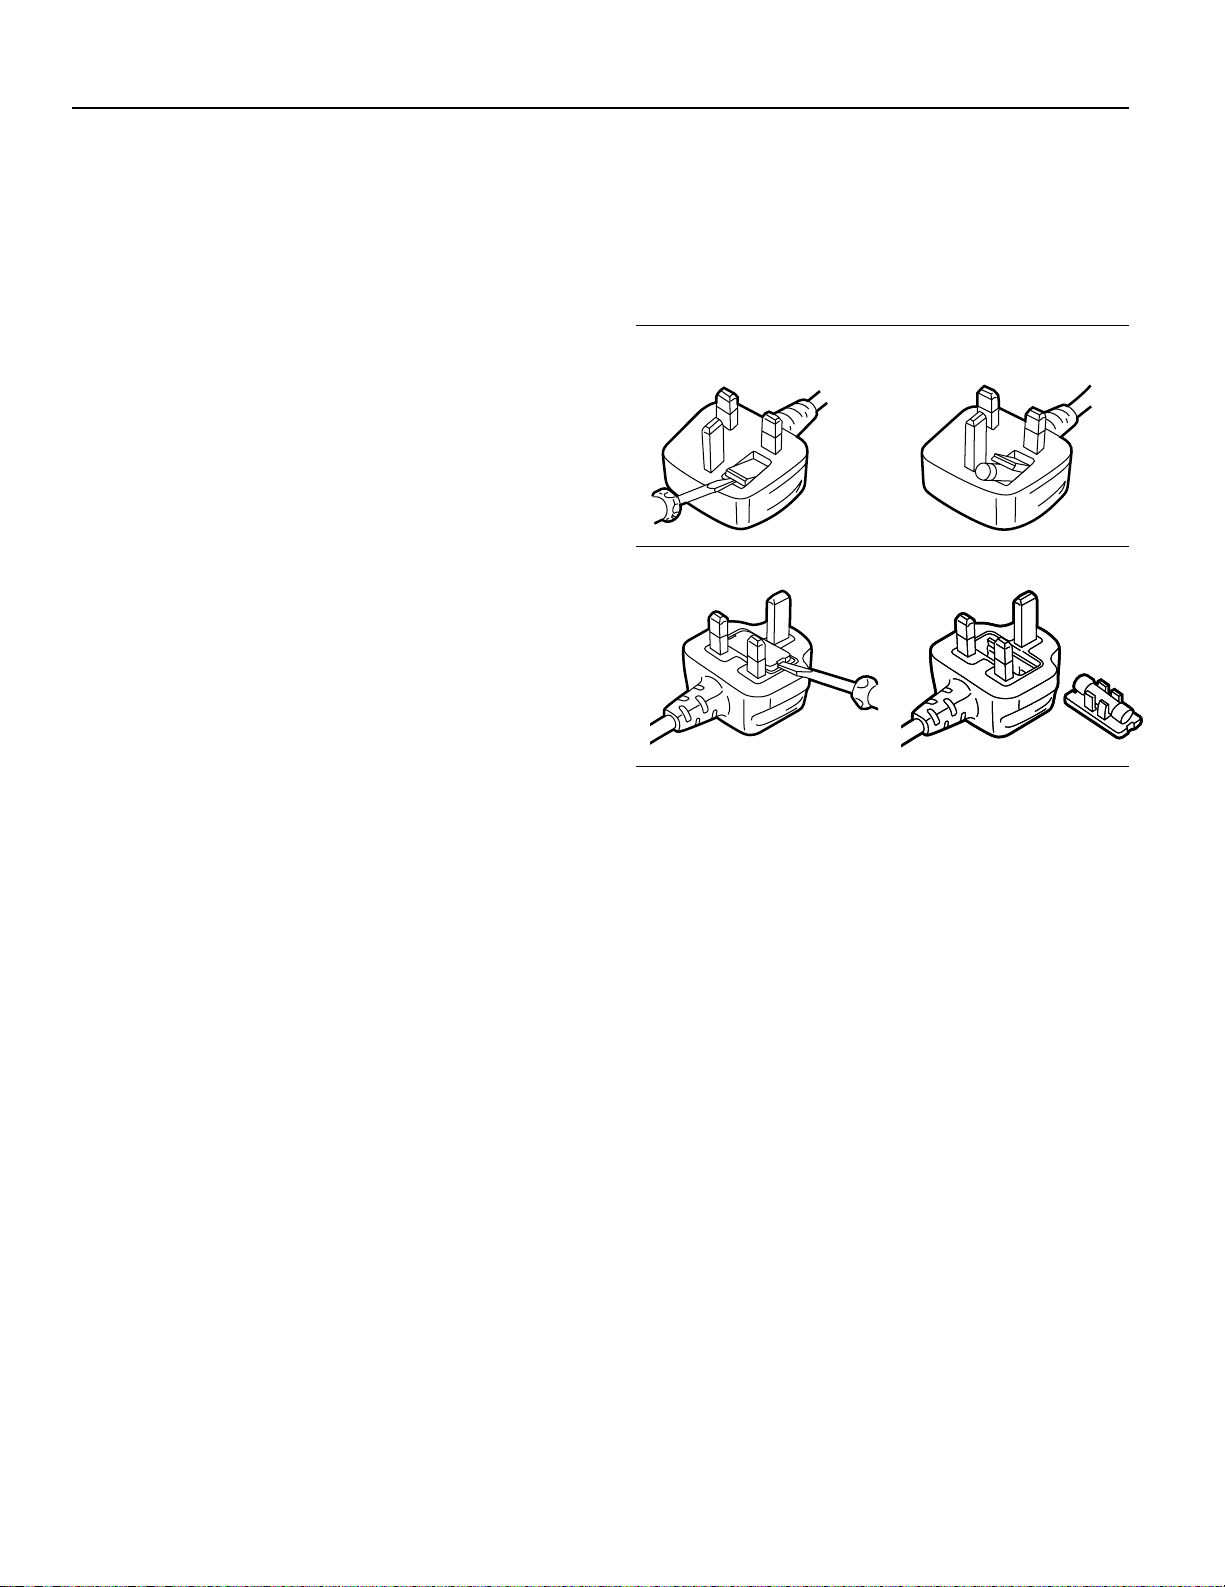
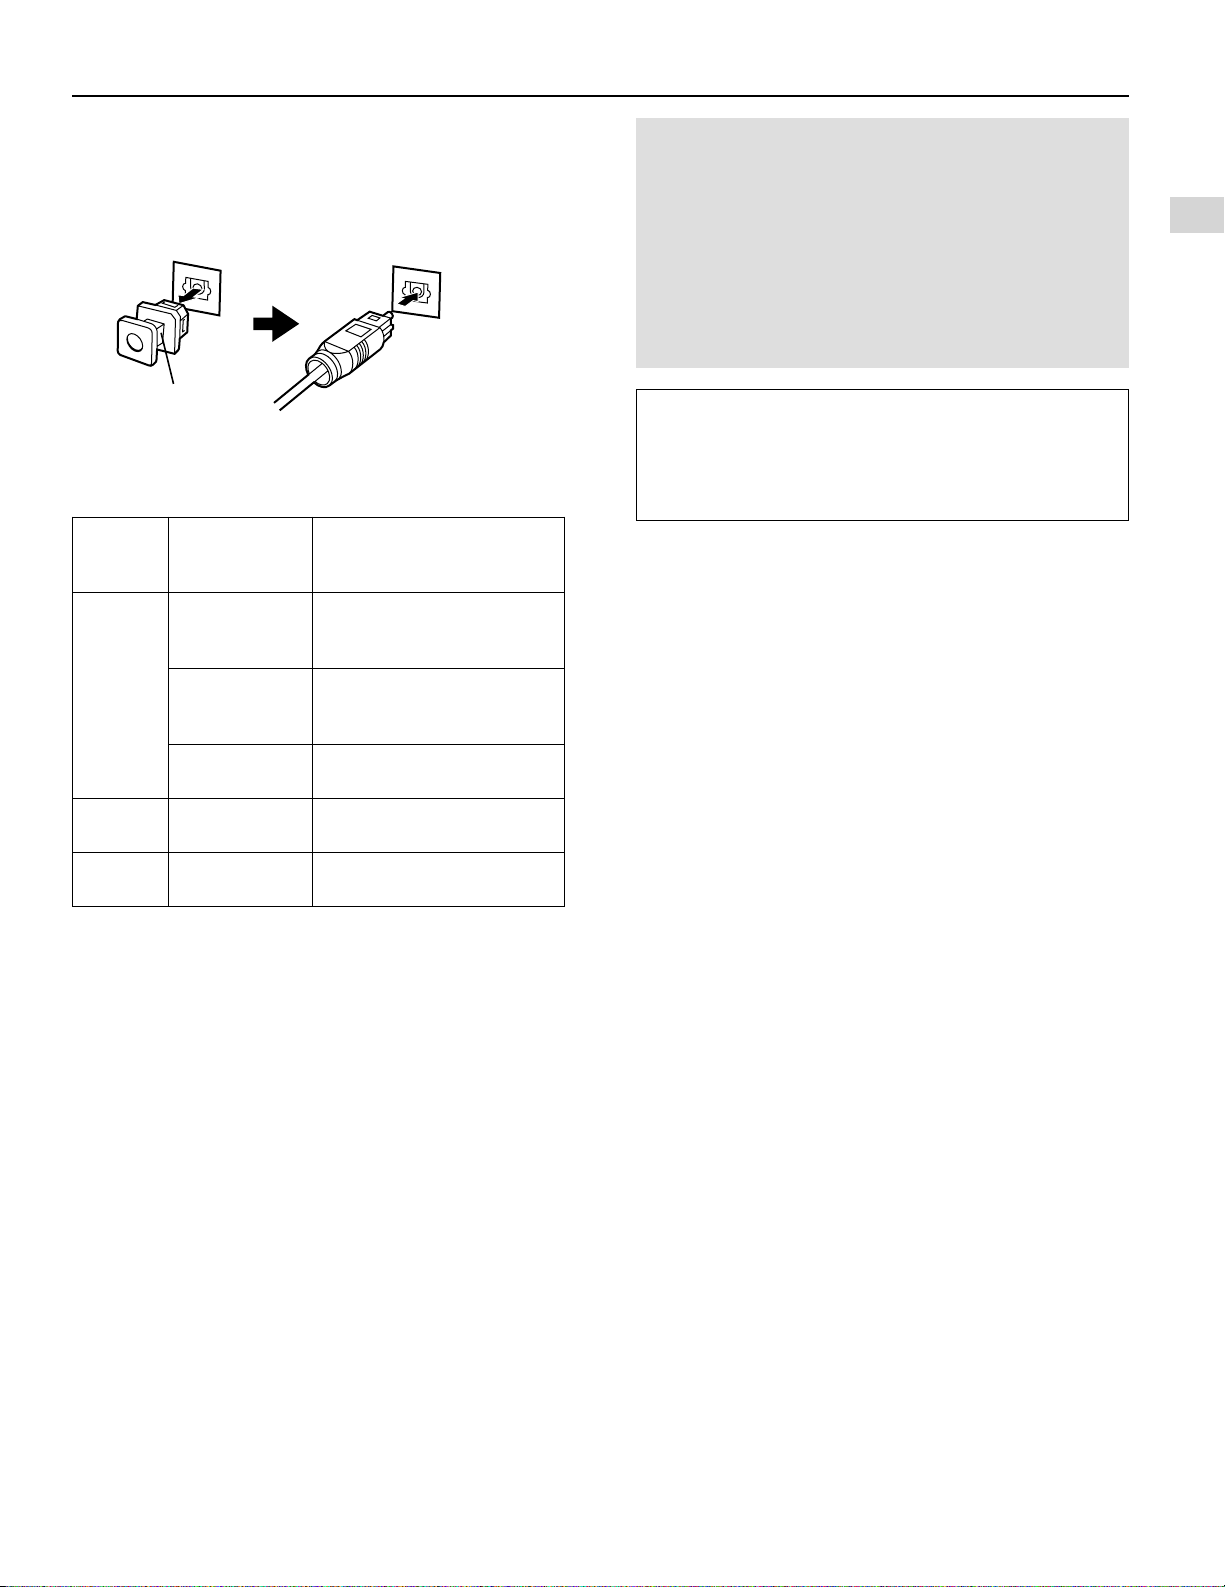
Caution for AC mains lead (For United Kingdom)
For your safety please read the following text carefully
This appliance is supplied with a moulded three pin mains
plug for your safety and convenience.
A 5 amp fuse is fitted in this plug.
Should the fuse need to be replaced please ensure that the
replacement fuse has a rating of 5 amps and that it is approved by ASTA or BSI to BS 1362.
Check for the ASTA mark ! or the BSI mark " on the body
of the fuse.
If the plug contains a removable fuse cover you must ensure
that it is refitted when the fuse is replaced.
If you lose the fuse cover the plug must not be used until a
replacement cover is obtained.
A replacement fuse cover can be purchased from your local
dealer.
IF THE FITTED MOULDED PLUG IS UNSUITABLE FOR
THE SOCKET OUTLET IN YOUR HOME THEN THE FUSE
SHOULD BE REMOVED AND THE PLUG CUT OFF AND
DISPOSED OF SAFELY.
THERE IS A DANGER OF SEVERE ELECTRICAL SHOCK
IF THE CUT OFF PLUG IS INSERTED INTO ANY 13 AMP
SOCKET.
If a new plug is to be fitted please observe the wiring code as
shown below.
If in any doubt please consult a qualified electrician.
How to replace the Fuse
ÁThere are two types of the supplied AC Mains Lead: ) and
* as shown below.
1 Open the fuse compartment with a screwdriver.
2 Replace the fuse and fuse cover.
TYPE )
12
TYPE *
12
If the socket outlets in the home are not suitable for the plug
supplied with this appliance, it should be cut off and an appropriate 3 pin plug fitted. For details, refer to the instructions
described below.
Note: The plug severed from the mains lead must be destroyed, as a plug with bared flexible cord is hazardous if engaged in a live socket outlet.
IMPORTANT
The wires in this mains lead are coloured in accordance with
the following code:
Blue: Neutral
Brown: Live
As the colours of the wires in the mains lead of this appliance
may not correspond with the coloured markings identifying
the terminals in your plug, proceed as follows:
The wire which is coloured BLUE must be connected to the
terminal in the plug which is marked with the letter N or coloured BLACK.
The wire which is coloured BROWN must be connected to
the terminal in the plug which is marked with the letter L or
coloured RED.
Under no circumstances should either of these wires be connected to the earth terminal of the three pin plug, marked with
the letter E or Earth Symbol #.
3
Dear Customers
May we take this opportunity to thank you for purchasing this
YAMAHA DVD/VIDEO CD/CD player.
We strongly recommend that you carefully study the Operating Instructions before attempting to operate the unit and that
you note the listed precautions.
Features
È DVD: a completely new dimension in video
entertainment
ÁSubtitles may be displayed in one of a maximum of 32 lan-
ÁThe audio soundtrack can be heard in up to 8 languages
ÁThe multi-angle function allows you to choose the viewing
\
The number of the languages recorded is dependent on the
software.
\
guages
angle of scenes which were shot from a number of different
angles. (Limited to DVD recorded with multiple camera angles.)
.
\
.
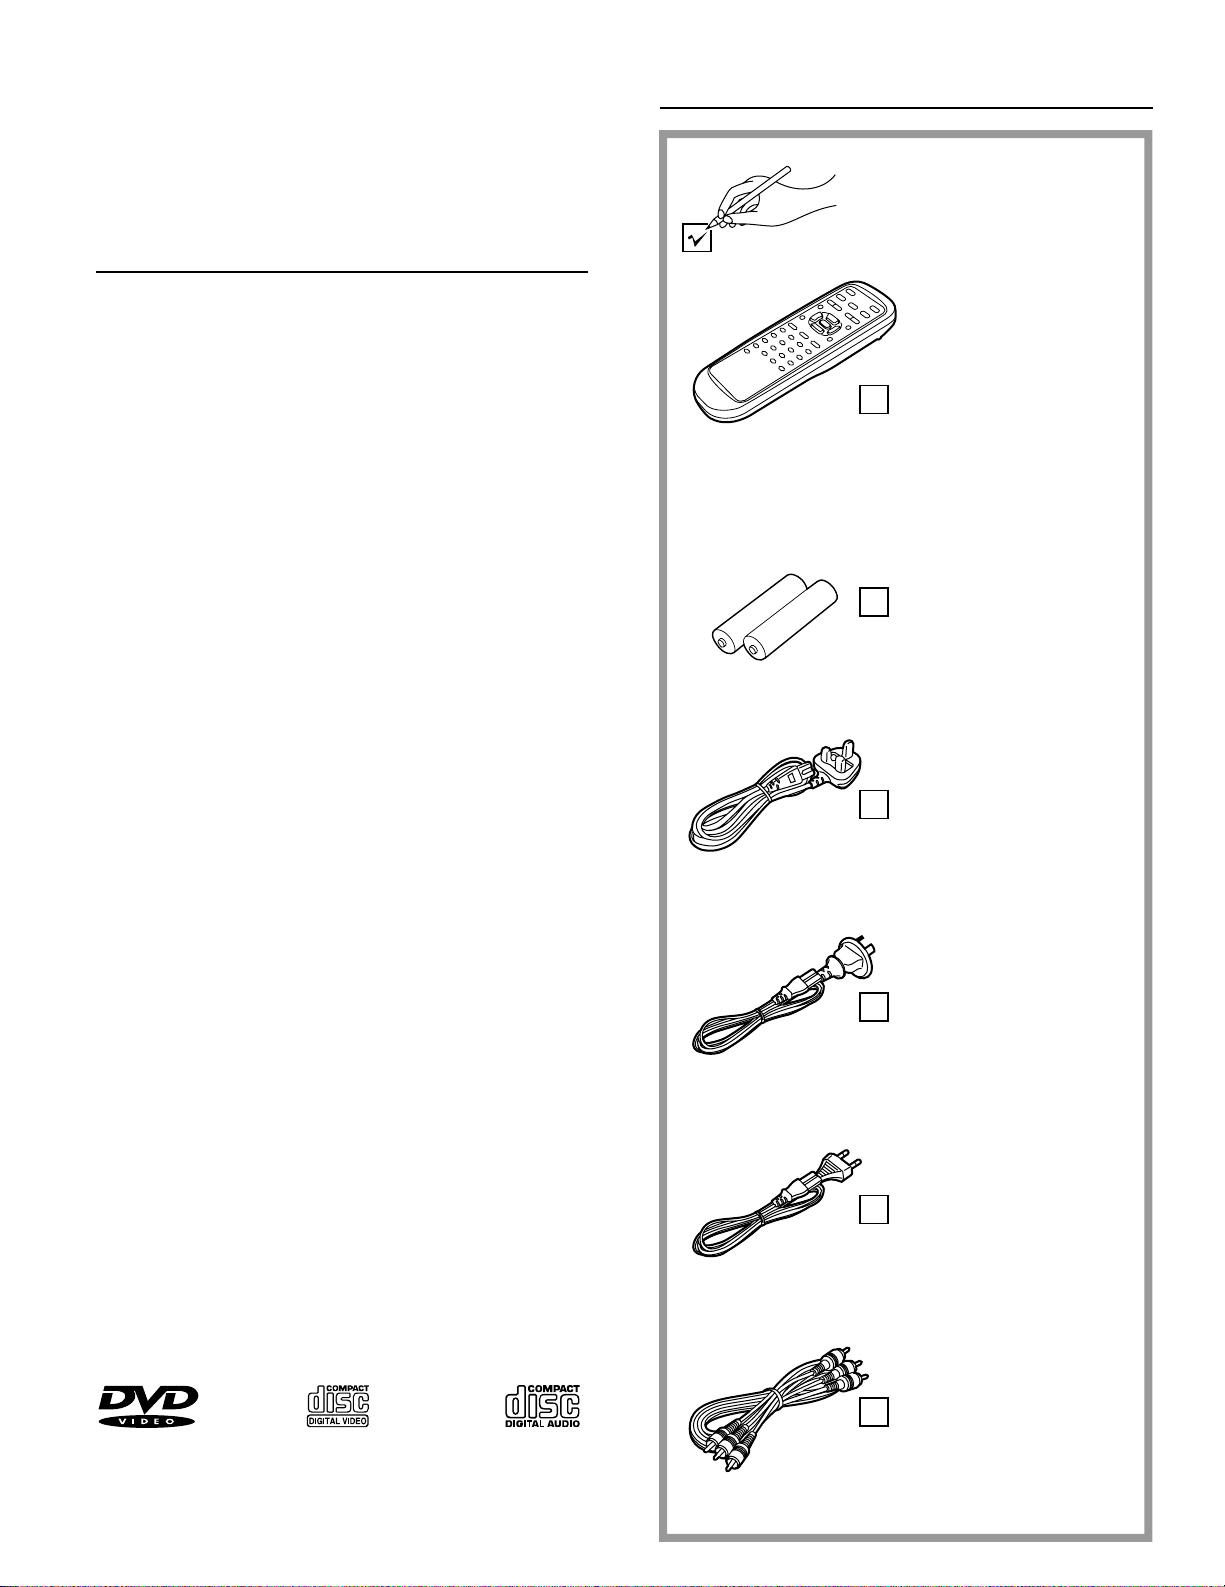
Accessories
Please check and identify the
supplied accessories.
Remote control
unit . . . . . . . . . . . . . . 1
È High quality digital audio
ÁThe Dolby Digital (AC-3)/MPEG 1/2 2–5.1ch audio/Linear
PCM decoder is built into the player which makes it possible
to enjoy Multi-Channel Surround sound.
ÁWith the linear PCM sound of a 48 kHz/16 bit through
96 kHz/24 bit, audio quality exceeding that of CDs becomes
possible.
È Many convenient features
ÁGUI (Graphical User Interface) screens for showing the disc
information or player information and providing access to
many major functions of this unit
ÁProgramming of up to 5 scenes in memory (markers)
ÁParental lock settings to prevent play of discs unsuitable for
some audiences [DVD only]
È Compatible with PAL DVD (Video CD) and
NTSC DVD (Video CD)
ÁThis player can play discs recorded in either PAL or NTSC
format.
For Continental Europe, United Kingdom and Australia
models
However, the player must be connected to a PAL TV which
is capable of receiving PAL 525/60 system to play both PAL
DVD (Video CD) and NTSC DVD (Video CD).
For other areas models
However, the player must be connected to a Multi-system
TV to play both PAL DVD (Video CD) and NTSC DVD
(Video CD). The use of a Multi-system TV is recommended.
È Compatible with Video CD and CD as well as
DVD
Batteries . . . . . . . . . 2
for remote control unit
[size “AA” (R6P)]
AC mains lead . . . . . 1
(For United Kingdom model)
AC mains lead . . . . . 1
(For Australia model)
AC mains lead . . . . . 1
(For Continental Europe
models and other models)
È Disc formats supported by this player
The unit can play back discs bearing any of the following
marks:
DVD
[8 cm disc/
12 cm disc]
Video CD
[8 cm disc/
12 cm disc]
4
Video/audio
cord . . . . . . . . . . . . . 1
CD
[8 cm disc/
12 cm disc]

Table of contents
Getting Started:
Safety information . . . . . . . . . . . . . . . . . . . . . 2
Caution for AC mains lead
(For United Kingdom) . . . . . . . . . . . . . . . . . . . . 3
Features . . . . . . . . . . . . . . . . . . . . . . . . . . . . . . 4
Accessories . . . . . . . . . . . . . . . . . . . . . . . . . . . 4
Precautions . . . . . . . . . . . . . . . . . . . . . . . . . . . 6
Selecting the type of disc for the type of the
connected TV
(For other areas) . . . . . . . . . . . 6
Control reference guide . . . . . . . . . . . . . . . . . 7
Front panel display . . . . . . . . . . . . . . . . . . . . . 9
Connection . . . . . . . . . . . . . . . . . . . . . . . . . . . 10
Remote control preparation . . . . . . . . . . . . . . 13
Before enjoying DVD/Video CD/CD . . . . . . . . 14
Basic Operation:
Basic play . . . . . . . . . . . . . . . . . . . . . . . . . . . . 14
ÁBasic play . . . . . . . . . . . . . . . . . . . . . . . . . . . . . . . . . . . . . 14
ÁStopping play . . . . . . . . . . . . . . . . . . . . . . . . . . . . . . . . . . 16
ÁSkipping ahead or back . . . . . . . . . . . . . . . . . . . . . . . . . . 16
Rapid advance (Rapid reverse) . . . . . . . . . . . 17
Still picture (Pause) . . . . . . . . . . . . . . . . . . . . 17
Frame advance [DVD/Video CD] . . . . . . . . . . . . . 17
Slow-motion play [DVD/Video CD] . . . . . . . . . . . 18
Enjoying Video CDs with playback control
without using menus [Video CD only] . . . . . . 18
Operation Using GUI Screens:
General information about GUI screens . . . . 19
ÁCommon procedures . . . . . . . . . . . . . . . . . . . . . . . . . . . . 19
Detailed descriptions of each GUI icon . . . . 20
ÁScreen for disc information . . . . . . . . . . . . . . . . . . . . . . . . 20
ÁScreen for player information . . . . . . . . . . . . . . . . . . . . . . 21
ÁScreen for slow-motion play and rapid advance
(reverse) . . . . . . . . . . . . . . . . . . . . . . . . . . . . . . . . . . . . . . 21
Advanced Operation:
Program play [Video CD/CD] . . . . . . . . . . . . . . . 22
Random play [Video CD/CD] . . . . . . . . . . . . . . . 23
Repeat play . . . . . . . . . . . . . . . . . . . . . . . . . . . 24
ÁRepeat viewing (listening) . . . . . . . . . . . . . . . . . . . . . . . . 24
ÁRepeating sections between two specific points
(A-B repeat) . . . . . . . . . . . . . . . . . . . . . . . . . . . . . . . . . . . 25
Storing markers in memory to be viewed
(listened) again . . . . . . . . . . . . . . . . . . . . . . 26
ÁStoring a marker in the memory . . . . . . . . . . . . . . . . . . . . 26
ÁRecalling/clearing a marker . . . . . . . . . . . . . . . . . . . . . . . 26
Changing subtitle language [DVD only] . . . . . . 27
Changing audio soundtrack language
[DVD only] . . . . . . . . . . . . . . . . . . . . . . . . . . . . 28
Switching vocals ON or OFF for Karaoke
discs [DVD/Video CD] . . . . . . . . . . . . . . . . . . . 28
Viewing from another angle [DVD only] . . . . . . 29
Using a title menu [DVD only] . . . . . . . . . . . . . . 30
Using a DVD menu [DVD only] . . . . . . . . . . . . . 30
Initial Settings:
Initial settings . . . . . . . . . . . . . . . . . . . . . . . . . 31
ÁCommon procedures of initial settings . . . . . . . . . . . . . . . 31
ÁSelecting disc languages [DVD only] . . . . . . . . . . . . . . . . 32
ÁSelecting rating level [DVD only] . . . . . . . . . . . . . . . . . . . 33
ÁSelecting language of On-Screen Display menu . . . . . . . 34
ÁSwitching the On-Screen Display ON or OFF . . . . . . . . . 35
ÁSelecting the display brightness . . . . . . . . . . . . . . . . . . . . 35
ÁSelecting TV screen type . . . . . . . . . . . . . . . . . . . . . . . . . 36
ÁSelecting digital output . . . . . . . . . . . . . . . . . . . . . . . . . . . 37
ÁSpeaker setting. . . . . . . . . . . . . . . . . . . . . . . . . . . . . . . . . 39
ÁOther settings . . . . . . . . . . . . . . . . . . . . . . . . . . . . . . . . . . 41
For Your Reference:
Disc handling and maintenance . . . . . . . . . . 42
Language code list . . . . . . . . . . . . . . . . . . . . . 43
Troubleshooting . . . . . . . . . . . . . . . . . . . . . . . 44
Self-diagnosis display function . . . . . . . . . . . 45
Definition of terms . . . . . . . . . . . . . . . . . . . . 46
Specifications . . . . . . . . . . . . . . . . . . . . . . . . . 47
Region Management
Information. . . . . . . . . . . . . . . . . . Back cover
5
Precautions
Selecting the type of disc for the
Please read these precautions before operating this unit.
È Mains lead protection
To avoid any malfunctions of the unit, and to protect against
electric shock, fire or personal injury, please observe the following.
ÁHold the plug firmly when connecting or disconnecting
the AC mains lead to this unit.
ÁDo not connect or disconnect the AC mains lead when
your hands are wet.
ÁKeep the AC mains lead away from heating appliances.
ÁNever put any heavy object on the AC mains lead.
ÁDo not attempt to repair or reconstruct the AC mains
lead in any way.
ÁRemove dust, dirt, etc. on the plug at regular intervals.
ÁIf the unit has been dropped or otherwise damaged, set
the unit to the standby mode and disconnect the AC
mains lead.
ÁIf smoke, malodors or noises are emitted from the unit,
set the unit to the standby mode and disconnect the AC
mains lead.
È Placement
Avoid placing the unit in areas of:
Ádirect sunlight or heating radiators, or closed automobiles
Áhigh temperature (over 35uC) or high humidity (over 90%)
Áexcessive dust
Ávibration, impact or where the surface is tilted
As the internal parts may be seriously damaged.
È Non-use periods
When the unit is not being used, switch the unit to the standby mode.
When left unused for a long period of time, the unit should be
unplugged from the household AC outlet.
È No fingers or other objects inside
ÁTouching internal parts of this unit is dangerous, and may
cause serious damage to the unit. Do not attempt to disassemble the unit.
ÁDo not put any foreign object on the disc tray.
È Keep away from water and magnets.
ÁKeep the unit away from flower vases, tubs, sinks, etc. If liq-
uids are spilled into the unit, serious damage could occur.
ÁNever bring magnetic objects such as speakers near to this
unit.
È Stacking
ÁPlace the unit in a horizontal position, and do not place any-
thing heavy on it.
ÁDo not place the unit on amplifiers or other equipment which
may become hot.
È Condensation
Moisture may form on the lens in the following conditions…
Áimmediately after a heater has been turned on.
Áin a steamy or very humid room.
Áwhen the unit is moved from a cold environment to a warm
one.
If moisture forms inside this unit, it may not operate properly.
In this case, turn on the power and wait about one hour for
the moisture to evaporate.
È If there is noise interference on the TV while a
broadcast is being received
Depending on the reception condition of the TV, interference
may appear on the TV screen while you are watching a TV
broadcast and the unit is left on. This is not a malfunction of
the unit or the TV. To watch a TV broadcast, switch this unit
to the standby mode.
6
type of connected TV
(For other models)
Both DVDs and Video CDs have the material recorded in the
PAL and NTSC systems. Refer to the table below to select
the correct disc type for the type of connected TV.
È Connecting to the Multi-system TV
Disc
PAL
NTSC
È Connecting to the NTSC TV
Disc
PAL
NTSC
È Connecting to the PAL TV
Disc
PAL
NTSC
Note:
When a disc which does not comply with Video CD standard
is played, the bottom part of the picture may disappear.
TV Monitor
Played in the PAL
system.
Played in the NTSC
system.
TV Monitor
No clear images are
shown on the screen.
Played in the NTSC
system.
TV Monitor
Played in the PAL
system. However, the
initial settings and
Video CD’s “Program
Play” functions cannot
be used.
No clear images are
shown on the screen.
Control reference guide
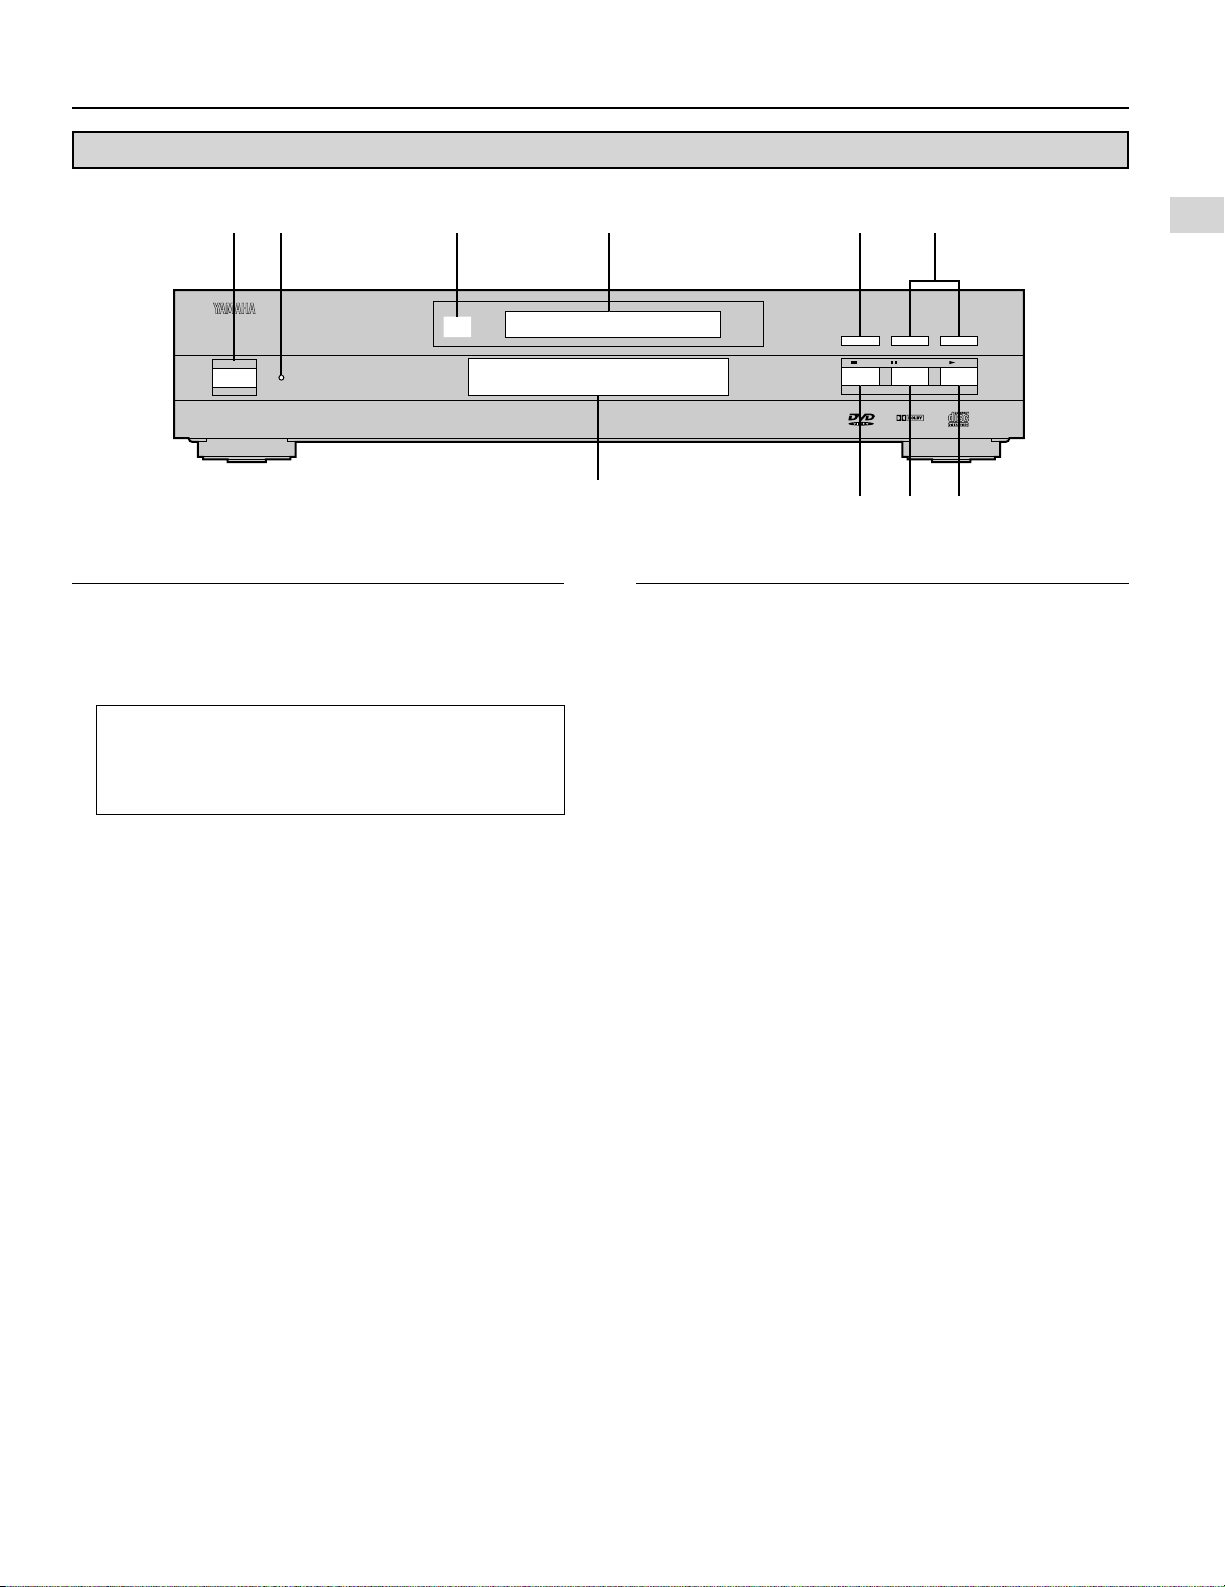
Main unit
1 23 546
NATURAL SOUND DVD PLAYER DVD-S700
STANDBY/ON
Page
e STANDBY/ON button . . . . . . . . . . . . . . . . . . . . . . . . . . 14
Press to switch the unit to ON from Standby mode or vice
versa. In standby mode, the unit is still consuming a small
amount of power.
Standby mode
In this state, this unit consumes a very small quantity
of power to receive infrared-signals from the remote
control transmitter.
f STANDBY indicator
When the unit is connected to the AC mains supply, this
indicator lights up in standby mode and goes out when the
unit is turned on.
DVD / VIDEO CD / CD
7
SKIP
f OPEN/CLOSE
STOP STILL/PAUSE PLAY
:
D I G I T A L
;
098
Page
g Remote control signal sensor . . . . . . . . . . . . . . . . . . . 13
h Display window . . . . . . . . . . . . . . . . . . . . . . . . . . . . . . 9
i OPEN/CLOSE button . . . . . . . . . . . . . . . . . . . . . . . . . . 14
j SKIP buttons . . . . . . . . . . . . . . . . . . . . . . . . . . . . . . 15, 16
k Disc tray . . . . . . . . . . . . . . . . . . . . . . . . . . . . . . . . . . . . 14
l STOP button . . . . . . . . . . . . . . . . . . . . . . . . . . . . . . . . . 16
m STILL/PAUSE button . . . . . . . . . . . . . . . . . . . . . . . . . . 17
n PLAY button . . . . . . . . . . . . . . . . . . . . . . . . . . . . . . . . . 14
7
Control reference guide
POWER
@
STOP
TITLE
SUBTITLE
MARKER
ANGLEAUDIO
ON SCREEN RETURN
MENU
SELECT
H
SKIP
I F
G
D
PLAY
g
STILL/PAUSE
OPEN/CLOSE
*/ I
PLAY MODE
REPEAT
A-B CLEAR
DVD
SET UP
SLOW/
SEARCH
1
2
4
5
6
7
8
9
0
o
p
3
r
s
u
x
y
z
v
w
t
q
Remote control unit
Page
e POWER */I button . . . . . . . . . . . . . . . . . . . . . . . . . . . . 14
f STOP button . . . . . . . . . . . . . . . . . . . . . . . . . . . . . . . . . 16
g SKIP buttons . . . . . . . . . . . . . . . . . . . . . . . . . . . . . . 15, 16
h TITLE button . . . . . . . . . . . . . . . . . . . . . . . . . . . . . . 15, 30
i Cursor buttons/SELECT button . . . . . . . . . . . . . . . . . 15
j ON SCREEN button . . . . . . . . . . . . . . . . . . . . . . . . . . . 19
k SUBTITLE button . . . . . . . . . . . . . . . . . . . . . . . . . . . . . 27
l MARKER button . . . . . . . . . . . . . . . . . . . . . . . . . . . . . . 26
m PLAY MODE button . . . . . . . . . . . . . . . . . . . . . . . . 22, 23
n REPEAT button . . . . . . . . . . . . . . . . . . . . . . . . . . . . . . 24
o A-B button . . . . . . . . . . . . . . . . . . . . . . . . . . . . . . . . . . . 25
p SET UP button . . . . . . . . . . . . . . . . . . . . . . . . . . . . . . . 31
q STILL/PAUSE button . . . . . . . . . . . . . . . . . . . . . . . . . . 17
r OPEN/CLOSE button . . . . . . . . . . . . . . . . . . . . . . . . . . 14
s PLAY button . . . . . . . . . . . . . . . . . . . . . . . . . . . . . . . . . 14
t SLOW/SEARCH buttons . . . . . . . . . . . . . . . . . . . . 17, 18
u MENU button . . . . . . . . . . . . . . . . . . . . . . . . . . 15, 18, 30
v RETURN button . . . . . . . . . . . . . . . . . . . . . . . . . . . 15, 19
w AUDIO button . . . . . . . . . . . . . . . . . . . . . . . . . . . . . . . . 28
x ANGLE button . . . . . . . . . . . . . . . . . . . . . . . . . . . . . . . 29
y Numeric buttons . . . . . . . . . . . . . . . . . . . . . . . . . . . . . . 15
ÁTo select a 2-digit number
Example: To select track 23
Press “X10”, “2” and then “3”.
z CLEAR button . . . . . . . . . . . . . . . . . . . . . . . 19, 23, 26, 32
8
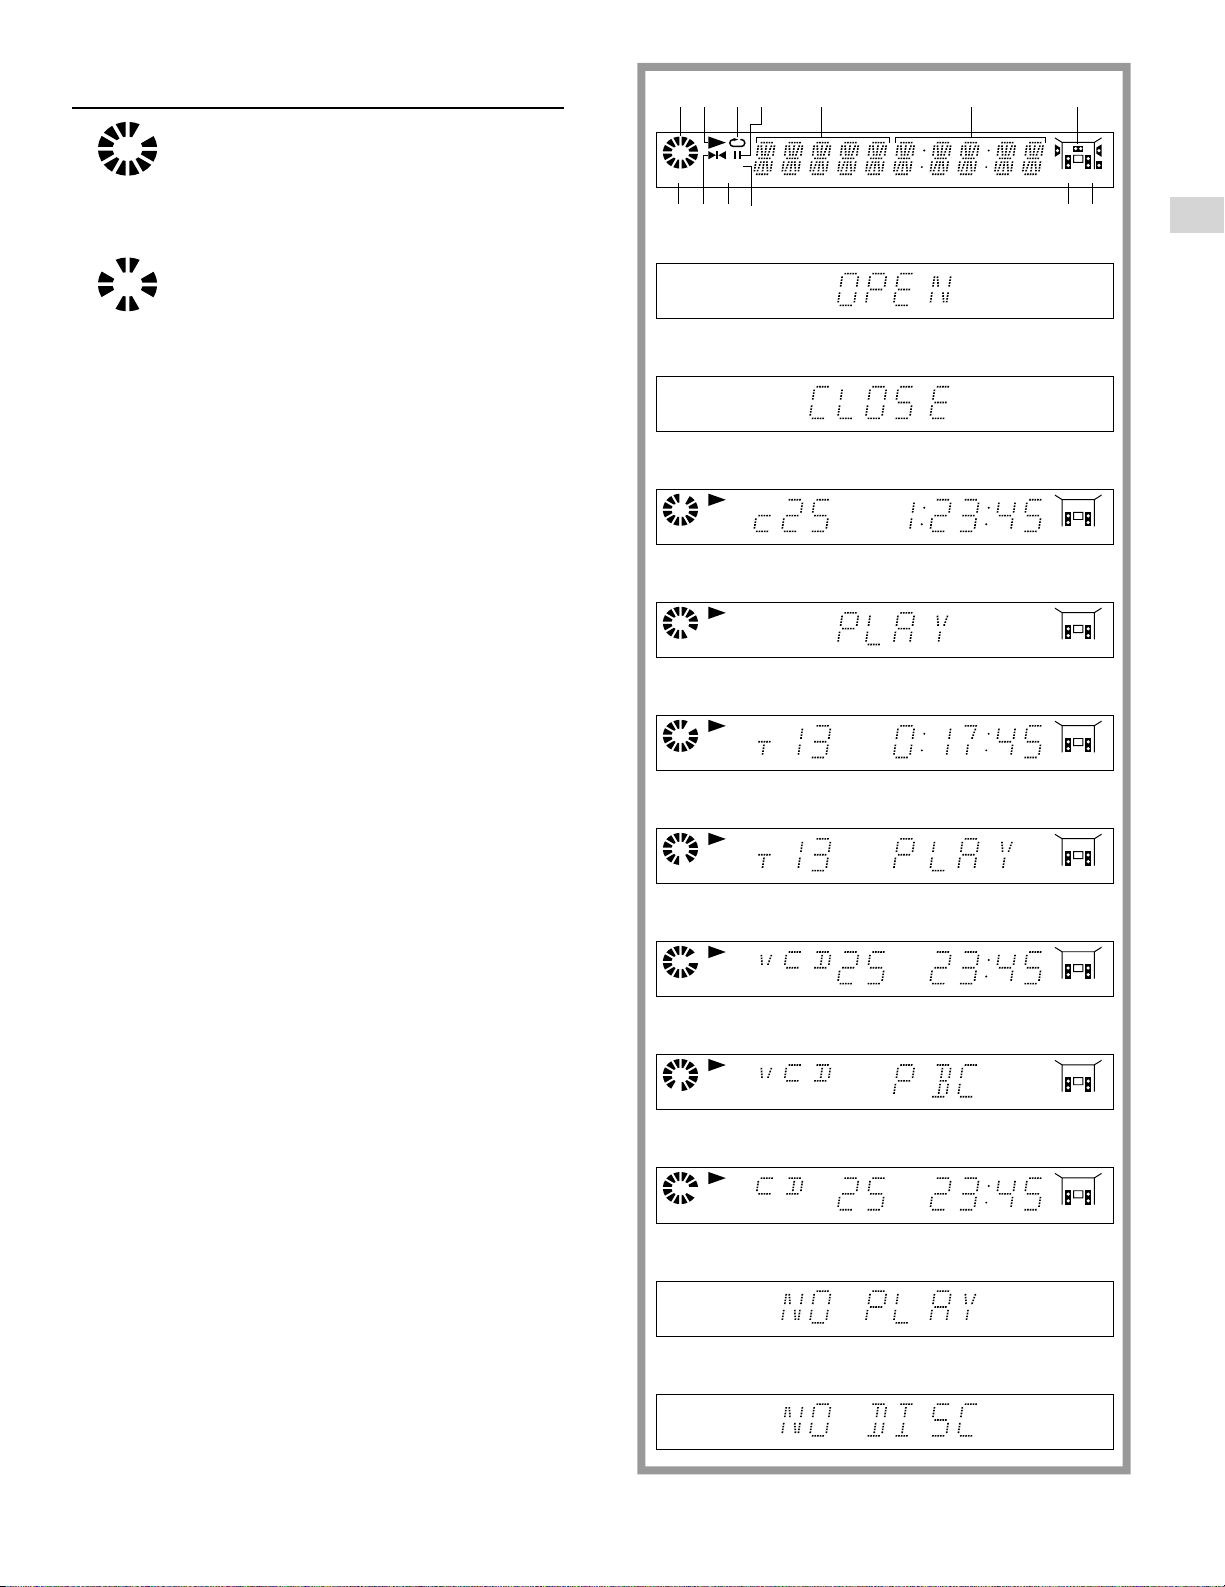
Front panel display
e Rotates during play.
Rotates fast clockwise or counterclockwise
during rapid advance (reverse). (See page 17.)
Rotates slowly clockwise or counterclockwise
during slow-motion play.
[DVD/Video CD] (See page 18.)
Illuminates in the stop mode.
f Illuminates during playback.
Flashes when the RESUME function is ON.
(See page 16.)
g Illuminates during repeat play. (See pages 24 and 25.)
h Illuminates in the pause mode. [CD] (See page 17.)
i Indicates the chapter number. [DVD]
Indicates the track number. [Video CD/CD]
j Indicates the total playing time when the disc tray is
closed. [Video CD/CD]
Indicates the elapsed playing time from the start of the
title/track during play.
k Indicates the current audio channel information re-
corded in the disc (e.g. 2ch or 5.1ch).
l Illuminates when a DVD is loaded.
m Illuminates in the still picture mode.
[DVD/Video CD] (See page 17.)
n Illuminates during program play. [Video CD/CD]
(See pages 22 and 23.)
o Illuminates when it is possible to switch the angle
[DVD] (See page 29.)
p Illuminates when Linear PCM of 96 kHz sampling is
being played.
q Illuminates when Linear PCM of 24 bit is being played.
r Illuminates when the disc tray is open.
s Illuminates when the disc tray is being closed (re-
tracted).
t Illuminates during play of a DVD.
u Illuminates during play of an interactive DVD.
v Illuminates during play of a Karaoke DVD.
w Illuminates during play of an interactive Karaoke
x Illuminates during play of a Video CD.
y Illuminates during play of a Video CD with playback
z Illuminates during play of a CD.
{ Illuminates when playback is impossible.
| Illuminates when no disc is loaded.
\
DVD.
control.
ÁDVDs for which playback is prohibited by the setup “Rat-
ings”. (See page 33.)
For Continental Europe and United Kingdom models
ÁDVDs with Region No. other than “2” or “ALL”.
For Australia model
ÁDVDs with Region No. other than “4” or “ALL”.
For other models
ÁDVDs with Region No. other than “3” or “ALL”.
(See page 42.)
\
1 3 5 642
ANGLE
DVD
PROG.
96kHz 24bit
89 p0o q
r
s
t
DVD
u
DVD
v
DVD
w
DVD
x
y
z
{
7
\
An interactive DVD is a DVD software which includes multiple angles, stories and so on.
|
9
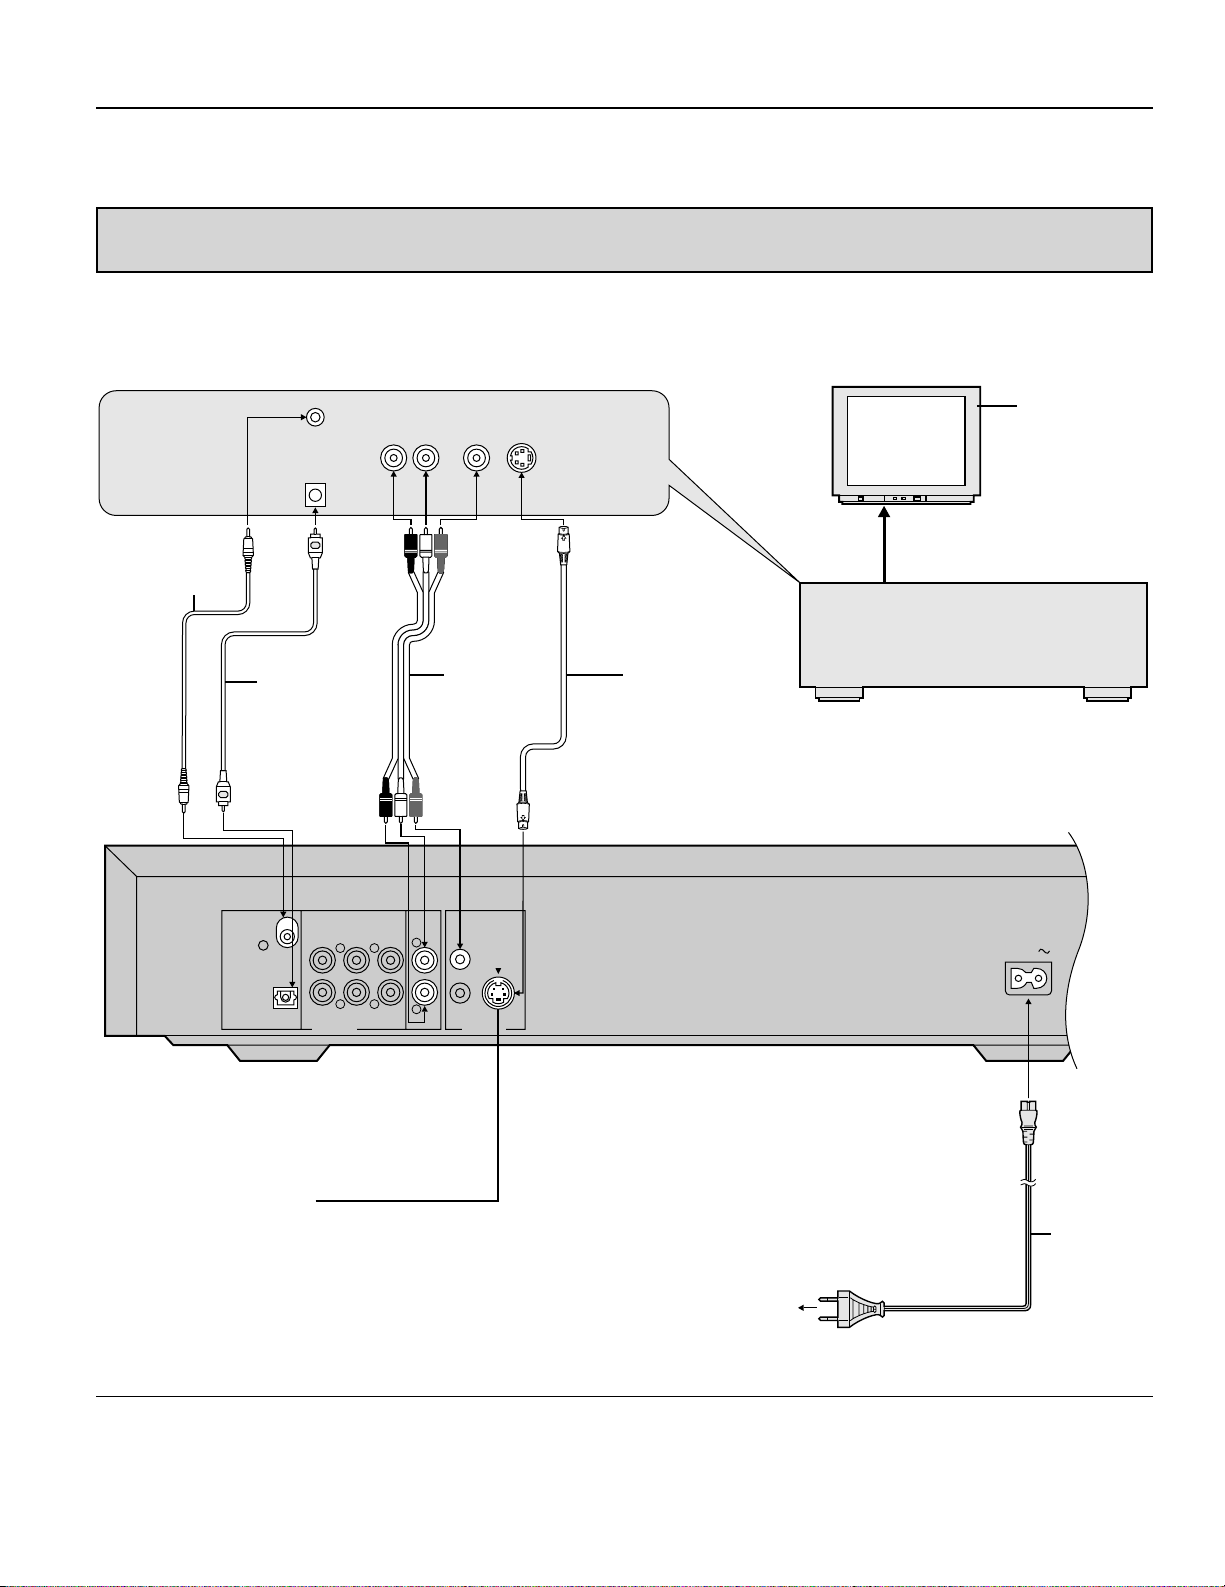
Connection
PCM/U DIGITAL
MPEG
COAXIAL
DIGITAL
OPTICAL
L
AUDIO OUT VIDEO OUT
SUBWOOFER
CENTER SURROUND
6CH DISCRETE
MIXED 2CH
VIDEO
MAIN
AC IN
S VIDEO
L
R R
R
L
2
1
Never plug in this unit and other components until all connections are completed.
ÁBe sure that the colors of the connectors and plugs match up when connecting the cord.
ÁRead through the instructions for the equipment to be connected.
Connecting to an AV amplifier containing Dolby Digital (AC-3)/MPEG 1/2 2–5.1ch audio
decoder
When DVDs recorded in Dolby Digital or MPEG audio are played, Dolby Digital bitstream or MPEG audio bitstream is output from
the player’s OPTICAL digital audio output connector or COAXIAL digital audio output connector. When the player is connected to a
Dolby Digital decoder or MPEG audio decoder, you can enjoy theater-quality audio in your home. [An optical digital cable or coaxial
audio cable (both optional) is required when an optional Dolby Digital decoder or MPEG audio decoder is used.]
Coaxial audio
cable (optional)
AUDIO
COAXIAL
DVD/LD
OPTICAL
Optical digital
cable (optional)
SIGNAL
L
R
VIDEO SIGNAL
VIDEO
S-VIDEO
DVD/
LD
Video/audio
cord
(supplied)
DVD/
LD
S-video cord
(optional)
TV set (optional)
AV amplifier with
Dolby Digital (AC-3)/
MPEG audio decoder
(optional)
DVD/VIDEO CD/CD player
S-video output
connector
The S (separate) video output connector separates the color
(C) and luminance (Y) signals before transmitting them to the
TV set in order to achieve a sharper picture.
Use the S-video cord (optional) when connecting the player
to a TV set equipped with an S-video input connector for the
best picture clarity possible.
Notes:
ÁDuring DVD play, the TV volume may be at a lower level
than during TV broadcasts, etc. If this is the case, adjust the
volume to the desired level.
10
AC mains
lead
(supplied)
To power
outlet
\
The configuration of the plug differs according to
the area.
ÁIf the DVD player is connected to the TV through a video
cassette recorder, the picture may not be played back normally with some DVDs. If this is the case, do not connect
the player via the VCR.
Connection
Notes when connecting the optical digital cable
ÁRemove the dust protection cap from the connector and
connect the cable firmly so that configurations of both the
cable and the connector match.
ÁKeep the dust protection cap and always reattach the cap
when not using the connector to protect against dust.
Caution for the optical/coaxial digital audio output connector:
ÁDo not connect an amplifier (with an optical/coaxi-
al digital input connector) which does not contain
the Dolby Digital (AC-3) or MPEG audio decoder.
ÁOtherwise any attempt to play DVDs may cause to
such a high level of noise that it may be harmful to
your ears and damage your speakers.
ÁVideo CDs and CDs can be played as they would nor-
mally be played.
Dust protection cap
Concerning the audio output from the unit’s optical/coaxial digital audio output connector
Disc
DVD
Video
CD
CD
Sound
recording
format
Dolby Digital
(AC-3)
Linear PCM
(48/96 kHz
16/20/24 bit)
MPEG
MPEG 1
Linear PCM
Optical/coaxial digital
audio output from
connector
Dolby Digital bitstream
(2–5.1ch) or PCM (2ch)
(48 kHz/16 bit)
\1
Linear PCM (2ch)
(48 kHz sampling/16 bit
only)\2 or no output
\1
MPEG audio bitstream or
PCM (2ch) (16 bit)
\1
PCM
(44.1 kHz sampling)
Linear PCM
(44.1 kHz sampling)
\1
The type of audio output from the connector can be selected by the initial settings. (See page 37.)
\2
Sound having 96 kHz sampling converted into 48 kHz sampling when it is output from the unit’s optical/coaxial digital
audio output connector.
Manufactured under license from Dolby Laboratories.
“Dolby” and the double-D symbol are trademarks of
Dolby Laboratories. Confidential Unpublished Works.
j 1992–1997 Dolby Laboratories, Inc. All rights reserved.
For your reference:
ÁDolby Digital (AC-3) is a digital sound compression tech-
nique developed by the Dolby Laboratories Licensing Corporation.
Supporting 5.1-channel surround sound, as well as stereo
(2-channel) sound, this technique enables a large quantity
of sound data to be efficiently recorded on a disc.
ÁLnear PCM is a signal recording format used in CDs. While
audio CDs are recorded in 44.1 kHz/16 bit, DVDs are recorded in 48 kHz/16 bit up to 96 kHz/24 bit.
ÁIf you have a Dolby Pro Logic Surround decoder, you will
obtain the full benefit of Pro Logic from the same DVD movies that provide full 5.1-channel Dolby Digital soundtracks,
as well as from titles with the Dolby Surround mark.
11

Connection
PCM/U DIGITAL
MPEG
COAXIAL
DIGITAL
OPTICAL
L
AUDIO OUT VIDEO OUT
SUBWOOFER
CENTER SURROUND
6CH DISCRETE
MIXED 2CH
VIDEO
MAIN
AC IN
S VIDEO
L
R R
R
L
2
1
Connecting to an AV amplifier which does not contain Dolby Digital (AC-3)/MPEG
audio decoder
This DVD/VIDEO CD/CD player contains a Dolby Digital (AC-3)/MPEG audio decoder. This enables the playback of DVDs recorded
in Dolby Digital Surround, MPEG audio or Linear PCM without the need for an optional decoder with Dolby Digital, MPEG audio or
Linear PCM processing. When the DVD player is connected to an AV amplifier with 5.1ch input connectors, you can enjoy theaterquality audio right in your home when playing discs recorded in Dolby Digital Surround, MPEG audio or Linear PCM.
Audio cord
(optional)
6CH DISCRETE INPUT DVD/LD
SURROUND
CENTER
SUB
WOOFER
MAIN
L
R
VIDEO SIGNAL
AUDIO SIGNAL
L
R
DVD/LD
Video/audio cord (supplied)
TV set (optional)
AV amplifier without
Dolby Digital (AC-3)/
MPEG audio decoder
(optional)
DVD/VIDEO CD/CD player
Notes:
ÁAfter connection is made, set the “Speaker setting” (such as
Yes/No and Large/Small) according to your speaker sys-
tem. (See page 39.)
ÁIf the surround speakers or the center speaker can’t be in-
stalled at an equal distance to (or further away from) the
front speakers from the listening position, then change the
delay time setting at the “Speaker setting” on page 39, to
compensate.
12
ÁIf the surround speakers are set to “None” at the “Speaker
setting” (see page 39), the discs recorded in MPEG 2 audio
or Linear PCM will be played back only in 2 channels even
when the center speaker is connected as well as the front
speakers.
ÁDVDs recorded in Linear PCM/96 kHz sampling in which
“Center Speaker” is contained will also be played back only
in 2ch.
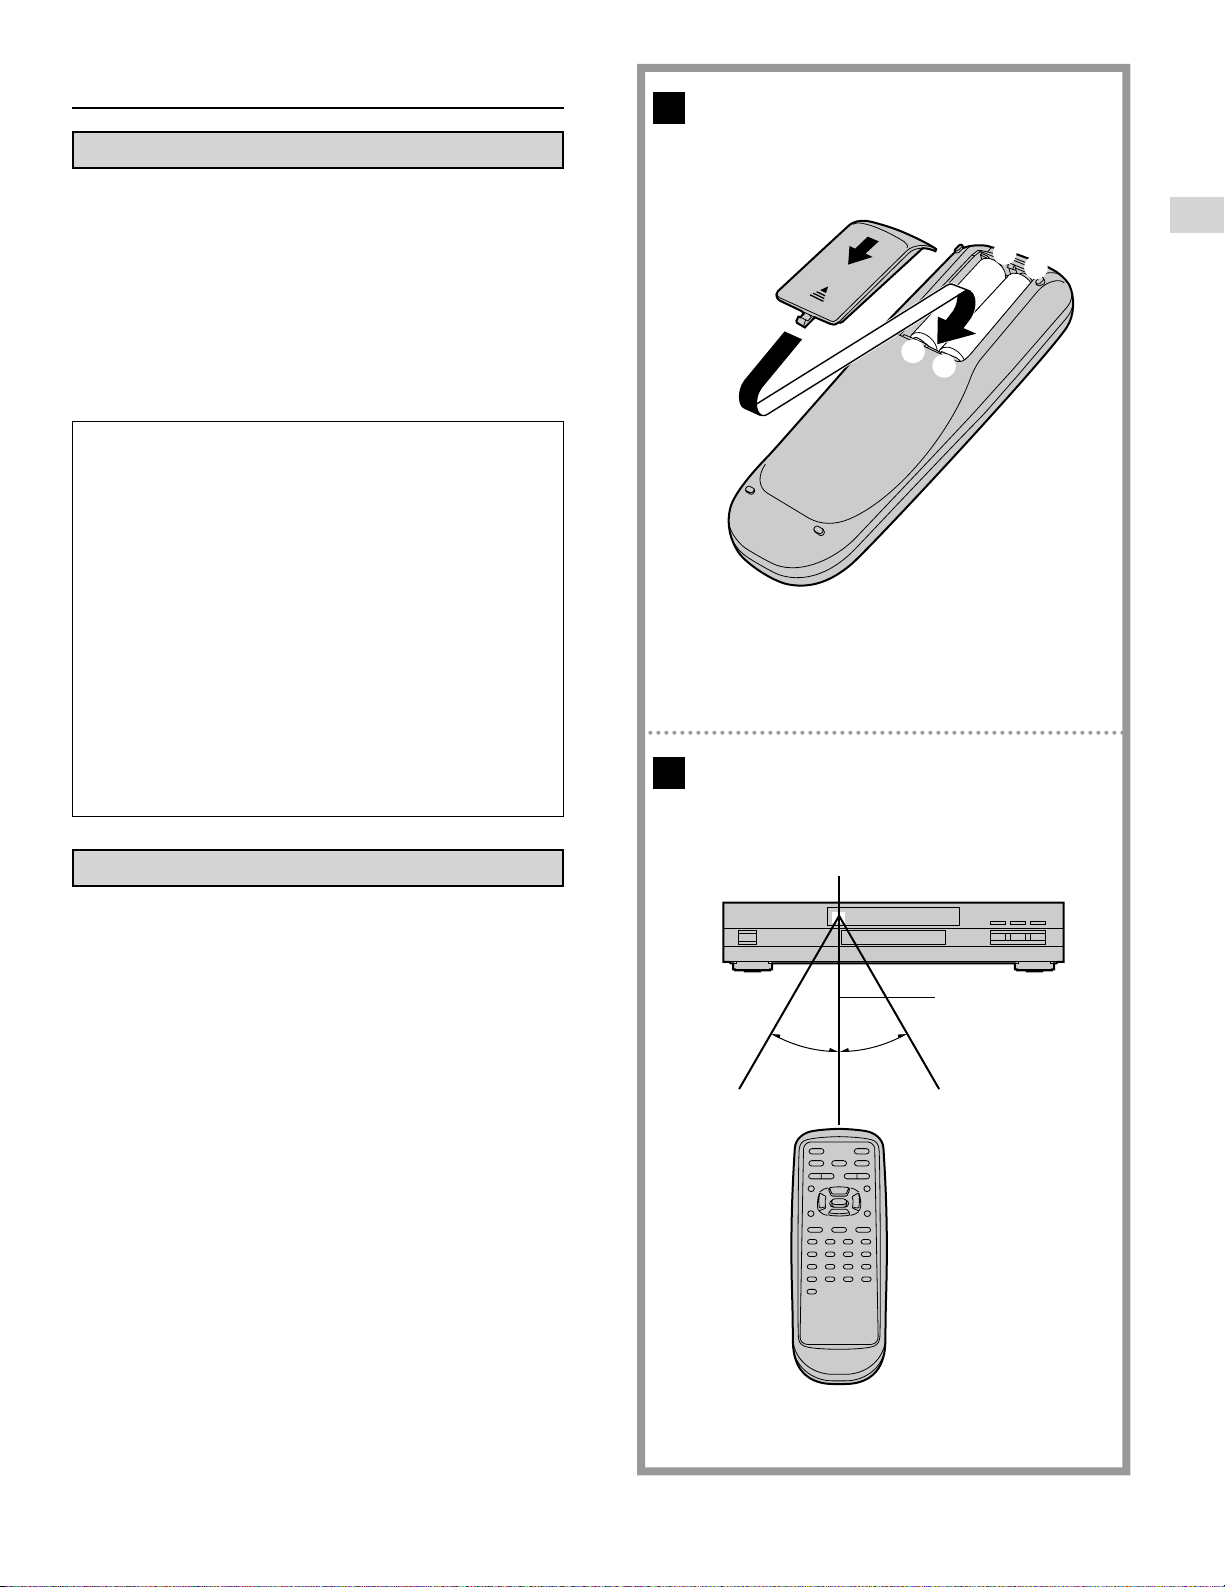
Remote control preparation
Battery installation )
Insert the batteries while observing the correct (o) and (p)
polarities as illustrated at right.
A
Service life of batteries
ÁThe batteries normally last for about one year although this
depends on how often and for what operations the remote
control is used.
ÁIf the remote control unit fails to work even when it is oper-
ated near the player, replace the batteries.
ÁUse size “AA” (R6P) batteries.
Notes:
ÁDo not use rechargeable (Ni-Cd) batteries.
ÁDo not attempt to recharge, short-circuit, disassem-
ble, heat or throw the batteries into the fire.
ÁDo not drop, step on or otherwise impact the remote
control unit. This may damage the parts or lead to
malfunction.
ÁDo not mix old and new batteries.
ÁIf the remote control unit is not going to be used for a
long time, remove the batteries. Otherwise, electrolyte
may leak which may lead not only to malfunctioning
but also to burns if contact is made with the electro-
lyte.
ÁWipe away any electrolyte leaking inside the remote
control unit, and install new batteries.
ÁIf any electrolyte should come into contact with parts
of your body, wash it off thoroughly with water.
B
8
7
7
8
Remote control operation range *
Point the remote control unit no more than about 7 m from the
remote control sensor and within about 60u of the front of the
unit.
ÁThe operating distance may vary according to the bright-
ness of the room.
Notes:
ÁDo not point bright lights at the remote control sensor.
ÁDo not place objects between the remote control unit and
the remote control sensor.
ÁDo not use this remote control unit while simultaneously op-
erating the remote control unit of any other equipment.
Remote control signal sensor
7m
30˚ 30˚
13
Before enjoying DVD/Video CD/CD
The On-Screen menu language of your player has
been factory pre-set to English.
If you would like to change the menu language to
French, Spanish, German or Italian (for Continental Europe, United Kingdom and Australia models) or to
French or Spanish (for other models), please refer to
“Selecting language of On-Screen Display menu” on
page 34.
In the explanations given below it is assumed that English has been selected as the menu language.
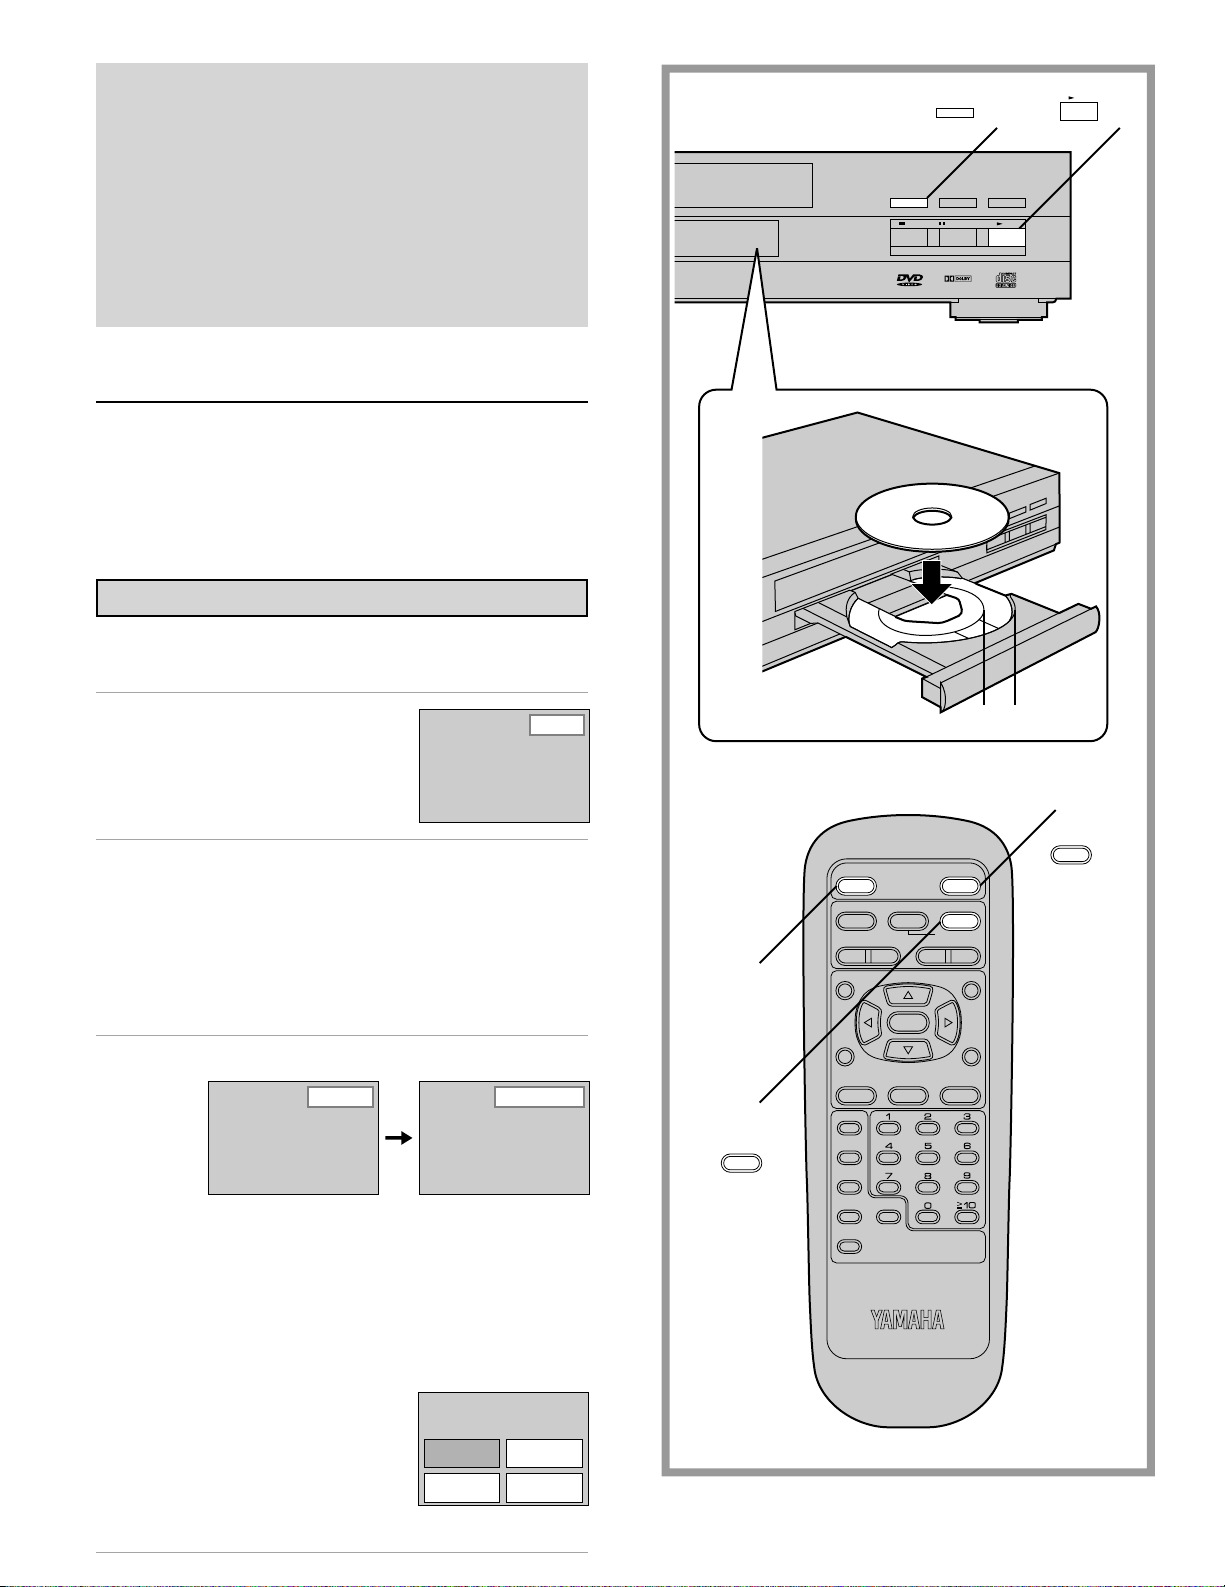
Basic play
f OPEN/CLOSE
PLAY
2 4
f OPEN/CLOSE
STOP STILL/PAUSE PLAY
/ CD
:
D I G I T A L
SKIP
;
Preparations
ÁSwitch the TV ON and select the Audio/Video (AV) position,
e.g. AV1, AV2, which has been connected to the player.
ÁSwitch on the stereo system’s power if the player has been
connected to a stereo system.
Basic play
1
Press POWER to switch on the power.
2
Press OPEN/CLOSE to
open the disc tray.
3
Place a disc onto the disc tray.
Hold the disc without touching either of its surfaces, position it with the printed title side facing up, align it with the
guides, and place it in its proper position.
e 8 cm disc
f 12 cm disc
Open
3
1
POWER
@
H
TITLE
STOP
SKIP
*/ I
g
STILL/PAUSE
I F
SELECT
OPEN/CLOSE
D
PLAY
SLOW/
SEARCH
12
2
OPEN/CLOSE
G
MENU
4
Press PLAY.
CloseReading
The disc tray is automatically closed and play begins.
ÁWhen the disc tray is closed by pressing OPEN/CLOSE,
press PLAY to commence play.
ÁWhen a menu screen appears on the TV monitor
In case of interactive DVDs or Video CDs with playback
control, a menu screen appears on the TV monitor. Perform
step 5 on page 15 to commence play.
TITLE MENU
Dogs
(Example of DVD)
14
Castles
BirdsLovers
4
D
PLAY
ON SCREEN RETURN
SUBTITLE
MARKER
PLAY MODE
REPEAT
A-B CLEAR
SET UP
ANGLEAUDIO
DVD
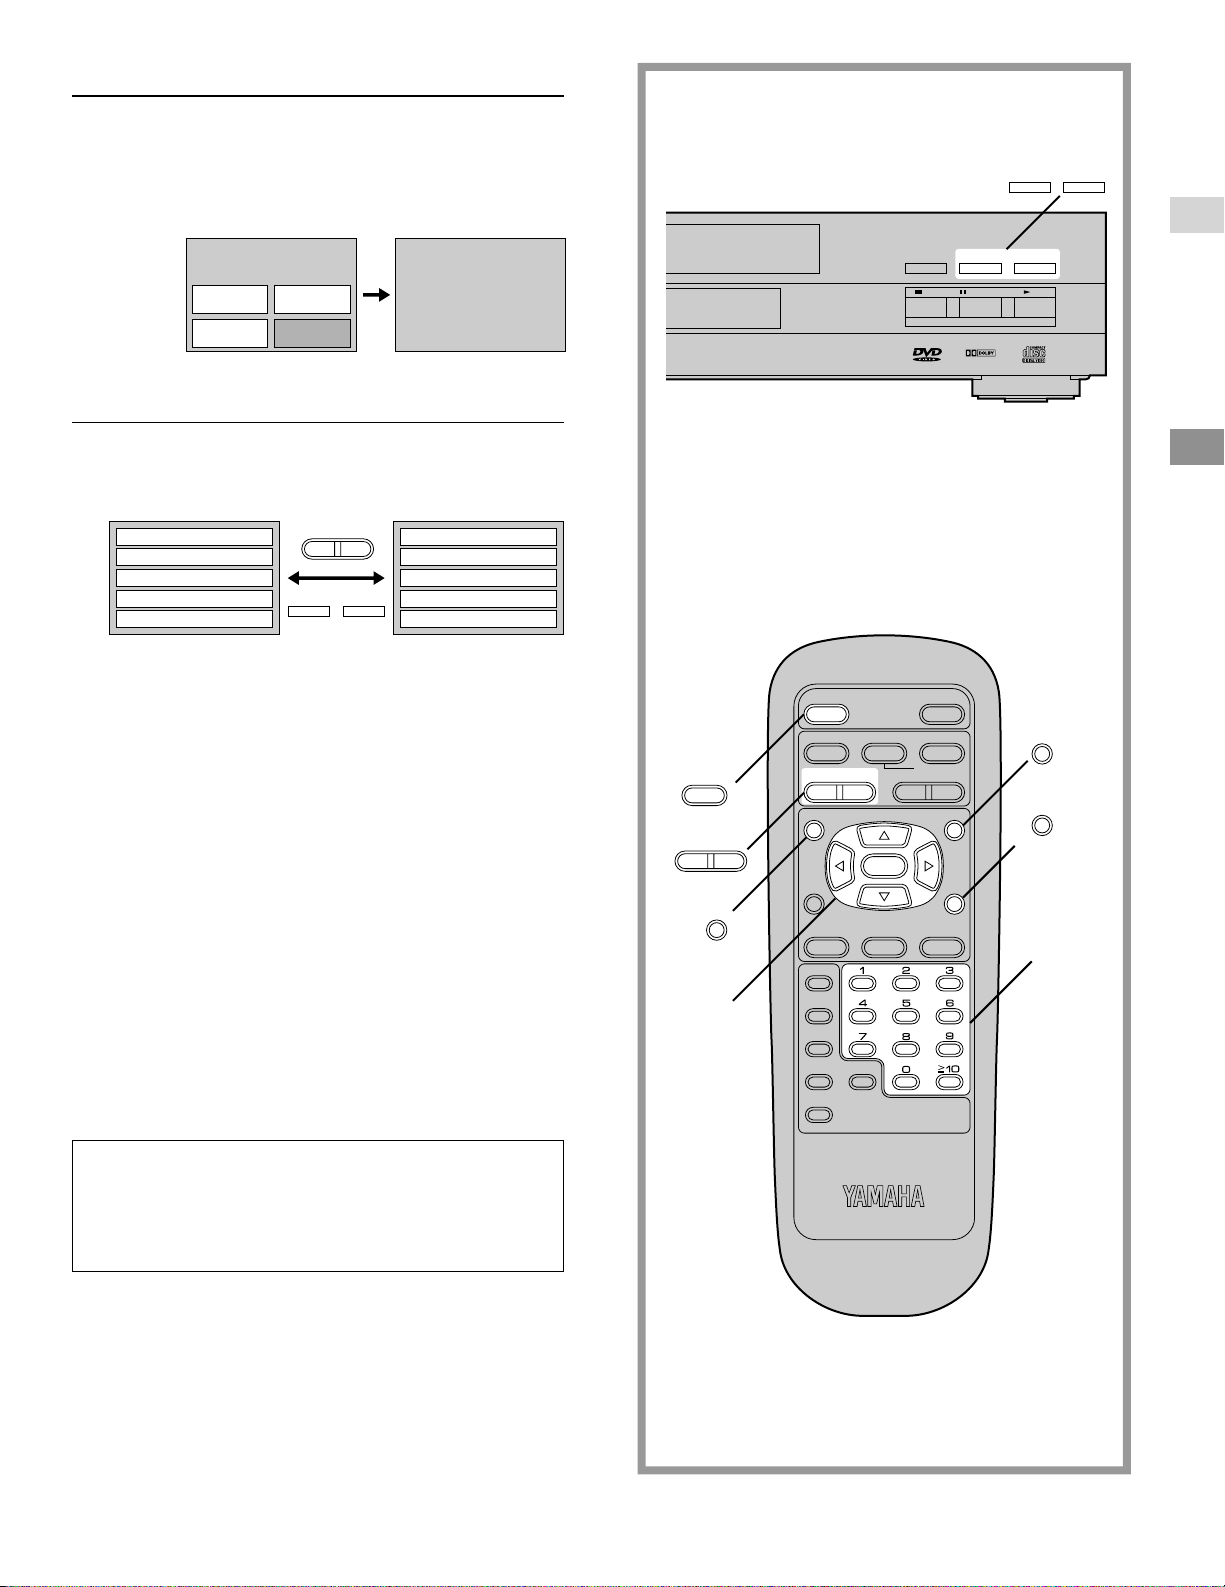
Basic play
5
Press C/D/A/B and press SELECT, or
press the numeric button(s), to select the
preferred item.
ÁC/D/A/B are not effective for selecting items for
Video CDs.
:
SKIP
;
TITLE MENU
Birds
Dogs
Lovers
Play of the selected item now begins.
When the menu continues onto another screen
After step 4 on page 14, press SKIP I. (SKIP buttons may
not be effective depending on the disc.)
1 EAST ASIA
2 SOUTH ASIA
3 MIDDLE EAST
4 AFRICA
5 EUROPE
ÁTo return to the previous menu screen
Press H SKIP.
ÁFor operation, refer also to the jacket of the disc concerned.
Stopping play and returning to the menu
screen
ÁDVD
Press TITLE, MENU or RETURN.
(Which button is pressed differs depending on the disc
used.)
ÁVideo CD
Press RETURN.
ÁPlay is suspended, and the menu screen is displayed.
After operation
When the unit is not in use, remove the disc and press
POWER to switch the power to the standby mode.
The power will automatically be switched to the standby
mode after 30 minutes or so have elapsed in the stop mode.
(Auto turn-off function)
Castles
Birds
H
SKIP I
:
SKIP
of the world
6 OCEANIA
7 NORTH AMERICA
CENTRAL AMERICA
8
;
9 SOUTH AMERICA
10 ANTARCTIC
/ CD
H
POWER
SKIP
5
TITLE
f OPEN/CLOSE
POWER
*/ I
@
STOP
g
STILL/PAUSE
SLOW/
I F
SELECT
SEARCH
H
*/ I
I
SKIP
TITLE
ON SCREEN RETURN
SUBTITLE
MARKER
PLAY MODE
REPEAT
A-B CLEAR
SET UP
:
SKIP
;
STOP STILL/PAUSE PLAY
D I G I T A L
OPEN/CLOSE
D
PLAY
G
MENU
RETURN
ANGLEAUDIO
DVD
MENU
5
What is playback control?
If a Video CD has “playback control” written on its disc
or jacket, it means that particular scenes or information
can be selected for viewing interactively with the TV
monitor using the menu screen.
15
 Loading...