

Page 1

GUITAR/BASS AUTO TUNER
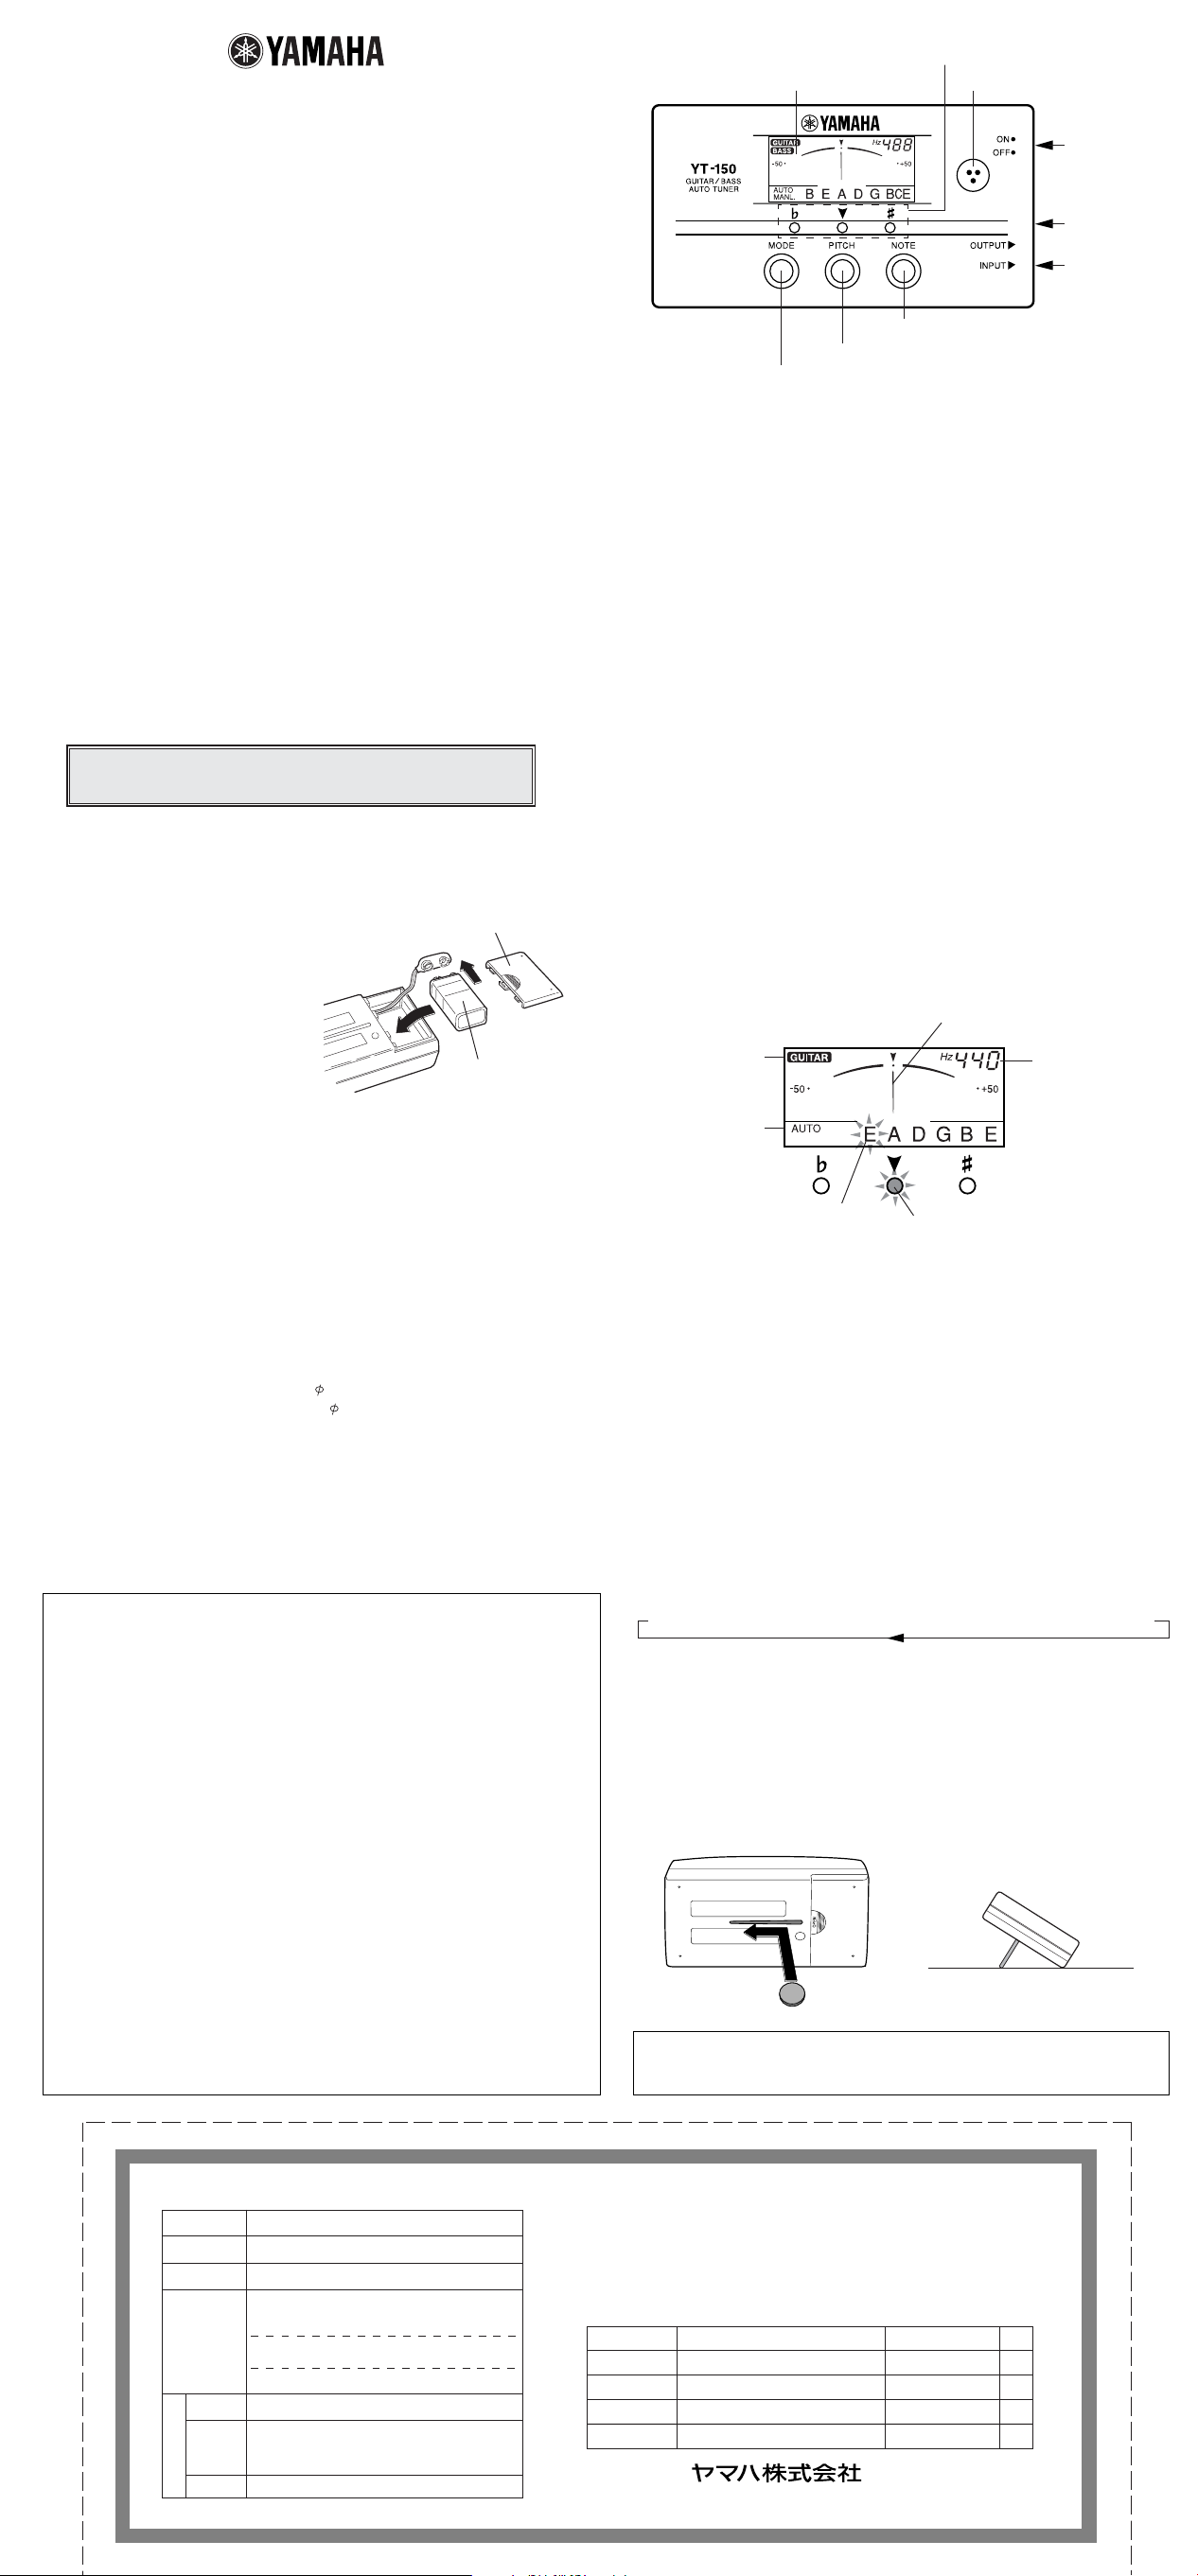
■ 各部の名称
q液晶インジケーター
wチューニングガイド
y内蔵マイクロホン
YT-150
YT-150
取扱説明書
このたびはヤマハ・ギター/ベースオートチューナーYT-150をお買い求めいた
だき、まことにありがとうございます。
お使いになる前に、この取扱説明書をよくお読みになり、正しくご使用ください。
また、お読みになった後は、保証書と共に大切に保管してください。
安全へのこころがけ
火災・感電・人身傷害の危険を防止するには
〜以下の指示を必ず守ってください〜
絵表示に
ついて
■ ご使用になる前に
◆使用する場所
故障の原因となりますので、次のような場
所でご使用にならないでください。
・ 直射日光の当たる場所
・ 温度や湿度が非常に高い場所や低い場所
・ 砂やホコリの多い場所
◆電池について
・ YT-150は、6F22(006P)乾電池で
作動します。
・ご使用にならない時は、必ず電源ス
イッチをOFFにしておいてください。
また、電池の液漏れを防ぐため、長時
間ご使用にならない場合は、電池を取
り出しておいてください。
・ 電池が切れたままで長時間放置します
と、電池の液漏れなど、故障の原因と
なります。お早めに電池交換してくだ
さい。
◆取り扱いはやさしく
スイッチや本体に無理に力を加えたり、本
体を落としたりしますと、故障の原因とな
ります。ご注意ください。
■仕様
表示 : 液晶インジケーター、チューニングガイド(3点LED)
弦名 : ギター E,A,D,G,B,E
調律範囲 : A0(27Hz)〜C8(4186Hz)
調律精度 : ±1セント
ジャストチューン範囲 : ±3セント
基準ピッチ範囲 : A4=435〜446Hz(1Hzステップ)
入力 : INPUT端子(6φモノラル)、内蔵マイクロホン
出力 : OUTPUT端子(6φモノラル)
電源 : 6F22(006P)9V乾電池×1個
電池寿命 : 約50時間(AUTOモード時)
外形寸法 : 118(W)×63(H)×24.5(D)mm
重量(本体) : 130g(乾電池含む)
付属品 : 6F229V乾電池×1個
この「安全へのこころがけ」は製品を安全に正しくお使いいただき、
お客様や他の人々への危害や財産への損害を未然に防止するため
に、いろいろな絵表示を使って説明しています。
絵表示の意味をよく理解してから、本文をお読みください。
注意(危険・警告を含む)を促す内容があることを告げるものです。
禁止の行為を告げるものです。
この表示を無視して誤った取
警告
この機器を使用する前に、以下の指示と取扱説
明書をよく読んでください。
この機器を分解したり、改造したりしないでく
ださい。火災、感電の原因となります。
修理/部品の交換などで、取扱説明書に書かれ
ている以外のことは、絶対にしないでください。
必ずサービスセンターに相談してください。
次のような場所での使用や保存はしないでくだ
さい。火災、感電の原因となります。
・ 温度が極端に高い場所(直射日光の当たる場
所、暖房機器の近く、発熱する機器の上など)
・ 水気の近く(風呂場、洗面台、濡れた床など)
や湿度の高い場所
・ ホコリの多い場所
・ 振動の多い場所
※ 特に自動車内は直射日光などにより非常に
高温となります。この機器を車内に放置し
ないでください。
この機器に、異物(燃えやすいもの、硬貨、針金な
ど)や液体(水やジュースなど)を絶対に入れな
いでください。火災、感電の原因となります。
ぐらついた台の上や傾いた所など、不安定な場
所に置かないでください。また、過度に積み重
ねての使用はしないでください。落ちたり倒れ
たりして、けがの原因となります。
扱いをすると、人が死亡又は
重傷を負う危険の恐れがある
内容を示しています。
例: → 分解禁止
注意
この表示を無視して誤った取扱い
をすると、人が障害を負ったり、
財産が損害を受ける危険の恐れが
ある内容を示しています。
この機器は、正常な通気が妨
げられることのない所に設
定して、使用してください。
使用後の電池は火中に捨て
ないでください。発熱、破
裂、発火の原因となりま
す。一般のゴミとは分け
て、決められた場所に捨て
ましょう。
電池は表示された極性
(+、−)を間違えないよう
にしてください。間違えま
すと電池の破裂や液もれに
よって、けがや周囲を汚損
する原因となることがあり
ます。
本体を、故意に投げたり落
としたりしないでくださ
い。本体の故障だけでな
く、思わぬけがの原因とな
ることがあります。
電池は幼児の手の届かない
場所に保管してください。
◆お手入れ
外装のお手入れの際は、必ず柔らかい布で
乾拭きしてください。ベンジンやシンナー
系の液体、強燃性のポリッシャーなどは絶
対にご使用にならないでください。
◆保証書の手続き
製品をお買上げいただいた日より1年間は
保証期間となり、修理料金は無償とさせ
ていただきます。ただし、保証書に販売
店印、購入年月日の記入がない場合は、
保証期間中でもサービスが有償となるこ
とがあります。必ずお求めになった販売
店で保証書の手続きを行なった後、大切
に保管してください。
◆取扱説明書は大切に
この取扱説明書をお読みになった後は、
大切に保管してください。
ご使用済みの電池は、火の中
に入れないでください。
また、電池は幼児の手の届か
ない所に保管してください。
ベース B,E,A,D,G,C
※仕様および外観は、改良のため予告なく変更することがあります。
u POWER
スイッチ
MIC
i OUTPUT
ジャック
o INPUT
ジャック
tNOTEスイッチ
rPITCHスイッチ
eMODEスイッチ
■ チューニングの方法
●オートチューニング:AUTO
弾いた弦に一番近い音の音名(弦名)と、その音に対して高いか低いかを自動的に表示します。
1. エレキギター/ベースの場合は、INPUTジャックoにギターからのコードを接続し
ます。(この時、OUTPUTジャック
ON/OFFに関わらずギターの信号はアンプに送られます。ただし、ノイズの原因とな
りますので、演奏中は本機の電源を切っておいてください。)
※ INPUTジャック
しません。
2. POWERスイッチ
液晶インジケーター
れ、その後自動的にオートチューニングのモードになります。(液晶インジケーター
oにプラグが接続されている時には、内蔵マイクロホンyは作動
uをONにします。
qに基準ピッチ(初期設定はA4=440Hz)が約2秒間点滅表示さ
iとアンプを接続しておけば、本機の電源の
qのGUITARとAUTOが点灯します)
3. 基準ピッチを変更する場合は、PITCHスイッチ
の設定の項参照)
4. チューニングする楽器に合わせて、MODEスイッチ
rにより設定します。(基準ピッチ
eを押して液晶インジケーター
qにGUITARまたはBASSを表示させます。
5. アコースティックギターをチューニングする場合は、ギターのサウンドホールに内蔵
マイクロホン
6. チューニングしたい弦を弾きます(単音で鳴らします)。
液晶インジケーター
チューニングします。
6-1. まず、弾いた弦の弦名が点滅するようにおおまかにチューニングします。
6-2. 次に、針表示が中央を差し、チューニングガイド
細かくチューニングしたら完了です。
yをできるだけ近付けます。
qの弦名、針表示およびチューニングガイドwを見ながら楽器を
wの緑のLEDが点灯するように
例)ギターの6弦(E)をオートチューニングする場合
針表示が中央を差すように
GUITARを表示させる
AUTOを表示させる
弾いた弦の弦名が
点滅するように
このLEDが点灯したら
チューニングOK
基準ピッチを表示
●マニュアルチューニング:MANL.
自分で音名(弦名)を選んでおいてチューニングします。
1. オートチューニングの手順1〜5と同様の設定をします。
2. チューニングしたい音名(弦名)が点滅するまで、NOTEスイッチ
マニュアルチューニングのモードになり、液晶インジケーター
と表示されます。
3. オートチューニングの手順5と同様に、チューニングしたい弦を弾き、チューニング
をします。
4. 別の弦をチューニングする場合は、上記手順2,3を繰り返します。
tを数回押します。
qの左下部にMANL.
■ 基準ピッチの設定
1. POWERスイッチuをONにします。ピッチは440Hzにセットされます。(点滅表示)
2. PITCHスイッチ
ます。
rを繰り返し押して、希望する基準ピッチ(435〜446Hz)に設定し
435→436→437→438→439→440→441→442→443→444→445→446
3. PITCHスイッチ
ります。
※ POWERスイッチ
■ 電池交換
電池が消耗してくると、液晶インジケーター
が暗くなってきます。電池が消耗したままだ
と、誤動作する場合があります。お早めに新
しい電池(6F22,006P9V乾電池)と交換し
てください。
※ 電池の交換は、必ずPOWERスイッチ
OFFにしてから行ってください。
※ 電池の極性(+,−)を間違えないように注
意してください。
rを押す操作を止めた後、約2秒後に自動的にチューニングモードへ戻
uをOFFにすると、ピッチ設定は440Hzにリセットされます。
電池カバー
裏面
uを
6F22,006P
9V乾電池
■ チルトスリットの使い方
本体裏側のスリットは、チューナーを傾けて使うためのものです。下図のようにスリット
にコインなどをセットしてお使いください。
■保証とアフターサービス
● 保証書
保証書は、販売店にて「販売店印、お買い上げ
年月日」の押印、記入をしてお渡し致しますの
で、お買い上げの際にご確認の上、大切に保
管ください。
● 保証期間
お買い上げ日から1年間です。
● 保証期間中の修理
保証書記載内容に基づいて修理いたします。
詳しくは保証書をご覧ください。
● 保証期間経過後の修理について
修理可能な部分は、ご要望により有料にて修
理させて頂きます。但し、修理料金の金額や
補修部品の保有期間の都合により、相当品の
代替購入をおすすめする場合もございます。
弦打楽器事業部 国内営業部 ギタードラム営業課
〒430-8650 静岡県浜松市中沢町10番1号
TEL053-460-2433
ヤマハ電気音響製品アフターサービス拠点
[修理受付および修理品お預り窓口]
北海道サービスセンター 〒064-8543 札幌市中央区南1 0条西1丁目1-50ヤマハセンター内 TEL(011)512-6108
仙台サービスセンター 〒984-0015 仙台市若林区卸町5-7仙台卸商共同配送センター3F TEL(022)236-0249
首都圏サービスセンター 〒211-0025 川崎市中原区木月1184 TEL(044)434-3100
浜松サービスセンター 〒435-0048 浜松市上西町911 ヤマハ(株)宮竹工場内 TEL(053)465-6711
名古屋サービスセンター 〒454-0058 名古屋市中川区玉川町 2-1-2ヤマハ(株)名古屋流通センター3F TEL(052)652-2230
大阪サービスセンター 〒565-0803 吹田市新芦屋下1-16ヤマハ(株)千里丘センター内 TEL(06)6877-5262
四国サービスステーション 〒760-0029 高松市丸亀町8-7ヤマハミュージック神戸高松店内 TEL(087)822-3045
広島サービスセンター 〒731-0113 広島市安佐南区西原6-14-14 TEL(082)874-3787
九州サービスセンター 〒812-8508 福岡市博多区博多駅前2-11-4 TEL(092)472-2134
[本社]カスタマーサービス部 〒435-0048 浜松市上西町911ヤマハ(株)宮竹工場内 TEL(053)465-1158
ヤマハ株式会社各事業所/営業所(商品に関する問い合わせ先)
弦打楽器国内営業部 〒430-8650 浜松市中沢町10番1号 TEL(053)460-2433
EM東京事業所 〒108-8568 東京都港区高輪2-17-11 TEL(03)5488-5476
EM北海道営業所 〒064-8543 札幌市中央区南10条西1丁目1-50 ヤマハセンター内 TEL(011)512-6113
EM仙台営業所 〒980-0804 仙台市青葉区大町2-2-10 TEL(022)222-6147
EM関東営業所 〒108-8568 東京都港区高輪2-17-11 TEL(03)5488-5447
EM大阪事業所 〒542-0081 大阪市中央区南船場3-12-9 心斎橋プラザビル東館 TEL(06)6252-5231
EM名古屋営業所 〒460-8588 名古屋市中区錦1-18-28 TEL(052)201-5199
EM広島営業所 〒730-8628 広島市中区紙屋町1-1-18 ヤマハビル TEL(082)244-3749
EM九州営業所 〒812-8508 福岡市博多区博多駅前2-11-4 TEL(092)472-2130
※住所及び電話番号は変更になる場合があります。
Page 2
GUITAR/BASS AUTO TUNER
YT-150
YT-150
OWNER’S MANUAL
Thank you for purchasing the YAMAHA YT-150 Guitar/Bass
Auto Tuner.
Please read this manual thoroughly and keep it in a safe place for
future reference.
■ COMPONENTS
q LCD indicator
e MODE switch
w Tuning guide
y Built-in microphone
u POWER
switch
MIC
i OUTPUT
jack
o INPUT
jack
t NOTE switch
r PITCH switch
■ PRECAUTIONS
◆ To prevent damage, do not use the tuner in the following locations:
• places where the unit will be in direct sunlight;
• places subject to temperature and humidity extremes;
• places that are sandy or dusty.
◆ To power the tuner, use only a 6F22 or 006P 9V dry cell battery.
◆ For maximum battery life, always be sure the tuner is turned OFF when not in
use.
◆ If an exhausted battery is left in the unit for an extended period of time, it may
leak and cause malfunctioning of the unit. When the battery becomes
exhausted, always remove it and replace it as soon as possible.
◆ Do not subject the tuner to strong physical shock or vibration. Do not use
excessive force on any of the controls.
◆ Never use solvents such as benzene or thinner to clean the tuner. Wipe clean
with a soft, dry cloth.
◆ After reading the owner's manual, keep it in a safe place for future reference.
Never dispose of used batteries by burning them.
Also make sure to keep batteries away from children.
■ BATTERY REPLACEMENT
When battery power runs down, the
LCD indicator will grow dim.
Continued use of the tuner may result in
inaccurate operation. Replace the
battery with a new one (6F22 or 006P
Bottom
side
9V dry cell battery) as soon as possible.
The battery compartment is in the rear
of the tuner. Remove the old battery
and replace it with a new one of the
same type. Be careful to connect the
battery in the correct polarity.
* Always turn the POWER switch u to “OFF” before changing the battery.
Battery cover
6F22 or 006P
9V dry cell battery
■ TUNING PROCEDURES
● Auto Tuning : AUTO
The tuner will automatically select the closest note name (string name) to the
plucked string’s pitch.
1. For electric guitars/basses, connect the guitar cable to the INPUT jack o.
(The OUTPUT jack i can also be connected to an amplifier. The guitar’s
signal will be sent to the amp whether the tuner’s power is switched ON or
OFF. However, it might result in added noise to the line so you should
switch the tuner’s power OFF during performance.)
* The built-in microphone y will not operate when a cable is plugged into the
INPUT jack o.
2. Turn the POWER switch u ON.
The standard pitch (factory preset A=440Hz) will flash on LCD indicator q
for about 2 seconds. After that, the tuner will enter the auto tuning mode
(GUITAR and AUTO will appear on the LCD indicator q).
3. Use the PITCH switch r to change the standard pitch. (Refer to the
“Setting the Standard Pitch” section below.)
4. Press the MODE switch e to select the instrument to be tuned. GUITAR or
BASS will appear on the LCD indicator q.
5. To tune an acoustic guitar, place the tuner’s internal microphone y as
close as possible to the guitar’s sound hole.
6. Pluck the string to be tuned. (Do not pluck more than one string at a time.)
The appropriate string name will appear on the LCD indicator q. Use the
needle and the tuning guide w as a reference while tuning the instrument.
6-1. First, adjust the string so that the appropriate string name indicator
flashes.
6-2. Next, tune the string until the needle rests in the middle and the green
LED of the tuning guide w lights.
example) To tune the “E” string on a six string guitar.
Tune until needle comes to
rest in the center.
Select GUITAR on
the LCD indicator.
Select the AUTO
mode.
Standard Pitch is
displayed.
■ SPECIFICATIONS
Indicators : Liquid crystal display, Tuning guides
Tuning Notes : GUITAR E, A, D, G, B, E
Note Setting Range : A0 (27Hz) – C8 (4186Hz)
Accuracy : ±1 cent
In Pitch Accuracy : ± 3 cent
Standard Pitch Setting Range : A4=435 – 446Hz (1Hz steps)
Input : INPUT (6
Output : OUTPUT (6
Power Source : 9V dry cell battery (006P or 6F22)
Battery Life : Approximately 50 hrs. (AUTO mode)
Dimensions (W x H x D) : 118 x 63 x 24.5 mm (4.6" x 2.5" x 1.0")
Weight (including battery) : 130 g (4.6 oz)
Accessory : 9V dry cell battery (6F22) x 1
* Specifications and external appearance are subject to change without notice.
1.IMPORTANT NOTICE: DO NOT MODIFY THIS UNIT!
This product, when installed as indicated in the instructions contained in this manual,
meets FCC requirements. Modifications not expressly approved by Yamaha may void
your authority, granted by the FCC, to use the product.
2.IMPORTANT: When connecting this product to accessories and/or another product
use only high quality shielded cables. Cable/s supplied with this product MUST be used.
Follow all installation instructions. Failure to follow instructions could void your FCC
authorization to use this product in the USA.
3.NOTE: This product has been tested and found to comply with the requirements listed
in FCC Regulations, Part 15 for Class ”B” digital devices. Compliance with these requirements provides a reasonable level of assurance that your use of this product in a
residential environment will not result in harmful interference with other electronic devices. This equipment generates/uses radio frequencies and, if not installed and used
according to the instructions found in the users manual, may cause interference harmful
to the operation of other electronic devices. Compliance with FCC regulations does not
guarantee that interference will not occur in all installations. If this product is found to
be the source of interference, which can be determined by turning the unit ”OFF” and
”ON”, please try to eliminate the problem by using one of the following measures:
Relocate either this product or the device that is being affected by the interference.
Utilize power outlets that are on different branch (circuit breaker or fuse) circuits or
install AC line filter/s.
In the case of radio or TV interference, relocate/reorient the antenna. If the antenna
lead-in is 300 ohm ribbon lead, change the lead-in to co-axial type cable.
If these corrective measures do not produce satisfactory results, please contact the
local retailer authorized to distribute this type of product. If you can not locate the
appropriate, please contact Yamaha Corporation of America, Electronic Service Division, 6600 Orangethorpe Ave, Buena Park, CA 90620
The above statements apply ONLY to those products distributed by Yamaha
Corporations of America or its subsidiaries.
BASS B, E, A, D, G, C
monaural), microphone
monaural)
FCC INFORMATION (U.S.A.)
The string name of the
plucked string flashes.
When this LED lights,
the string is tuned.
● Manual Tuning : MANL.
Each note must be selected individually as needed.
1. Carry out the same settings as described in steps 1 through 5 of the Auto
Tuning section.
2. Continue to press the NOTE switch t until the desired note name (string
name) flashes. The tuner is now in the manual mode, MANL. appears in
the bottom left hand corner of the LCD display q.
3. As in step 5 of the Auto Tuning section, pluck the string to be tuned and
proceed to tune the string.
4. Repeat steps 2 and 3 to tune other strings.
■ SETTING THE STANDARD PITCH
1. Turn the POWER switch u ON. The pitch is set to 440 Hz (flashing
display).
2. Continuously press the PITCH switch r until the desired standard pitch
(435 – 446Hz) is selected.
435→436→ 437→438→ 439→440→ 441→442→ 443→444→ 445→ 446
3. When the PITCH switch r has not been pressed for about 2 seconds, the
tuner will automatically return to the tuning mode.
* When the POWER switch u is turned OFF, the standard pitch setting will be
reset to A=440Hz.
■ TILT SLIT
The tuner can be tilted back by using the slit in the rear panel. Insert a coin or
similar flat object into the slit and tilt back as shown in the diagram below.
THIS DIGITAL APPARATUS DOES NOT EXCEED THE “CLASS B” LIMITS FOR RADIO
NOISE EMISSIONS FROM DIGITAL APPARATUS SET OUT IN THE RADIO INTERFERENCE REGULATION OF THE CANADIAN DEPARTMENT OF COMMUNICATIONS.
持込修理
品名/品番
保証期間
※お買上げ日
お客様
店名
※
販
住所
売
店
電話
ギター/ベースオートチューナー/YT-150
本体:お買上げの日から1ヶ年間
年 月 日
ご住所 〒
お名前 様
電 話 ( )
印
()
ご販売店様へ ※印欄は必ずご記入してお渡しください。
保証書
この度はヤマハ・ギター/ベースオートチューナーをお買上げ戴きまして
ありがとうございました。
本書は、本書記載内容で修理を行なう事をお約束するものです。お買上げ
の日から左記期間中に故障が発生した場合は、本書をご提示の上お買上げ
の販売店に修理をご依頼ください。(詳細は裏面をご覧ください)
修理(サービス)メモ
内 容年 月 日 印
〒430-8650 静岡県浜松市中沢町10番1号
担 当 者
弦打楽器事業部 国内営業部
ギタードラム営業課
TEL053-460-2433
Page 3

ACCORDEUR AUTOMATIQUE DE GUITARE/BASSE
■ ORGANES
q Afficheur à cristaux
liquides
w Guide d’accord
y Microphone incorporé
YT-150
YT-150
MODE D’EMPLOI
Nous vous remercions d’avoir porté votre choix sur l’accordeur
automatique de guitare/basse YAMAHA YT-150.
Nous vous prions de lire attentivement ce mode d’emploi et de le
conserver en lieu sûr pour vous y reporter ultérieurement.
■ PRECAUTIONS
◆ Afin de ne pas endommager l’accordeur, évitez de l’utiliser dans des endroits
répondant aux conditions suivantes :
• plein soleil
• humidité ou températures excessives.
• sable ou poussière
◆ Pour alimenter l’accordeur, utilisez exclusivement une pile sèche 6F22 ou
006P de 9 Volts.
◆ Pour garantir une longévité maximale des piles, mettez toujours l’accordeur
hors tension lorsque vous ne l’utilisez pas.
◆ Les piles épuisées qui restent dans l’accordeur pendant une longue période,
peuvent fuir et provoquer des anomalies de fonctionnement. Lorsque les
piles présentent des signes de décharge, remplacez-les dans le délai le plus
bref.
◆ L’accordeur ne doit pas subir de chocs ni de vibrations importants. Ne le
manipulez jamais avec une force excessive.
◆ N’utilisez jamais de solvants tels que de la benzine ou du diluant pour
nettoyer l’accordeur. Essuyez-le avec un chiffon doux et sec.
◆ Après avoir lu ce mode d’emploi, conservez-le en lieu sûr pour vous y reporter
ultérieurement.
Ne jetez jamais les piles au feu et conservez-les
toujours hors de portée des enfants.
■ REMPLACEMENT DE LA PILE
Lorsque la puissance de la pile devient
insuffisante, l’afficheur à cristaux
liquides s’assombrit.
Le fait de continuer à utiliser l’accordeur
dans ces conditions risque de ne pas
permettre de fournir une indication
précise. Remplacer la pile par une pile
sèche neuve (6F22 ou 006P 9 V) dans
les meilleurs délais.
Le logement de la pile est situé au dos
de l’accordeur. Retirer la pile usée et
la remplacer par une pile neuve du
même type. Faire très attention de placer la pile en respectant les polarités.
* Toujours mettre l’interrupteur POWER u sur la position “OFF” avant de
remplacer la pile.
Dos de
l’accordeur
Couvercle du
logement des piles
Pile 6F22 ou 006P
de 9 Volts
■ FICHE TECHNIQUE
Indicateurs et témoins : Afficheur à cristaux liquides, guide d’accord (à 3
Notes d’accord : guitare E, A, D, G, B, E
Plage de réglage de note : A0 (27Hz) - C8 (4186Hz)
Précision : ± 1 centième
Précision de hauteur : ± 3 centièmes
Plage de réglage de hauteur standard
Entrée : INPUT (6
Sortie : OUTPUT (6
Source d’alimentation : Pile sèche de 9V (006P ou 6F22)
Autonomie des piles : 50 heures environ. (Mode AUTO)
Dimensions (L x H x P) : 118 x 63 x 24,5 mm
Poids (piles incluses) : 130 g
Accessoires : Pile sèche de 9V (6F22) x 1
* Les spécifications et l’aspect externe peuvent être modifiés sans aucun avis.
diodes électroluminescentes)
basse B, E, A, D, G, C
: A4=435 - 446Hz (par incréments d’1 Hz)
monaurale), microphone
monaurale)
u Interrupteur
d’alimentation
MIC
POWER
i Mini-prise de
sortie OUTPUT
o Mini-prise
d’entrée INPUT
t Commutateur de note NOTE
r Commutateur de hauteur PITCH
e Commutateur de mode MODE
■ MÉTHODES D’ACCORD
● Accord automatique : AUTO
L’accordeur sélectionnera automatiquement le nom de la note (le nom de la
corde) le plus proche de la tonalité de la corde pincée.
1. Avec les guitares électriques ou basses, raccorder le câble de guitare à la
mini-prise INPUT o.
(Il est également possible de raccorder la mini-prise OUTPUT i à un
amplificateur. Que l’alimentation de l’accordeur soit appliquée ou non avec
l’interrupteur d’alimentation, le signal de la guitare sera envoyé à
l’amplificateur. Cependant, cela risque de perturber la ligne en la parasitant
quelque peu de sorte qu’il est préférable de couper l’alimentation de
l’accordeur pendant que cette opération se déroule.)
* Le microphone incorporé y est automatiquement asservi dès que la prise d’un
câble est raccordée à la mini-prise INPUT o.
2.
Mettre l’accordeur sous tension avec l’interrupteur d’alimentation POWER u.
La hauteur standard du son (dont le préréglage a été fait sur A = 440 Hz en
usine) apparaîtra en clignotant dans l’afficheur à cristaux liquides q
pendant 2 secondes environ. Ensuite, l’accordeur se commutera en mode
d’accord automatique (GUITAR et AUTO apparaîtront dans l’afficheur à
cristaux liquides q).
3. Se servir du commutateur PITCH r pour changer la hauteur standard.
(Reportez-vous à la description intitulée “Réglage de la hauteur de
standard” ci-après.)
4. Appuyer sur le commutateur MODE e pour choisir l’instrument à accorder.
GUITAR ou BASS apparaîtront dans l’afficheur à cristaux liquides q.
5. Pour accorder une guitare acoustique, placer le microphone interne de
l’accordeur y le plus près possible de la bouche de la guitare.
6. Pincer la corde qui doit être accordée. (Ne pas pincer plus d’une corde à la
fois.) La corde appropriée apparaîtra dans l’afficheur à cristaux liquides q.
Utiliser en même temps l’aiguille et le guide d’accord w comme moyen de
référence tout en accordant l’instrument.
6-1. Régler tout d’abord la corde pour faire en sorte que l’indicateur du nom
de la corde appropriée clignote.
6-2. Ensuite, accorder la corde jusqu’à ce que l’aiguille se stabilise en position
centrale et que la diode électroluminescente verte du guide d’accord w
s’allume.
Exemple) Comment accorder la corde de mi d’une guitare à six cordes.
Accorder jusqu’à ce que l’aiguille se
stabilise en position centrale.
Choisir l’indication
GUITAR dans
l’afficheur à
cristaux liquides.
Choisir le mode
AUTO.
Le nom de la corde
pincée clignote.
La corde est accordée dès que la
diode électroluminescente s’allume.
● Accord manuel : MANL.
Chaque note doit être choisie individuellement à chaque fois que c’est
nécessaire.
1. Effectuer les mêmes réglages que ceux qui sont mentionnés aux étapes 1
à 5 ci-dessus du passage consacré au procédé d’accord automatique.
2. Maintenir le commutateur NOTE t enfoncé jusqu’à ce que le nom de la note
que l’on veut obtenir (nom de la corde) clignote. L’accordeur se trouve
maintenant en mode d’accord manuel et MANL. apparaît dans le coin
inférieur gauche de l’afficheur à cristaux liquides t.
3. Comme au cours de l’étape 5 du passage consacré au procédé d’accord
automatique, pincer la corde qui doit être accordée et faire en sorte que la
corde soit accordée.
4. Refaire les étapes 2 et 3 pour accorder les autres cordes.
La hauteur
standard est
affichée.
■ FENTE D’INCLINAISON
L’accordeur peut être maintenu incliné en utilisant la fente du panneau arrière.
Introduire une pièce de monnaie, ou autre objet plat similaire, dans la fente et
incliner l’accordeur de la manière illustrée.
LE PRESENT APPAREIL NUMERIQUE N'EMET PAS DE BRUITS
RADIOELECTRIQUES DEPASSANT LES LIMITES APPLICABLES AUX
APPAREILS NUMERIQUES DE LA "CLASSE B" PRESCRITES DANS LE
REGLEMENT SUR LE BROUILLAGE RADIOELECTRIQUE EDICTE PAR LE
MINISTERE DES COMMUNICATIONS DU CANADA.
■ RÉGLAGE DE LA HAUTEUR STANDARD
1. Mettre l’accordeur sous tension avec l’interrupteur d’alimentation POWER
u. La hauteur est calée sur 440 Hz (l’afficheur clignote).
2. Maintenir le commutateur PITCH r enfoncé jusqu’à ce que la hauteur
standard désirée soit otenue (435 – 446 Hz).
435→436→ 437→438→ 439→440→ 441→442→ 443→ 444→445→ 446
3. Si le commutateur PITCH r est laissé ainsi sans être enfoncé pendant 2
secondes environ, l’accordeur reviendra automatiquement en mode
d’accord.
* Lorsque l’alimentation de l’accordeur est coupée avec l’interrupteur
d’alimentation POWER u, la hauteur standard est ramenée sur A = 440 Hz.
Page 4

ELEKTRONISCHES GITARREN/BASS- STIMMGERÄT
■ BAUTEILE
q Display
w Stimmanzeige
y Eingebautes Mikrofon
YT-150
YT-150
BEDIENUNGSANLEITUNG
Vielen Dank für den Kauf des elektronischen Gitarren/Baß-
Stimmgeräts YT-150 von YAMAHA.
Lesen Sie diese Anleitung bitte aufmerksam durch, und bewahren
Sie sie dann zur späteren Bezugnahme gut auf.
■ VORSICHTSMASSREGELN
◆ Verwenden Sie das Stimmgerät nicht an Orten, wo es den folgenden
schädlichen Einflüssen ausgesetzt ist:
• Direktes Sonnenlicht
• Extreme Temperatur- und Luftfeuchtigkeitswerte
• Sand und Staub
◆ Verwenden Sie als Stromquelle ausschließlich 9V-Trockenbatteriezellen vom
Typ 6F22 oder 006P.
◆ Schalten Sie das Stimmgerät nach Gebrauch stets aus, um die Batterien zu
schonen.
◆ Wenn verbrauchte Batterien längere Zeit im Gerät verbleiben, können sie
auslaufen und Schäden verursachen. Wenn die Batterien schwächer
werden, sollten Sie sie daher entnehmen und so bald wie möglich durch neue
ersetzen.
◆ Schützen Sie das Stimmgerät vor starken Schlägen und Erschütterungen.
Wenden Sie beim Betätigen der Bedienelemente nicht zu viel Kraft auf.
◆ Verwenden Sie zum Säubern des Stimmgeräts keine Lösungsmittel wie
Benzin oder Verdünner. Entfernen Sie Staub und Schmutz mit einem
weichen, trockenen Tuch.
◆ Bewahren Sie diese Anleitung nach dem Durchlesen gut auf.
Achten Sie bitte auf korrekte Entsorgung verbrauchter
Batterien. Batterien dürfen nicht verbrannt werden!
Achten Sie bitte auch darauf, daß Batterien nicht in
Kinderhände geraten.
■ BATTERIEWECHSEL
Wenn die Batterie erschöpft ist, sind die
Anzeigen des Flüssigkristall-Displays
schwächer als gewöhnlich.
Falls das Stimmgerät in diesem
Zustand weiterbenutzt wird, kann es
ungenau arbeiten. Ersetzen Sie die
Batterie (9-V-Trockenbatterie vom Typ
6F22 oder 006P) daher so bald wie
möglich durch eine neue.
Das Batteriefach befindet sich auf der
Rückseite. Die alte Batterie durch eine
neue des gleichen Typs austauschen.
Beim Anschließen der Batterie auf korrekte Polung achten.
* Vor dem Wechseln der Batterie den Betriebs-schalter u unbedingt auf OFF
stellen.
Unterseite
Batteriefachdeckel
Batterie 6F22
oder 006P, 9V
u Ein/Aus-
Schalter
MIC
(POWER)
i Ausgangsbuchse
(OUTPUT)
o Eingangsbuchse
(INPUT)
t Tonwahlschalter (NOTE)
r Tonhöhenschalter (PITCH)
e Modusschalter (MODE)
■ STIMMVORGANG
● Automatisches Stimmen: AUTO
Das Stimmgerät wählt automatisch den Ton, der dem Ton der gezupften Saite
am nächsten kommt.
1. Eine elektrische Gitarre/Baßgitarre wird mit dem Gitarrenkabel an die
INPUT-Buchse o angeschlossen. (An der OUTPUT-Buchse o kann ein
Verstärker angeschlossen werden. Das Gitarrensignal wird bei ein- und
ausgeschaltetem Stimmgerät an den Verstärker weitergeleitet. Bei
eingeschaltetem Stimmgerät können jedoch Rauscheinstreuungen
auftreten, weshalb dieses beim Spielen stets ausgeschaltet sein sollte.)
* Wenn die INPUT-Buchse o beschaltet ist, arbeitet das eingebaute Mikrofon y
nicht.
2. Stellen Sie den POWER-Schalter u auf ON.
Die Bezugstonhöhe (werkseitig auf A = 440 Hz voreingestellt) blinkt etwa 2
Sekunden lang auf dem Display q. Danach schaltet das Stimmgerät auf
automatischen Stimmbetrieb (GUITAR und AUTO erscheinen dabei auf
dem Display q).
3. Drücken Sie nun, falls erforderlich, den PITCH-Schalter r , um die
Bezugstonhöhe zu ändern. (Einzelheiten siehe EINSTELLEN DER
BEZUGSTONHÖHE an späterer Stelle.)
4. Geben Sie nun mit dem MODE-Schalter e den Typ der zu stimmenden
Gitarre vor. Der Gitarrentyp (GUITAR oder BASS) wird auf dem Display q
angezeigt.
5.Wenn es sich um eine akustische Gitarre handelt, halten Sie das
Stimmgerät so, daß das eingebaute Mikrofon y sich so dicht wie möglich
am Schalloch der Gitarre befindet.
6. Zupfen Sie die zu stimmende Saite an. (Vermeiden Sie ein gleichzeitiges
Zupfen mehrerer Saiten.) Der Name des erkannten Tons erscheint dabei
auf dem Display q. Stimmen Sie nun die Saite mit Hilfe des Zeigers und
der Stimmanzeige w.
6-1. Stimmen Sie die Saite zunächst, bis ihr Tonname auf dem Display
blinkt.
6-2. Stimmen Sie die Saite nun fein ein, bis der Zeiger in der Mitte steht und
die grüne LED der Stimmanzeigew leuchtet.
Beispiel: Stimmen der E-Saite einer 6saitigen Gitarre
Die Saite stimmen, bis der
Zeite in der Mitte steht.
GUITAR auf dem
Display wählen.
AUTO-Betrieb
wählen.
Die Bezugstonhöhe
wird hier angezeigt.
■ TECHNISCHE DATEN
Anzeigen :Flüssigkristall-Display, Stimmanzeigen (3 LEDs)
Stimmnoten : E-Gitarre E, A, D, G, B, E
Noteneinstellbereich : A0 (27Hz) bis C8 (4186Hz)
Präzision : ±1 cent
Tonhöhengenauigkeit : ±3 cent
Standardtonhöhen-Einstellbereich
Eingänge : INPUT-Buchse (6 mm, mono), Mikrofon
Ausgang : OUTPUT-Buchse (6 mm, mono)
Power Source : 9V dry cell battery (006P or 6F22)
Batterie-Lebensdauer : ca. 50 Studen (AUTO-Betrieb)
Abmessungen (B x H x T) : 118 x 63 x 24.5 mm
(einschließlich Batterien)
Gewicht
Zubehör : 9V Batterie (6F22) x 1
* Änderungen an Daten und Design vorbehalten.
Baß B, E, A, D, G, C
: A4=435 bis 446Hz (in Schritten zu 1 Hz)
: 130 g
■ KIPPSCHLITZ
Das YT-150 weist einen Schlitz auf der Rückseite auf, wodurch es nach hinten
gekippt werden kann. Eine Münze o.ä. in den Schlitz einführen und das Gerät
nach hinten kippen, wie gezeigt.
Der Tonname der gezupften
Saite muß blinken.
Wenn diese LED leuchtet,
ist die Saite gut gestimmt.
● Manuelles Stimmen: MANL.
Beim manuellen Stimmbetrieb müssen Sie die Note der zu stimmenden Saite
wählen.
1. Zunächst die in Schritten 1 bis 5 unter "Automatisches Stimmen"
beschriebenen Vorbereitungen treffen.
2. Den NOTE-Schalter t drücken, bis der Tonname der zu stimmenden
Saite blinkt. Das Stimmgerät ist nun auf manuellen Betrieb gestellt, und
MANL. wird zur Bestätigung unten links auf dem Display q angezeigt.
3. Nun die Saite anzupfen und stimmen, wie in Schritt 5 unter "Automatisches
Stimmen" beschrieben.
4. Schritte 2 und 3 wiederholt ausführen, um andere Saiten zu stimmen.
■ EINSTELLEN DER BEZUGSTONHÖHE
1. Stellen Sie den POWER-Schalter u auf ON. Die Tonhöhe ist auf 440 Hz
voreingestellt (Blinkanzeige).
2. Drücken Sie den PITCH-Schalter r, bis die gewünschte Bezugstonhöhe
(435 bis 446 Hz) angezeigt wird.
435→436→ 437→438→ 439→440→ 441→442→ 443→444→ 445→ 446
3. Wenn der PITCH-Schalter r etwa 2 Sekunden lang nicht betätigt wird,
schaltet das Gerät automatisch auf Stimmbetrieb.
* Wenn Sie den POWER-Schalter u zum Ausschalten des Geräts auf OFF
stellen, wird die Bezugstonhöhe wieder auf A = 440 Hz rückgesetzt.
Bescheinigung des Importeurs
Hiermit wird bescheinigt, daß der / die / das
GUITAR/BASS AUTO TUNER Typ : YT-150
(Gerät, Typ, Bezeichnung)
in Übereinstimmung mit den Bestimmungen der
VERFÜGUNG 1046/84
(Amtsblattverfügung)
funkentstört ist.
Der Deutschen Bundespost wurde das Inverkehrbringen dieses Gerätes
angezeigt und die Berechtigung zur Überprüfung der Serie auf
Einhaltung der Bestimmungen eingeräumt.
YAMAHA Europa GmbH
Name des Importeurs
Page 5

AFINADOR AUTOMATICO DE GUITARRA Y BAJO
YT-150
YT-150
MANUAL DEL PROPIETARIO
Gracias por comprar el YAMAHA YT-150 Afinador Automático
de Guitarra y Bajo.
Por favor lea este manual completamente y manténgalo en un
lugar seguro para futuras consultas.
■ Los COMPONENTES
q Indicador de LCD
r Interruptor de PITCH (DIAPASON)
e Interruptor de MODO
w Guía de afinado
y micrófono
MIC
t Interruptor de NOTA
u Interruptor
de POWER
(ENCENDIDO)
i JACK de
SALIDA
o JACK de
ENTRADA
■ PRECAUCIONES
◆ Para prevenir daños, no usar el afinador en las situaciones siguientes:
• los lugares donde la unidad estará expuesto a la luz del sol directa de
forma continuada;
• los lugares sujetos a temperaturas y humedad extremas;
• lugares que son arenosos o polvorientos.
◆ Para alimentar el afinador, use sólo una pila 6F22 o 006P 9V.
◆ Para la máxima vida de la pila, asegúrese que el afinador se apaga cuando
no se usa.
◆ Sí una pila gastada queda en la unidad por un periodo extendido de tiempo,
puede dañar la unidad. Cuando las pilas se agotan, quítelas y reemplácelas
lo más pronto posible.
◆ No someta el afinador a golpe físico fuerte o vibración. No use fuerza
excesiva en cualquiera de los mandos.
◆ Nunca use disolventes como gasolina o aguarrás para limpiar el afinador.
Límpielo con un paño suave y seco.
◆ Después de leer el manual, manténgalo en un lugar seguro para futuras
consultas.
Nunca tire las pilas usadas al fuego.
También asegúrese de mantener las pilas lejos de los niños.
■ REEMPLAZO de la PILA
Cuando la pila está baja, el indicador de
LCD perderá fuerza.
El uso continuado del afinador así
puede producir funcionamiento
inexacto. Reemplace la pila con una
nueva (6F22 o 006P 9V) lo mas pronto
posible.
El compartimento de la pila esta situado
en la parte trasera del afinador. Quite la
pila vieja y reemplácela con una nueva
del mismo tipo. Tenga cuidado de
conectar la pila en la polaridad correcta.
* Apague siempre el afinador (interruptor en OFF) antes de cambiar la pila.
Lado del
fondo
Tapa de la pila
6F22 o 006P 9V
■ ABERTURA de INCLINACION
El afinador puede ser inclinado atrás usando la abertura en la parte trasera.
Inserte una moneda u objeto similar en la abertura y incline atrás como se
muestra en el diagrama debajo.
■ PROCEDIMIENTOS DE AFINADO
● Afinación automática: AUTO
El afinador seleccionará el nombre de la nota más cercana de la cuerda tocada.
1. Para la guitarra ó bajo eléctrico, conecte el cable de la guitarra al jack de
ENTRADA o. (El jack de salida también puede conectarse a un
amplificador. La señal de la guitarra se enviará al amplificador esté el
afinador encendido ó no. Sin embargo, podría producir ruido en la línea,
así que usted debe apagar el afinador durante la actuación).
* El micrófono no operará cuando un cable se conecte en el jack de ENTRADA.
2. Encienda el interruptor POWER.
El diapasón normal (la fábrica prefijó A=440Hz) encenderá el indicador
LCD durante aproximadamente 2 segundos. Después de eso, el afinador
entrará en el modo auto(GUITAR y AUTO aparecerá en el indicador LCD).
3. Use el interruptor de PITCH para cambiar el diapasón normal. (Refiérase a
al sección "Poniendo el Diapasón Normal" más abajo)
4. Apriete el interruptor MODO para seleccionar el instrumento a afinar.
BASS ó GUITAR aparecerán en el indicador LCD.
5. Para afinar una guitarra acústica, ponga el micrófono del afinador lo más
cerca posible de la boca de la guitarra.
6. Pulse la cuerda a afinar. (No pulse más de una cuerda a la vez). El nombre
de la cuerda apropiada aparecerá en el indicador LCD. Use la aguja y la
guía de afinación como referencia mientras afina el instrumento.
6-1. Primero, ajuste la cuerda para que el indicador el nombre de la cuerda
apropiada parpadee.
6-2. Luego, afine la cuerda hasta que la aguja pare en el medio y en el LED
verde de las luces de la guía de afinación.
ejemplo) para poner a punto la cuerda "E" en una guitarra de seis cuerdas.
Afine hasta que la aguja
pare en el centro.
Seleccione GUITAR
en el indicador de LCD.
Seleccione el
modo de AUTO.
El nombre de la cuerda
pulsada parpadea.
Cuando se enciende esta
luz, la cuerda esta afinada.
● La Afinación manual: MANL.
Cada nota debe seleccionarse individualmente como se necesite.
1. Haga los mismos ajuste como se describió en los pasos 1 a 5 de la sección
de Afinación automática.
2. Continúe apretando el interruptor de NOTA hasta que el nombre de la nota
deseado (nombre de la cuerda) parpadee. El afinador está ahora en el
modo manual, MANL. aparece la esquina inferior izquierda del LCD.
3. Como en el paso 5 de la sección de Afinación automática, pulse la cuerda
a afinar y proceda a afinarla.
4. Repita los pasos 2 y 3 para afinar las otras cuerdas.
El Diapasón se
muestra normal.
■ ESPECIFICACIONES
Indicadores : Pantalla de cristal líquido, guías de afinación,
Notas de afinación : GUITARRA: E, A, D, G, B, E
Rango de Ajuste : A0 (27Hz) – C8 (4186Hz)
Exactitud :+ / – 1 cont
Exactitud del Diapasón :+ / – 3 cont
Rango de Ajuste Diapasón normal
Entradas : ENTRADA (6 monofónico), micrófono
Salida : SALIDA (6 monofónico)
Alimentación : 9V pila (006P o 6F22)
Vida de la pila : Aproximadamente 50 hrs. (Modo AUTO)
Dimensiones (W x H x D) : 118 x 63 x 24.5 mm
Peso (incluida la pila) : 130 g
Accesorio : 9V pila (6F22) x 1
* Las especificaciones y la apariencia externa están sujetas a cambio sin previo aviso.
BAJO: B, E, A, D, G, C
: A4=435 – 446Hz (1Hz pasos)
■ PONIENDO EL DIAPASON NORMAL
1. Encienda el interruptor de encendido. El diapasón se pone a 440 Hz
(pantalla parpadeante).
2. Continuamente apriete el interruptor de PITCH hasta que el diapasón
deseado (435 – 446Hz) sea seleccionad.
435→436→437→ 438→439→ 440→ 441→442→ 443→444→ 445→446
3. Cuando el interruptor de PITCH no se ha mantenido apretado durante
aproximadamente 2 segundos, el afinador volverá automáticamente al
modo de afinación.
* Cuando el interruptor de ENCENDIDO se apaga, los ajustes de diapasón se
pondrán a A=440Hz.
Page 6

Accordatore per chitarra / basso
YT-150
YT-150
MANUALE UTENTE
Grazie per avere scelto l’accordatore YAMAHA YT-150.
Vi preghiamo di leggere attentamente questo manuale e di
conservarlo per eventuali necessità.
■ AVVERTENZE
◆ Per prevenire guasti, non utilizzare l’accordatore nelle seguenti locazioni:
• luoghi direttamente esposti al sole;
• luoghi soggetti a livelli estremi di temperatura e umidità;
• luoghi sabbiosi o polverosi.
◆ Per alimentare l’accordatore utilizzare esclusivamente batterie 9V dry cell
(6F22 o 006P).
◆ Per ottenere la massima durata della batteria, assicurarsi sempre che
l’accordatore sia spento quando inutilizzato.
◆ Se una batteria scarica è lasciata all’interno dell’apparecchio per un periodo
di tempo prolungato, può rilasciare perdite e causare danni all’unità.
Quando la batteria è scarica è necessario rimuoverla e sostituirla appena
possibile.
◆ Non sottoporre l’accordatore a forti urti o vibrazioni. Non usare eccessiva
forza sui controlli.
◆ Non utilizzare mai solventi come benzene o diluente per pulire
l’accordatore. Usare un panno soffice e asciutto.
◆ Dopo aver letto il manuale, conservarlo in un posto sicuro per eventuali
necessità future.
Non tentare di bruciare le batterie usate.
Tenere le batterie fuori dalla portata dei bambini.
■ SOSTITUZIONE DELLA BATTERIA
Quando la batteria è scarica,
l’ indicatore LCD si affievolisce.
L’utilizzo continuato dell’accordatore
può determinare un funzionamento
non corretto. Sostituire la batteria con
una nuova (6F22 o 006P) appena
possibile.
Il compartimento della batteria si trova
sul retro dell’accordatore. Rimuovere
la vecchia batteria e sostituirla con una
nuova dello stesso tipo. Fare
attenzione a collegare la batteria con
la corretta polarità.
* Impostare sempre l’interruttore POWER u su “OFF” prima di sostituire la
batteria.
parte
posteriore
coperchio portapilà
batteria 9V
(6F22 o 006P)
■ COMPONENTI
q indicatore LCD
w LED guida per l’accordatura
y microfono incorporato
u interruttore
POWER
MIC
i jack
OUTPUT
(uscita)
o jack
INPUT
(ingresso)
t selettore NOTE
r selettore PITCH
e selettore MODE
■ PROCEDURA DI ACCORDATURA
● Accordatura automatica : AUTO
L’accordatore selezionerà automaticamente la nota più vicina (indicata con il
nome della corda) all’accordatura della corda suonata.
1. Con chitarre/bassi elettrici, collegare il cavo proveniente dallo strumento al
jack INPUT o. Il jack OUTPUT i può essere collegato all’amplificatore. Il
segnale della chitarra sarà inviato all’amplificatore con l’interruttore
impostato sia in ON che in OFF. Si consiglia comunque di impostare
l’interruttore su OFF durante l’esecuzione per evitare l’introduzione di
rumori indesiderati.
* Il microfono incorporato y non funziona se un cavo è collegato al jack INPUT o.
2. Impostare l’interruttore POWER u su ON.
L’intonazione (standard pitch) sarà indicata in modo lampeggiante
sull’indicatore LCD q per circa 2 secondi. Dopo, l’accordatore si
posizionerà in modalità di Accordatura automatica (le indicazioni GUITAR
e AUTO appariranno sull’indicatore LCD q.)
3. Utilizzare il selettore PITCH r per cambiare l’intonazione di riferimento
(vedere la sezione “Impostare l’intonazione” più avanti).
4. Premere il selettore MODE e per selezionare il tipo di strumento da
accordare. La scritta GUITAR o BASS apparirà nell’indicatore LCD q.
5. Per accordare una chitarra acustica, posizionare il microfono incorporato
y il più vicino possibile alla buca della chitarra.
6. Suonare la corda da accordare (non suonare più di una corda alla volta).
Il nome della corda apparirà nell’indicatore LCD q. Utilizzare l’ago e gli
indicatori LED guida per l’accordatura w come riferimento.
6-1. Innanzitutto, regolare la corda in modo che si illumini il corretto
indicatore.
6-2. In seguito, perfezionare l’accordatura in modo che l’ago si posizioni in
mezzo e il LED verde (fra gli indicatori LED guida per l’accordatura w)
si illumini.
Esempio) per accordare la corda MI (E) su una chitarra a sei corde :
L’ago deve trovarsi in
centro.
Selezionare GUITAR
sull’indicatore LCD
Selezionare il
modo AUTO
L’intonazione
selezionata è
indicata a 440 Hz.
■ INCLINAZIONE DELL’ACCORDATORE
L’accordatore può essere inclinato all’indietro utilizzando la fessura posta nel
pannello posteriore. Inserire una moneta o un oggetto piatto simile e
posizionare come nel disegno.
■ SPECIFICHE TECNICHE
Indicatori : Indicatore LCD, LED guida per l’accordatura
Note selezionabili : CHITARRA E, A, D, G, B, E
BASSO B, E, A, D, G, C
Gamma di accordatura : A0 (27 Hz) – C8 (4186 Hz)
Accuratezza :+/– 1 cent
Accuratezza “In Pitch” :+/– 3 cent
Gamma di intonazione : A4= 435 – 446 Hz (in incrementi di 1 Hz)
Ingresso : INPUT (jack mono, microfono)
Uscita : OUTPUT (jack mono)
Alimentazione : batteria 9V (6F22 o 006P)
Durata della batteria : 50 ore circa (modalità di Accordatura automatica)
Dimensioni : 118 x 63 x 24,5 mm
Peso (batteria inclusa) : 130 g
Accessori : batteria 9V (6F22) x 1
* Specifiche soggette a cambio senza preavviso.
La lettera corrispondente al
nome della corda si illumina.
Quando si accende il LED
verde, la corda è accordata.
● Accordatura manuale : MANL.
Ognuna delle note deve essere selezionata individualmente secondo
necessità.
1. Seguire le stesse regolazioni descritte nei punti da 1 a 5 nella sezione
“Accordatura automatica”.
2. Premere ripetutamente il selettore NOTE t fino a far apparire il nome
della nota (e della corda) desiderata. L’accordatore si trova ora in modalità
di Accordatura manuale.
3. L’indicazione MANL appare nell’angolo in basso a sinistra dell’indicatore a
LED q.
4. Come descritto nel punto 5 della sezione Accordatura automatica, suonare
la corda e procedere all’accordatura.
5. Ripetere i punti 2 a 4 per accordare le altre corde.
■ IMPOSTARE L‘INTONAZIONE (Standard pitch)
1. Impostare l’interruttore POWER u su ON.
2. Premere ripetutamente il selettore PITCH r fino a selezionare (con
incrementi di 1 Hz) l’intonazione desiderata.
435→436→437→438→ 439→440→ 441→442→ 443→444→ 445→446
3. Quando il selettore PITCH r non è premuto per almeno 2 secondi,
l’accordatore ritorna automaticamente in modalità di accordatura.
* Quando l’interruttore POWER u è impostato su OFF, l’impostazione di
intonazione viene riportata a A = 440 Hz.
Page 7

GITAAR/BAS AUTO TUNER
YT-150
YT-150
HANDLEIDING
Dank u voor de aanschaf van de YAMAHA YT-150 Gitaar/Bas Auto
Tuner.
Lees deze handleiding alstublieft aandachtig door, en bewaar deze
op een veilige plek zodat u er later nog eens iets in op kan zoeken.
■ VOORZORGSMAATREGELEN
◆ Gebruik de tuner niet op de volgende lokaties om schade te voorkomen:
• plaatsen waar het apparaat in direct zonlicht staat;
• plaatsen die worden blootgesteld aan extreme temperaturen en
vochtigheid;
• plaatsen waar veel zand ligt of waar het stoffig is.
◆ Voorzie de tuner alleen van stroom middels een 6F22 of 006P 9V dry cell
batterij.
◆ Doe de tuner altijd uit (OFF) als u hem niet gebruikt om de batterijen te
sparen.
◆ Als u een bijna lege batterij voor langere tijd in het apparaat laat zitten, kan
deze gaan lekken en schade veroorzaken aan het apparaat. Als de batterij
leeg raakt, moet u deze altijd verwijderen en deze zo snel mogelijk
vervangen.
◆ Stel het instrument niet bloot aan overdreven schokken of sterke vibraties. Ga
niet te ruw om met de knoppen.
◆ Gebruik nooit oplosmiddelen zoals benzine of verdunner om de tuner schoon
te maken. Maak het instrument schoon met een zachte, droge doek.
◆ Bewaar de handleiding na het lezen op een goede plek, zodat u er in een later
stadium ook nog eens wat in op kunt zoeken.
Verbrand gebruikte batterijen nooit.
Houdt batterijen buiten het bereik van kinderen.
■ BATTERIJ VERVANGEN
Zodra de batterij leegraakt, wordt de
LCD indicator minder goed leesbaar.
Als u desondanks doorgaat met het
gebruiken van de tuner kan het zijn dat
deze niet goed meer werkt. Vervang
derhalve de batterij zo snel mogelijk
met nieuwe batterijen (6F22 of 006P 9V
dry cell batterij).
De batterijhouder bevindt zich op de
achterkant van de tuner. Verwijder de
oude batterijen en vervang deze door
nieuwe batterijen van hetzelfde type.
Let hierbij erop dat de polariteit van de
batterij juist wordt aangesloten.
* Doe altijd het instrument uit (AAN/UIT schakelaar u uit (=“OFF”) ) alvorens
de batterij te verwisselen.
Onderkant
Batterij deksel
6F22 of 006P
9V dry cell batterij
■ COMPONENTEN
q LCD indicator
w Stemming indicator
y Ingebouwde microfoon
u POWER
(aan/uit)
MIC
schakelaar
i OUTPUT
jack
o INPUT
jack
t NOTE (noot) schakelaar
r PITCH (toonhoogte) schakelaar
e MODE schakelaar
■ HANDELINGEN BIJ HET STEMMEN
● Automatisch Stemmen : AUTO
De tuner selecteert automatisch de dichtstbijzijnde nootnaam (snaarnaam) van
de aangeslagen snaartoonhoogte.
1. Sluit de gitaarkabel bij elektrische gitaren/bassen aan op de INPUT jack o.
(De OUTPUT jack i kan bovendien worden aangesloten op een versterker.
Het gitaarsignaal wordt vervolgens naar de versterker gestuurd mits de tuner
aanstaat (aan/uit schakelaar op ON). Dit kan echter leiden tot extra
bijgeluiden in het lijnniveau als u de tuner tijdens het spelen uitzet.
* De ingebouwde microfoon y werkt niet als er een kabel is aangesloten op INPUT
jack o.
2. Doe de tuner aan met de POWER schakelaar u (ON).
De standaard toonhoogte (fabriekspreset A=440Hz) knippert ongeveer q of
2 seconden in de LCD indicator. Hierna gaat de tuner naar de automatische
stemmode (GUITAR en AUTO verschijnen in de LCD indicator q).
3. Wijzig de standaard toonhoogte met de PITCH schakelaar r. (Zie het “Het
instellen van de Standaard Toonhoogte” gedeelte hieronder.)
4. Druk op de MODE schakelaar e om het instrument te selecteren dat
gestemd moet worden. GUITAR of BASS verschijnt in de LCD indicator q.
5. Om een akoestische gitaar te stemmen moet u de ingebouwde microfoon y
van de tuner zo dicht mogelijk bij het klankgat van de gitaar houden.
6. Sla de snaar aan die u wilt stemmen. (Sla niet meer dan één snaar tegelijk
aan.)
De betreffende snaarnaam verschijnt in de LCD indicator q. Let op de naald
en de stemmingsindicator als een referentie tijdens het stemmen van het
instrument.
6-1. Sla eerst de snaar aan zodat de juiste snaarnaam indicator gaat
knipperen.
6-2. Stem vervolgens de snaar tot dat de naald netjes in het midden staat en
de groene LED van de stemmingsgids oplicht.
voorbeeld) Om de “E” snaar te stemmen van een gitaar met zes snaren.
Stem tot de naald netjes
in het midden staat.
Selecteer GUITAR
in de LCD indicator.
Selecteer de
AUTO mode.
De snaarnaam van de
aangeslagen snaar knippert.
Als deze LED oplicht, is
de snaar gestemd.
De standaard
toonhoogte wordt
weergegeven.
Bij dit produkt zijn batterijen geleverd.
Wanneer deze leeg zijn, moet u ze niet weggooien
maar inleveren als KCA.
■ SPECIFICATIES
Indicators : Liquid crystal display, Stemmingsindicators
Stem Noten : GUITAR E, A, D, G, B, E
BASS B, E, A, D, G, C
Nootbereik : A0 (27Hz) – C8 (4186Hz)
Nauwkeurigheid :+/– 1 cent
Nauwkeurigheid In Toonhoogte :+/– 3 cent
Standaard Toonhoogte Instelling Bereik
: A4=435 – 446Hz (1Hz stappen)
Input : INPUT (6 mono), microfoon
Output : OUTPUT (6 mono)
Voedingsbron : 9V dry cell batterij (006P of 6F22)
Batterijduur : Ongeveer 50 uur (AUTO mode)
Afmetingen (B x H x D) : 118 x 63 x 24.5 mm
Gewicht (inclusief batterij) : 130 g
Los verkrijgbaar : 9V dry cell batterij (6F22) x 1
* Specificaties en uiterlijk kunnen zich wijzigen zonder dat hier vantevoren over
bericht wordt.
● Handmatig stemmen: MANL.
Iedere noot moet naar wens individueel geselecteerd worden.
1. Voer dezelfde handelingen uit de omschreven handelingen in stappen 1 t/m
5 van het Automatisch Stemmen gedeelte.
2. Ga door met het indrukken van de NOTE schakelaar t tot de gewenste
nootnaam (snaarnaam knippert.) De tuner is nu in manual (handmatige)
mode, MANL. verschijnt onderin de linkerhoek van de LCD display q.
3. Sla, net als in stap 5 van het Automatische stemmen gedeelte, de snaar aan
die u wilt stemmen en begin met het stemmen van de snaar.
4. Herhaal stappen 2 en 3 om de andere snaren te stemmen.
■ STANDAARD TOONHOOGTE INSTELLEN
1. Zet het instrument aan met de aan/uit schakelaar (POWER schakelaar u
ON). De toonhoogte wordt op 440 Hz gezet (knipperende display).
2. Druk nu herhaaldelijk op de PITCH schakelaar r tot de gewenste standaard
toonhoogte is geselecteerd (435 – 446Hz).
435→436→ 437→438→ 439→440→ 441→442→ 443→ 444→445→ 446
3. Als de PITCH schakelaar r twee seconden lang niet wordt ingedrukt keert
de tuner automatisch terug naar de stem mode.
* Als u tuner uitzet (POWER schakelaar u op OFF), wordt de standaard
toonhoogte instelling gereset op A=440Hz.
■ UITKLAP UITSPARING
De tuner kan worden uitgeklapt met behulp van de uitsparing op de achterkant.
Steek een munt of soortgelijk voorwerp in de uitsparing en klap de tuner uit zoals
getoond wordt in het onderstaande diagram.
無償修理規定
1. 正常な使用状態(取扱説明書、本体貼り付けラベルなどの注意書に
従った使用状態)で故障した場合には、お買上げの販売店が無料修
理を致します。
2. 保証期間内に故障して無料修理をお受けになる場合は、お買上げの
販売店に商品と本書をご持参のうえご依頼ください。
3. ご贈答品、ご転居後の修理についてお買上げ販売店にご依頼できな
い場合には、最寄りのヤマハ電気音響製品アフターサービス拠点に
お問い合わせください。
4. 保証期間内でも次の場合は有料となります。
(1) 本書のご提示がない場合。
(2) 本書にお買上げの年月日、お客様、お買上げの販売店の記入が
ない場合、及び本書の字句を書き替えられた場合。
(3) 使用上の誤り、他の機器から受けた障害または不当な修理や改
造による故障及び損傷。
(4) お買上げ後の移動、輸送、落下などによる故障及び損傷。
(5) 火災、地震、風水害、落雷、その他の天災地変、公害、塩害、異
常電圧などによる故障及び損傷。
(6) 消耗部品の交換。
(7) お客様のご要望により出張修理を行なう場合の出張料金。
5. この保証書は日本国内においてのみ有効です。
ThiswarrantyisvalidonlyinJapan.
6. この保証書は再発行致しませんので大切に保管してください。
※この保証書は本書に示した期間、条件のもとにおいて無料修理をお
約束するものです。したがってこの保証書によってお客様の法律上
の権利を制限するものではありませんので、保証期間経過後の修理
などについてご不明の場合は、お買上げの販売店、ヤマハ電気音響
製品アフターサービス拠点にお問い合わせください。
Page 8

9802 R1
 Loading...